
Overview
You can use the organization feature on the GDMS platform to manage CloudUCM multiple tenants:
- The reseller can purchase a CloudUCM plan for each tenant separately, and then add the tenant’s CloudUCM device and VoIP devices under the corresponding organization on the GDMS platform for management. The GDMS platform has comprehensive device management capabilities that allow you to efficiently manage multiple tenants’ devices.
- Each CloudUCM device is a cloud PBX virtual machine with its own separate storage space for data and files.
- We provide a variety of CloudUCM plans with different specifications to meet the requirements of different tenants. Please refer to the Plan Specifications page.
This document introduces how intermediary resellers manage multi-tenant CloudUCM devices and plans.
Purchase Plans for Tenants
You will need to contact your superior channel to purchase CloudUCM plans.
The reseller can purchase a CloudUCM plan for each tenant separately, and purchase the corresponding plan according to the requirements of each tenant, such as the number of extensions and concurrent calls (see CloudUCM Plan Specifications), which is very flexible and convenient.
For example, if the reseller purchases a 1-year Plus plan on April 2nd, 2024, and the device is not activated until May 5th, 2024, then the CloudUCM device will take effect on May 5th, 2024, and this plan will expire on May 5th, 2025. Since the CloudUCM plan is timed after the CloudUCM device is activated, the order can be completed quickly after the customer has confirmed the order. In this way, there is no cost before activation, and you can quickly respond to customers’ requirements.
Apply Free Trials for Tenants
If there is a tenant who wants to try CloudUCM services first, you can apply for a CloudUCM free trial plan on the GDMS platform for this customer. The number of free trial plans is limited. If you need more free trial plans, please contact your superior reseller.
- Select the organization of the tenant (e.g. Custom AAA), and apply the free trial plan on the CloudUCM device list:
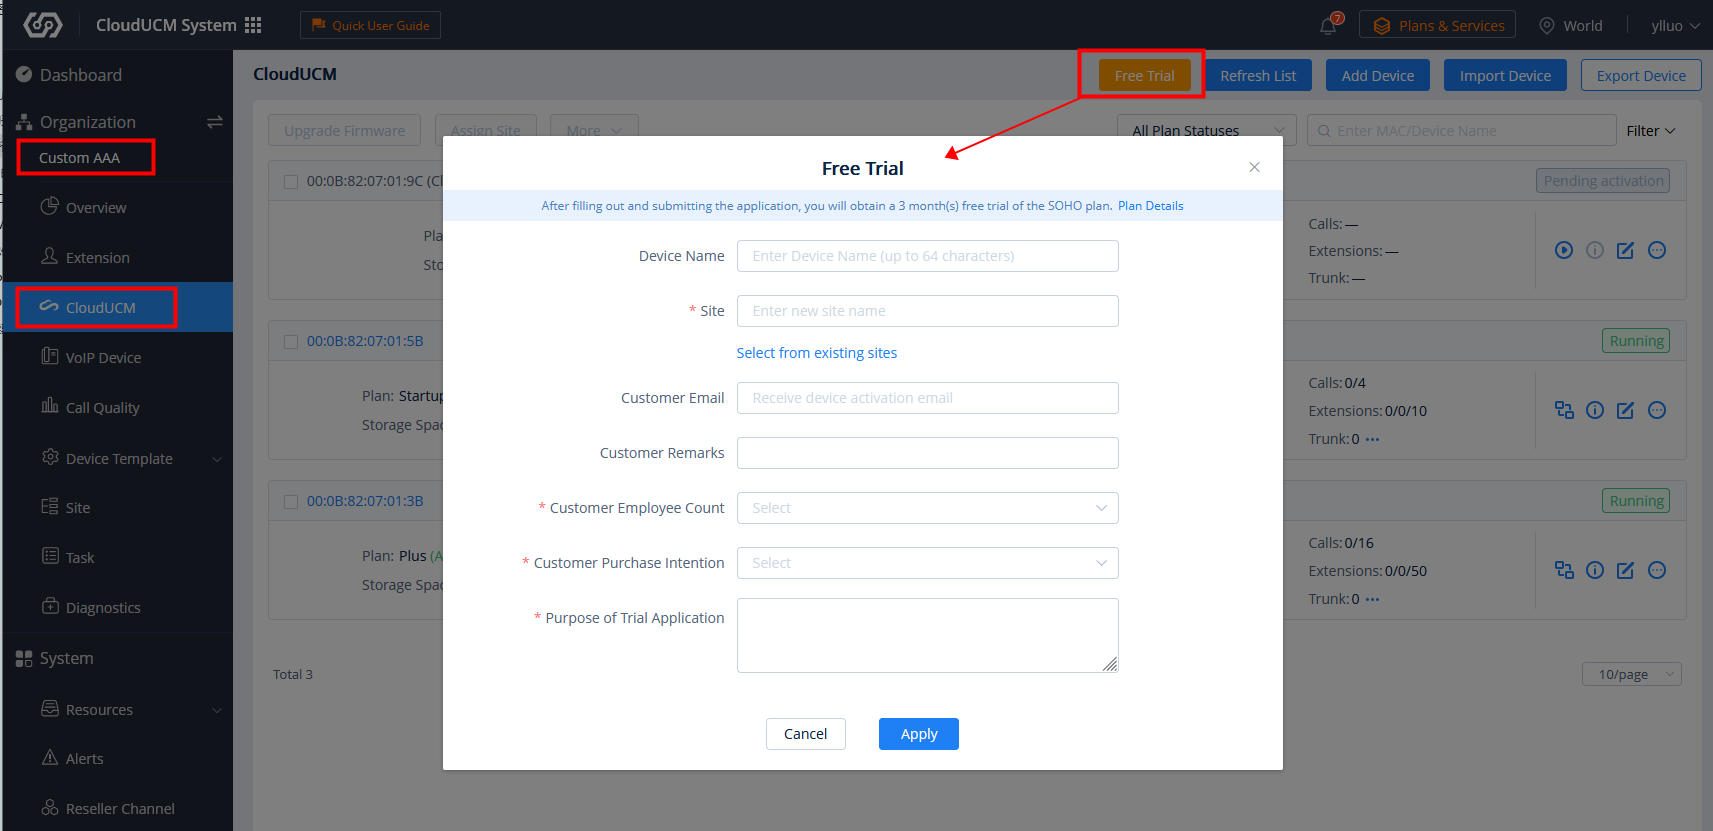
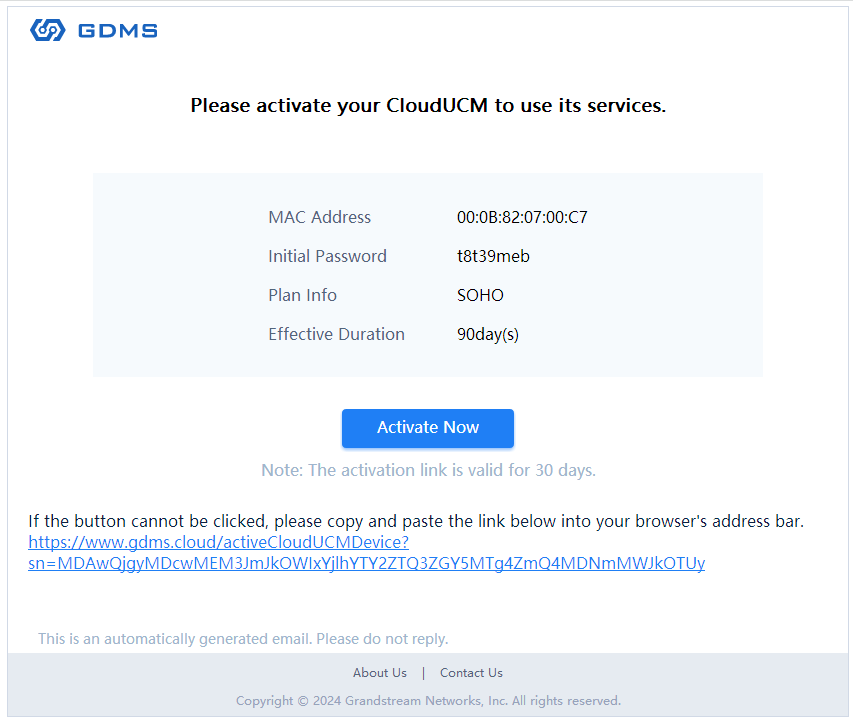
- Fill in the information. Enter the tenant’s email address in the field “Customer Email”. The CloudUCM device information and activation link will be sent to the tenant’s email address for the tenant to activate the CloudUCM device. The email reads as follows:

Manage Tenants’ CloudUCM Devices
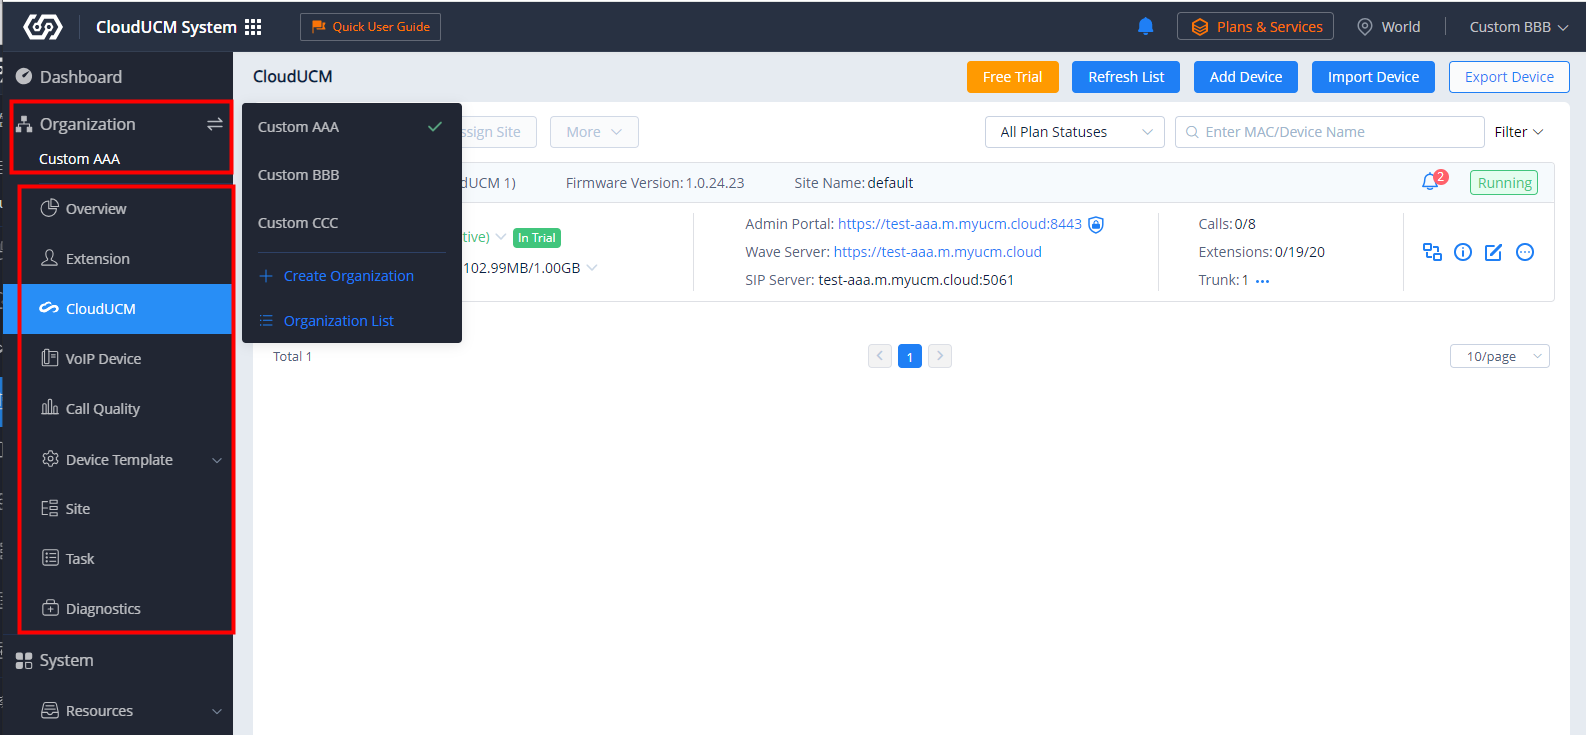
The reseller can log in to the GDMS platform, create an organization for each tenant, and manage CloudUCM devices and extensions for different tenants by switching organizations.
CloudUCM devices in each organization, as well as synced extensions from CloudUCM devices, VoIP devices, sites, tasks, and diagnostics records, are stored separately. The reseller can switch organizations for separate management, and the data of each tenant is managed independently.
For example, you can create an organization “Custom AAA” for tenant A and add the CloudUCM device “1” to the organization “Custom AAA”. You can also create another organization “Custom BBB” for tenant B and add the CloudUCM device “2” to the organization “Custom BBB”.
View All Tenants’ CloudUCM Devices
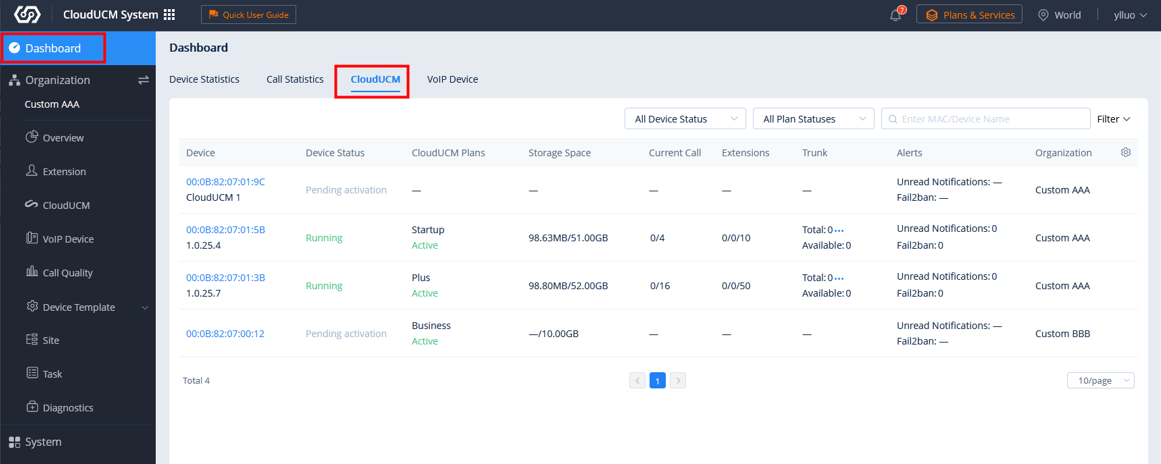
Resellers can view the status and information of all tenants’ CloudUCM devices and plans on the Dashboard -> CloudUCM on the GDMS platform.
Resellers can click the MAC address of the device so that resellers can be automatically redirected to the organization where the device is located, and enter the CloudUCM device list to filter and manage the device.
Activate Tenants’ CloudUCM Devices
CloudUCM devices need to be activated before use.
There are 2 methods:
Method 1: The reseller activates the CloudUCM device for the tenant on the GDMS platform.
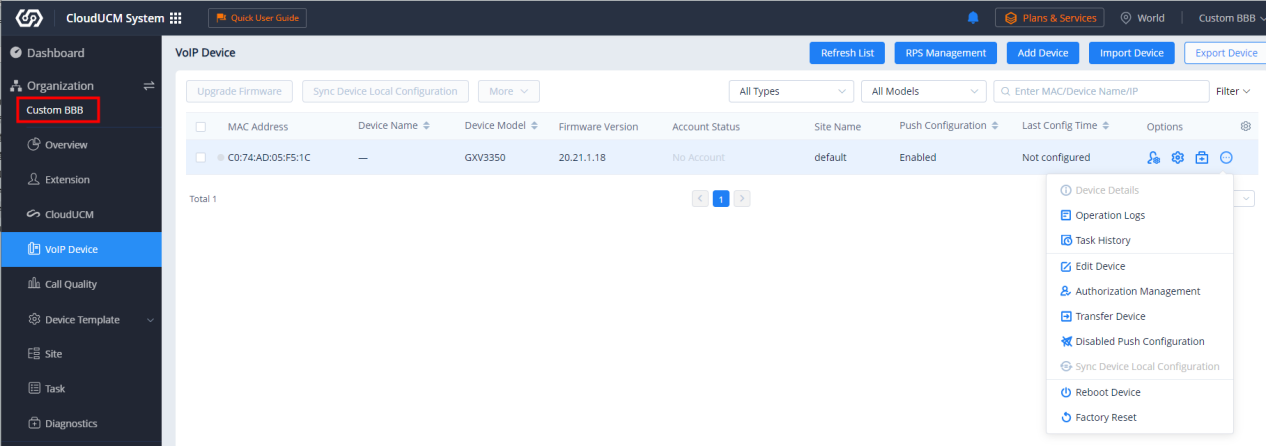
- On the CloudUCM device list, the reseller can click the option
 to activate the device.

- The device activation page is displayed as follows. The reseller can select the zone where the CloudUCM device is located, customize the server address (supported only by SOHO or higher-level plans), and enter the email address of the super administrator (to obtain plan-related emails or retrieve the password).
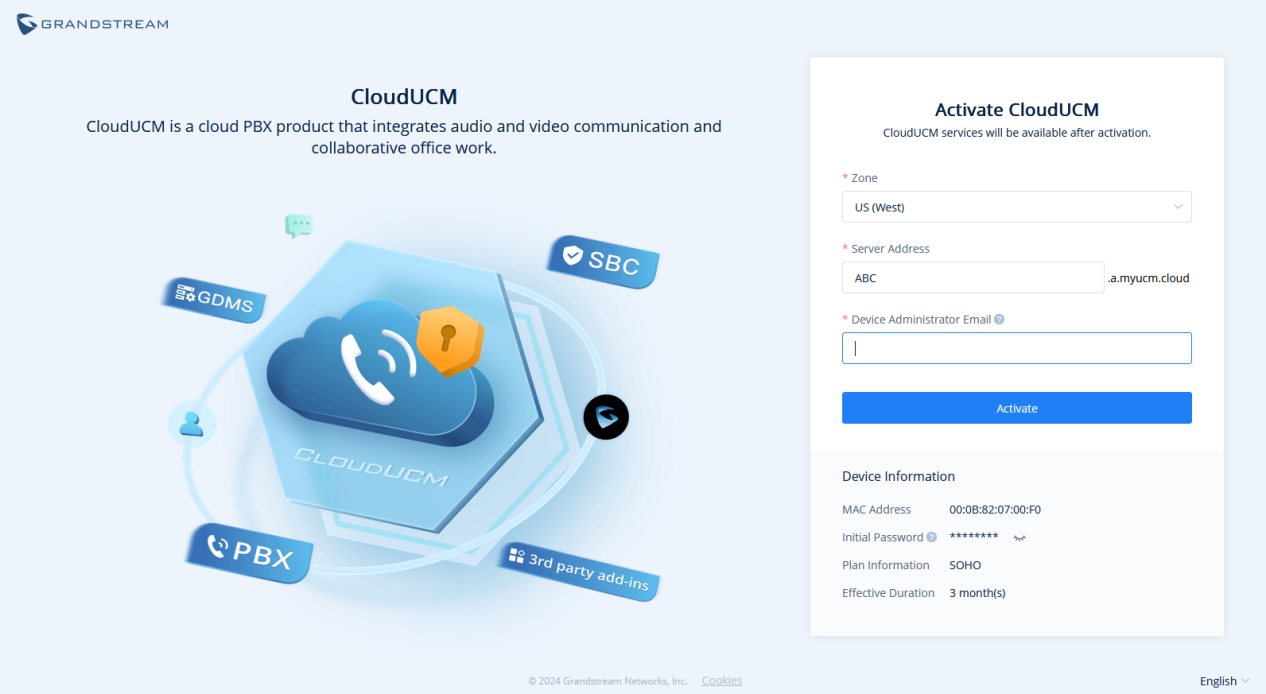
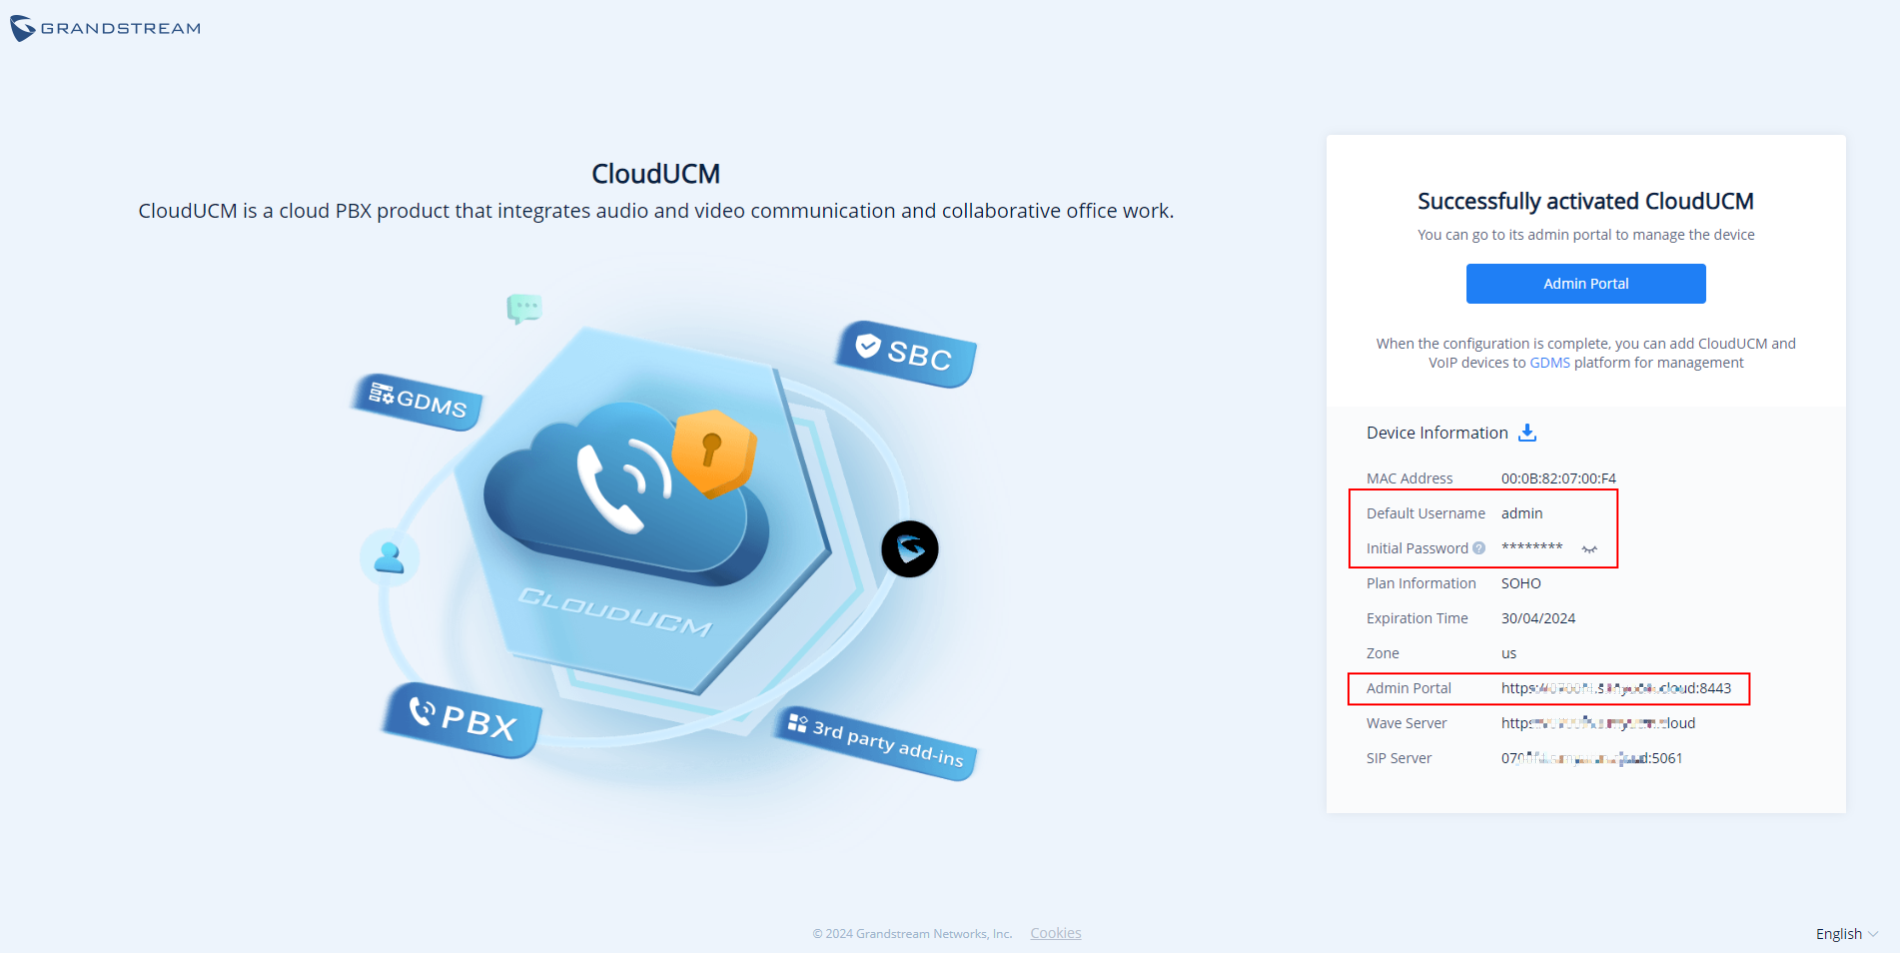
- After the CloudUCM device is successfully activated, the device can be accessed, and the plan takes effect. You can copy the device information and send it to tenants so that they can access the system.
Method 2: The reseller can send the activation link to the tenant to activate the CloudUCM device. The tenant can activate the CloudUCM device through the activation link sent by the reseller.
- The reseller can click the option
 following the device on the CloudUCM device list and select the option “Send Activation Email” to send the activation email to the tenant.

- The tenant’s mailbox will receive the following email, and then the tenant can click the activation button to activate the CloudUCM device.
The subsequent activation process is consistent with activating on the activation page.
Manage Tenants’ CloudUCM Devices and Extensions
Each tenant corresponds to an organization. The reseller can manage multiple tenants’ devices separately by switching organizations.
- The reseller can manage tenants’ CloudUCM devices on the GDMS platform. For example, if you switch to the organization “Custom AAA”, you can view the CloudUCM devices in this organization and perform remote access, reboot devices, upgrade firmware, etc.

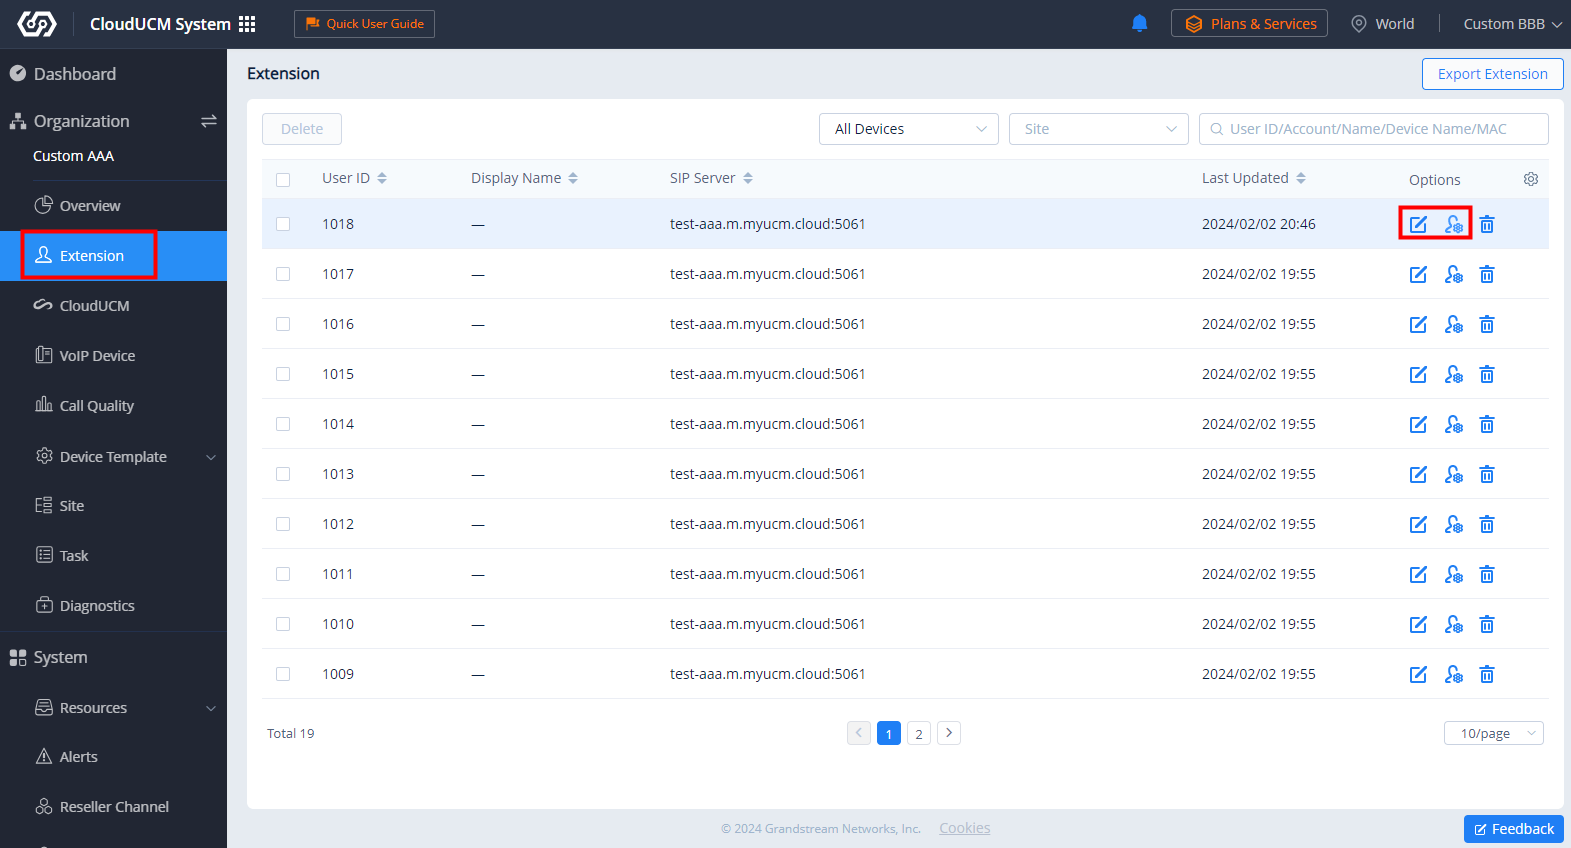
- After the CloudUCM device is added, the extensions created in the CloudUCM device will be synced to the corresponding organization. For example, the CloudUCM device “1” will sync the extensions created in the device to the organization “Custom AAA”.
- If a tenant has purchased multiple CloudUCM devices that need to be used by different departments, the reseller can add multiple sites and add the devices to different sites for management.

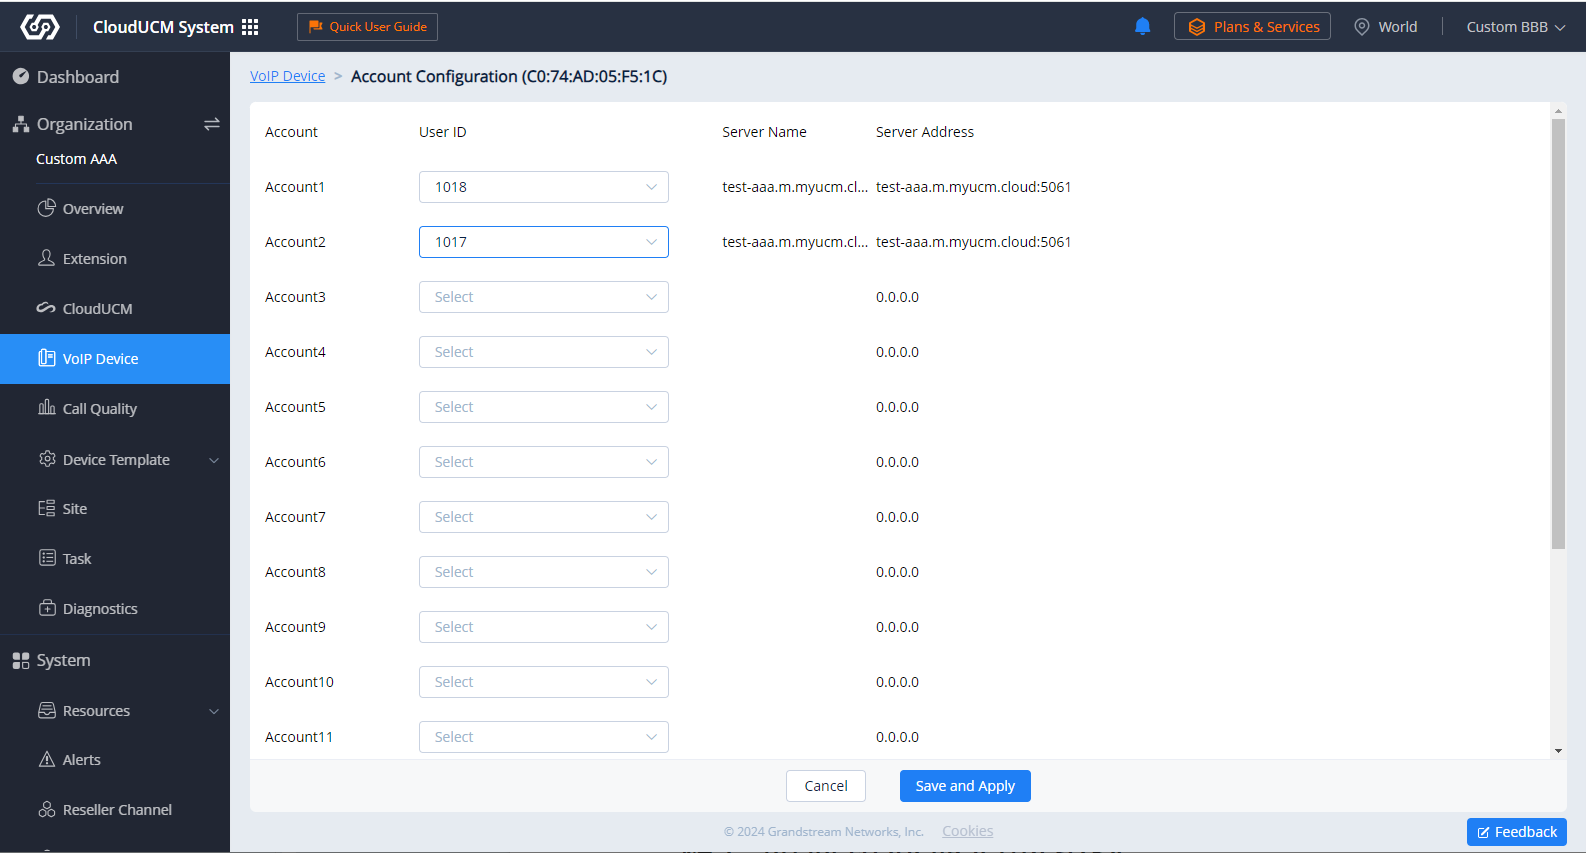
Manage Tenants’ VoIP Devices
- The reseller can also add the tenant’s VoIP devices to the organization (e.g. “Custom AAA”) for account configuration, parameter configuration, device diagnosis, scheduled firmware upgrade, etc.
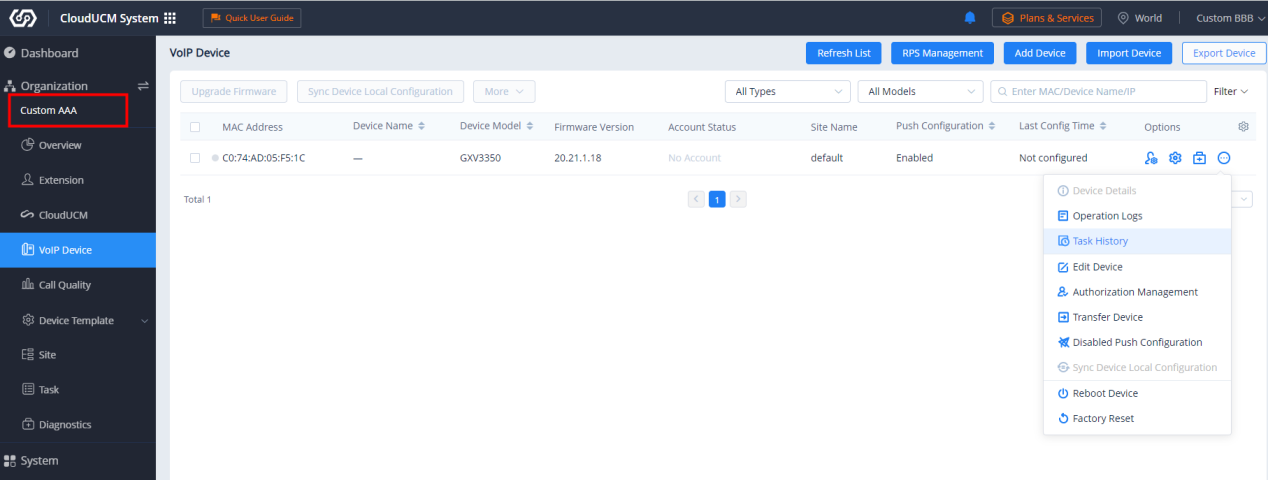
- The reseller can assign extensions for this VoIP device, such as assigning the CloudUCM device’s extension to the VoIP device with one click.
- The reseller can also remotely configure parameters for the VoIP device, including “By Model” templates, “By Site” templates, “By Group” templates, and “By CFG” files.

How Do Tenants Access Systems
Each CloudUCM device is a cloud PBX virtual machine with a separate storage space to store data and files. After activating the CloudUCM, each CloudUCM device has a unique access address for the admin portal and SIP server address. Tenants use the admin portal address to access the system for management.
Method 1: Access through the CloudUCM Admin Portal
- The reseller needs to send the CloudUCM admin portal address and the initial username and password of the super administrator to each tenant. The reseller can copy the information in the CloudUCM Device Details on the GDMS platform. For example, you can switch to the organization “Custom AAA”, on the CloudUCM device list, and click the option
 to see the device details of the CloudUCM “1”.

- The tenant can use a browser to open the admin portal address (e.g. https://test-aaa.m.myucm.cloud:8443), and log in to the system using the initial username and password.
Method 2: Access through GDMS
- The reseller can create multiple sub-users on the GDMS platform, that is, create a sub-user for each tenant, and then assign corresponding organization privileges to the sub-user accordingly.
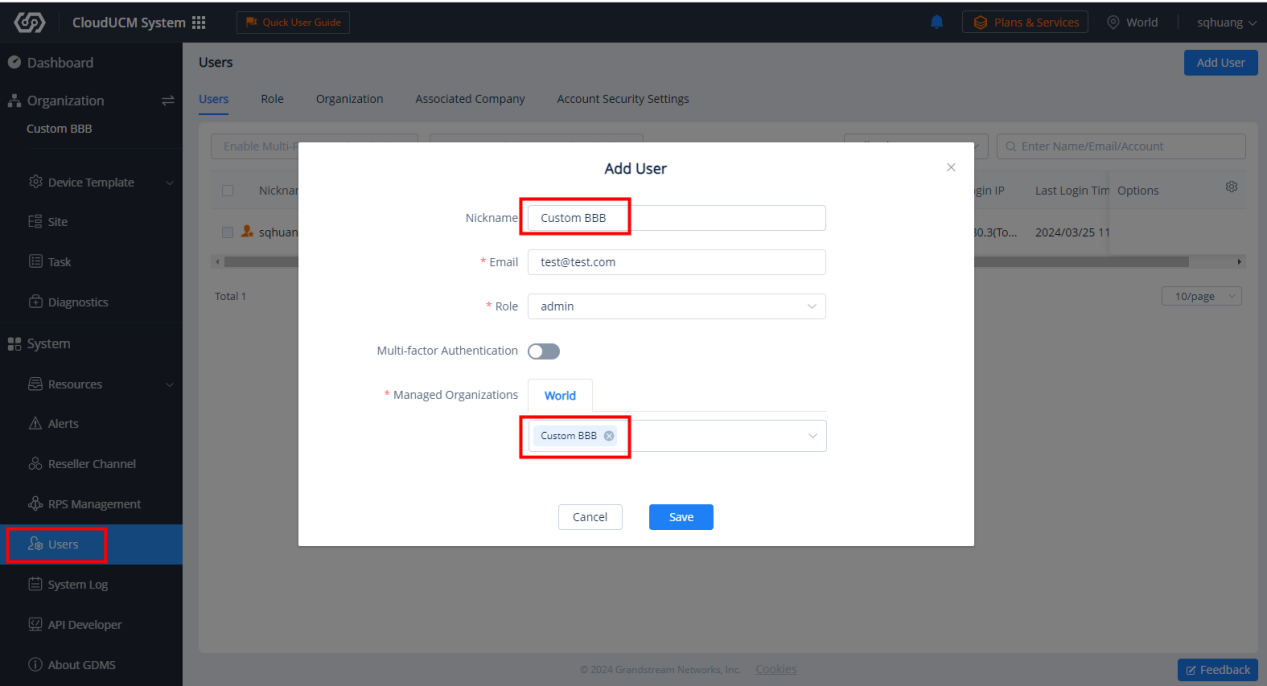
If the reseller wants tenants to manage only devices in the CloudUCM system, the reseller can create a new role and assign the corresponding privileges:

- After logging in as a sub-user, the tenant can switch to the authorized organization only and manage the organization based on the role’s privileges. For example, as the screenshot shows below, the tenant can only switch to the organization “CloudUCM BBB”, and cannot switch to other organizations.

- The tenant can also add VoIP devices to this organization (e.g. CloudUCM BBB), assign CloudUCM extensions to VoIP devices with one click, and perform parameter configuration, batch firmware upgrade, device diagnosis, etc.
Register to Extensions via IP Phones/Wave
Tenants can view the Wave Server and the SIP Server on the CloudUCM Services page.
For more details, please refer to the document How to Configure CloudUCM on IP Phones

Renew/Upgrade Plans for Tenants
If a tenant’s plan is about to expire and needs to renew the CloudUCM plan, or needs to upgrade the plan, the reseller can directly contact the superior reseller to purchase the plan (via MAC addresses).