
WELCOME
The DP760 is a powerful DECT Repeater that auto associates to Grandstream DP750 Base Station to offer extended mobility to business and residential users. It extends an additional range of 300 meters outdoors and 50 meters indoors to give users the freedom to move around their work or home space, delivering efficient flexibility. This DECT Repeater relays up to two concurrent HD calls. The Ethernet connection provides PoE for convenient installation and variety of remote features including provisioning, status monitoring and firmware upgrade. When paired with Grandstream DP750 DECT VoIP base station and DP720 handsets, the DP760 is a powerful DECT Repeater that allows any business or residential user to create a cordless VoIP solution of extended coverage.
PRODUCT OVERVIEW
Feature Highlights
The following table contains the major features of the DP760:
 DP760 |
|
DP760 Features at a Glance
DP760 Technical Specifications
The following table resumes all technical specifications including the protocols / standards supported, voice codecs, telephony features, languages and upgrade/provisioning settings for DP760 DECT Repeater.
Air Interface | Telephony standards:
Frequency bands:
Number of channels: 10 (Europe), 5 (US, Brazil). Range: up to 300 meters outdoor and 50 meters indoor. |
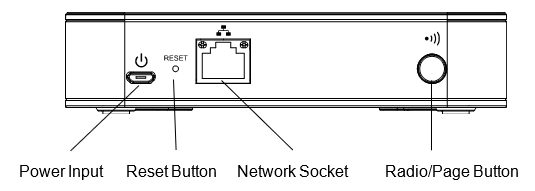
Peripherals | 5 LED indicators: Power, Network, Association, Activity, DECT Reset button, Pairing/Paging button One 10/100 Mbps auto-sensing Ethernet port with integrated PoE |
Protocols/Standards | TCP/IP/UDP, HTTP/HTTPS, ARP/RARP, ICMP, DNS (A record, SRV, NAPTR), DHCP, PPPoE, SSH, TFTP, NTP, SIMPLE, LLDP-MED. |
Voice Codecs | G.722 codec for HD audio and G.726 codec for narrow band audio. |
Telephony Features | Plug-n-Play, auto association, auto region detection and seamless call handover. |
Security | User and administrator level access control, MD5 and MD5-sess based authentication, 256-bit AES encrypted configuration file, HTTPS, 802.1x media access control, DECT authentication. |
Multi-language | English, Czech, German, Spanish, French, Arabic, Hebrew, Italian, Russian, Netherlands, Japanese, Polish, Chinese Simple, Chinese Tradition, Korean, Portuguese, Slovakian, Serbian, Swedish and Turkish. |
Upgrade/ Provisioning | Firmware upgrade via FTP/FTPS/HTTP/HTTPS. |
Association | Up to 5 stations in star. Automatic or manual association to base station. |
Power & Green Energy Efficiency |
|
Package Content | DECT Repeater Unit, Universal Power Supply, Ethernet cable, Quick Installation Guide, GPL statement |
Dimensions | 28.5 mm (H) x 130 mm (W) x 90 mm (D). |
Weight | DECT Repeater unit: 143g; Universal Power Supply: 50g; Package: 360g. |
Temperature and Humidity | Operation: -10º to 50ºC (14º to 122ºF); Storage: -20º to 60ºC (-4º to 140ºF). Humidity: 10% to 90% non-condensing. |
Compliance | FCC: Part 15D, Part 15B, MPE CE: EN60950, EN301489-1-6, EN301406, EN50385 RCM: AS/NZS60950 ANATEL: #2288-16-9452 |
GETTING STARTED
This chapter provides basic installation instructions including the list of the packaging contents and description of the LED patterns.
Equipment Packaging
DP760 |
|

Connecting DP760
To set up the DP760 DECT Repeater, please follow the steps below:
There are two options to connect DP760 DECT Repeater, either with the AC power or Power over Ethernet (PoE)
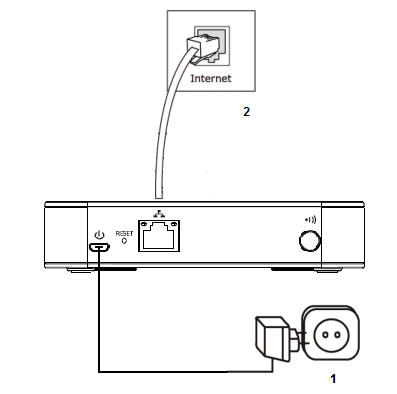
Connecting via AC power
- Connect the micro-USB connector into the related port on the repeater station and connect the other end of the power adapter into an electrical power outlet.
- Connect the supplied Ethernet cable between the Internet port on the DP760 DECT Repeater and the Internet port in your network or the switch/hub device port.
Connecting via PoE
To connect the DP760 DECT Repeater using PoE, you need to connect the Ethernet cable provided (or 3rd party network cable) between the Network Socket on the repeater station to Ethernet port of your PoE switch/hub.
DP760 Implementation Architecture
The DP750 Base Station can support up to 5 DP760 DECT Repeater stations to extend the coverage area of the base in all directions, including through floors and ceilings using star architecture as displayed on the following diagrams.
When a repeater powers on, it searches for signals from the base and any other repeaters registered to the same base. The repeater will automatically connect to the first available signal.
The base can hand-off calls to the repeaters as the user moves from one coverage area to another. When connected to the repeater, the DP720 handsets operate as it is connected to the base, and the hand-off from the base to the repeater can be completely invisible to the end user, even during an active call.
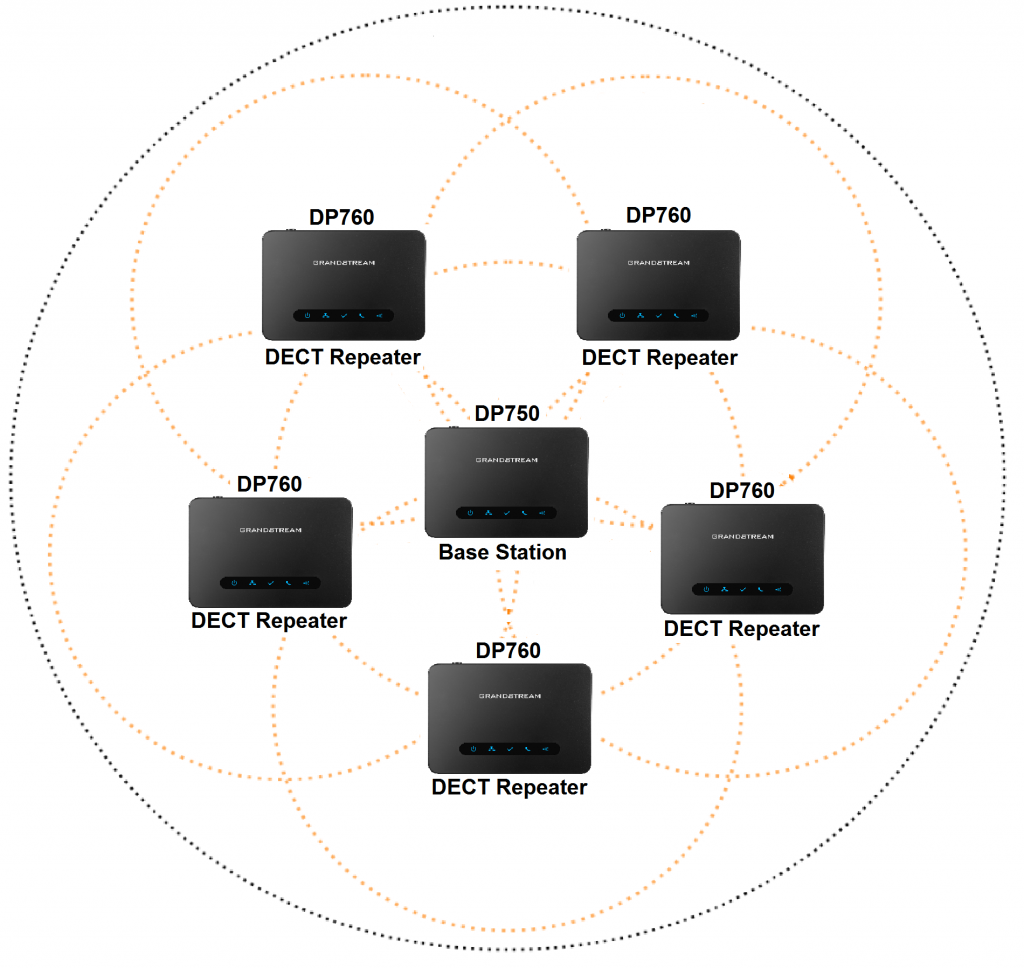
In star mode configuration, the coverage area of the repeaters should overlap the coverage area of the base station.
DP760 LED Patterns
The DP760 has 5 LED lights. Please refer to following table describing the status of each LED.

LED | Status |

| Indicates Power ON/OFF. |

| Indicates access to the network.
|

| Indicates status of the association between DP760 and DP750
|

| Indicates status of the association between DP760 and DP750 during calls.
|

| Indicates status of the association link between the DP760 and DP750.
|
CONFIGURATION GUIDE
The DP760 can be configured via the Web GUI embedded using a Web browser. By default, DP760 is configured to obtain IP address from DHCP server where the unit is located and can be discovered using UPnP feature (by default enabled).
Configuration via Web Browser
The DP760 embedded Web server responds to HTTP/HTTPS GET/POST requests. Embedded HTML pages allow a user to configure the DP760 through a Web browser such as Google Chrome, Mozilla Firefox and Microsoft Internet Explorer.
Note: If DP760 has a known IP, users can access to its Web GUI by entering the IP address in their Web browser on a device connected to same network.
Accessing the Web GUI using UPnP Feature
DP760 supports UPnP feature (by default enabled) for auto discovery by computers in same network. Please refer to following steps to access DP760 Web GUI:
- Power on DP760 and connect it to the network.
- Connect a computer to same network as DP760. (The computer must be connected to the same sub-network as the DP760. This can be easily done by connecting the computer to the same hub or switch as the DP760).
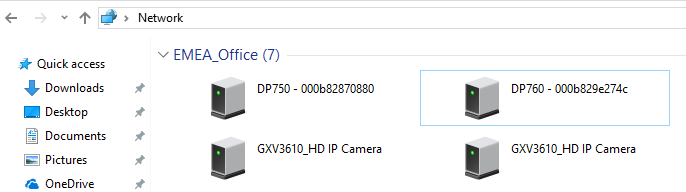
- Access Network directory on the computer.
- Locate DP760 – <MAC Address> device and double click on it to access Web GUI.
- Enter admin’s username and password and press Login button to access the configuration menu. (Starting HW version 1.3A the default admin username is ‘admin’ while the admin password is the random password that can be found on the sticker at the back of the unit. For lower hardware versions; the default username and password are: admin/admin)
Accessing the Web GUI using DP750 Repeater Management Mode
The repeater management mode on the DP750 allows managing discovered / paired repeater stations and accessing the DP760 Web GUI from DP750 Web GUI. Please refer to following steps to access DP760 Web GUI using DP750 repeater management mode:
- Access the Web GUI of your DP750 using the admin’s username and password. (Starting HW version 1.7A the default admin username is ‘admin’ while the admin password is the random password that can be found on the sticker at the back of the unit. For lower hardware versions; the default username and password are: admin/admin).
- Navigate to DECT 🡪 General Settings and set Enable Repeater Management to Yes.
- Press Save and Apply button, then reboot the unit to apply the new settings.
- After finishing the reboot, access again the DP750 Web GUI.
- Navigate to Status 🡪 DECT Repeater Status.
- Access the discovered or paired repeater Web GUI by clicking on its IP address.
- You will be redirected to login page of the repeater, enter admin’s username and password and press Login button to access the configuration menu.
Saving the Configuration Changes
After users make changes to the configuration, pressing the Save button will save but not apply the changes until the Apply button on the top of Web GUI page is pressed. Users can instead directly press the Save and Apply button. We recommend rebooting or powering cycle the device after applying all changes.
Web GUI Access Level Management
There are two default passwords for the login page:
User Level | Username | Password | Web Pages Allowed |
End User Level | user | 123 | Status, Network Settings and Maintenance pages |
Administrator Level | admin | The random password that can be found on the sticker at the back of the unit starting from HW version 1.3A. For lower hardware versions, the admin password is ‘admin’. | All pages |
The password is case sensitive with a maximum length of 25 characters.
When changing any settings, always SUBMIT them by pressing the Save or Save and Apply button on the bottom of the page. If using the Save button, after making all the changes, click on the Apply button on top of the page to submit. After submitting the changes in all the Web GUI pages, reboot DP760 to have the changes take effect if necessary; most of the options under the Maintenance page require a reboot.
Changing User Level Password
- Access the Web GUI of your DP760 using the admin’s username and password. (Starting HW version 1.3A the default admin username is ‘admin’ while the admin password is the random password that can be found on the sticker at the back of the unit. For lower hardware versions; the default username and password are: admin/admin).
- Press Login to access your settings.
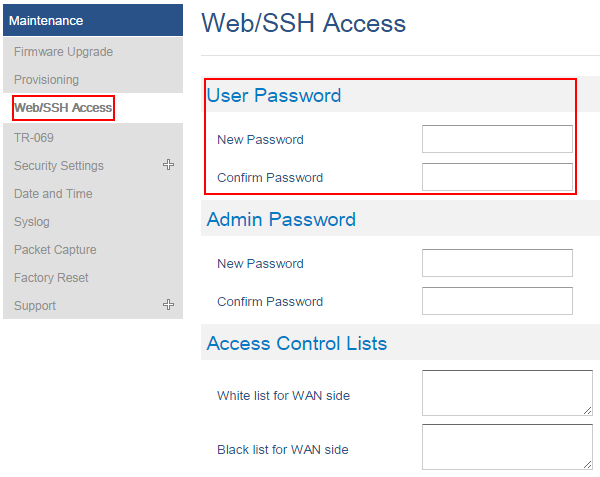
- Go to Maintenance 🡪 Web/SSH Access.
- In Web/SSH Access page, locate User Password section:
- Type in your new user password in New Password field.
- Type in again same entered password in Confirm Password field.
- Press Save and Apply to save your new setting.
Changing Admin Level Password
- Access your DP760 DECT Repeater Web GUI by entering its IP address in your favorite browser.
- Enter your admin’s username and password. (Starting HW version 1.3A the default admin username is ‘admin’ while the admin password is the random password that can be found on the sticker at the back of the unit. For lower hardware versions; the default username and password are: admin/admin)
- Press Login to access your settings.
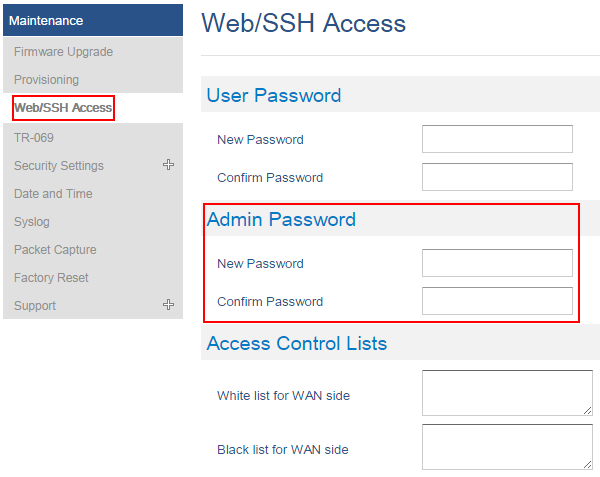
- Go to Maintenance 🡪 Web/SSH Access.
- In Web/SSH Access page, locate Admin Password section:
- Type in your new Admin Password in New Password field.
- Type in again same entered password in Confirm Password field.
- Press Save and Apply to save your new setting.
Changing HTTP/HTTPS Web Access Port
- Access your DP760 DECT Repeater Web GUI by entering its IP address in your favorite browser.
- Enter your admin’s username and password. (Starting HW version 1.3A the default admin username is ‘admin’ while the admin password is the random password that can be found on the sticker at the back of the unit. For lower hardware versions; the default username and password are: admin/admin).
- Press Login to access your settings.
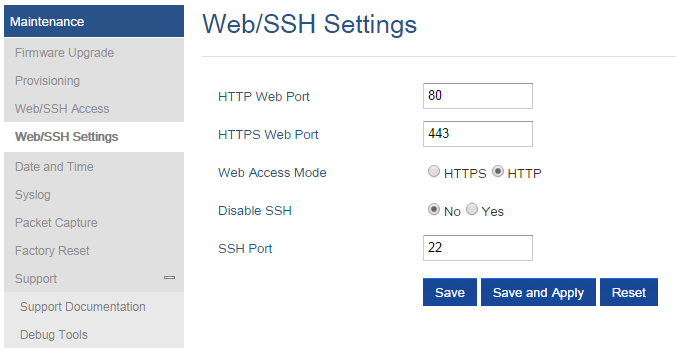
- Go to Maintenance 🡪 Web/SSH Settings.
- In Web/SSH Settings page, locate HTTP / HTTPS Web Port field and change it to your new HTTP/HTTPS port.
- Select the Web Access Mode depending on desired protocol (HTTP or HTTPS).
- Press Save and Apply to save your new setting.
Web Configuration Definitions
This section describes DP760 options available in its Web GUI. As mentioned, you can log in as an administrator or an end user.
- Status: Display the system info, network status, DECT status options.
- DECT: Configure DECT general settings, repeater name and RFPI manual configuration.
- Network Settings: Configure network basic and advanced settings.
- Maintenance: Configure upgrading and provisioning, Web/SSH access, date and time, and syslog, packet capture and factory reset settings.
Status Page Definitions
DECT Repeater Status | ||
Repeater Name | Displays name of DECT repeater. Default is DP760_[last 6 digit of MAC address]. | |
Repeater DECT RF Region | Indicates region of repeater station. Example: EU, US, Auto… | |
Repeater Status | Status | Scanning for available RFPs: DP760 is scanning and searching for available RFPs (Radio Fixed Part Identity) address. |
Repeater is searching for the requested RFP: DP760 DECT repeater is searching for DP750 base station configured RFPI. (During manual association) | ||
Repeater is in normal operation: DP760 DECT repeater is operational and associated with the DP750. Note: The message “Repeater is operational after auto configuration procedure first time“ appears briefly during DP760/DP750 association. | ||
Signal Strength | Displays the signal strength of the DECT repeater. | |
Number of Active Calls | Displays number of active calls on the DECT repeater. | |
Global Functions |
| |
Network Status | ||
MAC Address | Shows Device ID in hexadecimal format. This is needed by network administrators for troubleshooting. The MAC address will be used for provisioning and can be found on the label on original box and on the label located on the bottom panel of the device. | |
IP Address Mode | Indicates used IP address mode: DHCP, Static IP or PPPoE. | |
IP Address | Displays assigned IP address. Example: 192.168.5.110 | |
Subnet Mask | Displays assigned subnet mask. Example: 255.255.255.0 | |
Gateway | Displays assigned default gateway. Example: 192.168.5.1 | |
PPPoE Link Up | Indicates PPPoE connection status. | |
DNS Server 1 | Shows assigned DNS server address 1. Example: 8.8.8.8 | |
DNS Server 2 | Shows assigned DNS server address 2. Example: 8.8.4.4 | |
System Info | ||
Product Model | Displays product model info. Default is DP760. | |
Part Number | Shows product part number. Example: 9610003814A (last 2 digits show HW version, in this example 14A for HW version 1.4A). | |
Software Version |
| |
System Up Time | Indicates system uptime since last reboot. | |
System Time | Shows actual time and date according to your configuration. | |
Service Status | Reveals status of VoIP applications. | |
Core Dump | Provides generated core dump file when available if unit malfunctions. | |
Table 6: Status Pages Definitions
DECT Page Definitions
Repeater Name | Configures the name of the repeater station. Default is DP760_[last 6 digit of MAC address]. |
Manually Configured Base RFPI | Configures manually RFPI of DP750 base station to connect to. If empty, the repeater station DP760 will search for DP750 base stations and connect automatically to the first one found. |
Use Manually Configured RFPI | Allows to use manually configured RFPI (if non-empty) when set to Yes. If set to NO, the DP760 will search for a DP750 to connect with, regardless of manual configuration. |
Network Settings
Network Settings – Basic Settings | ||
IP Address Mode | Selects IP address mode (DHCP, Static IP or PPPoE) for DP760 DECT Repeater. | |
Preferred DNS Server | Specifies preferred DNS server to use when DHCP, PPPoE or Static mode is set. | |
DHCP Settings | Host name (Option 12) | Specifies the name of the client. The name may or may not be qualified with the local domain name. This field is optional but may be required by ISP. |
Vendor Class ID (Option 60) | Exchanges vendor class ID by clients and servers to convey particular configuration or other identification information about a client. Default is DP7XX. | |
PPPoE Settings | Configures PPPoE account ID, password and service name. | |
Static IP Settings | Sets IP address, subnet mask, gateway, DNS server 1, and DNS server 2. | |
Network Settings – Advanced Settings | ||
802.1X Mode | Enables 802.1X mode. To enable this mode, you should select EAP-MD5. Default is Disable. | |
802.1X Identity | Configures the identity for 802.1X mode. | |
MD5 Password | Determines the MD5 password for 802.1X mode. | |
802.1X CA Certificate | Uploads / deletes the 802.1X CA certificates. | |
802.1X Client Certificate | Uploads / Deletes the 802.1X Client Certificates. | |
Enable LLDP | Activates LLDP (Link Layer Discovery Protocol). Default is Yes. | |
Layer 2 QoS Settings | Enable VLAN | Enables / Disables the VLAN mode. Default is Disabled. |
Layer 2 QoS 802.1Q/VLAN Tag | Sets layer 2 QoS 802.1Q/VLAN tag. Default is 0. | |
Layer 2 QoS 802.1p Priority Value for SIP signaling | Sets layer 2 QoS 802.1p priority value for SIP signaling. Default is 0. | |
Layer 2 QoS 802.1p Priority Value for RTP media | Sets layer 2 QoS 802.1p priority value for RTP media. Default is 0. | |
UPnP Discovery Settings | Enable UPnP discovery | Enables UPnP discovery feature. Default is Yes. |
UPnP discovery notify interval | Specifies in seconds the interval to send out SSDP notifies. Default is 30. | |
Table 8: Network Settings Pages Definitions
Maintenance Page Definitions
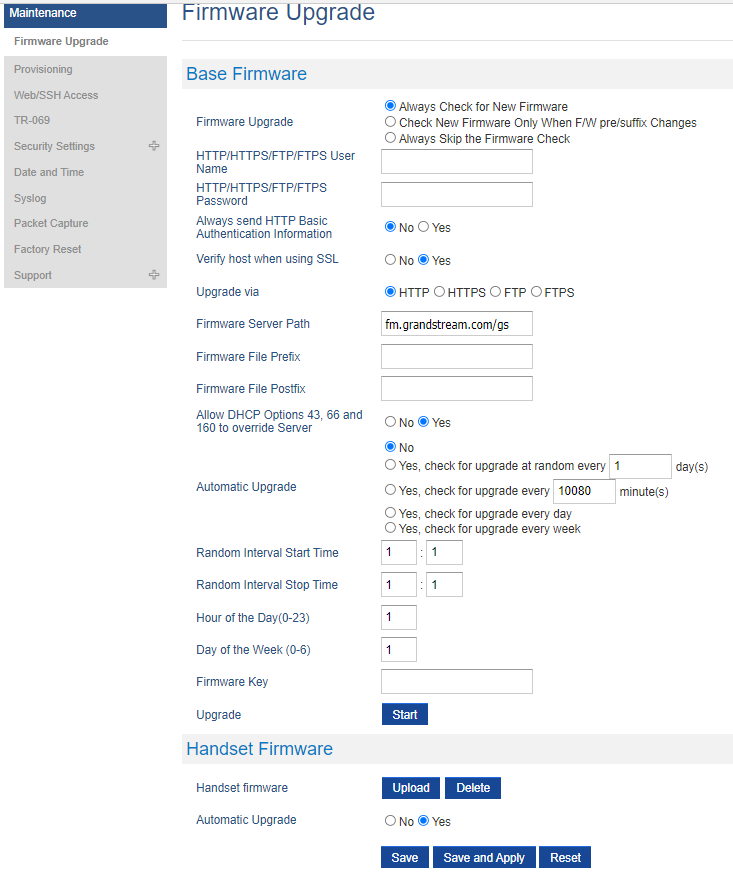
Firmware Upgrade | ||
Firmware Upgrade | Selects how firmware upgrade request will be sent: “Always Check for New Firmware”, “Check New Firmware only when F/W pre/suffix changes”, or “Always Skip the Firmware Check”. | |
HTTP/HTTPS Username | Enters user name to authenticate with HTTP/HTTPS server. | |
HTTP/HTTPS Password | Enters password to authenticate with HTTP/HTTPS server. | |
Always send HTTP Basic Authentication Information | Includes configured user name and password in HTTP request before receiving authentication challenge from the server. Default is No. | |
Verify host when using HTTPS | Verifies host name in server certificate when using HTTPS. Default is Yes. | |
Upgrade via | Selects firmware upgrade method: FTP/FTPS or HTTP/HTTPS. | |
Firmware Server Path | Sets IP address or domain name of firmware server. The URL of the server that hosts the firmware release. Default is fm.grandstream.com/gs. | |
Firmware File Prefix | Checks if firmware file is with matching prefix before downloading it. This field enables user to store different versions of firmware files in one directory on the firmware server. | |
Firmware File Postfix | Checks if firmware file is with matching postfix before downloading it. This field enables user to store different versions of firmware files in one directory on the firmware server. | |
Allow DHCP Option 43 and Option 66 to Override Server | Obtains configuration and upgrade server’s information from DHCP server using options 66 and 43. Note: If DHCP Option 66 is enabled, the base will attempt downloading the firmware file from the server URL provided by DHCP, even though Firmware Server Path is left blank. | |
Automatic Upgrade | Specifies when the firmware upgrade process will be initiated; there are 4 options:
Default is No. | |
Firmware Key | Decrypts the firmware file using specified key (32-digit in Hexadecimal) when encrypted. | |
Provisioning | ||
XML Config File Password | Decrypts XML configuration file when encrypted. The password used for encrypting the XML configuration file is using OpenSSL. | |
HTTP/HTTPS Username | Enters user name to authenticate with HTTP/HTTPS server. | |
HTTP/HTTPS Password | Enters password to authenticate with HTTP/HTTPS server. | |
Always send HTTP Basic Authentication Information | Includes configured user name and password in HTTP request before receiving authentication challenge from the server. Default is No. | |
Verify host when using HTTPS | Verifies host name in server certificate when using HTTPS. Default is Yes. | |
Provisioning via | Choose the method that the base station uses to request handset ipei config file. Can use TFTP, HTTP,FTP,FTPS or HTTPS. | |
Config Server Path | Sets IP address or domain name of configuration server. The server hosts a copy of the configuration file to be installed on the DP750. Default is fm.grandstream.com/gs Note: Make sure to not prepend address with "http://" or any other protocol. | |
Config File Prefix | Checks if configuration files are with matching prefix before downloading them. This field enables user to store different configuration files in one directory on the provisioning server. | |
Config File Postfix | Checks if configuration files are with matching postfix before downloading them. This field enables user to store different configuration files in one directory on the provisioning server. | |
Allow DHCP Option 43 and Option 66 to Override Server | Obtains configuration and upgrade server’s information from DHCP server using options 66 and 43. Note: If DHCP Option 66 is enabled, the DP750 will attempt downloading the firmware file from the server URL provided by DHCP, even though Config Server Path is left blank. | |
Automatic Provisioning | Specifies when provisioning process will be initiated; there are 4 options:
Default is No. | |
Authenticate Conf File | Authenticates configuration file before being accepted. This protects the device configuration from unauthorized modifications. Default is No. | |
Upload Device Config | Uploads manually device configuration (XML and TXT formats are supported) to base station. | |
Device Config (TXT) | Downloads actual device configuration file in .txt format. | |
Device Config (XML) | Downloads default device configuration file in .xml format. | |
Backup Configuration | Generates an XML config file storing all current configuration after pressing Backup Settings and display list of backup files available (users need to wait a few seconds and refresh the provisioning page to display the backup files). Maximum of 10 backup files are supported and when it reaches 10 entries, this feature will be disabled. Note: Click on Download to download the specific backup or Delete to remove all the backup files. | |
Web/SSH Access | ||
User Password | Configures user level password. Case sensitive and max. length of 30 characters. | |
Confirm Password | Configures the new user password again to confirm the new password. | |
Admin Password | Configures admin level password. Case sensitive and max length is 30 characters. | |
Confirm Password | Configures the new user password again to confirm the new password. | |
Access Control Lists | White list for WAN side | If white list exists, then only these IP addresses are allowed to web and SSH access. |
Black list for WAN side | If black list exists and white list is empty, then only these IP addresses are not allowed to web and SSH access | |
Web/SSH Settings | ||
HTTP Web Port | Customizes HTTP port used to access repeater Web GUI. Default is 80. | |
HTTPS Web Port | Customizes HTTPS port used to access repeater Web GUI. Default is 443. | |
Web Access Mode | Determines the protocol to be used for the Web GUI access. Default is HTTP. | |
Disable SSH | Disables SSH access. Default is No. | |
SSH Port | Customizes SSH access port. Default is 22. | |
Date and Time | ||
NTP Server | Defines URL or IP address of the NTP (Network Time Protocol) server. Used by the repeater to synchronize the date and time. A list of public NTP servers can be found at http://www.ntp.org | |
NTP Update Interval | Contacts NTP server at specified period of time (in minutes) to obtain the date and time. Default is 60 minutes. | |
Allow DHCP Option 42 to NTP Server | Obtains NTP server address from a DHCP server using DHCP Option 42; it will override configured NTP Server. If set to No, the repeater will use configured NTP server to synchronize time and date even if a NTP server is provided by DHCP server. Default is Yes. | |
Time Zone | Selects time zone to define date/time on the repeater station. | |
Self-Defined Time Zone | Allows users to define their own time zone. | |
Allow DHCP Option 2 to override time zone | Obtains time zone setting (offset) from a DHCP server using DHCP Option 2; it will override selected time zone. If set to No, DP760 DECT repeater will use selected time zone even if provided by DHCP server. Default is Yes. | |
Syslog | ||
Syslog Server | Sets IP address or URL of system log server. The server collects system log information from the repeater station. | |
Syslog Level | Selects log level; the level is one of DEBUG, INFO, WARNING, ERROR (default is NONE). Syslog messages are sent based on the following events:
Syslog uses USER facility. In addition to standard Syslog payload, it contains the following components: GS_LOG: [device MAC address] [error code] error message. Example: May 19 02:40:38 192.168.1.14 GS_LOG:[00:0b:82:00:a1:be][000] Ethernet link is up | |
Packet Capture | ||
Status | Displays packet capture status. When user starts to capture trace file, it will show “RUNNING” status, otherwise, it will show “STOPPED”. | |
Factory Reset | ||
Force Reboot | Kills active processes and forces the reboot of DP750 base station. | |
Configure Web UI Button | Reset Type | Specifies the type of reset to perform via the Web UI reset button: - There are 3 reset type for Web UI button:
|
Perform Selected Reset | Press Reset button to reset settings based on the reset type selected. | |
Configure Hardware Button | Reset Type | Specifies the type of reset to perform via hardware button: - There are 4 reset types for hardware button:
|
Support | ||
Support Documentation Offline Support | Online Support | Redirects users to tools page and DP7xx product pages available on Grandstream official website. |
Offline Support | Allows users to download MD Hole Location for wall mount. | |
Debug Tool | Remote Log Submission - Terms & Conditions | By clicking the submit button, you agree to allow the device to send these files to Grandstream to be used for troubleshooting purposes. If possible, please include a comment with information regarding the use of the device when the problem occurred. As an alternative to the device submitting the files, you may download the files below and submit them to Grandstream manually. |
Debug Log Files | Kills device control process on DECT repeater and generates core file and other debug information. Reboot required to restart process. | |
Table 9: Maintenance Pages Definitions
Rebooting from Remote Location
Press the Reboot button on the top right corner of the Web GUI page to reboot the DP760 remotely. The Web browser will then display a reboot message to confirm the reboot by pressing OK or avoid by clicking on Cancel button. Wait for about 1 minute to log in again.
DP760 DECT REPEATER ASSOCIATION WITH DP750
After factory reset, DP760 will be set to “Auto-region” mode. In this mode, the three LEDs of right side keep quick blinking, then the DP760 will search the base signal in the current environment to auto associate with it and then auto switch to the same region (EU, US or BR) of the base station.
Enabling Repeater Mode on DP750
Before associating the DP760 DECT Repeater to your DP750 Base Station, you should firstly enable the repeater mode on your base station. Please refer following steps to enable the repeater mode on the DP750 base station:
- Access the Web GUI of your DP750 using the admin’s username and password. (Starting HW version 1.7A the default admin username is ‘admin’ while the admin password is the random password that can be found on the sticker at the back of the unit. For lower hardware versions; the default username and password are: admin/admin).
- Navigate to DECT 🡪 General Settings and set Enable Repeater Mode to Yes.
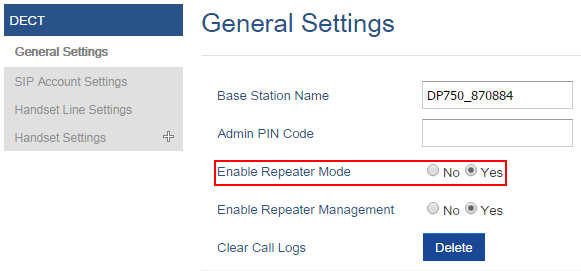
3. Press Save and Apply, then Reboot the base to apply the new settings.
DP760 DECT Repeater Association
After enabling the repeater mode on DP750 Base Station, you can easily associate it with your DP760 DECT Repeater using one of the following methods:
- Auto Association
- Manual Association
- Use DP750 Repeater Management to associate DP760
Auto Association
To auto associate your DP760 DECT Repeater with DP750 Base Station:
- Please put the DP760 DECT Repeater close to DP750, then power on the DP760.
-
After the DP760 finish booting, the association LED
 will be blinking to indicate that the repeater is searching for nearby base stations.
3. Open subscription on your DP750 Base Station using one of following methods:
- Rebooting the Base station.
- Long press on page/subscribe button on the back panel of DP750 for 7 seconds.
-
Access DP750 Web GUI and press subscribe button
 .
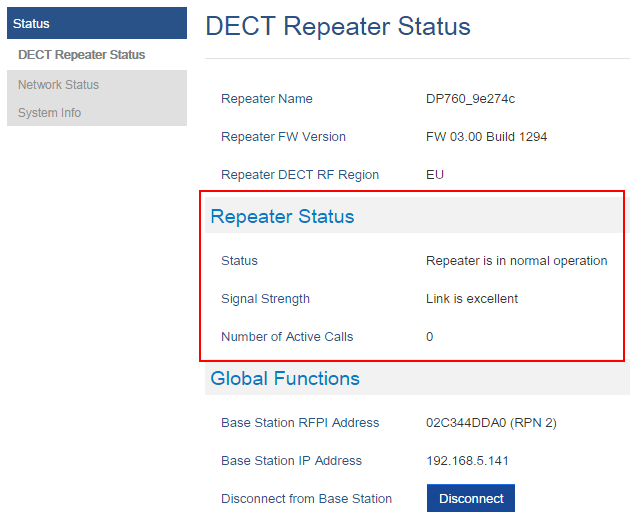
.
4. The DP760 DECT Repeater will automatically pair to DP750. Upon successful association with the DP750 Base station all LEDs will turn ON and the repeater status will be updated as following.
Manual Association
To manually associate your DP760 DECT Repeater to your DP750 Base Station:
- Access the Web GUI of your DP760 using the admin’s username and password. (Starting HW version 1.3A the default admin username is ‘admin’ while the admin password is the random password that can be found on the sticker at the back of the unit. For lower hardware versions; the default username and password are: admin/admin). Refer to [Accessing the Web GUI]
- Navigate to DECT 🡪 General Settings and set Use Manually Configured RFPI to Yes.
- On Manually Configured Base RFPI field, configure your DP750 Base Station RFPI address.
- Click Save and Apply to confirm the new settings.
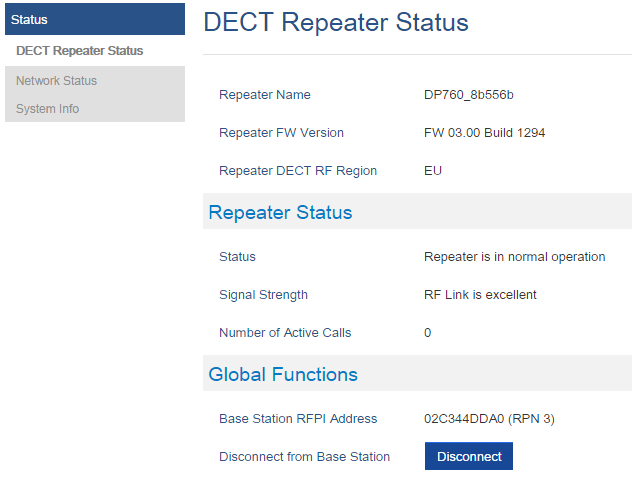
- Go to DECT Repeater Status page and click on “Manual-Lock to xxxxxxxxxx”.
- The DP760 DECT Repeater will automatically pair to DP750. If the association is correctly associated, all the LEDs will remain solid on and the repeater status will be updated as following.
Use DP750 Repeater Management to Associate DP760
The repeater management mode on the DP750 allows to associate, dissociate and manage discovered and paired repeater stations from DP750 web GUI.
- Enabling Repeater Management Mode
The following steps illustrate how to enable and use the Repeater Management mode on DP750:
- Access the Web GUI of your DP750 using the admin’s username and password. (Starting HW version 1.7A the default admin username is ‘admin’ while the admin password is the random password that can be found on the sticker at the back of the unit. For lower hardware versions; the default username and password are: admin/admin).
- Navigate to DECT 🡪 General Settings and set Enable Repeater Management to Yes.
- Press Save and Apply, then reboot the unit to apply the new settings.

- Associating DP760 using Repeater Management Mode on DP750
The repeater management mode displays discovered and paired devices using their name, IP and Mac addresses and also gives the possibility of associating the DP750 Base Station with DP760 DECT Repeater.
Please refer to following steps in order to associate DP760 with DP750 using repeater management mode.
- Access the Web GUI of your DP750 using the admin’s username and password. (Starting HW version 1.7A the default admin username is ‘admin’ while the admin password is the random password that can be found on the sticker at the back of the unit. For lower hardware versions; the default username and password are: admin/admin).
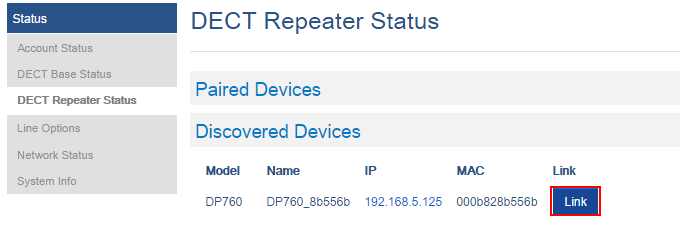
- Navigate to Status 🡪 DECT Repeater Status and select the repeater station from Discovered Devices.
- Clink Link button to associate the base and repeater stations.
DP760 DECT REPEATER DISSOCIATION
To disconnect DP760 DECT Repeater from the Base Station DP750, please refer to following options:
Using DP760 Web GUI
To disconnect your DP760 DECT Repeater via Web GUI, please refer to following steps:
- Access the Web GUI of your DP760 using the admin’s username and password. (Starting HW version 1.3A the default admin username is ‘admin’ while the admin password is the random password that can be found on the sticker at the back of the unit. For lower hardware versions; the default username and password are: admin/admin).
- Navigate to Status 🡪 DECT Status 🡪 Global Functions and press Disconnect.
- The DP760 DECT Repeater will be automatically disconnected from the DP750 and it will start again scanning for available RFPs.
Using Page Button
Long press on page button on the back panel of DP760 for 7 seconds, it will remove the association values of the previous base station.
Using Repeater Management Mode on DP750
To disconnect your DP760 DECT Repeater using the repeater management mode on DP750:
- Access the Web GUI of your DP750 using the admin’s username and password. (Starting HW version 1.7A the default admin username is ‘admin’ while the admin password is the random password that can be found on the sticker at the back of the unit. For lower hardware versions; the default username and password are: admin/admin).
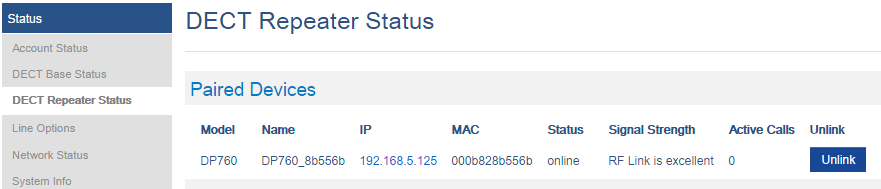
- Navigate to Status 🡪 DECT Repeater Status.
- Select the repeater station from Discovered Devices.
- Clink Unlink button to dissociate the repeater from the base station.
UPGRADING AND PROVISIONING
The DP760 DECT Repeater can be upgraded via FTP/FTPS/HTTP/HTTPS by configuring the URL/IP Address for the FTP/FTPS/HTTP/HTTPS server and selecting a download method. Configure a valid URL for FTP/FTPS/HTTP/HTTPS ; the server name can be FQDN or IP address.
Examples of valid URLs:
firmware.grandstream.com
fw.ipvideotalk.com/gs
Firmware Upgrade Procedure
Please follow below steps in order to upgrade the firmware version of your DP760 repeater station:
- Access the Web GUI of your DP760 using the admin’s username and password. (Starting HW version 1.3A the default admin username is ‘admin’ while the admin password is the random password that can be found on the sticker at the back of the unit. For lower hardware versions; the default username and password are: admin/admin).
- Navigate to Maintenance 🡪 Firmware Upgrade page, enter the IP address or the FQDN for the upgrade server in Firmware Server Path field and choose to upgrade via FTP/FTPS/HTTP/HTTPS.
- Make sure to select Always Check for New Firmware.
- Update the change by clicking the Save and Apply button. Then reboot or power cycle the device to update the new firmware.
Upgrading via Local FTP/HTTP Servers
For users that would like to use remote upgrading without a local FTP/HTTP server, Grandstream offers a NAT-friendly HTTP server. This enables users to download the latest software upgrades for their devices via this server. Please refer to the webpage: http://www.grandstream.com/support/firmware
Alternatively, users can download a free FTP or HTTP server and conduct a local firmware upgrade. A free windows version FTP server is available for download from:
https://filezilla-project.org/download.php?type=server
Instructions for local firmware upgrade via FTP:
- Unzip the firmware files and put all of them in the root directory of the FTP server.
- Connect the PC running the FTP server and the phone to the same LAN segment.
- Start the FTP server and configure the FTP server in the phone’s web configuration interface.
- Configure the Firmware Server Path to the IP address of the PC.
- Configure the Admin and password authentication Credentials set on your FTP server.
- Save and apply the changes and reboot the base station.
End users can also choose to download a free HTTP server from http://httpd.apache.org/ or use Microsoft IIS web server.
RESTORE FACTORY DEFAULT SETTINGS
Resetting DP760 Repeater Station
There are two methods to reset your DP760 DECT Repeater to the default settings:
Via Reset Button
- Locate the reset hole on the back panel of your DP760.
- Insert a pin in this hole, and press for about 7 seconds.
- Take out the pin. The unit will restart automatically with parameters restored to default values.
Via Web GUI
- Access your DP760 DECT Repeater Web GUI.
- Enter your admin’s username and password. (Starting HW version 1.3A the default admin username is ‘admin’ while the admin password is the random password that can be found on the sticker at the back of the unit. For lower hardware versions; the default username and password are: admin/admin)
- Press Login to access and navigate to Maintenance 🡪 Factory Reset.
- Press Reset button and the unit will prompt a confirmation message, press OK to reset the repeater, then the unit restart automatically with parameters restored to default values or press Cancel to annul the reset.
CHANGE LOG
This section documents significant changes from previous versions of the administration guide for DP760. Only major new features or major document updates are listed here. Minor updates for corrections or editing are not documented here.
Firmware Version 1.0.21.4
- No Major changes.
Firmware Version 1.0.21.2
- No Major changes.
Firmware Version 1.0.19.8
- No Major changes.
Firmware Version 1.0.19.6
- No Major changes.
Firmware Version 1.0.19.5
- No Major changes.
Firmware Version 1.0.19.4
- No Major changes.
Firmware Version 1.0.19.3
- No Major changes.
Firmware Version 1.0.19.2
- No Major changes.
Firmware Version 1.0.17.8
- No Major changes.
Firmware Version 1.0.17.4
Firmware Version 1.0.17.1
- No major changes
- No major changes
- No major changes
- No major changes
- No major changes
- No major changes.
- No major changes.
- No major changes.
- No major changes.
- No major changes.
- No major changes.
- No major changes.
- No major changes.
- No major changes.
- No major changes.
- No major changes.
- Added support for automatic upgrade and provisioning be triggered at a random time in every certain day. [Automatic Upgrade]
- This is the initial version for DP760.