
Grandstream provides a Windows-based utility tool to help users to flash firmware for the security products such as GDS3710 and Grandstream IP Camera products in LAN environment. This will help to prevent bricking the device during firmware upgrade process due to Internet interruption or power outage. This utility will also help users to upgrade firmware at installation sites where Internet access is restricted.
UPGRADE USING THE UTILITY TOOL
Step 1:
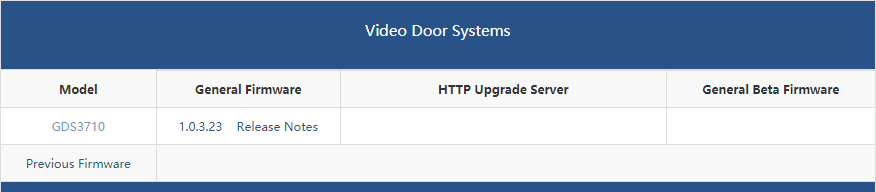
Download the correct firmware files required to upgrade the device, e.g., download GDS3710 firmware package from https://www.grandstream.com/support/firmware/ .
Go to the folder where the downloaded firmware file is saved, unzip the firmware and remember the path of the binary file stored.
Step 2:
Download the firmware upgrade utility software from Grandstream website tool page: https://www.grandstream.com/support/tools
Here is the link to download the upgrade tool directly: https://www.grandstream.com/sites/default/files/Resources/GSUpgradeTool.zip
Unzip the utility package. The utility does NOT require installation. Just click on the “GSUpgradeTool.exe” to run the program. The utility is designed to run at Windows operating system, e.g., Windows 7, 8 and 10 are supported.
Step 3:
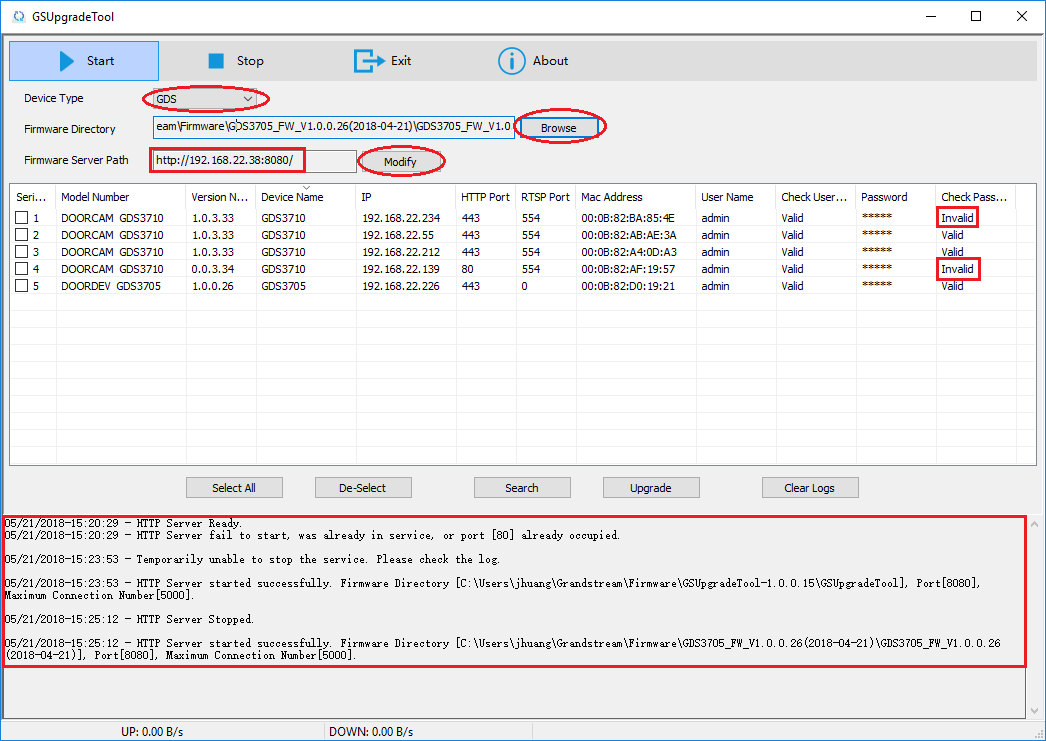
Run the utility, the screen will be displayed like below:
- On the “Device Type”, please select the device in the drop-down menu. The related device found in LAN will be displayed in the table. For example, select “GDS” from the dropdown menu, all GDS devices in the LAN will show in the table.
- Or, click on “Search” to find the GDS device in the same LAN as the computer.
- Click to select the device to be upgraded. Or click “Select All” to select all devices in the LAN.
Step 4:
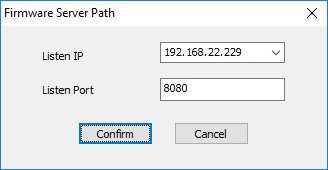
Please double check the logs displayed at the bottom window to see whether the TCP Port 80 is used by other program or system session (Windows10 likely port 80 is occupied already). If port 80 is occupied, please modify the port number on the utility interface to be a different unused TCP port (e.g.: 8080) by clicking the “Modify” button, then follow the prompt like below and click “Confirm” button to change the TCP port to the specified unused TCP port.
Step 5:
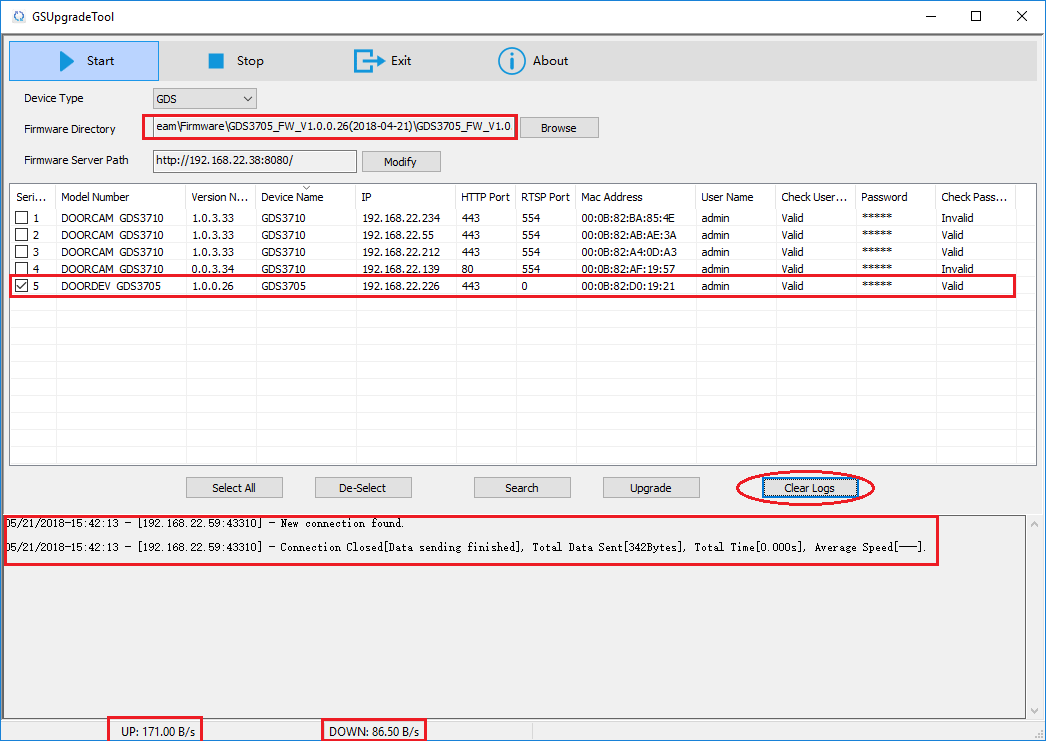
Make sure the administrator ID and password are correct and match the one displayed in the table. Otherwise the upgrade process will NOT happen. If the password doesn’t match (default: admin), “Invalid” will be displayed in the related field (see below orange circled part), please change the administrator password in the UI of the utility to match the one in device required to be upgraded. “Valid” will be displayed if matched. For security reason the password is displayed with “*****”.

Step 6:
Please double check the “Firmware Directory” has the correct firmware files. Otherwise, click “Browse” to change to the correct folder and firmware.
Step 7:
Select the device required to flash firmware by clicking the checkbox in the left of table.
Step 8:
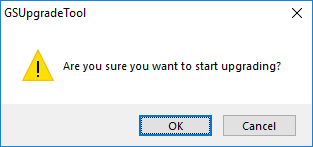
After confirming all selections and parameters are correct, click on “Upgrade” button. The utility will prompt below window. Click “OK” to start the upgrade process.
Step 9:
Once the upgrade process is started, please DO NOT exit or close the program.
Please be patient during upgrading process as the whole process (including self rebooting) may take about 10 minutes. Please allow the process uninterrupted running at long enough time to be on safe side.
Step 10:
Below are some log information during firmware process.
04/25/2018-12:51:59 - HTTP Server Ready.
04/25/2018-12:51:59 - HTTP Server started successfully. Firmware Directory [C:\Users\jhuang\Grandstream\Firmware\GDS3710FW_V1.0.3.31(2018- 04-12)\prod], Port[8080], Maximum Connection Number[5000].
04/25/2018-12:52:37 - Device upgrade and reboot in progress. It may take some time (about 2 minutes). Please be patient and do not shutdown the program.
04/25/2018-12:57:03 - [192.168.22.140:56452] - New connection found.
04/25/2018-12:57:04 - [192.168.22.140:56452] - Connection Closed[Connection closed at client side.], Total Data Sent[11.74MB], Total Time[1.390s], Average Speed[8.45MB/s].
04/25/2018-12:57:13 - [192.168.22.140:56453] - New connection found.
04/25/2018-12:57:19 - [192.168.22.140:56453] - Connection Closed[Data sending finished], Total Data Sent[49.42MB], Total Time[5.812s], Average Speed[8.50MB/s].
04/25/2018-12:59:52 - [192.168.22.140:46756] - New connection found.
04/25/2018-12:59:53 - [192.168.22.140:46756] - Connection Closed[Connection closed at client side.], Total Data Sent[10.86MB], Total Time[1.343s], Average Speed[8.09MB/s].
Step 11:
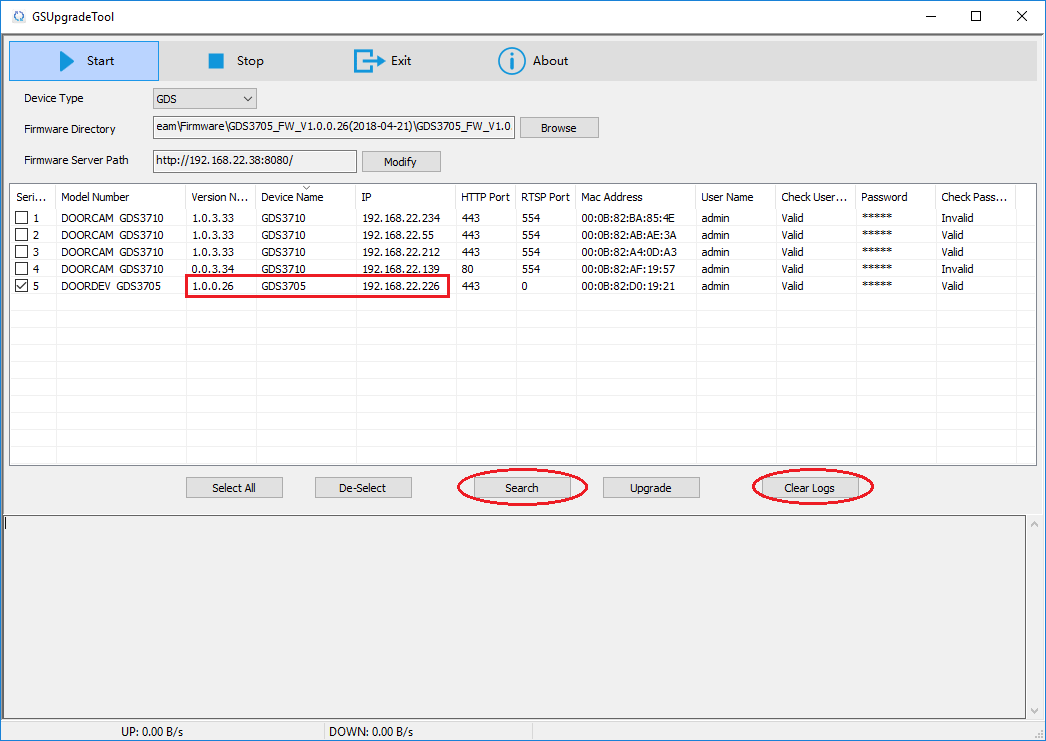
Click “Search” again to see the “Version Number” displayed in the
version is displayed. Click “Clear Logs” can clear the displayed logs in the utility.
Step 12:
Now click “Exit” to close the utility program and finish the firmware upgrade.
Step 13:
You can now log in the device webUI that has finished firmware upgrade. Confirm the firmware version, and configure the device if needed.