In this guide, we will introduce the configuration parameters of the GCC601X(W) Firewall Module.
OVERVIEW
The overview page provides the users with a global insight into the GCC firewall module and also security threats and statistics, the overview page contains:
- Firewall Service: displays the firewall service and package status with effective and expired dates.
- Top Security Log: shows the top logs for each category, the user can select the category from the drop-down list or click on the arrow icon to get redirected to the security log page for more details.
- Protection Statistics: displays various protections statistics, there is an option to clear all the statistics by clicking on the settings icon.
- Top Filtered Applications: shows the top applications that have been filtered with count number.
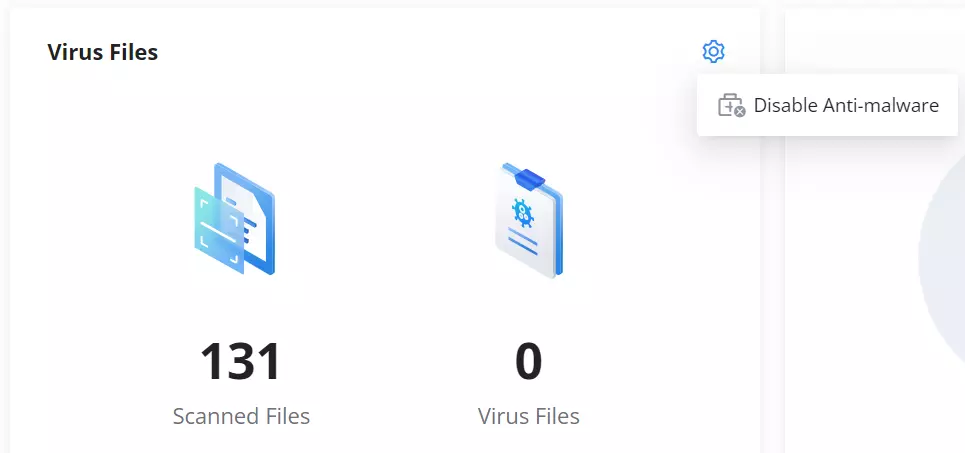
- Virus Files: displays the scanned files and found virus files as well, to enable/disable the anti-malware the users can click on the settings icon.
- Threat Level: shows the threat level from critical to minor with color code.
- Threat Type: displays the threat types with color code and number of repetition, the users can hover the mouse cursor over the color to display the name and the number occurrence.
- Top Threat: shows top threats with type and count.
The users can easily spot the most important notifications and threats.
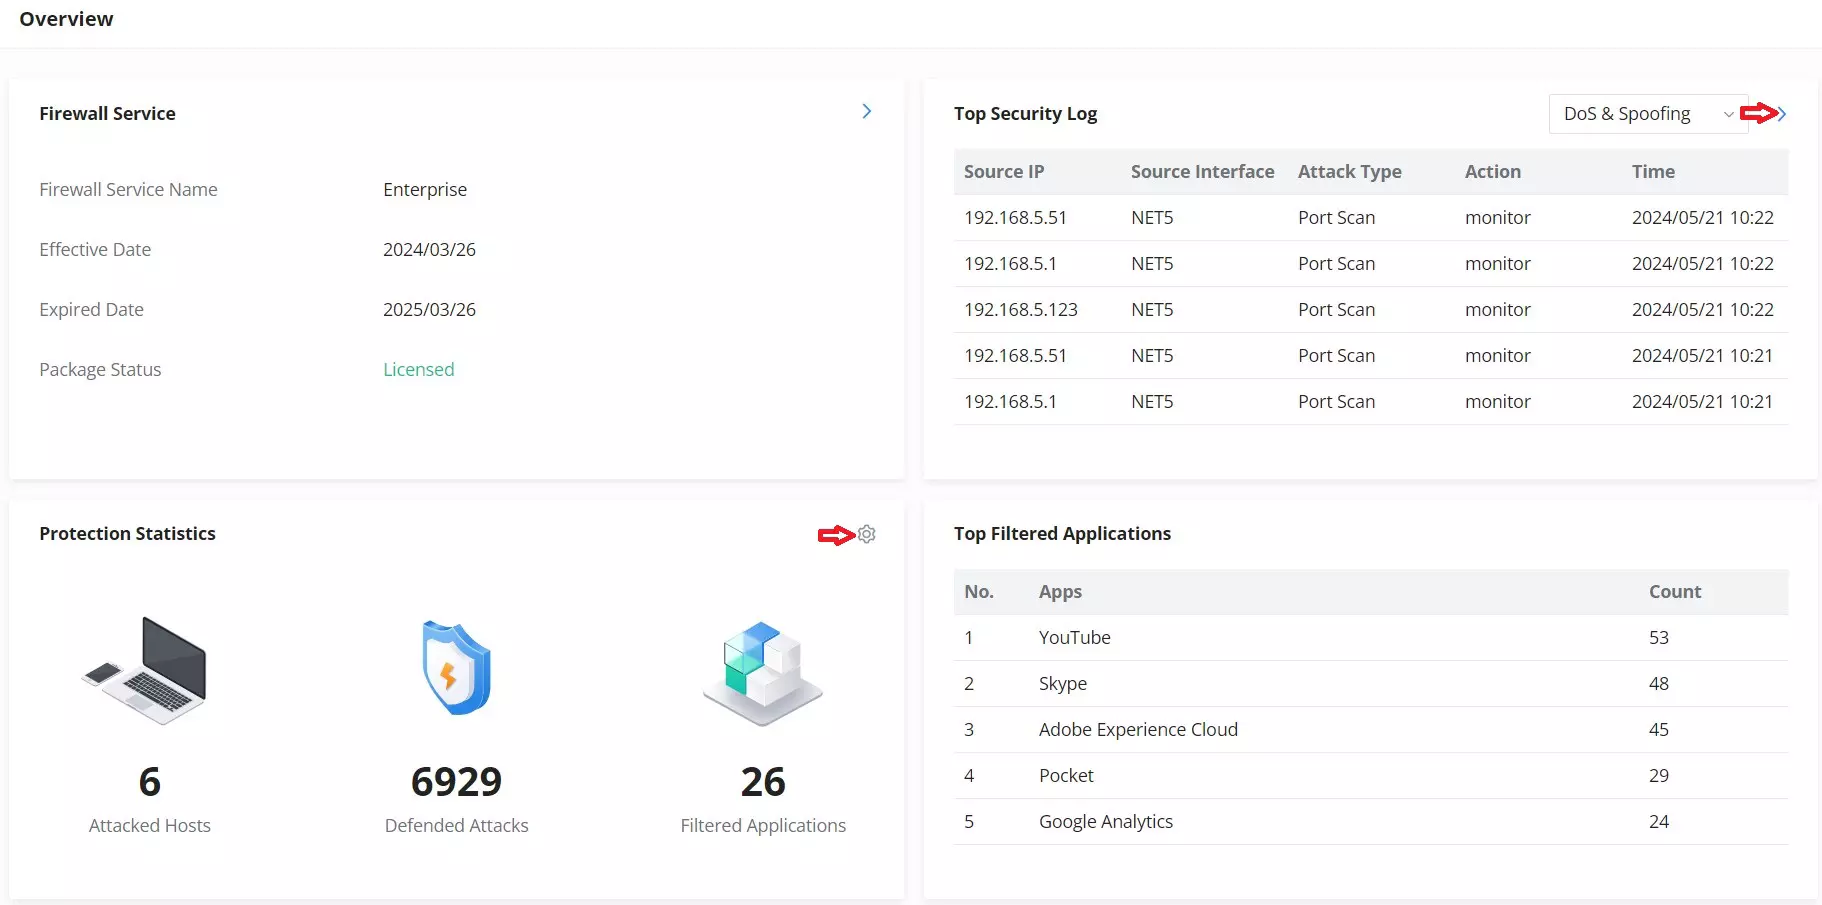
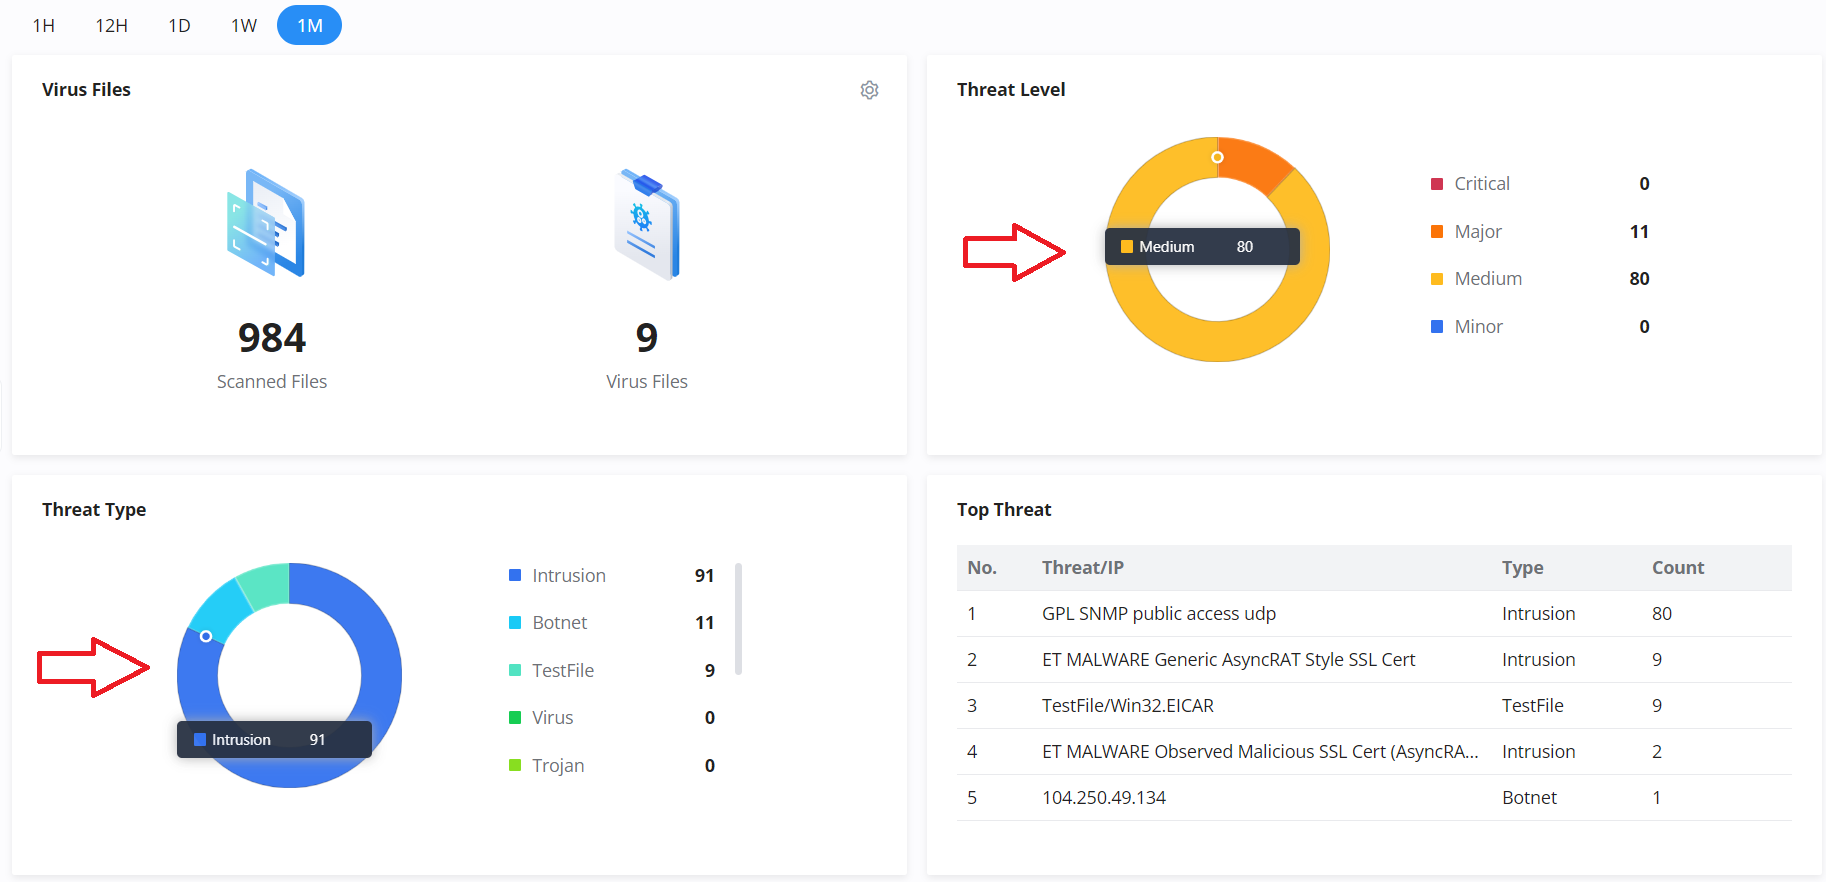
The users can click on the arrow icon under Top Security Log to get redirected to the Security Log section, or hover over the gear icon under Protection Statistics to clear the statistics or under Virus files to disable the Anti-malware. Under Threat Level and Threat Type, users can also hover over the graphs to show more details. Please refer to the figures above.
FIREWALL POLICY
Rules Policy
Rules policy allows to define of how the GCC device will handle the inbound traffic. This is done per WAN, VLAN, and VPN.
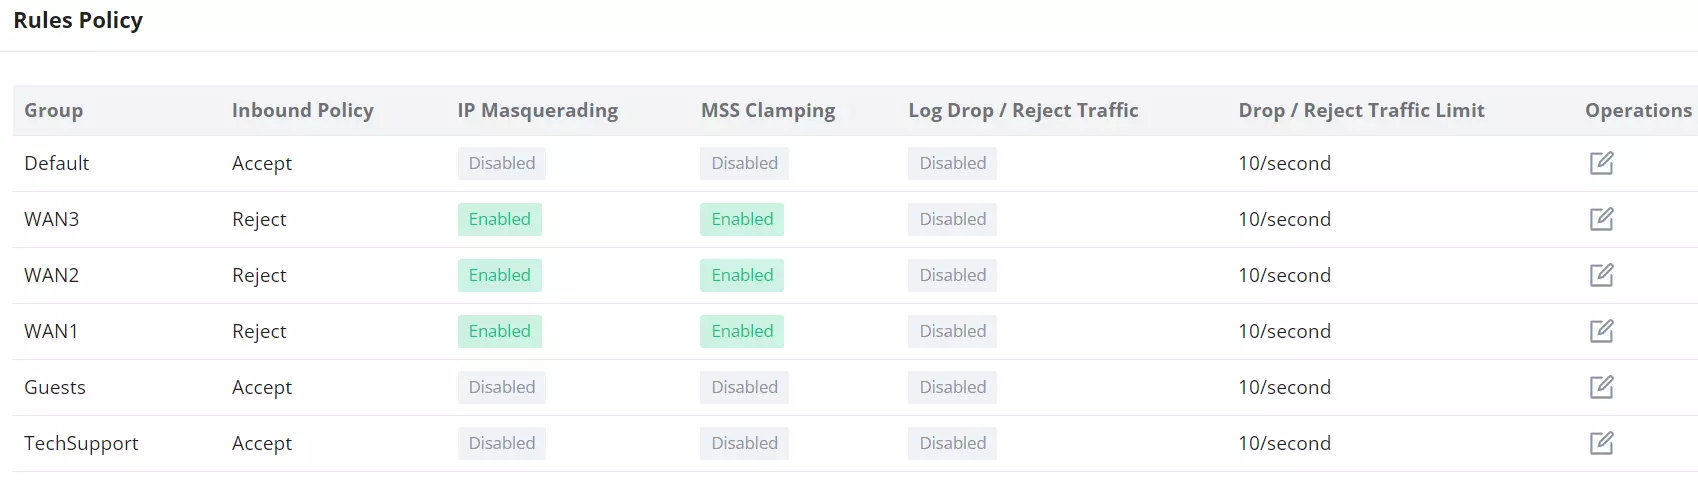
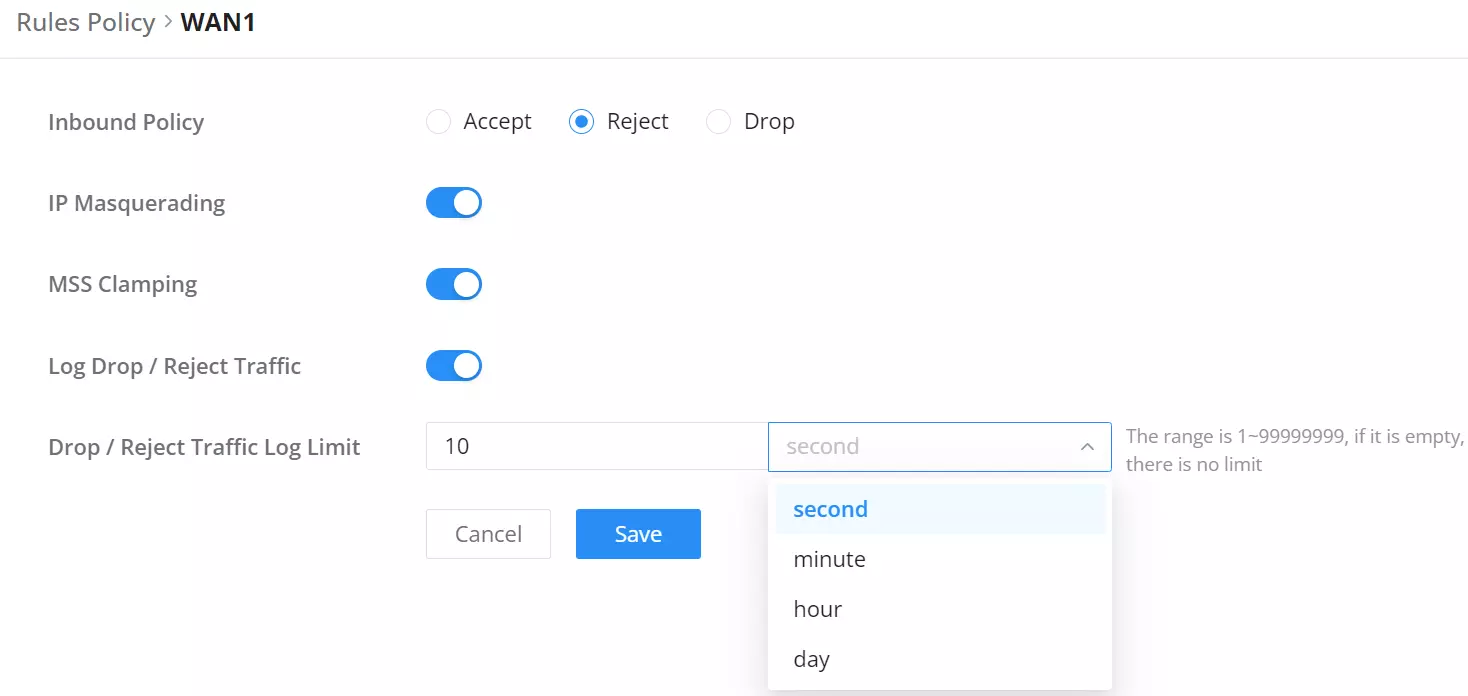
- Inbound Policy: Define the decision that the GCC device will take for the traffic initiated from the WAN or VLAN. The options available are Accept, Reject, and Drop.
- IP Masquerading: Enable IP masquerading. This will masque the IP address of the internal hosts.
- MSS Clamping: Enabling this option will allow the MSS (Maximum Segment Size) to be negotiated during the TCP session negotiation
- Log Drop / Reject Traffic: Enabling this option will generate a log of all the traffic that has been dropped or rejected.
- Drop / Reject Traffic Log Limit: Specify the number of logs per second, minute, hour or day. The range is 1~99999999, if it is empty, there is no limit.
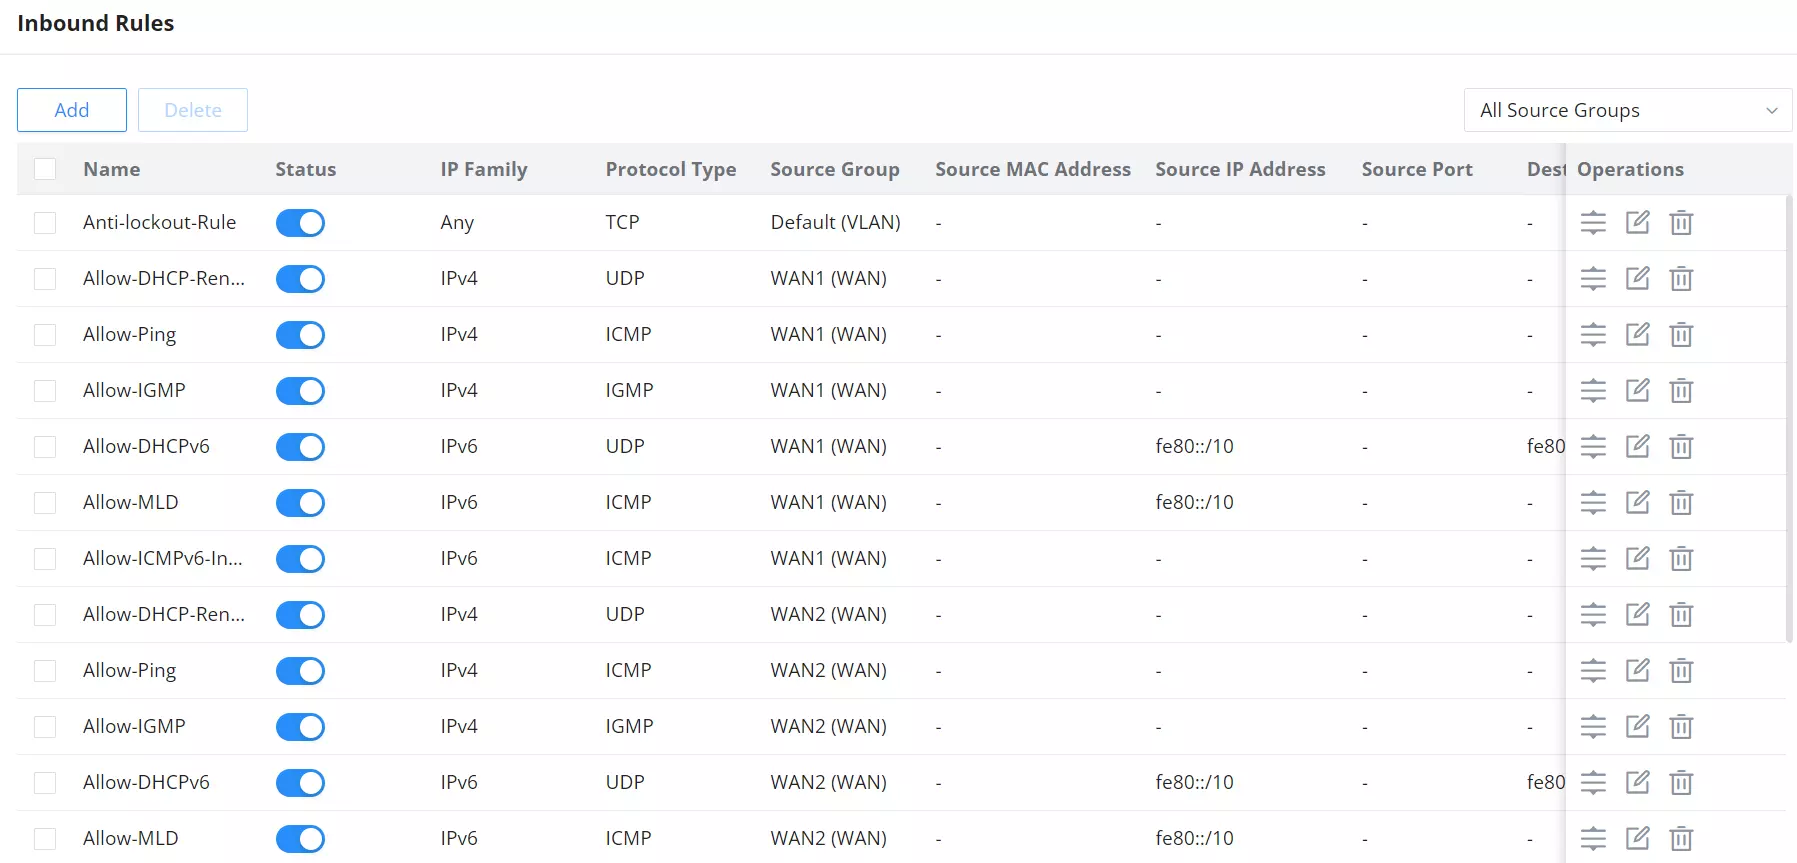
Inbound Rules
The GCC601X(W) allows to filtering of incoming traffic to networks group or port WAN and applies rules such as:
• Accept: To allow the traffic to go through.
• Deny: A reply will be sent to the remote side stating that the packet is rejected.
• Drop: The packet will be dropped without any notice to the remote side.
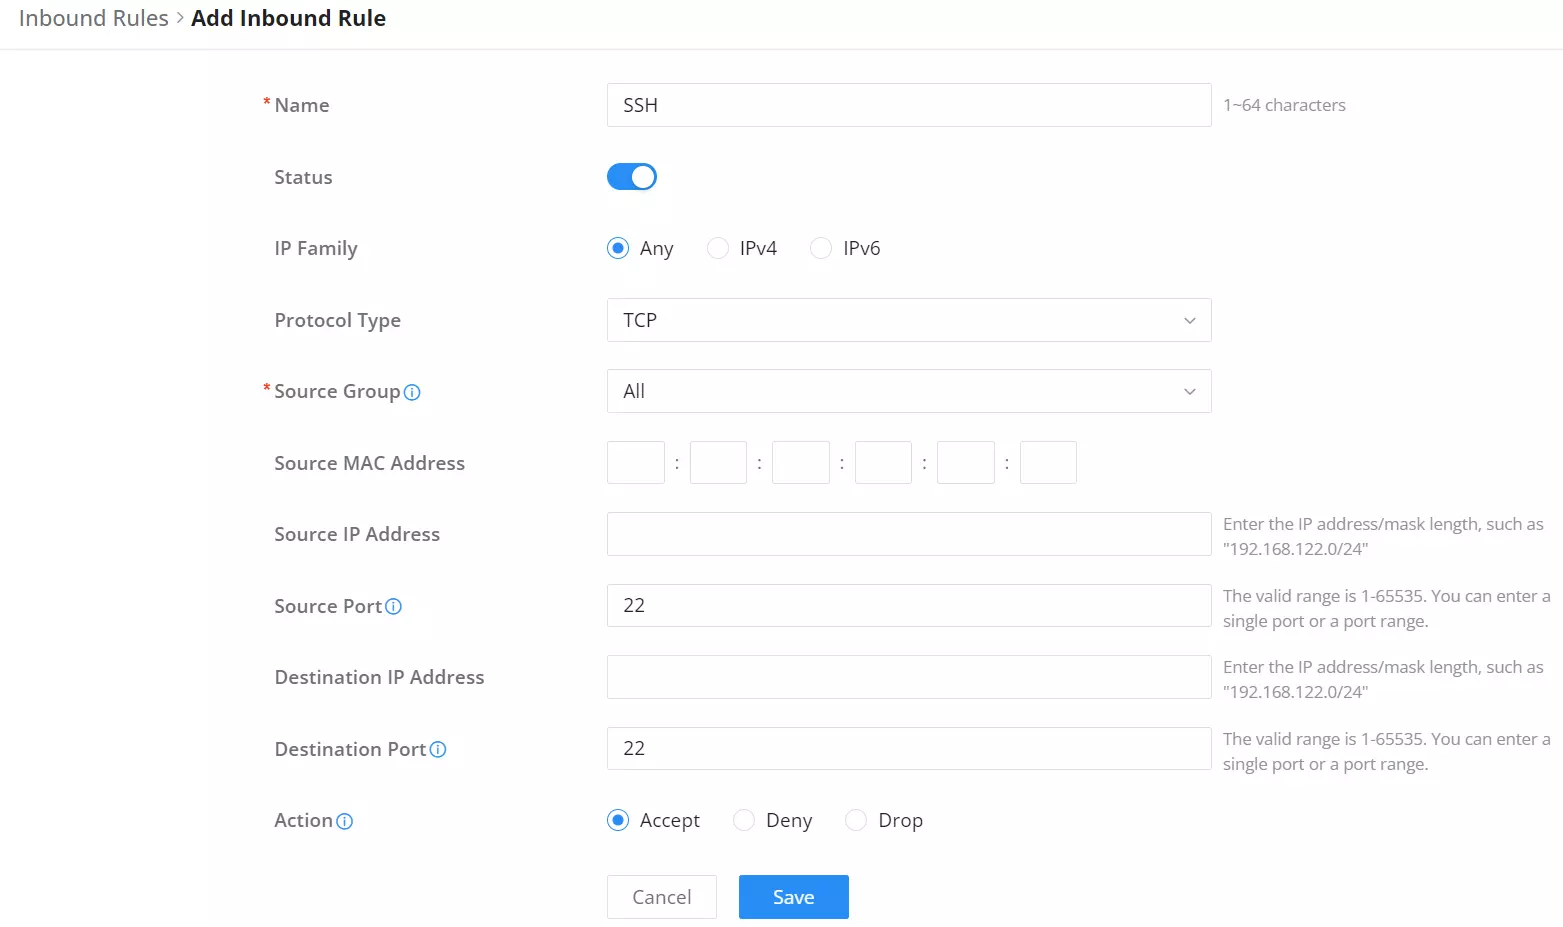
Name | Enter the name of the inbound rule. |
Status | Toggle on/off the status of the inbound rule. |
IP Family | Pick the IP family.
|
Protocol Type | Choose the protocol type.
|
Source Group | If set to "All", rules will be matched in preference to other specific ones. |
Source MAC Address | Specify the source MAC address. |
Source IP Address | Specify the source IP address. |
Source Port | To enter multiple port/port ranges, separate them using commas (,), for example:4,5-10. |
Destination IP Address | Specify the destination IP address. |
Destination Port | To enter multiple port/port ranges, separate them using commas (,), for example:4,5-10. |
Action | If set to "Accept", the external devices are allowed to access the router; if set to "Deny", the access of the external devices is denied and the result is returned; if set to "Drop", the access request of the external device will be directly droped. |
Traffic Rules – Inbound Rules
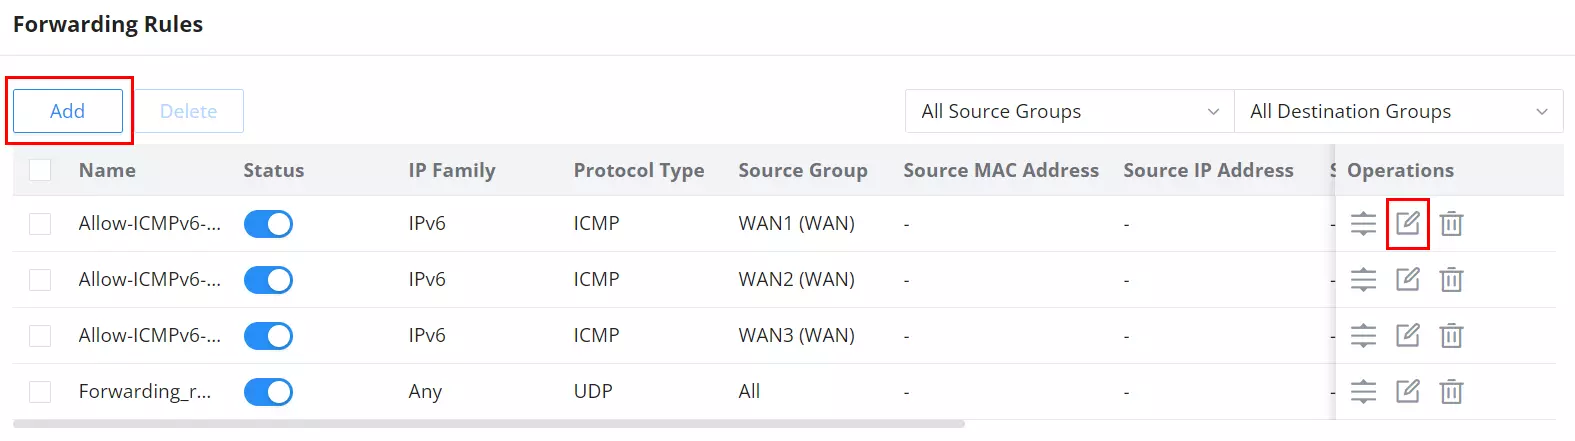
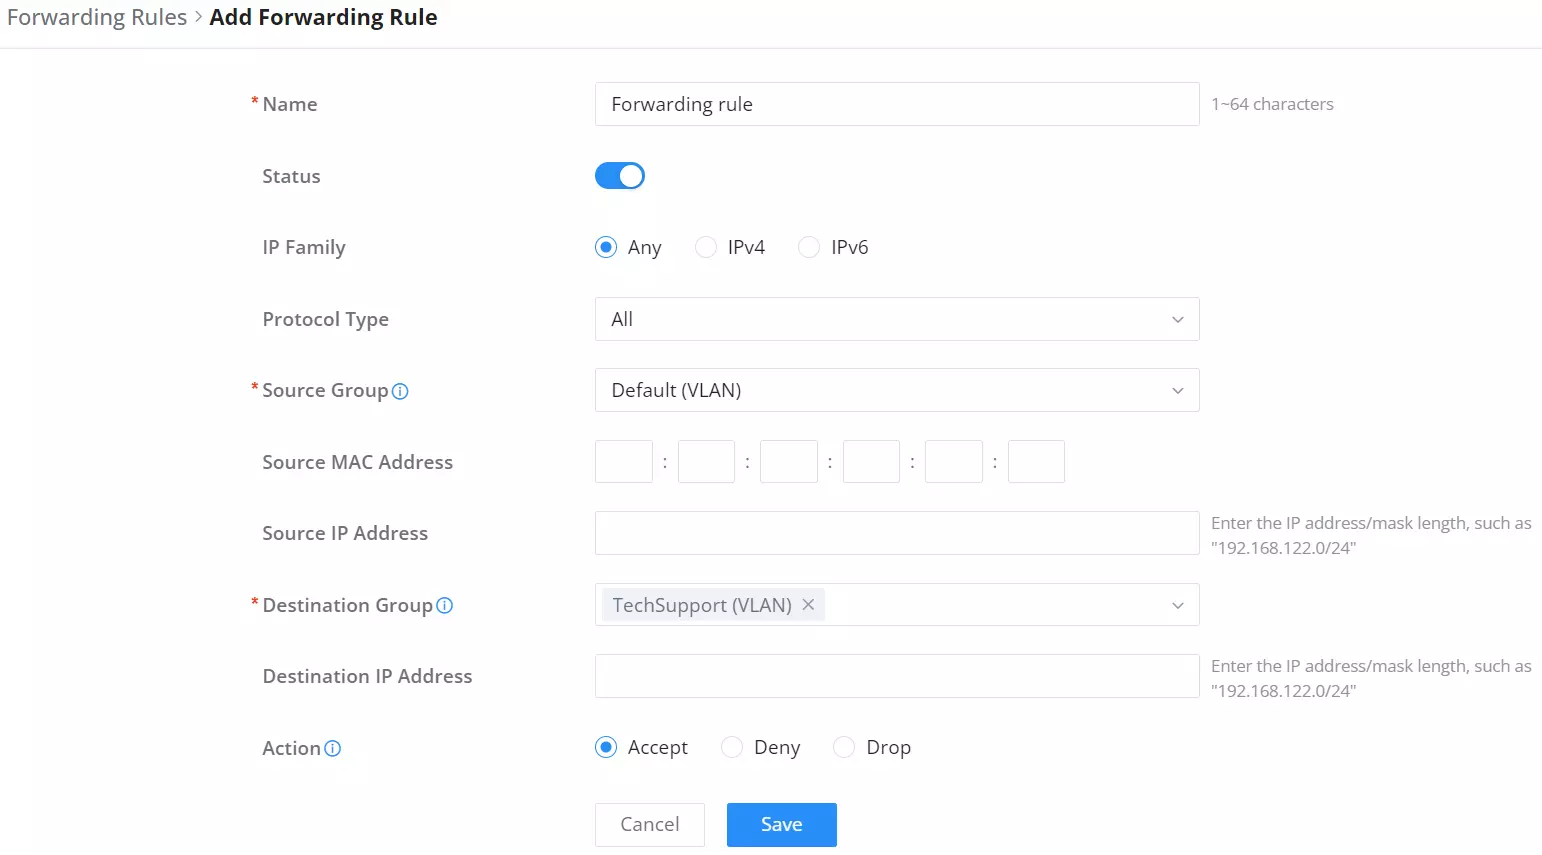
Forwarding Rules
GCC601X(W) offers the possibility to allow traffic between different groups and interfaces (WAN/VLAN/VPN).
To add a forwarding rule, please navigate to Firewall Module → Firewall Policy → Forwarding Rules, then click on the “Add” button to add a new forwarding rule or click on the “Edit” icon to edit a rule.
Advanced NAT
NAT or Network address translation as the name suggests it’s a translation or mapping of private or internal addresses to public IP addresses or vice versa, and the GCC601X(W) supports both.
- SNAT: Source NAT refers to the mapping of clients’ IP addresses (Private or Internal Addresses) to a public one.
- DNAT: Destination NAT is the reverse process of SNAT where packets will be redirected to a specific internal address.
The Firewall Advanced NAT page provides the ability to set up the configuration for source and destination NAT. Navigate to Firewall Module → Firewall Policy → Advanced NAT.
SNAT
To add an SNAT click on the “Add” button to add a new SNAT or click on the “Edit” icon to edit a previously created one. Refer to the figures and table below:

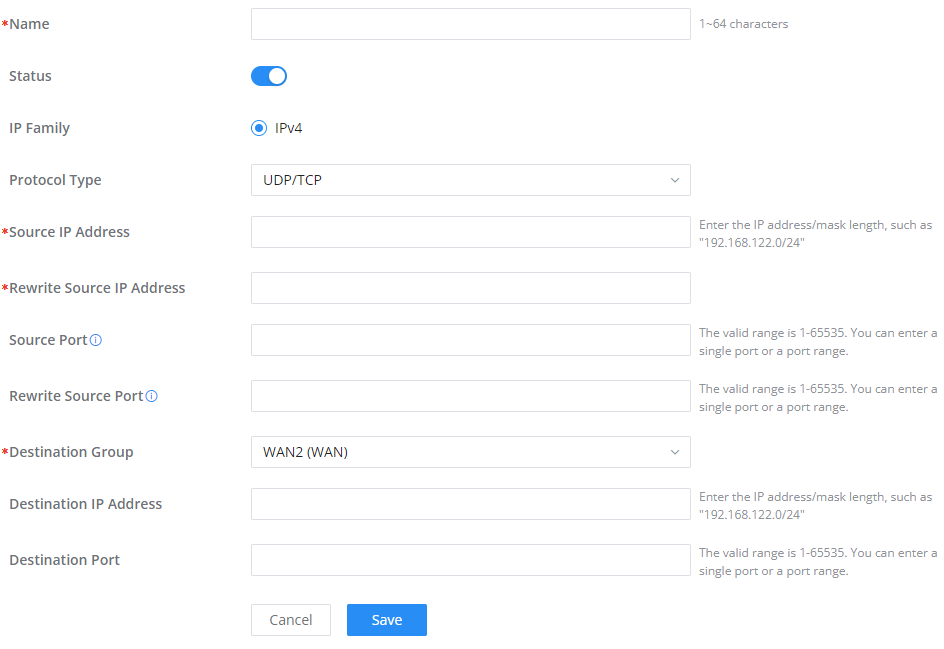
Refer to the below table when creating or editing an SNAT entry:
Name | Specify a name for the SNAT entry |
IP Family | Select the IP version, two options are available: IPv4 or Any. |
Protocol Type | Select one of the protocols from dropdown list or All, available options are: UDP/TCP, UDP, TCP and All. |
Source IP Address | Set the Source IP address. |
Rewrite Source IP Address | Set the Rewrite IP. The source IP address of the data package from the source group will be updated to this configured IP. |
Source Port | Set the Source Port |
Rewrite Source Port | Set the Rewrite source port. |
Destination Group | Select a WAN interface or a VLAN for Destination Group. |
Destination IP Address | Set the Destination IP address. |
Destination Port | Set the Destination Port |
SNAT page
DNAT
To add a DNAT click on the “Add” button to add a new DNAT or click on the “Edit” icon to edit a previously created one. Refer to the figures and table below:
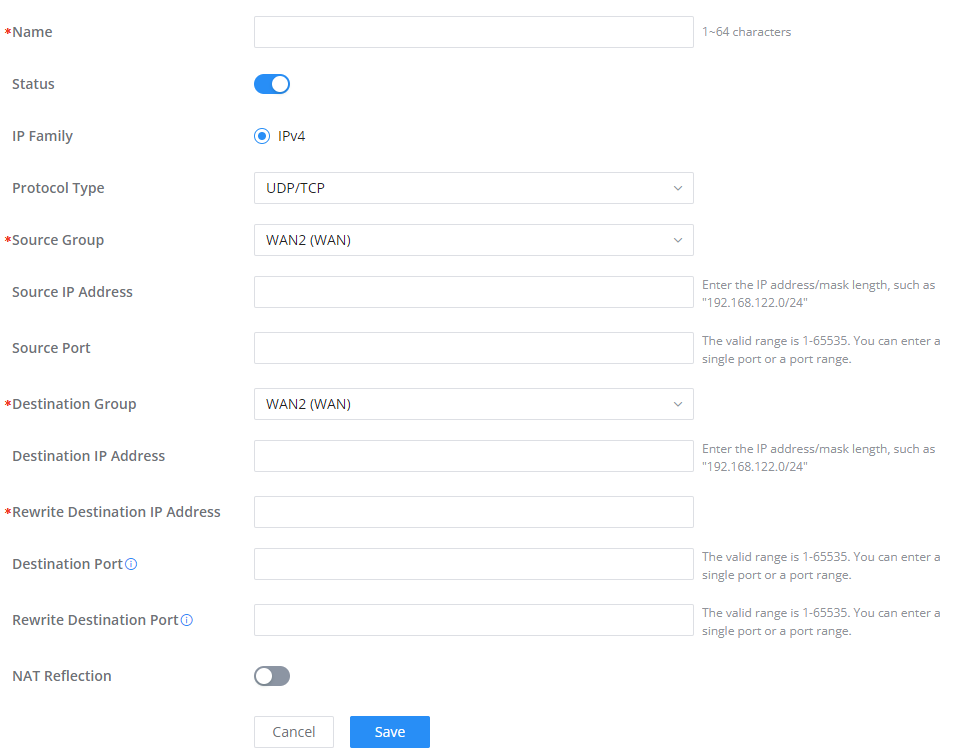
Refer to the below table when creating or editing a DNAT entry:
Name | Specify a name for the DNAT entry |
IP Family | Select the IP version, three options are available: IPv4, IPv6 or Any. |
Protocol Type | Select one of the protocols from dropdown list or All, available options are: UDP, TCP, TCP/UCP and All. |
Source Group | Select a WAN interface or a LAN group for Source Group, or select All. |
Source IP Address | Set the Source IP address. |
Source Port | Set the Source Port. |
Destination Group | Select a WAN interface or a LAN group for Destination Group, or select All. Make sure that destination and source groups are different to avoid conflict. |
Destination IP Address | Set the Destination IP address. |
Rewrite Destination IP Address | Set the Rewrite Destination IP Address. |
Destination Port | Set the Destination Port. |
Rewrite Destination Port | Set the Rewrite Destination Port |
NAT Reflection | Click on "ON" to enable NAT Reflection |
NAT Reflection Source | Select NAT Reflection either Internal or External. |
Advanced NAT – DNAT
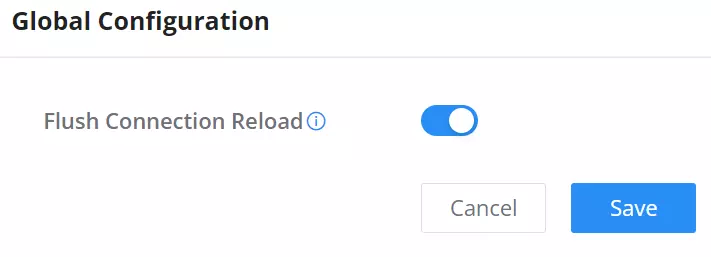
Global Configuration
- Flush Connection Reload
When this option is enabled and the firewall configuration changes are made, existing connections that had been permitted by the previous firewall rules will be terminated.
If the new firewall rules do not permit a previously established connection, it will be terminated and will not be able to reconnect. With this option disabled, existing connections are allowed to continue until they timeout, even if the new rules would not allow this connection to be established.
SECURITY DEFENSE
DoS Defense
Basic Settings – Security Defense
Denial-of-Service Attack is an attack aimed to make the network resources unavailable to legitimate users by flooding the target machine with so many requests causing the system to overload or even crash or shut down.
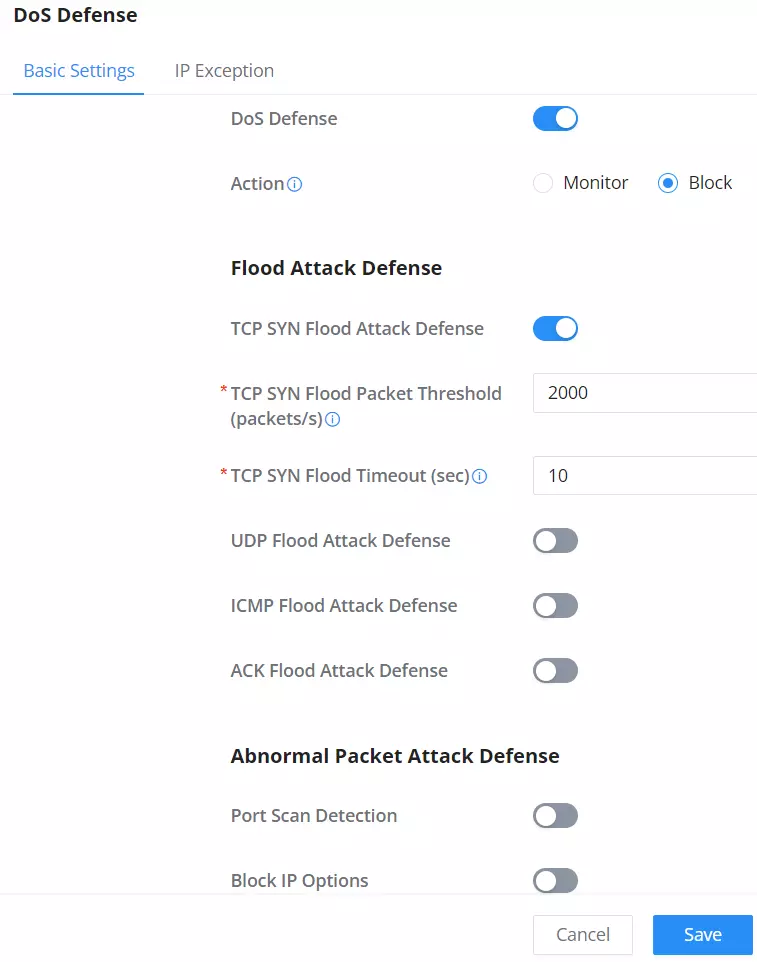
DoS Defence | Toggle on/off DoS Defence |
Action | Select the action: Monitor: An alarm is generated but is not blocked. |
Flood Attack Defense | |
TCP SYN Flood Attack Defense | When this option is enabled, the router will take counter measures to SYN Flood Attack.
|
UDP Flood Attack Defense | When this option is enabled, the router will take counter measures to the UDP Flood Attack.
|
ICMP Flood Attack Defense | When this option is enabled, the router will take counter measures to the ICMP Flood Attack.
|
ACK Flood Attack Defense | When this option is enabled the router will take counter measures to ACK Flood Attack.
|
Abnormal Packet Attack Defense | |
Port Scan Detection | When this option is enabled, the router will take counter measure to the port scanning attempts
|
Block IP Options | When this option is enabled, the router will ignore any IP packets with Options field. |
Block TCP Flag Scan | When this option is enabled, the router will ignore any packets with unexpected information in the TCP flags. |
Block Land Attack | When this option is enabled, the router will block any SYN packets which may have been spoofed and modified to set the source and the destination address to the address of the router. If this option is disabled, it might cause the router to be stuck in a loop of responding to itself. |
Block Smurf | When this option is enabled, the router will drop any ICMP echo requests. |
Block Ping of Death | When this option is enabled, the router will drop any abnormal or corrupted ping packets. |
Block Traceroute | When this option is enabled, the router will not allow the traceroute requests initiated from the WAN side. |
Block ICMP Fragment | When this option is enabled, the router will drop the ICMP packets which are fragmented. |
Block SYN Fragment | When this option is enabled, the router will drop the SYN packets which are fragmented. |
Block Unassigned Protocol Numbers | If enabled, the device will reject IP packets receiving IP protocol number greater than 133. |
Block Fraggle Attack | If enabled, the router will drop any UDP broadcast packets initiate from the WAN side. |
DoS Defense
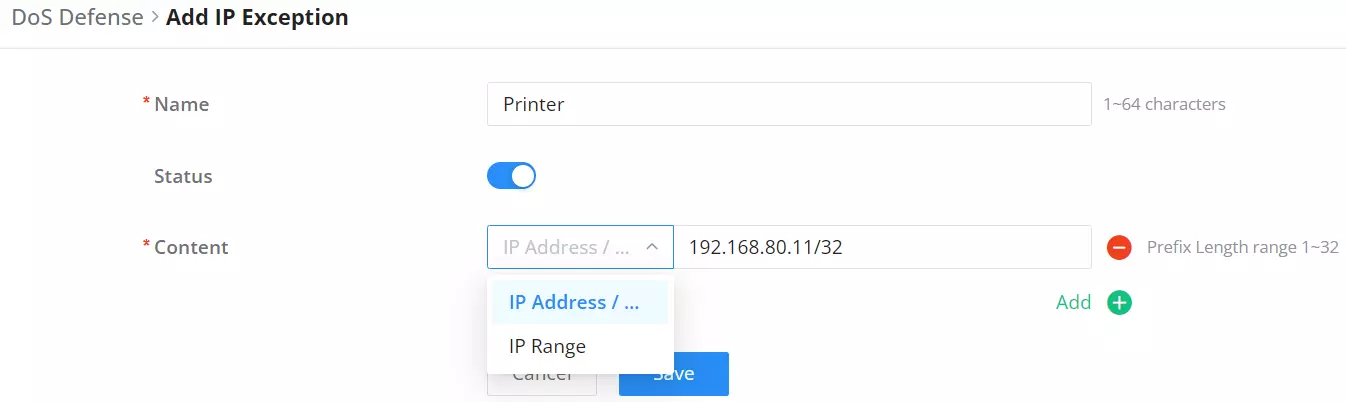
IP Exception
On this page, users can add IP addresses or IP ranges to be excluded from the DoS Defense scan. To add an IP address or IP range to the list, click on the “Add” button as shown below:
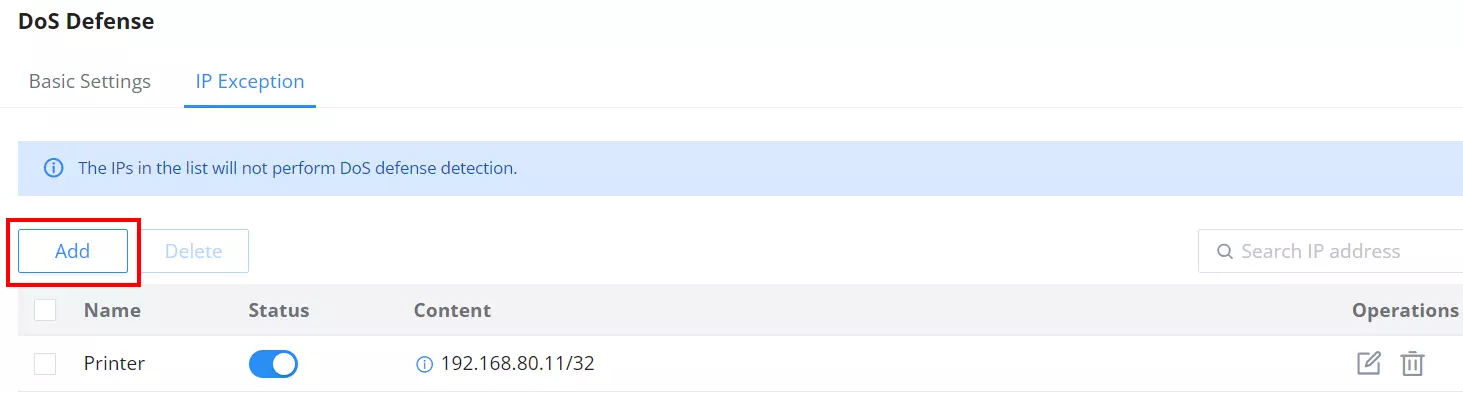
Specify a name, then toggle the status ON after that specify the IP address or IP range.
Spoofing Defense
The Spoofing defense section offers several counter-measures to the various spoofing techniques. To protect your network against spoofing, please enable the following measures to eliminate the risk of having your traffic intercepted and spoofed. GCC601X(W) devices offer measures to counter spoofing on ARP information, as well as on IP information.

ARP Spoofing Defense
- Block ARP Replies with Inconsistent Source MAC Addresses: The GCC device will verify the destination MAC address of a specific packet, and when the response is received by the device, it will verify the source MAC address and it will make sure that they match. Otherwise, the GCC device will not forward the packet.
- Block ARP Replies with Inconsistent Destination MAC Addresses: The GCC601X(W) will verify the source MAC address when the response is received. The device will verify the destination MAC address and it will make sure that they match. Otherwise, the device will not forward the packet.
- Decline VRRP MAC Into ARP Table: The GCC601X(W) will decline including any generated virtual MAC address in the ARP table.
ANTI-MALWARE
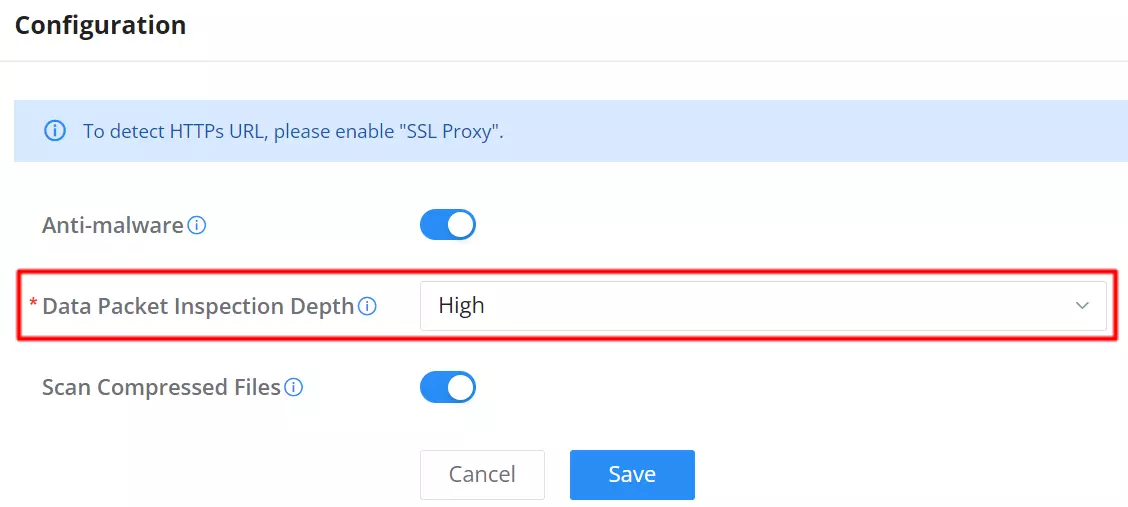
In this section, the users can enable Anti-malware and update their signature library information.
Configuration
To enable Anti-malware, navigate to Firewall module → Anti-Malware → Configuration.
- Anti-malware: toggle ON/OFF to enable/disable the Anti-malware.
- Data Packet Inspection Depth: Check the packet content of each traffic according to the configuration. The deeper the depth, the higher the detection rate and the higher the CPU consumption. There are 3 level of depth low, medium and high.
- Scan Compressed Files: supports scanning of compressed files.
On the Overview page, users can check the statistics and have an overview. Also, it’s possible to disable the Anti-malware directly from this page by clicking on the settings icon as shown below:
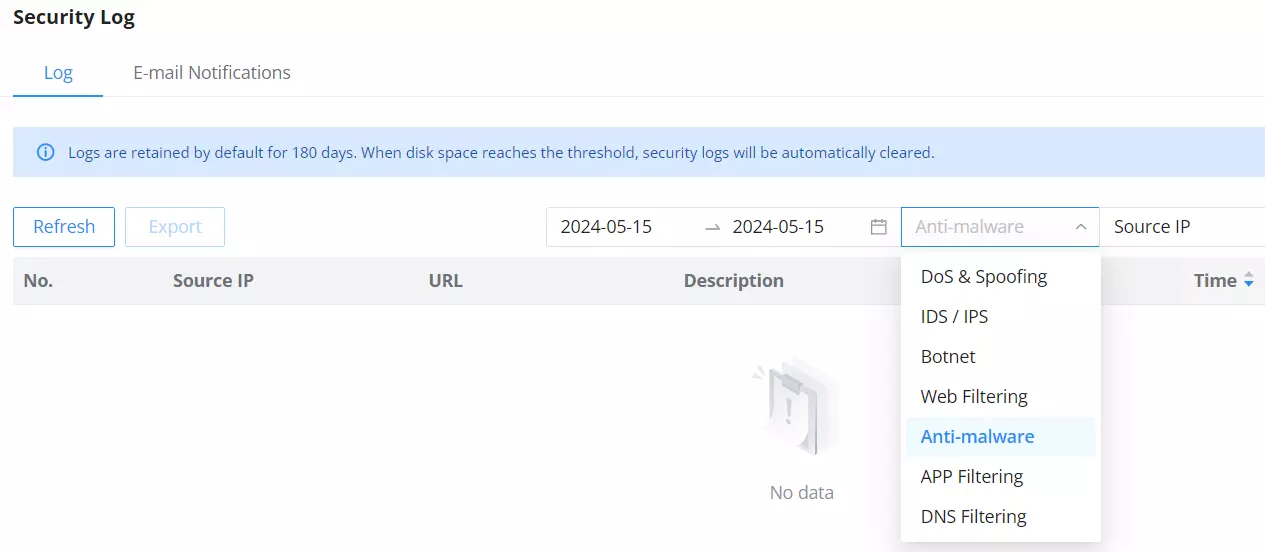
It’s also possible to check the security log for more details:
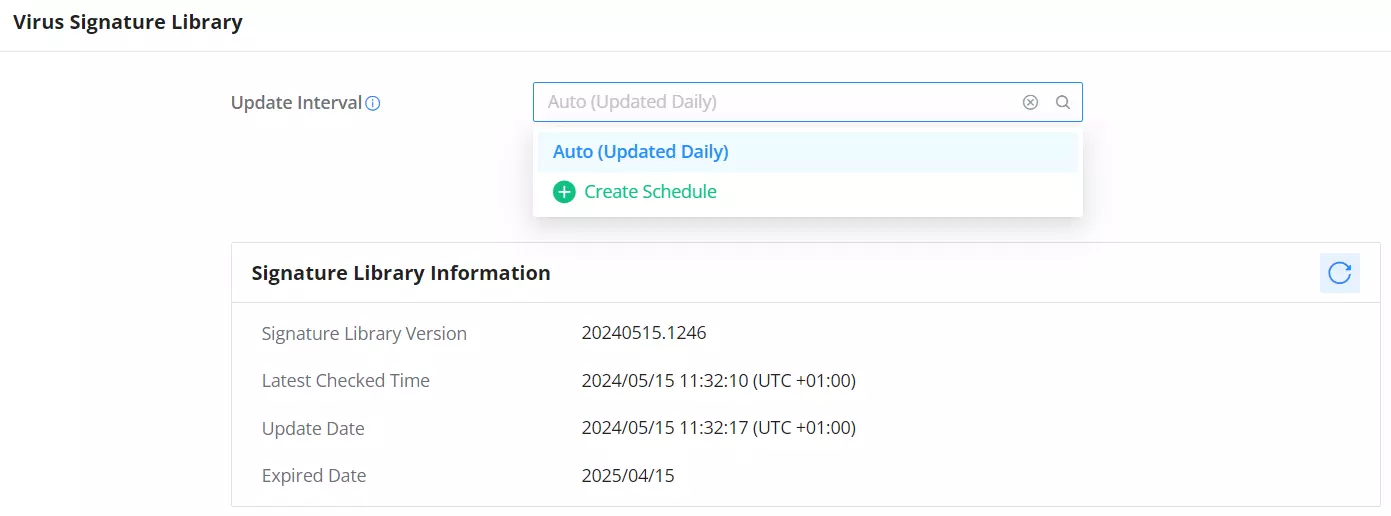
Virus Signature Library
On this page, the users can update the anti-malware signature library information manually, update daily or create a schedule, please refer to the figure below:
INTRUSION PREVENTION
Intrusion Prevention System (IPS) and Intrusion Detection System (IDS) are security mechanisms that monitor network traffic for suspicious activities and unauthorized access attempts. IDS identifies potential security threats by analyzing network packets and logs, while IPS actively prevents these threats by blocking or mitigating malicious traffic in real time. Together, IPS and IDS provide a layered approach to network security, helping to protect against cyberattacks and safeguard sensitive information. A botnet is a network of compromised computers infected with malware and controlled by a malicious actor, typically used to carry out large-scale cyberattacks or illicit activities.
IDS/IPS
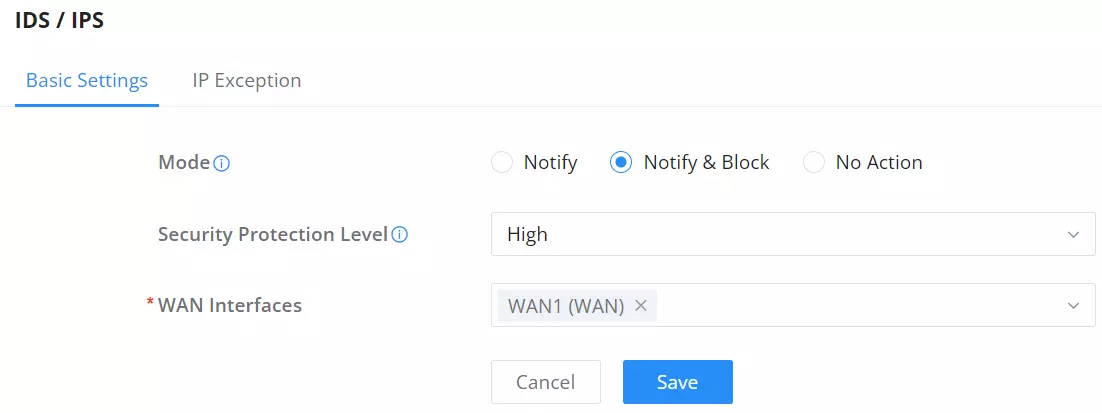
Basic Settings – IDS/IPS
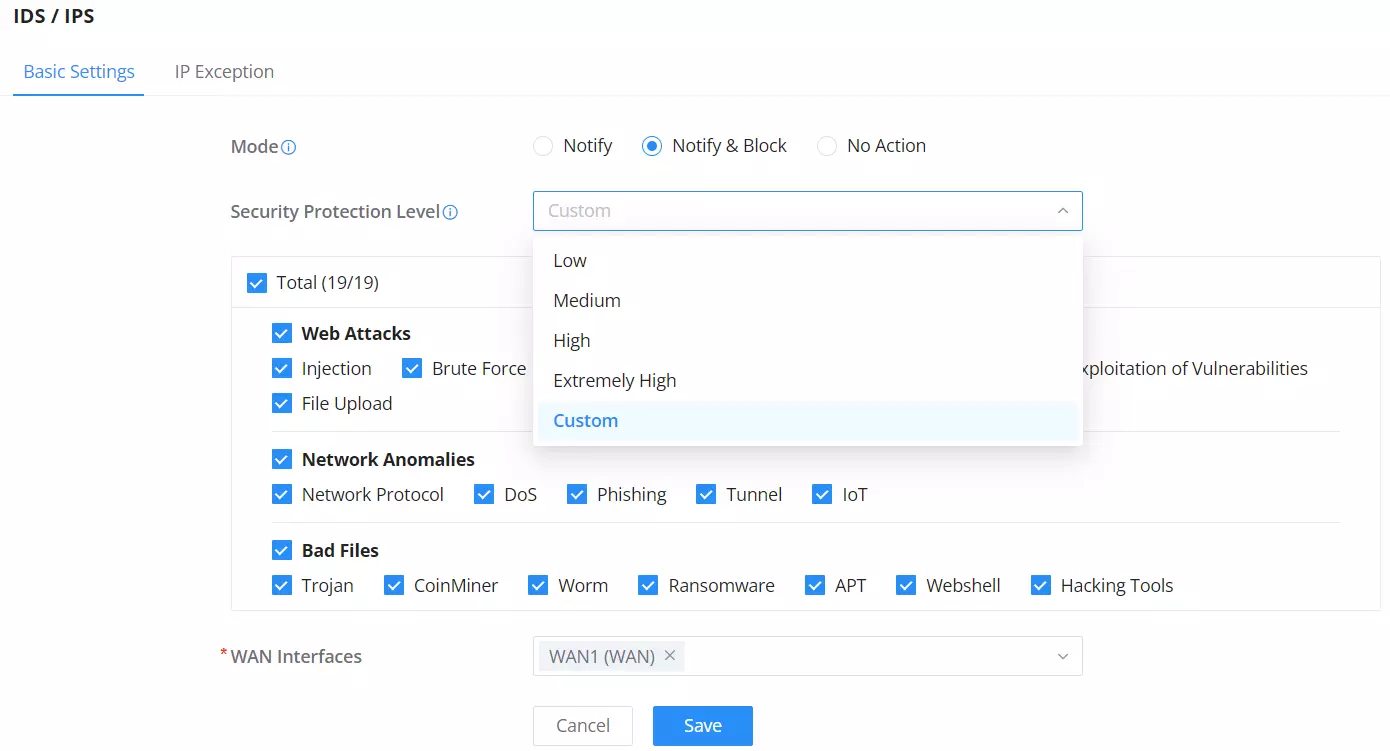
On this tab, the users can select IDS/IPS mode, Security Protection Level.
IDS/IPS Mode:
- Notify: detect traffic and only notify the users without blocking it, this is equal to IDS (Intrusion Detection System).
- Notify & Block: detects or blocks traffic and notifies about the security issue, this is equal to IPS (Intrusion Prevention System).
- No Action: no notifications or prevention, IDS/IPS is disabled in this case.
Security Protection Level: Select a protection level (Low, Medium, High, Extremely high and Custom). Different protection levels correspond to different protection levels. Users can customize the protection type. The higher the protection level, the more protection rules, and Custom will enable the users to select what to IDS/IPS will detect.
It’s also possible to select a custom security protection level and then select from the list the specific threats. Please refer to the figure below:
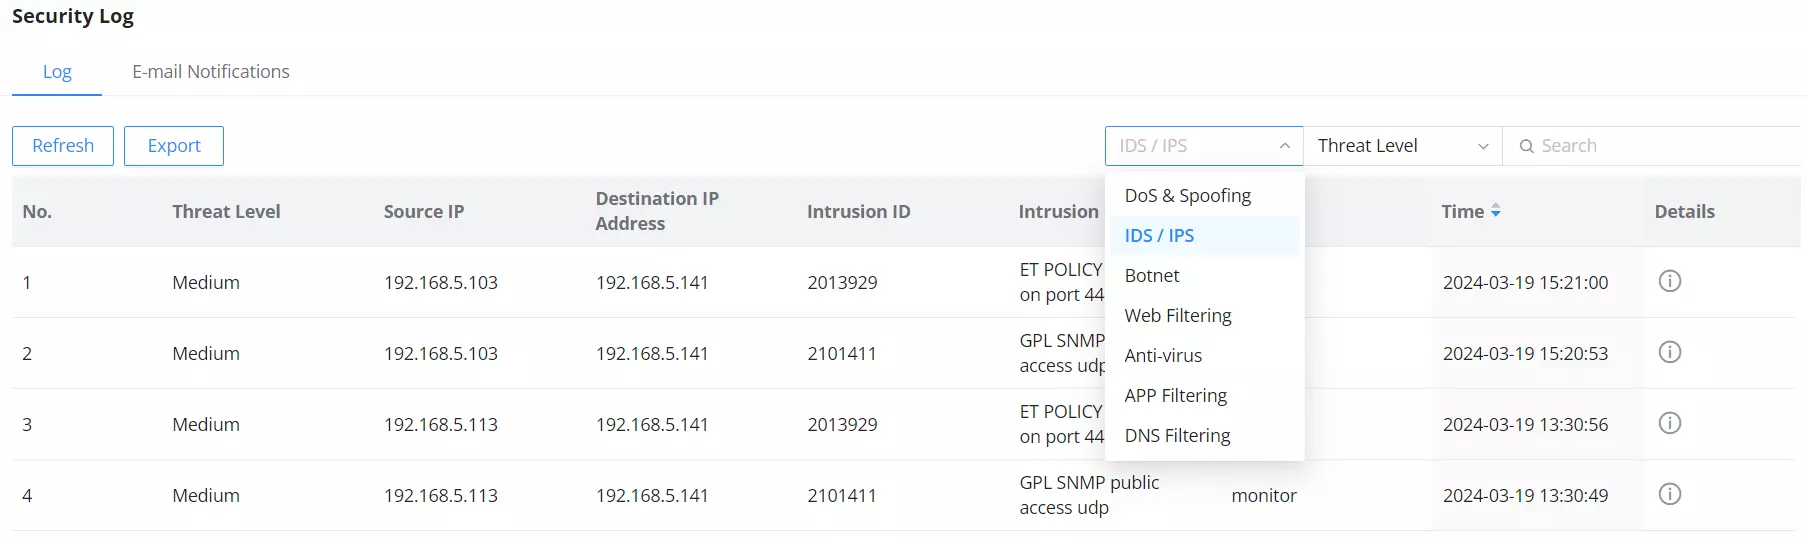
To check the notifications and the actions taken, under the Security log, select IDS/IPS from the drop-down list as shown below:
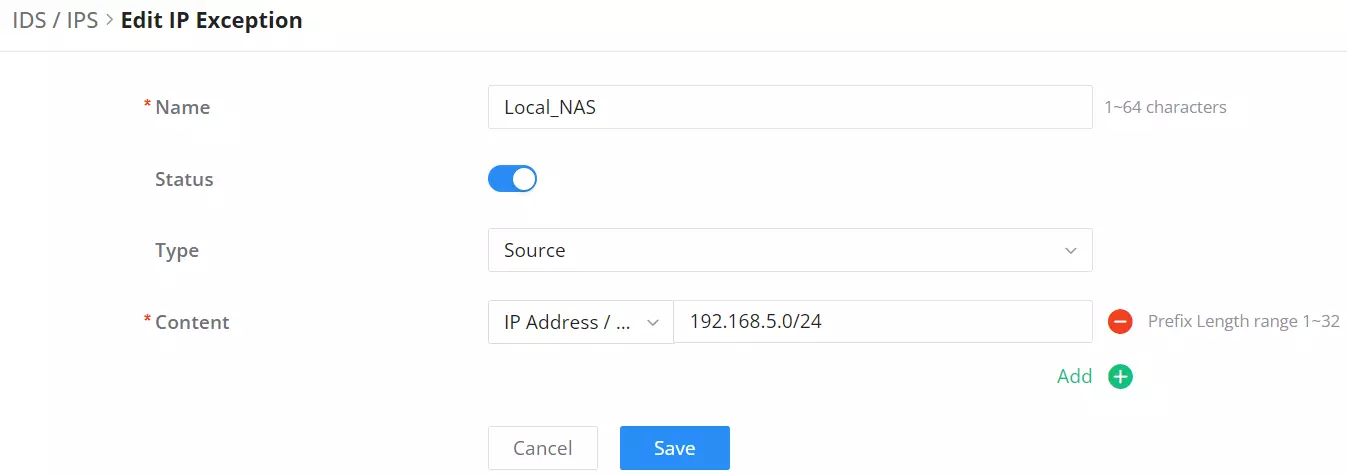
IP Exception
The IP addresses on this list will not be detected by IDS/IPS. To add an IP address to the list, click on the “Add” button as shown below:
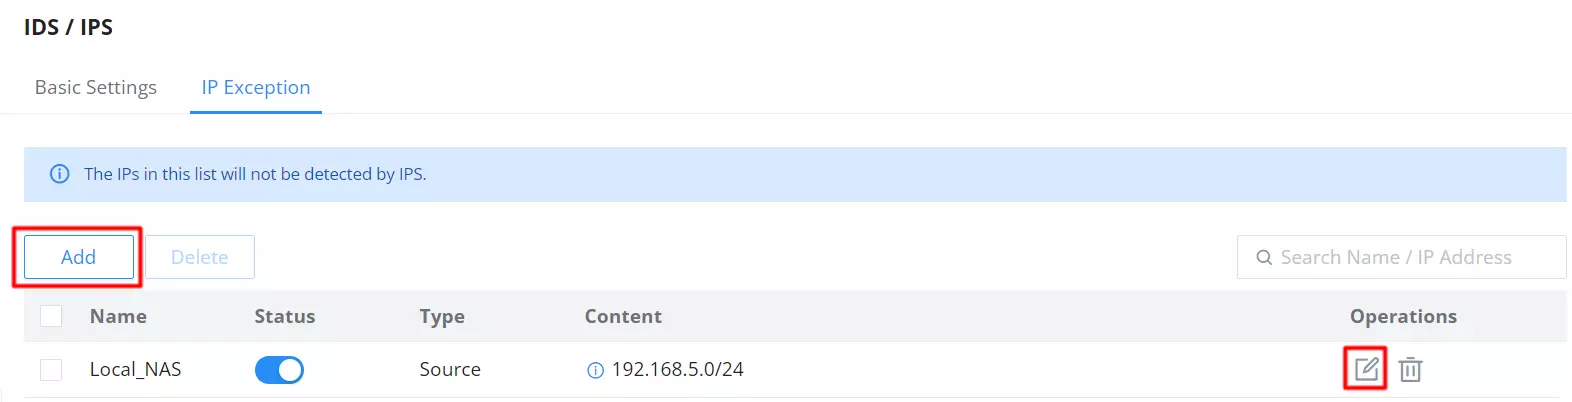
Enter a name, then enable the status, and then select the type (Source or Destination) for the IP address(s). To add an IP address click on the “+” icon and to delete an IP address click on the “– ” icon as shown below:
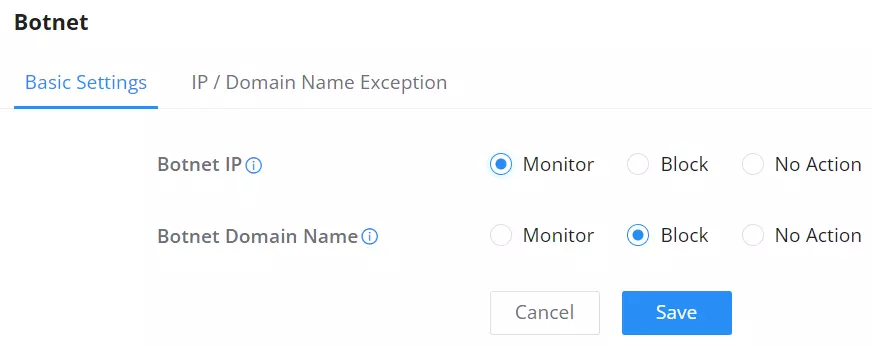
Botnet
Basic Settings – Botnet
On this page, users can configure the basic settings for monitoring the outbound Botnet IP and Botnet Domain Name and there are three options:
Monitor: alarms are generated but are not blocked.
Block: monitors and blocks outbound IP addresses/Domain names that access botnets.
No Action: The IP address/Domain name of the outbound botnet is not detected.
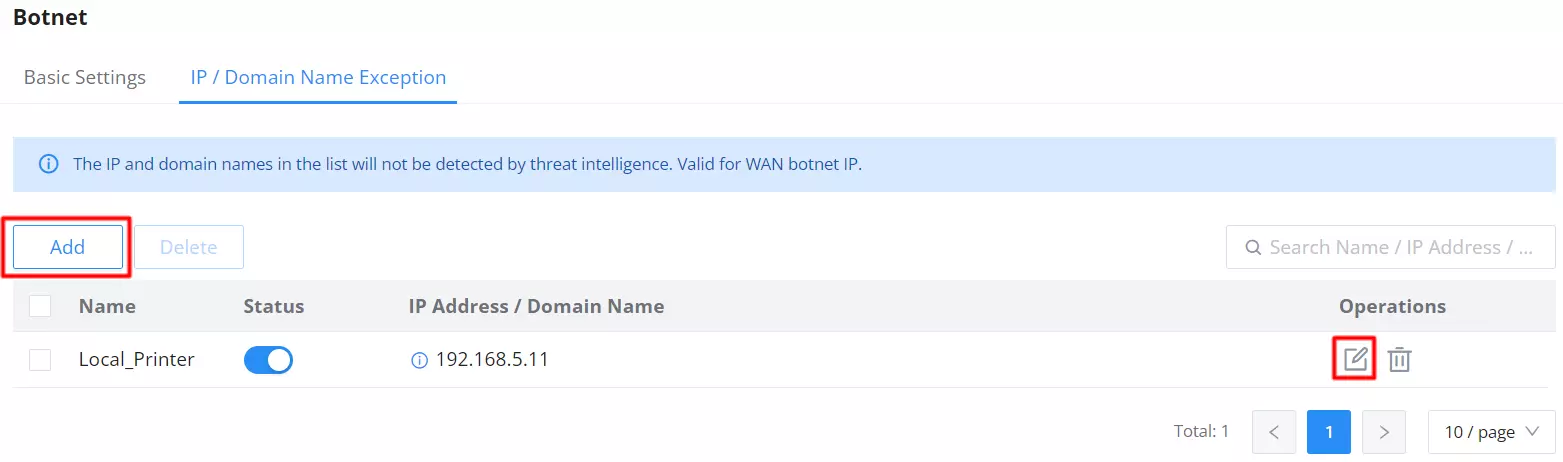
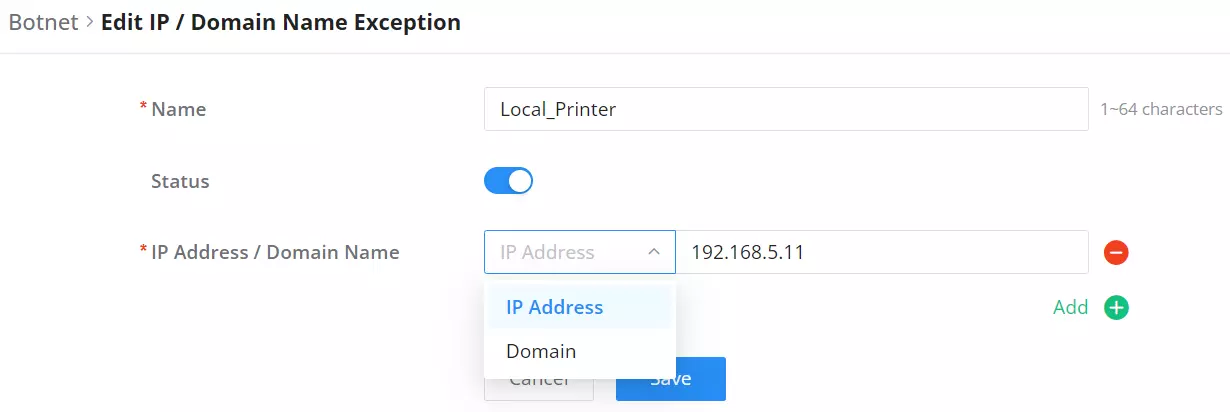
IP/Domain Name Exception
The IP addresses on this list will not be detected for Botnets. To add an IP address to the list, click on the “Add” button as shown below:
Enter a name, then enable the status. To add an IP address/Domain name click on the “+” icon and to delete an IP address/Domain name click on the “–” icon as shown below:
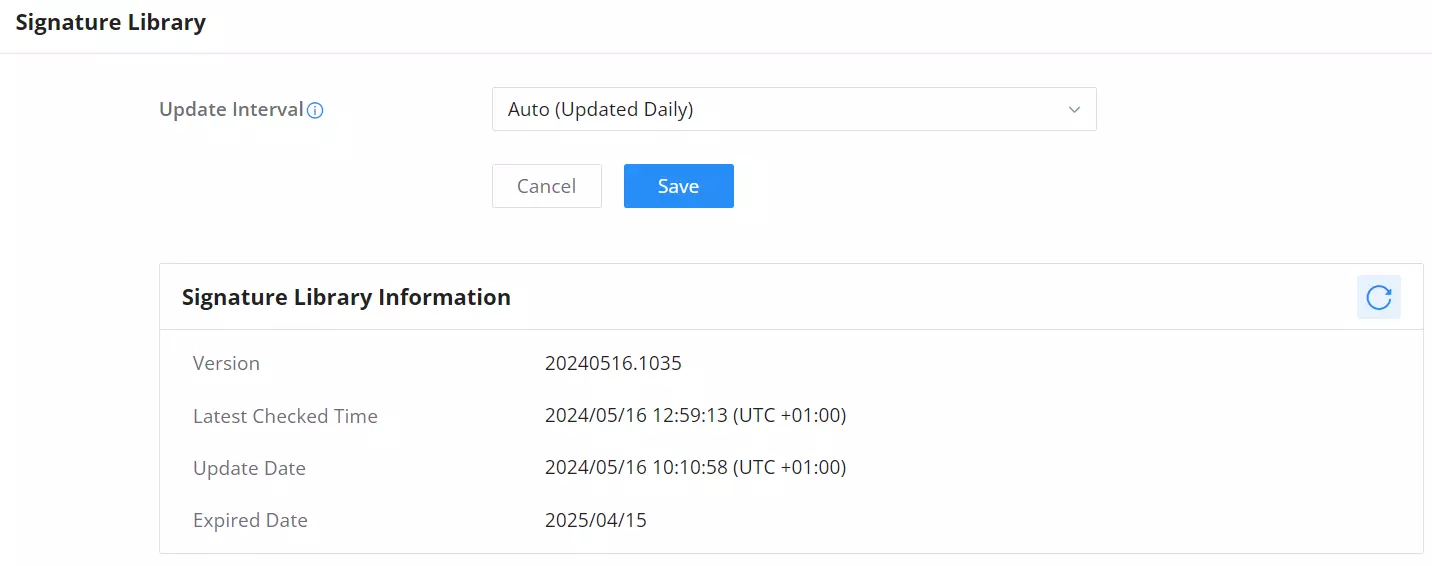
Signature Library – Intrusion Prevention
On this page, the users can update the IDS/IPS and Botnet signature library information manually, update daily or create a schedule, please refer to the figure below:
CONTENT CONTROL
The Content Control feature provides users with the ability to filter (allow or block) traffic based on DNS, URL, keywords, and application.
DNS Filtering
To filter traffic based on DNS, navigate to Firewall module → Content Control → DNS Filtering. Click on the “Add” button to add a new DNS Filtering as shown below:
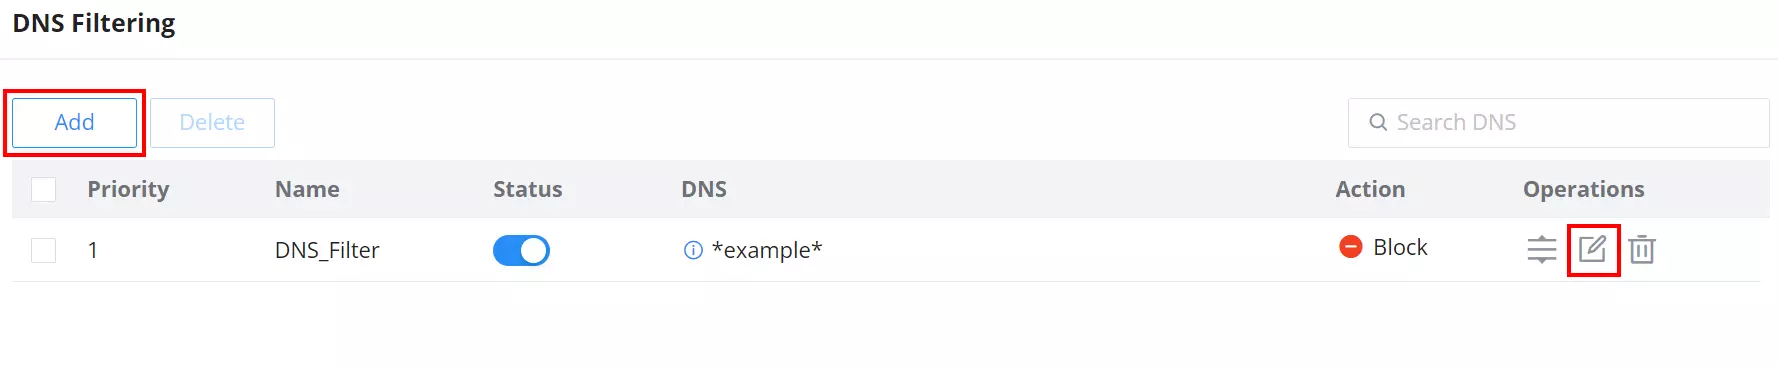
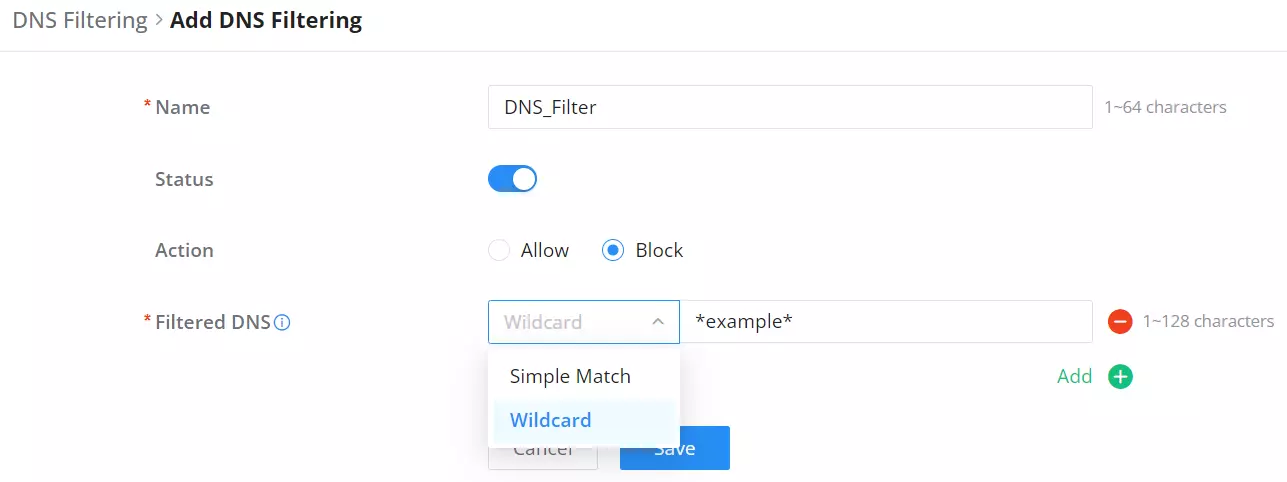
Then, enter the name of the DNS filter, enable the status, and select the action (Allow or Block) as for Filtered DNS, there are two options:
- Simple Match: the domain name supports multi-level domain name matching.
- Wildcard: keywords and wildcard * can be entered, wildcard * can only be added before or after the entered keyword. For example: *.imag, news*, *news*. The * in the middle is treated as a normal character.
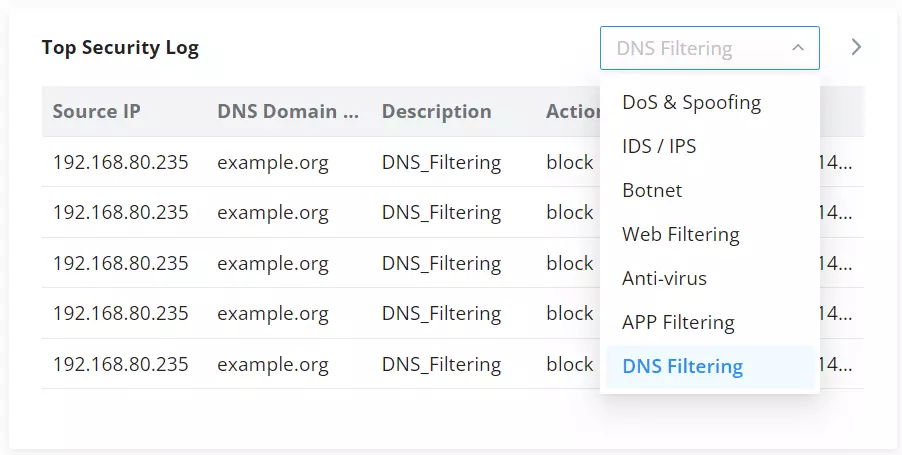
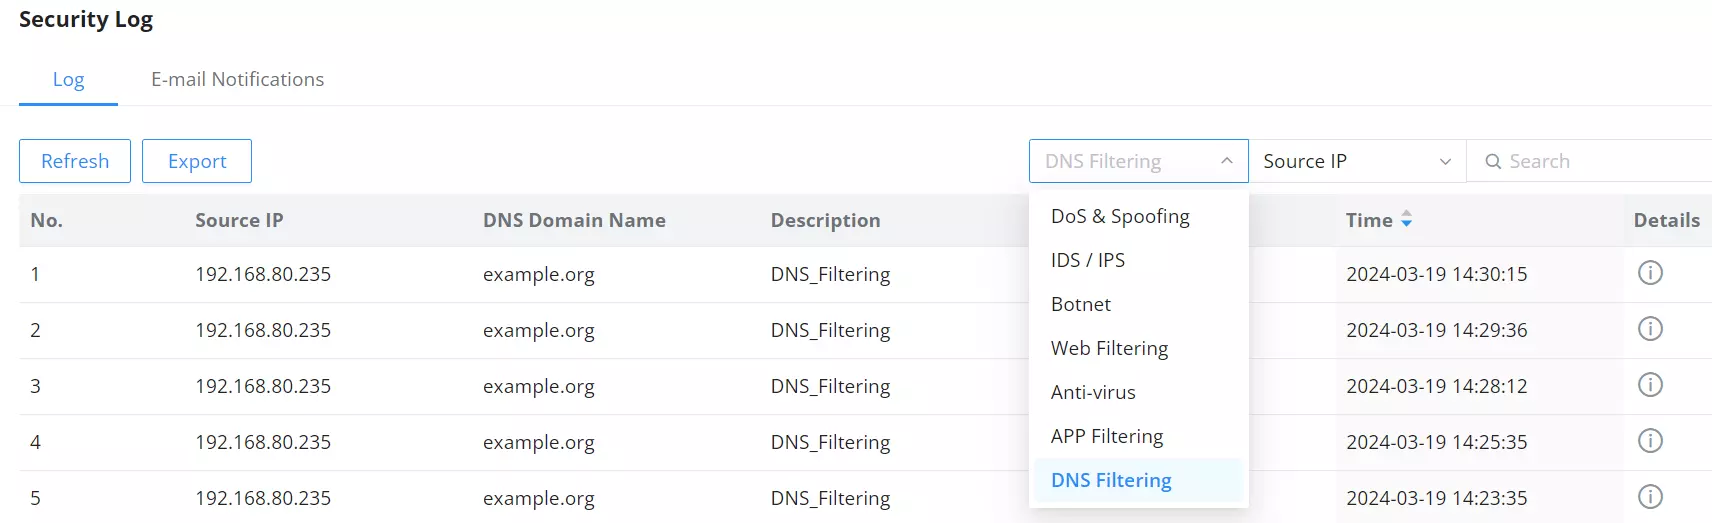
To check the filtered DNS, the users can either find it on the Overview page or under the Security log as shown below:
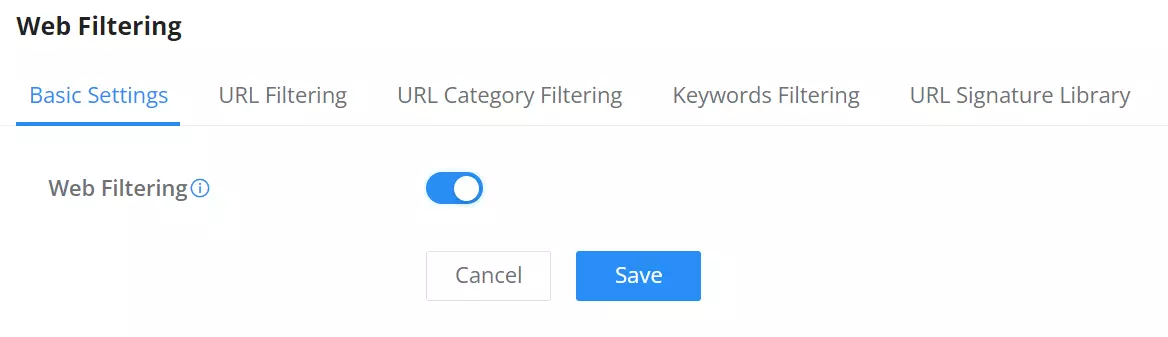
Web Filtering
Basic Settings – Web Filtering
On the page, the users can enable/disable the global web filtering, then the users can enable or disable web URL filtering, URL category filtering and keyword filtering independently and to filter HTTPs URLs, please enable “SSL Proxy“.
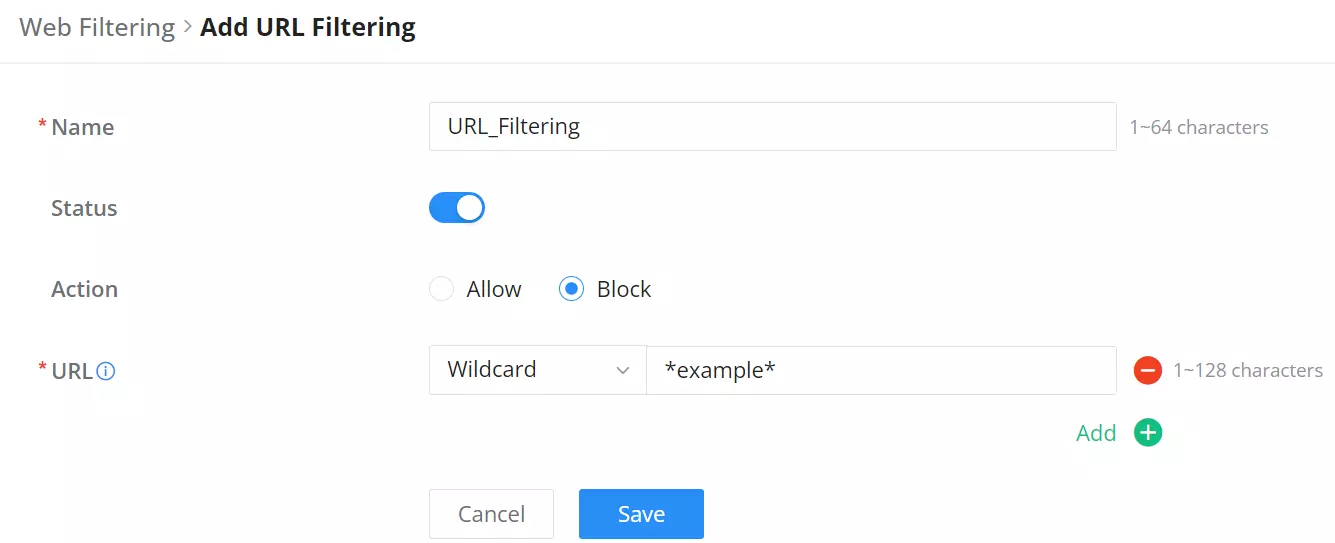
URL Filtering
URL filtering enables users to filter URL addresses using either a Simple match (domain name or IP address) or using a Wildcard (e.g. *example*).
To create a URL filtering, navigate to Firewall Module → Content Filtering → Web Filtering page → URL Filtering tab, then click on the “Add” button as shown below:

Specify a name, then toggle the status ON, select the action (Allow, Block), and finally specify the URL either using a simple domain name, IP address (Simple match), or using a wildcard. Please refer to the figure below:
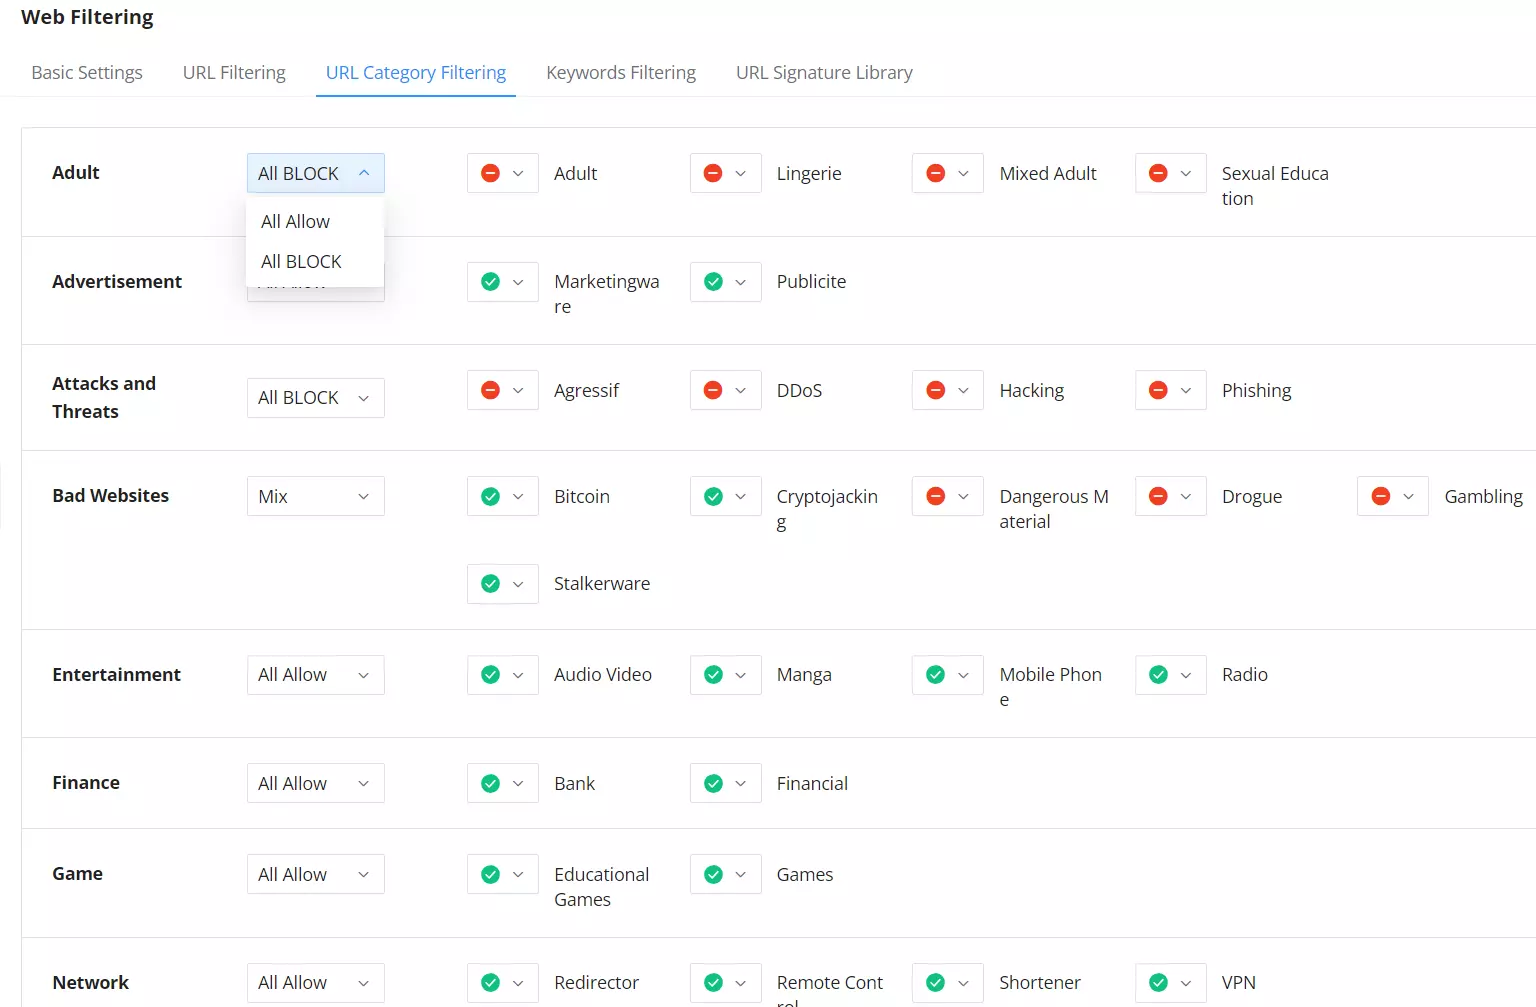
URL Category Filtering
The users also have the option not to only filter by specific domain/IP address or wildcard, but also to filter by categories for example Attacks and Threats, Adult, etc.
To block or allow the whole category, click on the first option on the row and select All Allow or All Block. It’s also possible to block/allow by sub-categories as shown below:
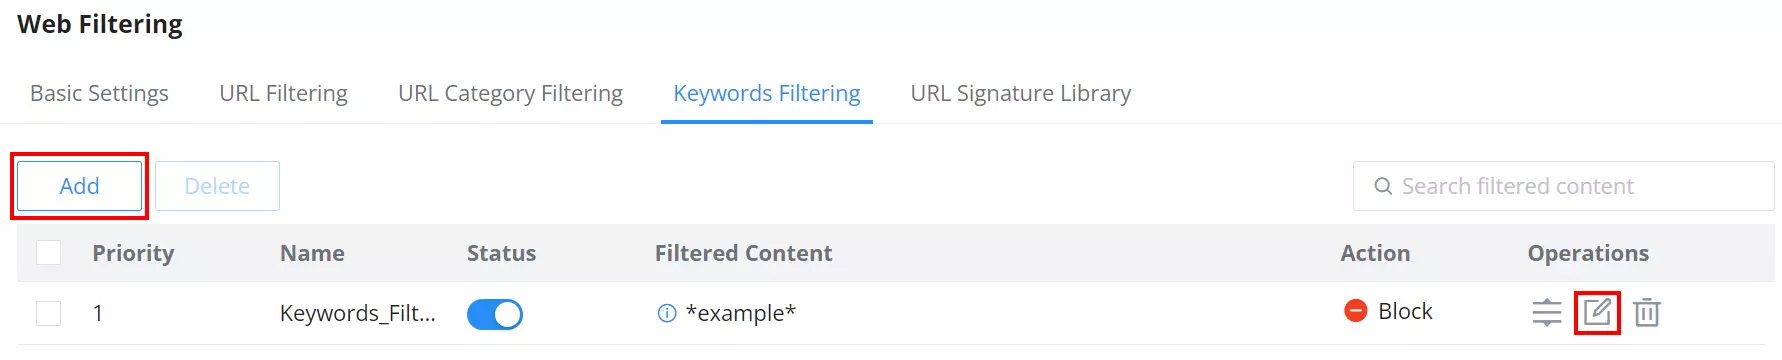
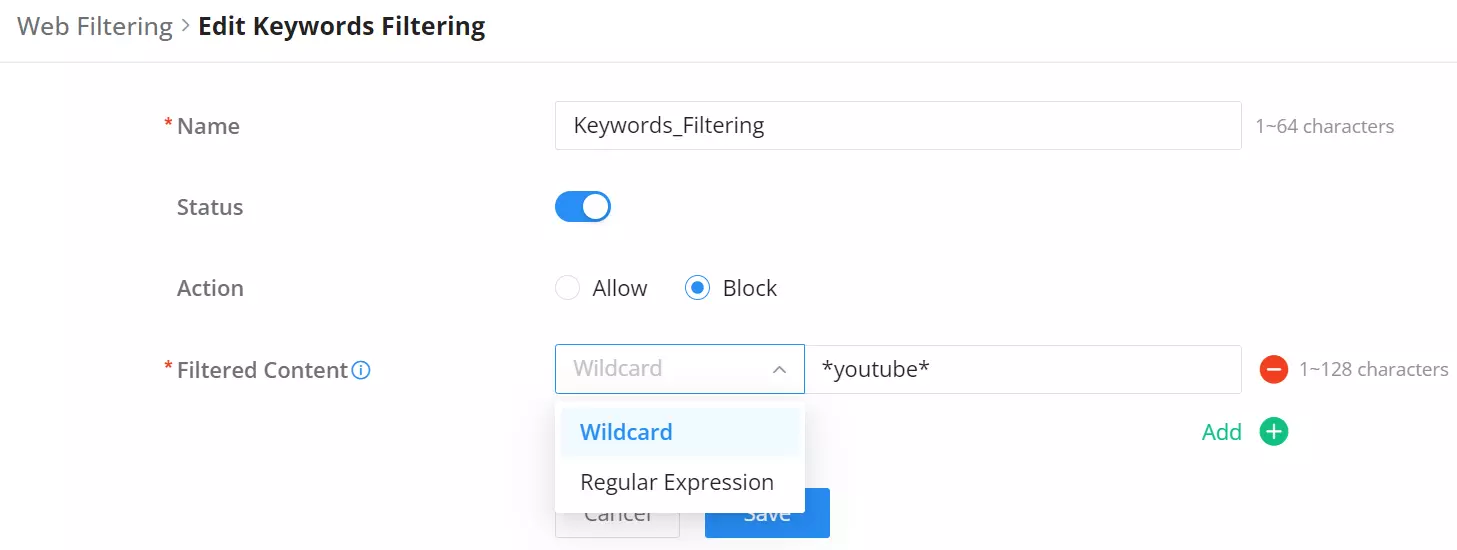
Keywords Filtering
Keyword filtering enables users to filter using either a regular expression or a Wildcard (e.g. *example*).
To create a keywords filtering, navigate to Firewall Module → Content Filtering → Web Filtering page → Keywords Filtering tab, then click on the “Add” button as shown below:
Specify a name, then toggle the status ON, select the action (Allow, Block), and finally specify the filtered content either using a regular expression or a wildcard. Please refer to the figure below:
When the keywords filtering is ON and the action is set to Block. If the users try to access for example “YouTube” on the browser, they will be prompted with a firewall alert as shown below:
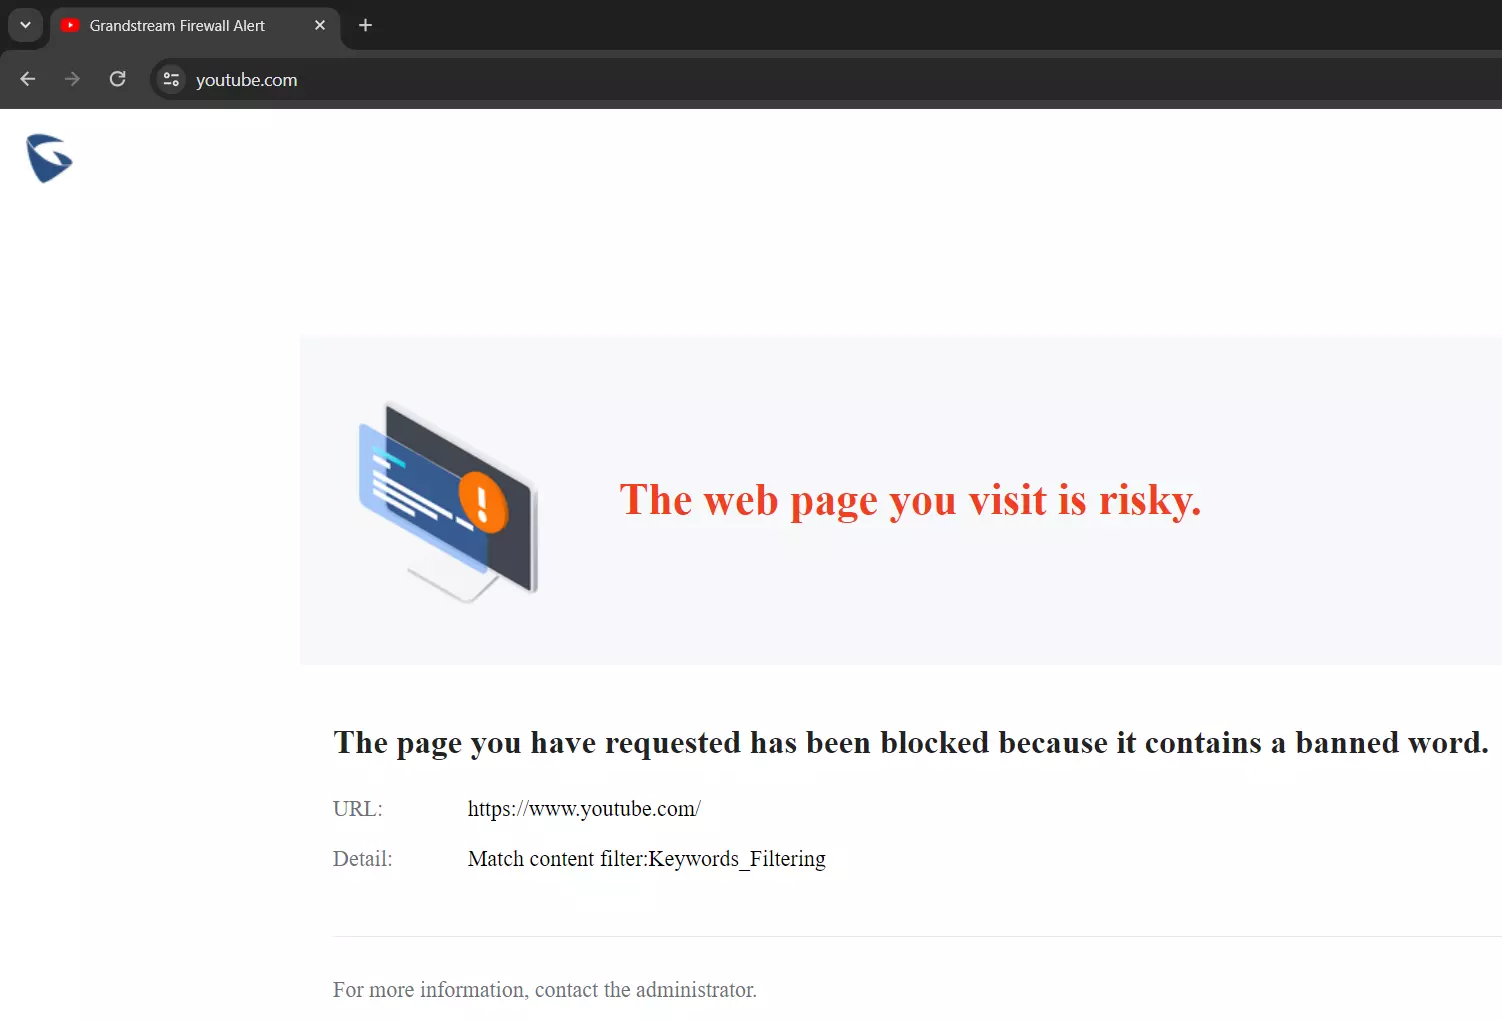
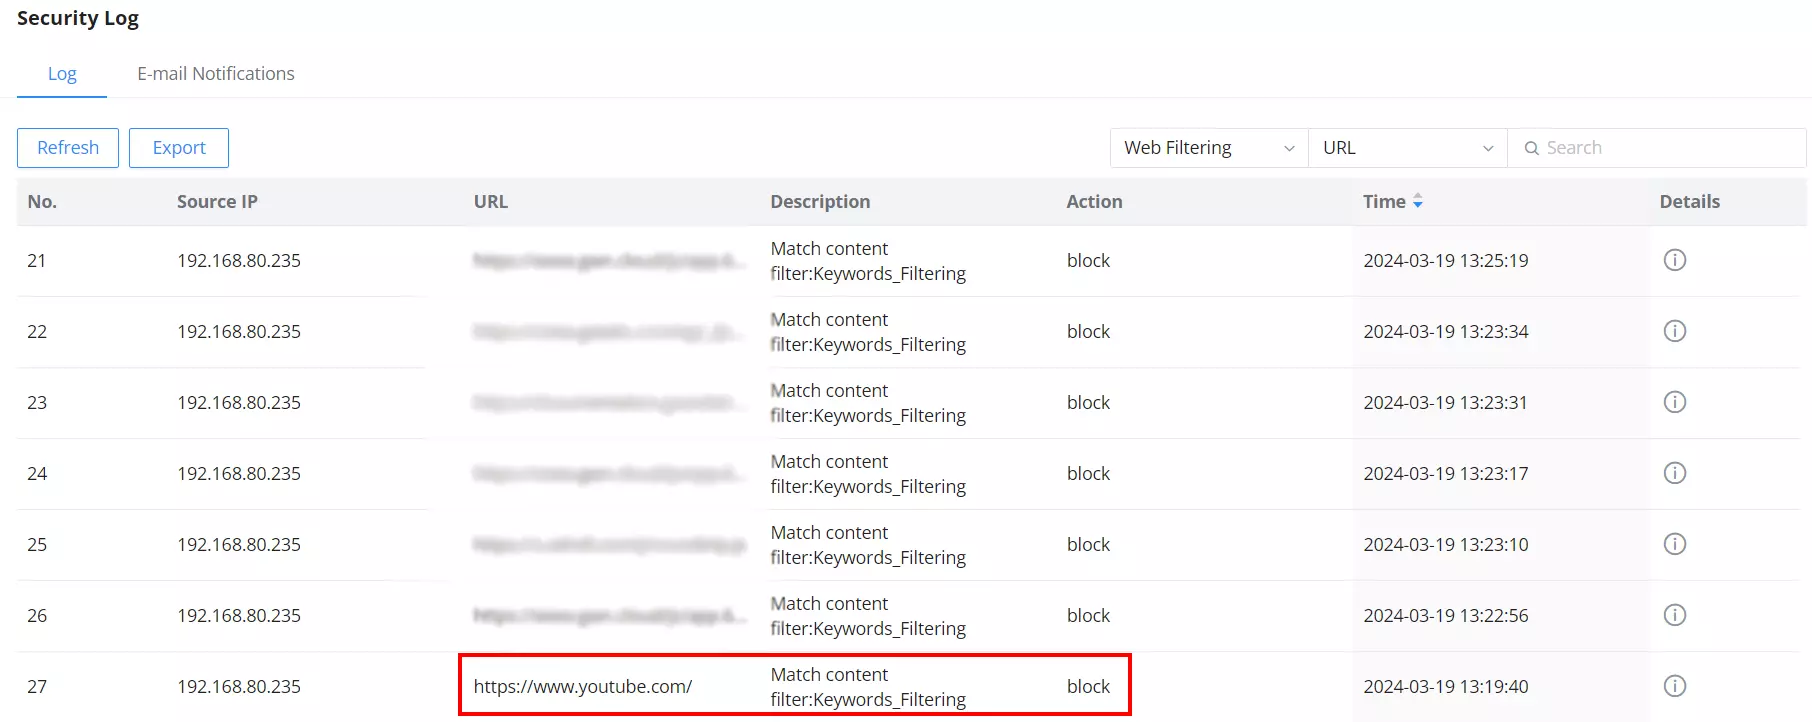
For more details about the alert, the users can navigate to the Firewall module → Security Log.
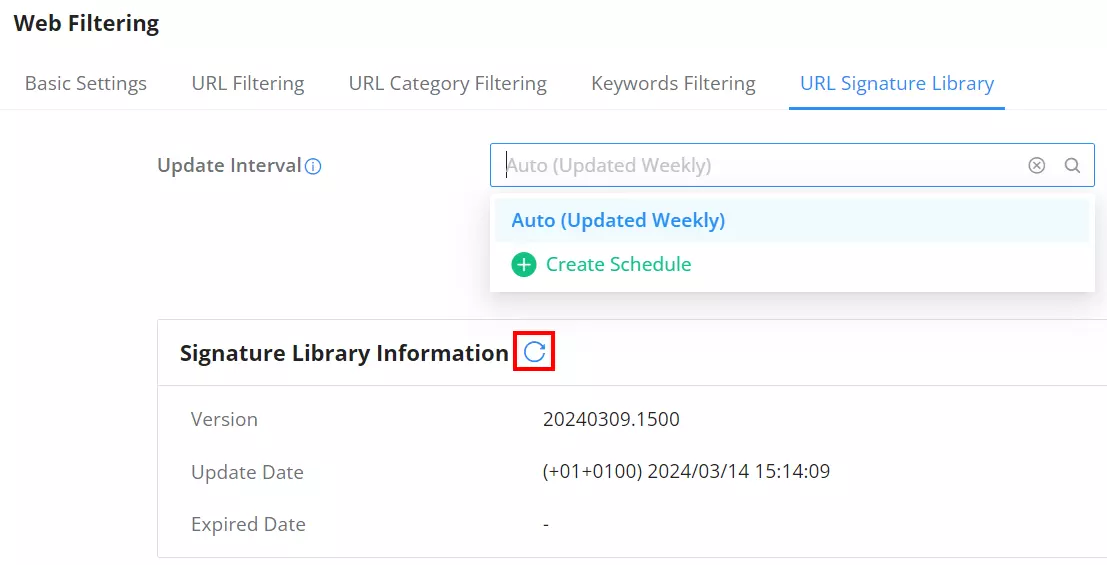
URL Signature Library
On this page, the users can update the Web Filtering signature library information manually, update daily, or create a schedule, please refer to the figure below:
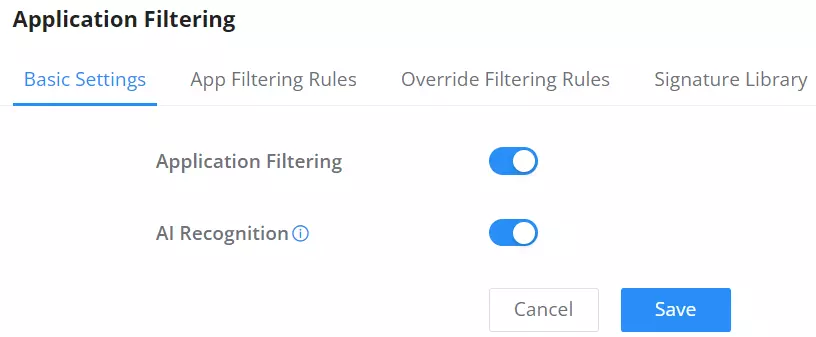
Application Filtering
Basic Settings – Application Filtering
On the page, the users can enable/disable the global application filtering, then the users can enable or disable by app categories.
Navigate to Firewall module → Content Control → Application Filtering, and on the basic settings tab, enable Application Filtering globally, it’s also possible to enable AI Recognition for better classification.
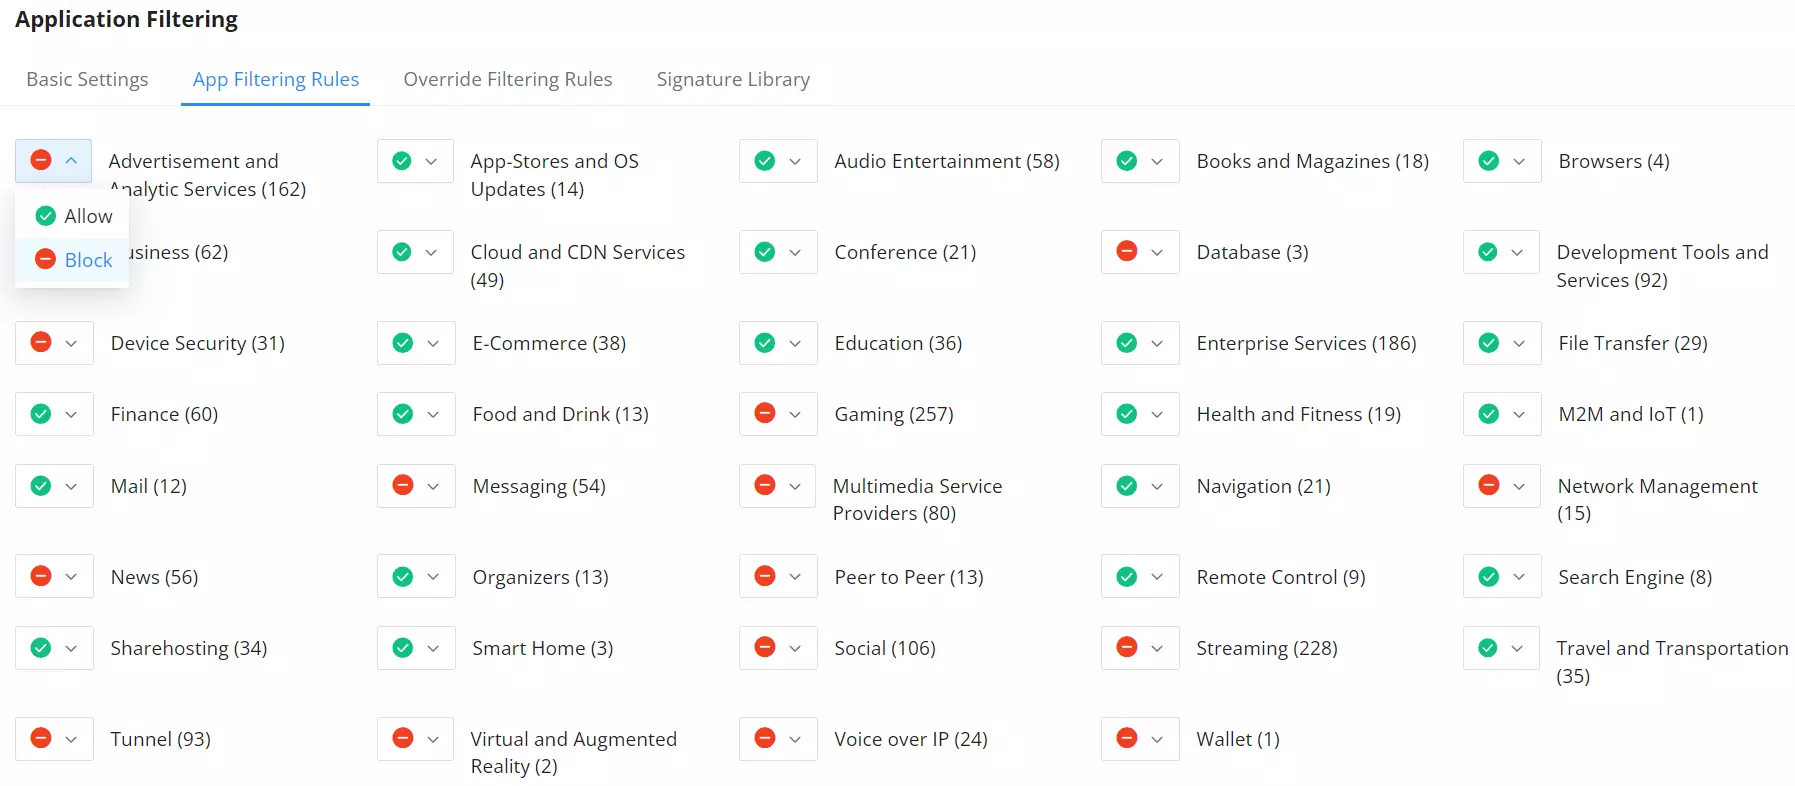
App Filtering Rules
On the App Filtering Rules tab, the users can Allow/Block by app category as shown below:
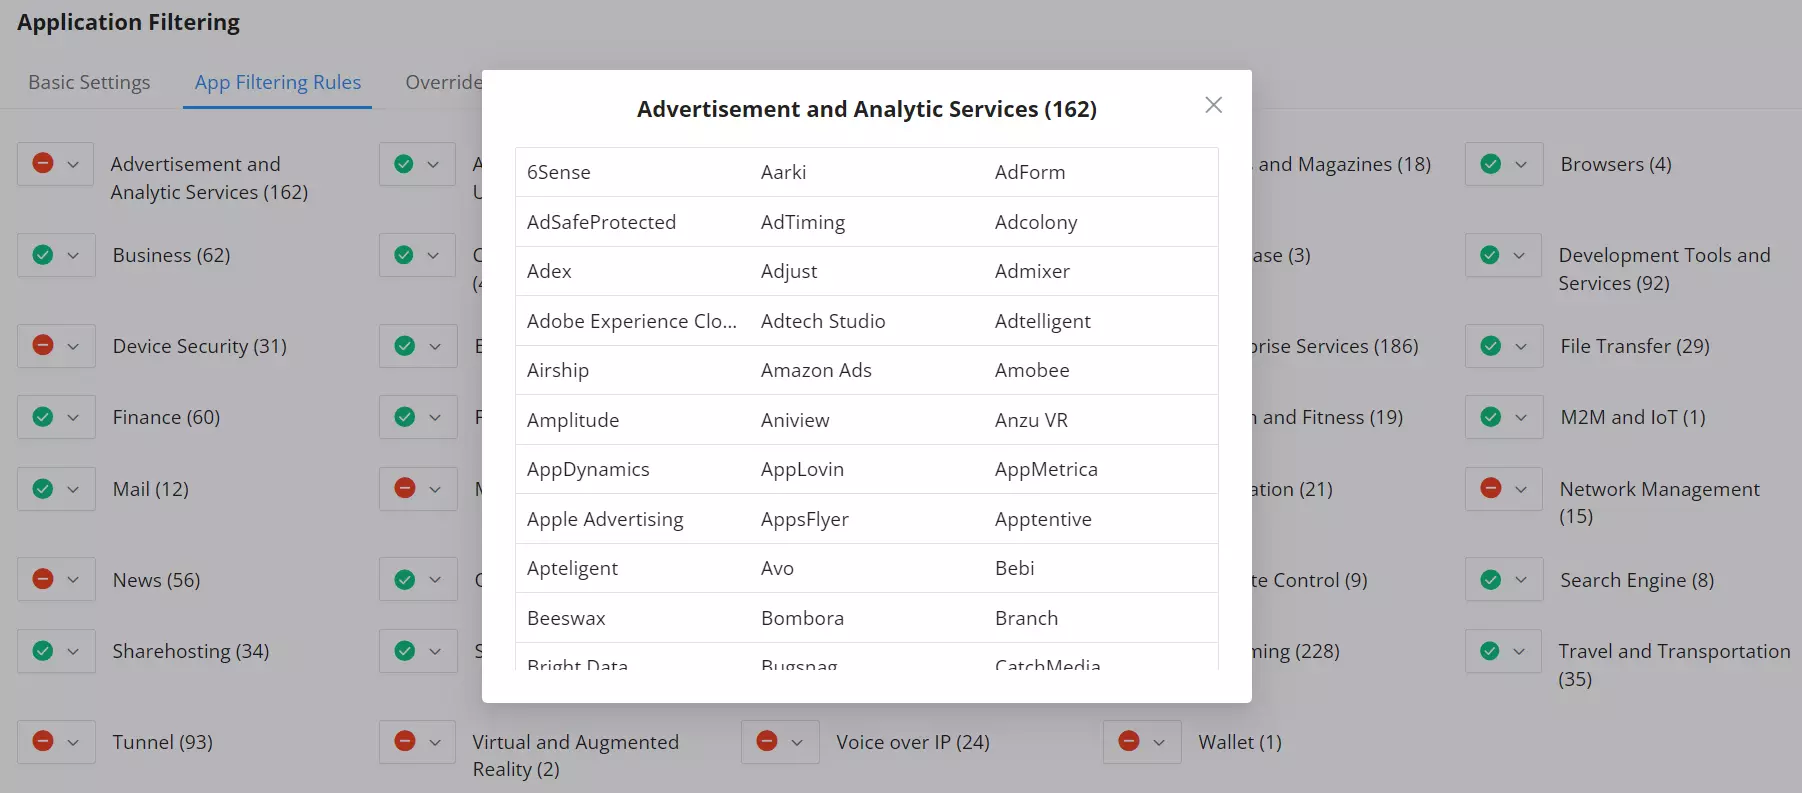
To view what the app category includes, click on the text and a list of apps will be displayed. Refer to the figure below:
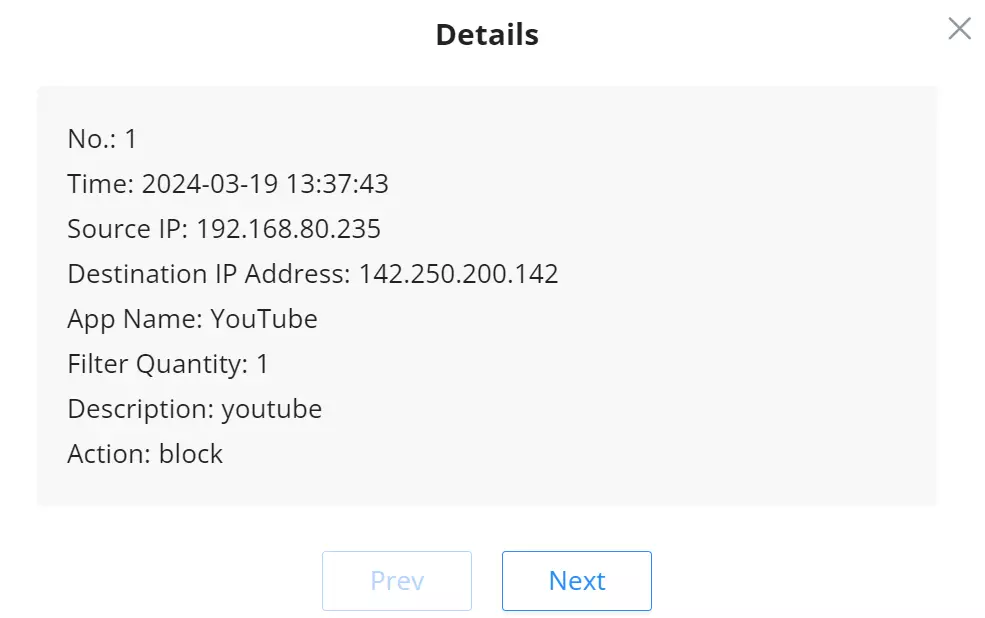
An example of application filtering is used on the app “YouTube” and the action set to “Block”, this information will be displayed under the Security Log.
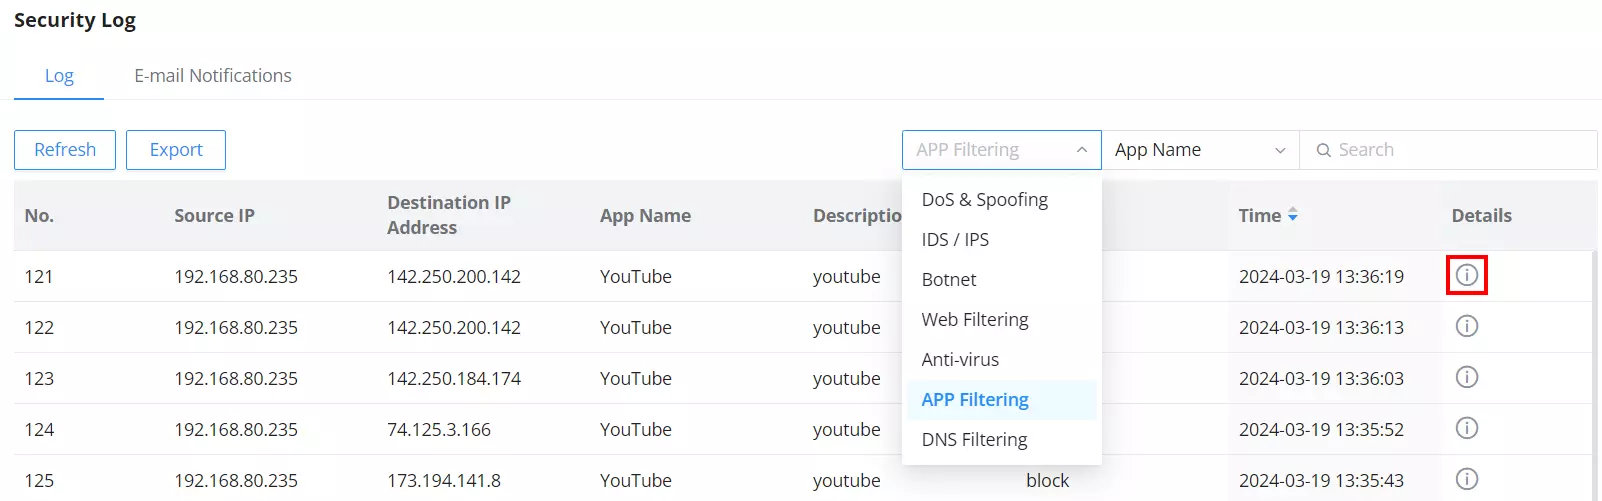
For more details, click on the exclamation icon as shown above:
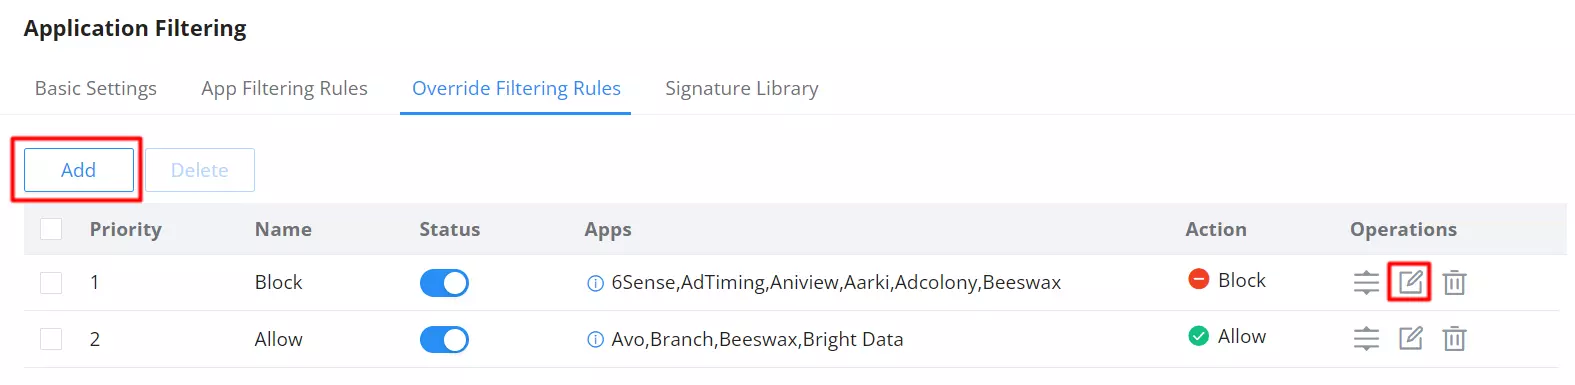
Override Filtering Rules
If an app category is selected, the users will still have the option to override the general rule (app category) with the override filtering rules feature.
For example, if the Browsers app category is set to Block, then we can add an override filtering rule to allow Opera Mini, this way the whole browser app category is blocked except Opera Mini.
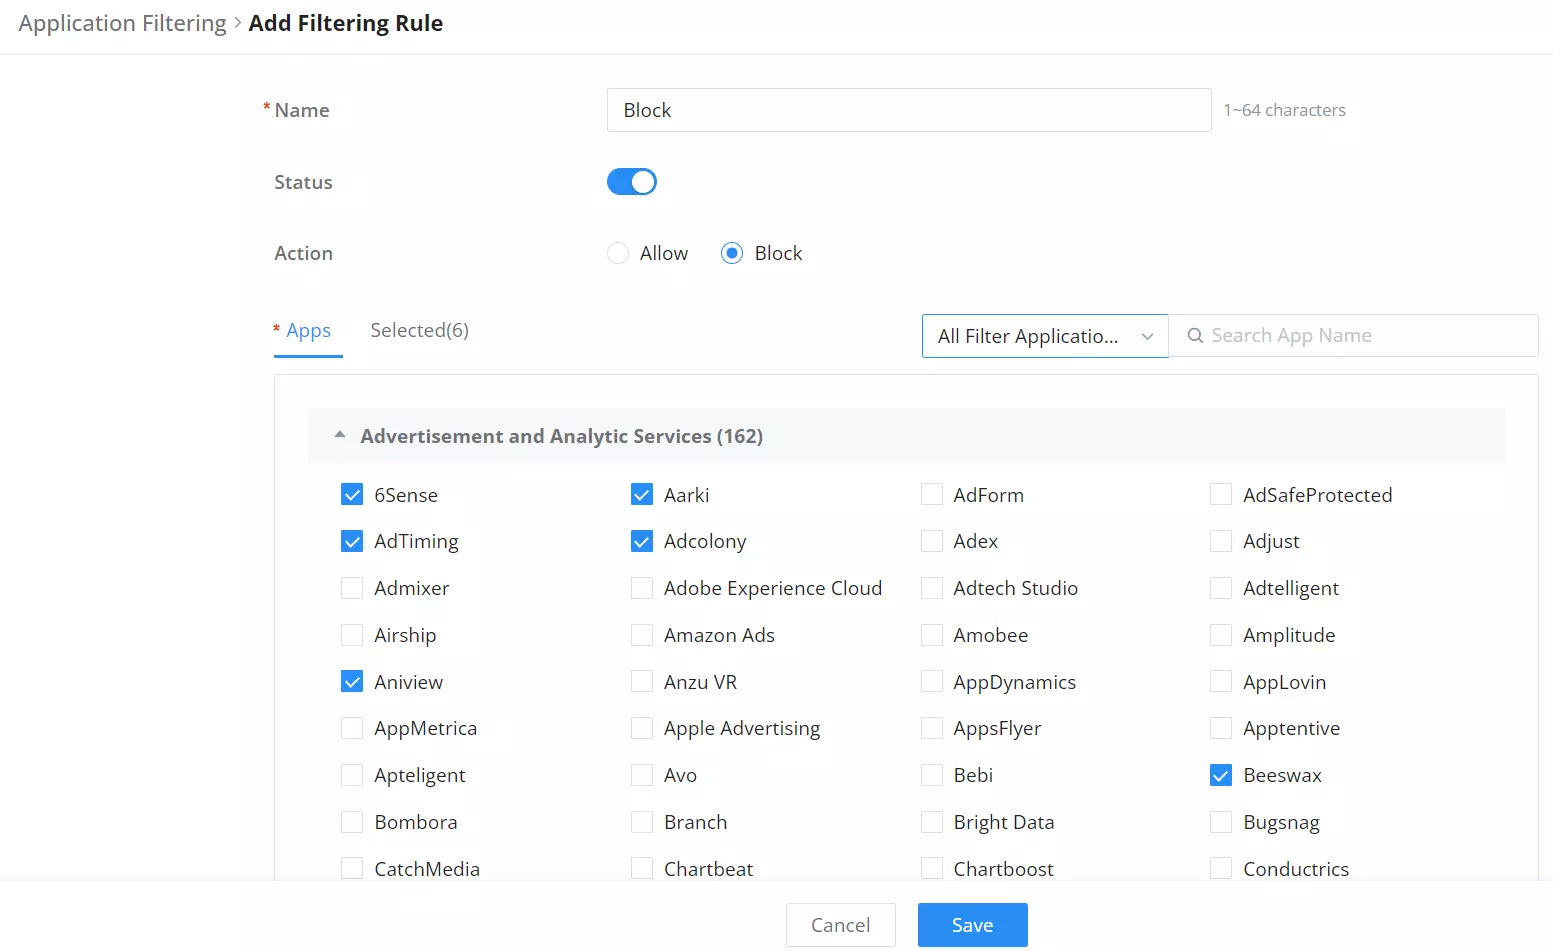
To create an override Filtering rule, click on the “Add” button as shown below:
Then, specify a name and toggle the status ON, set the action to Allow or Block and finally select from the list the apps that will be allowed or blocked. Please refer to the figure below:
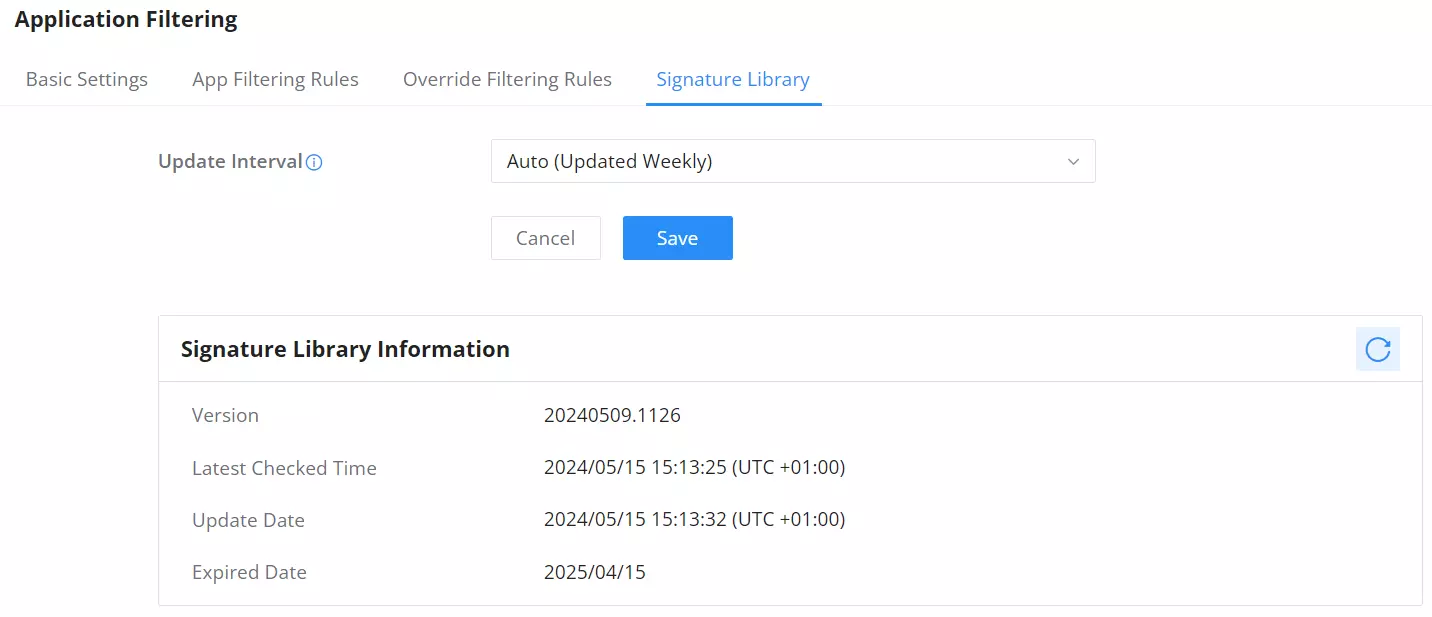
Signature Library – Application Filtering
On this page, the users can update the Application Filtering signature library information manually, update weekly or create a schedule, please refer to the figure below:
SSL PROXY
An SSL proxy is a server that uses SSL encryption to secure data transfer between a client and a server. It operates transparently, encrypting and decrypting data without being detected. Primarily, it ensures the safe delivery of sensitive information over the internet.
When the SSL Proxy is enabled, the GCC601x(w) will act as an SSL Proxy server for the connected clients.
Basic Settings – SSL Proxy
Turning on features like SSL Proxy, Web Filtering, or Anti-malware helps detect certain types of attacks on websites, such as SQL injection and cross-site scripting (XSS) attacks. These attacks try to harm or steal information from websites.
When these features are active, they generate alert logs under Security Log.
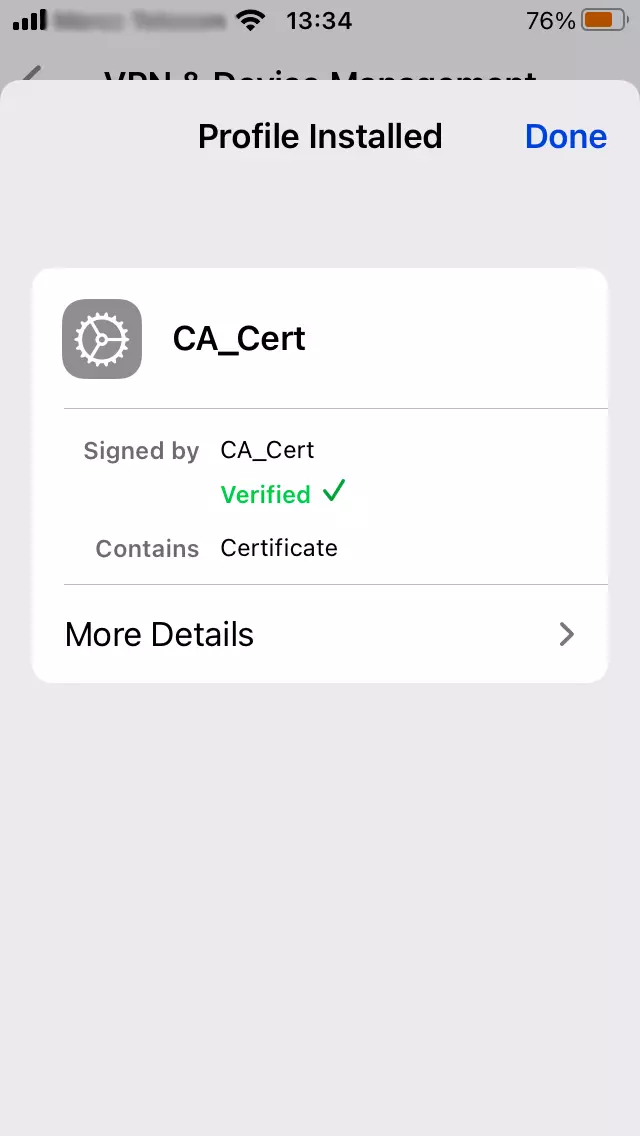
However, when these features are turned on, users might see warnings about certificates when they browse the web. This happens because the browser doesn’t recognize the certificate being used. To avoid these warnings, users can install the certificate in their browser. If the certificate isn’t trusted, some applications might not work correctly when accessing the internet
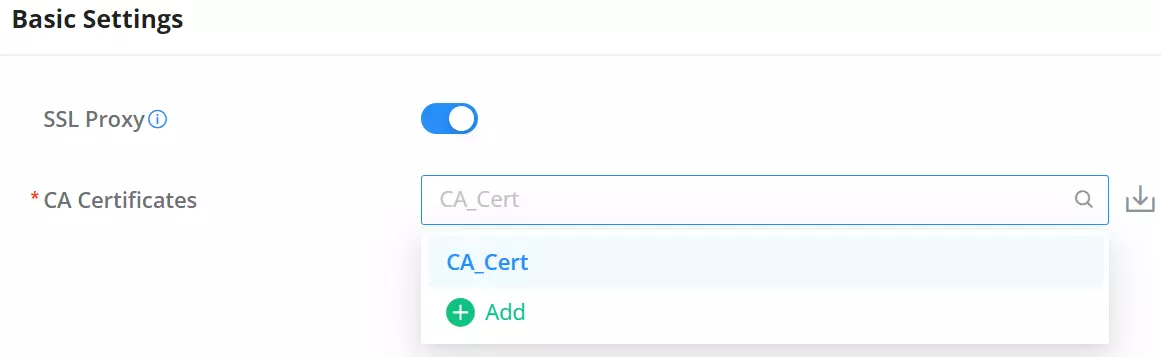
For HTTPS filtering, users can enable SSL proxy by navigating to Firewall module → SSL Proxy → Basic Settings, then toggle ON SSL proxy, after either selecting the CA Certificate from the drop-down list or clicking on the “Add” button to create a new CA certificate. Please refer to the figures and table below:
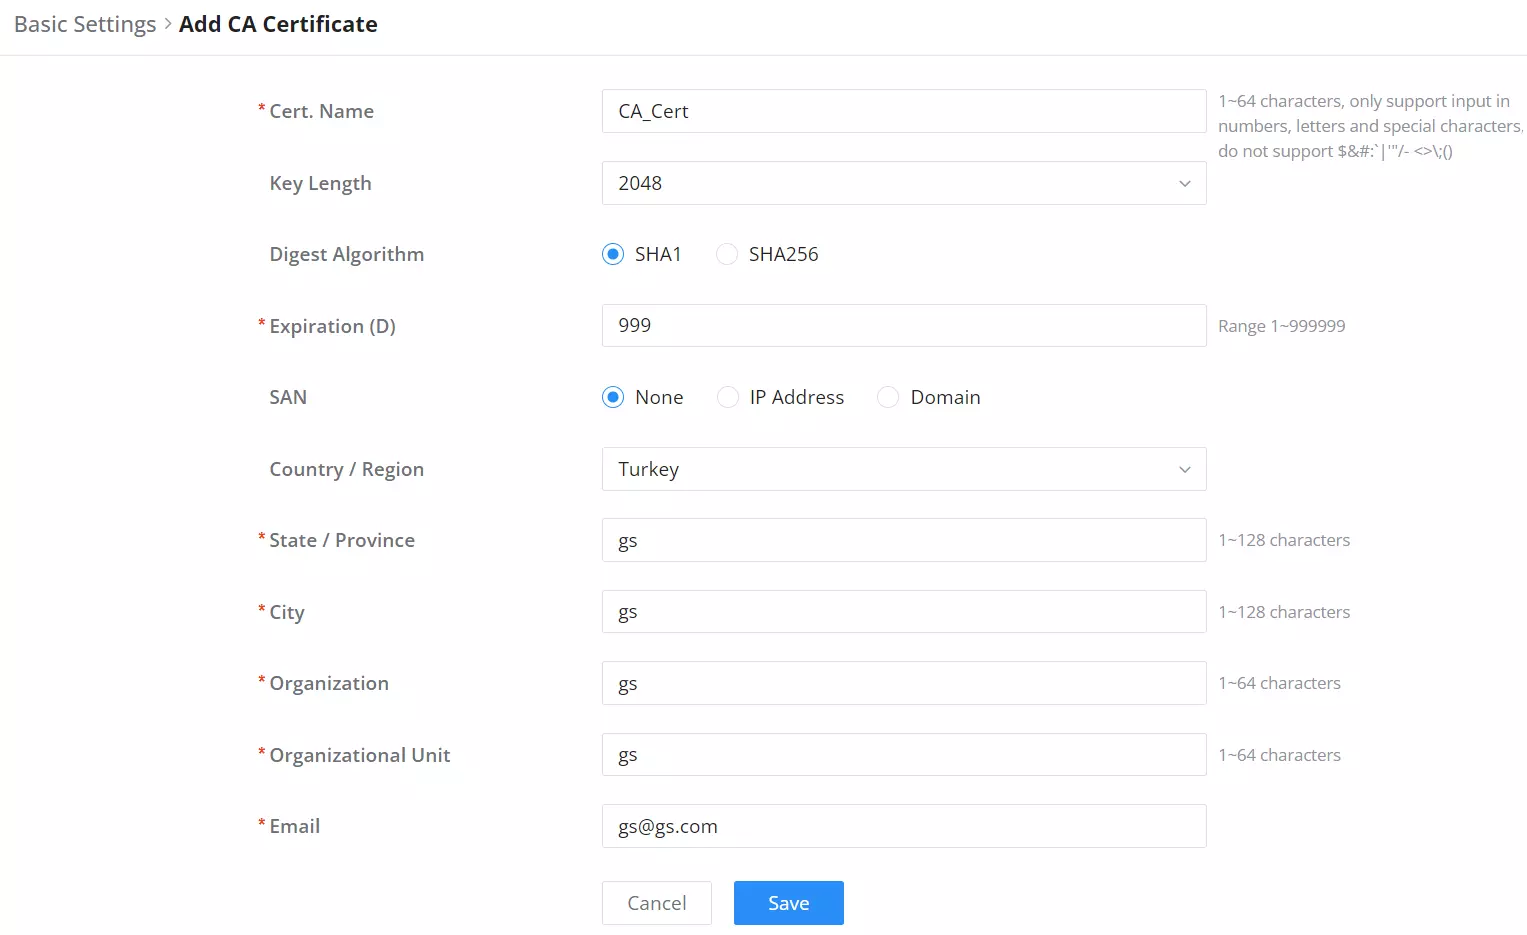
Cert. Name | Enter the Certificate name for the CA. Note: It could be any name to identify this certificate. Example: “CATest”. |
Key Length | Choose the key length for generating the CA certificate. The following values are available:
|
Digest Algorithm | Choose the digest algorithm:
Note: Hash is a one-way function, it cannot be decrypted back. |
Expiration (D) | Enter the validity date for the CA certificate in days. The valid range is 1~999999.. |
SAN | Enter the address IP or the domain name of the SAN (Subject Alternate Name). |
Country / Region | Select a country code from the dropdown list. Example: “United Stated of America”. |
State / Province | Enter a state name or province. Example: “Casablanca”. |
City | Enter a city name. Example: “SanBern”. |
Organization | Enter the organization’s name. Example: “GS”. |
Organizational Unit | This field is the name of the department or organization unit making the request. Example: “GS Sales”. |
Enter an email address. Example: “EMEAregion@grandstream.com” |
SSL Proxy – Add CA Certificate
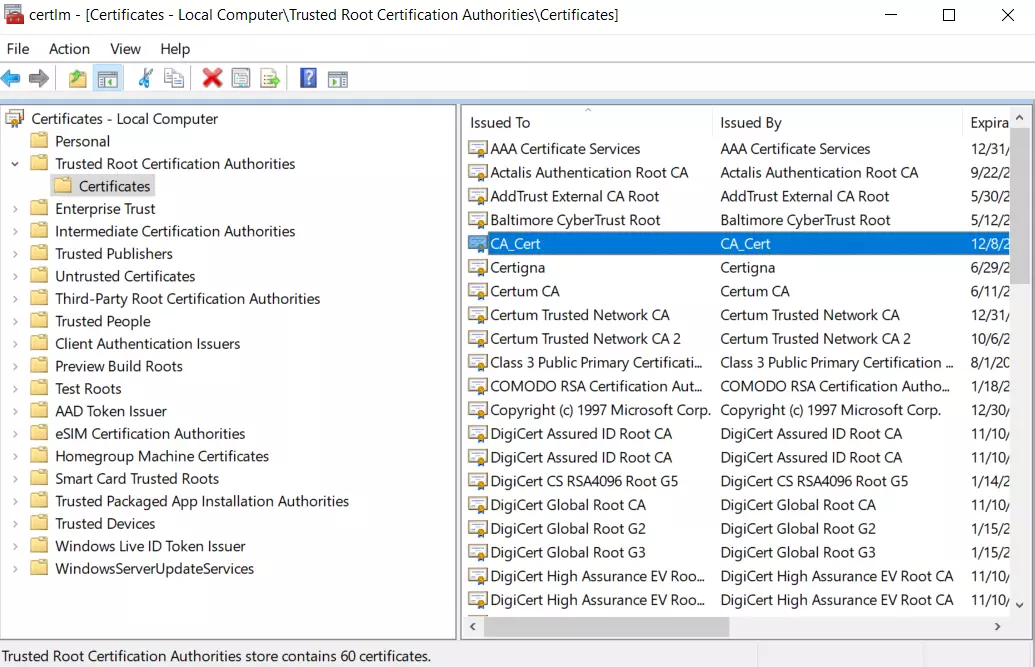
For the SSL Proxy to take effect, users can manually download the CA certificate by clicking on the download icon as shown below:
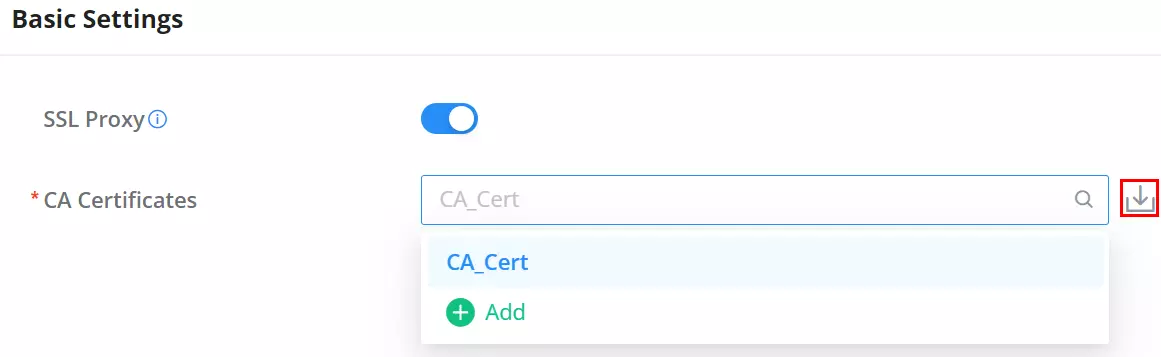
Then, the CA certificate can be added to the intended devices under the trusted certificates.
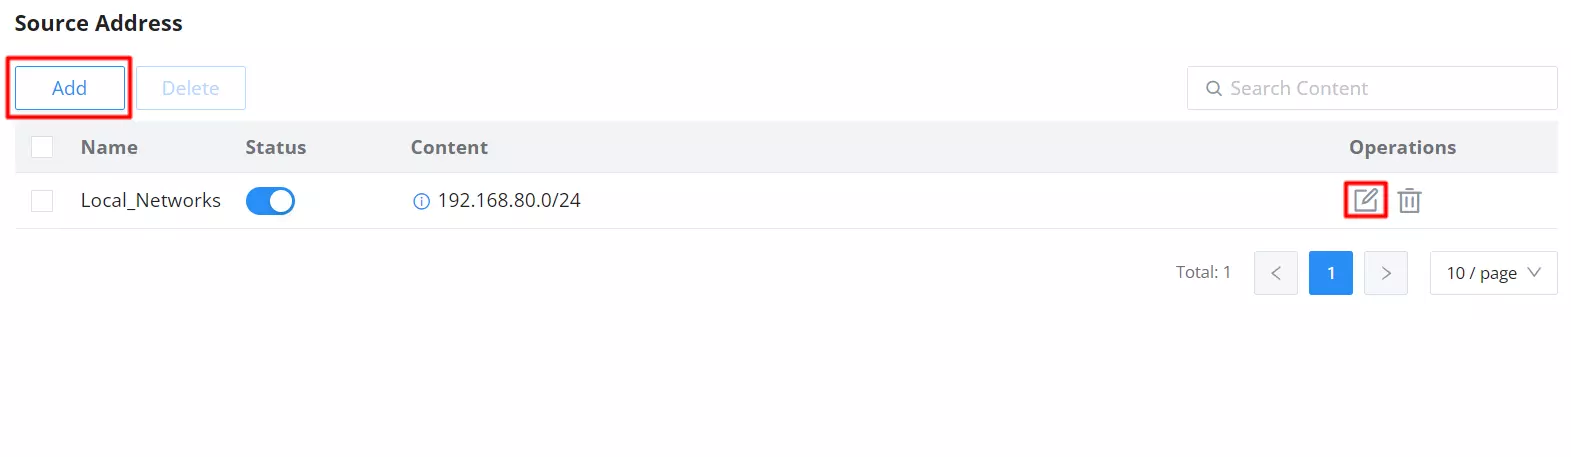
Source Address
When no source addresses are specified, all outgoing connections are automatically routed through the SSL proxy. However, upon manually adding new source addresses, only those specifically included will be proxied through SSL, ensuring selective encryption based on user-defined criteria.
SSL Proxy Exemption List
SSL proxy involves intercepting and inspecting SSL/TLS encrypted traffic between a client and a server, which is commonly done for security and monitoring purposes within corporate networks. However, there are certain scenarios where SSL proxy may not be desirable or practical for specific websites or domains.
The exemption list allows users to specify their IP address, domain, IP range, and web category to be exempted from SSL proxy.
Click on the “Add” button to add an SSL exemption as shown below:

Under the “Content” option, the users can add content by clicking on the “+ icon” button and delete by clicking on the “– icon” as shown below:

SECURITY LOG
Log
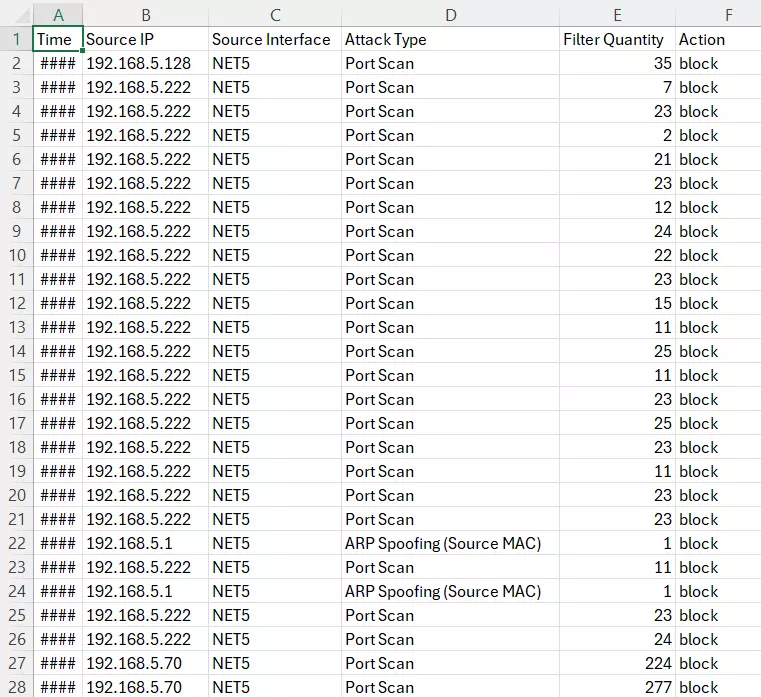
On this page, security logs will listed with many details such as Source IP, Source interface, Attack Type, Action, and Time. Click on the “Refresh” button to refresh the list and the “Export” button to download the list to the local machine.
The users have also the option to filter the logs by:
- Time
- Attack
Sort log entries by:
- Source IP
- Source Interface
- Attack Type
- Action
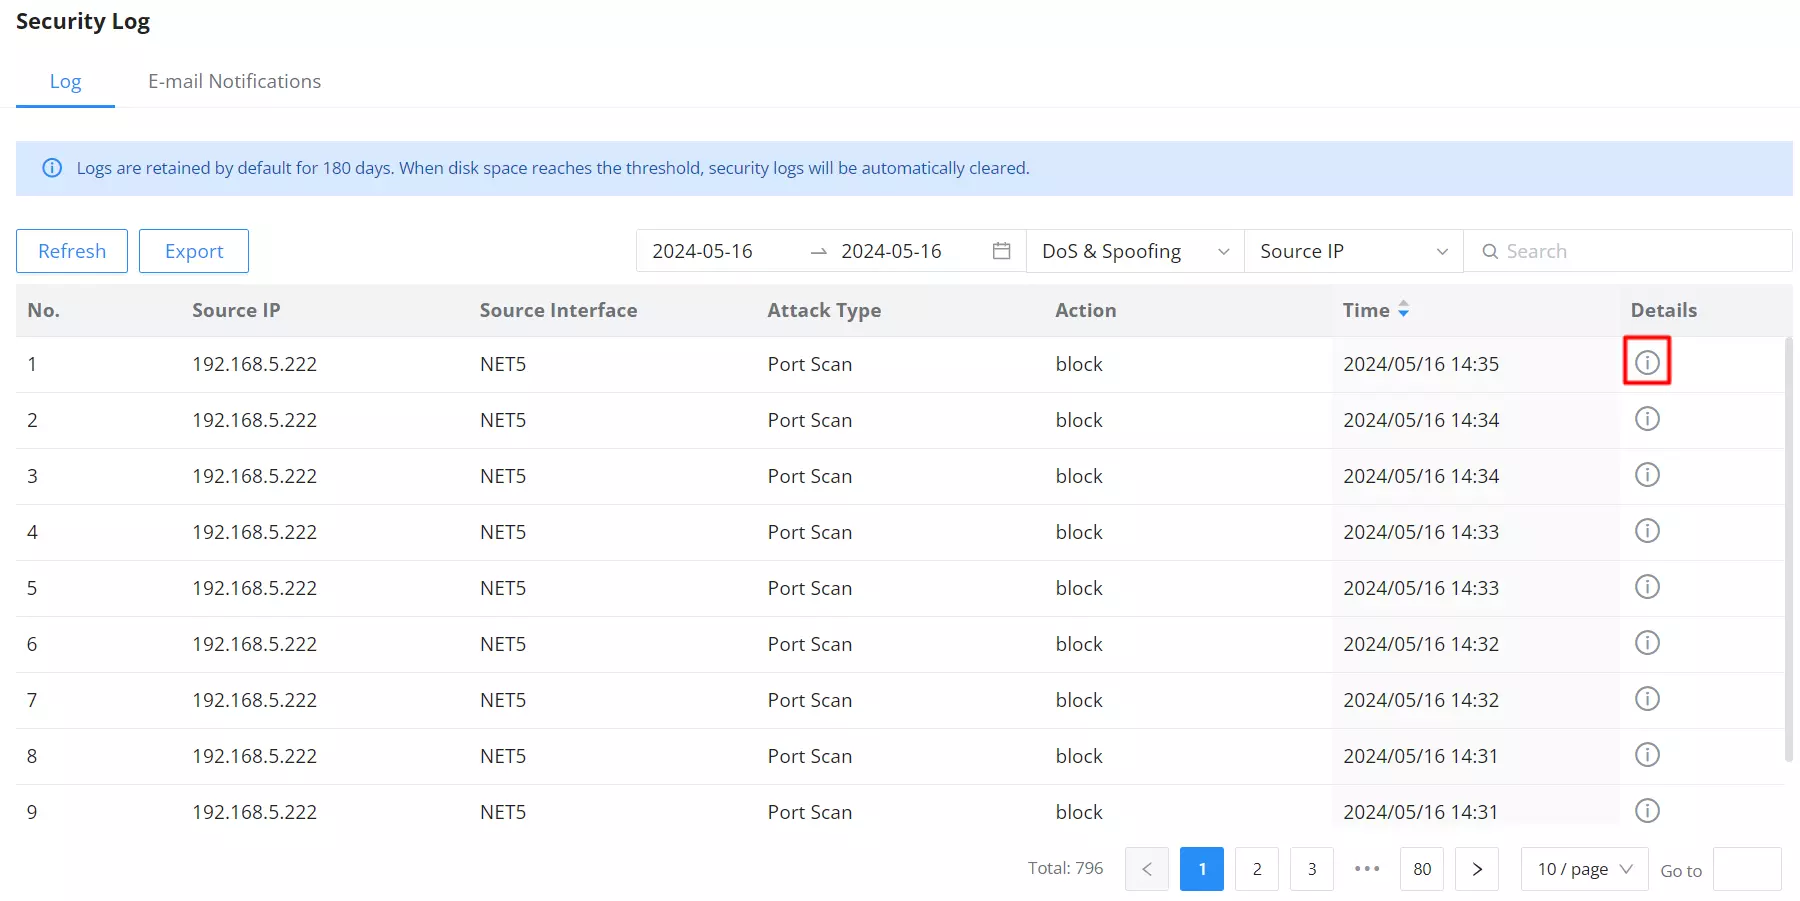
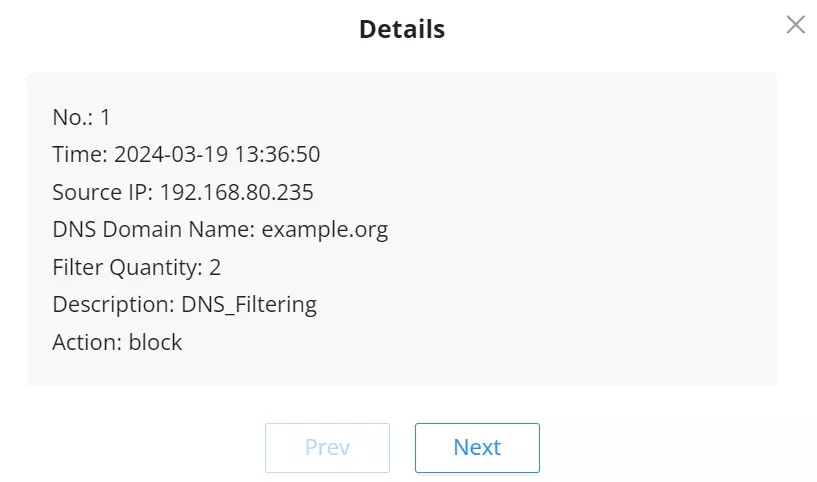
For more details, click on the “exclamation icon” under the Details column as shown above:
When the users click on “Export” button, an Excel file will be downloaded to their local machine. Please refer to the figure below:
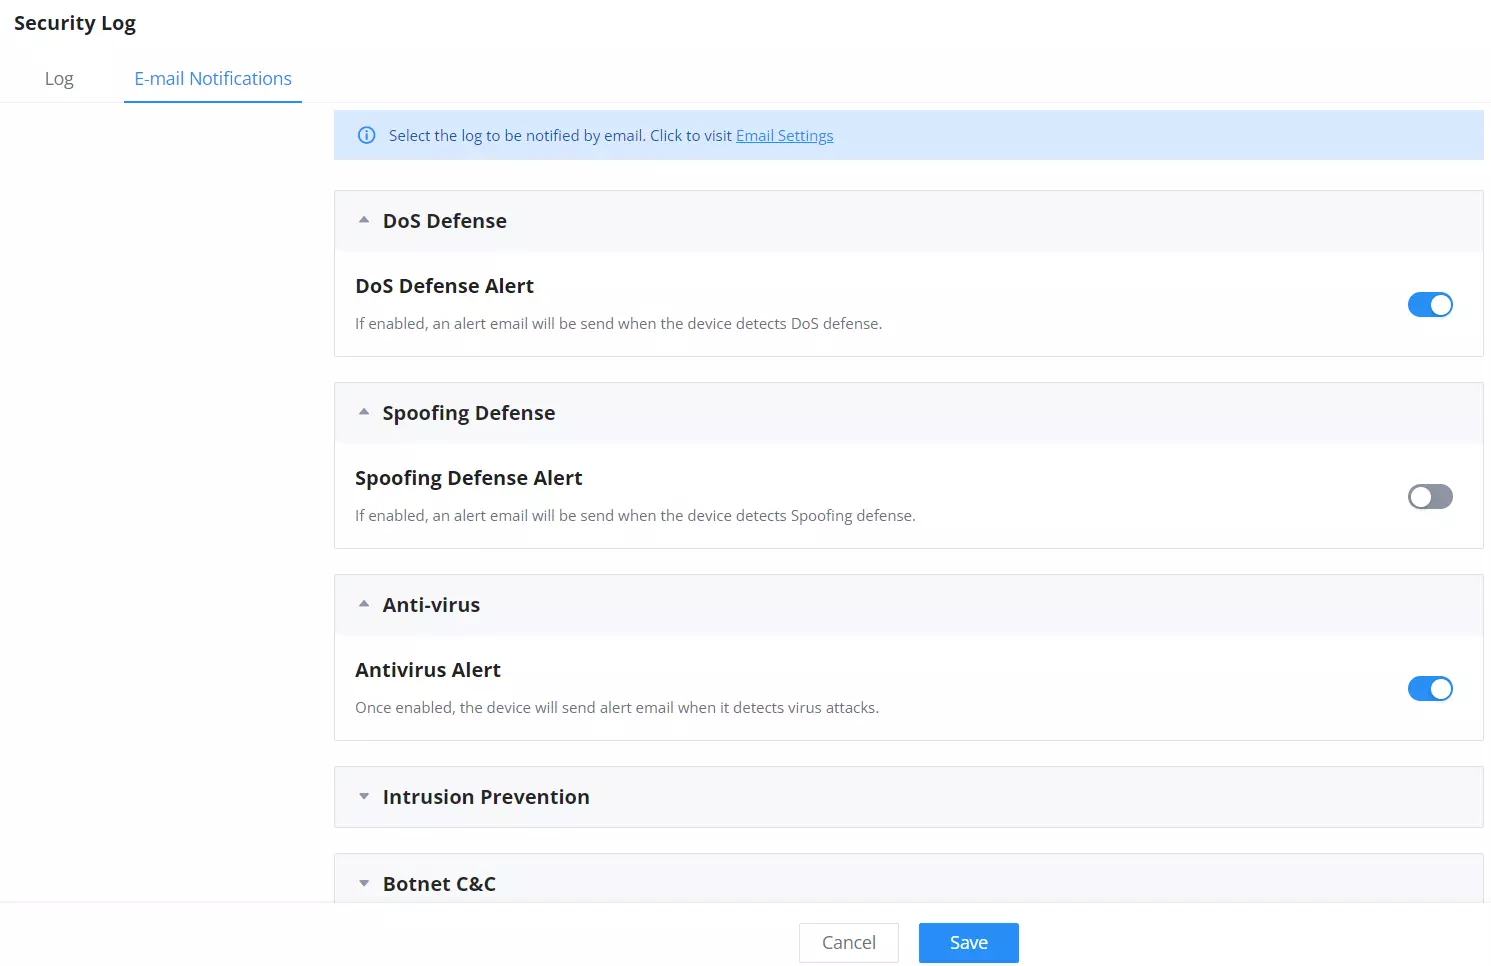
E-mail Notifications
On the page, the users can select what security threats to be notified of using E-mail addresses.
Select what you want to be notified about from the list.