


OVERVIEW
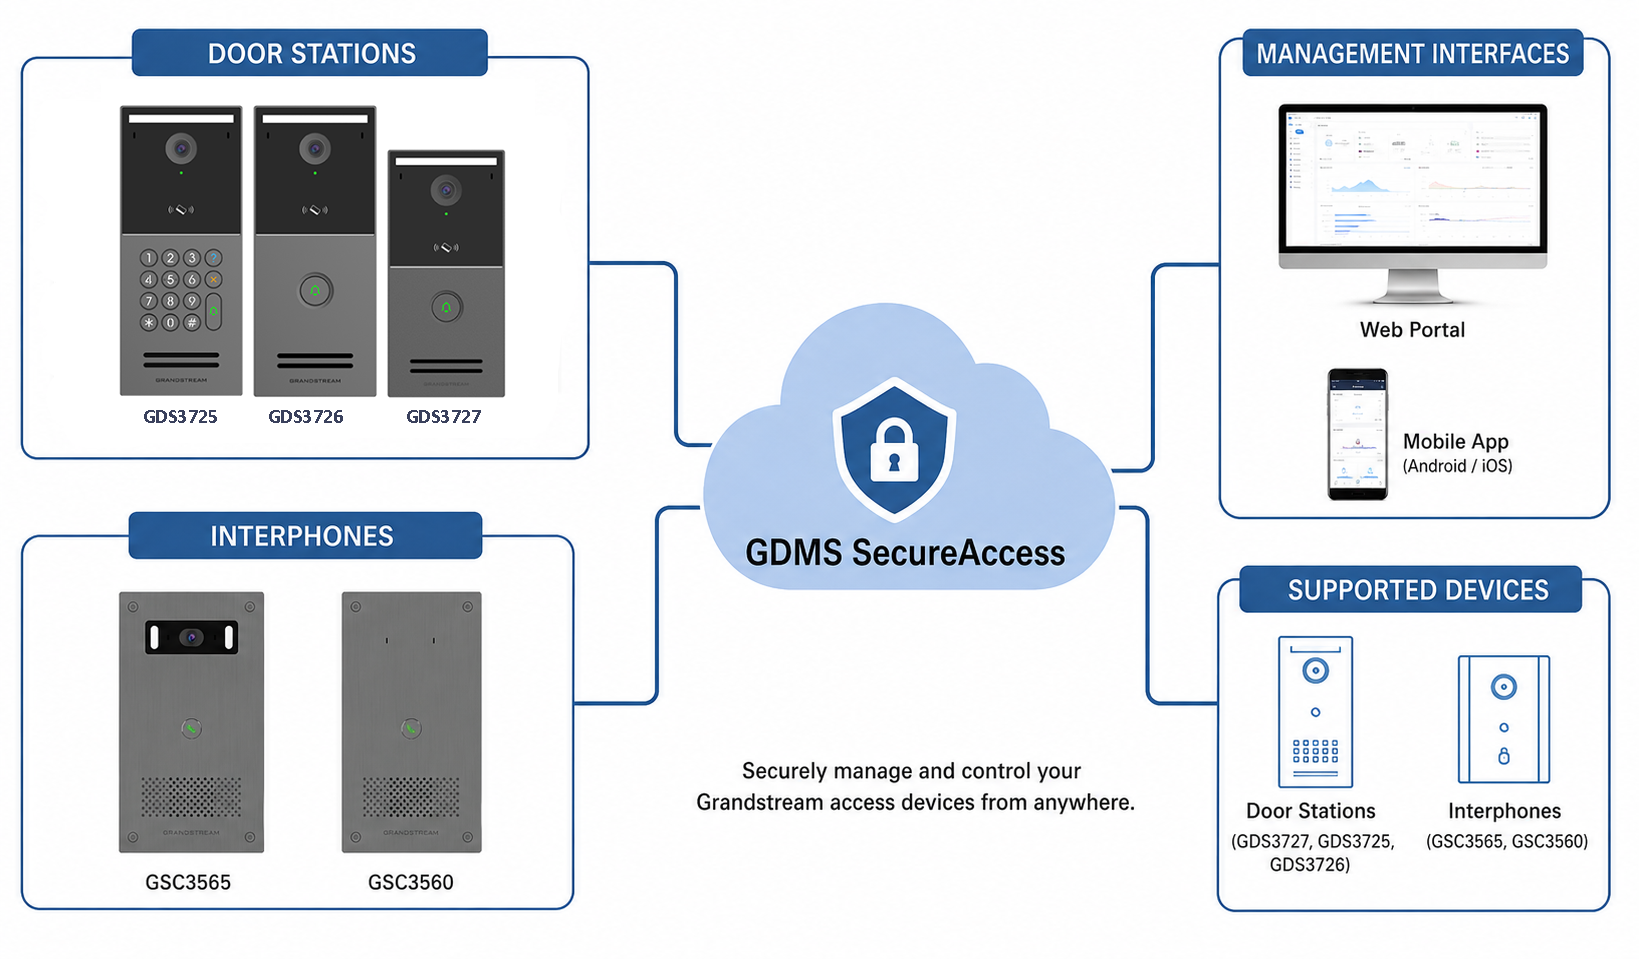
GDMS SecureAccess is a centralized cloud-based access management solution designed to simplify the deployment, monitoring, and administration of door stations and access control systems across multiple sites and organizations. Built for enterprises, residential communities, schools, offices, and commercial facilities, it enables administrators to remotely manage users, visitors, devices, and access permissions from a unified platform.
The platform provides fine-grained access control, allowing organizations to define and manage access rights with precision based on users, schedules, locations, or groups. Through its centralized management capabilities, administrators can efficiently oversee distributed deployments from a single interface, reducing operational complexity and improving scalability.
GDMS SecureAccess also includes monitoring and replay features, enabling real-time visibility into access events and recorded activities for improved security tracking and auditing. Combined with enhanced security mechanisms, the solution helps organizations strengthen facility protection while maintaining convenient and efficient access management.
Designed for modern smart building environments, GDMS SecureAccess delivers a secure, scalable, and intelligent approach to remote access control and door management.
PRODUCT OVERVIEW
Feature Highlights
GDMS SecureAccess |
|
Features Highlights
Specifications
Function | • Cloud-based access control and facility access management platform • Remote management of Grandstream access control devices and interphones • Centralized management of organizations, apartments, departments, users, and visitors • Real-time monitoring of devices, access records, alarms, and access activities |
Security and Authentication | • User and administrator permission management • Multi-factor authentication (MFA) support for administrator accounts • Access control through access groups and schedules • Time-based and holiday-based access permissions • Visitor access control using temporary PIN codes and QR codes • Secure cloud-based account authentication through GDMS Cloud |
Enterprise Features | • Centralized multi-site cloud management • Supports management of multiple organizations from a single account • Cloud-based device onboarding and provisioning • Remote firmware upgrades and device reboot operations • Real-time alarm notifications and event monitoring • Cloud synchronization of devices and access configurations • Administrator account hierarchy including Super Administrators, Platform Administrators, and Organization Administrators • Mobile App support for remote door opening, call answering, and real-time video viewing • Access management for residential communities, villas, and enterprise environments |
Supported Devices | • Door Stations: GDS3727, GDS3725, GDS3726, GDS3726Q • Interphones: GSC3565, GSC3560 • Indoor Stations: GSC3575, GSC3574, GSC3570 |
Access Management Features | • Apartment and department-based access management • Building and public area management • Access group management with customizable schedules • Automatic access group generation for residential buildings • User-based and visitor-based access permissions • PIN code and QR code visitor access support • Remote door opening through the mobile application |
Centralized Management | • Cloud-based centralized device management • Remote device configuration and monitoring • Centralized user, visitor, and access group management • Organization switching for multi-site management • Centralized access schedule and holiday management |
Reporting and Monitoring | • Real-time access control monitoring • Door opening logs and event history • Call logs with captured image records • Alarm logs with image and video records • Device operation logs including firmware upgrades, configuration changes, and reboots • Historical access and event tracking |
Maintenance | • Remote firmware upgrades • Remote device reboot operations • Cloud-based configuration synchronization • Device detail monitoring, including storage and authorization information • Batch device management operations |
Cloud Platform Integration | • Integrated within the GDMS Cloud ecosystem • Subsystem switching directly within the GDMS Cloud platform • Super Administrator: Supports seamless login and switching across all subsystems using a single GDMS account. • Platform&Organization Administrator: By default, only has permissions for the current system; access to other subsystems requires explicit permission grants. |
Languages | English, Chinese, French, Arabic, Greek, Spanish, Latin Spanish, German, Turkish, Italian, Russian, Czech, Portuguese (Brazilian), Polish |
GDMS SecureAccess specifications
Requirements
Before deploying and managing devices using GDMS SecureAccess, administrators must ensure that all platform, account, device, and connectivity requirements are properly met.
GDMS SecureAccess is a cloud-based subsystem within the GDMS Cloud ecosystem and requires a valid GDMS Cloud account to access and manage supported Grandstream access control devices remotely.
The platform is designed to provide centralized cloud management for organizations, residences, departments, users, visitors, and facility access devices.
GDMS Cloud Account Requirement
Administrators must first create and activate a GDMS Cloud account through:
The GDMS Cloud account functions as a centralized authentication account that provides access to multiple GDMS Cloud subsystems using the same login credentials.
The same GDMS Cloud account can be used to access:
- GDMS Networking
- GDMS Unified Communications (GDMS UC)
- GDMS SecureAccess
This unified cloud architecture allows administrators to manage networking, communication, and facility access systems from a single centralized cloud account.
After registration:
- The account must be approved
- The activation email process must be completed
- A password must be configured successfully
Only activated accounts can access GDMS SecureAccess services and begin organization management operations.
Supported Device Requirements
GDMS SecureAccess supports Grandstream access control and facility access devices that support GDMS cloud onboarding and remote cloud management.
The document specifically references support for:
- GDS3727/GDS3726/GDS3725
- GSC3560/GSC3565
Supported devices can be remotely managed through the platform for operations such as:
- Access control configuration
- Doorbell settings
- Door opening settings
- Alarm management
- Firmware upgrades
- Device reboot operations
- Access log monitoring
To successfully onboard devices into GDMS SecureAccess:
- Devices must support GDMS cloud integration
- Devices must be added using their MAC address and Serial Number
- Devices must maintain internet connectivity to communicate with the cloud platform
A device can only be associated with one GDMS account at a time.
If a device has already been added to another GDMS account:
- The device must first be restored to factory settings before it can be added to a new account
This prevents ownership conflicts and ensures proper cloud synchronization.
Administrator Access Requirements
At least one Super Administrator account is required to initialize and manage the GDMS SecureAccess environment.
The Super Administrator is responsible for:
- Creating organizations
- Adding administrator accounts
- Managing permissions
- Managing devices and users
- Configuring platform settings
Additional Platform Administrators or Organization Administrators can be created through the Account Management module.
Administrator accounts must have the appropriate organization permissions before they can:
- Add devices
- Manage users
- Configure access groups
- Manage schedules and holidays
- Manage visitor access
For enhanced security, Multi-Factor Authentication (MFA) is enabled by default for newly created administrator accounts and is strongly recommended for all deployments.
GETTING TO KNOW GDMS SecureAccess PLATFORM
GDMS SecureAccess
GDMS SecureAccess is a cloud-based access control system that supports administrator login only. Administrators can use SecureAccess Web to remotely manage devices, personnel, and visitors, as well as view door access records, alarms, and videos.
Sign up to GDMS SecureAccess
When accessing GDMS SecureAccess for the first time, users are required to sign up. The following screen will be displayed:
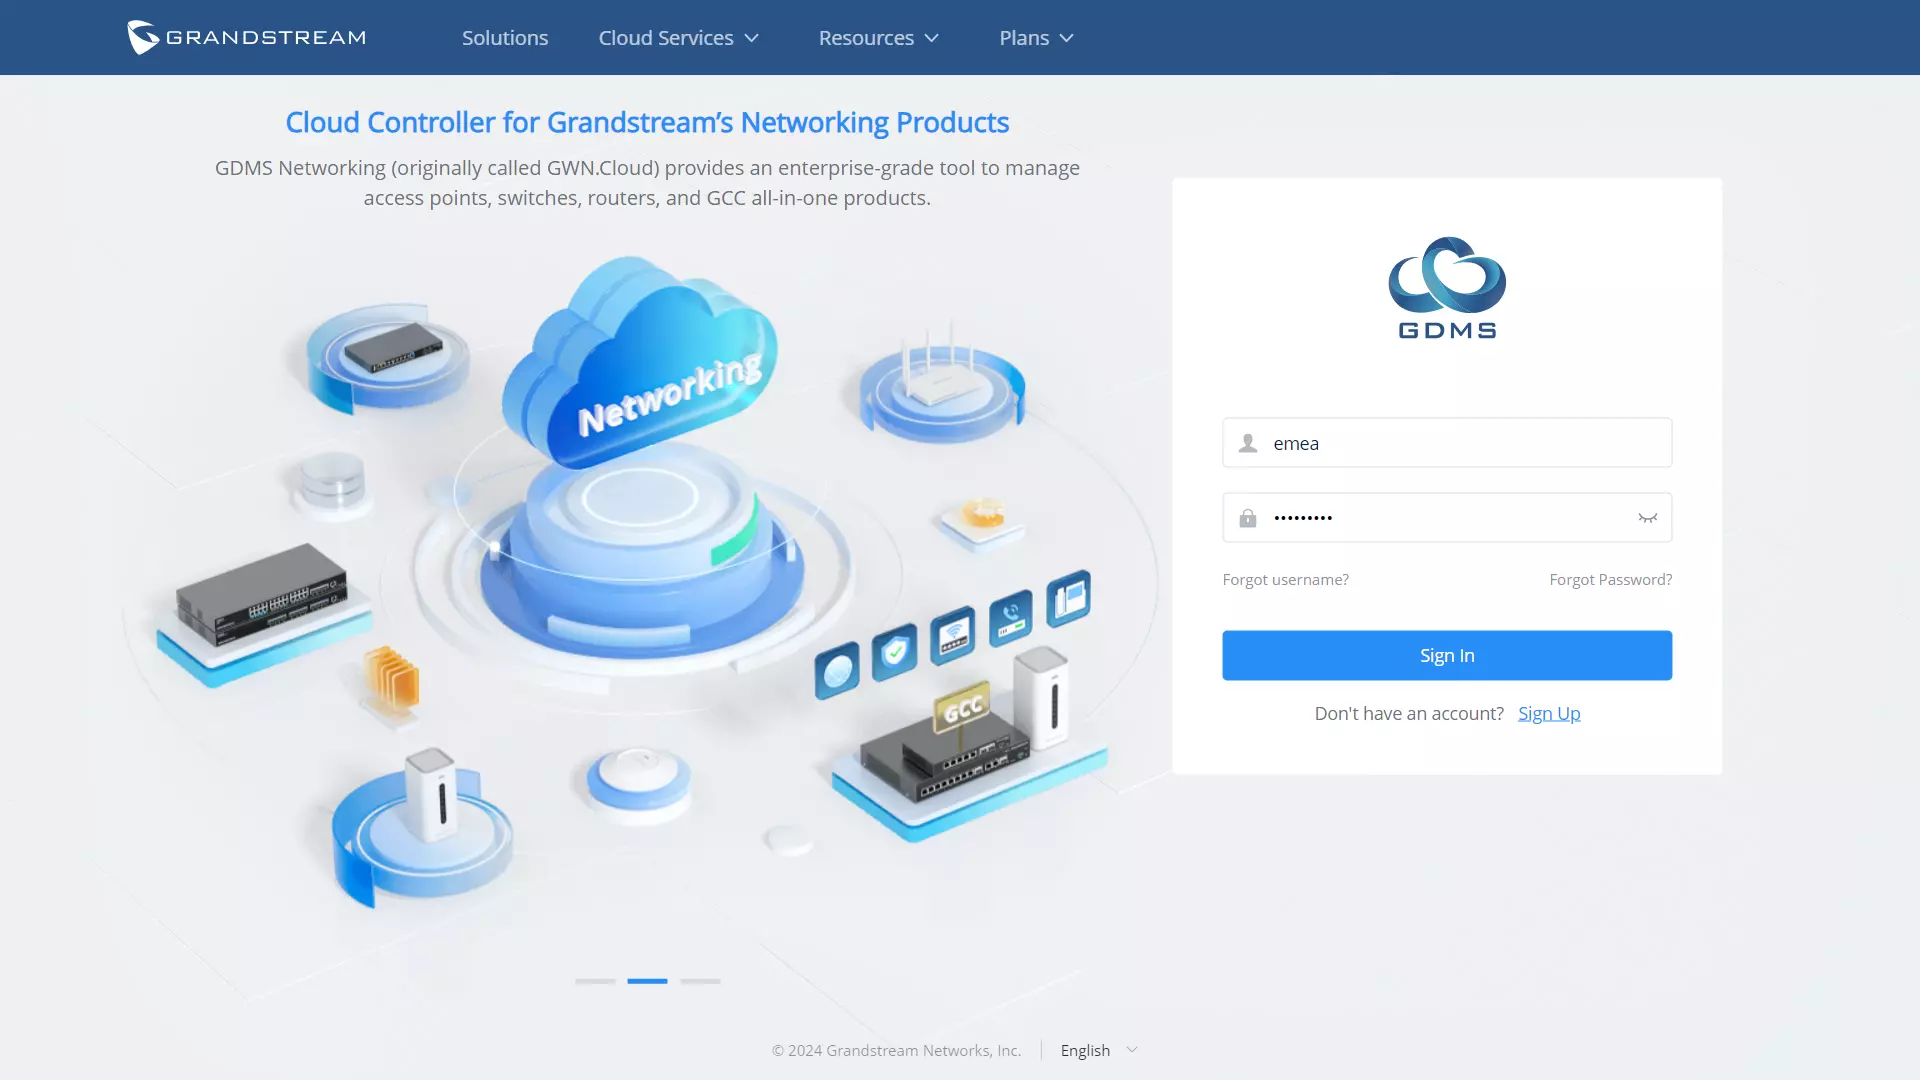
- Click “Sign up” to go to the sign-up screen, then enter the required information.
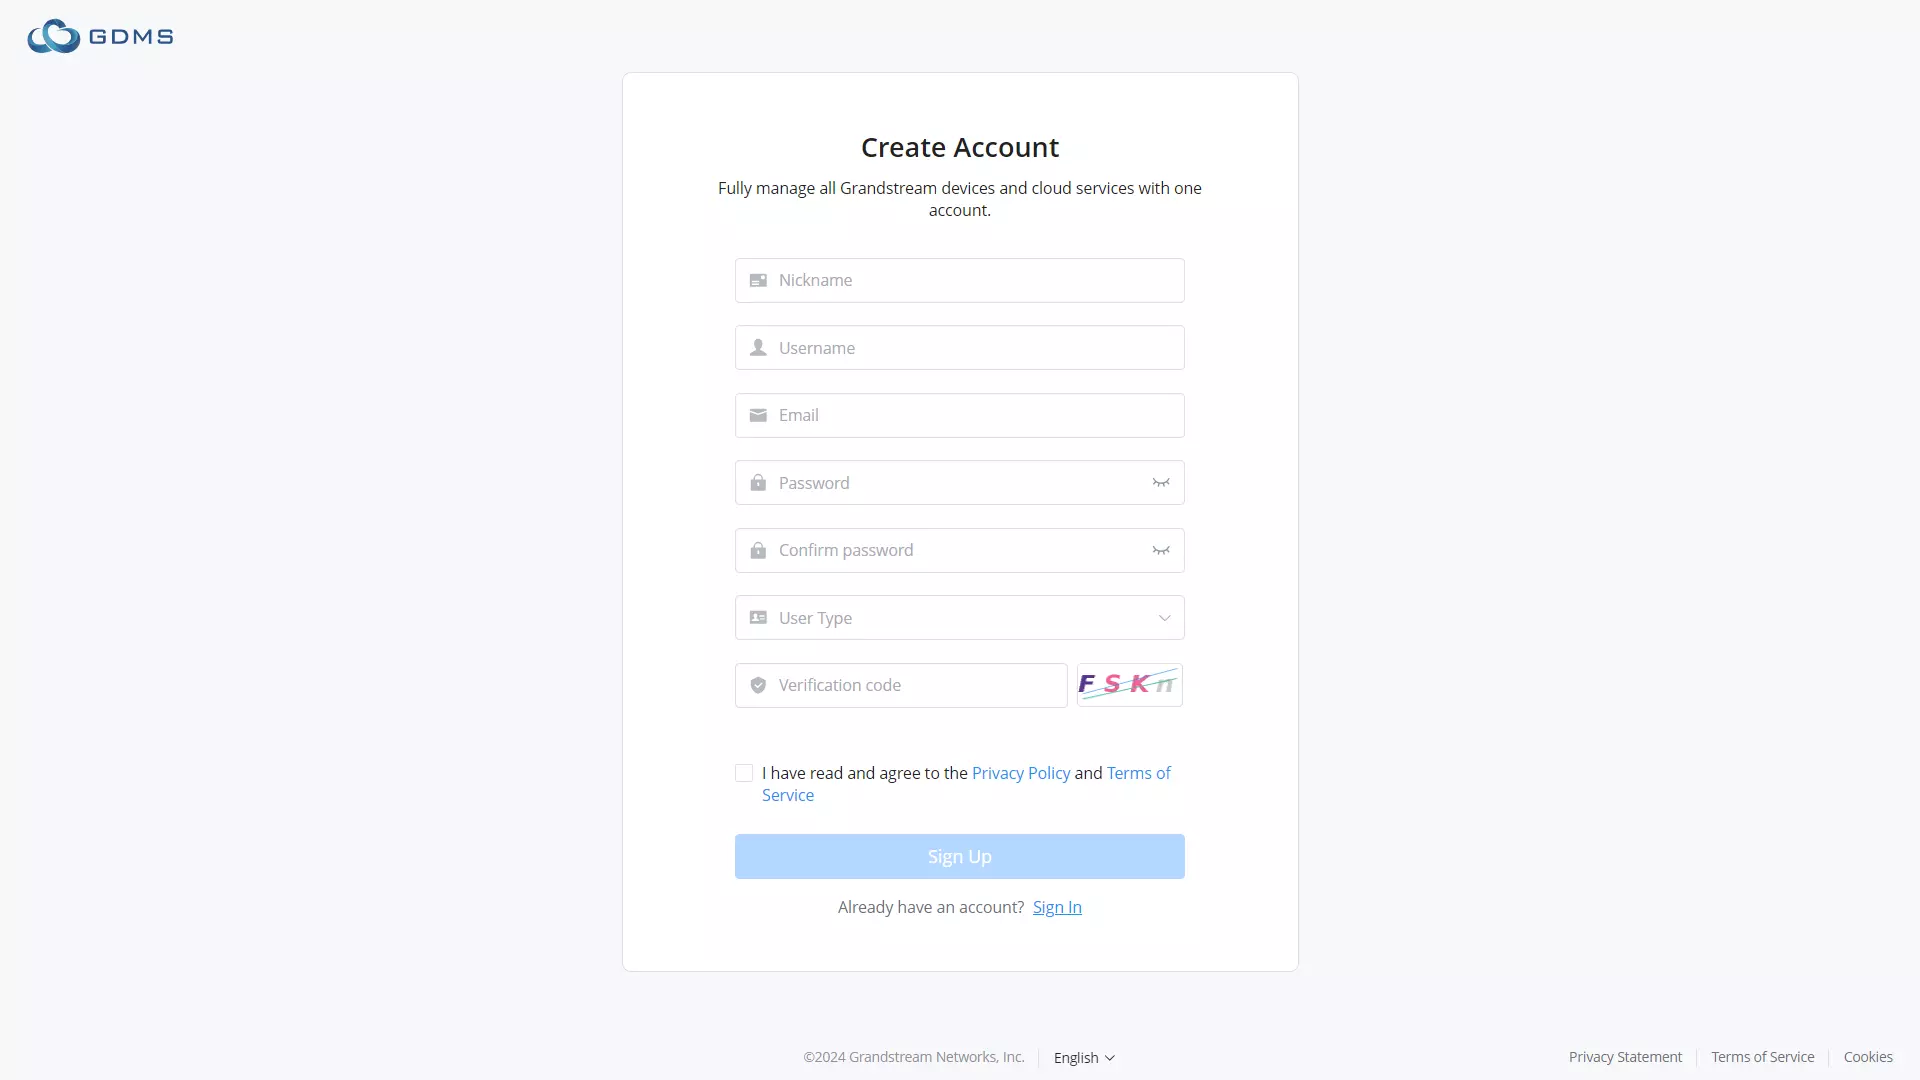
Nickname | Specify a nickname of this account. |
Username | Specify a username for this account. |
Enter the email address. | |
Password | Specify a password for the account Note: 8-16 characters, must be a combination of numbers, letters, and special characters. |
Confirm password | Re-enter the password again. |
User type | Select from the drop-down list the type of user:
|
Company Name | Enter the company name if the type of user is set to Enterprise, Server provider, Channel reseller, System integrator. |
Grandstream Device Verification | This mechanism allows Grandstream to verify that the account registration is associated with genuine Grandstream devices by validating their MAC addresses and serial numbers against its product records. Successful verification is required to complete account creation. |
Verification code | Copy the verification from the Captcha. |
GDMS Sign-up Settings
2. Once you create an account, you can access your GDMS SecureAccess page for the first time, and the following page will be displayed:
When the first page opens on GDMS Unified Communications, users can access GDMS SecureAccess by clicking on the “GDMS SecureAccess” option located in the top right corner, as shown below.
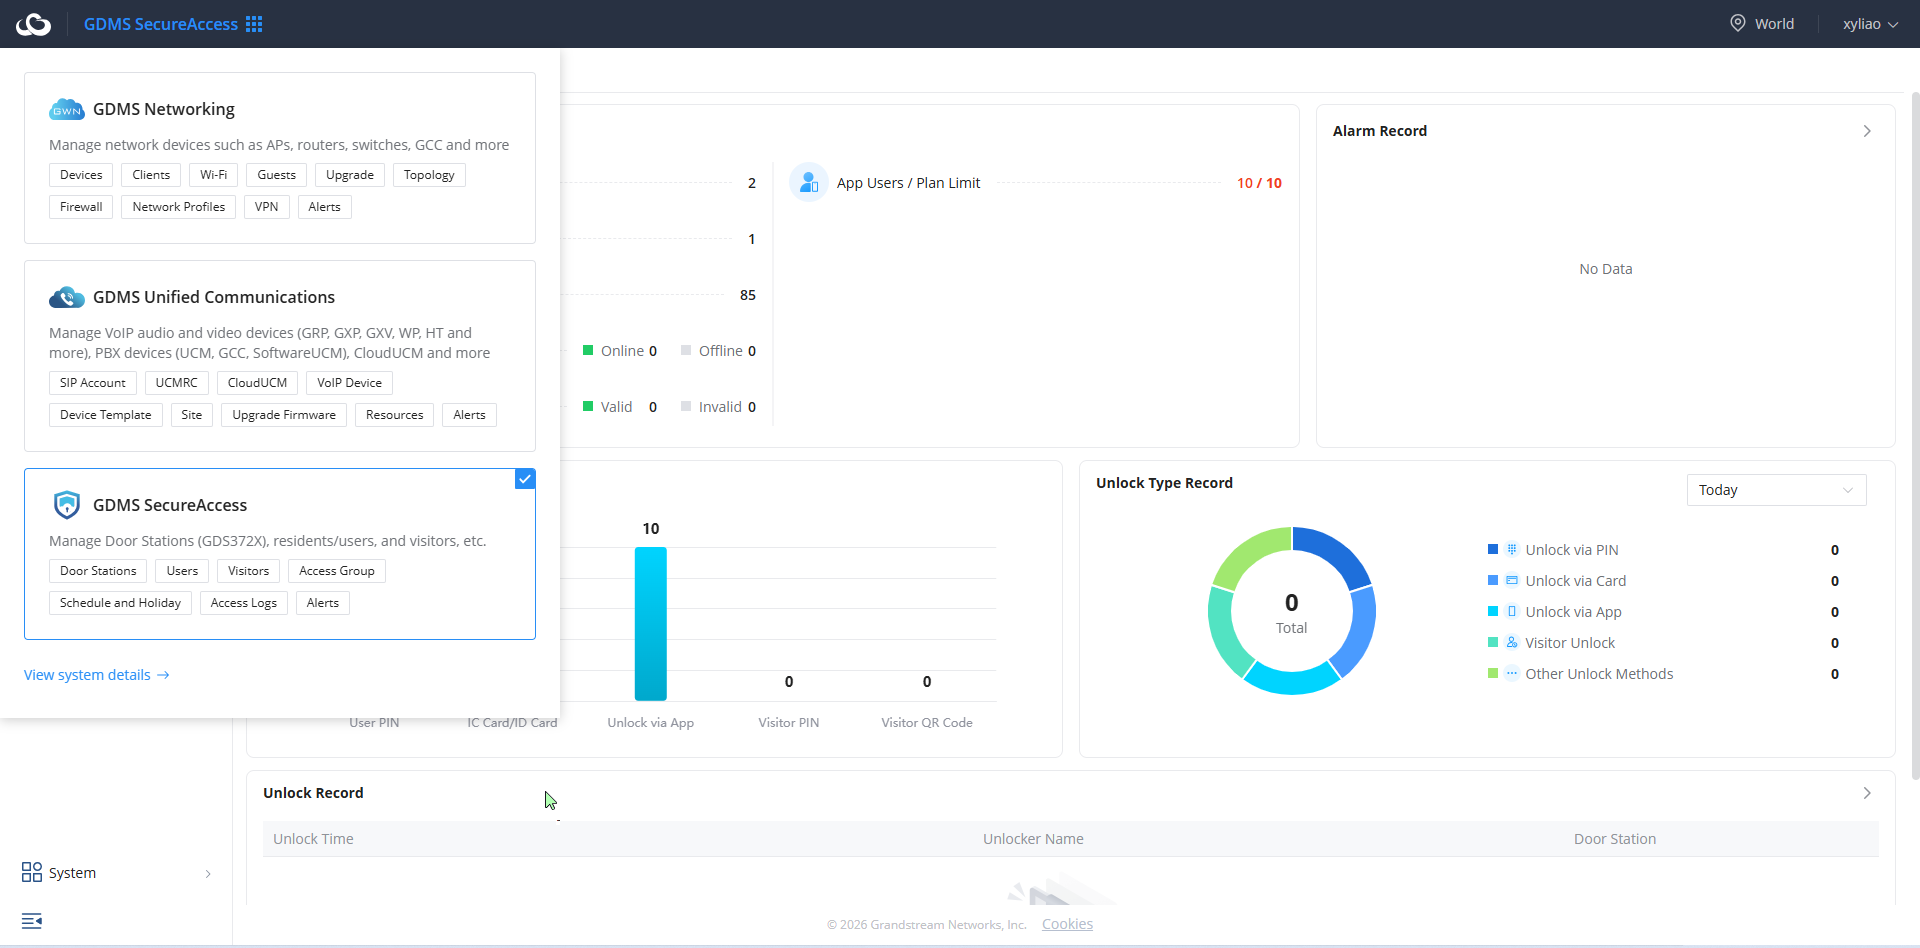
The user can access the modules listed in each category to jump quickly to the intended destination. See the example below for the GDMS SecureAccess system.
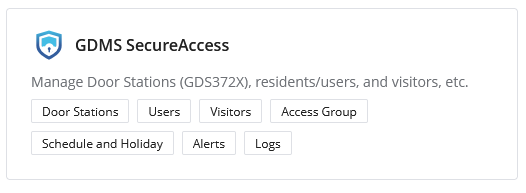
Super Administrator Account
The Super Administrator account functions as a centralized GDMS Cloud account and supports access across multiple GDMS Cloud ecosystems using the same credentials.
The same account can access:
- GDMS Networking
- GDMS Unified Communications (GDMS UC)
- GDMS SecureAccess
This unified authentication architecture simplifies centralized cloud management and reduces the need for multiple independent platform accounts.
Additional important considerations include:
- The Super Administrator account maintains the highest permission level across the platform
- The account owner is fully responsible for managing all additional administrator accounts and organization permissions
- Devices, organizations, users, and permissions under the platform are centrally controlled through this account
- the account uses strong passwords and Multi-Factor Authentication (MFA)
Because this account has full administrative control over the deployment, organizations should carefully control account ownership and credential security.
Sub-Administrator Account Creation
Sub-administrator accounts allow organizations to delegate operational and administrative tasks to additional personnel while maintaining controlled permission assignment and organization-level access separation.
This structure allows organizations to distribute management responsibilities across multiple teams or administrators without sharing the primary Super Administrator account credentials.
Sub-administrator accounts are used for:
- IT administrators
- Security management personnel
- Property management teams
- Building administrators
- Organization-level operators
- Technical support personnel
The permissions assigned to each administrator can be customized based on operational requirements and organizational responsibilities.
Creation Procedure
Only the Super Administrator can create and manage sub-administrator accounts.
To create a new administrator account:
- Log in to GDMS SecureAccess using the Super Administrator account
- Navigate to: System Settings → Account Management
- Select: Add Account
- Configure the required account parameters, including:
- Username
- Email address
- Administrator role
- Organization assignment
- Organization permissions
- Access privileges
- Feature access permissions
- Review the configuration carefully
- Save the account configuration
After the account is successfully created:
- The administrator account becomes available immediately
- The newly created administrator can log in to the platform using the assigned credentials
- Multi-Factor Authentication (MFA) is enabled by default for additional account security
Types of Sub-Administrators
GDMS SecureAccess supports multiple administrator role types to provide flexible permission delegation and organization-based management separation.
Platform Administrators
Platform Administrators maintain broader administrative access across the GDMS SecureAccess environment.
Platform Administrators:
- Can manage broader platform functions
- Can access most management modules
- Can manage multiple organizations if permissions are assigned
- Can monitor alarms, devices, users, and logs
- Are suitable for enterprise-wide administration and centralized operational management
This administrator type is commonly used for enterprise IT administrators or centralized security management personnel.
Organization Administrators
Organization Administrators are limited to the organizations specifically assigned to them by the Super Administrator.
Organization Administrators:
- Can only manage assigned organizations
- Cannot access Organization Management
- Cannot access the Administrator Management modules
- Cannot manage platform-wide account settings
- Can manage devices, users, visitors, and access permissions within their assigned organizations
This role is ideal for:
- Building administrators
- Property management staff
- Department managers
- Local security operators
This permission separation helps improve operational security and prevents unauthorized platform-wide administrative changes.
Security Recommendations
To ensure platform security and protect the organization’s access control infrastructure, administrators should follow recommended account security best practices.
Administrators should:
- Use strong and unique passwords
- Enable Multi-Factor Authentication (MFA)
- Restrict administrator permissions based on operational responsibilities
- Avoid sharing administrator account credentials
- Regularly review administrator account activity
- Remove unused or inactive administrator accounts
- Periodically audit organization permissions and account privileges
Organizations should also establish internal administrative access policies to ensure proper access control governance and long-term platform security.
Feedback
If the users have an issue/bug to report or need help with configurations or general feedback, on the top right corner of the page, click on the account username, then click on “Feedback” to send feedback.
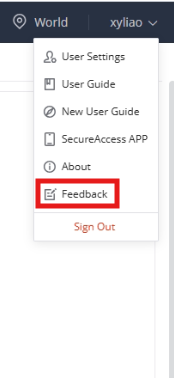
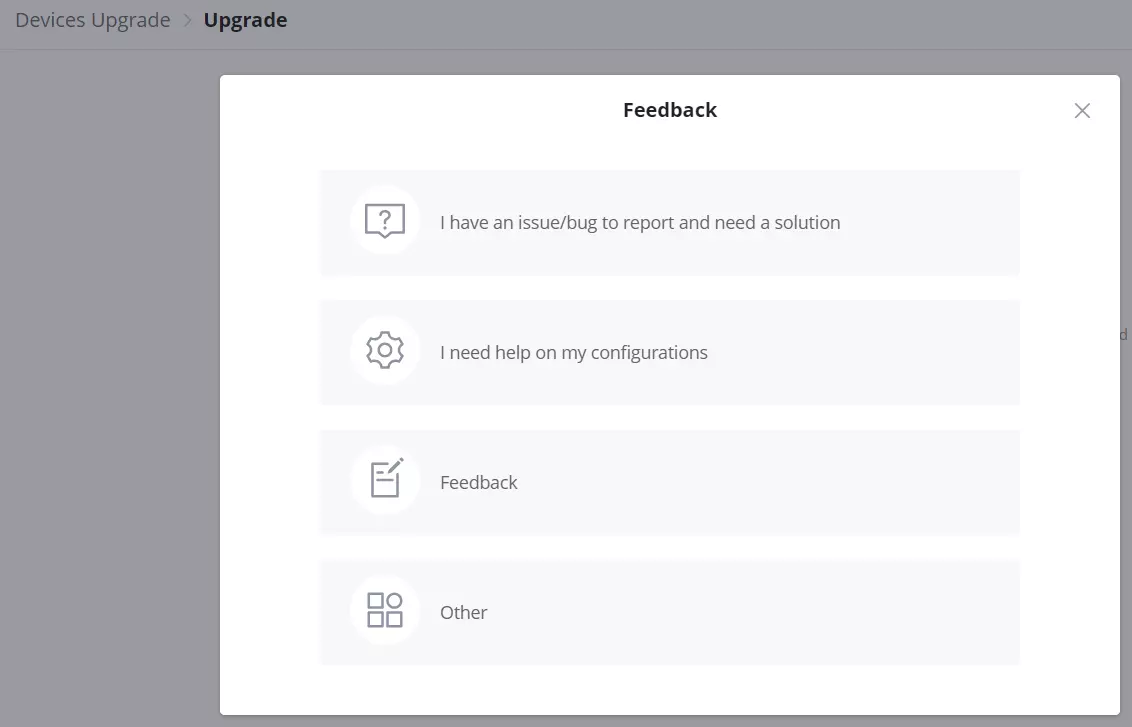
Then, select what type of feedback:
- I have an issue/bug to report and need a solution (forwards the users to Grandstream helpdesk)
- I need help with my configurations (forwarding the users to Grandstream helpdesk)
- Feedback.
- Other.
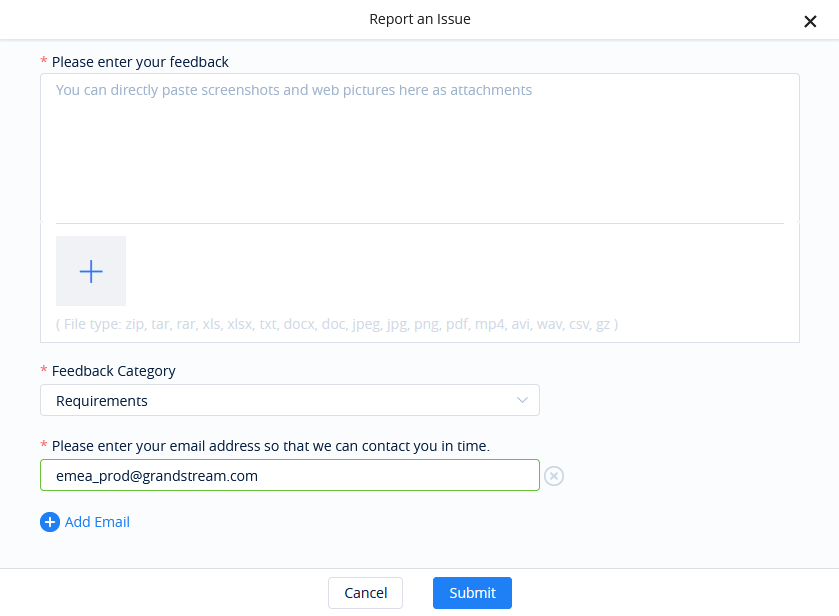
If Feedback or Other is selected, this page will be shown for users to specify the issue/bug/feedback with attachments (e.g., syslog) and emails for contact.
Global Operations
Overview
The Global Operations section contains the primary system-wide controls and global navigation tools available throughout the GDMS SecureAccess platform interface.
These controls provide administrators with centralized access to essential account operations, subsystem navigation, organization management, notifications, and regional platform settings. The Global Operations area is designed to simplify platform-wide administration and provide quick access to commonly used system-level functions.
Global Operations features remain accessible throughout most areas of the platform, allowing administrators to efficiently navigate between organizations, monitor alarms, manage account settings, and switch between supported GDMS ecosystems without interrupting ongoing administrative tasks.
The main functions available within the Global Operations section include:
- Subsystem switching
- Region selection
- Alarm and notification monitoring
- Account management access
- Organization switching
These features are particularly important for organizations managing multiple sites, multiple administrators, or multiple Grandstream cloud ecosystems simultaneously.
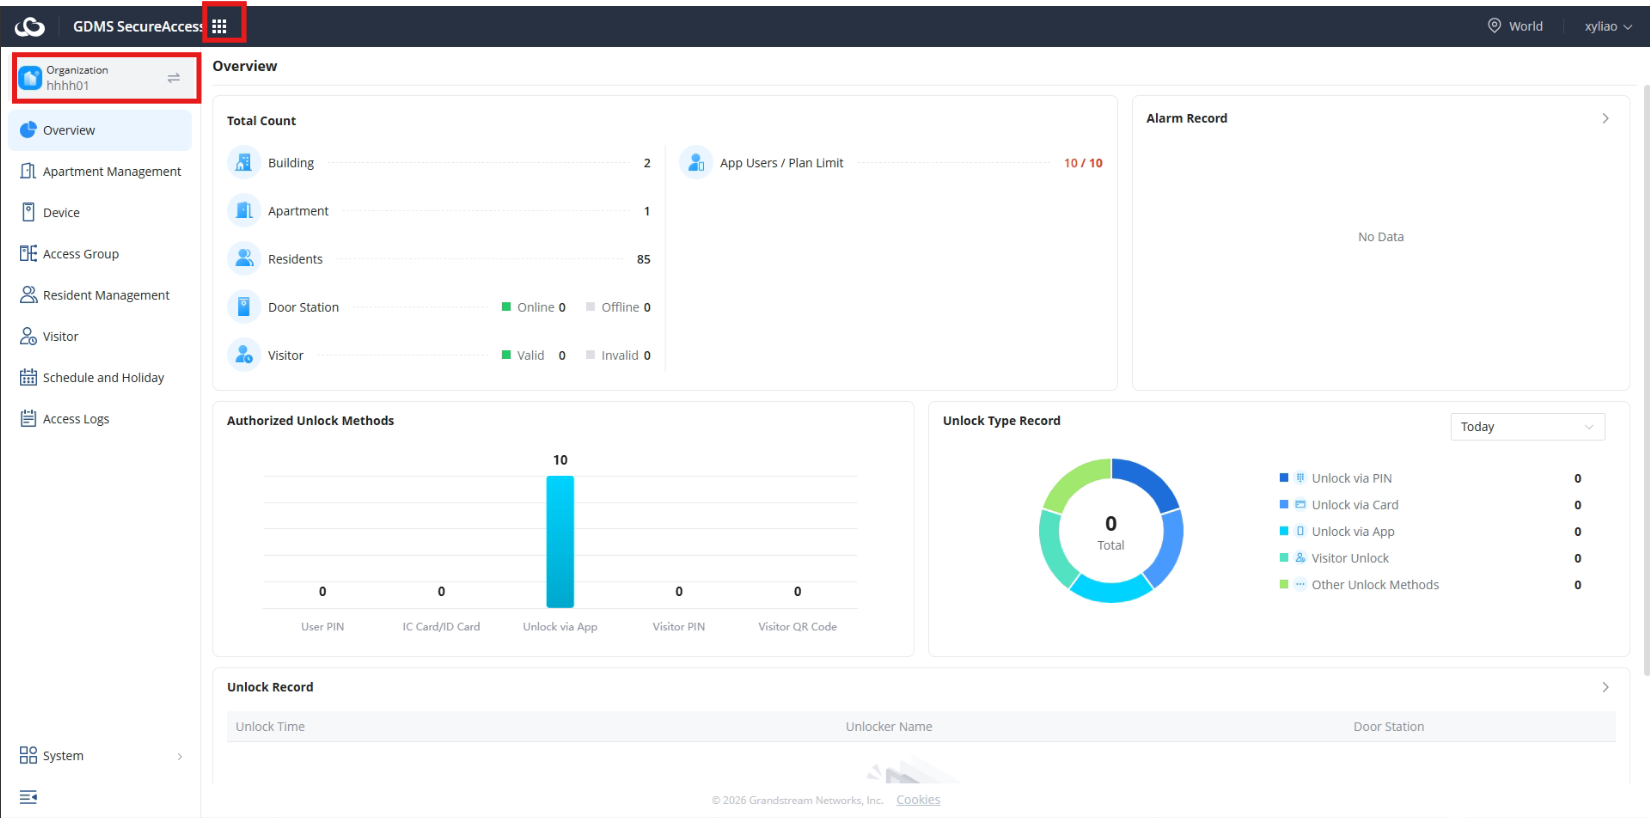
1. Subsystem Switch Entry
Purpose
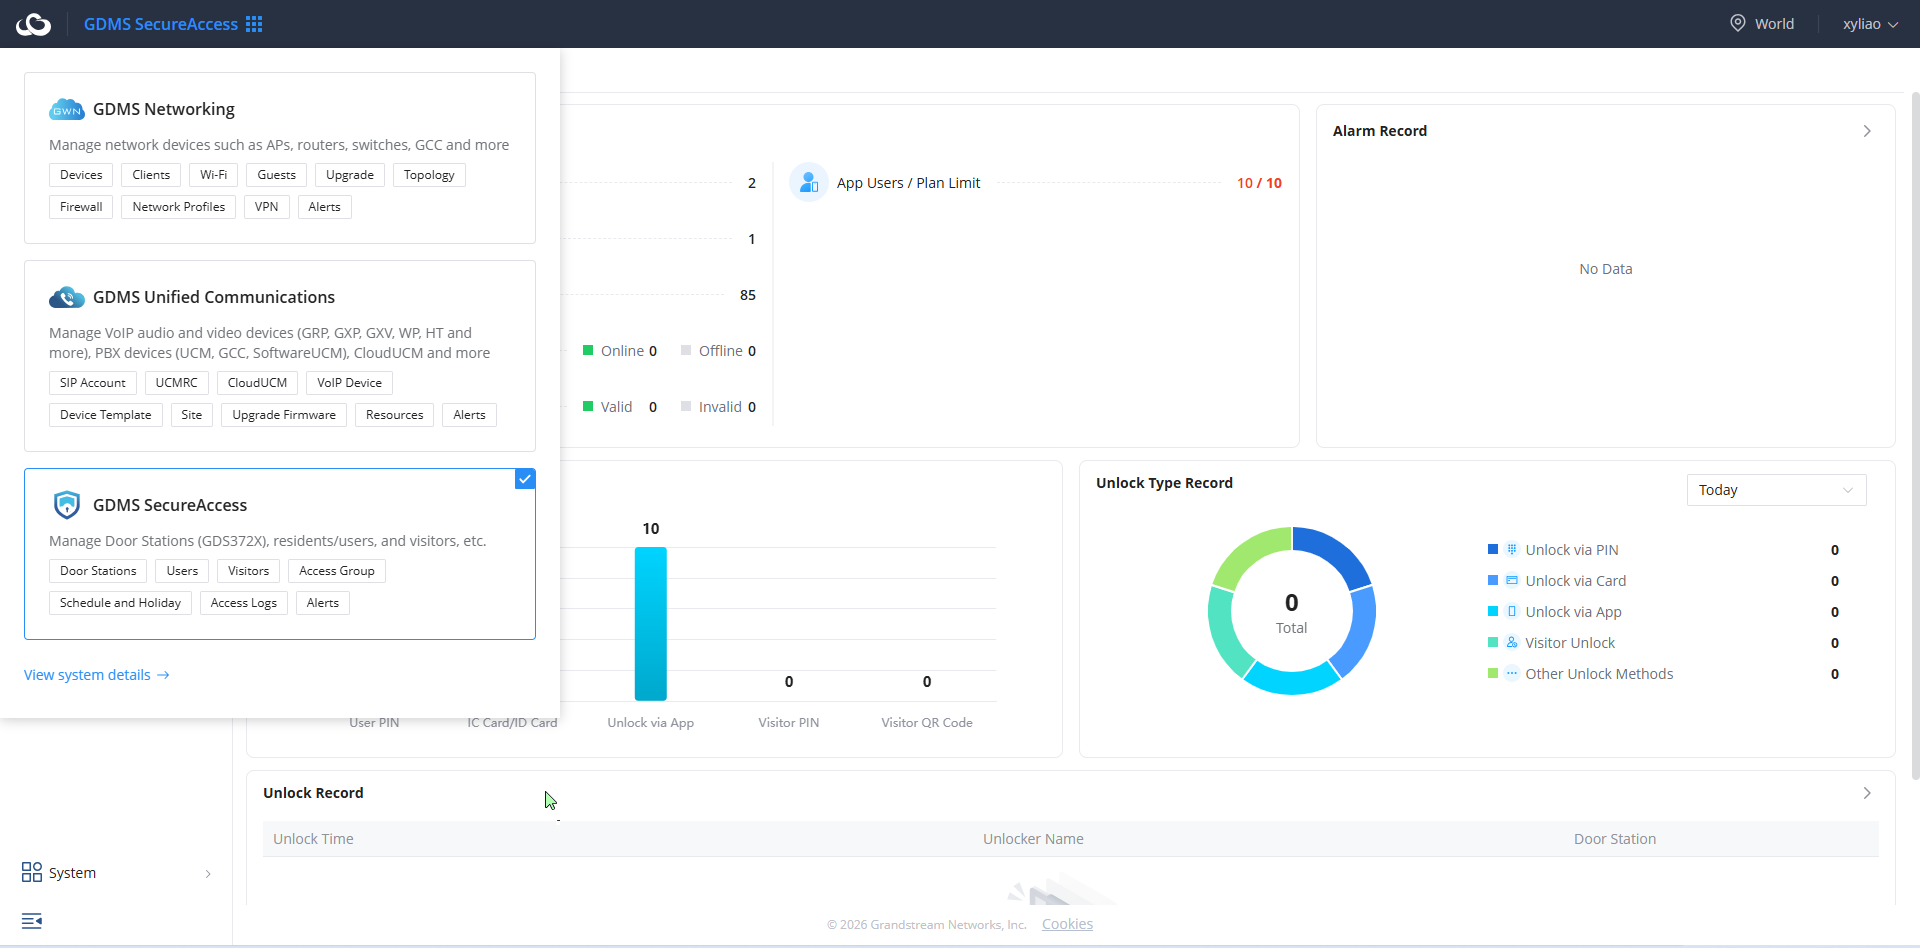
The Subsystem Switch Entry allows administrators to switch between different GDMS cloud ecosystems directly from the cloud platform interface using the same authenticated account session.
This centralized subsystem navigation capability simplifies operational management by allowing administrators to manage multiple Grandstream product ecosystems from a single cloud account without requiring separate logins.
Available Systems
Administrators can switch between the following supported GDMS cloud subsystems:
- GDMS Networking
- GDMS Unified Communications (GDMS UC)
- GDMS SecureAccess
Each subsystem provides centralized management for different Grandstream deployment categories:
- GDMS Networking for network infrastructure management
- GDMS Unified Communications for communication system management
- GDMS SecureAccess for cloud-based access control and facility management
The subsystem switch option is located within the top navigation interface of the GDMS platform.
After selecting a subsystem:
- The platform automatically redirects the administrator to the selected ecosystem
- Existing account permissions and assigned organizations remain associated with the account
- Navigation between ecosystems can occur without requiring reauthentication
This unified cloud architecture significantly simplifies enterprise administration for organizations deploying multiple Grandstream solutions simultaneously.
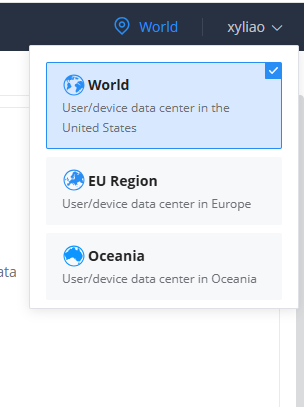
2. Region Switch
Purpose
The Region Switch feature allows administrators to select and manage the regional cloud environment where the organization’s data is stored and processed.
This setting is important for organizations operating across multiple countries or regions and may affect compliance, connectivity, and cloud service performance.
Available Regions
Supported regional cloud stations include:
- Global Station
- European Station
The selected region determines where cloud services, organization data, and associated platform resources are hosted.
Importance of Region Selection
Selecting the appropriate cloud region is an important part of deployment planning and long-term platform management.
Region selection may impact:
- Data residency requirements
- Regulatory compliance obligations
- Network latency and cloud responsiveness
- Data storage policies
- Regional cloud service optimization
Organizations operating under regional compliance frameworks should carefully evaluate which cloud region best aligns with their operational and legal requirements.
Administrators are encouraged to select the appropriate region during the initial deployment phase to ensure optimal platform performance and regulatory alignment.
3. Account Center
Purpose
The Account Center provides administrators with centralized access to account-related settings and profile management functions.
This section allows users to manage personal account settings, security configurations, and account preferences directly from the GDMS platform interface.
The Account Center is accessible via the administrator profile icon or the account menu in the platform’s upper navigation area.
Available Operations
Available account-related operations include:
- Logout
- Password recovery
- Personal information settings
- Account preferences
- About information
Logout
Administrators can securely terminate active sessions by selecting the logout option.
It is recommended to log out after completing management operations, especially when using shared or public systems.
Password Recovery
If account credentials are forgotten, administrators can initiate the password recovery process through the Account Center or login interface.
Password recovery requires:
- Account verification
- Email confirmation
- Credential reset validation
Personal Information Settings
Administrators can manage personal account details such as:
- Display name
- Email address
- Contact information
- Account profile information
Keeping administrator information updated helps simplify account management and recovery procedures.
Account Preferences
The platform can allow administrators to configure various interface and account-related preferences depending on available platform capabilities.
About Information
The About section provides information regarding:
- Platform version
- System information
- Product details
- Service information
This information assists during troubleshooting or technical support operations.
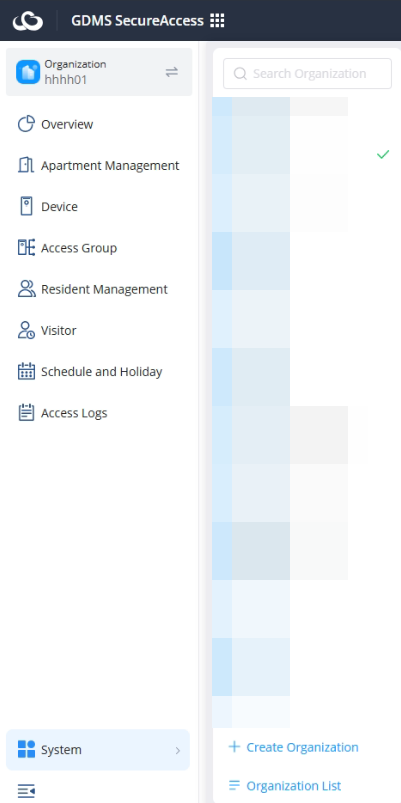
4. Organization Switch
Purpose
The Organization Switch feature allows administrators to manage multiple organizations from a single GDMS SecureAccess account.
This capability is particularly useful for:
- Multi-site deployments
- Property management companies
- Enterprise organizations
- Managed service providers
- Organizations operating multiple residential or commercial facilities
Organization switching allows administrators to quickly move between independently managed environments without requiring separate accounts or separate logins.
Supported Management Areas
Switching organizations updates all visible resources and management objects to the currently selected organization context.
Supported management areas include:
- Devices
- Buildings
- Apartments
- Departments
- Users
- Visitors
- Access groups
Additional organization-specific settings and resources are also updated automatically after switching organizations.
Once a different organization is selected:
- Only devices associated with that organization are displayed
- Only users and visitors under that organization become manageable
- Organization-specific alarms, logs, schedules, and permissions are loaded
- Administrative operations are limited to the selected organization scope
This separation ensures proper organization-level management isolation and improves operational clarity for administrators managing multiple deployments.
Organization
Overview
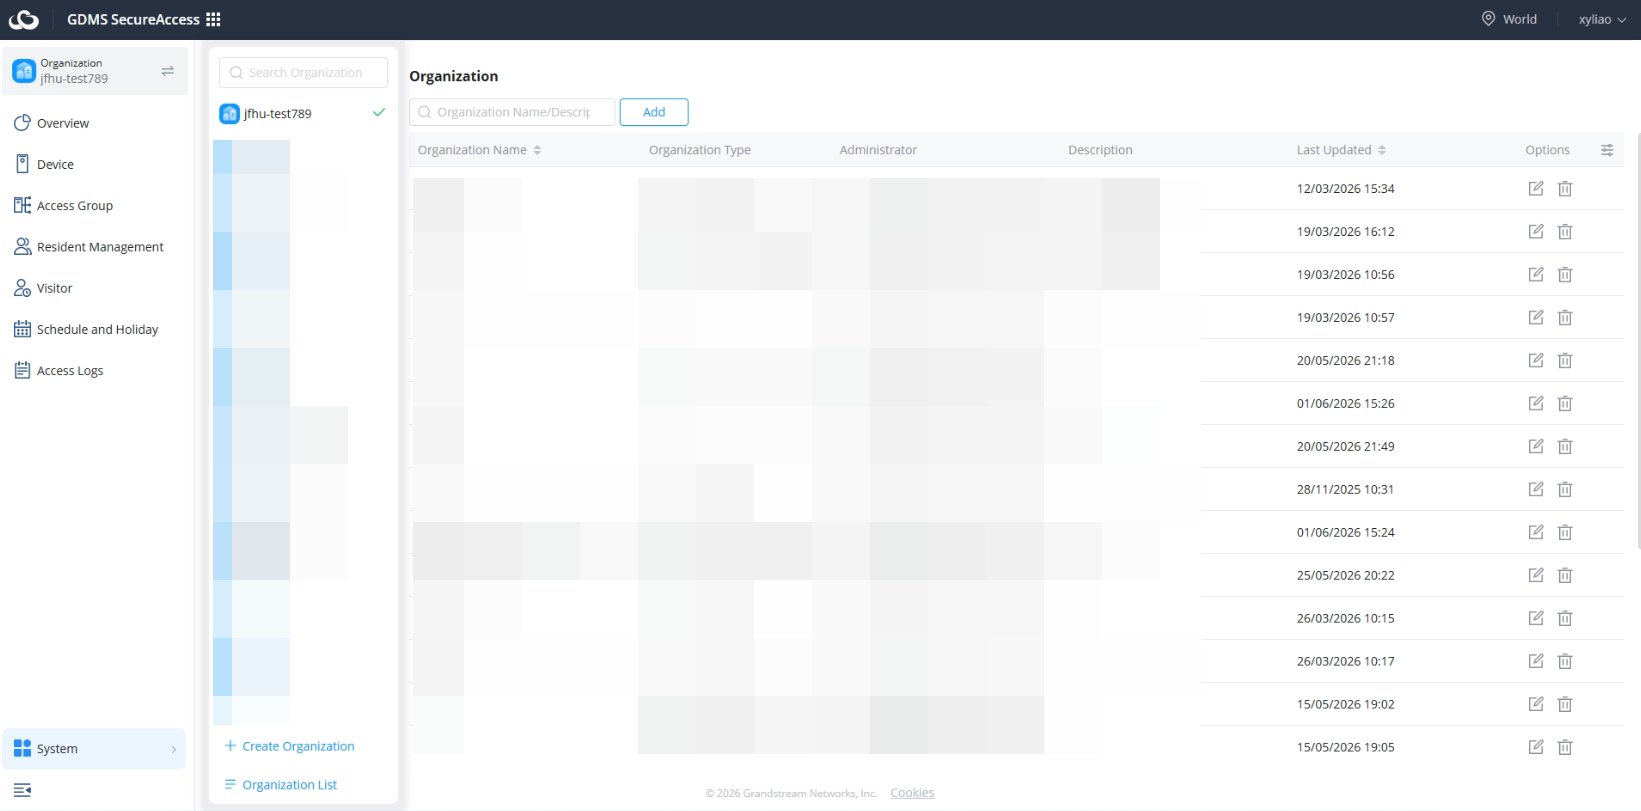
The Organization page allows administrators to create, import, and manage organizations within the platform. Organizations serve as the top-level structure used to group devices, residents, administrators, and access control resources. Depending on the deployment scenario, organizations can represent residential communities, villas, commercial buildings, schools, or other managed environments.
From this page, administrators can:
- View all existing organizations.
- Search for specific organizations.
- Create new organizations manually.
- Import organizations from an external UC system.
- Assign organization administrators.
- Define organization types based on deployment requirements.
- Manage organization descriptions and associated devices.
The organization list displays the following information for each entry:
| Organization Name | Name of the organization. |
| Organization Type | The deployment type assigned to the organization. |
| Administrator | Users assigned to manage the organization. |
| Description | Additional notes or information about the organization. |
Creating an Organization
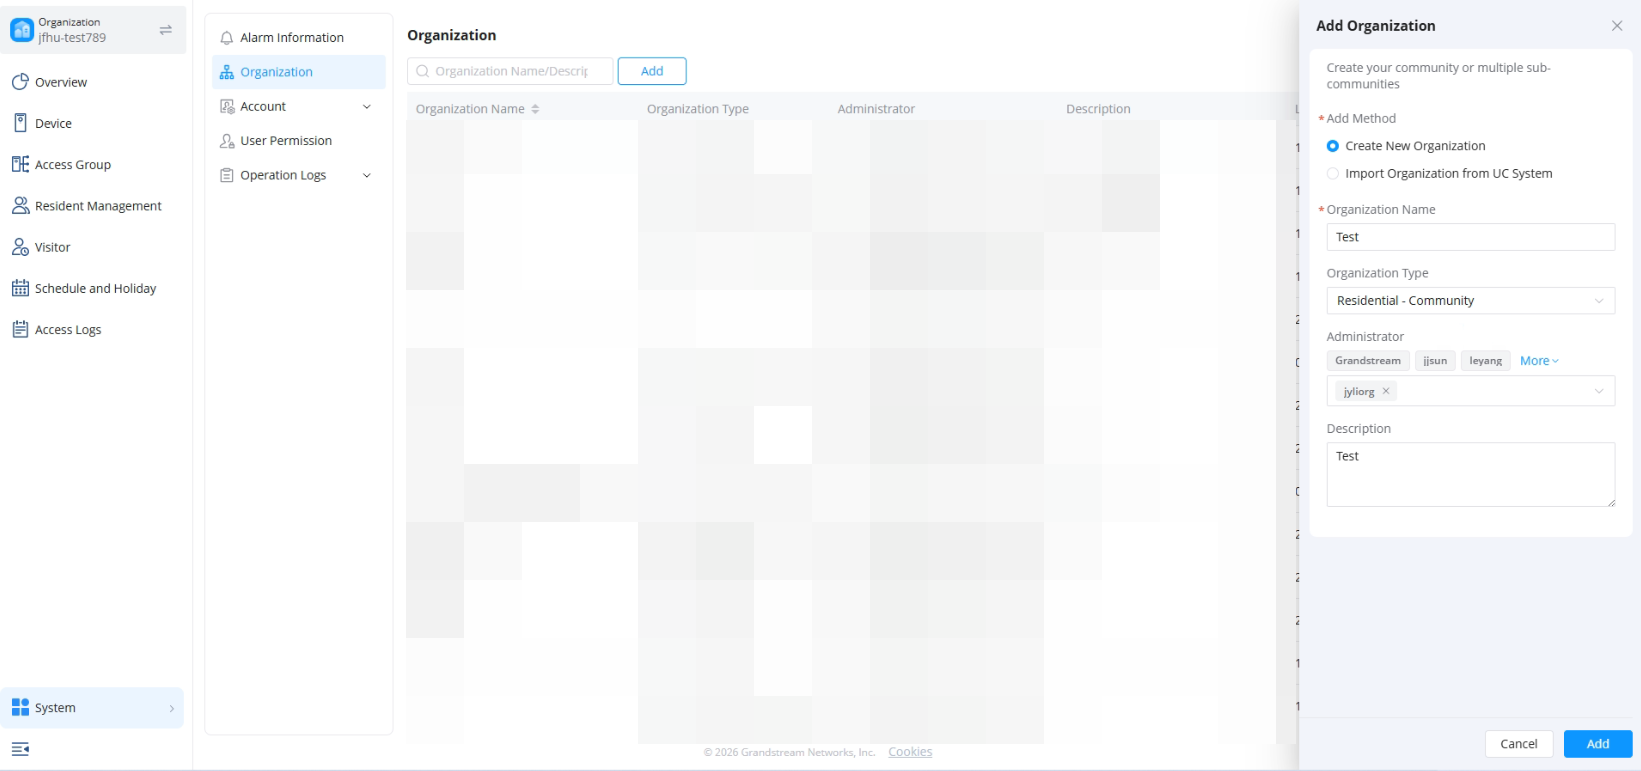
To create a new organization:
- Navigate to System → Organization.
- Click Add.
- Select Create New Organization.
- Configure the required parameters.
- Click Add to save the organization.
Organization Parameters
| Organization Name | Specifies the name of the organization. This field is mandatory and must be unique within the system. An error message is displayed if the field is left empty. It is recommended to use a descriptive name that clearly identifies the site, building, community, or organization being managed. |
| Organization Type | An optional field used to provide additional information about the organization. This may include deployment notes, project details, location information, or other administrative comments. |
| Administrator | Assigns one or more administrators to manage the organization. Administrators can manage organization settings, residents, users, devices, access permissions, and system logs. Multiple administrators can be assigned to the same organization. |
| Description | Optional field used to provide additional information about the organization. This may include deployment notes, project details, location information, or other administrative comments. |
Importing an Organization from a UC System
Instead of creating an organization manually, administrators can import an existing organization from a connected UC system.
To import an organization:
- Navigate to System → Organization.
- Click Add.
- Select Import Organization from UC System.
- Select the source organization from the available UC hierarchy.
- Configure the import settings.
- Click Add.
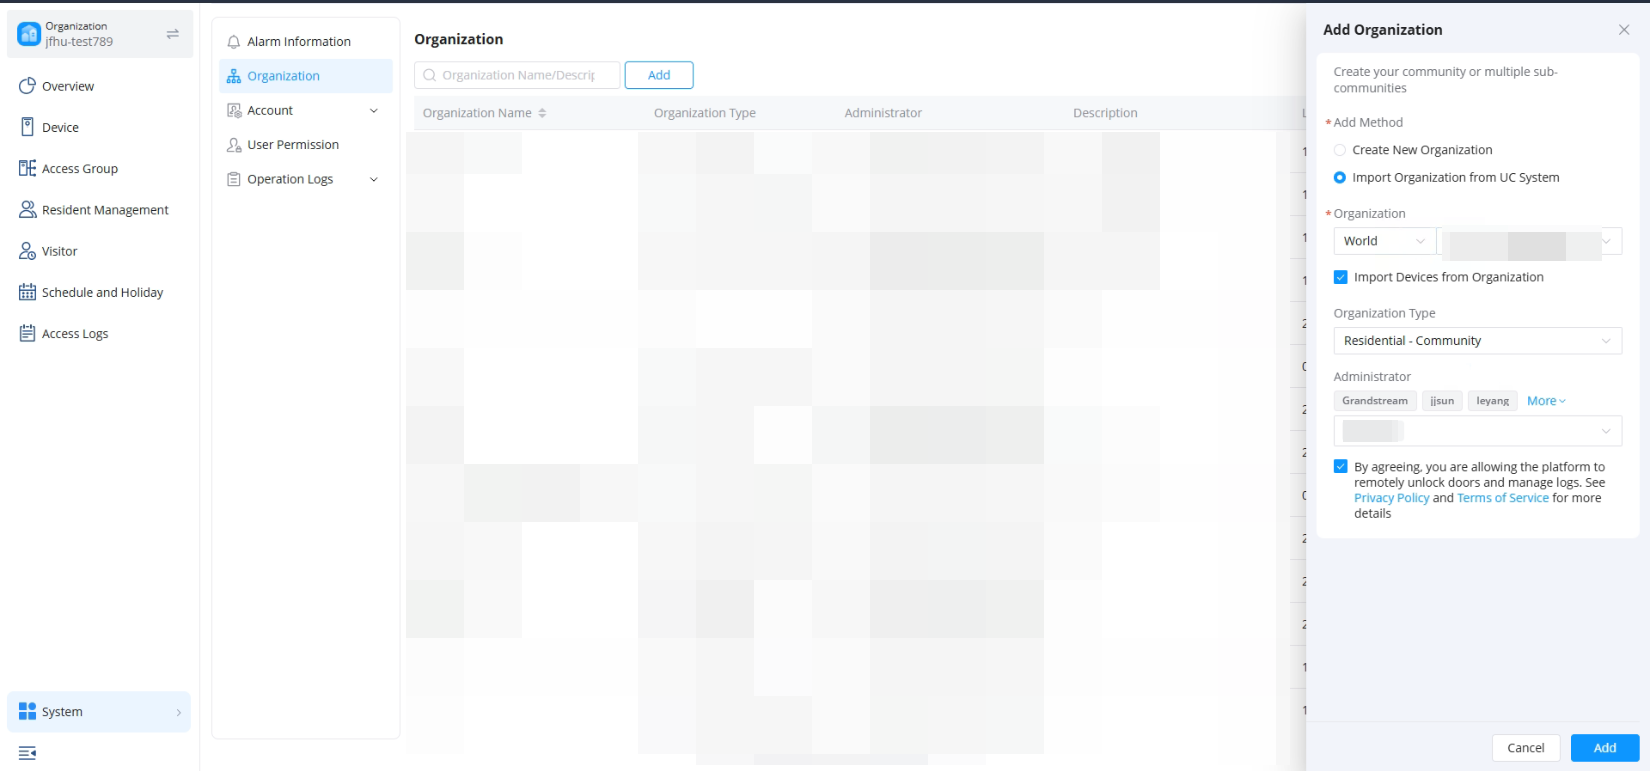
The configuration parameters are as displayed below:
| Organization | Selects an existing organization from the connected UC system to be imported into the platform. |
| Import Devices from Organization | When enabled, all devices associated with the selected organization are automatically imported together with the organization. |
| Organization Type | Displays or assigns the organization type for the imported organization. Available options are Residential – Community, Residential – Villa, and Non-residential. |
| Administrator | Assigns one or more administrators who will manage the imported organization after the import process is completed. |
| Remote Door Management Agreement | By enabling this option, administrators acknowledge that the platform is authorized to remotely unlock doors and manage access logs associated with the imported organization. |
Overview Dashboard
Purpose
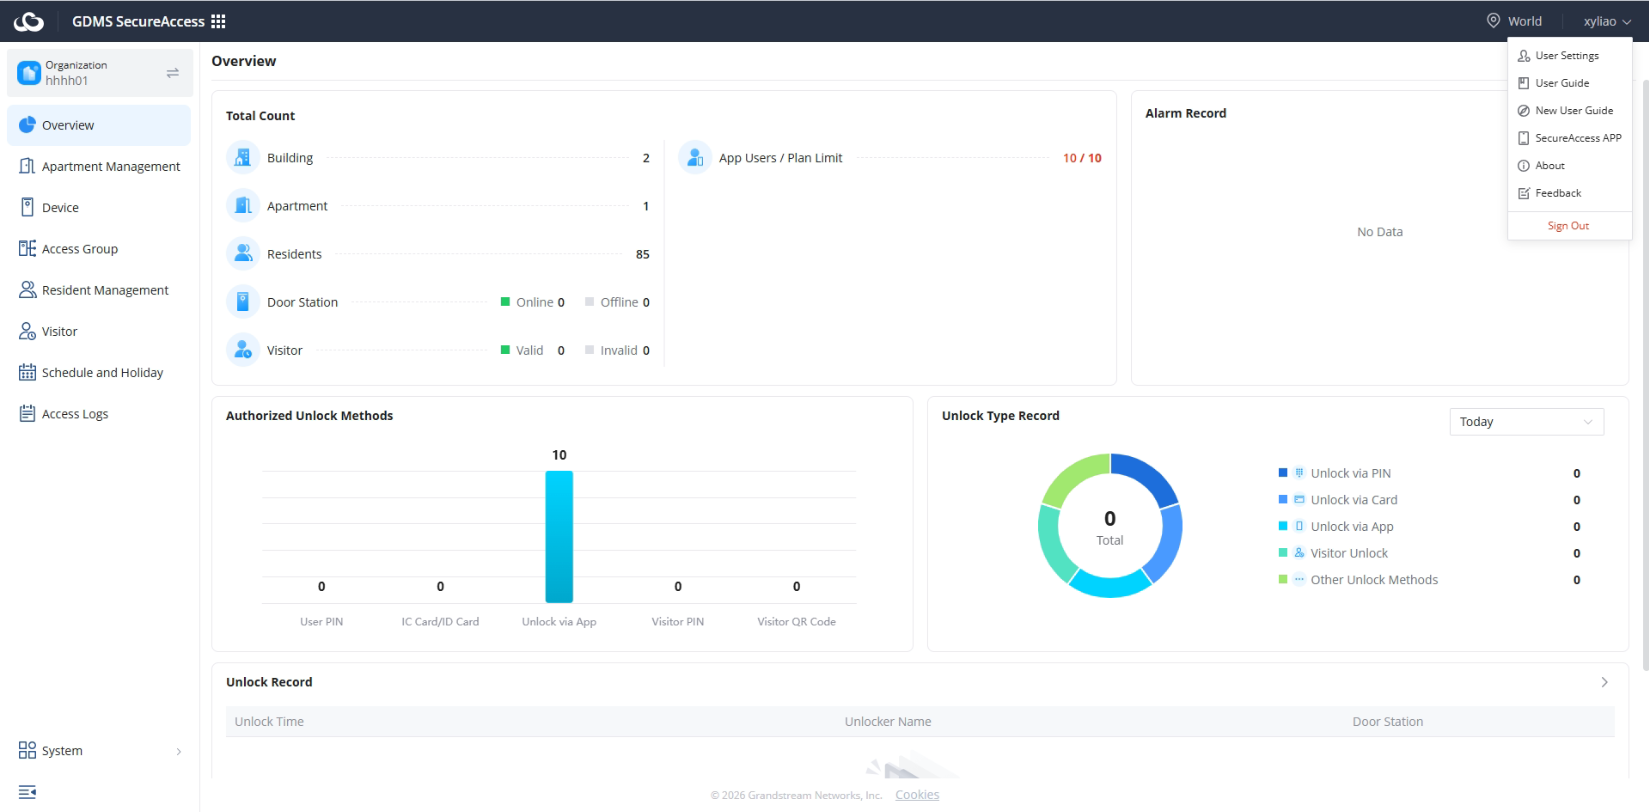
The Overview Dashboard serves as the main visual monitoring interface within GDMS SecureAccess and provides administrators with a centralized summary of organization-wide operational information.
Information displayed within the dashboard automatically updates based on the currently selected organization.
For administrators managing multiple organizations, switching organizations through the Global Operations menu will automatically refresh the dashboard to display information associated with the selected organization only.
Dashboard Information
The Overview Dashboard visually presents operational information using charts, counters, statistics panels, and monitoring widgets to simplify organization-wide visibility.
The dashboard contains both real-time and historical statistical information, depending on platform synchronization status and deployment activity.
The main information categories displayed within the dashboard include:
- Devices
- Residences or Departments
- Users
- Visitors
- Alarm Records
Below is a high-level statistical summary of the organization open door actions:
- Total Count: The Total Count section displays key deployment statistics, including buildings, apartments, residents, devices, and visitors. It also shows the device’s online/offline status and app user usage compared to the organization plan limit.
- Alarm Record: The Alarm Record section lists recent security and device-related alarm events detected by the system. It helps administrators quickly identify issues such as unauthorized access attempts, tamper alarms, or device storage problems.
- Authorized Unlock Methods: The Authorized Unlock Methods section shows the different methods used for successful door access. The chart helps administrators analyze which authentication methods are most frequently used within the organization.
- Unlock Type Record: The Unlock Type Record section provides a graphical summary of unlock activities based on access type. Administrators can use this section to monitor access trends during a selected time period.
- Unlock Record: The Unlock Record section displays detailed door access event logs generated by the system. Each record includes information such as unlock time, unlocker name, and associated door station.
These categories help administrators quickly understand the operational condition and activity level of the deployment environment.
Apartment / Department Management
Overview
The Apartment Management / Department Management module is used to organize and manage the physical structure of organizations within GDMS SecureAccess. This module provides administrators with a centralized method for organizing buildings, apartments, departments, users, and access control devices according to the organization type selected during deployment.
The module name and behavior automatically adjust based on the organization type configured during organization creation.
| Organization Type | Module Name |
|---|---|
| Residential – Community | Apartment Management |
| Non Residential – Community | Department Management |
This flexible architecture allows GDMS SecureAccess to support both residential and non-residential deployments while maintaining a consistent management workflow.
Depending on the organization type, administrators can manage:
- Residential buildings and apartments
- Departments and enterprise divisions
- Public access areas
- User-to-location relationships
- Device-to-location associations
Proper organization structure planning is strongly recommended before large-scale deployment to simplify long-term permission management and administrative operations.
| Organization Type | Structure | Key Features |
|---|---|---|
| Residential Community | Building → Apartment | • Building and apartment management• Residents assigned to apartments• Community-wide access control management |
| Non-Residential Community | Department | • Department management• User and device assignment by department |
| Private Property (Villa/Home) | Standalone Property | • Simplified structure• No apartment or department hierarchy required |
1. Apartment Management
Purpose
Apartment Management is designed specifically for residential community deployments and is used to organize and manage residential structures within a community environment.
This module allows administrators to create a hierarchical structure for residential facilities, simplifying user management, access control configuration, and device organization.
Apartment Management includes management for:
- Buildings
- Apartments
- Residents
- Access control devices
- Public access areas
This structure enables centralized management of all residential resources within the organization.
The Apartment Management interface allows administrators to quickly navigate between buildings and apartments while maintaining organized access control relationships across the deployment.
Building Management
Building Management allows administrators to create and manage residential building structures within the organization.
Each building represents a physical residential structure and may contain:
- Multiple apartment units
- Associated residents
- Building-specific access control devices
- Building-level access permissions
This structure simplifies large residential deployments by grouping apartments and devices logically under individual buildings.
Default Public Area
When a residential organization is created:
- The system automatically generates a default Public Area building
- This area is reserved for public or shared access control devices
The Public Area is intended for devices located in common shared areas accessible by multiple residents or users.
Examples include:
- Main entrances
- Parking gates
- Shared facilities
- Lobby entrances
- Common access points
Devices assigned to the Public Area can later be associated with public access groups or shared permissions.
The automatically created Public Area structure helps simplify deployment initialization and standardize public access management across residential environments.
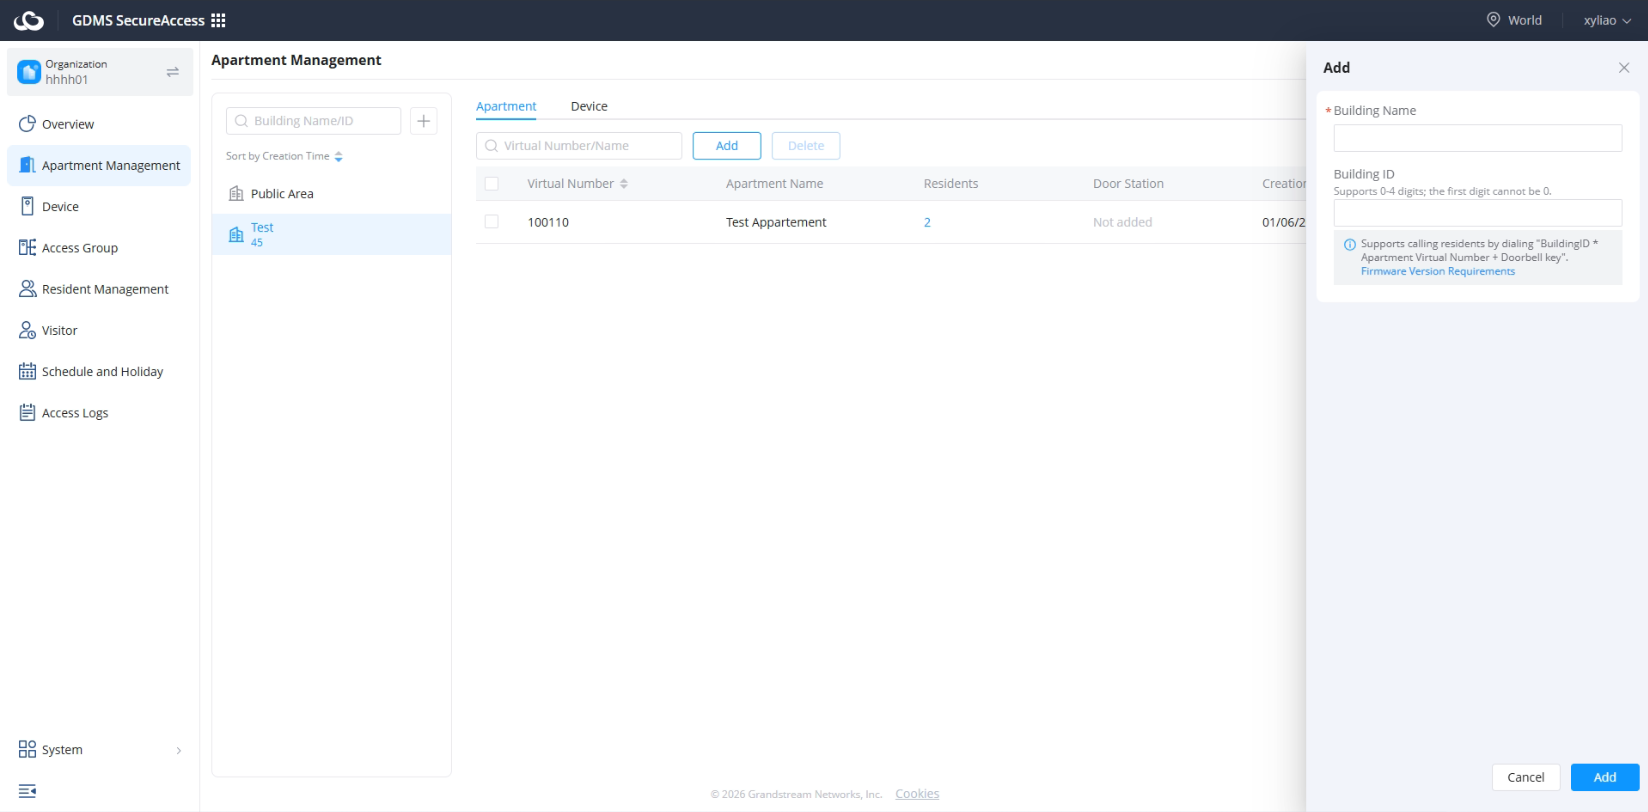
Adding Buildings
Administrators can manually create additional buildings within the residential organization structure.
When adding buildings, administrators can:
- Create additional residential buildings
- Organize apartments by building
- Separate access permissions logically
- Structure multi-building communities efficiently
Each building acts as an independent residential structure within the organization hierarchy.
Typical building configuration information may include:
- Building name
- Building identifier
- Associated apartments
- Related access groups
- Assigned devices
Proper building organization simplifies:
- Resident management
- Access control assignment
- Visitor permissions
- Device organization
- Operational monitoring
Apartment Management
Apartment Management allows administrators to organize residential units under each building.
Each apartment functions as an individual access management entity and may contain:
- Residents
- User accounts
- Apartment-specific permissions
- Associated access control devices
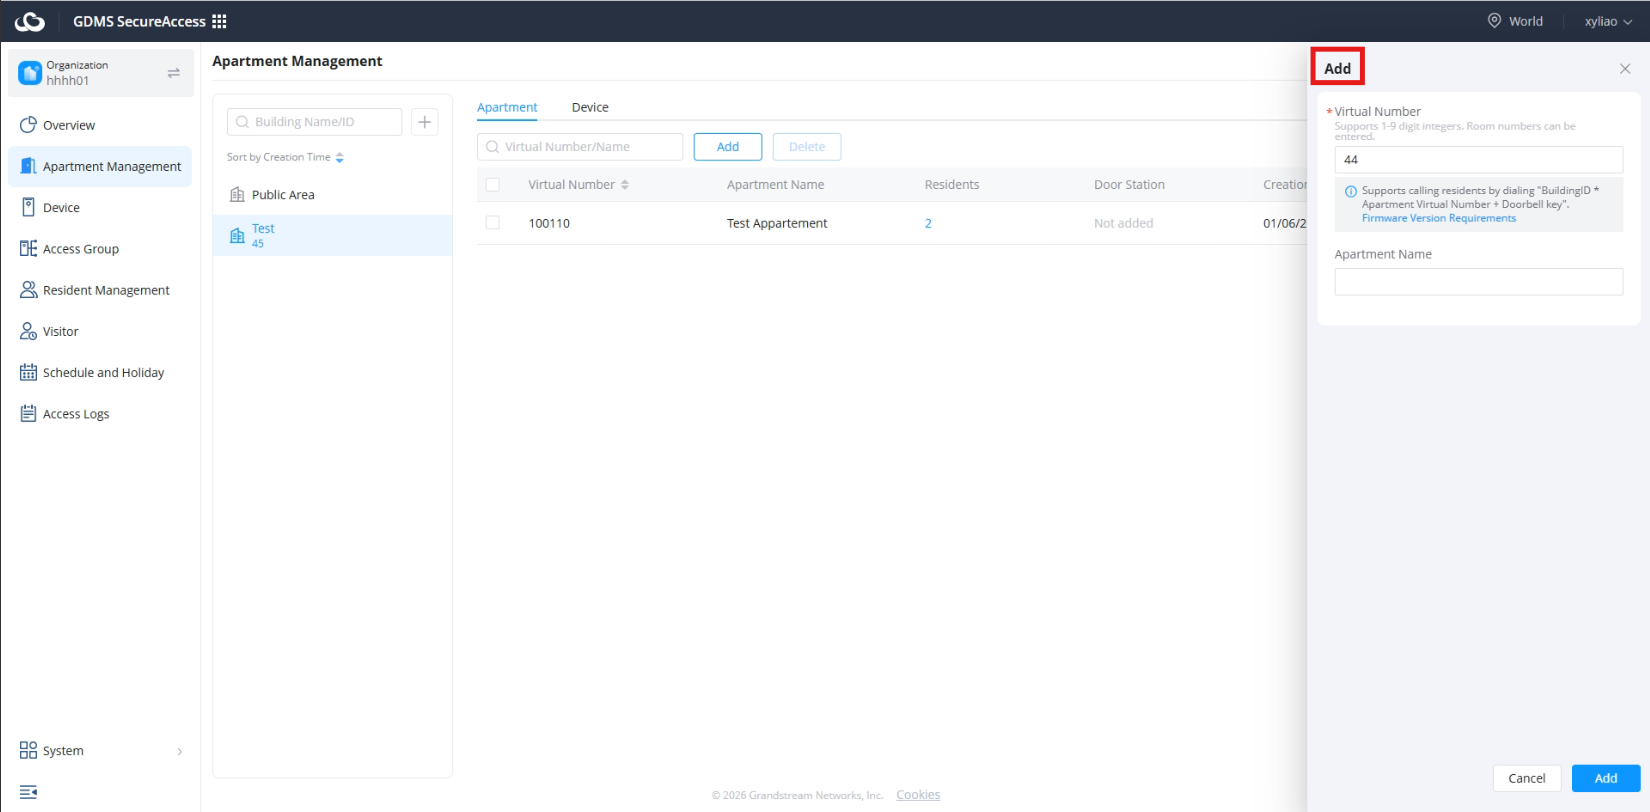
Each apartment can be assigned a virtual number and apartment name for resident and access management purposes. Follow the steps below to add an apartment:
- Navigate to Apartment Management from the left-side menu.
- Select the target building from the building list.
- Under the Apartment tab, click Add. In the Add Apartment panel, configure the following fields:
- Virtual Number: Enter the apartment or room number.
- Apartment Name: Enter the apartment name or label.
- Click Add to save the configuration.
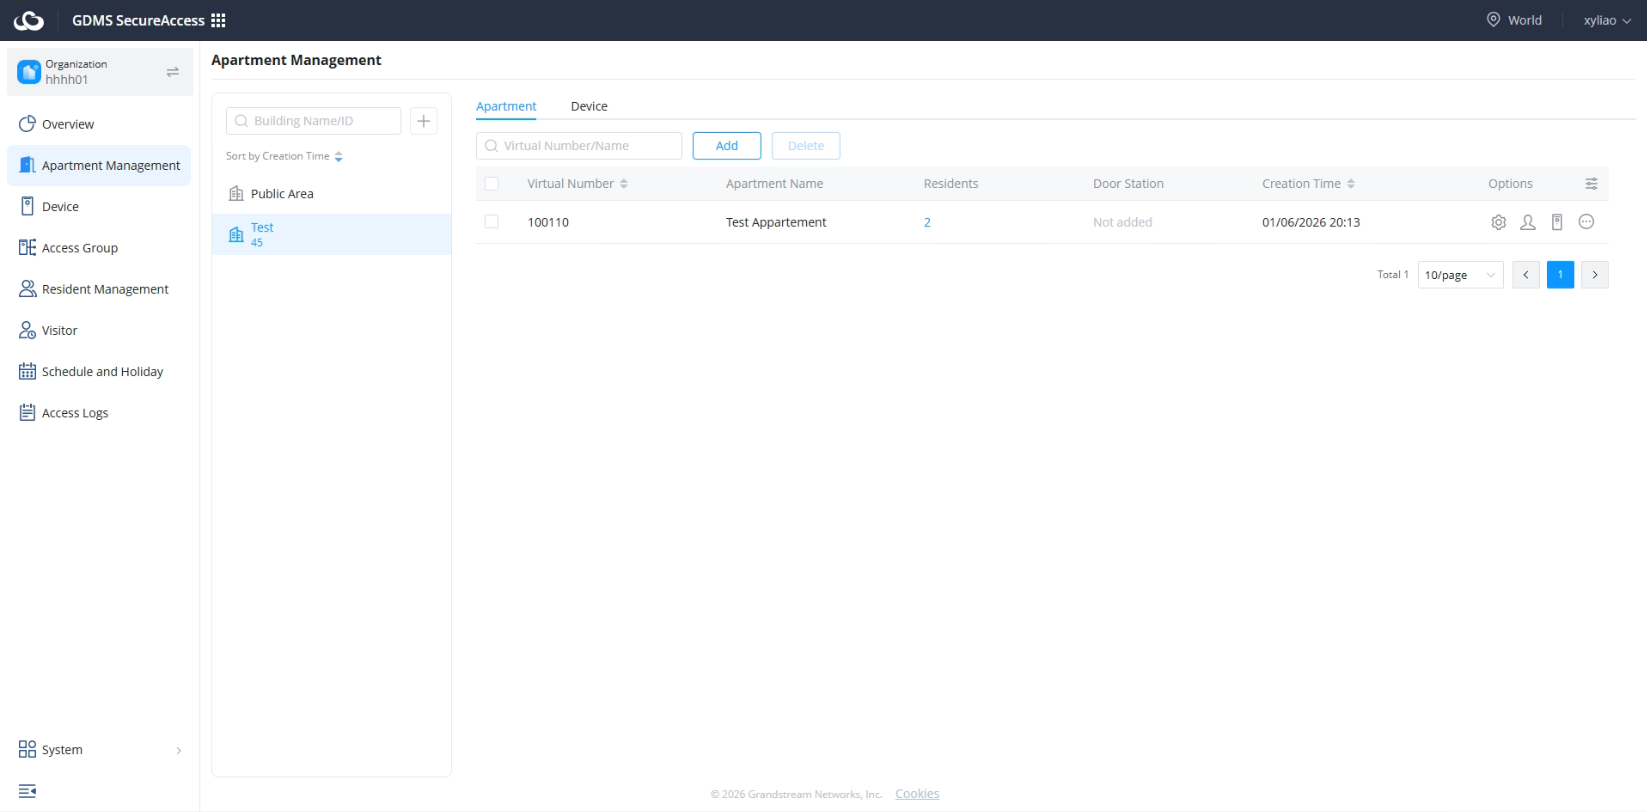
- Verify that the newly created apartment appears in the apartment list.
Once added, the list can be displayed as shown below:
Apartment-Based User Management
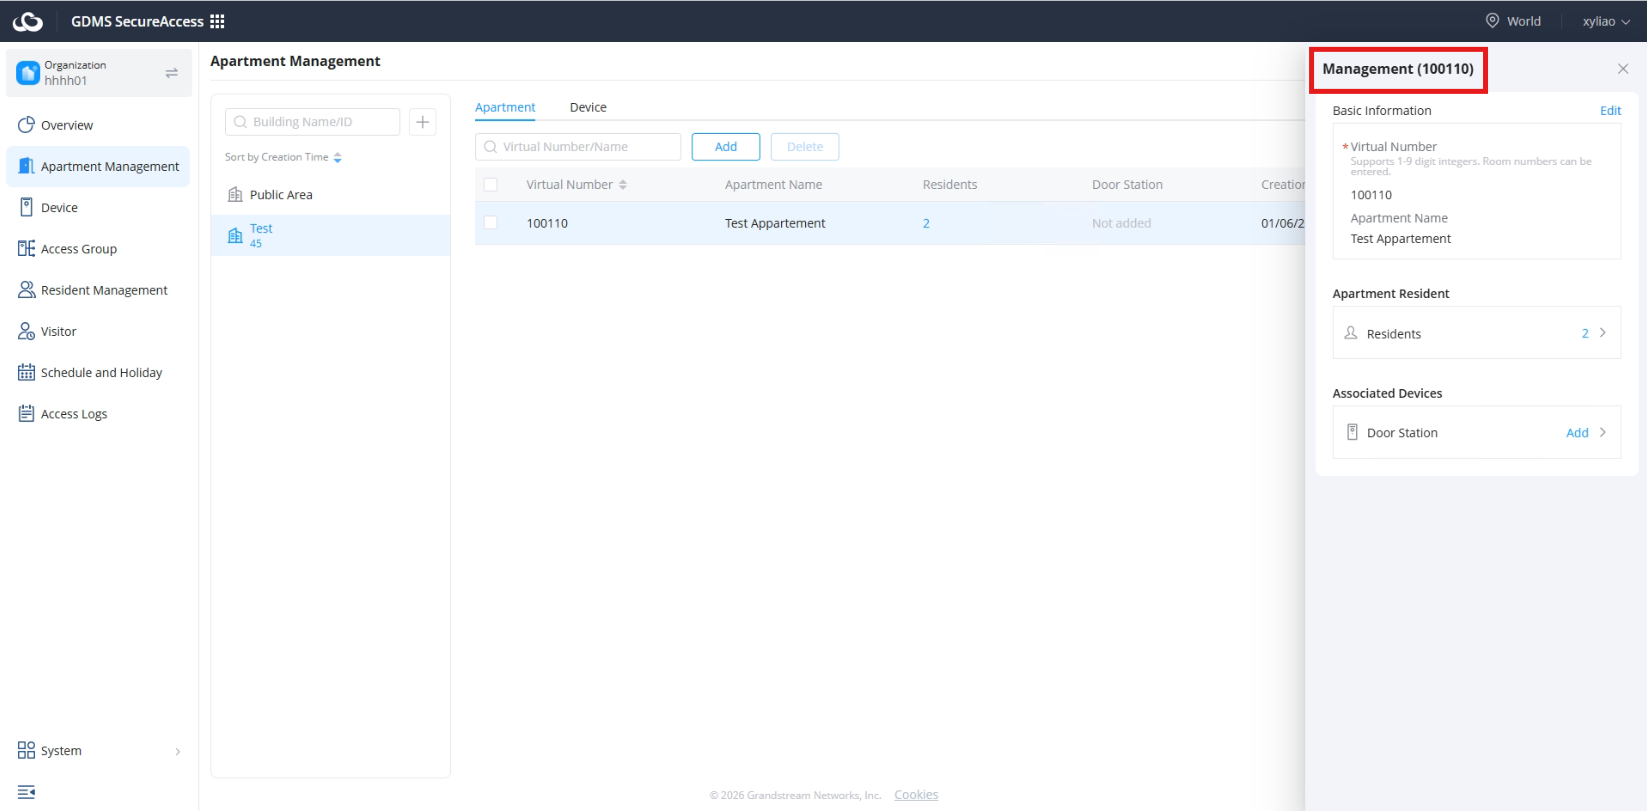
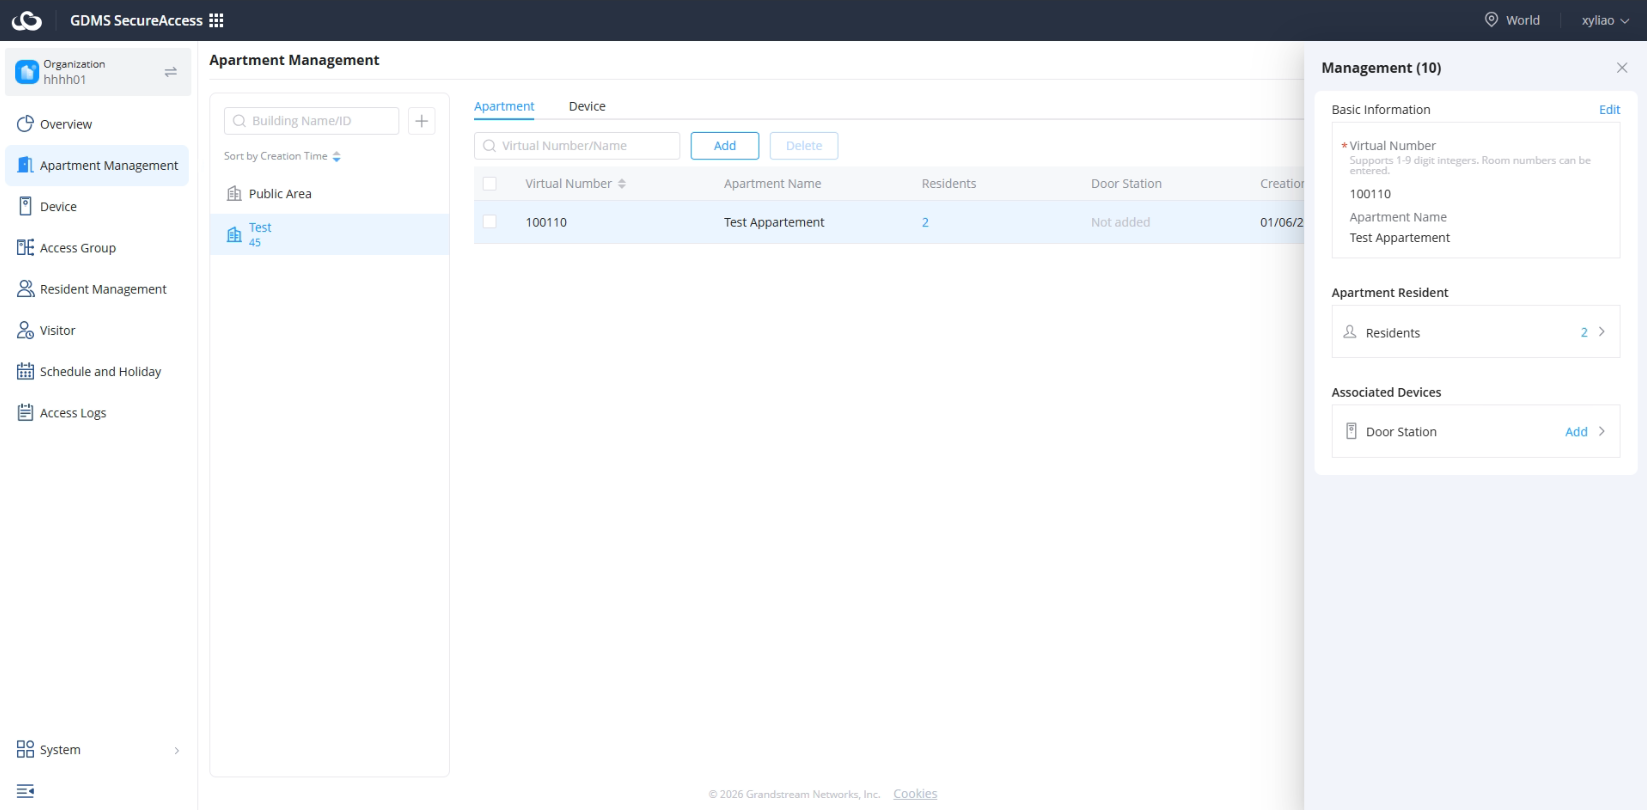
- The Apartment management page provides a centralized view of the apartment’s basic information, as well as its associated users and devices. Linking users and devices to an apartment allows for streamlined, centralized management.
- When a user is added to an apartment, the system automatically assigns them to the default access group of the building to which the apartment belongs. Once authorized, the user will be able to unlock the access control devices in the apartment’s public areas.
Device Association
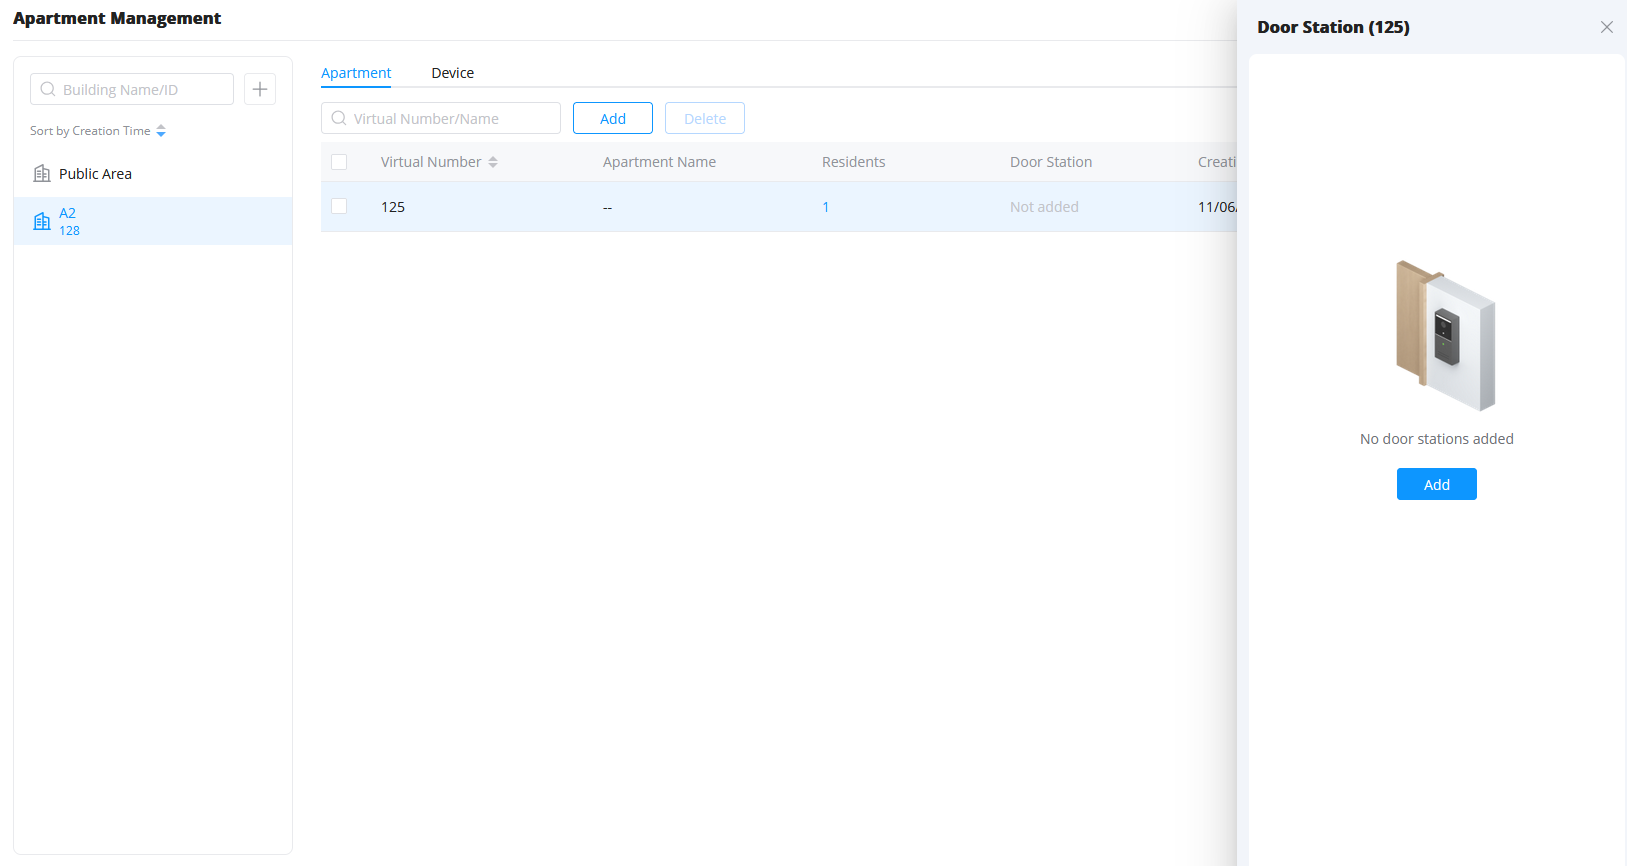
Administrators can associate a door station with an apartment, enabling calls, access requests, and resident communication between the apartment and the assigned door station.
To associate a door station:
- Navigate to Apartment Management.
- Select the desired Building and Apartment from the apartment list.
- Click the Door Station field or select the apartment to open the Door Station panel.
- Click Add.
- Select the door station to be associated with the apartment.
- Verify the device information and association settings.
- Click Save to complete the association.
An apartment can be associated with one or more door stations, depending on the deployment requirements. Once associated, the door station can be used for resident calls, visitor access requests, and apartment access control functions.
User Association
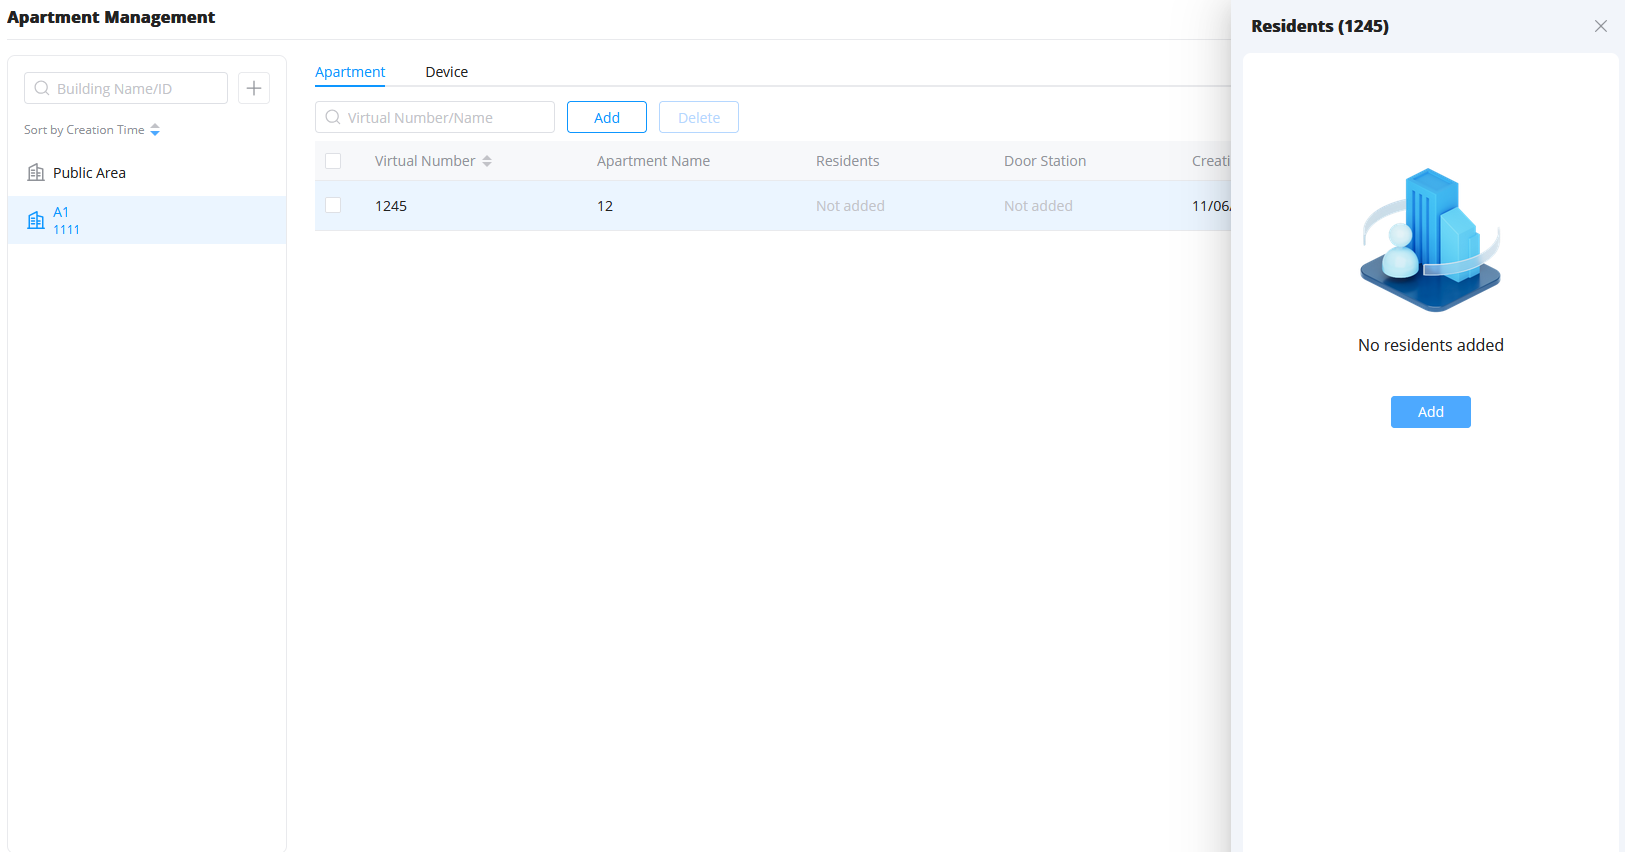
Administrators can add residents to an apartment, allowing them to be associated with a specific unit for access control, visitor management, and resident-related services.
To add residents to an apartment:
- Navigate to Apartment Management.
- Select the desired Building and Apartment from the apartment list.
- Click the Residents field or select the apartment to open the Residents panel.
- Click Add.
- Select an existing resident or create a new resident profile, depending on system configuration.
- Enter or verify the resident information.
- Click Save to assign the resident to the apartment.
Multiple residents can be assigned to the same apartment. Once added, residents can be managed, edited, or removed from the apartment as needed.
Automatic Public Area Creation
Every residential organization automatically includes:
- One Public Area building
The Public Area is automatically generated by the platform and is reserved for shared public access device management.
Automatic Access Group Creation
When a building is created:
- The system automatically generates a corresponding access group associated with that building
When the building is deleted:
- The associated access group is also deleted automatically
Apartment Calling Format
Residents can be called directly from supported access control devices using a structured apartment dialing format.
The supported dialing format is:
Building ID * Virtual Number (Apartement Number) + #
Example:
- Building 1 Apartment 201
- Dial format: 1*201#
This format simplifies resident calling operations and allows visitors or delivery personnel to contact residents directly through supported access control devices.
The building and apartment identifiers used in the dialing structure are based on the configured organization hierarchy.
Default Access Group Assignment
Users added to an apartment will be automatically linked to the access group of the building to which the apartment belongs.
2. Department Management
Purpose
Department Management is used for non-residential organizations and enterprise-style deployments where organizational structures are based on departments rather than residential apartments.
This module is commonly used for:
- Offices
- Commercial facilities
- Enterprise buildings
- Corporate environments
- Administrative organizations
Department Management allows administrators to organize users, devices, and permissions according to departmental structures within the organization.
This simplifies enterprise access control deployment and centralized permission management.
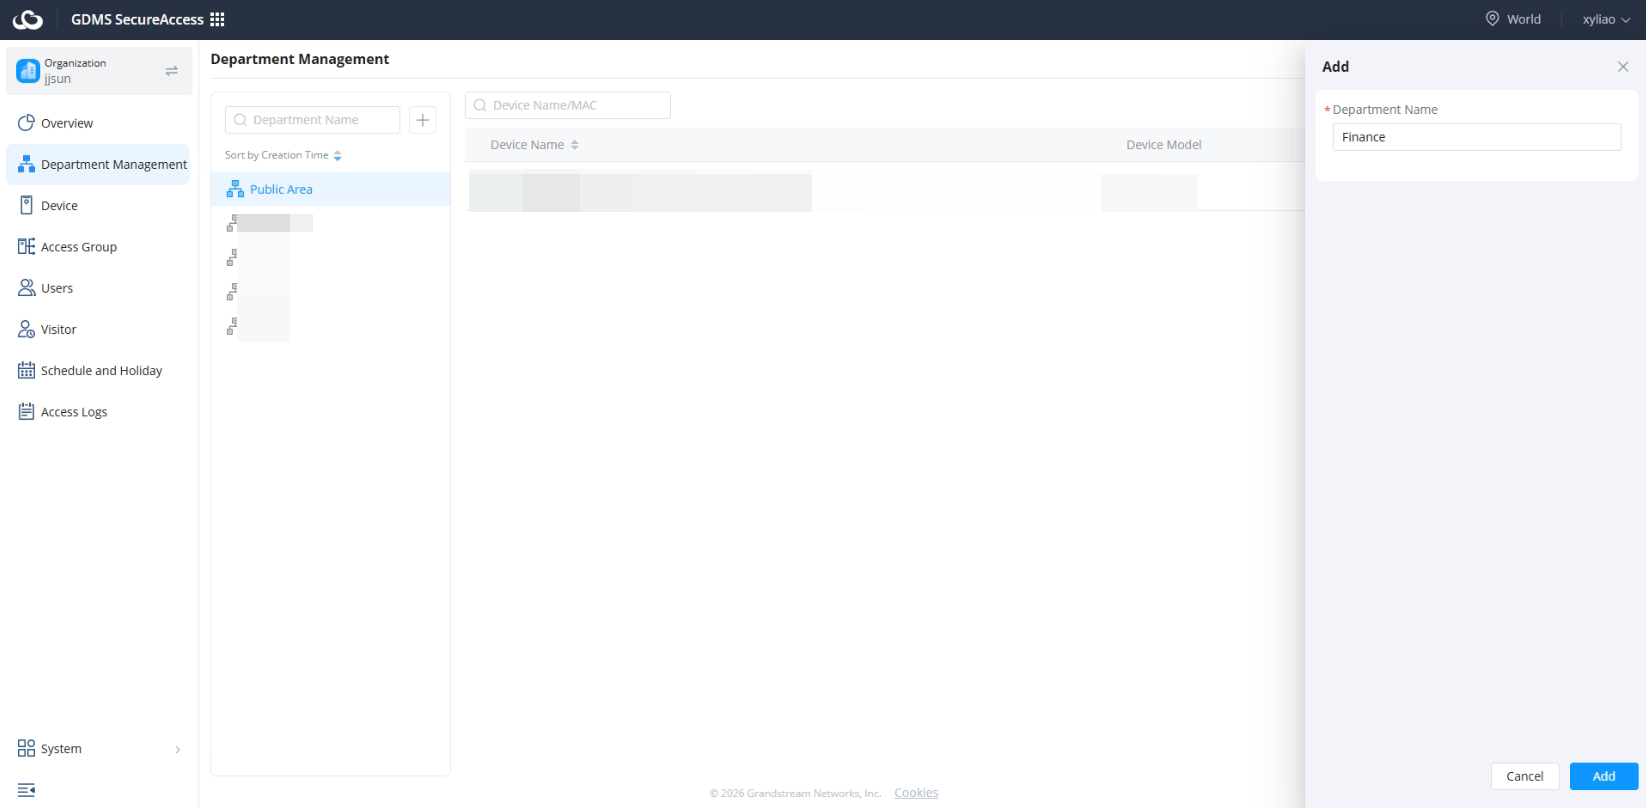
Add Department
Administrators can create departments directly within the organization hierarchy.
Edit Department
The Edit Department feature allows administrators to modify department information, assign users, and associate door stations with a selected department. This helps organize users and devices for centralized access and management.
- Navigate to Department Management from the left-side menu.
- Select the target department from the department list.
- In the Edit panel, modify the Department Name if needed.
- Under Department User, click Add to assign users to the department.
- Under Associated Devices, click Add to associate door stations with the department.
- After completing the configuration, save the changes to apply the updated department settings.
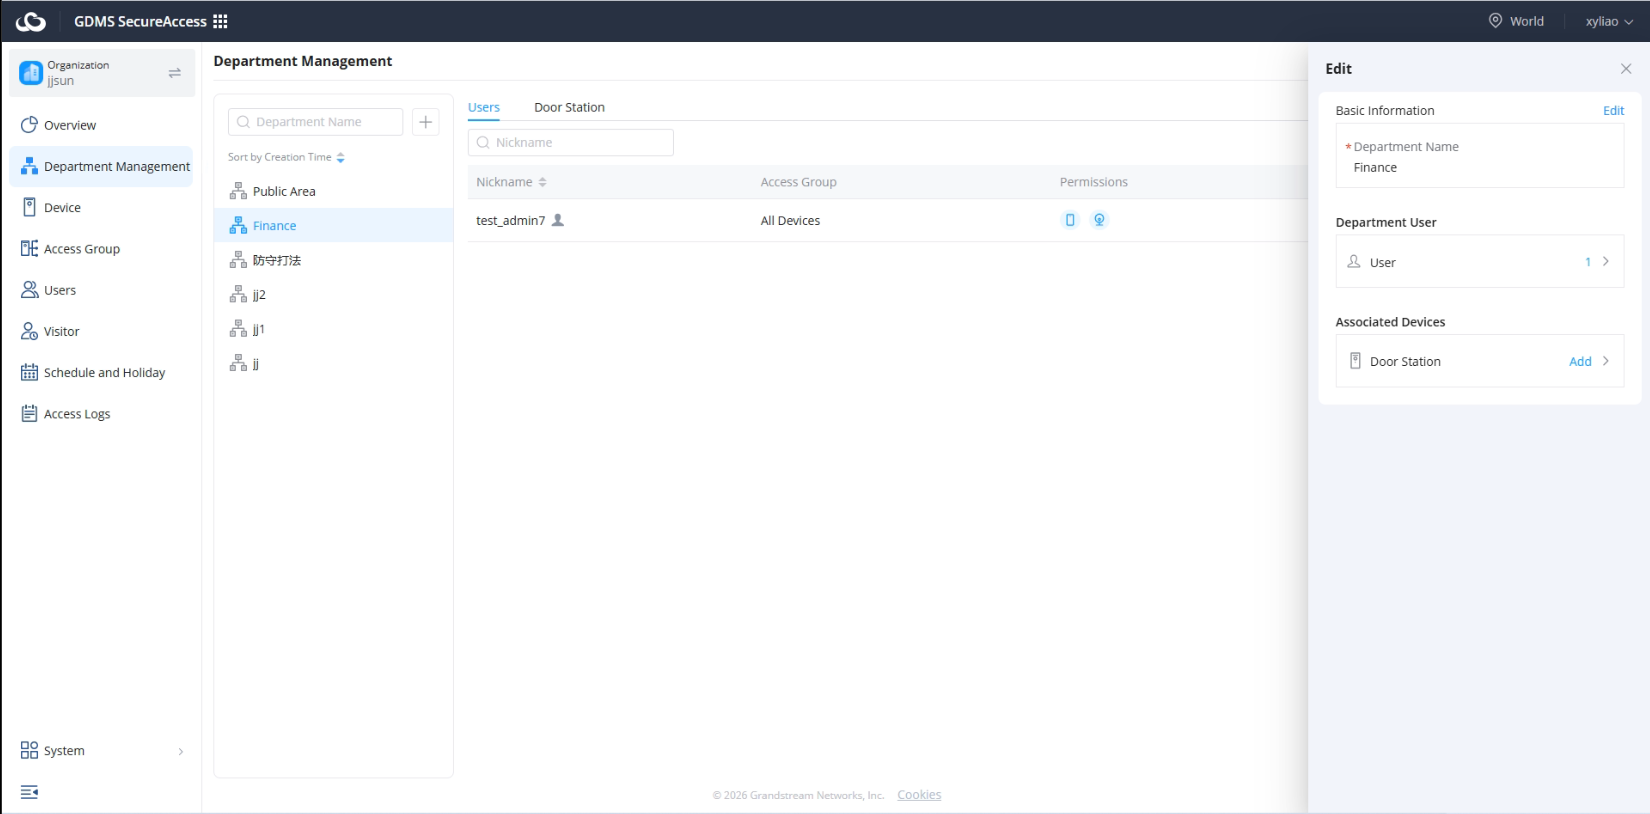
Associate Users
The Associate Users feature allows administrators to assign users to a selected department.
- Navigate to Department Management from the left-side menu.
- Select the target department from the department list.
- In the Edit panel, locate the Department User section.
- Click Add next to User.
- Select the users to associate with the department.
- Save the configuration to apply the user association settings.
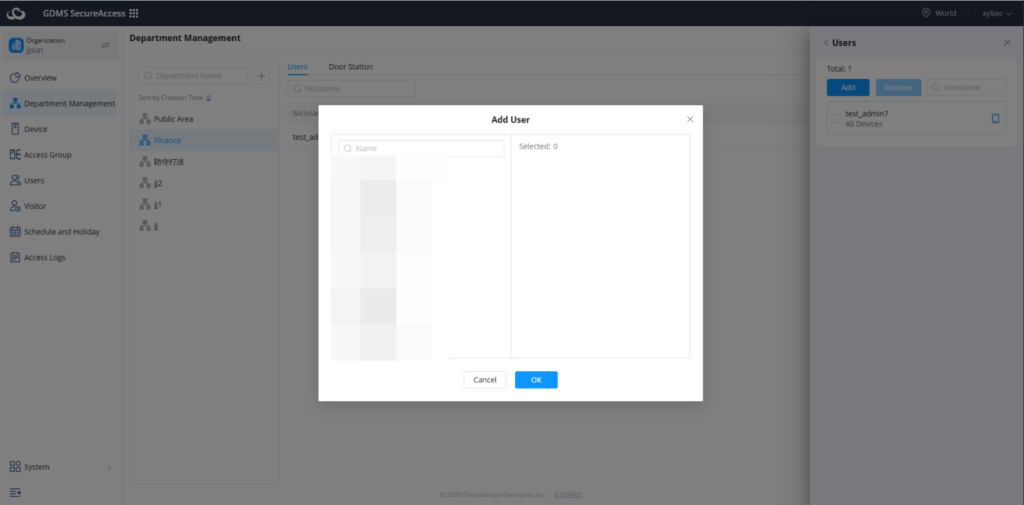
Device Management
Overview
The Device Management module is used to centrally manage all supported access control devices deployed within the organization through the GDMS SecureAccess cloud platform.
This module provides administrators with the ability to remotely configure, monitor, maintain, and manage Grandstream access control devices directly from the cloud without requiring local access to the devices.
Through this module, administrators can:
- Add devices
- Edit devices: including editing basic device information and parameter information
- Batch edit: editing selected basic information and parameter information
- Manage access groups: adding or removing associated access groups for devices
- Upgrade firmware
- Restart devices
This module acts as the primary operational center for device lifecycle management within GDMS SecureAccess.
Proper device management is critical for maintaining:
- Reliable access control operations
- Cloud synchronization
- Alarm monitoring
- Access permission enforcement
- Long-term deployment stability
1. Add Device
Purpose
The Add Device function allows administrators to register supported Grandstream access control devices into the GDMS SecureAccess cloud platform.
Once added successfully, devices become associated with the selected organization and can be remotely managed through the cloud interface.
To add a new door station, click Add and configure the following parameters.
| MAC Address | Specifies the MAC address of the door station. The MAC address is used to uniquely identify and register the device within the platform. This field is required. |
| Initial Password | Specifies the initial device password used for authentication during device onboarding. This field is required when adding a device manually. |
| Device Name | Defines a descriptive name for the door station. The name is used throughout the platform to identify the device. |
| Building | Selects the building to which the device belongs. Available buildings are displayed based on the organization’s configuration. |
| Device Purpose | Defines how the device will be used within the organization. Available options are Public Device and Associated Apartment. |
| Associated Apartment | Available when Associated Apartment is selected as the device purpose. Specifies the apartment that will be associated with the door station. |
| Access Group | Assigns the device to an access group. Access groups determine which users, residents, and credentials can interact with the device. |
| Remote Door Management Agreement | By enabling this option, administrators acknowledge that the platform is authorized to remotely unlock doors and manage access logs associated with the device. |
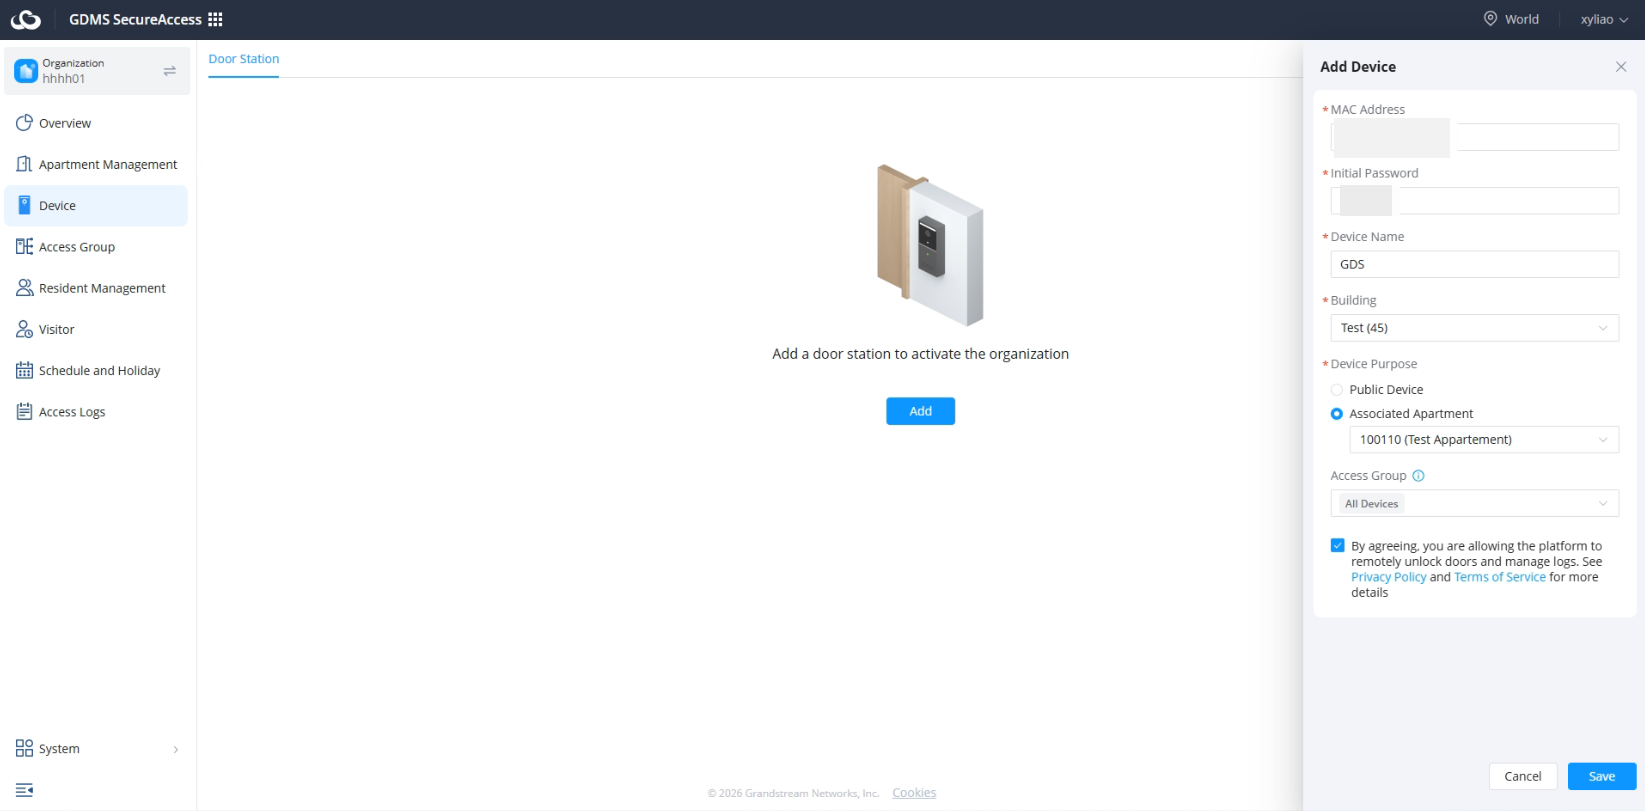
To add a device successfully, administrators must provide:
- Device MAC Address
- Initial device password
The MAC address uniquely identifies the device within the GDMS cloud platform.
The initial password is the default device password or the password configured locally on the device before onboarding.
Administrators should verify that the entered device information is accurate before submitting the onboarding request.
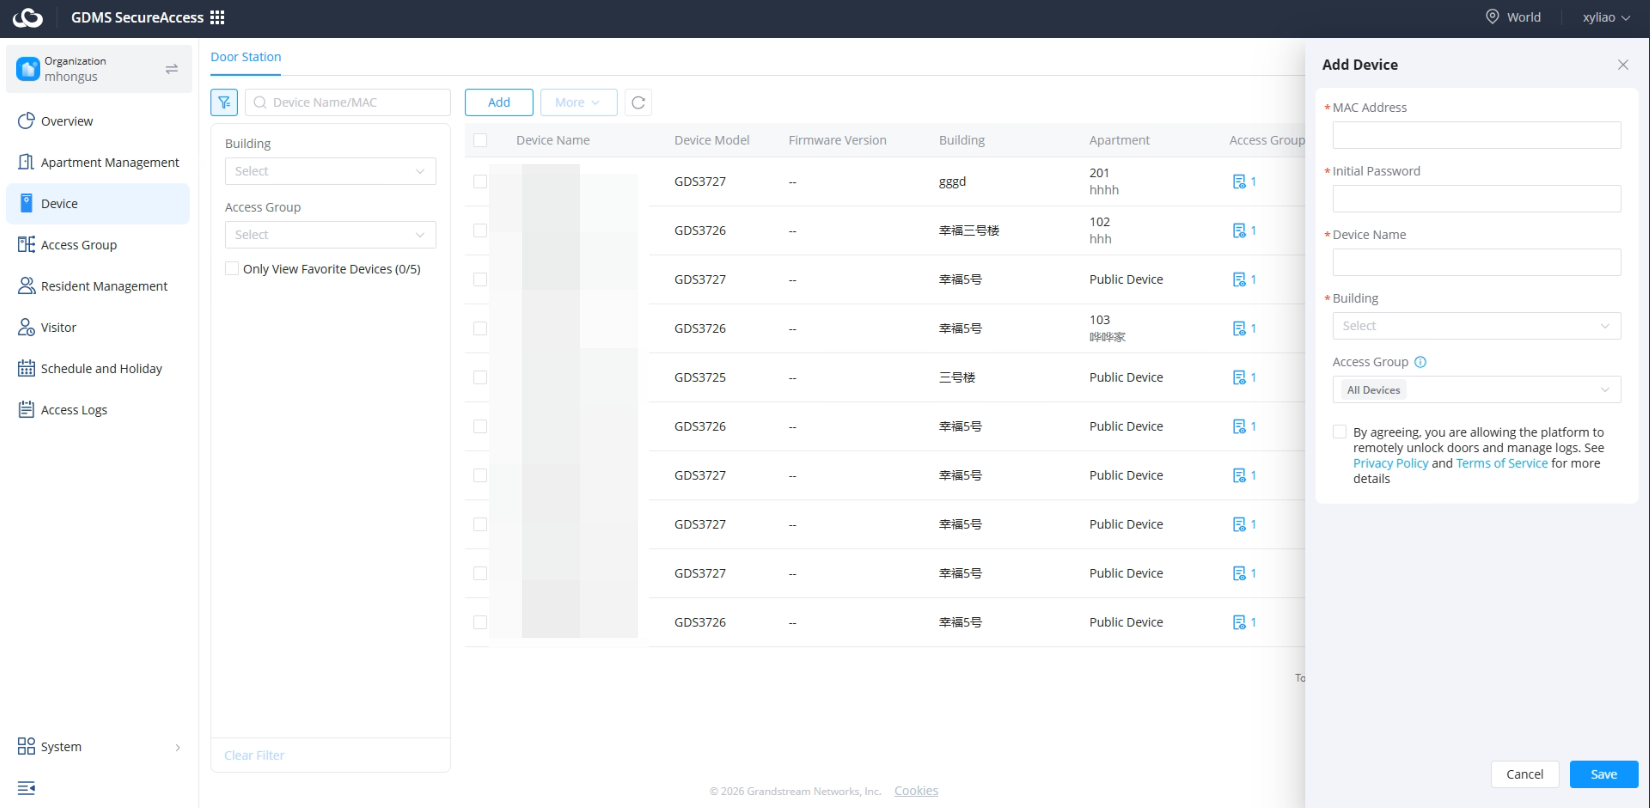
2. Manage Device Information
The Manage Device Information section allows administrators to remotely configure operational parameters and settings for onboarded access control devices. This centralized configuration capability eliminates the need for local device access in most deployment scenarios.
Administrators can configure:
- Access control settings
- Doorbell settings
- Door opening settings
- Alarm settings
- Additional device parameters
To apply and synchronize changes to supported devices via the GDMS SecureAccess cloud platform, follow these steps:
- Select the specific parameters you want to deploy to the device.
- Set the desired parameter values.
- Save the changes to deploy the configuration to the device.
Once saved, the updated settings are automatically synchronized to the supported devices through the cloud platform.
Access Control Settings
This section supports configuring the settings shown below for access control devices
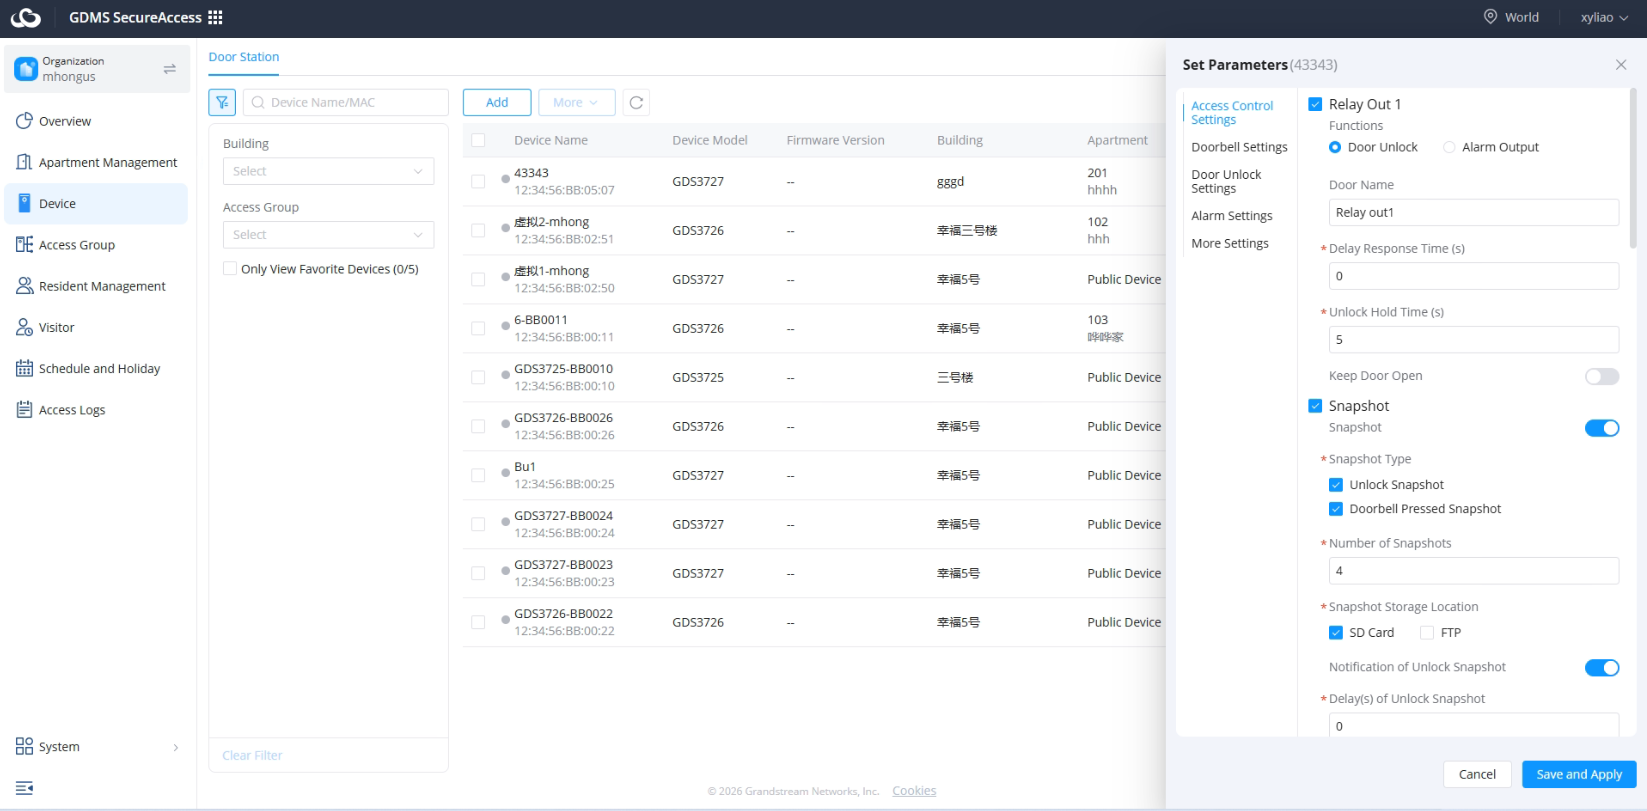
| Relay Out | Enables and configures relay output functions. |
| Function | Defines the relay purpose. Available options include Door Unlock and Alarm Output. |
| Door Name | Specifies a custom name for the controlled door. |
| Delay Response Time (s) | Specifies the delay before the relay responds to an unlock request. |
| Unlock Hold Time (s) | Specifies how long the relay remains active after a successful unlock operation. |
| Keep Door Open | Keeps the relay continuously activated, leaving the door unlocked. |
| Snapshot | Enables image capture functionality. |
| Snapshot Type | Defines the events that trigger image capture, such as unlock operations or doorbell presses. |
| Number of Snapshots | Specifies the number of images captured for each event. |
| Snapshot Storage Location | Defines where snapshots are stored. Available options include SD Card and FTP Server. |
| Notification of Unlock Snapshot | Sends notifications when unlock-related snapshots are generated. |
| Delay(s) of Unlock Snapshot | Defines the delay before an unlock snapshot is captured. |
| Notification of Doorbell Pressed Snapshot | Sends notifications when a doorbell-triggered snapshot is generated. |
| Delay(s) of Doorbell Pressed Snapshot | Defines the delay before a doorbell snapshot is captured. |
| Doorbell Call Mode | Defines how calls are routed when multiple destinations are configured. Available options include Ring in Parallel and Ring in Series. |
| Press the Doorbell to Call | Enables doorbell call functionality and allows call destinations to be configured. |
| Schedule | Defines when the doorbell call function is active. |
| Call Number | Specifies the SIP extension(s) or call destination(s) that receive doorbell calls. |
Doorbell Settings
Doorbell Settings control communication and call-related behavior for supported door station devices.
Administrators can configure:
- SIP account configuration
- Call routing
- Auto-answer behavior
These settings determine how devices communicate with users, interphones, or SIP endpoints during call operations.
Proper SIP configuration is important for ensuring reliable communication between access control devices and associated communication endpoints.
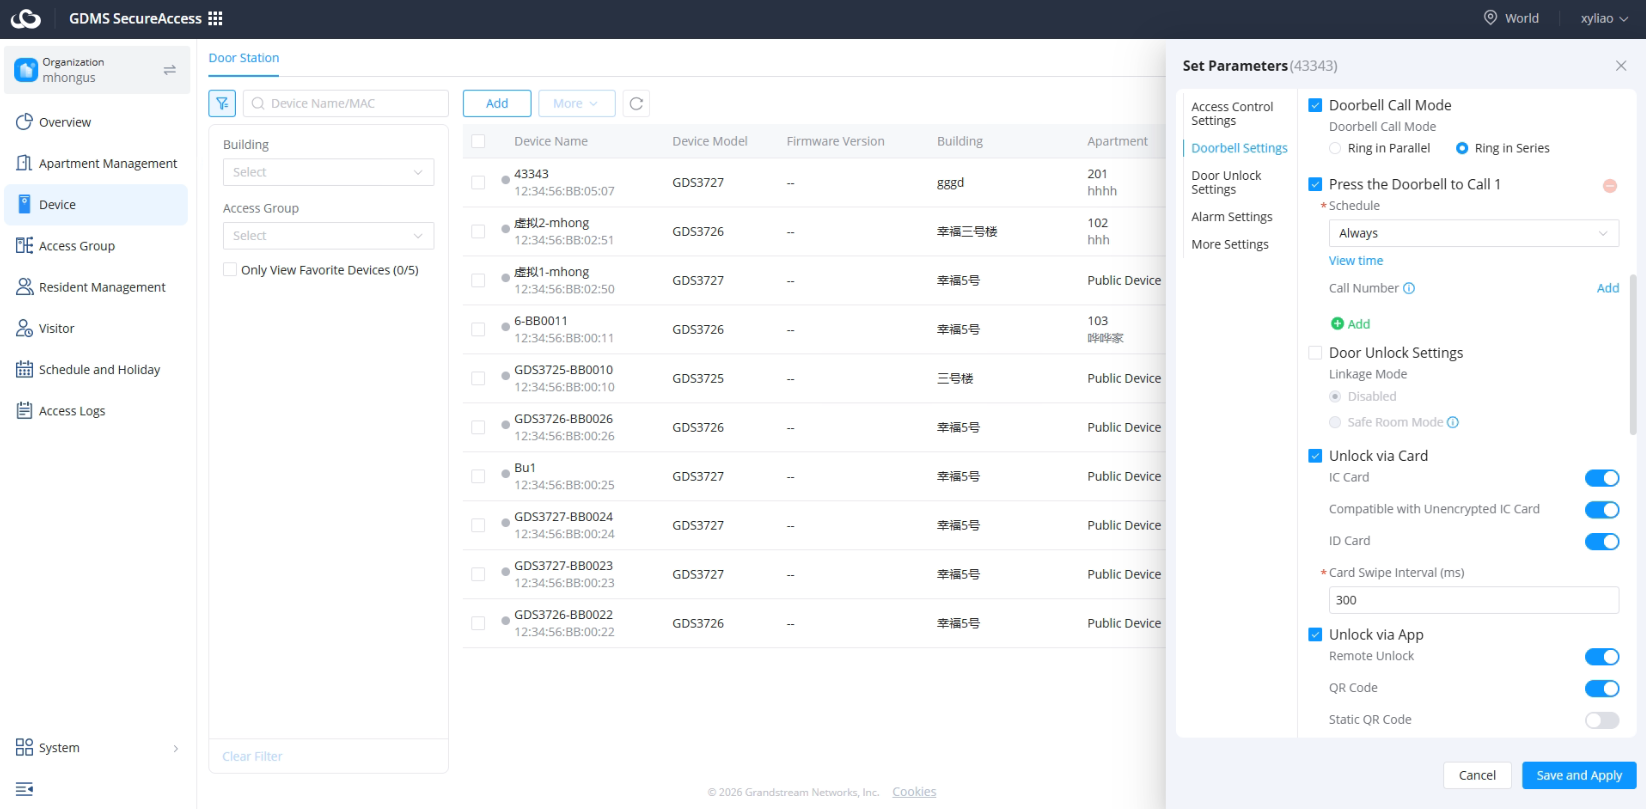
| Doorbell Call Mode | Determines how multiple call destinations are handled. |
| Ring in Parallel | Rings all configured call destinations simultaneously. |
| Ring in Series | Rings configured call destinations sequentially until answered. |
| Press the Doorbell to Call | Enables visitor call functionality when the doorbell button is pressed. |
| Schedule | Defines the active schedule for the doorbell call feature. |
| Call Number | Specifies the destination extensions or users that receive calls. |
| Safe Room Mode | Restricts unlock behavior according to security requirements. |
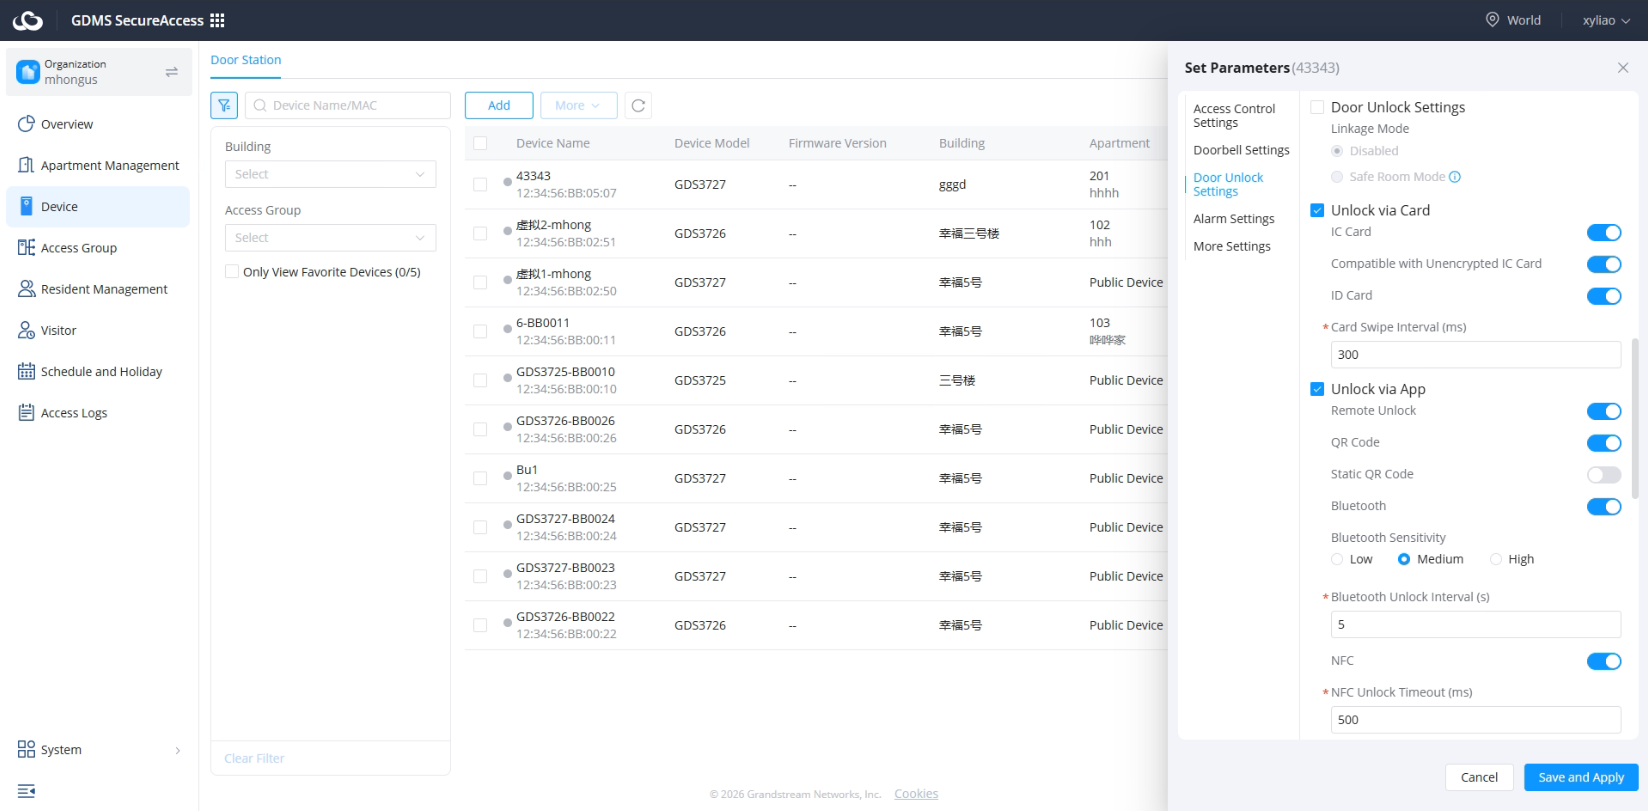
Door Unlock Settings
The Door Unlock Settings section controls supported door access methods and intrusion monitoring functions.
| Door Unlock Settings | Enables door unlock linkage options associated with doorbell calls. |
| Linkage Mode | Defines the device’s operating mode, such as the indoor unit mode. |
| Safe Room Mode | When Safe Room Mode is enabled, the door cannot be opened from the outside while the room is occupied. It supports two working modes: Indoor Station and Outdoor Station. |
| Door Access Code Type | Defines the local door access code type. Options include Personal Code, Universal Code, and Card and Personal Code. |
| Universal Code | Sets a door access code that all card users share to gain entry. |
| Universal Code Door Selection | Defines which doors can be opened using the universal code. |
| Universal Code Access Time | Specifies the time periods during which the universal code can be used to open doors. |
| Unlock via Card | Enables card-based door access. |
| IC Card | Enables or disables door access based on IC cards. |
| Allowed Card Types | Defines the types of cards permitted for IC card door access. |
| Compatible with Unencrypted IC Card | Allows IC cards to be compatible with legacy or unencrypted IC cards. |
| ID Card | Enables or disables door access based on ID cards. |
| Card Swipe Interval (ms) | Defines the minimum interval between two valid card swipes to prevent duplicate access triggers. |
| Unlock via App | Enables application-based unlocking methods. |
| Remote Door Opening | Allows users to open the door remotely via a mobile application. |
| QR Code Door Opening | Enables door access based on QR codes. |
| Static QR Code | Enables predefined static QR code access functionality. |
| Bluetooth | Enables door access based on Bluetooth. |
| Bluetooth Sensitivity | Defines Bluetooth detection sensitivity. Available options include Low, Medium, and High. |
| Bluetooth Unlock Interval (s) | Defines the minimum time interval between Bluetooth unlock events. |
| NFC | Enables door opening functionality based on NFC. |
| NFC Unlock Timeout (ms) | Defines the timeout duration for NFC authentication requests. |
| Alarm | Enables intrusion and loitering detection features. |
| Intrusion/Loitering Alarm | Generates alarms when suspicious activity is detected near the device. |
| Detection Area | Defines the monitored area. Available options include All Regions and Custom. |
| Duration of Loitering (s) | Defines how long a person must remain in the monitored area before an alarm is triggered. |
| Alarm Schedule | Defines when intrusion and loitering monitoring is active. |
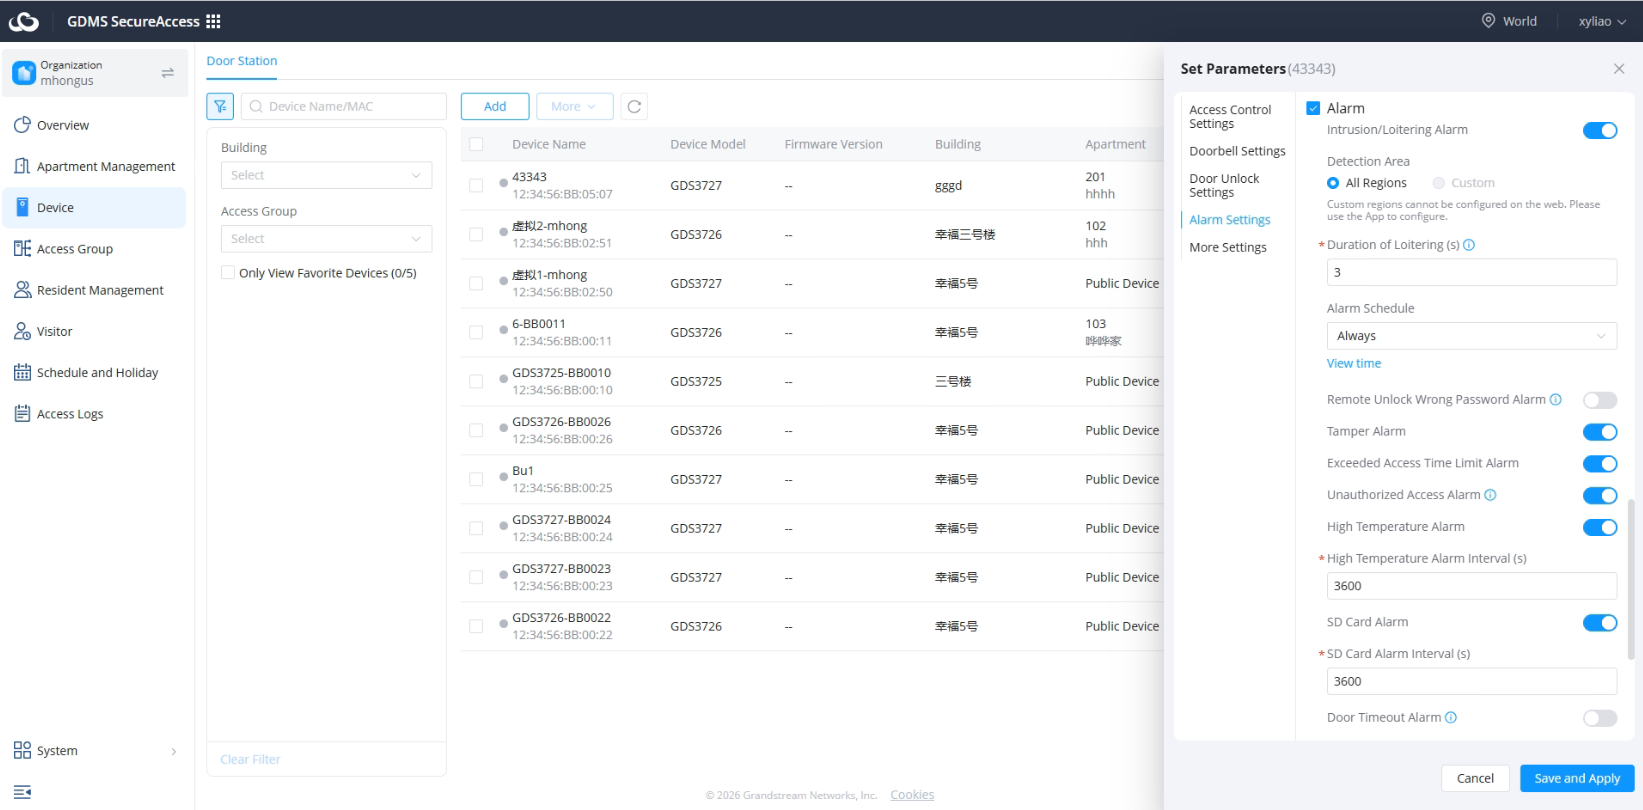
Alarm Settings
Alarm Settings define how devices detect and report abnormal security or operational conditions.
Administrators can configure:
- Forced entry detection
- Door held open alarms
- Tamper alarms
Alarm notifications are synchronized to the GDMS SecureAccess platform and can be monitored centrally through the Notifications and Alarm Information sections.
Proper alarm configuration improves security visibility and helps administrators respond quickly to abnormal conditions.
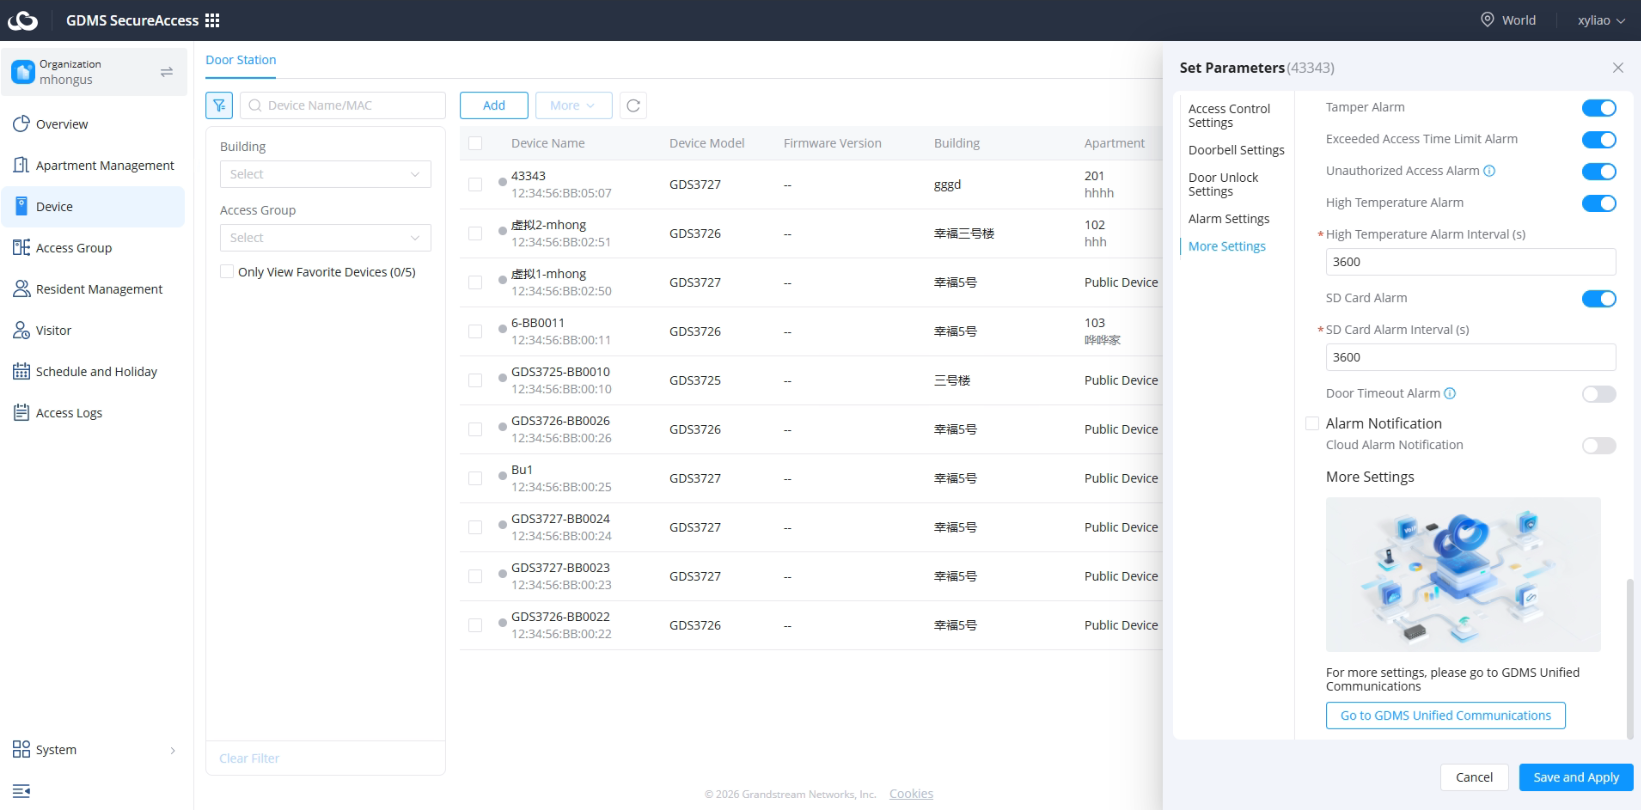
| Alarm | Enables intrusion and loitering detection functions. |
| Loitering/Intrusion Alarm | Triggers alarms when intrusion or loitering activities are detected. |
| Detection Zone | Defines the monitoring detection zone for intrusion and loitering alarms. |
| Loitering Duration (seconds) | Defines the minimum time a person must remain after detection to trigger a loitering alarm. |
| Alarm Schedule | Defines the activation times for intrusion and loitering monitoring. |
| Remote Unlock Password Error Alarm | When an account uses SIP Message, SIP DTMF, HTTP API, APP, or other methods to remotely unlock the door, and the number of incorrect password entries exceeds the configured limit within a specified period, the system temporarily blocks further attempts by that account and generates an alarm. |
| Lockout Duration | Defines the period during which remote unlocking is disabled for an account after multiple remote unlock password errors. The error count resets after the lockout duration expires. |
| Duress Password Alarm | When enabled, entering a duress password unlocks the door and generates an alarm without activating a local alarm sound. |
| Tamper Alarm | When enabled, an alarm is triggered if the device detects violent removal or tampering. The alarm remains active until the tampering condition is resolved. |
| Access Time Limit Exceeded Alarm | Triggers an alarm when a user attempts to open the door outside their configured access schedule. |
| Unauthorized Access Alarm | Generates an alarm when an unauthorized access attempt is detected. |
| High Temperature Alarm | Generates an alarm when the device temperature exceeds the configured threshold. |
| High Temperature Alarm Interval (seconds) | Defines the minimum interval between high-temperature alarm notifications. |
| SD Card Alarm | Enables alarms related to SD card anomalies, failures, or storage issues detected by the device. |
| SD Card Alarm Interval (seconds) | Defines the interval between repeated SD card alarm notifications. |
| Mantrap Alarm | Generates an alarm when a card is swiped at the outer door while the access control device is not in an idle state. |
| Door Open Timeout Alarm | Generates an alarm when the door remains open longer than the configured threshold. |
| Door Open Timeout Duration | Defines the duration a door may remain open before a timeout alarm is triggered. |
| Alarm Notification | Enables cloud alarm notification services. |
| Cloud Call Alarm | Initiates a cloud SIP call to selected app users when configured alarms are triggered. |
| Cloud Call Number | Defines the users who receive alarm calls and notifications. |
More Settings
The More Settings section provides access to additional advanced configuration options that are managed through GDMS Unified Communications.
| Go to GDMS Unified Communications | Opens the GDMS Unified Communications platform to access additional device configuration options not available within the current interface. |
3. Device Details
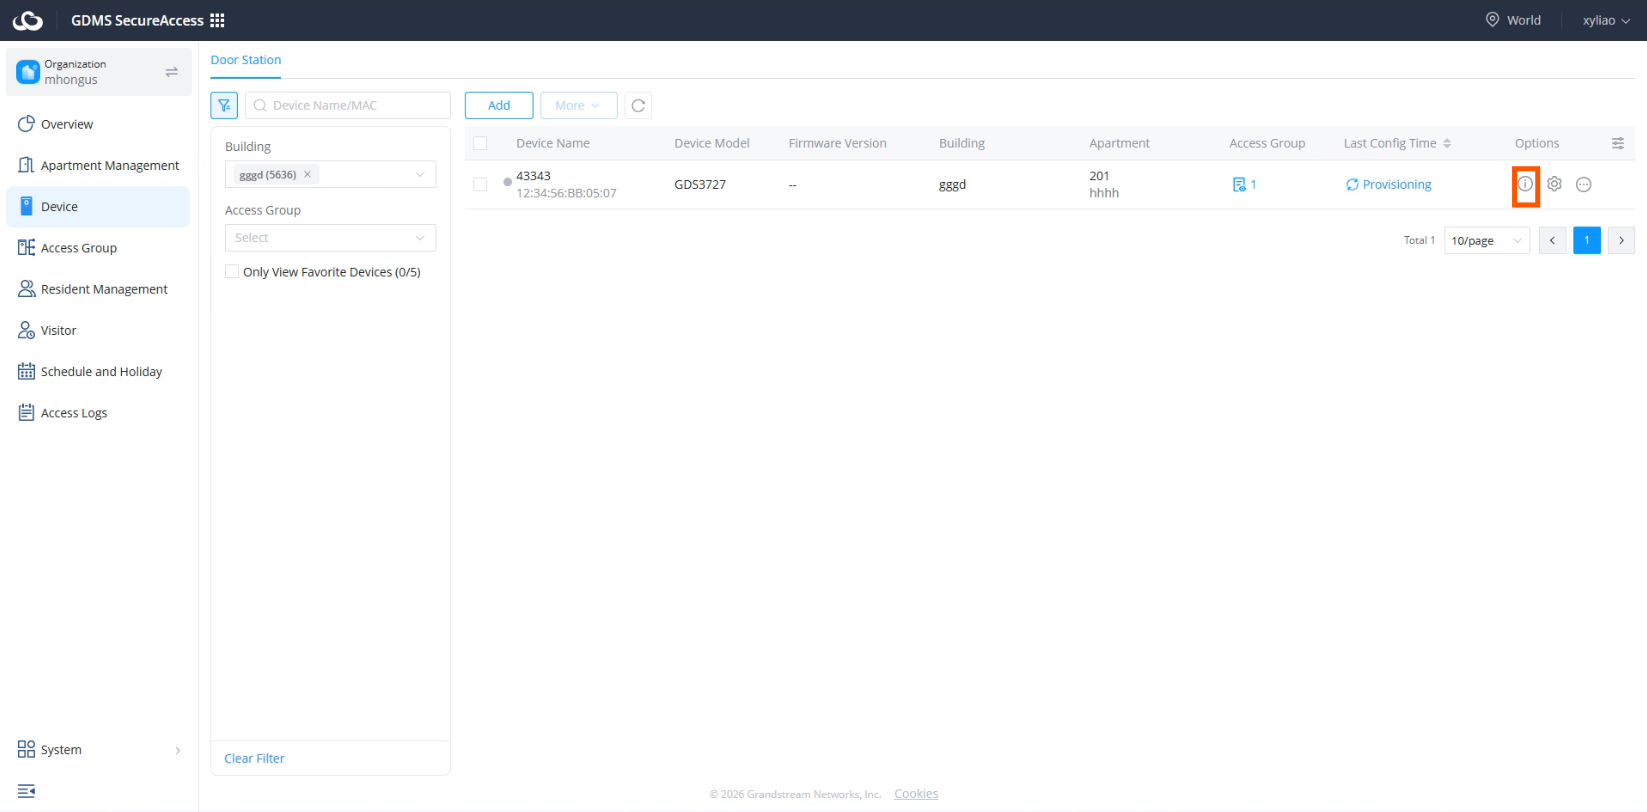
The Device Details page provides detailed operational information regarding individual access control devices.
Administrators can use this page to review device status, licensing information, storage information, and operational records.
The Device Details page provides:
- Device information
- Firmware version
- Cloud package details
- Local storage status
- Authorization information
- Door opening logs
Device Information
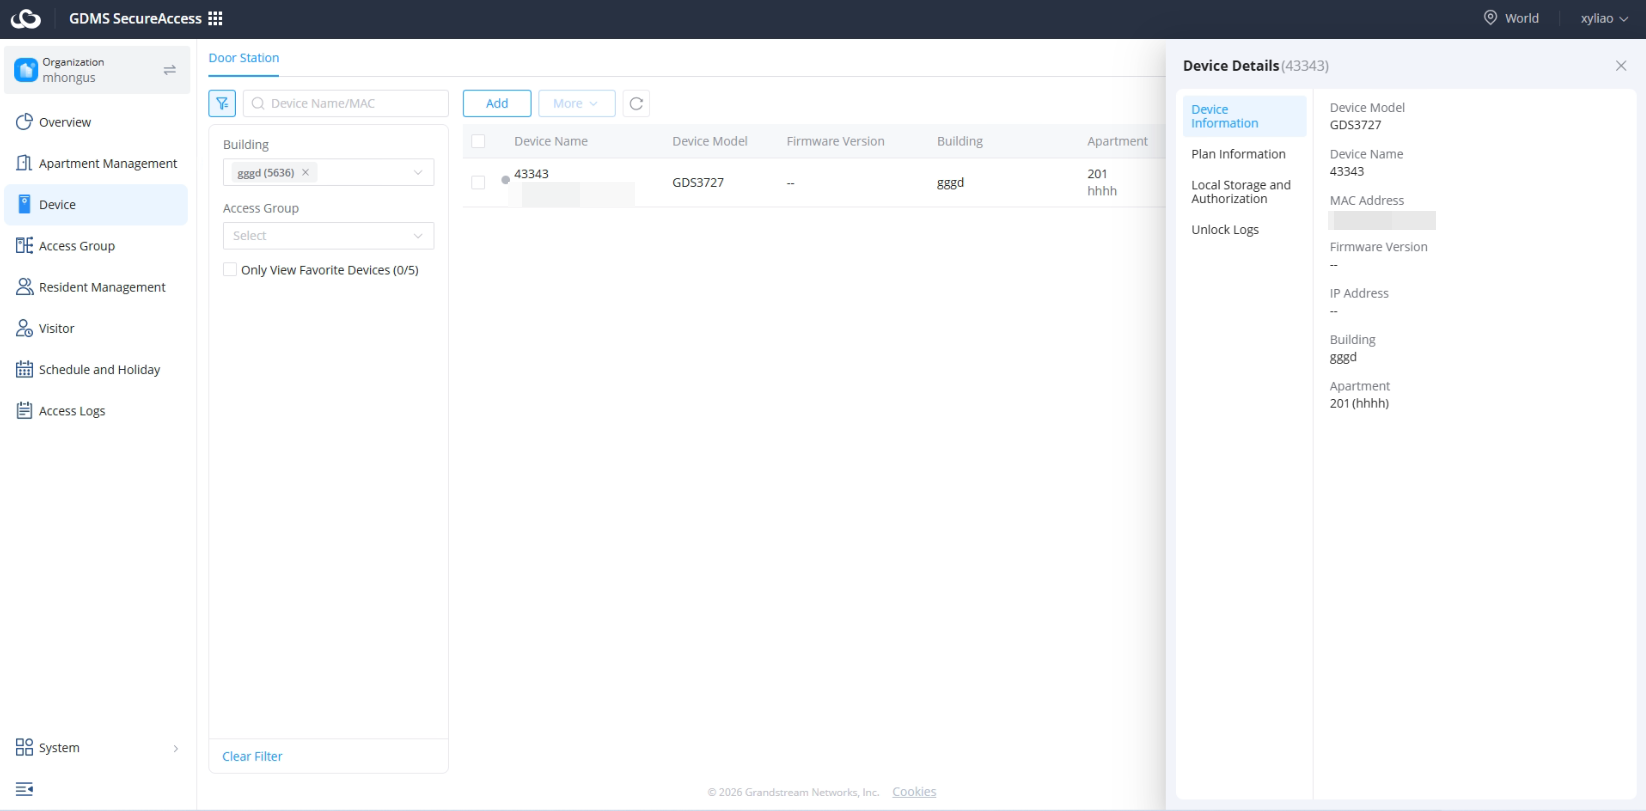
Basic device information includes:
- Device model
- Device name
- MAC address
- Firmware version
- IP Address
- Building
- Apartement
This information helps administrators identify and monitor devices throughout the deployment.
Plan Information
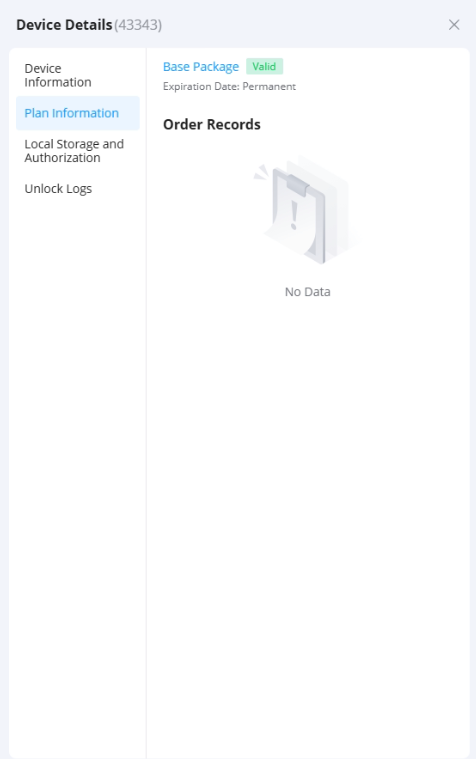
Displays cloud authorization and plan details associated with the device, including:
- Plan Name
- Expiration Date
- Order History
Local Storage and Authorization
When an SD card is inserted, local storage information is displayed, including:
- Total, used, and available storage space on the SD card;
- Allow SecureAccess to access local device files: When enabled, captured images and videos stored locally on the device can be viewed via SecureAccess.
- Format SD card: Supports deleting data from the SD card through SecureAccess.
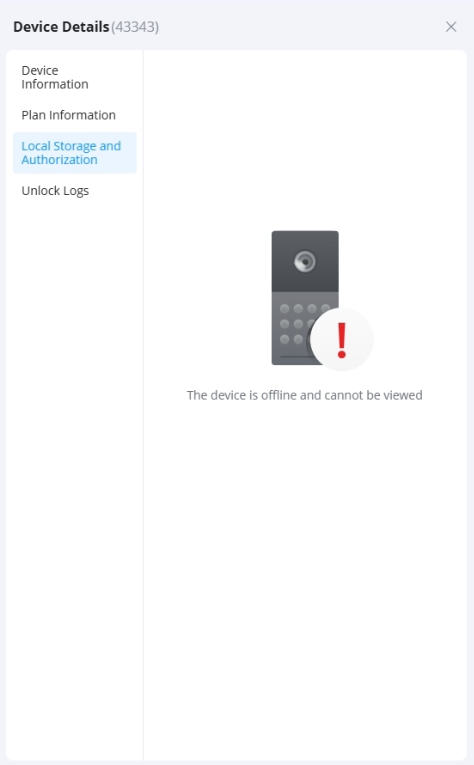
This helps verify successful cloud association. The device will need to be online to display such information. Otherwise, it will display the following message:
Unlock Logs
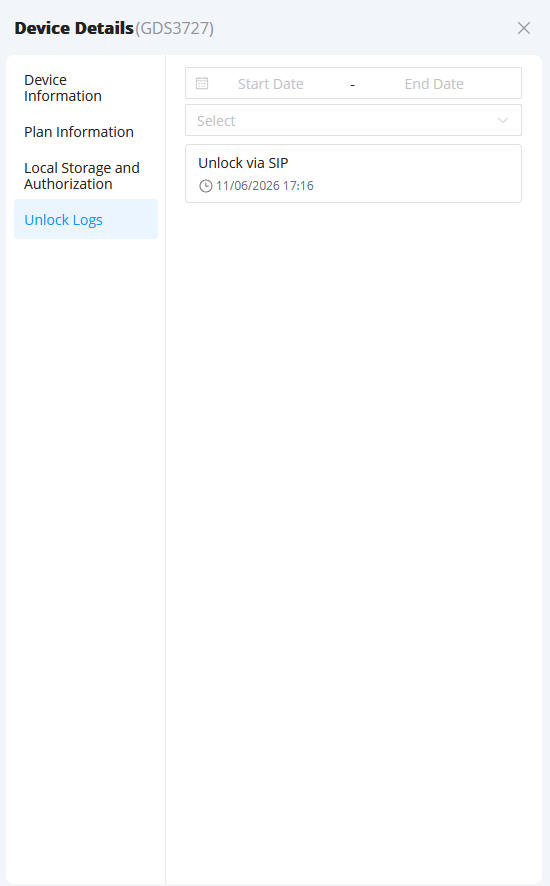
Provides visibility into door access activity generated by the device.
This information includes:
- Access timestamps
- Access methods
- User-related events
This simplifies operational auditing and access activity monitoring.
4. Device-Associated Access Groups
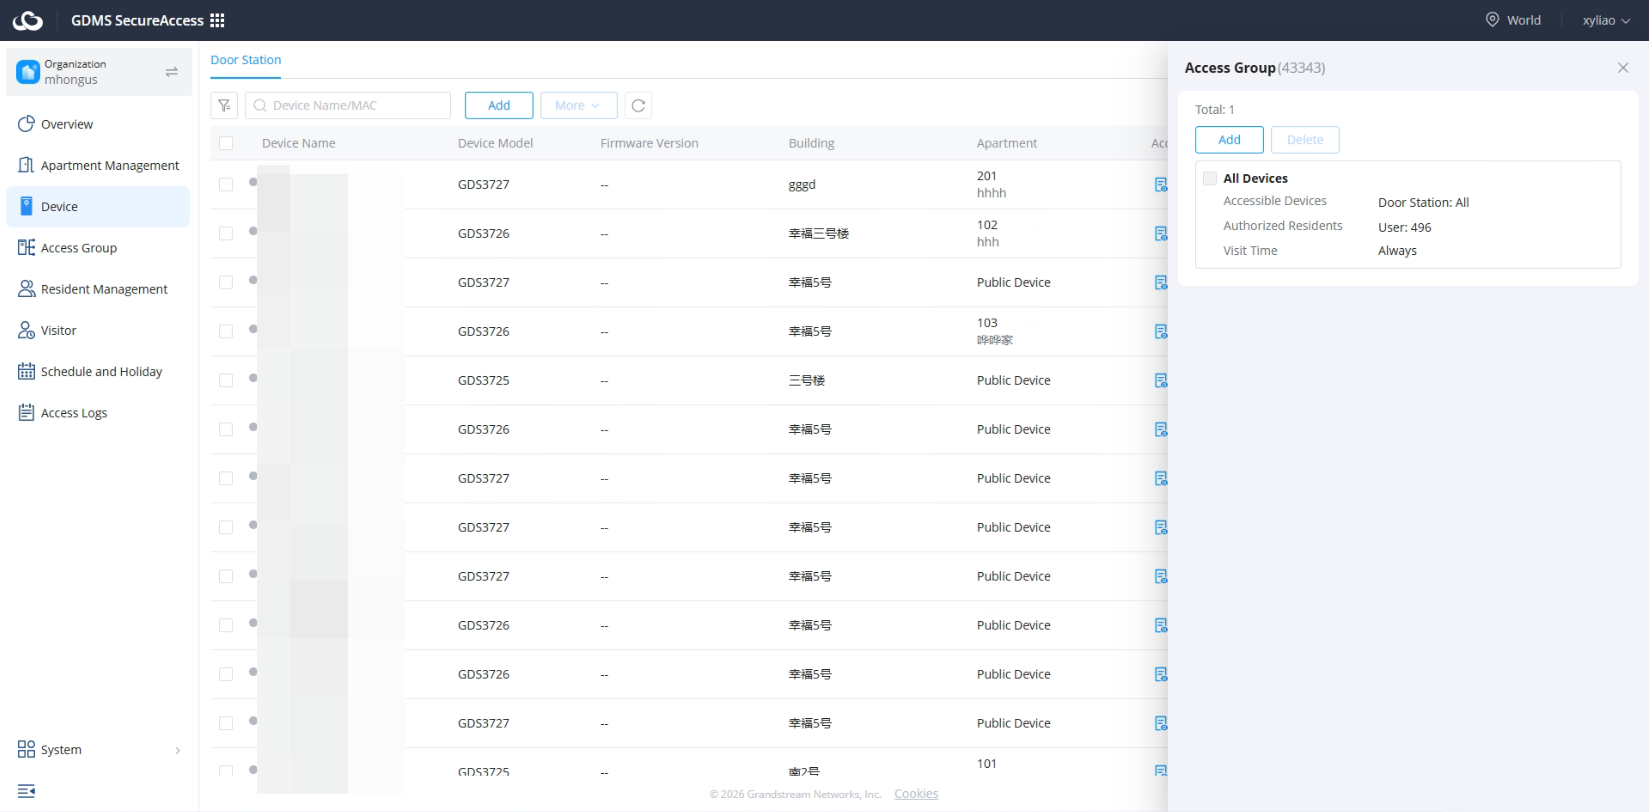
The Device-Associated Access Groups section allows administrators to manage relationships between devices and access groups.
This association mechanism controls which groups of users are authorized to access specific devices.
Administrators can:
- View assigned access groups
- Add devices to additional access groups
- Remove associations
5. Firmware Upgrade
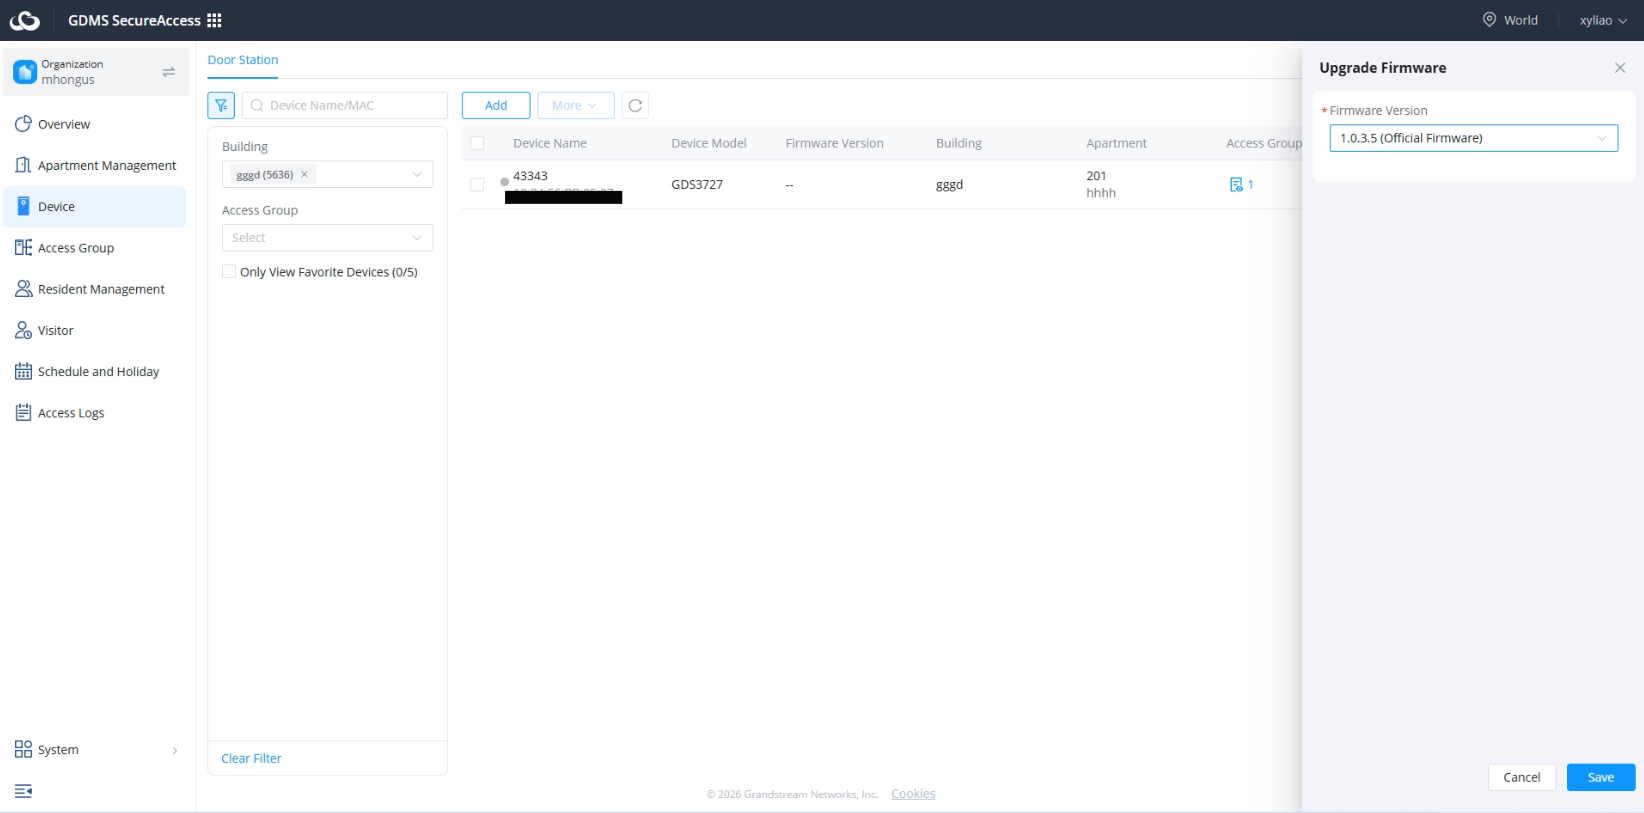
The firmware upgrade feature allows administrators to remotely upgrade supported access control devices via GDMS SecureAccess. Administrators can perform the following operations remotely:
- Specify a firmware version and upgrade.
- Select multiple devices in bulk, specify a firmware version, and upgrade.
Before performing firmware upgrades, administrators should follow recommended operational practices to minimize service interruptions.
Before upgrading:
- Verify device compatibility
- Ensure stable internet connectivity
- Schedule upgrades during low-traffic periods
Additional recommendations include:
- Avoid interrupting device power during upgrades
- Review firmware release notes before deployment
- Upgrade devices gradually in large deployments where applicable
Proper upgrade planning helps maintain deployment stability and operational continuity.
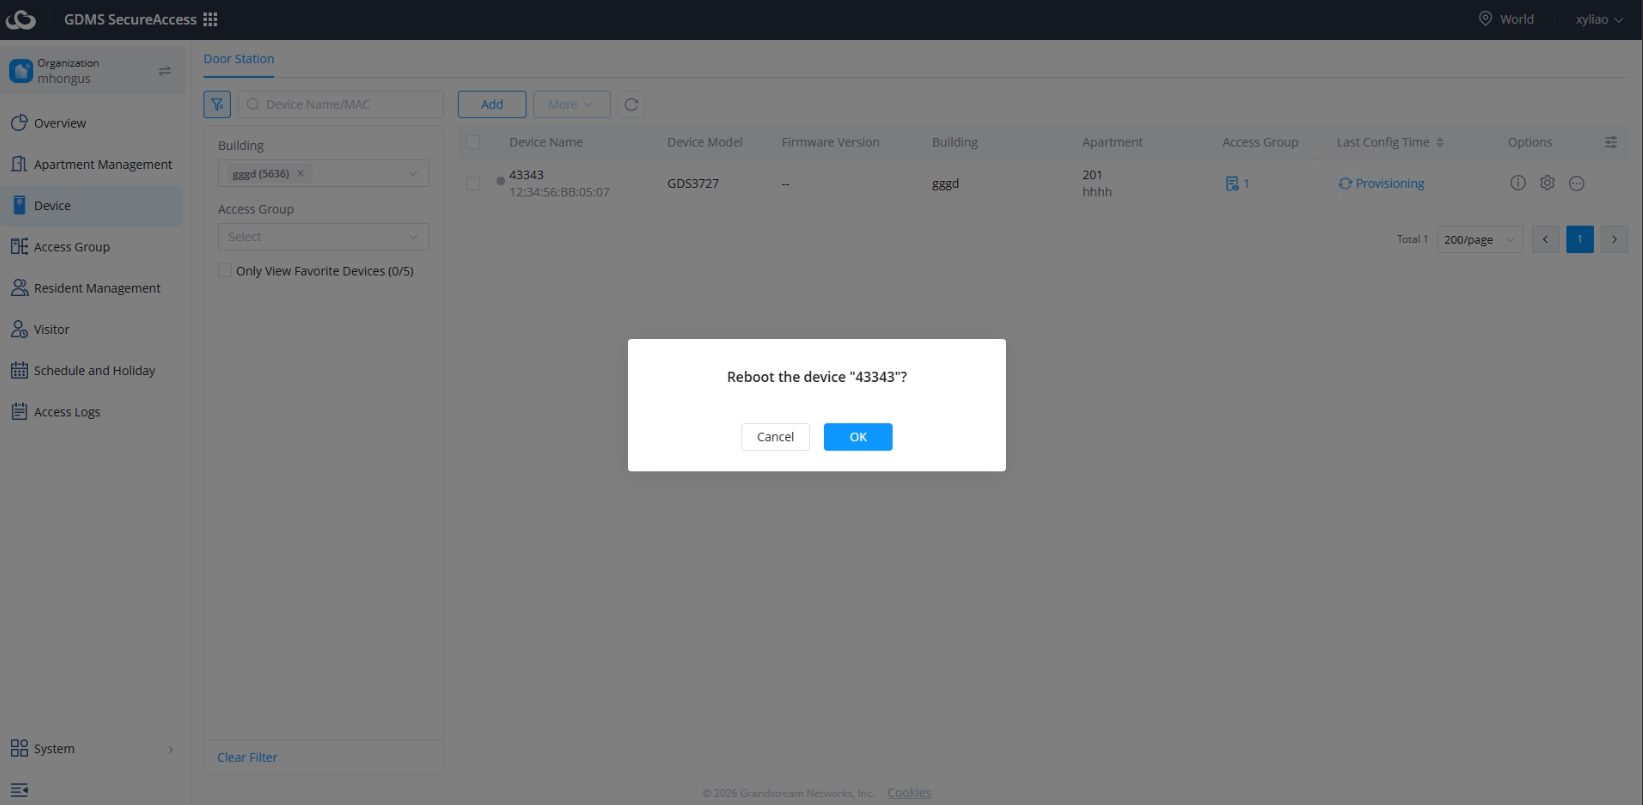
6. Restart Device
The Restart Device function allows administrators to remotely reboot onboarded devices through the cloud platform.
Administrators can:
- Restart individual devices
- Perform batch device reboots
Remote restart functionality is useful for:
- Maintenance operations
- Troubleshooting procedures
- Configuration synchronization
- Recovering unstable devices
- Applying certain configuration changes
The platform simplifies operational maintenance by eliminating the need for local physical device access in many scenarios.
Administrators should avoid restarting devices during critical operational periods unless necessary.
7. Delete Device
The Delete Device function removes devices from the GDMS SecureAccess organization and cloud management environment.
Administrators should carefully review deletion operations before confirming removal.
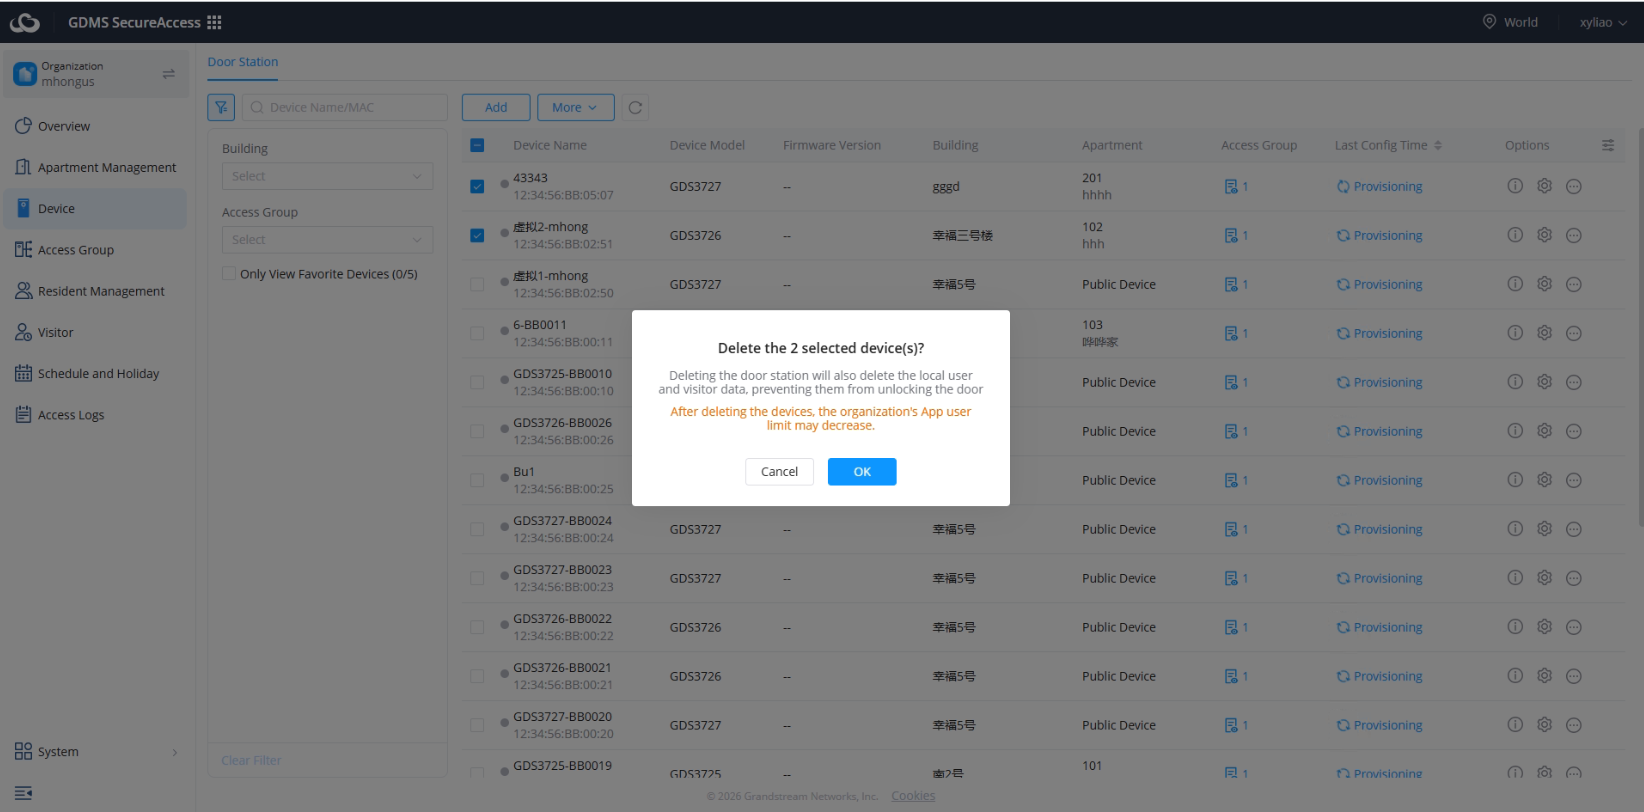
If a device is offline during deletion:
- The device enters a “Deleting” status
During this state:
- Other accounts cannot claim the device
- The system waits for synchronization opportunities where applicable
This mechanism helps maintain ownership consistency within the cloud platform.
Forced Deletion
Administrators can perform forced deletion operations when necessary.
Forced deletion is used when:
- Devices are permanently offline
- Devices are inaccessible
- Ownership transfer is required
Important considerations:
- User data remains stored locally on the device
- A manual factory reset is required to erase local device data completely
Administrators should ensure that devices are properly reset before redeployment or reassignment.
License Retention
Deleting a device does not remove:
- Existing cloud service package validity
Associated cloud service packages remain active according to their licensing period even after the device is removed from the organization.
This allows organizations to reuse valid licenses during future redeployment scenarios where applicable.
Access Group Management
Overview
The Access Group Management module is used to centrally manage user access permissions within GDMS SecureAccess through group-based permission assignment.
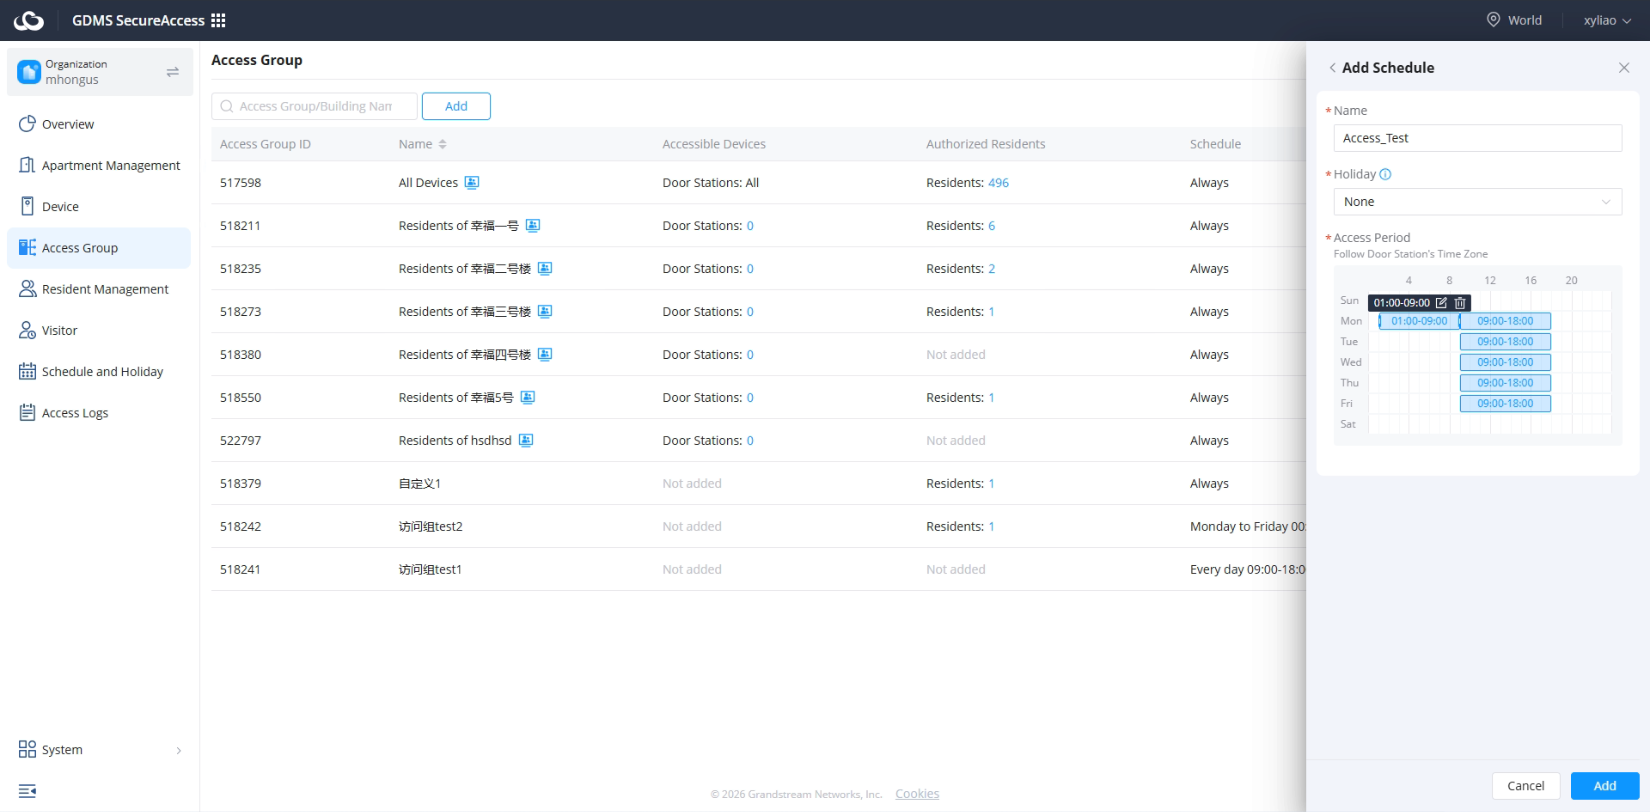
Access group management is designed to enable granular access control. Administrators can create access groups to associate users, target devices, and valid time periods, thereby precisely defining device access permissions for users within specified timeframes. Administrators can:
- Create and manage existing access groups
- Add devices or users to designated access groups
- Remove devices or users from access groups
The system generates the following four default system access groups. Only viewing details is supported; editing (name, accessible devices, schedule) and deletion are not permitted.
- “Access All Devices, All Hours”: Can access all devices under this organization.
- “Access All Public Access Control Devices, All Hours”: Can access all access control devices in public areas + all public access control devices in all residential buildings/all access control devices in all departments of non-residential buildings.
- “Access All Access Control Devices in Public Areas, All Hours”: Can access all access control devices in public areas.
- For Residential-Community type organizations, an access group is generated by default for each building, named “Residents of #Building Name#”: Can access public access control devices under this building.
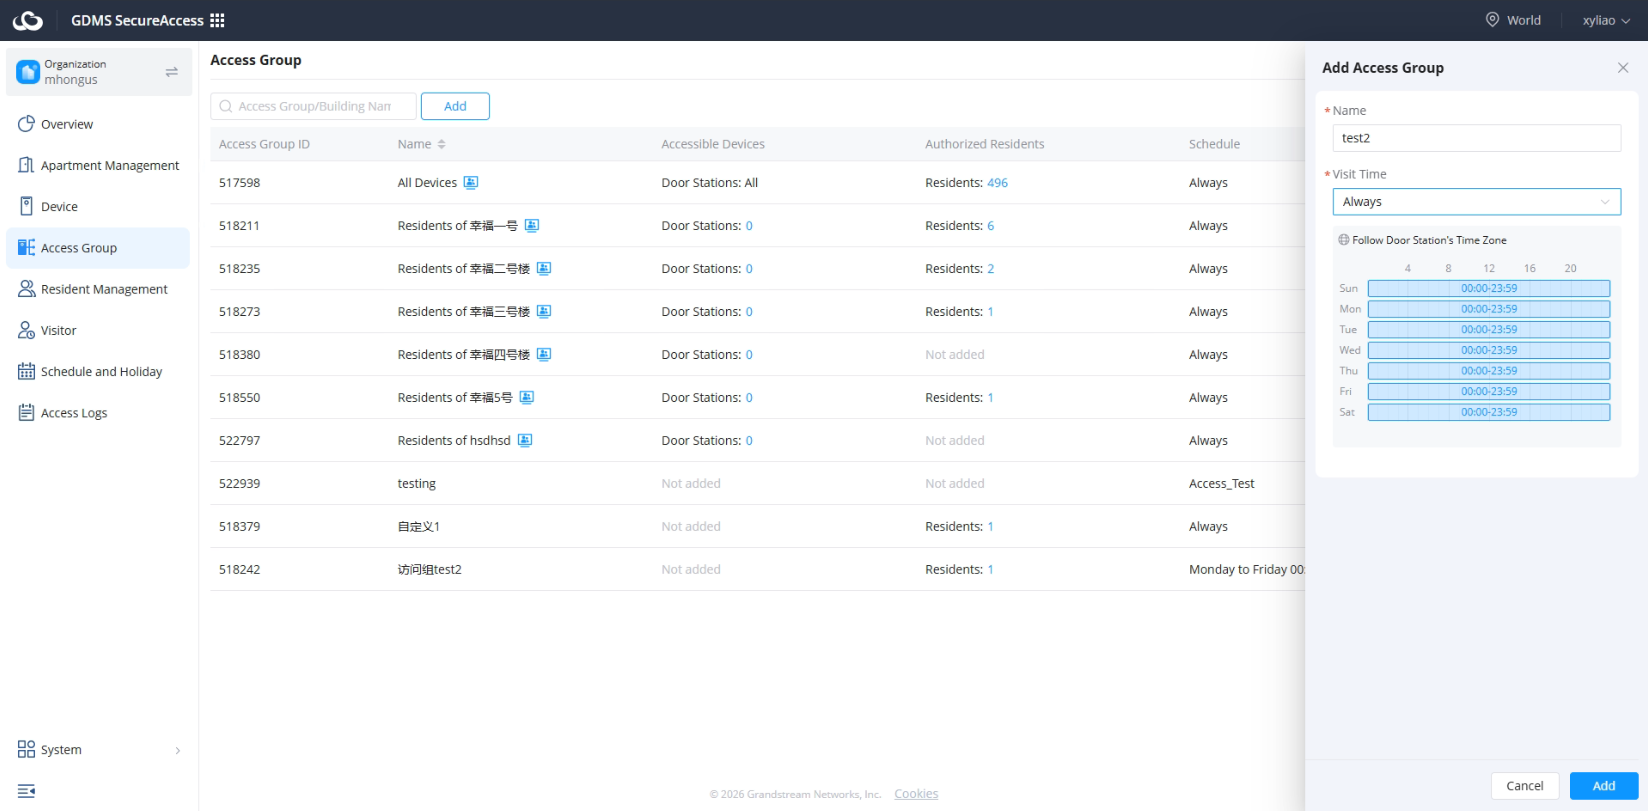
1. Add Access Group
Purpose
The Add Access Group function allows administrators to create logical access permission groups used to control how users interact with access control devices within the organization.
Access groups define:
- Accessible devices
- Access schedules
- Time restrictions
When users are assigned to an access group, they automatically inherit the permissions and restrictions associated with that group.
This centralized permission management structure helps administrators maintain consistent access policies across the deployment.
2. Manage Access Groups
The Manage Access Groups section allows administrators to modify existing access groups and maintain relationships between users, devices, schedules, and permissions.
Administrators can:
- Add users
- Add devices
- Modify schedules
- Review membership
This centralized management structure simplifies permission updates and operational adjustments without requiring manual per-user device configuration.
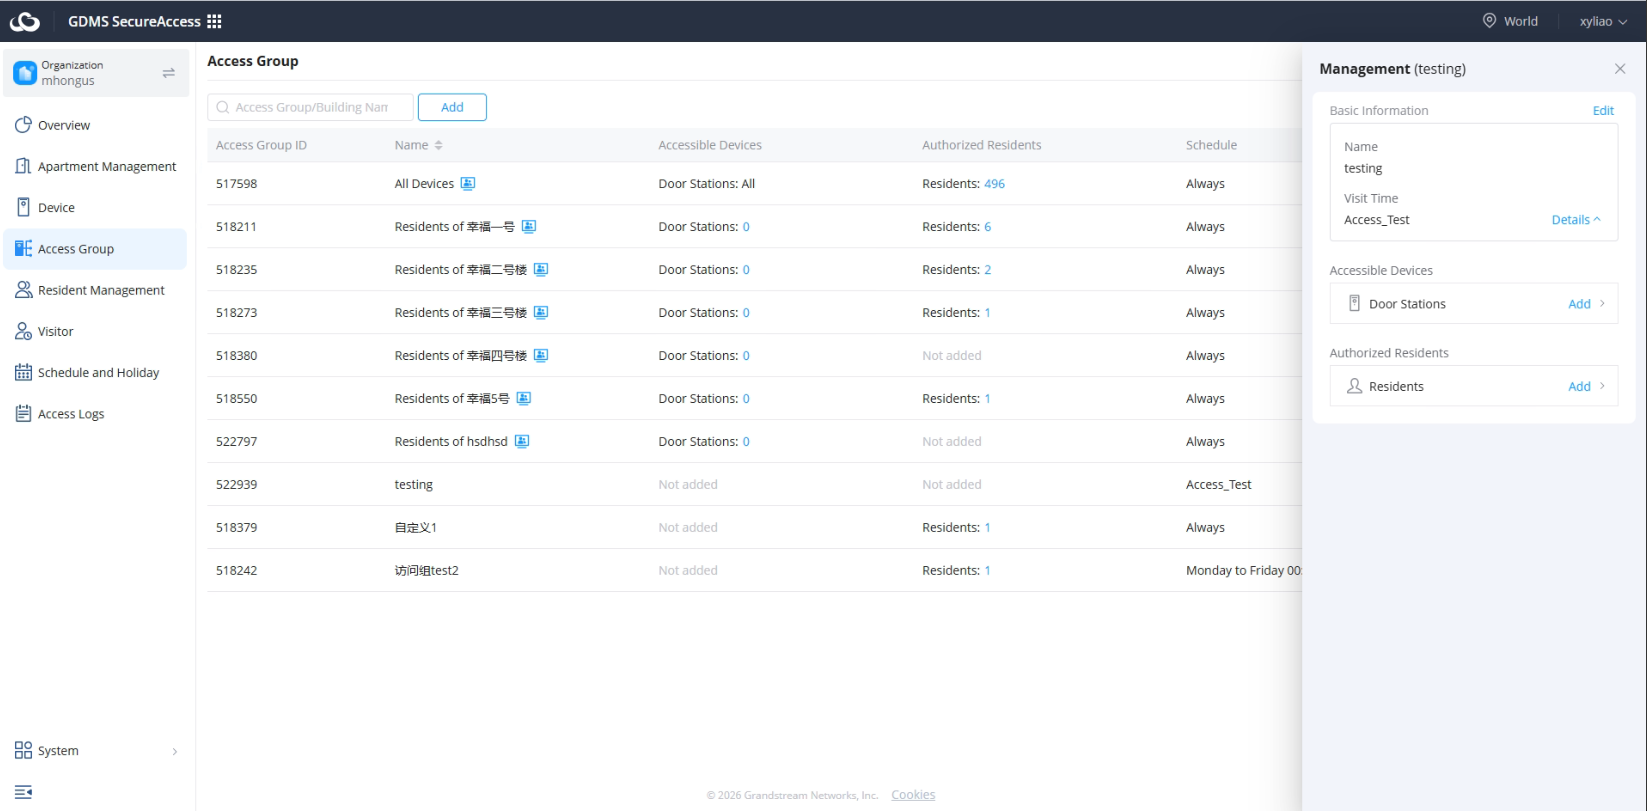
Add Users
Administrators can assign users directly to access groups.
Once assigned:
- Users inherit all permissions associated with the group
- Device access permissions become active automatically
- Schedule restrictions are applied automatically
This inheritance-based permission model greatly simplifies user onboarding and access management.
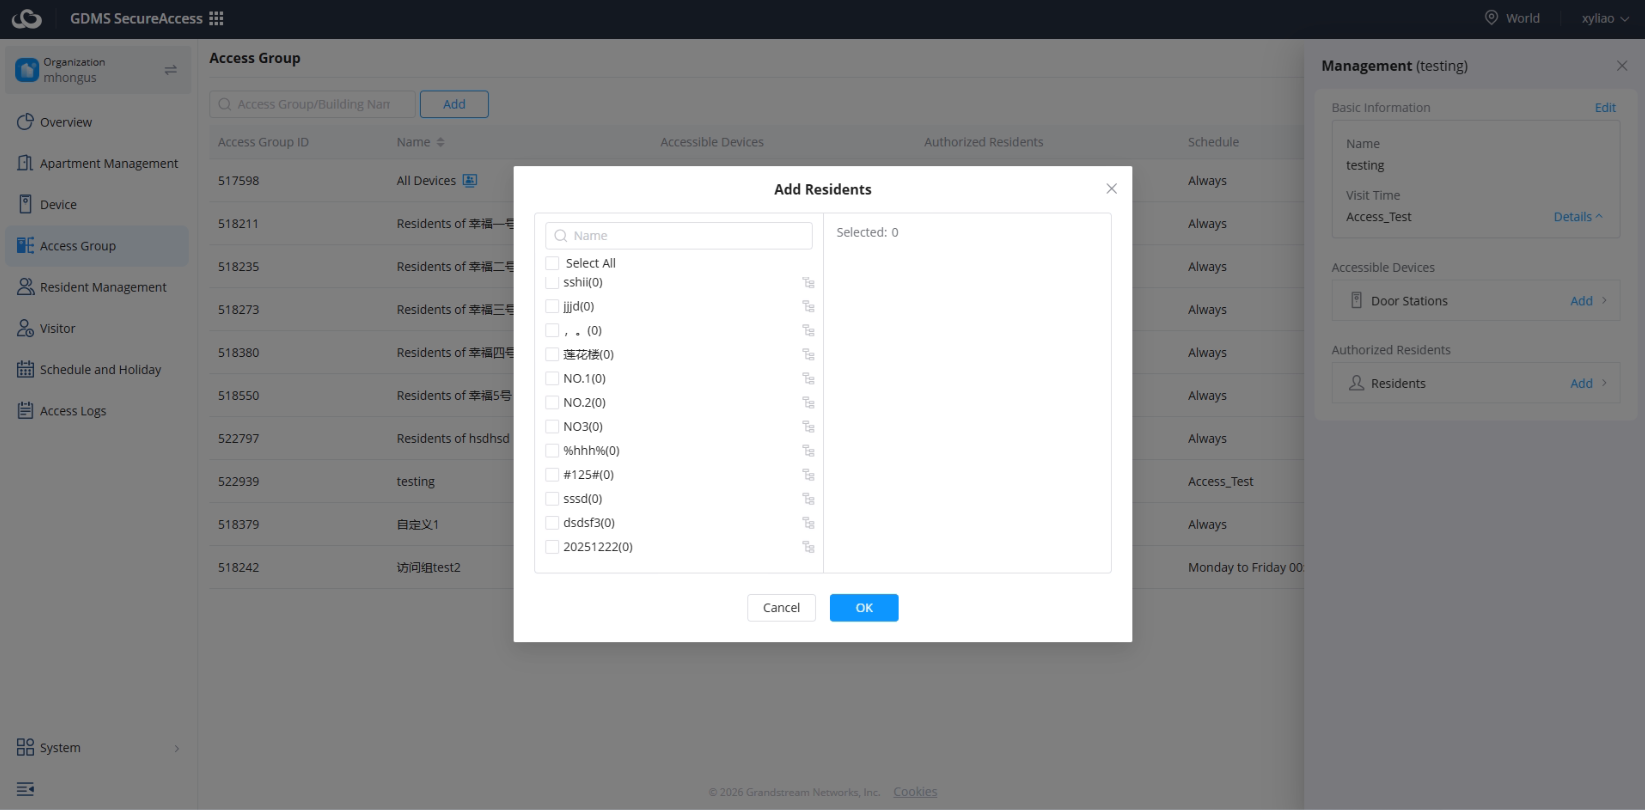
Add Devices
Devices can be associated with one or multiple access groups depending on operational requirements.
This allows administrators to:
- Share devices across multiple groups
- Separate permissions logically
- Apply flexible access policies
Examples include:
- Shared building entrances
- Department-specific devices
- Public access points
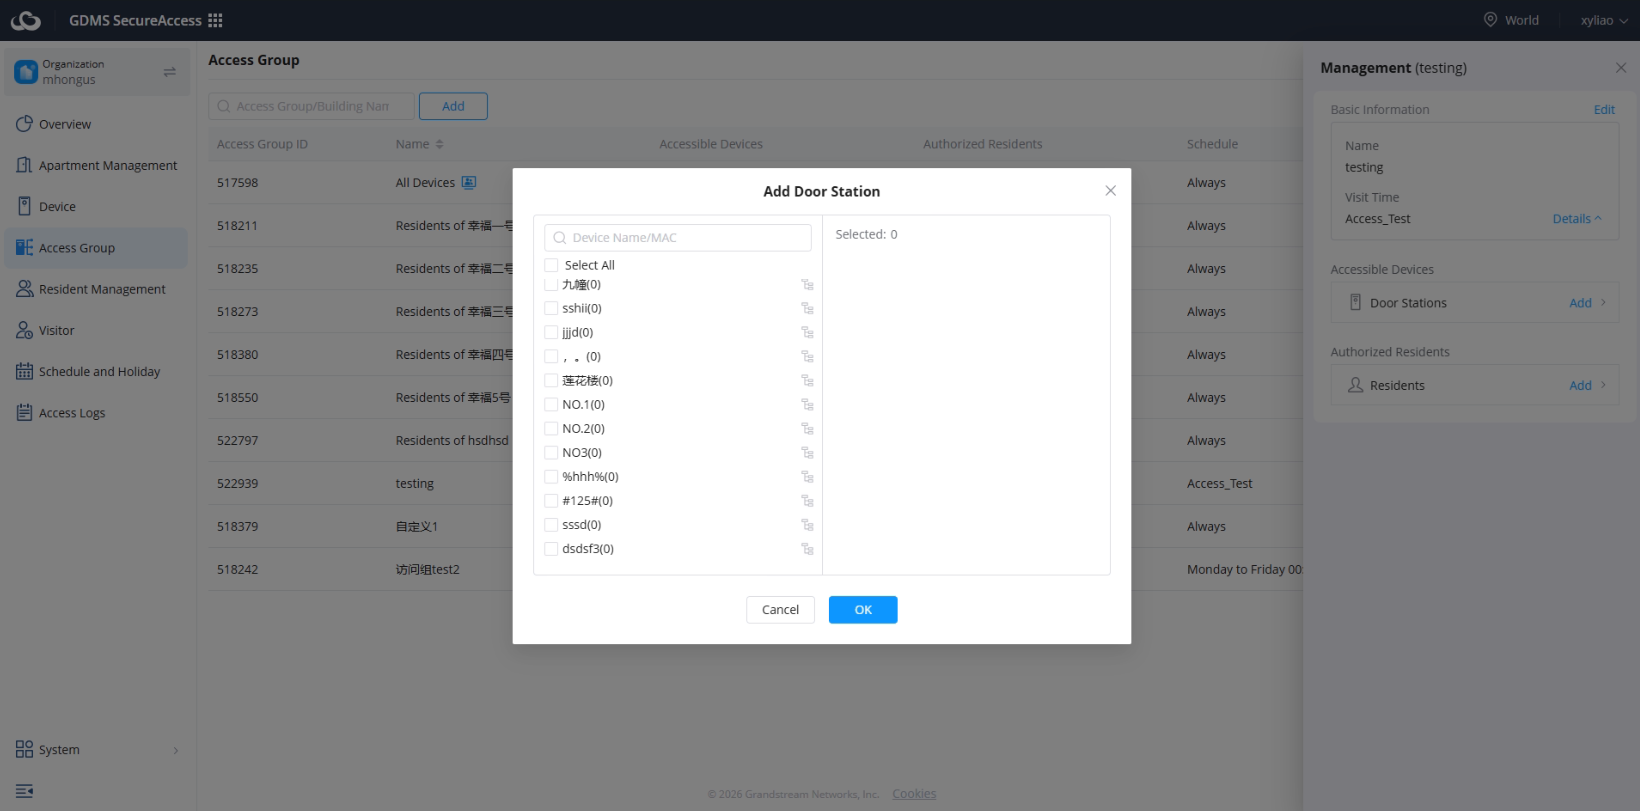
Modify Schedules
Administrators can update schedules associated with access groups at any time.
This allows organizations to adjust:
- Access hours
- Operational schedules
- Holiday behavior
- Time restrictions
Changes applied to schedules automatically affect all users associated with the access group.
This centralized scheduling structure improves operational efficiency and simplifies permission updates.
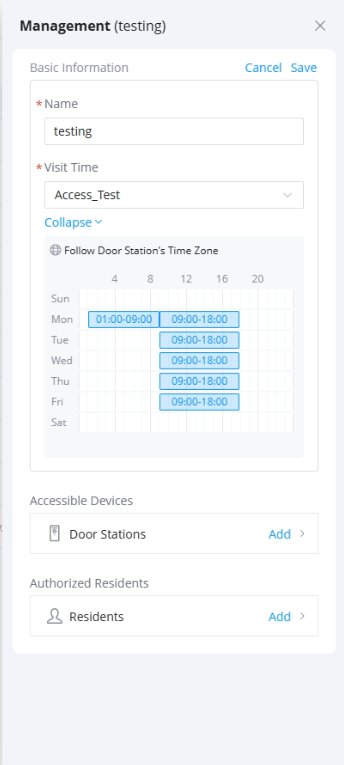
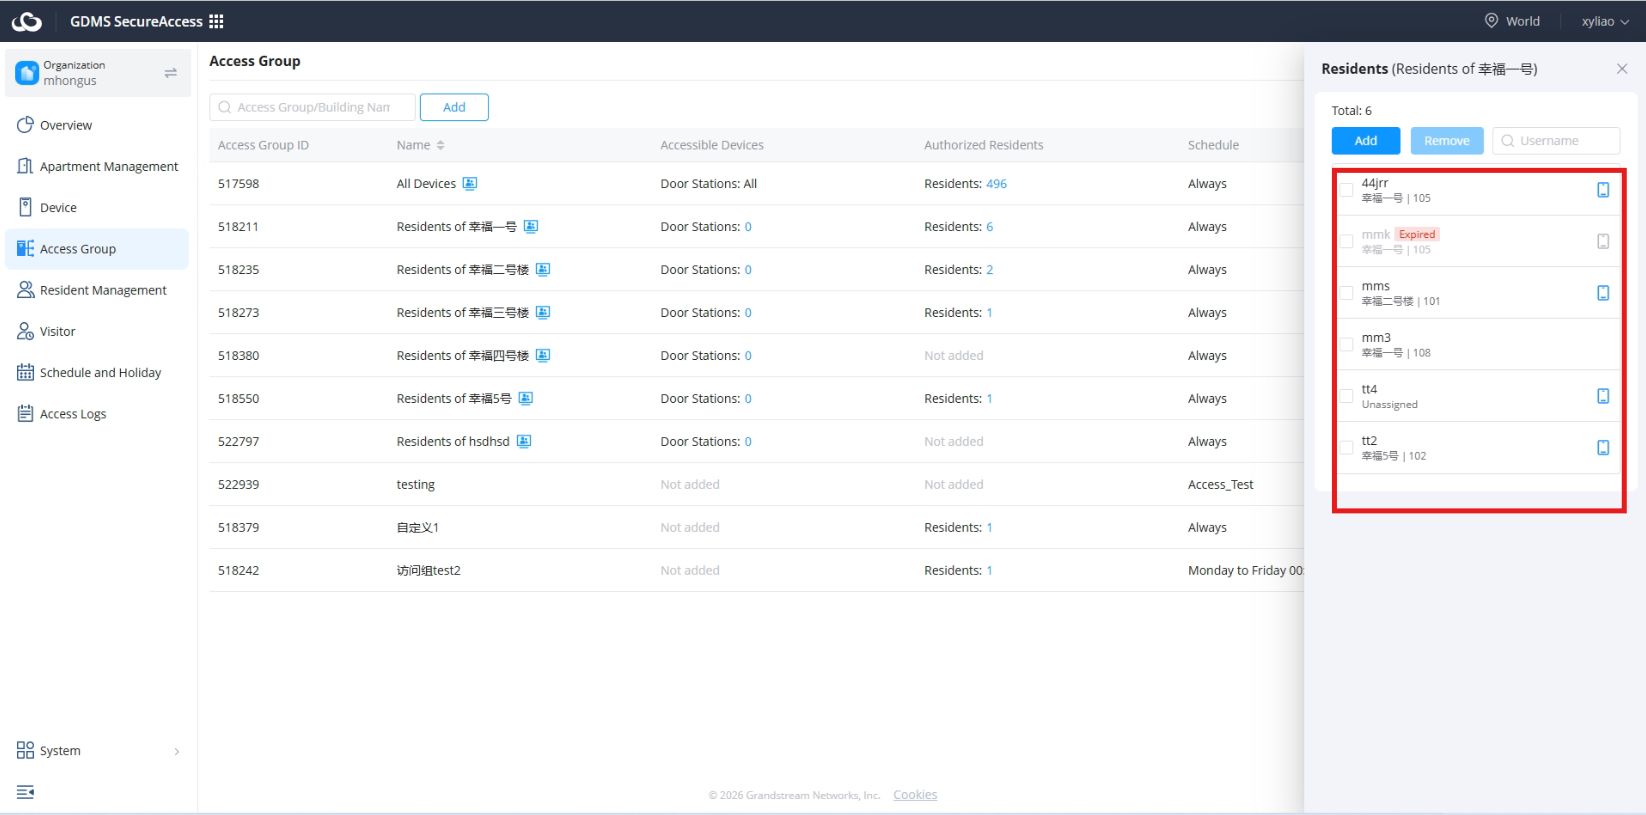
Review Membership
Administrators can review all users and devices associated with an access group directly from the management interface.
3. Delete Access Group
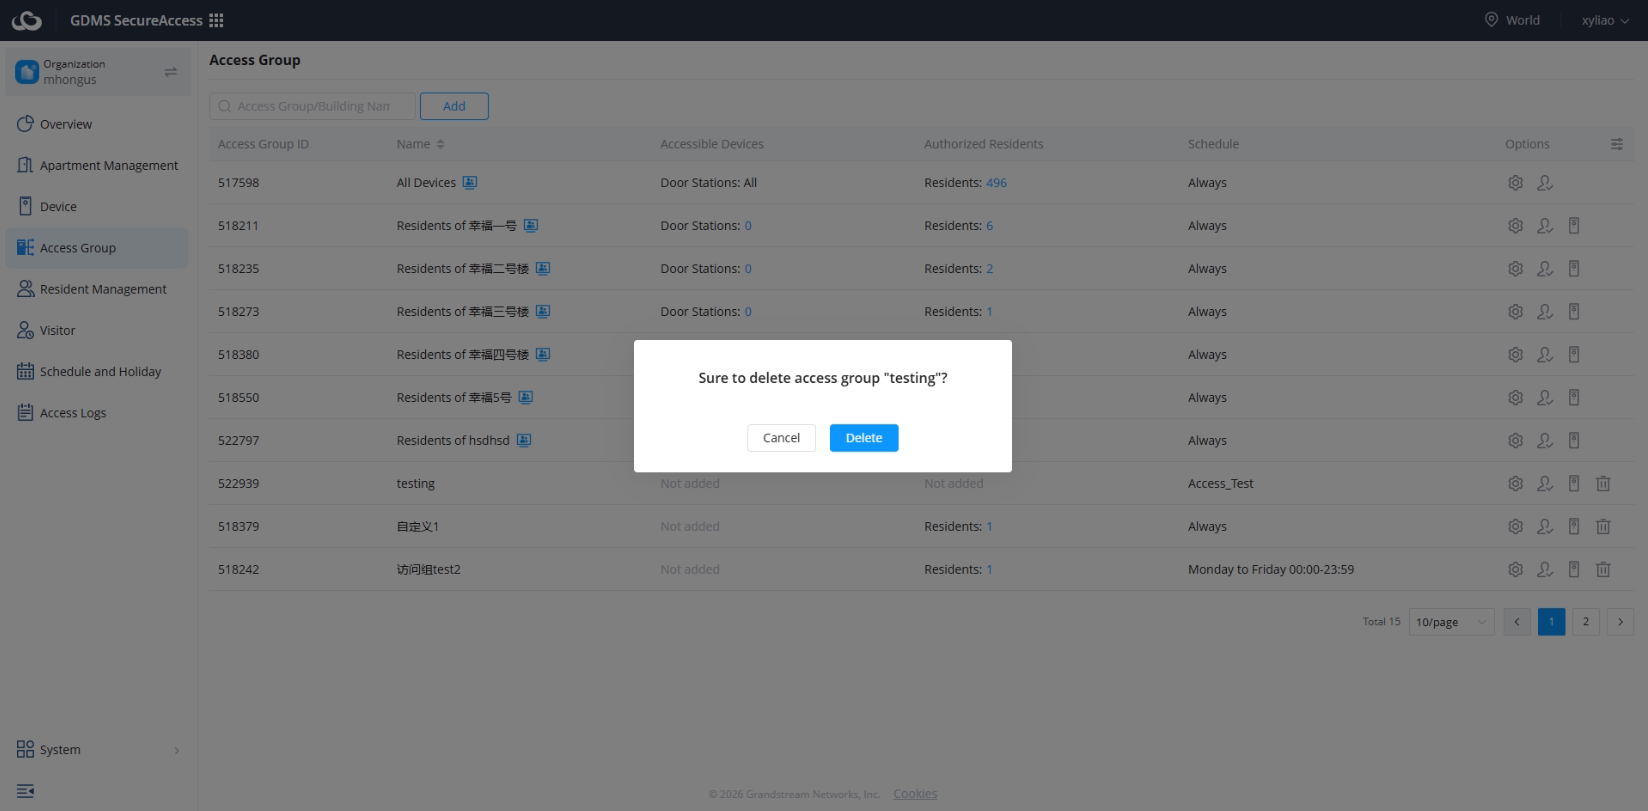
Unused or obsolete access groups can be removed from the organization when they are no longer required.
Deleting an access group removes:
- Group-device associations
- Group-user associations
Once deleted:
- Associated users no longer inherit permissions from the group
- Device relationships are removed
- Schedule associations are deleted
Administrators should carefully review access group usage before deletion to avoid unintended access interruptions.
It is recommended to verify:
- User membership
- Device associations
- Schedule dependencies
Before permanently removing an access group.
In residential deployments, automatically generated building-based access groups may also be removed automatically if the associated building is deleted.
Resident Management
Overview
The Standard User Management module is used to manage permanent users within the GDMS SecureAccess platform and assign door access permissions to authorized individuals.
This module allows administrators to centrally create, organize, monitor, and manage users associated with the organization’s access control environment.
Standard users represent individuals who require ongoing or long-term access to managed access control devices.
Examples include:
- Residents
- Employees
- Staff members
Users created within this module can be associated with:
- Buildings
- Apartments
- Departments
- Access groups
- Devices
- Schedules
This centralized structure simplifies large-scale access management across residential, enterprise, and commercial deployments.
Depending on assigned permissions and configurations, users may be authorized to:
- Open doors
- Receive access control calls
- Use mobile application features
- Access assigned devices
- Participate in building or department-level access structures
Changes applied within the User Management module are synchronized automatically through the GDMS SecureAccess cloud platform.
1. Add User
The Add User function allows administrators to create permanent user profiles within the organization and assign associated access permissions and operational privileges.
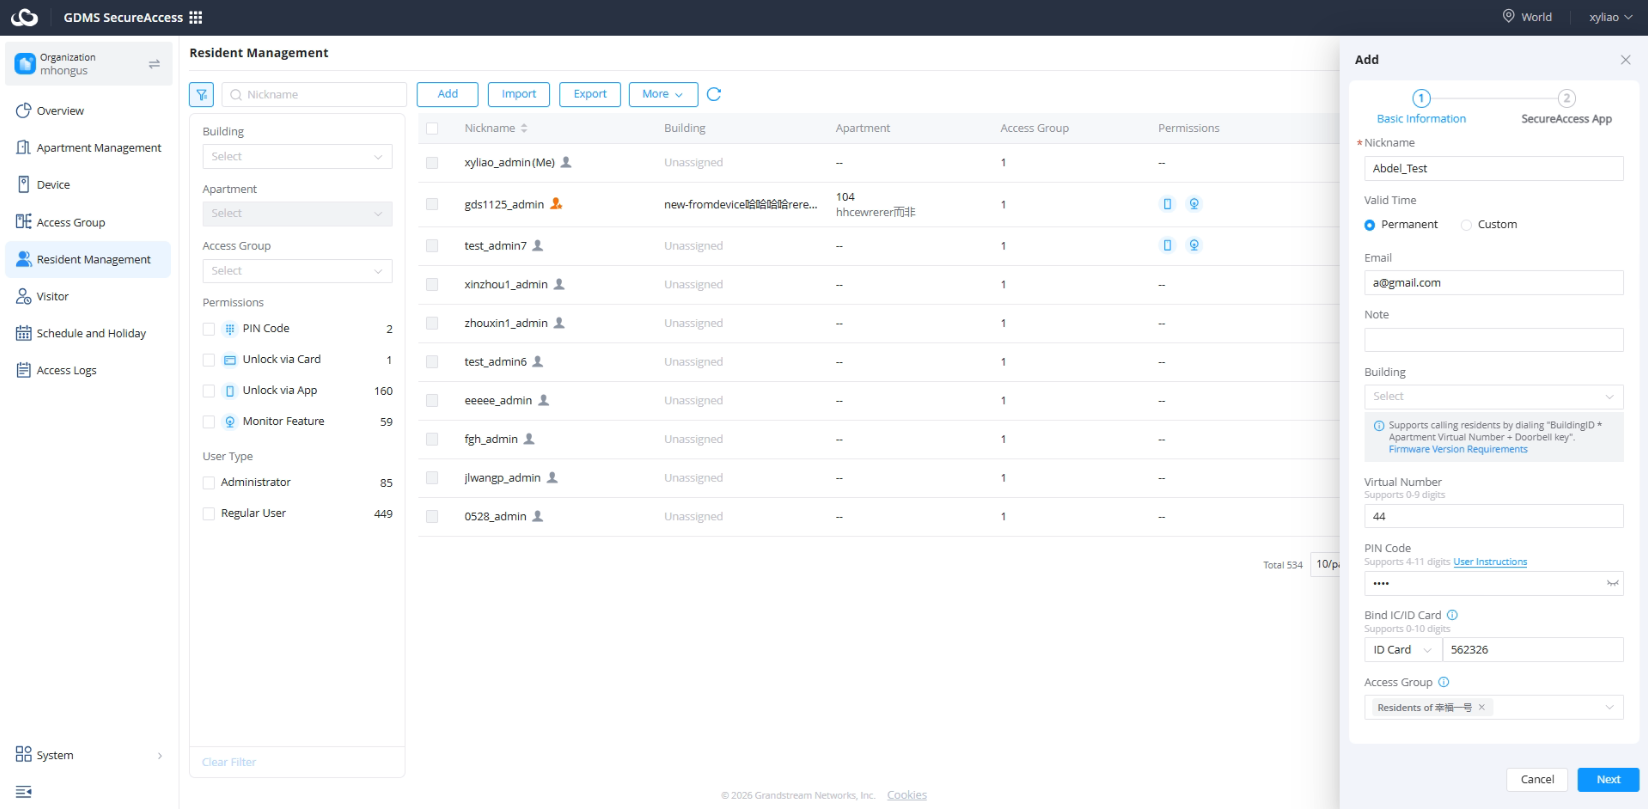
To create a new resident:
- Navigate to Resident Management.
- Click Add.
- Configure the resident information.
- Click Next to continue to SecureAccess App configuration.
The resident creation wizard consists of two steps:
- Basic Information
- SecureAccess App
Below are basic resident information parameters:
| Nickname | Specifies the resident’s display name. This field is required. |
| Valid Time | Defines the validity period of the resident account. Available options are Permanent and Custom. |
| Specifies the resident’s email address. Used for account notifications and SecureAccess App invitations. | |
| Note | Optional field used to add remarks or additional information about the resident. |
| Building | Assigns the resident to a specific building. |
| Virtual Number | Specifies the apartment virtual number used by door stations when calling residents. Supports 0–9 digits. |
| PIN Code | Defines a PIN credential that can be used for door access. Supports 4–11 digits. |
| Bind IC/ID Card | Associates an IC card or ID card credential with the resident. Supports card numbers containing digits and hexadecimal characters (A–F, a–f). |
| Access Group | Assigns the resident to an access group. Access permissions are inherited from the selected group. |
App Privileges
Administrators can enable mobile application privileges for users during account creation.
When enabled, users can interact with supported access control devices remotely through the mobile application.
This feature improves convenience and operational flexibility for residents and authorized personnel.
Please note that the number of App users is related to your GDMS SecureAccess Package.
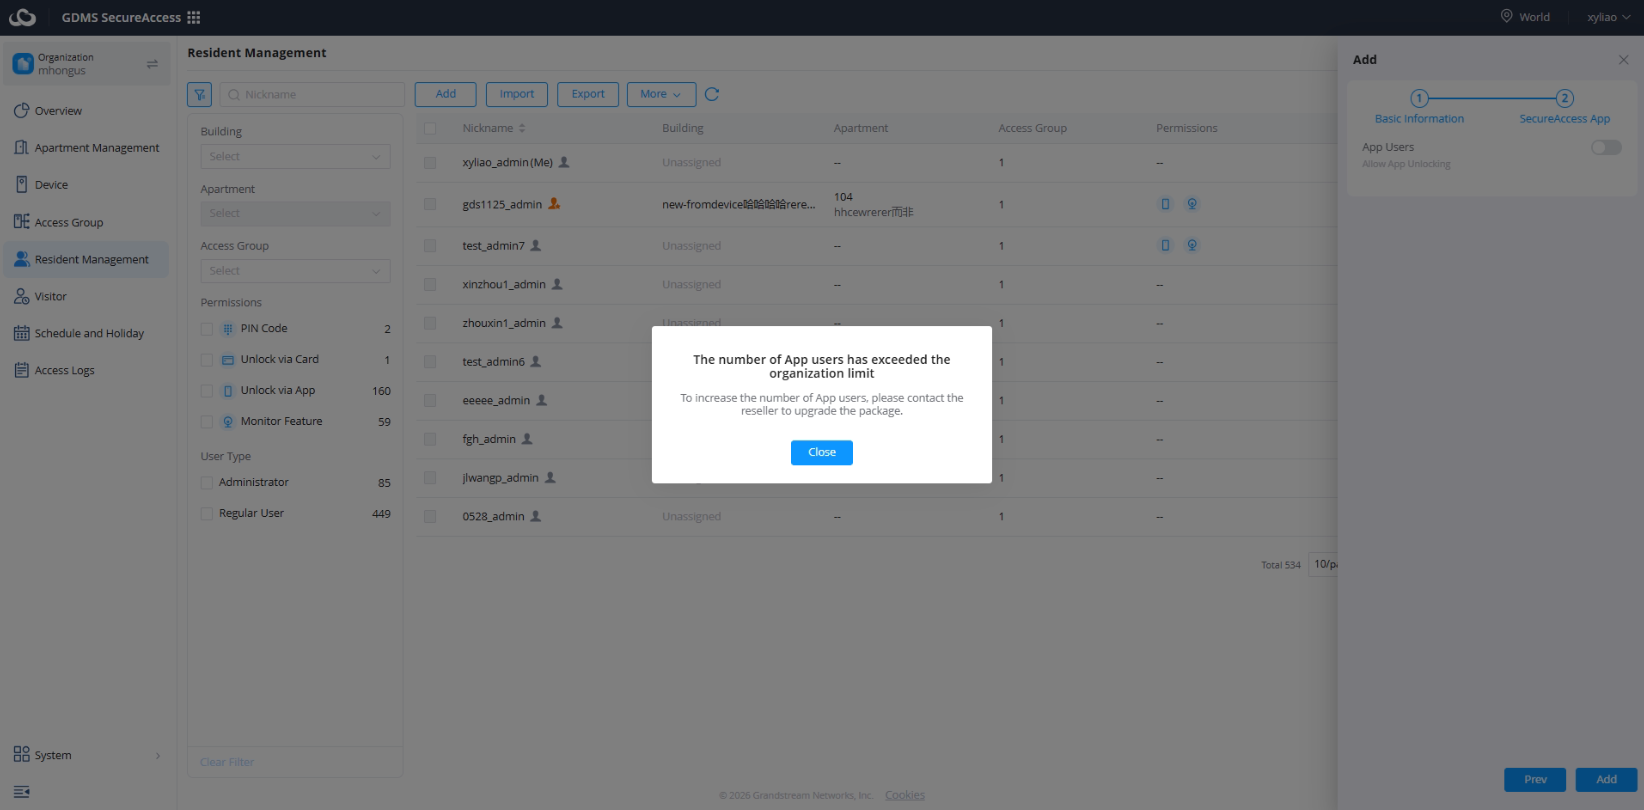
When App User privileges are enabled, users can:
- Open doors remotely
- Call access devices
- Answer door calls
- View live video streams
Using the mobile application.
This functionality allows users to remotely interact with access control devices without requiring direct physical access to the device itself.
Examples include:
- Residents remotely opening doors for visitors
- Employees answering access calls remotely
- Viewing live video from supported door stations
- Remote visitor verification
The mobile application integration enhances user experience and improves operational flexibility for modern cloud-managed access control deployments.
2. Import Users
The Import Users function allows administrators to perform bulk user onboarding operations through import templates.
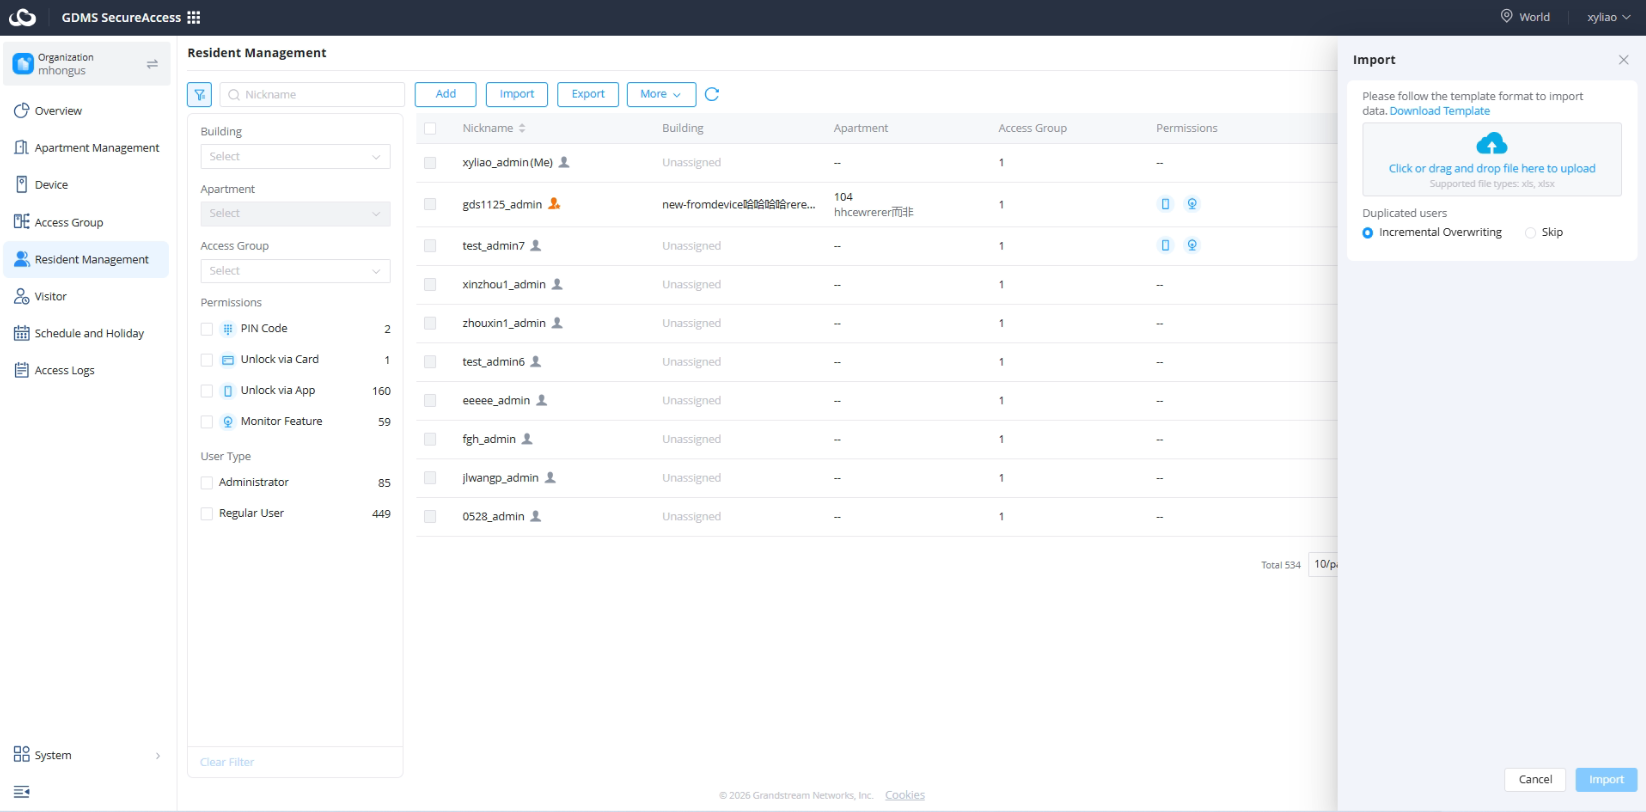
Before importing users, administrators must ensure that the correct import template is used according to the organization type.
Administrators must:
- Download the correct import template
- Match the organization type
Different organization types may require different user structure formats.
For example:
- Residential deployments may require apartment-based user information
- Enterprise deployments may require department-based user structures
Incorrect templates may cause import failure.
Administrators should carefully verify:
- Column formatting
- Required fields
- Organization structure alignment
- User data accuracy
Before importing user information into the platform.
Properly prepared import templates help simplify large-scale onboarding operations and reduce configuration errors.
3. Export Users
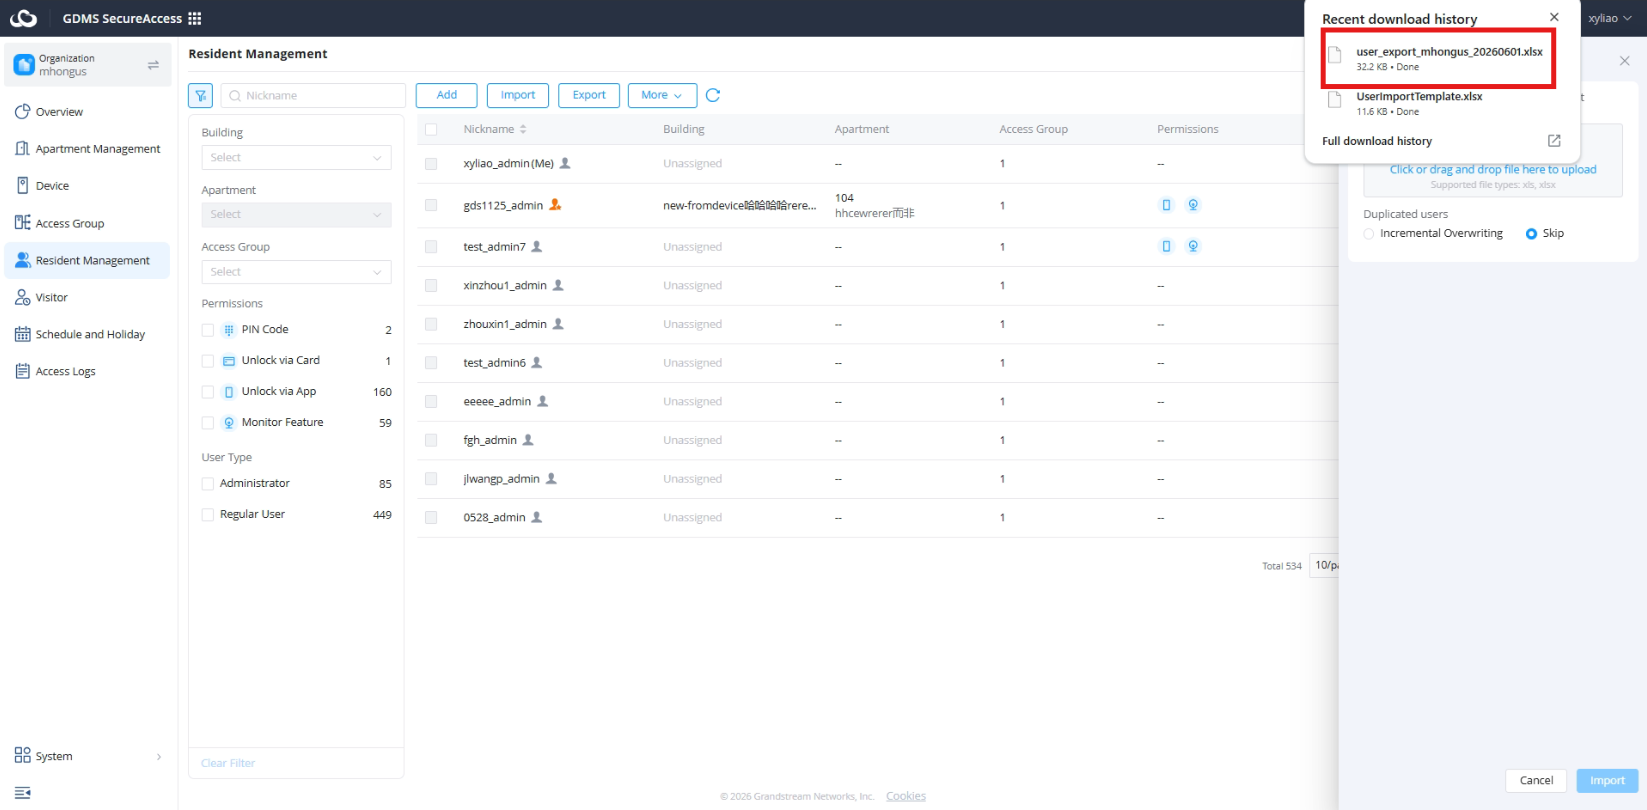
The Export Users function allows administrators to export user information from the platform into external files for administrative or operational purposes.
Administrators should protect exported user information appropriately according to organizational security policies.
4. Edit / Batch Edit
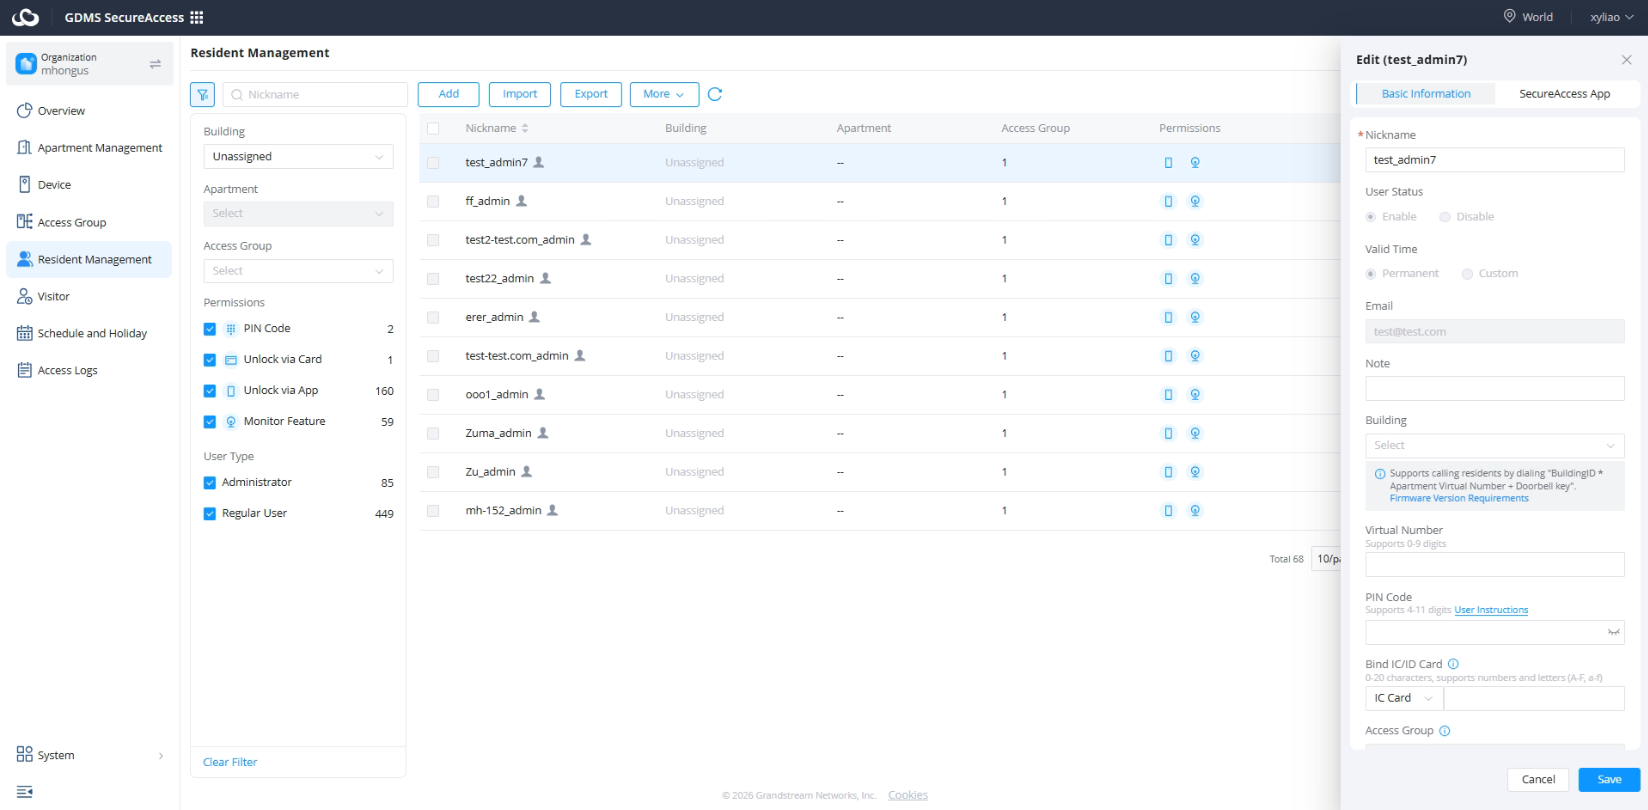
The Edit and Batch Edit functions allow administrators to modify user information after user creation.
Administrators can:
- Modify single users
- Perform mass updates
This functionality simplifies operational management and reduces repetitive administrative tasks.
Batch editing is especially useful for:
- Large user groups
- Department-wide updates
- Building-wide permission changes
- Schedule modifications
- Organizational restructuring
Changes applied through Edit or Batch Edit operations are synchronized automatically through the cloud platform.
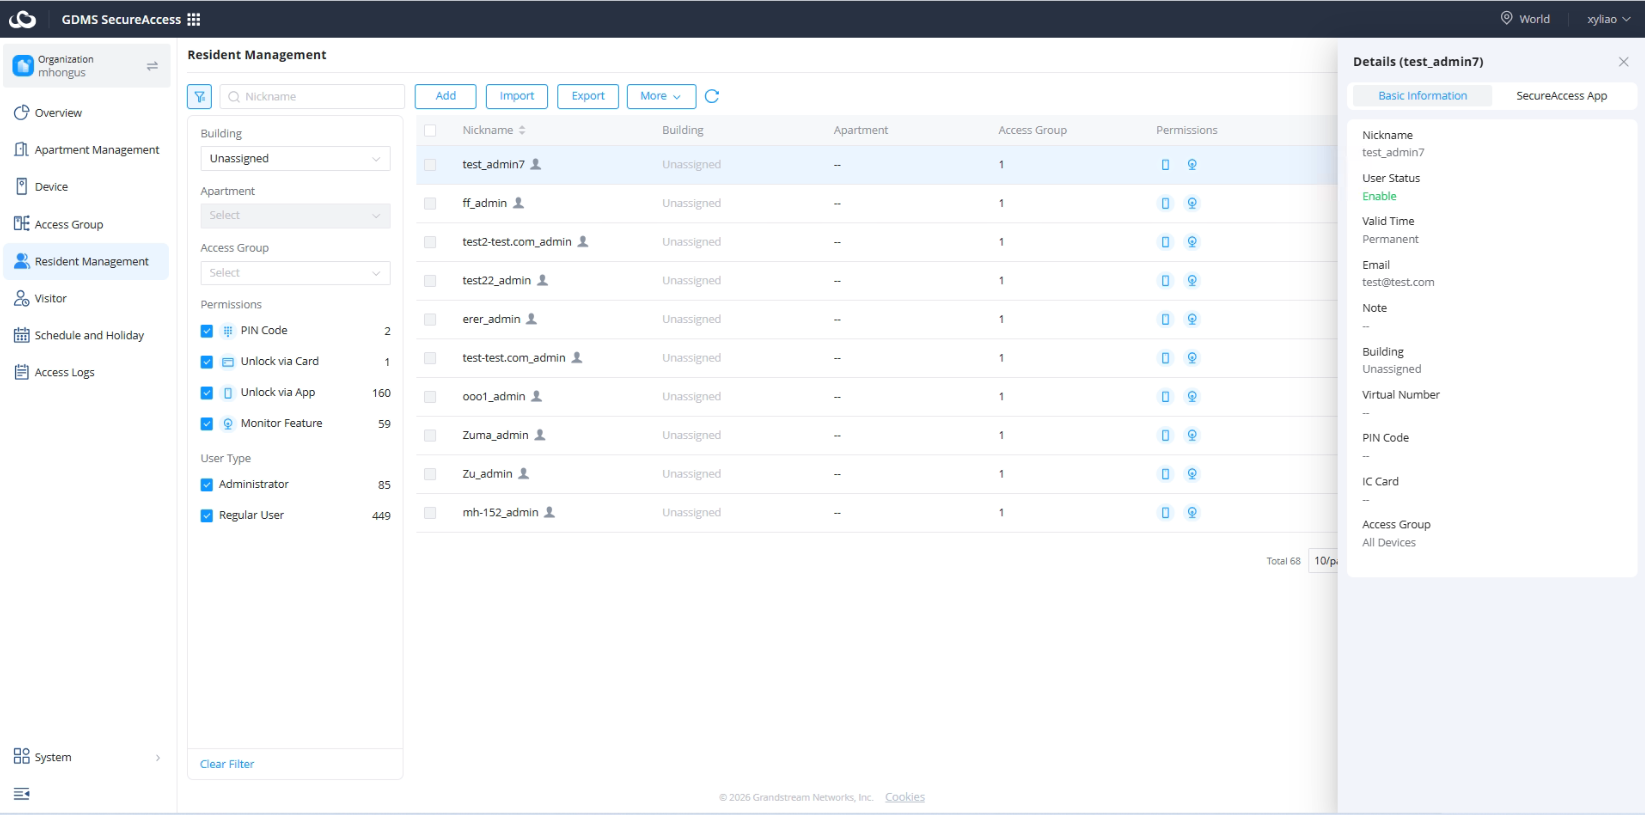
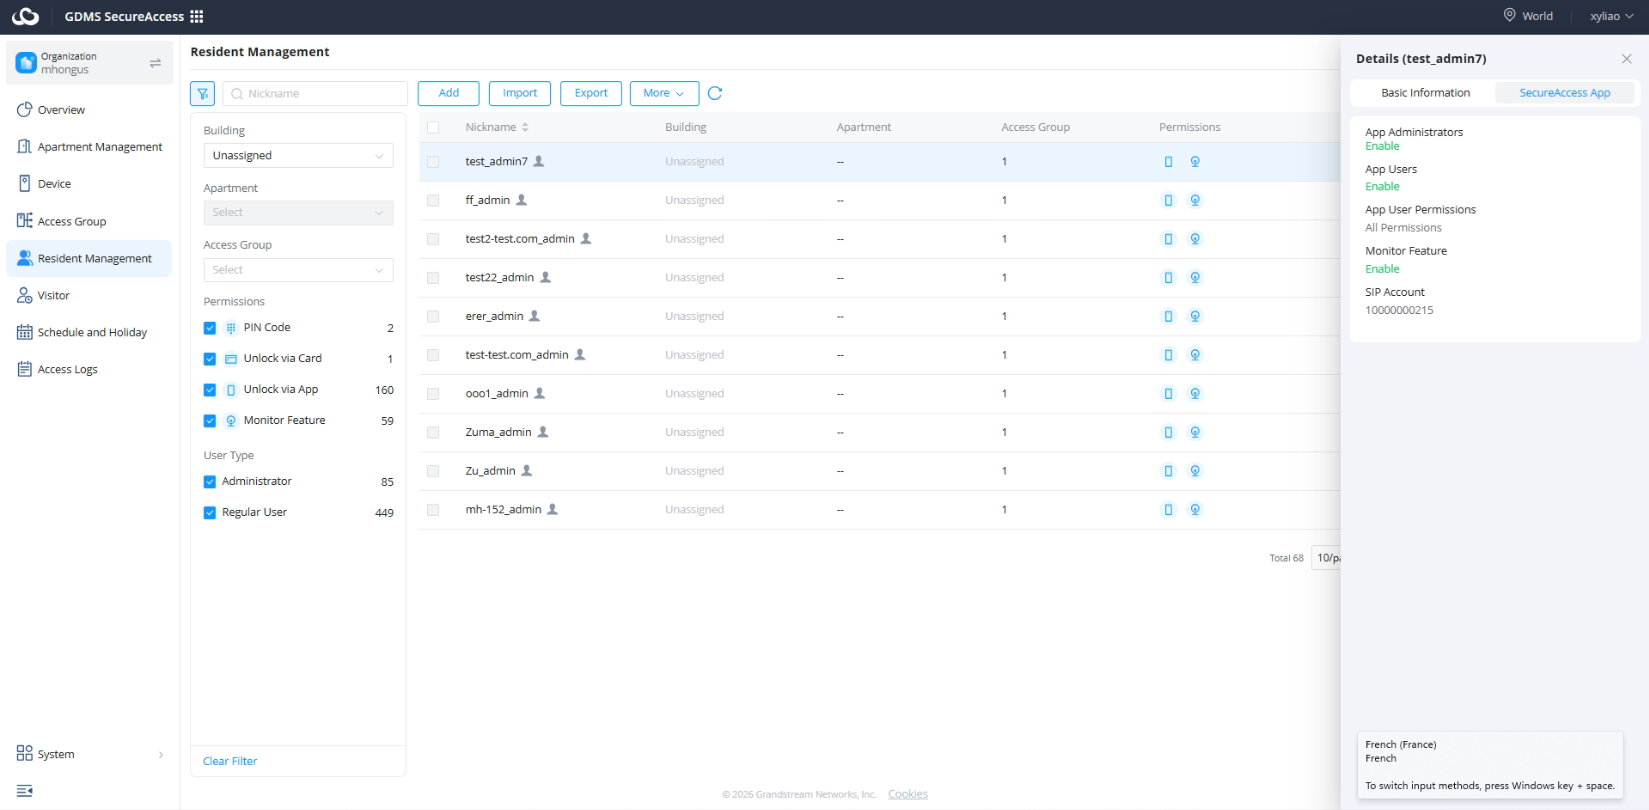
5. View User Information
The View User Information interface allows administrators to review detailed user-related operational and permission information.
User profiles display:
- Access permissions
- Assigned devices
- Access groups
- Status information
Additional information may also include:
- User identifiers
- Apartment or department associations
- App privilege status
- Access validity details
- Operational status
The detailed user profile view simplifies long-term user lifecycle management.
6. Quick IC Card Entry
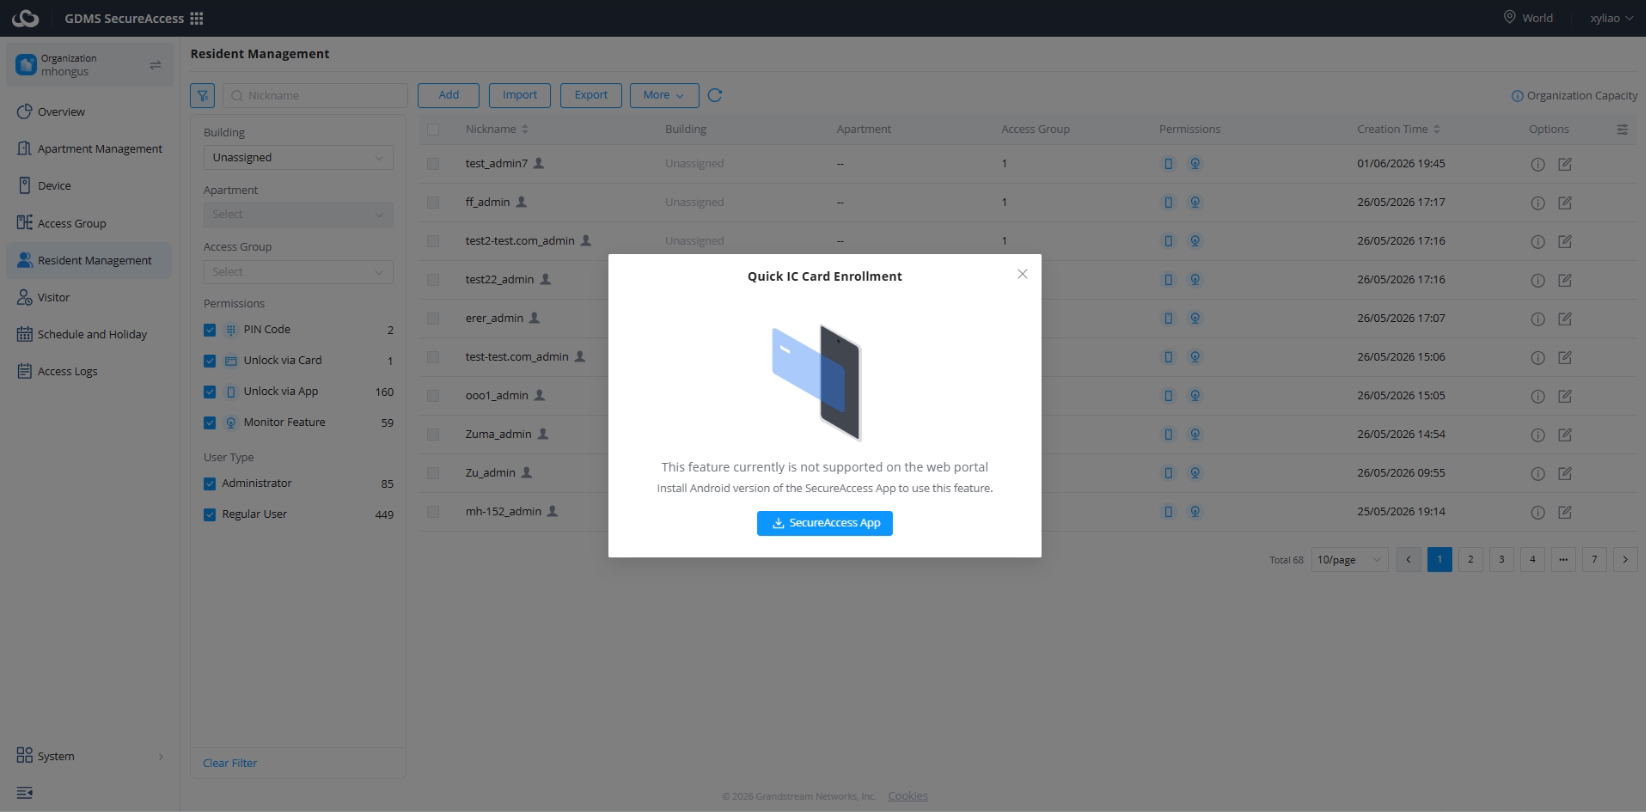
The Quick IC Card Entry feature allows rapid IC card enrollment for users through supported mobile application workflows.
This feature:
- Is not supported on the web platform
Requires:
- Mobile application usage
Administrators must use the mobile application to perform quick IC card enrollment operations.
This functionality simplifies user credential enrollment in environments utilizing IC card-based access control.
The mobile application workflow allows administrators to rapidly associate physical credentials with user accounts during onboarding operations.
7. Delete User
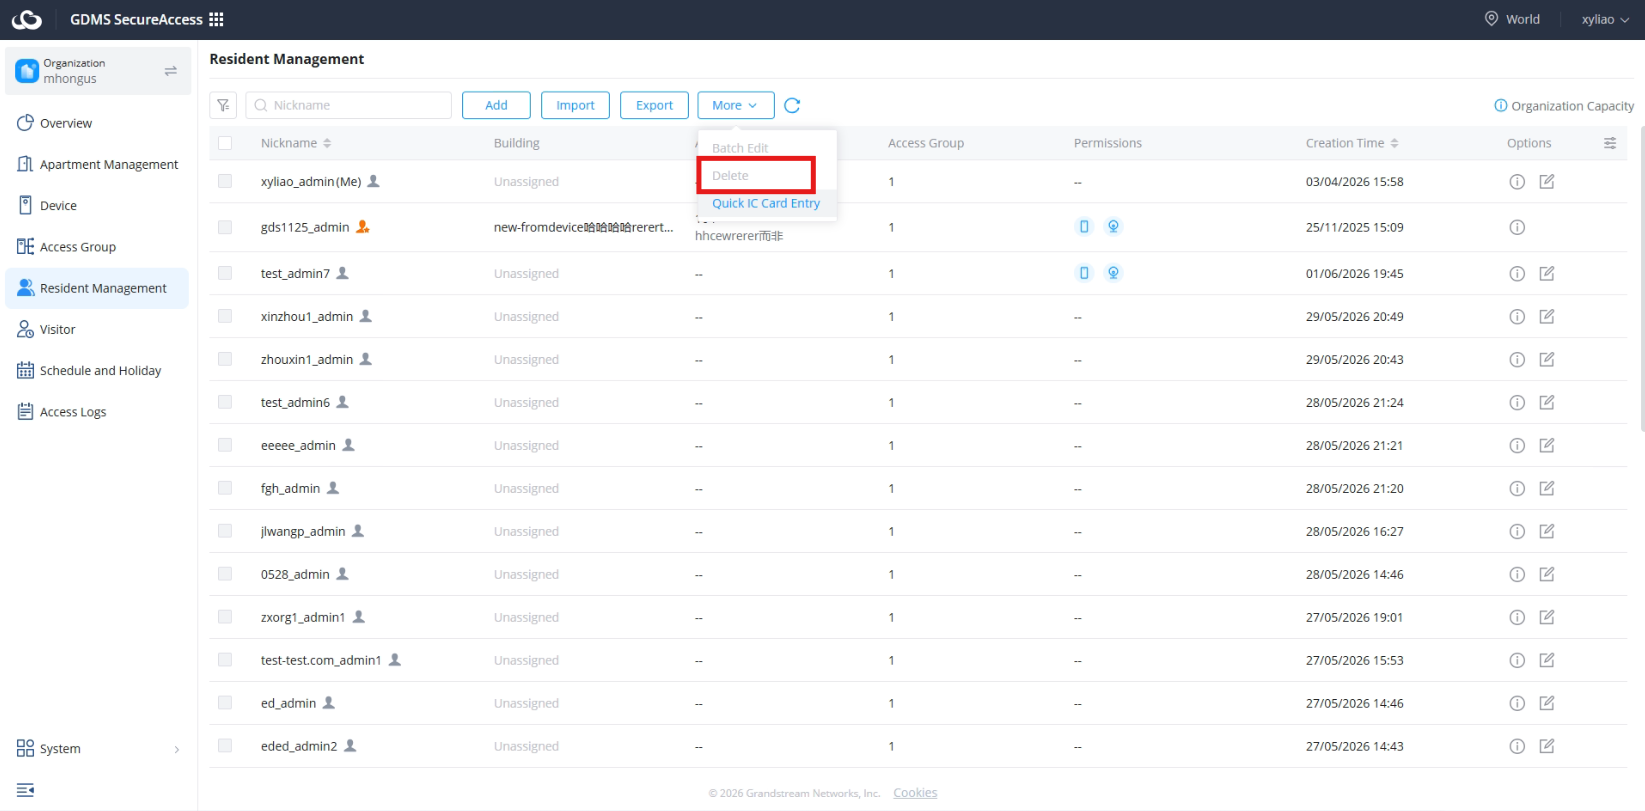
The Delete User function removes users from the organization and revokes associated access permissions.
Deleting users revokes:
- Device permissions
- Access rights
- App functionality
Once deleted:
- Users can no longer access associated devices
- Mobile application access is removed
- Associated permissions are revoked
- Access group inheritance is terminated
The platform automatically synchronizes permission removal across associated devices and access groups after deletion operations are completed.
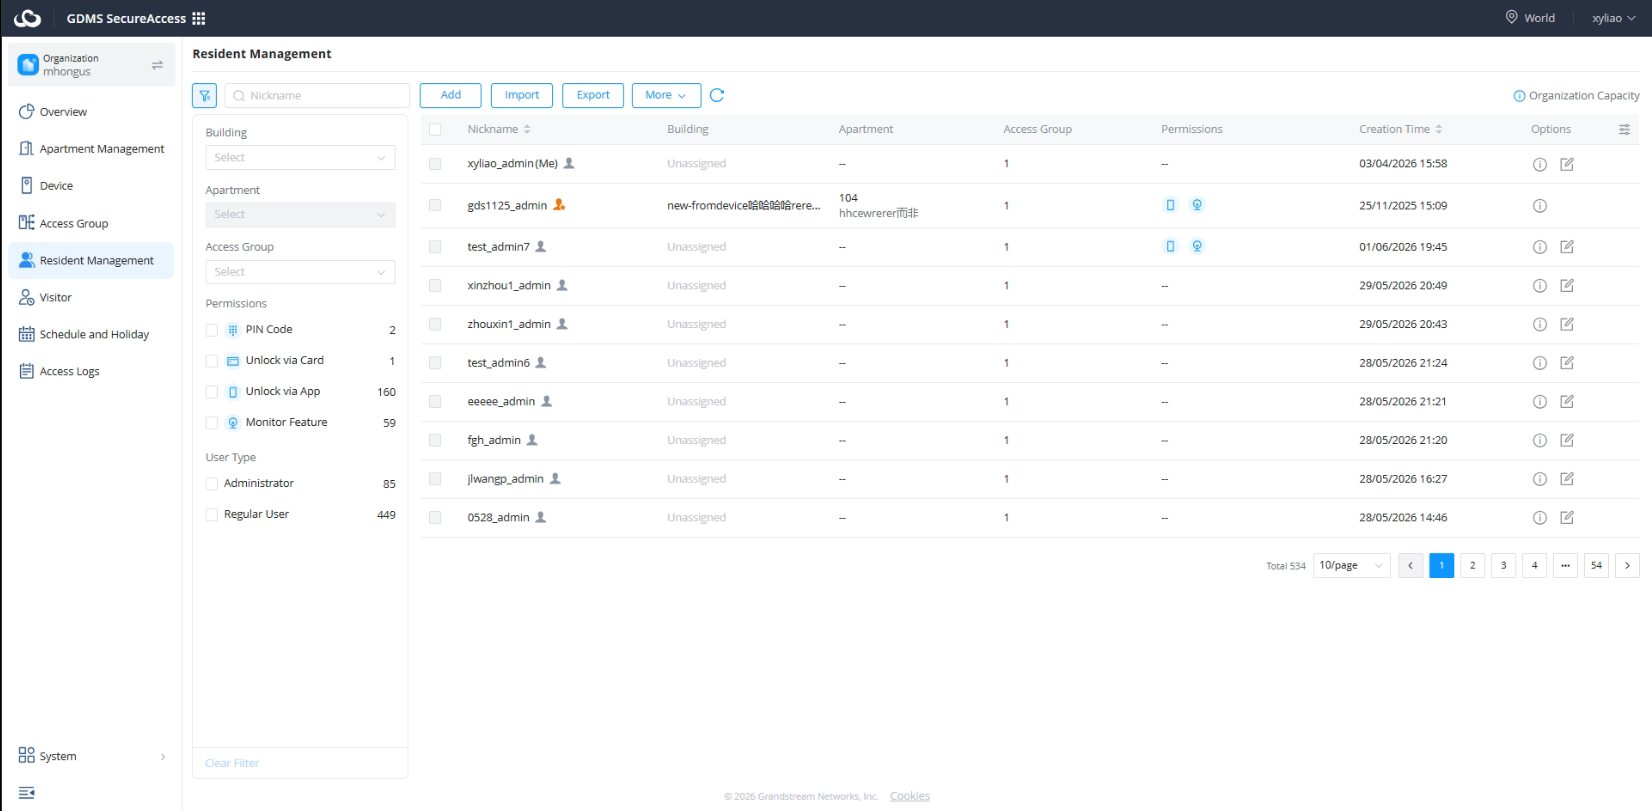
8. Resident Filtering
The Resident Management page provides a filtering panel that allows administrators to quickly locate specific residents based on their assigned building, apartment, access permissions, and user type. These filters help simplify resident management in large deployments by narrowing the displayed resident list to only the relevant entries.
The following filtering options are available:
- Nickname Search – Allows administrators to search for a resident by entering their nickname or name. The resident list is automatically filtered to display matching entries.
- Building – Filters residents based on the building to which they are assigned. This option is useful when managing organizations with multiple buildings.
- Apartment – Filters residents by apartment number or unit. The available apartments are automatically updated according to the selected building.
- Access Group – Displays only residents assigned to a specific access group. This allows administrators to quickly identify users associated with a particular access policy or door access configuration.
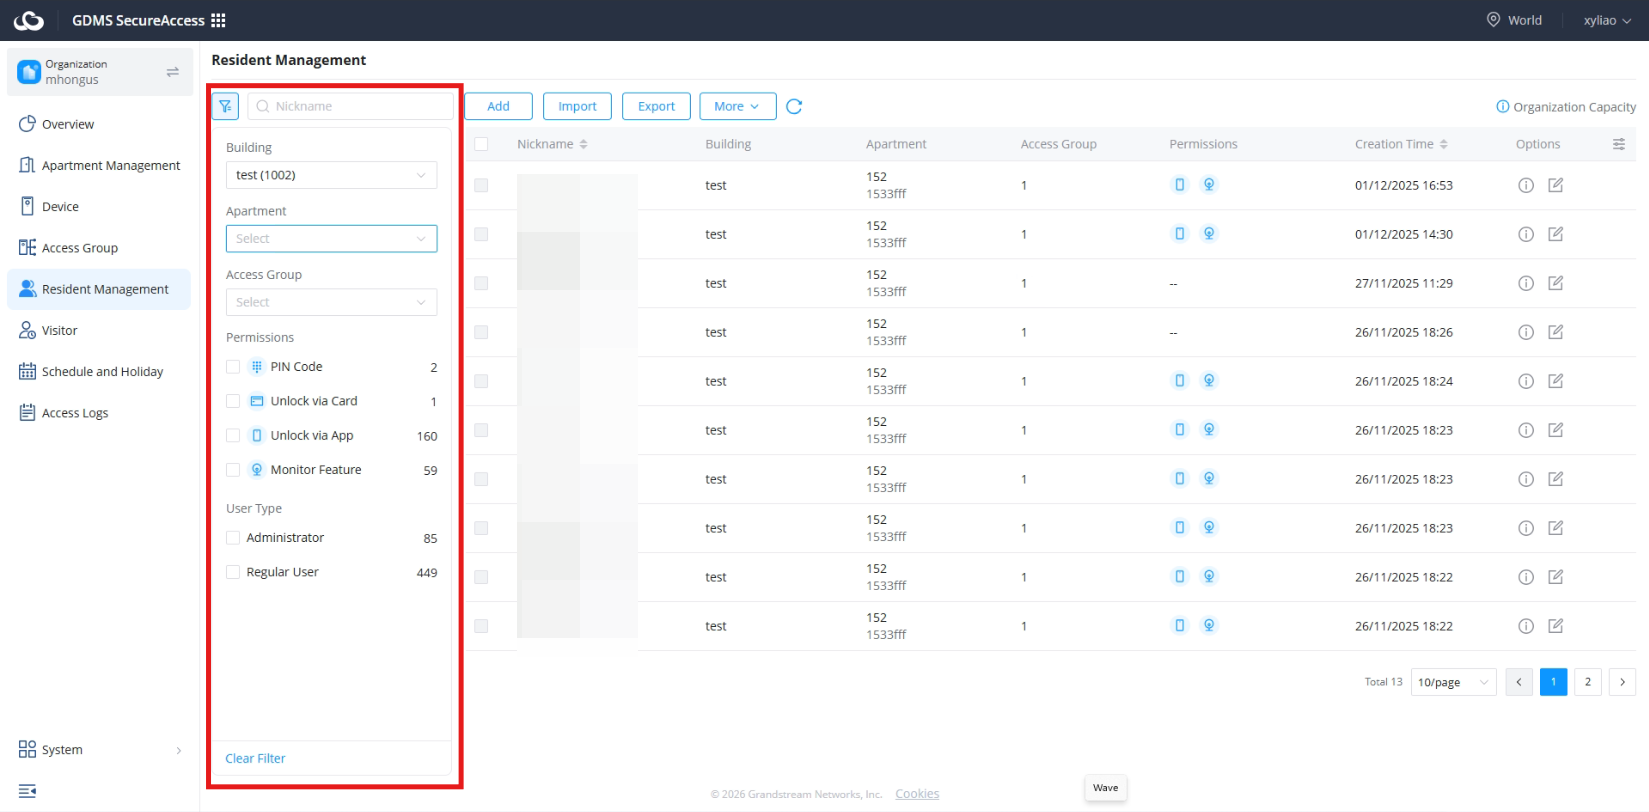
Permission Filters
The Permissions section allows administrators to filter residents according to the credentials and features assigned to their accounts.
- PIN Code – Displays residents who have been assigned a PIN code for door access.
- Unlock via Card – Displays residents who have one or more access cards assigned to their account.
- Unlock via App – Displays residents who are authorized to unlock doors using the mobile application.
- Monitor Feature – Displays residents who have monitoring privileges, allowing them to view door station video feeds or related monitoring functions.
The number displayed beside each permission indicates how many residents currently have that permission assigned.
User Type Filters
The User Type section allows administrators to filter residents according to their role within the organization.
- Administrator – Displays users with administrative privileges who can perform management and configuration tasks.
- Regular User – Displays standard resident accounts without administrative permissions.
The number displayed beside each user type indicates the total number of users belonging to that category.
Clearing Filters
After applying one or more filters, administrators can click Clear Filter to remove all active filter conditions and restore the complete resident list. This provides a quick way to return to the default view without manually resetting each filter.
Visitor Management
Overview
The Visitor Management module is used to provide temporary and controlled access permissions for non-permanent users within the GDMS SecureAccess platform.
This module allows administrators or authorized users to create temporary visitor credentials for individuals who require short-term or limited access to managed access control devices.
Visitor Management provides temporary access control for:
- Guests
- Delivery personnel
- Contractors
- Property staff
The Visitor Management module simplifies temporary access administration while maintaining centralized control and security oversight.
Visitor credentials can be configured with:
- Limited access periods
- Device-specific permissions
- Temporary access validity
- Time-based restrictions
Visitor activities and access behavior are recorded and monitored through the platform to improve operational visibility and security tracking.
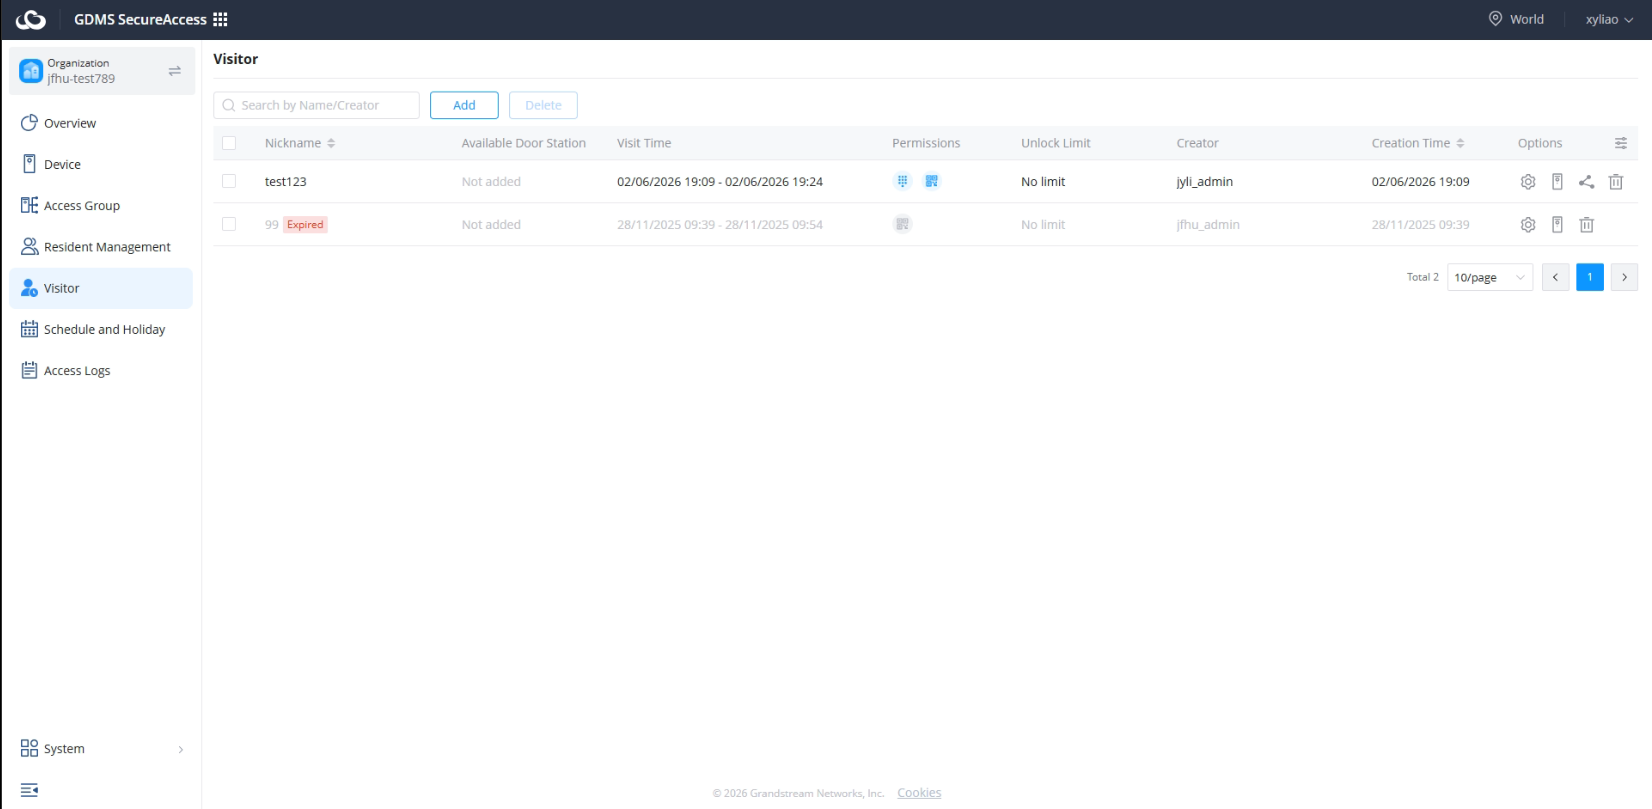
1. Add Visitor
The Visitor page allows administrators and residents to create temporary visitor credentials for guests. Visitor credentials can be configured with a specific validity period, recurring schedule, access duration, and unlock limitations. Depending on the selected configuration, a visitor can be granted one-time access, time-limited access, or recurring access privileges.
When a visitor is created, the visitor’s access permissions are automatically synchronized with the creator’s access permissions and access time restrictions.
Administrators can create visitor credentials using:
- Temporary PIN codes
- QR codes
Once created successfully, visitor credentials can be distributed to the visitor for temporary access usage.
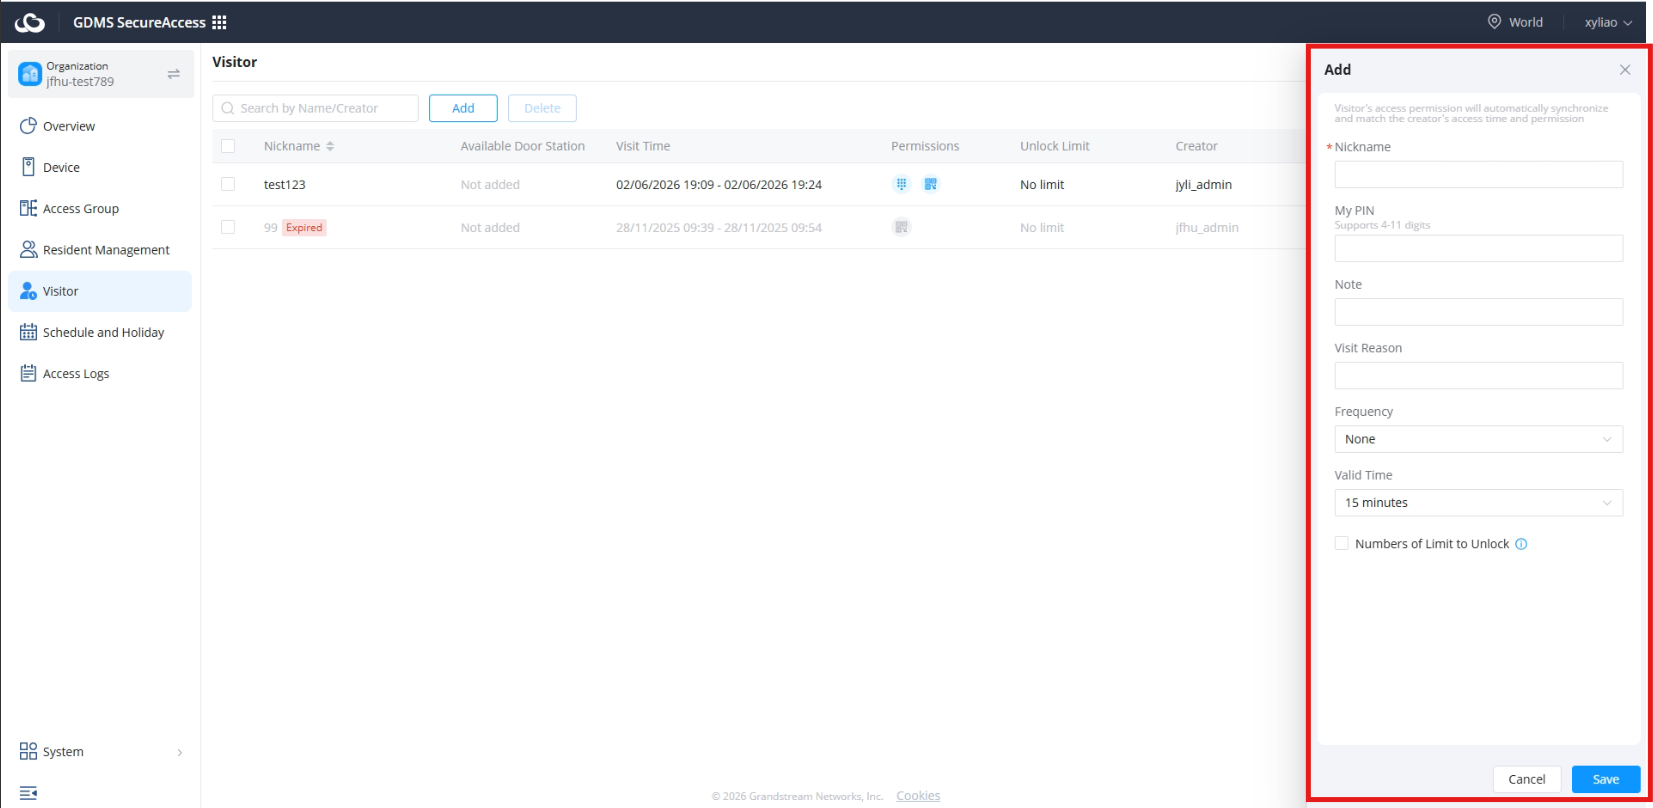
Below are the options to be configured for each added visitor:
| Nickname | Specifies the name or identifier of the visitor. This field is used to identify the visitor within the system and visitor records. |
| My PIN | Defines the PIN code assigned to the visitor. The PIN must contain between 4 and 11 digits and can be used as a temporary door access credential. |
| Note | Defines how often the visitor credential is valid. Available options may include one-time access, daily access, weekly access, or other recurring schedules, depending on system configuration. |
| Visit Reason | Specifies the purpose of the visit, such as delivery, maintenance, guest visit, or contractor access. |
| Frequency | When a recurring weekly schedule is selected, it specifies the days on which the visitor credential is valid (for example, Monday, Wednesday, and Friday). |
| Weekday Selection | When a recurring weekly schedule is selected, specifies the days on which the visitor credential is valid (for example, Monday, Wednesday, and Friday). |
| Valid Time | Defines the duration for which the visitor credential remains valid. Example values may include 15 minutes, 30 minutes, 1 hour, or other predefined durations. |
| Start Date | Specifies the first date on which the visitor credential becomes active. |
| End Date | Specifies the last date on which the visitor credential remains valid. After this date, the visitor credential automatically expires. |
| Access Period | Defines the daily access window during which the visitor is allowed to unlock doors. For example, access may be restricted between 08:00 and 18:00. |
| Numbers of Limit to Unlock | Enables a limit on the number of unlock operations that can be performed using the visitor credential. |
| Unlock Limit Value | Specifies the maximum number of unlock operations allowed when the unlock limit option is enabled. Supported values range from 1 to 200 unlocks. |
PIN Entry
Temporary PIN codes allow visitors to manually enter a generated access code directly on supported access control devices.
PIN-based access is used for:
- Residential guest access
- Delivery personnel
- Temporary maintenance access
- Contractor entry
PIN credentials can be configured with:
- Expiration periods
- Time restrictions
- Device-specific permissions
This method simplifies temporary access distribution without requiring permanent credentials.
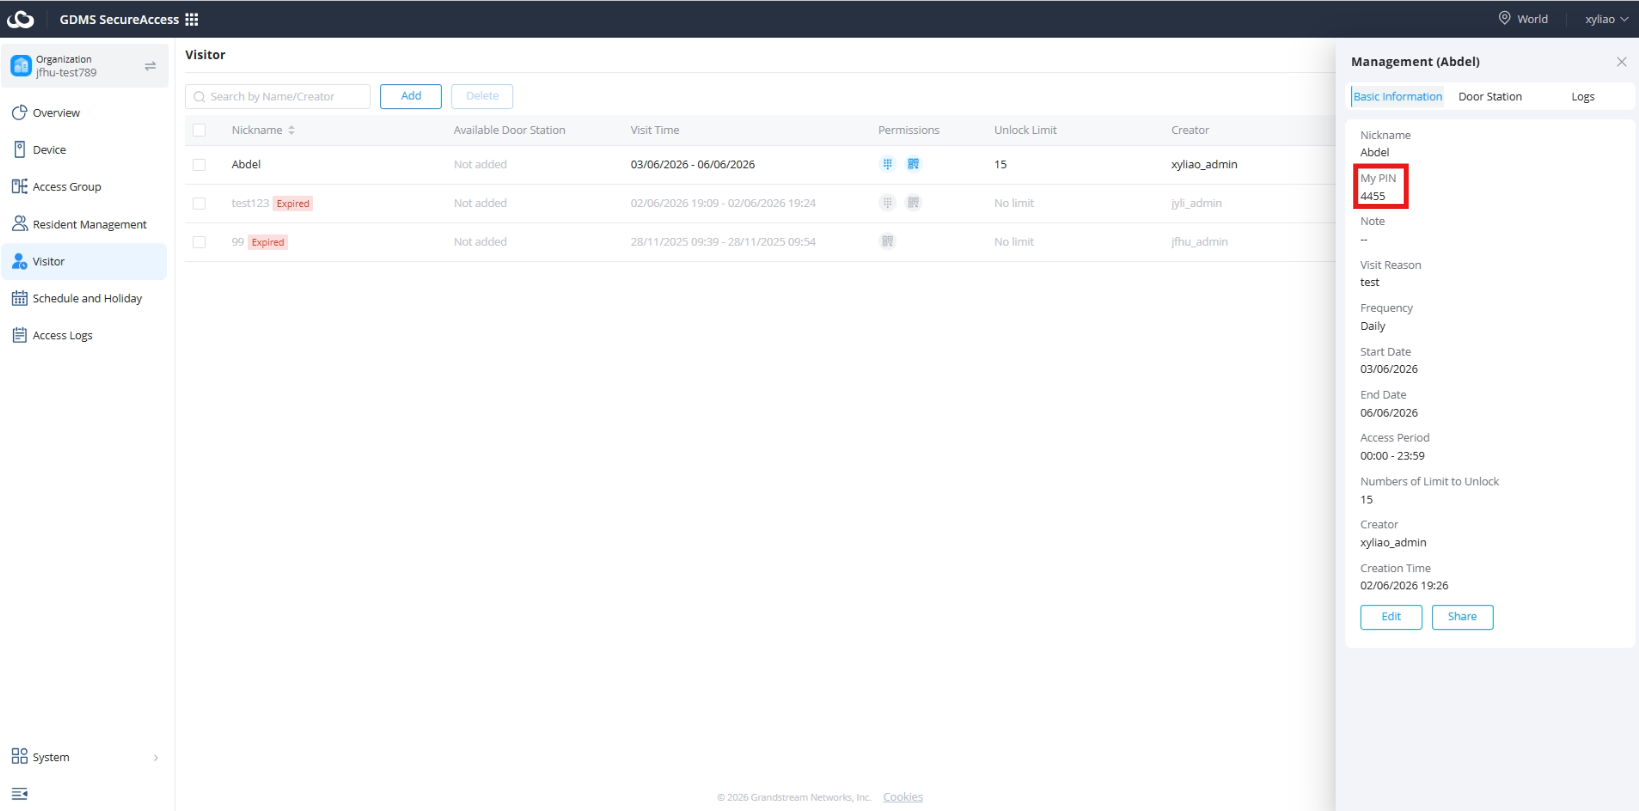
QR Code Scanning
QR code-based visitor access allows visitors to scan generated QR credentials at supported devices.
QR code access may be distributed through the following actions:
- Share Access Credentials – Administrators can share temporary visitor credentials, including PIN codes, QR codes, and QR links, to simplify visitor access management.
- Generate Static QR Codes – Static QR codes can be generated, downloaded, and shared with visitors. The QR code remains valid according to the configured visitor access schedule.
- Send QR Links – QR links can be distributed electronically, allowing visitors to conveniently receive and use their access credentials remotely.
QR code access improves convenience and simplifies temporary credential management.
This method is especially useful for:
- Visitor self-service entry
- Contactless access workflows
- Mobile-based visitor authorization
The platform automatically associates generated QR codes with the configured visitor permissions and validity period.
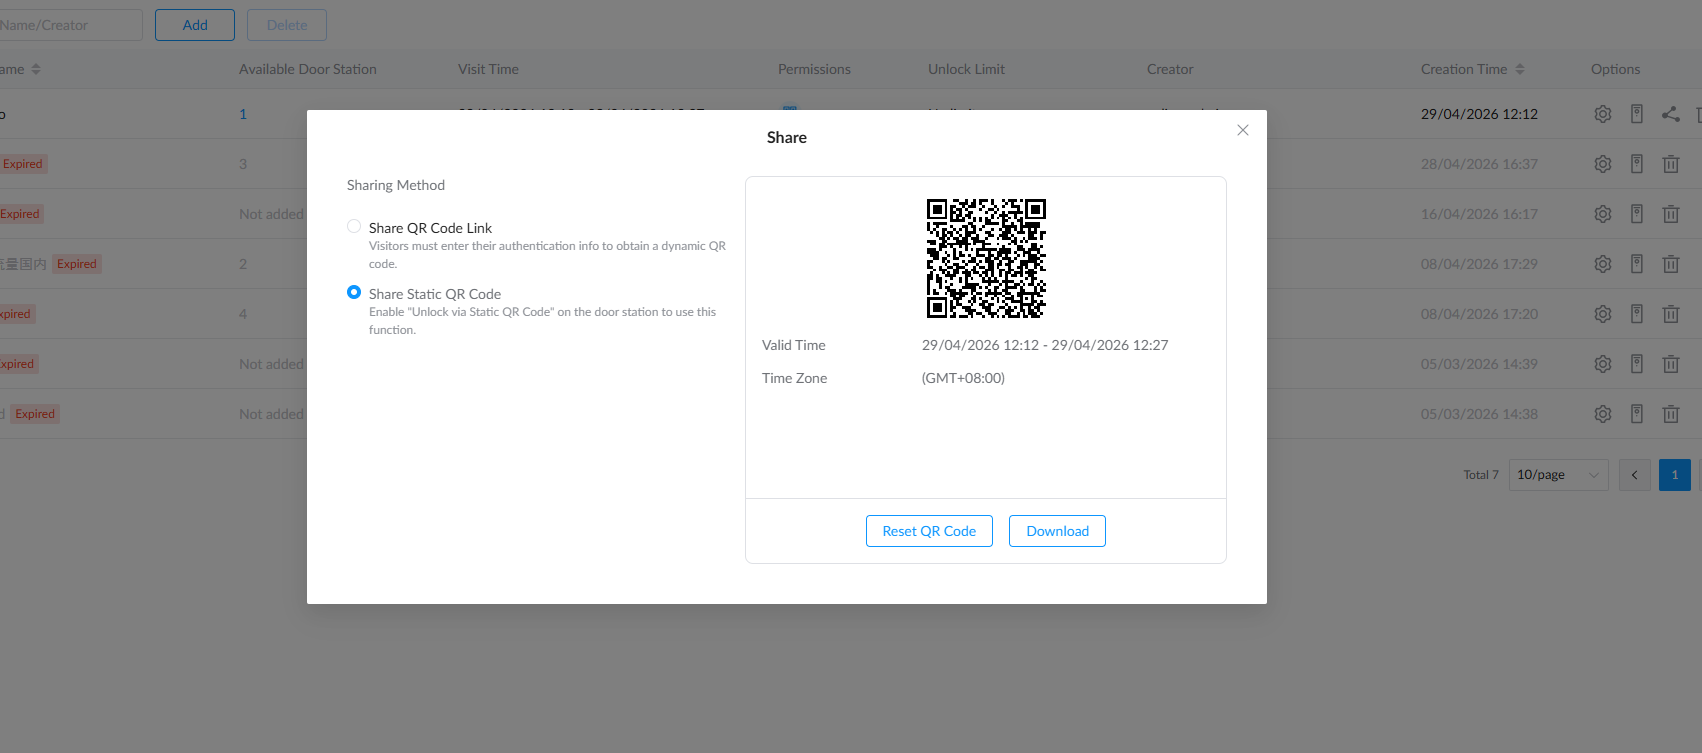
2. Manage Visitors
The Manage Visitors section allows administrators to monitor, modify, review, and control existing visitor credentials and permissions.
Administrators can centrally manage all temporary visitor access records within the organization.
Management functions include:
- Reviewing visitor information
- Modifying permissions
- Monitoring access activity
- Managing credential distribution
- Reviewing access validity
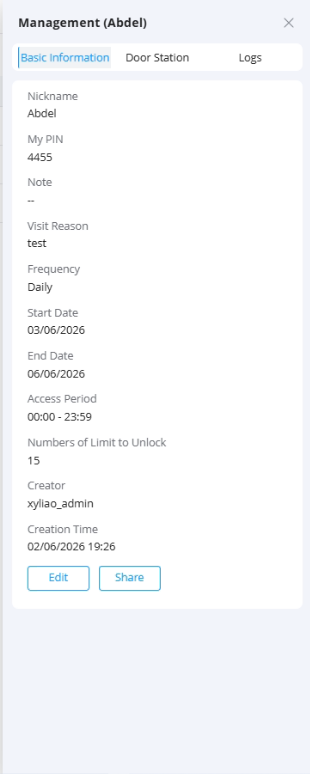
The Visitor Information section provides detailed operational information regarding configured visitor accounts and credentials.
Administrators can:
- View visitor profiles
- Share access credentials
- Generate static QR codes
- Send QR links
Visitor profile information may include:
- Visitor name
- Access validity period
- Assigned devices
- Credential type
- Access status
- Associated creator information
This centralized visibility simplifies visitor lifecycle management and operational auditing.
Accessible Devices
Administrators can define which devices visitors are authorized to access.
Administrators can:
- Specify accessible devices
- Define access periods
This allows organizations to limit visitor access strictly to approved locations and approved time windows.
Examples include:
- Main entrance access only
- Temporary parking access
- Maintenance room access
- Delivery entrance access
Visitor permissions should be configured carefully to maintain operational security and minimize unnecessary access exposure.
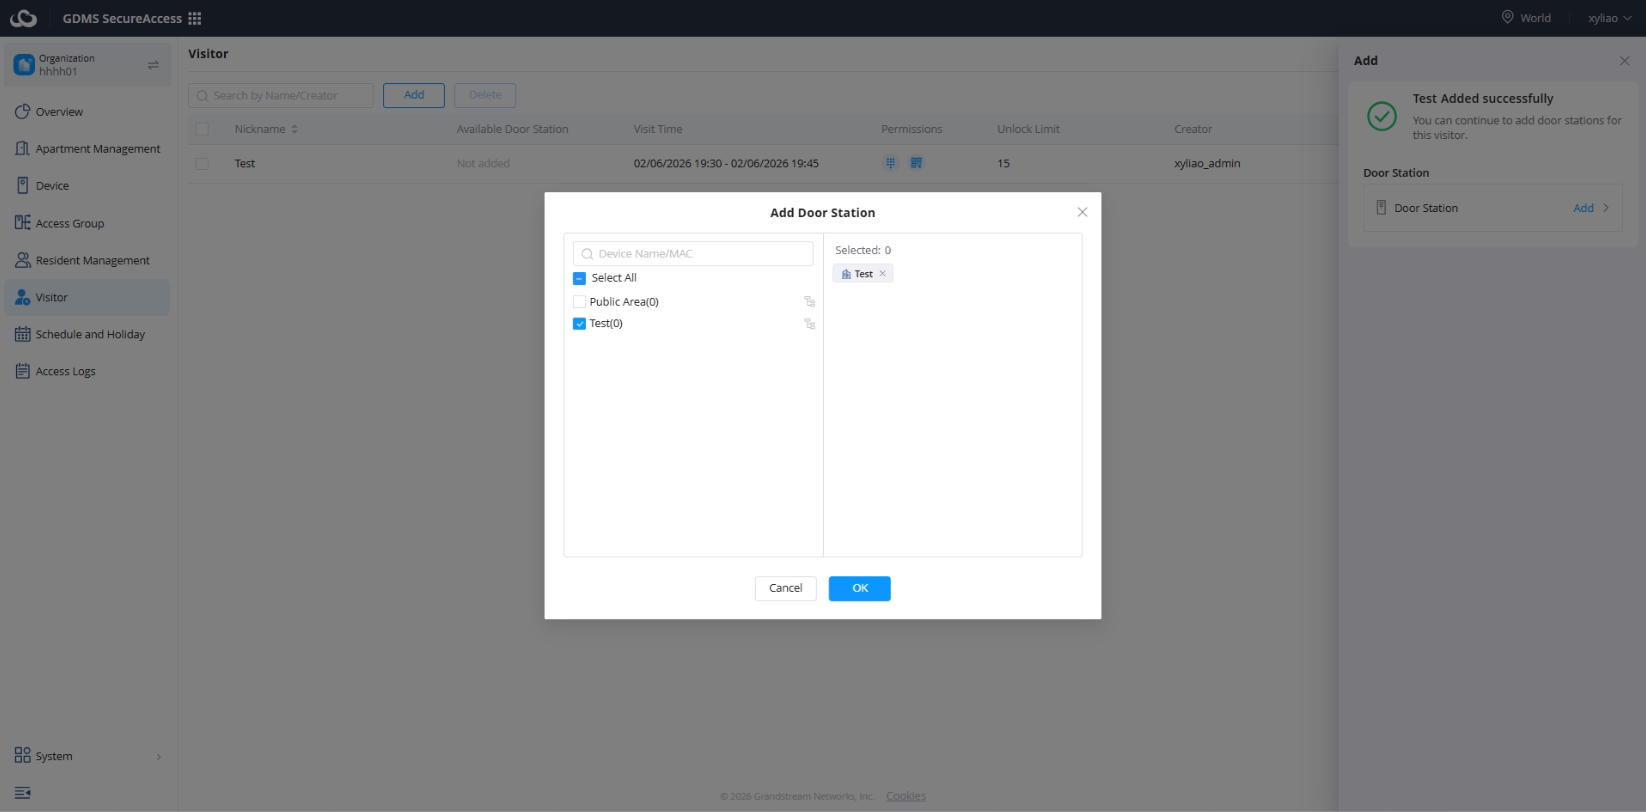
Access Logs
Visitor activity is centrally recorded through the platform for operational visibility and auditing purposes.
Visitor activities are recorded, including:
- Door opening times
- Access methods
- Device usage
Access logs help administrators monitor:
- Visitor activity history
- Temporary access usage
- Unauthorized access attempts
- Credential usage patterns
These logs are useful for:
- Security reviews
- Operational auditing
- Incident investigation
- Visitor activity tracking
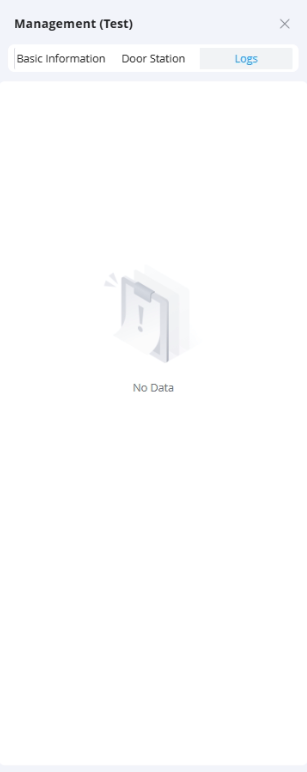
3. Delete Visitor
The Delete Visitor function allows administrators to remove visitor credentials and immediately revoke associated temporary access permissions.
Deleting a visitor immediately revokes access permissions.
Once deleted:
- PIN codes become invalid
- QR codes become unusable
- Device access permissions are revoked
- Visitor credentials can no longer be used
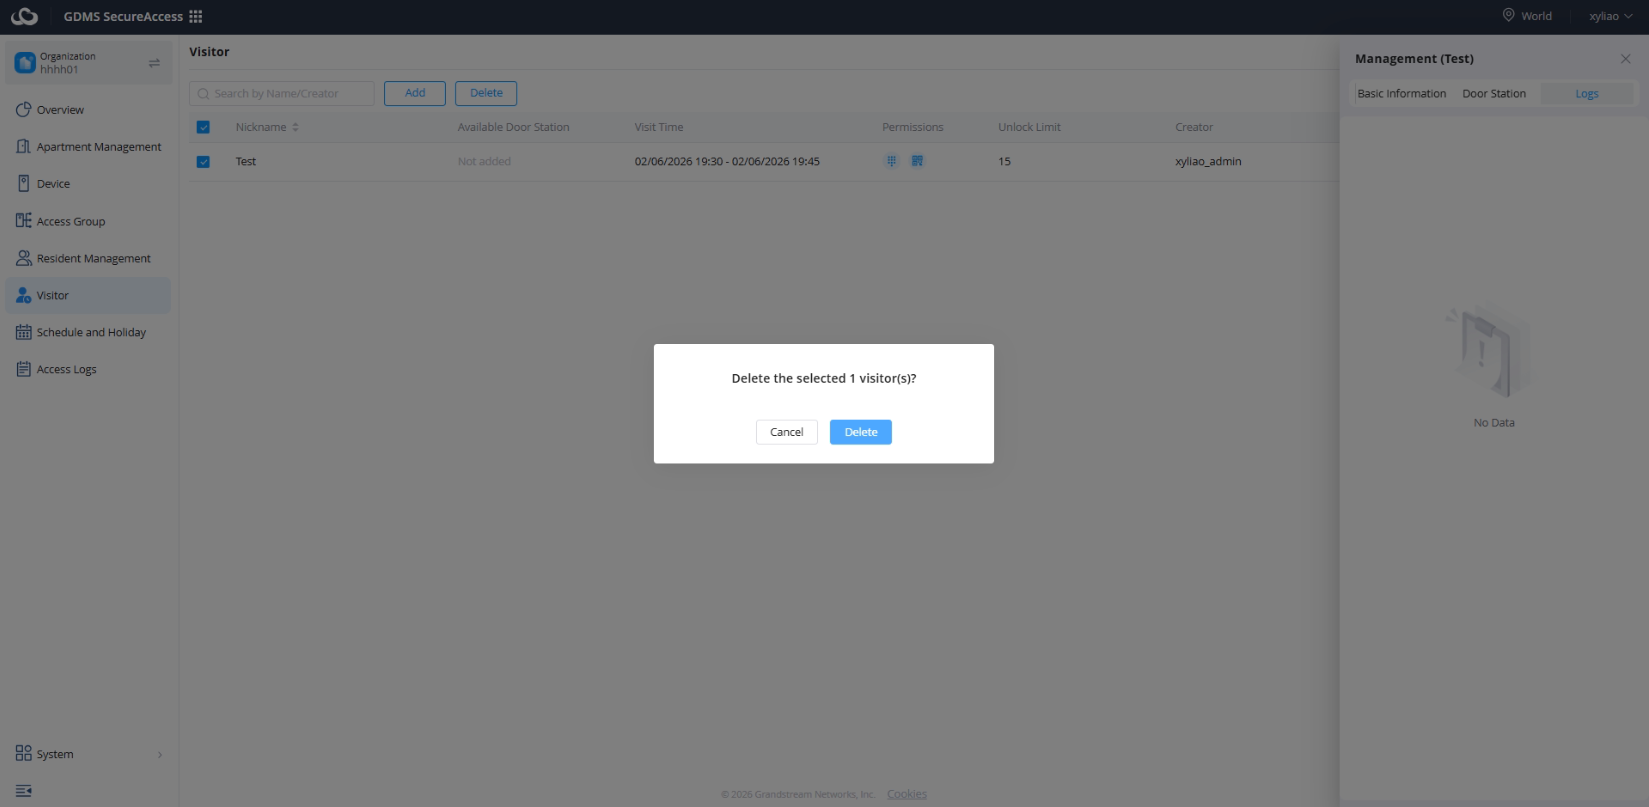
Important Visitor Permission Rules
Visitor permissions within GDMS SecureAccess are tightly controlled and are directly dependent on the permissions of the user or administrator who created the visitor account.
Visitor permissions depend entirely on the creator’s permissions.
This dependency structure helps prevent visitors from receiving permissions exceeding the creator’s authorized access scope.
Administrators should carefully review creator permissions before generating visitor access credentials.
Device Access Dependency
Visitors can only access:
- Devices accessible to the creator
This means that visitor permissions cannot exceed the creator’s authorized device access scope.
For example:
- If the creator only has access to Building A entrances, visitors created by that user can only access those same devices
- Visitors cannot inherit permissions beyond the creator’s own access rights
This improves operational security and prevents privilege escalation through visitor management.
Time Restriction Dependency
Visitor access validity is also dependent on the creator’s own access conditions.
Visitor access follows:
- Creator schedules
- Creator holidays
- Creator validity period
This means that:
- Visitors cannot access devices outside the creator’s permitted schedules
- Holiday restrictions affecting the creator also affect visitor permissions
- If the creator’s account validity expires, visitor permissions may also become invalid
This dependency model ensures that temporary access remains aligned with organization-wide security policies.
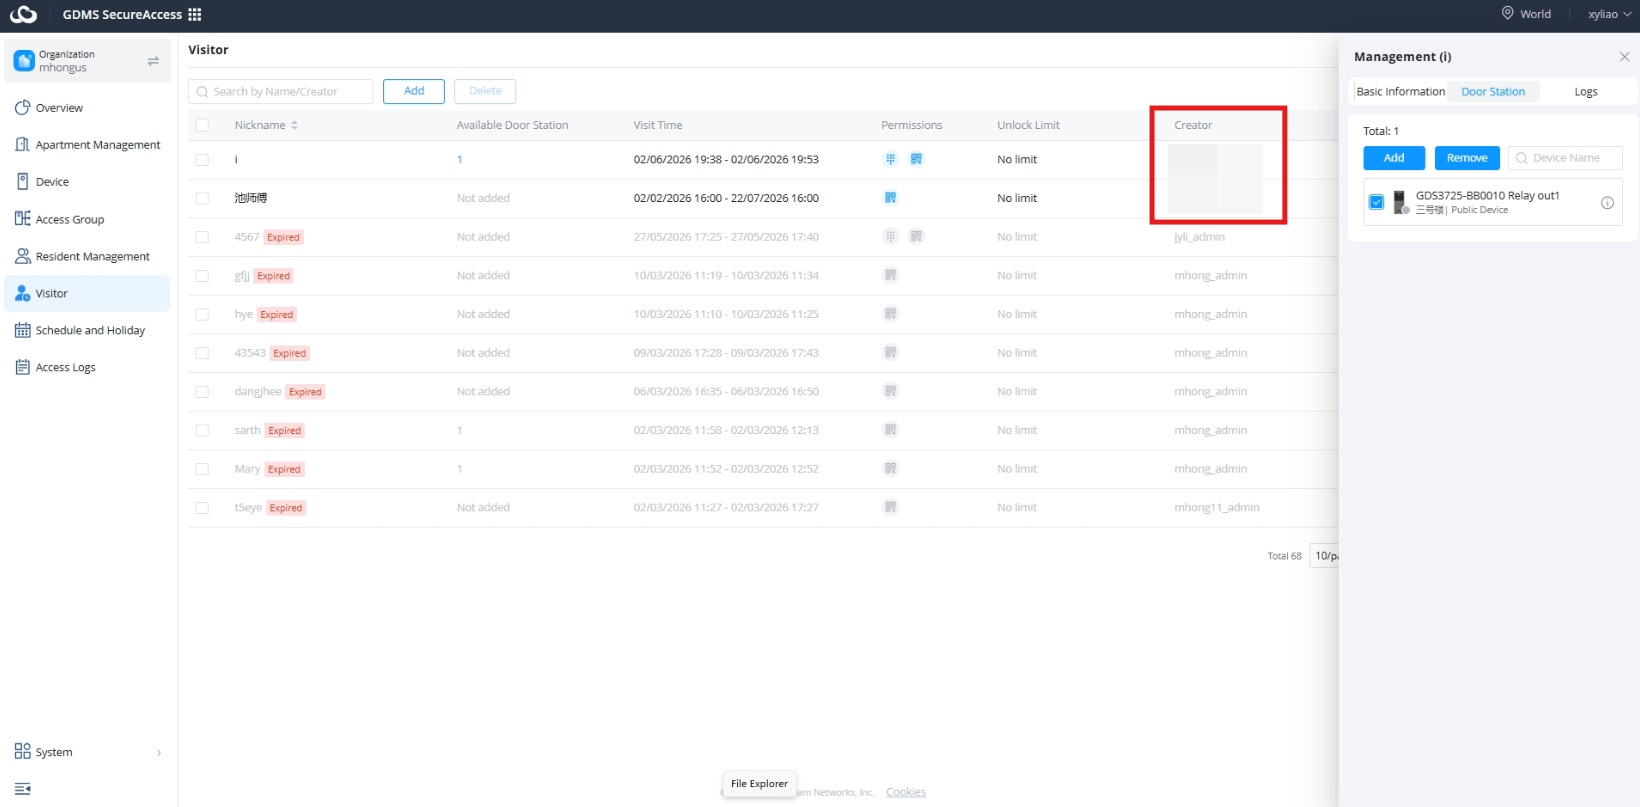
Creator Disabled
If the creator account is disabled:
- Visitor access is disabled automatically
This automatic synchronization helps maintain operational security and prevents inactive or unauthorized accounts from indirectly maintaining active visitor access.
Creator Deleted
If the creator account is deleted:
- Visitor permissions become invalid immediately
All associated temporary access credentials generated by that creator are automatically revoked.
Administrators should consider this behavior when performing user lifecycle management operations.
Device Limitation
The GSC3560 model does not support:
- PIN-based access
- QR code access
The GSC3565/GSC3560/GDS3726/GDS3727 models do not support:
- PIN-based access
Administrators should verify device capabilities before configuring visitor credential methods.
Schedule and Holiday Management
Overview
The Schedule and Holiday Management module is used to define and manage time-based access control policies within GDMS SecureAccess.
This module allows administrators to control when users are permitted to access associated devices by applying schedules and holiday rules through access groups.
Schedules and holidays are essential for implementing structured access policies across residential, commercial, and enterprise deployments.
Because schedules are applied through access groups, administrators can efficiently manage large numbers of users and devices without requiring individual user scheduling configuration.
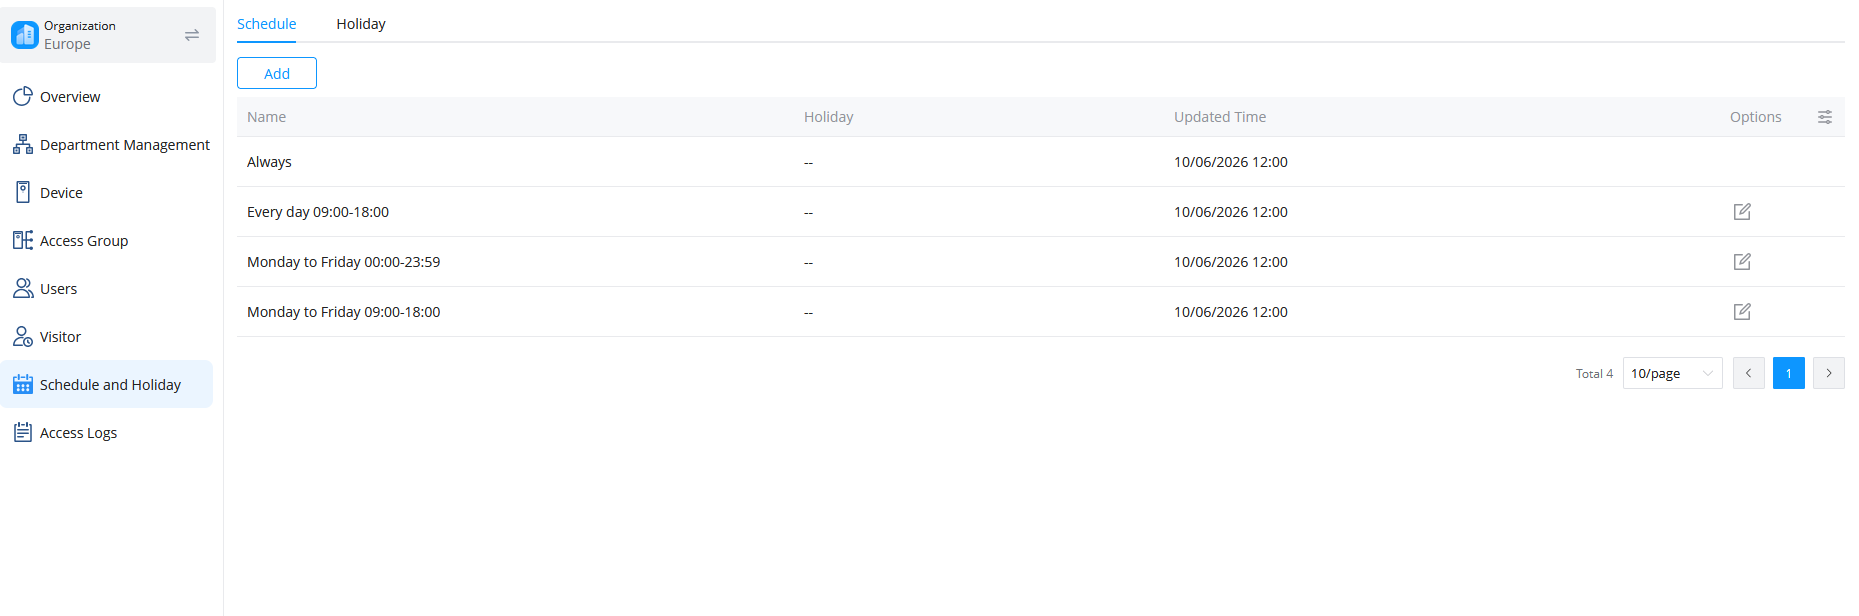
1. Add Schedule
Schedules define when users assigned to access groups are permitted to access devices. A schedule can be reused across multiple access groups, making access management easier and more consistent.
Schedules define when users assigned to access groups are permitted to access devices. A schedule can be created manually or imported from another organization.
Create a Schedule Manually
- Navigate to Schedule and Holiday → Schedule.
- Click Add and select Manually Add.
- Enter a unique Name for the schedule.
- (Optional) Select a Holiday profile if holiday exceptions should apply.
- Under Access Period, configure the allowed access times:
- Select the required day(s) of the week.
- Specify the Start Time and End Time for each selected day.
- Add additional time periods as needed.
- Review the schedule on the weekly timeline.
- Click OK to save the schedule.
Example: Configure access from 09:00 to 18:00, Monday through Friday.
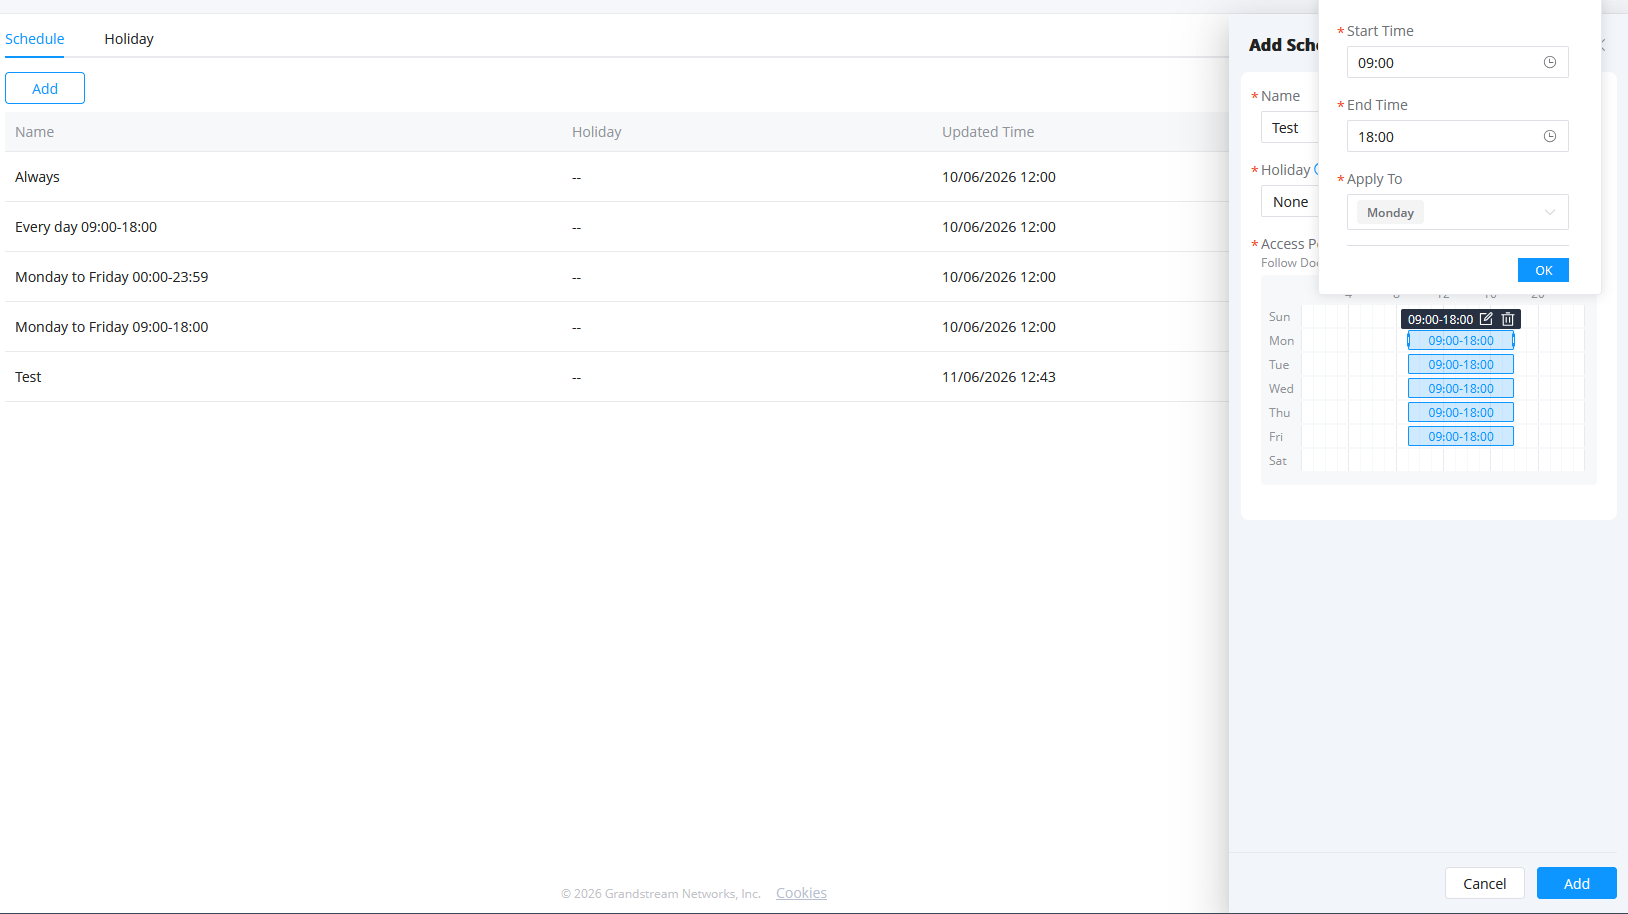
Import a Schedule from Another Organization
- Navigate to Schedule and Holiday → Schedule.
- Click Add and select Import from Another Organization.
- Select the source Organization.
- Choose one or more schedules to import.
- Configure the duplicate name handling method:
- Overwrite: Replaces the existing schedule with the imported one.
- Auto Rename: Creates the imported schedule with a new name if a duplicate exists.
- Click Add to import the selected schedules.
Imported schedules can be assigned to access groups immediately after import. Once a schedule is created or imported, it can be reused across multiple access groups to enforce consistent time-based access policies.
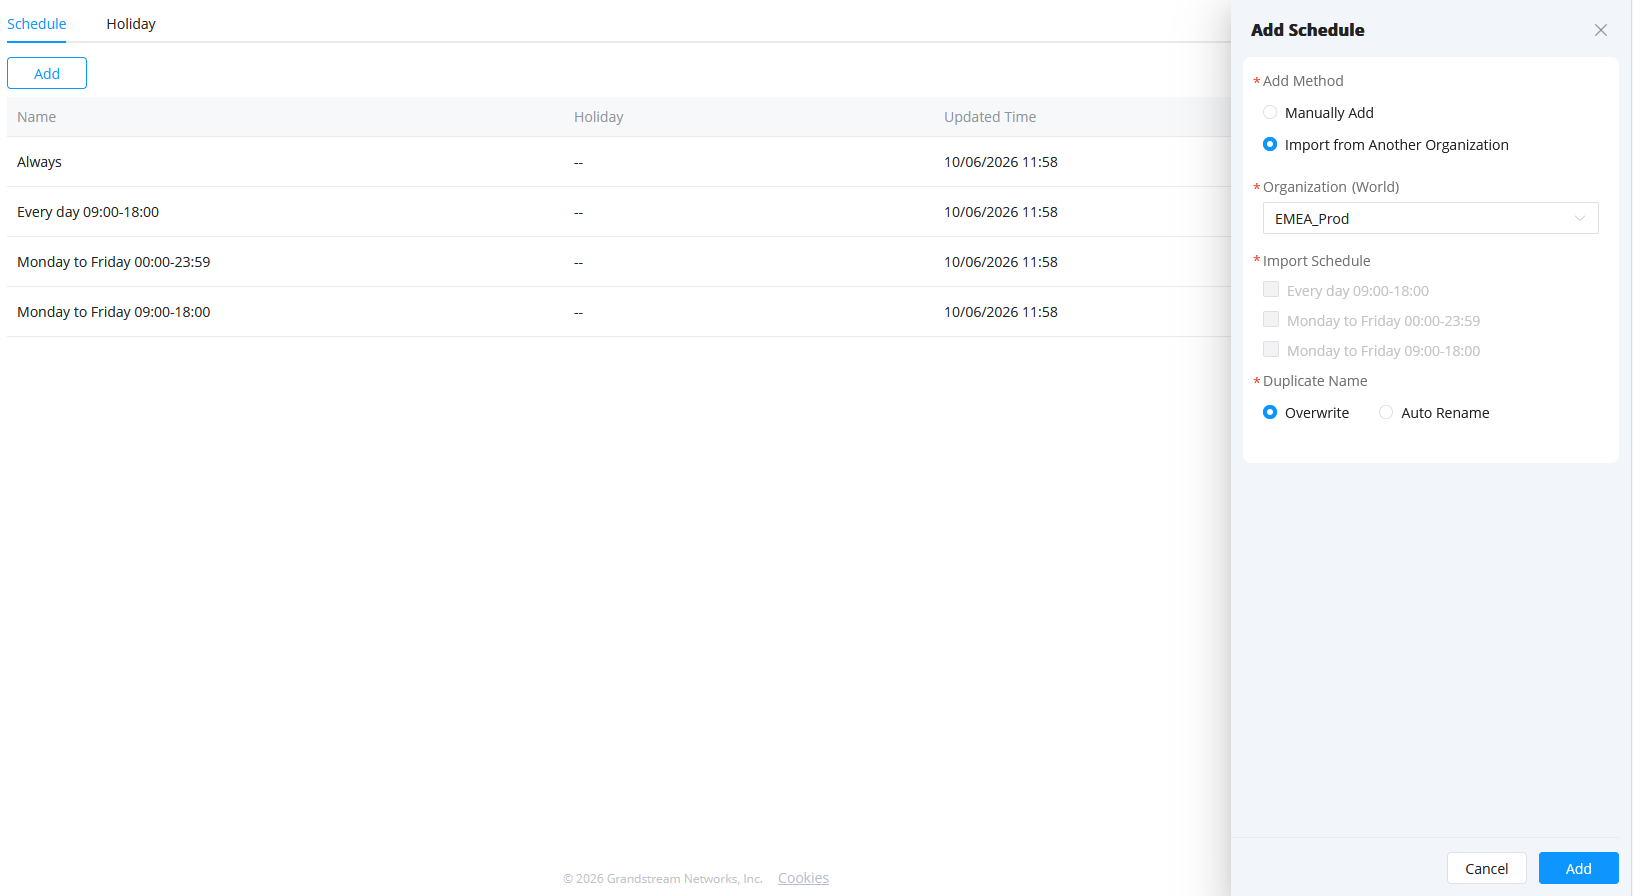
2. Edit Schedule
Existing schedules can be modified at any time to reflect changing operational requirements or updated security policies.
To edit a schedule:
- Navigate to Schedule and Holiday → Schedule.
- Locate the schedule to be modified and click the Edit icon.
- Update the Name if required.
- (Optional) Select a different Holiday profile.
- Modify the Access Period as needed:
- Add new time periods.
- Adjust existing start and end times.
- Remove access periods that are no longer required.
- Review the updated schedule on the weekly timeline.
- Click Save to apply the changes.
Example: Update a schedule from 09:00–18:00 to 07:30–20:30 on weekdays, or add an additional access period for specific days.
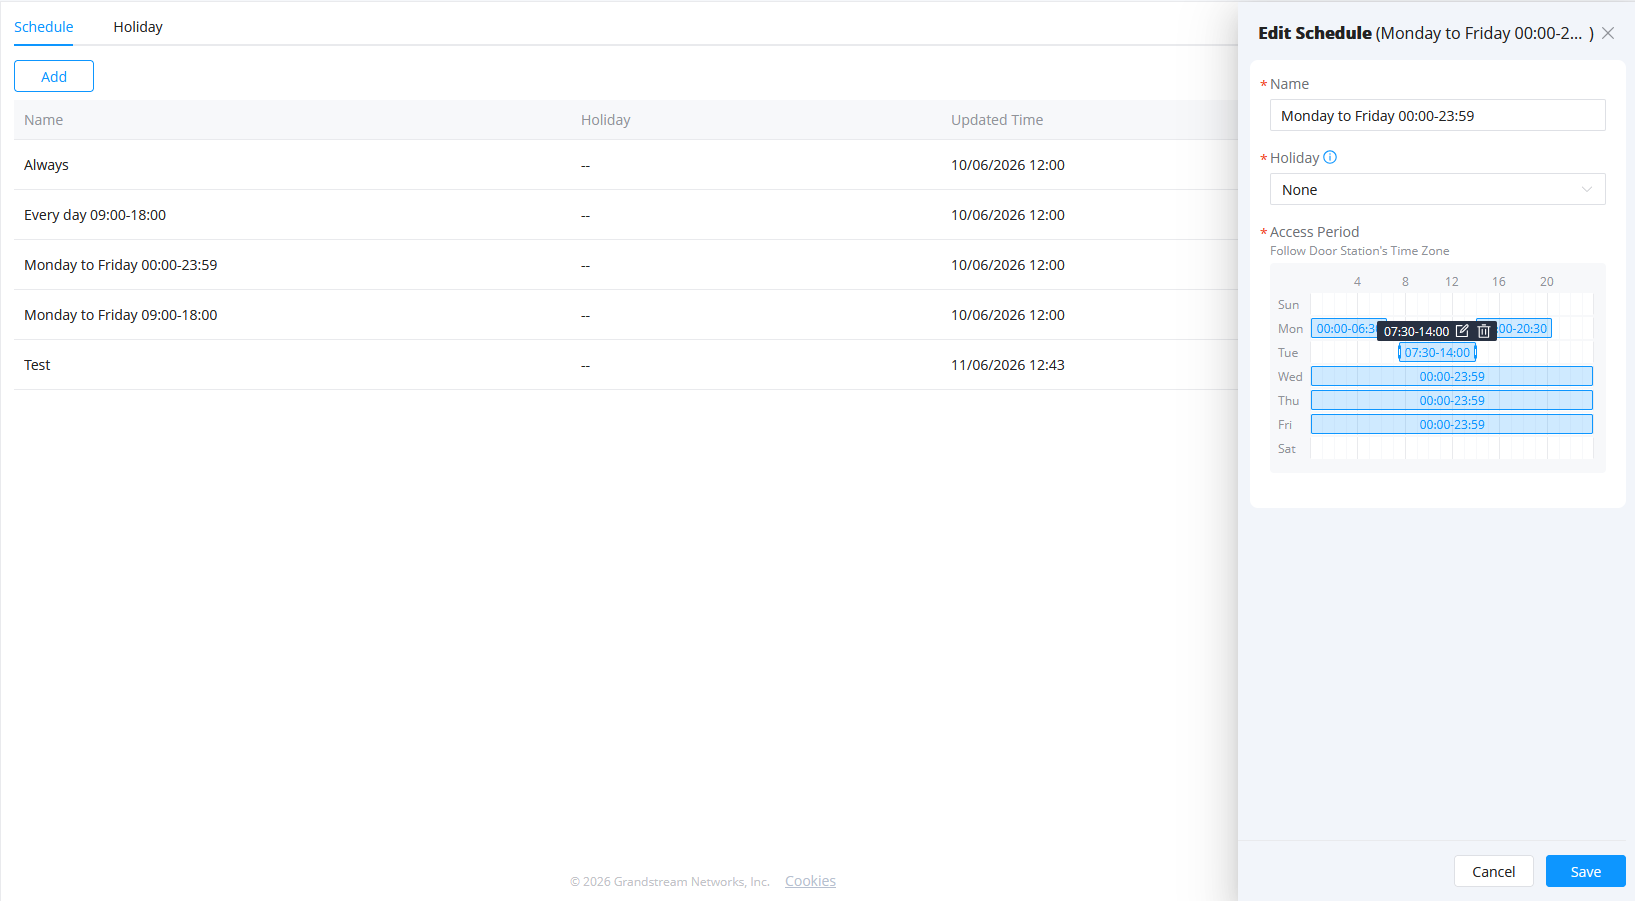
3. Copy Schedule
Administrators can copy an existing schedule to one or more organizations, allowing the same access time configuration to be reused across multiple sites without recreating it manually.
To copy a schedule:
- Navigate to Schedule and Holiday → Schedule.
- Locate the schedule to be copied and click the Copy icon.
- In the Copy to Another Organization window, select the destination Organization(s).
- (Optional) Enable Copy Existing Holidays to copy any holiday profiles associated with the schedule.
- Configure the duplicate schedule handling method:
- Overwrite: Replaces an existing schedule with the same name in the destination organization.
- Auto Rename: Creates the copied schedule with a different name if a duplicate exists.
- Click Copy to complete the operation.
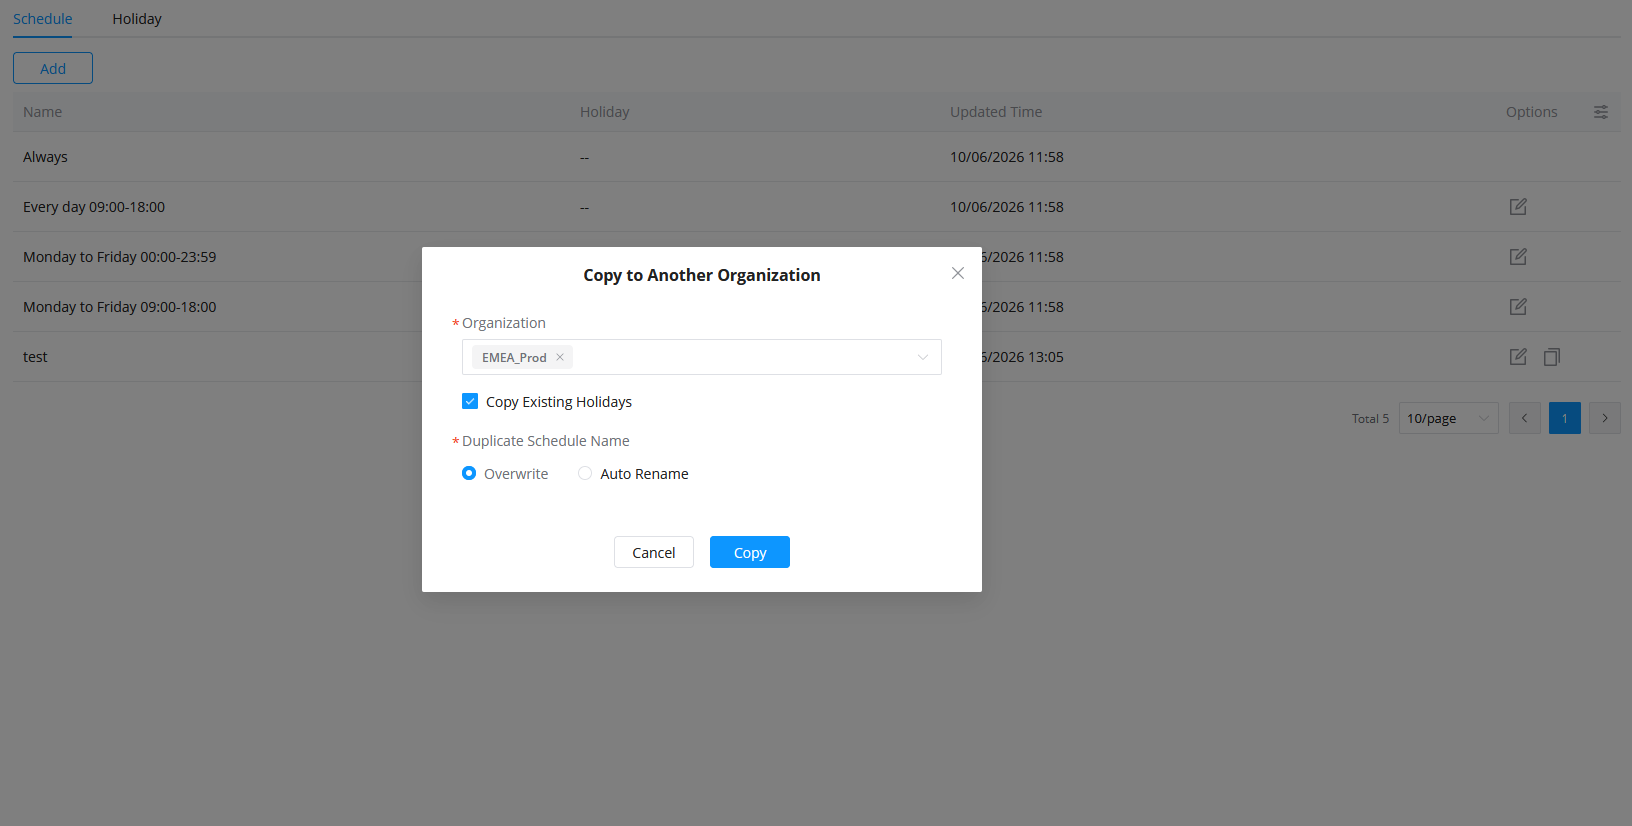
4. Add Holiday
Holiday profiles define specific dates or date ranges during which normal schedule behavior can be adjusted. Holidays can be created manually or imported from another organization.
Add a Holiday Manually
- Navigate to Schedule and Holiday → Holiday.
- Click Add and select Manually Add.
- Enter a unique Holiday Name.
- Click Add Date to create a holiday entry.
- Specify the holiday name and select the Start Date and End Date.
- Repeat the process to add additional holiday periods if required.
- Click Add to save the holiday profile.
Example: Create a holiday profile named Public Holidays 2026 and add date ranges for national holidays or company shutdown periods.
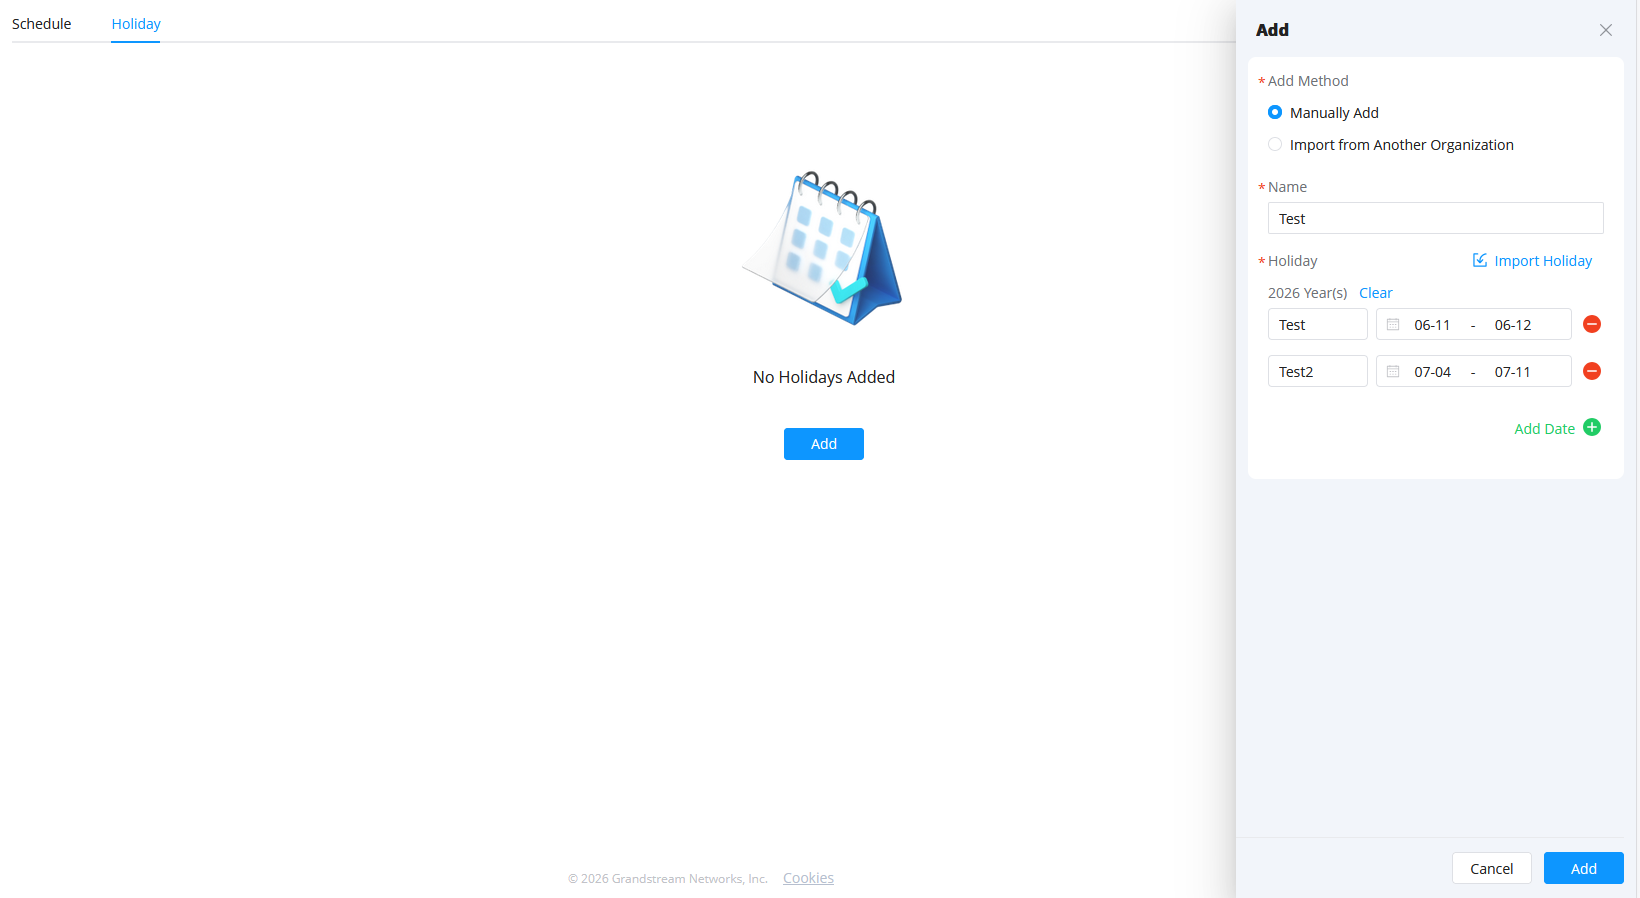
Import a Holiday from Another Organization
- Navigate to Schedule and Holiday → Holiday.
- Click Add and select Import from Another Organization.
- Select the source Organization.
- Choose the holiday profile(s) to import.
- Configure the duplicate name handling method:
- Overwrite: Replaces an existing holiday profile with the same name.
- Auto Rename: Creates the imported holiday profile with a different name if a duplicate exists.
- Click Add to import the selected holiday profile(s).
Imported holiday profiles can be associated with schedules immediately after import and reused across multiple schedules within the organization.
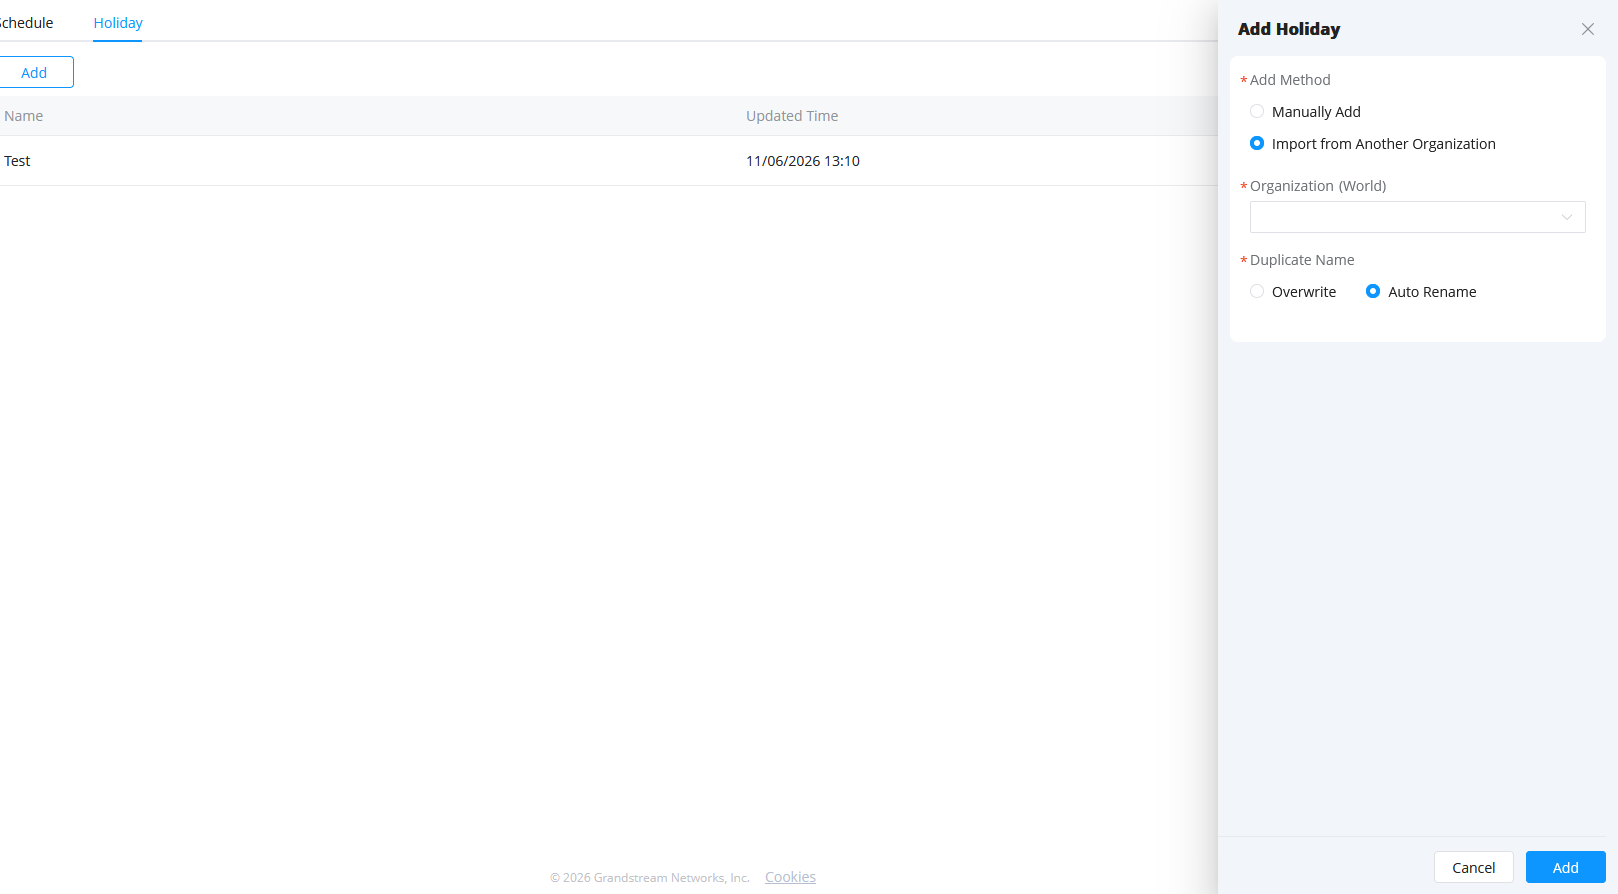
Holiday Import
The Import Holiday feature allows administrators to quickly import predefined public holidays for a specific country or region, eliminating the need to create holiday entries manually.
To import holidays:
- Navigate to Schedule and Holiday → Holiday.
- Click Add and select Import Holiday.
- Select the desired Country/Region.
- Select the applicable Year.
- Choose the holiday(s) to import from the displayed list.
- Select individual holidays as needed.
- Use the header checkbox to select all available holidays.
- Click Import to add the selected holidays to the organization.
Example: Select United States and 2026, then import holidays such as New Year’s Day, Independence Day, and Thanksgiving Day.
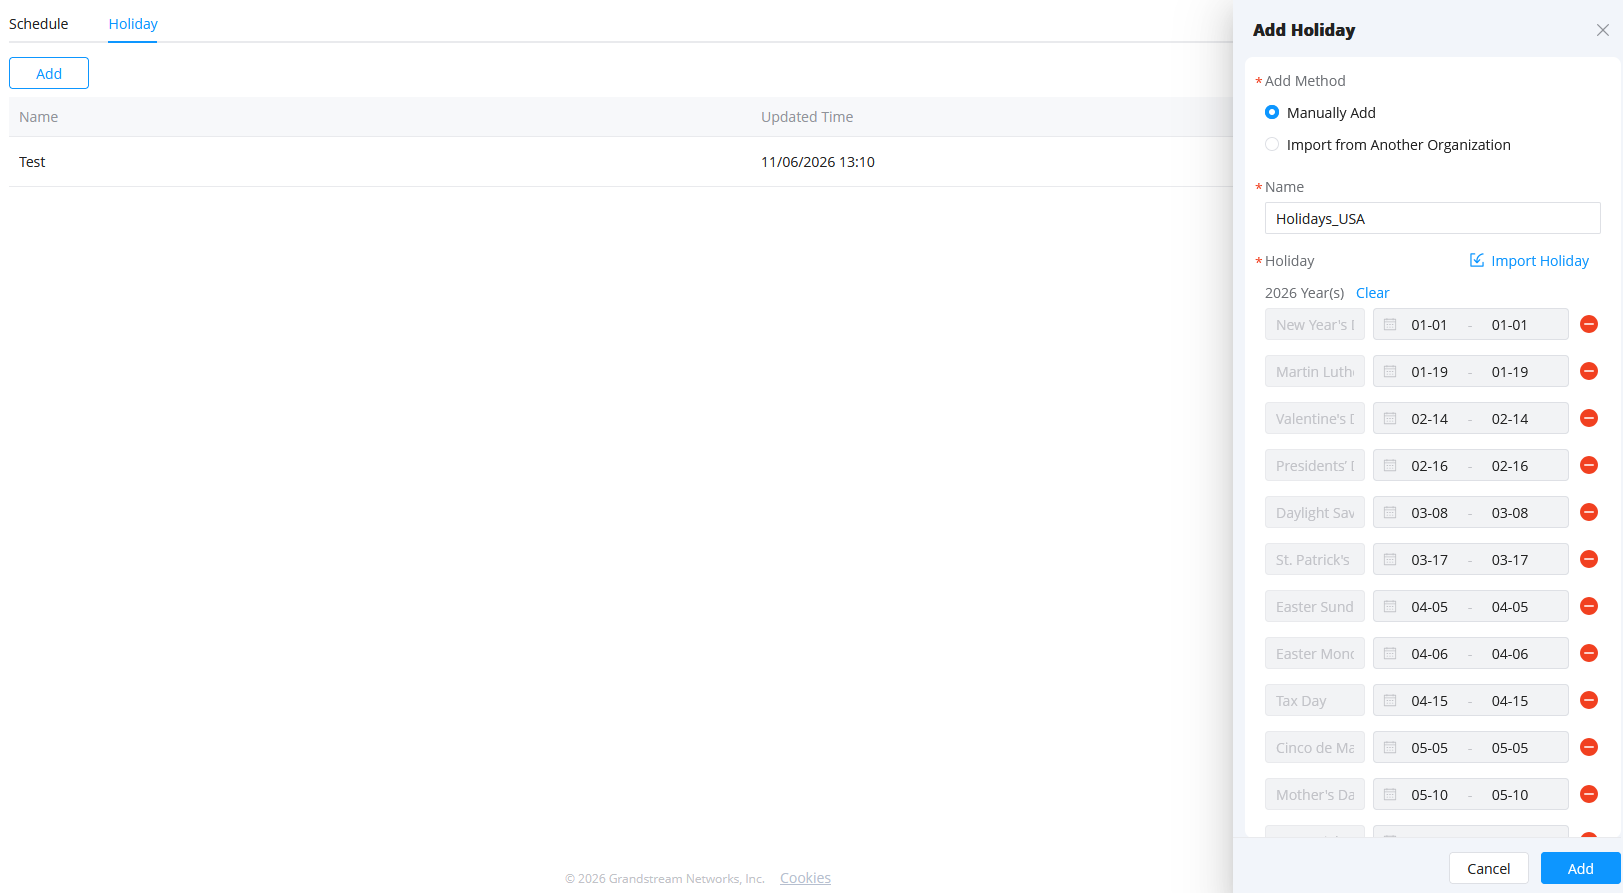
5. Edit Holiday
Existing holiday entries can be modified as operational requirements change.
Holiday dates and rules can be updated as needed.
Administrators may modify:
- Holiday names
- Dates
- Associated schedule conditions
Updating holiday configurations ensures that access control behavior remains aligned with current organizational policies and operational calendars.
Changes to holiday configurations automatically affect associated schedules and access group behavior.
Administrators should review holiday configurations regularly to maintain accurate operational scheduling.
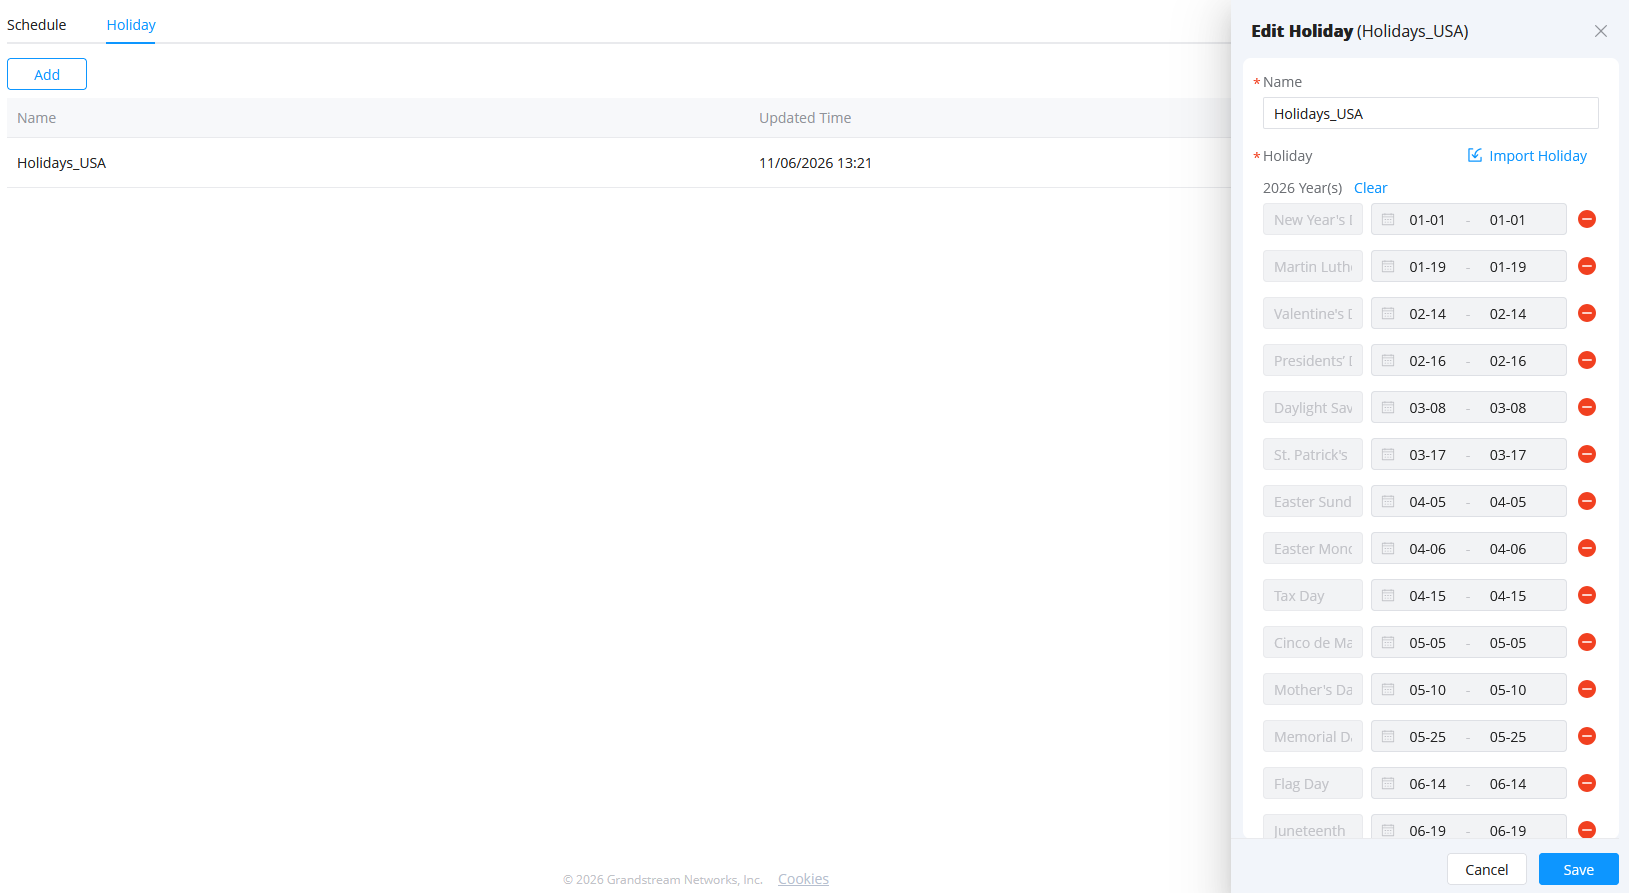
6. Copy Holiday
Administrators can copy an existing holiday profile to one or more organizations, allowing the same holiday configuration to be reused across multiple sites without creating it manually.
To copy a holiday:
- Navigate to Schedule and Holiday → Holiday.
- Locate the holiday profile to be copied and click the Copy icon.
- In the Copy to Another Organization window, select the destination Organization(s).
- Configure the duplicate holiday handling method:
- Overwrite: Replaces an existing holiday profile with the same name in the destination organization.
- Auto Rename: Creates the copied holiday profile with a different name if a duplicate exists.
- Click Copy to complete the operation.
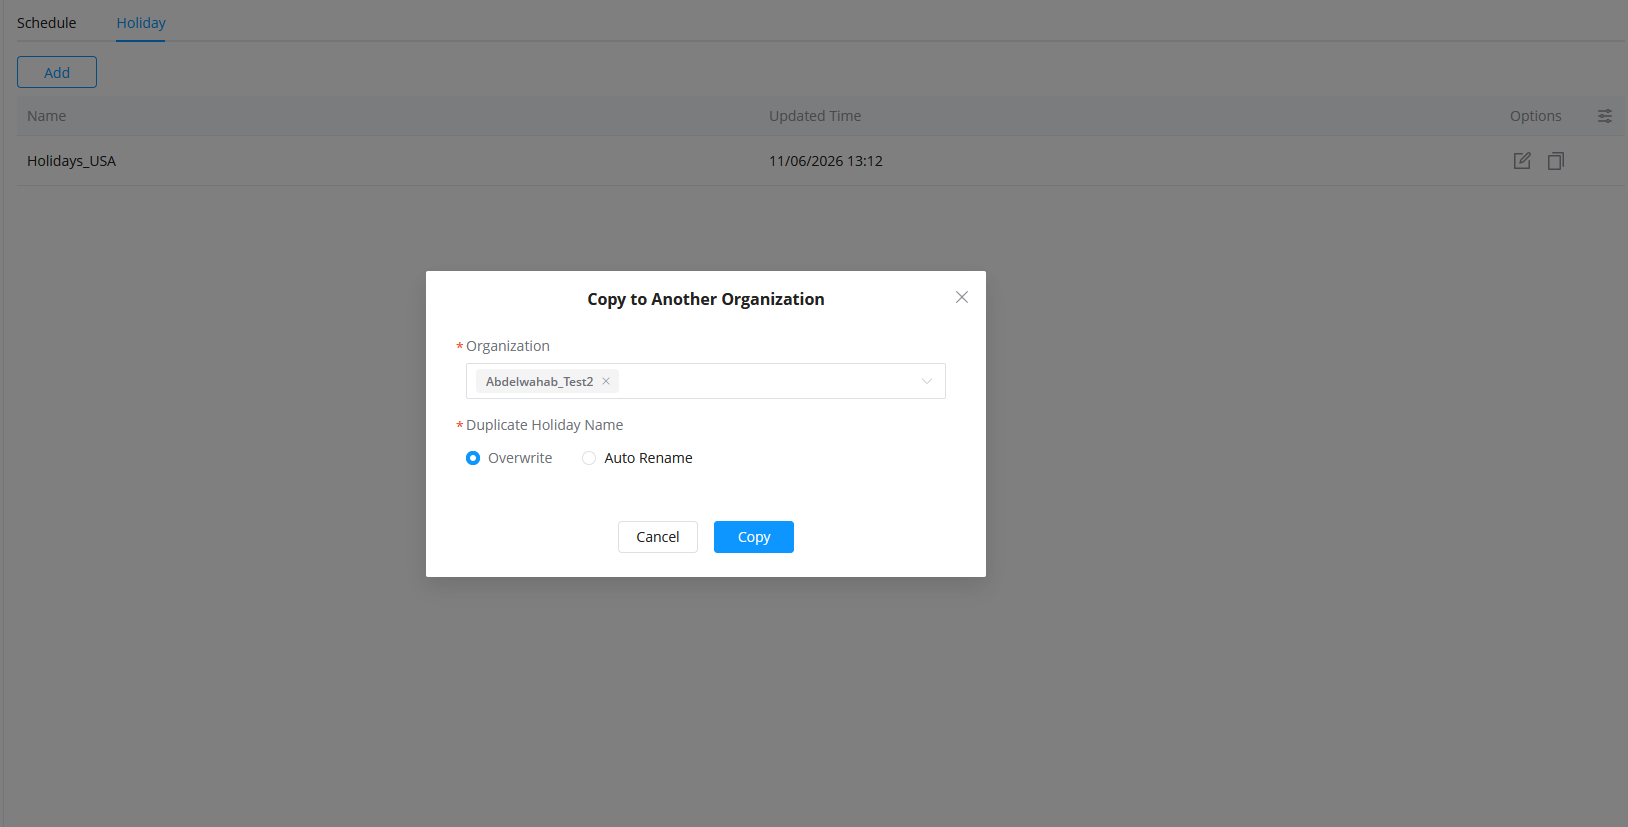
Important Compatibility Note
Administrators should verify device firmware compatibility before deploying large numbers of schedules or implementing advanced scheduling structures.
Devices running:
- GDS372X firmware version 1.0.1.X or below
Support only:
- 10 schedules maximum
Deployments exceeding this limitation may experience scheduling restrictions on affected devices.
Administrators are strongly encouraged to:
- Verify device firmware versions regularly
- Upgrade firmware where applicable
- Review compatibility before large-scale deployment
Maintaining compatible firmware versions helps ensure full platform functionality and consistent schedule synchronization behavior across all managed devices.
Access Control Logs
Overview
The Access Control Logs module provides centralized visibility into operational activity generated by managed access control devices within the GDMS SecureAccess platform.
This module allows administrators to review historical events, monitor operational activity, perform auditing operations, and investigate security-related incidents across the deployment.
The Access Control Logs module is an important part of deployment monitoring and security management, as it provides administrators with detailed records of user activity and device operations.
Administrators can review:
- Door opening events
- Calls
- Other System operations
1. Door Unlock Logs
The Door Opening Logs section records all door access events generated by supported access control devices.
These logs provide detailed information regarding how and when users accessed devices within the organization.
Door Opening Logs are one of the most important operational monitoring tools within the platform because they provide direct visibility into physical access activity across the deployment.
Logs include:
- Access Methods: Includes PIN code, card access, app access, visitor access, etc.
- Access Device: Displays which door was opened.
- Operator: Displays who performed the access operation.
- Access Time: Each access log records the precise date and time of the access event.
- Snapshot Preview: When the snapshot capture function of the entrance panel is enabled, administrators can directly view snapshots associated with specific access events from the access logs. Multiple snapshots captured during the access operation can be reviewed using the built-in preview window.
Additional information may also be available depending on device capabilities and deployment configuration.
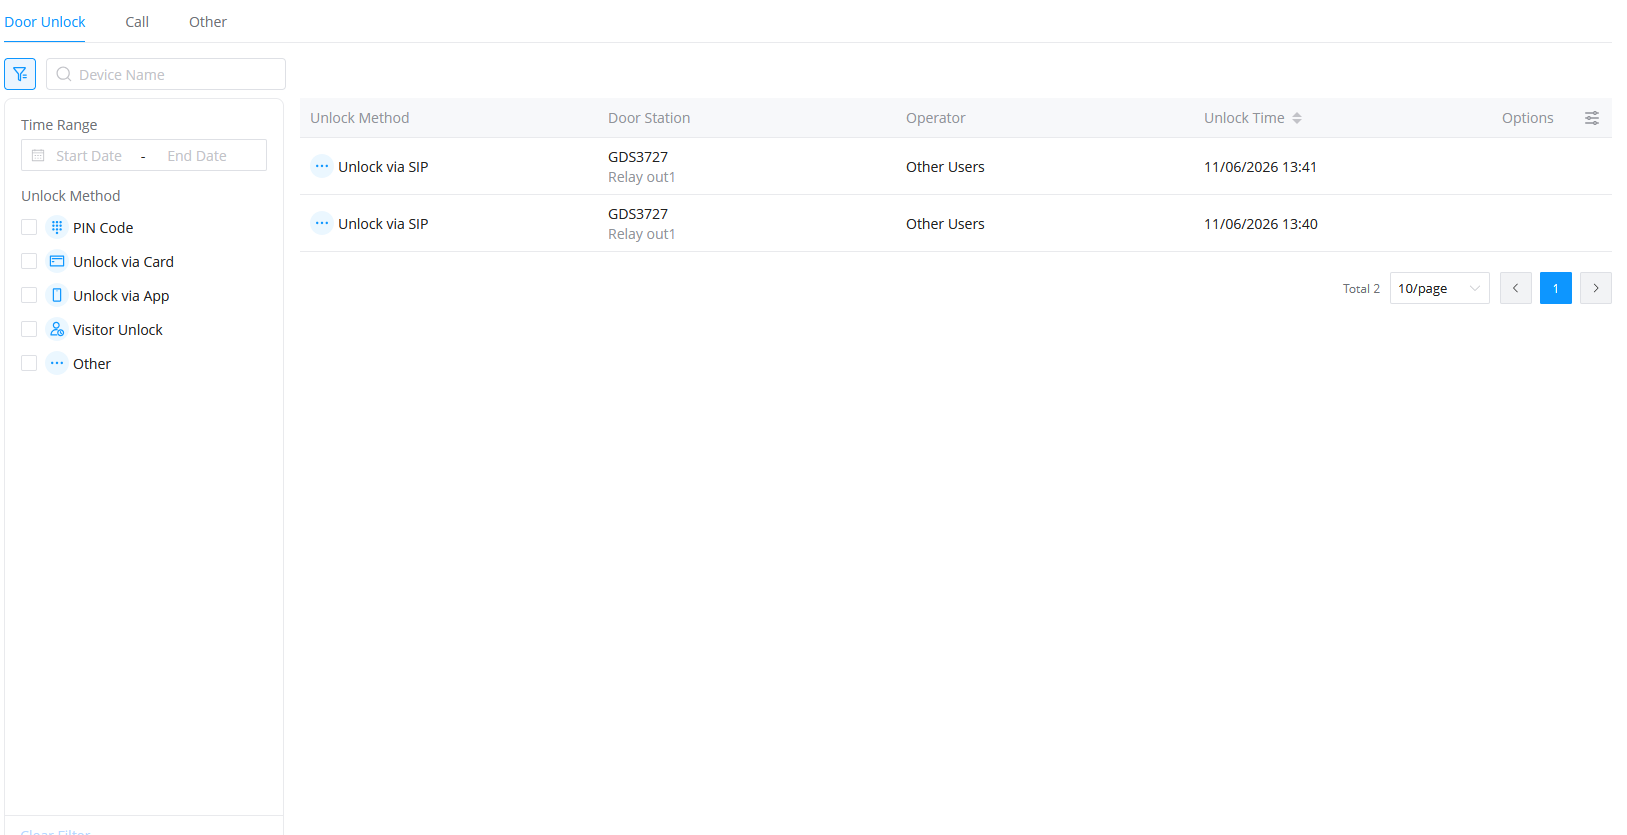
2. Call Logs
The Call Logs section records communication-related activity generated by supported door stations and interphone devices.
Summary of all Call Records Generated by Access Control Devices:
- Caller Information
- User Caller: Display username, SIP/Virtual Number, and Building/Department affiliation;
- Device Caller: Display device name and Building/Department location;
- Called Party Information
- Apartment Called: Display Apartment Name and related information;
- User Called: Display username, SIP/Virtual Number, and Building/Department affiliation;
- Status and Duration
- Identify calls as Missed or Answered;
- Display call duration with support for viewing call details.
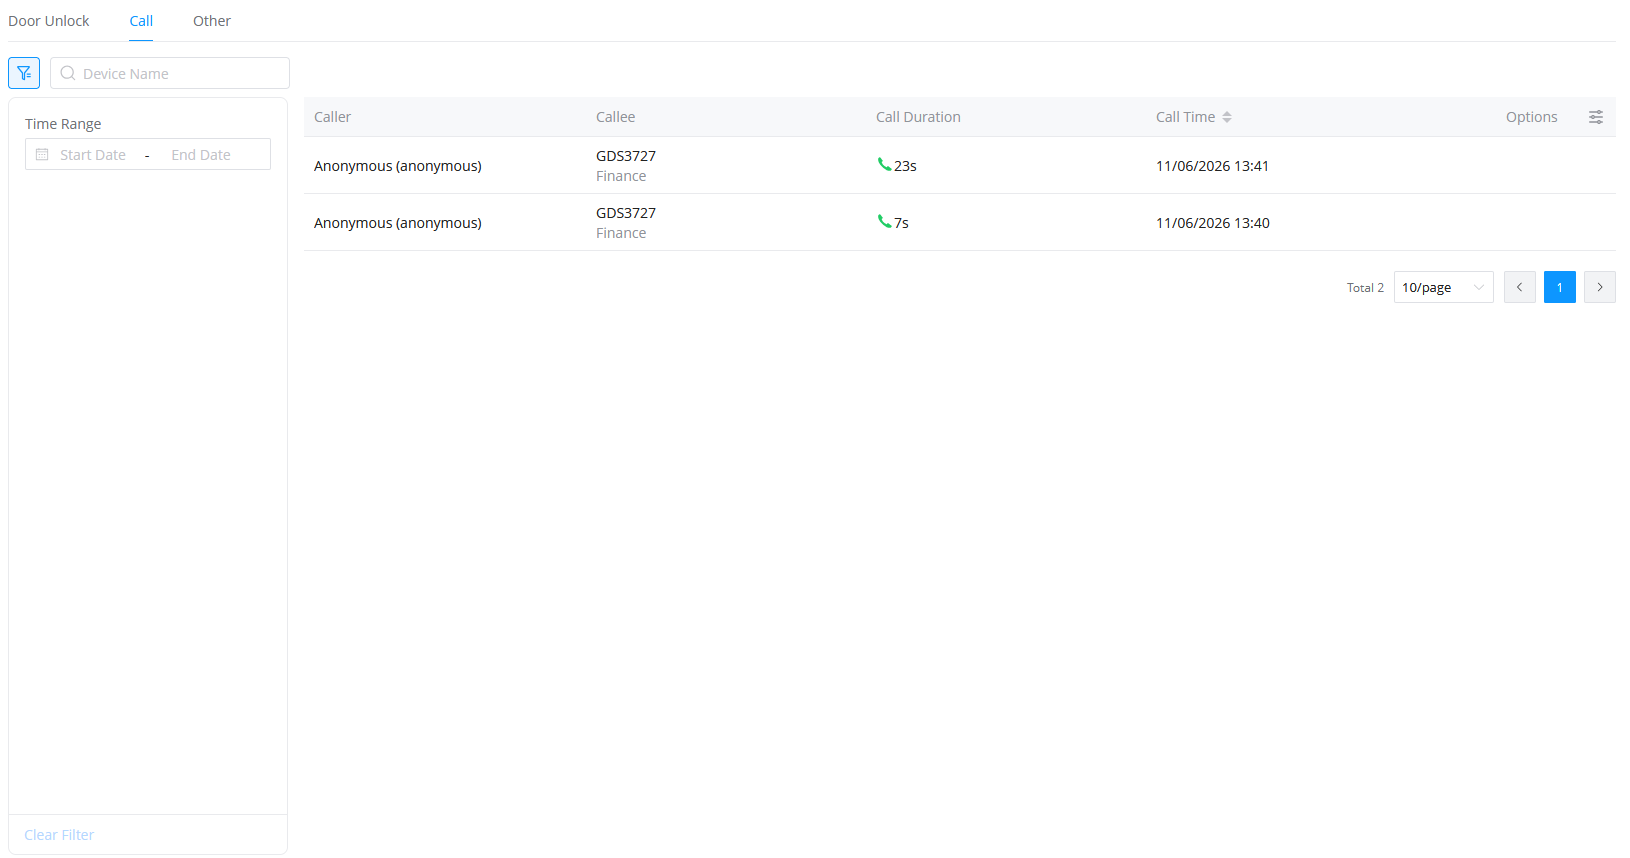
3. Other Logs
The Other Logs section records additional operational and system-related events generated by managed devices and cloud synchronization operations.
These logs provide administrators with visibility into device maintenance activity and platform operational behavior.
“Other Logs” primarily record user login/logout actions, as well as key operational behaviors on the device, excluding door access and calls, including:
- Device Operations: Device reboot, device reset, configuration updates, firmware updates, etc.
- Administrator Operations: Administrator login, administrator logout, etc.
- User Operations: User login, user logout, etc.
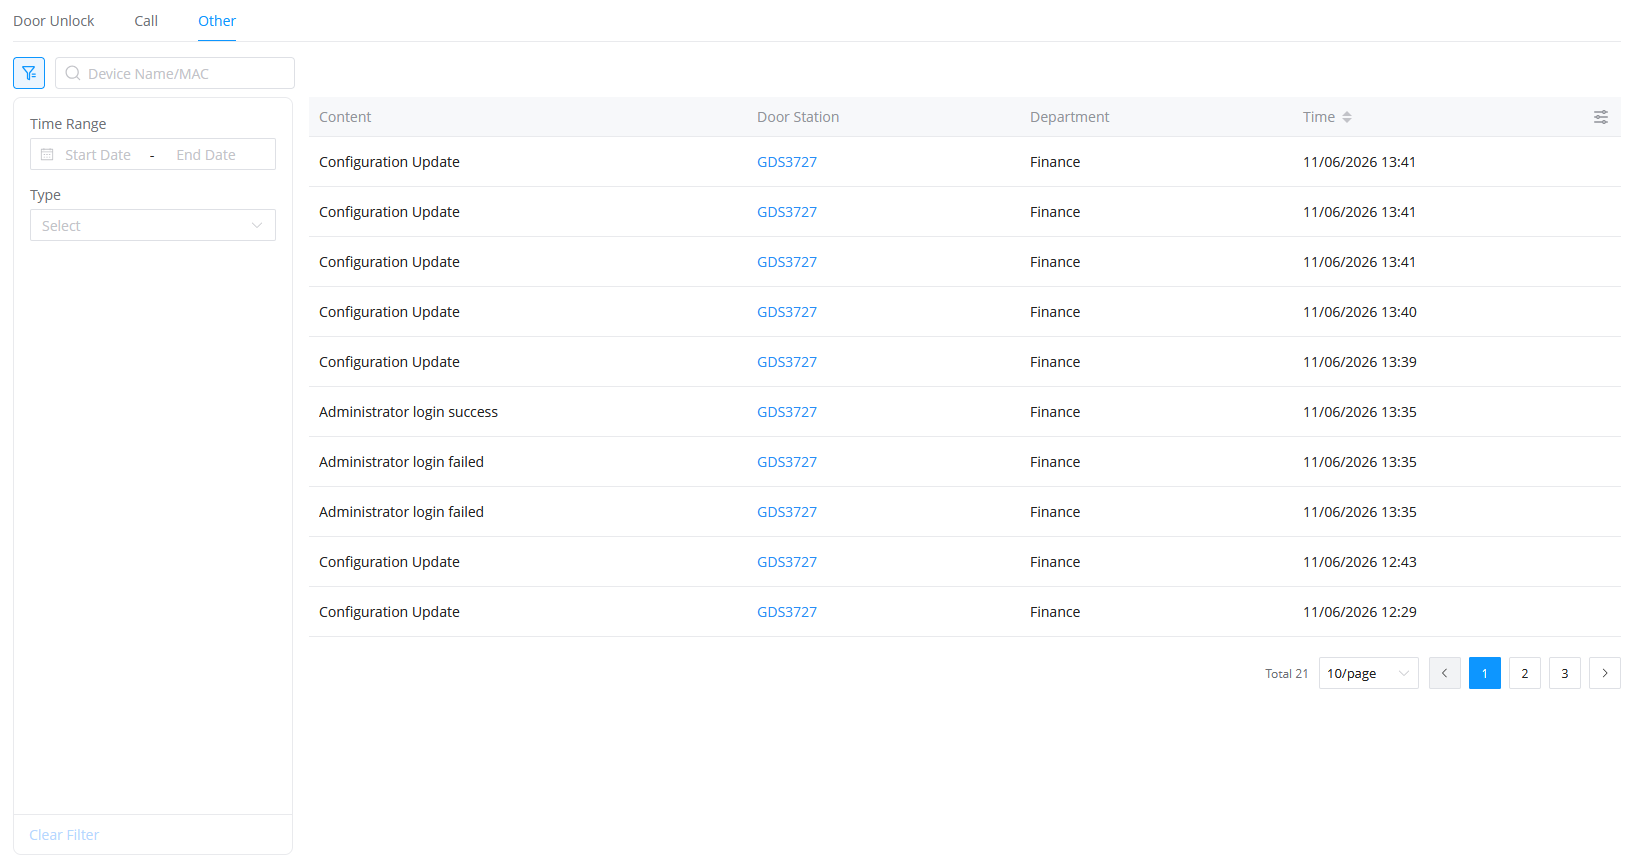
System Management
Overview
The System Management module provides centralized administrative and platform-level management controls within GDMS SecureAccess.
This module acts as the primary administrative control center for the GDMS SecureAccess deployment environment.
Modules include:
- Alarm Information
- Organization Management
- Account Management
- User Permissions
- Operation Logs
- About
1. Alarm Information
The alert list provides detailed records of alert events. Users can access snapshots and video recordings associated with the door station device at any time.
Administrators can configure which organizations subscribe to alert notifications. By default, all organizations are automatically subscribed. Once an organization successfully subscribes, any alert event triggered by the door station device will generate an alert notification and be sent directly to the App.
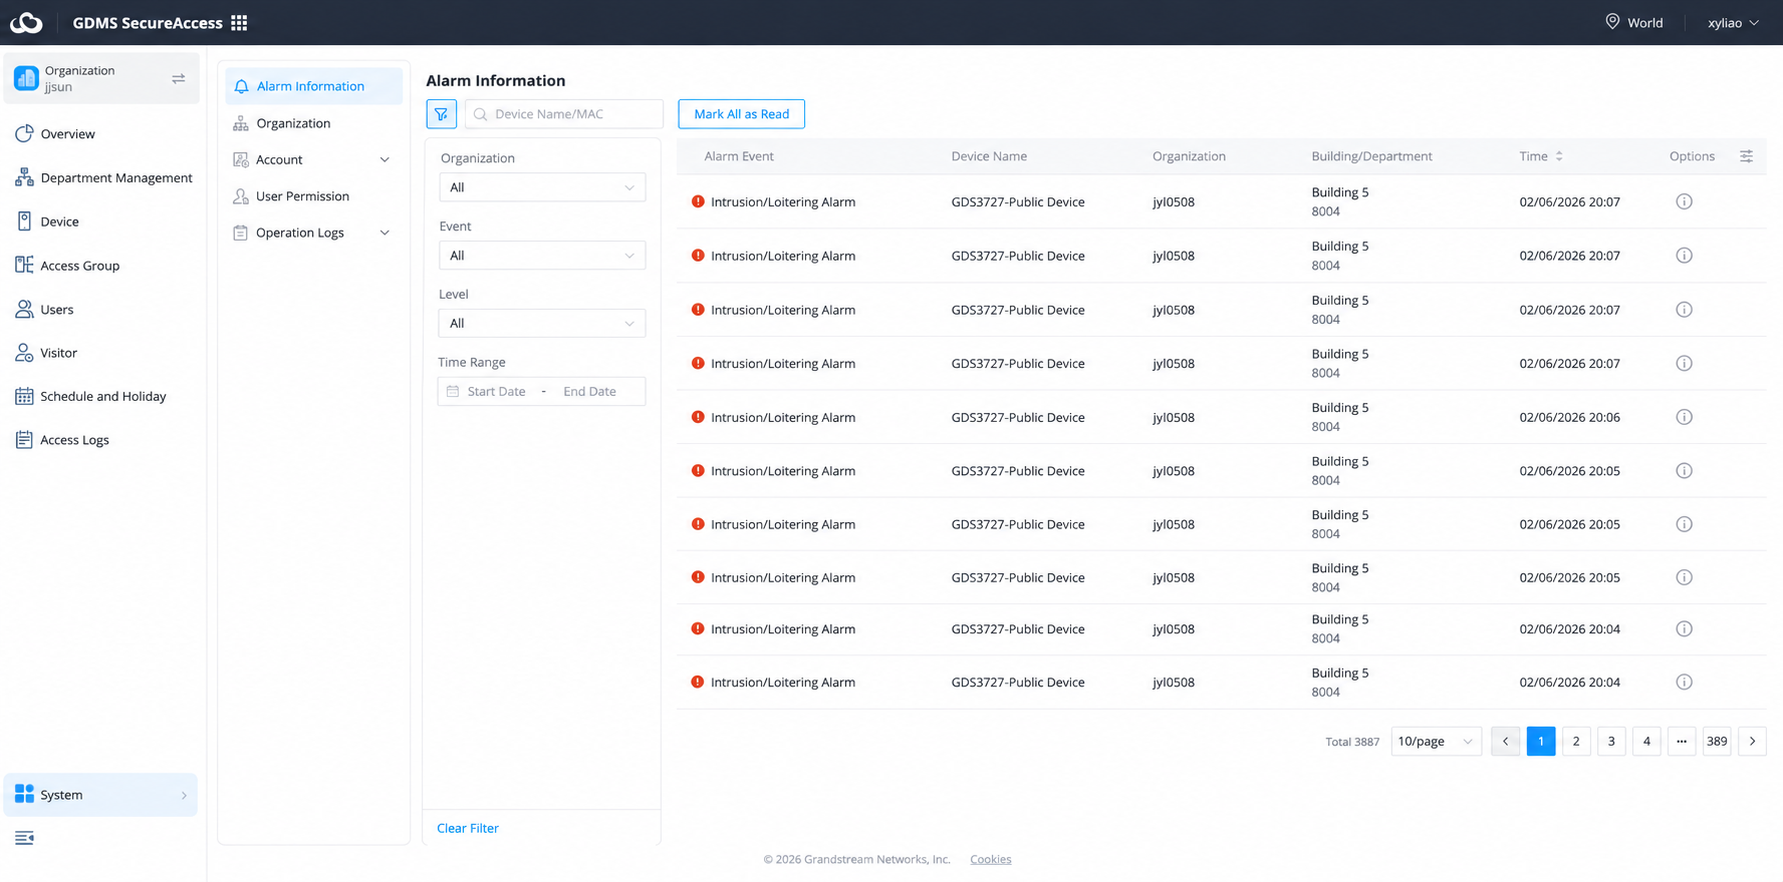
Alarm Types
The platform supports multiple alarm categories depending on the deployed device functionality and configuration.
Examples include:
- Forced the door open
- Device tampering
- Motion detection
- Offline devices
Additional alarm types may also be available depending on supported device features.
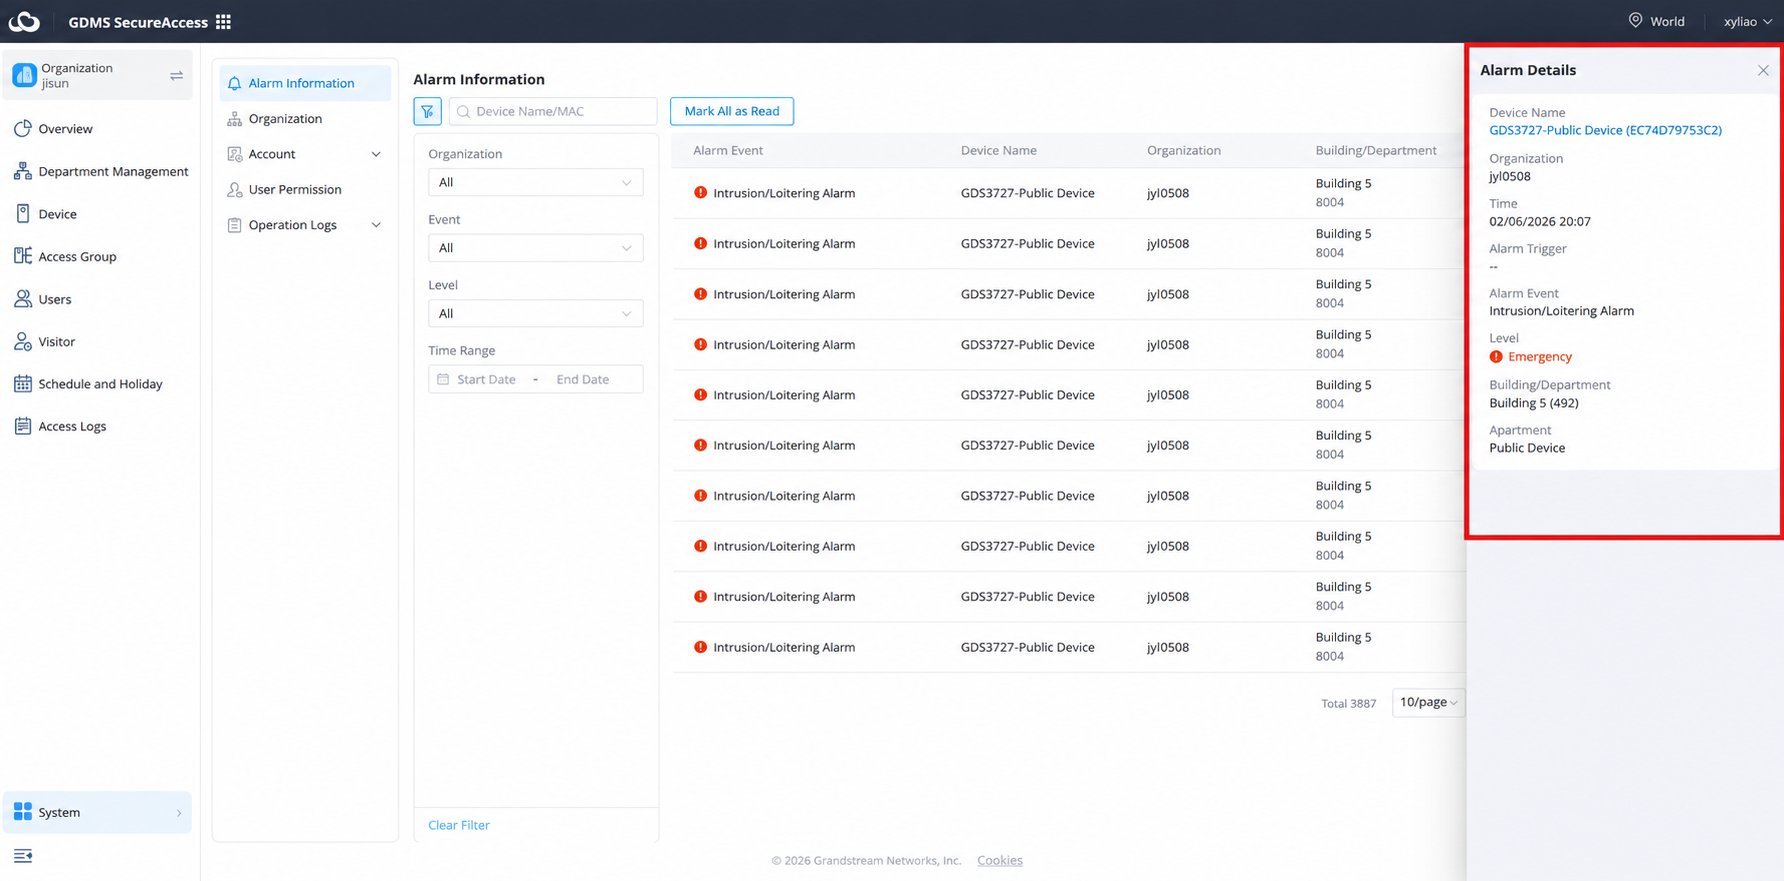
View Replay Files
Administrators can view replay files associated with alarm events to review captured recordings and investigate incidents.
To view replay files:
- Navigate to System → Alarm Information.
- Locate the alarm event containing replay data.
- Click the View Replay icon in the Options column.
- When prompted, enter the Door Station Post-Alarm Account credentials.
- Click OK to verify access.
- After successful authentication, the replay files associated with the selected alarm event are displayed and can be reviewed.
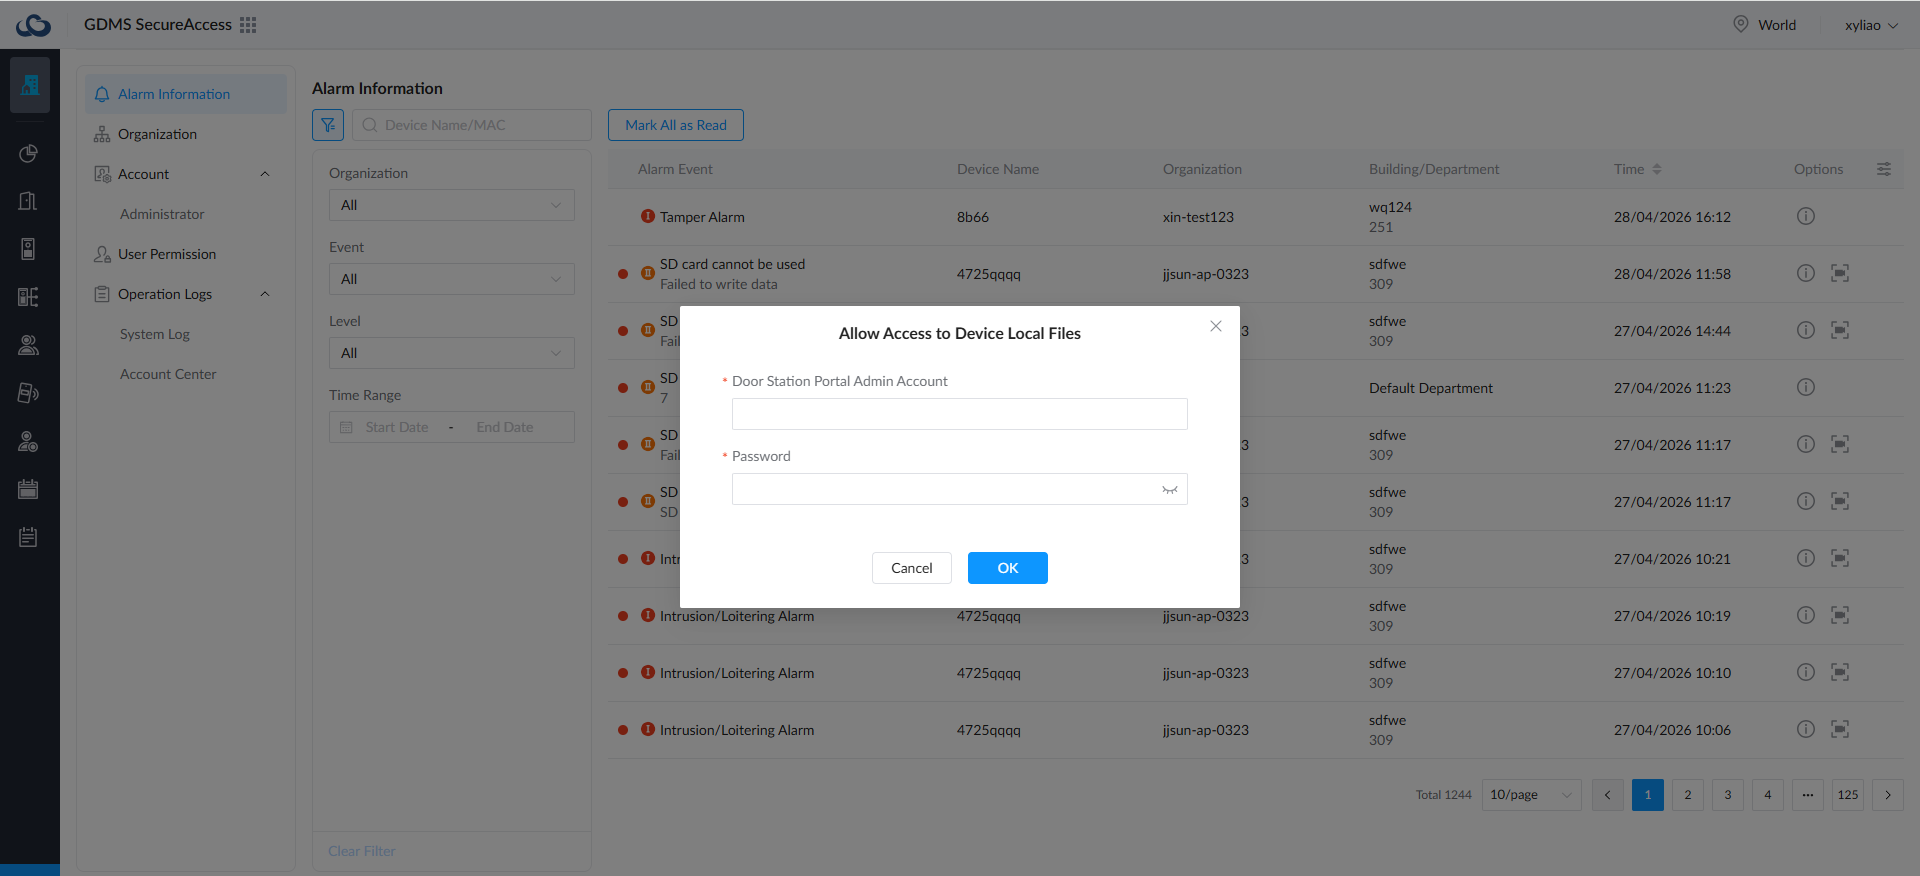
Filtering Alarms
The Alarm Information page includes a filtering panel that allows administrators to quickly locate alarm records based on the organization and alarm type. This simplifies alarm monitoring and troubleshooting by narrowing the displayed events to specific categories of interest.
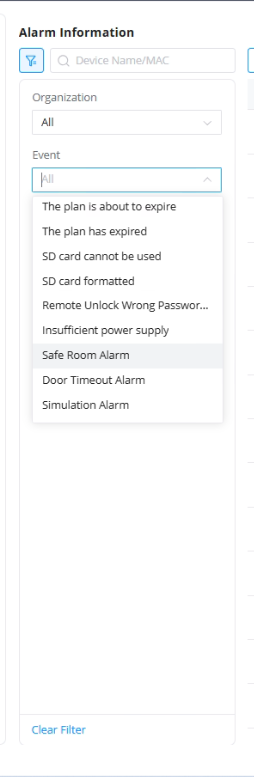
The following filtering options are available:
- Device Name/MAC – Search for alarm events generated by a specific device using its name or MAC address.
- Organization – Filters alarm records by organization, allowing administrators to focus on alarms generated within a particular site or deployment.
- Event – Filters alarm records based on the alarm category. This is useful when investigating specific security, device, or system-related incidents.
- Clear Filter – Removes all applied filters and restores the complete alarm record list.
The platform supports filtering and monitoring the following alarm events:
- Intrusion/Loitering Alarm – Triggered when intrusion detection or loitering behavior is detected within the monitored area.
- Hostage Code Alarm – Generated when a predefined duress or hostage PIN code is used during authentication.
- Tamper Alarm – Generated when the device detects unauthorized removal, opening, or tampering attempts.
- Multiple Error Input Alarm – Triggered after multiple consecutive authentication failures.
- Exceeded Access Time Limit Alarm – Generated when access is attempted outside the permitted access schedule or configured time limits.
- Unauthorized Access Alarm – Triggered when an unauthorized access attempt is detected.
- High Temperature Alarm – Generated when the device temperature exceeds the configured threshold.
- Digital Input 1 Alarm – Generated when the first digital input alarm source is triggered.
- Digital Input 2 Alarm – Generated when the second digital input alarm source is triggered.
- The Plan is About to Expire – Notification indicating that the organization’s subscription plan is approaching its expiration date.
- The Plan Has Expired – Notification indicating that the organization’s subscription plan has expired.
- SD Card Cannot Be Used – Generated when the device detects an SD card malfunction or an unusable storage card.
- SD Card Formatted – Generated when an SD card is formatted on the device.
- Remote Unlock Wrong Password Alarm – Triggered when multiple incorrect passwords are entered during a remote unlock attempt.
- Insufficient Power Supply – Generated when the device detects inadequate power input or power-related issues.
- Safe Room Alarm – Triggered when a Safe Room mode event or related security condition occurs.
- Door Timeout Alarm – Generated when a door remains open longer than the configured timeout period.
- Simulation Alarm – Generated when a simulated or test alarm event is triggered for verification purposes.
2. Organization Management
The Organization Management section allows administrators to create and manage organization structures within GDMS SecureAccess.
Organizations act as logical management containers that separate devices, users, permissions, schedules, and operational resources.
Administrators can:
- Create organizations
- Manage organization structures
- Configure organization settings
Organizations may represent:
- Residential communities
- Enterprise facilities
- Commercial deployments
- Office buildings
- Multi-site operational environments
Each organization maintains its own independent:
- Devices
- Users
- Visitors
- Access groups
- Schedules
- Administrative permissions
This organizational separation improves scalability and simplifies multi-site management.
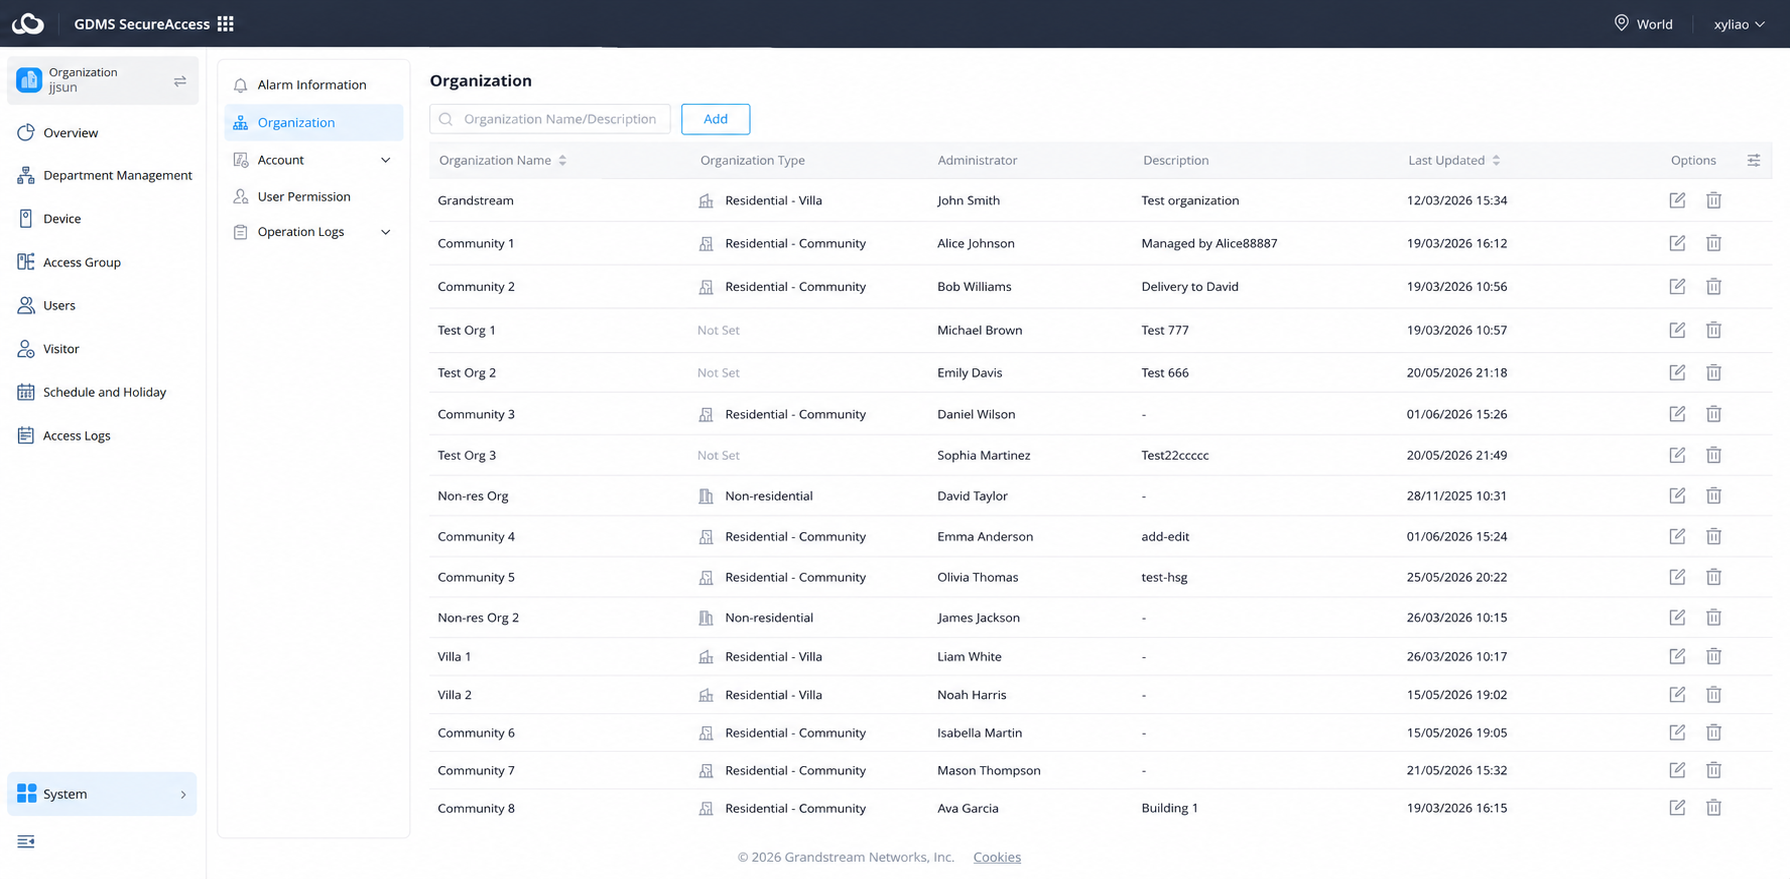
Create Organizations
Administrators can create organizations during initial deployment or when expanding the management environment.
During organization creation, administrators may configure:
- Organization name
- Organization type
- Residential or enterprise structure
- Region association
- Initial management configuration
The selected organization type affects available modules and organizational behavior within the platform.
Examples include:
- Residential – Community
- Residential – Villa
- Enterprise or commercial deployments
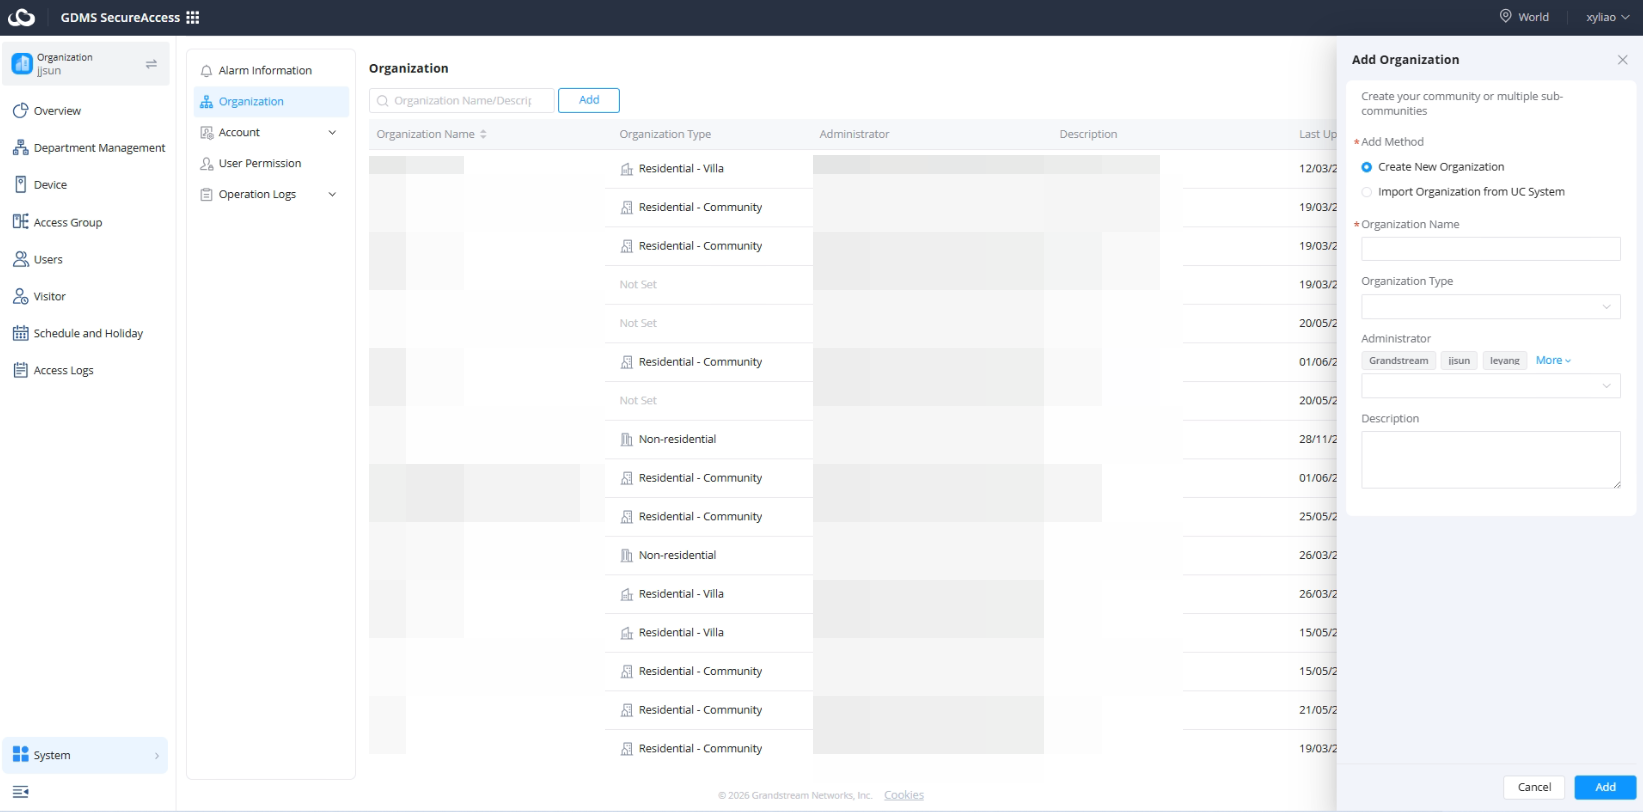
Administrators can modify and maintain organization hierarchies after deployment.
This includes management of:
- Buildings
- Apartments
- Departments
- Public areas
- Device relationships
This structure helps simplify large-scale operational management.
Edit Organization Settings
Administrators can configure organization-level operational settings and platform behavior according to deployment requirements.
Proper organization planning is strongly recommended before deployment expansion.
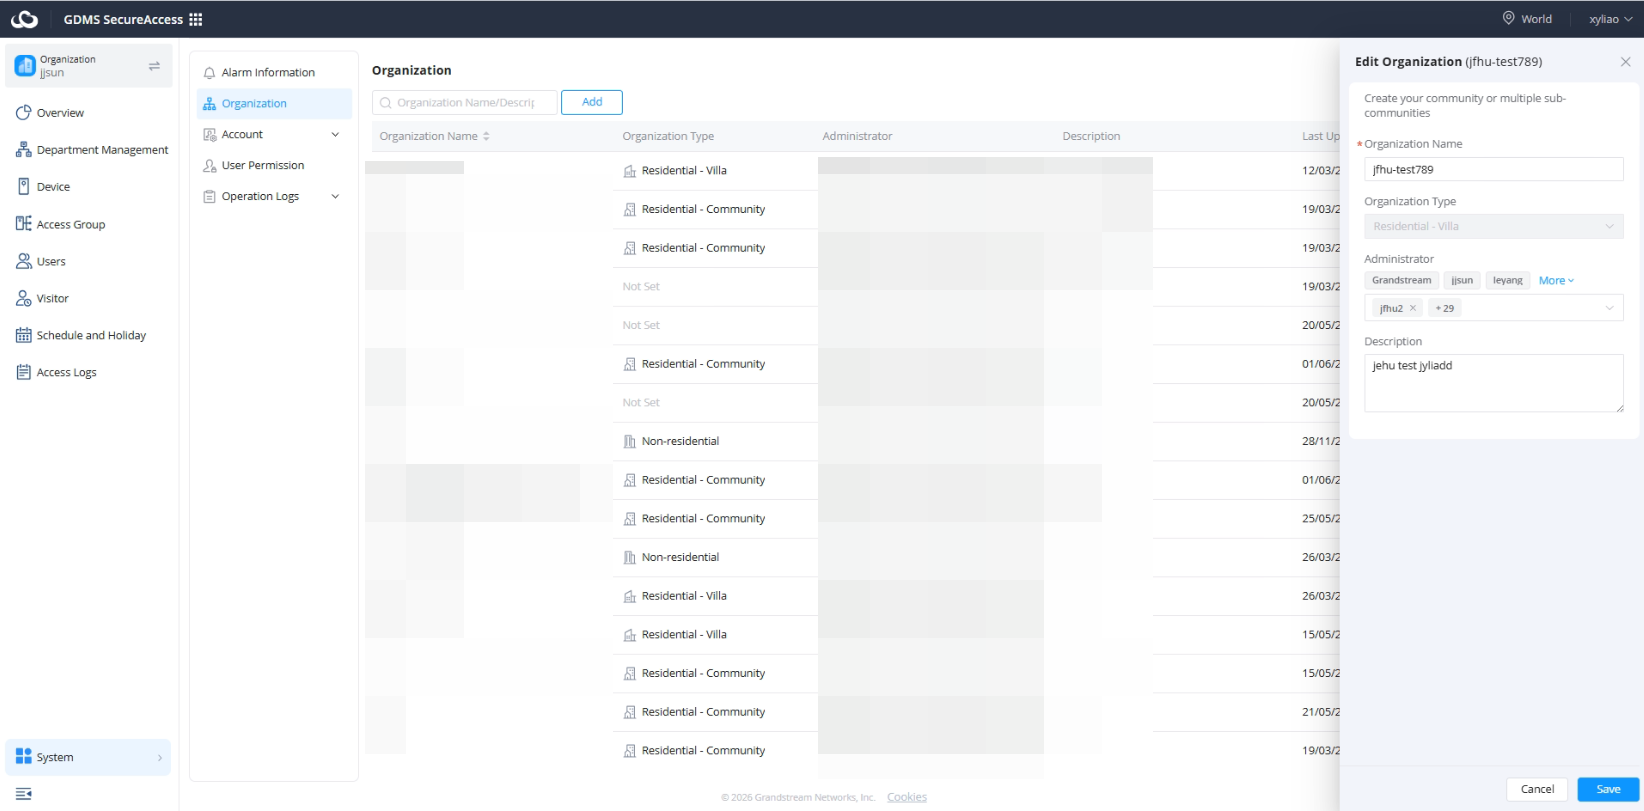
3. Account Management
The Account Management section is used for managing administrator accounts and permissions within GDMS SecureAccess. This module supports operations only by Super Administrators and Organization Administrators.
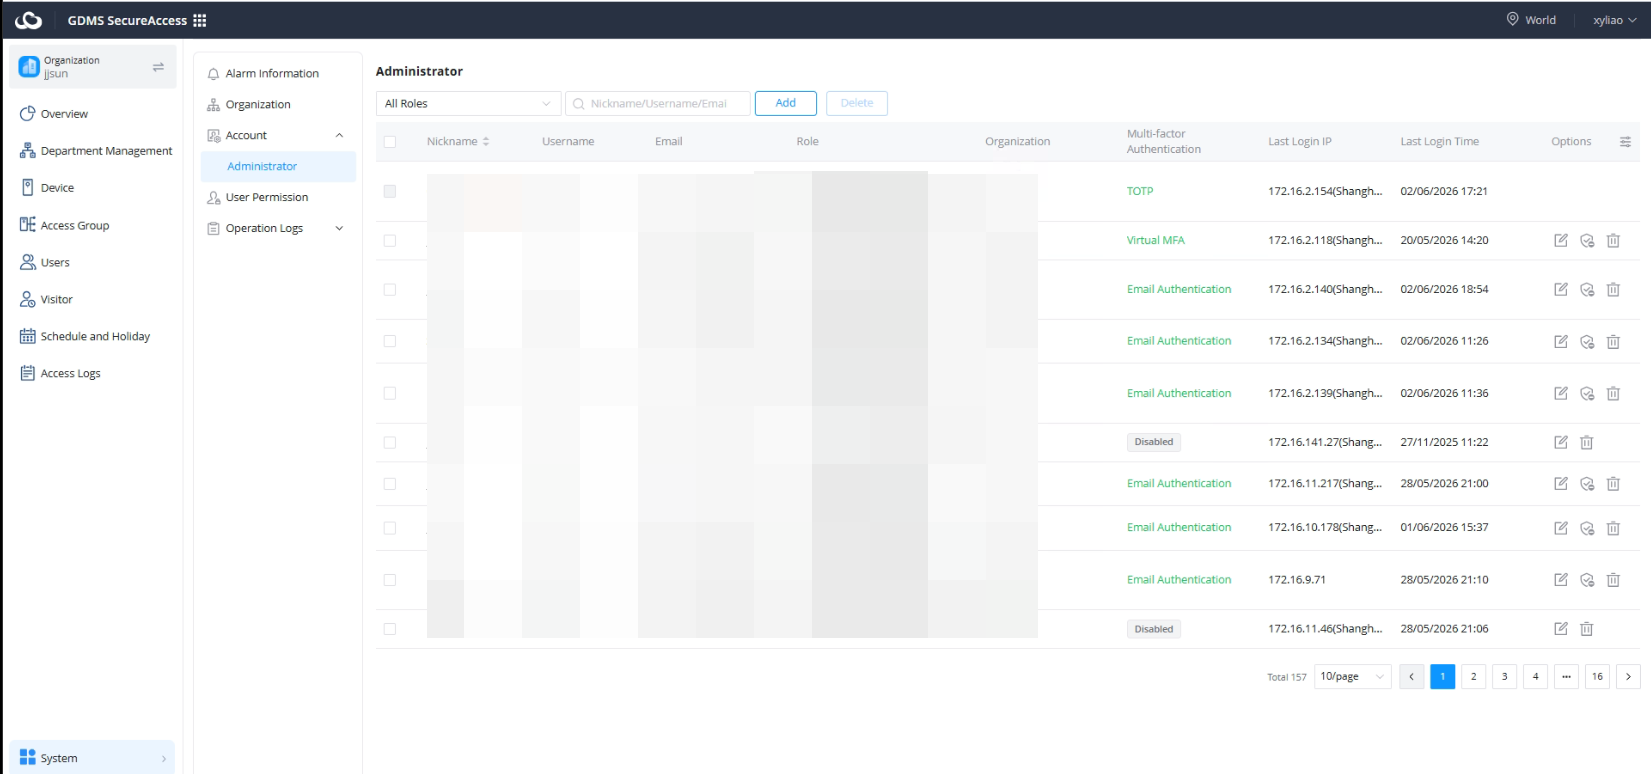
Administrators can create:
- Platform administrators: manage all organizations, devices, and users of the GDMS SecureAccess; created by Super Admin
- Organization administrators: manage users and devices within specific organizations; created by Super or Platform Admins.
Each administrator type supports different permission scopes and operational responsibilities.
Adding an Administrator
Administrators can create additional administrator accounts and assign roles to manage organizations, devices, and users within GDMS SecureAccess.
To add an administrator:
- Navigate to Account → Administrator.
- Click Add.
- Enter the administrator’s Nickname.
- Enter a valid Email Address.
- Select the appropriate Role:
- Platform Administrator: Manages all organizations, devices, and users in GDMS SecureAccess. Platform Administrators can only be created by a Super Admin.
- Organization Administrator: Manages users and devices within assigned organizations. Organization Administrators can be created by a Super Admin or a Platform Administrator.
- Under Managed Organizations, select the organization(s) the administrator will manage.
- Click Add to create the administrator account.
The permissions available to the administrator depend on the selected role. The administrator will receive an invitation email to activate the account and complete the login setup.
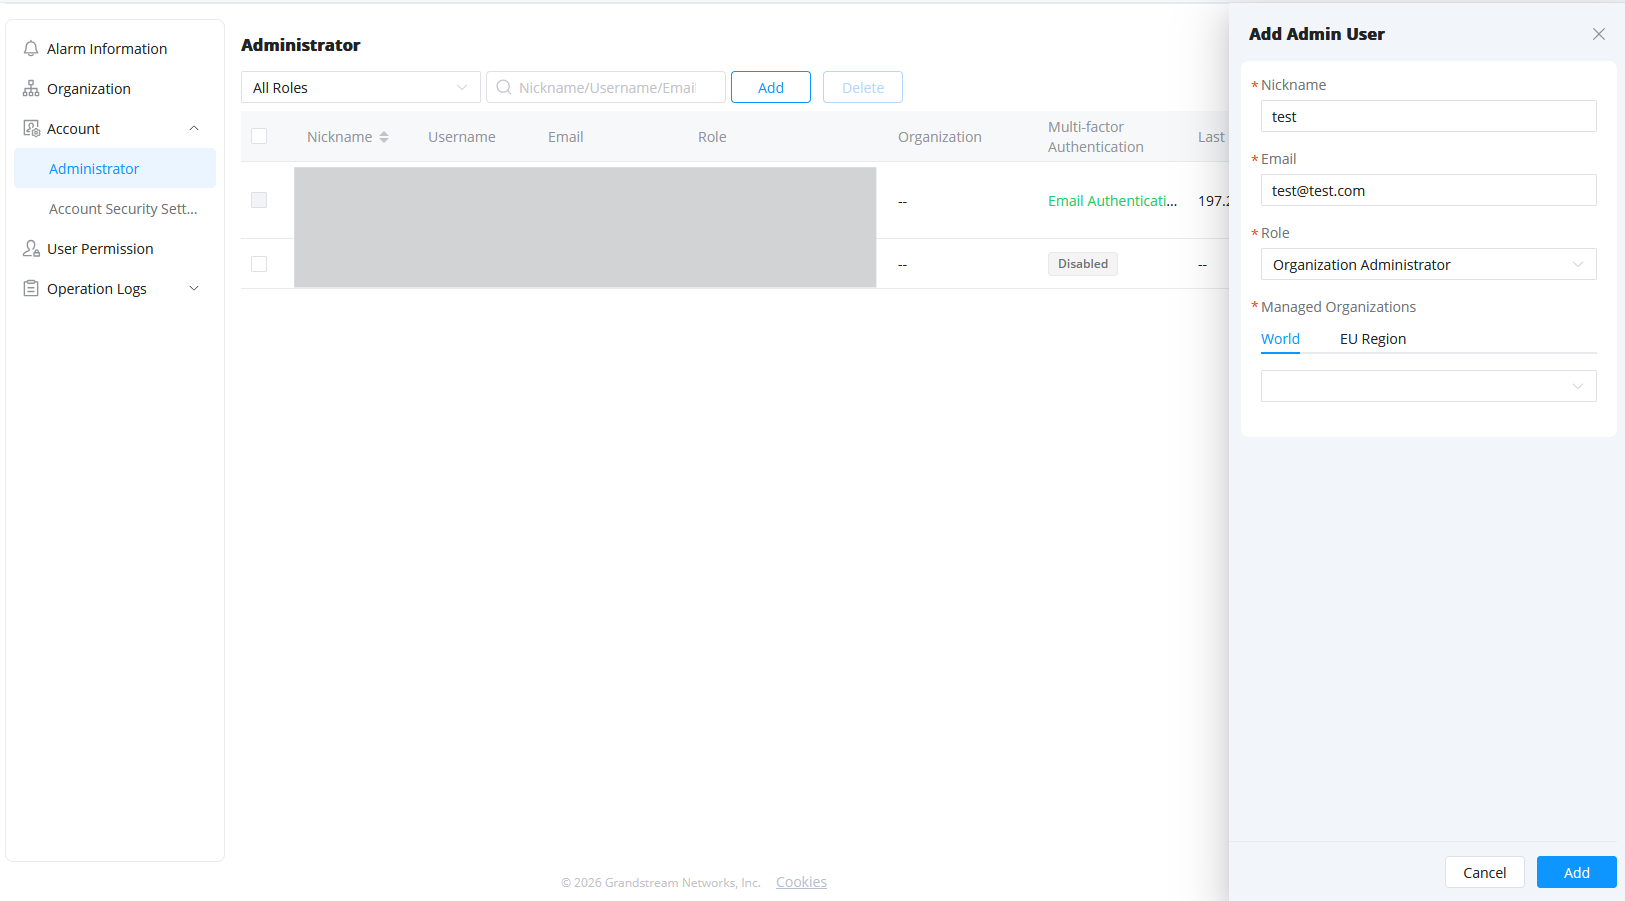
Multi-Factor Authentication
Multi-Factor Authentication (MFA) support is provided to improve administrator account security.
Enabled by default after account creation.
This improves account security by requiring additional authentication verification during login.
MFA helps protect against:
- Unauthorized login attempts
- Credential compromise
- Account misuse
Organizations are strongly encouraged to keep MFA enabled for all administrator accounts, especially Super Administrator accounts.
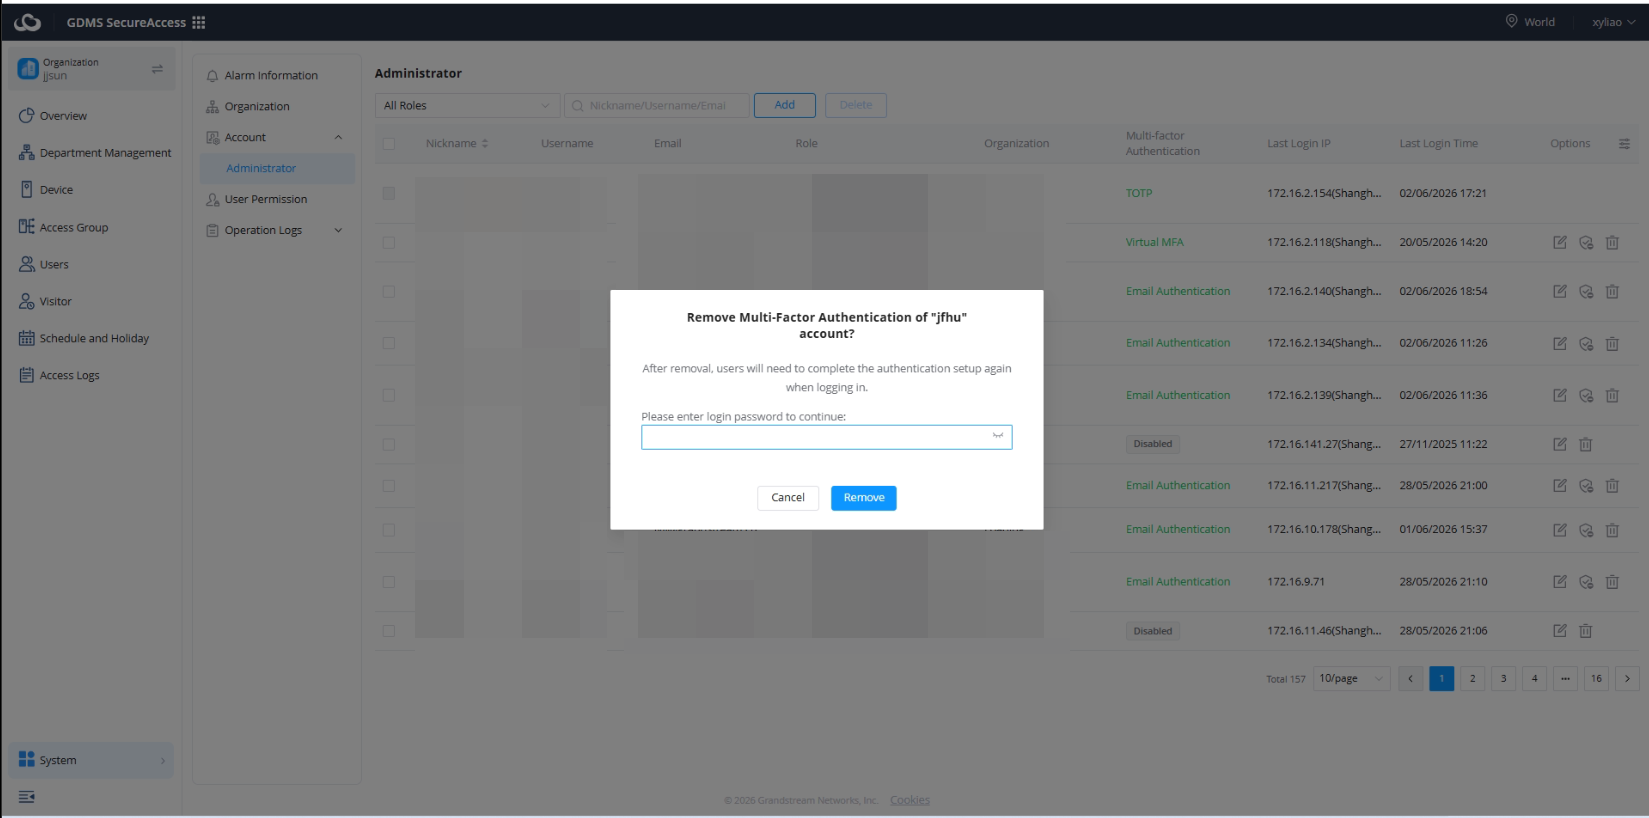
Delete Account
Administrator accounts can be removed when no longer required.
Deleting an account requires:
- Password verification of the currently logged-in administrator
This additional verification mechanism helps prevent unauthorized administrative account removal.
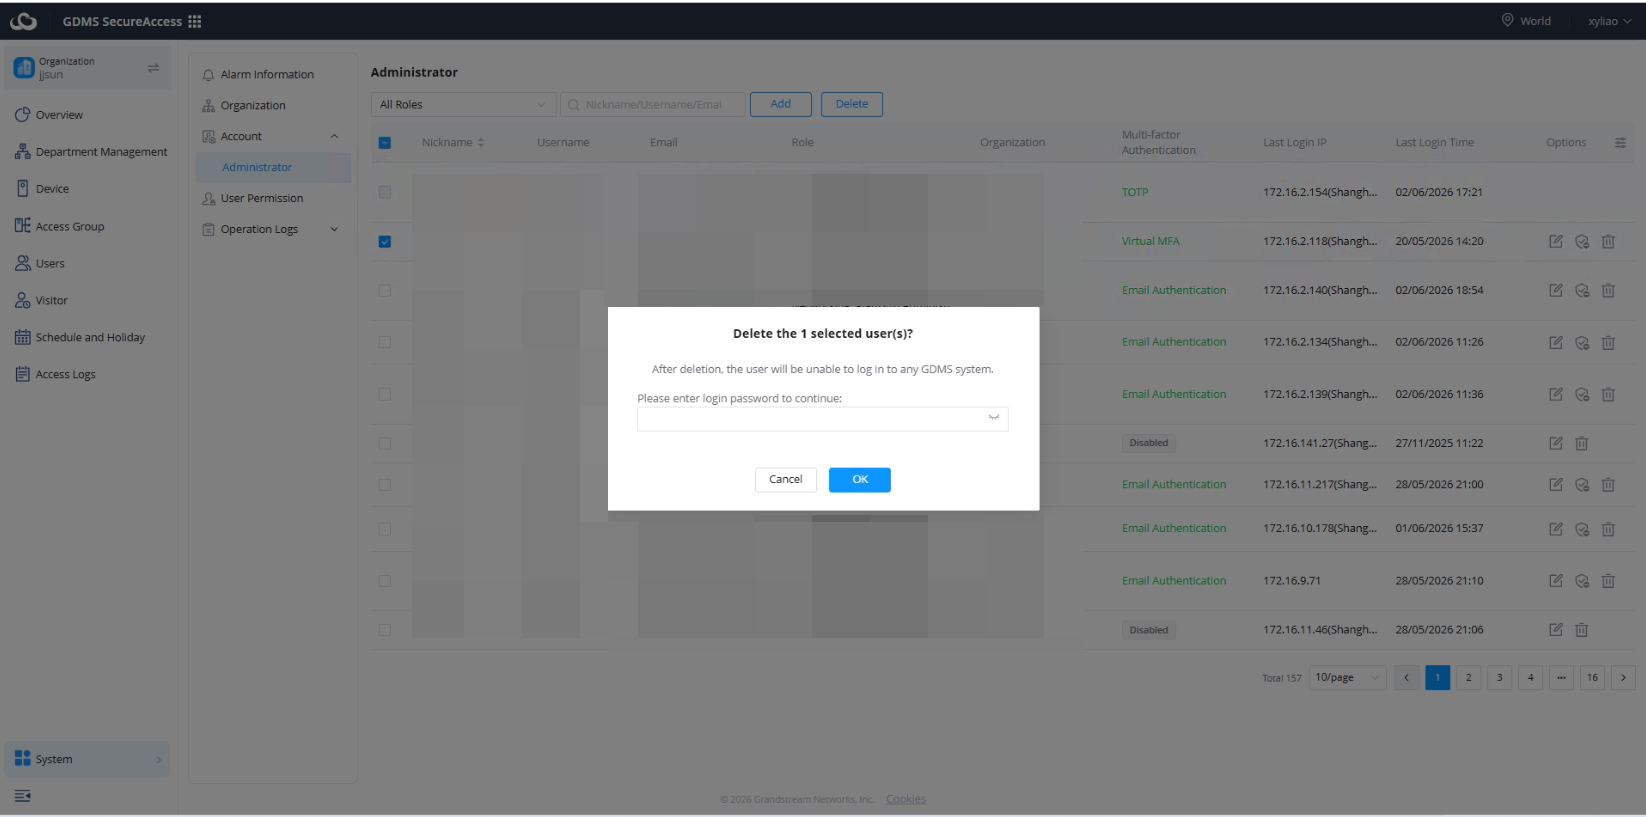
4. User Permission Management
Administrators can centrally manage administrator permissions and operational access rights.
This option is used to set permissions for APP users regarding local door opening, remote door opening, and creating temporary passwords. After successful configuration, these permissions will be displayed under [User Management – Add User – SecureAccess App – APP User Permissions]. Initially, there are 2 permission options, which do not support editing or deletion:
- All Permissions: Supports all permissions (including local door opening, remote door opening, and other permissions).
- Local Door Opening Only: Supports only the local door opening function (allows Bluetooth door opening and NFC door opening). “Local Door Opening Only” is the default permission.
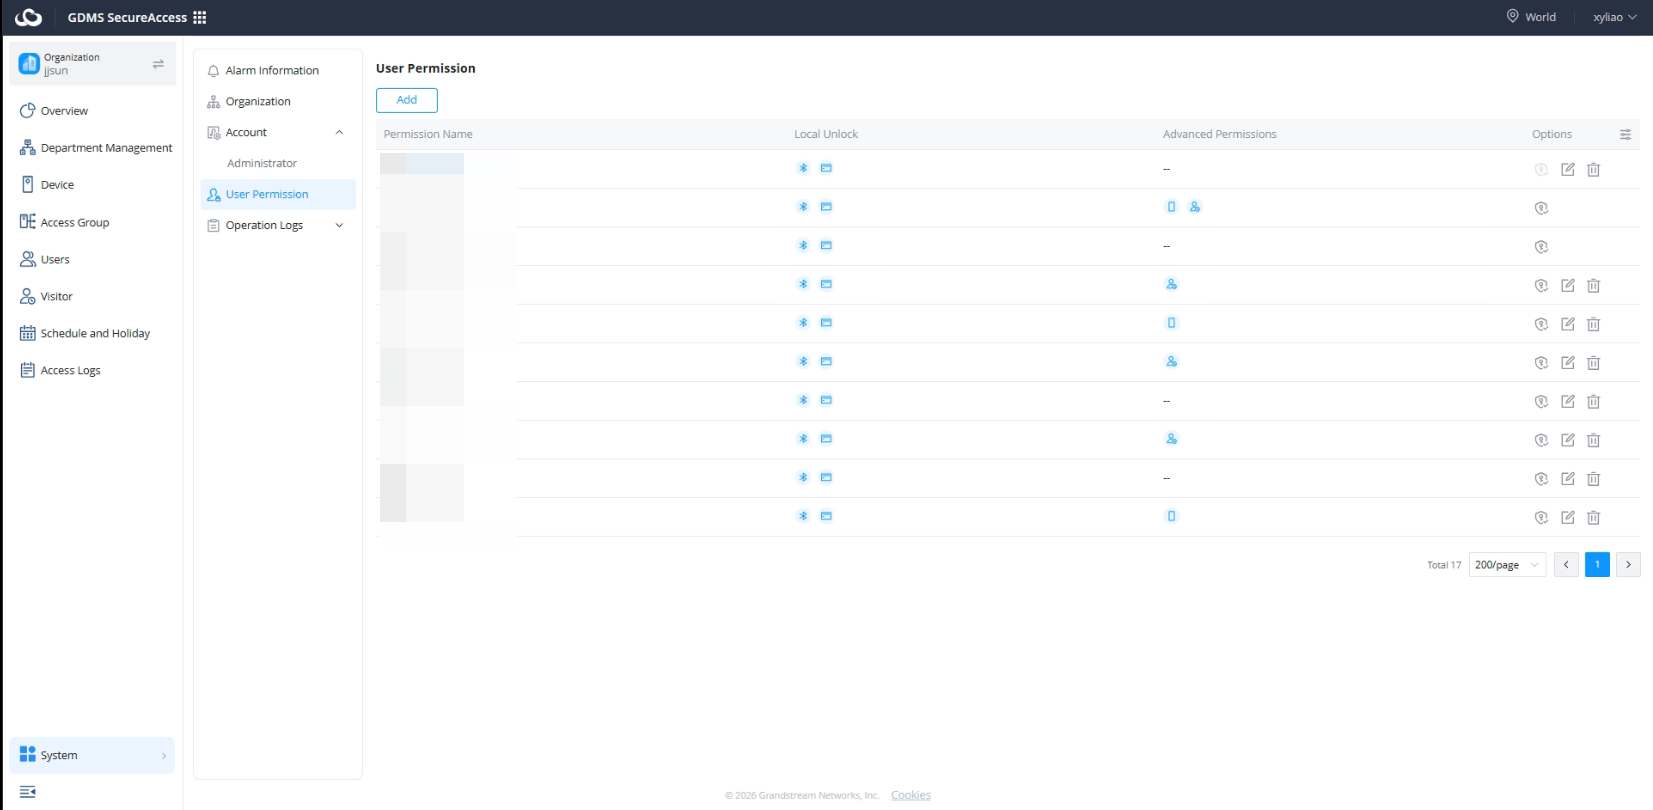
Creating a Permission Profile
To create a new permission profile:
- Navigate to System → User Permission.
- Click Add.
- Please enter the user permission tag name.
- Configure the desired access permissions.
- Click Save.
| Name | Specifies the user permission tag name. |
| Set as Default Permissions | Sets this user permission as the default value for “APP User Permissions” when adding new users. |
| Local Unlock | Defines whether users with this permission have the authority to unlock locally. |
| Bluetooth | Defines whether users with this permission have the authority to unlock via Bluetooth. |
| NFC | Defines whether users with this permission have the authority to unlock via NFC. |
| Remote Unlock | Defines whether users with this permission have the authority to unlock remotely. |
| Create Temp Key | Defines whether users with this permission have the authority to create temporary passwords. |
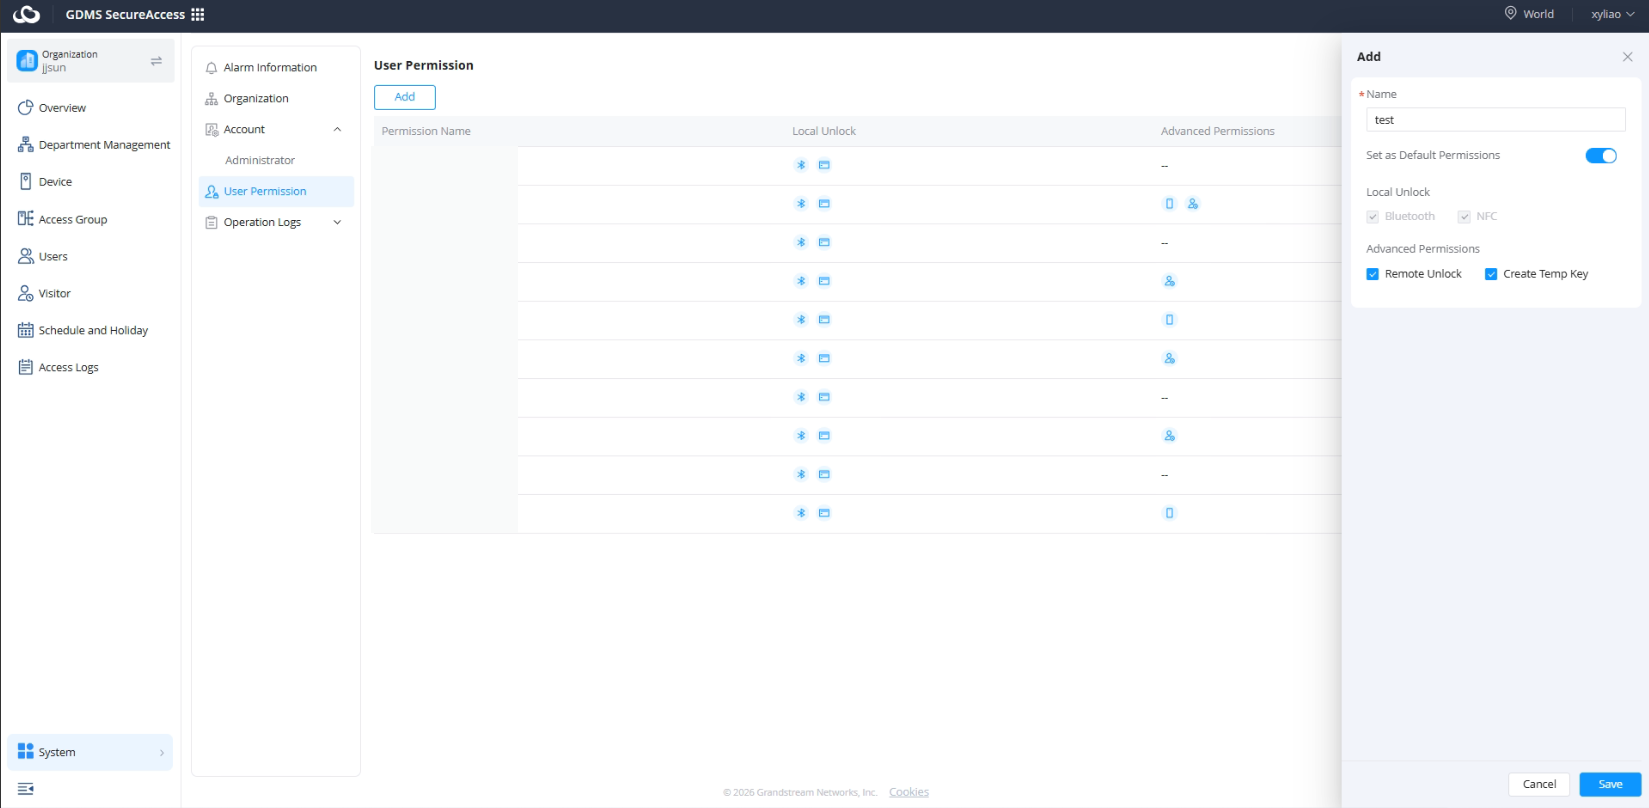
5. Operation Logs
Operation logs are records used by the platform to audit and track administrator actions across various functional modules. Log viewing permissions are controlled by roles:
- Super Administrator: Can view operation logs for all users within the platform.
- Platform Administrator: Can view operation logs for all users within the platform.
- Organization Administrator: Can only view operation logs for their own account and cannot access records of other users.
System Logs
System logs record the operational behaviors of administrators across various organizations on business modules such as devices, holidays, and access groups within the platform.
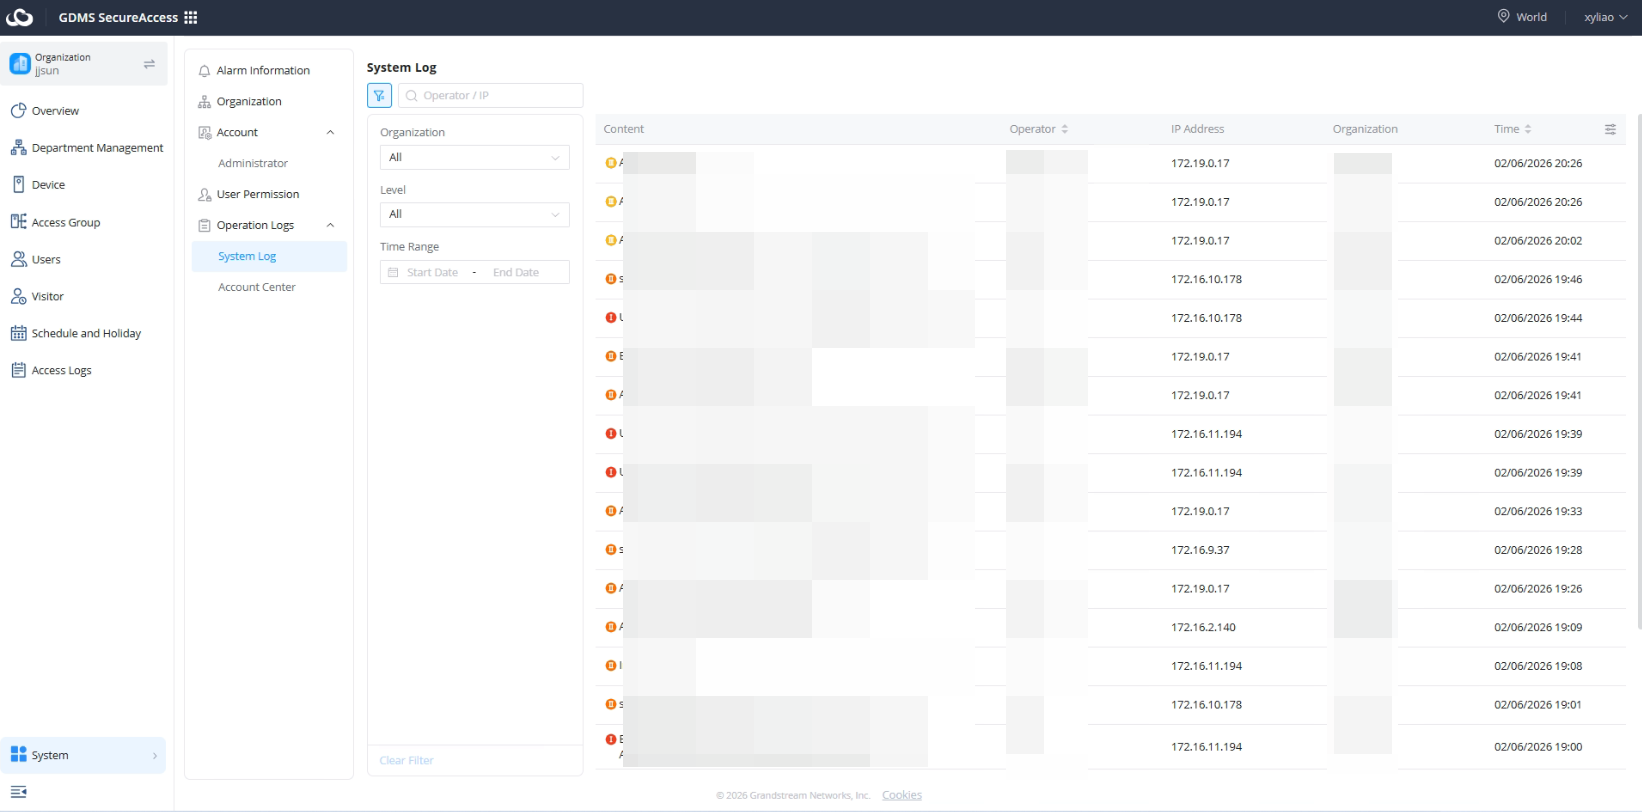
Account Center Logs
The Account Center is divided into administrator logs and user logs, recording operation behaviors related to users.
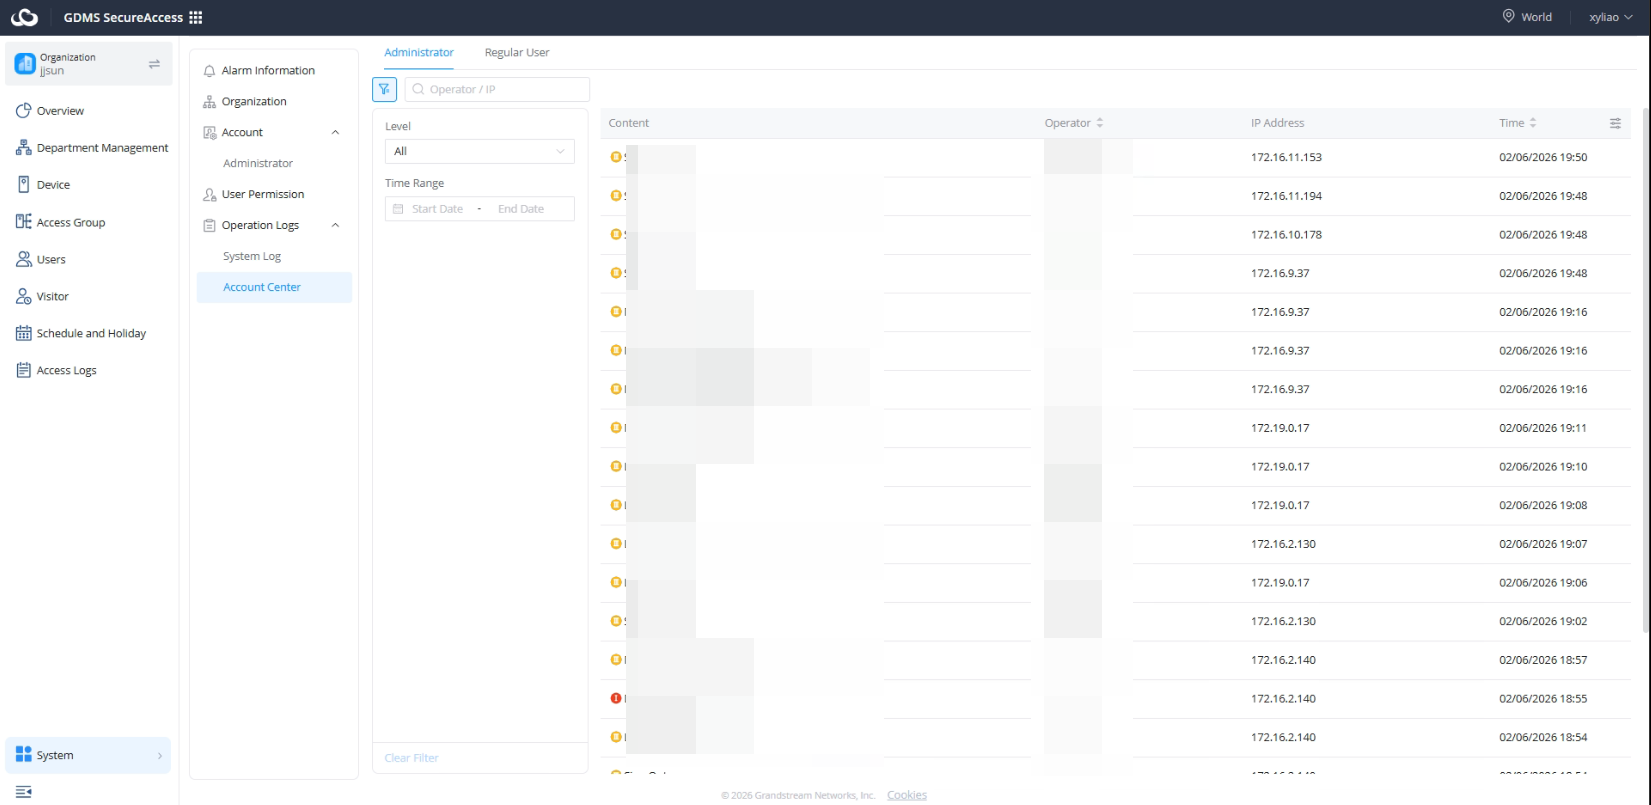
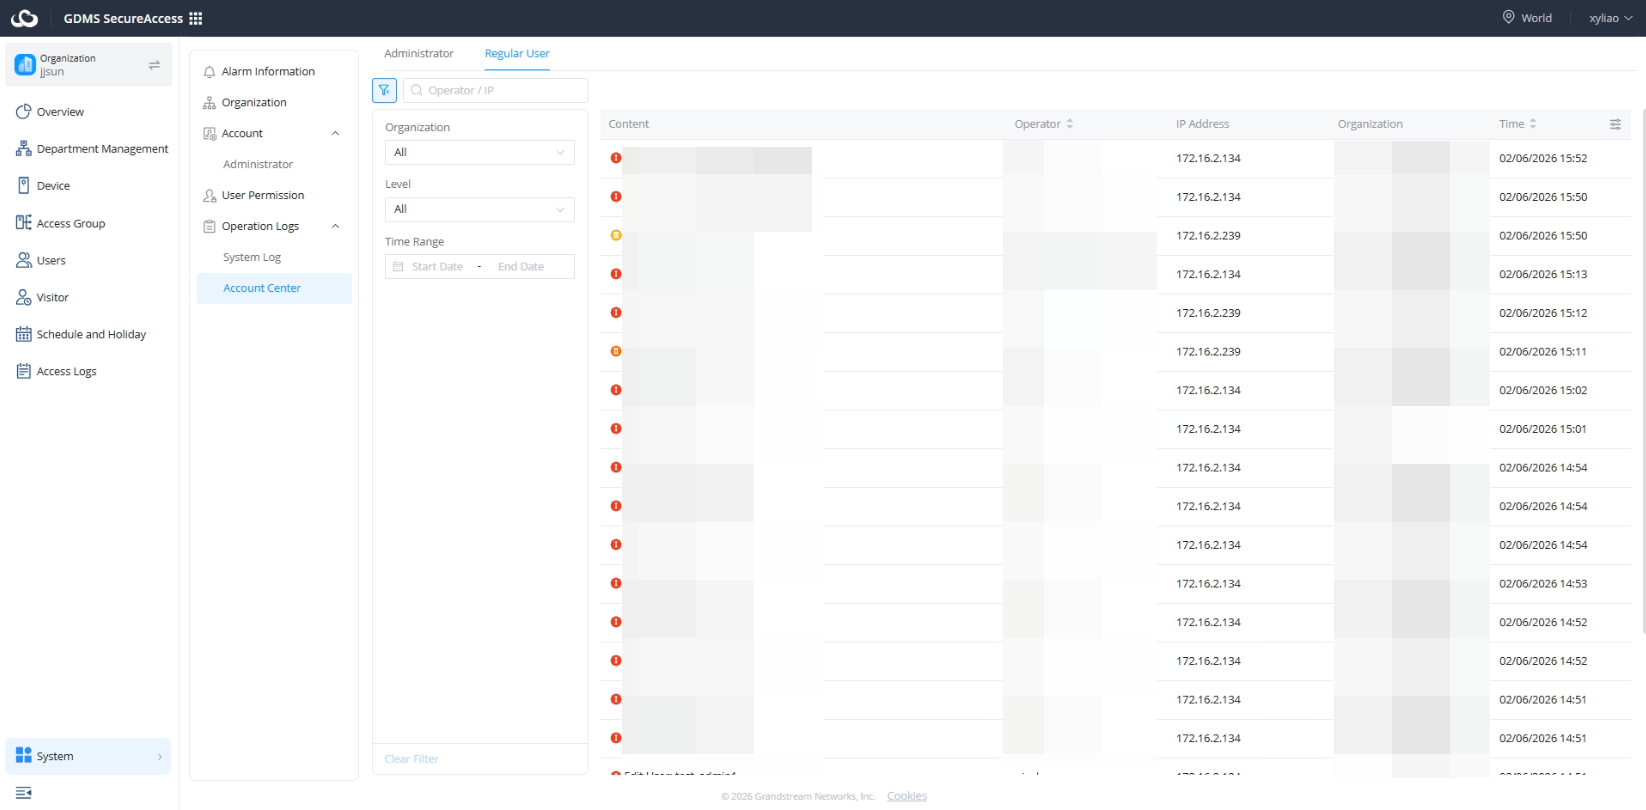
CHANGE LOG
This section documents significant changes from previous versions of the GDMS SecureAccess Platform User Manual. Only major new features or major document updates are listed here. Minor updates for corrections or editing are not documented here.
Version 1.0.3.9
- This is the initial version.