


The GRP261x/GRP262x/GRP263x/GRP2670/GRP2650 series of carrier grade IP phones come with a variety of features that is suitable for mass deployment scenarios, among these features we find the customization of the wallpaper and screensaver.
This guide describes how to customize the wallpaper and screensaver on a GRP261x IP phone, both from the local WebUI configuration of the IP phone, and from the cloud configuration through GDMS.
Wallpaper Customization
To change the wallpaper settings, please access the Web UI by opening a browser, entering the phone’s IP address, and logging in with the administrator username and password. Then, go to System Settings 🡪 Preferences 🡪 Display Control 🡪 Wallpaper.

Users will have the option to select the preferred wallpaper source from the list below. Each option will be configured separately and will need to follow a different list of steps:
- Default Source: This option will let the device use the system’s built-in wallpapers. No configuration needed. The default wallpaper will be selected.
- Download Source: Downloads wallpapers from a specified server source. This will require a URL configuration and setting up an HTTP server.
- USB Source: Loads wallpapers from a connected USB drive. Requires the drive to be plugged in and accessible.
- Uploaded Source: Allows users to upload a wallpaper file directly from the Upload Wallpaper button above.
- Color Background: Sets a solid color as the wallpaper. Users choose from a palette or enter a custom hex code.
On the “Wallpaper Source” list, users can choose their preferred method to store the wallpapers. There are four ways, either by using the default option, downloading the wallpaper using a server path, uploading it or choosing a specific color.
In this section, we will explain how to configure each method on the phone’s Web UI.
Default Wallpaper
The GRP261x comes with a predefined wallpaper that can be set under System Settings 🡪 Preferences 🡪 Wallpaper by selecting “Default” from the Wallpaper Source drop-down menu.

The following image shows the default GRP261x wallpaper.

Wallpaper Download
Users can also download a wallpaper using a configured server path. In this example, we will be using a local HTTP server by following these steps :
- Launch the installation of the tool once it’s fully downloaded from the following link: “ http://www.rejetto.com/hfs/download ”
- Click on Run to launch the HTTP server.
- When HFS starts, browse and add the wallpaper image file from the local directories.
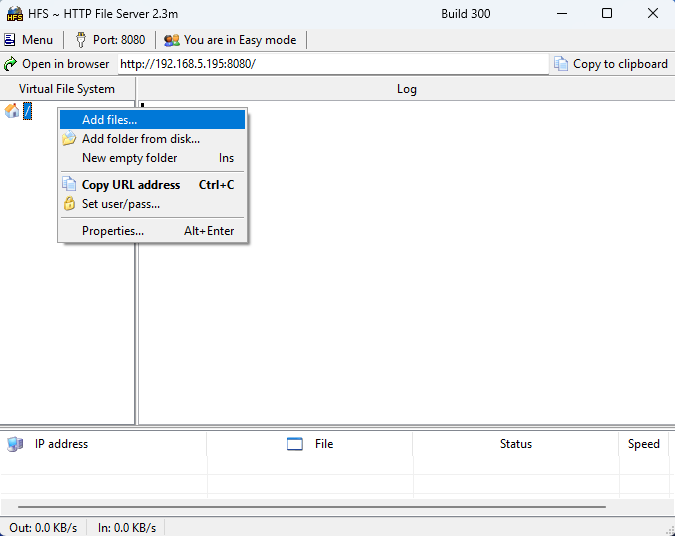
- Select the file and click Open to upload it to the HTTP server.
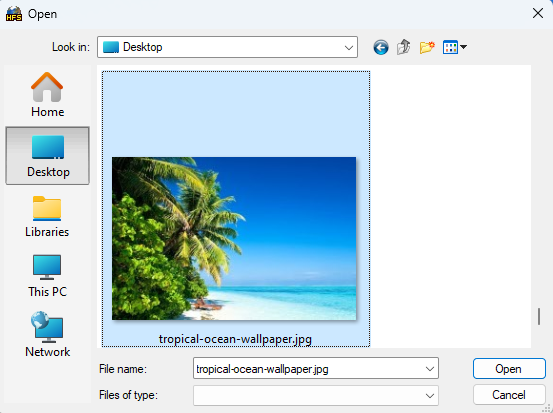
- Once the wallpaper image has been uploaded, copy the server path as shown below :
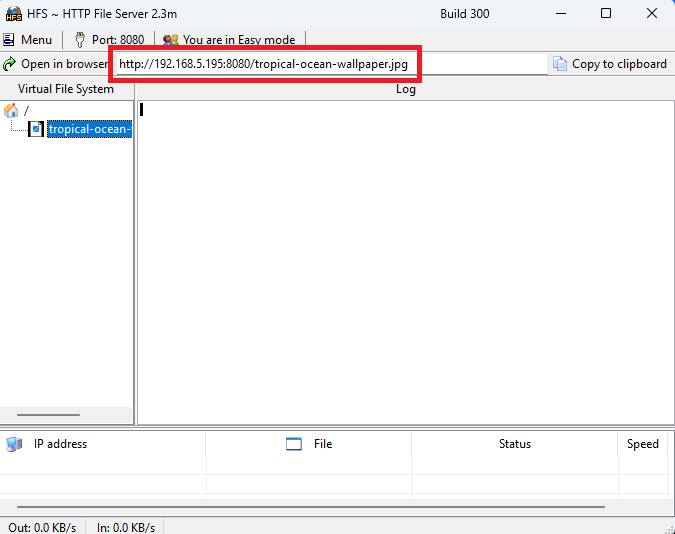
- To configure the server path on the GHP63x(W), go to System Settings 🡪 Preferences 🡪 Wallpaper, set Wallpaper Source to “Download“, and paste the HTTP server path under Wallpaper Server Path.

- Click on Save and Apply for the changes to reflect on the GRP261x phone’s LCD.

USB Download
- Users can upload wallpapers from a USB drive plugged to the GRP261x IP phone, to do that, go to System Settings 🡪 Preferences 🡪 Display Control 🡪 Wallpaper. Set Wallpaper Source to “USB“.

2. On the USB storage, save the image that you want to use as a wallpaper for the GRP261x IP phone.

3. Once completed, click ‘Save and Apply’ in the GRP261x WebUI settings to set the USB wallpaper as the new background.

Wallpaper Upload
- To upload a wallpaper, go to System Settings 🡪 Preferences 🡪 Wallpaper. Set Wallpaper Source to “Uploaded” and click on Upload


- Select the wallpaper from a local directory and click Open to upload it, and then Save and Apply.

- Click on Save and Apply, and the uploaded wallpaper will appear on the phone as follows:

Color Background Wallpaper
- In order the change the phone’s wallpaper to a solid color, go to System Settings 🡪 Preferences 🡪Display Control 🡪 Wallpaper and set Wallpaper Source to “Color Background“.
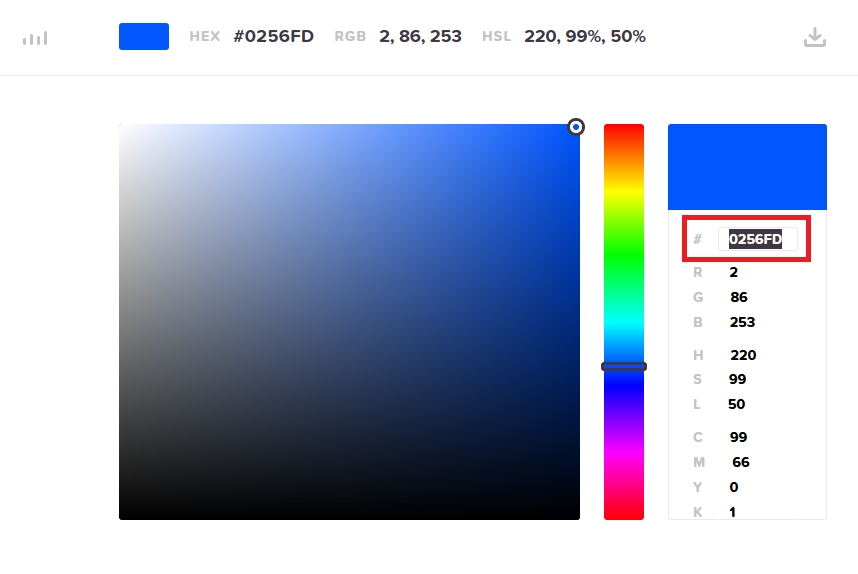
- Enter a color to use in HEX format under Color Background. Please use this link to find the HEX format of a specific color http://htmlcolorcodes.com

- Once the settings are saved and applied, the phone’s wallpaper will change to the color chosen, as shown in the image below :

Screensaver Customization
In order to customize the screensaver, user need to access the Web UI and go to System Settings 🡪 Preferences 🡪 Screensaver.

To turn on or off the screensaver feature, set Screensaver to “Yes”, “No”, or “On if no VPK is active” (This is the default value, and the screensaver will be displayed only when there no configured VPKs active, like for example an active BLF key or active call park key).
Users can also choose whether or not to Show Date and Time and configure the minutes of idle time before the screensaver activates under Screensaver Timeout.
As for the screensaver source, there are three options on the GRP261x:
The following section will describe each one in detail.
Default Screensaver
The screensaver activated by default on the phone can be configured in System Settings 🡪 Preferences 🡪 Screensaver 🡪 Screensaver Source.

The following image shows an example of the default GRP261x screensaver images.

USB Screensaver
The phone administrator have the possibility to define a custom screensaver, using an inserted USB drive, the USB drive will contain a list of images that meet the criteria for a screensaver for the GRP261x, the images will be displayed one after the other.
Please follow the steps below to define a screensaver from the images stored on a connected USB drive.
- Go to System Settings 🡪 Preferences 🡪Display Control 🡪 Screensaver, and set Screensaver Source to “USB“.

2. On the USB drive, save a list of images that will be displayed when the screensaver is enabled. We will save 4 images.

3. Insert the USB drive into the GRP261x IP phone, after sometime when the screensaver timeout is reached, the list of stored images will be displayed one after the other as screensavers.


Download Screensaver
To further customize the GRP261x screensaver, users can configure a personalized XML file containing many image paths that will be displayed chronologically on the phone’s LCD.
The screensaver XML file should respect the following format :
<screensaver>
<image path="http://server-ip-address/image1.jpg" />
<image path="http://server-ip-address/image2.jpg" />
<image path="http://server-ip-address/image3.jpg" />
<image path="http://server-ip-address/image4.jpg" />
</screensaver>
In order the configure the HTTP server with the XML file locally, please refer to the steps below :
- Launch the installation of the tool once it’s fully downloaded from the following link: “ http://www.rejetto.com/hfs/download ”
- Click on Run to launch the HTTP server.
- When HFS starts, browse and add the screensaver image files from local directories.

- Select the files and click Open to upload them to the HTTP server.
- Once the images are uploaded, copy the path for each image and enter it in the XML file.


- Upload the XML file created to the HTTP server and copy the path.
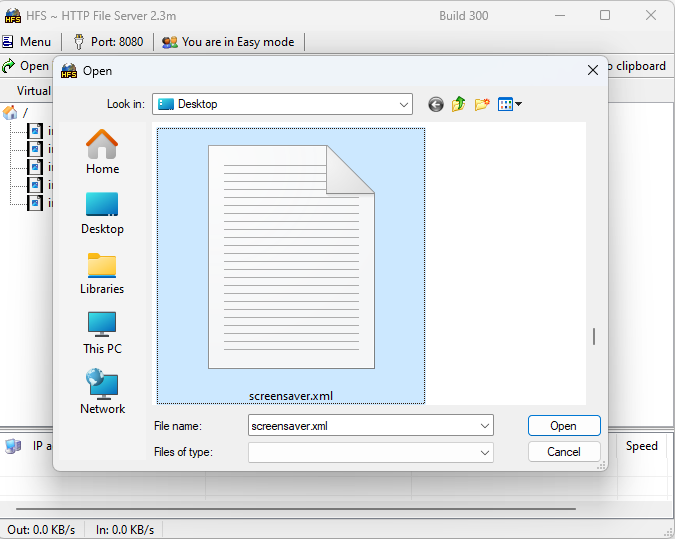
- Go to System Settings 🡪 Preferences 🡪 Screensaver, set Screensaver Source to Download, and paste the XML file path in Screensaver Server Path.

- Click on Save and Apply so the changes take effect, and wait for the screensaver to be activated.
- Once the screensaver is activated, the configured images will appear one at a time.


Cloud Configuration
You can also customize the wallpaper and screensaver of your GRP261x device from the Grandstream cloud solution. Once the device is added to the cloud, it can be selected and configured for Wallpaper and Screensaver customization.
Please follow the steps below to customize your GRP261x IP phone from the GDMS cloud solution:
- Connect to your GDMS cloud account using the following link: https://www.gdms.cloud/
- Once connected, make sure the GRP261x device or devices that you would like to configure are already added to your cloud management platform. You can view the added devices under the VoIP devices tab.

- Select a GRP261x device, then click on
 to configure the device


- On device Parameters, go to System Settings 🡪 Preferences

- Under the preferences tab, you have the option to configure the Device Wallpaper and screensaver. We will configure both in this example.
- Select the parameter Wallpaper Source, and set it to one of the following options:
- Default: Displays the default Wallpaper
- Download: Loads the wallpaper or screensaver from a specified HTTP server URL.
- USB: Uses an image stored on a USB drive connected to the device.
- Uploaded: Uses an image that was manually uploaded to the device through the Web UI.
- Color Background: Displays a solid color as the background, defined by a HEX color code.
Once the wallpaper source is selected, you can define the other parameters that complete the chosen source. For example, if the wallpaper source is set to Download, then the parameter Wallpaper Server Path needs to be filled. Alternatively, if Color Background is selected as the wallpaper source, then the parameter Color Background must be defined. The upload process is similar to the local WebUI configuration.
In this example, we will set the wallpaper source to Color Background and define the background color as black, using its HEX format: #000000.

- Using the same method, we can define the screensaver for our GRP261x. We start by enabling the Screensaver option, then selecting the screensaver source (Default, USB, or Download). Depending on the chosen source, we can define the remaining parameters. In our example, we choose to download the screensaver images from an HTTP server. So, we set the Screensaver Source to Download, then define the Screensaver Server Path.

- After the configuration is completed, click on Save and Apply, select the device, and then click on Sync Device Local Configuration. This will push the configured parameters to the phone, and the wallpaper and screensaver will be updated accordingly.

