
Thank you for purchasing Grandstream Small Business IP phone GXP1610/GXP1615/GXP1620/ GXP1625/GXP1628/GXP1630. GXP16xx series is a next generation small-to-medium business IP phone: the GXP1620/GXP1625 features 2 lines with 2 SIP accounts, superior HD wideband audio, 132 x 48 backlit graphical LCD; the GXP1610/GXP1615 supports 2 lines with 2 SIP accounts, 132 x 48 graphical LCD; GXP1630 supports 3 lines with 3 SIP accounts, 132×64 backlit graphical LCD. The GXP1610/GXP1615/ GXP1620/GXP1625/GXP1628/GXP1630 delivers rich features of 3 XML programmable context-sensitive softkeys, dual network ports with PoE (GXP1615 / GXP1625 / GXP1628 / GXP1630 only), EHS (Electronic Hook-Switch) with Plantronics headsets, 3-ways conference on GXP1610/GXP1615/GXP1620/GXP1625/ GXP1628 and up to 4-way conference on GXP1630, superb full-duplex hands-free speakerphone with advanced acoustic echo cancellation, advanced security protection for privacy, and compatible with Grandstream UCM Features. It is a perfect choice for small-to-medium businesses looking for a high quality, feature rich IP phone with affordable cost.
PRODUCT OVERVIEW
Feature Highlights (GXP1610/GXP1615/GXP1620/GXP1625/GXP1628)
- 132*48-pixel backlit graphical LCD display (GXP1610/GXP1615 do not support backlit).
- 2 dual-color line keys, 3 XML programmable context-sensitive soft keys, 8 BLF keys (GXP1628 only), 3-way conference, multi-language support.
- HD wideband audio (GXP1620/GXP1625/GXP1628 only), superb full-duplex hands-free speakerphone with advanced acoustic echo cancellation and excellent double-talk performance.
- LDAP Directory with the option to display all contacts on the LCD Menu.
- Large phonebook (up to 1000 contacts) and call history (up to 200 records).
- Automated personal information service, personalized music ring tone/ring back tone, flexible customizable screen content & format using XML, and advanced Web and enterprise applications.
- Dual switched 10/100 Mbps ports on GXP1610/GXP1615/GXP1620/GXP1625, dual switched auto-sensing 10/100/1000 Mbps Ethernet ports on GXP1628, integrated PoE on GXP1615/GXP1625/GXP1628.
- Automated provisioning using TR-069 or encrypted XML configuration file, SRTP and TLS for advanced security protection, 802.1x for media access control.
- Perfectly compatible with Grandstream UCM Features.
- Innovative UI design (easy and useable multi-language support).
- Use with Grandstream UCM6xxx series IP PBX appliance for Zero-Config provisioning, 1-touch call recording and more.
Feature Highlights (GXP1630)
- 132*64-pixel backlit graphical LCD display.
- 3 dual-color line keys, 3 XML programmable context-sensitive soft keys, 8 BLF keys, 4-way conference, multi-language support.
- HD wideband audio, superb full-duplex hands-free speakerphone with advanced acoustic echo cancellation and excellent double-talk performance.
- LDAP Directory with the option to display all contacts on the LCD Menu.
- Large phonebook (up to 1000 contacts) and call history (up to 200 records).
- Automated personal information service, personalized music ring tone/ring back tone, flexible customizable screen content & format using XML, and advanced Web and enterprise applications.
- Dual switched auto-sensing 10/100/1000 Mbps Ethernet ports with integrated PoE.
- Automated provisioning using TR-069 or encrypted XML configuration file, SRTP and TLS for advanced security protection, 802.1x for media access control.
- Perfectly compatible with Grandstream UCM Features.
- Innovative UI design (easy and useable multi-language support).
- Use with Grandstream UCM6xxx series IP PBX appliance for Zero-Config provisioning, 1-touch call recording and more.
GXP1610/GXP1615/GXP1620/GXP1625/GXP1628/GXP1630 Technical Specifications
SIP RFC3261, TCP/IP/UDP, RTP/RTCP, RTCP-XR, HTTP/HTTPS, FTP/FTPS, ARP/RARP, ICMP, DNS (A record, SRV, NAPTR), DHCP, PPPoE, SSH, TFTP, NTP, STUN, SIMPLE, LLDP-MED, LDAP, TR-069, 802.1x, TLS, SRTP | |
Network Interfaces | Dual switched 10/100 Mbps ports, integrated PoE (GXP1615 only) |
Graphic Display | 132*48 LCD display |
Feature Keys | 2 line keys with dual-color LED and 2 SIP accounts. 3 XML programmable context sensitive soft keys. 5 (navigation, menu) keys. 13 dedicated function keys for PAGE/INTERCOM, PHONEBOOK, MESSAGE, HOME, HOLD, RECORD, MUTE, HEADSET, TRANSFER, CONFERENCE, SEND and REDIAL, SPEAKERPHONE, VOLUME |
Voice Codecs | Support for G.711µ/a, G.722 (wide-band), G.723.1, G.726-32, G.729 A/B, iLBC, in-band and out-of-band DTMF (In audio, RFC2833, SIP INFO) |
Telephony Features | Hold, transfer, forward (unconditional/no-answer/busy), 3-way conference, call park/pickup, downloadable phone book (XML, LDAP, up to 1000 items), call waiting, call history (up to 200 records), off-hook auto dial, auto answer, click-to-dial, flexible dial plan, Hot Desking, personalized music ringtones, server redundancy & fail-over |
Headset Jack | RJ9 headset jack (allowing EHS with Plantronics headsets) |
Base Stand | Yes, allow 2 angle positions available, Wall Mountable |
QoS | Layer 2 QoS (802.1Q, 802.1P) and Layer 3 (ToS, DiffServ, MPLS) QoS |
Security | User and administrator level access control, MD5 and MD5-sess based authentication, 256-bit AES encrypted configuration file, TLS, SRTP, HTTPS, 802.1x media access control |
Multi-language |
LCD Language: Arabic Czech German English Spanish French Croatian Hungarian Italian Japanese Korean Latvian Dutch Polish Portuguese Russian Slovenian Swedish Turkish Traditional Chinese Simplified Chinese Ukrainian Hebrew |
Upgrade/Provisioning | Firmware upgrade via TFTP / HTTP / FTP/FTPS /HTTPS, mass provisioning using TR-069 or AES encrypted XML configuration file |
Power & Green Energy Efficiency | Universal Power Supply Input 100-240VAC 50-60Hz; Output +5VDC, 600mA |
Temperature and Humidity | Operation: 0°C to 40°C Storage: -10°C to 60°C Humidity: 10% to 90% Non-condensing |
Physical | Dimension: 209mm(L)x 184.5mm(W)x 76.2mm(H) (with handset) Unit Weight: 0.74kg Package Weight: 1.1kg |
Package Content | GXP1610/GXP1615 phone, handset with cord, base stand, universal power supply, network cable, Quick Installation Guide, brochure, GPL license |
Compliance | FCC : Part 15 (CFR 47) Class B CE : EN55022 Class B, EN55024, EN61000-3-2, EN61000-3-3, EN60950-1 RCM: AS/ACIF S004; AS/NZS CISPR22/24; AS/NZS 60950; AS/NZS 60950.1 |
Protocols/Standards | SIP RFC3261, TCP/IP/UDP, RTP/RTCP, RTCP-XR, HTTP/HTTPS, FTP/FTPS, ARP/RARP, ICMP, DNS (A record, SRV, NAPTR), DHCP, PPPoE, SSH, TFTP, NTP, STUN, SIMPLE, LLDP-MED, LDAP, TR-069, 802.1x, TLS, SRTP |
Network Interfaces | Dual switched auto-sensing 10/100/1000 Mbps Ethernet ports, integrated PoE |
Graphical Display | 132 x 48 backlit graphical LCD display |
Feature Keys | 2 line keys with dual-color LED and 2 SIP accounts. 3 XML programmable context sensitive soft keys. 5 (navigation, menu) keys. 8 BLF keys. 13 dedicated function keys for PAGE/INTERCOM, PHONEBOOK, MESSAGE, HOME, HOLD, RECORD, MUTE, HEADSET, TRANSFER, CONFERENCE, SEND and REDIAL, SPEAKERPHONE, VOLUME |
Voice Codecs | Support for G.711µ/a, G.722 (wide-band), G.723 (pending), G.726-32, G.729 A/B, in-band and out-of-band DTMF (In audio, RFC2833, SIP INFO) |
Telephony Features | Hold, transfer, forward (unconditional/no-answer/busy), call park/pickup, 3-way conference, shared-call-appearance (SCA) / bridged-line-appearance (BLA), downloadable phone book (XML, LDAP, up to 1000 items), call waiting, call history (up to 200 records), off-hook auto dial, auto answer, click-to-dial, flexible dial plan, Hot Desking, personalized music ringtones, server redundancy & fail-over. |
Headset Jack | RJ9 headset jack (allowing EHS with Plantronics headsets) |
HD Audio | Yes, HD handset and speakerphone with support for wideband audio |
Base Stand | Yes, 2 angle positions available, Wall Mountable |
QoS | Layer 2 QoS (802.1Q, 802.1P) and Layer 3 (ToS, DiffServ, MPLS) QoS |
Security | User and administrator level access control, MD5 and MD5-sess based authentication, 256-bit AES encrypted configuration file, TLS, SRTP, HTTPS, 802.1x media access control |
Multi-language |
LCD Language: Arabic Czech German English Spanish French Croatian Hungarian Italian Japanese Korean Latvian Dutch Polish Portuguese Russian Slovenian Swedish Turkish Traditional Chinese Simplified Chinese Ukrainian Hebrew |
Upgrade/Provisioning | Firmware upgrade via TFTP / HTTP / FTP/ FTPS / HTTPS, mass provisioning using TR-069 or AES encrypted XML configuration file |
Power & Green Energy Efficiency | Universal Power Supply Input 100-240VAC 50-60Hz; Output +5VDC, 600mA PoE IEEE802.3 af Class 2, 3.84W-6.49W |
Temperature and Humidity | Operation: 0°C to 40°C Storage: -10°C to 60°C Humidity: 10% to 90% Non-condensing |
Physical | Dimension: 220.5mm (L) x 192.5mm (W) x 76.0mm (H) (with handset) Unit weight: 0.8kg; Package weight: 1.2kg |
Package Content | GXP1628 phone, handset with cord, base stand, universal power supply, network cable, Quick Installation Guide, brochure, GPL license, BLF label cards |
Compliance | FCC : Part 15 (CFR 47) Class B CE : EN55022 Class B, EN55024, EN61000-3-2, EN61000-3-3, EN60950-1 RCM: AS/ACIF S004; AS/NZS CISPR22/24; AS/NZS 60950; AS/NZS 60950.1 |
Protocols/Standards | SIP RFC3261, TCP/IP/UDP, RTP/RTCP, RTCP-XR, HTTP/HTTPS, FTP/FTPS, ARP/RARP, ICMP, DNS (A record, SRV, NAPTR), DHCP, PPPoE, SSH, TFTP, NTP, STUN, SIMPLE, LLDP-MED, LDAP, TR-069, 802.1x, TLS, SRTP |
Network Interfaces | Dual switched auto-sensing 10/100/1000 Mbps Ethernet ports, integrated PoE |
Graphical Display | 132 x 64 backlit graphical LCD display |
Feature Keys | 3 line keys with dual-color LED and 3 SIP accounts. 3 XML programmable context sensitive soft keys. 5 (navigation, menu) keys. 8 BLF keys. 13 dedicated function keys for PAGE/INTERCOM, PHONEBOOK, MESSAGE, HOME, HOLD, RECORD, MUTE, HEADSET, TRANSFER, CONFERENCE, SEND and REDIAL, SPEAKERPHONE, VOLUME |
Voice Codecs | Support for G.711µ/a, G.722 (wide-band), G.723.1, G.726-32, G.729 A/B, iLBC, in-band and out-of-band DTMF (In audio, RFC2833, SIP INFO) |
Telephony Features | Hold, transfer, forward (unconditional/no-answer/busy), call park/pickup, 4-ways conference, shared-call-appearance (SCA) / bridged-line-appearance (BLA), downloadable phone book (XML, LDAP, up to 1000 items), call waiting, call history (up to 200 records), off-hook auto dial, auto answer, click-to-dial, flexible dial plan, Hot Desking, personalized music ringtones, server redundancy & fail-over. |
Headset Jack | RJ9 headset jack (allowing EHS with Plantronics headsets) |
HD Audio | Yes, HD handset and speakerphone with support for wideband audio |
Base Stand | Yes, 2 angle positions available, Wall Mountable |
QoS | Layer 2 QoS (802.1Q, 802.1P) and Layer 3 (ToS, DiffServ, MPLS) QoS |
Security | User and administrator level access control, MD5 and MD5-sess based authentication, 256-bit AES encrypted configuration file, TLS, SRTP, HTTPS, 802.1x media access control |
Multi-language |
LCD Language: Arabic Czech German English Spanish French Croatian Hungarian Italian Japanese Korean Latvian Dutch Polish Portuguese Russian Slovenian Swedish Turkish Traditional Chinese Simplified Chinese Ukrainian Hebrew |
Upgrade/Provisioning | Firmware upgrade via TFTP / HTTP / FTP/ FTPS / HTTPS, mass provisioning using TR-069 or AES encrypted XML configuration file |
Power & Green Energy Efficiency | Universal Power Supply Input 100-240VAC 50-60Hz; Output +5VDC, 600mA PoE IEEE802.3 af Class 2, 3.84W-6.49W |
Temperature and Humidity | Operation: 0°C to 40°C Storage: -10°C to 60°C Humidity: 10% to 90% Non-condensing |
Physical | Dimension: 222.5mm (L) x 192.5mm (W) x 76.0mm (H) (with handset) Unit weight: 0.8kg; Package weight: 1.2kg |
Package Content | GXP1630 phone, handset with cord, base stand, universal power supply, network cable, Quick Installation Guide, brochure, GPL license, BLF label cards |
Compliance | FCC : Part 15 (CFR 47) Class B CE : EN55022 Class B, EN55024, EN61000-3-2, EN61000-3-3, EN60950-1 RCM: AS/ACIF S004; AS/NZS CISPR22/24; AS/NZS 60950; AS/NZS 60950.1 |
INSTALLATION
Equipment Packaging
Main Case | 1 |
Handset | 1 |
Phone Cord | 1 |
5V DC Power Adaptor | 1 |
Ethernet Cable | 1 |
Phone Stand | 1 |
Quick Installation Guide | 1 |
BLF Name Cards (GXP1628/GXP1630 only) | 1 |
Connecting Your Phone

Slots for Phone Stand | Slots for the phone stand if placing the phone on a flat surface |
PC Port | 10/100M Ethernet to connect PC on GXP1610/GXP1615/GXP1620/GXP1625, auto-sensing 10/100/1000M Ethernet to connect PC on GXP1628 and GXP1630 |
LAN Port | 10/100M Ethernet to connect LAN on GXP1610/GXP1615/GXP1620/ GXP1625, auto-sensing 10/100/1000M Ethernet to connect LAN on GXP1628 and GXP1630, integrated PoE (GXP1615/GXP1625/GXP1628/GXP1630 only) |
DC 5V Power Port | 5V/600mA power port to connect to power adaptor |
HEADSET Port | To connect to RJ9 or EHS headphones |
HANDSET Port | To connect handset RJ9 |
Cord Slot | To place and fix the phone cords |
Stand Installation
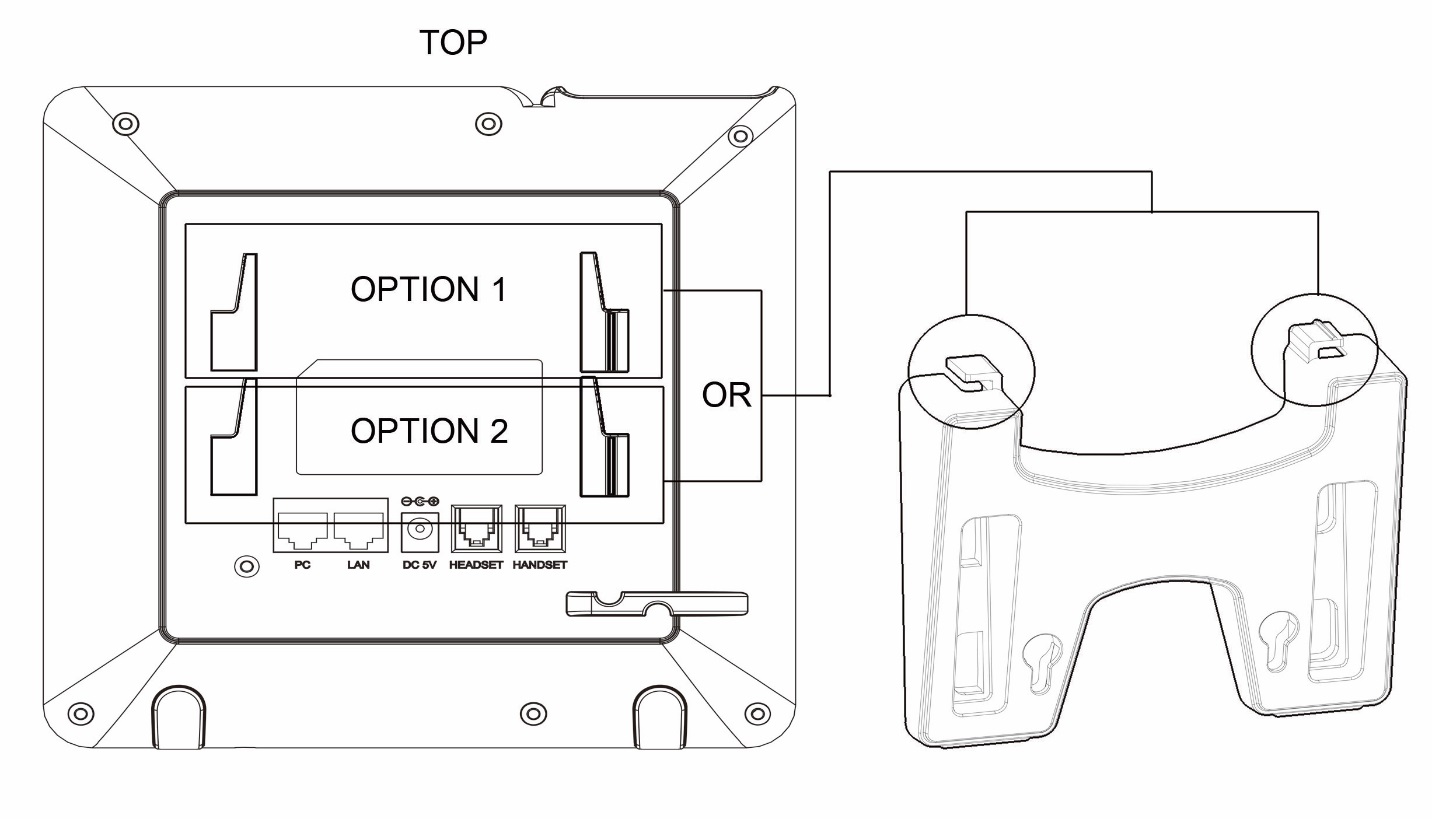
- Insert the hooks on the top of the stand into the slots, you have option to use either upper slots OR lower slots.
- After both hooks are in the slots, firmly slide the entire stand upward to lock them in place.
Wall Mount Installation
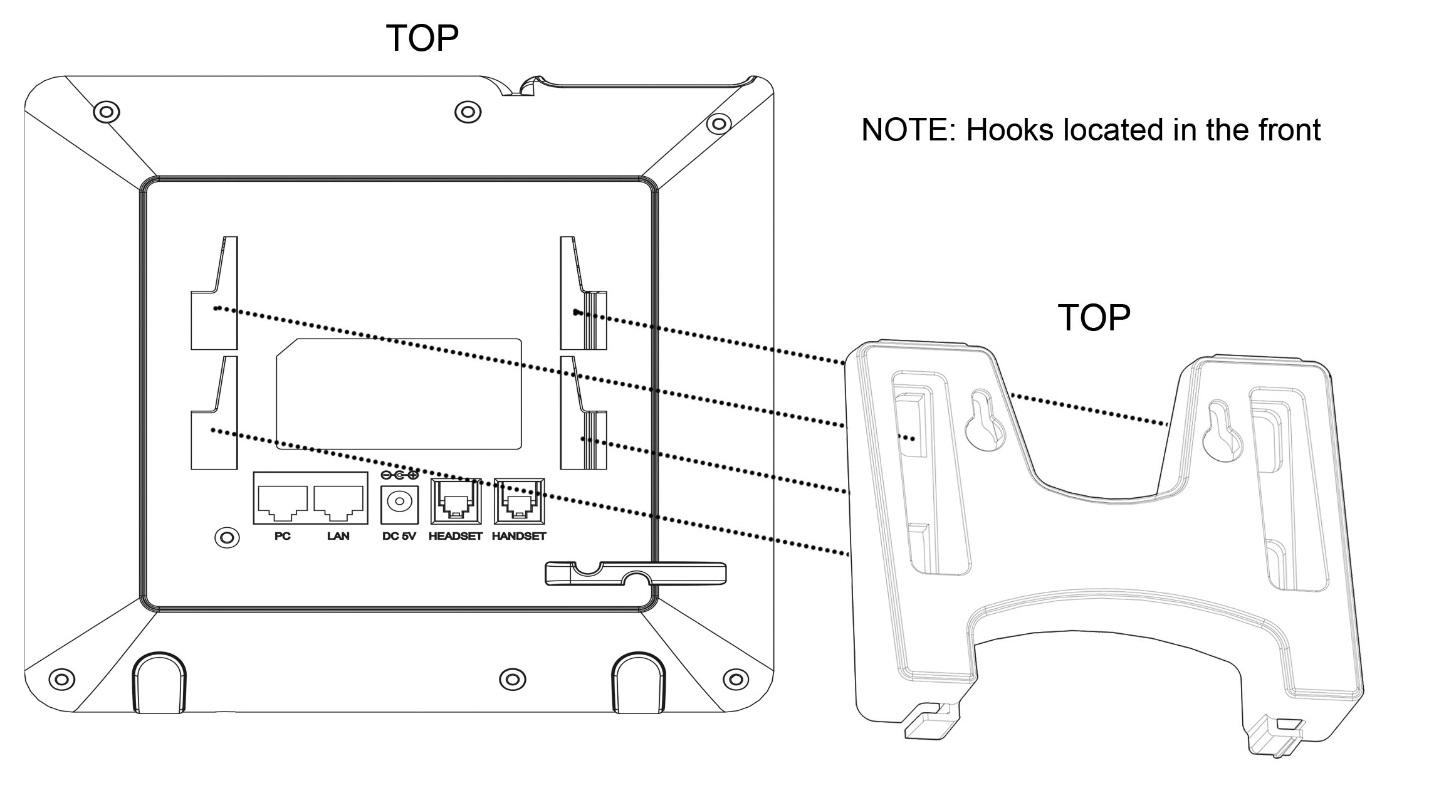
- Insert all 4 hooks into the slots.
- Firmly slide the wall mount upward to lock it in place.
To set up the GXP1610/GXP1615/GXP1620/GXP1625/GXP1628/GXP1630, follow the steps below:
- Attach the phone stand or wall mount to the back of the phone where there are slots.
- Connect the handset and main phone case with the phone cord.
- Connect the LAN port of the phone to the RJ45 socket of a hub/switch or a router (LAN side of the router) using the Ethernet cable.
- Connect the 5V DC output plug to the power jack on the phone; plug the power adapter into an electrical outlet. If PoE switch is used in step 3, this step could be skipped.
- The LCD will display provisioning or firmware upgrade information. Before continuing, please wait for the date/time display to show up.
- Using the keypad configuration menu or phone’s embedded Web server (Web GUI) by entering the IP address in Web browser, you can further configure the phone.
GETTING TO KNOW THE GXP16XX SERIES
Idle Screen
GXP1610/GXP1615/GXP1620/GXP1625/GXP1628/GXP1630 screen displays differently depending on whether the phone is idle or in use (active). User can show/hide softkeys and customize the main screen softkey by assigning a multi-purpose function
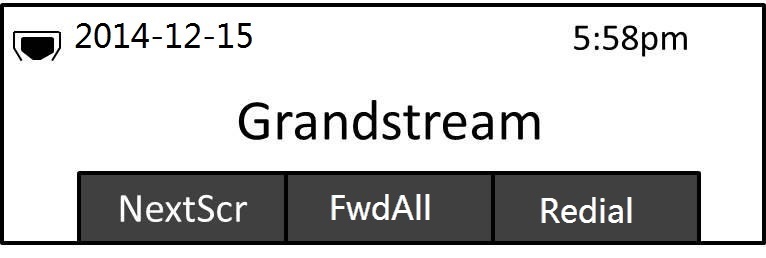
The following table describes the items displayed on the GXP1610/GXP1615/GXP1620/GXP1625/GXP1628/GXP1630 idle screen.
Date and Time | Displays the current date and time. It can be synchronized with Internet time servers. |
Network Icon | Shows the status of network. It will indicate whether the network is down or starting. |
Status Icon | Shows the status of the phone for registration status, call features and etc., using icons as shown in the next table. |
Softkeys in Idle Screen | The softkeys are context sensitive and will change depending on the status of the phone. Typical functions assigned to softkeys are:
Toggles between different idle screens. For example, for GXP1610 / GXP1615 / GXP1620 / GXP1625 / GXP1628 / GXP1630, pressing most left soft key (switch screen) will toggle among default idle screen, IP address and Account information.
Redial the last dialed number when there is existed dialed call log.
Unconditionally forwards the phone line (account 1) to another phone.
Shows up unanswered calls to this phone. Note: The ability to customize the 3rd softkey on the idle screen was added starting firmware 1.0.7.49. |
Softkeys in Call Screen | The softkeys are context-sensitive and will change depending on the call status of the phone. Here are the main softkeys in call screen.
Redials the last dialed number after off hook when there is existing call log. Dials the call out after off hook and entering the number.
Answers the incoming call when the phone is ringing.
Rejects the incoming call when the phone is ringing.
Ends the active call.
Transfer softkey will show up after pressing TRAN button and entering transfer target number. Press Transfer softkey to do blind transfer.
In auto-attended transfer mode, after establishing the second call, press Split to quit transfer and go back to normal talking status.
Conferences the active calls.
Re-establish the conference among the calls on hold. |
Special Softkeys (Only for GXP1610/GXP1615/GXP1620/GXP1625/GXP1628/GXP1630 when integrated with UCM6xxx) |
When the phone dials out, the CallPark softkey will display on screen. To park the call, press it to park the call on available parking lot.
During an active call, the RecOn softkey will display on screen. Press it to trigger UCM call recording.
During an active call, after RecOn softkey is pressed and call recording starts, RecOff softkey will appear on screen. Press it to stop call recording on UCM. Note: Please refer to UCM6xxx User Manuals for the UCM configurations. |

| Registration Status. |

| Missed Call(s) Notification Status.
|

| Handset Status.
|

| Speaker Status.
|

| Headset Status.
|

| Mute Status.
|
 | Call Forward Status.
|

| DND Status.
|

| SRTP Status.
|
Using the Keypad
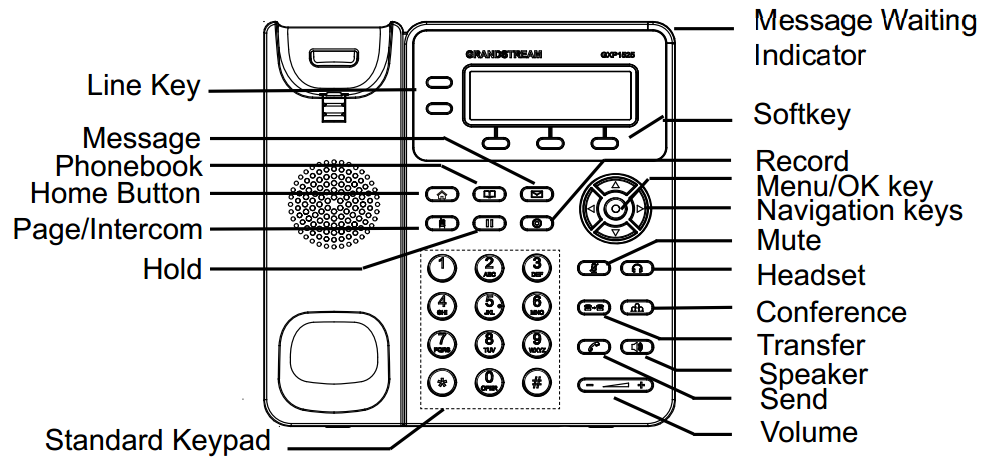
LINE Key | Switch between line 1 and line 2. Solid Green:Calling, Talking. Flash Green:Call on hold. Flash Red:Incoming call. |
Softkeys | The softkeys are context sensitive and will change depending on the status of the phone. |
 | Messages. Press to view messages. |
 | Phonebook. Press to view Contacts. |
 | Home. Press to go to idle screen, when stay in submenu. |

| Page/Intercom. If the intercom number has set, call this number directly. If the intercom number has not set, press this key will have no effect. |
 | Hold. Place active call on hold or resume the call on hold. |
 | Record. Press to enable/disable record feature in an active call or on conference. |
Standard Keypad | To dial phone numbers. Press numeric keys “0-9” to enter phone numbers. Press “*” to enter voice menu or input special characters or long press it to lock the keypad. Press “#” to dial out numbers or input special characters. |
 | Navigation Keys. When entered the menu: Press the UP/DOWN keys to scroll through menu options. Press the LEFT key to go back to the previous menu. The RIGHT key has no function. In Idle: Press the UP key to view missed calls. Press the DOWN key to view dialed calls. Press the RIGHT key to view answered calls. |
 | Menu/OK Key. In Idle: Press to enter the main menu. Confirm the current selection or the inputted info. Off hook: Switch between outgoing call and paging call. |
 | Mute. To mute/unmute an active call. When DND is on: Enable/disable DND when the phone is in idle. |
 | Headset. Press to switch between headset and handset mode in an active call. |
Transfer. Transfer an active call to another number. | |
 | Conference. Establish 3-way conference with other 2 parties. |
 | Send. Send. Enter the digits and then press Send to dial out. Redial. Redial when there is a previously dialed call. |
 | Speaker. Press to switch between speaker and handset mode in an active call. |
Message Waiting Indicator | Message Waiting Indicator. The LED Indicator will flash in red when there is new voice mail. |
Characters Input
Each key on a GXP16XX except for key 1 corresponds to one number and a group of three letters, Users need to tap on a key multiple times until the wanted number or letter appears (Both lower and upper case available), While key 1 is used to input special characters and number 1.
Refer to below table for each key and character input:
| Key | Description | Key | Description | Key | Description |
|---|---|---|---|---|---|
1 | 1 Space . : / ‘ ` @ * + – = , | & ? ! % ( ) ~ _ < > { } [ ] ^ | 2 | 2 A B C a b c | 3 | 3 D E F d e f |
4 | 4 G H I g h i | 5 | 5 J K L j k l | 6 | 6 M N O m n o |
7 | 7 P Q R S p q r s | 8 | 8 T U V t u v | 9 | 9 W X Y Z w x y z |
* | * | 0 | 0 | # | # |
Making Phone Calls
Handset, Speaker and Headset Mode
The GXP1610/GXP1615/GXP1620/GXP1625/GXP1628/GXP1630 allows users to switch among handset, speaker or headset when making calls. Press the Hook Switch to switch to handset; press the Headset button to switch to headset; or press the Speaker button to switch to speaker.
SIP Accounts and Lines
GXP1630 supports up to 3 independent SIP accounts, GXP1610/GXP1615/GXP1620/GXP1625/GXP1628 can support up to 2 independent SIP accounts. Each account is capable of independent SIP servers, user and NAT settings. Each of the LINE button is “virtually” mapped to an individual SIP account. In off hook state, select an idle line and the dial tone will be heard.
To make a call, select the line you wish to use. The corresponding LINE LED will light up in green. The user can switch lines before dialing any number by pressing the LINE buttons.
For example: If 2 independent accounts are registered on GXP1610/GXP1615/GXP1620/GXP1625/GXP1628, when LINE 1 is pressed, the LINE 1 LED will light up in green. If LINE 2 is pressed, the LINE 2 LED will light up in green and the subsequent call will be made through SIP account 2.
Incoming calls to a specific account will attempt to use its corresponding LINE if it is not in use. When the “virtually” mapped line is in use, the GXP1610/GXP1615/GXP1620/GXP1625/GXP1628/GXP1630 will flash the other available LINE in red. A line is ACTIVE when it is in use and the corresponding LED is red.
SIP URI Calls
SIP URIs typically look like this: sip:username@domain.com. When you enter a SIP URI into the GXP16xx , it will use the SIP protocol to connect to the specified SIP server or destination, allowing you to establish voice or video calls over the internet.
Example: You have an IP phone in your office, and you want to call a colleague, John Doe, who is also using an IP phone, but he’s located in a different office within your organization. John’s SIP URI is sip:johndoe@companyvoip.com, on the GXP16xx, instead of dialing a traditional phone number or an extension, you enter John’s SIP URI into the dialing interface, which looks like sip:johndoe@companyvoip.com.
Completing Calls
There are several ways to complete a call.
On hook dialing
Enter the number when the phone is on hook and then send out.
- When the phone is in idle, enter the number to be dialed out.
- Take handset off hook; or Press Speaker button; or Press Headset button with headset plugged in; or Select an available LINE key.
- The call will be dialed out.
Off hook and dial
Off hook the phone, enter the number and send out.
- Take handset off hook; or
- Press Speaker button; or Press Headset button with headset plugged in; or Press an available LINE key to activate speaker.
- You shall hear dial tone after off hook.
- Enter the number.
- Press SEND key or # to dial out.
Predictive dialing
While dialing, the phone will predict, and list candidates of the target number based on the entered digits. If the target number exists in the contacts/call log, the phone will display a list of matched numbers and the user could select the number using the Up/Down key and dial out.
Redial
Redial the last dialed number.
- Take handset off hook; or Press Speaker button; or Press Headset button with headset plugged in; or Press an available LINE key to activate speaker; or When the phone is in idle.
- Press SEND key, or the REDIAL soft key.
Via Call History
Dial the number logged in phone’s call history.
- Press MENU button to bring up the main menu.
- Enter Call History.
- Select the entry you would like to call using the navigation arrow keys.
- Press SEND button to dial out.
Via Contacts
Dial the number from the Contacts
- Press Contacts button.
- Under Contacts, enter Local Phonebook/ Broadsoft Phonebook using the navigation arrow key.
- Select the contact you would like to call using the navigation arrow key.
- Press SEND button to dial the selected contact.
Speed Dial from Line Key
Dial the number configured as Speed Dial on Line Key.
- Go to phone’s Web GUI🡪Settings🡪Programmable Keys, configure the Line Key’s Key Mode as Speed Dial. Select the account to dial from, enter the Name and User ID (the number to be dialed out) for the Line Key. Click on “Update” at the bottom of the Web GUI page.
- Off hook the phone, or directly press the Speed Dial key to dial out.
Call Return
Dial the last answered call.
- Go to phone’s Web GUI🡪Settings🡪Programmable Keys, configure the Line Key’s Key Mode as Call Return. Select the account to dial from, no Name or User ID has to be set on for Call Return.
- Off hook the phone, or directly press the Call Return key to dial out.
Via Paging/Intercom
- Take handset off hook; or Press Speaker button; or Press Headset button with headset plugged in; or Press an available LINE key to activate speaker.
- You shall hear dial tone after off hook.
- Press MENU button to switch the call screen from “Dialing” to “Paging”.
- Enter the number.
- Press SEND key or # to dial out.
Via Intercom Hard Button
Dial pre-configured intercom number.
- Go to phone’s Web GUI🡪Settings🡪Call Features, configure the Intercom User ID as the destination number of intercom call.
- When phone is in idle, press in Intercom Hard Button to dial pre-configured number.
Notes:
- After entering the number, the phone waits for the No Key Entry Timeout (Default timeout is 4 seconds, configurable via Web GUI) before dialing out. Press SEND or # key to override the No Key Entry Timeout.
- If digits have been entered after handset is off hook, the SEND key will works as SEND instead of REDIAL.
- By default, # can be used as SEND to dial the number out. Users could disable it by setting “User # as Dial Key” to “No” from Web GUI🡪Account X🡪Call Settings.
- For Paging/Intercom, if the SIP Server/PBX supports the feature and has Paging/Intercom feature code set up already, users do not necessarily need toggle to paging mode in the call screen. Simply dial the feature code with extension as a normal call.
- When dial out via paging, user can see the “call-info” header contains “answer-after=0” and “the “alert-info” header contains “info=alert-autoanswer;delay=0” in the outgoing INVITE.
Making Calls Using IP Addresses
Direct IP Call allows two phones to talk to each other in an ad-hoc fashion without a SIP proxy. VoIP calls can be made between two phones if:
- Both phones have public IP addresses; or
- Both phones are on the same LAN/VPN using private or public IP addresses; or
- Both phones can be connected through a router using public or private IP addresses (with necessary port forwarding or DMZ).
To make a direct IP call, please follow the steps below:
- Press MENU button to bring up main menu.
- Select “Direct IP Call” using the navigation arrow keys.
- Press MENU to enter the Direct IP Call mode.
- Input the 12-digit target IP address (Please see example below).
- Press the “More” softkey to make sure the softkey selection “IPv4” or “IPv6” is correctly selected depending on your network environment.
- Press “OK” softkey to dial.
For example:
If the target IP address is 192.168.1.60 and the port is 5062 (i.e., 192.168.1.60:5062), input the following: 192*168*1*60#5062. The * key represents the dot (.), the # key represents colon (:). Wait for about 4 seconds and the phone will initiate the call.
Quick IP Call Mode
The GXP1610/GXP1615/GXP1620/GXP1625/GXP1628/GXP1630 also supports Quick IP Call mode. This enables the phone to make direct IP calls using only the last few digits (last octet) of the target phone’s IP address. This is possible only if both phones are under the same LAN/VPN. This simulates a PBX function using the CSMA/CD without a SIP server. Controlled static IP usage is recommended.
To enable Quick IP Call Mode, go to phone’s Web GUI🡪Settings🡪Call Features, set “Use Quick IP – call mode” to “Yes”. Clicking on “Save and Apply” on the bottom of Web GUI page to take the change. To make Quick IP Call, take the phone off hook first. Then dial #xxx where x is 0-9 and xxx<255. Press # or SEND and a direct IP call to aaa.bbb.ccc.XXX will be completed. “aaa.bbb.ccc” is from the local IP address regardless of subnet mask. The number #xx or #x are also valid. The leading 0 is not required (but it is OK).
For example:
- 192.168.0.2 calling 192.168.0.3 — dial #3 followed by # or “SEND”.
- 192.168.0.2 calling 192.168.0.23 — dial #23 followed by # “SEND”.
- 192.168.0.2 calling 192.168.0.123 — dial #123 followed by # “SEND”.
- 192.168.0.2: dial #3 and #03 and #003 results in the same call — call 192.168.0.3.
Notes:
- The # will represent colon “:” in direct IP call rather than SEND key as in normal phone call.
- If you have a SIP server configured, direct IP call still works. If you are using STUN, direct IP call will also use STUN.
- Configure the “Use Random Port” to “No” when completing direct IP calls. The option “Use Random Port” is under phone’s Web GUI Settings 🡪 General Settings page.
Answering Phone Calls
Receiving Calls
- Single incoming call. Phone rings with selected ring tone. The corresponding LINE key will flash in red. Answer call by taking handset off hook, or using Speaker/Headset, or pressing the flashing LINE key.
- Multiple incoming calls. When another call comes in while having an active call, the phone will produce a Call Waiting tone (stutter tone). The other LINE key will flash in red. Answer the incoming call by pressing the flashing LINE key. The current active call will be put on hold automatically.
Do Not Disturb
Do Not Disturb can be enabled/disabled from phone’s LCD by following the steps below:
- Press the Menu button and select “Preference” using navigation keys.
- Press Menu button again to get into Preference options.
- Select “Do Not Disturb” and press Menu button.
- Use arrow keys to select and press Menu button to enable or disable “Do Not Disturb” feature.
When Do Not Disturb feature is turned on, the DND icon will appear on the right side of the LCD. The incoming call will not be accepted, or the call will directly go into voicemail.
During a Phone Call
Call Recording
During an active call, users could record the conversation to the UCM6xxx Series server and download the record to PC and listen to it with the help of the server administrator. Please contact server administrator to ensure the PBX feature codes for Audio Mix Record is enabled on UCM before using call recording feature.
In the process of establishing the call, when get through, press the RECORD key
![]() to start recording. Press
to start recording. Press
![]() one more time to stop recording.
one more time to stop recording.
Note: Recording feature is available when using the Grandstream UCM series IP PBX appliance, or the PBX which supports this feature, Record On/Off DTMF code can be configured from the phone’s web UI 🡪 Account🡪Call Settings (for more details, refer to GXP16xx Administration Guide https://documentation.grandstream.com/knowledge-base/gxp16xx-series-administration-guide/). The record file will be saved automatically to UCM or the supported PBX. Please contact the UCM server administrator, or the supported PBX administrator to download the file from the server.
Call Waiting/Call Hold
- Hold. Place a call on hold by pressing the HOLD button. The active LINE key will blink in green.
- Resume. Resume call by pressing the blinking LINE key.
- Multiple calls. Automatically place active call on hold or switch between calls by pressing the LINE key. Call waiting tone (stutter tone) will be audible on new incoming call during the active call.
Mute
During an active call, press the MUTE button to mute/unmute the microphone. The LCD will show the Mute icon on the top of screen when the call is muted.
Group Listening with Speaker
If the option “Group Listening with Speaker” is enabled on the web UI (refer to the administration guide), the phone will display a softkey during the call to enable speaker listening along with handset or headset.
Call Transfer
GXP1610/GXP1615/GXP1620/GXP1625/GXP1628/GXP1630 supports Blind Transfer, Attended Transfer and Auto-Attended Transfer.
- Blind Transfer.
- During the first active call, press TRANSFER and dial the number to transfer to.
- Press SEND key or # to complete transfer of active call.
- Attended Transfer.
- During the first active call, press LINE key. The first call will be put on hold.
- Enter the number for the second call in the new line and establish the call.
- Press TRANSFER.
- Press the other LINE key which is on hold to transfer the call.
- Auto-Attended Transfer.
- Set “Attended Transfer Mode” to “Dynamic” under Web GUI🡪Settings🡪Call Features. And then click “Save and Apply” on the bottom of the page.
- Establish one call first.
- During the call, press TRANSFER. A new line will be brought up and the first call will be automatically placed on hold.
- Dial the number and press SEND or # to make a second call. (Once the number is entered, a “Transfer” soft key will show. If “Transfer” soft key is pressed instead of SEND or #, a blind transfer will be performed).
- Press TRANSFER again. The call will be transferred;
- For Auto-Attended Transfer, after dialing out the number for the second call, a “Split” soft key will show. If the second call is not established yet (ringing), pressing “Split” will hang up the second call. If the second call is established (answered), pressing “Split” will resume the second call and keep the first call on hold.
Conferencing
GXP1610/GXP1615/GXP1620/GXP1625/GXP1628 can host up to 3-ways conference call and up to 4-ways conference call on GXP1630 (PCMU/PCMA).
- Initiate a conference call.
- Establish calls with 2 parties respectively (up to 3 parties for GXP1630).
- While 1 call is active, the other call/calls will be put on hold with its LINE key blinking in green.
- Press CONF key.
- Press the desired LINE key on hold, the conference will be established.
- Repeat the previous 2 steps above to add the 4th party into the conference (GXP1630 only).
- Cancel Conference.
- If after pressing the CONF key, the user decides not to conference, press Cancel soft key or the current active LINE key (LED in solid green);
- This will resume the 2-way conversation with the current line.
- Split and Re-conference.
- During the conference, press HOLD key. The conference call will be split, and the calls will be put on hold separately with the LINE keys blinking in green;
- Select one LINE key and press to resume the 2-way conversation;
- If users would like to re-establish conference call, before 1 separate LINE is selected, press the ReConf soft key right after the conference call is held/split.
- End Conference.
Users could press the EndCall soft key or simply hang up the call to terminate the conference call.
Easy Conference Mode
GXP1610/GXP1615/GXP1620/GXP1625/GXP1628/GXP1630 supports Easy Conference Mode, which can be used combined with the traditional way to establish the conference.
- Initiate a conference call.
- Establish 1 call.
- Press CONF key and a new line will be brought up using the same account.
- Dial the number and press SEND key to establish the second call.
- Press CONF key or press the ConfCall softkey to establish the conference.
- Split and Re-conference.
- During the conference, press HOLD key. The conference call will be split and both calls will be put on hold separately with 2 LINE keys blinking in green.
- Select one LINE key and press to resume the 2-way conversation.
- If users would like to re-establish conference call, before 1 separate LINE is selected, press the ReConf softkey right after the conference call is split.
- Cancel Conference.
- If users decide not to conference after establishing the second call, press EndCall softkey instead of the ConfCall softkey/CONF key.
- This will end the second call and the screen will show the first call on hold.
- End Conference.
Users could press the EndCall softkey or simply hang up the call to terminate the conference call. If the remote party hangs up the call itself, it will be disconnected from the conference but other parties on GXP1610/GXP1615/GXP1620/GXP1625/GXP1628/GXP1630 will stay in the existed conference.
Voicemail
A blinking red LED indicator on the top right corner of the GXP1610/GXP1615/GXP1620/GXP1625/ GXP1628/GXP1630 indicates a message is waiting. Go to Web GUI🡪Account 🡪General Settings to configure Voice Mail UserID.
To retrieve the voicemail:
- Press the hard key to dial into the voicemail box.
- Select the account and confirm to access the dial-up interface, make operations according to the voice prompt.
- Enter the account and password which is configured on SIP PBX.
The steps above are for the situation that both accounts are configured, if configured only one account, there is no need for users to select account but go to the dial-up interface directly.
For each account, the Voicemail User ID can be set up under Web GUI🡪Account X🡪General Settings: “Voice Mail UserID”. This is the number that will be dialed out to access voicemail message when tapping on the account in Voice Mail screen.
Shared Call Appearance (SCA)
The GXP1610 / GXP1615 / GXP1620 / GXP1625 / GXP1628 / GXP1630 phone supports shared call appearance by Broadsoft standard. This feature allows members of the SCA group to shared SIP lines and provides status monitoring (idle, active, progressing, hold) of the shared line. When there is an incoming call designated for the SCA group, all of the members of the group will be notified of an incoming call and will be able to answer the call from the phone with the SCA extension registered.
All the users that belong to the same SCA group will be notified by visual indicator when a user seizes the line and places an outgoing call, and all the users of this group will not be able to seize the line until the line goes back to an idle state or when the call is placed on hold (with the exception of when multiple call appearances are enabled on the server side).
In the middle of the conversation, there are two types of hold: Public Hold and Private Hold. When a member of the group places the call on public hold, the other users of the SCA group will be notified of this by the red-flashing button and they will be able to resume the call from their phone by pressing the line button. However, if this call is placed on private-hold, no other member of the SCA group will be able to resume that call.
To enable shared call appearance, the user would need to register the shared line account on the phone. In addition, they would need to navigate to “Settings”🡪”Programmable Keys” on the Web UI and set the line key mode as “Shared Line”. If the user requires more shared call appearances, the user can configure multiple line buttons to be “shared line” buttons associated with the account.
Call Features
The GXP1610 / GXP1615 / GXP1620 / GXP1625 / GXP1628 / GXP1630 supports traditional and advanced telephony features including caller ID, caller ID with caller Name, call forward and etc.
*30 | Anonymous Calls (for all subsequent calls)
|
*31 | Cancel Anonymous (for all subsequent calls)
|
*50 | Enable Call Waiting (for all subsequent calls)
Note: The subsequent incoming call will hear a busy tone other than enter call waiting when the current call is in active. |
*51 | Disable Call Waiting (for all subsequent calls)
|
*67 | Selective Anonymous Call (per Call).
Note: Once set, the firstly dialed call is anonymous. |
*82 | Call with Caller ID Enabled (per call)
|
*70 | Call with Call Waiting Disable (per Call)
Note: Once set, the first call need not to enter call waiting as being supposed to. |
*71 | Call with Call Waiting Enabled (per Call)
|
*72 | Unconditional Call Forward. To set up unconditional call forward:
Note: Once set, all calls will be forwarded to another preset number and your phone will not ring. |
*73 | Cancel Unconditional Call Forward. To cancel the unconditional call forward:
|
*90 | Busy Call Forward. To set up busy call forward:
|
*91 | Cancel Busy Call Forward. To cancel the busy call forward:
|
*92 | Delayed Call Forward. To set up delayed call forward:
|
*93 | Cancel Delayed Call Forward. To cancel the delayed call forward:
Note: Once set, the incoming call will be forwarded to another preset number if no one answers the phone. |
Configuring VPK/MPK using LCD
To quickly manage your VPK/MPKs, the GXP16XX offers the ability to configure using the phone’s LCD. To configure a VPK/MPK, follow the instructions below:
- Press and hold the VPK/MPK to configure for 7 seconds.
- Configure the “Account”, “Mode”, and “Name” on the configuration screen.
- Press “Save” to apply the settings.
GDS37xx OpenDoor Key Support
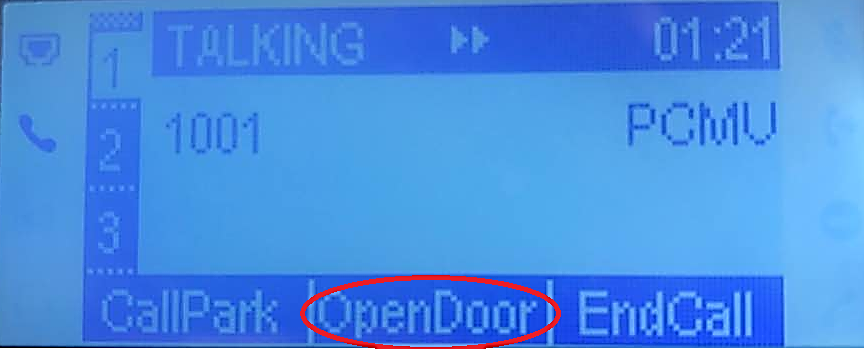
The GXP16XX can be integrated with the GDS37XX IP Video Door System. The new integration allows users to interact with the GDS37XX while in call and send OpenDoor request via Softkey to open the door remotely.
Assuming that remote number and PIN is set under GDS doorbell settings, the following configuration needs to be done on the phone WebGUI, under “Settings 🡪 External Service”:
- Account: Select the Account to be used while sending the OpenDoor request.
- System Identification: Specify a name or a number to identify the GDS37XX.
- System Number: Specify the SIP extension or the IP address of the GDS37XX.
- Access Password: Specify Remote PIN configured on the GDS37XX.
During a call between the GXP16XX and the GDS37XX, a softkey named “OpenDoor” will popup, user can click on this softkey to send the OpenDoor request to the GDS37XX. If the password set on “Access Password” matches the “Remote PIN to open door” on the GDS, the door will be successfully opened.
Configuration to Open door in idle state:
Assuming the device already has GDS open door setting configured under device web UI→ Settings → External Service. Navigate to device web UI → Settings → Programmable Keys, add an MPK or Line key, choose “GDS OpenDoor” for key “Mode” and enter the GDS SIP extension for the MPK/Line key value.
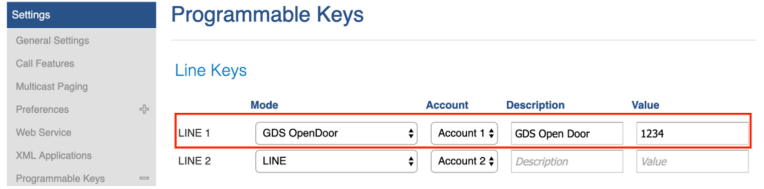
The GDS device must be properly configured as well by enabling “Remote PIN To Open Door” under
GDS web UI 🡪 Door System Settings 🡪 Basic Settings.
When the phone is in idle state, pressing the configured MPK or Line key will open the door via GDS.
CONNECTING TO DEVICES
EHS Headset
The GXP1610/GXP1615/GXP1620/GXP1625/GXP1628/GXP1630 supports normal RJ11 headset and Plantronics EHS headset. To use Plantronics EHS headset, go to the GXP1610 / GXP1615 / GXP1620 / GXP1625 / GXP1628 / GXP1630 web GUI🡪Settings🡪Audio Control Headset Type. Select “Plantronics EHS” and reboot the phone to take effect.
- Connect EHS Headset (Plantronics) to GXP1610 / GXP1615 / GXP1620 / GXP1625 / GXP1628 / GXP1630. Insert headset connector into the RJ11 headset port on the back of GXP1610 / GXP1615 / GXP1620 / GXP1625 / GXP1628 / GXP1630.
-
To use headset mode, press headset button on the GXP1610/GXP1615/GXP1620/GXP1625/GXP1628/GXP1630. A headset icon
 will show on the GXP1610/GXP1615/GXP1620/GXP1625/GXP1628/GXP1630 status bar. The EHS headset will ring when there is an incoming call.
Note: The GXP16xx keeps the headset mode on regardless of power off or reboot.
RESTORE FACTORY DEFAULT SETTINGS
Please follow the instructions below to reset the phone:
Restore to Factory Default via LCD Menu
- Press MENU button to bring up the keypad configuration menu.
- Select “Config” and enter.
- Select “Factory Reset”.
- A warning window will pop out to make sure a reset is requested and confirmed.
- Press the “OK” softkey to confirm and the phone will reboot. To cancel the Reset, press “Cancel” softkey instead.
Restore to Factory Default via Web GUI
- Login GXP1610/GXP1615/GXP1620/GXP1625/GXP1628/GXP1630 Web GUI.
- At the top right corner of the web page, click the “Factory Reset” button to reset the device.
CHANGE LOG
This section documents significant changes from previous versions of user manuals for GXP1610/GXP1615/GXP1620/GXP1625/GXP1628/GXP1630. Only major new features or major document updates are listed here.
Firmware Version 1.0.7.64
- No Major changes.
Firmware Version 1.0.7.56
- Added Support of SIP URI to make call. [SIP URI Calls]
Firmware Version 1.0.7.50
- No Major changes.
Firmware Version 1.0.7.49
- Added Support to display all contacts in LDAP Directory on the LCD menu. [Feature Highlights]
- Added Support to customize the 3rd softkey on the idle screen. [Idle Screen]
Firmware Version 1.0.7.33
- Added Support to configure MPK through LCD. [Configuring VPK/MPK using LCD]
Firmware Version 1.0.7.24
- No major changes
- No major changes.
- No major changes.
- No major changes.
- Added Two accounts support on GXP1610/1615. [Table 1: GXP1610/GXP1615 Technical Specifications]
- No major changes.
- No major changes.
- Added Support for Ukrainian language and input.
- Added ability to open door in idle stage for GDS integration. [Open door in idle state]
- Increased phonebook limit to 1000 entries. [PRODUCT OVERVIEW]
- Added support for more characters in password input from LCD including <, >, ?, {, }, [, ], ^ using number key 1.
- Added support for Group Listening softkey. [Group Listening with Speaker]
- Added support for RTCP-XR. [GXP1610/GXP1615/GXP1620/GXP1625/GXP1628/GXP1630 Technical Specifications]
- Updated phonebook string in LCD and Web UI to “Contacts”.
- No major changes.
- No major changes.
- No major changes.
- Added HTTP/HTTPS Username/Password configuration on LCD menu for firmware upgrading and provisioning.
- No major changes.
- Added Opendoor Action Softkey support for GDS integration [GDS37xx OpenDoor Key Support]
- No major changes.
- No major changes.
- Added support of confirmation message to reboot the phone.
- Added support to remember the headset mode after being set and reboot.
- Added ability to perform a quick search and create new contact using Czech characters.
- Added ability to perform a quick search and create new contact using Russian characters.
- Added ability to lock settings on phone.
- Added ability to adjust ringtone level from web GUI.
- Added configurable web access port.
- Added ability to configure record button. [Call Recording]
- Added dial soft key on LCD screen. [Dial]
- Added ability to displays more characters for account name on LCD display.
- Added ability to hide web access mode and disable SSH from LCD menu under constraint mode.
- Add support for Latvian Language.
- Update Polish language.
- Added ability to customize the system softkey.
- Added ability to hide system softkey on main screen.
- Added supports of configurable User Agent field.
- Added option to disable recovery on blind transfer.
- Added call-pickup barge-in code.
- Added options to hide remote user ID based on both call type and length.
- Added option to set Broadsoft contacts download interval.
- Added G723.1 and iLBC codecs support.
- Added Event Notification.
- Added options to specify Broadsoft XSI authentication method.
- Added DHCP option 150/160 support.
- Added ability to filter characters from dial numbers.
- Web logo and style changed.
- Added DHCP Option 125 support.
- Enabled/Disabled Broadsoft Call Park subscribe.
- Separate Firmware/Config’s upgrade via, HTTP/HTTPS username, and HTTP/HTTPS password.
- Ignore Alert-Info Header.
- Validate Certification Chain.
- Bypass Dial Plan through Call History and Directories.
- Backup Outbound Proxy.
- Enable OPTIONS Keep Alive.
- OPTIONS Keep Alive Interval.
- OPTIONS Keep Alive Max Lost.
- This is the initial version.