
Package Contents

Connecting the GXV3500
Refer to the illustration below when following the instructions on the next page.
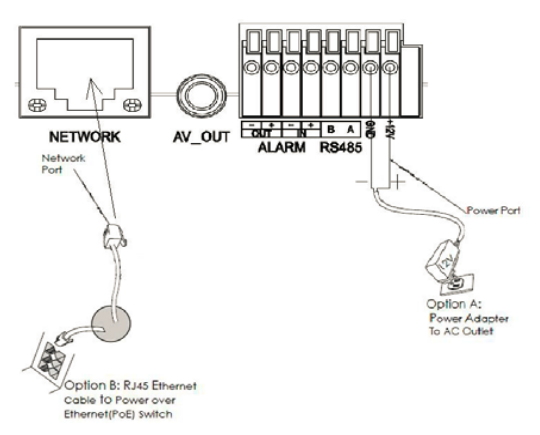
Option A
Step 1:
Insert the power adapter into the 12V DC interface in GXV3500. Plug the other end of the adapter into an AC power outlet.
Step 2:
Plug an RJ45 Ethernet cable into the network interface of GXV3500. Plug the other end into a switch/hub or router.
Option B
Plug an RJ45 Ethernet cable into the network interface of GXVV3500.
Plug the other end into a Power over Ethernet(PoE) switch.
GXV3500 Configuration
Configure the GXV3500 using Firefox, Chrome or Microsoft Internet Explorer (with related Plug-in or ActiveX installed).
Connect the GXV3500 to a DHCP Server Enabled Network.
- Download and install GS_Search tool from the link below:
https://www.grandstream.com/hubfs/IoT%20Team/GS_Search.zip - Run the Grandstream GS_Search tool.
- Click on
 button to start device detection.
 - The detected devices will appear in the output field as below.
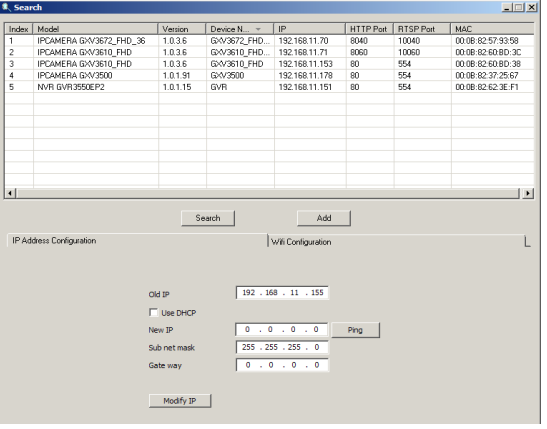
- Double click on the detected device. The default browser(Firefox in this example) will open to display the camera’s webGUI.
- A pop-up window will prompt for user name & password. The factory default value of administrator username and password are both set to “admin”.
- Once log into the webGUI, the browser will indicate that Active-X or Video Plug-in is required. Follow the displayed instruction to download and install it.
- If downloading or installing is unsuccessful due to browser’s security setting or slow internet connection, please download the files from the link below. Save and install the program then restart the browser. The video will appear embedded inside the browser’s web interface.
- Here is an example screenshot with the successful Active-X or Plug-in installation. Click “Play” button to view the video feed.

- Click icons and menus on the left side of web interface for more detailed and advanced configuration.
Connect GXV3500 using Static IP
If the GXV3500 does not get response from the DHCP server or the network without DHCP server, after 3 minutes, it can be accessed by the default IP address 192.168.1.168.
- Use RJ45 Ethernet cable to connect your computer network port directly to the Ethernet socket of GXV3500.
- Run the GS_Search tool as above. It will show the original IP of the GXV3500 (default IP address 192.168.1.168).
- Input the NEW IP Address, Subnet Mask and Default Gateway, according to your network configuration. Please check with local system administrator for the necessary information.
- Click on “Modify IP”. The desired IP address will be applied to GXV3500.
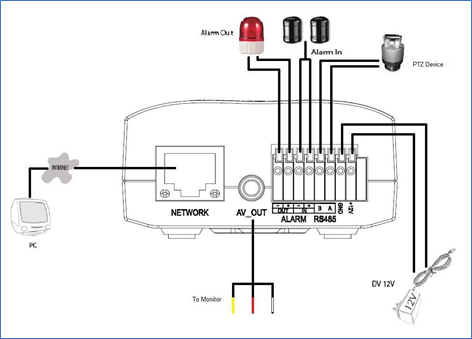
GXV3500 Sample Connection Diagram
Refer to online documents and FAQ for more detailed information:
Products | Grandstream Networks
For Certification, Warranty and RMA information, please visit www.grandstream.com