
The GXW410x offers an easy to manage, easy to configure IP communications solution for any small business or businesses with virtual and/or branch locations who want to leverage their broadband network and/or add new IP Technology to their current phone system. The Grandstream Enterprise Analog VoIP Gateway GXW410x series converts SIP/RTP IP calls to traditional PSTN calls. There are two models – the GXW4104 and GXW4108, which have either 4 and 8 FXO ports respectively. The installation is the same for both models.
A SIP proxy server such as Asterisk or a SIP registrar server can be deployed with the GXW410x series. In this environment, the SIP server handles SIP registration and call control and the GXW410x processes media conversion between IP and PSTN calls. By design, the system supports the North American call progress tones and signaling standards on PSTN sides.
Equipment Packaging
Unpack and check all accessories
- One device unit
- One Ethernet cable
- One 12V universal power adapter

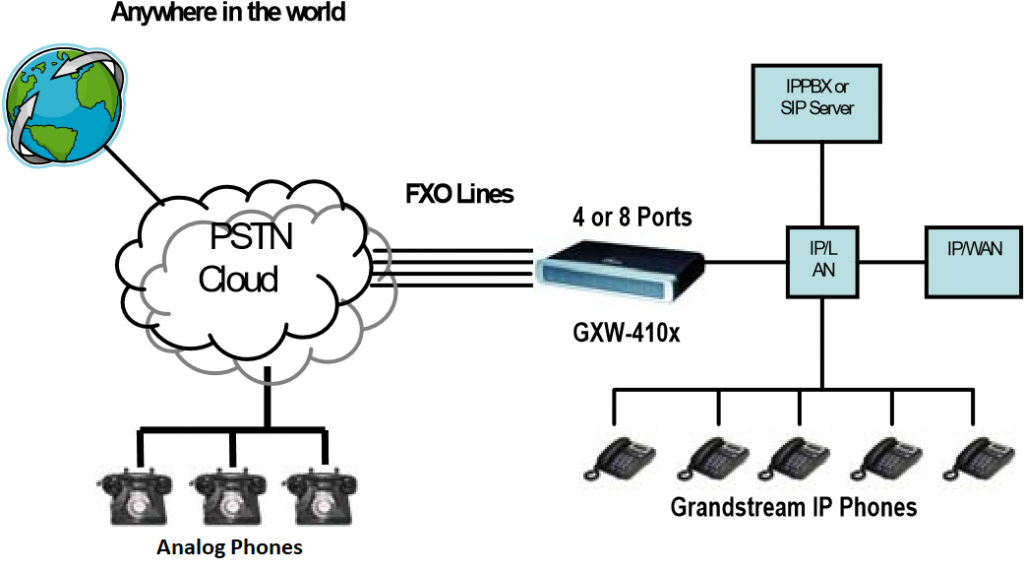
Application Diagram
GXW410x series can be deployed in the following enterprise topology:
Connect the GXW410x
Please use the equipment included in the packaging. Using any other power source may damage the product.
- Connect one or more PSTN (PBX) telephone lines to FXO ports.
- Insert the Ethernet cable into the WAN port and connect the other end of the Ethernet cable to an uplink port (a router or a modem, etc.).
- Connect a PC to the LAN port (optional).
- Insert the power adapter into the GXW-410x and connect it to an electrical outlet.
- Using the GXW-400x embedded web server, you can further configure the device.
Configuring the GXW410x using a Web Browser
- By default, GXW410x has DHCP option turned on.
- To find out GXW410x’s IP address, please download “Grandstream Device IP Discovery” tool from https://www.grandstream.com/support/tools Please follow the instructions below on how to use the tool:
- Run “IP Query.exe”
- Select the network interface that has access to the GXW410x.
- Click “Listen” to start sniffing on the network interface.
- Reboot the GXW410x.
- Select the desired entry from output box
- Type the GXW410x’s IP address in your PC web browser.
- Log in using password “admin” to configure the unit.
You may then change it to use static IP address or PPPoE according to your local network environment.
There are 2 methods to configure GXW410x to work with IP PBX:
Method | Description |
Method 1 | Configure GXW410x with SIP Accounts in IP PBX, this will enable you to put GXW-410x behind a NAT/Firewall (Used for one-stage and two-stage dialing) |
Method 2 | Configure GXW410x to function as a PEER gateway (No SIP accounts needed; only used for one-stage dialing) |
METHOD 1 (Configuration):
Please follow the steps below:
- Enter a SIP Server IP Address (or FQDN ex. sip.mysipserver.com) in the SIP Server field under Profile 1 page.
- Go to the Channels page and enter up to 8 accounts/extensions along with their Authentication ID and Authentication Passwords, and select the corresponding Profile.
Channel | SIP User ID | Authen ID | Authen Password | Profile ID |
1 | 101 | 101 | *** | Profile1 |
2 | 102 | 102 | *** | Profile1 |
3 | 103 | 103 | *** | Profile1 |
4 | 104 | 104 | *** | Profile1 |
5 | 105 | 105 | *** | Profile1 |
6 | 106 | 106 | *** | Profile1 |
7 | 107 | 107 | *** | Profile1 |
8 | 108 | 108 | *** | Profile1 |
- One of the most important settings on the GXW410x is the “Stage Method” setting under FXO Lines page. You can set this different (1 or 2) for each Channel. For simplicity purposes please keep Stage Method to 2.
Ex. Stage Method (1/2): Ch1-8:2; - Click on Update and Reboot the unit. When the GXW410x boots up, click on “Status Page” to check if the Account/extensions show up as “Registered:Yes”. If not, please double check the passwords or network settings.
- Once the accounts are registered to the SIP Server, you should be able to make VoIP to PSTN calls (assuming you have physical PSTN Lines connected to the FXO Ports at the back panel of the unit).
Below is an example showing VoIP-to-PSTN call flow:
Accounts 101 to 108 registered on the Channels page to SIP Server A.
IP Phone with Account 201 registered to the same SIP Server A.
PSTN Line X is connected to FXO X port on GXW-410x.- 201 dials 101 (or 102/103/104/105/106/107/108).
- It will hear ring back tone and then PSTN dial tone played from PSTN Line X.
- 201 can dial out via PSTN Line X.
- PSTN-to-VoIP call flow:
- PSTN number Y dials PSTN number X (connected to FXO1 on the gateway)
- Y gets ring back tone and then VoIP dial tone played from 101 (only)
- For One Stage Dialing, before you configure the GXW-410x you need to make sure the SIP Server is configured to forward certain calls (ex. external calls dialed with a prefix, etc) to the GXW-410x.
- On the GXW410x, you need to change the Stage Method field to 1. ex. Ch1-8:1;
- Based on the prefix you have configured on the SIP Server (ex. 91), if a user dials any number 91-xxx-xxxx, it will be routed to the GXW-410x, which will route it to the PSTN directly.
- Next you need to enter a VoIP account number for “Unconditional Call Forward to VOIP” under FXO Lines page. This account generally will be a dummy account on your SIP Server used simply to be a forwarding number for all incoming PSTN calls on the GXW410x. Ex. Unconditional Call Forward to VOIP: ch1-8:500;
So now all incoming PSTN calls will directly be forwarded to 500 on SIP Server A.
METHOD 2 (Configuration):
- In this scenario, you do not need any SIP accounts. So simply keep the Channels table shown above blank.
- You will still need to enter a SIP Server IP Address (or FQDN) in the SIP Server field under Profile 1 page.
- Since this scenario works only with one-stage dialing, you will have to set Stage Method to 1.
Ex. Stage Method: ch1-8:1; - It is advised to have “Wait for Dial Tone” field under FXO Lines page set to Y (Yes).
Ex. Wait for Dial Tone: ch1-8: Y;
Other Important Settings:
Most of the settings on the web configuration pages should be kept to default value. But there are some settings that need to be configured according to the local network environment.
A. PSTN Settings
The fields which need to be set according to the PSTN Service provider (or PSTN PBX) are:
- Call Progress Tones (under Channels page)
(Dial Tone, Ring back Tone, Busy Tone, Reorder Tone, Confirmation Tone)
These should be set according to the PSTN Service Provider or PSTN PBX that you are using with the GXW-410x. The format and syntax are shown on the web GUI. By default they are set according to North American PSTN settings.
- Caller ID Scheme (under FXO Lines page) There are 5 different options to choose from:
Bellcore, ETSI_RING, ETSI_TAS, DTMF and NTT
B. DTMF Methods
The gateway allows several combinations of sending DTMF across from PSTN to the IP end.
Setting | DTMF Method |
1 | In-audio |
2 | RTP (RFC2833) |
3 | In-audio + RTP (RFC2833) |
4 | SIP INFO |
5 | In-audio + SIP INFO |
6 | RTP (RFC2833) + SIP INFO |
7 | In-audio + RTP (RFC2833) + SIP INFO |
Ex. To set DTMF Method as in-audio: DTMF Method (1-7): ch1-8:1
C. NAT Settings
If the GXW410x is connected behind a firewall, an Outbound Proxy or a STUN server must be configured to solve the NAT issue. Here are four settings that can be useful in such a scenario:
- STUN Server (under Advanced Settings page) Enter a STUN Server IP or FQDN in this field.
- Outbound Proxy (Under Profile pages) Enter an Outbound Proxy server IP or FQDN.
- Use Random Ports (under Advanced Settings page)
By default, this field is set to No. It may needs to be set to “Yes” depending on your network environment. - NAT Traversal (under Profile pages) Set to Yes.
D. Preferred VOCODER (Codec)
Under Profile pages, you can choose from the following different codecs: PCMU (or G711u), PCMA (or G711a), G729A/B, G723 and GSM.
E. Firmware Upgrade
Under Advanced Settings page, enter “Firmware Server Path” (IP address or FQDN) under “Firmware Upgrade and Provisioning” field. Select upgrade protocol TFTP or HTTP accordingly. By default, “Always Check for New Firmware” is selected.
F. Factory Reset
The ONLY way to set the GXW410x to factory default is by following the steps below:
- Unplug the Ethernet cable.
- Locate a needle sized hole on the back panel of the gateway unit next to the Power connection.
- Enter a pin in this hole and press for about 7 seconds.
- You will see the LAN port LEDs (green and orange) go off and on simultaneously; this indicates the reset went through.
- Take out the pin. All configuration settings are restored to factory settings.