OVERVIEW
A remote disaster recovery site refers to a separate location from the main site where the primary server is, and the secondary server in the remote disaster recovery site is used for backing up data and recovering the service when the main location with the primary server has any unexpected events, such as a natural disaster, causing service interruption. The high-availability remote disaster recovery feature on the SoftwareUCM provides reliability and redundancy for deployments when the primary server experiences a hardware failure, power outage, network outage, or other disaster events.
To use the remote disaster recovery feature, the primary SoftwareUCM server and secondary SoftwareUCM server must use the same firmware version. The SoftwareUCM providing service is in an “active” role while the other SoftwareUCM is in a “standby” role. The data on active SoftwareUCM is synced to the standby SoftwareUCM in a real-time manner. The standby SoftwareUCM always monitors active SoftwareUCM. If the active SoftwareUCM fails, the standby SoftwareUCM will take over and become active to ensure the service is not interrupted.
DEFINITIONS
Primary/Secondary:
The high-availability remote disaster recovery sites have two types of SoftwareUCM: primary and secondary. The SoftwareUCM HA type doesn’t change while the roles of the SoftwareUCM can change between “active” and “standby”.
In the HA scenario, the primary SoftwareUCM has a higher chance of being in “active” role. Therefore, if enabling remote disaster recovery on SoftwareUCM servers, please make sure to configure the current SoftwareUCM providing PBX service at the main site as type “Primary” and configure the backup failover SoftwareUCM at the recovery site to be “Secondary”.
Active/Standby:
The HA remote disaster recovery involves two roles for the SoftwareUCM servers:
Active: this is for the SoftwareUCM, currently providing all PBX service.
Standby: this is for the backup SoftwareUCM.
Please note that “primary” SoftwareUCM can be different from “active” SoftwareUCM, and “secondary” SoftwareUCM can be different from “standby” SoftwareUCM. The SoftwareUCM can switch between active and standby roles. However, the SoftwareUCM always has the same type (primary or secondary) as configured on the SoftwareUCM webUI.
REMOTE DISASTER RECOVERY DEPLOYMENT TOPOLOGY
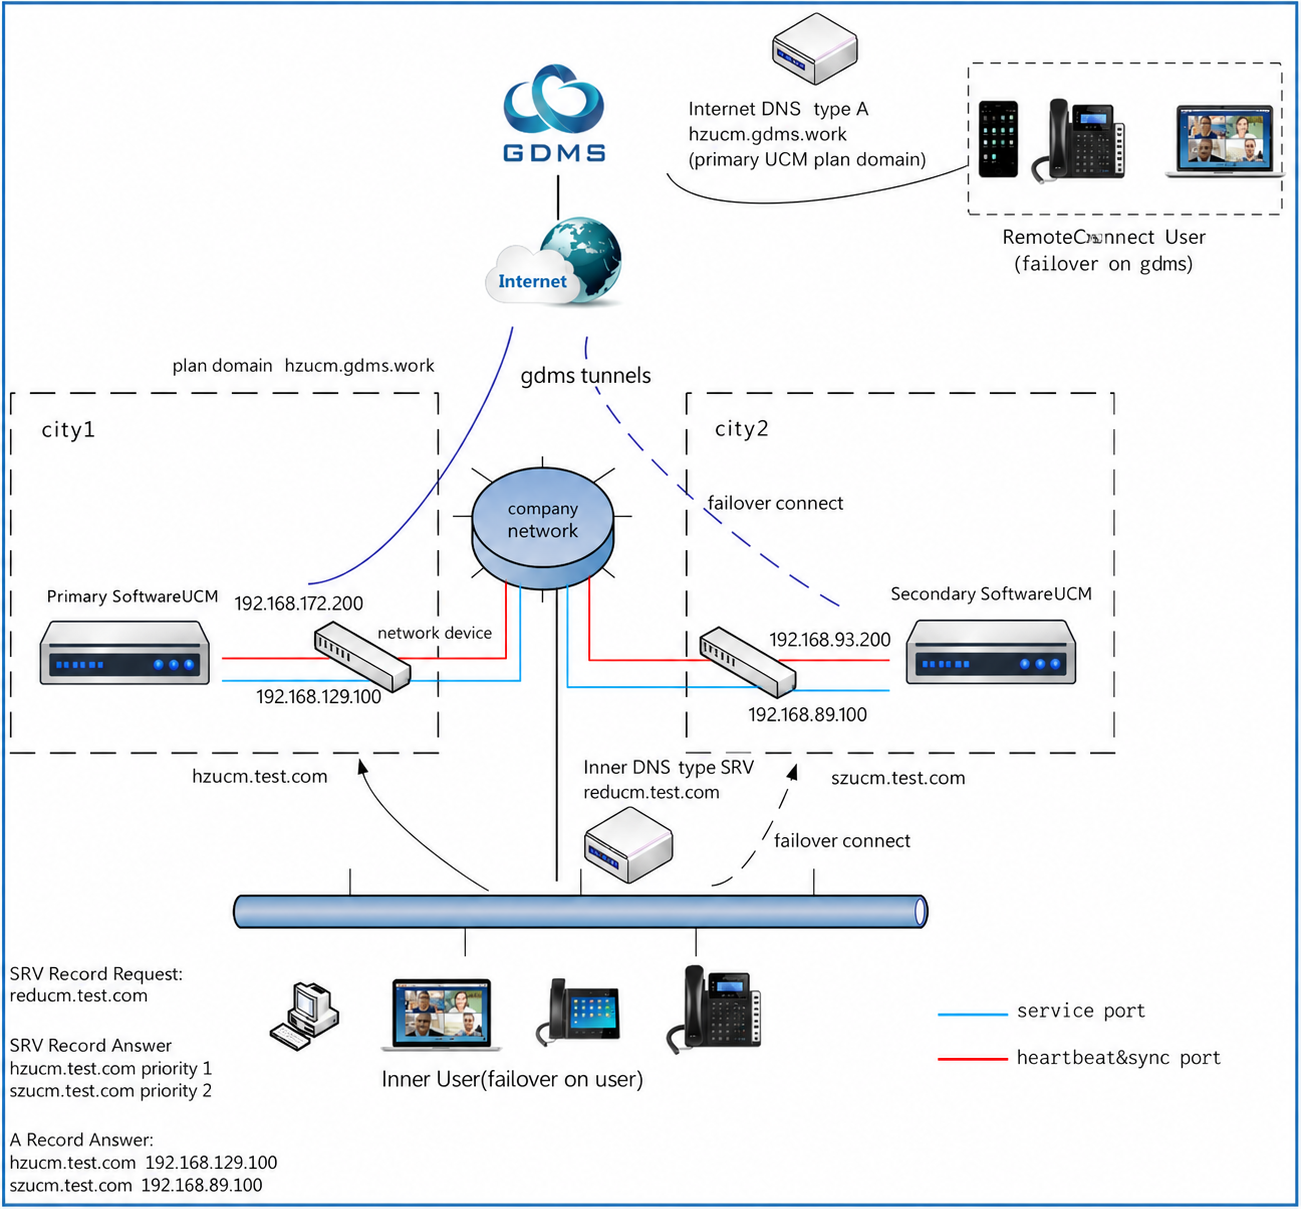
The primary SoftwareUCM and secondary SoftwareUCM are deployed in server rooms in two separate locations. The two locations have a network connecting all the devices between them.
The end devices in the company LAN network register with the SoftwareUCM using the domain name via DNS SRV. The DNS server in the LAN network returns two servers with assigned priorities. The primary SoftwareUCM has a higher priority and provides the active PBX service, so end devices send service requests to the primary SoftwareUCM first. If the primary SoftwareUCM fails, or if the main site where it is located encounters an unexpected disaster causing the service to become unavailable, the end devices in the LAN network will automatically switch to the secondary SoftwareUCM within a few minutes for failover and service recovery.
For users in the external network, users can register using the domain name provided by the UCMRC (SoftwareUCM RemoteConnect) plan, which is the custom server address configured for the primary SoftwareUCM’s RemoteConnect plan. When the primary SoftwareUCM or the main site fails, the secondary SoftwareUCM will notify GDMS to switch all activities to the secondary SoftwareUCM so that it can take over and provide RemoteConnect service to users.
During deployment, SoftwareUCM allows PBX service traffic and HA heartbeat communication to share the same network connection. This simplifies network design and deployment while ensuring reliable high-availability synchronization and failover operations.
Dual-Lan Deployment
In addition to single-LAN deployments, Remote Disaster Recovery HA also supports dual-LAN deployments. In this scenario, each SoftwareUCM instance uses separate LAN IP addresses for each network interface. To support this configuration, both SoftwareUCM instances must be configured in Dual NIC mode. This typically applies when the SoftwareUCM is deployed on a virtual machine or on systems with two physical network interfaces available.
During the Dual NIC configuration process, the user must configure two different remote addresses, one for each LAN interface. For example, one remote address must be configured for LAN 1 and another remote address must be configured for LAN 2. Both configurations should follow the same setup logic and requirements.
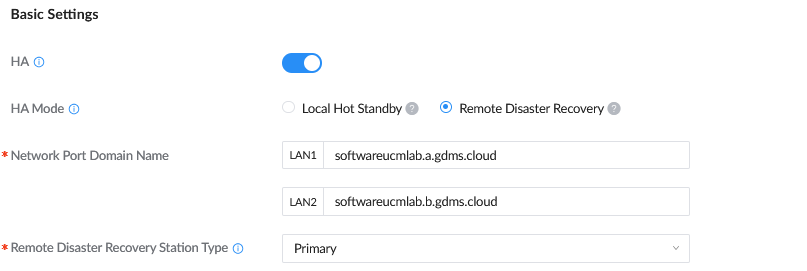
For the remainder of this guide, the configuration examples focus on a single LAN deployment for each remotely deployed SoftwareUCM instance. However, the same deployment logic and configuration flow also apply to dual LAN deployments, with the difference that the network port domain must be configured separately for both LAN interfaces.
REMOTE DISASTER RECOVERY CONFIGURATION
Prerequisites
SoftwareUCM Requirements
The SoftwareUCM servers used for Remote Disaster Recovery HA deployment must meet the following requirements:
- Remote Disaster Recovery HA is supported starting from firmware version 1.0.33.7.
- Both SoftwareUCM instances must be running firmware version 1.0.33.7 or later.
- Both SoftwareUCM servers must use the same firmware version.
Hardware Requirements
For end devices registered to the SoftwareUCM servers in remote disaster recovery deployment, only Grandstream end devices are fully supported for service recovery. 3rd party end devices used with SoftwareUCM are not supported.
Network Requirements
1. Before configuring the SoftwareUCM for the HA remote disaster recovery feature, each SoftwareUCM must complete individual network configuration first.
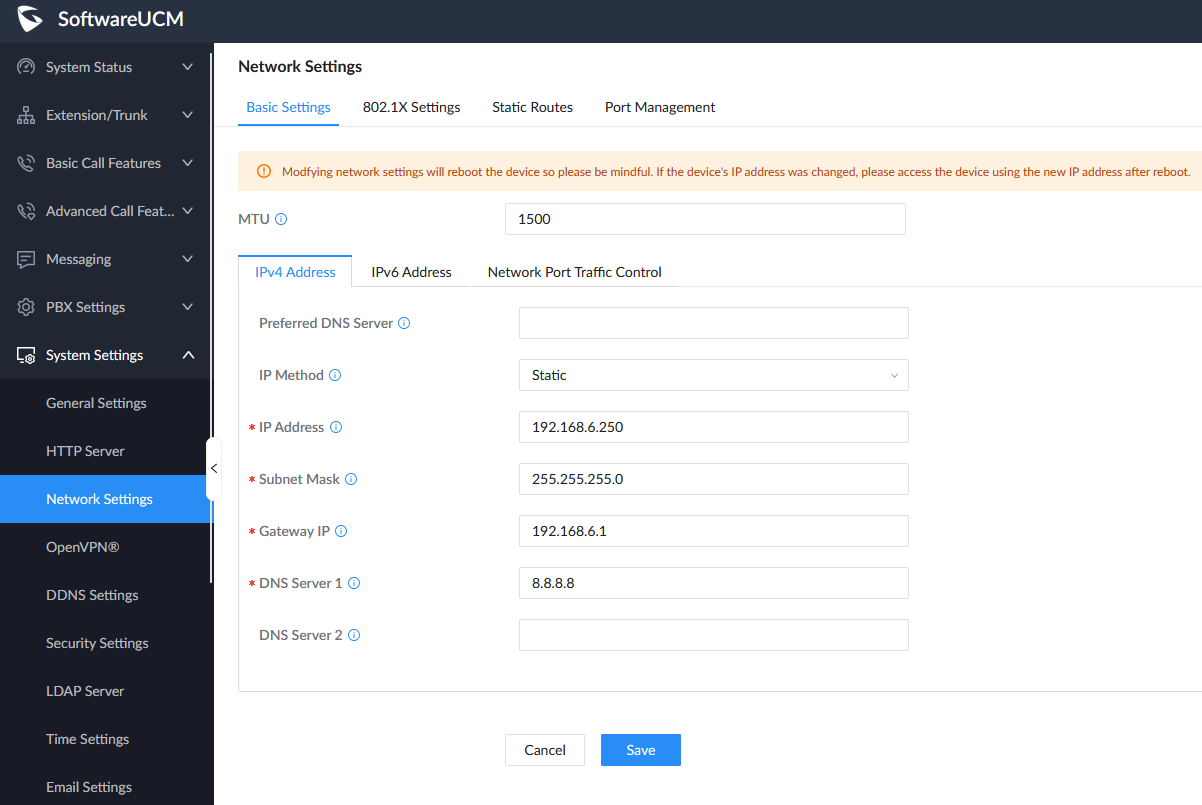
The SoftwareUCM must be configured with a static IP before enabling the remote disaster recovery feature. Please log in to the SoftwareUCM webUI as admin and go to System Settings->Network Settings->Basic Settings->IPv4 Address to configure a static IP for the SoftwareUCM.
2. In the LAN network, deploy a DNS server and use SRV. The DNS server should return the IP addresses of the 2 SoftwareUCM servers as primary and secondary SoftwareUCM. Please note that the primary SoftwareUCM’s IP address should have higher priority in the SRV response.
3. The network port on SoftwareUCM used for HA heartbeat must be in a different subnet from the one used for PBX service on the SoftwareUCM. The network admin should plan to assign the IP addresses in different subnets. For example, in the local network, assign two subnets, one for the SoftwareUCM’s service port, one for the SoftwareUCM’s heartbeat port.
4. Additionally, if the two locations have a firewall or routers between their network, i.e., the SoftwareUCM servers in the two locations do not have a direct Internet connection, the network admin will need to configure firewall rules or forwarding rules, such as port forwarding, so that the communications for heartbeat and traffic between the two SoftwareUCM servers can go through. Different networks may have different configurations depending on the network devices and infrastructures. Please refer to an example in section [Deployment example].
Below are the ports that need to be forwarded/opened in both routers/firewalls, in the case where the SoftwareUCM servers are behind the routers.
Port Number | Protocol | Description |
9527 | UDP | Heartbeat port |
273 | TCP | File sync port |
3610 | TCP | Data sync port |
8989 | TCP | Data sync port |
9292 | TCP | Data sync port |
8796 | TCP | Data sync port |
4433 | TCP | TLS handshake port |
Storage Device Requirements
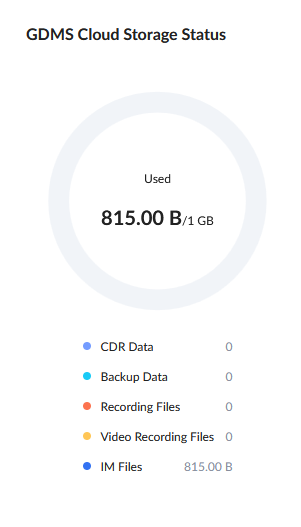
Before enabling HA remote disaster recovery, please ensure that both SoftwareUCM servers use the same type of external storage devices with identical storage capacity. For example, if SoftwareUCM A uses a USB flash drive for storage, SoftwareUCM B must also use a USB flash drive with the same storage size.
Note that SD cards connected to the host machine through a USB adapter are treated as USB storage devices and should be considered accordingly during deployment.
This requirement is mandatory to ensure that the standby SoftwareUCM can store and synchronize data properly in the same manner as the active SoftwareUCM. If SoftwareUCM A uses GDMS cloud storage, SoftwareUCM B must also use GDMS cloud storage.
The storage path-related settings may initially differ between the two SoftwareUCM instances because, after HA is enabled, the active SoftwareUCM will automatically synchronize its configuration to the standby SoftwareUCM.
Step-by-step Configuration
Scenario 1: For two new SoftwareUCM servers, or for two SoftwareUCM servers currently providing service
Here are the configuration steps:
- Check your SoftwareUCM servers and network to make sure they meet the prerequisites requirements and are ready.
- SoftwareUCM servers are using the same model and the same firmware version.
- Grandstream end devices are registered to SoftwareUCM.
- Network configurations: ensure both SoftwareUCM servers are using static IP.
- Both SoftwareUCM servers are using the same storage device(s)
- Choose one of the SoftwareUCM to be the primary SoftwareUCM (SoftwareUCM A) and the initial role for this SoftwareUCM is “active”.
- If both SoftwareUCM servers are new devices, any one of them can be used as SoftwareUCM A.
- If one of the SoftwareUCM is already deployed and providing PBX service, please use this SoftwareUCM as SoftwareUCM A.
- If Cloud IM service is used, please enable Cloud IM on SoftwareUCM A and ensure Cloud IM is turned off on SoftwareUCM B.
- On SoftwareUCM A, configure HA-related settings under SoftwareUCM web UI->System Settings->HA->HA Settings.
- Highly Available Enable: Yes
- HA Mode: Remote Disaster Recovery
- Remote Disaster Station Type: Primary
- Please refer to table [HA CONFIGURATION PARAMETERS FOR REMOTE DISASTER RECOVERY] for all configuration parameter information.
- Save and apply the settings. A reboot is required for the changes to take effect.
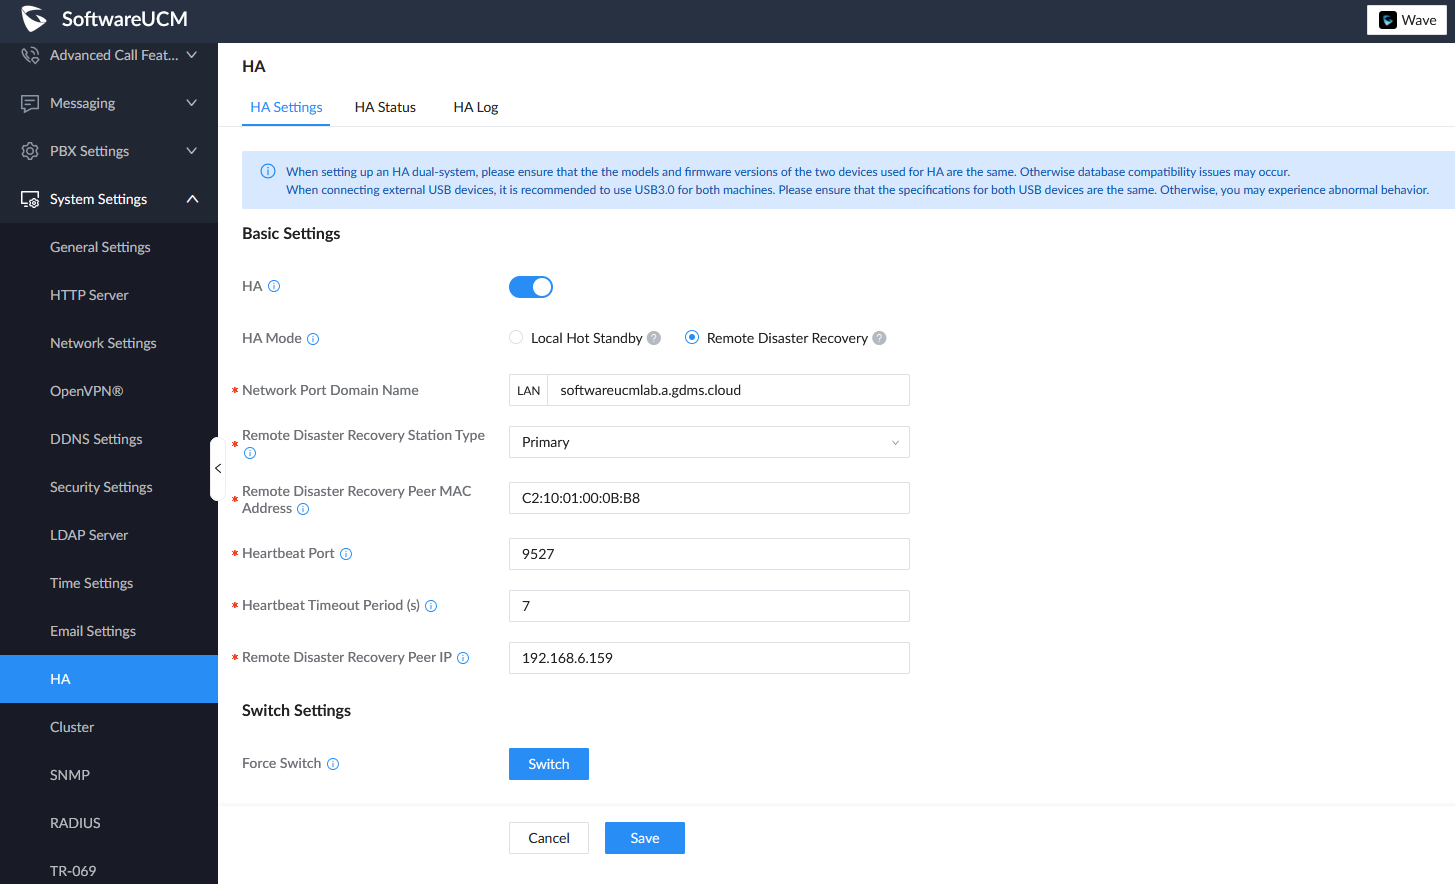
- After configuration is completed on SoftwareUCM A and SoftwareUCM A reboots, please verify the HA status by logging in to SoftwareUCM A’s web UI via its IP address with the admin’s credentials. Go to SoftwareUCM web UI->System Settings->HA->HA Status, it should show HA enabled, and HA status should show as “Active”.
- After verifying SoftwareUCM A’s configuration and status, you can now configure HA for SoftwareUCM B. Log in to SoftwareUCM B’s web UI and go to System Settings->HA->HA Settings. On SoftwareUCM B:
- High Availability Enable: Yes
- HA mode: Remote Disaster Recovery
- Remote Disaster Station Type: Secondary
- Please refer to table [HA CONFIGURATION PARAMETERS FOR REMOTE DISASTER RECOVERY] for the configurations for all configurations.
- Save and apply the settings. A reboot is required for the changes to take effect. Please note it will take longer for SoftwareUCM B to fully boot up because SoftwareUCM B will automatically perform a full backup during the bootup process.
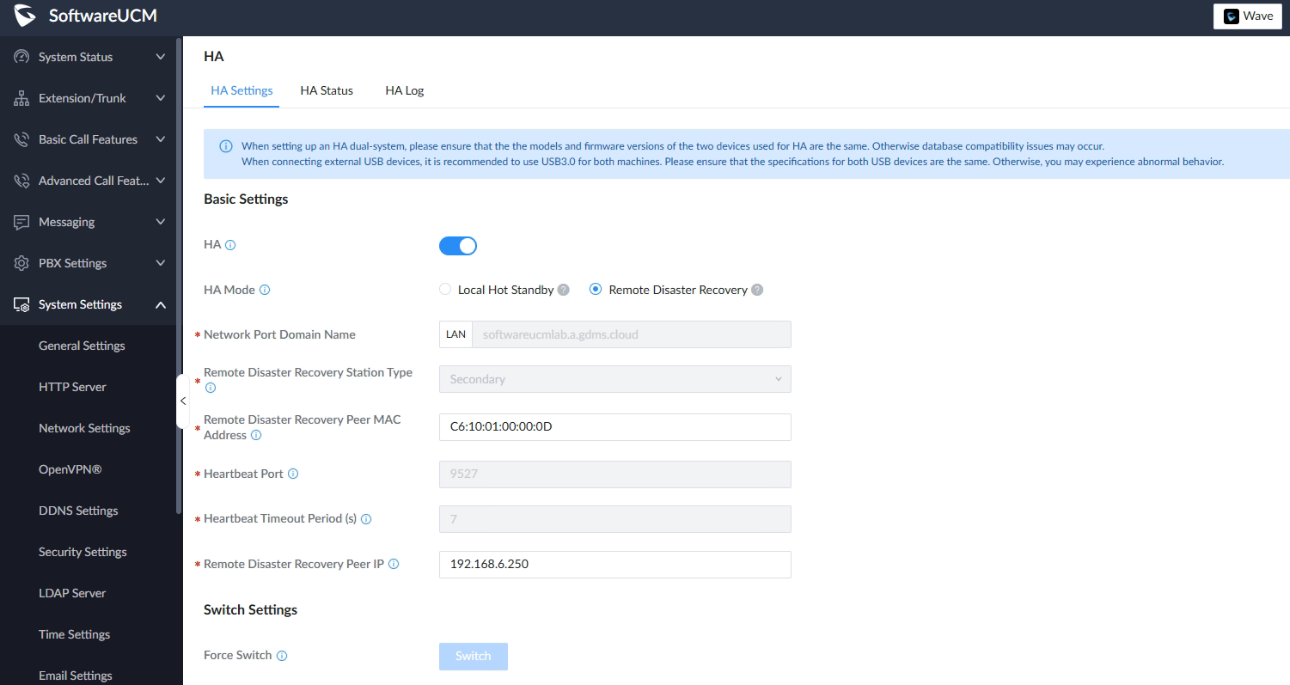
After SoftwareUCM B boots up, please verify the HA status on SoftwareUCM B by logging in to SoftwareUCM B’s web UI via its IP address with SoftwareUCM A’s admin credentials. Go to SoftwareUCM web UI->System Settings->HA->HA Settings, it should show HA enabled with the Force Switch “Switch” button in grey (unavailable). Only HA heartbeat-related settings, peer heartbeat IP, and MAC address configurations are available for configuration. Click on the HA status tab, it shows SoftwareUCM B’s role as “Standby”, and the HA status should show as “Active”.
HA Configuration Parameters For Remote Disaster Recovery
Please configure HA parameters and deploy HA when the SoftwareUCM is not in service period to avoid service interruption.
Parameter | Description | Value Range | Default Value | Note |
HA | Enable or disable HA function | Yes/No | No | |
HA Mode | Configure HA mode. “Local Hot Standby”: Deploy HA in the same location which provides redundancy and recovery in case the primary SoftwareUCM has hardware issues. “Remote Disaster Recovery”: Deploy two SoftwareUCMs in different locations to prevent service interruption in case of large-scale disaster at the primary SoftwareUCM site. | Local Hot Standby Or Remote Disaster Recovery | Local Hot Standby | For “Local Hot Standby”, SoftwareUCM must use network mode “Switch” or “Router” and use static IP address. For “Remote Disaster Recovery”, SoftwareUCM must be configured with static IP. Grandstream end devices are fully supported with SoftwareUCM HA remote disaster recovery feature for failover. |
Network Port Domain | | A valid domain name | This domain name is used for remote disaster recovery scenario only. | |
Remote Disaster Recovery Station Type | This configures the SoftwareUCM’s station type. In HA deployment, one SoftwareUCM should be primary type and the other SoftwareUCM should be secondary. The station type is always fixed for the SoftwareUCM and does not change when the SoftwareUCM’s role changes between active and standby. In HA deployment, primary SoftwareUCM is more likely to be the active role. Therefore, in the initial HA configuration, please configure the SoftwareUCM currently providing PBX service to be the primary station, and configure the backup SoftwareUCM to be secondary. | Primary/ Secondary | N/A | The purpose to define station type is to ensure there is always only one active SoftwareUCM providing service and avoiding having two active SoftwareUCMs at the same time. The active/standby roles are negotiated between the two SoftwareUCMs during heartbeat. Please note, active SoftwareUCM is the SoftwareUCM providing PBX service at the moment, standby SoftwareUCM is the backup SoftwareUCM. Station type “primary” doesn’t mean the SoftwareUCM’s role is active , “secondary” doesn’t mean the SoftwareUCM’s role is standby. The “active” and “standby” roles can be changed between the two SoftwareUCMs. But station type is always fixed for each SoftwareUCM, no matter which role it is. |
Remote Disaster Recovery Peer MAC Address | Peer SoftwareUCM’s MAC address | N/A | N/S | This is the MAC address for the SoftwareUCM in the remote location to pair with the current SoftwareUCM for HA remote disaster recovery deployment. |
Heartbeat Port | The port used for heartbeat communications between the active and standby SoftwareUCM. | 0 to 65535 | 9527 | The heartbeat port is configurable but it’s suggested to keep the default value to avoid misconfiguration issues. Please note both SoftwareUCMs must use the exact same value. |
Heartbeat Timeout Period (s) | This is the timeout for heartbeat connection (in seconds) | 7 to 45 | 7 | When the standby SoftwareUCM detects heartbeat timeout from the active SoftwareUCM, failover will happen and the standby SoftwareUCM will become the primary SoftwareUCM. If the network condition is not ideal (jitter, packet loss, etc), it’s suggested to adjust the heartbeat timeout to a larger value such as 15 seconds or longer. |
Remote Disaster Recovery Peer IP | Enter the IP address of the peer SoftwareUCM device used for HA communication, including heartbeat monitoring, failover coordination, and data synchronization between the primary and secondary SoftwareUCM systems. The configured IP address must be reachable from the current SoftwareUCM deployment.
Note: In NAT deployment scenarios, the required HA communication ports must be properly forwarded from the peer site’s router to the local IP address of the peer SoftwareUCM device. When using the Dual Network Interface Card mode with two separate LANs, two Network Port Domain Names must be configured, with one domain name assigned to each LAN/network interface. | N/A | N/A | In this field, enter the local IP address of the peer standby SoftwareUCM device associated with the current SoftwareUCM instance. For example, if the current device is configured as the primary SoftwareUCM, this field should contain the local IP address of the secondary SoftwareUCM.
|
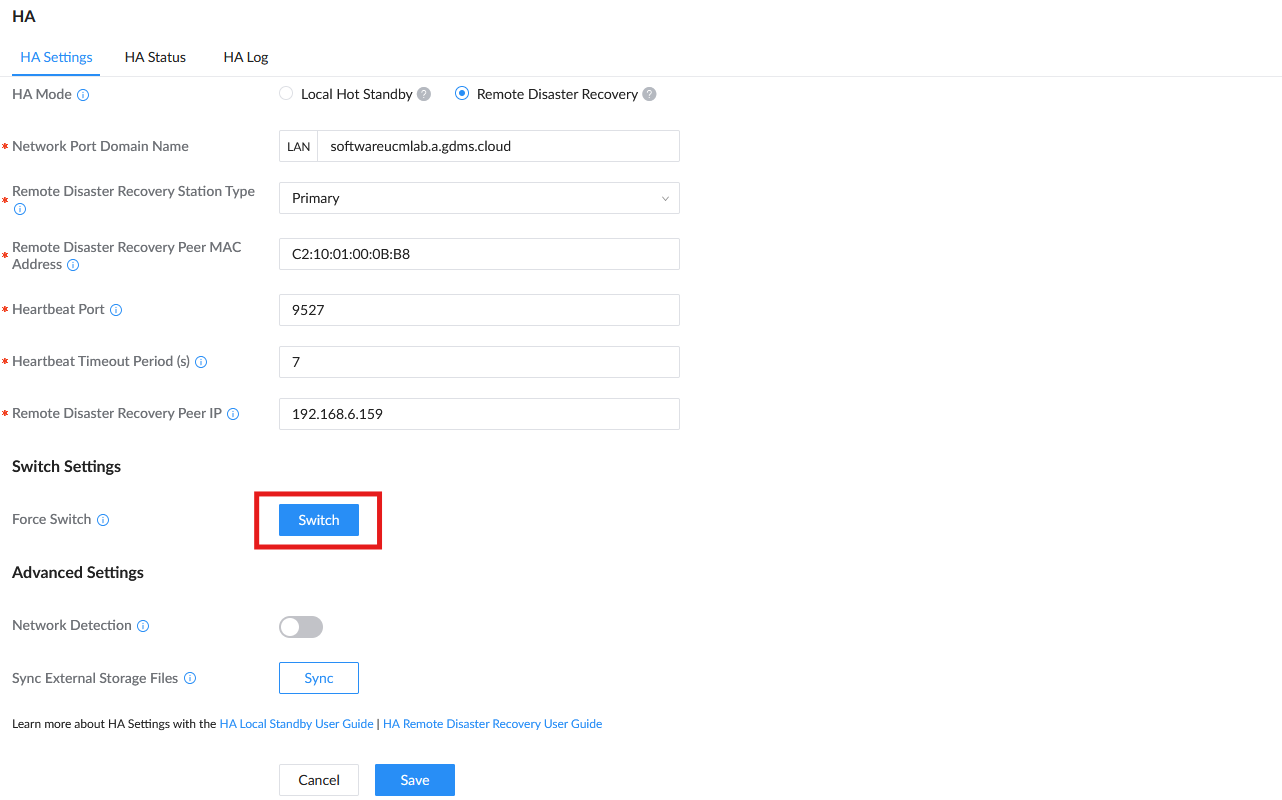
Force Switch | Force switch HA roles between “Active” and “Standby”. | N/A | N/A | This should be only used in special circumstances. It can be used during firmware upgrade. Please refer to section [Firmware upgrade] for details. Also, after failover happens, if the admin decides to manually switch back to the original primary SoftwareUCM at admin’s preferred time, this can be used. |
Network Detection | Monitor the network connection status of the devices. If an Active device detects a network disconnection from the network detection node, it will notify the Standby device to take over operations, ensuring reliable business continuity. | N/A | N/A | |
Network Detection Node 1/2 | Specify a reliable IP address to be used as the network detection node, such as the gateway address associated with the SoftwareUCM network interface. This node is used to monitor network connectivity and determine failover conditions. | N/A | N/A | In Dual NIC mode for Remote Disaster Recovery HA, two separate network detection nodes can be configured, one for each LAN interface. |
Scan External Storage Files | If the local SoftwareUCM’s file storage path is configured as SD card, USB flash drive or NAS, you can press the “Sync” button here to sync up all files and data from these external storage devices. | NA | NA | If the SoftwareUCM currently providing PBX service already has data, it’s suggested to sync external storage files during initial HA deployment. Files and data generated after HA deployment can be automatically synced up without manual operations. |
HA Parameters
After the above HA settings, click on the “save” button, and it will prompt users to reboot the SoftwareUCM. Follow the instructions to reboot the device.
HA Configuration With UCMRC
Scenario 2: For SoftwareUCM A and B, which are using UCMRC, besides the above configurations, additional plan configurations are required.
Please see the steps below:
- If Cloud IM service is used, please enable Cloud IM for SoftwareUCM A, and please ensure Cloud IM is disabled for SoftwareUCM B. When using Cloud IM (service provided by GDMS), please ensure that both SoftwareUCM servers have the UCMRC plan with Cloud IM.
- Make sure both SoftwareUCM servers have the same UCMRC plan with HA support. If SoftwareUCM A already has the UCMRC plan, then you just need to purchase the UCMRC plan for SoftwareUCM B. It’s OK if one of the SoftwareUCM has the UCMRC plan purchased later than the other one.
- Configure a custom server address for SoftwareUCM A, which has a station type “Primary”, and use the custom server address. See the section below for details. If SoftwareUCM A already has a custom server address, then this step can be skipped.
UCMRC Plan For HA
For the UCMRC plan to work normally when the SoftwareUCM servers use HA, it is required to purchase the same UCMRC plan with HA ability via GDMS. Each SoftwareUCM needs its own plan purchased and delivered.
Here are the steps:
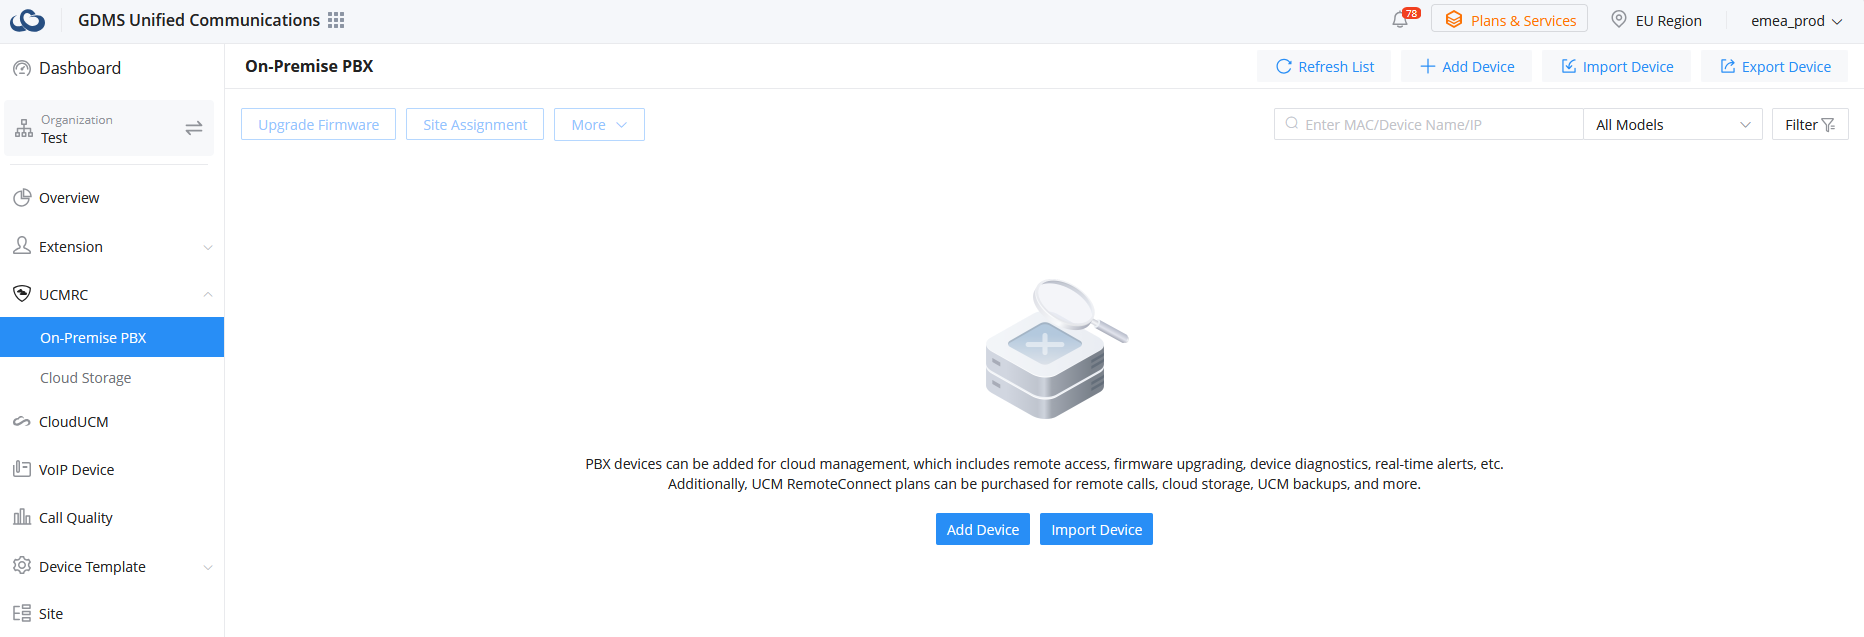
1. Log in to GDMS and make sure you are on the “UCMRC System” view. Go to the page “UCMRC Device”, click “Add Device”, and enter the device information.
Custom Server Address Configuration
For the two SoftwareUCM servers already having a UCMRC plan with HA support, please configure a custom server address for the primary SoftwareUCM and ensure this SoftwareUCM uses this custom address.
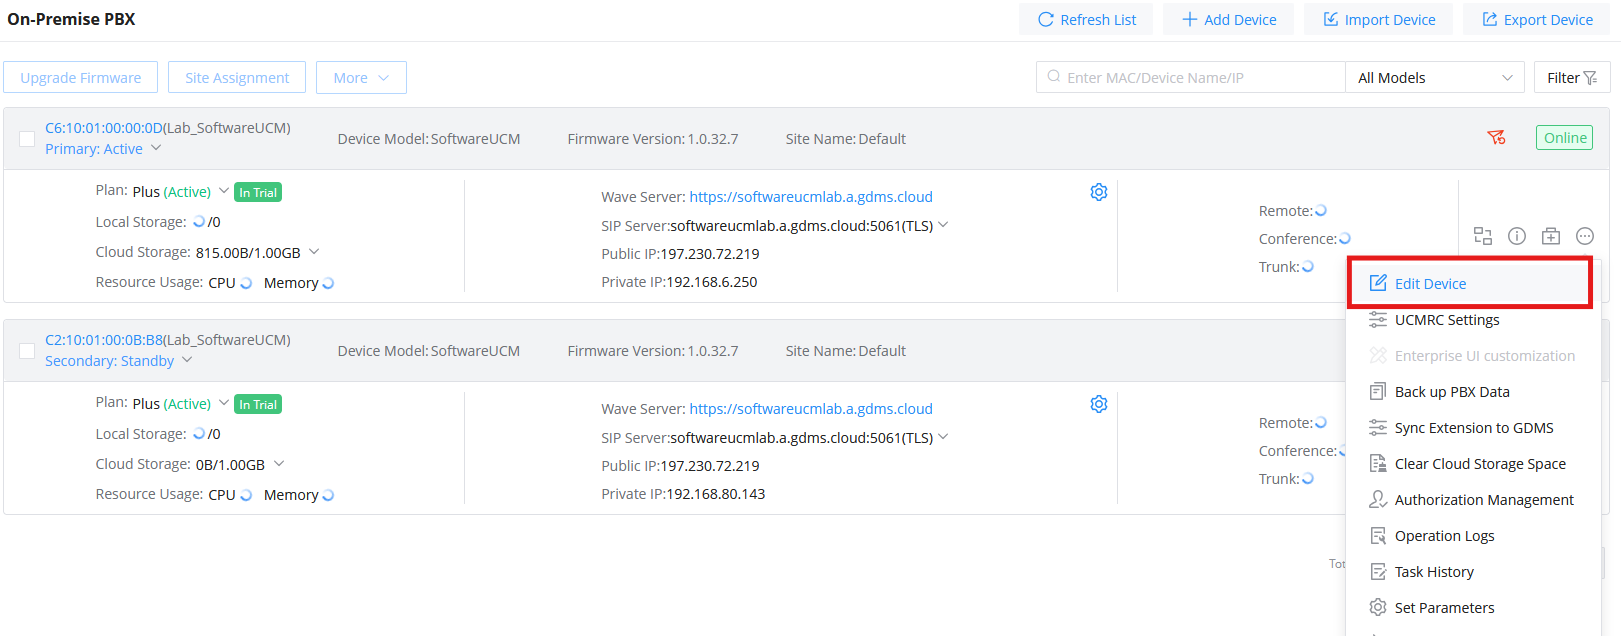
The custom server address must be configured on GDMS. Please log in to GDMS first. On the UCMRC System view, go to SoftwareUCM Device page->select options for the SoftwareUCM->select “Edit Device”.
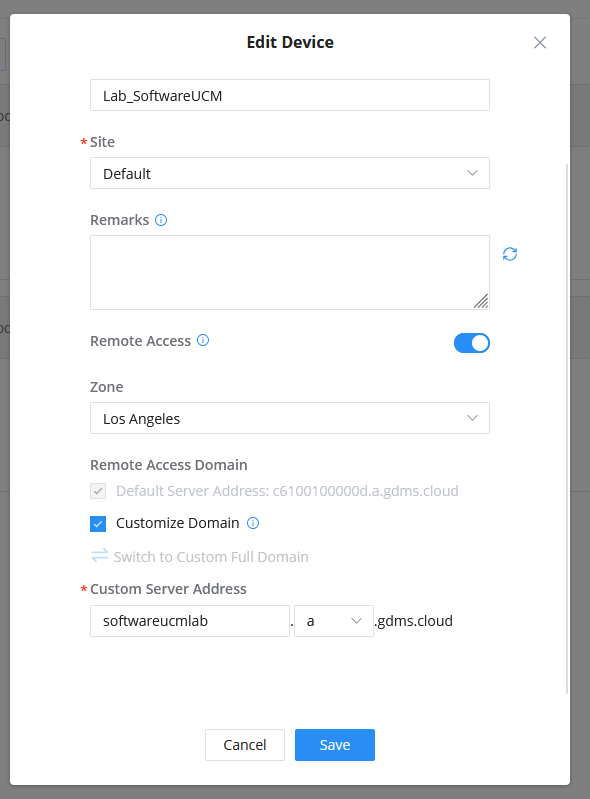
Please notify SoftwareUCM users of the new server address so they can use it to register in Wave. or access the administration portal for allowed administrators.
For more details on how to configure a custom server address, please refer to the GDMS user guide.
Verify HA Status
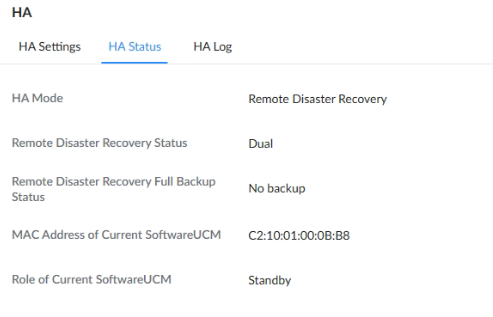
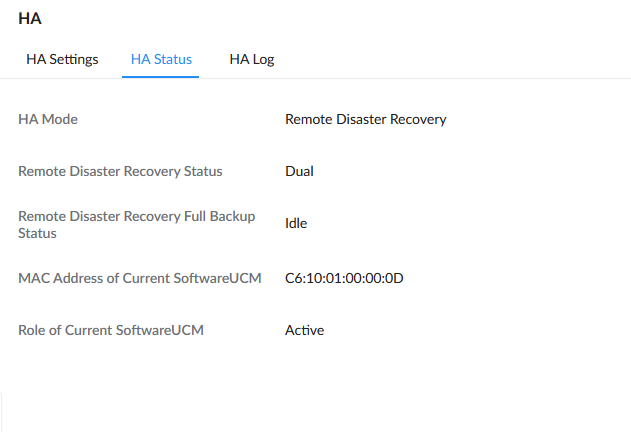
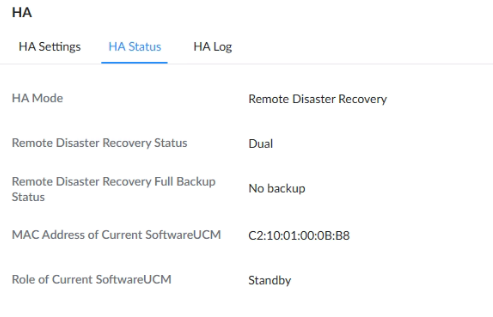
1. After configuring HA on both SoftwareUCM servers, please use each SoftwareUCM’s IP address to open SoftwareUCM’s webUI and log in using the active SoftwareUCM’s login credentials. Check the HA status under WebUI->System Settings->HA->HA Status page. Normally, it shows the Remote Disaster Recovery status as HA, and the roles as Active or Standby.
For the Remote Disaster Recovery Full Backup Status, it shows a backup if the device is currently performing a backup. Otherwise, it shows “No backup”.
2. Log in to the web UI of the active SoftwareUCM and create an extension. Then log in to the web UI of the standby SoftwareUCM to check the extension page. You should be able to see the same extension created on the standby SoftwareUCM automatically. This indicates the standby SoftwareUCM has synced up from the active SoftwareUCM, and the HA configuration is successful.
ROLE CHANGE BETWEEN ACTIVE SoftwareUCM AND STANDBY SoftwareUCM
The remote disaster recovery feature supports automatic role change upon failover, and the service will be taken over. Once the primary SoftwareUCM recovers, the admin must manually switch the service back to the primary SoftwareUCM when the SoftwareUCM is idle. Unless the secondary SoftwareUCM experiences failure, there is no automatic fallback to primary SoftwareUCM after the primary SoftwareUCM is recovered. The admin can find a time when service is not required to perform a switchover so that it doesn’t affect normal operation and service.
Automatic Failure Detection and Switchover
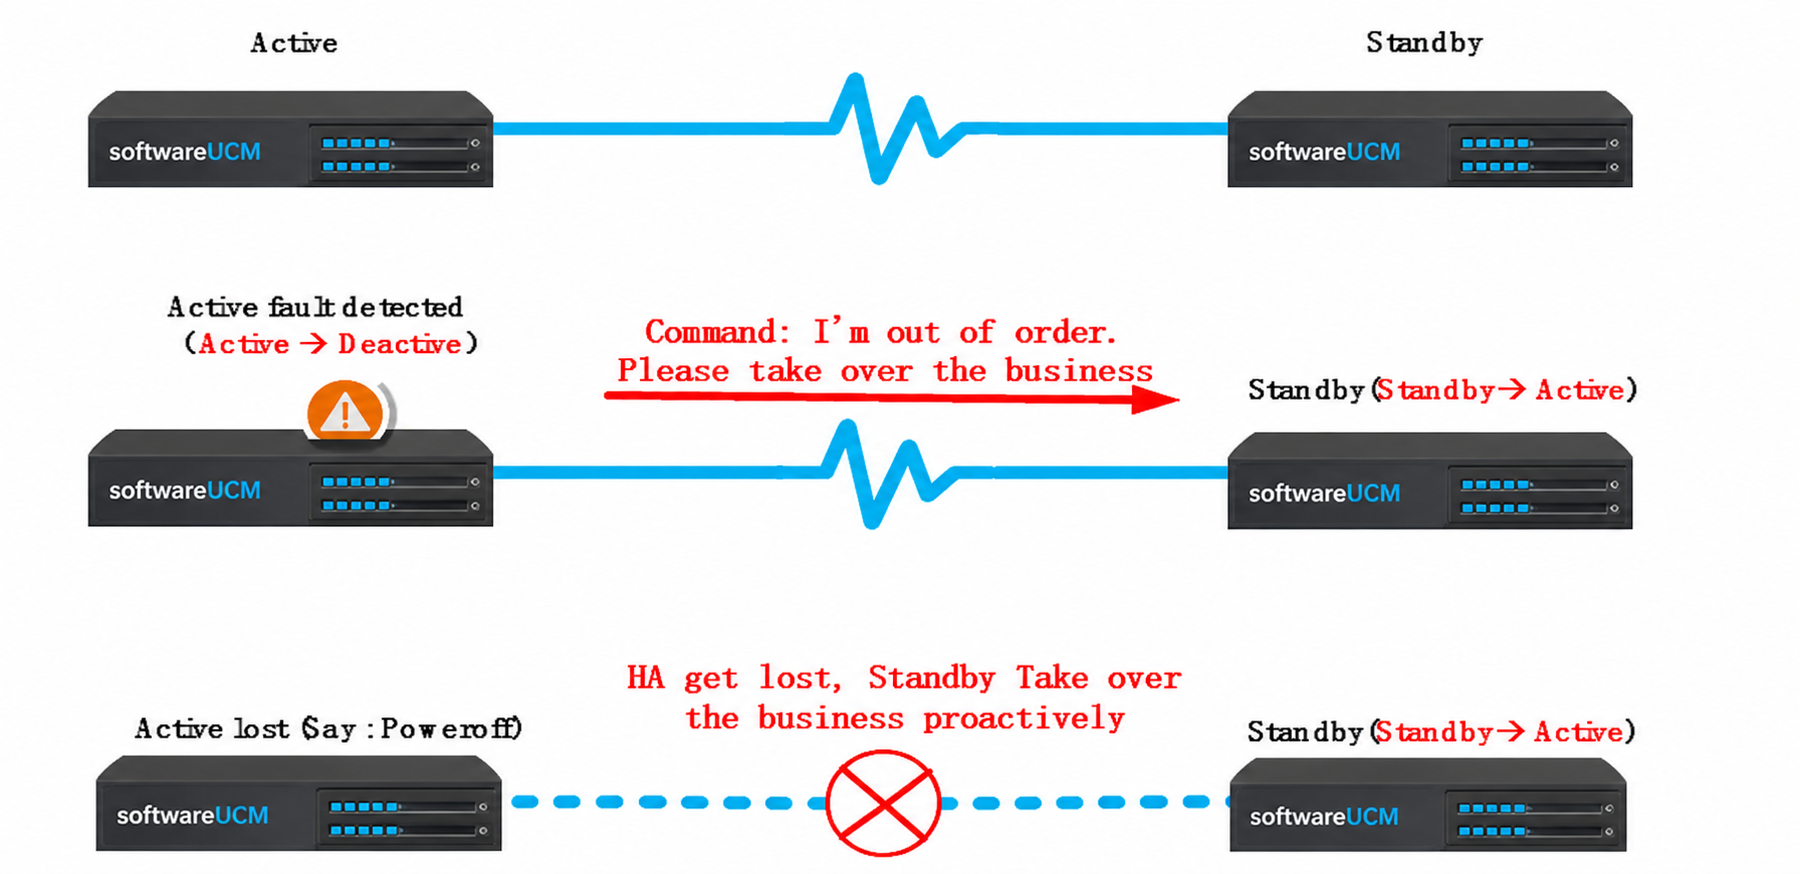
Active SoftwareUCM Auto Detection
With HA enabled and configured, if the active SoftwareUCM detects a disconnection on the network port for PBX service, it will trigger switchover, and the peer SoftwareUCM will take over PBX service.
Standby SoftwareUCM Heartbeat Detection
In HA deployment, the standby SoftwareUCM will check the active SoftwareUCM’s status periodically. Standby SoftwareUCM sends a heartbeat message to active SoftwareUCM and communicates the status via the heartbeat message. Normally, the active SoftwareUCM will respond to the standby SoftwareUCM via the heartbeat port. Once the active SoftwareUCM has failed or if the site encounters unexpected events causing a power or network outage, the active SoftwareUCM is unable to respond to the standby SoftwareUCM with a heartbeat message. After the heartbeat timeout, the standby SoftwareUCM will consider the active SoftwareUCM in a faulty state and start taking over.
The length of the period for the standby SoftwareUCM to detect and take over the service depends on the configuration of the heartbeat timeout on the SoftwareUCM. By default, it’s set to 7 seconds. Admin can adjust it as needed for different sensitivities. If there is network jitter, delay, or packet loss between SoftwareUCM A and SoftwareUCM B, the heartbeat timeout can be configured to a larger value, such as 30 seconds.
Manual Switchover
The admin can log in to the active SoftwareUCM’s web UI and click on the “Switch” button on the HA page to manually switch the active role to the other SoftwareUCM. Here are a few scenarios where manual switchover can be used:
Scenario 1:
Firmware upgrade. Please refer to section [Firmware upgrade] for more details.
Scenario 2:
Active SoftwareUCM has a problem switching over automatically.
Scenario 3:
After failover, the primary SoftwareUCM recovers, and the admin can manually switch over the active role back to the primary SoftwareUCM again. After switching back the roles, the users can check CDR, recording files, scheduled meetings, and chat history incurred on the primary SoftwareUCM during the period that the secondary SoftwareUCM provides PBX service.
FIRMWARE UPGRADE
To avoid service interruption, please follow the instructions to upgrade firmware for both SoftwareUCM servers in the HA deployment.
- Log in to the standby SoftwareUCM’s web UI (SoftwareUCM B). Upload firmware to the SoftwareUCM web UI and complete the upgrade on the standby SoftwareUCM first.
- After the standby SoftwareUCM boots up from a firmware upgrade, log in to the web UI of the current active SoftwareUCM, which is the primary SoftwareUCM (SoftwareUCM A). On SoftwareUCM A’s web UI HA page, the switch button for “Force Switch” will be available. Click to force switch the roles manually. This will make SoftwareUCM B become the active role and make SoftwareUCM A become the standby role.
- On SoftwareUCM A, log in to the web UI to upload firmware and perform a firmware upgrade. Once SoftwareUCM A boots up from a firmware upgrade, it will request a full backup by syncing up from SoftwareUCM B. Wait for the full backup to complete.
- After the full backup is completed and while both SoftwareUCM servers are in HA mode, log in to the secondary SoftwareUCM (SoftwareUCM B)’s web UI and click on the switch button for “Force Switch”. This will make SoftwareUCM B (secondary) change back to the standby role, and SoftwareUCM A (primary) will become the active SoftwareUCM again as the initial state. The secondary SoftwareUCM (SoftwareUCM A) will reboot. After bootup, both SoftwareUCM servers are back to the initial role.
This upgrading process ensures the primary SoftwareUCM remains the active role after upgrading, and the secondary SoftwareUCM remains the standby role.
REPLACE DEFECTIVE SoftwareUCM Product
SoftwareUCM With HA And UCMRC Plan
This scenario assumes SoftwareUCM A and SoftwareUCM B in the HA deployment already have their individual UCMRC plan that supports HA. If SoftwareUCM B is defective and needs replacement by SoftwareUCM C, please follow the steps below.
Scenario 1:
SoftwareUCM A is the primary SoftwareUCM (Active). SoftwareUCM B is the secondary SoftwareUCM (Standby). SoftwareUCM B becomes defective and needs to be replaced by SoftwareUCM C.
- Contact technical support to assist in replacing the device, and follow the RMA process to apply for a license for the new device C for HA.
- The requirements need to be clearly defined: device replacement in an HA scenario, clarify the role information of the old device B, and provide the device information of device B: for physical machines, this is the device information file + MAC address, and for virtual machines, this is the existing MAC address.
- After activating C’s license, add device C to GDMS and purchase a UCMRC package with HA permissions for device C that is the same as that for A and B.
- The administrator deletes device B from the host console.
- Modify the HA parameters of device A, change the peer MAC address from B to the MAC address and IP address of device C, save and restart.
- After a restart, confirm that A is in an Active state. Ensure necessary hardware connections on C are ready.
- After C starts up, perform basic network settings. The network settings parameters are the same as those for B. Note that C must be configured with the same site type and static IP address as B.
- Check the storage devices connected to device C to ensure that the types and quantities of storage devices connected to both devices are consistent.
- Check if Cloud IM is enabled on device C. If it is enabled, disable Cloud IM on C to ensure that C replaces B without Cloud IM service.
- Start C and configure the HA parameters. All configuration parameters are the same as those in B. Save and restart after configuration.
- After C restarts, the HA status is checked, and it shows that all devices are in HA status, with A being the Active role and C being the Standby role.
Scenario 2:
SoftwareUCM A is the secondary SoftwareUCM (Active). SoftwareUCM B is the primary SoftwareUCM (Standby). SoftwareUCM B becomes defective and needs to be replaced by SoftwareUCM C.
- Delete the custom server address or domain name of device B using GDMS.
- Contact technical support to assist in replacing the device, and follow the RMA process to apply for a license for the new device C for HA.
- The requirements need to be clearly defined: device replacement in an HA scenario, clarify the role information of the old device B, and provide the device information of device B: for physical machines, this is the device information file + MAC address, and for virtual machines, this is the existing MAC address.
- After activating C’s license, add device C to GDMS and purchase the same UCMRC package with HA permissions for device C as for A and B. Configure C’s custom server address or domain name through GDMS, ensuring it is the same as B’s previous custom domain name and that C uses it.
- The administrator deletes device B from the host console.
- Modify the HA parameters of device A, change the peer MAC address from B to the MAC address of device C, save and restart.
- After A restarts, confirm that A is in an Active state. Ensure necessary hardware connections on C are ready.
- After C starts up, perform basic network settings. The network settings parameters are the same as those for B. Note that C must be configured with the same site type and static IP address as B.
- Check the storage devices connected to device C to ensure that the types and quantities of storage devices connected to both devices are consistent.
- Check if Cloud IM is enabled on device C. If it is enabled, disable Cloud IM on C to ensure that C replaces B without Cloud IM service.
- Enable and configure HA parameters for C, the same as for B, with the site type device set to Primary. Save and restart after configuration.
- After C restarts, the HA status is checked, and it shows that all devices are in HA status, with A being the Active role and C being the Standby role.
- Once the dual-machine status of A as Active and C as Standby has been correctly established, wait for the full backup process to complete.
- The administrator then performs a manual switchover operation, transferring the Active role to the Primary site, while the Secondary site itself is downgraded to a disaster recovery standby state.
SoftwareUCM With HA And No UCMRC Plan
When two SoftwareUCMs that do not use UCMRC form an HA dual-machine system, and one of the devices fails and needs to be replaced, follow these steps.
Assuming SoftwareUCM A is the active role and SoftwareUCM B is the standby role, regardless of the site type:
- The administrator deletes device B from the host console.
- Modify the HA parameters of device A, change the peer MAC address from B to the MAC address of device C, save and restart.
- After A restarts, confirm that A is in an Active state.
- Contact technical support to assist in replacing the device. Follow the RMA process to apply for a license for the new device C in the HA scenario.
- The requirements need to be clearly defined: device replacement in an HA scenario, clarify the role information of the old device B, and provide the device information for B: for physical machines, this is the device information file + MAC address, and for virtual machines, this is the existing MAC address.
- After activating C’s license, configure the basic network settings, making sure all network settings are the same as for B. Note that C must be configured with the same site type and static IP address as B.
- Check the storage devices connected to device C to ensure that the types and quantities of storage devices connected to both devices are consistent.
- Check if Cloud IM is enabled on device C. If it is enabled, disable Cloud IM on C to ensure that C replaces B without Cloud IM service.
- Enable and configure HA parameters in C, the same as in B. Save and restart after configuration.
- After C restarts, the HA status is checked, and it shows that all devices are in HA status, with A being the Active role and C being the Standby role.
- Wait for the full backup to finish between SoftwareUCM A and SoftwareUCM C.
- If SoftwareUCM A is the active SoftwareUCM and the station type is secondary, log in to SoftwareUCM A’s web UI and go to the HA settings page. Find the option “Force Switch” and click the “Switch” button so the primary SoftwareUCM (SoftwareUCM C) can be changed to an active role. SoftwareUCM A (the secondary SoftwareUCM) will then be changed back to the standby role.
- If SoftwareUCM A’s station type is already primary, then no action is needed.
Additional Precautions and General Licensing Information
- Heartbeat Settings: The heartbeat interval can be adjusted as needed. If the network connection between the Primary and Secondary SoftwareUCM instances is not consistently stable, a longer heartbeat interval can be configured to improve tolerance to network fluctuations.
- License Structure: SoftwareUCM HA requires a dedicated license for the Secondary node. The HA Secondary license uses a separate license file, which is marked as HA Secondary and is bound to the MAC address of the corresponding Secondary machine.
- Pricing: The SoftwareUCM license package includes an HA Secondary add-on. When placing an order, select this add-on to obtain the Secondary license at a reduced cost compared to a standard license (for example, approximately 30% lower).
- Configuration Constraints: A SoftwareUCM instance using an HA Secondary license can only be paired with its corresponding Primary SoftwareUCM instance for High Availability deployment. If HA is not configured between the designated Primary and Secondary systems, extensions created on the Secondary system will not function independently and cannot be used for normal operations.
DISABLE HA FROM SOFTWAREUCM
To disable HA from the SoftwareUCM, please log in to the web UI of the active SoftwareUCM’s IP. Go to System Settings->HA->HA settings, uncheck the option “High Availability Enable”. Save and apply the change, then reboot the SoftwareUCM. After bootup, check the HA status from each SoftwareUCM.
After disabling HA, since the server address may be changed, the end devices registering to the SoftwareUCM need to update to the new address.
HA FOR SoftwareUCM WITH CLOUD IM
Please ensure only one Cloud IM service plan is used for the two SoftwareUCM servers in the HA deployment. When using the server address from GDMS, please ensure both SoftwareUCM servers have the UCMRC plan with Cloud IM.
When the active SoftwareUCM A enables Cloud IM, the standby SoftwareUCM B will obtain the Cloud IM service from the data sync in HA. Cloud IM always provides service with the active SoftwareUCM, and the associated MAC address with Cloud IM can change if the active SoftwareUCM device changes between the two SoftwareUCM servers.
When SoftwareUCM B becomes defective and requires replacement by a new SoftwareUCM C, which does not have Cloud IM enabled, once SoftwareUCM C is set up in HA, Cloud IM automatically works without additional configurations. If SoftwareUCM C has Cloud IM enabled before HA configurations, please ensure to disable it before replacing SoftwareUCM B.
HA DEPLOYMENT WITH UCMRC PLAN
After purchasing the UCMRC plan with HA support and setting up HA on GDMS, the SoftwareUCM device will be displayed as Primary (Host) and Secondary (Spare).
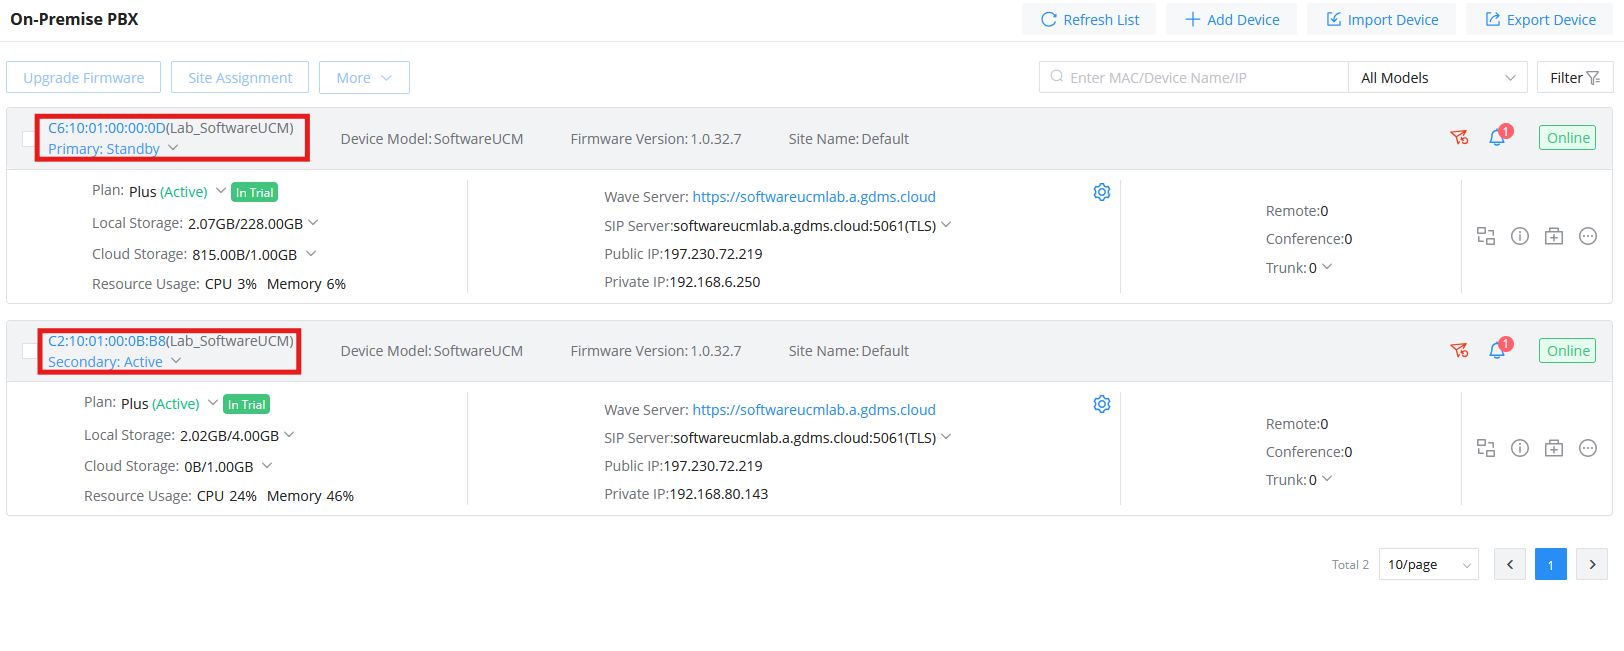
ROLE CHANGE PROCESS
Prerequisite:
- Both SoftwareUCM must have a UCMRC plan with HA ability, and the plans for each SoftwareUCM must have the same specifications.
- The UCMRC plan is delivered to the SoftwareUCM successfully for each SoftwareUCM.
The call service is provided by the active SoftwareUCM with GDMS. If the active SoftwareUCM A has a failure that triggers the failover switch, the standby SoftwareUCM B will take over and become the active SoftwareUCM. SoftwareUCM B sends the switchover command to GDMS, notifying that it will take over the call service with GDMS from now on.
ROLE STATUS WITH UCMRC
If both SoftwareUCM servers have a UCMRC plan with HA ability, the role status on each SoftwareUCM is reported to GDMS by the SoftwareUCM automatically. Admin does not need to manually assign a role for the SoftwareUCM servers on GDMS.
On GDMS, the admin can remotely access each SoftwareUCM and operate on it. However, certain configurations on the standby SoftwareUCM can be overridden due to HA backup. Active SoftwareUCM will be the one always providing PBX service, but GDMS always provides the Wave login address based on the primary SoftwareUCM.
SERVICE STATUS AND LOGIN
Active/Standby Status
After HA configurations on both SoftwareUCM servers, upon system bootup, the standby SoftwareUCM will request a full backup from the active SoftwareUCM.
The standby SoftwareUCM is always prepared to take over from the active SoftwareUCM. The configuration changes allowed on the standby SoftwareUCM are limited because the standby SoftwareUCM syncs up the data from the active SoftwareUCM in real-time. The standby SoftwareUCM monitors the active SoftwareUCM’s status so that it can take over quickly when the active SoftwareUCM fails. This provides uninterrupted call service while the admin can work on recovering the faulty SoftwareUCM.
Admin Login
Admin can use the SoftwareUCM’s local IP address to log in to the SoftwareUCM web UI. After HA is set up, the active SoftwareUCM’s admin login information is synced up to the standby SoftwareUCM and overrides the standby SoftwareUCM’s own admin login. Therefore, the active SoftwareUCM’s admin login is always used for both SoftwareUCM servers in HA.
Wave Login
HA setup affects Wave login methods.
1. Wave login from local network:
https://SoftwareUCM IP/gswave/#
SoftwareUCM IP is the primary or secondary SoftwareUCM IP. (Currently, Wave doesn’t support automatic switchover after HA failover.
2. Wave login from a remote network:
On Wave, use the custom domain address for the primary SoftwareUCM provided by GDMS.
Currently, only Wave clients registered from a remote network can switch over automatically after HA failover. For Wave clients in the local network, users must manually change the server address to register to the active SoftwareUCM after HA switchover.
End Device Registration
- Register on phones in the local network:
- Method 1: Register using the local domain name, which is configured on the SoftwareUCM HA settings->Network port domain name.
- Method 2: If phones support Secondary SIP Server, you can configure Secondary SIP Server with the Secondary SoftwareUCM IP.
- For both methods, it’s recommended to enable keep-alive so the phones can detect SoftwareUCM status via OPTIONS and trigger new registration if needed.
- Register on phones from a remote network:
On the phone, enter the custom domain address for the primary SoftwareUCM provided by GDMS as the SIP server for registration.
DATA SYNC
HA deployment provides a data sync mechanism with the following features:
- Full backup and data sync are performed during system bootup. The standby SoftwareUCM requests a full backup from the active SoftwareUCM when it boots up. Also, whenever the active SoftwareUCM has configuration changes, it will sync up the configuration change to the standby SoftwareUCM to ensure both SoftwareUCM always have the same configurations. Besides configuration changes, data sync is also triggered by adding extensions, changes in voicemail, CDR, and recordings stored locally and on external storage devices.
- At 3 am every day, a full backup is performed automatically to sync up data. The SoftwareUCM web UI HA status page can display “Remote Disaster Recovery Full Backup Status” in real time.
RESTORE BACKUP
To restore a backup file to SoftwareUCM, the admin just needs to import it to the active SoftwareUCM. After importing and restoring it to the active SoftwareUCM, both SoftwareUCM servers will reboot automatically. After reboot, the active SoftwareUCM will provide its full backup to the standby SoftwareUCM, so the standby SoftwareUCM will sync up the data from the backup file.
MAINTENANCE INTERFACE ON SoftwareUCM WEBUI
After HA deployment, the admin can check HA-related alerts under SoftwareUCM web UI->Maintenance->System Events. According to the time of alert events, the admin can further check logs to find out the cause of failure and failover.
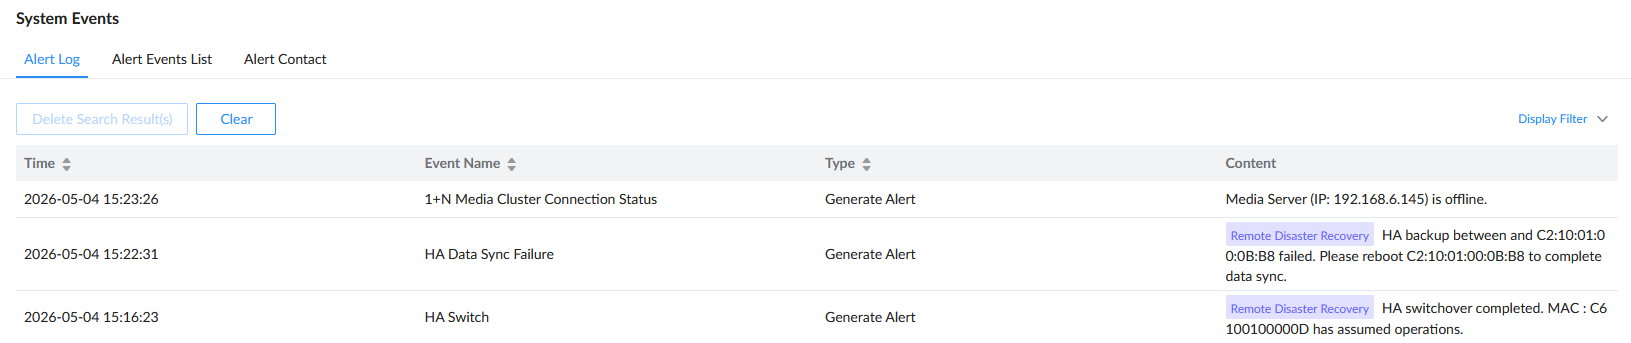
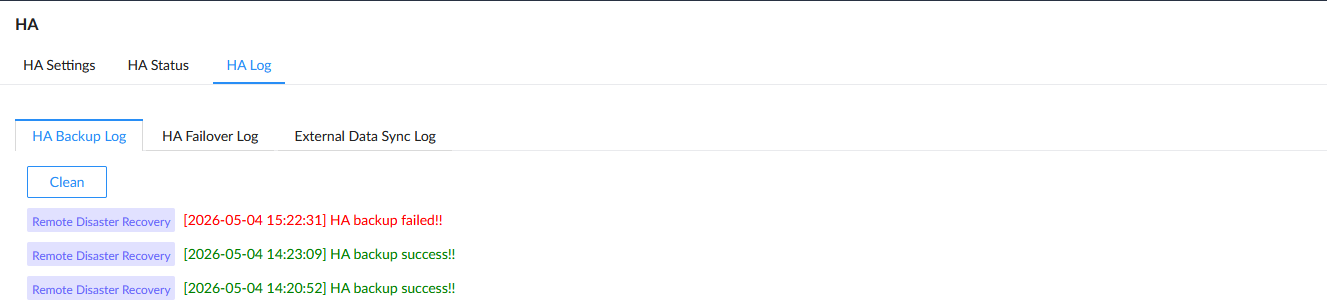
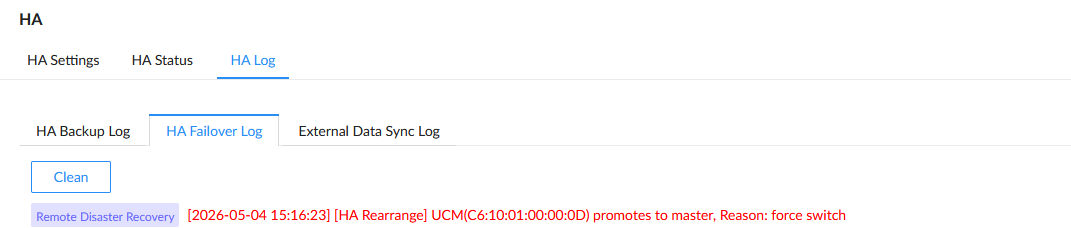
Admin can also go to SoftwareUCM web UI->System Settings->HA->HA Settings->HA Log to view HA backup log, HA failover log, and external data sync log.