
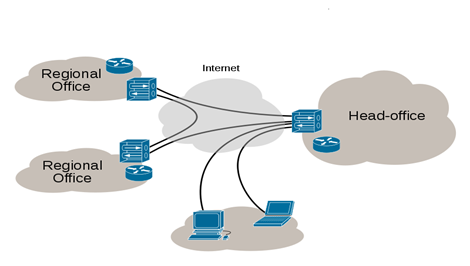
A Virtual Private Network (VPN) is used to create an encrypted connection enabling users to exchange data across shared or public networks acting as clients connected to a private network. The benefit of using a VPN is to ensure the appropriate level of security to connected systems when the underlying network infrastructure alone cannot provide it. The most common types of VPNs are remote-access VPNs and site-to-site VPNs.
VPNs can be defined between specific end points such as IP-Phones and computers, and servers in separate data centers, when security requirements for their exchanges exceed what the enterprise network can deliver. Increasingly, enterprises use VPNs to secure data and voice exchange.
The VPN security model provides:
- Client authentication to forbid any unauthorized user from accessing the VPN network.
- Encryption and confidentiality that will prevent man in middle attacks and eavesdropping on the network traffic.
- Data integrity to maintain the consistency, and trustworthiness of the messages exchanged.
Users must be authenticated before establishing secure VPN tunnels. Client/server tunnels use passwords or digital certificates. It is possible to permanently store the key to allow the tunnel to be established automatically.
The purpose of this guide is to underline VPN client/server feature on Grandstream GWN7000 Router. This guide covers OpenVPN® client/server configuration, L2TP client configuration and PPTP client/server configuration.
© 2002-2014 OpenVPN Technologies, Inc.
OpenVPN is a registered trademark of OpenVPN Technologies, Inc
GWN7000 VPN FEATURE
Grandstream GWN7000 router supports VPN feature giving ability to create an encrypted and tunneled connections across shared or public networks allowing users to exchange data securely. GWN7000 router supports 3 VPN technologies:
- OpenVPN®: GWN7000 can act as VPN server with remote VPN clients, or it can act as VPN client connected to a remote OpenVPN® server.
- L2TP/IPSec: GWN7000 can act as VPN client only and it can be connected to remote L2TP server.
- PPTP: GWN7000 can act either as VPN PPTP client or as server.
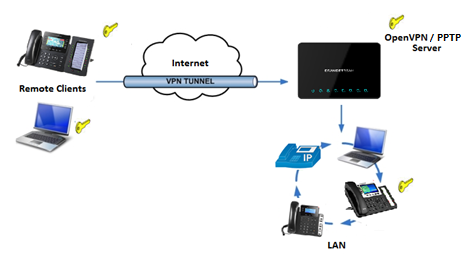
The following figure illustrates GWN7000 acting as an OpenVPN® server with remote clients connected via VPN tunnel.
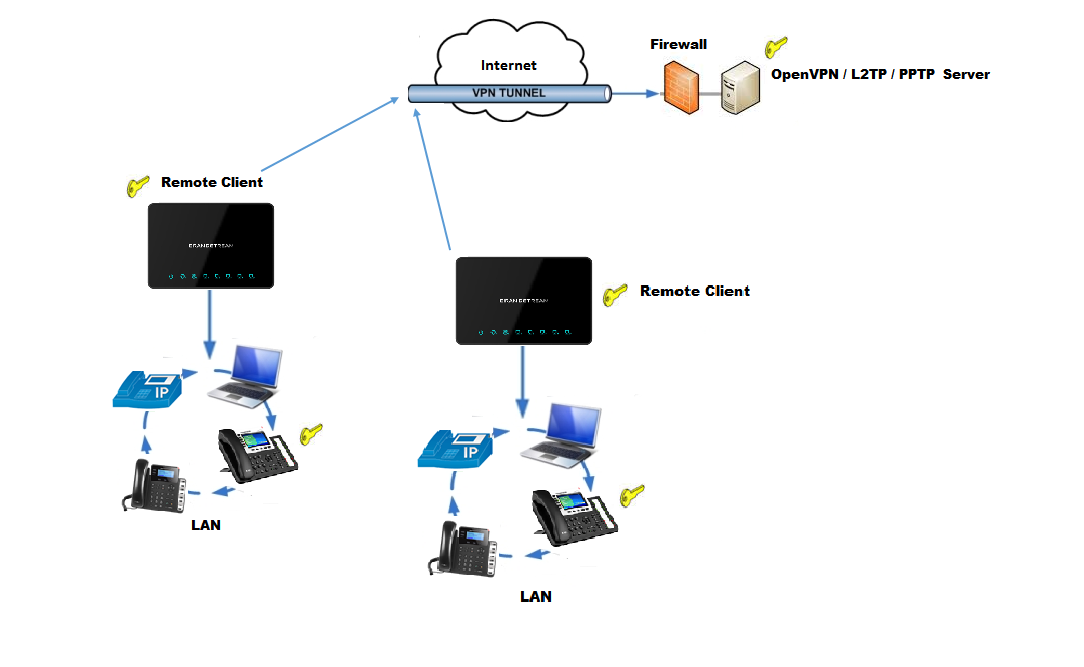 The following figure illustrates GWN7000 acting as OpenVPN®, L2TP or PPTP client connected to a remote VPN server.
OPENVPN® CONFIGURATION
VPN configuration is accessible from the GWN7000 web GUI under “VPN” menu. Three options are available, OpenVPN®, L2TP/IPSec or PPTP.
OpenVPN® Server Configuration
To use the GWN7000 as an OpenVPN® server, users need to start creating OpenVPN® server certificate and client certificates. Before generating server/client certificates, users should generate first the Certificate Authority (CA), which will help to issue server/clients’ certificates.
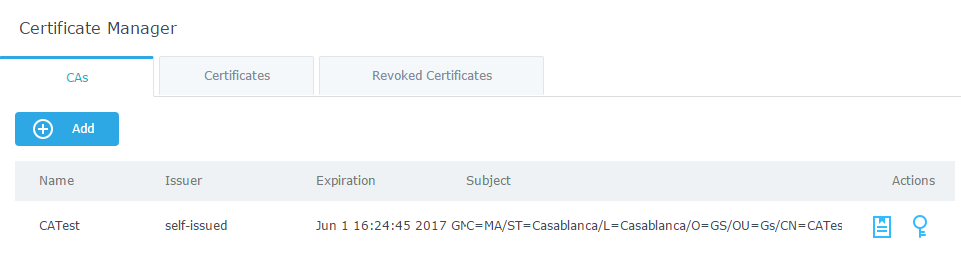
GWN7000 certificates can be managed from web UI→System Settings→Cert. Manager.
Generate Self-issued Certificate Authority (CA)
A certificate authority (CA) is a trusted entity that issues electronic documents that verify a digital entity’s identity on the Internet. The electronic documents (a.k.a. digital certificates) are an essential part of secure communication and play an important part in the public key infrastructure (PKI).
To create a Certification Authority (CA), follow below steps:
- Go to “System Settings→Cert. Manager→CAs” on the GWN7000 web GUI.
- Click on
 button. A popup window will appear.
 - Enter the CA values including CN, Key Length, Digest algorithm… depending on your needs.
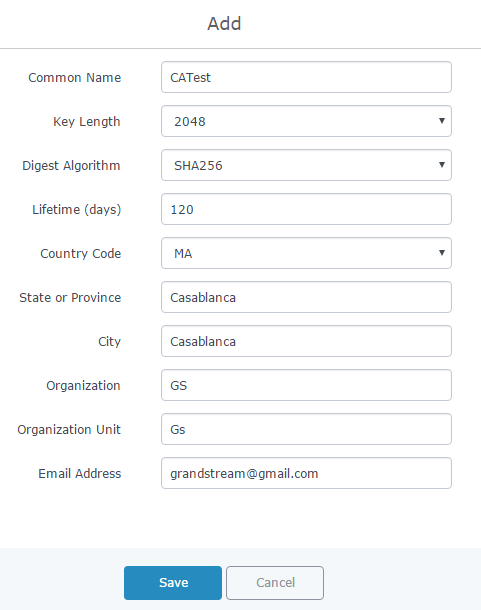
Refer to below figure showing an example of configuration and below table showing all available options with their respective description.
Field | Description |
Common Name | Enter the common name for the CA. It could be any name to identify this certificate. In our example, set to “CATest”. |
Key Length | Choose the key length for generating the CA certificate. Following values are available:
|
Digest Algorithm | Choose the digest algorithm:
|
Lifetime (days) | Enter the validity date for the CA certificate in days. In our example, set to “120”. |
Country Code | Select a country code from the dropdown list. In our example, set “MA”. |
State or Province | Enter a state name or province. In our example, set to “Casablanca”. |
City | Enter a city name. In our example, set to “Casablanca”. |
Organization | Enter the organization name. In our example, set to “GS”. |
Organization Unit | Enter the organization unit name. In our example, set to “Gs”. |
Email Address | Enter an email address. In our example, it is “grandstream@gmail.com” |
-
Click on
 button after completing all the fields for the CA certificate.
-
Click on
 button to export the CA to local computer. The CA file has extension “.crt”.
Generate Server/Client Certificates
Users need to create both server and client certificates for encrypted communication between clients and GWN7000 acting as an OpenVPN® server.
- Creating Server Certificate
To create server certificate, follow below steps:
- Go to “System Settings→Cert. Manager→Certificates”.
- Click on button. A popup window will appear.
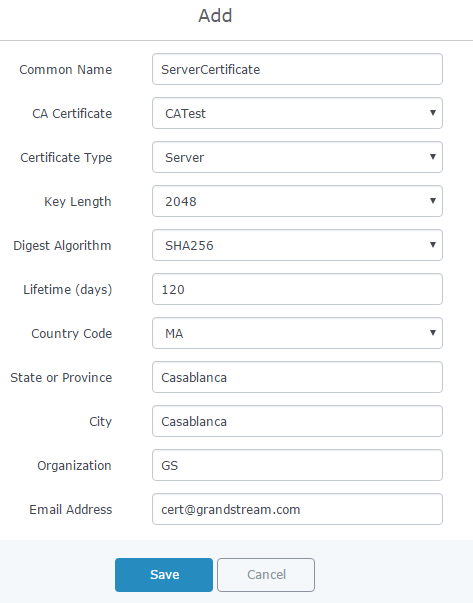
Refer to below figure showing an example of configuration and below table showing all available options with their respective description.

Field | Description |
Common Name | Enter the common name for the server certificate. It could be any name to identify this certificate. In our example, set to “ServerCertificate”. |
CA Certificate | Select CA certificate previously generated from the dropdown list. In our example, “CATest”. |
Certificate Type | Choose the certificate type from the dropdown list. It can be either a client or a server certificate. Choose “Server” to generate server certificate. |
Key Length | Choose the key length for generating the server certificate. Following values are available:
|
Digest Algorithm | Choose the digest algorithm:
|
Lifetime (days) | Enter the validity date for the server certificate in days. In our example, set to “120”. |
Country Code | Select a country code from the dropdown list. In our example, set to “MA”. |
State or Province | Enter a state name or province. In our example, set to “Casablanca”. |
City | Enter a city name. In our example, set to “Casablanca”. |
Organization | Enter the organization name. In our example, set to “GS”. |
Email Address | Enter an email address. In our example, it is “Cert@grandstream.com”. |
-
Click on
button after completing all the fields for the server certificate.
Click on
![]() button to export the server certificate file in “.crt” format.
button to export the server certificate file in “.crt” format.
Click on
![]() button to export the server key file in “. key” format.
button to export the server key file in “. key” format.
Click on
![]() button to revoke the server certificate if no longer needed.
button to revoke the server certificate if no longer needed.
Notes:
- The server certificates (.crt and .key) will be used by the GWN7000 when acting as a server.
- The server certificates (.crt and .key) can be exported and used on another OpenVPN® server.
- Creating Client Certificate
To create client certificate, follow below steps:
- Create Users
- Go to “System Settings→User Manager”.
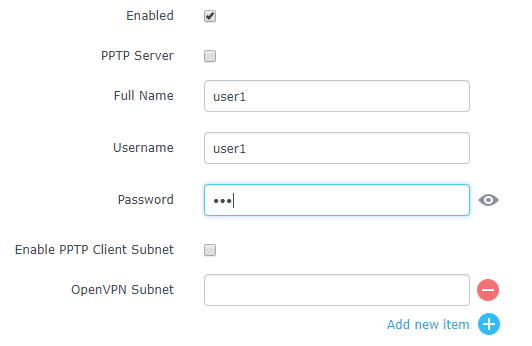
- Click on button. The following window will pop up.
Option | Description |
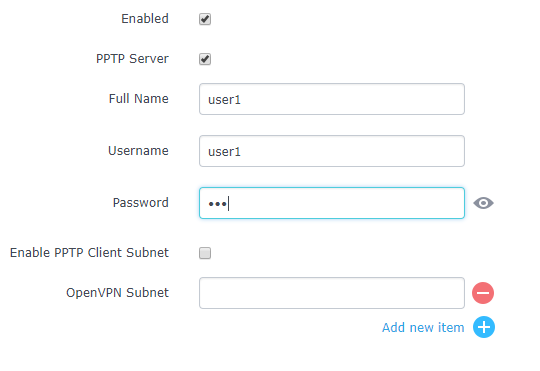
Enabled | Check this option to enable/disable the user account. |
PPTP Server | Check this option to enable the user connection to the PPTP server. |
Full Name | Enter user full name. When using PPTP it defaults to pptpd. |
Username | Enter user Username. |
Password | Enter user password. |
IPSec Pre-Shared Key | Set user pre-shared key for authentication. |
Enabled PPTP Client Subnet | Check this option when using PPTP, and enter the client subnet. |
Client Subnet | Configured to which subnet this client belongs to (ex: 192.168.1.0/24). |
OpenVPN Subnet | Configures OpenVPN user subnet (ex: 192.168.1.0/24). |
- Enter User information based on below descriptions.
- Repeat above steps for each user.
- Create Client Certificate
- Go to “System Settings→Cert. Manager→Certificates”.
- Click on button. The following window will pop up.
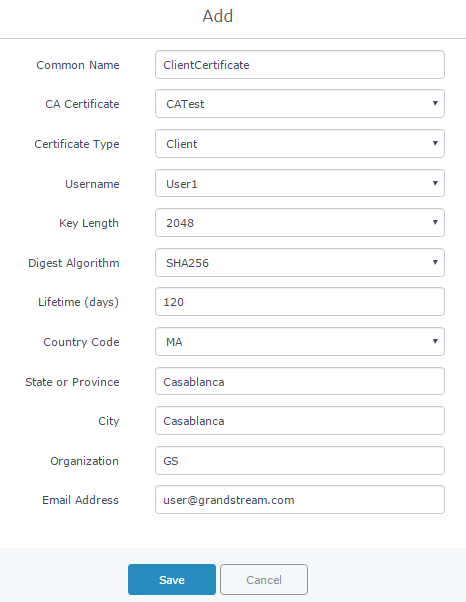
- Enter client certificate information based on below descriptions.
Field | Description |
Common Name | Enter the common name for the client certificate. It could be any name to identify this certificate. In our example, set to “ClientCertificate”. |
CA Certificate | Select the generated CA certificate from the dropdown list. In our example, select “CATest”. |
Certificate Type | Choose the certificate type from the dropdown list. It can be either a client or a server certificate. In our example, select “Client”. |
Username | Select created user to generate his certificate. In our example, select “User1”. |
Key Length | Choose the key length for generating the client certificate. Following values are available:
|
Digest Algorithm | Choose the digest algorithm:
|
Lifetime (days) | Enter the validity date for the client certificate in days. In our example, set to “120”. |
Country Code | Select a country code from the dropdown list. In our example, set to “MA”. |
State or Province | Enter a state name or province. In our example, set to “Casablanca”. |
City | Enter a city name. In our example, set to “Casablanca”. |
Organization | Enter the organization name. In our example, set to “GS”. |
Email Address | Enter an email address. In our example, set to “user@grandstream.com”. |
-
Click on
after completing all the fields for the client certificate.
-
Click on
to export the client certificate file in “.crt” format.
-
Click on
 to export the client key file in “.key” format.
Click on
![]() to revoke the client certificate if no longer needed.
to revoke the client certificate if no longer needed.
The client certificates (“.crt” and “.key”) will be used by clients connected to the GWN7000 to establish TLS handshake.
Notes:
- Client certificates generated from the GWN7000 need to be uploaded to the clients.
- For security improvement, each client needs to have his own username and certificate; this way even if a user is compromised, other users will not be affected.
Create OpenVPN® Server
Once client and server certificates are successfully created, users can create a new server, so that clients can be connected to it, by navigating under “VPN→OpenVPN®→Server”.
To create a new VPN server, follow below steps:
-
Click on
and the following window will pop up.

Field | Description |
Enable | Click on the checkbox to enable the OpenVPN® server feature. |
VPN Name | Enter a name for the OpenVPN® server. |
Server Mode | Choose the server mode the OpenVPN® server will operate with. 4 modes are available:
Less secure as it relies on a shared TLS key plus only something the user knows (Username/password).
Most secure as there are multiple factors of authentication (TLS Key and Certificate that the user has, and the username/password they know). |
Protocol | Choose the Transport protocol from the dropdown list, either TCP or UDP. The default protocol is UDP. |
Bind to Local Interface | Select the interface used to connect the GWN7000 to the uplink, either WAN1, WAN2, LAN or All. |
Local Port | Configure the listening port for OpenVPN® server. The default value is 1194. |
Traffic Routing Policy | Select which routing policy to assign to the traffic from this VPN network. See Policy Routing section in the GWN7000 usermanual. |
Destination | Choose to which destination group or WAN to allow traffic from the VPN, this will generate automatically a forwarding rule under the menu Firewall > Traffic Rules > Forward. |
Encryption Algorithm | Choose the encryption algorithm from the dropdown list to encrypt data so that the receiver can decrypt it using same algorithm. |
Digest Algorithm | Choose digest algorithm from the dropdown list, which will uniquely identify the data to provide data integrity and ensure that the receiver has an unmodified data from the one sent by the original host. |
TLS Authentication | This option uses a static Pre-Shared Key (PSK) that must be generated in advance and shared among all peers. This feature adds extra protection to the TLS channel by requiring that incoming packets have a valid signature generated using the PSK key. |
TLS Pre-Shared Key | Enter the generated TLS Pre-Shared Key when using TLS Authentication. |
Certificate Authority | Select a generated CA from the dropdown list. |
Server Certificate | Select a generated Server Certificate from the dropdown list. |
IPv4 Tunnel Network | Enter the network range that the GWN7000 will be serving from to the OpenVPN® client. Note: The network format should be the following 10.0.10.0/16. The mask should be at least 16 bits. |
Redirect Gateway | When redirect-gateway is used, OpenVPN® clients will route DNS queries through the VPN, and the VPN server will need to handle them. |
Automatic Firewall Rule | Enable automatic firewall rule. |
Push Route | Specify route(s) to be pushed to all clients. Example: 10.0.0.1/8 |
LZO Compression | Select whether to activate LZO compression or no, if set to “Adaptive”, the server will make the decision whether this option will be enabled or no. |
Allow Peer to Change IP | Allow remote change the IP and/or Port, often applicable to the situation when the remote IP address changes frequently. |
-
Click
after completing all the fields.
-
Click
 on top of the web GUI to apply changes.
OpenVPN® Client Configuration
There are two ways to use the GWN7000 as an OpenVPN® client:
- Upload client certificate created from an OpenVPN® server to GWN7000.
- Create client/server certificates on GWN7000 and upload server certificate to the OpenVPN® server.
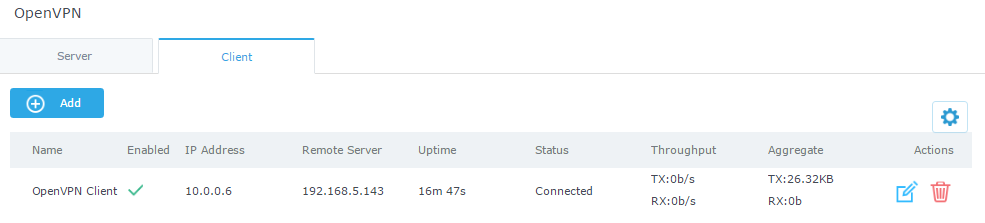
Go to “VPN→OpenVPN®→Client” and follow steps below:
-
Click on
and the following window will pop up.
Field | Description |
Enable | Click on the checkbox to enable the OpenVPN® client feature. |
VPN Name | Enter a name for the OpenVPN® client. |
Protocol | Choose the Transport protocol from the dropdown list, either TCP or UDP. The default protocol is UDP. |
Bind to Local | Select the interface used to connect the GWN7000 to the uplink, either WAN1, WAN2, LAN or All. |
Interface | Select the interface used to connect the GWN7000 to the uplink, either WAN1, WAN2. |
Local Port | Configure the listening port for OpenVPN® server. Default is 1194. |
Destination | Choose to which destination group or WAN to allow traffic from the VPN, this will generate automatically a forwarding rule under the menu Firewall 🡪 Traffic Rules 🡪 Forward. |
Remote OpenVPN® Server | Configure the remote OpenVPN® server IP address. |
Remote OpenVPN® Server Port | Configure the remote OpenVPN® server port. |
Local TUN IP address | Configures statically the local VPN tunnel IP address for the client. |
Remote TUN IP address | Configures statically the local VPN tunnel IP address for the remote server. |
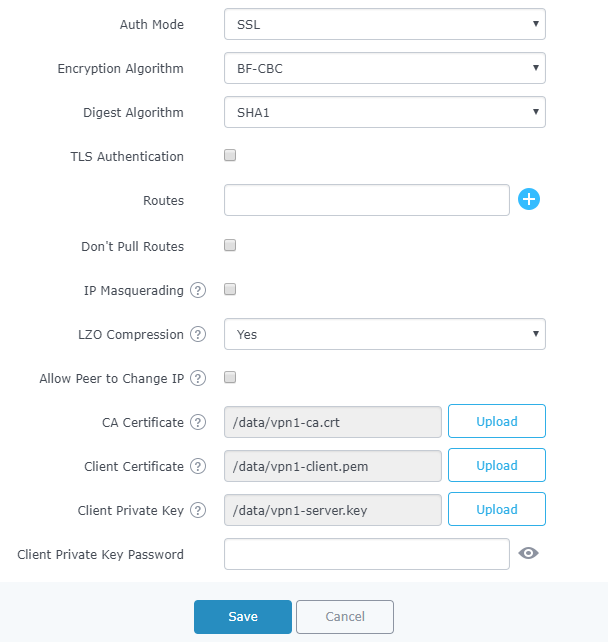
Auth Mode | Choose the server mode the OpenVPN® server will operate with, 4 modes are available:
Less secure as it relies on a shared TLS key plus only something the user knows (Username/password).
Most secure, as there are multiple factors of authentication (TLS Key and Certificate that the user has, and the username/password they know). |
Encryption Algorithm | Choose the encryption algorithm from the drop-down list, in order to encrypt data so that the receiver can decrypt it using the same algorithm. |
Digest Algorithm | Choose the digest algorithm from the drop-down list, which will uniquely identify the data to provide data integrity and ensure that the receiver has an unmodified data from the one sent by the original host. |
TLS Authentication | This option uses a static Pre-Shared Key (PSK) that must be generated in advance and shared among all peers. This feature adds extra protection to the TLS channel by requiring that incoming packets have a valid signature generated using the PSK key. |
TLS Pre-Shared Key | Enter the generated TLS Pre-Shared Key when using TLS Authentication. |
Routes | This feature allows specifying and adding custom routes. |
Don’t Pull Routes | If enabled, client will ignore routes pushed by the server. |
IP Masquerading | This feature is a form of network address translation (NAT) which allows internal computers with no known address outside their network, to communicate to the outside. It allows one machine to act on behalf of other machines. |
LZO Compression | LZO encoding provides a very high compression ratio with good performance. LZO encoding works especially well for CHAR and VARCHAR columns that store very long character strings. |
Allow Peer to Change IP | Allow remote change the IP and/or Port, often applicable to the situation when the remote IP address changes frequently. |
CA Certificate | Click on “Upload” and select the “CA” certificate generated previously on this guide. |
Client Certificate | Click on “Upload” and select the “Client Certificate” generated previously on this guide. |
Client Private Key | Click on “Upload” and select the “Client Private Key” generated previously on this guide. |
Client Private Key Password | Enter the client private key password |
-
Click
after completing all the fields.
-
Click
on top of the web GUI to apply changes.
© 2002-2014 OpenVPN Technologies, Inc.
OpenVPN is a registered trademark of OpenVPN Technologies, Inc
L2TP/IPSEC CONFIGURATION
Layer 2 Tunneling Protocol (L2TP) is a tunneling protocol used to support virtual private networks (VPNs) or as part of the delivery of services by ISPs. It does not provide any encryption or confidentiality by itself. Rather, it relies on an encryption protocol that it passes within the tunnel to provide privacy.
GWN7000 L2TP/IPSec Client Configuration
To configure L2TP client on the GWN7000, go to “VPN→L2TP/IPSec” and set the following:
-
Click on
and the following window will pop up.
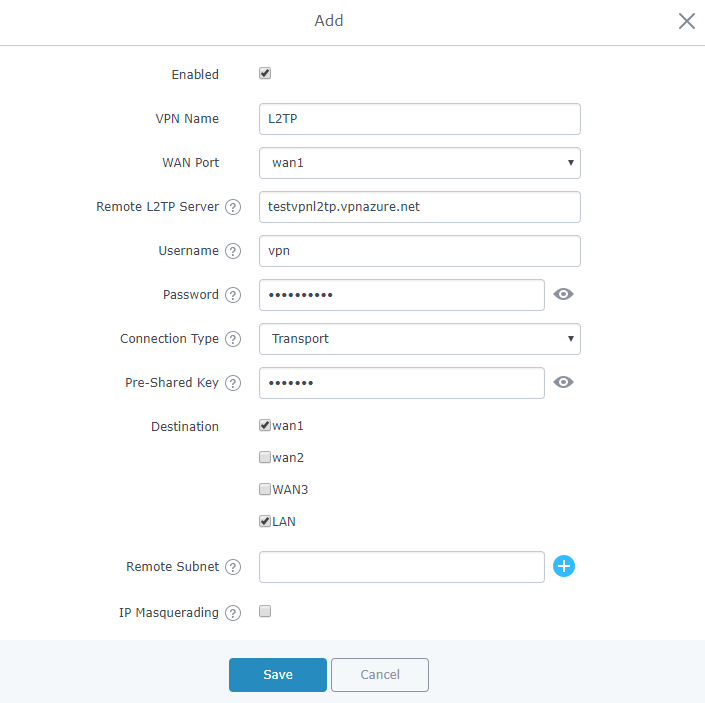
Figure 13: L2TP Client Configuration
Field | Description |
Enable | Click on the checkbox in order to enable the L2TP client feature. |
VPN Name | Enter a name for the L2TP client. |
WAN Port | Select which WAN port is connected to the uplink, either WAN1 or WAN2. |
Remote L2TP Server | Enter the IP/Domain of the remote L2TP Server. |
Username | Enter the Username for authentication against the VPN Server. |
Password | Enter the Password for authentication against the VPN Server. |
Connection Type | Select either Transport mode or Tunnel mode:
|
Pre-Shared Key | Enter the L2TP pre-shared key. |
Destination | Choose to which destination group or WAN to allow traffic from the VPN, this will generate automatically a forwarding rule under the menu Firewall 🡪 Traffic Rules 🡪 Forward. |
Remote Subnet | Configures the remote subnet for the VPN. The format should be “IP/Mask” where IP could be either IPv4 or IPv6 and mask is a number between 1 and 32. For example: 192.168.5.0/24 |
IP Masquerading | This feature is a form of network address translation (NAT) which allows internal computers with no known address outside their network, to communicate to the outside. It allows one machine to act on behalf of other machines. |
Masq Source | This option allows the user to configure the local subnets that needs to be masqueraded. |
Use DNS from Server | Enable this option to retrieve DNS from the VPN server. |
Keepalive | Specifies the keepalive failure value “n”. if ppp doesn’t receive LCP response from “n” LCP echo-request frames, then the connection to the peer will be terminated. If this option is set LCP echo-request will be sent to the peer for every 5 sec by default. |
Connection retries | Configures the number of attempts to reconnect the L2TP client, if this number is exceeded, the client will be disconnected from the L2TP/IP Server. |
Use Built-in IPv6 management | Enable the IPv6 management for the VPN. |
-
Click
after completing all the fields.
-
Click
on top of the web GUI to apply changes.

PPTP CONFIGURATION
PPTP is A data-link layer protocol for wide area networks (WANs) based on the Point-to-Point Protocol (PPP) and developed by Microsoft that enables network traffic to be encapsulated and routed over an unsecured public network such as the Internet. Point-to-Point Tunneling Protocol (PPTP) allows the creation of virtual private networks (VPNs), which tunnel TCP/IP traffic through the Internet.
GWN7000 PPTP Client Configuration
To configure PPTP client on the GWN7000, go to “VPN→PPTP→Client” and set the following:
-
Click on
and the following window will pop up.

Field | Description |
Enable | Click on the checkbox to enable the PPTP VPN client feature. |
VPN Name | Enter a name for the PPTP client. |
Remote PPTP Server | Enter the IP/Domain of the remote PPTP Server. |
Username | Enter the Username for authentication against the VPN Server. |
Password | Enter the Password for authentication against the VPN Server. |
Destination | Choose to which destination group or WAN to allow traffic from the VPN, this will generate automatically a forwarding rule under the menu Firewall 🡪 Traffic Rules 🡪 Forward. |
Remote Subnet | Configures the remote subnet for the VPN. The format should be “IP/Mask” where IP could be either IPv4 or IPv6 and mask is a number between 1 and 32. For example: 192.168.5.0/24 |
IP Masquerading | This feature is a form of network address translation (NAT) which allows internal computers with no known address outside their network, to communicate to the outside. It allows one machine to act on behalf of other machines. |
Use DNS from Server | Enable this option to retrieve DNS from the VPN server. |
Number of Attempts to Reconnect | Configures the number of attempts to reconnect the PPTP client, if this number is exceeded, the client will be disconnected from the PPTP Server. |
Use Built-in IPv6 management | Enable the IPv6 management for the VPN. |
Enable / disable the MPPE for data encryption. By default, it’s disabled. |
-
Click
after completing all the fields.
-
Click
on top of the web GUI to apply changes.

GWN7000 PPTP Server Configuration
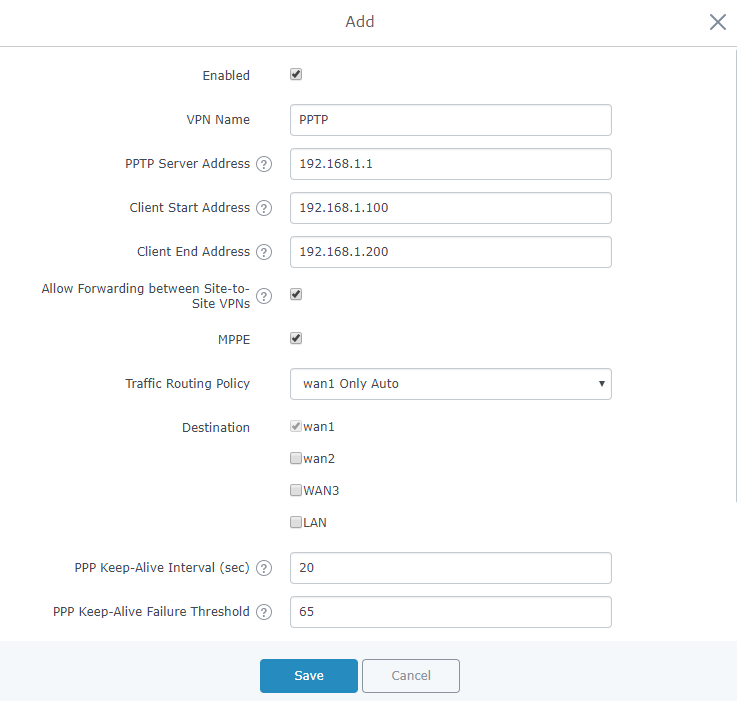
Configuring PPTP Server Parameters
To configure PPTP client on the GWN7000, go to “VPN→PPTP→Server” and set the following:
-
Click on
and the following window will pop up.
Field | Description |
Enable | Click on the checkbox to enable the PPTP VPN Server. |
VPN Name | Enter a name for the PPTP Server. |
PPTP Server Address | Configure the PPTP server local address (ex: 192.168.1.1). |
Client Start Address | Configure the remote client IP start address. Note: this address should be in the same subnet as the end address and PPTP server address. |
Client End Address | Configure the remote client IP end address. Note: this address should be in the same subnet as the start address and PPTP server address. |
Allow Forwarding between Site-To-Site VPNs | This option allows forwarding between multiple site-to-site VPNs. i.e. if there are multiple PPTP users configured with client subnet enabled, then this option allows one PPTP client subnet to access another PPTP client subnet through the server. Note: for this option to work more than one PPTP users with client subnet must be enabled. |
MPPE | Enable / disable the MPPE for data encryption. By default, it’s disabled. |
Traffic Routing Policy | Select which routing policy to assign to the traffic from this VPN network. See Erreur ! Source du renvoi introuvable. section |
Destination | Choose to which destination group or WAN to allow traffic from the VPN, this will generate automatically a forwarding rule under the menu Firewall 🡪 Traffic Rules 🡪 Forward. |
Interval in seconds for LCP echo-request frames to be sent. | |
PPP Keep-Alive Failure Threshold | The PPTP server will consider a peer to be dead if N Echo-request frames aren’t replied to. The connection will be then terminated. A setting of 0 disables this function. |
PPP Adaptive Keep-Alive | If the PPP keepalive failure settings is enabled, then echo-request frames will only be sent if no traffic has been received from the peers since the last echo-request was sent. |
Debug | Enable debug logging to syslog. |
Specify the MTU, valid range (1280-1500 Bytes). | |
Specify the MRU, valid range (1280-1500 Bytes). |
-
Click
after completing all the fields.
-
Click
on top of the web GUI to apply changes.
Creating PPTP Users
After creating PPTP server instance, you need next to create some users to allow then to connect to the PPTP server, to do this please follow below steps:
- Go under web GUI→System Settings→User Manager
- Click on to add a new user.
- Set the following parameters, with your own custom username and passwords.
-
Click
after completing all the fields.
-
Click
on top of the web GUI to apply changes.
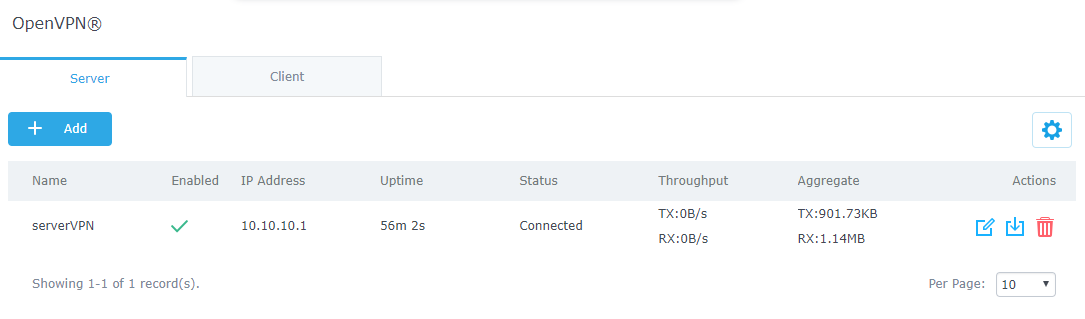
At this stage, the router is ready to receive PPTP connection requests from clients, below we used windows built-in client for connection.
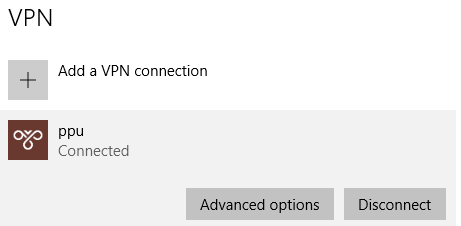
The PPTP server status should show as connected, and list the connected clients under the clients tab.


SUPPORTED DEVICES
Following table shows supported VPN types on Grandstream GWN7000 router:
Model | VPN Type | VPN Server | VPN Client | Firmware |
GWN7000 | OpenVPN® | Supported | Supported | 1.0.4.20 or higher |
PPTP | Supported | Supported | 1.0.4.20 or higher | |
L2TP/IPSec | Pending | Supported | 1.0.4.20 or higher |