
This guide will help users to configure their Grandstream GXW410x with 3CX Phone System.
Step 1: Prepare GXW410x
Follow below steps to set up a GXW410x:
- Connect the Grandstream GXW410x gateway with the network using the WAN port of the gateway and connect GXW410x to the power supply. The device will boot up.
- Ensure that the device is local to the 3CX server. The device should be in the same subnet and/or locally routed subnet.
- Find the IP and MAC Address of the device on your network:
- Download the Grandstream IP Discovery Tool from here
- Follow the “How to use the program” instruction in the Readme.txt file
- Take note of the: MAC Address / IP Address
Step 2: Add GXW410x to 3CX Server
To add Grandstream GXW410x to 3CX Server, follow below steps:
- Navigate to “SIP Trunks” within the 3CX Management Console and click “Add gateway”.

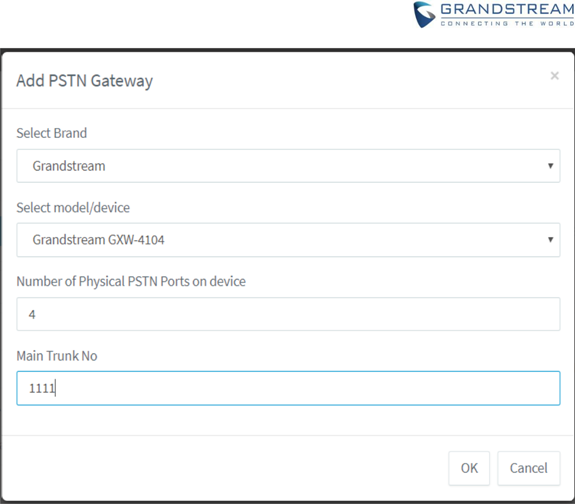
- Add PSTN Gateway.
- Select Brand: Grandstream
- Select model/device: Grandstream GXW410x
- Number of Physical PSTN Ports on the device: 4
- Main Trunk No: Define the number of the FXO lines which act as catching all destination.
- Click “OK” to save the configuration.
Step 3: PSTN Line Setup
Follow below steps to configure GXW410x on 3CX Management Console:
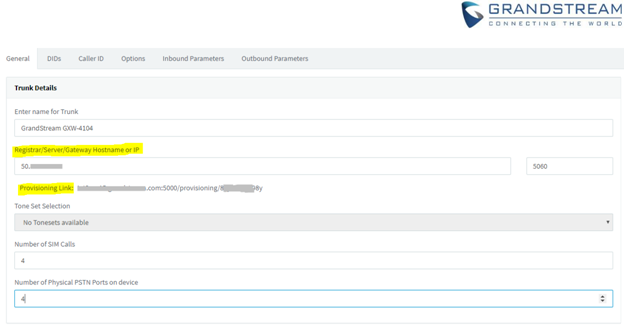
- In the General Tab:
- Enter Registrar/Server/Gateway Hostname of IP: This is the IP address of your GXW410x (acquired in Step1.3.c).
- Copy the “Provisioning Link” which needed in later steps.
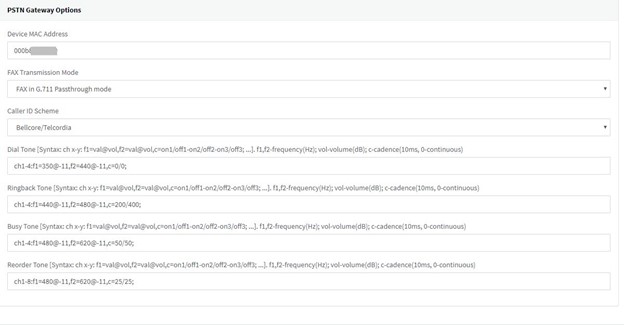
- In “PSTN Gateway Options” under ‘’Options” tab:
- Fill in “Device MAC Address”
- Select “Caller ID Scheme”
- Configure the Tone sets
- Fill in “Device MAC Address”
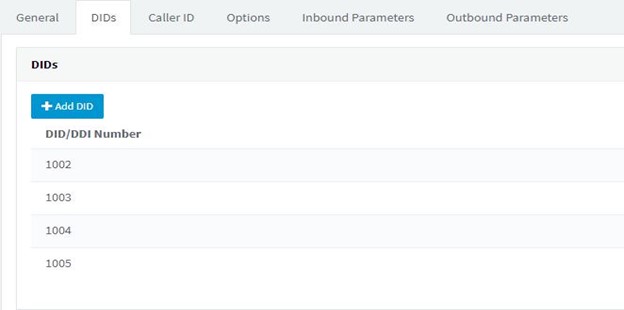
- Inbound Rules:
- In “DIDs” tab, click “Add DID” to create DIDs. The DIDs are used to allow calls to be routed based on the port the call was received. For example, if your device has 4 ports and you want to make 4 parallel calls, please configure at least 4 DID numbers here. Take notes of these DID numbers, we will need them later.
- Press the “Generate device config” button at the top of the page. It will open a new tab in your browser and redirect to the device web UI.

Step 4: Provisioning GXW410x
Please refer to steps below to provision GXW410x.
- Log into GXW410x. The default password is “admin”.
- Go to Maintenance -> Upgrade/Provisioning.
- In the “Config Server Path” part, enter the “Provisioning Link” got in Step3.1. Make sure “Upgrade Via” is set to HTTP.
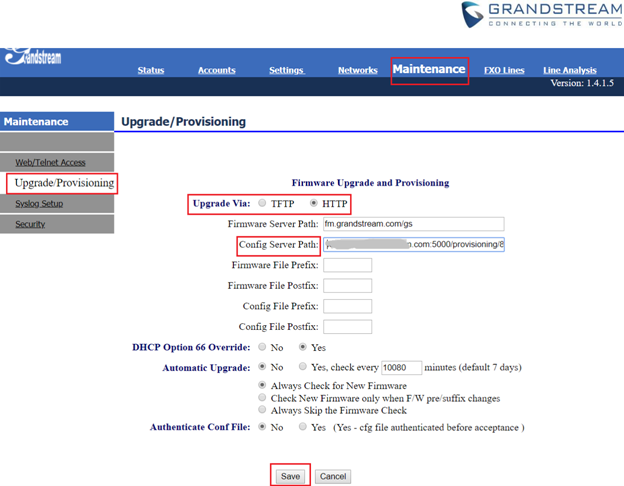
- Click the “Save” button and reboot device.
Step 5: Configuring GXW410x Unconditional Call Forward
Please refer to steps below for GXW410x channels settings:
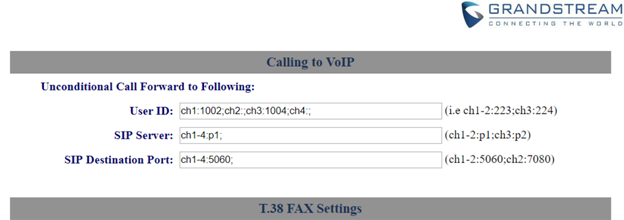
- Log into GXW410x using the IP address in a browser. Go to Settings -> Channels Settings -> Calling to VoIP -> Unconditional Call Forward to Following.
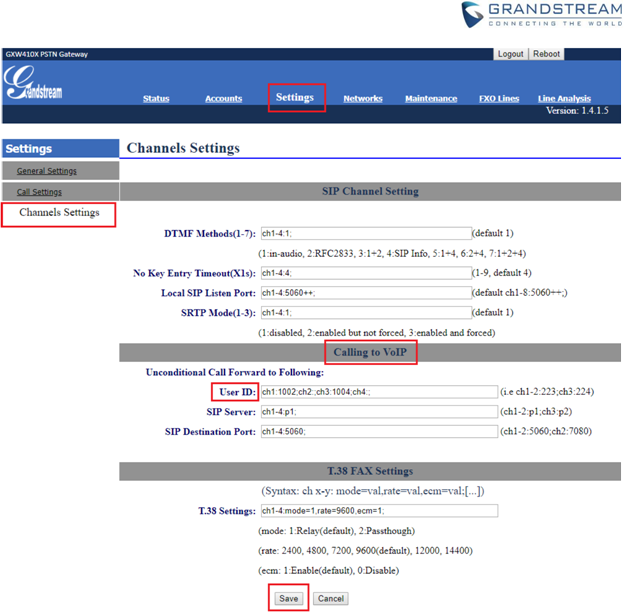
- Configure “User ID” with your DID number for each channel. (As we set on Step3.3). Click the “Save” button and reboot the device after configuration.
Take 2 parallel calls for example:
We want 2 parallel calls and plug one PSTN line to port 1 and plug another PSTN line to port 3. And we want to route port 1 calls according to DID number 1002, route port 3 calls according to DID number 1004, then we need to configure the “User ID” section as below:
Step 6: GXW410x FXO Lines Setting
Please refer to steps below to configure GXW410x stage method:
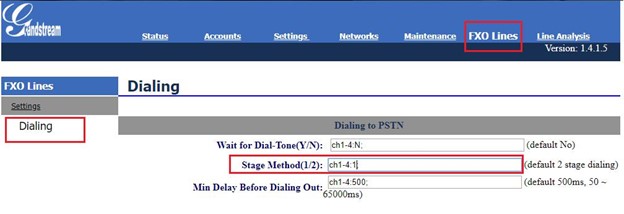
- Log into GXW410x using the IP address in a browser. Go to FXO Lines -> Dialing -> Dialing to PSTN. Configure this page as follows:
- Set the “Stage Method” field to “ch1-4:1;”
- Click the “Save” button and reboot the device.
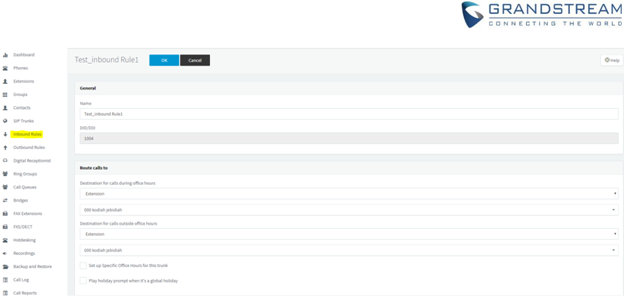
Step 7: 3CX Server Inbound Rules Configuration
Please refer to steps below to configure inbound rules on 3CX Management Console:
- Go to “Inbound Rules” within 3CX Management Console, press “Add DID Rule” button
- Under “General” tab
- Name: Enter the inbound rule name.
- DID/DDI: From the drop-down list, choose the DID number you created in part III.3
- Under “Route calls to”, configure “Destination for calls”.
- Click “OK”.
Note: