This document provides instructions on a new mechanism for remotely provisioning handset settings on a base station by handset IPEI, as opposed to configuring these settings via base station P values which are statically mapped to a handset index. This mechanism allows the assignment of SIP Accounts to specific handsets without knowing which order these handsets will be subscribed to the base station.
In this document, DP720 and DP750 are used as the example of handset and base station.
Provisioning Work Flow
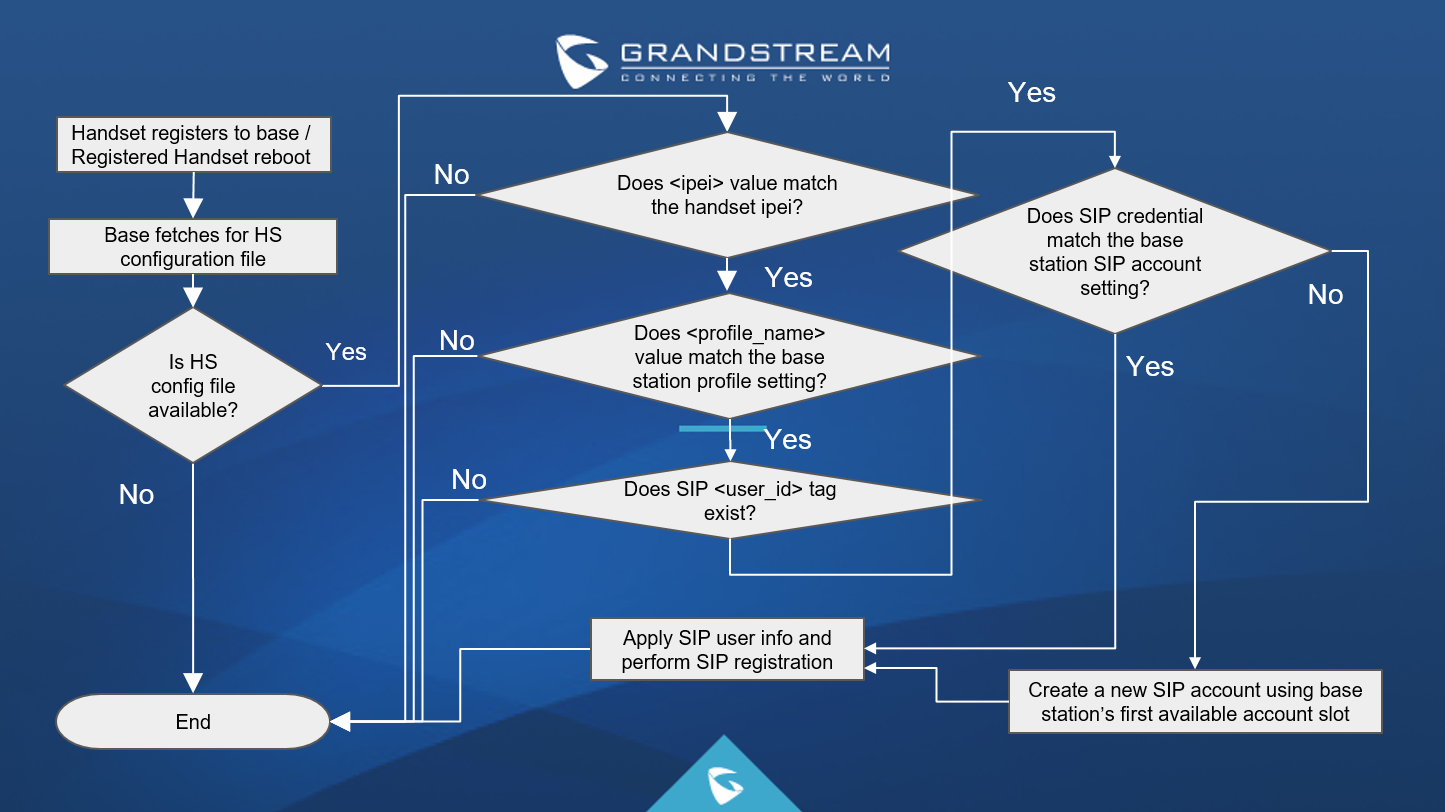
When a DP720 registers to a DP750 for the first time or an already registered handset boots up, the DP750 will send a provisioning request for a file on the configured provisioning server, with location “Config_Server_Path/[Prefix][HS IPEI].xml[Postfix]”. For example, if handset’s IPEI number is 02c332b510, prefix is “ipei_”, postfix is null, and config server path is “fw.grandstream.com/gs”, the request URL is “fw.grandstream.com/gs/ipei_02c332b510.xml.If the configuration file exists, DP750 will parse and validate it. First, it checks if the <ipei> field matches the handset’s. Then, it checks if the <profile_name> field matches any profile name on the base station, and if the SIP <user_id> is present in the configuration file with a valid value. Mismatch of IPEI or profile name, or an absent/invalid user ID, will make the provisioning stop and exit immediately. Otherwise, base station will check if the <user_id> field matches any account credential on base station. If so, the base station will apply the SIP account to handset’s first available line slot; if not, the base station will write the SIP account info as a new account and assign this account to the handset as well. Please note this new account will take the first available account slot on the base station or, when all account slots are occupied, will check if all the SIP accounts are in use (assigned to any handset) and take the first stale account slot.
USE HANDSET PROVISIONING FEATURE
Enable Handset Provisioning
There are two methods to enable the handset provisioning mechanism:
Method 1: On base station (DP750) Web GUI -> Maintenance -> Provisioning -> Set “Enable Handset Config” to “Yes”, reboot the base station to take effect.
Method 2: Set DP750 P value 27014 to 1 (enabled) via the DP750 provisioning file or set it directly by SSH access, then reboot the base station to take effect.
Prepare Handset Configuration File
The configuration file for handset provisioning is in XML format with the following hierarchy and fields:
- <?xml version=”1.0″ encoding=”UTF-8″?> – The XML header must be present.
- <hs_config> – This is the root node for the XML configuration file.
- <ipei> – This field is mandatory and must match the IPEI of the handset requesting the provisioning file. The whole file will be ignored if the IPEI is not matched.
- <hs_name> – This field is a string value with max 10 digits. If present, sets the name of the handset.
- <sip> – This is the parent node for all SIP settings.
- <line> – Up to 10 line configurations may be present in the file. These are applied sequentially (line 1, 2, 3…). In order to remove a line configuration, simply remove the line from the XML file and reboot the handset (or base station). When the new file is provisioned, any lines which are no longer present will be removed, but the SIP account the line was mapped to will remain until it is removed as a stale account if a slot is needed.
- <profile_name> – This field is mandatory and specifies the profile for this line. It has to match any profile name on the base station or the entire handset configuration file is invalid.
- <user_id> – This field is mandatory and specifies the SIP user ID for this line. If an account has already been configured on the base station using this user ID and server pair, the line will be mapped to this existing account; otherwise, a new account will be added to an empty slot.
- <display_name> – This field specifies the SIP display name for the account.
- <auth_id> – This field specifies the SIP authentication ID for the account.
- <password> – This field specifies the SIP authentication password for the account.
- <ring_type> – This field specifies the incoming ring behavior for the account (HS Mode, on the web UI). Allowed values are DID, Circular, Linear, Parallel, and Shared. If the ring_type is configured to DID, the HS Mode will be set to “HS X”, where X is the handset ID on the base station.
- <hs_settings> – Handset specific settings (such as disable phonebook, disable auto answer, and various key mappings, etc.) will be configurable under this parent node.
- <force_apply> – There are two types of HS settings under <hs_settings>: “Admin settings” and “User settings”. This field is used to determine whether to apply “User settings” (settings which are editable by both HS and base). “Admin settings” (editable only by base station) are always applied. Field value can be number 0 or 1, 0 means “No” and doesn’t apply “User settings”, 1 means “Yes” and will force apply all “User settings”.
- <admin> – This is the parent node for all “Admin settings” that are always applied no matter how force_apply is set.
- <disable_private_phonebook> – Disables private phonebook access on the handset. Field value can be number 0 or 1, 0 means “No” (won’t disable private phonebook) and 1 means “Yes” (disable private phonebook).
- <disable_shared_phonebook> – Disables shared phonebook access on the handset. Field value can be number 0 or 1, 0 means “No” and 1 means “Yes”.
- <disable_conference> – Disables the conference option on the handset. Field value can be 0 or 1, 0 means “No” and 1 means “Yes”.
- <disable_transfer> – Disables the transfer option on this handset. Field value can be 0 or 1, 0 means “No” and 1 means “Yes”.
- <custom_ringtone> – Specifies a custom ringtone for this handset from the ringtones available on this base station. Field value can be 0 to 10, 0 means “Disable Custom Ringtone” and 1 to 10 correspond to ring1.bin to ring10.bin on the server.
- <user> – This is the parent node for all “User settings” that are only applied when <force_apply> is set to 1.
- <auto_answer> – Enables auto answer of incoming calls to a handset. Field value can be number 0 or 1, 0 means “No” and 1 means “Yes”.
- <cradle_answer> – Enables answering calls by picking up handset from cradle. Field value can be number 0 or 1, 0 means “No” and 1 means “Yes”.
- <cradle_hangup> – Enables hanging up calls by repositioning handset to cradle. Field value can be number 0 or 1, 0 means “No” and 1 means “Yes”.
- <remote_disconnect_tone_disable> – Disables remote disconnect tone. Field value can be number 0 or 1, 0 means “No” and 1 means “Yes”.
- <disable_callwaiting_tone> – Disables call waiting tone. Field value can be number 0 or 1, 0 means “No” and 1 means “Yes”.
- <lcd_backlight_cradle> – Enables LCD backlight when handset is on cradle. Field value can be number 0, 1 or 2, 0 means “Disabled”, 1 means “Enabled”, and 2 means “Dim” (Enabled, but not full brightness).
- <key_up_idle_function> – Configure the key mapping for the Up key when in idle. Please refer the table at the end of this section.
- <key_down_idle_function> – Configure the key mapping for the Down key when in idle. Please refer the table at the end of this section.
- <key_left_idle_function> – Configure the key mapping for the Left key when in idle. Please refer the table at the end of this section.
- <key_right_idle_function> – Configure the key mapping for the Right key when in idle. Please refer the table at the end of this section.
- <key_up_call_function> – Configure the key mapping for the Up key when in call. Please refer the table at the end of this section.
- <key_down_call_function> – Configure the key mapping for the Down key when in call. Please refer the table at the end of this section.
- <key_left_call_function> – Configure the key mapping for the Left key when in call. Please refer the table at the end of this section.
- <key_right_call_function> – Configure the key mapping for the Right key when in call. Please refer the table at the end of this section.
- <left_softkey_idle_function> – Configure the key mapping for the left soft key when in idle. Please refer the table at the end of this section.
- <right_softkey_idle_function> – Configure the key mapping for the right soft key when in idle. Please refer the table at the end of this section.
- <left_softkey_call_function> – Configure the key mapping for the left soft key when in call. Please refer the table at the end of this section.
- <right_softkey_call_function> – Configure the key mapping for the right soft key when in call. Please refer the table at the end of this section.
- <mute_as_dnd> – Configure the Mute key to work as a shortcut for Do Not Disturb (DND) feature key. Field value can be 0 or 1. 0 means “Disabled”, 1 means “Enabled” (will make long press mute key to enable DND, long press again will disable DND).
Value for key mapping field | Corresponding setting | |
0 | None | |
1 | Menu | Main Menu |
2 | Call History | Missed Calls |
3 | Accepted Calls | |
4 | Outgoing Calls | |
5 | All Calls | |
6 | Phonebook | Private Phonebook |
7 | Shared Phonebook | |
8 | Settings & Status | Info |
9 | Line Status | |
10 | Voice Mail | |
11 | Ringer Volume UP | |
12 | Ringer Volume DOWN | |
13 | Audio volume UP | |
14 | Audio Volume DOWN | |
15 | Call | Intercom |
16 | Send | |
17 | Hold/Resume/Swap | |
18 | Transfer | |
19 | Conference | |
20 | New Call | |
Example Configuration File
<?xml version="1.0" encoding="UTF-8"?>
<hs_config>
  <ipei>02c332b510</ipei>
  <hs_name>HS 1FEDE</hs_name>
  <sip>
    <line>
      <display_name>1FEDE_Line_1</display_name>
      <profile_name>profile1</profile_name>
      <user_id>5328</user_id>
      <auth_id>5328</auth_id>
      <password>password</password>
      <ring_type>DID</ring_type>
    </line>
  </sip>
  <hs_settings>
<force_apply>1</force_apply>
<admin>
  <disable_private_phonebook>0</disable_private_phonebook>
      <disable_shared_phonebook>0</disable_shared_phonebook>
      <disable_conference>0</disable_conference>
      <disable_transfer>0</disable_transfer>
      <custom_ringtone>2</custom_ringtone>
    </admin>
    <user>
      <auto_answer>0</auto_answer>
      <cradle_answer>0</cradle_answer>
      <cradle_answer>0</cradle_answer>
      <remote_disconnect_tone_disable>0</remote_disconnect_tone_disable>
      <disable_callwaiting_tone>0</disable_callwaiting_tone>
      <lcd_backlight_cradle>0</lcd_backlight_cradle>
      <key_up_idle_function>4</key_up_idle_function>
      <key_down_idle_function>3</key_down_idle_function>
      <key_left_idle_function>12</key_left_idle_function>
      <key_right_idle_function>11</key_right_idle_function>
      <key_up_call_function>0</key_up_call_function>
      <key_down_call_function>0</key_down_call_function>
      <key_left_call_function>14</key_left_call_function>
      <key_right_call_function>13</key_right_call_function>
      <left_softkey_idle_function>1</left_softkey_idle_function>
      <right_softkey_idle_function>7</right_softkey_idle_function>
      <left_softkey_call_function>16</left_softkey_call_function>
      <right_softkey_call_function>17</right_softkey_call_function>
      <mute_as_dnd>0</mute_as_dnd>
</user>
  </hs_settings>
</hs_config>
Configure Handset Provisioning
To configure the handset provisioning, please browse the base station Web GUI at Maintenance -> Provisioning. This is the same page used for base station provisioning. Handset shares the settings of base station provisioning in the field in the red rectangle, and has its own settings in the blue rectangle.
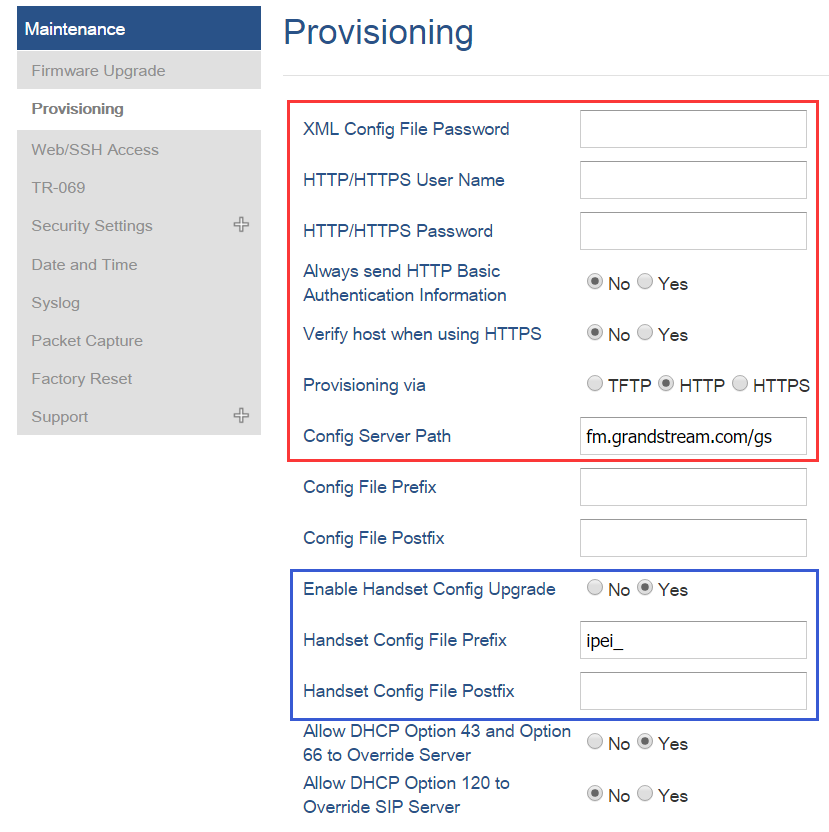
Provisioning via: Choose the method that the base station uses to request handset ipei config file. Can use TFTP, HTTP or HTTPS.
Config Server Path: Defines the server path for provisioning. Do not prepend address with “http://” or any other protocol.
Handset Config File Prefix: If configured, only the handset configuration file with the matching encrypted prefix will be downloaded and flashed into the device.
Handset Config File Postfix: If configured, only the handset configuration file with the matching encrypted postfix will be downloaded and flashed into the device.
Pre-Configuration and Configuration Redirection
This is similar to Grandstream SIP device pre-provision and configuration redirection. For mass deployment, Grandstream provides TFTP/HTTP redirection service. This service is free. By default, all Grandstream products point to our provisioning system. When a handset is booted up or registers to a base station, the base will automatically contact our provisioning server. Our provisioning server will then redirect the unit to customer’s TFTP/HTTP/HTTPS server. The unit will reboot and send further provisioning request asking for the configuration file from customer’s TFTP/HTTP/HTTPS server.
Below is the information we need from service providers for TFTP/HTTP redirection:
1. Handset IPEI range (this should be printed on the carton box)
2. Your TFTP/HTTP server IP address
3. Your company name and address
Service providers should:
1. Create configuration files for all the devices and put them on your TFTP/HTTP server
2. After we inform you that the devices have been entered into our central provisioning database, please take out a few devices to test. Upon powering up, they should contact our provisioning server fm.grandstream.com/gs first, and then get redirected to your TFTP/HTTP server and pull out the firmware files and the configuration files. They will be upgraded to the latest firmware with your configurations.
Grandstream also offers pre-configuration of our devices in factory, but this will incur an extra cost to the product ordered.
Automatic Provisioning within LAN
Grandstream products support DHCP Option 66 or 43 for automatic provisioning within a Local Area Network. The provisioning server URL is embedded inside standard option 66 or 43 of DHCP responses. Grandstream DECT DP750/DP720 supports both DHCP Option 66 and 43.
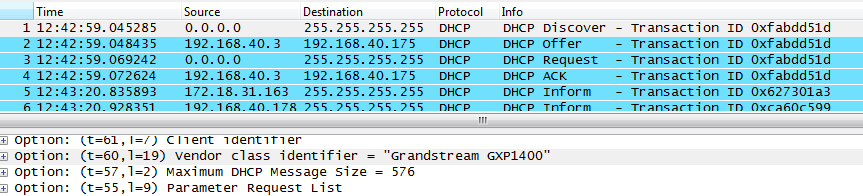
Grandstream SIP devices send out DHCP DISCOVER with the following information:
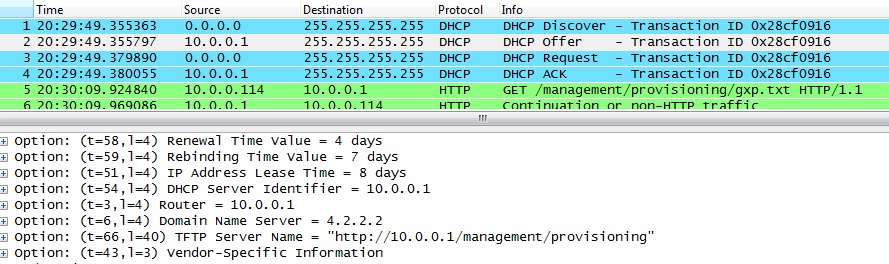
DHCP Server can be configured to send the following information in its DHCP OFFER. Please notice that in this example, an HTTP://URL is provided in the Option 66 “TFTP Server Name” field. The device will then issue HTTP requests instead of the traditional TFTP requests to the server. This design allows more flexibility in device provisioning.
File Encryption
The XML configuration file may be encrypted using AES-256-CBC algorithm. The encryption password is defined in P1359 (XML Config File Password) of the configuration file. The encryption may use salt to enhance security. The algorithm to derive the key and IV from a password is the same as the one used by OpenSSL:The OpenSSL command-line to encrypt the file is as follows:
Openssl enc –e –aes-256-cbc –k password –in config.xml –out [Prefix][HS IPEI].xml[Postfix]
Alternatively, users can also set the XML Config File Password in the web UI of the phone.
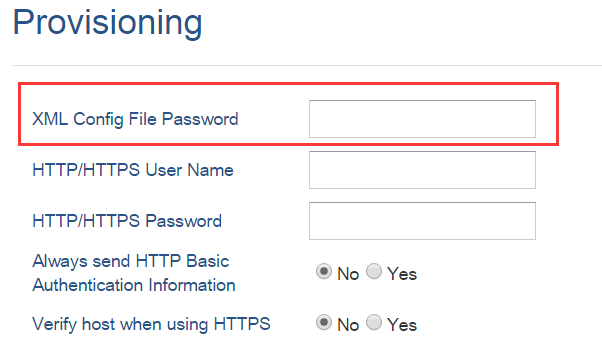
When the XML configuration file is encrypted using this method, the base station will only be able to decrypt and parse the file if the user set the XML Config File Password in P1359 of the binary configuration file or in the web UI.
Secure Provisioning
Although the XML configuration file can be encrypted and the encryption algorithm itself is regarded as safe and strong by using AES with 256-bit key length, it remains a question on how to bootstrap and provision the initial XML encryption password. There are several methods to provide solutions to this:
1. Use the legacy binary configuration file to set the initial XML encryption password. The legacy binary file is encrypted and it generally regarded safe.
2. Use HTTPS and use client side authentication. This is the industry standard approach and has the strongest safety.