All Grandstream SIP products support being provisioned by an XML configuration file which consists of <Pxxxxx > tags (xxxxx is a number that can be 0-99999) known as P values. Every P value is mapped to a configurable option of the device. By setting/changing the values of those P values, we can provision the device with zero touch. This XML provisioning mechanism is beneficial to every GS customer since the very beginning. To learn more about Grandstream SIP device provisioning, please refer https://documentation.grandstream.com/knowledge-base/sip-device-provisioning-guide/
Since there are thousands of P values for each product, and all required configurations come with a default value, usually there is no need to set all the P values but only the ones to be customized in real usage. Also, some users, especially resellers and VoIP providers, need to deploy a lot of devices by using the XML files that only have different SIP credentials while all other settings such as network settings, call feature settings, audio settings and etc., which are the same parameters. Creating XML file one by one for each device is very time consuming. This XML configuration file generator is designed to save time for these customers in this situation.
The principle of this software is to use a TXT/XML format file to store all these “same” values of P values, and use a CSV format file to store the “various” value of P values, and generate a batch of XML configuration files from the two input files, with most identical settings having only a few fields different.
This user guide introduces how to use the windows-based XML configuration file generator to create XML configuration files.
To download the XML Configuration File Generator, please refer to the following link https://www.grandstream.com/support/tools
FILES IN THE PACKAGE
After unzipping the software package, you will find all the files as below screenshot.

Main program is: GSXmlGenerator_[version].exe, double click the exe file to open it.
Example_Configure_CSV_file: It is a folder contains four example files. One example file is the “TXT format file” which is the configuration template containing all the constant P values (SIP credential P values can be different). The second example file is a CSV file which contains variables for SIP credential related P values for the “TXT format file”. The third example file is the “XML format file” (using GXV model as the example) which is the configuration template containing all pre-configure parameters (SIP credential parameters can be different). The fourth example file is a CSV file which contains variables for the preconfigure parameters for the “XML format file” (using GXV model as the example).
Example TXT Config Template (Config_Example_Ver1.txt)
Below is the txt config template in the downloaded folder. It only includes a few P values for the most basic SIP account settings. You can always add as many P values as you need.
To find all the P values, you can download the full P value config template for all the devices from Grandstream Networks official website tools page.
#########################################################################
## Configuration Template Example for testing the converting tool      ##
#########################################################################
#####################################################
## Example P values                                ##
#####################################################

# Account 1:
# Account Active. 0 - No, 1 - Yes. Default value is 0
# Number: 0, 1
P271 =

# Account Name
P270 =

# SIP Server
P47 =

# SIP User ID
P35 =

# SIP Authenticate ID
P36 =

# SIP Authenticate Password
P34 =

# Name (Display Name, e.g., John Doe)
P3 =

# Account 2:
# Account Active. 0 - No, 1 - Yes. Default value is 0
# Number: 0, 1
P401 =

# Account Name
P417 =

# SIP Server
P402 =

# SIP User ID
P404 =

# SIP Authenticate ID
P405 =

# SIP Authenticate Password
P406 =

# Name (Display Name, e.g., John Doe)
P407 =

### IP Address.
### Note: Please change Subnet mask, Gateway, DNS Servers to your network.
### GS_XML_Generator will only configure the IP address.
# IP Address Mode. 0 - DHCP, 1 - Static IP, 2 - PPPoE
# Number: 0,1,2
# Mandatory
# Reboot required
# If you want to use this tool to set IP address, set P8=1 then.
P8=1

#IP Address. Ignore if DHCP or PPPoE is used
P9=
P10=
P11=
P12=

#Subnet mask. Ignore if DHCP or PPPoE is used
P13=
P14=
P15=
P16=

#Gateway. Ignore if DHCP or PPPoE is used
P17=
P18=
P19=
P20=

#DNS server 1. Ignore if DHCP or PPPoE is used
P21=
P22=
P23=
P24=

#DNS server 2. Ignore if DHCP or PPPoE is used
P25=
P26=
P27=
P28=
####################################################################
## Example P values End                                           ##
####################################################################
There are some regulations for the txt config template file:
- Lines starting with “#” will be commented in XML file.
- Lines starting with “Pxxxxx = value” will be set in XML as <Pxxxxx>values</Pxxxxx>.
- The SIP account 1 and account 2 related P values in template will be replaced with the value in the CSV file and all other values will use the same ones in template. For example, if we set SIP server P47 = Grandstream.com in the template, all the XML files will be <P47>Grandstream.com</P47>.
Example CSV File (MAC_Ver1.csv)
You can open and edit the CSV file in MS Office Excel or editor like Notepad++ (be aware of the comma).
MS Office Excel:

Notepad++

There are some regulations for the CSV file:
- The first line of the CSV file includes the parameters in the config template. The P values must match the actual P values in the config template in order to provision the correct parameters to the device.
- The MAC address is used for identifying each XML files. If there are any duplicated MAC addresses in the CSV file, the generated XML file will be updated with the last row parameters of the duplicated MAC address.
- The order of the columns does not matter; however, a column of “mac” is required. The value of “mac” column is not case sensitive, it only allows 0-9, a-f and A-F.
- Other than MAC address, all other settings in CSV file are optional and can be left blank.
Example XML Config Template (Config_Example_Ver2_GXV.xml)
Below is the XML config template in the downloaded folder. The example file is generated based on the parameters in GXV models. It only includes a few parameters for GXV account settings. You can always add as many P values as you need based on the parameters in GXV models. To find all the parameters, you can download the full parameters config template for other models from Grandstream Networks official website tools page.
<?xml version="1.0" encoding="UTF-8"?>
<gs_provision version="1">
  <config version="2">

    <!--#################################################################-->
    <!--##  Configuration Template                                     ##-->
    <!--#################################################################-->
<!-- Account 1 Active -->
 	 	<!-- Yes, No -->
 	 	<item name="account.1.enable">Yes</item>
 	 	<!-- Account Name -->
 	 	<item name="account.1.name"></item>
 	 	<!-- SIP Server -->
 	 	<item name="account.1.sip.server.1.address"></item>
 	 	<!-- SIP User ID -->
 	 	<item name="account.1.sip.userid"></item>
 	 	<!-- SIP Authentication ID -->
 	 	<item name="account.1.sip.subscriber.userId"></item>
 	 	<!-- SIP Authentication Password -->
 	 	<item name="account.1.sip.subscriber.password"></item>
     	<!-- Display Name -->
 	 	<item name="account.1.sip.subscriber.name"></item>
<!-- Account 2 Active -->
 	 	<!-- Yes, No -->
 	 	<item name="account.2.enable">Yes</item>
 	 	<!-- Account Name -->
 	 	<item name="account.2.name"></item>
 	 	<!-- SIP Server -->
 	 	<item name="account.2.sip.server.1.address"></item>
 	 	<!-- SIP User ID -->
 	 	<item name="account.2.sip.userid"></item>
 	 	<!-- SIP Authentication ID -->
 	 	<item name="account.2.sip.subscriber.userId"></item>
 	 	<!-- SIP Authentication Password -->
 	 	<item name="account.2.sip.subscriber.password"></item>
     	<!-- Display Name -->
 	 	<item name="account.2.sip.subscriber.name"></item>
    <!--####################-->
    <!--##  P values End  ##-->
    <!--####################-->
  </config>
</gs_provision>
There are some regulations for the XML config template file:
- Lines starting with “<!–” will be commented in XML file.
- Lines starting with “<item name = parameter” will be set in XML as <Pxxxxx>values</Pxxxxx>, the parameter must correspond the P value in the device.
- The SIP account 1 and account 2 related P values in template will be replaced with the value in the CSV file and all other values will use the same ones in template. For example, if we set SIP server account.1.sip.server.1.address = Grandstream.com in the template, all the generated XML files will be <P47>Grandstream.com</P47>.
Example CSV File (MAC_Ver2_GXV.csv)
You can open and edit the CSV file in MS Office Excel or editor like Notepad++ (be aware of the comma).
The screenshots below are the CSV example based on GXV model.
MS Office Excel:

Notepad++

There are some regulations for the CSV file:
- The first line of the CSV file includes the parameters in the XML file. The parameters must match the actual parameters in the device in order to provision the correct parameters to the device.
- The MAC address is used for identifying each XML files. If there are any duplicated MAC addresses in the CSV file, the generated XML file will be updated with the last row parameters of the duplicated MAC address.
- The order of the columns does not matter; however, a column of “mac” is required. The value of “mac” column is not case sensitive, it only allows 0-9, a-f and A-F.
- Other than MAC address, all other settings in CSV file are optional and can be left blank.
USE THE XML CONFIGURATION GENERATOR
Program Menu
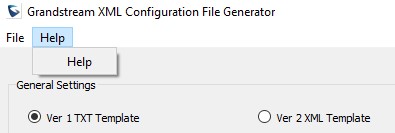
Program menu provide 2 functions allow user to change the XML header text and reset all the field to make this tool more helpful for general users. You can use the help menu to access the user manual online.
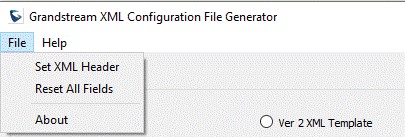
Menu | Description |
Set XML Header | Default XML header is “Grandstream XML Provisioning Configuration”, you can change the file header to others. |
Reset All Fields | Click to clear all the input on the program GUI. |
About | Version and copyright about this program. |
Help | Click to open the online User Manual. |
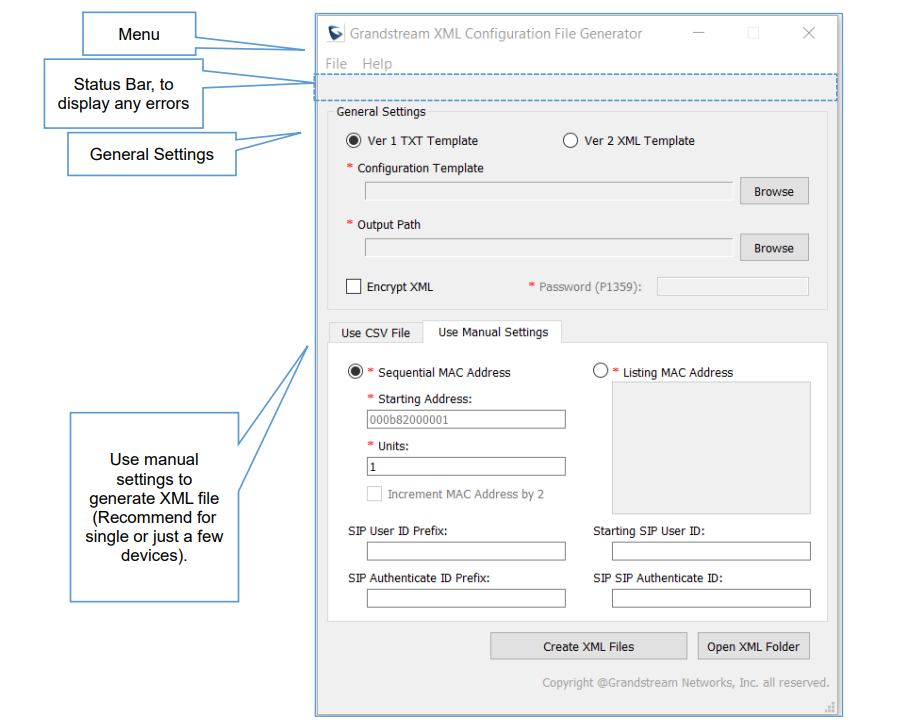
General Settings
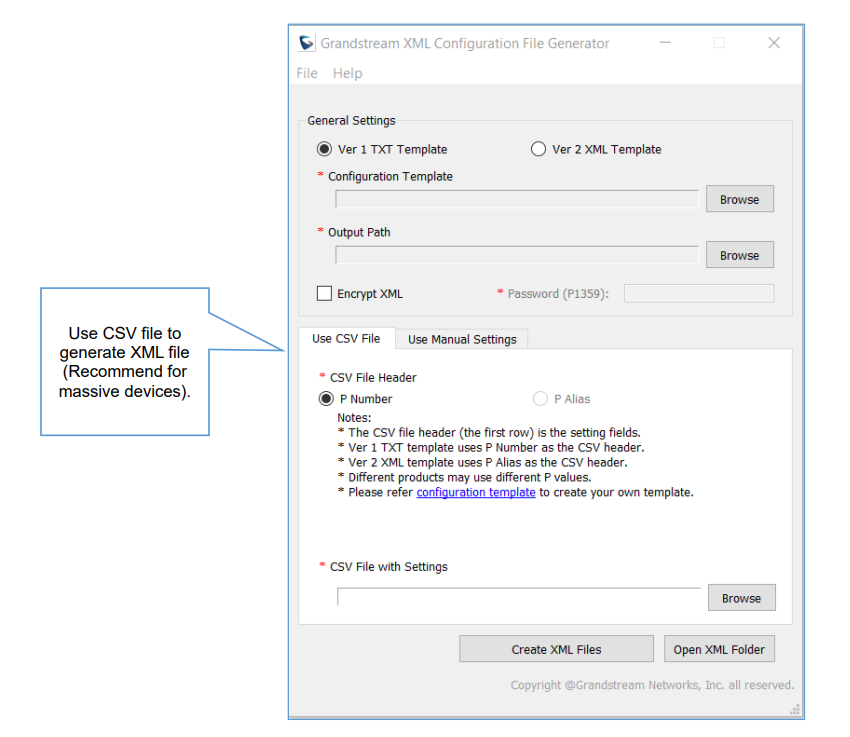
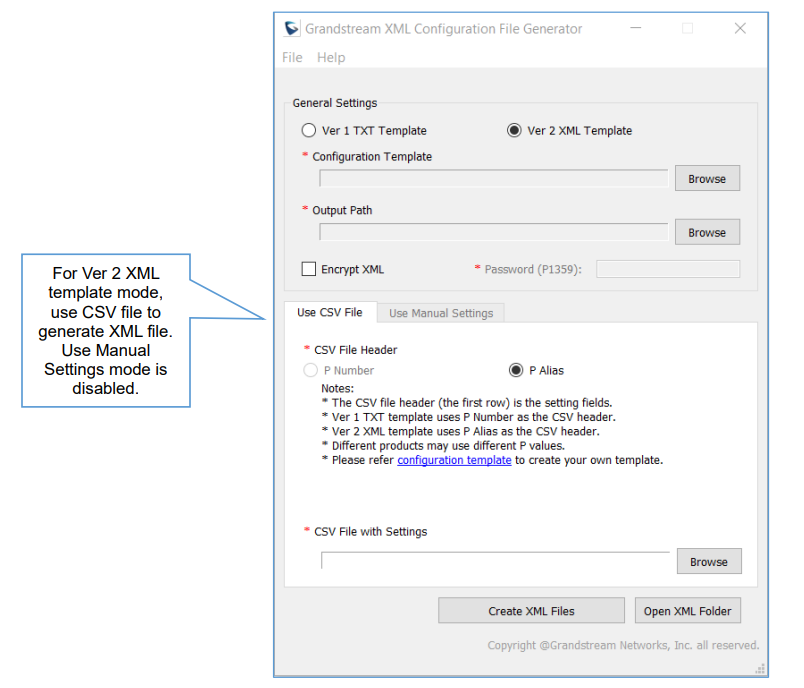
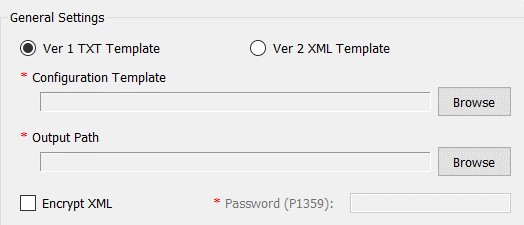
Users can select “Ver 1 TXT Template” to generate the XML files with “.txt” file or generate the XML files with “.xml” file by selecting “Ver 2 XML Template”. Users can use “Ver 1 TXT Template” to generate XML files by CSV file or Manual Settings each time. If users select “Ver 2 XML Template”, users can only use CSV file to generate XML configuration files.
For all methods, users must configure this General Settings section. User must choose the configuration template which is a TXT/XML file, and the output path. Users can optionally choose to encrypt the XML file or not. Any pre-check error will display in the Status Bar.
General Settings | Description |
Configuration Template | Click “Browse” button to choose the TXT/XML template you want to use. You can download all the parameters from Grandstream Support page and add more parameters to the template. |
Output Path | Click “Browse” button to choose the output path of your XML files. |
Encrypt XML | Check this option if you want to encrypt your XML files. |
Password | If you checked “Encrypt XML” option, you can enter the password here. The password cannot be null and should only contains ASCII characters between 33 to 126. If you choose to encrypt the XML files, make sure your devices have pre-configured P1359 with the same value of this password. When the device tries to be provisioned by the XML file, it will use P1359 to decrypt the XML file. More detailed please refer GS Provisioning Guide. |
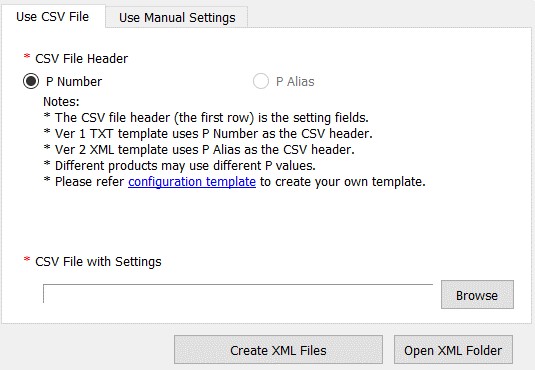
Use CSV file to Generate XML files
Use CSV file is one option to use this tool, after you click “Browse” button choose the CSV file, you can select the CSV file with the configured parameters. You can click the “Open XML Folder” option to open the Output Path you configured in the General Settings.
Use CSV File | Description |
Browse | Click “Browse” button to choose the CSV file you want to use. The csv file requires a MAC field in each row and options to have the parameters of the device. On the CSV file, each row corresponds to an XML file. Every XML file will be named as cfg{MAC}.xml and use the values in CSV file, if no values have been find in CSV, it will use null value. |
Open XML Folder | Click this button to open the directory of your configured XML Output path. |
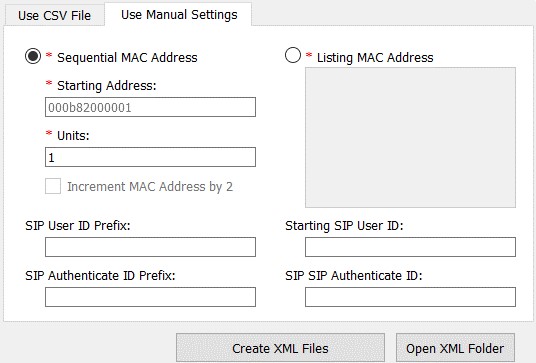
Use Manual Settings to Generate XML Files
If you do not have very much devices need XML files, you can choose to use manual settings which is convenient without any need to configure the CSV file. You can choose to use either sequential MAC address or listing Mac address to do so. This method is only available for “Ver 1 TXT Template”.
If you select “Sequential MAC Address”, you will need to set the starting address and units (how many devices you have) and if the MAC address is incremented by 2 (by default it is increment by 1).
If you select “Listing MAC address”, you will need to emulate all the MAC addresses in the text field, break them by skipping the lines, it must have no break signs like , ; : “ ” between the MAC addresses, just make sure to skip the lines. The MAC address is not capital sensitive.
Click the “Create XML Files” which will start to generate the XML files, once completed, you will see a message box with either success info or error info. Any pre-check error will be displayed in the Status Bar. You can click the “Open XML Folder” file to open the Output Path you have configured in the General Settings.
Use Manual Settings | Description | |
Sequential MAC Address | Starting Address | Select “Sequential MAC address” to use the sequential MAC address settings. This will generate an XML files with the SIP User ID/Authenticate ID fields configured. All the other P values will stay the same as in the TXT file. |
Units | Enter the number of units to provision, this also will be the number of output XML files. | |
Increment MAC address by 2 | Check this option if you want to increment MAC address by 2 instead of default 1. | |
Listing MAC Address | Select “Listing MAC Address” will use all the listed MAC address in this text field. Every MAC address is divided by new line. Must not contain any special break sign such as , : ; “” in the MAC address. | |
SIP User ID Prefix | The prefix for SIP User ID, it can be numbers or strings, if you set Prefix to 100, and Starting SIP User ID as 1, the SIP User ID be generated will be 1001, or if the prefix is “Company”, and the start SIP User ID is 1001, the generated User ID will be “Company1001”. It will increment by 1 since the first sequential MAC address or listing MAC address. | |
Starting SIP User ID | The SIP User ID, it can be numbers or strings, if you set Prefix to 100, and Starting SIP User ID as 1, the SIP User ID be generated will be 1001, or if the prefix is “Company”, and the start SIP User ID is 1001, the generated User ID will be “Company1001”. It will increment by 1 since the first sequential MAC address or listing MAC address. | |
SIP Authenticate ID Prefix | The prefix for SIP Authenticate ID, it can be numbers or strings, if you set Prefix to 100, and Starting SIP User ID as 1, the SIP User ID be generated will be 1001, or if the prefix is “Company”, and the start SIP User ID is 1001, the generated User ID will be “Company1001”. It will increment by 1 since the first sequential MAC address or listing MAC address. | |
Starting SIP Authenticate ID | The SIP Authenticate ID, it can be numbers or strings, if you set Prefix to 100, and Starting SIP User ID as 1, the SIP User ID be generated will be 1001, or if the prefix is “Company”, and the start SIP User ID is 1001, the generated User ID will be “Company1001”. It will increment by 1 since the first sequential MAC address or listing MAC address. | |
CHANGE LOG
Version 4.1
- Added support for Ver 2 XML template. (Only with CSV setting, not manual setting as alias may be different for each product.)
- Added support to self-adjust to high resolution screen and the scale and layout settings.
Version 4.0
- Added support for customized CSV file header to support unlimited P values. (for multiple accounts). Since v4.0, the CSV header must be the P values except the “mac” column. Users can add as many P values as needed into their CSV files to generate new XML config files.
- Removed restriction for GS MAC OUI, now it supports any MAC OUI address for GS Wave devices.
- Updated the UI to break CSV file and manual settings into 2 separate tabs to avoid confusing.
Version 3.5
- Adjusted UI to support Mac OSX and Linux Platform. Release Mac OSX and Linux Ubuntu version.
- Fixed the issue that Windows Defense consider this tool as virus.
Version 3.4
- Added support for Grandstream new MAC OUI, now MAC address start with “C074AD” (not case sensitive) will also be supported.
Version 3.3
- Fixed bug that mistakenly escape \ sign into ', correct it to escape ‘ into '.
Version 3.2
- Added Gateway and Subnet Mask setting in CSV file.
Version 3.1
- Added IP address setting in CSV file.
- Fixed encrypt xml file could crash because of some template have non-ascii string issue.
Version 3.0
- Initial Version of 3.x, changed GUI framework from windows 2.3.