
Dynamic Host Configuration Protocol (DHCP) is a standardized network protocol used on Internet Protocol (IP) networks for dynamically distributing network configuration parameters, such as IP addresses for interfaces and services. With DHCP, network devices request IP addresses and networking parameters automatically from a DHCP server, reducing the need for a network administrator or a user to configure these settings manually.
DHCP servers can be configured to provide optional data that fully configures TCP/IP on a client. Some of the most common DHCP option types configured and distributed by the DHCP server during leases include default gateway, router, DNS, and WINS parameters.
This guide describes advanced DHCP options supported on Grandstream products. Administrators can use these DHCP options for easy setup, to provide specific configuration per device model, synchronize time with NTP servers, configure ACS server URL on devices and more…

ENVIRONMENT SETUP
This chapter provides steps to setup a minimal test environment to run DHCP options described in this guide using DHCP-server via server manager in Windows server 2012.
Administrators can use other Windows or Linux based DHCP servers at their convenience.
Step 1: Install DHCP via Server Manager
Before starting the role installation, make sure the computer has a static IP address. In this guide, we will use Windows Server 2012 with static IP address: 192.168.1.1.
- Launch the “Add Roles and features Wizard” from the Dashboard on Server Manager, and select “Role based or feature based installation”.
- After choosing the server from the “server pool”, select DHCP server from the roles list and go through the installation steps.
- The installation will be completed, and the last page of the wizard is the following figure:
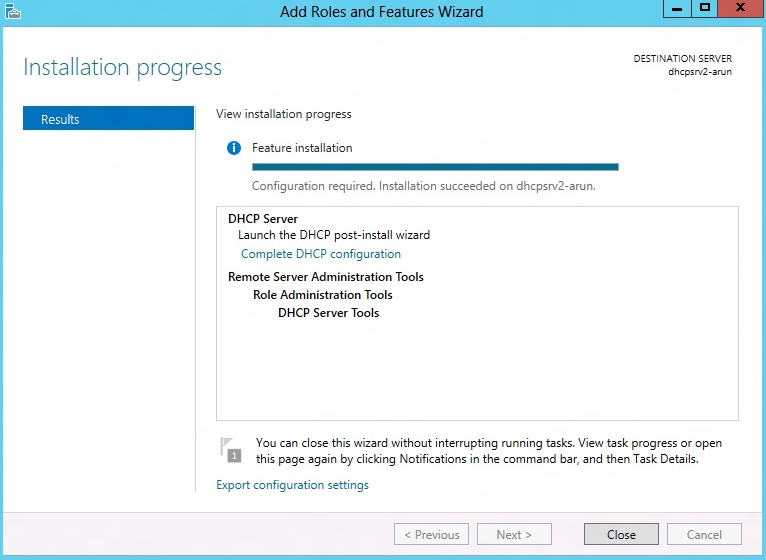
- Complete the steps required for the post-install configuration by clicking on “complete DHCP configuration”.
Step 2: DHCP Server Basic Configuration
The first step in the installed DHCP server configuration is to create scopes (Ranges of IP addresses) the administrator wants to lease out to clients.
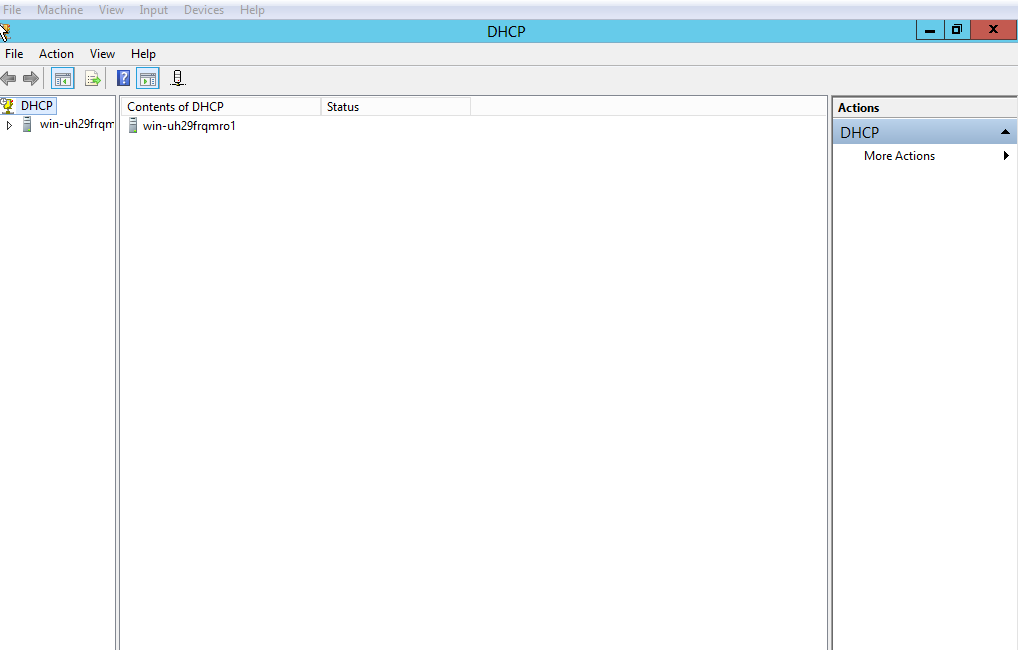
- Type: dhcpmgmt.msc Under “Windows Run” to open DHCP Management.
- Under the domain name, right click the “IPv4”, and then click on “New Scope” to open the New Scope wizard:

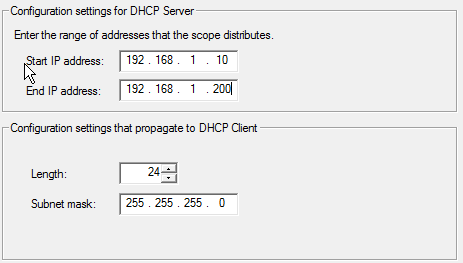
- Enter the Name of the new scope and its description, and set the range of IP addresses to lease to DHCP clients. Leave the Length 24 by default and click Next.
- The administrator can configure a restricted range of IP addresses by entering the range in “Add exclusions” and setting the lease duration.
- If you have a Router (Default gateway), set the router IP address and click Next.
- Set the domain Name of the DNS server and its IP address, and click Next.
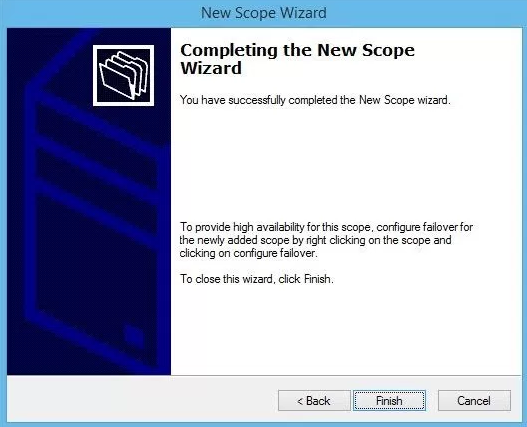
- Activate the scope by clicking “Yes, I want to activate this scope now”, and click Next.
- Click on Finish to close the wizard.
DHCP OPTIONS
To configure the DHCP options, the method includes the following steps:
- In the DHCP MMC, right-click on IPv4 and select “Set Predefined Options”.
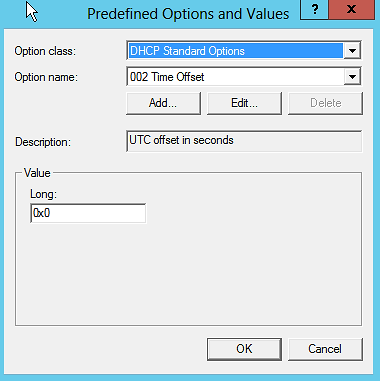
- Option Class: Set the Vendor Class serving to enhance DHCP functionalities (The admin can create a vendor class: DHCP MMC /IPv4 /Define Vendor Classes).
- Option Name: Set the option needed.
- Add: Increase the number of options by adding a new one.
- Edit: Modify a specific option.
- Value: Set the value of the chosen option.
- Just after predefining the options and their values, click on “Server Options” to choose the options.

DHCP Option 2 (Time Offset)
Description
DHCP option 2 informs the client about the time zone offset (in seconds).
A positive offset indicates a location east of the zero meridian and a negative offset indicates a location west of the zero meridian.
Please refer to RFC2132 for more details.
Example
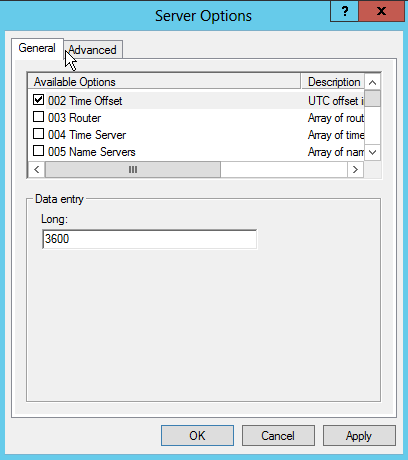
In above example, GMT+1 was set as an offset value
(One hour * 60 minutes/hour * 60 seconds/minute) = 3600.
Screenshots
Below screenshots of DHCP Discover/Offer for Option 2:

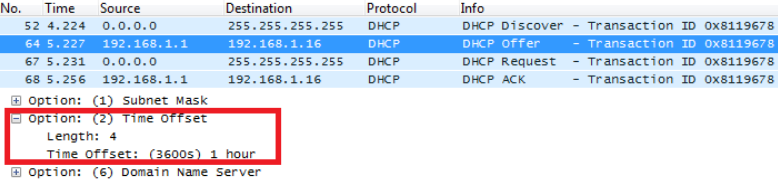
To set Pacific Standard Time (GMT-8) for example. This field would be filled with “-28800”. (Eight hours * 60 minutes/hour * 60 seconds/minute).
DHCP Option 42 (NTP Server)
Description
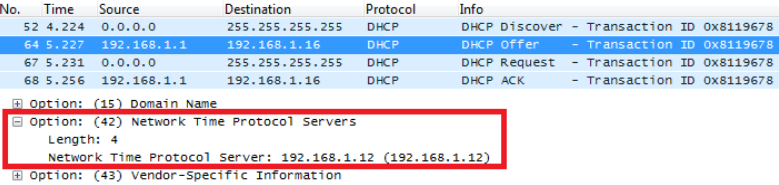
DHCP option 42 specifies a list of NTP servers available to the client by IP address, so that the phone may obtain the date and time from the server.
Please refer to RFC2132 for more details.
Example
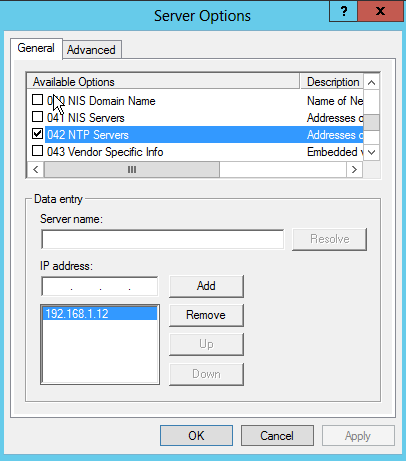
Screenshots
Below screenshots of DHCP Discover/Offer for Option 42.

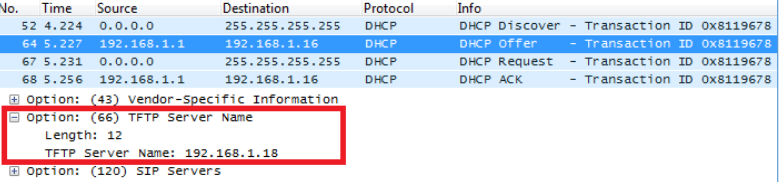
DHCP Option 66 (TFTP Server Name)
Description
DHCP option 66 provides the IP address or the hostname of a single provisioning server where devices will be redirected to get their configuration files. Without this DHCP option, a manual configuration is requested on each phone the first time it boots.
Please refer to RFC2132/RFC5859 for more details.
Example
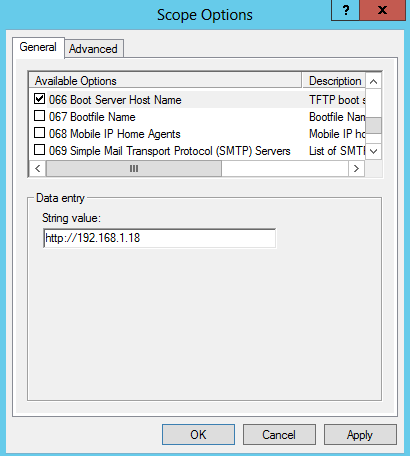
If http:// is not specified, default TFTP protocol is used for configured server.
Screenshots

DHCP Option 43 (Vendor Specific Information)
Description
This option is used by clients and servers to exchange vendor-specific information.
DHCP server can send one or more vendor specific parameters to clients, encoded in the form option_code/value_length/value in hexadecimal format.
Please refer to RFC2132 for more details.
Example
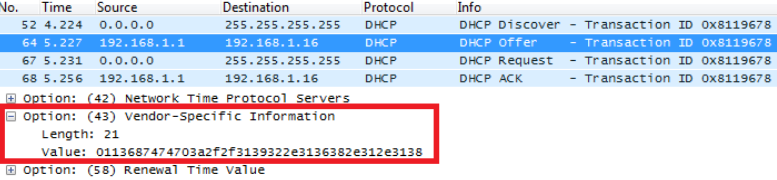
In following example, DHCP server is configured to send CWMP information (ACS URL http://192.168.1.18) encapsulated in option 43.
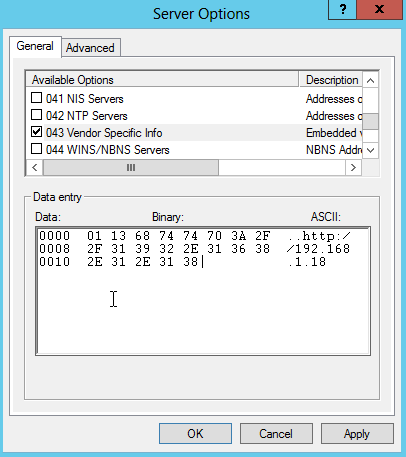
Above DHCP option 43 contains the following:
0x01 (CWMP option for ACS URL)
0x13 (hex of decimal 19 = length of the URL)
19 bytes forming the URL in hexadecimal format (http://192.168.1.18)
Screenshots

DHCP Option 12 (Host Name)
Description
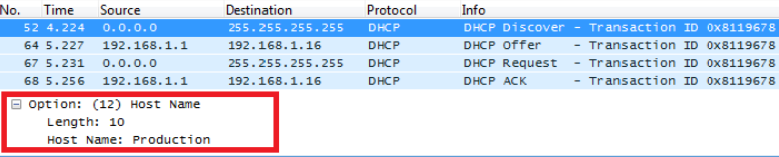
This option specifies the name of the client.
Option 12 is used to identify the client’s name against the DHCP server to make special configuration from the server side, this is similar to option 60 and 125.
Please refer to RFC1533/RFC2132 for more details
Screenshots
Below screenshot is taken from GXP2140, the value of Option 12 can be modified from the Phone WebGUI under Network Settings 🡪 Basic Settings 🡪 Host Name

DHCP Option 60 (Vendor Class Identifier)
Description
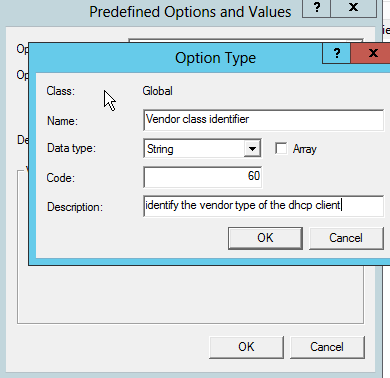
Option 60 is used by clients to optionally identify the vendor type and configuration of a DHCP client.
When using multiple devices from different vendors, DHCP server can provide specific configuration for each client based on received Option 60.
Please refer to RFC1533/RFC2132 for more details.
Example
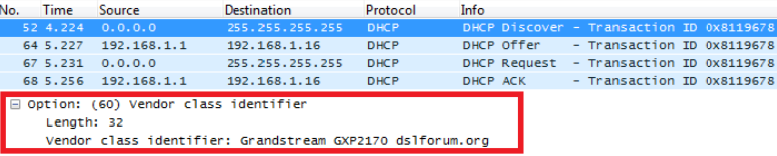
In following example, option 60 is configured to identify GXP2170 with its value “Grandstream GXP2170 dslforum.org”.
The first step is to add the option 60 under “Predefined options and values 🡪 Add”.
Client packets with configured “option 60” but have no string specified (a string of 0 length) are handled accordingly.
Screenshots
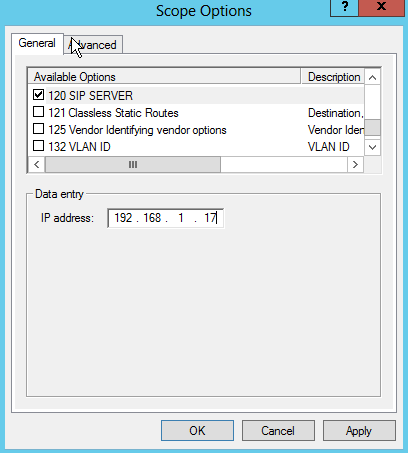
DHCP Option 120 (SIP Server)
Description
The option is used to provide SIP server IP address or FQDN to SIP clients.
Please refer to RFC3361 for more details.
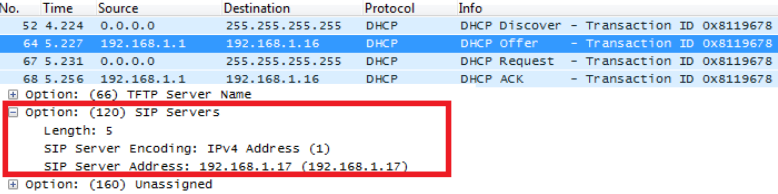
Example
In the following example, the DHCP option 120 is configured by adding and defining a new option under “Predefined Options and Values”.
Screenshots

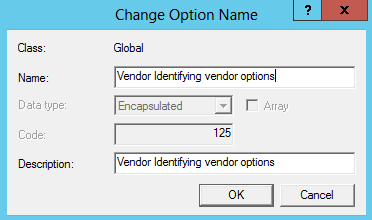
DHCP Option 125 (Vendor-Identifying Vendor Options)
Description
DHCP clients may use this option to identify the vendor that manufactured the hardware on which the client is running the software in use in a unique way.
Option 125 is similar to option 12 & 60 but advertising more parameters of a device:
- DeviceManufacturerOUI
- DeviceSerialNumber (Grandstream products set DeviceSerialNumber with MAC address)
- DeviceProductClass
Please refer to RFC3925 for more details.
Example
Add the option under “Predefined options and values” with data type: Encapsulated.
Screenshots
During DHCP initiation, DHCP Discover/DHCP Request including option 125 are sent from client, the server checks V-I Vendor-specific information, if matching configured values, specific configuration will be provided to client, otherwise, common configuration is provided to client.

Advertised information in above option 125 are:
- DeviceManufacturerOUI = 000b82
- DeviceSerialNumber = DeviceMACaddress = 000b82XXXXXX
- DeviceProductClass = GXV3370
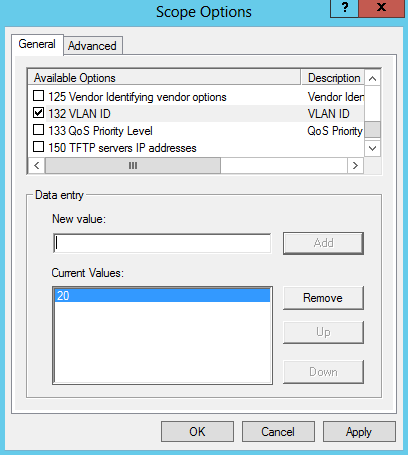
DHCP Option 132 (Vlan ID)
Description
This option allows to assign a VLAN ID tag to devices during booting stage/DHCP renewal.
Please refer to RFC4578 / IEEE_802.1Q for more details.
Example
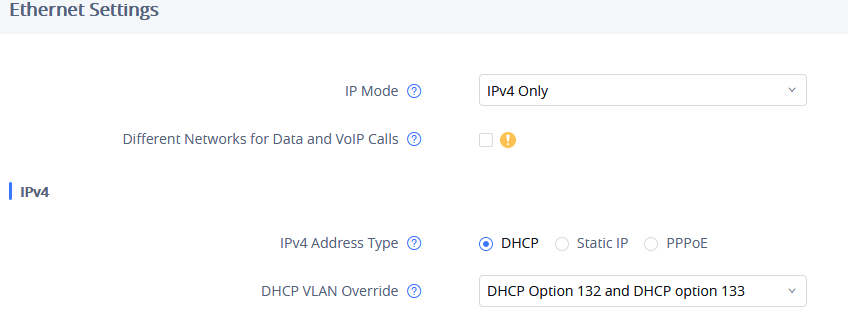
- Enable the DHCP VLAN Override by setting it to: “DHCP Option 132 and DHCP Option 133” under the web GUI of your IP Phone supporting the DHCP option 132.
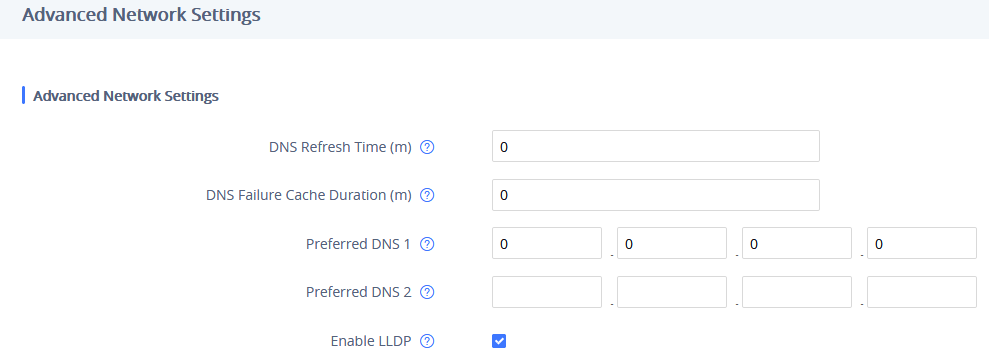
- Disable LLDP because the phone cannot support LLDP and option 132 at the same time as they conflict.


- Add the Option 132 under “Predefined options and values” with data type: “String” and select “Array”.
Screenshots

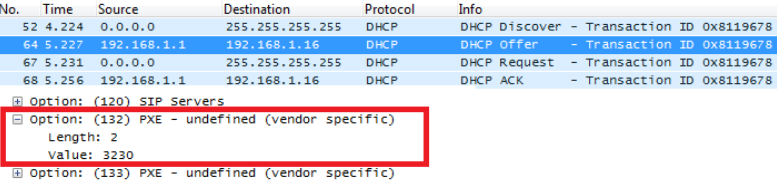
In above screenshot, value 3230 is 20 (vlan-id) converted from text to hexadecimal.
DHCP Option 133 (QoS Priority Level)
Description
This option assigns the priority within an Ethernet frame header when using VLAN tag, it specifies a priority value between 0 and 7 to differentiate the traffic priority.
Please refer to RFC4578 / IEEE_P802.1p for more details
Example
- Enable the DHCP VLAN Override by setting it to: “DHCP Option 132 and DHCP Option 133” under the web GUI of your IP Phone supporting the DHCP option 132.
- Disable LLDP because the phone cannot support LLDP and option 132 at the same time as they conflict.
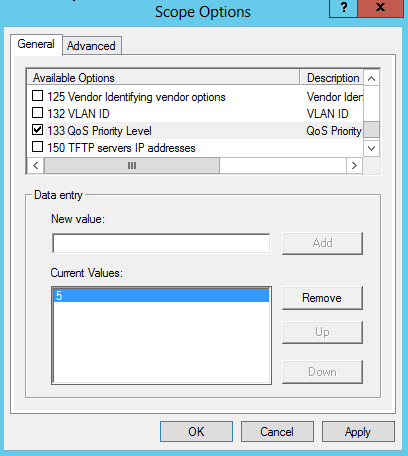
- Add the Option 133 under “Predefined options and values” with data type: “String” and select “Array”.
Screenshots

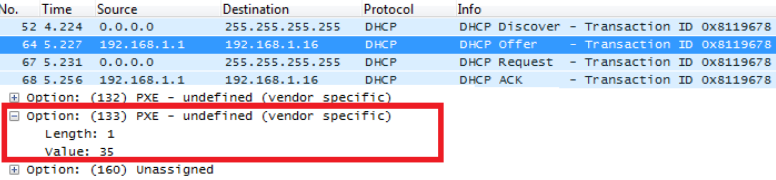
In above screenshot, value 35 is 5 (priority level) converted from text to hexadecimal.
DHCP Option 150 (TFTP Servers List)
Description
DHCP option 150 provides one or more IP addresses of TFTP server(s) where devices will be redirected to download their configuration files. Without this DHCP option, a manual configuration is requested on each phone the first time it boots.
Please refer to RFC5859 for more details.
Example
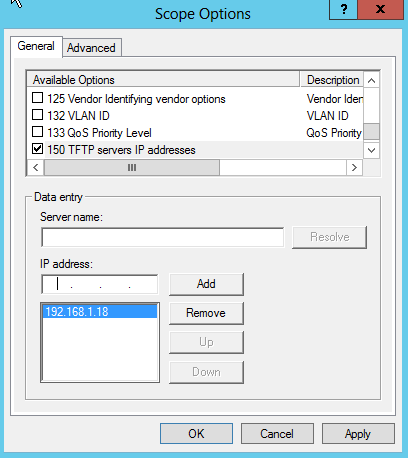
Using a GXP Color phone for example, go to the WebGUI under “Maintenance 🡪 Upgrade and Provisioning”, set the “Additional Override DHCP Option” to Option 150.

Predefine the option 150 by adding it and setting the IP addresses of the TFTP servers needed by the devices to be configured.
Screenshots


DHCP Option 160 (Configuration Server Address)
Description
Similar to option 66, DHCP option 160 can provide one or more configuration server(s) to clients to get automatically provisioned. Without this DHCP option, a manual configuration is requested on each phone the first time it boots.
Example
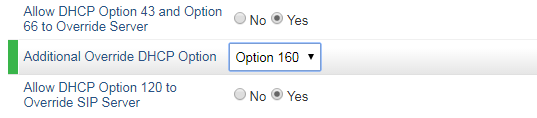
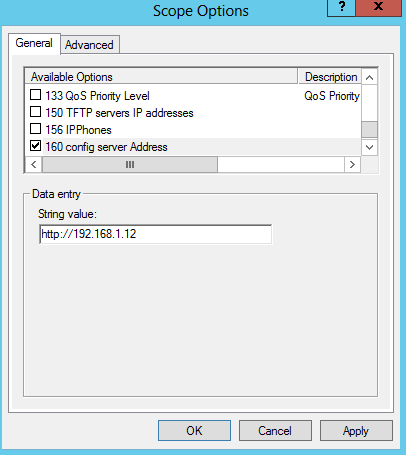
Using a GXP Color phone for example, go to the WebGUI under “Maintenance 🡪 Upgrade and Provisioning”, set the “Additional Override DHCP Option” to Option 160.
Screenshots

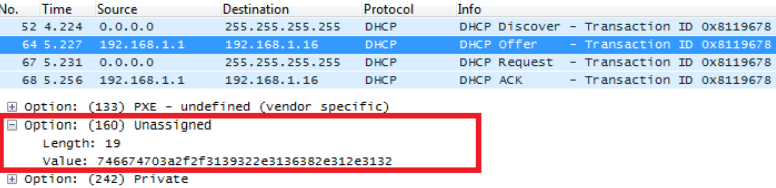
In above screenshot, the value of the TFTP server was converted to hexadecimal. The phone contacts this IP address to get provisioned after receiving TFTP server value.
DHCP Option 242 (Avaya IP Phones)
Description
Once this option enabled, the phone will use configuration info issued by DHCP sever.
Option 242 can include following parameters:
- MC IP address
- VLAN configuration
- HTTP server, Proxy
- Transport Protocol
Example

Screenshots

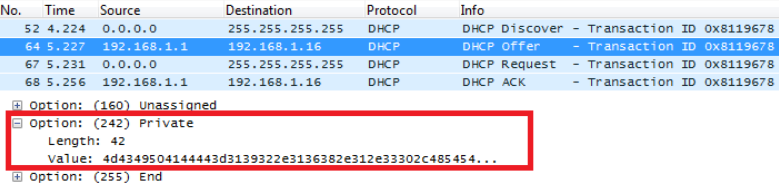
In above screenshot, MCIPADD and HTTPSRVR are converted to hexadecimal.
SUPPORTED DEVICES
Following table shows Grandstream products supporting DHCP Options:
DHCP Options | Grandstream Models |
| |||||||||
GXP16XX | GXP17XX | GXP21XX | GRP261X | GRP260X | GVC320X | GAC2500 | GXV33XX | GXW42XX | HT8XX | DP75X | |
Option 2 | ✓ | ✓ | ✓ | ✓ | ✓ | ✓ | ✓ | ✓ | ✓ | ✓ | ✓ |
Option 12 | ✓ | ✓ | ✓ | ✓ | ✓ | ✓ | ✓ | ✓ | ✓ | ✓ | ✓ |
Option 42 | ✓ | ✓ | ✓ | ✓ | ✓ | ✓ | ✓ | ✓ | ✓ | ✓ | ✓ |
Option 43 | ✓ | ✓ | ✓ | ✓ | ✓ | ✓ | ✓ | ✓ | ✓ | ✓ | ✓ |
Option 60 | ✓ | ✓ | ✓ | ✓ | ✓ | ✓ | ✓ | ✓ | ✓ | ✓ | ✓ |
Option 66 | ✓ | ✓ | ✓ | ✓ | ✓ | ✓ | ✓ | ✓ | ✓ | ✓ | ✓ |
Option 120 | ✓ | ✓ | ✓ | ✓ | ✓ | ✓ | ✓ | ✓ | ✗ | ✓ | ✓ |
Option 125 | ✓ | ✓ | ✗ | ✗ | ✗ | ✓ | ✓ | ✓ | ✓ | ✓ | ✓ |
Option 132 | ✗ | ✗ | ✗ | ✗ | ✗ | ✗ | ✗ | ✓ | ✗ | ✗ | ✗ |
Option 133 | ✗ | ✗ | ✗ | ✗ | ✗ | ✗ | ✗ | ✓ | ✗ | ✗ | ✗ |
Option 150 | ✓ | ✓ | ✓ | ✓ | ✓ | ✗ | ✗ | ✗ | ✗ | ✗ | ✗ |
Option 160 | ✓ | ✓ | ✓ | ✓ | ✓ | ✓ | ✓ | ✓ | ✗ | ✓ | ✓ |
Option 242 | ✗ | ✗ | ✗ | ✗ | ✗ | ✓ | ✓ | ✓ | ✗ | ✗ | ✗ |