
WELCOME
Thank you for purchasing Grandstream GAC2570 Audio Conferencing Systems. The GAC2570 is a full-duplex conference GAC2570 featuring high-quality voice communication for meeting rooms with a middle room. With an outstanding speaker and MMAD (Multichannel Microphone Array Design), GAC2570 delivers a natural and immersive conference experience to both local and remote participants. The true wireless design, composed of wireless extension Microphones, modern Wi-Fi/BT support, and a built-in battery, can keep your ongoing conference unstopped in case of an occasional conference room change. The state-of-the-art Microphone array design stands for stereo, dead-zone-free, and long-range voice pickup. It wirelessly connects to two extended Microphones and is ideal for large rooms. Furthermore, its modern industrial design and rich features make it ideal for day-to-day business conference conversations.
PRODUCT OVERVIEW
Feature Highlights
The following table contains the major features of the GAC2570:
 GAC2570 |
|
GAC2570 Technical Specifications
The following table resumes all the technical specifications including the protocols/standards supported, voice codecs, telephony features, languages, and upgrade/provisioning settings for GAC2570.
Protocols/Standards | SIP RFC3261, TCP/IP/UDP, RTP/RTCP, HTTP/HTTPS, ARP, ICMP, DNS (A record, SRV, NAPTR), DHCP, PPPoE, SSH, TFTP, NTP, STUN, LLDP- MED, TR-069, 802.1x, TLS, SRTP, IPv6, OpenVPN®. |
Network Interfaces | Ethernet RJ45 10/100/1000 Mbps ports with integrated PoE+ only. |
Bluetooth | Yes, Bluetooth integrated. |
Wi-Fi | Yes, Wi-Fi 6, Dual-band 2.4 & 5GHz with 802.11 a/b/g/n/ac/ax. |
Operating System | Android 10 |
Voice Codec | G.711µ/a, G.722 (wide-band), G.722.1c, G.726-32, iLBC, Opus, G.729A/B in-band and out-of-band DTMF (In audio, RFC2833, SIP INFO), VAD, CNG, AEC, PLC, AJB, AGC, ANS, Noise shield. |
Microphone | 12 omnidirectional Microphones with MMAD. |
External Microphone | Support two external wireless Microphones. |
Speaker | 10-watt high-fidelity speaker Frequency: 220-14,000 Hz Volume: Up to 83 dBA at 1.0 meter |
HD Audio | Yes, HD speakerGAC2570 with support for full-band audio |
QoS | Layer 2 QoS (802.1Q, 802.1p) and Layer 3 (ToS, DiffServ, MPLS) QoS. |
Auxiliary Port | 1x Media port, 1x network port, 1x HDMI IN, 1x USB, 1x Line-Out, 1x Micro- USB, 1x Reset Button, 1x Kensington lock |
Certification | Zoom, Microsoft Teams (ready) |
Security | User and administrator level passwords, MD5 and MD5-sess-based authentication, 256-bit AES encrypted configuration file, TLS, SRTP, HTTPS, 802.1x media access control. |
Multi-languages | English, Chinese, German, Italian, French, Spanish, Portuguese, and Russian. |
Upgrade/ Provisioning | Firmware upgrade via TFTP / HTTP / HTTPS or local HTTP upload, mass provisioning using TR-069 or AES encrypted XML configuration file. |
Power and Green Energy Efficiency | Integrated PoE+ 802.3at Class 4. Built-in rechargeable battery to allow up to 4-hour talk time. |
Package Content | GAC2570 Conference Phone, Ethernet cable, Micro-USB cable, quick installation guide, PoE Injector, HDMI cable (optional), dual wireless extension Microphones (optional) |
Temperature and Humidity | Operation: 0°C to 40°C, Storage: -10°C to 60°C, Humidity: 10% to 90% Non-condensing |
Compliance | FCC: Part 15 (CFR 47) Class B; UL 60950 (power adapter); FCC Part 15C, FCC Part 15E, MPE CE: EN 55032; EN 55024; EN 61000-3-2; EN 61000-3-3; EN 60950-1; EN 301 489-1/17; EN 300 328; EN 301 893; EN 62311; RoHS RCM: AS/NZS CISPR 32/24; AS/NZS 60950.1; AS/NZS 4268 IC: ICES 003, RSS 247, RSP-100, RSS 102 |
GETTING STARTED
This chapter provides basic installation instructions including the list of the packaging contents and also information for obtaining the best performance with the GAC2570.
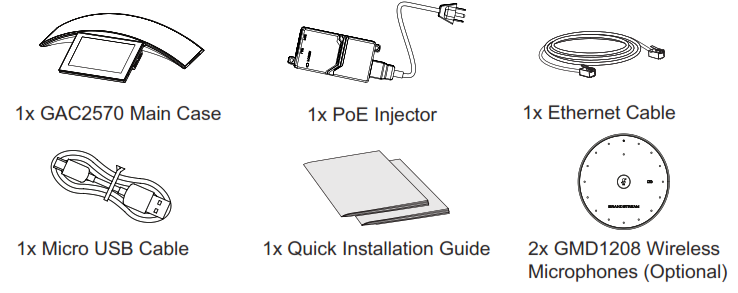
Equipment Packaging
GAC2570 |
|
GAC2570 Ports
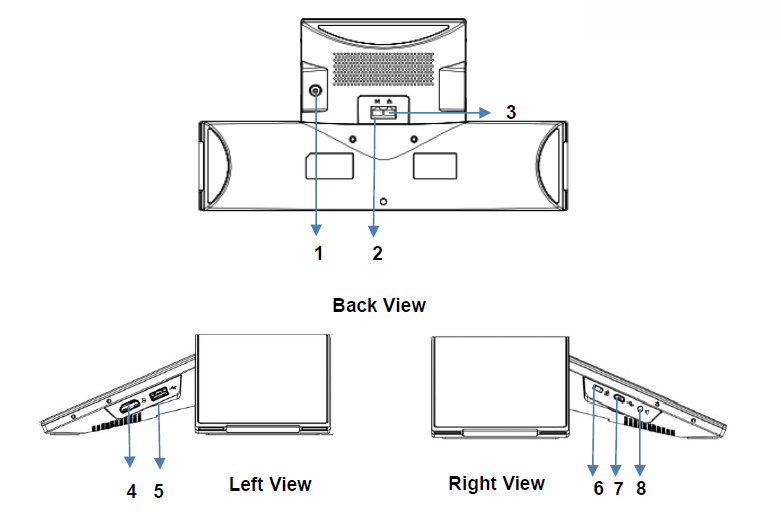
NO. | Name | Description |
1 | Power Button | Press and hold for 5 seconds to power On/Off the device. |
2 | Media Port | Input/output for Media (HUB where multiple Microphones are connected). |
3 | RJ48 Interface | Ethernet RJ45 port (10/100/1000Mbps) supporting PoE+. |
4 | HDMI IN | Share presentation to GVC32xx via Media Port. (The presentation is not displayed on GAC2570) |
5 | USB Interface | Connect your flash drive/hard disk to the USB 2.0 port to read or write data. |
6 | Kensington Lock | Attach the device using this port to a stationary object such as a table with an adequate cable (not included). |
7 | Micro-USB Port | Connect the GAC2570 as Microphone to a GVC32xx or computer. |
8 | 3.5mm Audio Interface | Connect to a 3.5mm speaker to increase the sound. |
Powering and Connecting GAC2570
The GAC2570 can be powered on using a PoE+ switch or injector using the following steps:
- Step 1: Plug an RJ45 Ethernet cable into the network port of the GAC2570.
- Step 2: Plug the other end into the Power over Ethernet (PoE+) switch or PoE+ injector.
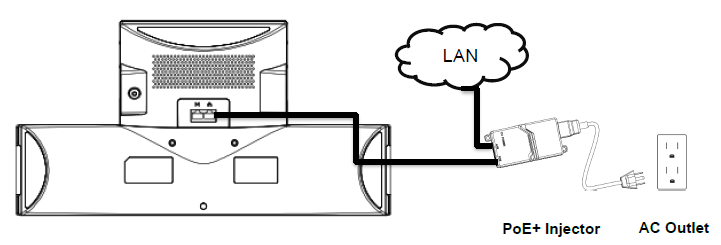
Press and hold the “Power” button to turn on the GAC2570.
Connection Configuration
GAC2570 can be connected via HDMI IN port to a laptop for presentation sharing and linked via Micro USB port to a GVC32xx or a laptop acting as an external MIC/Speaker and via 3.5mm port using a male-to-male cable (not included in the package).
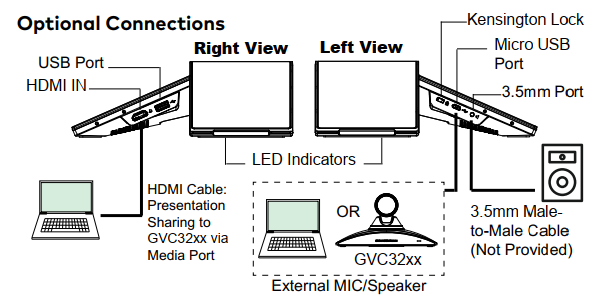
Use GAC2570 as Speaker
GAC2570 can be used as an auxiliary device for GVC32xx or PC for audio acquisition and play either via Bluetooth or Micro-USB interface.
Via USB:
- Connect one end of the USB cable to the Micro USB port of the GAC2570 and the other end to the USB port of GVC32xx/PC;
- The user will be able to Mute/Unmute himself by taping the Mute Key of GAC2570 and can adjust the volume of the GAC2570 speaker playing the conference audio.
Via Bluetooth:
- Enable Bluetooth on the GAC2570 and on the GVC32xx/PC
- Proceed by pairing both devices and make sure that the Audio Input/Output is detected as Bluetooth.
- Users can still be able to Mute/Unmute themselves by tapping the Mute Key of GAC2570 and can adjust the volume of the GAC2570 speaker playing the conference audio.
GAC2570 LCD SETTINGS
The GAC2570 LCD MENU provides easy access to the settings on the device. Some of the settings from Web GUI could be configured via the LCD as well. The following table shows the LCD Settings menu options.
Status |
|
Network |
|
Features |
|
Basic |
|
Apps |
|
Advanced |
|
Access LCD Settings
To open the settings menu, you should:
-
Tap on
 Settings app on the screen. Or;
-
Swipe down from the top of the home screen to open the notifications panel and hit the
 Settings icon in the top right corner.
 Settings app on the screen. Or;
 Settings icon in the top right corner.

Status
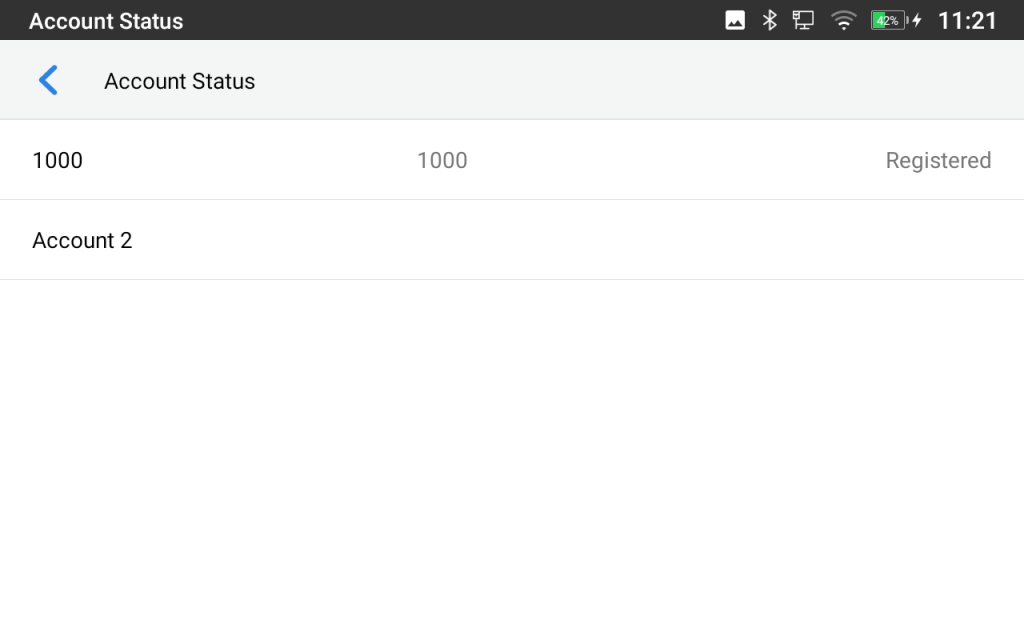
Account Status
This page displays all available accounts on the device with their respective statuses (Activated/Inactivated and Registered/Unregistered).
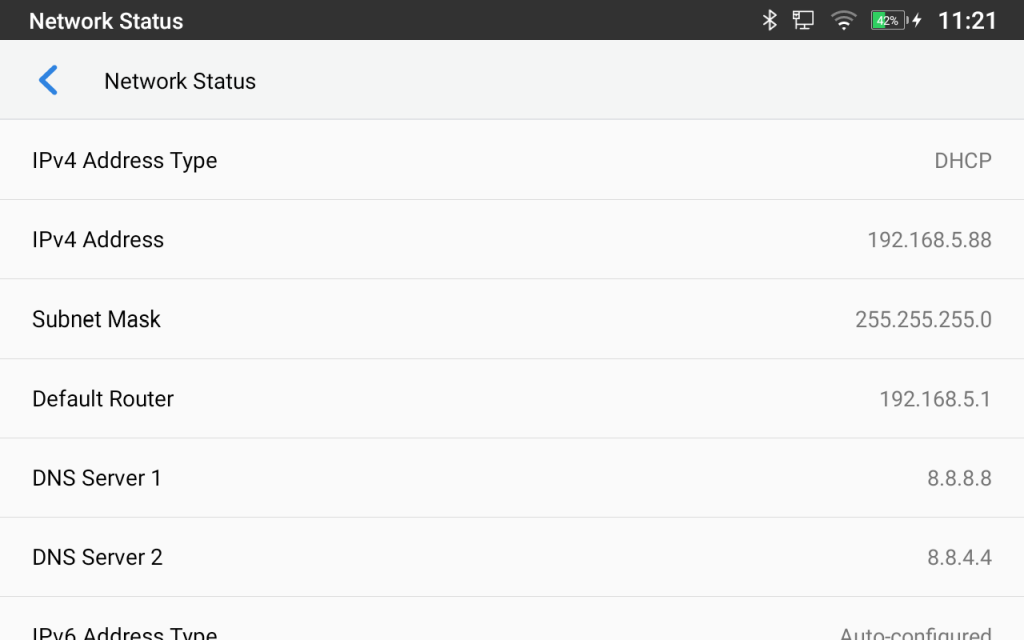
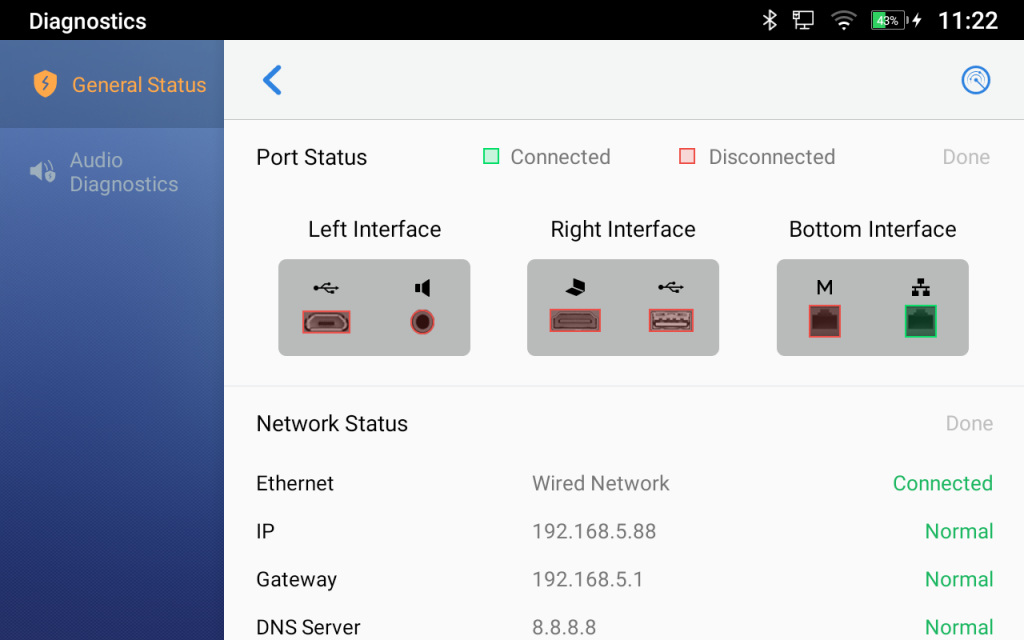
Network Status
This page displays Network status including IPv4/IPv6 address, subnet mask, gateway, DNS server, MAC address, and VPN Address…
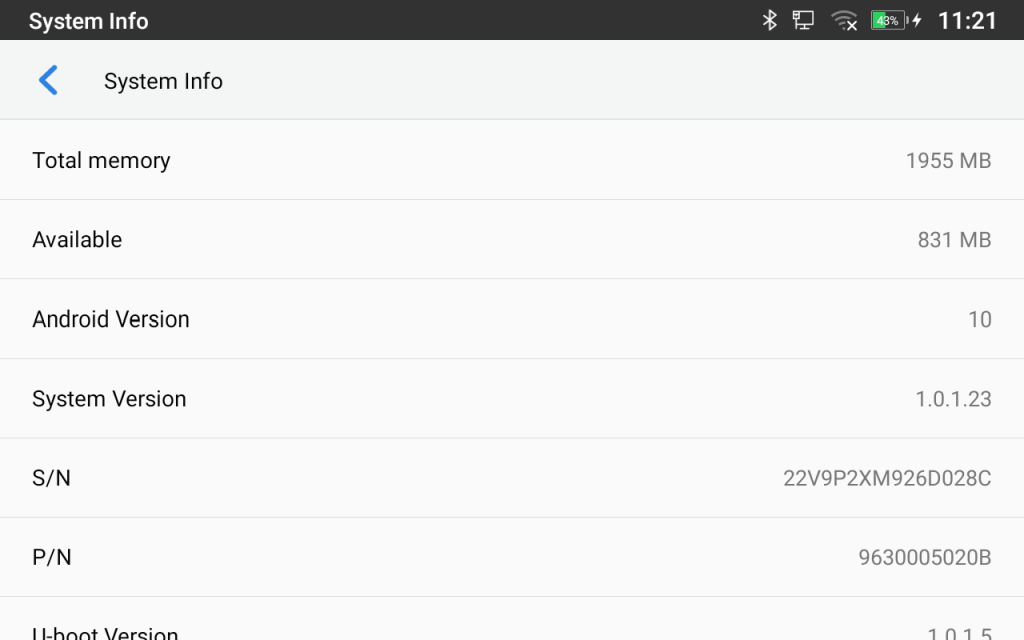
System Info
This page shows system info including Total Memory, Available Memory, Android Version, System Version, S/N, P/N, Hardware version, Country Code…
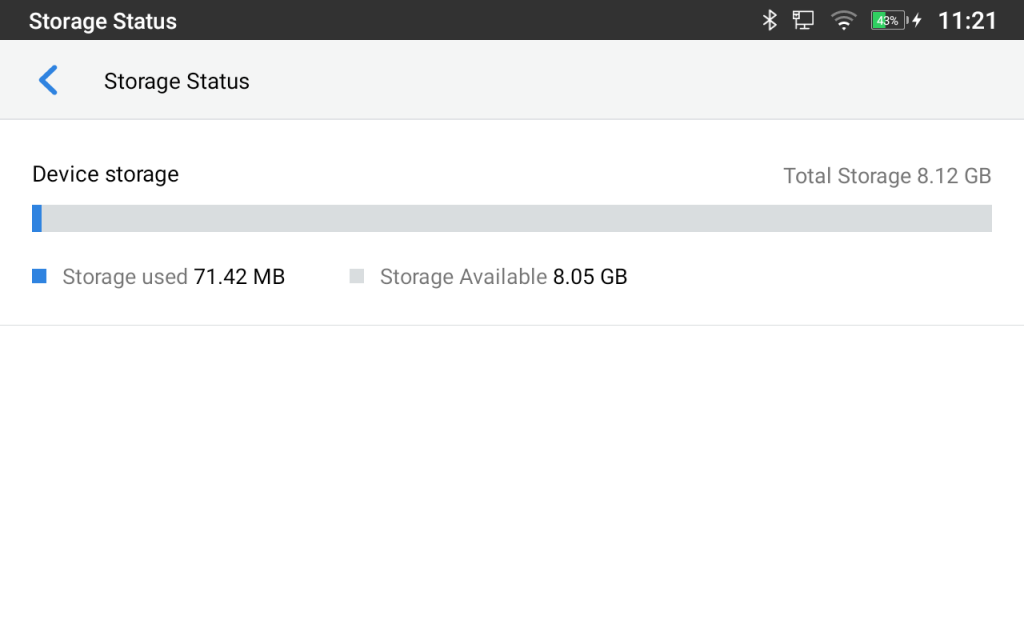
Storage Status
This page shows the device storage status.
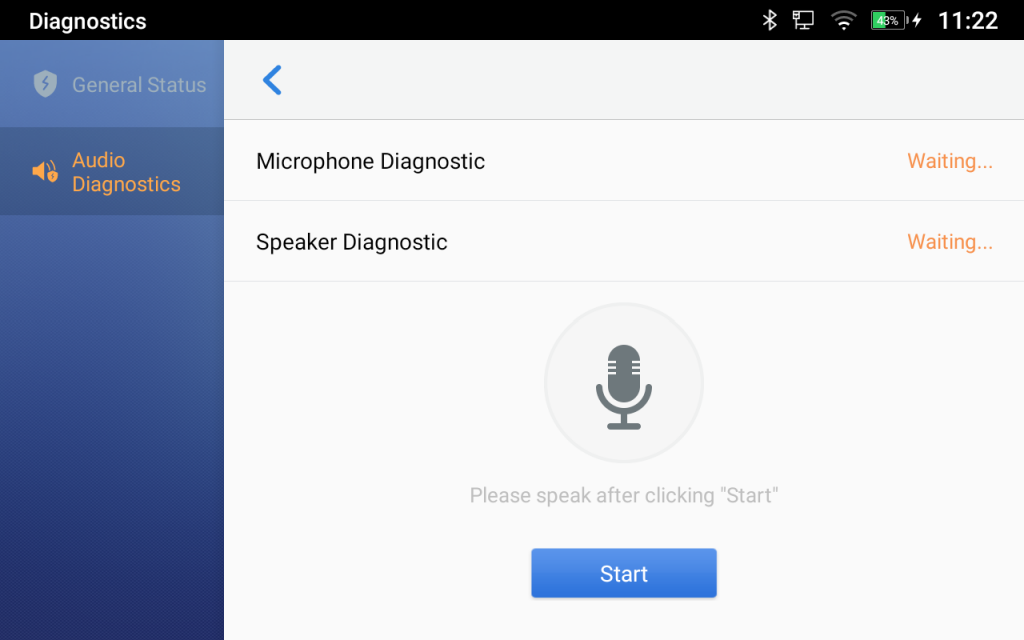
Detection
This page shows the general Interface/Ports status and Audio Diagnostics.
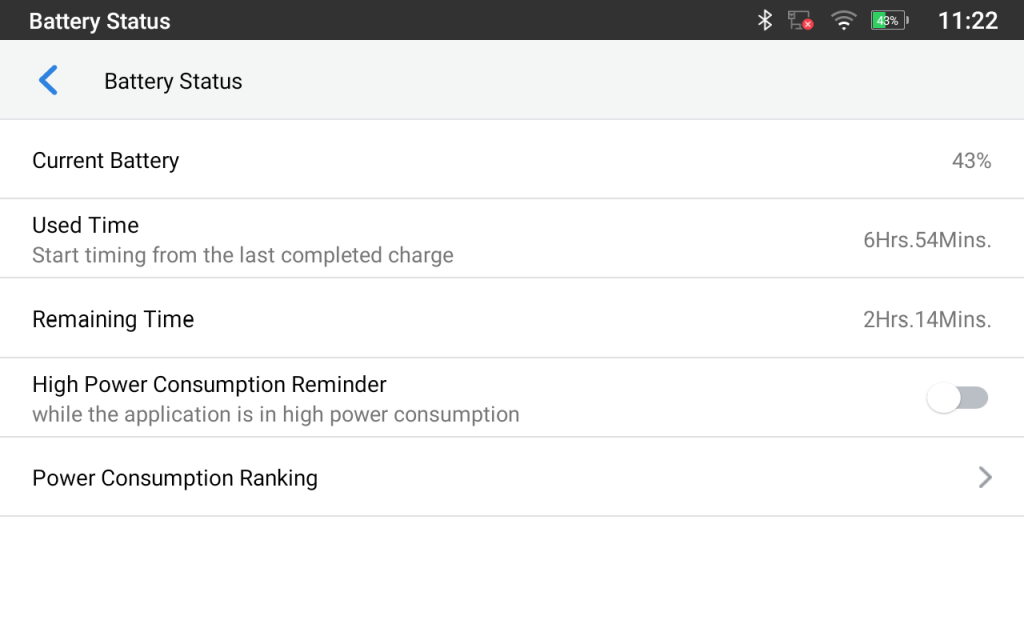
Battery Status
This page shows the current Battery level, usage time, remaining time, and High power consumption reminder…
Network
Users can configure Ethernet settings, Wi-Fi, VPN, PPPoE, and other advanced network settings here.
Ethernet Settings
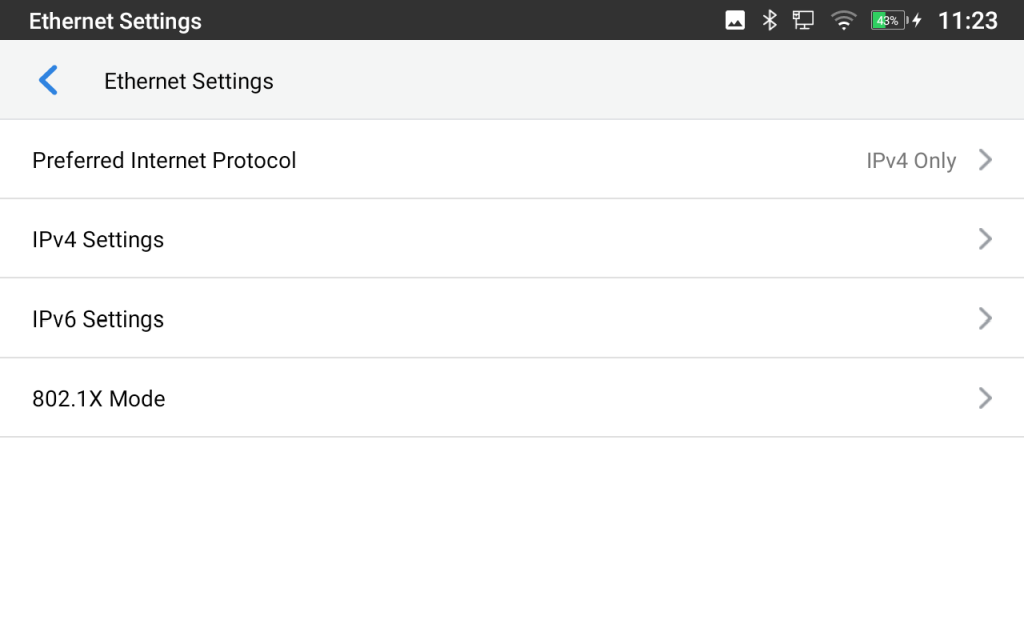
- Preferred Internet Protocol: Select which Internet protocol to use. When both IPv4 and IPv6 are enabled, the GAC2570 attempts to use the preferred protocol first and switches to the other choice if it fails.
- IPv4 Settings: Here user can configure the IPv4 address Type.
- If DHCP is selected, the GAC2570 will get an IP address automatically from the DHCP server in the network. This is the default mode.
- If Static IP is selected, manually enter the information for IP Address, Subnet Mask, Default Gateway, DNS Server, and Alternative DNS server.
- If PPPoE is selected, type PPPoE Account ID and PPPoE Password provided from the PPPoE server to get authenticated for network access.
- IPv6 Settings: Here user can configure the IPv6 address Type.
- If Auto-Configured is selected, the GAC2570 will get an IP address automatically from the DHCP server in the network. This is the default mode.
- If Static IP is selected, manually enter the information for IP Address, Prefix Length, DNS Server, and Alternative DNS server.
- 802.1X mode: This option allows the user to enable/disable 802.1x mode on the GAC2570. The default setting is disabled. To enable 802.1x mode, select the 802.1x mode and enter the required configuration depending on the 802.1x mode chosen. The available modes are EAP-MD5, EAP-TLS, and EAP-PEAP.
Wi-Fi
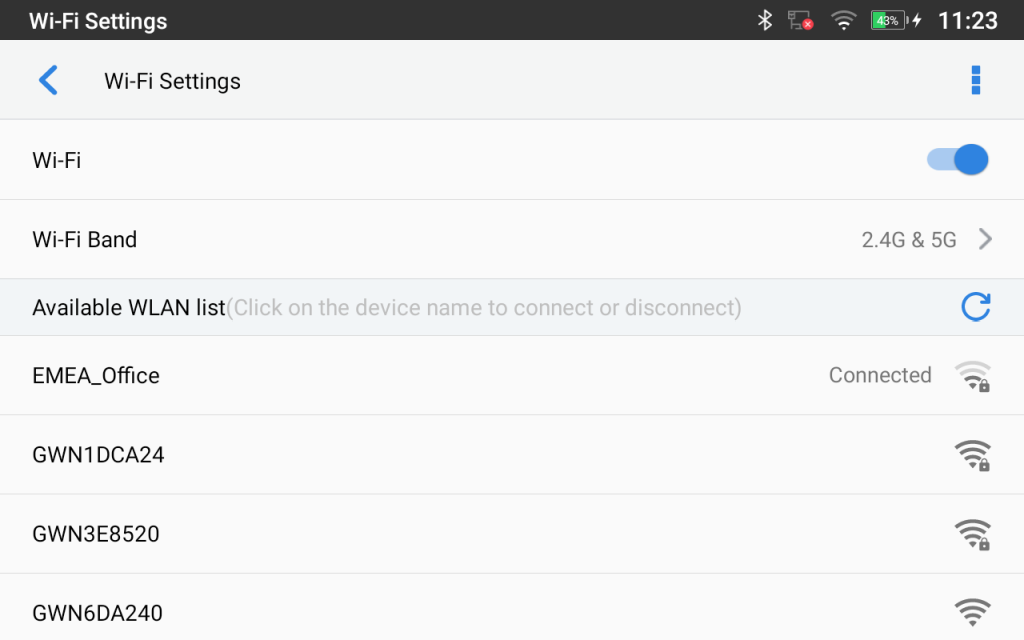
- Tap on “Wi-Fi” to turn on/off the Wi-Fi connection. By default, it is turned off.
 Tap on “Wi-Fi Band” to set the type of Wi-Fi Band (“2.4G”, “5G” or “2.4G&5G”). The default setting is 2.4G&5G.
- Press the “Refresh” icon to initiate a scan for the Wi-Fi network within the range. This option is available only when Wi-Fi is turned on.
- Click on “More” to list the following options (This option is available only when Wi-Fi is turned on):
- Add Network: If the Wi-Fi network SSID does not show up in the list, or users would like to set up advanced options for the Wi-Fi network, click on “More” then click “Add Network”. Then Enter SSID, Security type, and password and set up the address type (DHCP/Static IP/PPPoE) in the prompt dialog. The GAC2570 will reboot with a Wi-Fi network connected.
- Wi-Fi Direct: This is to set up a peer-to-peer connection between two Wi-Fi Direct devices so that they can share data and sync files.
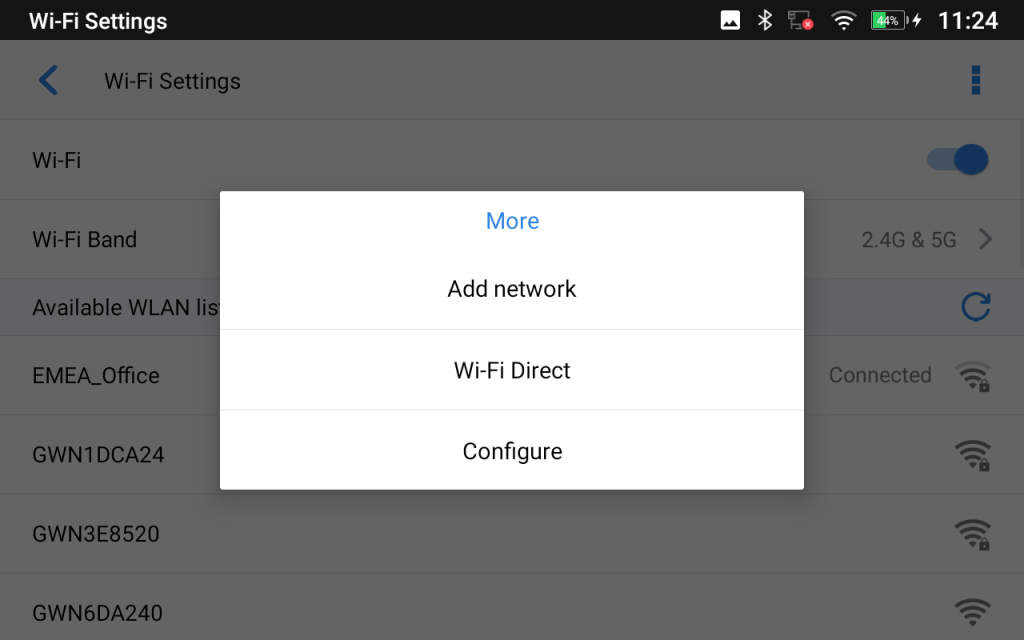
- Configure: Enable/Disable Open Network Notification which informs the user whenever a high-quality public Network is available, also lists the MAC address of the device and its IP address and Country Code:
- Open Network notification: If enabled, the GAC2570 will show a notification on the top status bar indicating a high-quality public network is available. By default, it is enabled.
- Saved Networks: This is to show/edit all the Wi-Fi Networks that are registered on the GAC2570.
- MAC address: This shows the MAC address of the Wi-Fi.
- IP address: This shows the IP address of the GAC2570 from the Wi-Fi network.
- Country Code: This shows the Country Code.
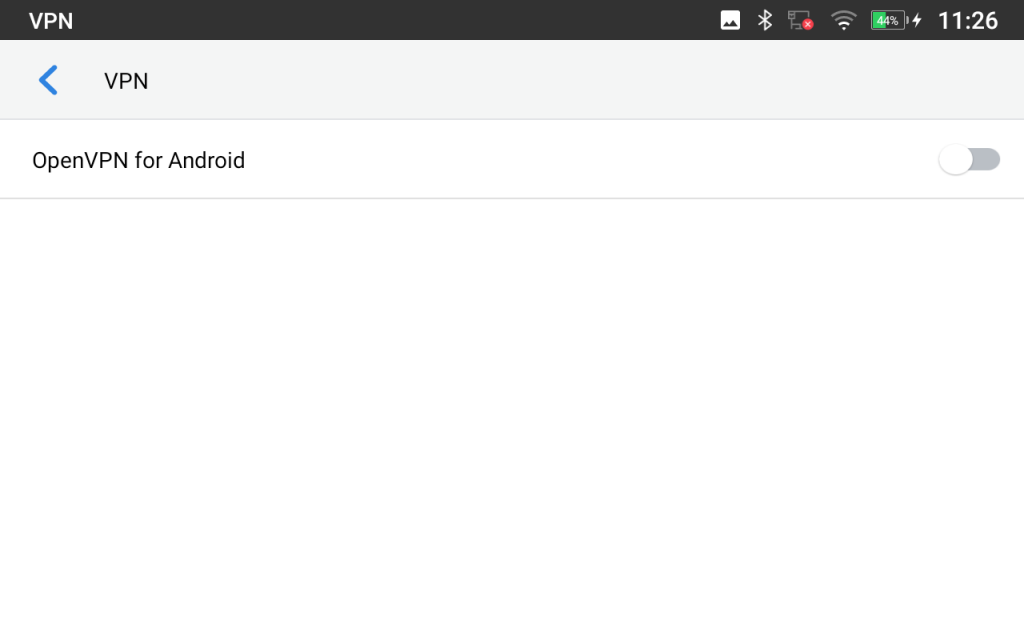
VPN
Enable / Disable OpenVPN®.
General Network Settings
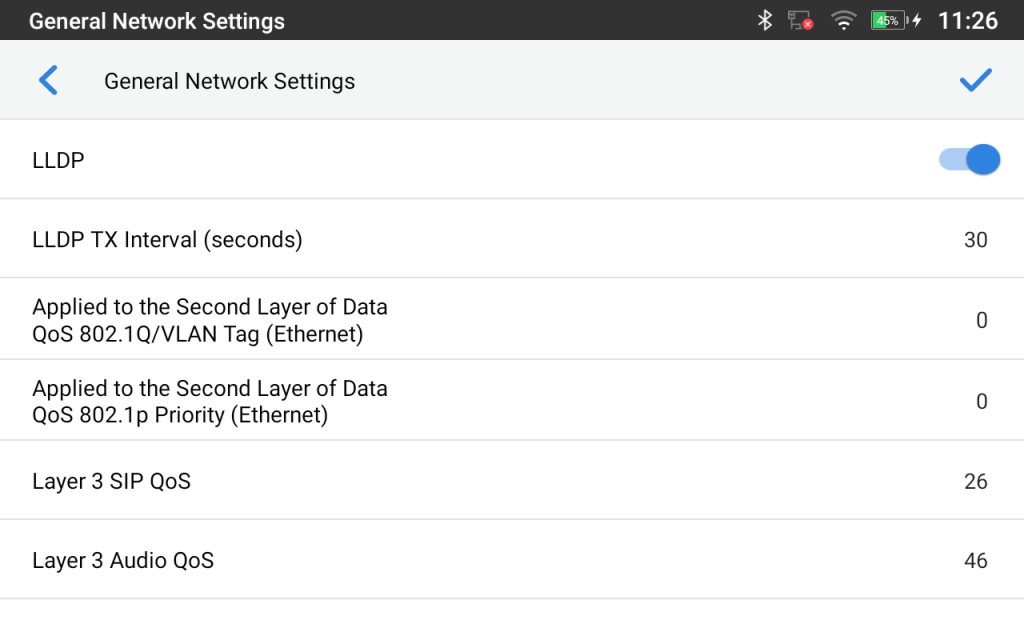
- LLDP
Turn on/off LLDP on the GAC2570. If turned on, the GAC2570 will be able to discover the LAN policies as set up on the switch side to obtain network settings such as VLAN tag, Layer 2 QoS 802.1p priority, and Layer 3 QoS in a plug-and-play manner.
- LLDP TX Interval (seconds)
Specifies the time interval, in seconds, between successive LLDP-MED transmission cycles
- Applied to the Second Layer of Data QoS 802.1Q/VLAN (Ethernet)
This field contains the value used for layer 2 VLAN tagging for the Ethernet network.
The Default value is 0.
- Applied to the Second Layer of Data QoS 802.1p/VLAN (Ethernet)
This assigns the priority value of the Layer 2 QoS packets on the Ethernet Network.
The Default value is 0.
- Layer 3 SIP QoS
This field defines the layer 3 QoS parameter for SIP packets.
This is the value used for IP Precedence, Diff-Serv, or MPLS. The Default value is 26.
- Layer 3 Audio QoS
This field defines the layer 3 QoS parameter for audio packets. This is the value used for IP Precedence, Diff-Serv, or MPLS. The Default value is 46.
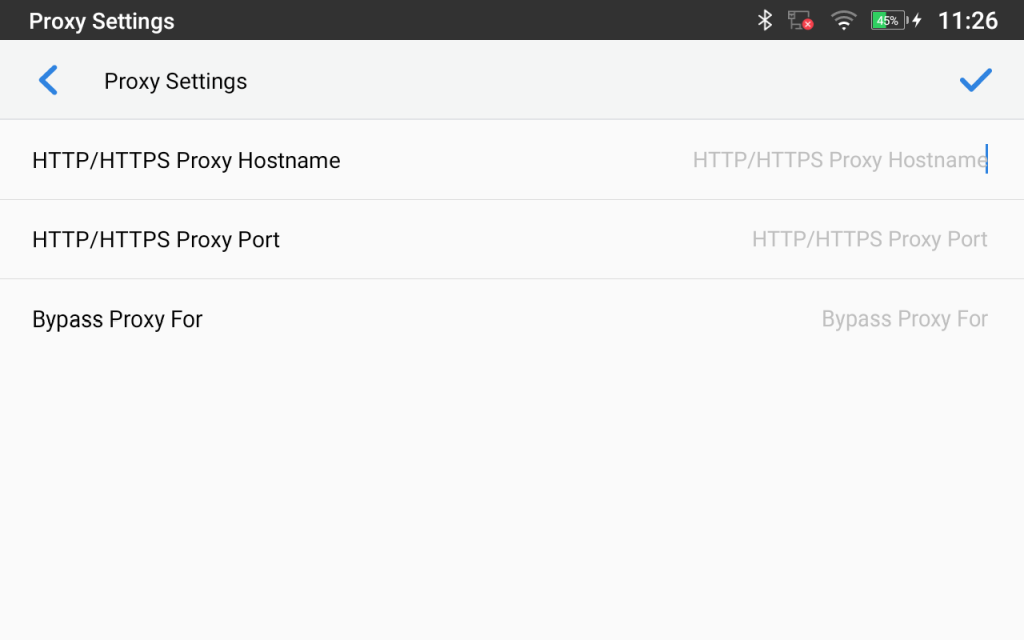
Proxy Settings
For some network setups, it is required to connect to the Internet via a proxy server. Manually configure “HTTP/HTTPS Proxy hostname”, “HTTP/HTTPS Proxy port” and “Bypass proxy for” in proxy settings for the device to get an Internet connection successfully.
Tethering & Portable Hotspot
The GAC2570 can serve as a Wi-Fi access point for other devices to provide wireless access to the network if the Portable Wi-Fi hotspot is turned on.
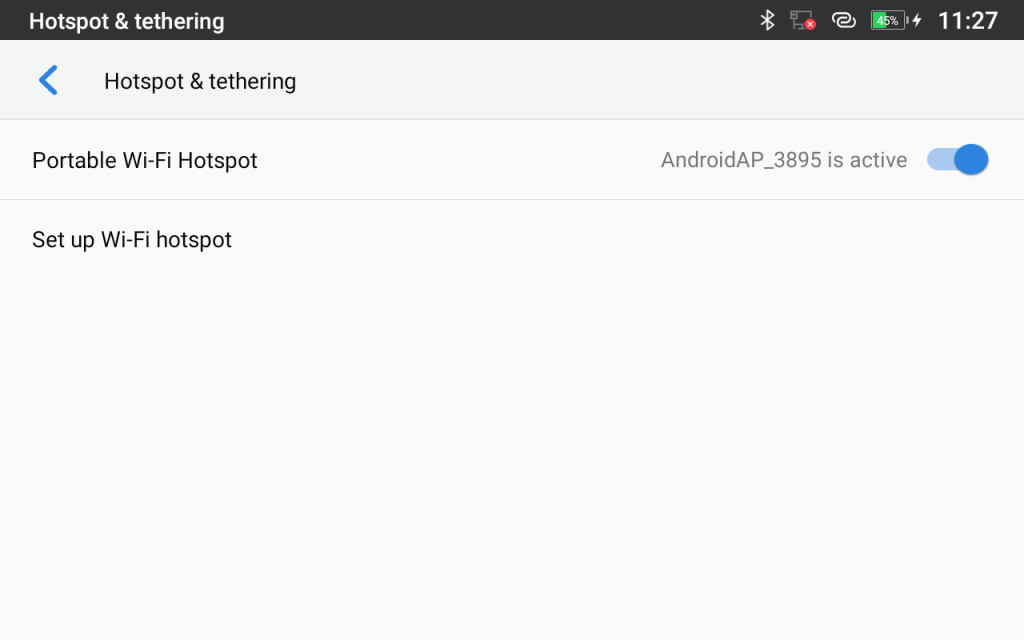
- Turn on the hotspot by tapping on “Portable Wi-Fi hotspot”. Icon
 will show on the top status bar.
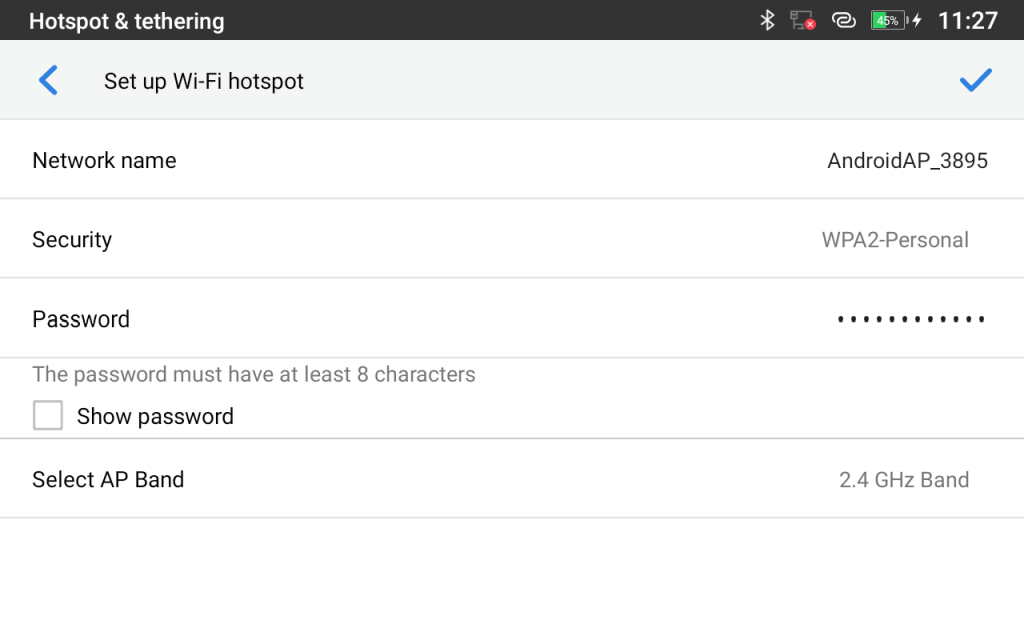
 - Tap on “Set up Wi-Fi hotspot” to configure network SSID, security type, and password.
- On the other device that needs Wi-Fi access, turn on Wi-Fi, look for the SSID of the GAC2570 hotspot, and enter authentication information to get connected.
Features
In this menu, users can configure different features related to each account of the active accounts:
Auto Answer
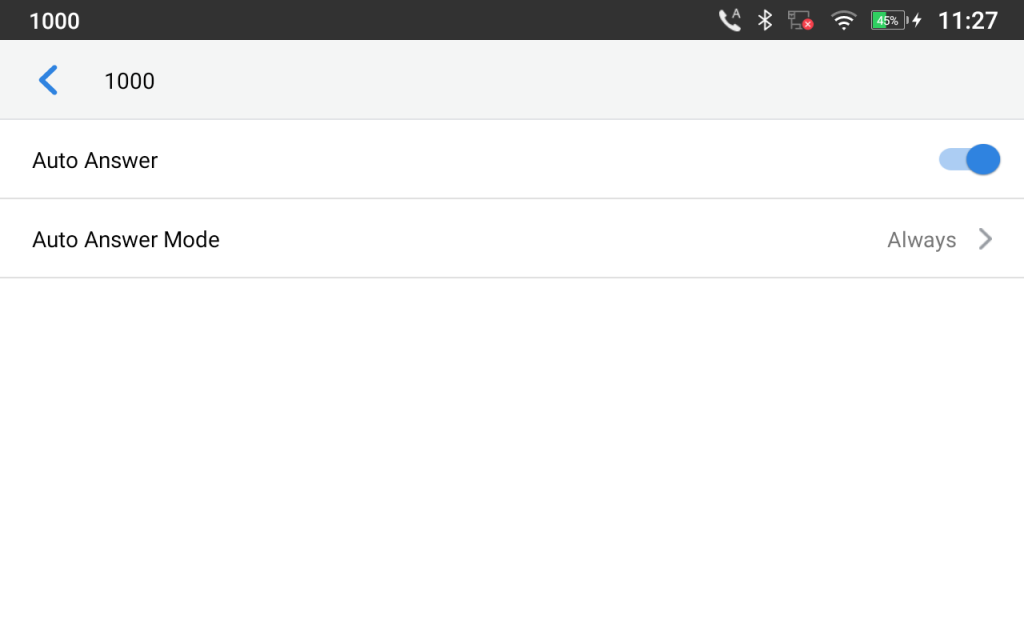
- If enabled and set to “Always”, the GAC2570 will automatically turn on the speaker GAC2570 to answer all incoming calls.
- If enabled and set to “Enable Intercom/Paging”, the GAC2570 will answer the call based on the SIP info header sent from the server/proxy.
- By default, it is turned off.
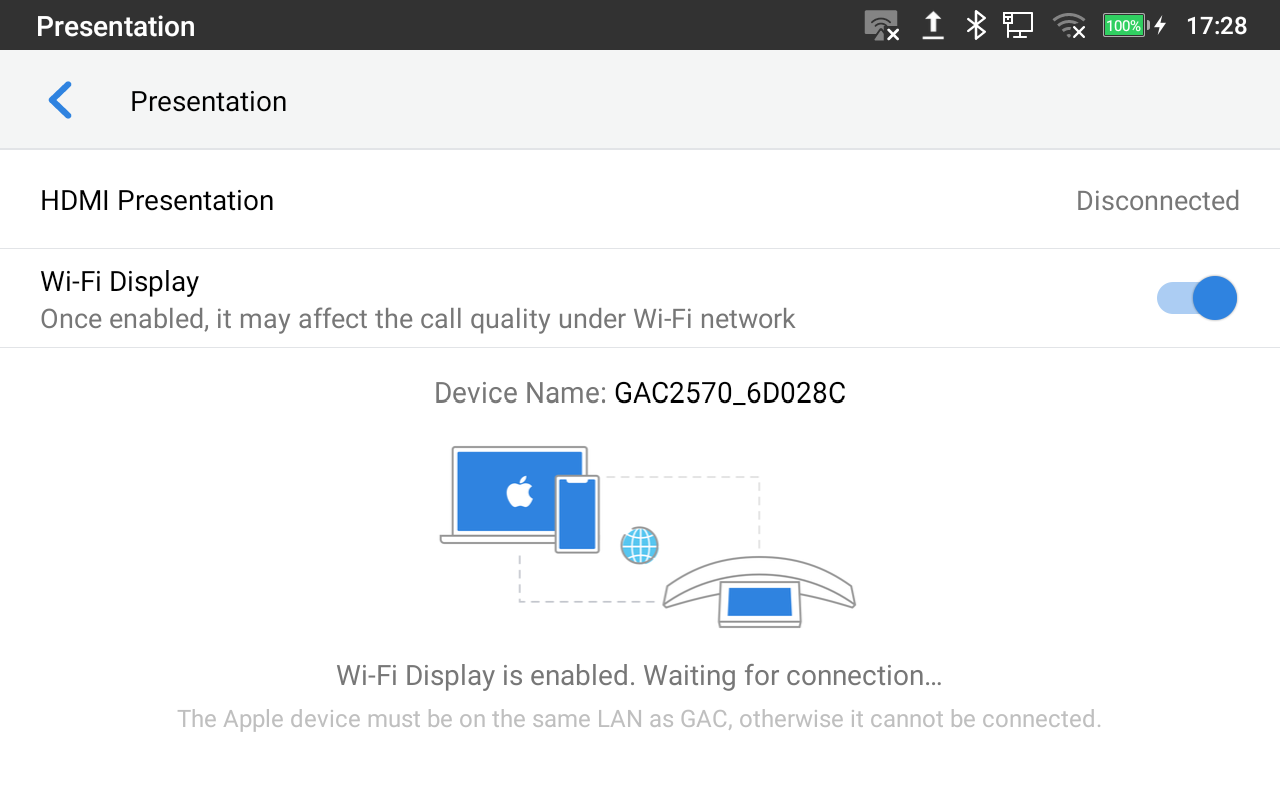
Presentation
When HDMI In cable is connected, the following message will be displayed on the notification bar.
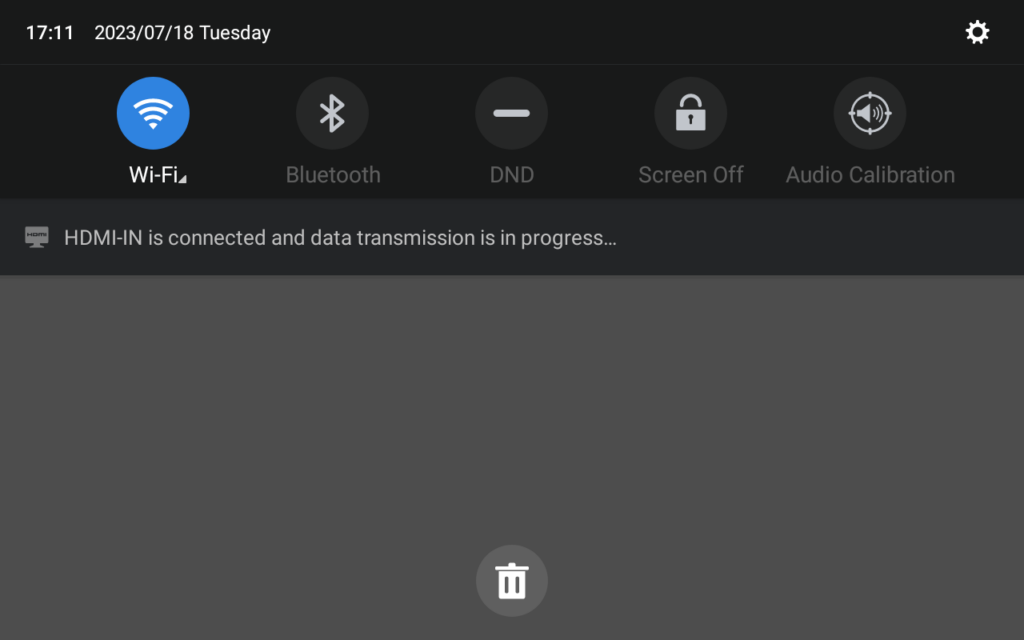
Once Plugged, under Features => Presentation, you will see that the device in the presentation mode is set as connected
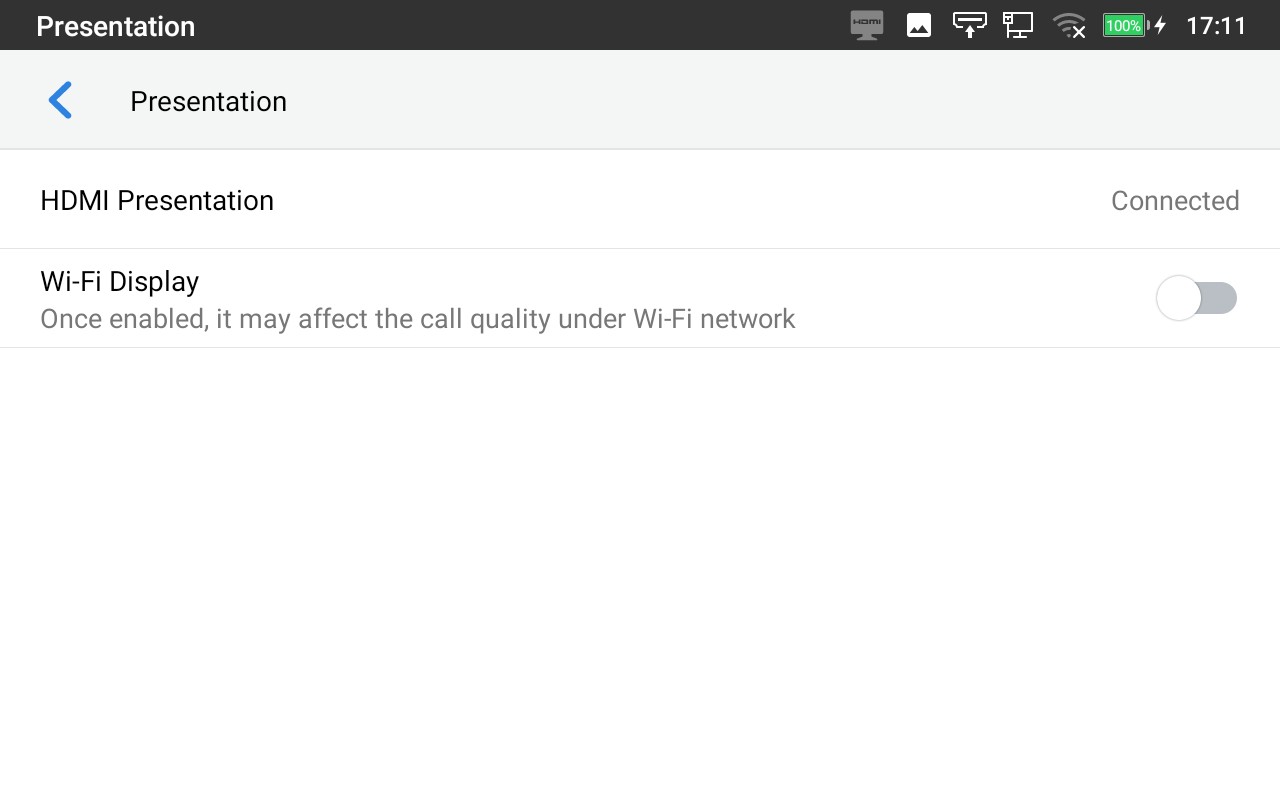
- Wi-Fi Display
Wi-Fi Display is a feature in GAC2570 devices that allows users to wirelessly mirror content from their smartphones, tablets, or laptops onto a larger screen during conferences, enhancing collaboration.
You can enable Wi-Fi display by toggling the switch above, once enabled it may affect the call quality under the Wi-Fi network, Wi-FI Display feature
Bluetooth
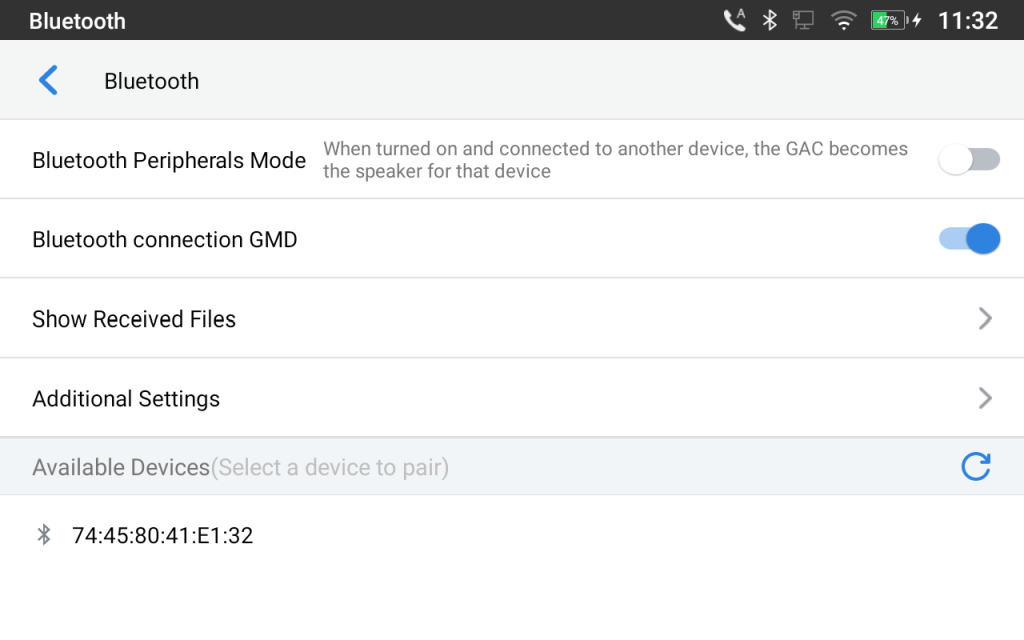
- Bluetooth Peripherals Mode: When turned on and connected to another device, the GAC becomes the speaker for that device. By default, it is turned off.
- Bluetooth connection GMD: when turned on, it enables the wireless GMD1208 Microphone discovery to pair them with GAC2570. Refer to [Wireless Microphone Configuration] for more details.
- Show received files: Shows the Transfer history of Bluetooth files
- Additional Settings: This menu is available only when Bluetooth is enabled:
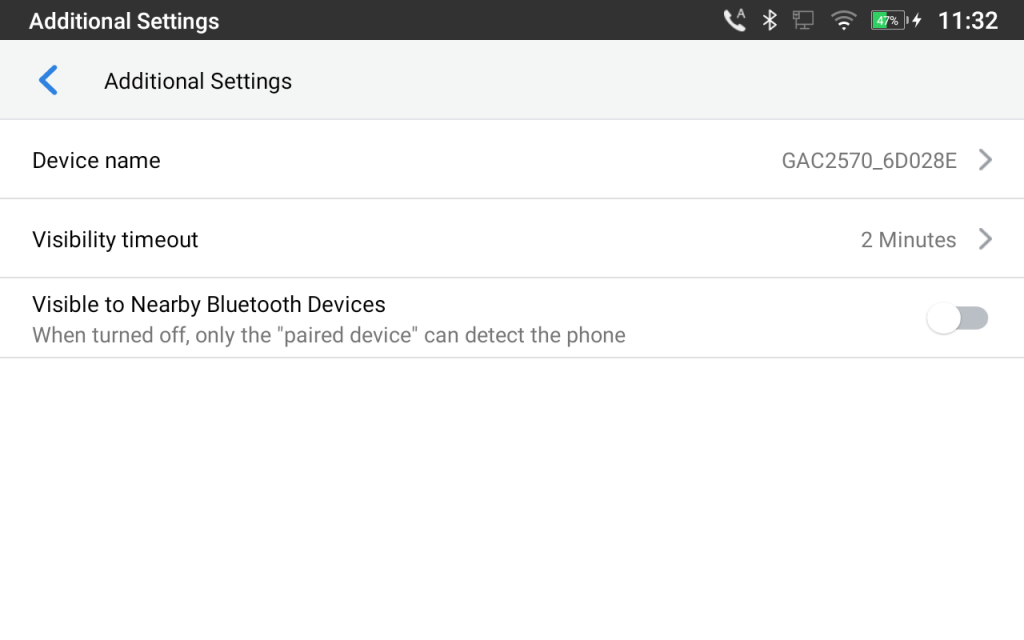
- Device Name. Tap to change the name of the GAC2570, which is displayed on other Bluetooth devices when discovered. By default, it is “GAC2570_XXXXXX” Where XXXXXX are the last 6 digits of the GAC2570’s MAC address.
- Visibility timeout. Tap to select the timeout interval among “2 minutes”, “5 minutes”, “1 hour” or “never”. By default, the visibility timeout is 2 minutes.
- Visibility to nearby Bluetooth devices. Sets the visibility of the GAC2570 to other Bluetooth devices. Normally this option is enabled during the pairing process so that other Bluetooth devices can discover the GAC2570.
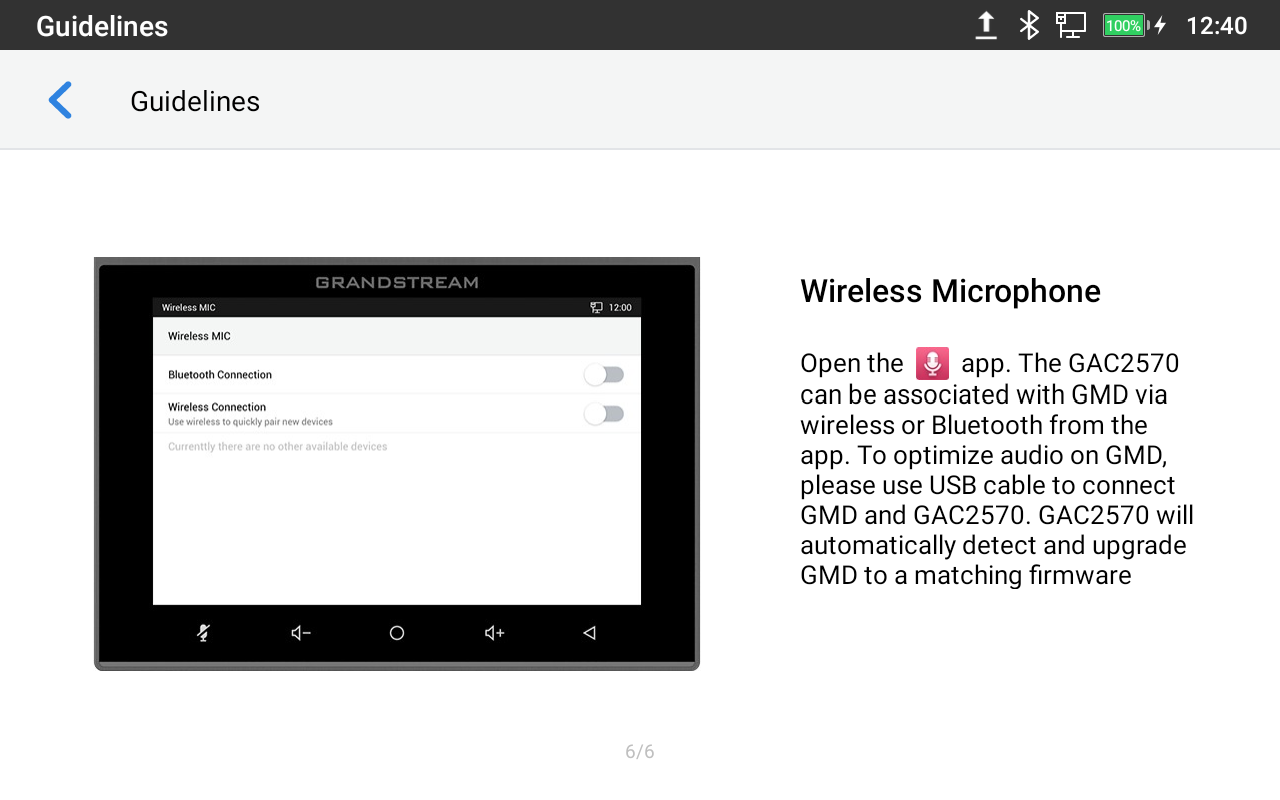
Wireless Microphone
Enable the wireless GMD1208 Microphone discovery to pair them with GAC2570.
Refer to [WIRELESS MICROPHONE CONFIGURATION] for more details.
Call Block
Block Anonymous calls or set up your blacklist.
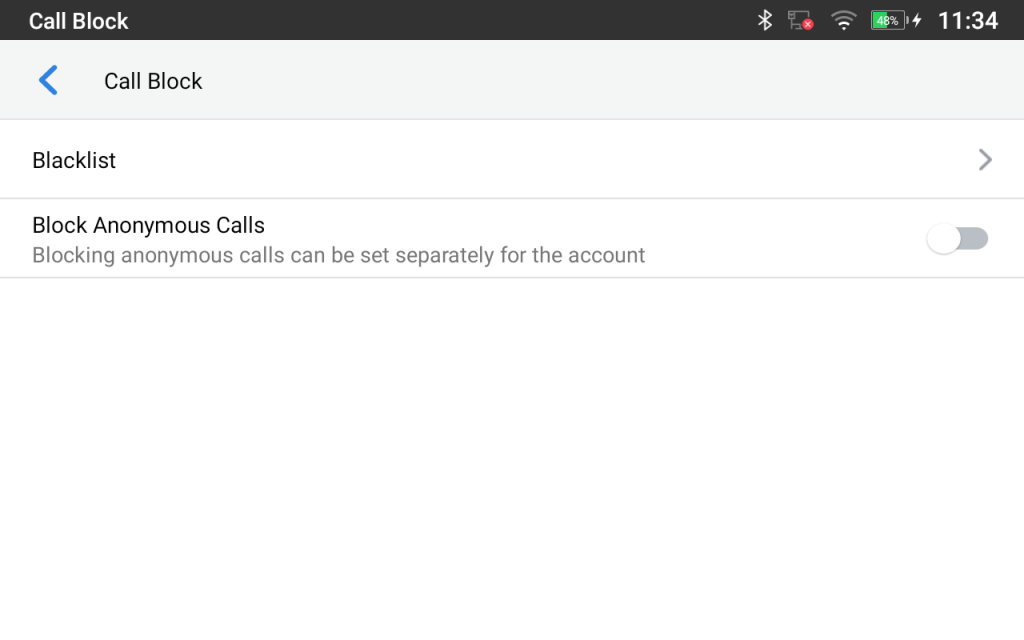
- Blacklist: This menu allows configuring a blacklist of numbers that will be blocked from calling the GAC2570, users can either enter the numbers to block manually from contacts or from call history
- Block Anonymous Calls: when enabled the GAC2570 rejects all the anonymous calls, users can choose on which account this setting is to be applied
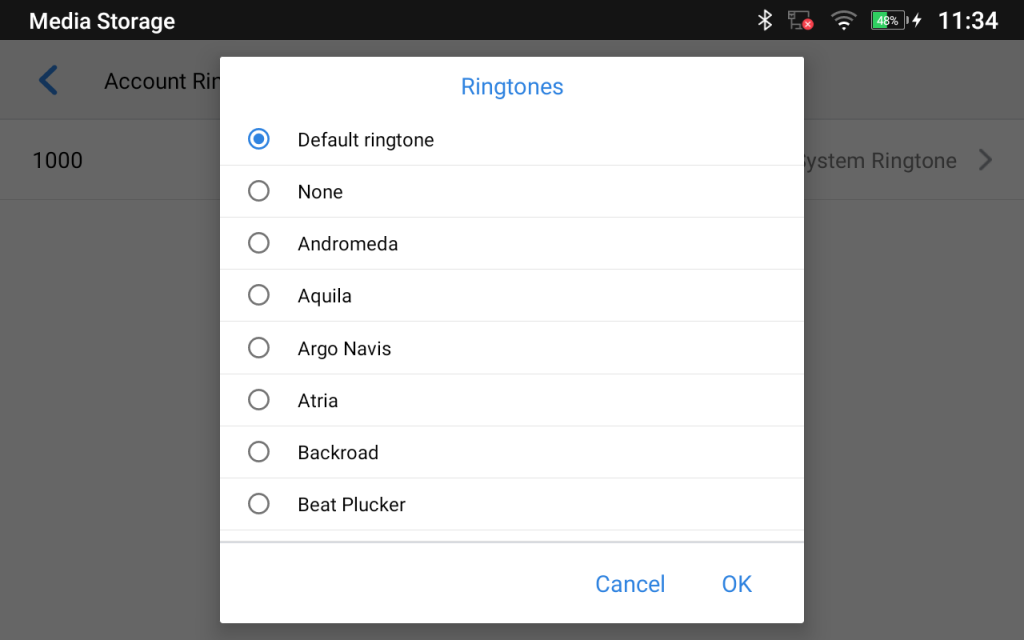
Account Ringtones
Select a ringtone for the incoming call to the SIP account chosen. The system ringtone is set by default.
Basic
Sound
Use the Voice settings to configure the GAC2570’s sound mode, volume, ring tone, and notification tone.
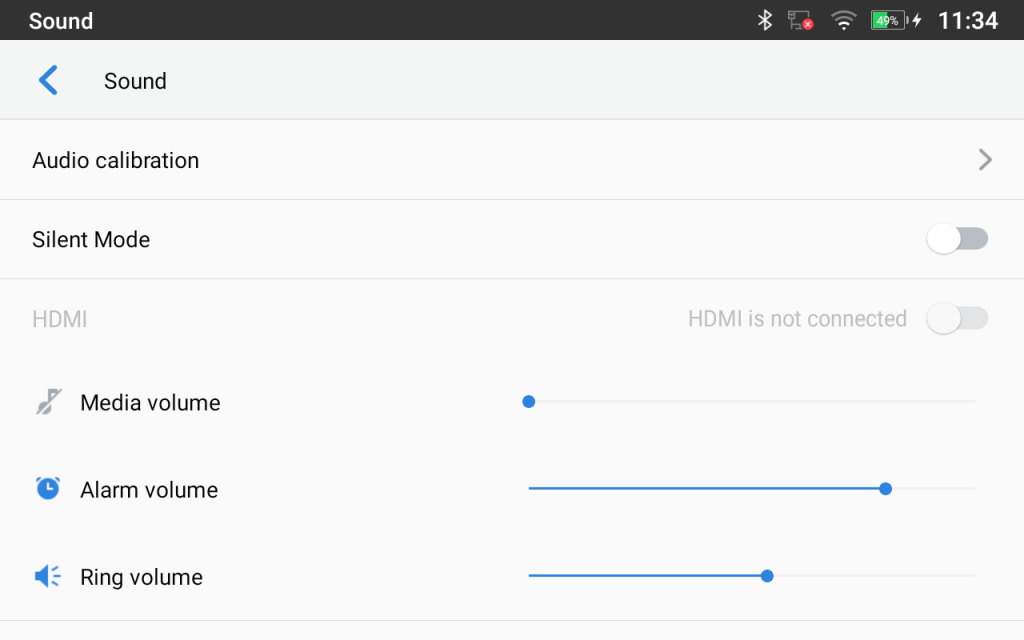
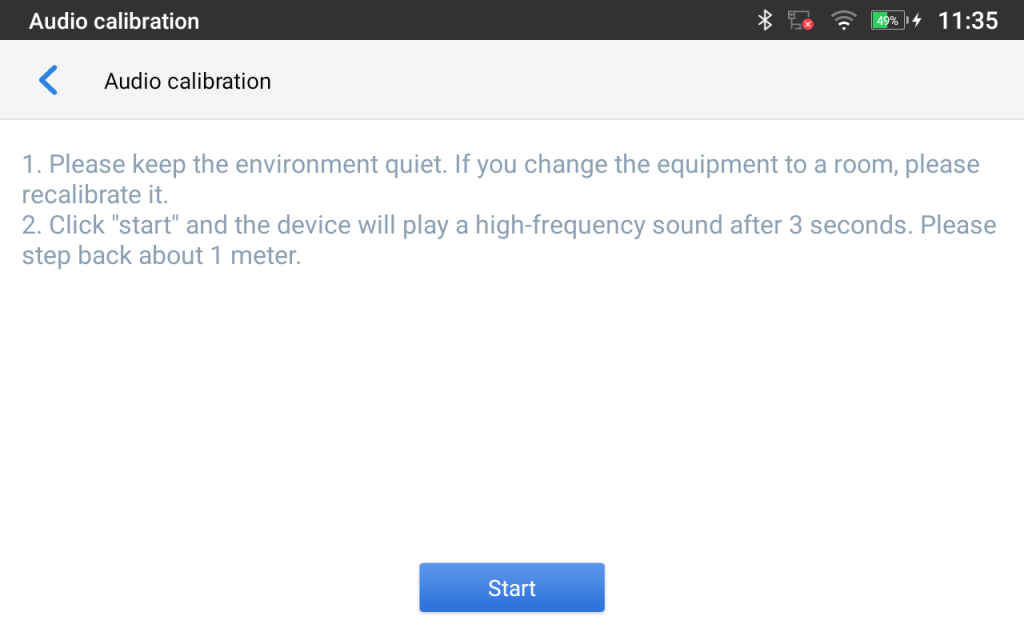
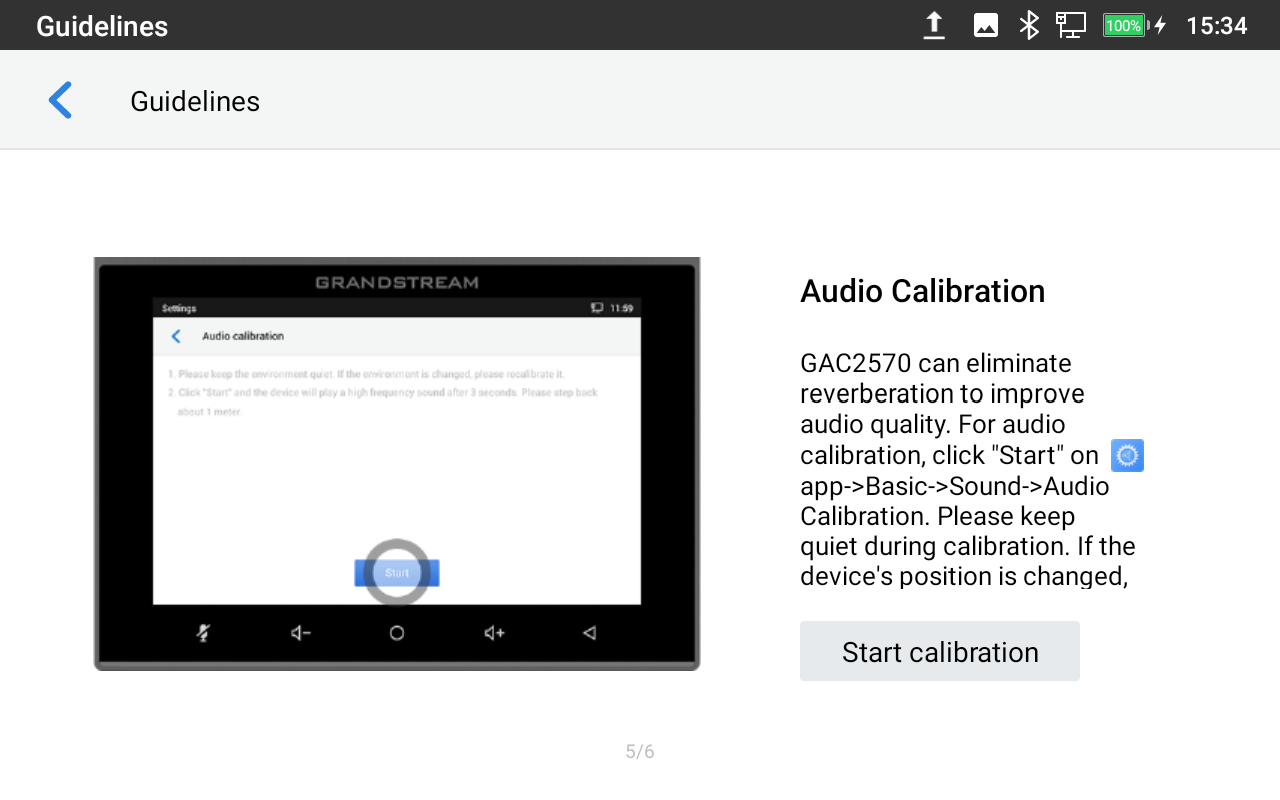
- Audio calibration: Click to start Audio calibration. It is recommended to run audio calibration when changing the environment (new room for instance) when the GAC is installed. Click “Start” to initiate the audio calibration and follow the instructions.
- Silent mode: Tap on it to turn on/off the sound from the speaker when there is an incoming call.
- HDMI: The HDMI interface supports input audio and video content which will be displayed in the GVC3220 through the media port or wireless projection.
- Media Volume: Adjust the sound volume for media audio
- Alarm Volume: Adjust the alarm ring volume
- Ring Volume: Adjust the GAC2570 ringing volume
- Ringtone: Select GAC2570’s ringtone for incoming calls.
- Default Notification Sound: Select notification ringtone.
- Default Alarm Sound: Select the alarm ringtone.
- Other Sounds: Enable/disable Dial pad Tones, Screen locking sounds, Touch sounds, and Touch Vibration (Haptic feedback for tap, and keyboard…).
Display
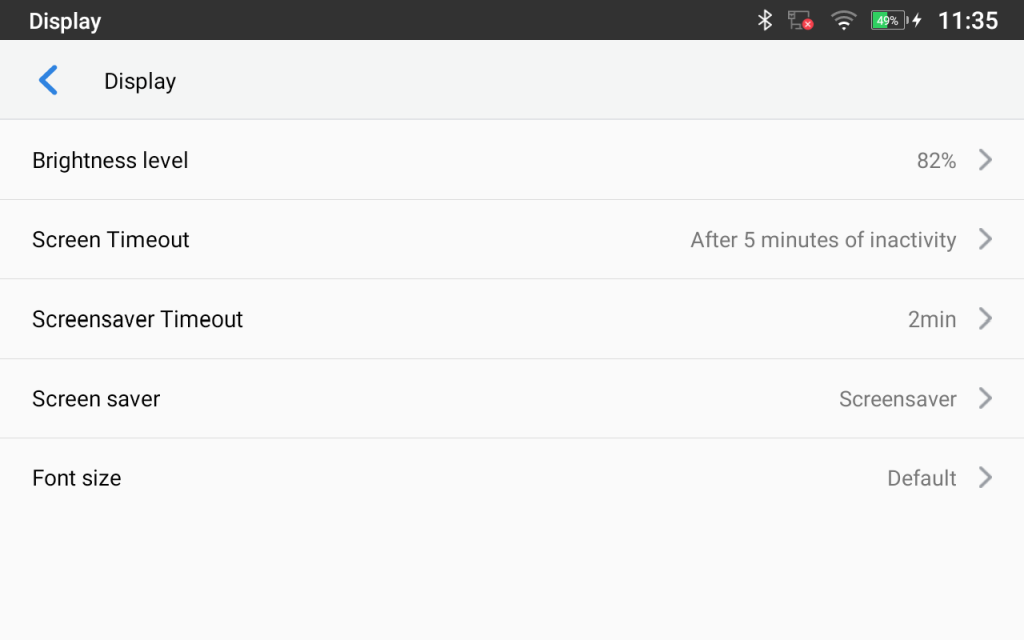
- Brightness level: Tap on Brightness and scroll left/right to adjust the LCD brightness.
- Screen Timeout: Tap to open the dialog to set the screen timeout interval. Available options: 15 seconds, 30 seconds, 1 minute, 2 minutes, 5 minutes, 10 minutes, 30 minutes, Never. The default setting is 5 minutes.
- Screensaver Timeout: Tap to set the screensaver timeout interval. Available options: 15 seconds, 30 seconds, 1 minute, 2 minutes, 5 minutes, 10 minutes, 20 minutes, 30 minutes, Never. The default setting is 2 minutes.
- Screensaver: Enable/disable the screensaver. Two options are available:
- Clock: If the clock is set as a screensaver, tap on
 and set the clock style and the Night Mode.
 - Screensaver: If the screensaver is set, please tap on to set use a network image or use local images as screensaver and set the Animation Interval between the images.
- Clock: If the clock is set as a screensaver, tap on
- Font size: Tap on it to adjust the font size for the LCD screen.
Wallpaper
Choose either the default Wallpaper or navigate through the local gallery or use pictures from an external drive.

Language & Keyboard
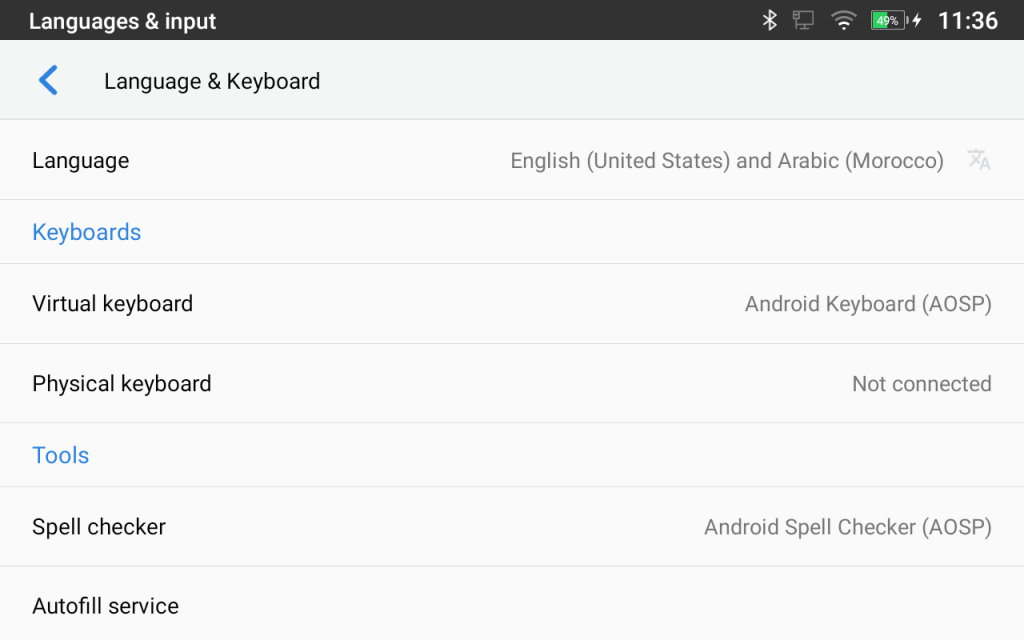
- Language: Tap to open the list of chosen languages, Language Number 1 is the language used on the device. Tap on Add a Language to add more languages to the list.
- Keyboards
Set up the default input method for a virtual and physical keyboard and the different parameters related to the Keyboard use. The default input method is the Android Keyboard.
- Virtual Keyboard:
- Android keyboard (AOSP): Set up the language used on the Android keyboard and configure its different parameters including sound, auto-correction, word suggestion, and so on.
- Manage Keyboards: Tap on the + sign to choose which keyboard to use on the device.
- Physical Keyboard: When the physical keyboard is connected to the GAC2570, users will have the possibility to choose a keyboard among the available ones on the virtual keyboard.
- Show virtual Keyboard: This option gives the possibility of showing the virtual keyboard even if the physical one is connected to the GAC2570.
- Keyboard shortcuts helper: Display available shortcuts.
- Tools:
- Spell checker. Configure whether to check the spelling and select the language to check.
- Personal dictionary: Add new words to the user’s dictionary so that they will not be displayed as errors in the text.
- Auto Fill Service: An autofill service is an app that makes it easier for users to fill out forms by injecting data into the views of other apps.
- Pointer Speed. Adjust the sensitivity of the mouse pointer.
Date & Time
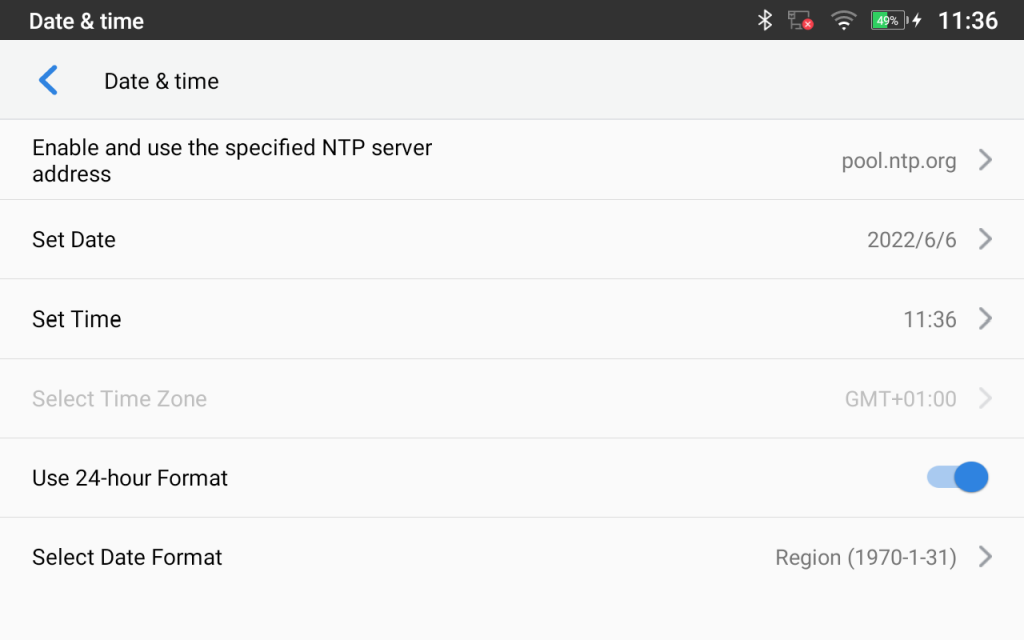
- Enable and use the specified NTP server address: Assign the URL or IP Address of the NTP Server. The default NTP Server used is pool.ntp.org
- Set Date: Set the current date for the GAC2570.
- Set Time: Set the time on the GAC2570 manually.
- Select Time Zone: Select the time zone for the GAC2570.
- Use 24-hour Format: Check/uncheck whether to display the time using the 24-hour time format or not. For example, in 24-hour format, 13:00 will be displayed instead of 1:00 p.m.
- Select Date Format: Select the format of year, month, and day for the date to be displayed.
File Manager
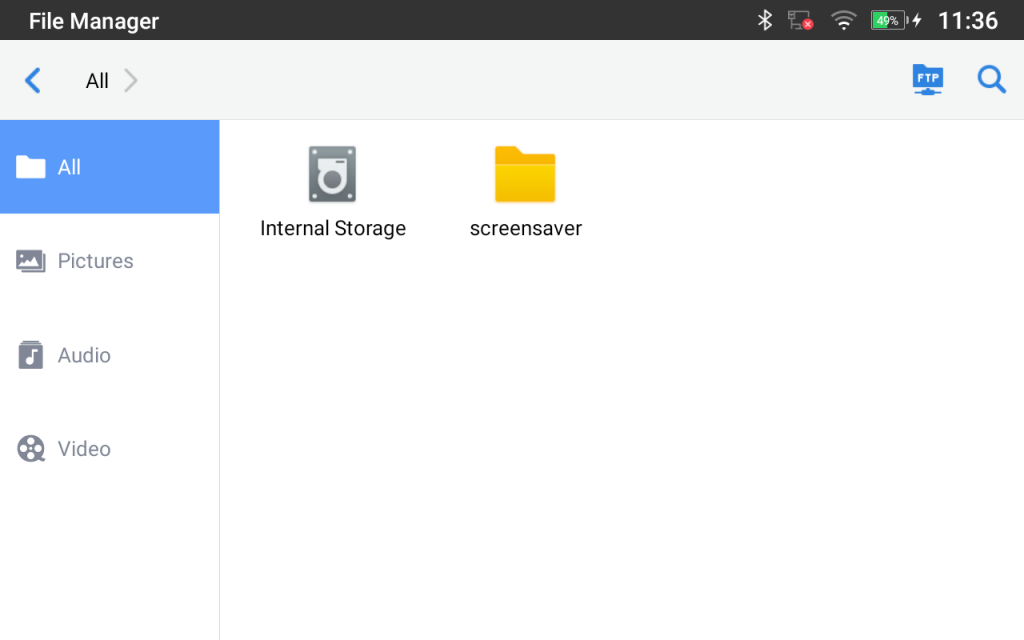
- Internal Storage: Manage all the stored files on the local storage of the device.
- External Storage: Enable/Disable Zoom mode feature. If enabled, the font and icon become larger.
- FTP Server: Enable/Disable the local FTP Server of the device, edit username/password, and edit port.

Security Settings
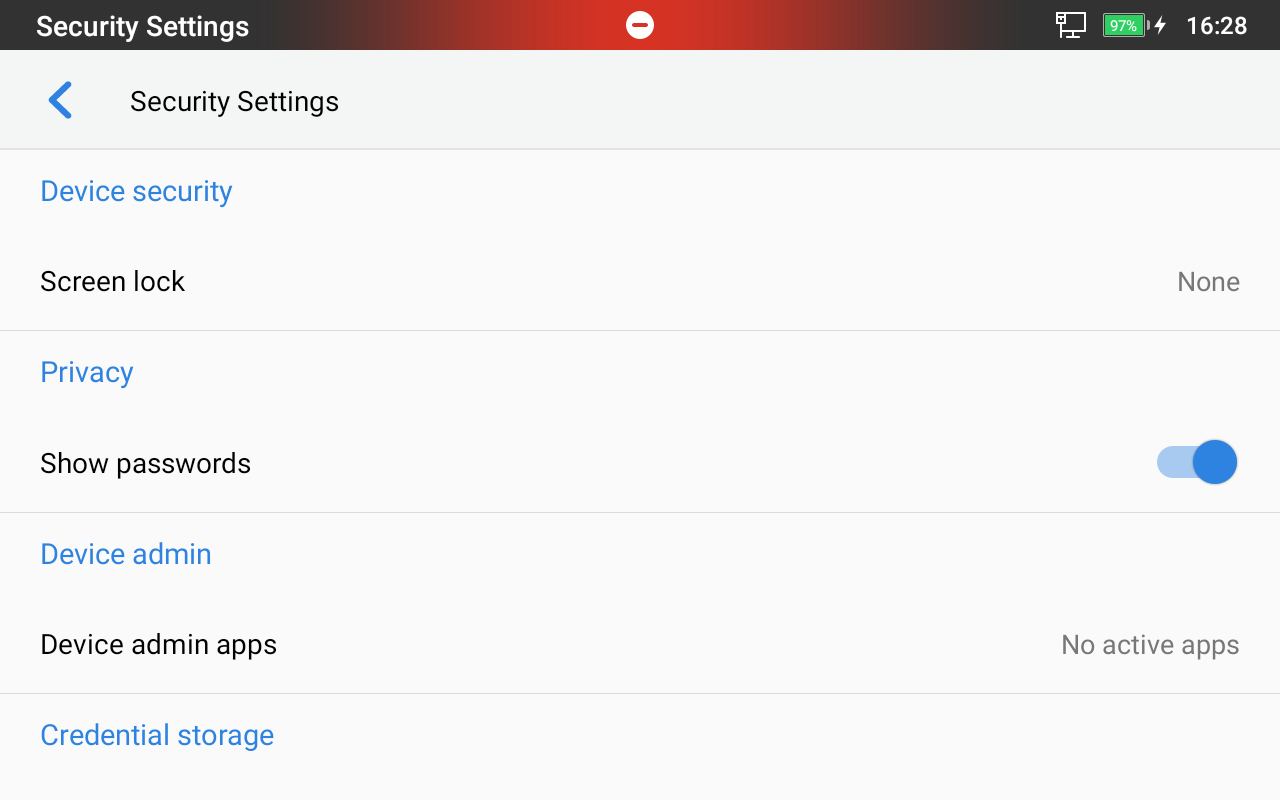
- Device Security
- Screen lock: Set up a pattern or password for the screen lock. A wizard will be provided to set up the pattern. The screen will be locked after booting up or the screen is off (i.e., screensaver screen activated, or manually slide down Status Bar🡪Screen Off to turn off LCD). Users will then be required to enter a password or pattern to log in. When the screen is locked, users can still be able to answer or reject incoming calls.
- Privacy:
- Show Passwords: Check/uncheck to show/hide letters when the user types the screen lock password instantly.
- Device Admin:
- Device admin apps: View or deactivate device administrators.
- Credentials Storage
- Trusted Credentials: Display trusted CA certificates for the system or user. Users can tap on the certificate to check the credential details or disable it.
- User Credentials: View and modify stored credentials
- Advanced
- Trust Agents: View or deactivate trust agents
- Screen Pinning: When enabled, the user can select to keep the current screen in view until you unpin it.
- Apps with usage access: Manage what apps have access to app-usage data on your device.
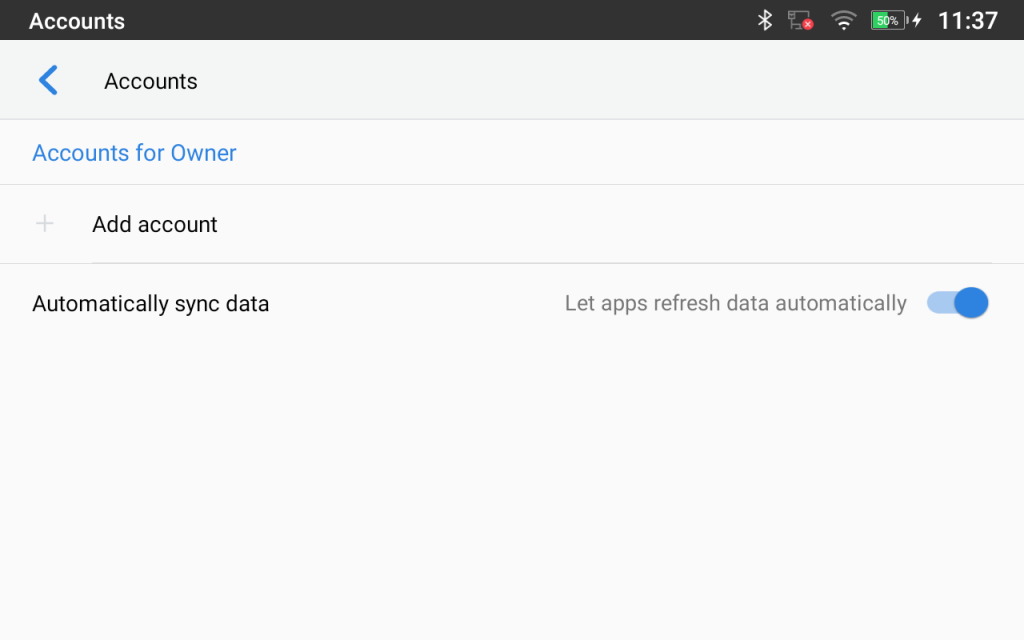
Accounts
Add a system account to synchronize contacts calendars and other information.
Guidelines
General Tips on how to use buttons to perform operations such as Screenshots…
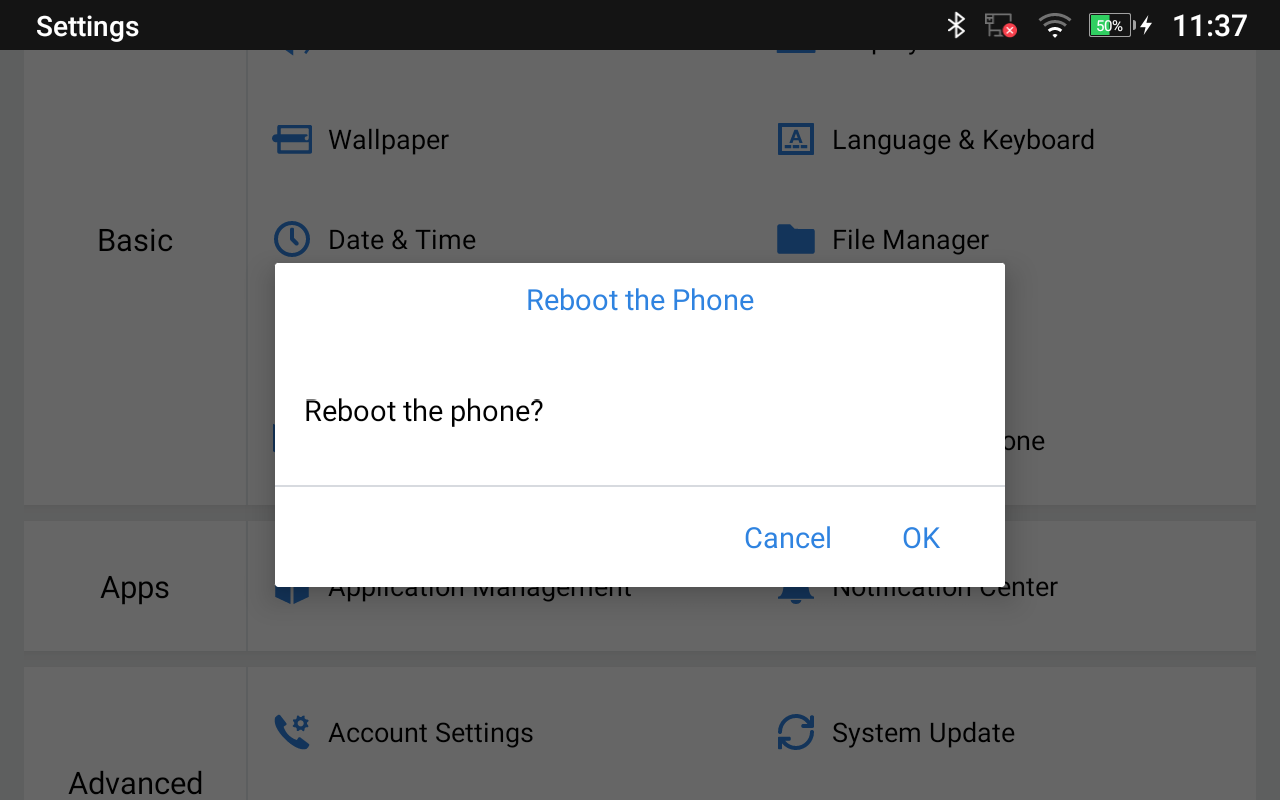
Reboot the Phone
Press to reboot the GAC2570. A confirmation window will pop up to Cancel or go on with the reboot.
Apps
Application Management
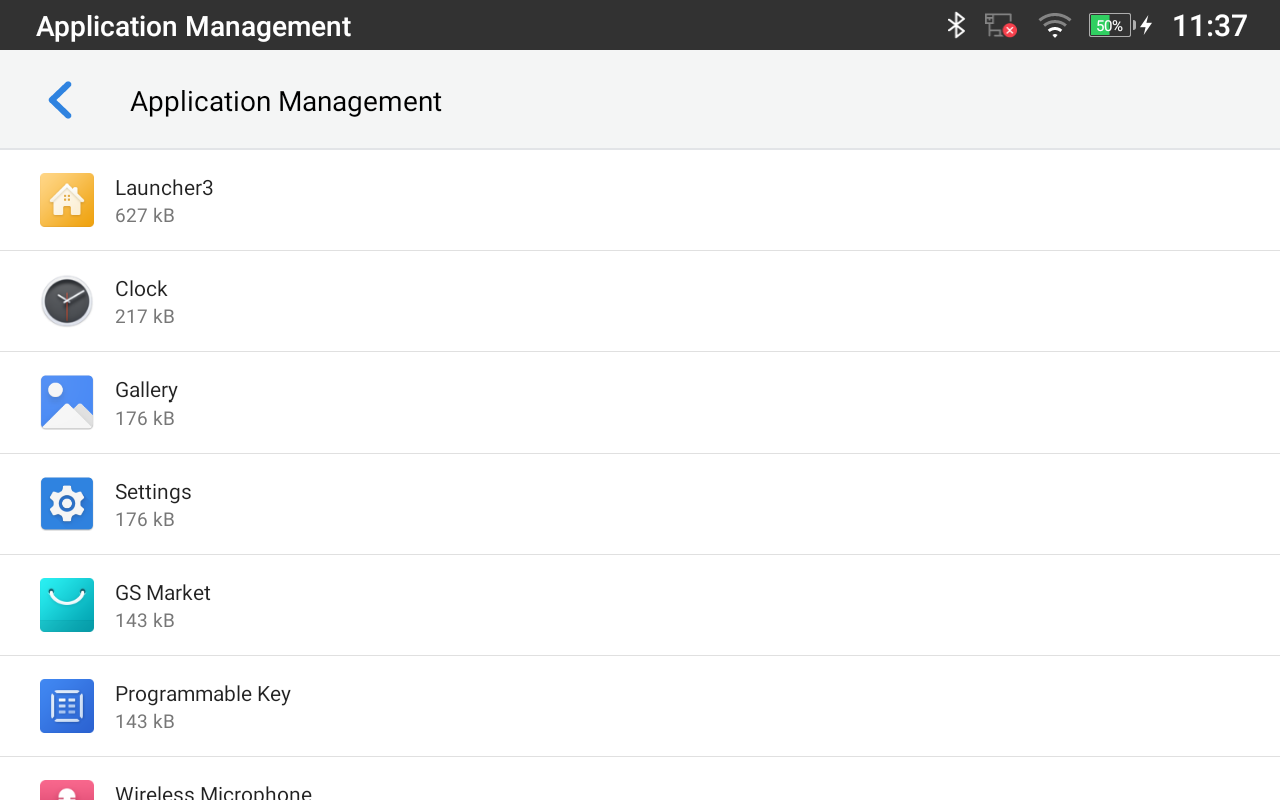
Tap on an application, process, or service to open it. The Application Info screen for each application lists its name, version, size, etc. Depending on the app, it may also include options for managing the application’s data, forcing the application to stop, and disabling the application. Usually, the options are:
- Tap the “Force stop” softkey to stop an application forcefully. This setting might not be valid for some applications.
- Tap the “Open” softkey to Open an application by bringing it forward in the LCD.
- Tap the “Uninstall” softkey to uninstall the applications.
- Tap the “Notifications” softkey to enable/disable notifications for different events depending on the App.
- Storage & Cache: provides storage information that an application uses on the GAC2570. Tap “Clear Storage” to delete an application setting and other data. This setting might be valid for some applications. If the application stores data in a temporary space of the GAC2570’s memory, “Cache” lists how much information is stored.
- Tap on “Clear cache” to clear the cache.
- “Permissions” lists information on the data to which the app has access. For example, the application might access the location information, storage, GAC2570 calls, etc.
- “Open by default”. If the application is configured to launch a certain file type by default, tap on “Clear defaults” to reset this.
- Display over other apps: If active, the application will be displayed on top of the other apps.
- Picture-in-picture: this allows you to watch videos in a floating window (always on top of other windows) so you can keep an eye on what you’re watching while interacting with other sites, or applications.
- Modify System settings: it gives the application permission to modify the system settings. (This option is displayed for some Apps)
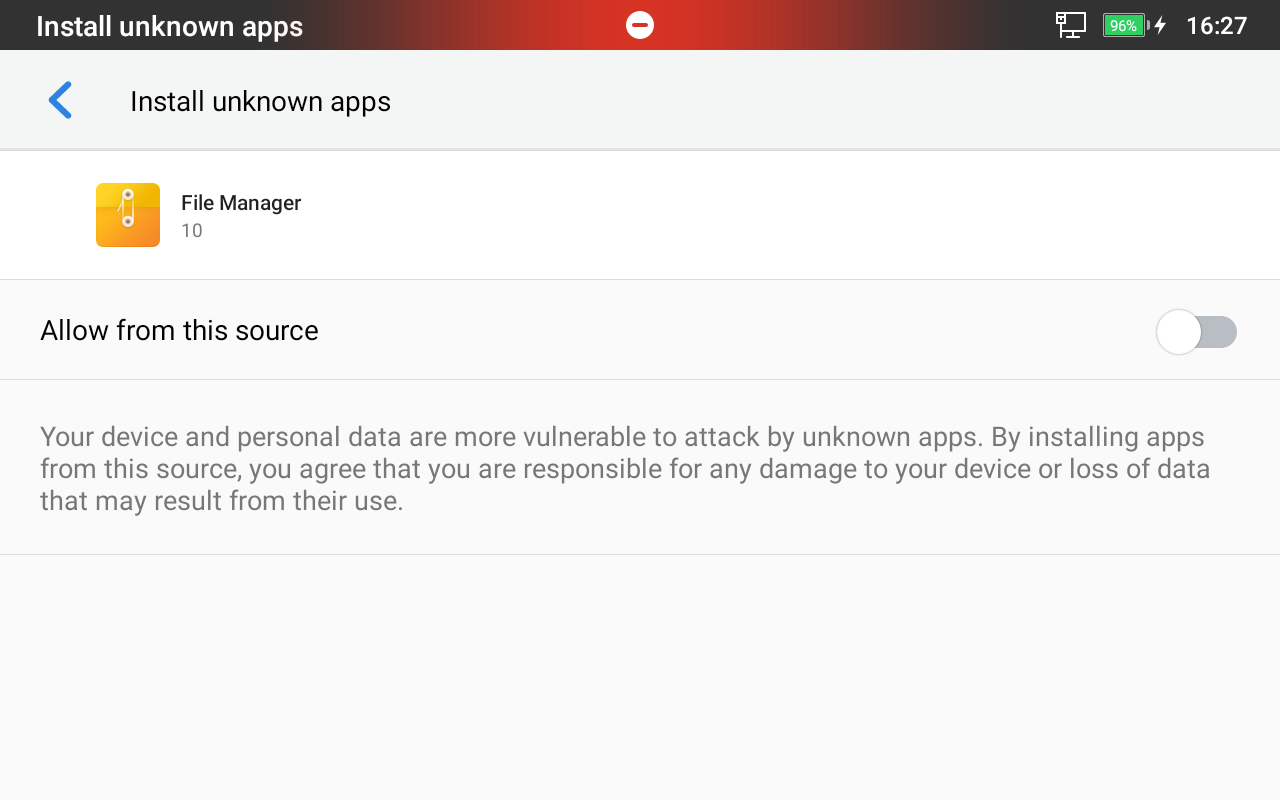
- Install unknown apps: By installing apps from other sources, you agree that you’re responsible for any damage to your device or loss of data that may result from their use. Your GAC2570 and personal data are more vulnerable to attacks from unknown apps.
Installing an app from unknown resources
If you opt to download and install apps from the web in the form of APK files, you must acknowledge the security risks that come with it. During the downloading process, you will encounter a security message, as shown below:
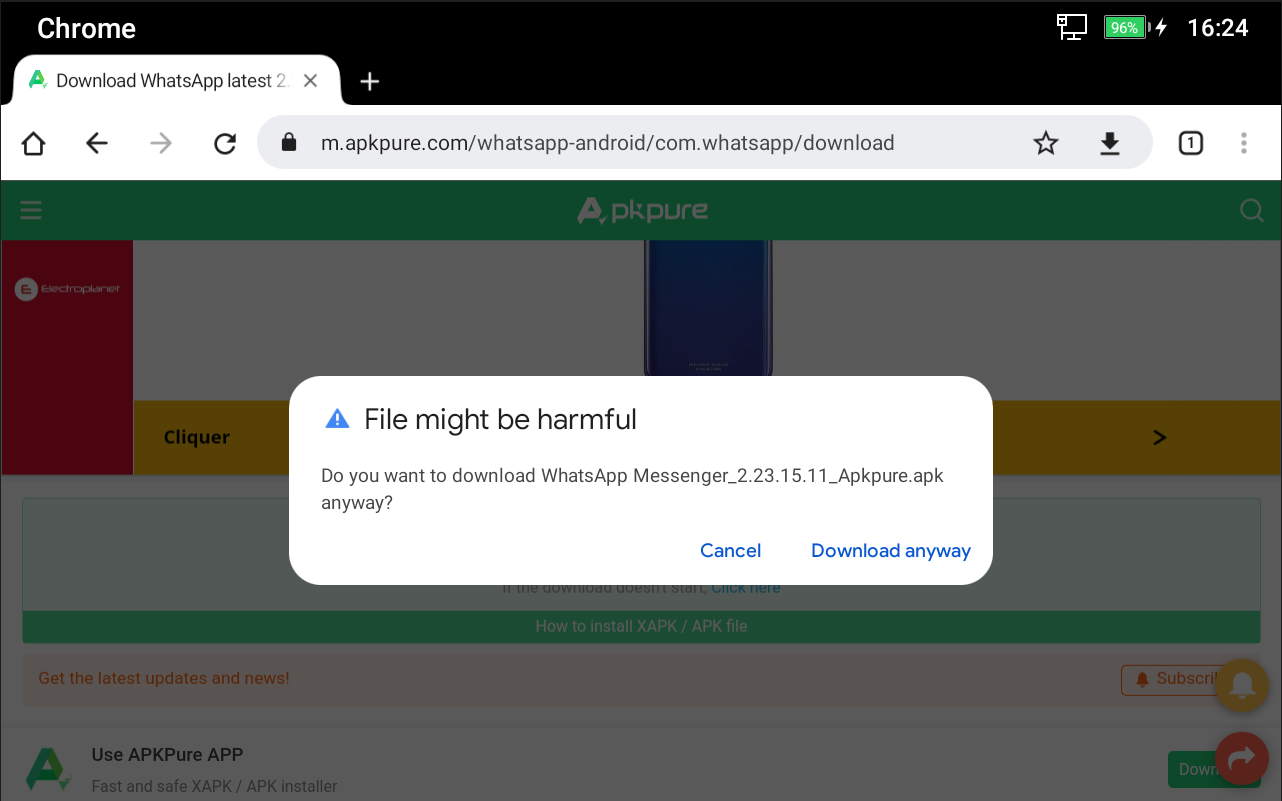
To proceed to the installation, click on “Download anyway”
By default, you will not be able to install the APK downloaded from the web, to change that Click on “Settings”
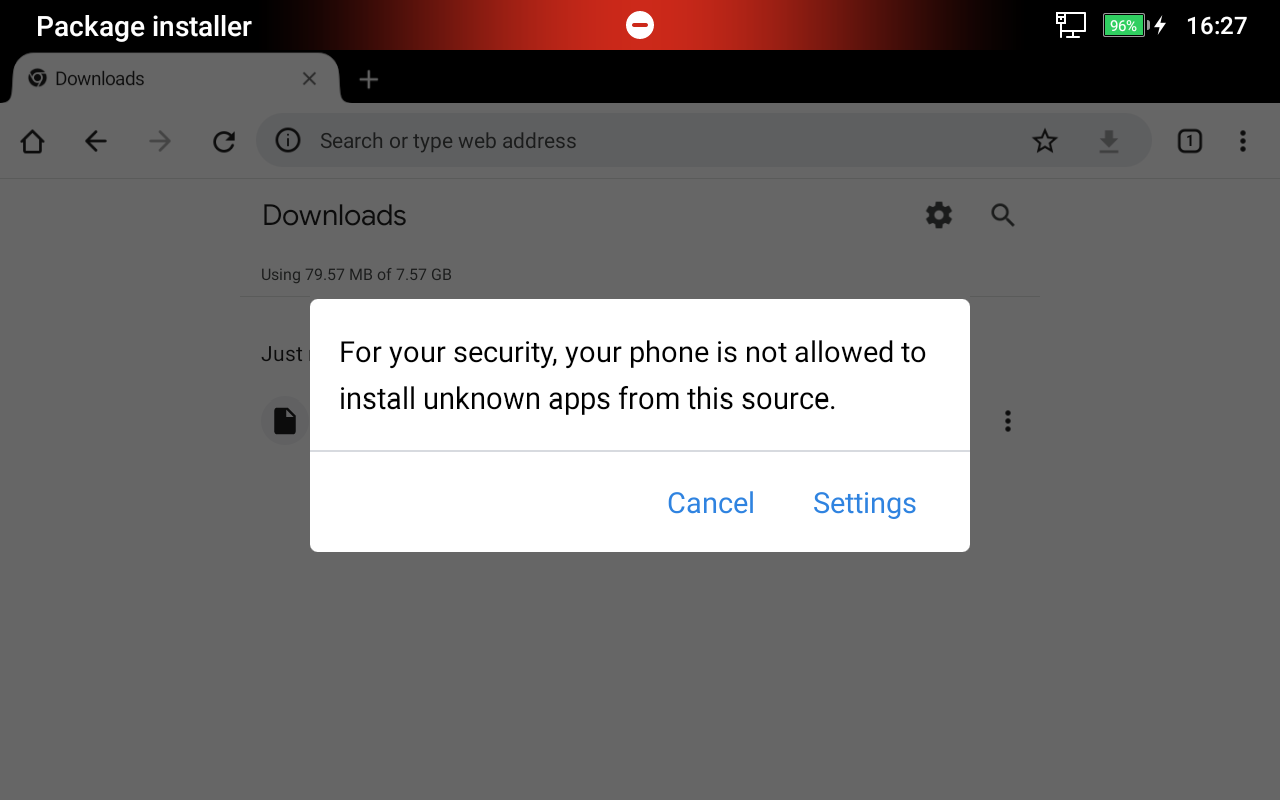
On this prompt you can enable download from an unknown resource by toggling the option “Allow from this source” and then you will be able to install the desired application.
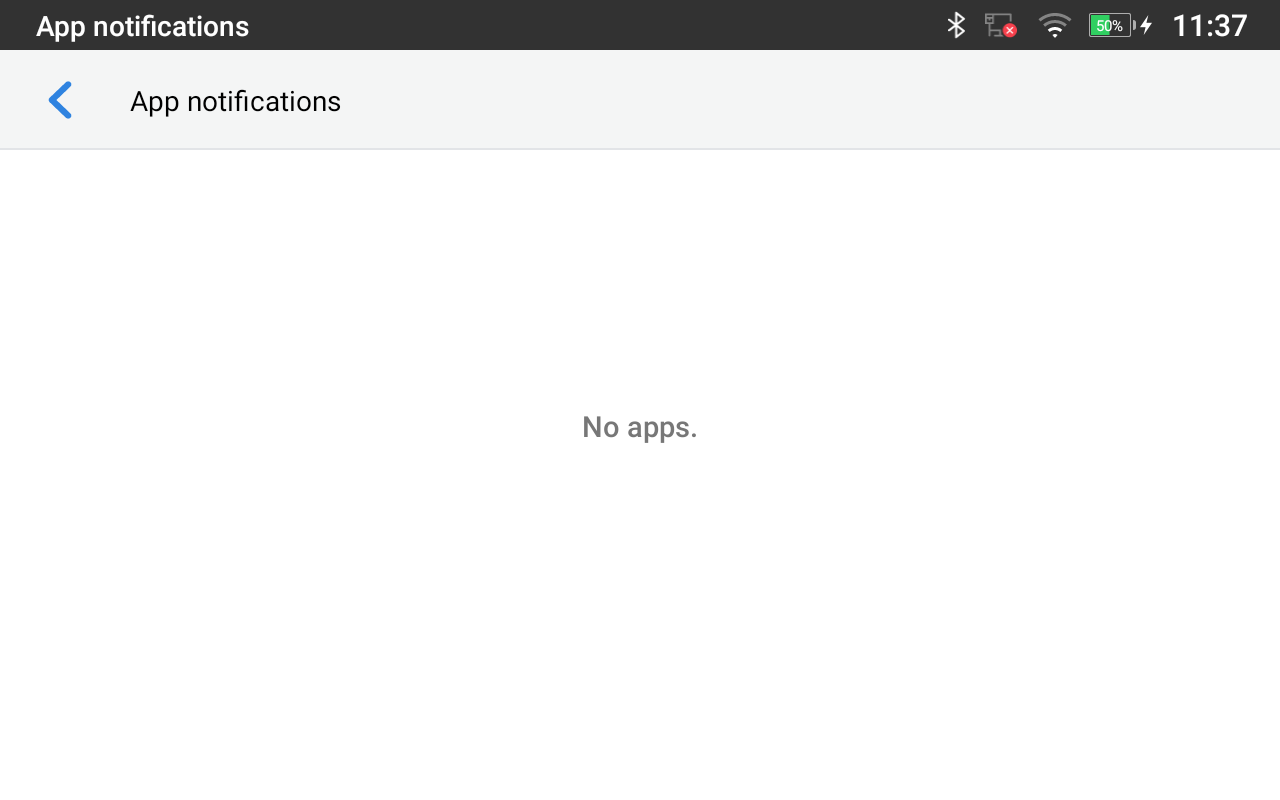
Notification Center
Tap on an application, process, or service to open it. The notification Info screen for each application lists supported actions and allows users to activate/deactivate each notification.
Advanced
Account Settings
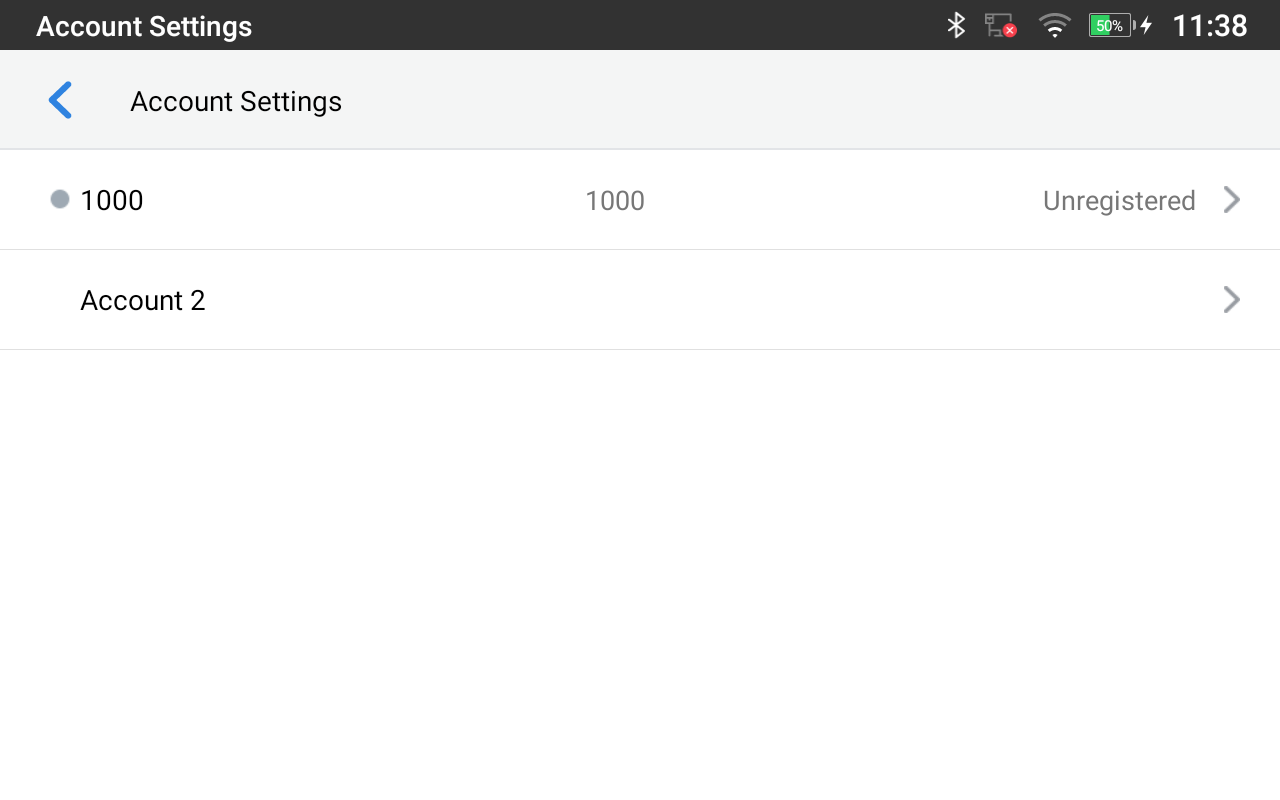
The Account Settings page allows configuring SIP settings for each account. Tap on Account# to access the settings, when configured press the ✔ sign (on the top right corner) to confirm the changes, or press the back button to cancel them. Users can press Empty Configuration at the bottom of the page to clear all the settings. The following settings can be configured for each account. Refer to [General Settings] for the description of each option.
- Account Activation.
- Account Name.
- SIP Server.
- SIP User ID.
- SIP Authentication ID.
- SIP Authentication Password.
- Outgoing Proxy Server.
- Outgoing Call Display Name.
System Update
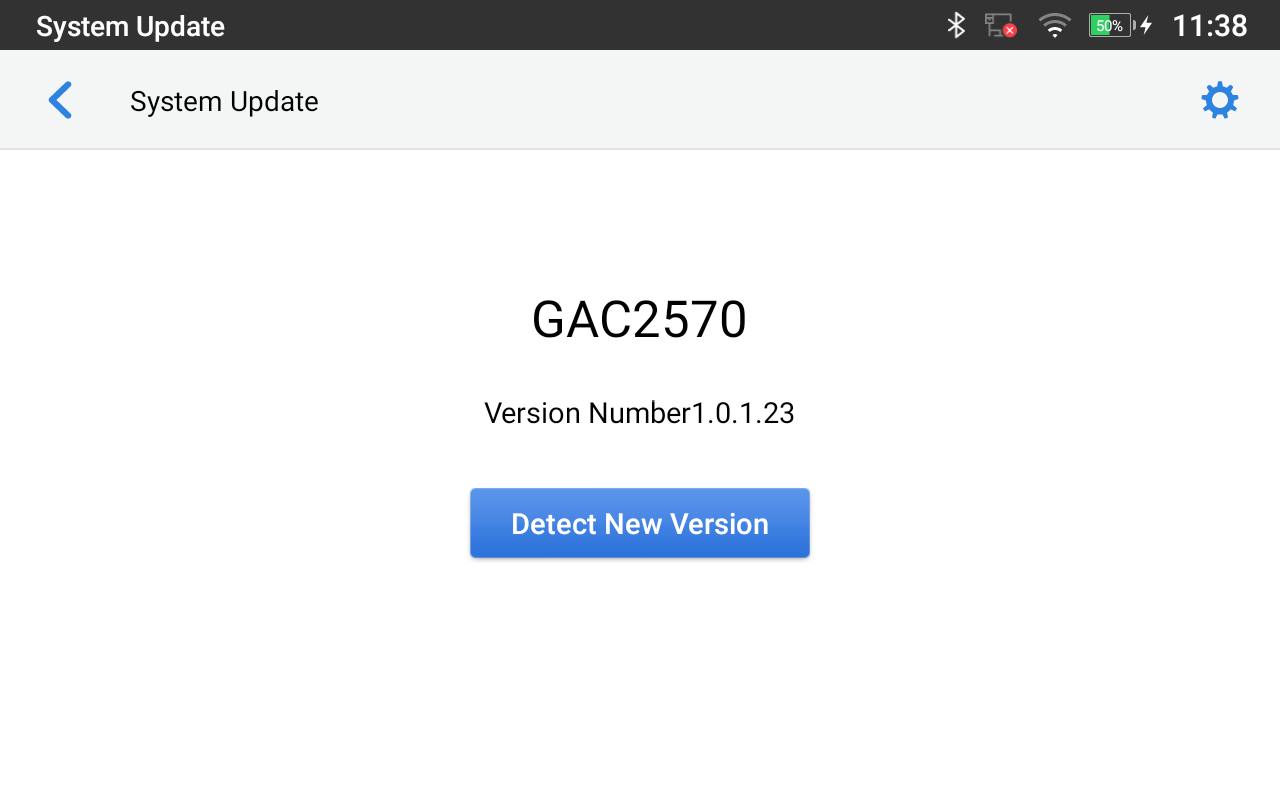
This page allows initiating the upgrade process by checking if a new firmware is available in the configured firmware server path and then upgrading if available. Users can press Settings to configure Firmware/Provisioning settings directly from the GAC2570’s LCD. The following settings can be configured from this screen:
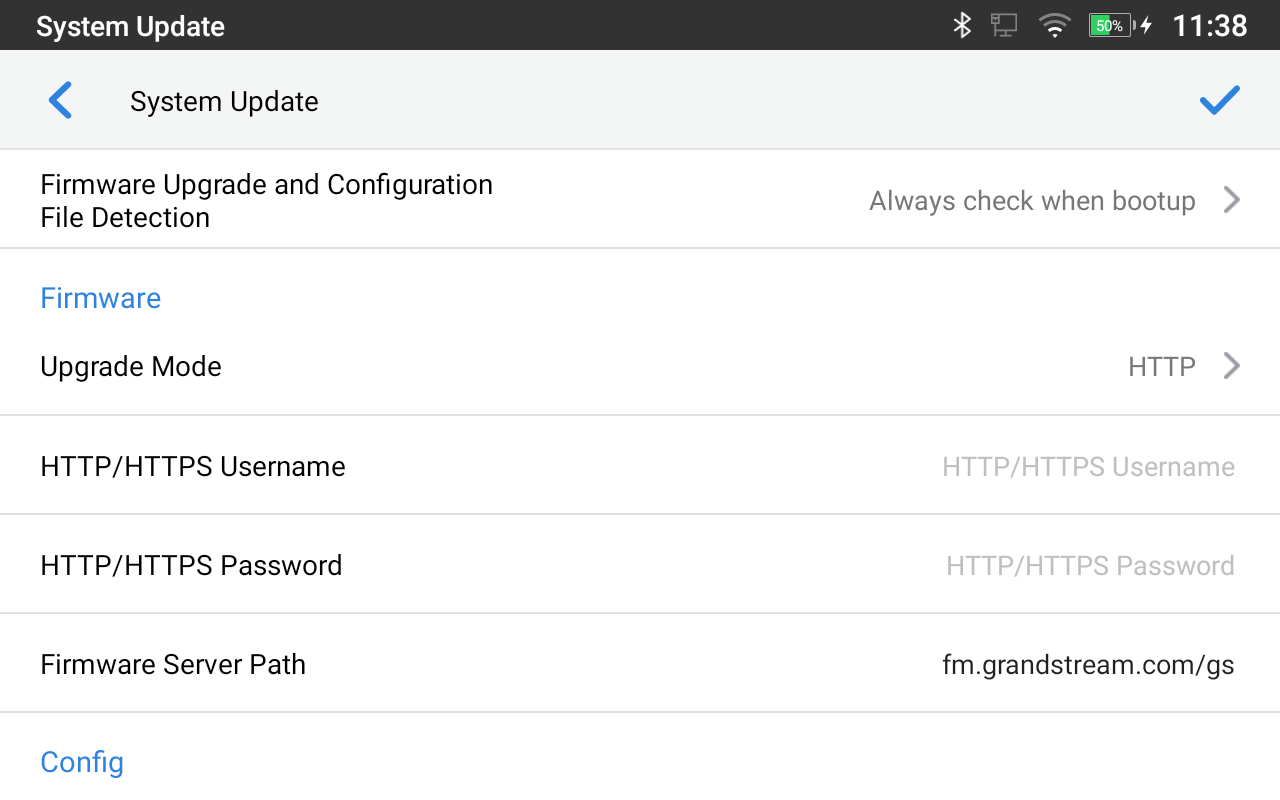
- Firmware upgrade and configuration file detection: This will send a request to the firmware and provisioning server to upgrade/provision the GAC2570 if the files are available on the servers.
- Firmware:
- Upgrade Mode: This field allows the user to choose the firmware upgrade method: TFTP, HTTP, or HTTPS.
- HTTP/HTTPS username: The username for the HTTP/HTTPS server if set up on the server.
- HTTP/HTTPS password: The password for the HTTP/HTTPS server if set up on the server.
- Firmware Server Path: This defines the server path for the firmware server. It can be different from the configuration server for provisioning.
- Config:
- Upgrade mode: This field allows the user to choose the provisioning method: TFTP, HTTP, or HTTPS.
- HTTP/HTTPS username: The username for the HTTP/HTTPS server if set up on the server.
- HTTP/HTTPS password: The password for the HTTP/HTTPS server if set up on the server.
- Config Server Path: This defines the server path for the provisioning server. It can be different from the firmware server.
Syslog
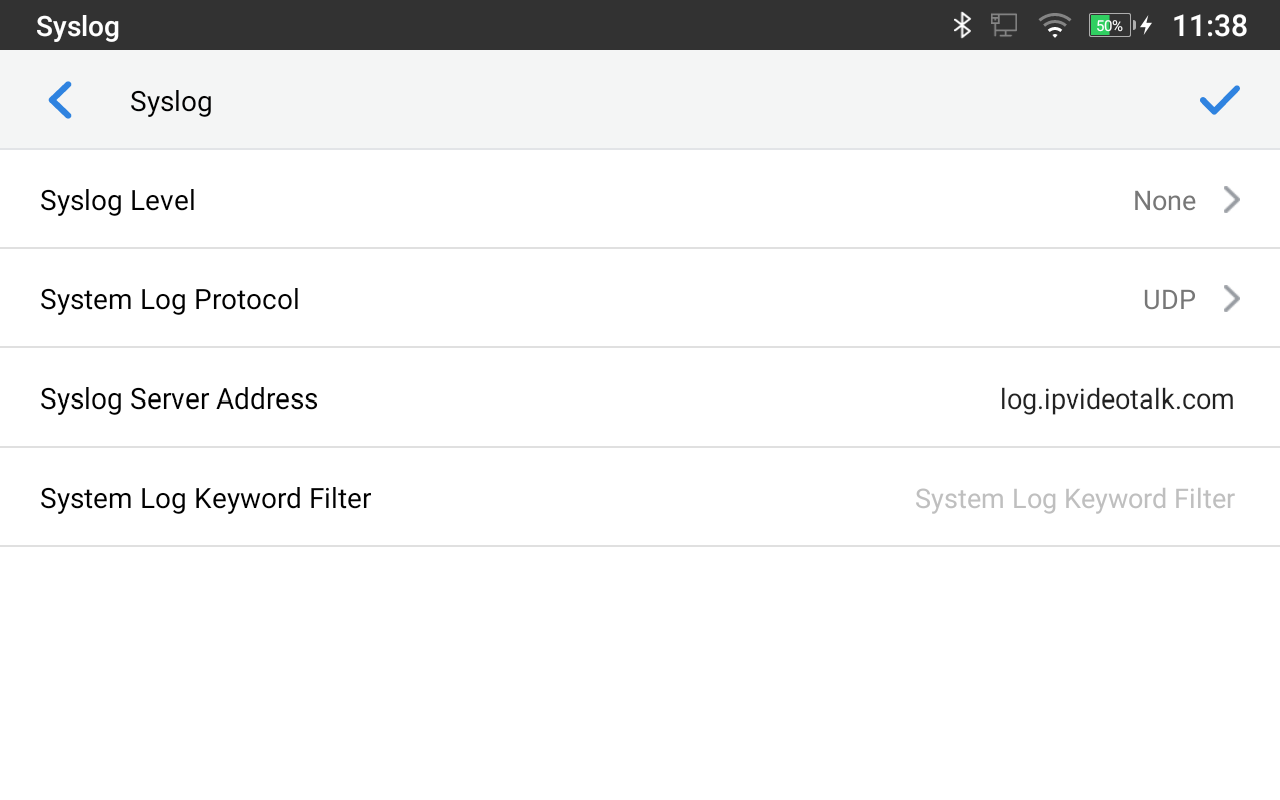
- Syslog Level: Select the level of logging for Syslog. The default setting is “None”. There are 4 levels: DEBUG, INFO, WARNING, and ERROR.
- System Log Protocol: Select the protocol of Syslog (UDP or SSL/TLS).
- Syslog Server Address: The URL/IP address for the Syslog server. If the GAC2570 has a network connection, the GAC2570 will send the Syslog packets to this server address.
- System Log Keyword Filter: Only send the Syslog with the keyword, multiple keywords are separated by a comma. Example: set the filter keyword to “SIP” to filter the SIP log.
System Security
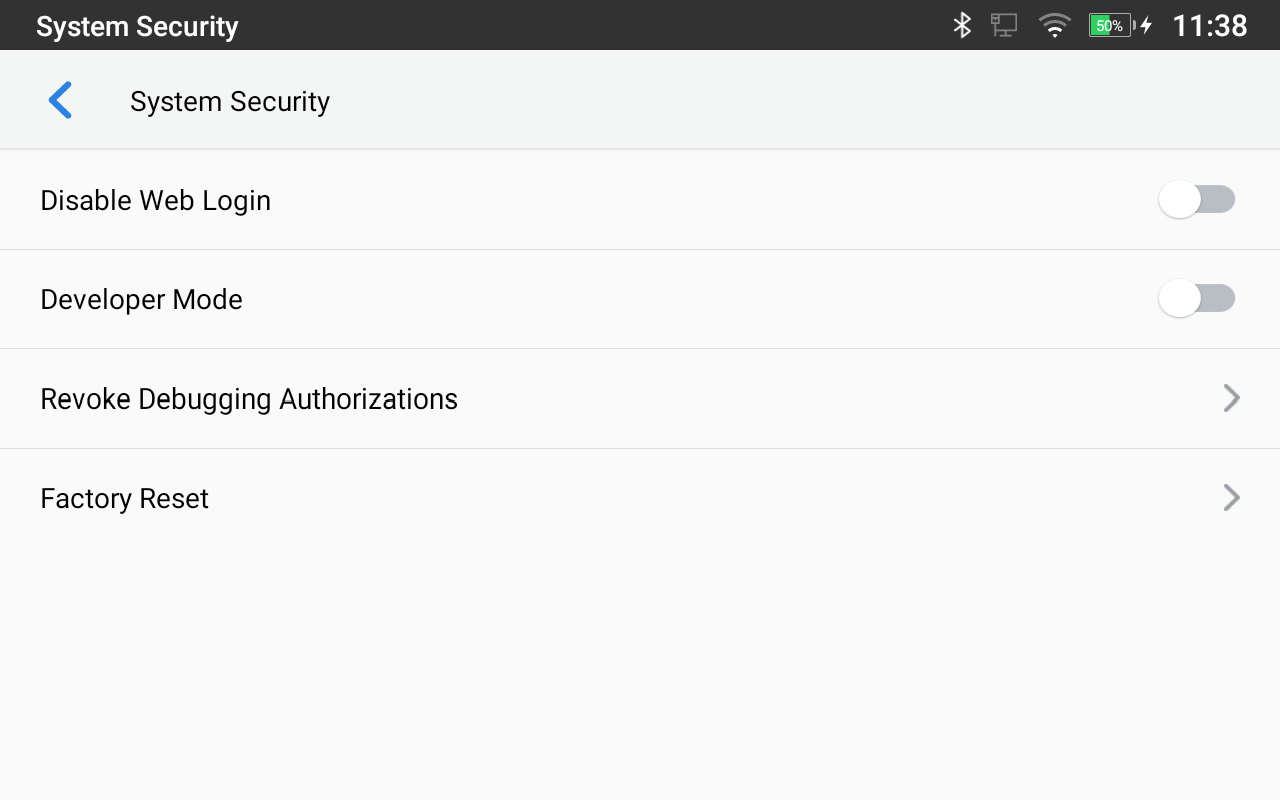
- Disable Web Login: This disables web GUI access.
- Developer Mode. To enable/disable developer mode.
- Revoke Debugging Authorizations. To Revoke access to debugging from all computers previously authorized
- Factory Reset. Restore default settings.
GETTING TO KNOW GAC2570
Use the Touchscreen
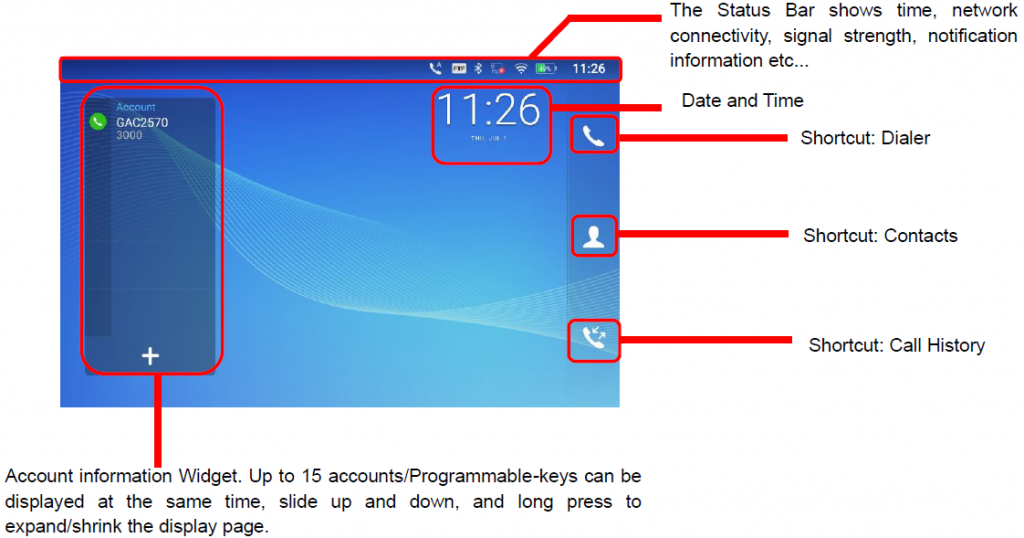
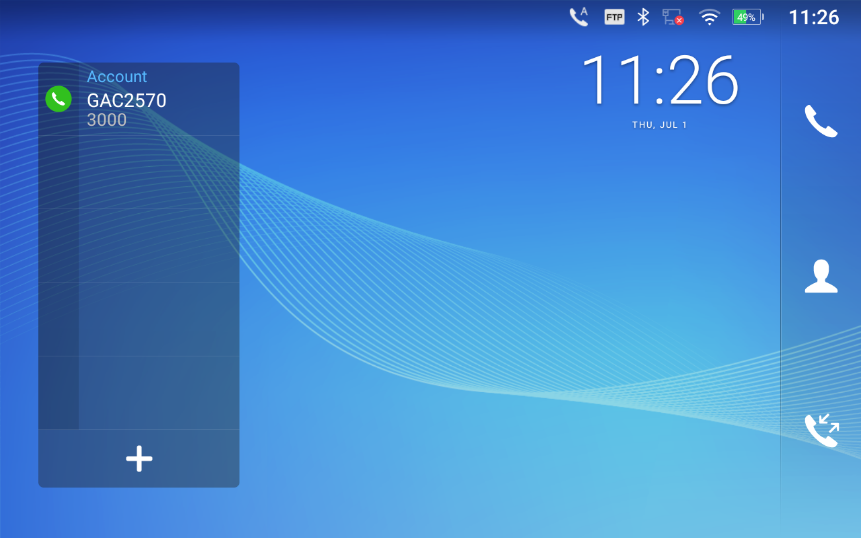
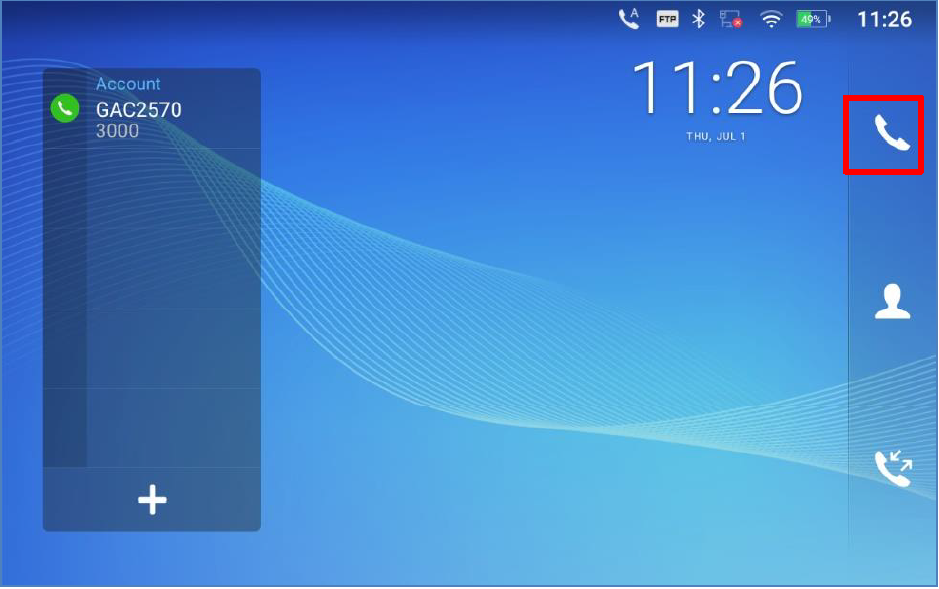
When the GAC2570 boots up, the LCD HOME screen will display as below. A registered account is shown in the following figure and users might need to register their account to have the account status displayed.
The Status Bar shows time, network connectivity, signal strength, notification information, etc…
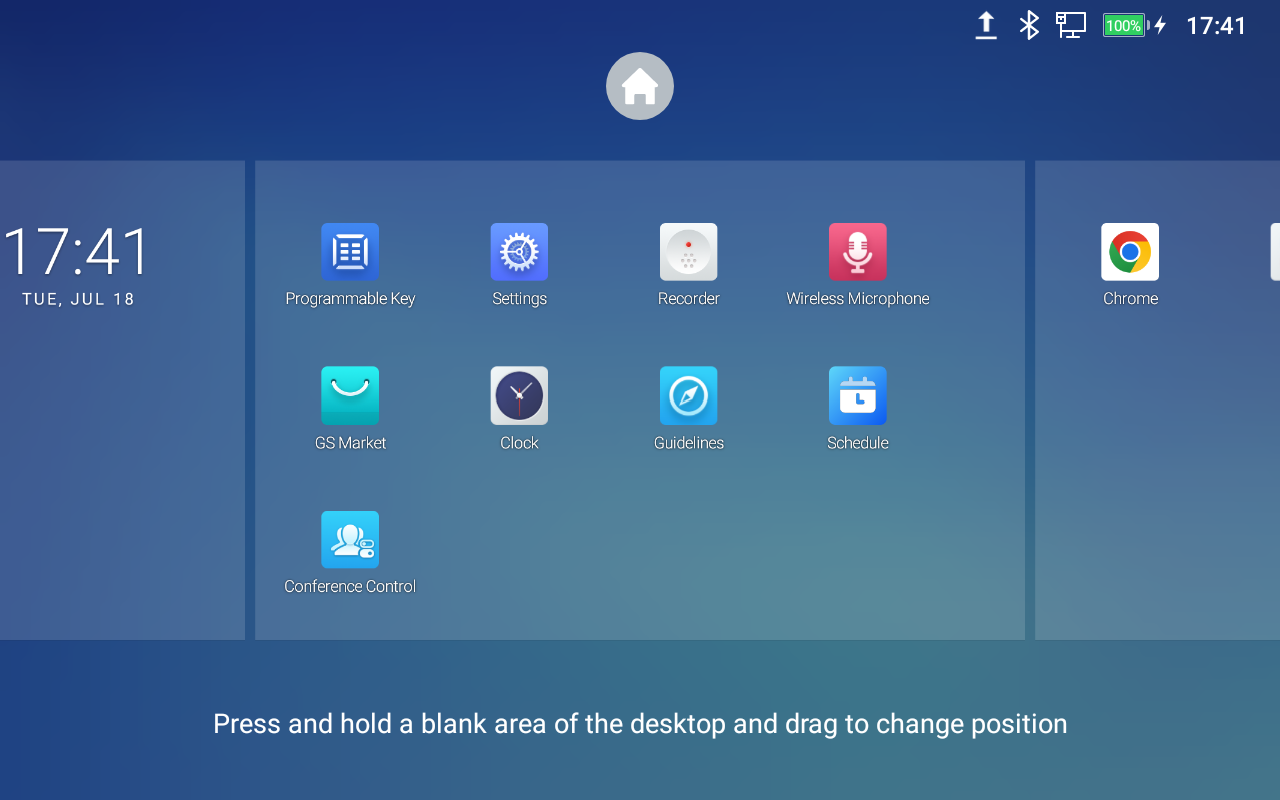
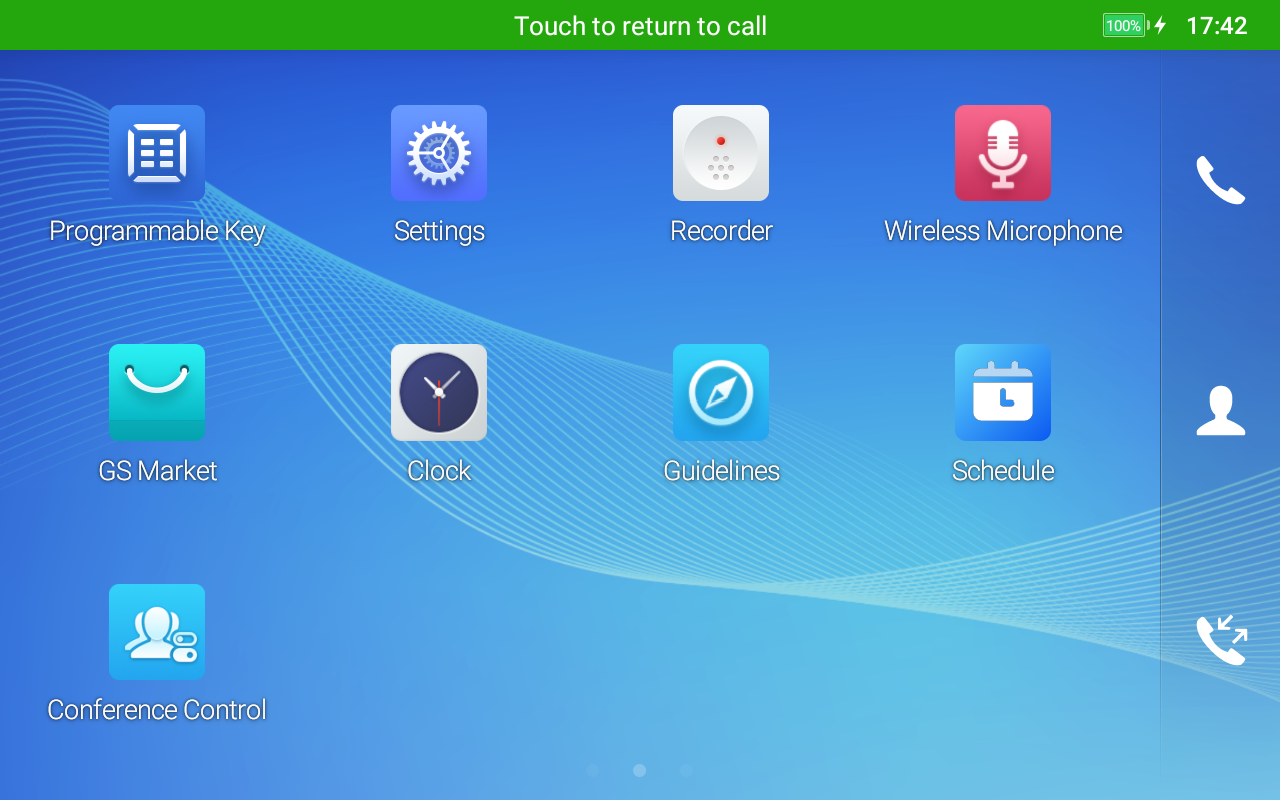
Swipe from right to left to show the application menu of the device. The settings and applications installed will be brought up as shown below.

To fully manipulate the GAC2570 capacitive touch screen, use your fingers to operate the following on the GAC2570 icons, buttons, menu items, onscreen keyboard, etc.
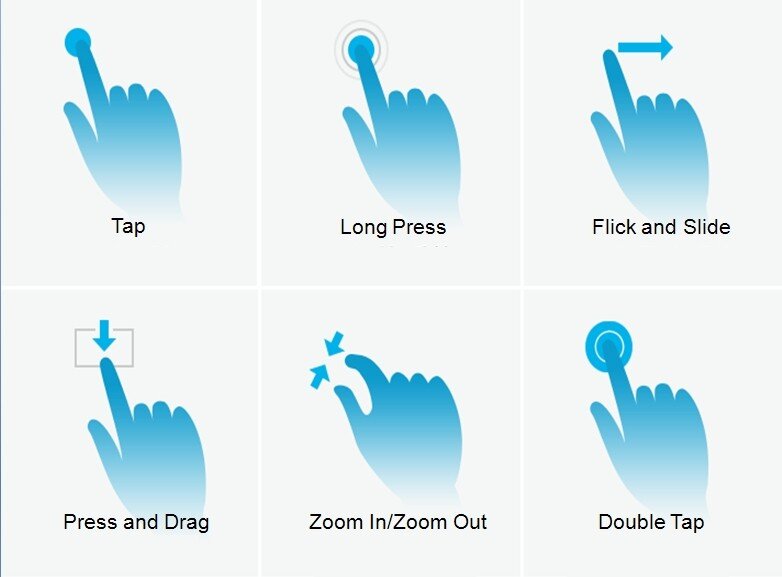
- Tap
Slightly touch the screen with a fingertip to initiate menu, options, or applications. For example, to select items on the screen (e.g., setting options, apps, etc.); to press onscreen buttons (e.g., “End” or “Options” softkey during the call); to type letters and symbols using the onscreen keyboard.
- Long Press
Touch the screen with your fingertip and press for about 2 seconds without lifting your finger from the screen till an action occurs. For example, long press on a picture to bring up a selection option.
- Flick and Slide
Touch the screen with a fingertip and slide over the screen. For example, users could slide up to scroll up the page, slide down to open a dropdown menu, slide left or slide right to delete an item from the list. If your finger stays on the screen for too long, the item may be selected, and sliding won’t occur.
- Press and Drag
Touch and press the item, then move it by dragging it up, down, left, or right, without lifting your finger from the screen.
- Zoom In/Zoom Out
Place two fingers on the screen, then pinch them together (zoom out) or spread them apart (zoom in).
- Double Tap
Quickly tap the screen twice with a fingertip to switch between the default display and zoomed-in display. This is usually used when viewing photos or web pages.
Use the Desktop
Desktop Menu
When the GAC2570 is on an idle screen, press the blank area of the desktop to bring up the device’s menu. Users can access the following in the desktop menu to drag and change desktop position:
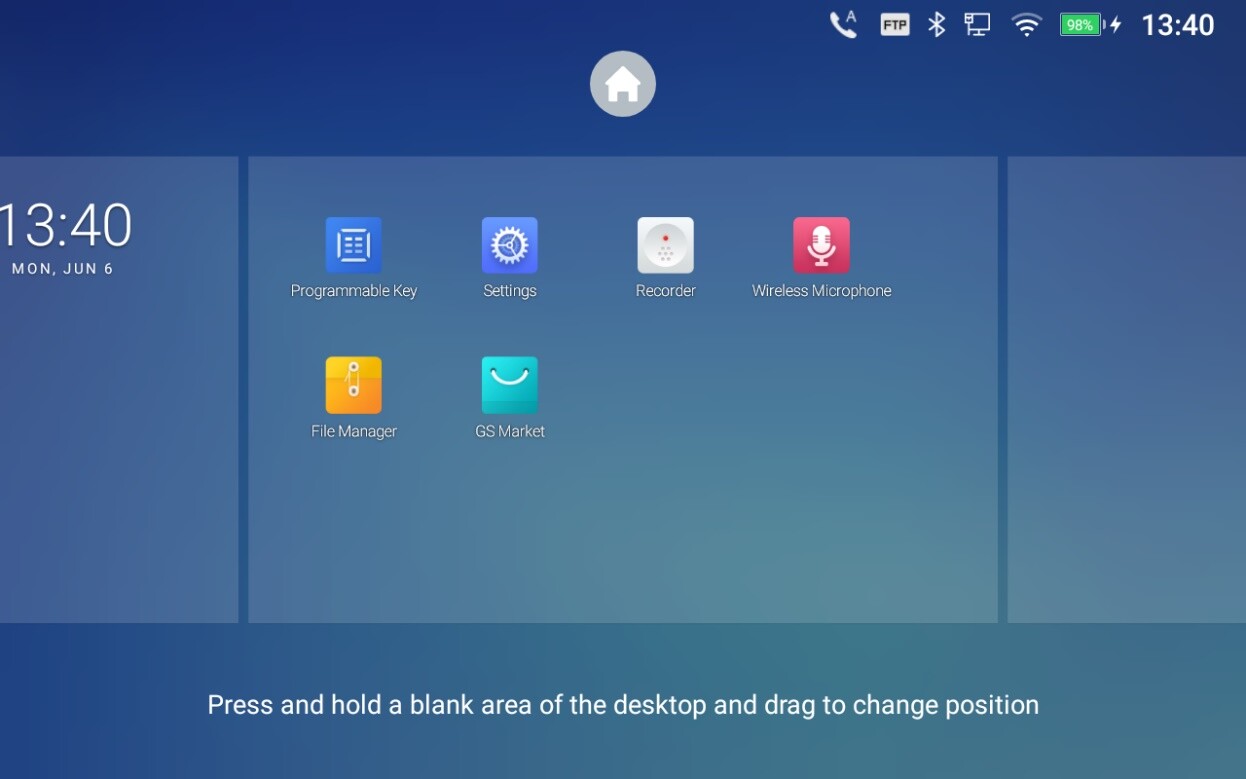
- Desktop page
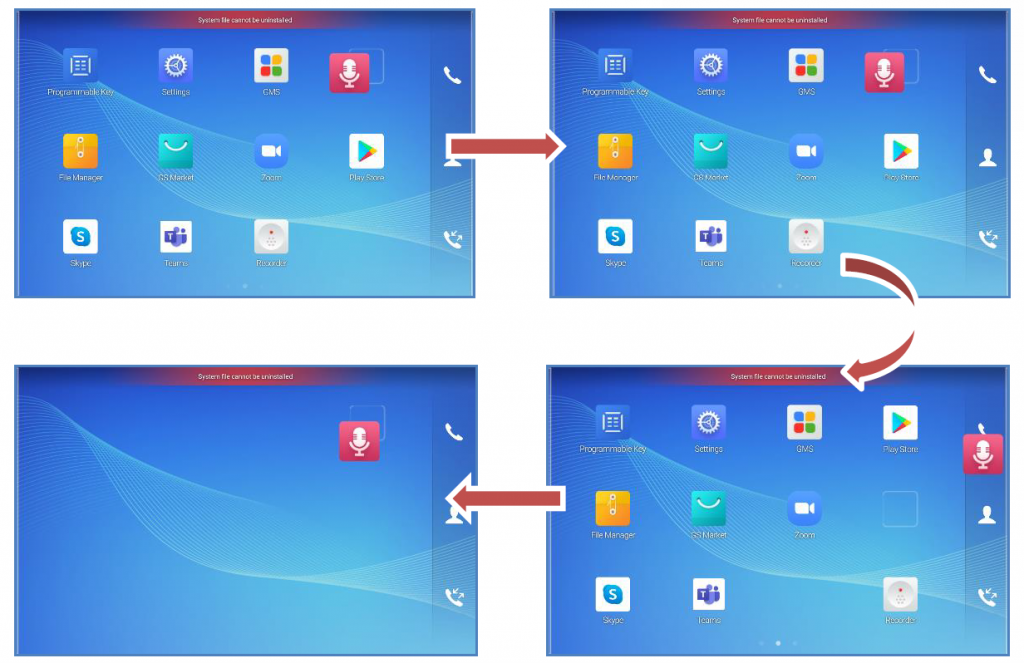
Set the Home page and change the screen sequence, move apps between windows, edit apps position, and delete apps (except system apps).
Manage Desktop Items
On the GAC2570 desktop, users could tap on the desktop items to manage shortcuts and widgets. The following operations can be done:
- Tap on the shortcut icon to open the application.
For example, tap on the “Guidelines” icon  to access the guidelines application.
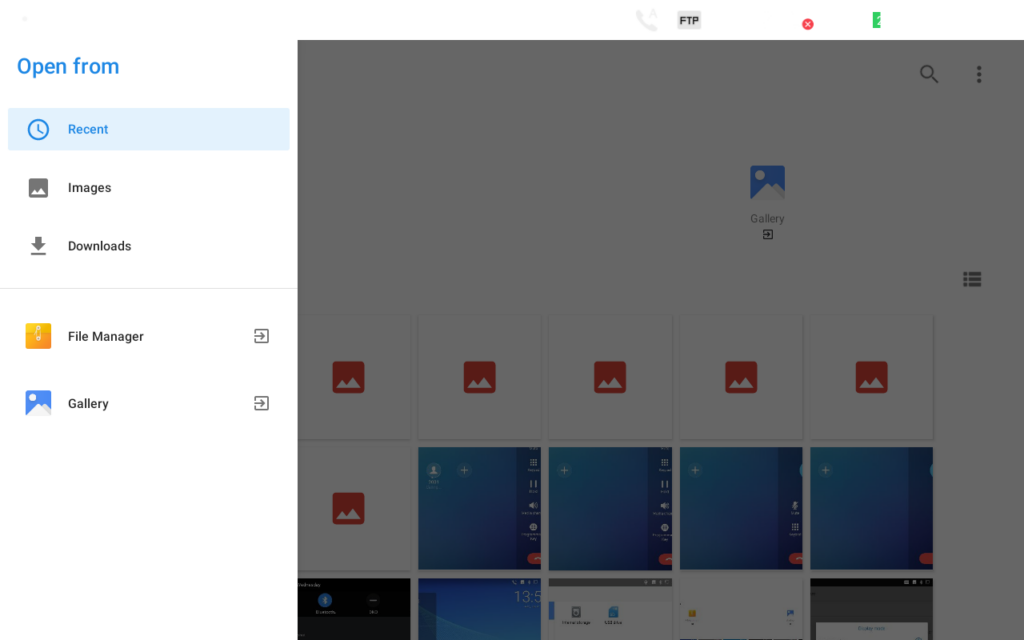
Set Wallpapers
On the GAC2570 desktop, tap on Settings 🡪 Basic 🡪 Wallpaper:
- My Photos
Open either the Gallery application or enter the File Manager to gain access to both local and external storage. Use the left panel to navigate through Recent, Images, and Downloads. Tap on the picture to preview. Touch and drag the picture to adjust the frame that will be used as wallpaper. Then tap on “Set Wallpaper” to set the selected area of the picture as wallpaper.
- Wallpapers
On the right side of the Wallpaper menu of the GAC2570. Select the picture from the default wallpapers available to preview and then tap on “Set wallpaper”.

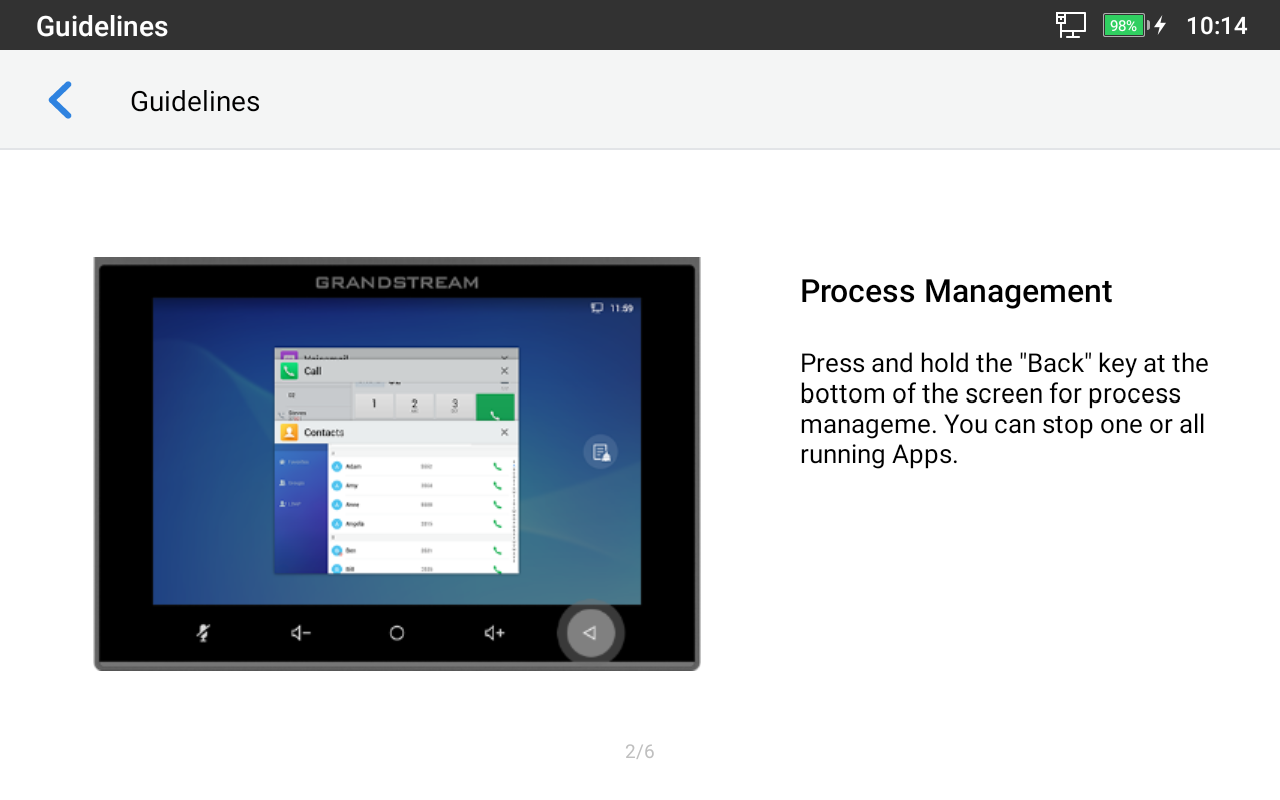
Manage Running Applications
From the GAC2570 desktop, press for about 2 seconds to bring the running Apps, and click on the “App Management” icon ![]() to clear the running Apps.
to clear the running Apps.
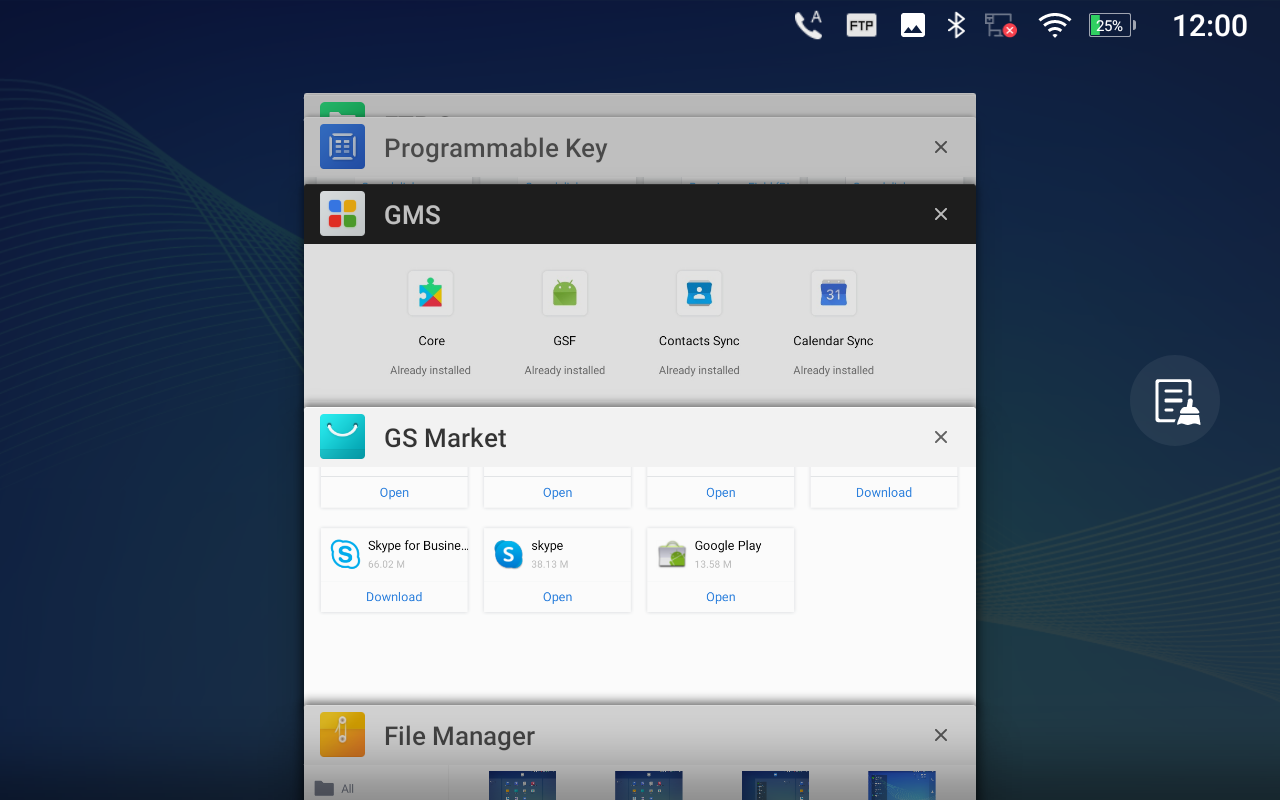
Users could use the thread manager to do the following:
- Slide the running thread to the left or right to stop the application.
- Tap on the icon “X” to delete all running threads.
Idle Screen
Switch Idle Screens
The GAC2570 supports multiple idle screens by sliding the screen horizontally. On the GAC2570 screen, slightly touch an empty area and slide to the left or right using your finger to switch between different idle screens.
Set Up Idle Screen
- Set home screen
Follow the steps below to set up the HOME screen.
- GAC2570 is up and running on the idle screen.
- Press an empty area on the desktop.
- The screen with
 displayed is the HOME screen. Others are shown with icon
  . Tap on the icon to select the corresponding screen as the new HOME screen.
- Move an APP to another Available desktop screen
As shown in the figure below, this section shows the available desktop screens. Users could send an APP to the empty desktop.
- Long press on an empty area on the desktop
- Long press the APP and drag it to the right edge of the screen then drop it
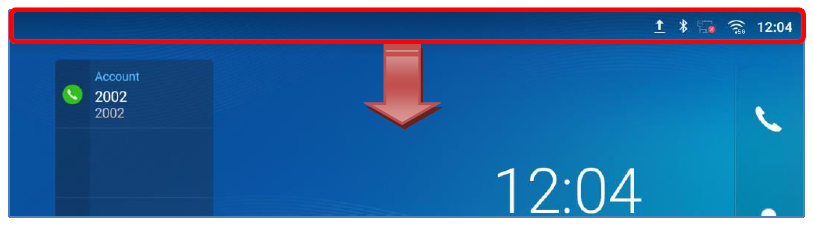
Use the Status Bar
The status bar on the top of the GAC2570 screen provides visual notifications for the system settings and status, as well as quick access to important system settings. To access it, on the GAC2570 idle screen, slowly slide down from the top to the bottom of the screen as the following figure shows.
For more options on the Status Bar for Brightness adjustment. Users can pull down the status bar twice, or once with two fingers.
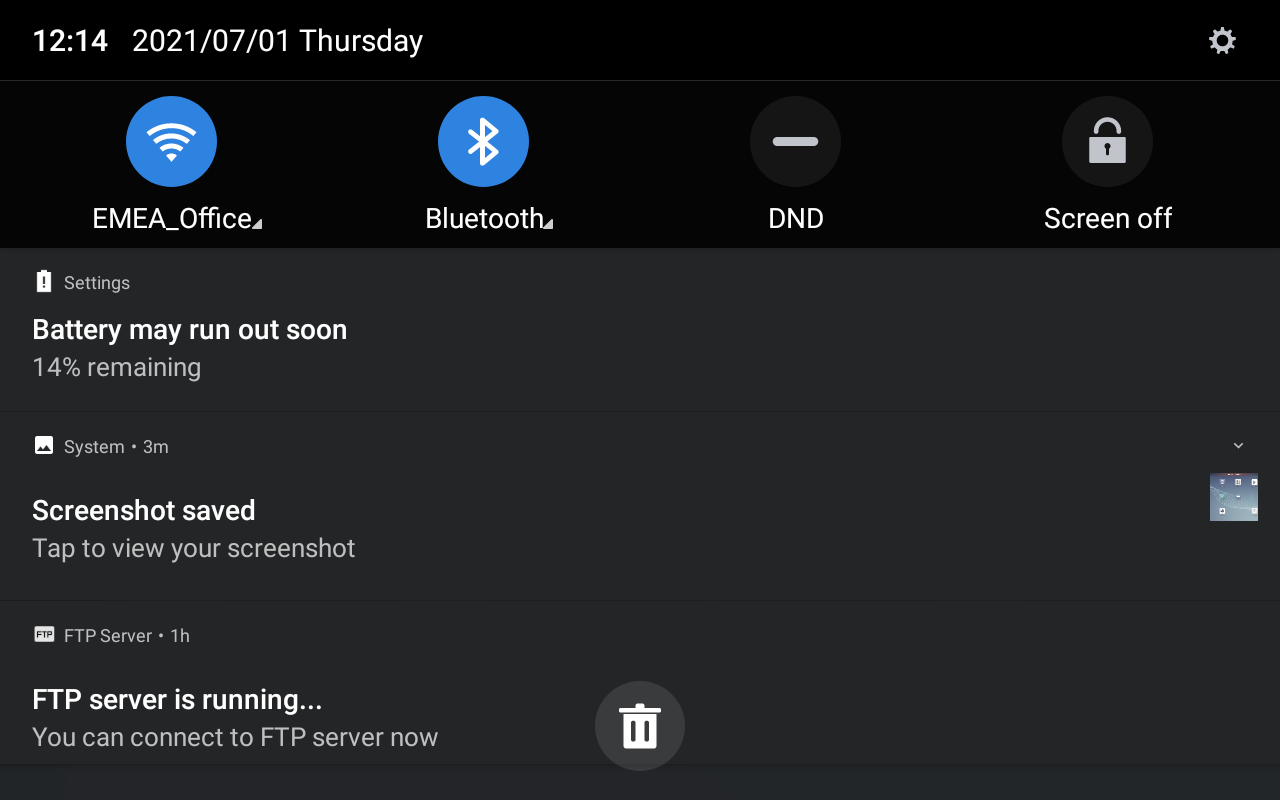
- Tap on the notification message to view the details.
- Slide the notification message to the left or the right side to remove it.
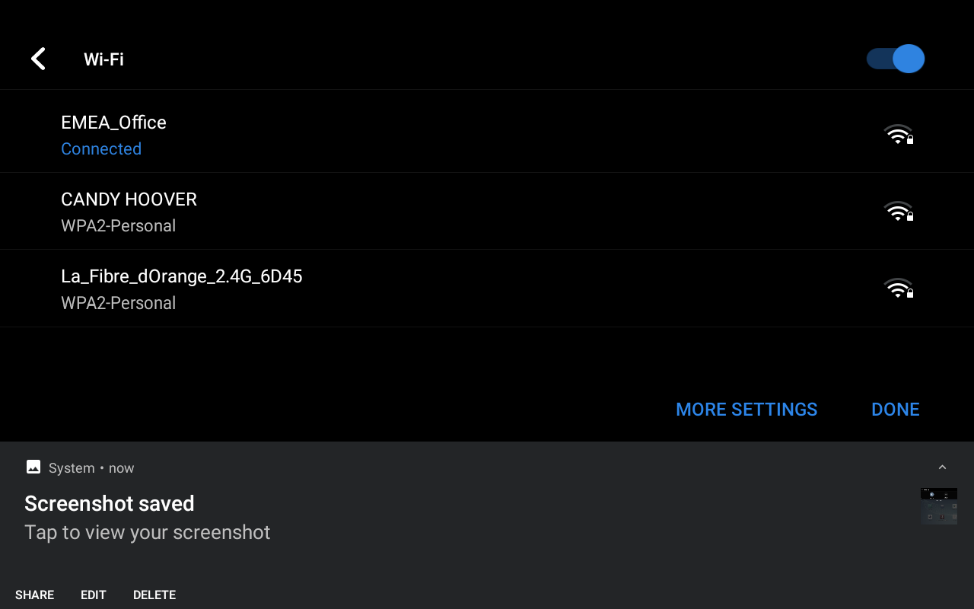
For more information about Wi-Fi connection in the notification bars, you can press the bottom right triangle of the feature in question.
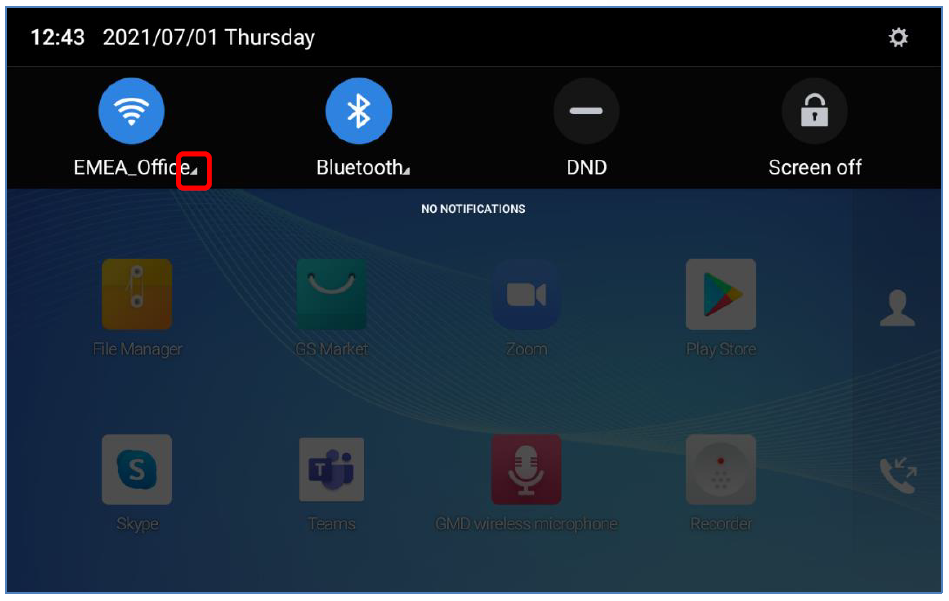
For example, you can see the available Wi-Fi Networks.
Notifications in the Status Bar
The following table describes the icons used on the status bar for notification purposes.
Network connected via Ethernet cable. | |
Trying to connect to the network via Ethernet cable. | |
Network disconnected via Ethernet cable. | |
Speaker is being used. (x) | |
Wi-Fi is enabled and still not connected. | |
Wi-Fi network is available. | |
Wi-Fi is enabled and connected. | |
Bluetooth is enabled but not connected. | |
Bluetooth is enabled but not connected. | |
Bluetooth is enabled and connected. | |
Downloading files via Bluetooth. | |
Downloading files via Bluetooth. | |
DND is enabled. | |
Silent mode is enabled. When it’s on, the incoming call/message won’t produce ring tone/notification tone from GAC2570’s speaker. | |
USB flash drive is inserted. | |
Downloading files via Internet connection. | |
Contact storage is full. | |
Incoming call from blacklist contact. | |
HDMI cable is connected to display device. | |
The GAC2570 is powered up using PoE+. | |
PPPoE is connected. | |
PPPoE is not connected. | |
Wireless Microphone connected. | |
Warning message. |
GAC2570 Status Bar Notification Icons
Use the GAC2570 Keys
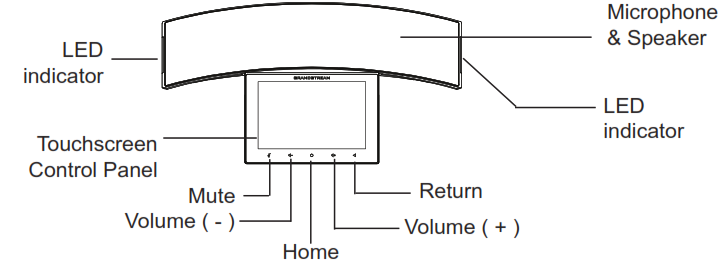
Microphone & Speaker | Built-in Microphone and Speaker. |
Touchscreen Control Panel | Tap to view options for different screens or applications. |
Mute | When in standby, turn on/off DND. During a call, mute/unmute the Microphone. |
Return | Tap to go back to the previous menu. |
Volume (-) | Decrease the device volume. |
Volume (+) | Increase the device volume. |
Keypad Shortcut Functions
The GAC2570 supports key shortcuts for certain special system functions.
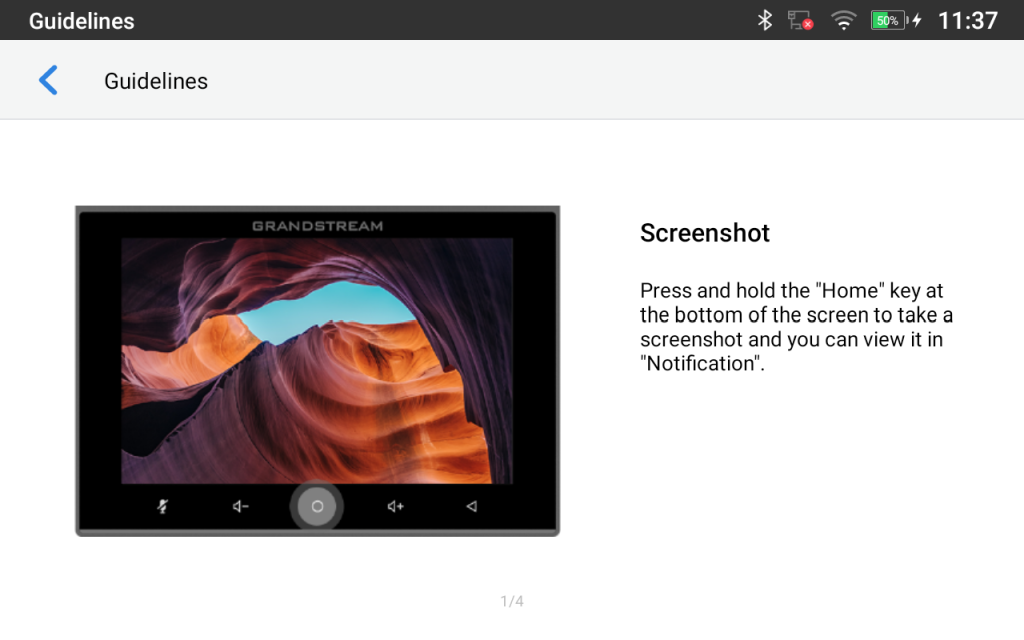
- Screenshot
Press and hold the Home button ![]() for about 2 seconds to capture a screenshot. The screenshot can be accessed via File Manager🡪 Pictures. The screenshot picture size is 1280×800 pixels.
for about 2 seconds to capture a screenshot. The screenshot can be accessed via File Manager🡪 Pictures. The screenshot picture size is 1280×800 pixels.
- Firmware upgrade via USB Flash Drive
For users who could not use a remote upgrade or could not access the device’s Web GUI to upload firmware, upgrading via USB Flash Drive is an alternative.
Follow the steps below to upgrade GAC2570 via USB Flash Drive
Download the firmware file to the PC and save it (gac2570fw.bin file) in the USB Flash Drive:
- Insert the USB drive to GAC2570.
- The device will detect the firmware located in the USB and will prompt an upgrade message.
- Once finished, the GAC2570 will reboot itself.
- Check the firmware status and remove the USB Drive.
- Hard reset
For users who want to factory reset the device manually, a hard reset is an alternative:
- Power cycle the GAC2570.
- Wait for the Mute LED to start flashing.
- Press the Home Button 10 times.
- The LCD screen will display “Erasing”.
- The GAC2570 will reboot with factory default settings.
Use the On-Screen Keyboard
The GAC2570 onscreen keyboard can be activated by tapping on an input field.
- English Keyboard
This is the default keyboard on GAC2570.
To switch input between lowercase and uppercase, tap on
![]() (lowercase) or
(lowercase) or
![]() (uppercase).
(uppercase).
- Number and symbols
To input number and symbols, tap
![]() on the default keyboard to switch to number/symbols. Tap on
on the default keyboard to switch to number/symbols. Tap on
![]() to switch back.
to switch back.

Tap on
![]() to access more symbols.
to access more symbols.
MAKE PHONE CALLS
Register SIP Accounts
The GAC2570 supports up to 16 independent SIP accounts. Each account can have separate SIP servers, usernames, and NAT configurations.
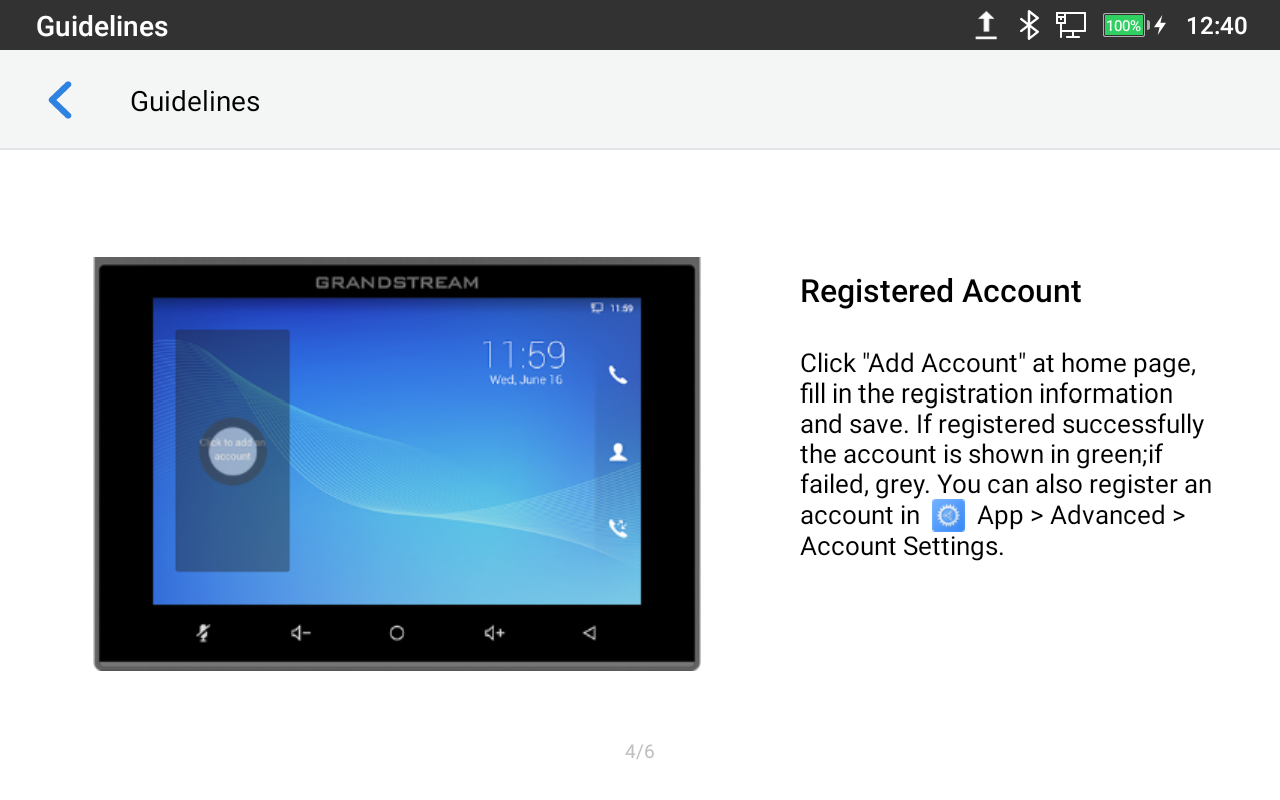
Account Status
On the idle screen, the account widget shows the account name and registration status.
- The following figure shows the account is successfully registered (the account icon is green).
- If the account icon is grey, it’s still trying to register or unable to register.
Configure SIP Account
To register a SIP account, users can access GAC2570’s LCD menu🡪Settings🡪Advanced 🡪Account Settings
Or users could log in to the GAC2570 web GUI🡪Account Settings page to fill in the necessary registration information, i.e., Account active, Account name, SIP Server, SIP User ID, SIP Authentic ID, SIP Authentic Password, etc. Once the correct information is entered and saved, the account registration status will show on the main screen.
If the account is successfully registered, users could use one of the following ways to bring up the dial screen to start making calls.
- On the shortcuts menu of the idle screen, tap on

icon to open the dial screen.
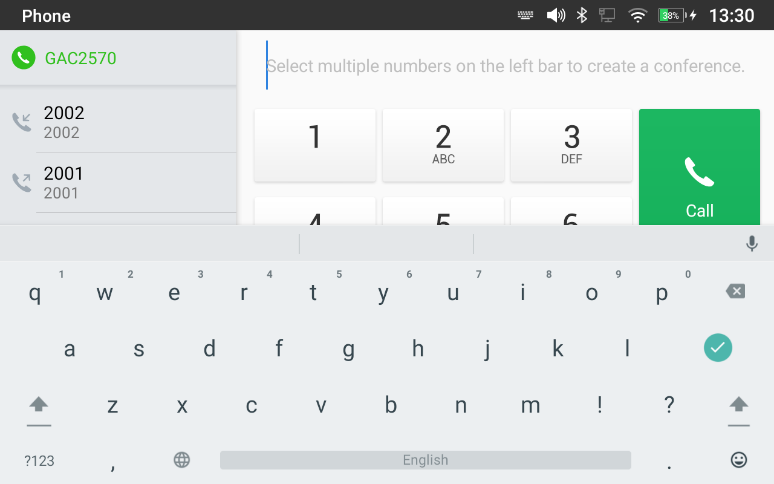
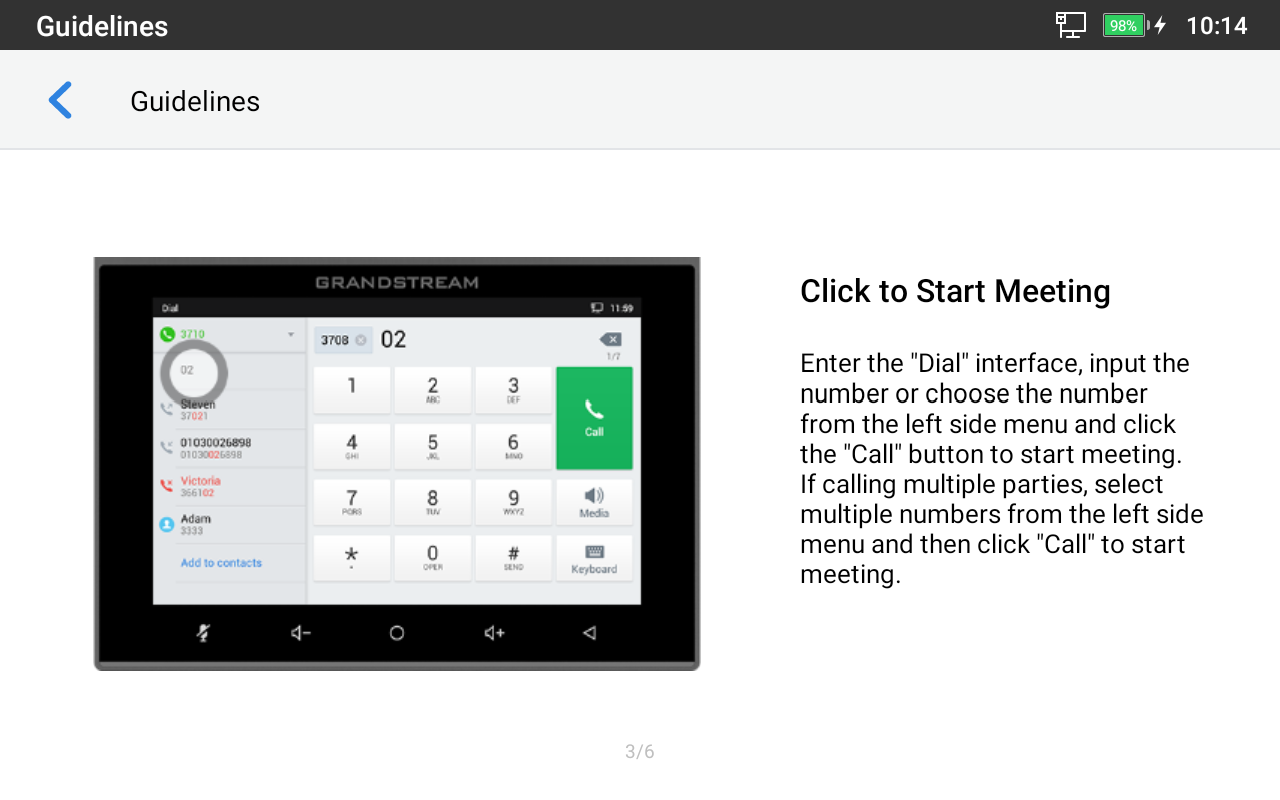
Making Calls
Dial a Number Directly
- Use the methods mentioned above to open the dial screen.
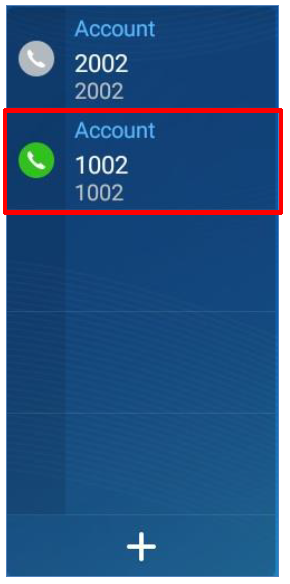
- Select the account to dial out on the left panel of the dial screen. The selected account will be displayed in green
- Enter the digits to be dialed out using the keypad. If the digit matches call history, a list of numbers will be displayed for users to select from.
- Tap on
 to send the number. If no key is pressed, by default the call will be automatically dialed out after 4 seconds timeout.
 to send the number. If no key is pressed, by default the call will be automatically dialed out after 4 seconds timeout.
Redial
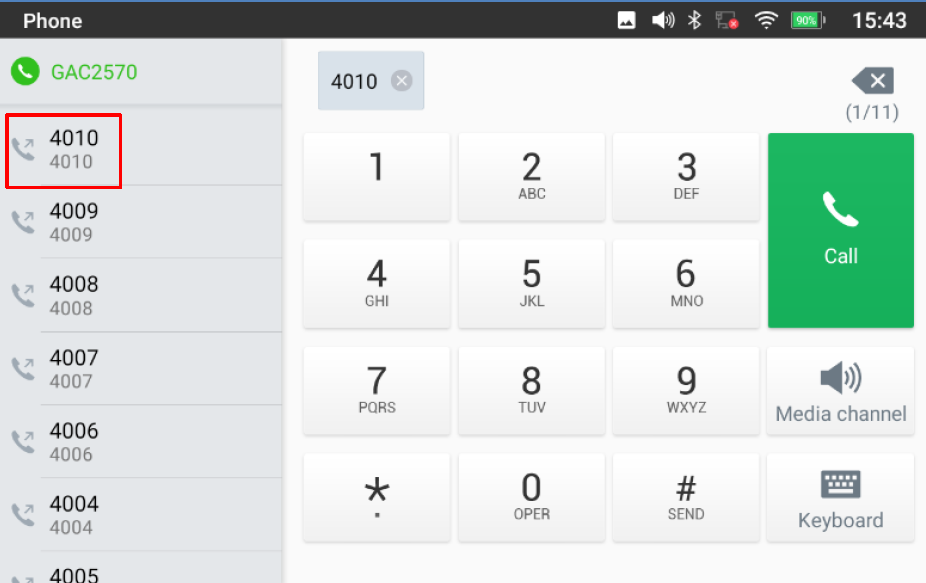
Users can dial out the last dialed number if there is in the dialed call log, using the same SIP account making the call last time.
- Enter the dial screen.
- A list of dialed calls will be displayed on the left side of the dial pad. Tap on the number you would like to call, the number will be added to the dialing field, press call to redial.
Dial a Number via Contact
Follow the steps below to dial a number via Contact.
- Access Contacts by tapping on
 icon on the left side of the idle screen.
 - Navigate in the contacts entries by sliding up/down on the screen.
- Tap on the dial icon for the contact
 .
.
Dial a Number via Call History
- Access Call History by tapping on
 icon on the bottom of the idle screen.
 - Incoming and outgoing calls are displayed in the “Conference” in the form of meetings, and missed calls are displayed in the “Missed”.
- Navigate to the call history list by selecting the call history category and sliding up/down on the screen.
- Tap on the entry to show more details or tap on
 to dial out.
Direct IP Calls
Direct IP Call allows two phones to talk to each other in an ad-hoc fashion without a SIP proxy. VoIP calls can be made between two phones if:
- Both phones have public IP addresses; or
- Both phones are on the same LAN/VPN using private or public IP addresses; or
- Both phones can be connected through a router using public or private IP addresses (with necessary port forwarding or DMZ).
To make a direct IP call, please follow the steps below:
- On the shortcuts menu of the idle screen, tap on
 icon to open the dial screen.
 - Input the target IP address (For example: if the target IP address is 192.168.1.60, input the following: 192*168*1*60. The * key represents the dot (.) ).
- Tap on or # keyto send the number. If no key is pressed, by default the call will be automatically dialed out after 4 seconds timeout.
Answer a Call
Single Incoming Call
- When the device is idle and there is an incoming audio call, the device will show the call screen as below. Tap on the “Answer” softkey to answer the call via built-in speaker and Microphones.
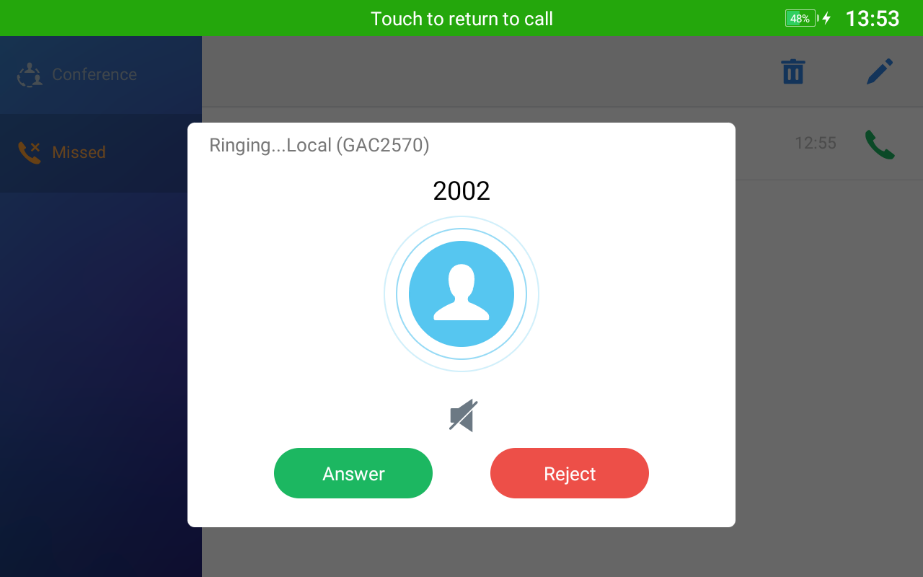
Multiple Calls/Call Waiting
- When there is another incoming call during an active call, users will hear a call waiting tone, with the LCD displaying the caller’s name and ID for the incoming call.
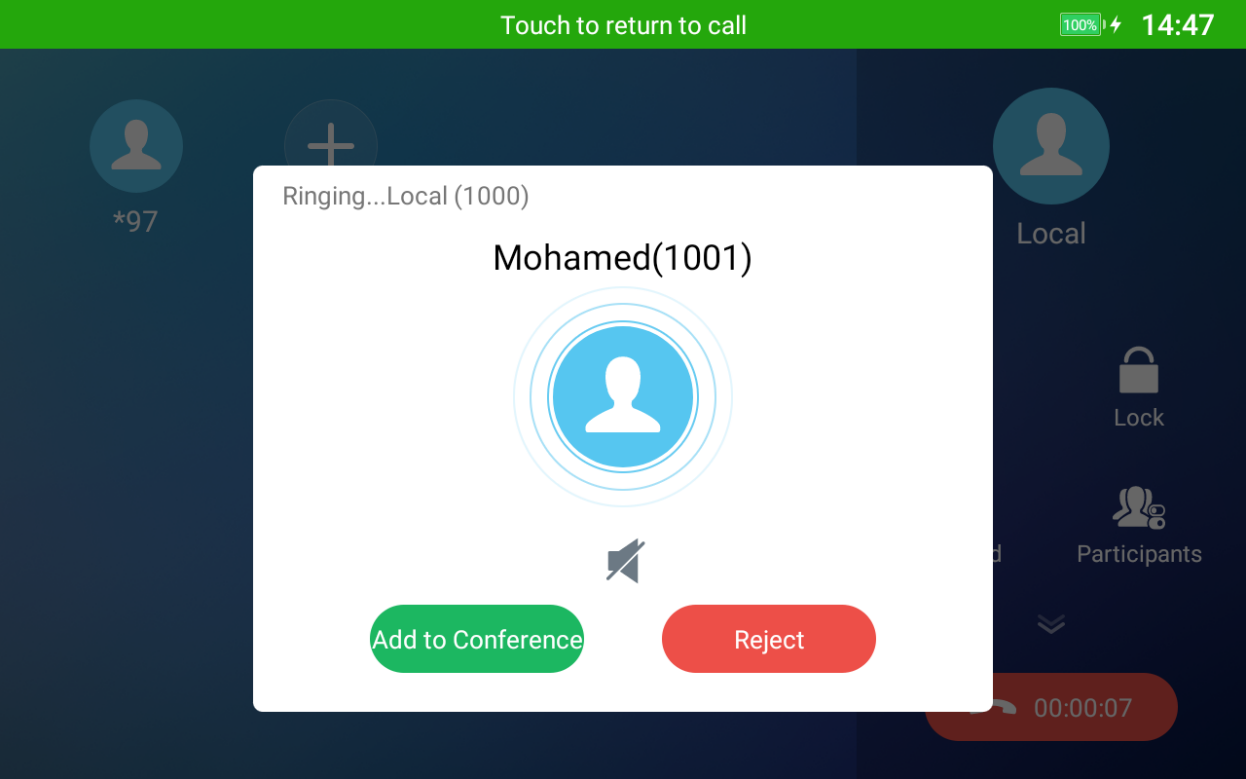
- Similar to the single incoming call, users can choose to Answer or to Reject.
- Once the new call is answered, the current one will join the ongoing Conference.
Call Progress Status
During an active call, if the Home Button is pressed, the GAC2570 will go back to the home screen and the call-in-progress status will be shown on the GAC2570 status bar, once clicking the bar it will go back to the call screen.
Call Hold
During the active call, tap
![]() icon to bring up all the hidden operations:
icon to bring up all the hidden operations:
Call Recording
- During the call, users could record the conversation to the device by tapping on “Record”
- If need to stop the recording, tap on “Stop Recording”
- The recording files can be retrieved from the GAC2570 Recorder application.

MPK Monitoring
During the call, users could view and monitor the programmable keys configured for the current Account:
- During the Call, press the MPK button as shown above.
- The list of MPK configured for the active account will be displayed.
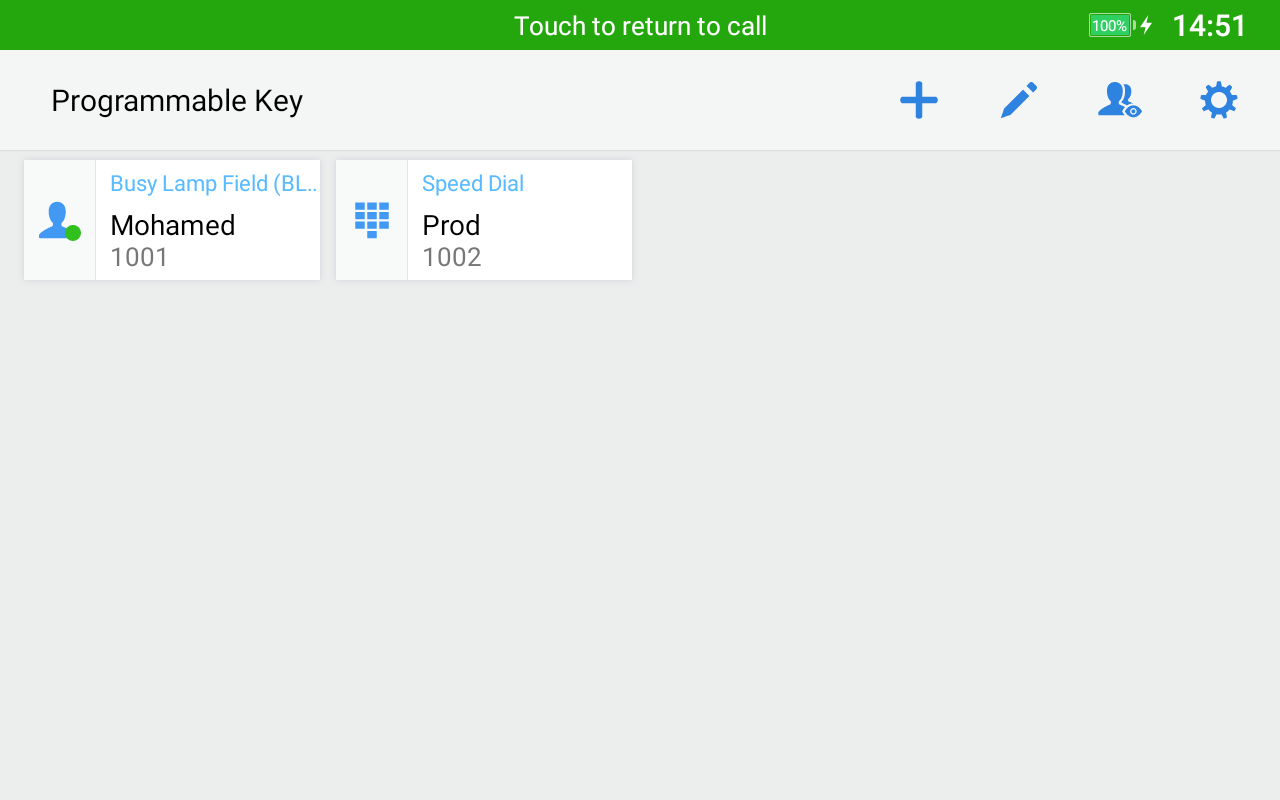
- Users can choose an MPK from the list as they see convenient.
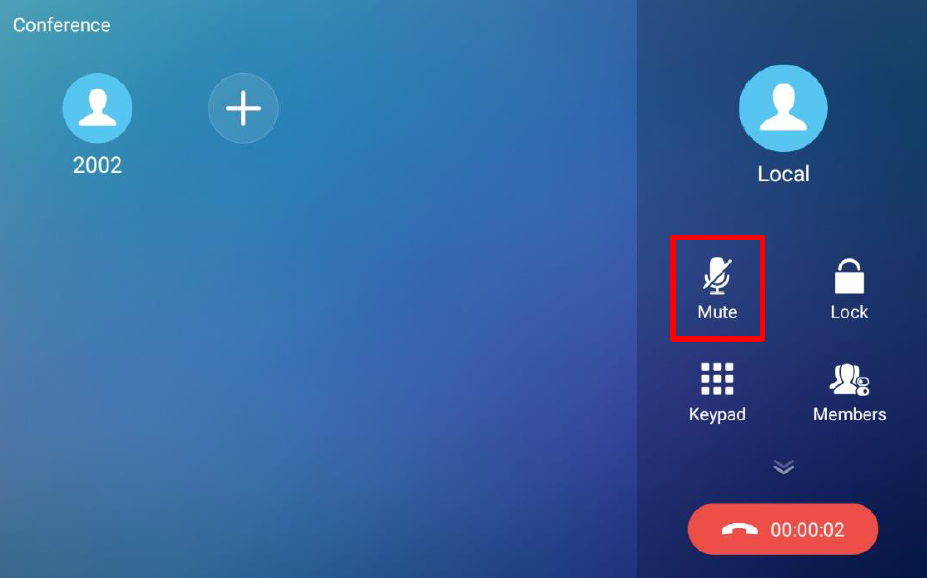
Mute
During an active call, press “Mute” to mute the call. The mute icon  will be displayed in the Call Operation menu on the right of the screen. Press “Unmute” to unmute the call.
12-Way Conference
The GAC2570 supports up to 12-way Audio conferencing.
Initiate Conference
There are three ways to initiate a conference call.
- Initiating conference from dial screen
- Bring up the dial screen.
- Enter the extension number then press it on the left panel of the screen
- The extension number will be added to the dialing field and users can dial another number
- Initiating a conference during a GAC2570 call
- When the GAC2570 is on the call screen, tap on
 softkey;
 - Enter the third-party number or choose an available number on the left menu from call history or contacts to form a conference of 3.
- Tap on to add another member to the conference;
 softkey;
 to add another member to the conference;
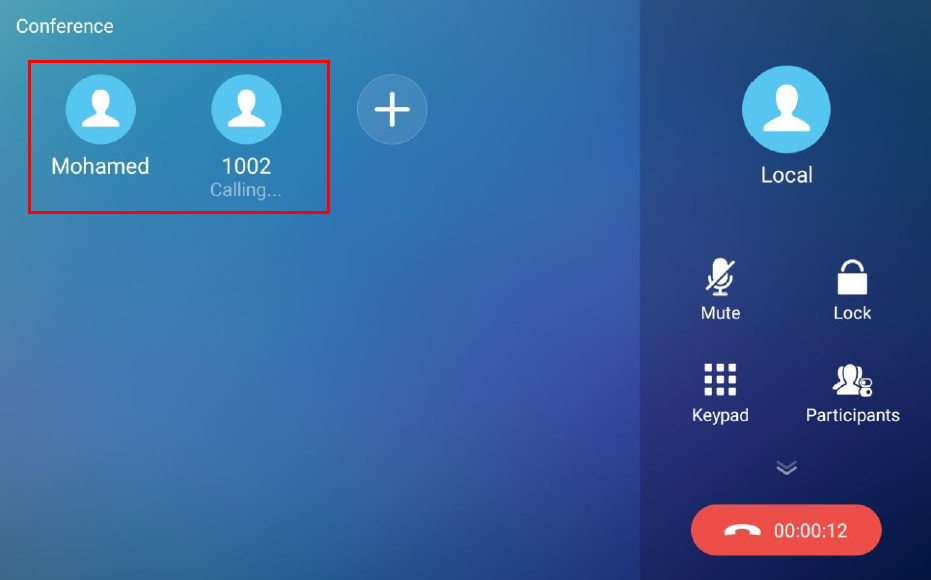
Note: When users press on
 to invite another member to the conference, a dial tone will be heard for the user to start dialing the number.
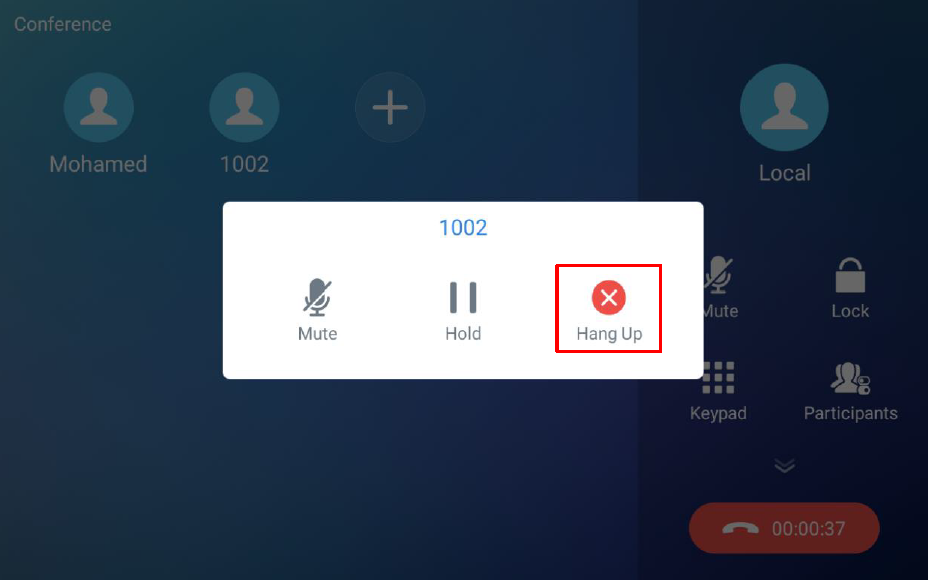
Remove Party from Conference
To remove a party from the conference:
- Tap on the participant icon of the user you want to remove. The below window will show up giving the possibility to Mute /Hold and Hang up.
- Tap on icon to remove a party from the conference.
End Conference
To end the conference, tap on  to disconnect all the parties from the conference. GAC2570 will hang up the call. If the remote party hangs up the call itself, it will be disconnected from the conference but other parties on GAC2570 will stay in the existing conference.
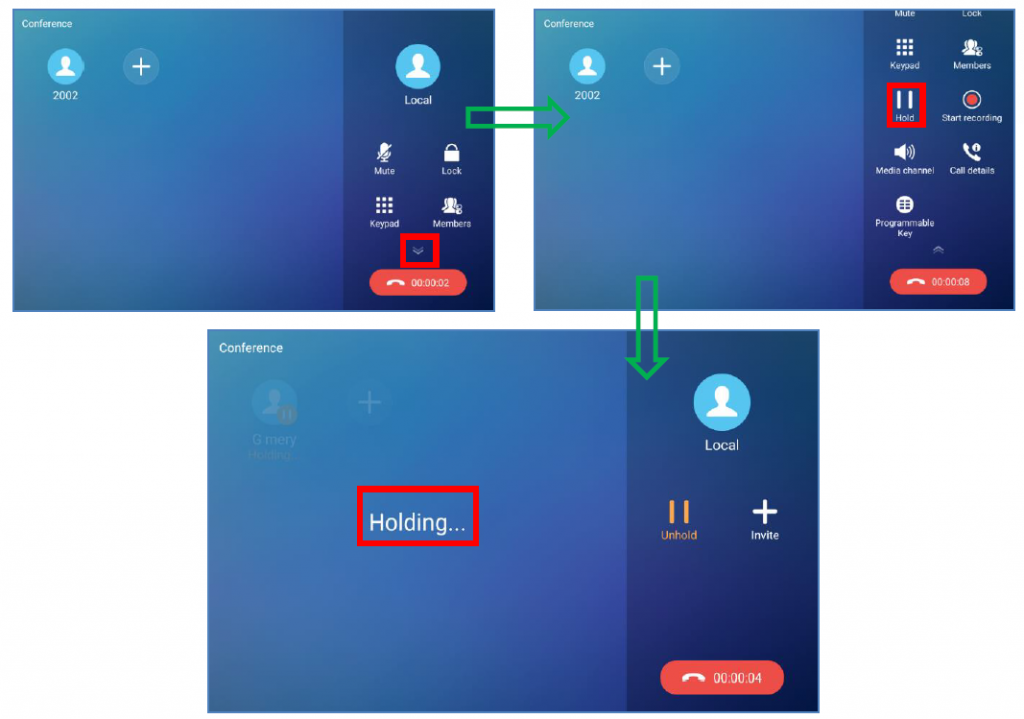
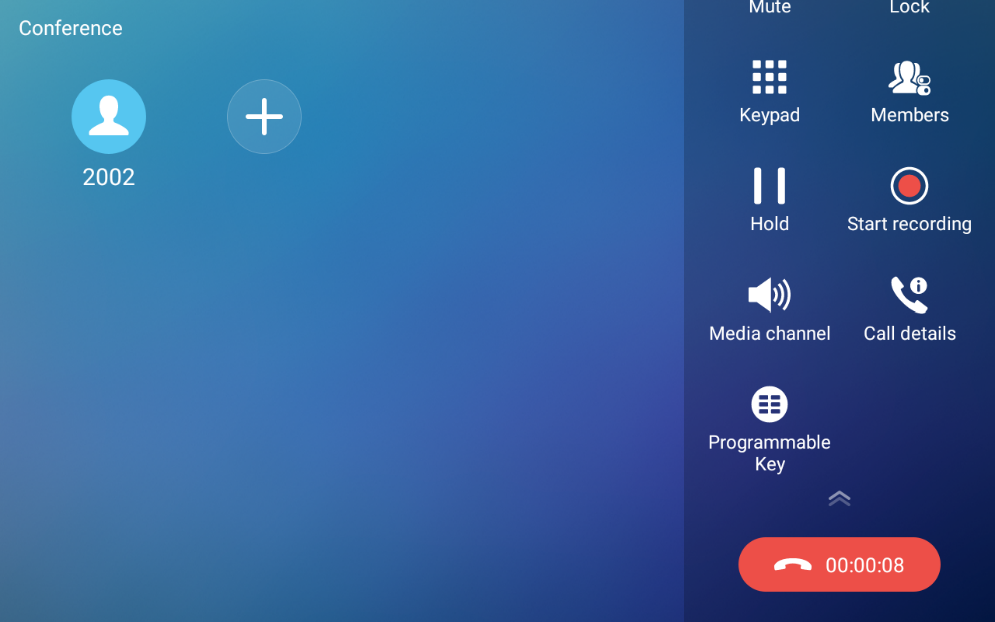
Hold and Resume Conference
During the conference, users could tap on More Softkey and then tap on Hold to hold the conference at any time. To resume the call, tap on Unhold.
Missed Call
When there is a missed call, the LCD will show a missed call dialog on the idle screen.
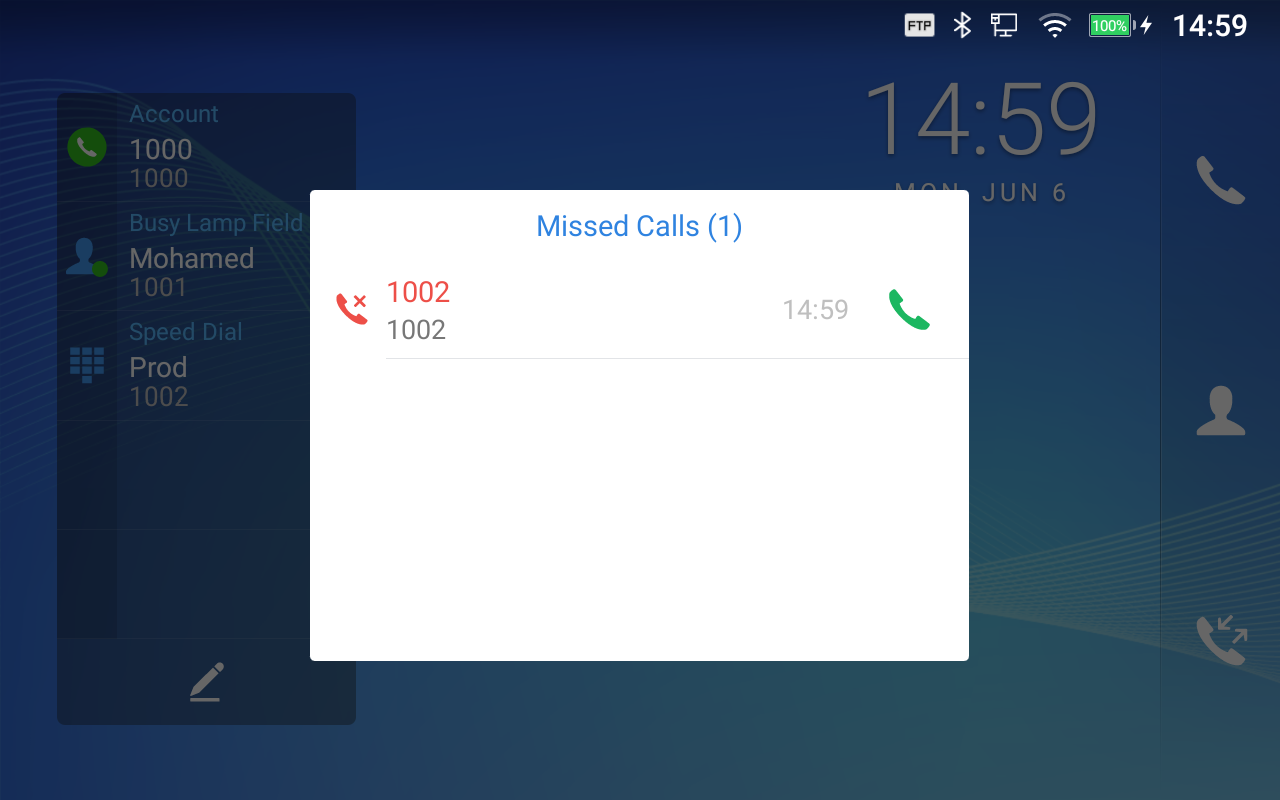
Users can tap on the missed call entry to access the missed call log. To close the missed call screen and return to the idle screen, tap outside the prompt message.
DND (Do Not Disturb)
When DND is on, the incoming calls to the GAC2570 will be blocked for all registered accounts with a reminder ring produced. To turn on/off DND:
- Touch and drag the status bar down on the GAC2570 idle screen.
- Tap on the DND icon
 to turn it on. The status bar shows icon
  indicating DND is on.
 - Tap on the DND icon
 to turn it off.
 to turn it on. The status bar shows icon
  to turn it off.
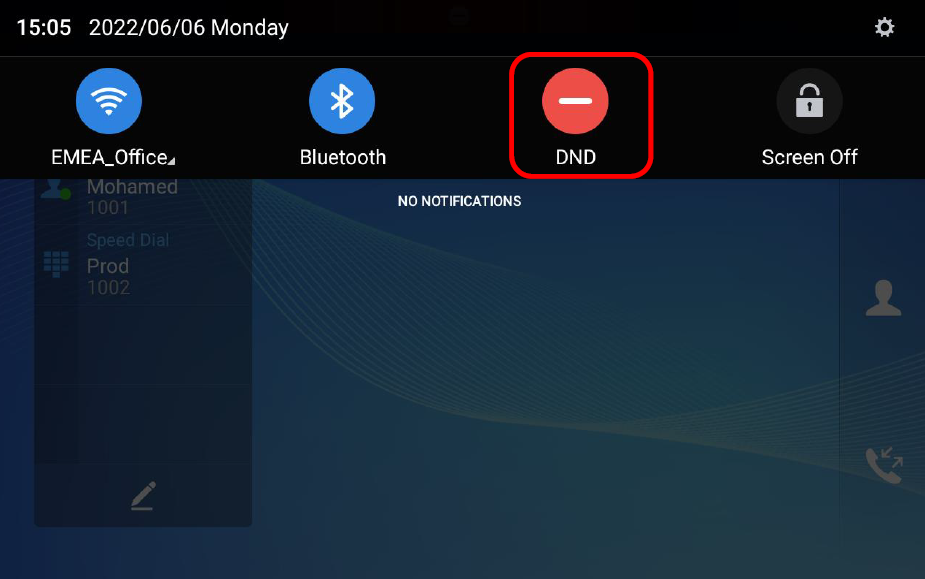
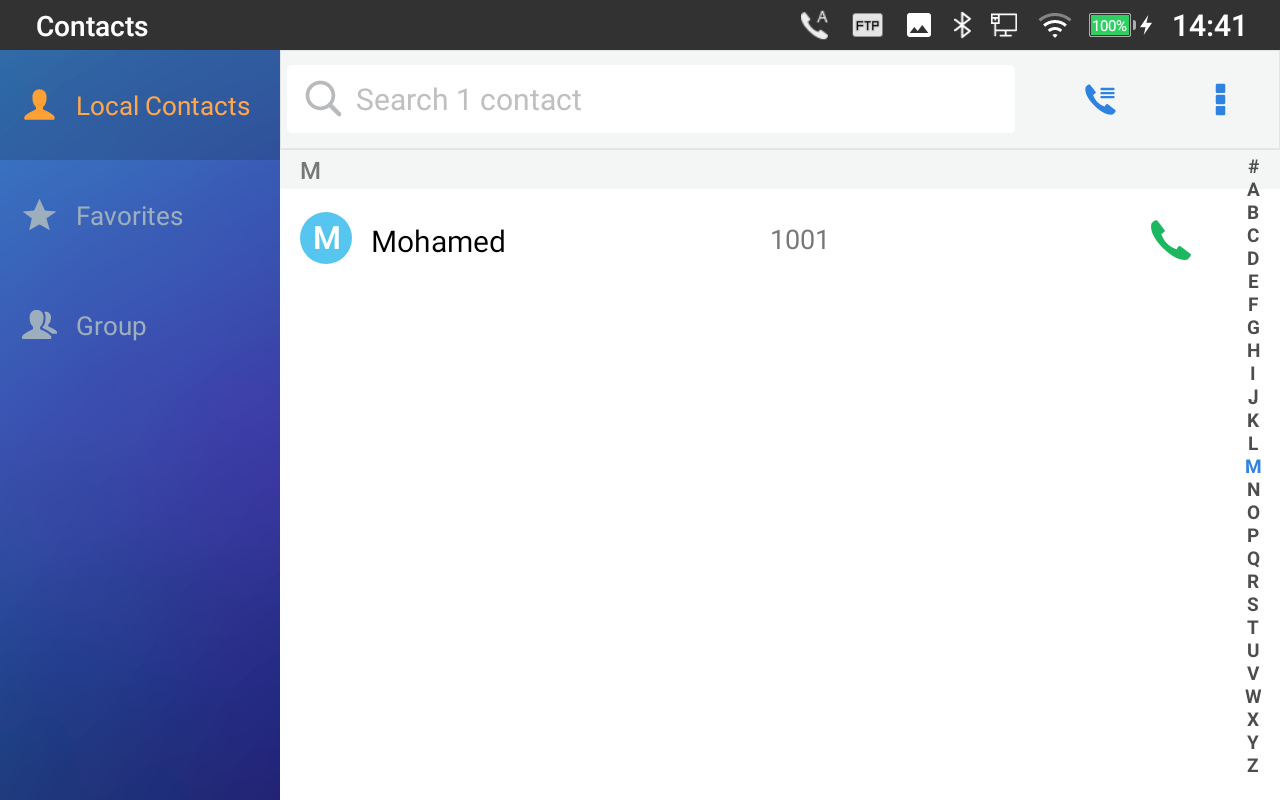
CONTACTS
The GAC2570 supports local and LDAP contacts.
To access GAC2570 contacts, on the GAC2570’s idle screen, tap on icon
![]() on the right panel. The following figure shows Contacts on the GAC2570.
on the right panel. The following figure shows Contacts on the GAC2570.
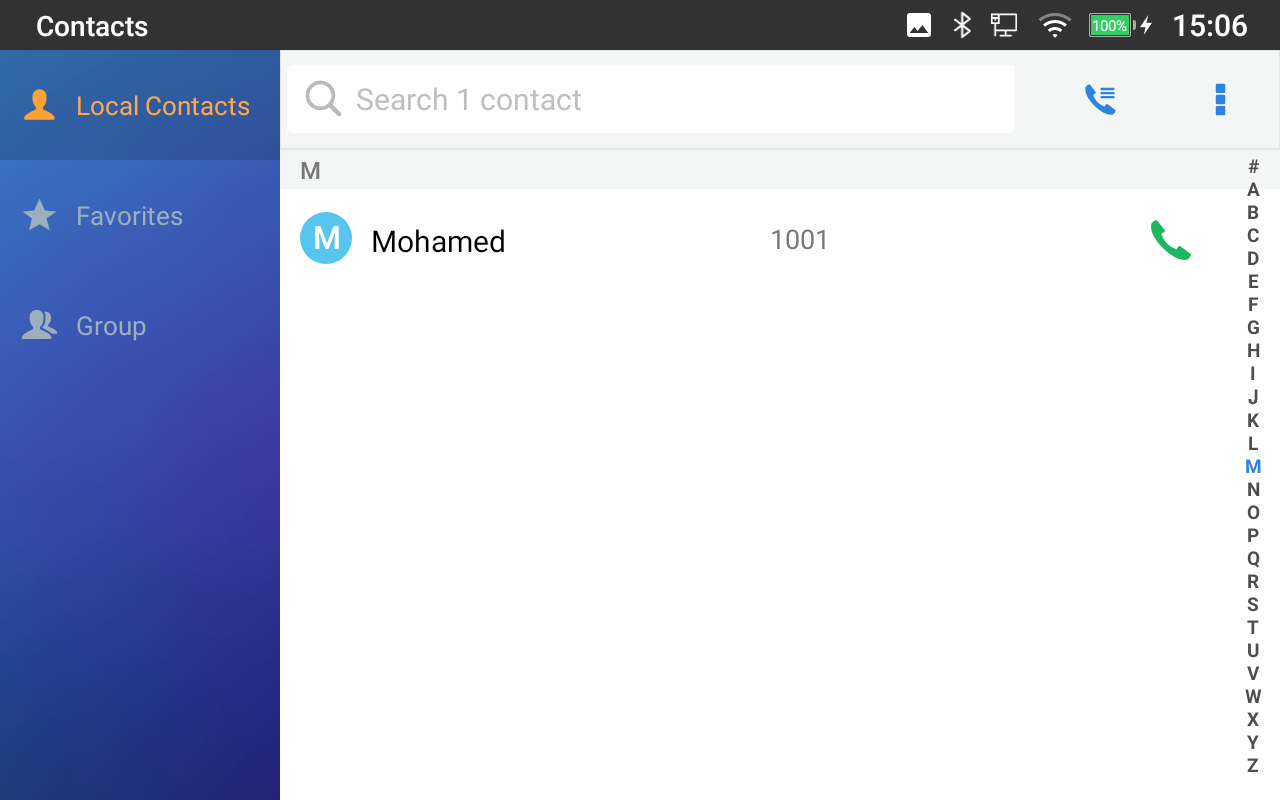
Local Contacts
The local contacts can save up to 2000 entries. Users can manage contacts by adding, deleting, and modifying single contacts, downloading contacts from HTTP/TFTP servers, importing contacts from external storage, and exporting contacts to external storage.
Note: A reminder prompt is shown on the GAC2570 LCD screen when adding a number of contacts more than the allowed one (when importing contacts for instance).
Add Single Contacts
- On the Local Contacts menu, Tap on

to bring up “More” Sub-Menu to manually add a new contact. When adding it for the first time, the users can directly click the “New Contact” button displayed.

- Type First name, Last name, GAC2570 number, and other information for the new contacts. Please make sure the account number field is selected so the GAC2570 will use this account to dial out the new contact.
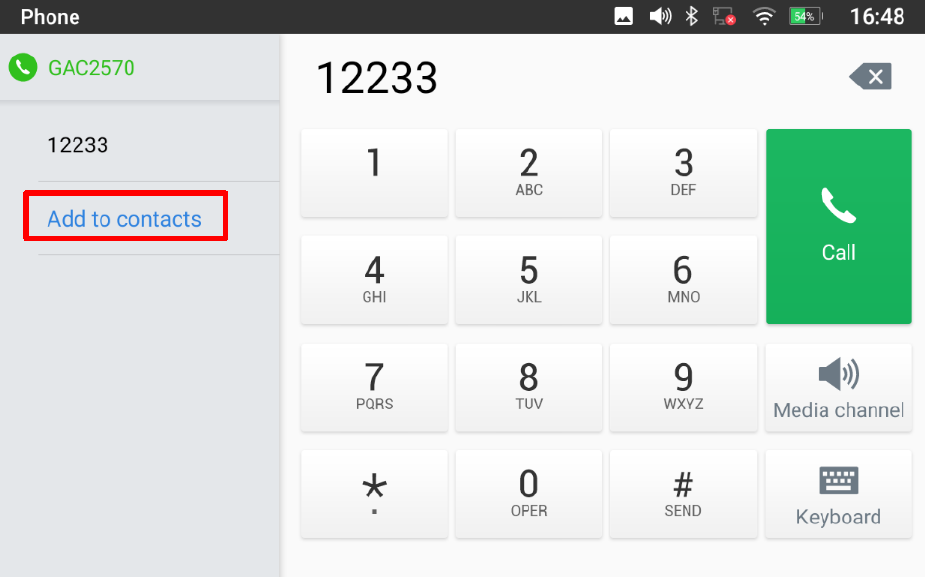
Note: When typing a number using the dial pad, the “Add to contacts” button will appear as displayed in the following picture, to add a new entry to your contacts list if the input number does not match any entry in your contacts.
Import/Export Contacts
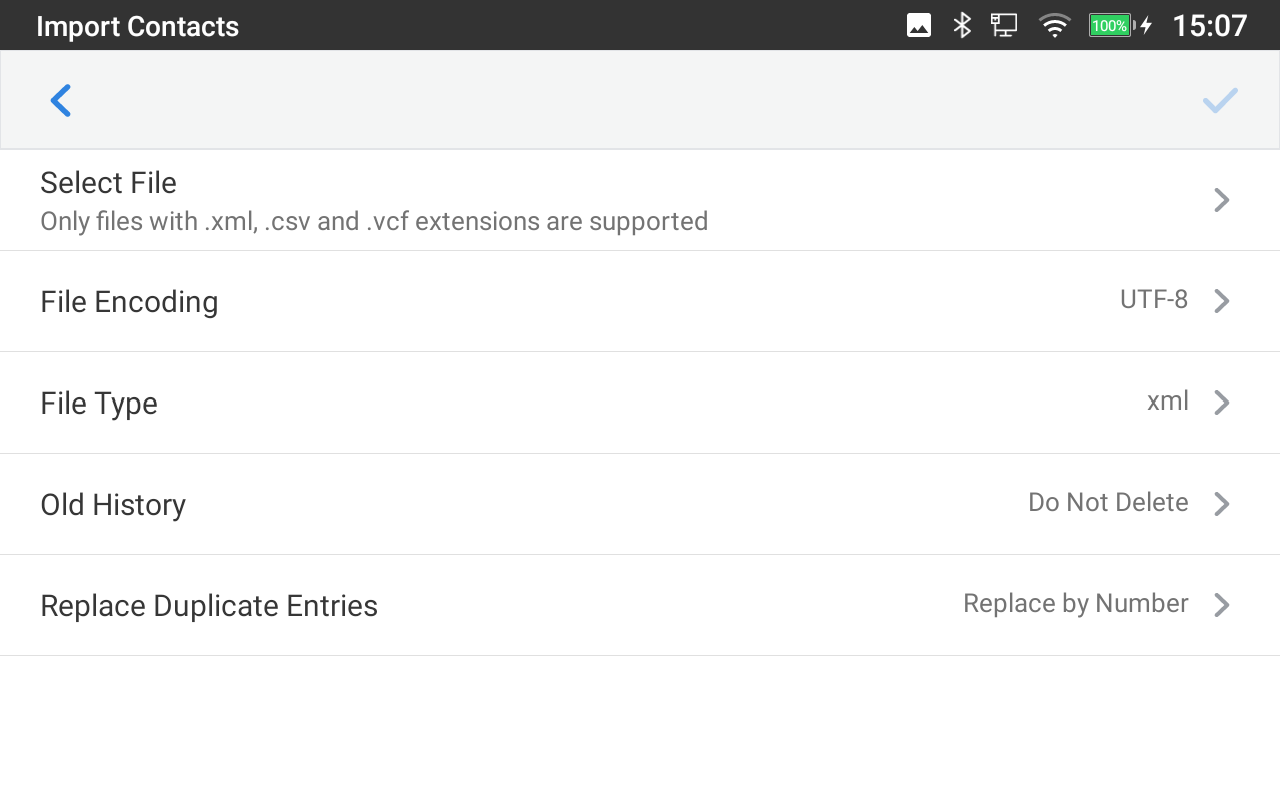
If the users have the GAC2570 Phonebook file saved in local storage or an external storage device that has been plugged into the GAC2570, the Phonebook file can be directly imported to the Contacts. There are two different formats supported for the Phonebook file: “vCard”, and “xml”. Users could manually create contacts first and export the Phonebook file in vCard or XML format to take a look at the Phonebook file.
To Import Contacts:
- Open Contacts.
- Tap on More
 on the upper right corner of the Contacts screen.
 - Select “Import contacts” to bring up the dialog below.
- Fill in the import options and scroll down to the bottom of the screen.
- Tap on “Select file” to import the Phonebook file from the directory in an internal or external storage device.
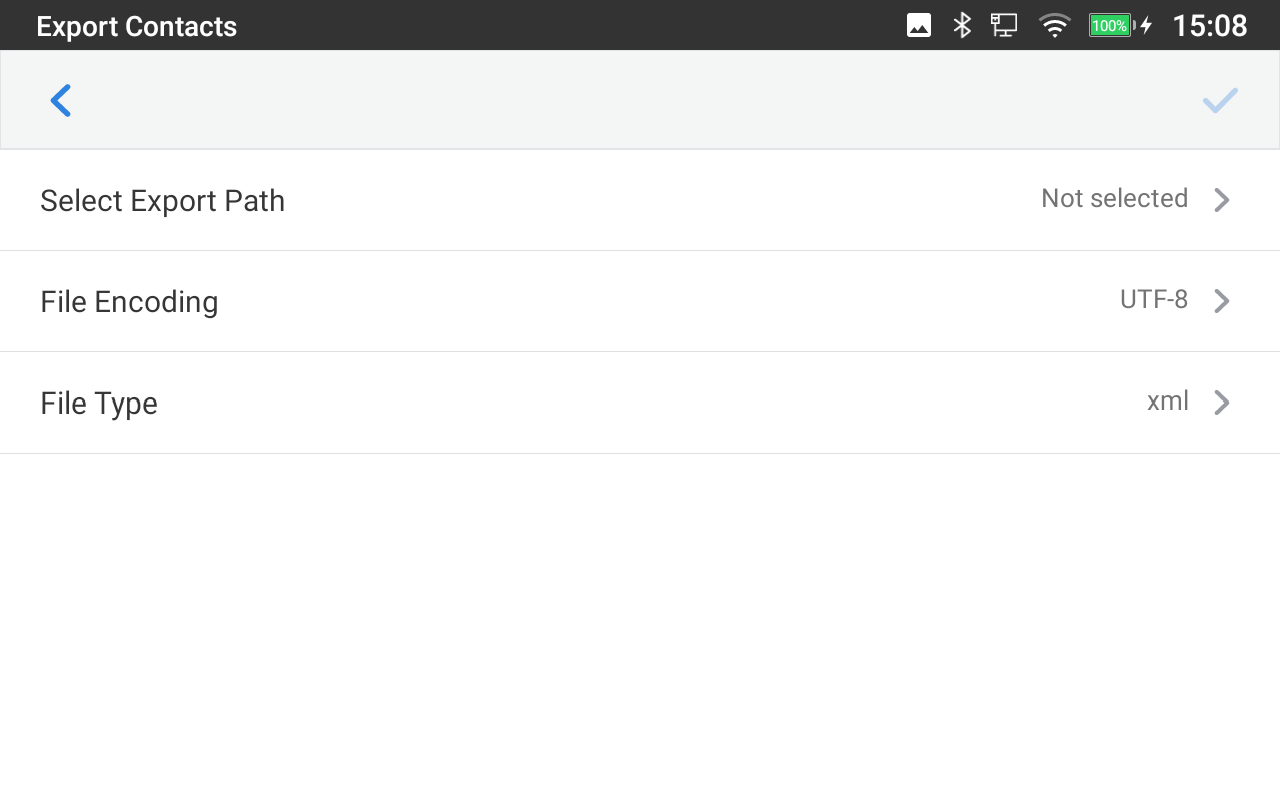
To Export Contacts:
- Open Contacts.
- Tap on More on the upper right corner of the Contacts screen.
- Select “Export Contacts ” to bring up the dialog below.
- Select the file encoding and file type for the exported Phonebook file. By default, the GAC2570 is using “UTF-8” as the encoding method.
- Tap on “Choose Directory” and select the directory to which the Phonebook file will be exported.
Download Contacts
The GAC2570 supports downloading XML Phonebook from a remote HTTP/TFTP/HTTPS server to local Contacts. When downloading the Phonebook, the GAC2570 sends a request to the HTTP/TFTP/HTTPS server looking for the file Phonebook.xml.
To Download Contacts:
- Make sure the GAC2570 can connect to the HTTP/TFTP/HTTPS server and that the Phonebook.xml file in the correct format is downloadable from the HTTP/TFTP/HTTPS server.
- Open Contacts.
- Tap on More
 on the upper right corner of the Contacts screen.
 - Select “Download Contacts” to bring up the dialog below.
- Fill in the necessary options and then tap on in the upper right corner of the screen. The GAC2570 will send out a request to the configured HTTP/TFTP/HTTPS server.
 on the upper right corner of the Contacts screen.
 in the upper right corner of the screen. The GAC2570 will send out a request to the configured HTTP/TFTP/HTTPS server.
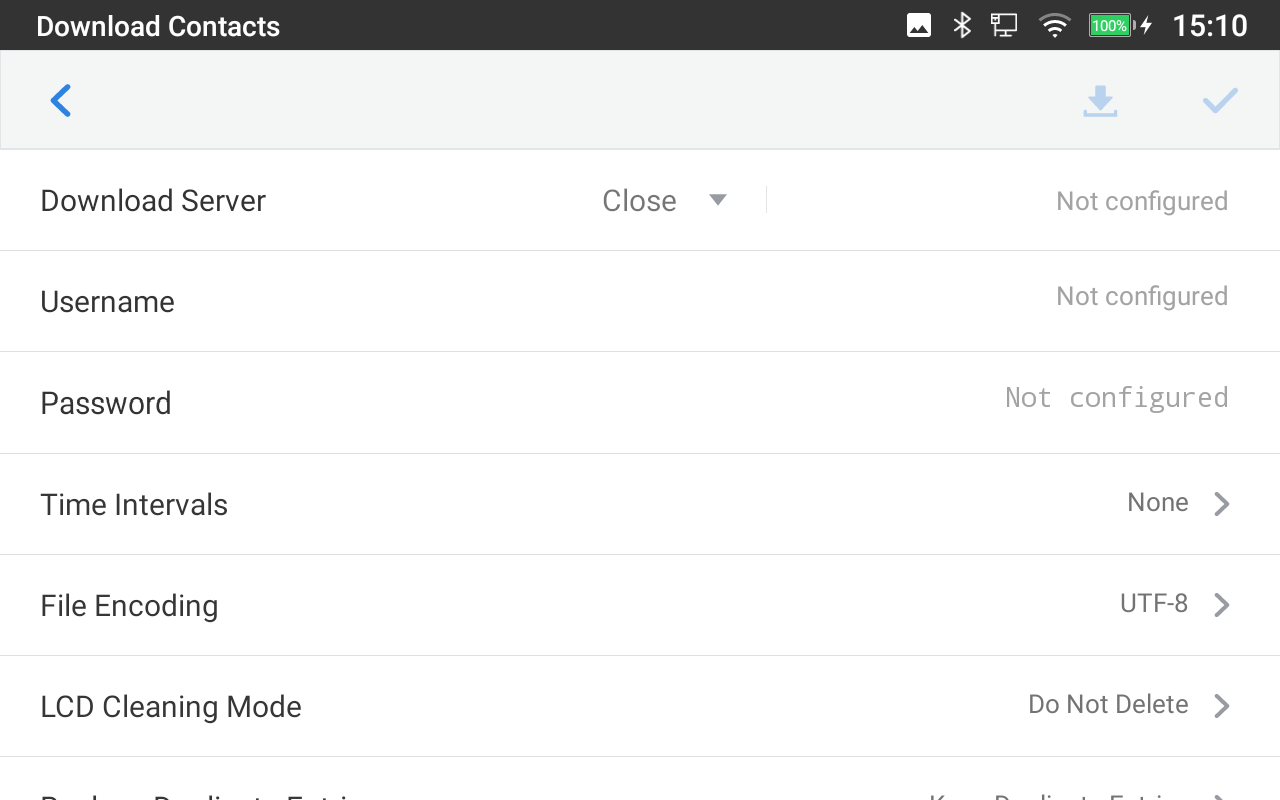
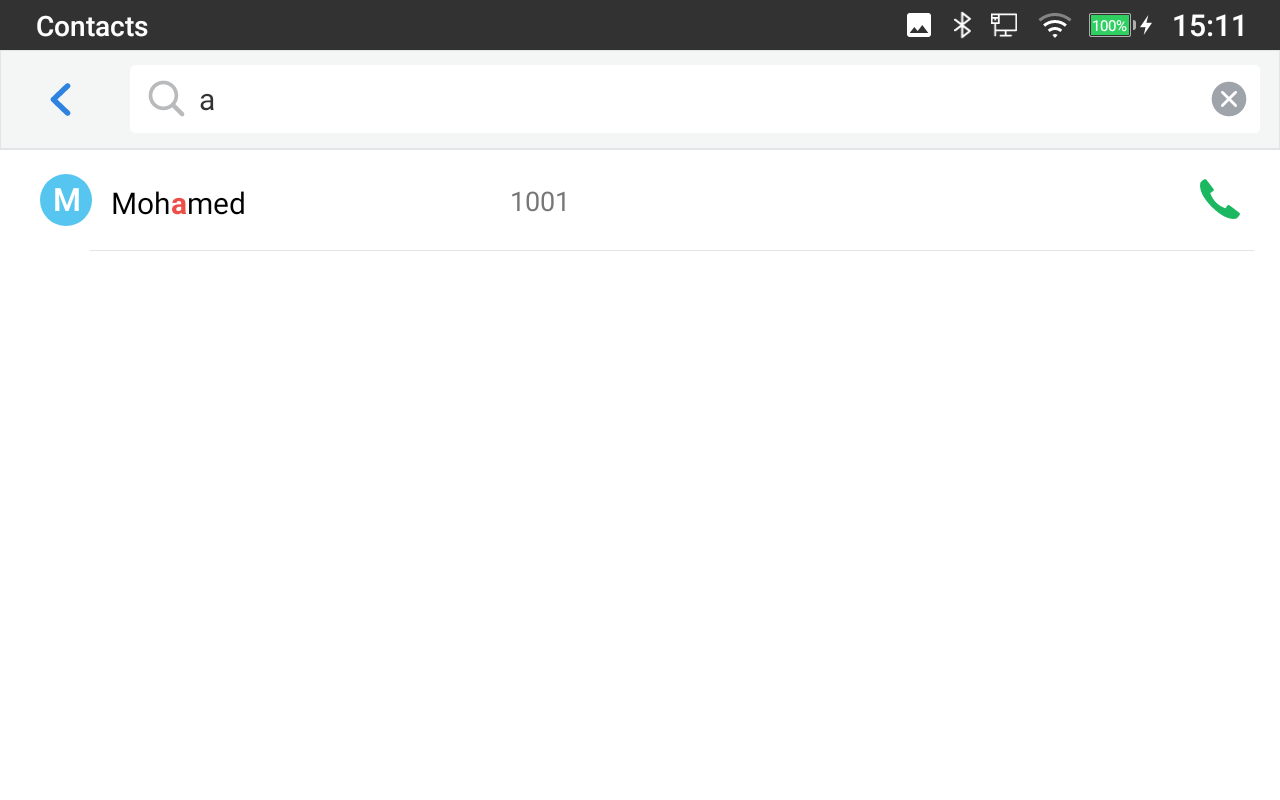
Search Contacts
- Open Contacts.
- Tap on the search field .
- Enter a contact’s name or a number to search. The search result will be automatically updated and displayed when entering the keywords.
Use Contacts
Once the contacts are added, users can navigate in the contacts list ![]() to make a call and manage the contacts further.
to make a call and manage the contacts further.
Make a Call to Contacts
Scroll up/down to find the contact in the list and tap on
![]() to call this contact.
to call this contact.
Select Contacts
- Scroll up/down to find the contact in the list.
- Touch and press on the contact for about 2 seconds to show more options such as Delete contact, add to blacklist, etc.
- To select a batch of contacts at the same time, press More on the upper right corner of the contacts screen and select Batch operation, Tap on the checkbox for the contacts to be selected.
 indicates the contact is selected.
 indicates the contact is selected.
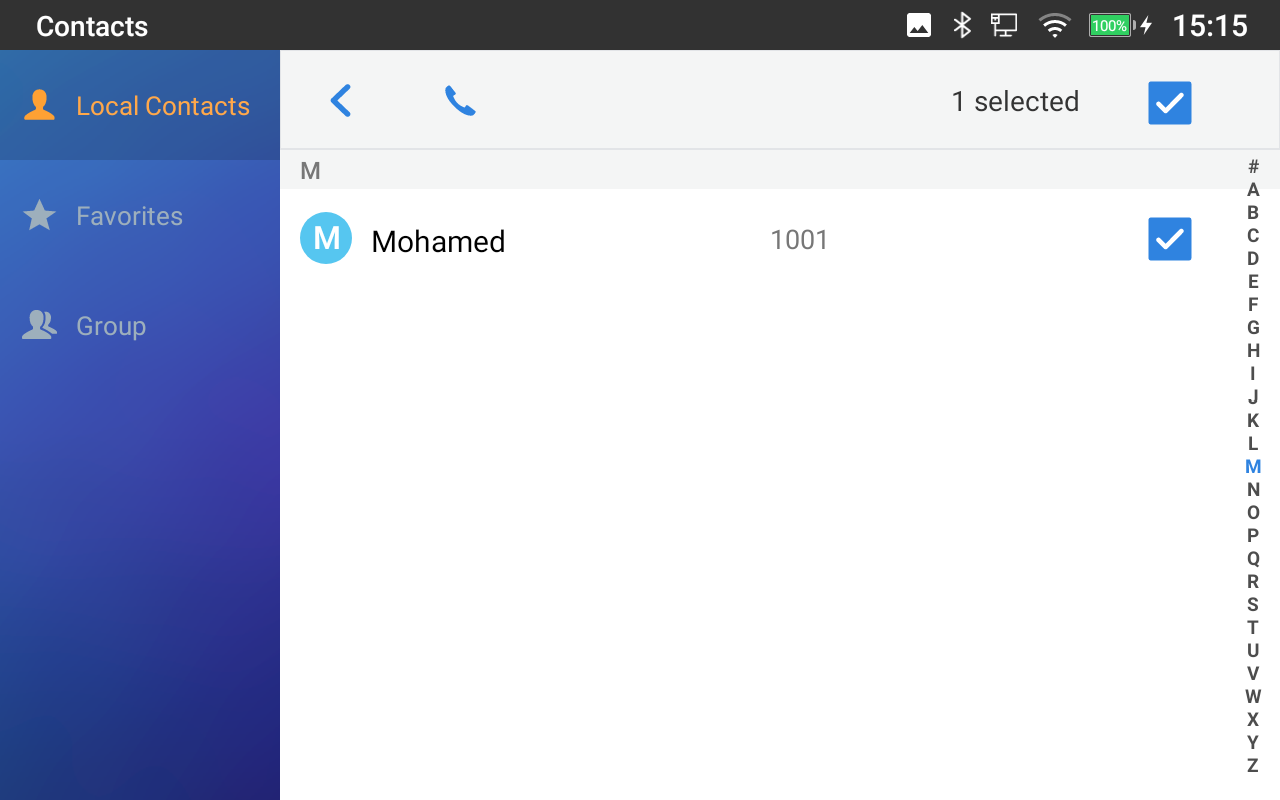
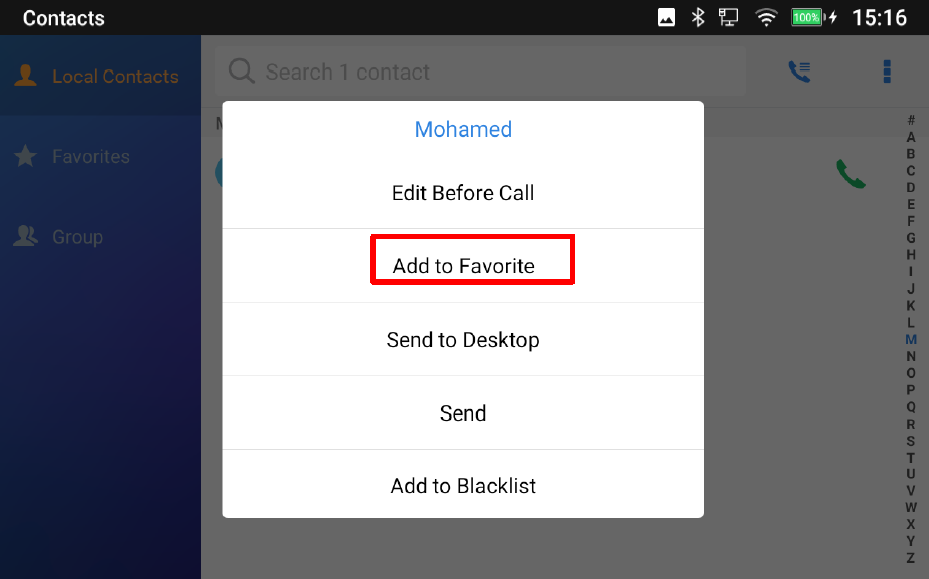
Add Contacts to Favorites
- Select the contact/contacts to be added as described in [Select Contacts].
- Directly press on the contact and tap on “Add to Favorite” to add the contact to your favorite.
Edit Contacts
- Tap on a contact from the contacts list
- Tap on
 to edit the contact.
 to edit the contact.
Send Contacts to Desktop Shortcut
- Long press on the contact
- Tap on Send to Desktop from the menu.
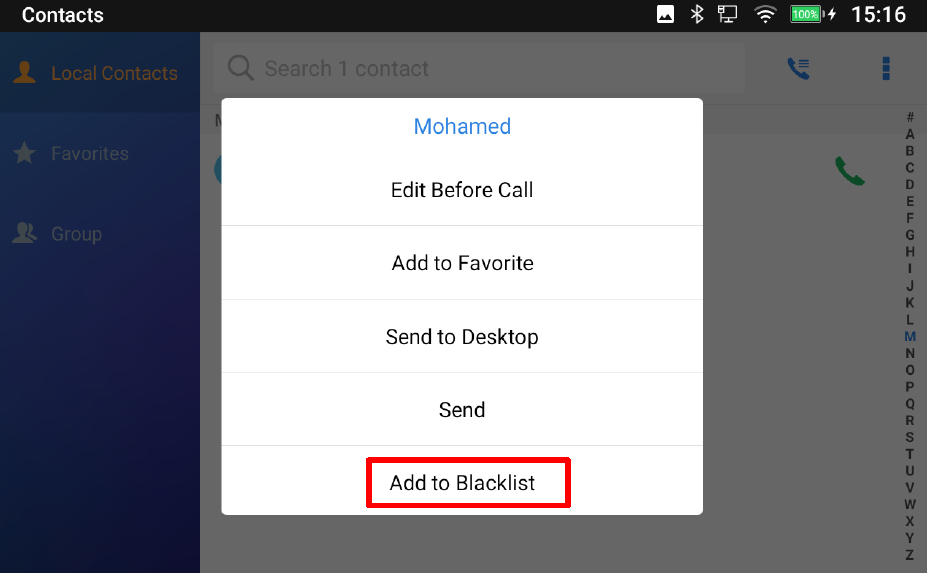
Add Contacts to Blacklist
Users can add a single contact or a batch of contacts to the blacklist. Refer to the following steps to do so:
- Add a single contact to the blacklist:
- Long press on the contact
- Select “Add to Blacklist” from the menu.
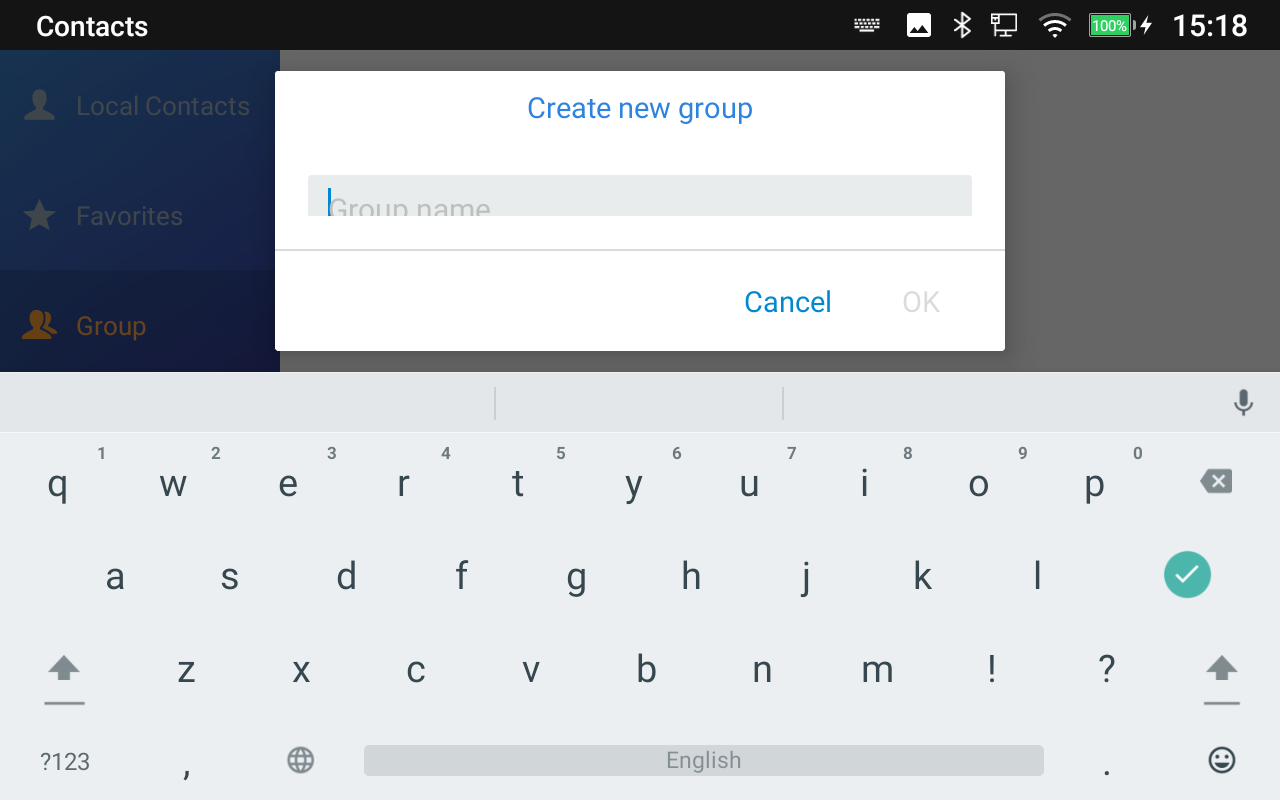
Add Group
Open Contacts tap on Group, then New Group, and enter the name of the group.
Add Contacts to Group
To add contacts to a group, tap on the group then tap “Add Contact” , check the contacts to be added to the group and press  .
.
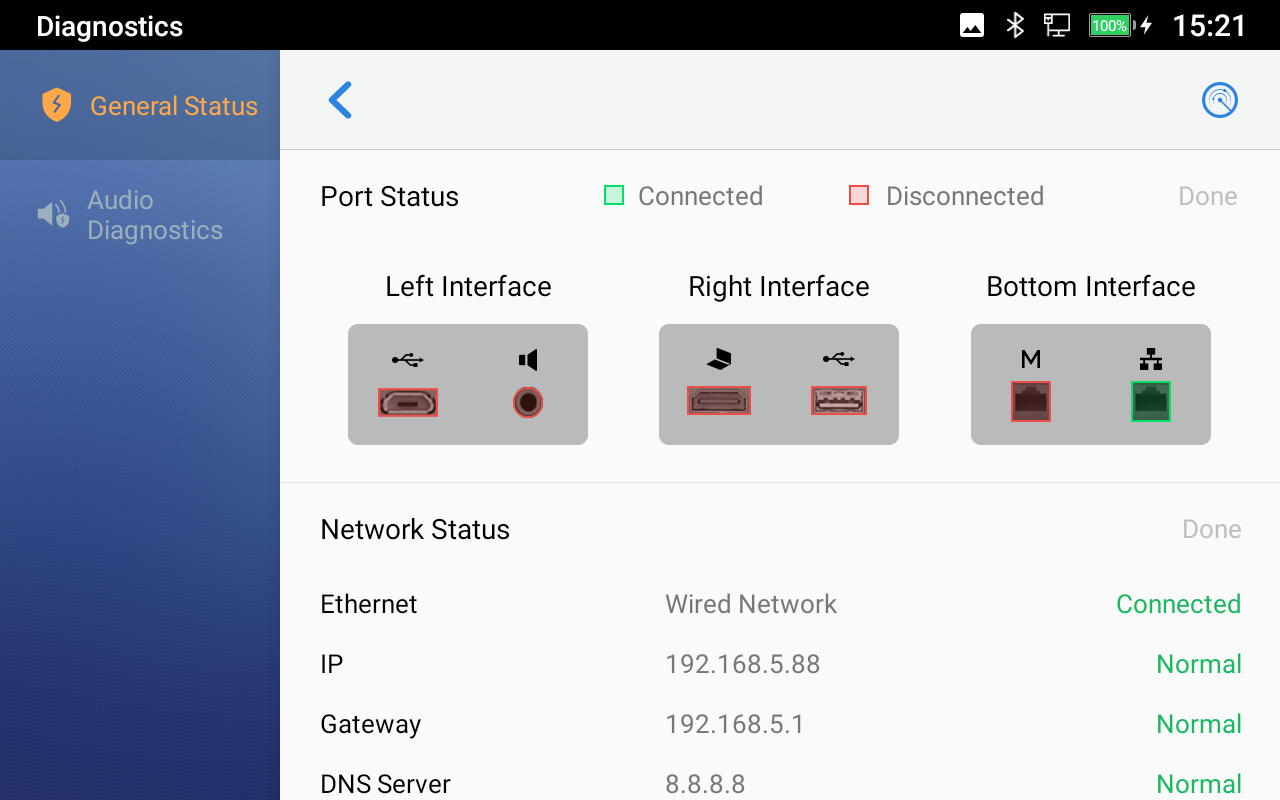
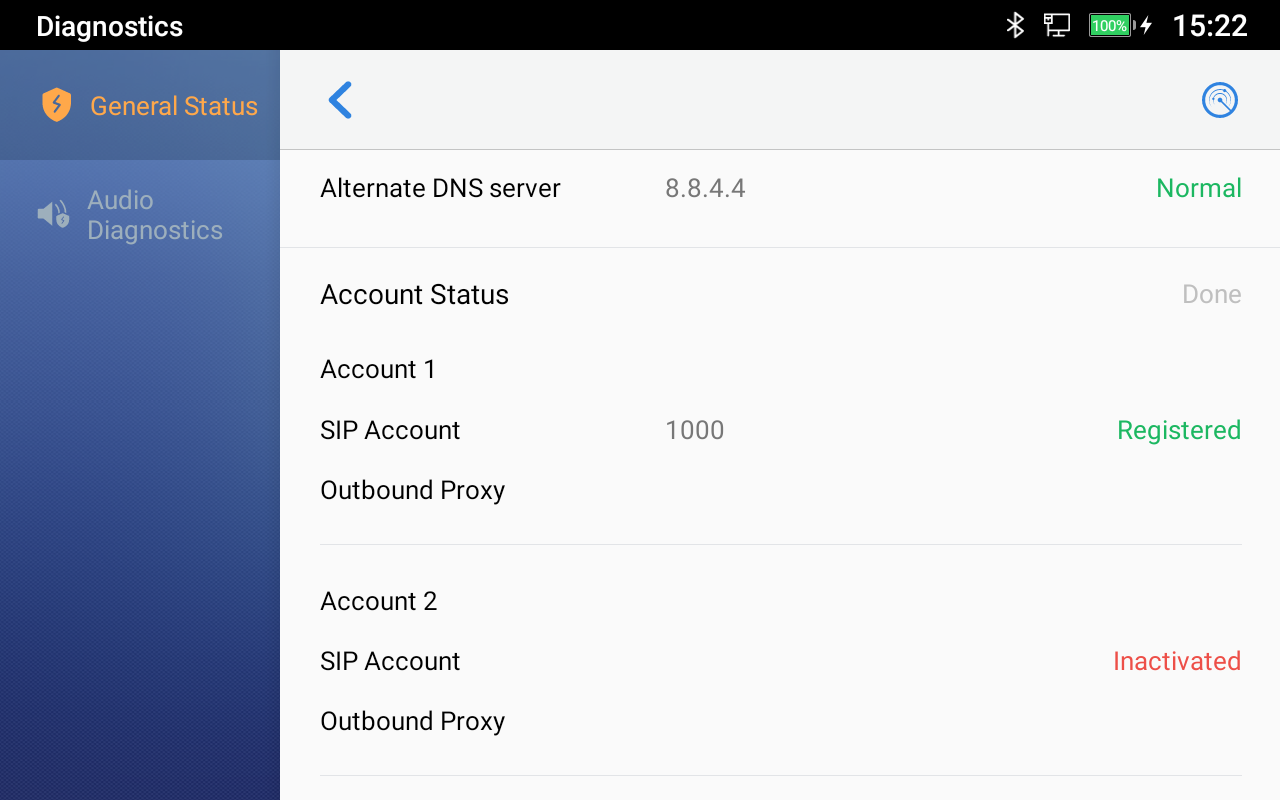
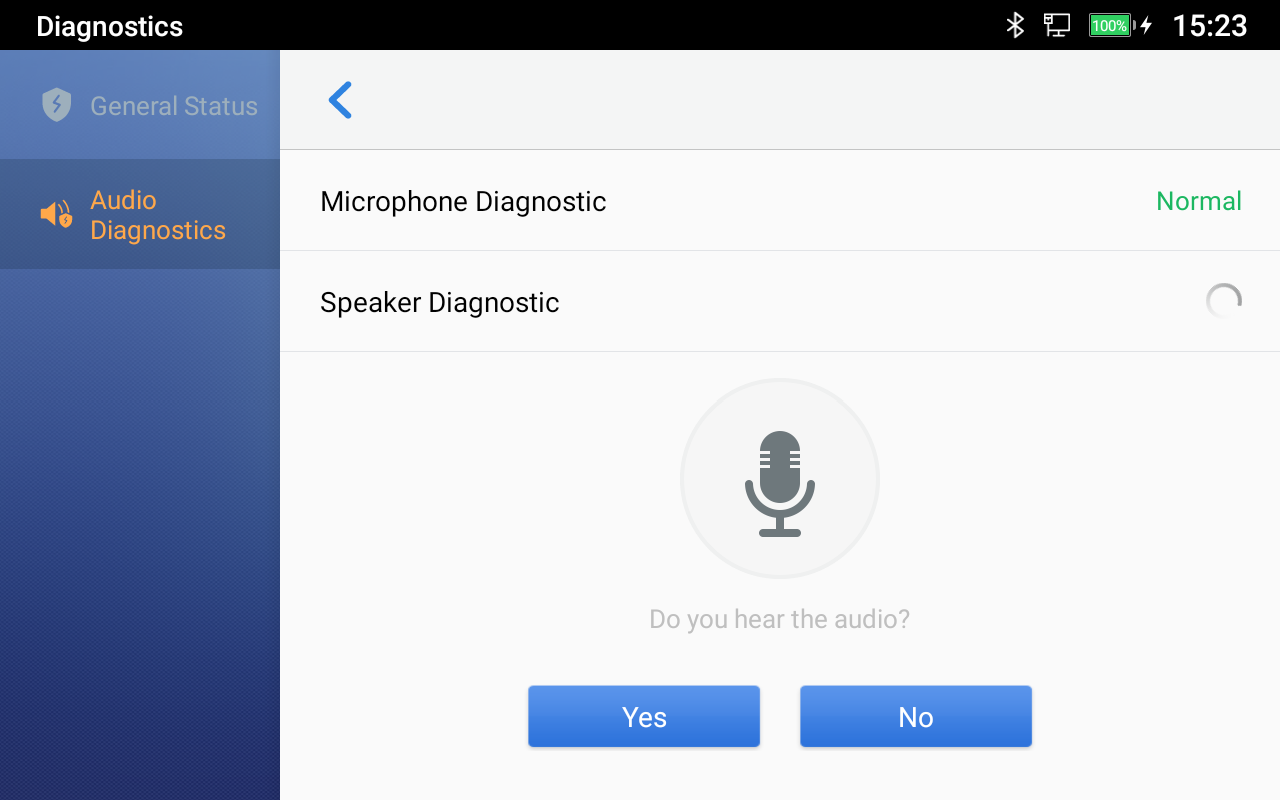
DETECTION
The Detection section provides visual information about the device’s interface connection, Network and
Accounts status. Users can also perform an Audio diagnostic test to check if the built-in speaker and Microphones are working.
Proceed from LCD Menu 🡪 Settings 🡪 Status 🡪 Detection.
- General Detection:
- Audio Diagnostics:
To perform audio detection, first, perform Microphone detection. The users need to press “Start” first, and then the device will start recording. You can click “Finished” at any time to end the recording.
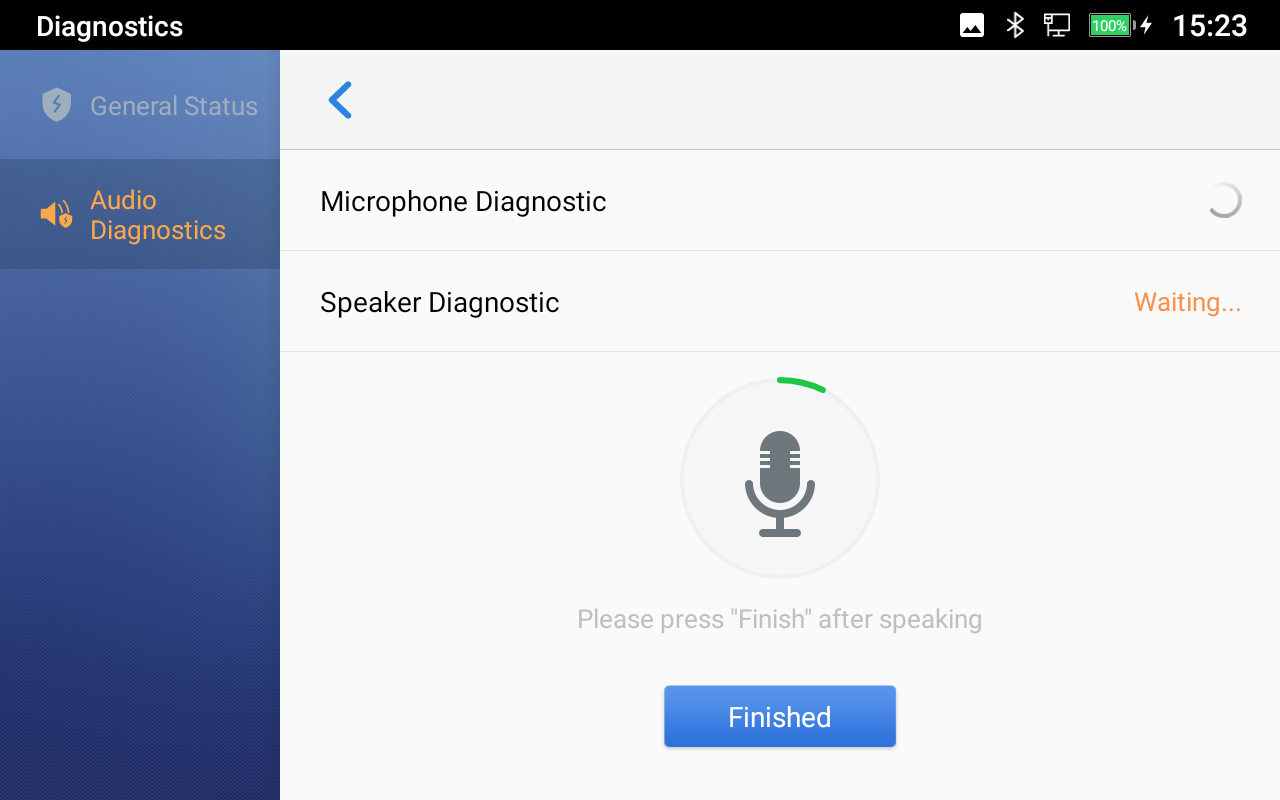
The speaker detection will start after the Microphone detection is completed. The device will play the recording when the Microphone is detected and choose whether to hear the recording. If you can hear it, the speaker is normal.
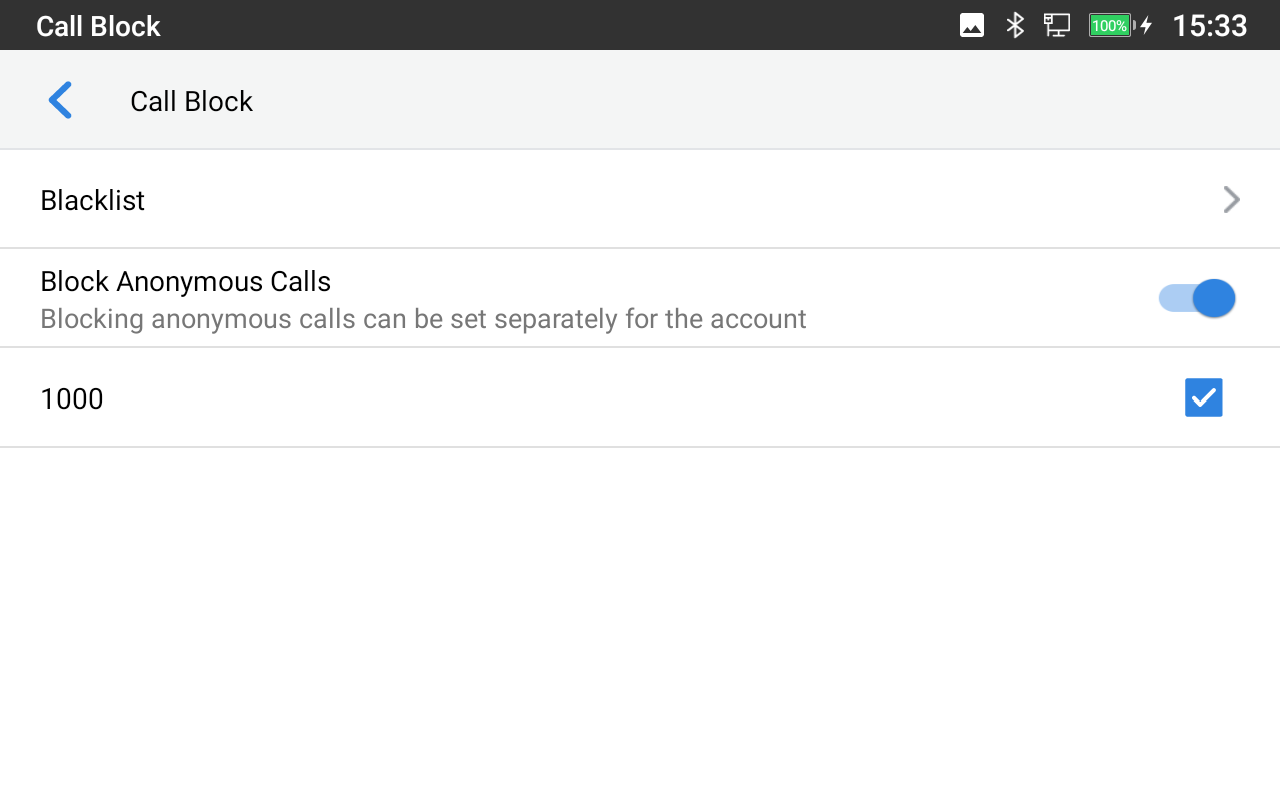
CALL BLOCK
The GAC2570 has blacklist support for users to manage incoming calls. To access the blacklist, tap on the “Settings” icon then under “Features”, access “Call Block”.
Blocked Contacts
The blocked Contacts are the contacts that were added to the blacklist, the GAC2570 will block any calls coming from these contacts. To show the blocked contacts tap on Blacklist from the Call Block page.
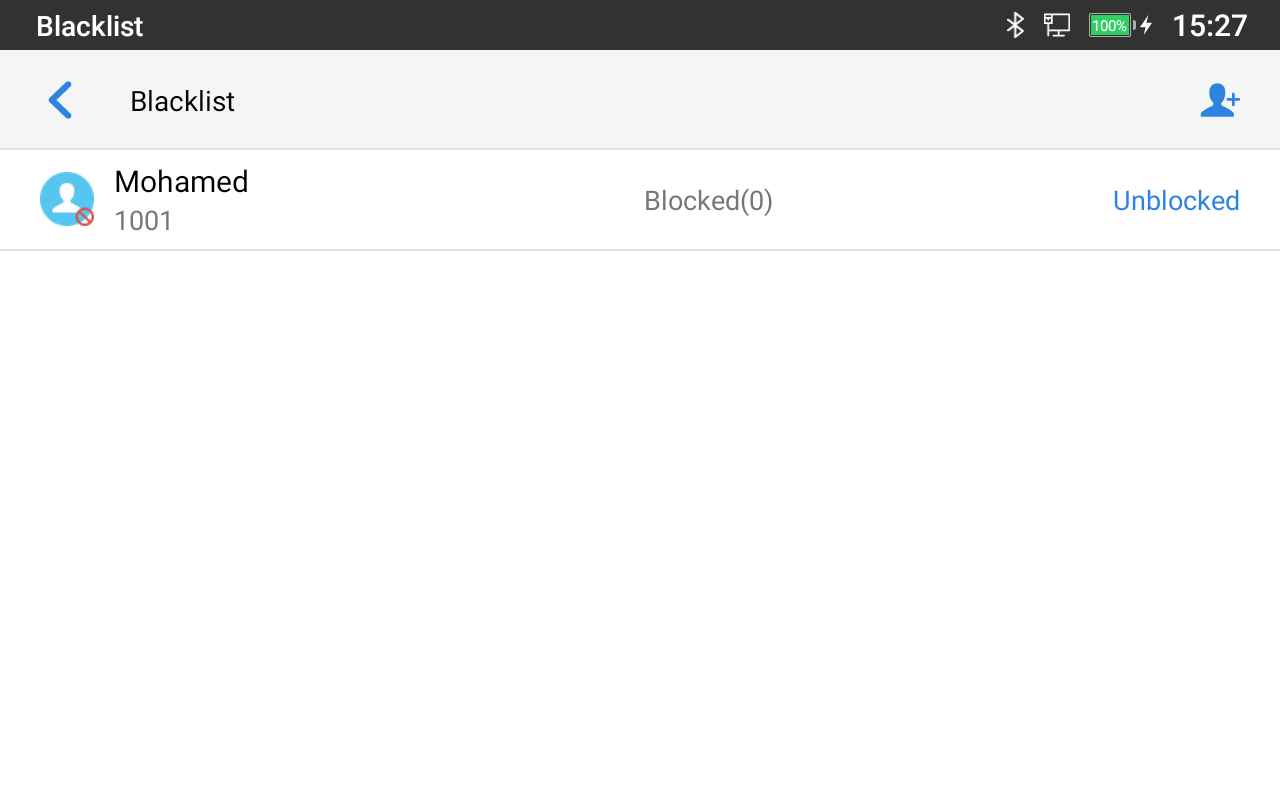
Edit Blacklist
Tap on Blacklist under the Call Block Menu to show the blacklisted contacts
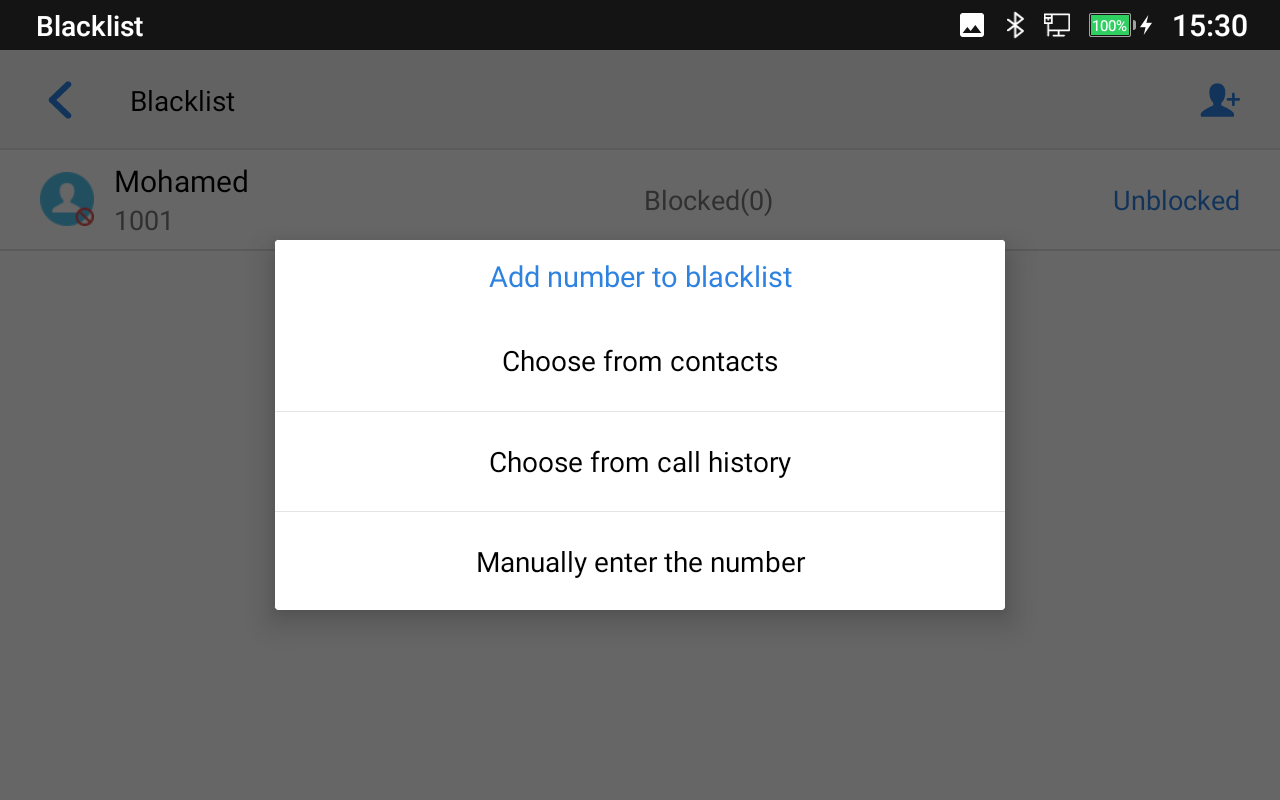
- Add a number to the blacklist
- Tap on

to start adding a new entry to the blacklist. The blacklist can be added manually, from contacts, or call history.
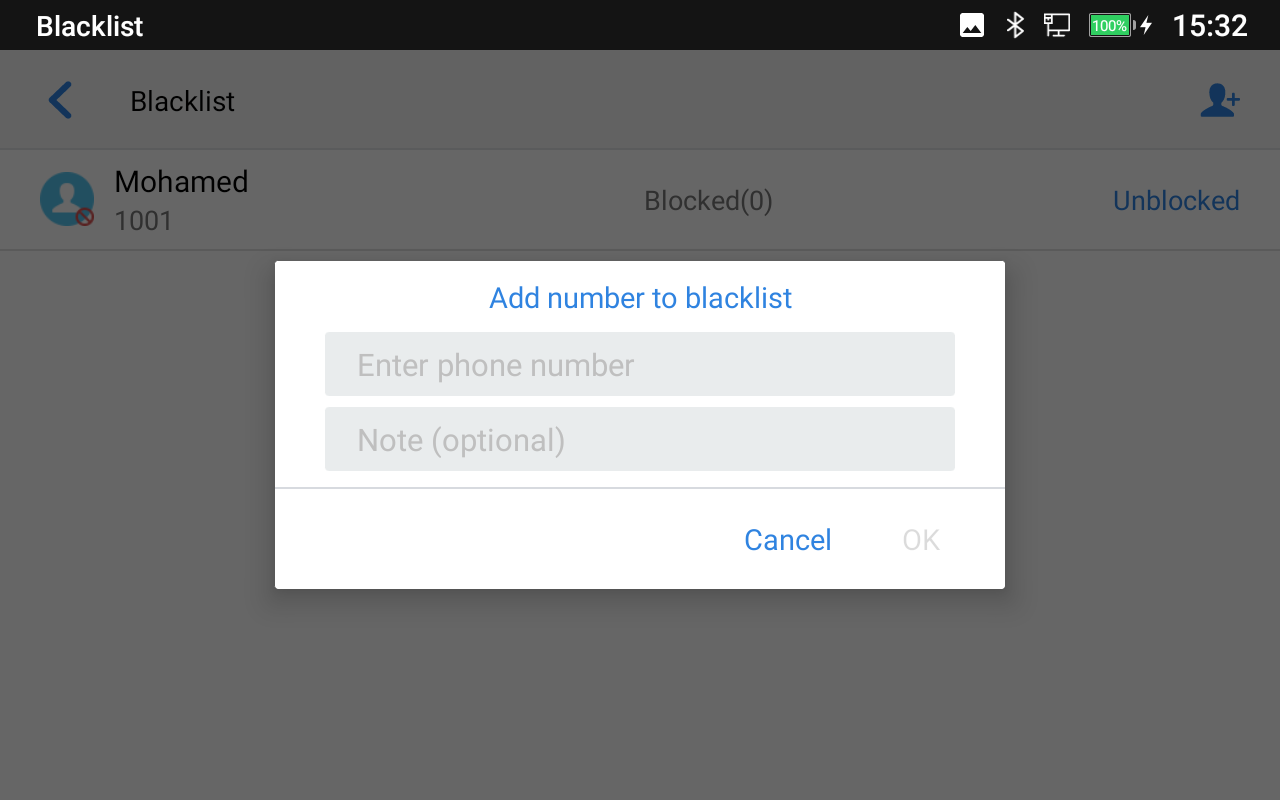
- The following figure shows manually adding numbers to the blacklist. Once the Manually add option is selected, a window will be prompted for users to enter the GAC2570 number in the first field and name/note in the second field (optional). Tap on OK to finish the adding operation.
- Edit Blacklist
- In the blacklist, touch and press the entry for about 2 seconds a prompt allowing changing the name/note is displayed
- Change the name/note.
- Tap on OK once done.
- Delete Blacklist
Users can Delete/unblock contacts from the blacklist using two methods:
- From the blacklist menu press “Unblocked” to no longer block the calls from coming from this contact.
- From the contacts menu, long press on the contact and press “Remove from Blacklist”.
Intercept Anonymous calls
The GAC2570 gives the possibility to intercept anonymous calls for each account registered:
- Enter the Call Block Menu.
- Check Intercept Anonymous Calls as shown in the figure below.
- Check the account to apply the interception.
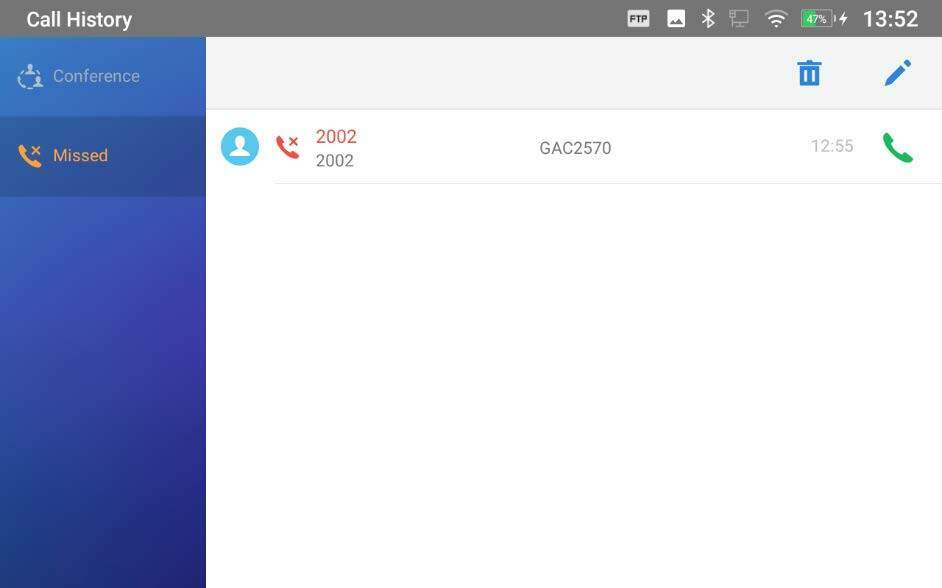
CALL HISTORY
There are two different categories in the local call history. Users could tap on the icon on the left menu to access the corresponding call logs:
- Conference
- Missed

Dial Out from Call History
Tap on the icon ![]() on the right side of one of the call history, and the device will use the same account to dial or initiate a conference.
on the right side of one of the call history, and the device will use the same account to dial or initiate a conference.
Delete Call History
- Delete the entire call history
Users can delete the complete call history by pressing the  directly after accessing the call history page.
- Delete a single call history entry
Users can delete a single call history entry by pressing the entry for about 2 seconds to bring up the options and then select Delete call history.
- Delete multiple call history entries
- Press on the top right corner of the screen and select the entries to be deleted
- Tap on
 to delete the entries.
- Press on
 to delete the entries.
Call History Options
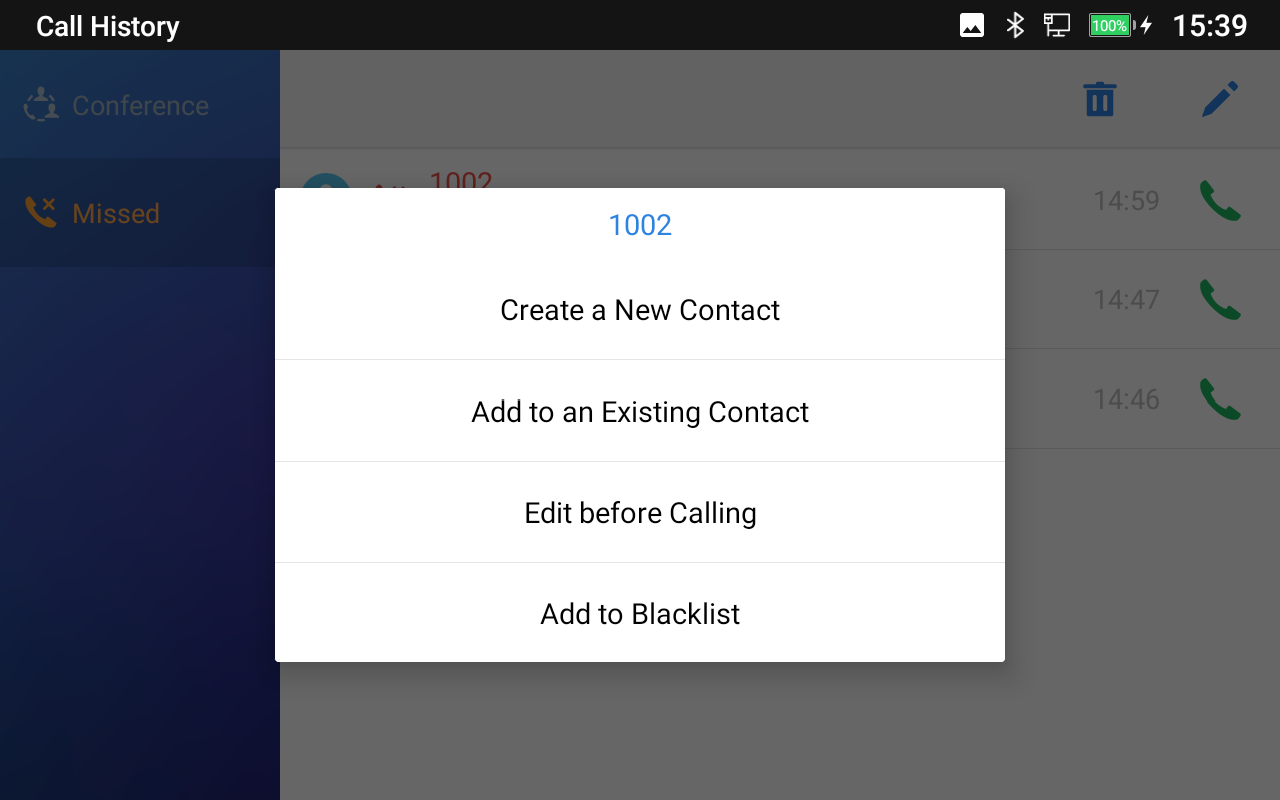
For each call history entry, users could tap on the Missed Call once to access the Sub-Menu below.
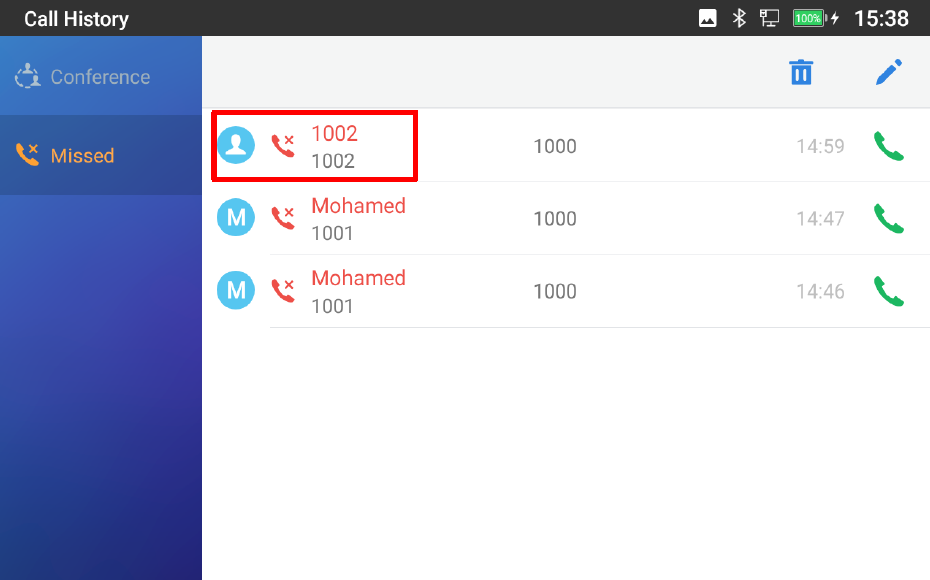
Users can find the following call details by tapping on the entry:
- The Call date: the time when the call was initiated.
- The Call duration: The period of time when the call was in progress.
Note: Call details under conference history include the previous details of the conference and for each one of the participants.
The following operations could be done:
 Dial out this number directly.
- Bring up the dial screen with the call history number. Users could edit the number before dialing out.
 Add to Blacklist
 Delete the entry.
- Options, ”Create a New Contact”, “Add to an Existing Contact”.
 Dial out this number directly.
 Add to Blacklist
 Delete the entry.
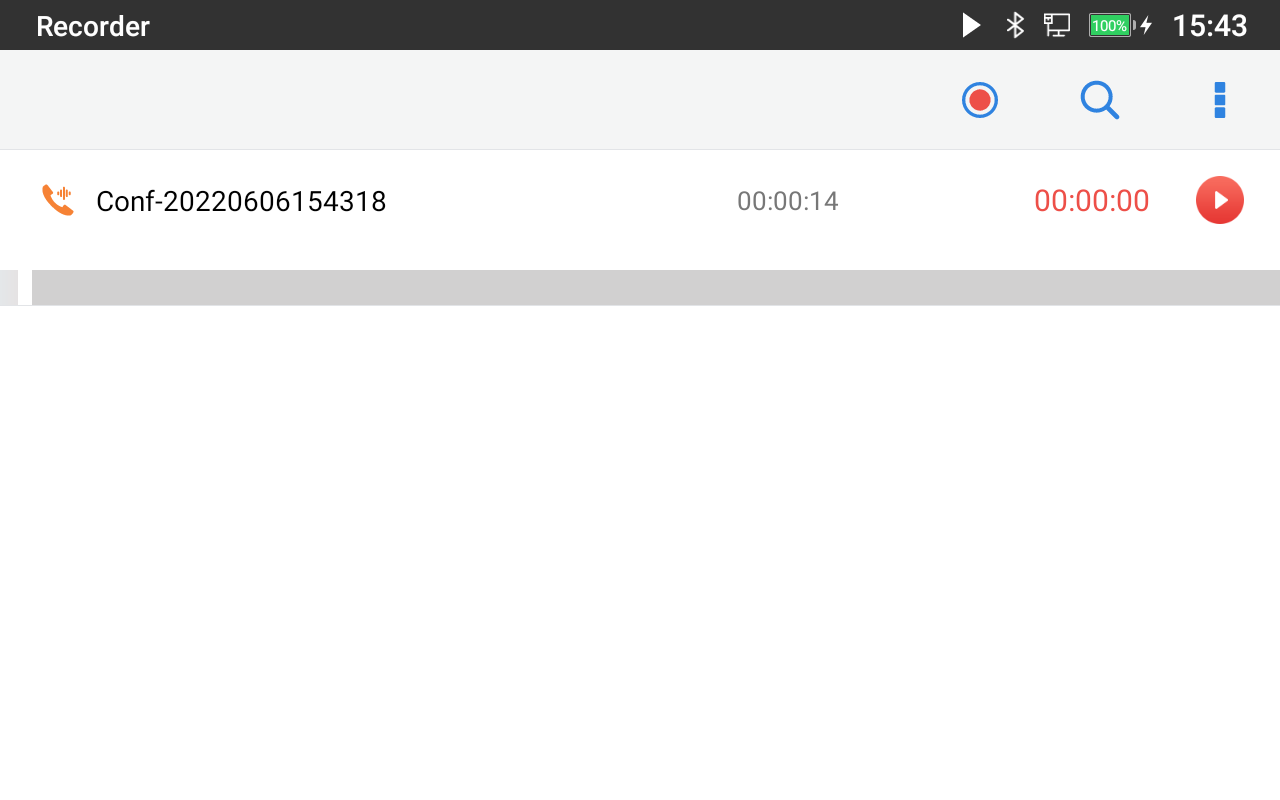
RECORDER
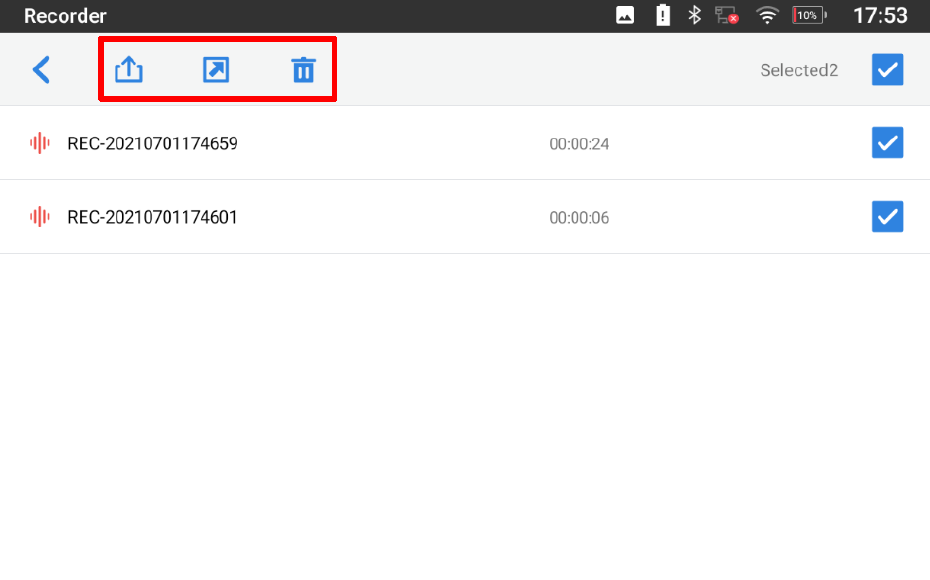
GAC2570 Recorder application allows users to record audio and access recording files from call recordings. There is no time limit on the recorder as long as there is enough space to save the recording file. Tap
![]() on the GAC2570’s desktop to launch the Recorder application.
on the GAC2570’s desktop to launch the Recorder application.
Call Records
During an active call, users have the option to record the conversation. The recorded conversation can be retrieved from the recorder application. The account and date are specified in each record’s file name.
Audio Records
To use the recorder app to record audio, tap on
![]() open the recorder.
open the recorder.
- Tap on
 to bring the recording page
 - Tap on
 to start recording
 to start recording
- Users can tap on
 during the recording to mark a section of the conversation (a red flag will be displayed beside the record’s file name to indicate that it’s marked)
- Tap on
 to cancel the recording, or on
  to end the recording. The file will be saved and accessible under the Recorder application. Users can tap on the recording file to play the recording.
Recorder Settings
Users can view the information about storage status and enable/Change a password for accessing the Recorder application by taping on ![]() followed by Settings:
followed by Settings:
-
From the GAC2570’s desktop page click on
to open the recorder.
- Click on the Menu icon on the top right as shown above
- Tap on Settings
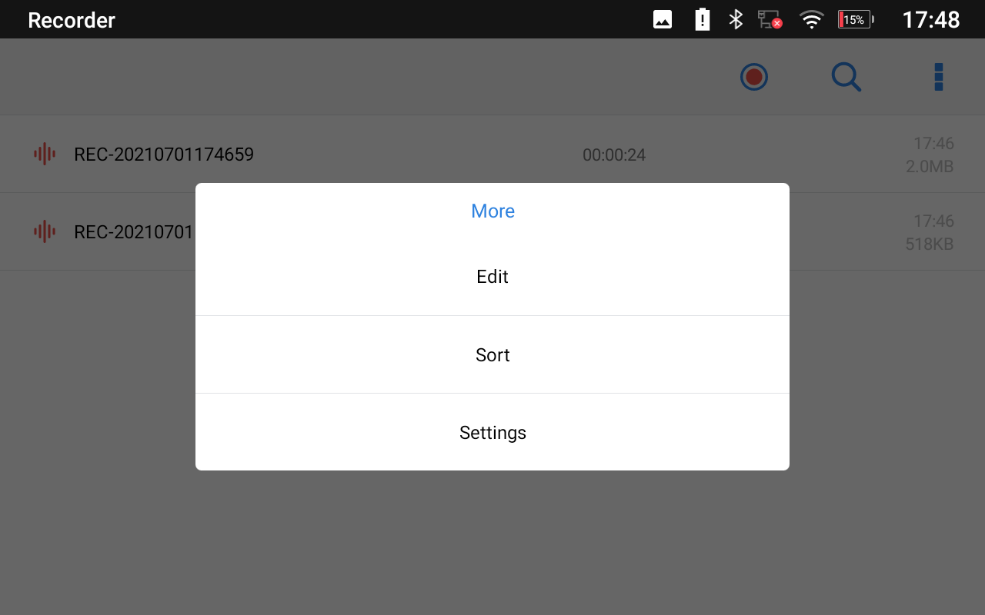
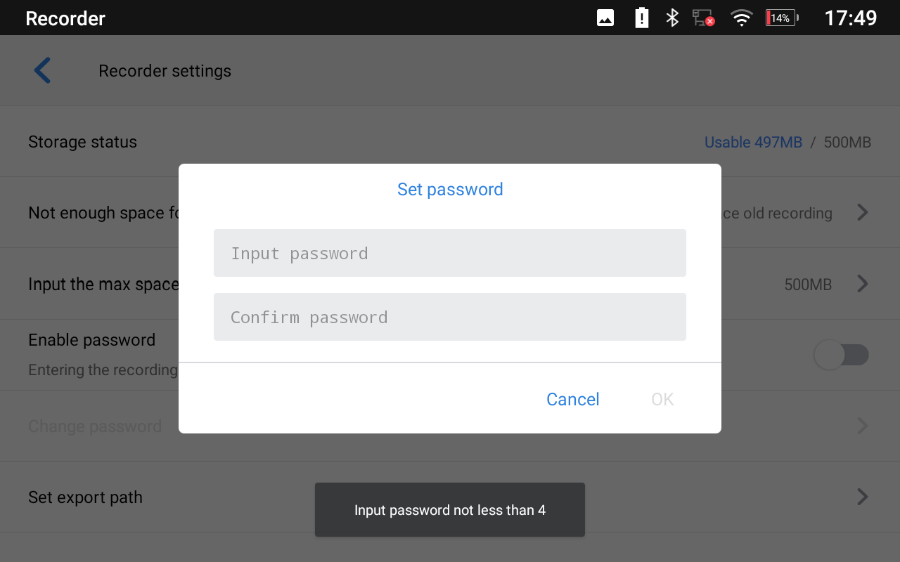
- Users can enable and choose a password to be set for accessing the Recorder application by taping on Enable Password:
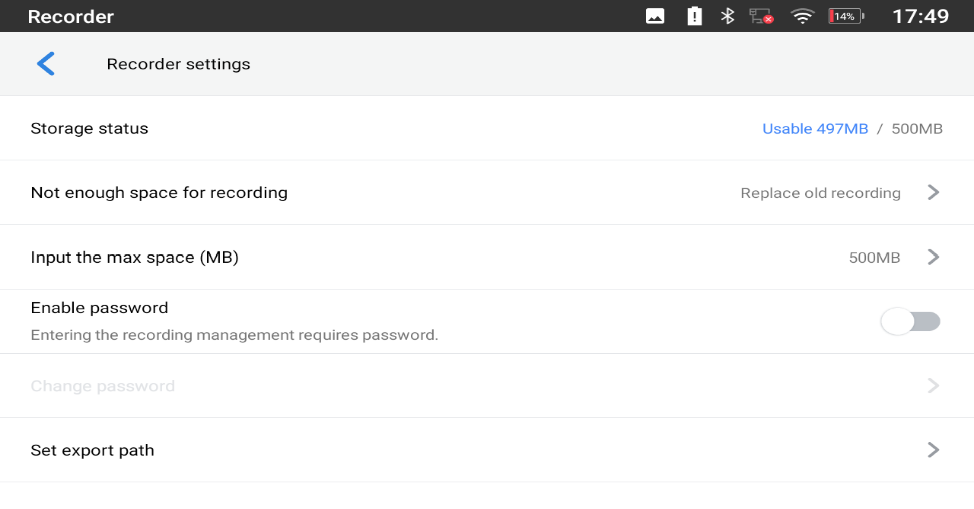
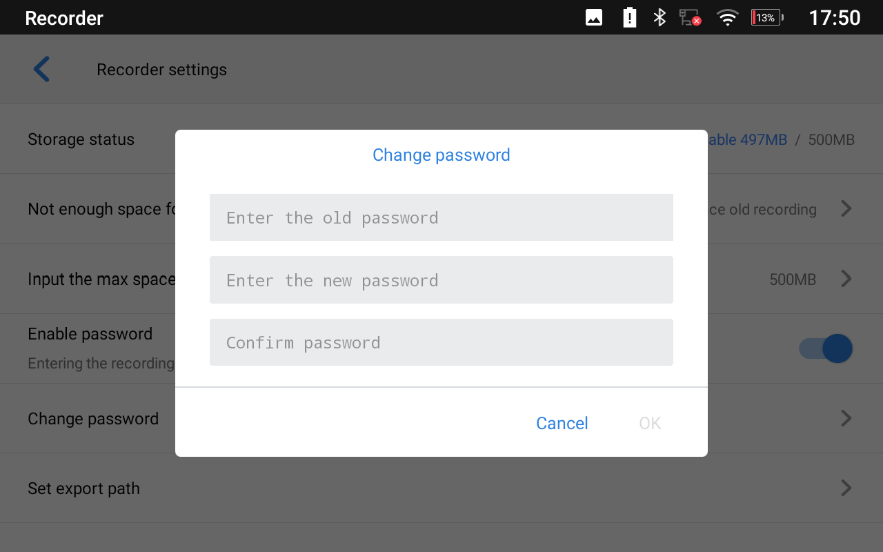
- Users can change the preconfigured password by tapping on Change password:
Files operations
Users could long-press on each file to select it and then perform the following operations on the selected file.

Export: Choose this option to export the file to other storage destinations (USB Drive as an example).
Lock/Unlock: Users can lock and unlock the file.
Send: Make sure to enable Bluetooth on the GAC2570 to send the file to other devices.
Rename: Click on this option to rename the file.
Delete: Choose this option to delete a file
Users can Export or Delete recordings alternatively by pressing on the Menu key
![]() ,click on Edit and then select the file to operate on; choose
,click on Edit and then select the file to operate on; choose
![]() for file export,
for file export,
![]() to delete or
to delete or
![]() to send via Bluetooth and 3rd party APPs.
to send via Bluetooth and 3rd party APPs.
FILE MANAGER
File Manager is a tool that allows users to delete, move, copy/paste, send, and rename files. It helps users to access and manage files in local storage as well as external storage devices (USB flash drives). Tap on the device’s File Manager settings under Basic Settings.
Files Operations
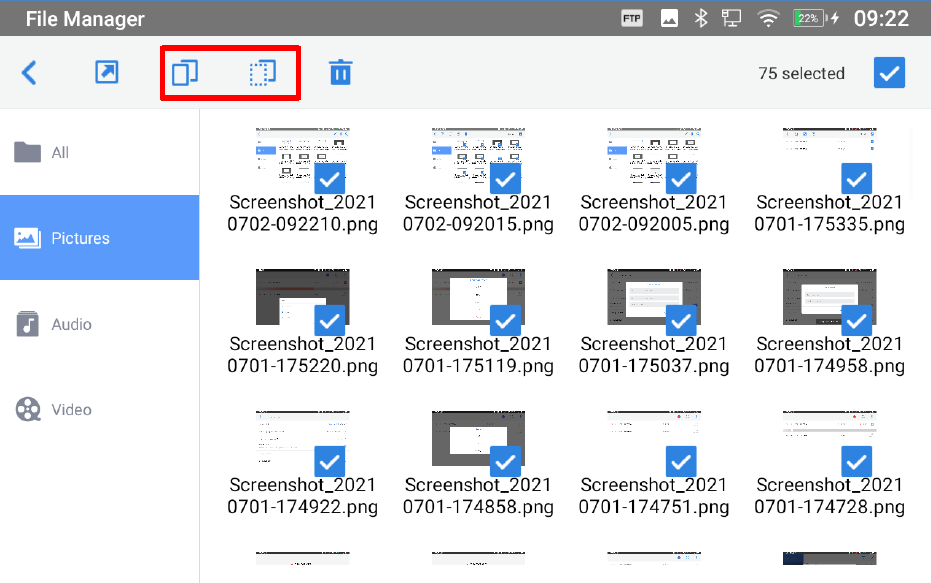
Copy and Paste Files
Follow the steps below to copy and paste a file on the GAC2570:
- Open file manager and navigate to the directory of the file to be copied. Touch and press on the file for about 2 seconds until the option s window pops up then press Copy.
- Select the location to which you want to paste the file and press on .
Or
-
-
Press
 on the top right corner of the screen and select the files to copy.
-
Tap on
to copy the files selected.
-
Select the directory to which you want to past the files then press

-
Press
 on the top right corner of the screen and select the files to copy.
 to copy the files selected.
Move Files
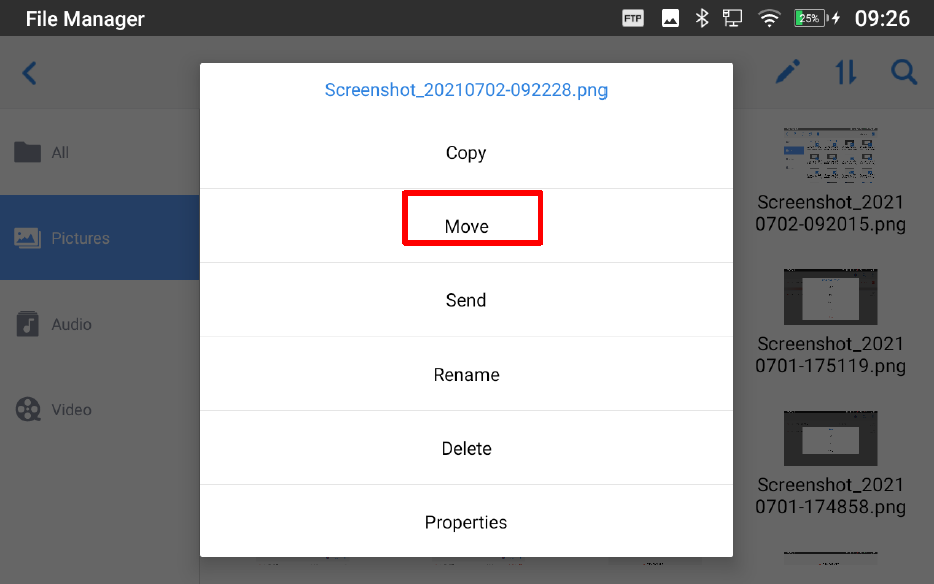
The steps to move a file are similar to the steps to copy/paste a file. The difference is once the file is moved, the file will not be kept in the source folder. Follow the steps below to move a file on the GAC2570.
- Open file manager and navigate to the directory of the file to be moved. Touch and press on the file for about 2 seconds until the options window pops up then press Move.
- Select the location to which you want to past the file and press on .
 .
.
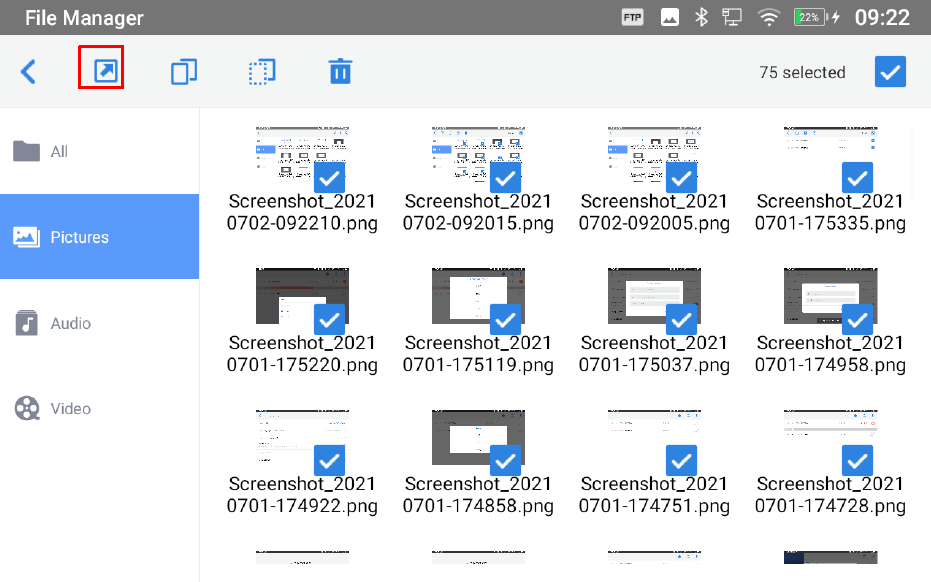
Send Files
The users can send a file via Bluetooth. Please make sure Bluetooth is turned on and connected to the Bluetooth devices. Otherwise, users will be directed to set it up before the file can be sent out.
To send a file:
- Open file manager and navigate to the directory of the file to be sent over. Touch and press on the file for about 2 seconds and press send
- Select the Bluetooth device to which the file will be transferred
Or
1. Open file manager and navigate to the directory of the file to be sent over then press on

2. The check boxes will appear then check the files to be sent over
3. Press on
 to send the selected files via Bluetooth then choose the Bluetooth devices to send the files to.
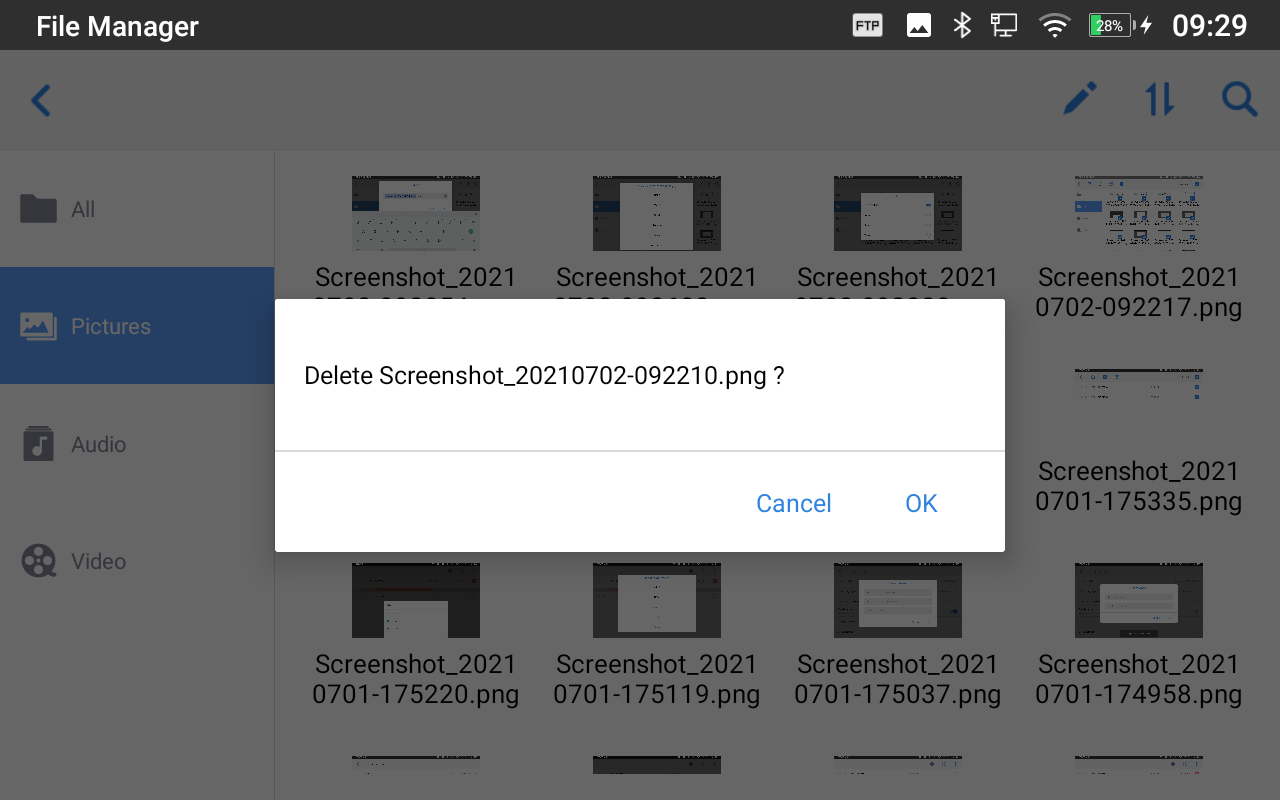
Delete Files
- Open file manager and navigate to the directory of the file to be deleted. Touch and press on the file for about 2 seconds until more options appear.
- Select “Delete”.
Or,
1. Open file manager and navigate to the directory of the file/files to be deleted the click on
 .
.
2. The check boxes will appear then check the files to delete
3. Press on
 to delete the files selected.
4. Tap on OK to confirm.
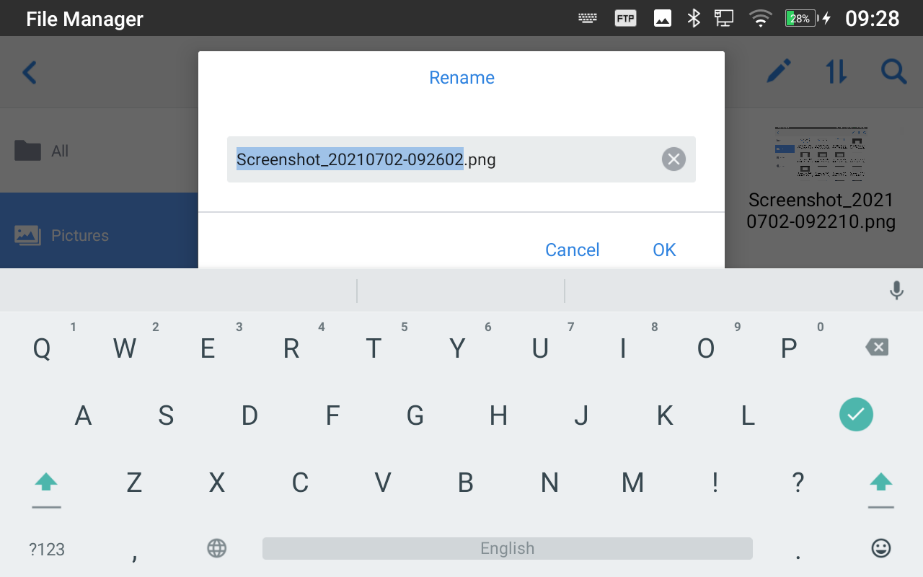
Rename a File
- Open file manager and navigate to the directory of the file to be renamed. Touch and press on the file for about 2 seconds until more options appear.
- Tap on “Rename”. A new dialog window will pop up for users to enter the new name.
- Tap on OK.
File Categories
The file manager will categorize the files stored on local/external storage based on the type of files. The available categories are
- All: gives access to all internal storage files as well as external storage devices.
- Pictures: contains all the pictures stored on the device including screenshots, and local and external pictures.
- Video: contains all the videos stored on the device including videos stored on local and external devices.
- Audio: contains all the Audio file on local and external storage.
GS MARKET
The GAC2570 supports an extensive amount of 3rd party Android applications. Users could install those applications from the built-in GS Market.
Tap on
 at the device onscreen menu to launch the GS Market. Users could browse, search, download and install the apps from there for tools, games, and other applications.
CONFERENCE CONTROL
To better integrate with the GVC32xx series, GAC2570 provides the app Conference Control. GAC2570 must connect a GVC device via an Ethernet cable on the Media port of both devices before using the app. Users then can access the contact, call interface, schedule, and camera feature from the GVC device.
To access the Conference control application, Click the icon displayed in the screenshot below:
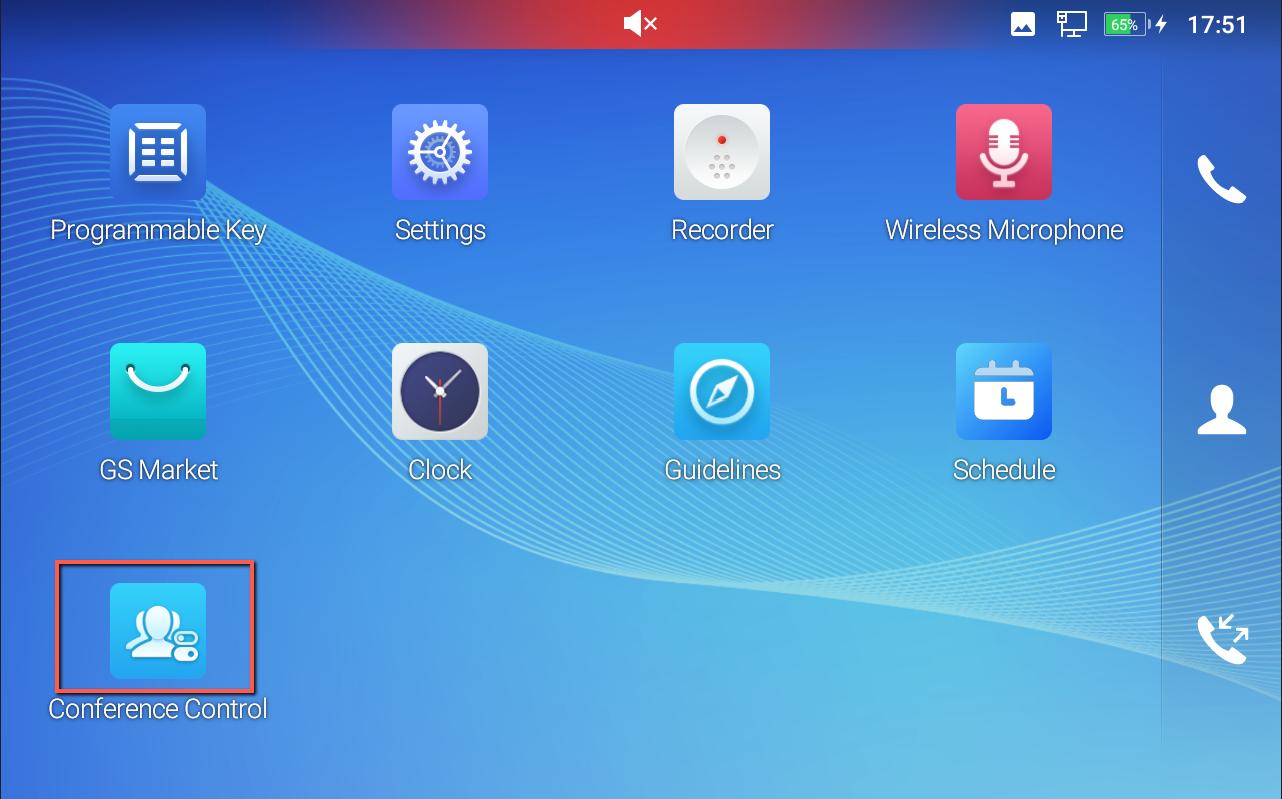
Once you click on the icon, you will be prompted with the following interface, considering that the media port is connected to both the GVC3220 and the GAC2570 with an Ethernet cable.
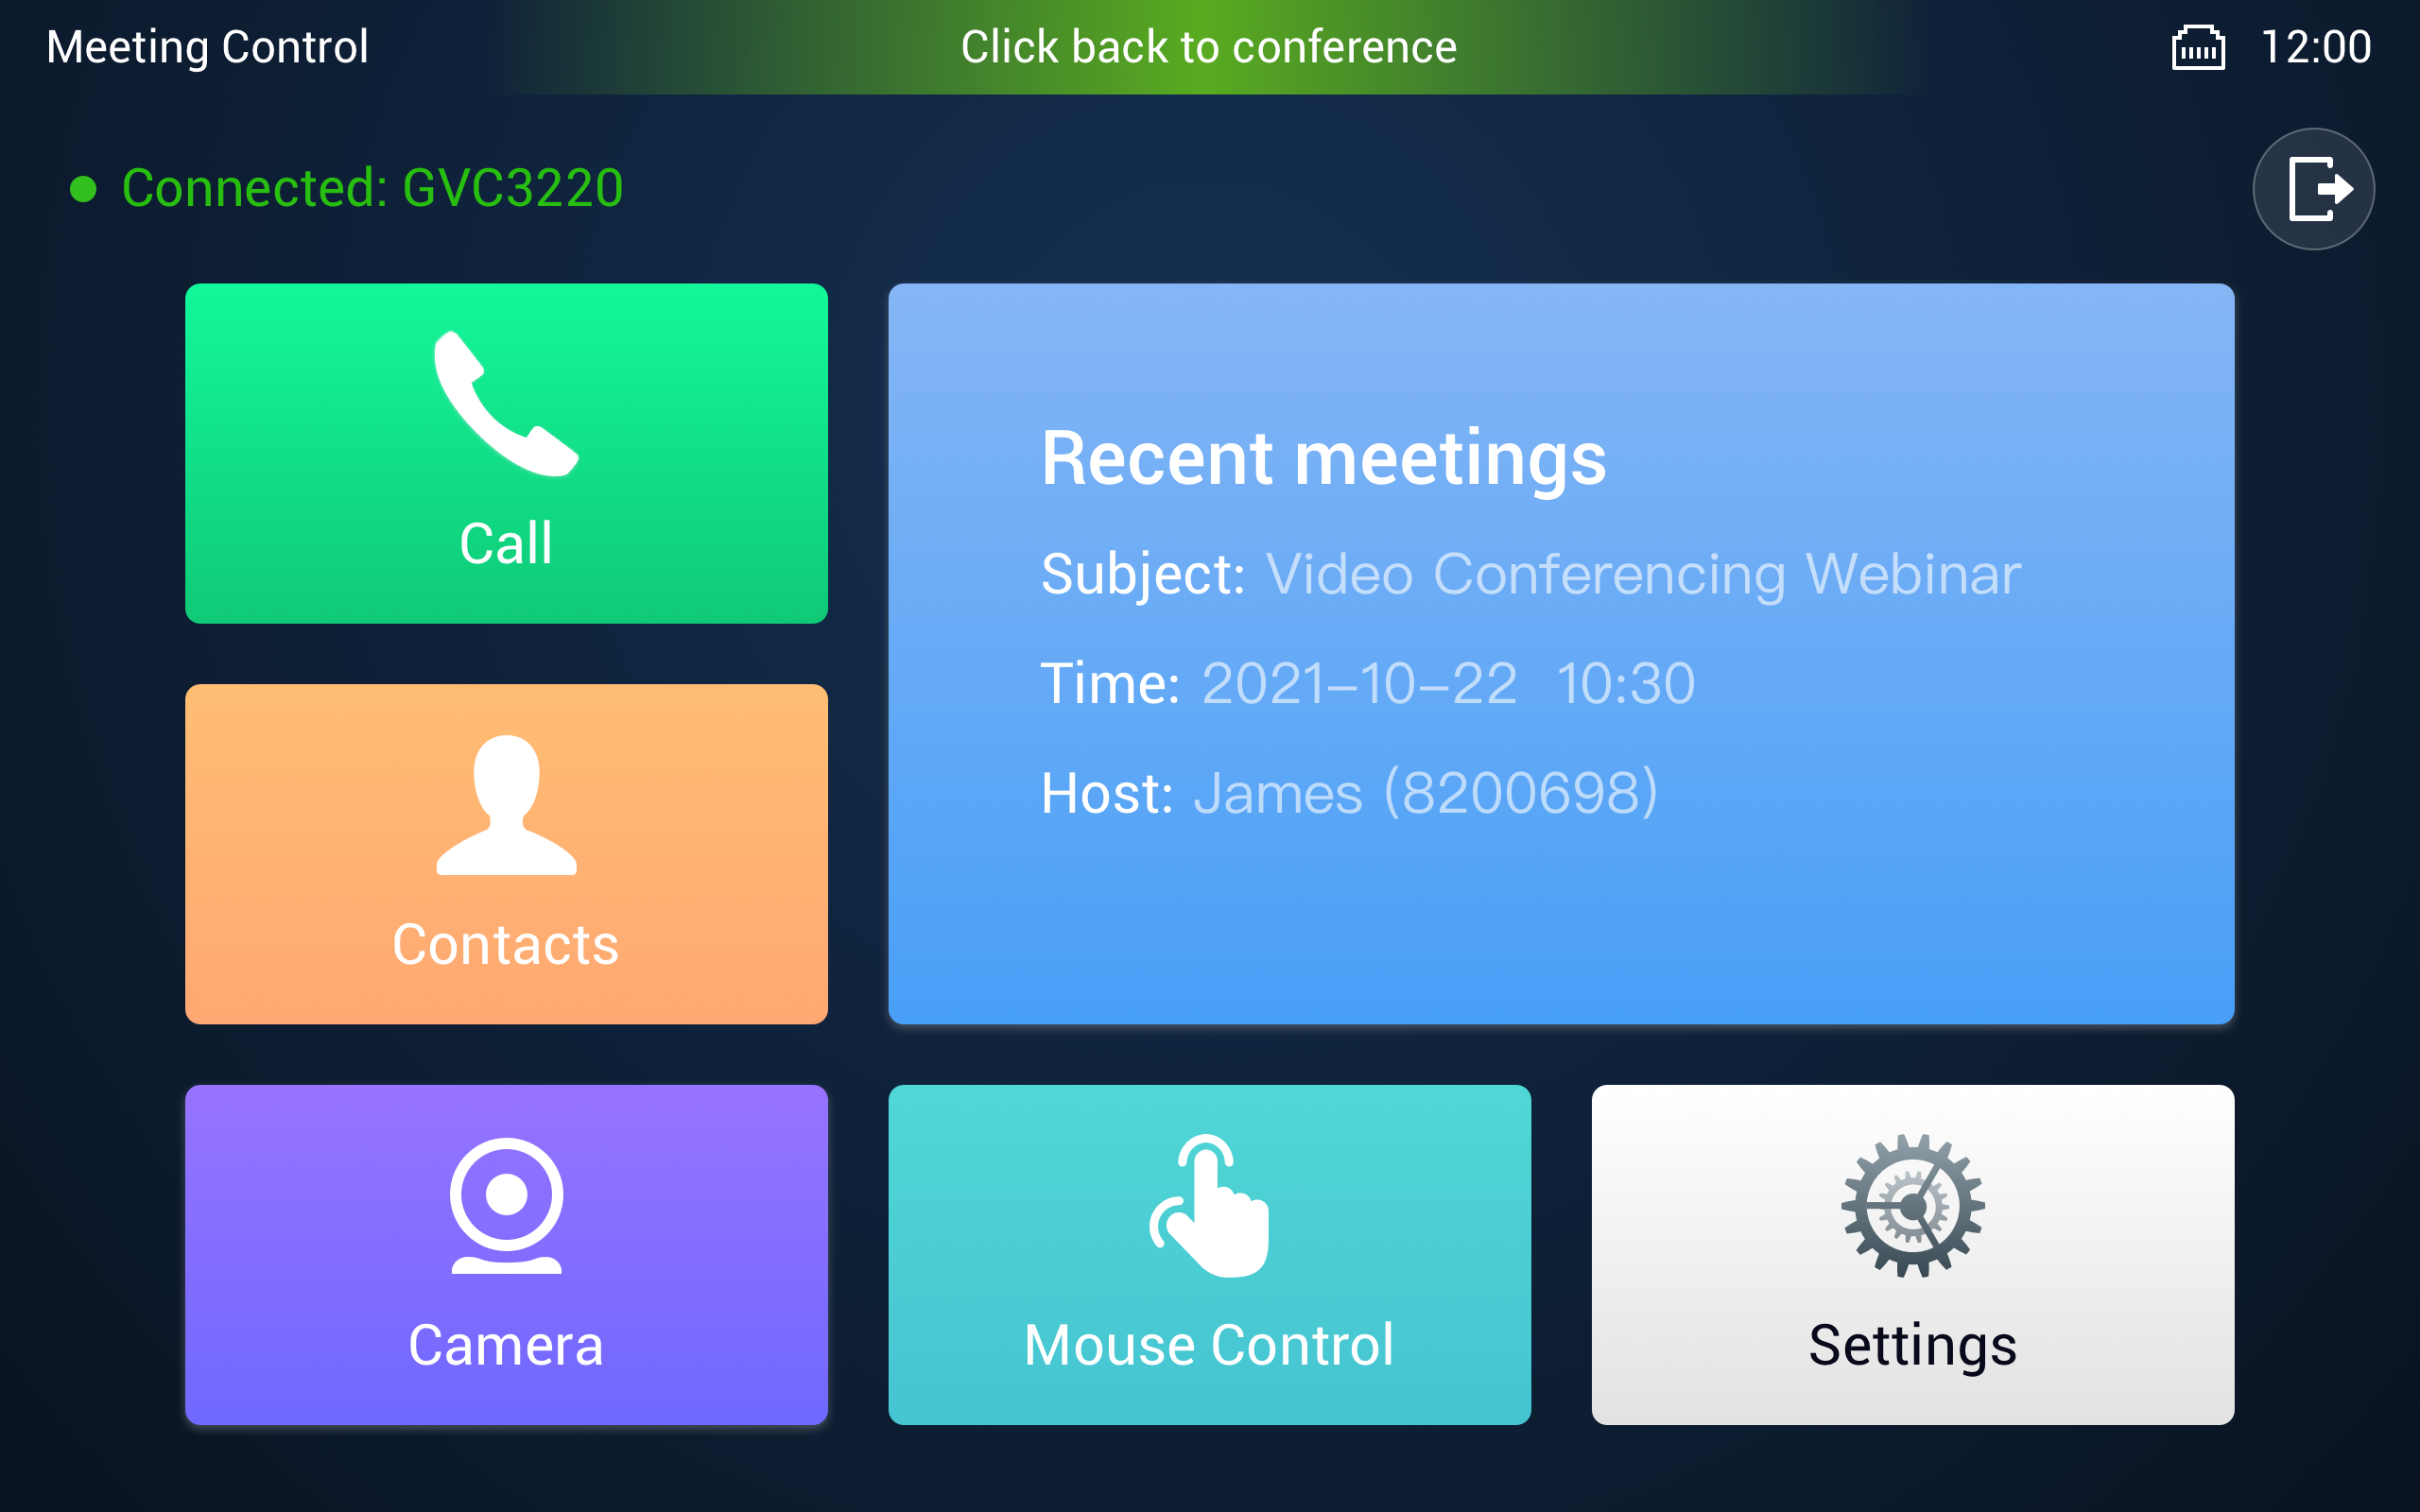
The GAC2570 interface offers convenient control over the GVC32xx device, eliminating the need to access its configuration panel. Essentially, the GAC2570 functions as a remote controller for the GVC32xx, enabling conference call setup, camera adjustment, contact list access, call-making capabilities, and SIP parameter configuration.
For more information on how to set up and use the Conference Control App, please check the following guide :
SCHEDULE APP
The Schedule application on the GAC2570 enables users to generate and oversee schedules by utilizing their GAC2570 account as a conference host. As the host, they can modify various aspects of the schedule, including time, duration, participant information, and more.
To access the Schedule App, please Click the Icon in the screenshot below

Once you access the app, you have the view on many tabs, such as :
- All: displays a list of all conference meetings managed on the GAC2570
- In Process: Displays a list of ongoing meeting conferences.
- Not Started: Displays scheduled Meetings.
- Ended: Displays meetings that have been concluded.

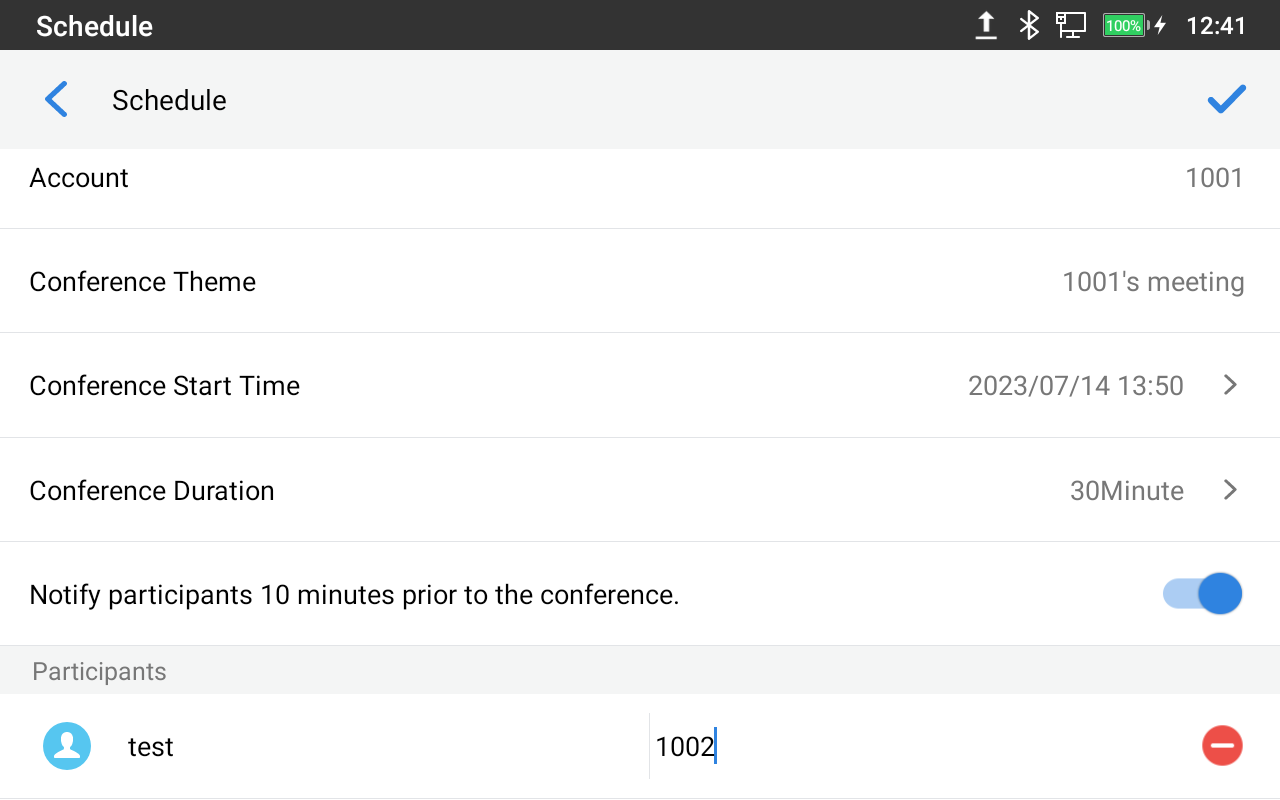
Create a schedule
To create a schedule on the GAC2570 schedule app, please follow the below steps:
- Click the icon
 to add a new schedule.
 - Select the account from which the schedule notification will be sent, we will select account 1001 in our case.
- Name the Conference: 1001’s meeting.
- Configure the Conference Start Time.
- Configure the Duration, We will set it to 30 minutes.
- Enable the 10-minute reminder notification sent to the meeting’s participants. (Optional)
- Add the participants.
- Click Save. The Scheduled meeting will be displayed on the list of Conferences.
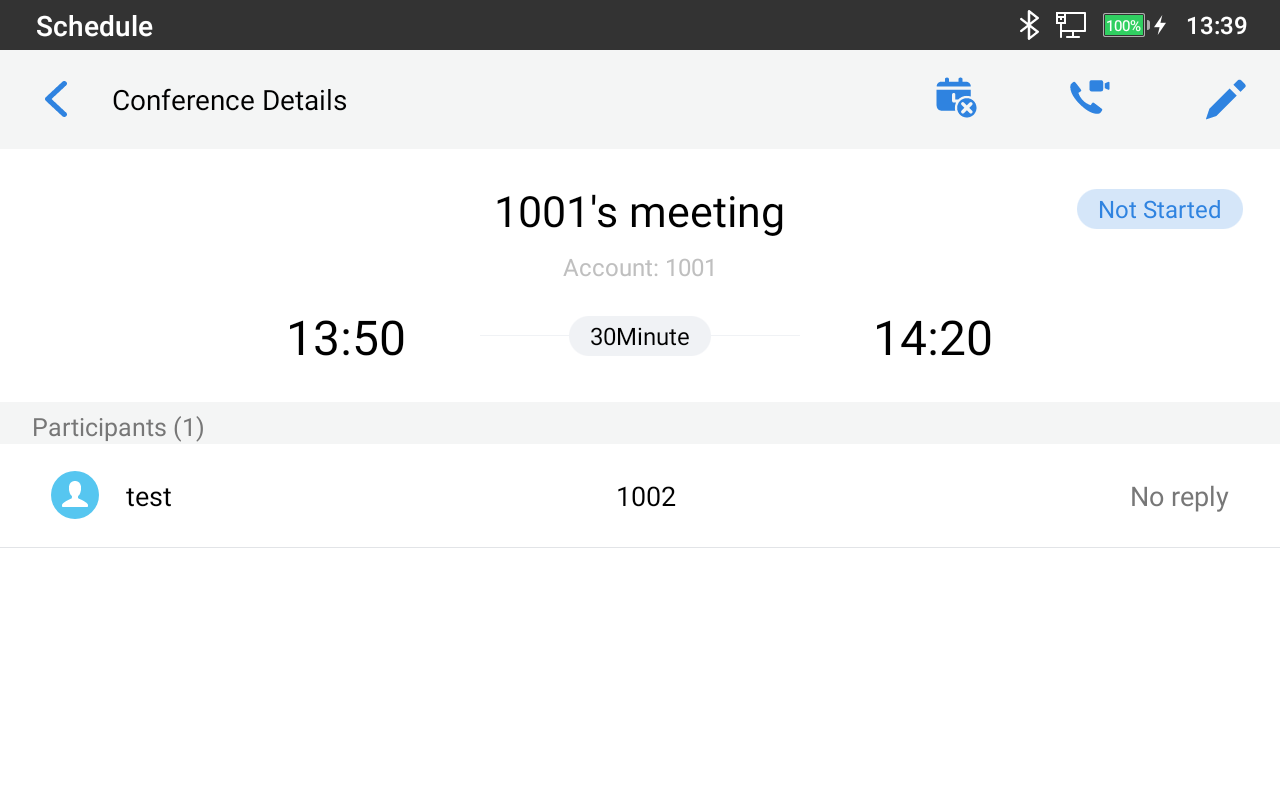
Update a schedule
You can Edit an already created schedule to add more participants, change the meeting’s duration, or change the date, to do that:
- Click on the desired meeting that hasn’t started yet.
- Click on the edit icon
 .
. - Make the desired changes and then save the meeting.
 .
.
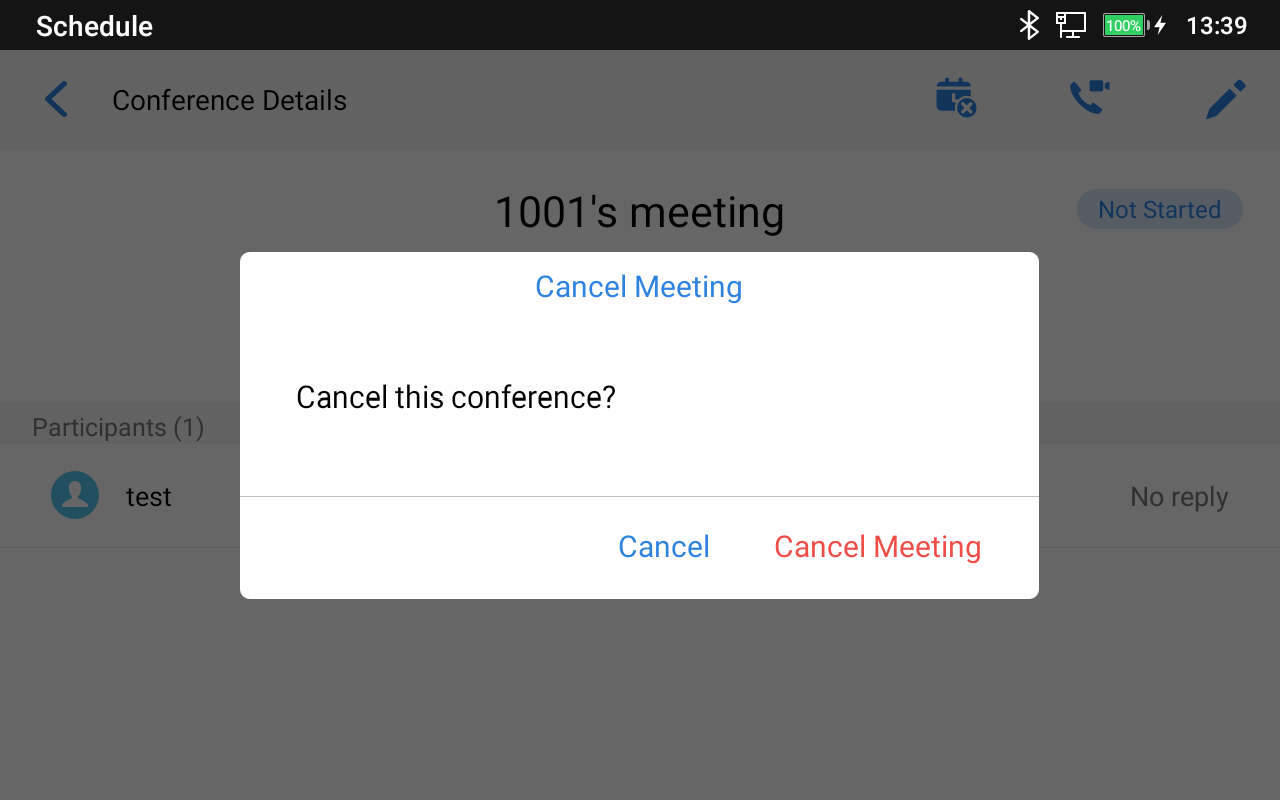
Cancel A schedule
To cancel a schedule, simply click the icon highlighted below :
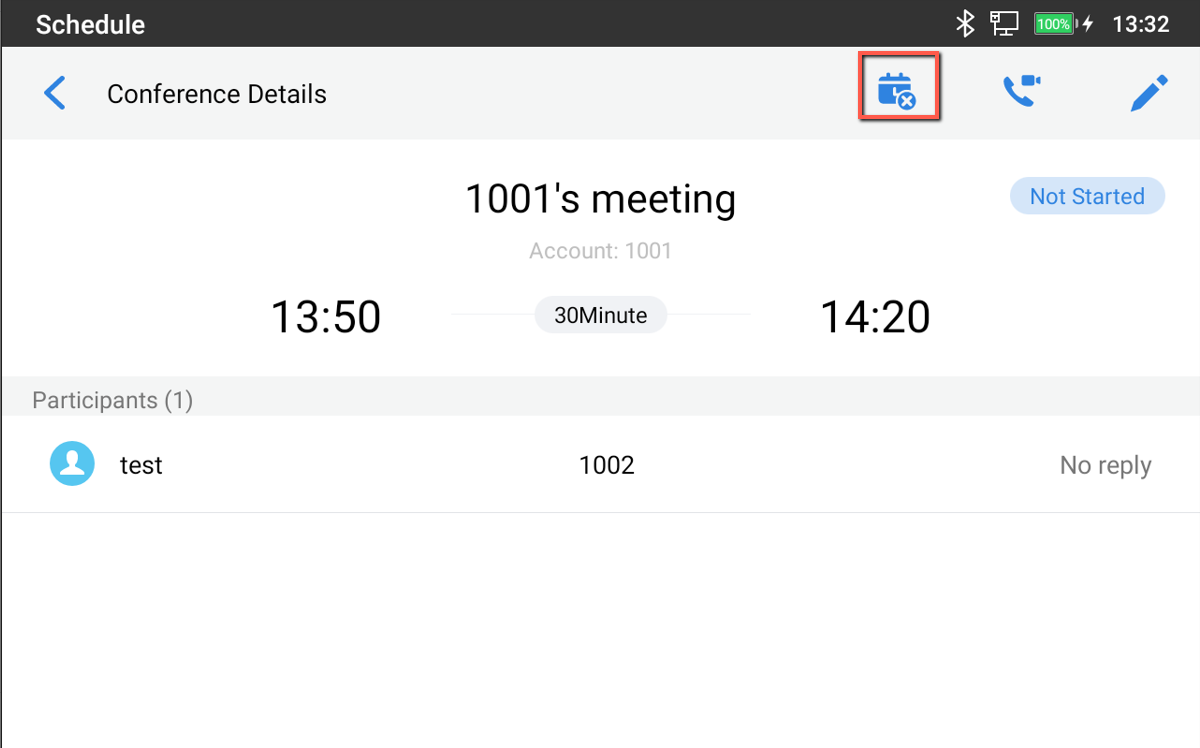
You will then be prompted with a confirmation window, Click Cancel Meeting
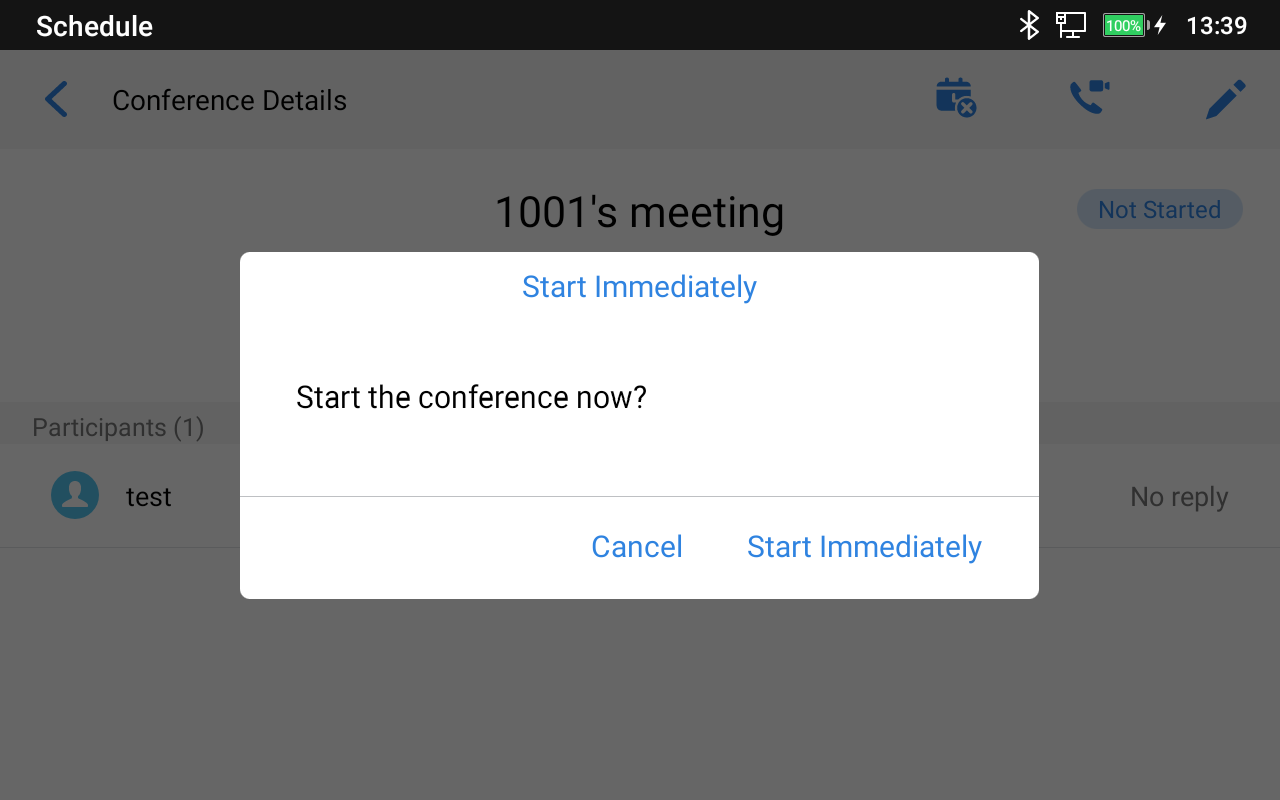
Start Meeting Immediately
In case you need to launch the meeting before the scheduled time, you can click the icon highlighted below :

After confirmation, this will trigger an immediate call to all Meeting members.
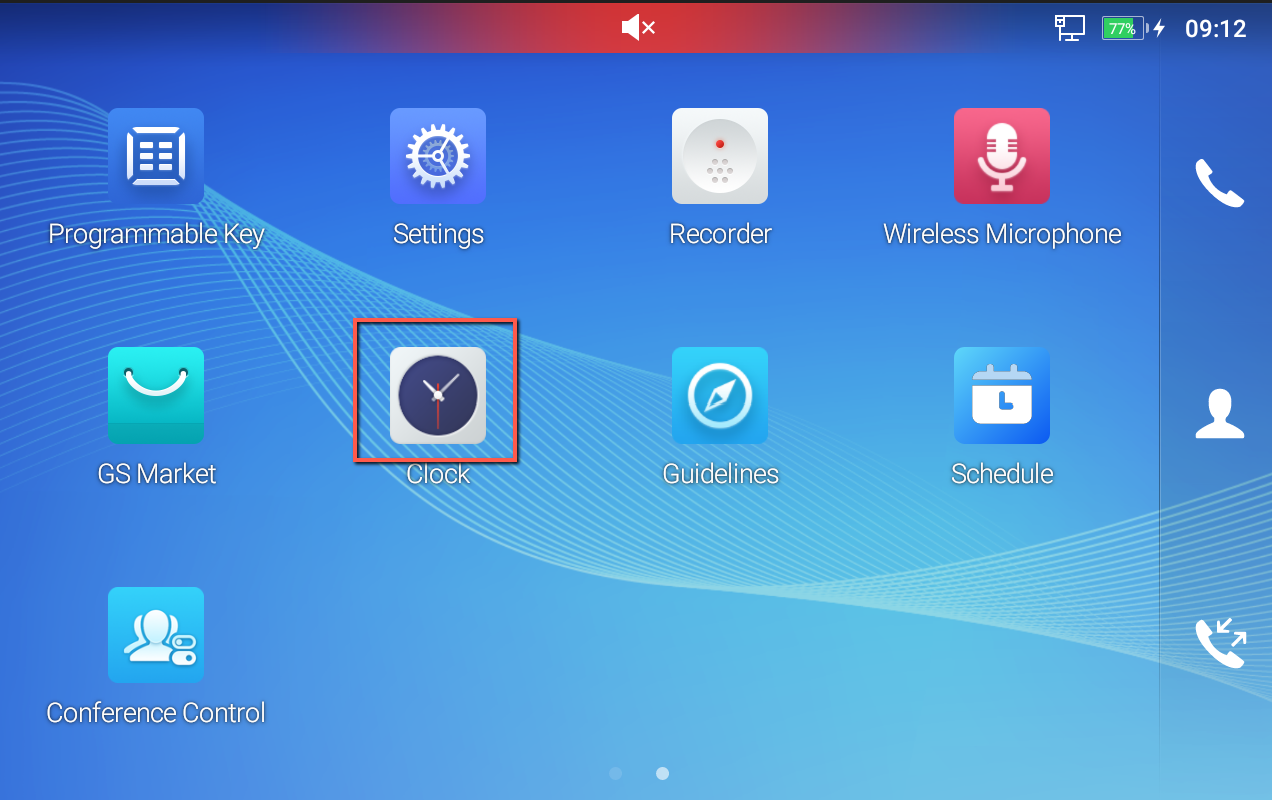
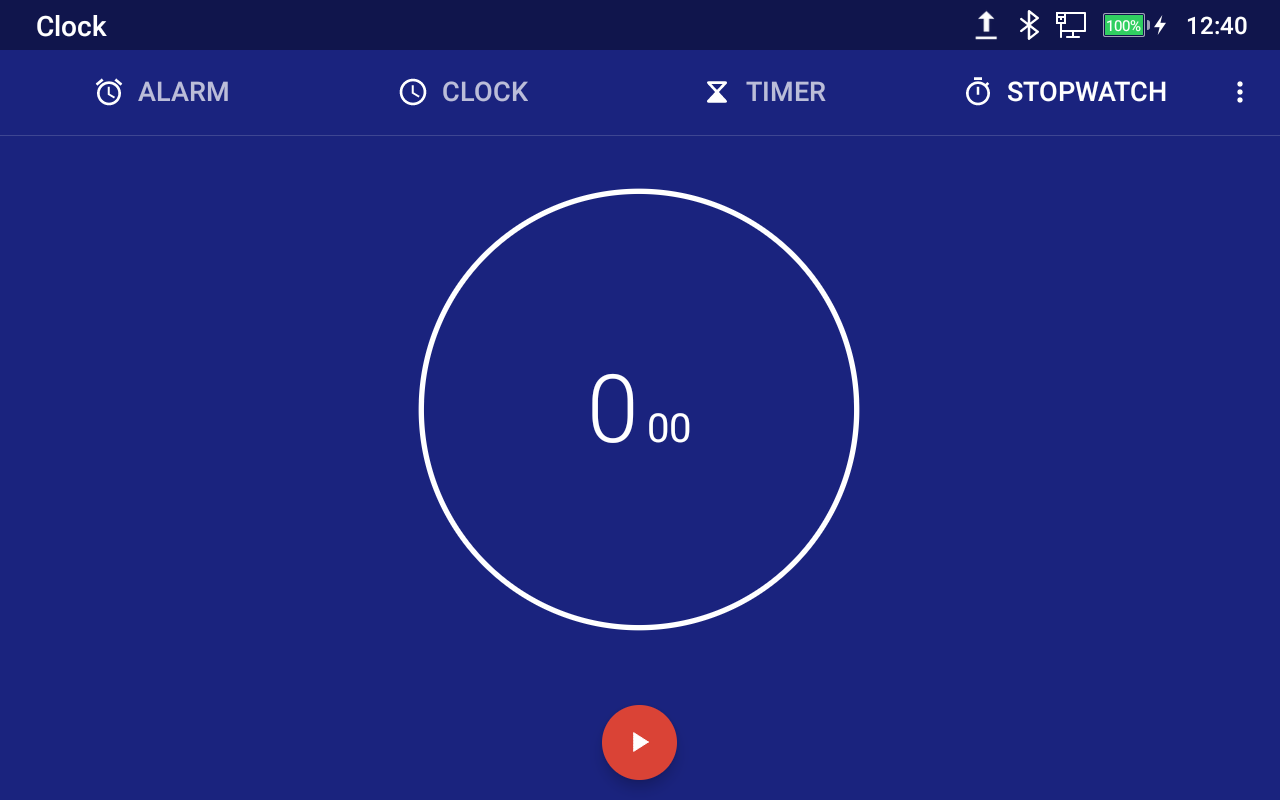
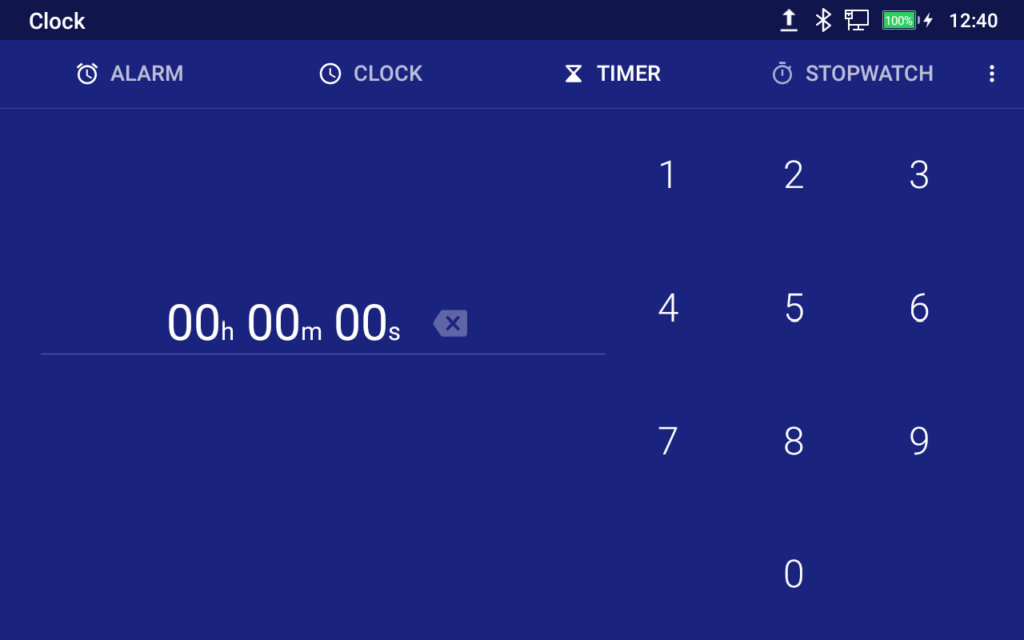
CLOCK
The clock app is the newly added app on the GAC2570 audio conferencing device starting from firmware release 1.0.3.4, the app is found on the desktop menu as shown below:
It features the following functionalities:
- Alarm: Sets up alarm clocks.
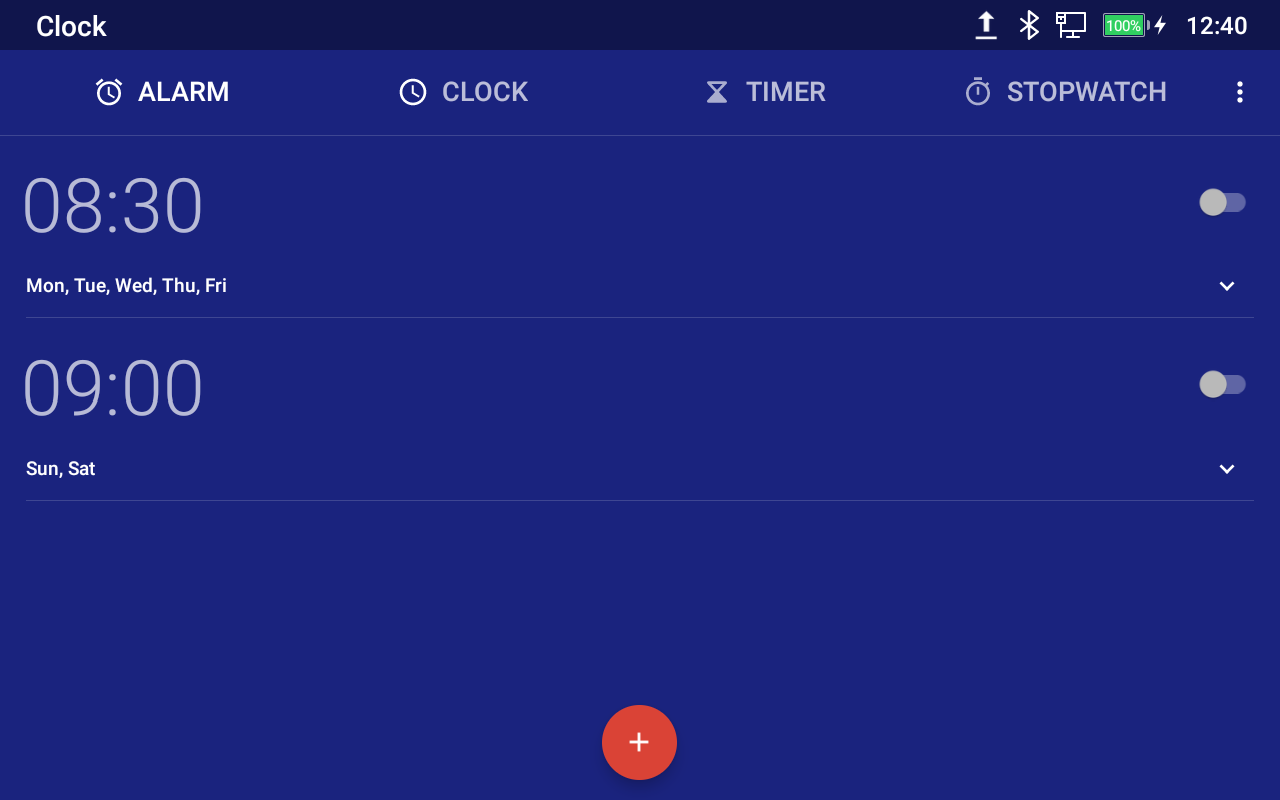
- Clock: displays the local time, as well as the world clock time based on a list of world cities.
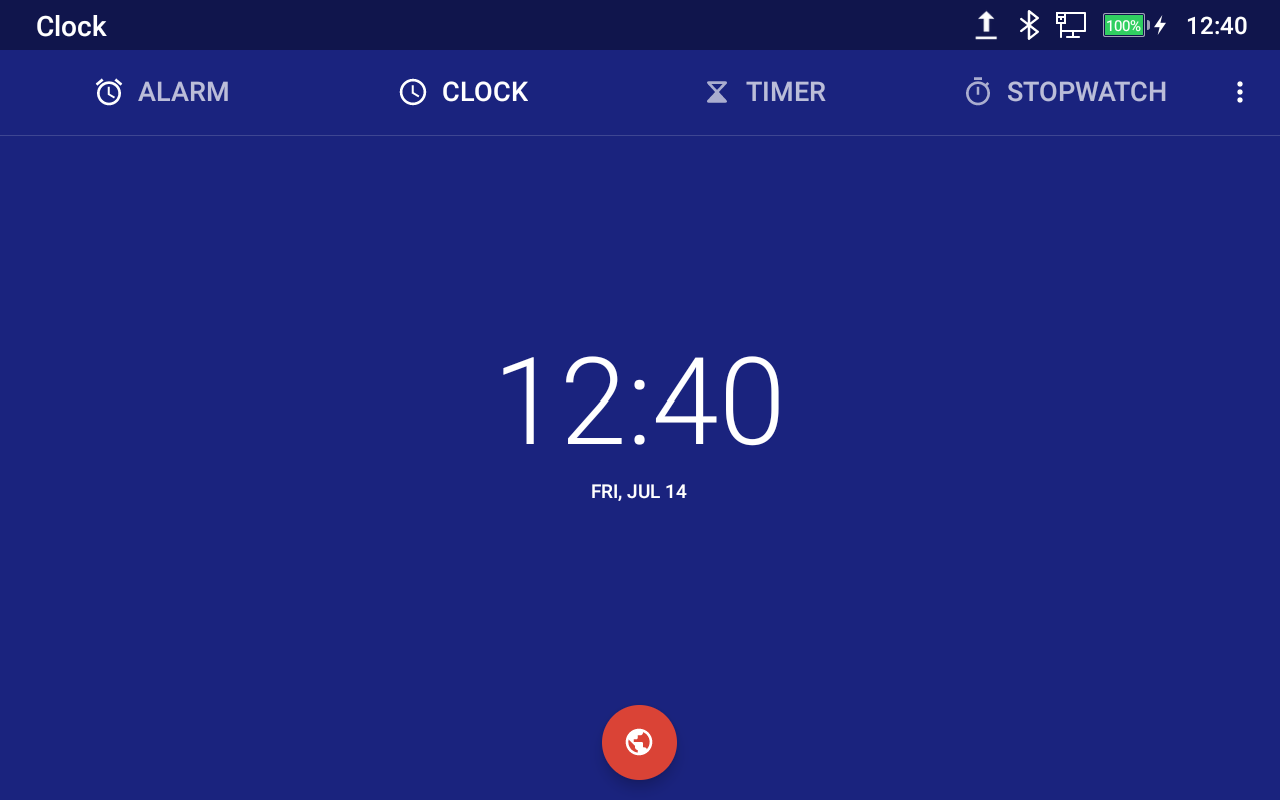
- Stopwatch: Configures a Stopwatch Chronometer.
- Timer: Configures a Timer.
GUIDELINES
The Guidelines App presents wizards on how to access and enable the most common features used on the GAC2570 Audio conferencing model. To access the Guidelines app, please press the icon highlighted below:
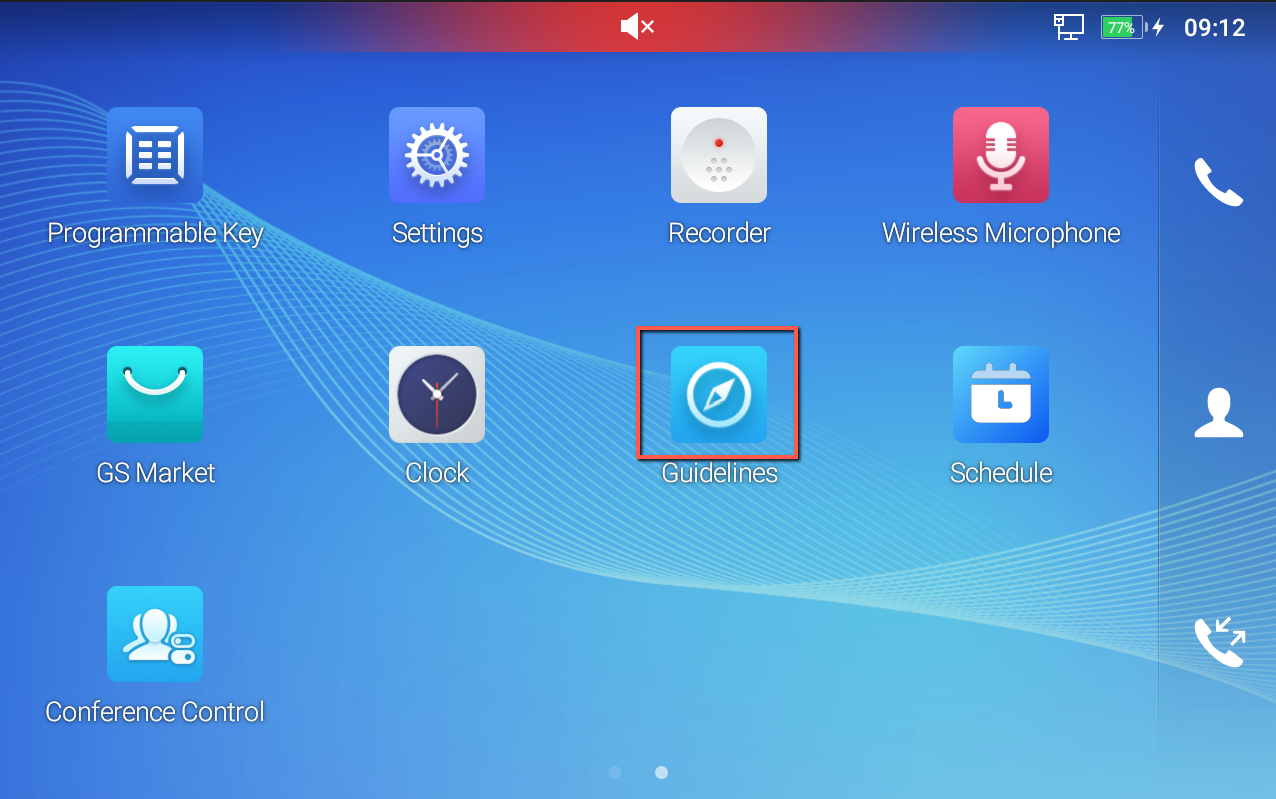
The features include small instructions for the following:
- Screenshot

- Process Management
- Launch A Meeting
- Registered Account
- Audio Calibration
- Wireless Microphone
FTP SERVER
The GAC2570 supports file transfer via an FTP server. Once installed, users could access the GAC2570 file system from a PC.
There are two ways to access the FTP Server application:
- Go to the GAC2570 application screen 🡪 File Manager and click on the icon
 .
.
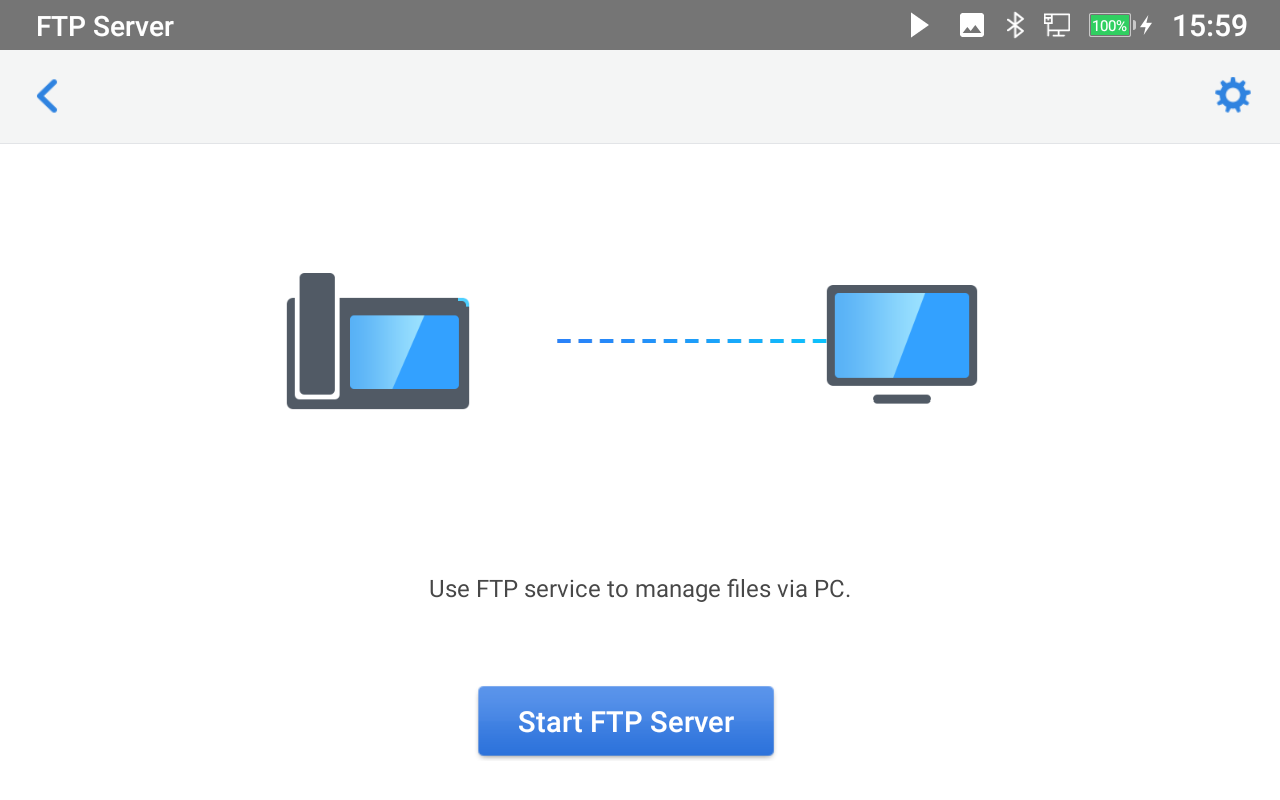
Tap on “Start FTP Server” to turn the server on. The FTP server address URL will be provided on the screen.
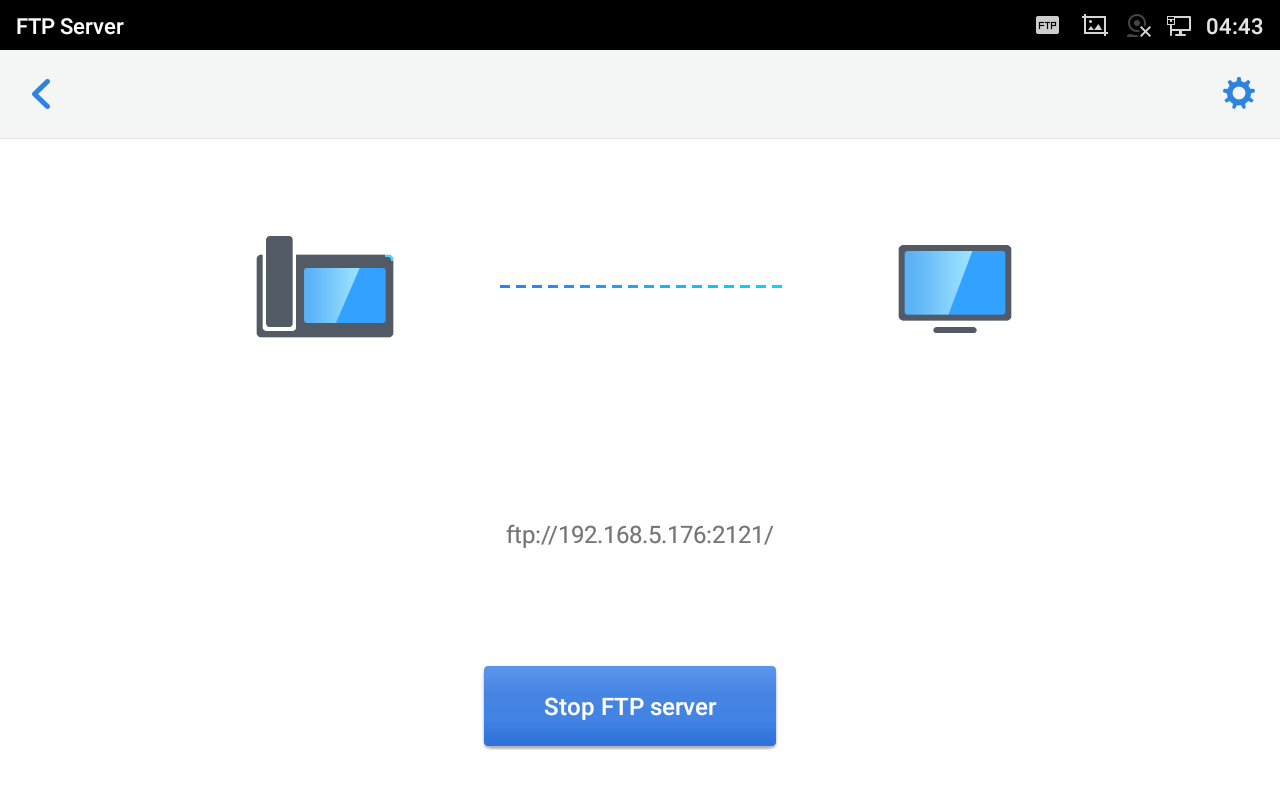
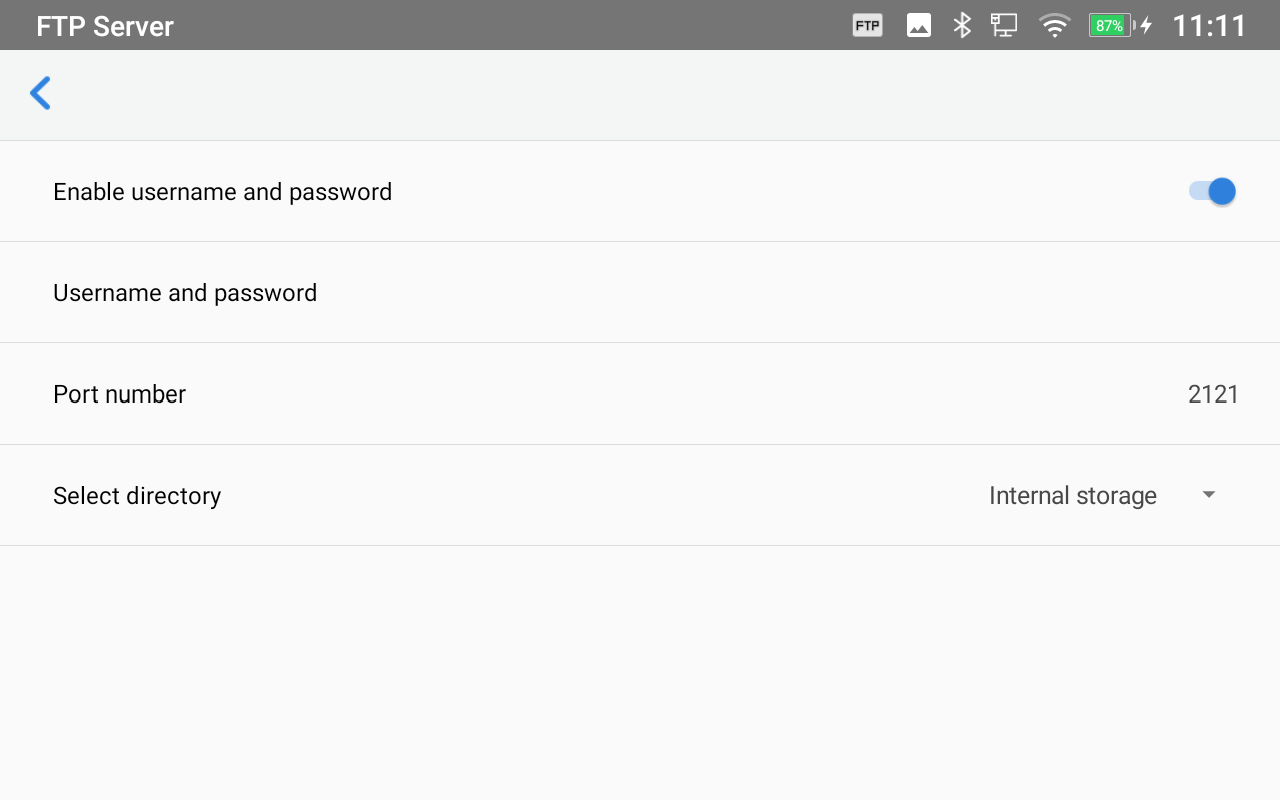
For security purposes, users could also tap on ![]() in the above figure to set up a username, password, port number, and directory for remote access. By default, when the users access the FTP server from a PC, a prompt will show asking for a username and password. The default username and password are “admin”.
in the above figure to set up a username, password, port number, and directory for remote access. By default, when the users access the FTP server from a PC, a prompt will show asking for a username and password. The default username and password are “admin”.
SCREENSAVER
Users can set screensaver from the device’s idle screen under Settings 🡪 Basic 🡪 Display 🡪 Screensaver.
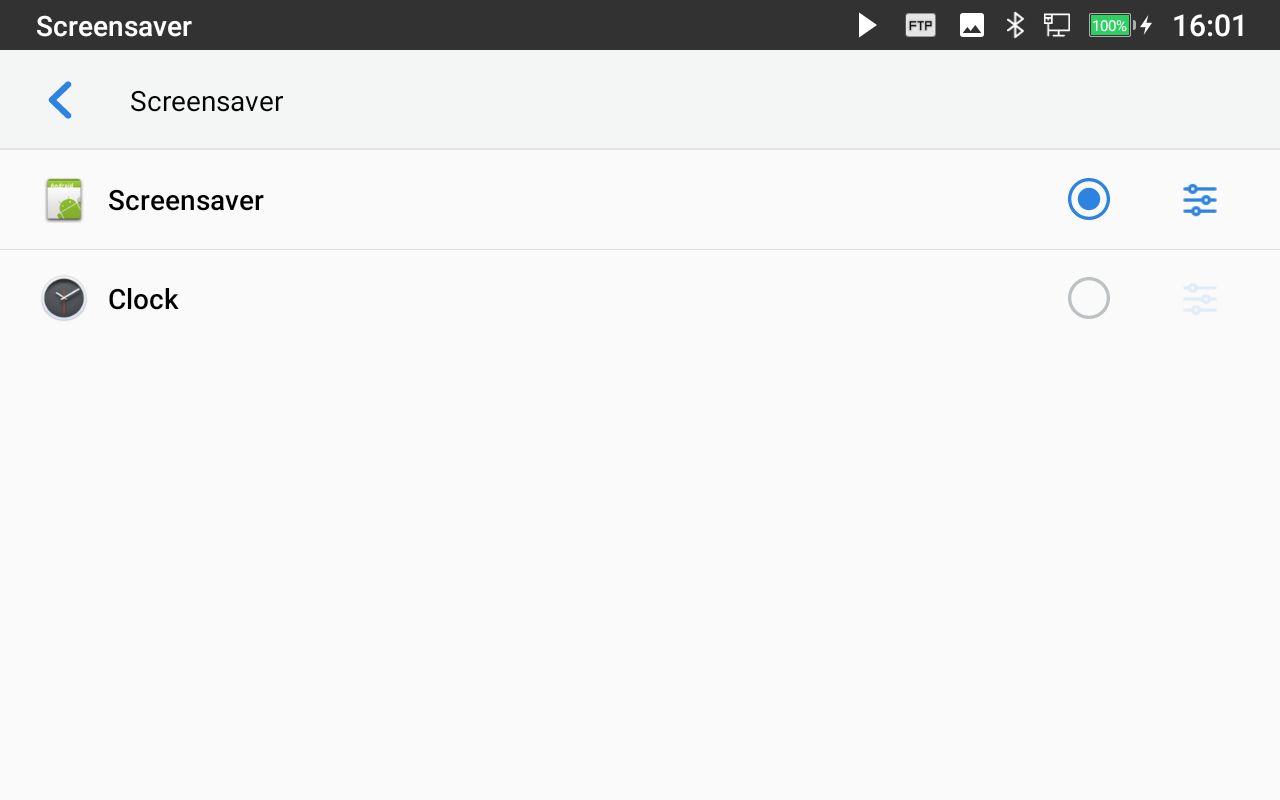
Users can set Screensaver to Clock or Screensaver.
- Clock: When setting the screen saver to Clock the GAC2570 will show a clock on the screen when the GAC2570 goes to standby mode. Press to set the clock as Digital or Analog and Enable/Disable the Night mode.
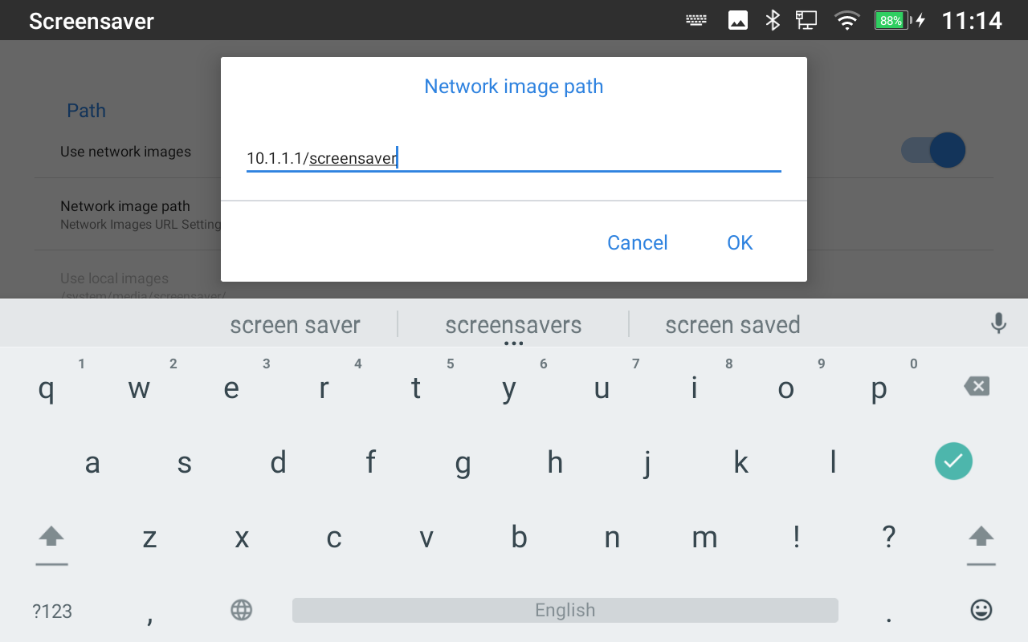
- Screensaver: Users can set Screensaver from the local images, the default directory (Screensaver), or from Internal storage, or they can set a folder in a remote HTTP server to display images contained on it as a screensaver. Press to show the screensaver settings. Click on Use network images and set the path of the remote screensaver folder.
WIRELESS MICROPHONE CONFIGURATION
The GAC2570 supports connecting up to two GMD1208 Wireless Microphones to act as external microphones.
To Pair your GAC2570 to your GMD1208 Wireless Microphones, please proceed as below:
- Users can either tap on directly Wireless Microphone APP on the desktop or by accessing the LCD Menu 🡪 Settings 🡪Features 🡪 Wireless MIC.
- Once enabled, the GAC2570 will show instructions for use on the LCD screen.
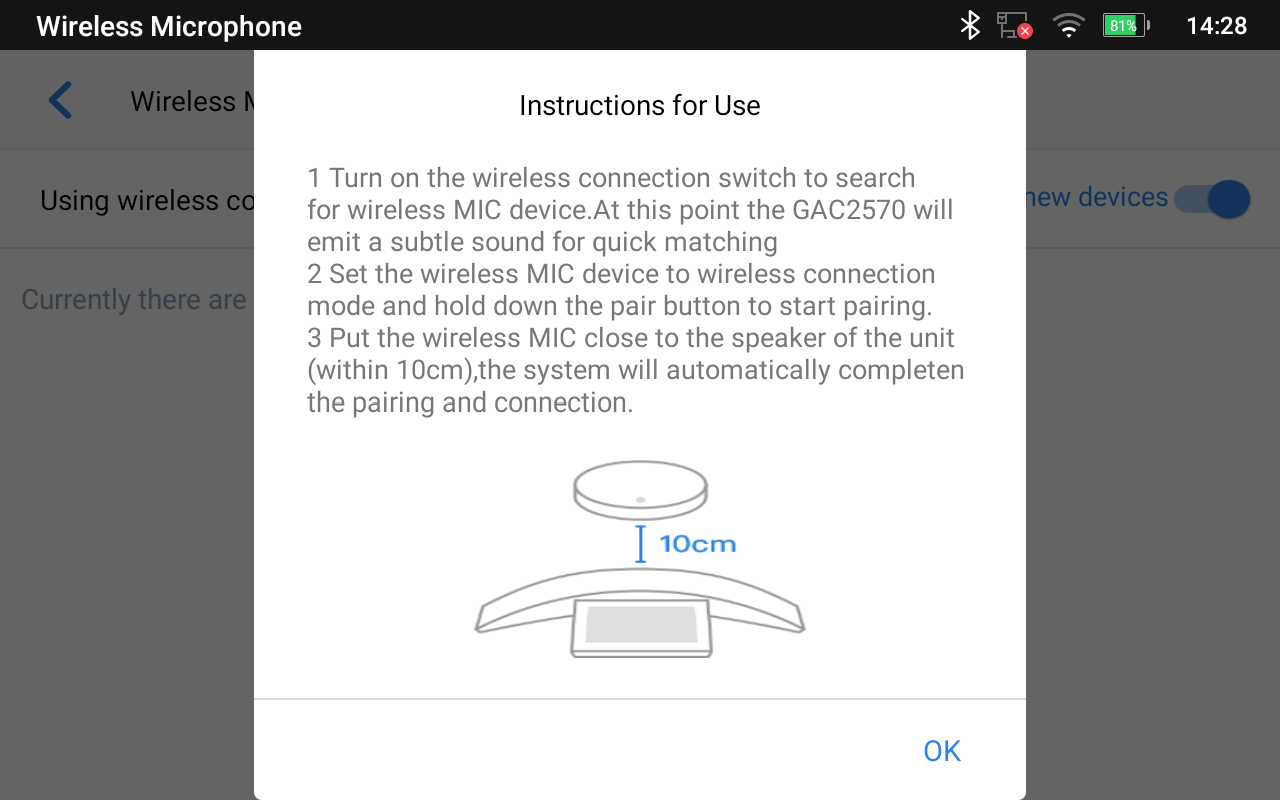
- Place the GMD1208 (up to 2) at a 10 cm distance from the GAC2570.
- Switch GMD1208 to the wireless connection mode and initiate pairing (hold down the pair button).
- The pairing process will be completed automatically.
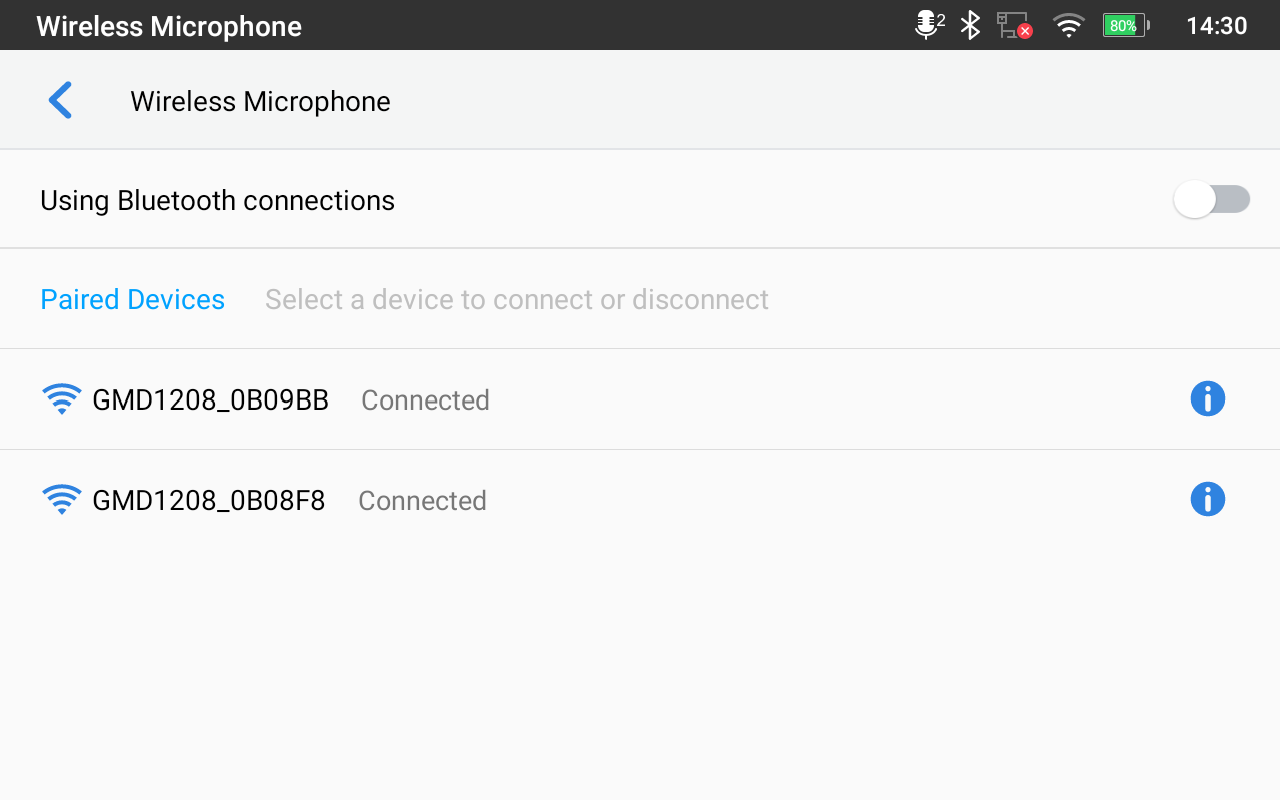
Diagram Representation
The following diagrams illustrate how the GMD1208 Microphone will be integrated with the GAC2570 Audio Conferencing System.
Using a single GMD1208
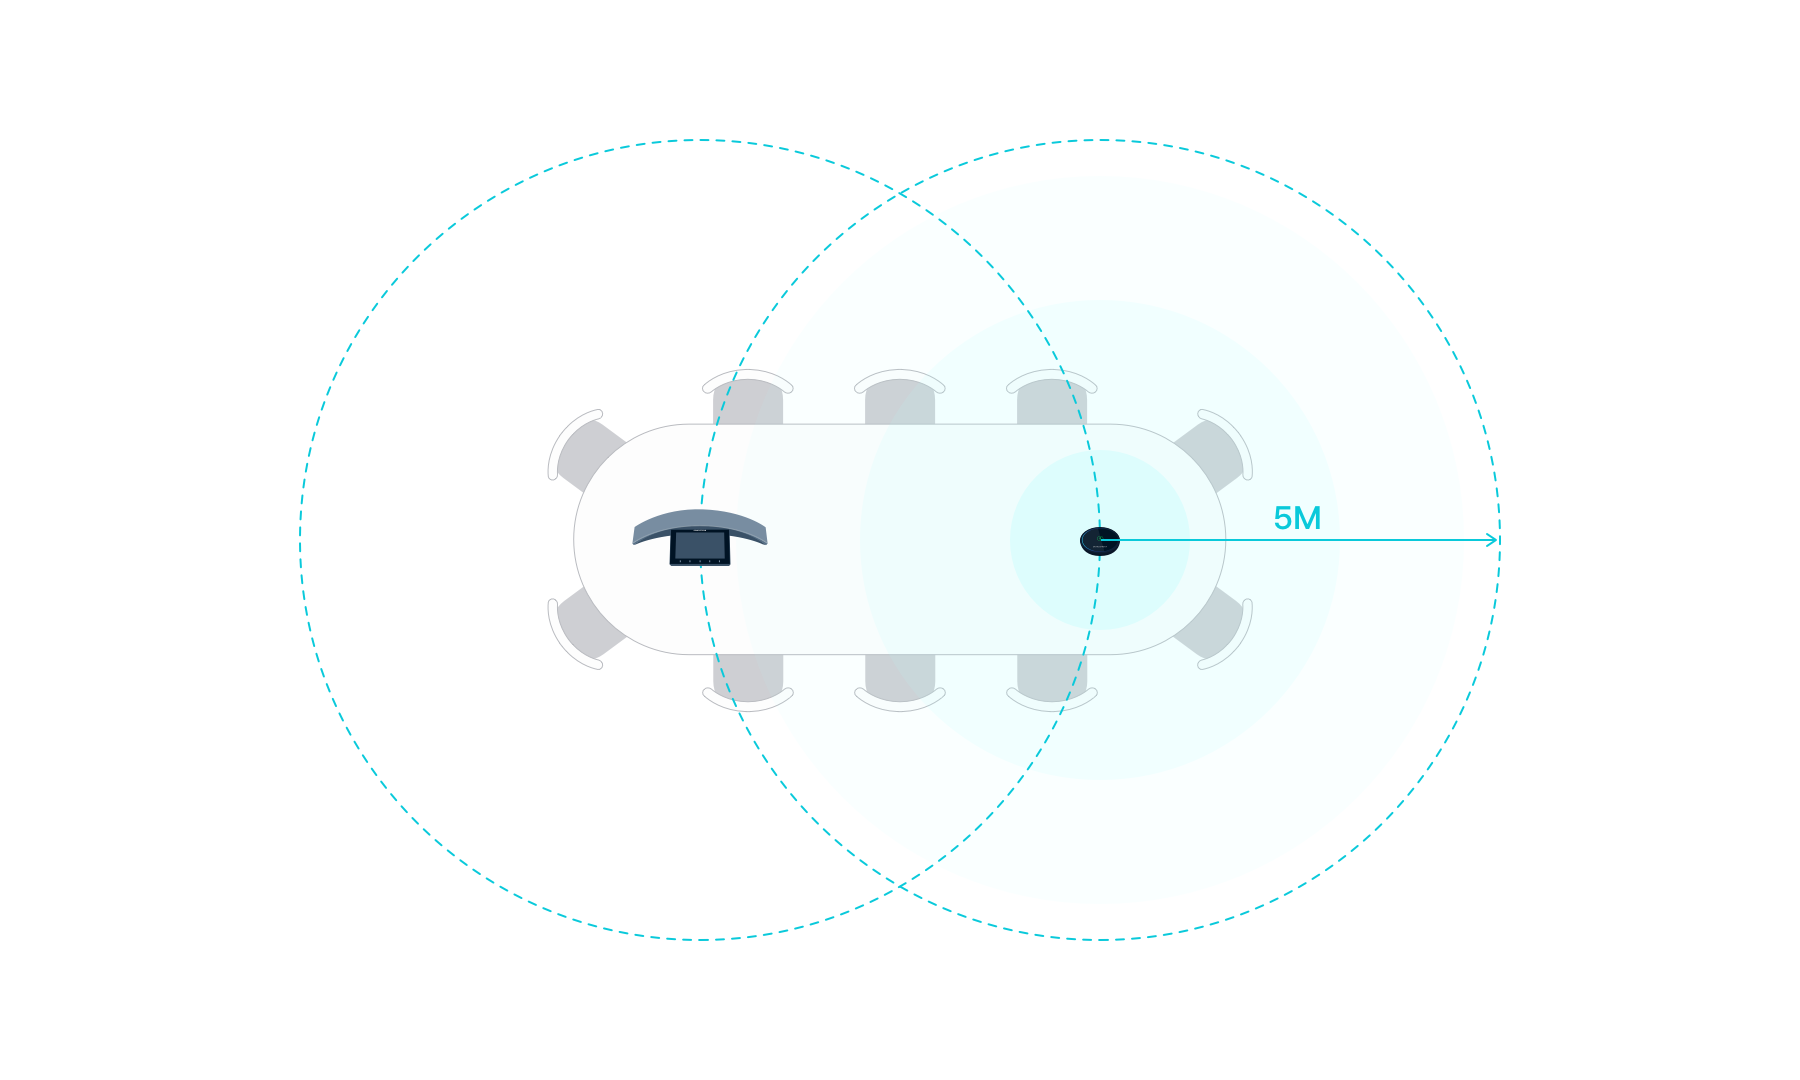
Using two GMD1208 connected to GAC2570

GAC2570 WEB GUI SETTINGS
The GAC2570 embedded Web server responds to HTTP/HTTPS GET/POST requests. Embedded HTML pages allow users to configure the application GAC2570 through a Web browser such as Microsoft’s IE, Mozilla, Firefox, Google Chrome, etc.
Status Page Definitions
Account Status
Account | 2 SIP accounts on the device. |
SIP User ID | SIP User ID for the account. |
SIP Server | URL or IP address, and port of the SIP server. |
Status | Registration status for the SIP account. |
Network Status
MAC Address | Global unique ID of device, in HEX format. The MAC address will be used for provisioning and can be found on the label coming with the original box and on the label located on the back of the device. |
NAT Type | Type of NAT connection used by the device. |
IPv4 | |
IPv4 Address Type | Configured address type: DHCP, Static IP or PPPoE. |
IPv4 Address | IP address of the device. |
Subnet Mask | Subnet mask of the device. |
Gateway | Default IPv4 gateway of the device. |
DNS Server 1 | DNS Server 1 of the device. |
DNS Server 2 | DNS Server 2 of the device. |
IPv6 | |
IPv6 Address Type | Configured address type: DHCP, Static IP or PPPoE. |
IPv6 Address | IPv6 address of the device. |
IPv6 Gateway | Default IPV6 gateway of the device. |
IPv6 DNS Server 1 | IPv6 DNS Server 1 of the device. |
IPv6 DNS Server 2 | IPv6 DNS Server 2 of the device. |
System Info
Product Model | Product model of the device: GAC2570. |
Hardware Revision | Hardware version number. |
Part Number | Product part number. |
Serial Number | Product’s serial number. |
System Version | Firmware version ID. This is the main software release version, which is used to identify the software system of the device. |
Boot Version | Booting code version. |
Kernel Version | The kernel version. |
AndroidTM Version | 10 |
CPE Version | Indicates CPE version. |
Device Individual Certificate | Device Individual Certificate for the device. |
System Up Time | System up time since the last reboot. |
Account Page Definitions
GAC2570 has 2 independent SIP accounts. Each SIP account has an individual configuration page.
General Settings
Account Registration | |
Account Active | Indicates whether the account is active. 1st account active by default. |
Account Name | Configures the name associated with each account. |
SIP Server | Specifies the URL or IP address, and port of the SIP server. This should be provided by the VoIP service provider (ITSP). |
SIP User ID | Configures user account information provided by your VoIP service provider (ITSP). It’s usually in the form of digits similar to a phone number or actually a phone number. |
SIP Authentication ID | Configures the SIP service subscriber’s Authenticate ID used for authentication. It can be identical to or different from the SIP User ID. |
SIP Authentication Password | Configures the account password required for the device to authenticate with the ITSP (SIP) server before the account can be registered. After saving, it will appear as hidden for security purpose. |
Display Name | Specifies the SIP server subscriber’s name (optional) that will be used for Caller ID display. The configured content will be included in the From, Contact, and P-Preferred-Identity headers of the SIP INVITE message. |
Show Account Name Only | Configures the subscriber’s name (optional) that will be used for Caller ID display. |
Tel URI | Indicates E.164 number in “From” header by adding “User=GAC2570” parameter or using “Tel:” in SIP packets. If the device has an assigned PSTN Number. Disabled: Will use “SIP User ID” information in the Request-Line and “From” header. User=phone: “User=GAC2570” parameter will be attached to the Request-Line and “From” header in the SIP request to indicate the E.164 number. If set to “Enable”. Enabled: “Tel:” will be used instead of “sip:” in the SIP request. Please consult your carrier before changing this parameter. Default is “Disabled”. |
Network Settings | |
Outbound Proxy | Configures the IP address or the domain name of the primary outbound proxy, media gateway, or session border controller. It’s used by the device for firewall or NAT penetration in different network environments. If a symmetric NAT is detected, STUN will not work and only an outbound proxy can provide a solution |
Secondary Outbound Proxy | Sets IP address or domain name of the secondary outbound proxy, media gateway, or session border controller. The device will try to connect the Secondary outbound proxy only if the primary outbound proxy fails. |
DNS Mode | Defines which DNS service will be used to lookup the IP address for SIP server’s hostname. There are three modes: A Record SRV NATPTR/SRV To locate the server by DNS SRV set this option to “SRV” or “NATPTR/SRV”. The default setting is “A Record”. |
Maximum Number of SIP Request Retries | Sets the maximum number of retries for the device to send requests to the server. In DNS SRV configuration, if the destination address does not respond, all request messages are resent to the same address according to the configured retry times. Valid range: 1-10. The default setting is 4. Note: This option is available when DNS Mode is set to SRV or NAPTR/SRV only. |
DNS SRV Failover Mode | The option will decide which IP is going to be used in sending subsequent SIP packets (ex: Register refresh requests) after the list of IPs for SIP server host is resolved with DNS SRV. Default (prefer server with lowest SRV priority): The device will always prefer to send SIP requests to the available server having the lowest priority, and in case it’s down it contacts the next one, but once the server having the lowest priority is UP again, the device will switch over to this one. Saved one until DNS TTL (Stay on responding IP until DNS timeout): In this mode, the device will resolve DNS SRV records and tries to send the request to the server having the lowest priority and if it doesn’t respond, it will move on to the next IP until one of the servers responds, once this happens the device will keep contacting this responding IP until DNS timeout (30 minutes) before starting over. Saved one until no response (Stay on responding IP until its failure): In this mode, the device will send SIP requests to the last responding IP, and it doesn’t failover/switchover to the next one until this responding server is down. Failback follows failback expiration timer: When selected, the device will send all SIP messages to the current failover SIP server or Outbound Proxy until the failback timer expire server is down. Note: This option is available when DNS Mode is set to SRV or NAPTR/SRV only. |
Register Before DNS SRV Fail-over | When this feature is enabled (default), the device will register using the outbound proxy when the SIP server is failed to get the registration. Note: This option is available when DNS Mode is set to SRV or NAPTR/SRV only. |
NAT Traversal | Specifies which NAT traversal mechanism will be enabled on the device. It can be selected from the dropdown list: NAT NO STUN Keep-alive Auto OpenVPN If the outbound proxy is configured and used, it can be set to “NAT NO”. If set to “STUN” and the STUN server is configured, the device will periodically send STUN messages to the STUN server to get the public IP address of its NAT environment and keep the NAT port open. STUN will not work if the NAT is symmetric type. If set to “Keep-alive”, the device will send the STUN packets to maintain the connection that is first established during the registration of the device. The “Keep-alive” packets will fool the NAT device into keeping the connection open and this allows the host server to send SIP requests directly to the registered GAC2570. If it needs to use OpenVPN to connect host server, it needs to set it to “VPN”. The default setting is “Keep-alive”. |
Proxy-Require | Adds the Proxy-Required header in the SIP message. It is used to indicate proxy-sensitive features that must be supported by the proxy. Do not configure this parameter unless this feature is supported on the SIP server. |
SIP Settings
SIP Basic Settings | |
SIP Registration | Allows the device to send SIP REGISTER messages to the proxy/server. The default setting is “Yes”. |
Unregister before New Registration | Controls whether to clear SIP user’s information by sending an un-register request to the proxy server. When set to “All”, the un-registration is performed by sending a REGISTER message with “Contact” header set to * and Expires=0 parameters to the SIP server when the device starts pre-registration after rebooting. If set to “Instance”, the device only cleans the current SIP user’s info by sending REGISTER message with “Contact” header set to concerned SIP user’s info and Expires=0 parameters to the SIP server. If set to “No”, the GAC2570 will not unregister the SIP account when rebooting. The default setting is “Instance”. |
Register Expiration (m) | Configures the time period (in minutes) in which the device refreshes its registration with the specified registrar. The default setting is 60. The maximum value is 64800 (about 45 days). |
Subscribe Expiration (m) | Specifies the frequency (in minutes) in which the GAC2570 refreshes its subscription with the specified register. The maximum value is 64800 (about 45 days). |
Re-register before Expiration (s) | Specifies the time frequency (in seconds) that the device sends re-registration request before the Register Expiration. The default setting is 0. The range is from 0 to 64,800. |
Registration Retry Wait Time (s) | Configures the time period (in seconds) in which the device will retry the registration process in the event that is failed. The default setting is 20. The maximum value is 3600 (1 hour). |
Add Auth Header On Re-register | Configure if the SIP account needs to add Auth header in RE-REGISTER. If the option is checked, device will always add authentication header in REGISTER. If the option is unchecked, device will only send authentication for the first REGISTER. |
Enable SIP OPTIONS Keep Alive | Enables SIP OPTIONS to track account registration status so the device will send periodic OPTIONS message to server to track the connection status with the server. The default setting is “No”. |
SIP OPTIONS Keep Alive Interval (s) | Configures the time interval when the device sends OPTIONS message to SIP server. The default value is 30 seconds, in order to send an OPTIONS message to the server every 30 seconds. The default range is 1-64800. |
SIP OPTIONS Keep Alive Maximum Tries | Configures the maximum times of sending OPTIONS message consistently from the device to server. GAC2570 will keep sending OPTIONS messages until it receives response from SIP server. The default setting is “3”, which means when the device sends OPTIONS message for 3 times, and SIP server does not respond this message, the device will send RE-REGISTER message to register again. The valid range is 3-10. |
Use Privacy Header | Controls whether the Privacy header will present in the SIP INVITE message or not, whether the header contains the caller info. Do not use the privacy header fields by default in Huawei IMS mode. If set to “Yes”, the Privacy Header will always show in INVITE. If set to “No”, the Privacy Header will not show in INVITE. |
Use P-Preferred-Identity Header | Controls whether the P-Preferred-Identity header will present in the SIP INVITE message or not, whether the header contains the caller info. Do not use the P-Preferred-Identity header fields by default in Huawei IMS mode. If set to “Yes”, the P-Preferred-Identity Header will always show in INVITE. If set to “No”, the P-Preferred-Identity Header will not show in INVITE. |
Use P-Access-Network-Info Header | Enables / disables the use of P-Access-Network-Info header in SIP request. When disabled, the SIP message sent from the GAC2570 will not include the selected header. Default setting is “Yes”. |
Use P-Emergency-Info Header | Enables / disables the use of P-Emergency-Info header in SIP request. When disabled, the SIP message sent from the GAC2570 will not include the selected header. Default setting is “Yes” |
Use Mac Header | If Yes except REGISTER, the sip message for register or unregister will contains MAC address in the header, and all the outgoing SIP messages except REGISTER message will attach the MAC address to the User-Agent header; If Yes to ALL SIP, the sip message for register or unregister will contains MAC address in the header, and all the outgoing SIP message including REGISTER will attach the MAC address to the User-Agent header; If No, neither will the MAC header be included in the register or unregister message nor the MAC address be attached to the User-Agent header for any outgoing SIP messages. The default setting is “No”. |
Add MAC In User-Agent | Configures whether to add MAC address in User-Agent header. If set to “No”, all outgoing SIP messages will not attach MAC address to the User-Agent header; If set to “Yes except REGISTER”, all outgoing SIP messages except REGISTER message will attach the MAC address to the User-Agent header; If set to “Yes to All SIP”, all outgoing SIP messages including REGISTER message will attach MAC address to the User-Agent header. |
SIP Transport | Determines which network protocol will be used to transport the SIP message. It can be selected from TCP/UDP/TLS. The default setting is “UDP”. |
Local SIP Port | Determines the local SIP port used to listen and transmit. The default setting is 5060 for Account 1, and 5062 for Account 2. The valid range is from 5 to 65535. |
SIP URI Scheme When Using TLS | Defines which SIP header, “sip” or “sips”, will be used if TLS is selected for SIP Transport. The default setting is “sip”. |
Use Actual Ephemeral Port in Contact with TCP/TLS | Determines the port information in the Via header and Contact header of SIP message when the device uses TCP or TLS. If set to No, these port numbers will use the permanent listening port on the device. Otherwise, they will use the ephemeral port for the particular connection. The default setting is “No”. |
Support SIP Instance ID | Determines if the device will send SIP Instance ID. The SIP instance ID is used to uniquely identify the device. If set to “Yes”, the SIP Register message Contact header will include +sip.instance tag. Default is “Yes”. |
SIP T1 Timeout | Defines an estimate of the round-trip time of transactions between a client and server. If no response is received in T1, the figure will increase to 2*T1 and then 4*T1. The request re-transmit retries would continue until a maximum amount of time defined by T2. The default setting is 0.5 sec. |
SIP T2 Interval | Specifies the maximum retransmit time of any SIP request messages (excluding the SIP INVITE message). The re-transmitting and doubling of T1 continue until it reaches the T2 value. The default setting is 4 sec. |
SIP Timer D Interval | Defines the amount of time that the server transaction can remain when an unreliable response (3xx-6xx) is received. The valid value is 0-64 seconds. The default value is 0. |
Remove OBP from Route | Configures the device to remove the outbound proxy URI from the Route header. This is used for the SIP Extension to notify the SIP server that the device is behind a NAT/Firewall. If it is set to “Yes”, it will remove the Route header from SIP requests. The default setting is “No”. |
Enable 100rel | Actives PRACK (Provisional Acknowledgment) method. PRACK improves the network reliability by adding an acknowledgment system to the provisional Responses (1xx). If it is set to “Yes”, the device will respond to the 1xx response from the remote party. The default is “No”. |
Session Timer | |
Enable Session Timer | Allows the device to use the session timer, when set to “Yes”, it will be added in the SIP INVITE message to notify the server. |
Session Expiration (s) | Configures the device’s SIP session timer. It enables SIP sessions to be periodically “refreshed” via a SIP request (UPDATE, or re-INVITE). If there is no refresh via an UPDATE or re-INVITE message, the session will be terminated once the session interval expires. Session Expiration is the time (in seconds) where the session is considered timed out, provided no successful session refresh transaction occurs beforehand. The default setting is 180. The valid range is from 90 to 64800. |
Min-SE (s) | Determines the minimum session expiration timer (in seconds) if the device act as a timer refresher. Default is 90. The valid range is from 90 to 64800. |
UAC Specify Refresher | Sets which party will refresh the active session if the device makes outbound calls. If it is set to “UAC” and the remote party does not support the Refresher feature, the device will refresh the active session. If it is set to “UAS”, the remote party will refresh it. If it is set to “Omit”, the header will be omitted so that it can be selected by the negotiation mechanism. The default setting is “Omit”. |
UAS Specify Refresher | Specifies which party will refresh the active session if the device receives inbound calls. If it is set to “UAC”, the remote party will refresh the active session. If it is set to “UAS” and the remote party does not support the refresh feature, the device will refresh it. The default setting is “UAC”. |
Caller Request Timer | Sets the caller party to act as a refresher by force. If set to “Yes” and both parties support session timers, the device will enable the session timer feature when it makes outbound calls. The SIP INVITE will include the content “refresher=uac”. The default setting is “No”. |
Callee Request Timer | Sets the callee party to act as a refresher by force. If set to “Yes” and both parties support session timers, the device will enable the session timer feature when it receives inbound calls. The SIP 200 OK will include the content “refresher=uas”. The default setting is “No”. |
Force Timer | Configures the session timer feature on the device by force. If it is set to “Yes”, the device will use the session timer even if the remote party does not support this feature. If set to “No”, the device will enable the session timer only when the remote party supports this feature. To turn off the session timer, select “No”. The default setting is “No”. |
Force INVITE | Sets the SIP message type to refresh the session. If it is set to “Yes”, the Session Timer will be refreshed by using the SIP INVITE message. Otherwise, the device will use the SIP UPDATE or SIP OPTIONS message. Default is “No”. |
Codec Settings
Preferred Vocoder | |
Preferred Vocoder | Lists the available and enabled Audio codecs for this account. Users can enable the specific audio codecs by moving them to the selected box and setting them with a priority order from top to bottom. This configuration will be included with the same preference order in the SIP SDP message. |
Codec Negotiation Priority | Configures the device to use which codec sequence to negotiate as the callee. When set to “Caller”, the device negotiates by SDP codec sequence from received SIP Invite; When set to “Callee”, the device negotiates by audio codec sequence on the device. The default setting is “Callee”. |
Use First Matching Vocoder in 200OK SDP | Configures the device to use the first matching codec in the 200OK message. The default setting is not checked. |
iLBC Frame Size | Sets the iLBC (Internet Low Bitrate Codec) frame size if ILBC is used. Users can select it from 20ms or 30ms. The default setting is 30ms. |
G726-32 ITU Payload Type | Configures G726-32 payload type for ITU packing mode. Payload 2 is static and payload dynamic is dynamic. The default setting is “2”. |
G726-32 Dynamic Payload Type | Specifies the G726-32 payload type, and the valid range is 96 to 126. The default setting is “126”. |
Opus Payload Type | Defines the desired value (96-126) for the payload type of the Opus codec. The default value is 123. |
DTMF | Specifies the mechanism to transmit DTMF (Dual Tone Multi-Frequency) signals. There are 3 supported modes: in audio, RFC2833, or SIP INFO. • In audio, which means DTMF is combined in the audio signal (not very reliable with low-bit-rate codecs); • RFC2833, which means to specify DTMF with RTP packet. Users could know the packet is DTMF in the RTP header as well as the type of DTMF. • SIP INFO, which uses SIP INFO to carry DTMF. The defect of this mode is that it’s easy to cause desynchronized of DTMF and media packet if the SIP and RTP messages are required to be transmitted respectively. The default setting is “RFC2833”. |
DTMF Payload Type | Configures the RTP payload type that indicates the transmitted packet contains DTMF digits. Valid range is from 96 to 127. Default value is 101. |
Enable Audio RED with FEC | If set to “Yes”, FEC will be enabled for audio call. The default setting is “No”. |
Audio FEC Payload Type | Configures audio FEC payload type. The valid range is from 96 to 127. The default value is 121. |
Audio RED Payload Type | Configures audio RED payload type. The valid range is from 96 to 127. The default value is 124. |
Silence Suppression | Enables the silence suppression/VAD feature. If it is set to “Yes”, when silence is detected, a small quantity of VAD packets (instead of audio packets) will be sent during the period of no talking. If set to “No”, this feature is disabled. The default setting is “No”. |
Voice Frames Per TX | Configures the number of voice frames transmitted per packet. When configuring this, it should be noted that the “ptime” value for the SDP will change with different configurations here. This value is related to the codec used and the actual frames transmitted during the in-payload call. For end users, it is recommended to use the default setting, as incorrect settings may influence the audio quality. The default setting is 2. |
RTP Settings | |
SRTP Mode | Sets if the device will enable the SRTP (Secured RTP) mode. It can be selected from dropdown list: Disable Enabled but not forced Enabled and forced SRTP uses encryption and authentication to minimize the risk of denial of service. (DoS). If the server allows to use both RTP and SRTP, it should be configured as “Enabled but not forced”. The default setting is “Disable”. |
SRTP Key Length | Configures all the AES (Advanced Encryption Standard) key sizes within SRTP. It can be selected from the dropdown list: AES128&256 bit, AES 128 bit or AES 256 bit If it is set to “AES 128&256 bit”, the device will provide both AES 128 and 256 cipher suites for SRTP. If set to “AES 128 bit”, it only provides 128-bit cipher suite; if set to “AES 256 bit”, it only provides 256-bit cipher suite. The default setting is “AES128&256 bit”. |
Enable SRTP Key Lifetime | Defines the SRTP key lifetime. When this option is set to be enabled, during the SRTP call, the SRTP key will be valid within 231 SIP packets, and GAC2570 will renew the SRTP key after this limitation. The default setting is “Yes”. |
RTCP Destination | Configures a remote server URI where RTCP messages will be sent to during an active call. |
Symmetric RTP | Configures if the device enables the symmetric RTP mechanism. If it is set to “Yes”, the device will use the same socket/port for sending and receiving the RTP messages. The default setting is “No”. |
RTP IP Filter | Receives the RTP packets from the specified IP address and Port by the communication protocol. If it is set to “IP Only”, the device only receives the RTP packets from the specified IP address based on the communication protocol; If it is set to “IP and Port”, the device will receive the RTP packets from the specified IP address with the specified port based on the communication protocol. The default setting is “Disable”. |
RTP Timeout (s) | Configures the RTP timeout of the GAC2570. If the GAC2570 does not receive the RTP packet within the specified RTP time, the call will be automatically disconnected. The default range is 0-600. If set to 0, the GAC2570 will not hang up the call automatically. |
Call Settings
Call Features | |
Auto-answer | If set to “Yes”, the GAC2570 will automatically answer incoming calls. If set to “Intercom/Paging Only”, it will answer the call based on the SIP Call-Info or Alert-Info header sent from the server/proxy. The Default is No. |
Play Warning Tone for Auto Answer Intercom | When this option is enabled, the device will play a warning tone When auto-answering the intercom. The default setting is “yes”. |
Send Anonymous | If enabled, the “From” header in outgoing INVITE messages will be set to anonymous, blocking the Caller ID to be displayed. Default is No. |
Reject Anonymous Calls | If set to “Yes”, anonymous calls will be rejected. Default is No. |
Call Log | Categorizes the call logs saved for this account. You can log all calls, disable call log, log all calls except missed calls, disable call log, or don’t prompt missed calls. If it is set to “Do Not Show Prompt for Missed Call”, the GAC2570 will log the missed call log, but there is no prompt to indicate the missed calls on GAC2570 LCD. The default setting is “Log All”. |
Enable Call Features | If set to “Yes”, call features (including call forwarding, DND and etc.) will be supported locally instead of using the feature code supported on the SIP server/proxy. Default is No. |
Mute On Answer Intercom Call | When enabled, GAC2570 will mute the incoming intercom call by Call-Info/Alert-Info. Default is No. |
Transfer On 3-Way Conference Hang up | Defines whether or not the local conference call is transferred to the other parties if the initiator of the conference hangs up. Default is No. |
Use # As Dial Key | Allows users to configure the “#” key as the “Send” key. If set to “Yes”, the “#” key will immediately dial out the input digits. In this case, this key is equivalent to the “Send” key. If set to “No”, the “#” key is treated as part of the dialed string. Default is Yes. |
Use # As Redial Key | Allows users to configure the “#” key as the “Redial” key. If set to “Yes”, the “#” key will immediately redial the last call. In this case, this key is equivalent to the “Redial” key. If set to “No”, the “#” key is treated as part of the dialed string. Default is No. |
DND Call Feature On | Configures DND feature code to turn on DND. |
DND Call Feature Off | Configures DND feature code to turn off DND. |
No Key Entry Timeout (s) | This is used to set the time length before dialing the entered digits automatically when no key operation is detected. The default setting is 4 seconds. The valid range is 0-15 seconds. |
Ring Timeout (s) | Defines the timeout (in seconds) for the rings on no answer. |
RFC2543 Hold | If yes, c=0.0.0.0 will be used in INVITE SDP for hold. Default is Yes. |
Dial Plan | |
Dial Plan Prefix | This parameter can be configured to define the prefix added to each dialed number. |
Disable Dial Plan | Enables/disables the Dial plan mechanism for different cases. If the specific case is checked, the Dial plan mechanism will be disabled. Dial Page: It controls the pattern of dialing numbers from the call page. Contact: It controls the pattern of dialing numbers from local, LDAP, and Broadsoft contacts. Incoming Call History: It controls the pattern of dialing numbers from inbound call logs. Outgoing Call History: It controls the pattern of dialing numbers from outbound call logs. Programmable Key & Click2Dial: It controls the pattern of dialing numbers from MPK keys or using Click2Dial. |
Dial Plan | Configures the dial plan to establish the expected number and pattern of digits for a telephone number. This parameter configures the allowed dial plan for the device. Dial Plan Rules: 1. Accepted Digits: 1,2,3,4,5,6,7,8,9,0 , *, #, A,a,B,b,C,c,D,d,+ 2. Grammar: a) xx – any 2-digit numbers from 0-9 b) xx+ – at least 2-digit numbers from 0-9 c) xx. – at least 1-digit number from 0-9 d) xx? – 1-digit or 2-digit numbers from 0-9 e) ^ – exclude f) T – dialing delay when matched g) , – ring the second dial tone h) | – the OR operand i) + – add + to the dialing number j) [3-5] ¨C any digit of 3, 4, or 5 k) [147] – any digit of 1, 4, or 7 l) <2=011> – replace digit 2 with 011 when dialing Example 1: {[369]11 | 1617xxxxxxx} Allow 311, 611, and 911 or any 10-digit numbers with leading digits 1617 Example 2: {^1900x+ | <=1617>xxxxxxx} Block any number of leading digits 1900 or add prefix 1617 for any dialed 7-digit numbers Example 3: {1xxx[2-9]xxxxxx | <2=011>x+} Allow any number with leading digit 1 followed by a 3-digit number, followed by any number between 2 and 9, followed by any 7-digit number OR allow any length of numbers with leading digit 2, replacing the 2 with 011 when dialed. 1. Default: Outgoing – { x+ | +x+ | *x+ | *xx*x+ } Allow any number of digits, OR any number with a leading +, OR any number with a leading *, OR any number with a leading * followed by a 2-digit number and a *. Example of a simple dial plan used in a Home/Office in the US: {^1900x. | <=1617>[2-9]xxxxxx | 1[2-9]xx[2-9]xxxxxx | 011[2-9]x. | [3469]11 } Explanation of example rule (reading from left to right): ^1900x. – prevents dialing any number started with 1900 <=1617>[2-9]xxxxxx – allow dialing to local area code (617) numbers by dialing 7 numbers and 1617 area code will be added automatically 1[2-9]xx[2-9]xxxxxx |- allow dialing to any US/Canada Number with 11 digits length 011[2-9]x. – allow international calls starting with 011 [3469]11 – allow dialing special and emergency numbers 311, 411, 611 and 911 Note: In some cases, where the user wishes to dial strings such as *123 to activate voice mail or other applications provided by their service provider, the * should be predefined inside the dial plan feature. An example dial plan will be: {*x+} which allows the user to dial * followed by any length of numbers. |
Caller IDs | |
Caller ID Display | When set to “Automatic”, the device will look for the caller ID in the order of P-Asserted Identity Header, Remote-Party-ID Header, and From Header in the incoming SIP INVITE. When set to “Disabled”, all incoming calls are displayed with “Unavailable”. When set to “From Header”, use the Caller ID in From Header. When set to “PAI Header”, use the Caller ID in PAI Header. Default is Automatic. |
Callee ID Display | If set to “Auto”, if the Privacy header is carried in 180 Ringing and the value is “id”, “Anonymous” will be displayed on the GAC2570; otherwise, the GAC2570 will update the callee ID in the order of P-Asserted Identity Header, Remote-Party-ID Header, and To Header. If set to “Disabled”, the callee ID will be displayed as “Unavailable”. If set to “To Header”, the callee ID will not be updated and displayed as To Header. Default is Auto. |
Ringtones | |
Account Ring Tone | Allows users to configure the ringtone for the account. Users can choose different ringtones from the dropdown list. |
Ignore Alert-Info Header | When enabled, the Device will ignore the Alert-Info header and play the configured default ringtone. Default is No. |
Match Incoming Caller ID | Set the ringing rule for the incoming calls. There are 3 spaces on the left to set the ringing rule. For example: 139x+ means that the ringing bell corresponding to the incoming call beginning with 139 is the ringtone on the right. |
Distinctive Ring Tone | This field specifies the distinctive ringtone for the matching incoming caller ID on the left. Users can choose from different ringtones from the dropdown menu. |
Advanced Settings
Security Settings | |
Check Domain Certificates | Sets the device to check the domain certificates if TLS/TCP is used for SIP Transport. The default setting is “No”. |
Enabled Authentication Server Validation | Validates CA certification when TLS/TCP is configured for SIP. |
SIP CA Certificate | Select the CA certificate for server verification. Press “Manage” to add / delete “Custom CA“ and list “Phone CA”. |
SIP User Certificate | Select the user certificate to access the SIP TLS authentication content required by some specific servers. If the private key is included, upload it with the user certificate. Press “Manage” to add/delete “User Certificates”. |
Validate Incoming SIP Messages | Specifies if the device will check the incoming SIP messages caller ID and CSeq headers. If the message does not include the headers, it will be rejected. The default setting is “No”. |
Only Accept SIP Requests from Known Servers | Answers the SIP request from saved servers when set to “Yes”, only the SIP requests from saved servers will be accepted; and the SIP requests from the unregistered server will be rejected. The default setting is “No”. |
Check SIP User ID for Incoming INVITE | Configures the device to check the SIP User ID in the Request URI of the SIP INVITE message from the remote party. If it doesn’t match the device’s SIP User ID, the call will be rejected. The default setting is “No”. |
Allow SIP Reset | It is used to configure whether to allow the SIP Notification message to perform a factory reset on the device. The default setting is “No”. |
Authenticate Incoming INVITE | Configures the device to authenticate the SIP INVITE message from the remote party. If set to “Yes”, the device will challenge the incoming INVITE for authentication with SIP 401 Unauthorized response. Default is “No”. |
SIP Realm used for Challenge INVITE & NOTIFY | Configure this item to validate incoming INVITE, but you must enable authenticate incoming INVITE first to make it take effect. You can verify the NOTIFY information for the provision, including check-sync, resync, and reboot, but only when SIP NOTIFY authentication is enabled first to make it take effect. |
MOH | |
Upload Local MOH Audio File (Music on Hold) | Loads the MOH file to the device. Click on the “Browse” button to upload the music file from the local PC. The MOH audio file has to be in .wav or .mp3 format. Note: Please be patient while the audio file is being uploaded. It could take more than 3 minutes to finish the uploading especially since the file size is large. The button will show as “Processing” during the uploading. Once done, it will show as “Browse” again. Click on “Save” at the bottom of the web page and “Apply” at the top of the web page to save the change. |
Enable Local MOH | Plays a local MOH file if the call is being held by the device. Default is “No”. |
Advanced Features | |
Virtual Account Group | It is used to set to categorize accounts in server mode groups, the accounts in the same group will be combined as one and the account widget will display the Caller ID in the account with the lowest ID. The device can answer any incoming calls to each account in groups. If a user makes an outbound call, the device will use the lowest ID account by default. If the account fails or SIP INVITE message is timeout, the device will failover to the next account in the group with a higher account ID. If all the accounts are not available in the group, the device will traverse all the accounts in the group and notify the users the session is failed. Default is “Default”. |
Special Feature | Configures GAC2570’s settings to meet different vendors’ server requirements. Users can choose from Standard, NEC, Metaswitch, WorldStone, BroadSoft, China Mobile, ZTE IMS, Mobotix, ZTE NGN, or Huawei IMS depending on the server type. Default is Standard. |
Feature Key Synchronization | This feature is used for BroadSoft or Metaswitch call feature synchronization. When set to “BroadSoft/Metaswitch”, DND and Call Forward features can be synchronized with the server. The local call forward function is disabled when this feature is active. Default is No. |
Allow Sync Phonebook Via SIP Notify | If set to “Yes”, the GAC2570 will allow SIP NOTIFY messages to synchronize local Phonebook. |
Phone Settings Page Definitions
General Settings
Basic Settings | |
Local RTP Port | Defines the local RTP port pair used to listen and transmit. The default value is 50040. The valid range is from 50040 to 65000. |
Use Random Port | Forces the device to use random ports for both SIP and RTP messages. This is usually necessary when multiple GAC2570s are behind the same full cone NAT. The default setting is “No”. Note: This parameter must be set to “No” for Direct IP Calling to work. |
Enable In-call DTMF Display | If enabled, the entered DTMF digit will be displayed on the ongoing call screen. Default is Yes. |
Enable LDAP Timeout Auto-Search | Configures whether to display the matched content automatically in LDAP search when timeout. If set to “No”, users need to click the Search button to search the matched contacts mentioned above. Default is Yes. |
Keep-alive Interval (s) | Specifies how the device will send a Binding Request packet to the SIP server in order to keep the “ping hole” on the NAT router to open. The default setting is 20 seconds. The valid range is from 10 to 160. |
STUN Server | Configures the URI of STUN (Simple Traversal of UDP for NAT) server. The device will send STUN Binding Request packet to the STUN server to learn the public IP address of its network. Only non-symmetric NAT routers work with STUN. The default setting is “stun.ipvideotalk.com”. |
Use NAT IP | Configures the IP address for the Contact header and Connection Information in the SIP/SDP message. It should ONLY be used if it’s required by your ITSP. By default, the box is blank. |
UAC Settings | |
UAC Audio Mode | Select the audio parameters to be used in UAC mode. It only takes effect in UAC mode. Select “Normal”, it will be compatible with most scenes. Select “Zoom Room PC”, it will be fully adapted to Zoom meeting on the PC. Select “Microsoft Teams PC”, it will be fully adapted to Microsoft Teams meetings on the PC. |
Call Settings
Enable Direct IP Call Mode | Configures enable/disable the direct IP call mode of the GAC2570. If set to “Yes”, the feature of direct IP call will be enabled. |
Enable Paging Call Mode | Configures enable/disable the paging call mode of the GAC2570. If set to “Yes”, the feature of paging call will be enabled. |
Enable Call Waiting | Enables call waiting feature. If it is disabled, the GAC2570 will reject the second incoming call during an active session without the user’s knowledge. But this missed call record will be saved to remind users. The default setting is checked (enabled). |
Enable Call Waiting Tone | Sets the GAC2570 to play the call waiting tone along with an LED indicator if there is another incoming call. If unchecked, only LED will indicate another incoming call. The default setting is checked (enabled). |
Enable DND Reminder Ring | Enables the DND reminder ring. If set to “Yes”, the ring splash that indicates an incoming call when DND is enabled will be played. The default setting is “Yes” |
Auto Mute on Entry | Configures whether to mute the call on entry automatically. If set to “Disable“, then do not use the auto-mute function. If set to “Auto Mute on Outgoing Call”, then mute automatically when the other party answers the outgoing call. If set to “Auto Mute on Incoming Call”, then mute automatically when answering the incoming call; If set to “Mute on Incoming & Outgoing Call”, then mute automatically when the call gets through. Note: This function only takes effect when the GAC2570 is from the idle status to the call status. Users could click the Mute button on the call interface to cancel the current mute status. |
Virtual Account Group Avaya Mode | If set to “Yes”, when processing SIP Register 3XX Response, it will parse the address site in 3XX, modify the account server info “SIP Server: port” & “SIP Transaction” in virtual account group and initiate registration again. This feature is designed for the Avaya customers. |
Number Of Concurrent Registration For Virtual Account Group | Configures the number of concurrent accounts in the virtual account group. If the total amount of virtual group accounts is “N”, and the number of accounts the user sets is “n”, then the GAC2570 will register the first n accounts; If registration for all of these accounts fails, then register the last N-n accounts. |
Filter Characters | Sets the characters for the filter when dialing out numbers. Users could set up multiple characters. For example, if set to “[()-]”, when dialing (0571)-8800-8888, the character “()-“ will be automatically filtered, and dial 057188008888 directly. |
Escape # as %23 in SIP URI | Determines which characters will be included in the SIP INVITE URI if end-users input #. If it is set to “Yes”, the GAC2570 system will replace the # by %23. Otherwise, it will include # in the SIP INVITE message. The default setting is “Yes”. |
Default Phone APP | Configures the Phone APP for the device. The default setting is Phone of Grandstream, but if you develop a new Phone application using SDK, you can choose the new one to replace the original. The configuration of “Quickly Launch 3rd Party APP” is not available in the default Phone application changes. The default setting is “Phone”. |
Quickly Launch Specified APP | Selects the specified application that launches quickly by clicking the Dial. Once selected, the package name and activity of the specified application will be displayed below. When a user clicks the Dial application, it will automatically enter the configured application interface. The default setting is None, which means using the GS phone application. |
Record Mode | Configures GAC2570 recording mode. If set to “Record locally“, then the GAC2570 will use the local tape recorder for call recording, and the audio file will be saved in accordance with the tape recorder setup. If set to “Record on PortaOne“, then will send the specified SIP messages to the corresponding server. If set to “Record on UCM“, then will send the recording feature code to the UCM server to request for recording, and the recording function will be executed by the server. If set to “Record on Broadsoft“, then will send the recording feature code to the Broadsoft server to request for recording, and the recording function will be executed by the server. If set to “Disable”, recording functionality will be disabled during calls. |
Enable Auto Record When Call Established | Configures whether to auto-record a call. If enabled, all recordings will start automatically after the call is established. The default setting is No. |
Rejected Call Notification | Specify whether to enable rejected call notification. Once enabled, a missed call will prompt on LCD when rejecting the incoming call. |
Return Code When Refusing Incoming Call | When refusing the incoming call, the GAC2570 will send the selected type of SIP message of the call. Available options are: Busy(486) Temporarily Unavailable(480) Not Found(404) Decline(603) Default is Busy(486). |
Return Code When Enable DND | When DND is enabled, the GAC2570 will send the selected type of SIP Message in reply to an incoming call (INVITE). Busy(486) Temporarily Unavailable(480) Not Found(404) Decline(603) Default is Busy(486). |
Ring Tone
Auto Config CPT by Region | Configures whether to choose Call Progress Tone automatically by region. If set to “Yes”, the device will configure CPT (Call Progress Tone) according to different regions automatically. If set to “No”, you can manually configure CPT parameters. The default setting is “No”. |
Call Progress Tones: Dial Tone Second Dial Tone Ringback Tone Busy Tone Reorder Tone Confirmation Tone Call Waiting Tone | Configures tone frequencies according to user preference. By default, the tones are set to North American frequencies. Frequencies should be configured with known values to avoid uncomfortable high pitch sounds. Syntax: f1=val,f2=val [,c=on1/off1[-on2/off2[-on3/off3]]]; (Frequencies are in Hz and cadence on and off are in 10ms) ON is the period of ringing (“On time” in “ms”) while OFF is the period of silence. In order to set a continuous ring, OFF should be zero. Otherwise, it will ring ON ms and a pause of OFF ms and then repeats the pattern. Please refer to the document below to determine your local call progress tones: https://www.itu.int/ITU-T/inr/forms/files/tones-0203.pdf |
Call-Waiting Tone Gain | Adjusts the call waiting tone volume. Users can select “Low”, “Medium” or “High”. The default setting is “Low”. |
Default Ring Cadence | Defines the ring cadence for the device. The default setting is c=2000/4000. |
Multicast Paging
Multicast Paging | |
Paging Barge | Sets the threshold of paging calls. If the paging call’s priority is higher than the threshold, the existing call will be held and the paging call will be answered. Otherwise, the existing call does not be affected. If it is set to Disable (Default), any paging call will not be answered. |
Paging Priority Active | Determines if a new paging call whose priority is higher than the existing paging call will be answered. The default is disabled. Check to enabled. |
Multicast Paging Codec | Selects the codec type for the multicast paging call. This list includes PCMU, PCMA, G726-32, G722, and G729A/B, iLBC, and Opus. |
Multicast Listening | |
Priority Listening Address Label | Configures the IP address and port number for monitoring multicast paging call. Reboot the device to make changes take effect. The valid IP address range is from 224.0.0.0 to 239.255.255.255. Users may also fill the label for each listening address corresponding to priority. |
Network Settings Page Definitions
Ethernet Settings
IP Mode | Selects which Internet protocol to use. When both IPv4 and IPv6 are enabled, the phone attempts to use the preferred protocol first and switches to the other choice if it fails. Available options are: Both, prefer IPv4. Both, prefer IPv6 IPv4 Only IPv6 Only Default is “IPv4 Only”. |
IPv4 | |
IPv4 Address Type | Allows users to configure the appropriate network settings on the device. Users could select “DHCP”, “Static IP” or “PPPoE”. DHCP: Obtain the IP address via one DHCP server in the LAN. All domain values about static IP/PPPoE are unavailable (although some domain values have been saved in the flash.) PPPoE: Configures PPPoE account/password. Obtain the IP address from the PPPoE server via dialing. (When “Different Networks for Data and VoIP Calls” is set to Yes; it will be available for “Network Configuration of Data” only). Static IP: Manually configures IP Address, Subnet Mask, Default Router’s IP Address, DNS Server 1, and DNS Server 2. By default, it is set to “DHCP”. |
DHCP VLAN Override | DHCP Option 132 defines VLAN ID and DHCP Option 133 defines priority tag ID. GAC2570 supports DHCP VLAN override via DHCP Option 132 and DHCP Option 133, or encapsulated DHCP option 132 and DHCP option 133 in DHCP option 43. When set to “DHCP Option 132 and DHCP Option 133”, the GAC2570 will get DHCP Option 132 as VLAN ID and get DHCP Option 133 as VLAN priority, from the DHCP server directly. When set to “Encapsulated in DHCP Option 43”, the GAC2570 will get VLAN ID and VLAN priority value from the DHCP Option 43 which has DHCP Option 132 and DHCP Option 133 encapsulated. In this case, please make sure the option “Allow DHCP Option 43 and Option 66 to Override Server” is enabled under GAC2570 web UI 🡪 Maintenance 🡪 Upgrade. By default, it is set to “Encapsulated in DHCP Option 43”: |
Host name (Option 12) | Sets the name of the client in the DHCP request. It is optional but may be required by some Internet Service Providers. |
Vendor Class ID (Option 60) | Configures the vendor class ID header in the DHCP request. The default setting is “Grandstream GAC2570” . |
Layer 2 QoS 802.1Q/VLAN Tag (Ethernet) | Assigns the VLAN Tag of the Layer 2 QoS packets for Ethernet. The Default value is 0. |
Layer 2 QoS 802.1p Priority Value (Ethernet) | Assigns the priority value of the Layer 2 QoS packets for Ethernet. The Default value is 0. |
IPv6 | |
IPv6 Address | Configures the appropriate network settings on the device. Users could select from “Auto-configured” or “Statically configured”. |
Preferred DNS Server | Configures the Preferred DNS Server. |
Static IPv6 Address | Enter the static IPv6 address in the “Statically configured” IPv6 address type. |
IPv6 Gateway | The static gateway when static IPv6 is used. |
IPv6 Prefix Length | Enter the IPv6 prefix length in the “Statically configured” IPv6 address type. Default is 64. |
DNS Server 1 | Configures the primary DNS IP address. |
DNS Server 2 | Configures the secondary DNS IP address. |
802.1x Mode | |
802.1x mode | Enables and selects the 802.1x mode for the device. The supported 802.1x modes are: EAP-MD5, EAP-TLS and EAP-PEAP. The default setting is “Disable”. |
802.1x Identity | Enters the identity information for the selected 802.1x mode. (This setting will be displayed only if 802.1 X mode is enabled). |
802.1x Secret | Enters the secret for the 802.1x mode. This option will appear when 802.1x mode is EAP-MD5 or EAP-PEAP. |
CA Certificate | Uploads the CA Certificate file to the device. (This setting will be displayed only if the 802.1 X mode is enabled) |
Client Certificate | Loads the Client Certificate file to the device. (This setting will be displayed only if the 802.1 X TLS mode is enabled) |
Private Key | Loads the private key file to the device. (This setting will be displayed only if the 802.1 X TLS mode is enabled) |
Wi-Fi Settings
Connect to Wi-Fi Network
Users can connect wirelessly to a network using Wi-Fi under GAC2570 Web GUI 🡪 Network Settings 🡪 Wi-Fi Settings. To connect to a network using Wi-Fi, please, refer to the following steps:
- Go to GAC2570 Web GUI 🡪 Network Settings 🡪 Wi-Fi Settings 🡪 Wi-Fi Basics.
- Enable Wi-Fi Function by turning the option on.
- Click on Scan to show the list of Wi-Fi networks available around the GAC2570
Note: The list of Wi-Fi Networks refreshes automatically every 15 seconds and the user can force it to refresh by clicking again on “Scan”.
- Identify the Wi-Fi network’s SSID and click on “Connect”, then enter the correct password information to connect to the selected network:
- Users can check the Wi-Fi parameters and change the setting by checking the “Show advanced options” in the bottom.
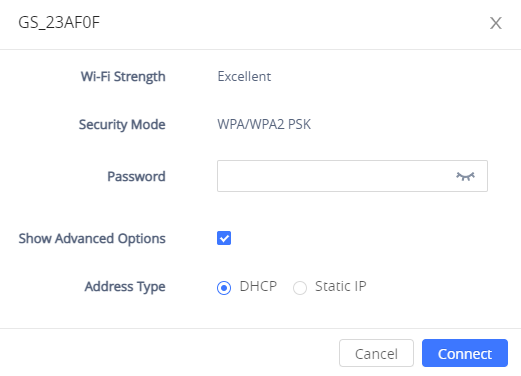
Wi-Fi Settings
Wi-Fi Basics | |
Wi-Fi Function | Enables/disables the Wi-Fi feature. The default setting is “Disable”. |
Wi-Fi Band | Sets the type of Wi-Fi Band (2.4G & 5G, 2.4G or 5G). The default setting is 2.4G&5G. |
ESSID | Permits to scan and select the available Wi-Fi networks within the range if the Wi-Fi feature is enabled. Click on “Connect” to select the Wi-Fi network and to enter the needed password if it is required. |
Add Network | |
ESSID | Configures the hidden ESSID name. |
Security Mode for Hidden SSID | Defines the security mode used for the wireless network when the SSID is hidden. Default is “None”. Users can choose: WEP, WPA/WPA2 PSK. |
Password | Configures the hidden ESSID password. |
Advanced Settings | |
Country Code | Configures Wi-Fi country code. The default value is “United States of America”. Note: Reboot is requested to take effect. |
OpenVPN® Settings
OpenVPN® Settings | |
Enable OpenVPN® | This enables/disables OpenVPN® functionality and requires the user to have access to an OpenVPN® server. The default setting is No. Note: To use OpenVPN® functionalities, users must enable OpenVPN® and configure all of the settings related to OpenVPN®, including server address, port, OpenVPN® CA, certificate, and key. |
OpenVPN® Mode | Simple mode only supports some basic or common parameters configuration. Expert mode supports configuration file upload, which can be fully customized. Please refer to https://openvpn.net for more information. |
Enable OpenVPN® Comp-lzo | Configures enable/disable the LZO compression. When the LZO Compression is enabled on the OpenVPN® server, you must turn on it at the same time. Otherwise, the network will fail to connect. |
OpenVPN® Server Address | The URL/IP address for the OpenVPN® server. |
OpenVPN® Port | The network port for the OpenVPN® server. By default, it is set to 1194. |
OpenVPN® Transport | Determines network protocol used for OpenVPN®: UDP or TCP. |
OpenVPN® CA Certificate | Select the OpenVPN® CA file (*.pem; *.der; *.crt; “.cer) required by the OpenVPN® server for authentication purposes. Press “Manage” to add / delete “Custom CA” and list the “Phone CA”. |
OpenVPN® User Certificate | OpenVPN® Client certificate file (*.pem; *.pfx; *.p12) required by the OpenVPN® server for authentication purposes. Press “Manage” to add / delete “User Certificates” |
OpenVPN® Cipher Method | The cipher method of OpenVPN® must be the same cipher method used by the OpenVPN® server. Available methods are: Blowfish AES-128 AES-256 The default is “Blowfish” |
OpenVPN® Username | OpenVPN® authentication username (optional). |
OpenVPN® Password | OpenVPN® authentication password (optional). |
Advanced Network Settings
Advanced Network Settings | |
Preferred DNS 1 | Sets the preferred DNS server 1 for the user. |
Preferred DNS 2 | Sets the preferred DNS server 2 for the user. |
Enable LLDP | Enables the LLDP (Link Layer Discovery Protocol) feature on the device. If it is set to “Yes”, the device will broadcast LLDP PDU to advertise its identity and capabilities and receive same from a physical adjacent layer 2 peer. The default setting is “Yes”. |
LLDP TX Interval (s) | Configures the interval the device sends LLLD-MED packet. The default setting is 30s. Note: Reboot the device to make changes take effect. |
Enable CDP | Configures whether to enable CDP to receive and/or transmit information from/to CDP-enabled devices. The default setting is “No”. |
Layer 3 QoS for SIP | Defines the Layer 3 QoS parameter for SIP. This value is used for IP Precedence, Diff-Serv or MPLS. The default value is 26. |
Layer 3 QoS for Audio | Defines the Layer 3 QoS parameter for RTP. This value is used for IP Precedence, Diff-Serv or MPLS. The default value is 46. |
HTTP/HTTPS User-Agent | Sets the user-agent for contacts. Note: Reboot the device to make changes take effect. |
SIP User-Agent | Sets the user-agent for SIP. Default is: Grandstream GAC2570 $version |
Proxy | |
HTTP/HTTPS Proxy Hostname | Specifies the HTTP/HTTPS proxy hostname for the device to send packets to. The proxy server will act as an intermediary to route the packets to the destination. |
HTTP/HTTPS Proxy Port | Specifies the HTTP/HTTPS proxy port for the device to send packets to. The proxy server will act as an intermediary to route the packets to the destination. |
Bypass Proxy For | Defines the destination IP address where no proxy server is needed. The device will not use a proxy server when sending packets to the specified destination IP address. |
System Settings Page Definitions
Time & Language Settings
Time Settings | |
NTP Server | Defines the URL or IP address of the NTP server. The GAC2570 may obtain the current date and time information from the server. The default setting is “pool.ntp.org”. |
Allow DHCP Option 42 to Override NTP Server | Obtains the NTP server address from a DHCP server using DHCP Option 42; it will override configured NTP Server. If set to “No”, the GAC2570 will use configured NTP server to synchronize time and date even if an NTP server is provided by the DHCP server. The default setting is “Yes”. Note: Changes in this setting need reboot to take effect. |
Allow DHCP Option 2 to Override Time Zone Settings | Obtains time zone setting (offset) from a DHCP server using DHCP Option 2; it will override selected time zone. If set to “No”, the GAC2570 will use the selected time zone even if provided by the DHCP server. The default setting is Yes. Note: Changes in this setting need reboot to take effect. |
Time Zone | Specifies the local time zone for the GAC2570. It covers the global time zones and users can select the specific one from the drop-down list. |
Time Display Format | Specifies which format will be used to display the time. It can be selected from 12-hour and 24-hour formats. |
Date Display Format | Determines which format will be used to display the date. It can be selected from the drop-down list. Normal (M/D/YYYY) YYYY/MM/DD MM/DD/YYYY DD/MM/YYYY The default setting is Normal (M/D/YYYY) |
Language | |
Language Selection | Select the language displayed on the GAC2570. |
Select Language File | Press “Browse” to bring up a file selection menu to select the local .txt file to upload to the device. |
Security Settings
Web/SSH Access | |
Enable SSH | Enables/disables SSH access to the device. The default setting is “Yes”. |
SSH Port | Customizes the SSH port. By default, SSH uses port 22. |
Access Method | Determines which protocol will be used to access the device‘s Web GUI. It can be selected from HTTP and HTTPS. The default setting is HTTP. |
Web Port | Specifies which port to use to access the Web UI. By default, if HTTP, the port number will be 80; if HTTPS is selected, the port number will be 443. |
WebServer User Certificate | Select the user certificate as the web server certificate to encrypt web access. Press “Manage” to add/delete “User Certificates”. |
Configuration via Keypad Menu | Configures access control for keypad Menu settings on the Settings interface of the GAC2570. Unrestricted: configure all settings on the Settings interface; Basic Settings Only: The Advanced Settings option will not be displayed; Basic Settings & Network Settings: Only the Advanced Settings option will not be displayed Constraint Mode: users need to input the admin user password to configure Wireless & Network and Advanced Settings. Note: When access control for keypad is limited to “Basic Settings Only” or “Constraint Mode”, the Admin authentication will be mandatory to start Factory Reset process. |
Permission to Install/Uninstall Apps | Configures the permissions for users to install/uninstall the applications. If set to “Allow“, the user is free to install/uninstall third-party apps. If set to “Require admin password“, the user needs to input the correct administrator password to install/uninstall third-party apps. If set to “Require admin password if the app source is unknown”, the user needs to input admin password only when installing apps from an unknown source, administrator password authentication is required when the user uninstalls third-party apps. If set to “Not allow“, the user cannot install/uninstall third-party apps. |
User Info Management | |
Current Admin Password | Enter the current logged-in user’s password. This field is case-sensitive. The default password is “admin”. |
New Admin Password | Allows the user to change the admin password. The password field is purposely blank after clicking the “Save” button for security purposes. This field is case-sensitive with a maximum length of 32 characters. |
Confirm New Admin Password | Enter the new Admin password again to confirm. |
New User Password | Allows the administrator to set the password for user-level web GUI access. This field is case-sensitive with a maximum length of 32 characters. The default password is “123”. |
Confirm New User Password | Enter the new User password again to confirm. |
Encryption Settings | |
TLS | |
Minimum TLS Version | Specifies the minimum TLS version allowed for the connection. |
Maximum TLS Version | Specifies the maximum TLS version allowed for the connection. |
Enable Weak TLS Cipher Suite | Defines the function for weak TLS cipher suites. If set to “Enable Weak TLS Cipher Suites“, allow users to encrypt data by weak TLS cipher suites. If set to “Disable Symmetric Encryption RC4/DES/3DES“, allow users to disable weak cipher DES/3DES and RC4. |
Certificate Management | |
Trusted CA Certificates | |
Custom CA | Press “Add” to upload the CA Certificate file (.pem, .der, .crt or. cert format) to GAC2570. Note: Reboot is required to take effect. Press “Delete” to delete a custom CA. |
Phone CA | Lists the pre-loaded phone CA certificates. |
User Certificates | |
User Certificates | Press “Add” to upload & Install User Certificate file (.pem, .pfx, or .p12 format) to GAC2570. Press “Delete” to delete a user certificate. |
Preferences
LCD & LED Management | |
Enable Missed Call Backlight | If set to “Yes”, the LCD backlight will be turned on when there is a missed call on the GAC2570. Note: Needs reboot to take effect. |
Enable Missed Call Indicator | If set to “Yes”, the LED indicator on the upper right corner of the GAC2570 will light up when there is a new voicemail on the GAC2570. |
Enable Contact Full Indicator | If set to “Yes”, the LED indicator on the upper right corner of the GAC2570 will light up when the contact storage or message storage is full. |
Enable Indicator When LCD is Off | If set to “Yes”, the LED indicator on the upper right corner of the GAC2570 will light up when the LCD screen is off. |
TR-069
Enable TR-069 | Sets the device to enable the “CPE WAN Management Protocol” (TR-069). The default setting is “No”. Note: Reboot the device to make changes take effect. |
ACS URL | Specifies URL of TR-069 ACS (e.g., https://acs.test.com), or IP address. The default setting is https://acs.gdms.cloud |
ACS Username | Enters username to authenticate to ACS. |
ACS Password | Enters password to authenticate to ACS. |
Enable Periodic Inform | Enables periodic inform. If set to “Yes”, the device will send inform packets to the ACS. Default is “No”. |
Periodic Inform Interval (s) | Configures to send periodic “Inform” packets to ACS based on a specified interval. The default setting is 86400. |
Connection Request Username | Enters username for the ACS to connect to the device. |
Connection Request Password | Enters password for the ACS to connect to the device. |
Connection Request Port | Enters the port for the ACS to connect to the device. The default setting is 7547. |
CPE CA Certificate | Select the CA certificate for server verification. Press “Manage” to upload the CA certificate. |
CPE User Certificate | Select the user certificate to be used for mutual server authentication. If the private key is included, upload it with the user certificate. Press “Manage” to upload the User Certificate. |
Maintenance Page Definitions
Upgrade
Firmware | |
Upgrade via Manually Upload | |
Complete Upgrade | If enabled, all files will be replaced except user data. The default setting is disabled. |
Upload Firmware File to Update | Allows users to load the local firmware to the device to update the firmware. Note: Need a reboot to take effect. |
Upgrade via Network | |
Firmware Upgrade Mode | Allows users to choose the firmware upgrade method: TFTP, HTTP, HTTPS, or Manual Upload. The default setting is “HTTP”. |
Firmware Server Path | Sets IP address or domain name of firmware server. The URL of the server that hosts the firmware release. The default is “fm.grandstream.com/gs”. |
HTTP/HTTPS Username | Enters the username for the firmware HTTP/HTTPS server. |
HTTP/HTTPS Password | Enters the password for the firmware HTTP/HTTPS server. |
Firmware File Prefix | Checks if firmware file is with matching prefix before downloading it. This field enables user to store different versions of firmware files in one directory on the firmware server. |
Firmware File Postfix | Checks if the firmware file is with matching postfix before downloading it. This field enables users to store different versions of firmware files in one directory on the firmware server. |
Firmware Upgrade | Click the “Detect” button to check whether the firmware in the firmware server has an updated version, if so, update immediately. |
Config File | |
Configure Manually | |
Download Device Configuration | Downloads the device’s configuration file in text format. The config file includes all the P-value parameters for GAC2570’s current settings except the password for security purposes. Users can use the Grandstream configuration file generator to generate binary config file from this text file. |
Upload Device Configuration | Uploads configuration file to the device. Notes: - The GAC2570 supports only txt format for config file upload. - Reboot is required to take effect. |
Configure via Network | |
Use Grandstream GAPS | It is used to configure the download path and update mode for the configuration file server. If set to “Yes“, the device will set the download path of the configuration file to “fm.grandstream.com/gs” by default and use the HTTPS protocol to connect to the server. If set to “No“, then users can manually configure the path and update mode for the configuration file server. |
Config Upgrade Mode | Selects provisioning method: TFTP, HTTP or HTTPS. The default setting is “HTTPS”. |
Config Server Path | Sets IP address or domain name of the configuration server. The server hosts a copy of the configuration file to be installed on the device. The default is “fm.grandstream.com/gs”. |
HTTP/HTTPS Username | Configures the username for the config HTTP/HTTPS server. |
HTTP/HTTPS Password | Configures the password for the config HTTP/HTTPS server. |
Config File Prefix | Checks if configuration files are with matching prefix before downloading them. This field enables users to store different configuration files in one directory on the provisioning server. |
Config File Postfix | Checks if configuration files are with matching postfix before downloading them. This field enables users to store different configuration files in one directory on the provisioning server. |
Authenticate Conf File | Sets the device to authenticate the configuration file before applying it. When set to “Yes”, the configuration file must include value P1 with the phone system’s administration password. If it is missed or does not match the password, the device will not apply it. The default setting is “No”. |
XML Config File Password | Decrypts XML configuration file when encrypted. The password used for encrypting the XML configuration file is using OpenSSL. |
Provision | |
Automatic Upgrade | |
Automatic Upgrade | Specifies when the firmware upgrade process will be initiated; there are 4 options: No: The device will only do an upgrade once at boot up. Check every day: The user needs to specify “Hour of the day (0-23)”. Check every week: The user needs to specify “Hour of the day (0-23)” and “Day of the week (0-6)”. Check every interval: User needs to specify “Hour of the day (0-23)” Note: Day of week is starting from Sunday. The default setting is “No”. |
Automatic Upgrade Check Interval (m) | Specifies the time period to check for firmware upgrade (in minutes). The default setting is 10080. |
Starting – Ending Hour of the Day (0 – 23) | Sets the time or time period of the automatic upgrade, and automatically updates during the set time or time period. |
Day of the week | Defines the day of the week to check the HTTP/TFTP server for firmware upgrades or configuration file changes. |
Enable Randomized Automatic Upgrade | Randomized Automatic Upgrade within the range of hours of the day or postpone the upgrade every X minute(s) by random 1 to X minute(s). The default setting is “No”. |
Firmware Upgrade and Provisioning | Defines the device’s rules for automatic upgrade. It can be selected from: Always Check at bootup Always Check at bootup, when F/W pre/suffix changes, Skip the Firmware Check. The default setting is “Always Check at bootup”. |
Upgrade With Prompt | If set to “Yes”, the GAC2570 will pop up a prompt after downloading the firmware files to confirm whether start upgrading. Otherwise, the GAC2570 will automatically start the upgrading process. |
DHCP Options | |
Allow DHCP option 43, option 160 and option 66 to Override Server | If DHCP option 43, 160 and 66 is enabled on the LAN side, the device will reset the CPE, upgrade, network VLAN tag, and priority configuration according to option 43 sent by the server. At the same time, the update mode and server path of the configuration upgrade mode will be reset according to the options 160 and 66 sent by the server. The default setting is “on”. The default setting is “Yes”. Note: Reboot the device to make changes take effect. |
DHCP Option 120 Override SIP Server | Configures the device to allow the DHCP offer message to override the Config Server Path via the Option 120 header. The default setting is “Yes”. Note: Reboot to take effect. |
Allow DHCP Option 242 (Avaya IP Phones) | Enables DHCP Option 242. Once enabled, the device will use the configuration info issued by the local DHCP in Option 242 to configure the proxy, transport protocol, and server path. The default setting is “Yes”. Note: Reboot the device to make changes take effect. |
Config Provision | |
Download and Process All Available Config Files | By default, the device will provision the first available config in the order of cfgMAC, cfgMAC.xml, cfgMODEL.xml, and cfg.xml (corresponding to device-specific, model-specific, and global configs). If set to “Yes”, the device will download and apply (override) all available configs in the order of cfgMAC, cfg.xml, cfgMODEL.xml, cfgMAC.xml. |
Config Provision | The device will download the configuration files and provision in the configured order. Use arrow buttons to add and order configuration files. |
PNP Feature | |
Enable PNP Feature | Sets the device to broadcast the SIP SUBSCRIBE message during booting up to allow itself to be discovered and configured by the SIP platform. The default setting is “Yes”. Note: Reboot to take effect. |
PNP URL | Configures the PNP file server URL. Users should input transport protocol in URL such as HTTP/HTTPS/TFTP. You could also set the device to be the file server. The format is http://192.168.121.111/pnp. In this case, you have to copy your cfg file to the device /sdcard/pnp directory. |
PNP (3CX) Auto Provision | If enabled, the GAC2570 will send SUBSCRIBE request for an automatic assigned URL to the multicast address in LAN when bootup to accomplish automatic configuration of SIP account, It requires 3CX server support. |
Advanced Settings | |
Send HTTP Basic Authentication By Default | Determine whether to send basic HTTP authentication information to the server by default when using wget to download firmware or config file. If set to “Yes”, send HTTP/HTTPS user name and password no matter whether the server needs authentication or not. If set to “No”, only send HTTP/HTTPS user name and password when the server needs authentication. |
Enable SIP NOTIFY Authentication | Enables the SIP NOTIFY Authentication on the device. If set to “Yes”, the GAC2570 will challenge NOTIFY with 401. The default setting is “Yes”. |
Enabled Authentication Server Validation | Configures whether to validate the server certificate when downloading the firmware/config file. If set to “Yes”, the device downloads firmware/configuration files only from servers validated by CA certificates. The default setting is “No”. |
CA Certificate | Select the CA certificate for server verification. Press “Manage” to upload custom CA. |
User Certificate | Select the user certificate to be used for mutual server authentication. If the private key is included, upload it with the user certificate. Press “Manage” to upload the User Certificate. |
Factory Reset | Resets the device to the default factory setting mode. |
Safe Mode | Configures Enable/Disable Safe Mode. If enabled, the GAC2570 will enter safe mode after rebooting, which will help remote troubleshoot when an abnormal situation occurs. Note: Once entering safe mode, only the system applications will be up and running, all widgets and 3rd party apps will be disabled. It requires a reboot to take effect. |
System Diagnosis
Syslog | |
Syslog Protocol | Select the transport protocol over which log messages will be carried. UDP: Syslog messages will be sent over UDP. SSL/TLS: Syslog messages will be sent securely over a TLS connection. |
Syslog Server | Configures the URI to which the device will send the Syslog messages to. The default setting is “log.ipvideotalk.com”. |
Syslog Level | Selects the level of logging for Syslog. The default setting is “None”. There are 4 levels from the dropdown list: DEBUG, INFO, WARNING, and ERROR. The following information will be included in the Syslog packet: DEBUG (Sent or received SIP messages). INFO (Product model/version on boot up, NAT-related info, SIP message summary, Inbound and outbound calls, Registration status change, negotiated codec, Ethernet link up). WARNING (SLIC chip exception). ERROR (SLIC chip exception, Memory exception). Note: Changing Syslog level does not require a reboot to take effect. |
Syslog Keyword Filter | Only send the Syslog with keyword, multiple keywords are separated by a comma. Example: set the filter keyword to “SIP” to filter the SIP log. |
Logcat | |
Clear Log | Clears the log files saved in the device. |
Log Tag | Configures the filter to display the specified process log file. |
Log Priority | Selects the log priority to display. It can be selected from the list below: Verbose (Default Setting) Debug Info Warning Error Fatal Silent (suppress all output) |
Get Log | Displays the log file on the web page. |
Debug | |
One-click Debugging | |
One-click Debugging | Capture the checked info in the debugging list, click “Start” to debug if including the “Capture trace” item, and click “Stop” to end, Click “Capture” in another situation. All retrieved files will be generated to a package, and the last package will be overwritten, while the trace file will stay remain. |
Debug Info Menu | Display a list of info items that can be debugged, currently supports system logs, info log, capture package, tombstones, and ANR log. The captured data can be viewed in the “Debug information list”. The default is all selected. |
Debug Info List | You can select the existing debugging info package or grab the package. Click the “Delete” button on the right to delete the file. |
View Debug Info | You can select the existing debugging info package or grab the package. Click the “Delete” button on the right to delete the file. |
Core Dump | |
Enable Core Dump Generation | Configures whether to generate and save the core dump file when the program crashes. The default setting is “No”. Note: Reboot the device to make changes take effect. |
Core Dump List | Selects the existing core dump file in the drop-down box. Users could delete the file by pressing on “Delete” button. |
View Core Dump | Press the “List” button to view all existing core dump files. The files are listed in chronological order, users could click the file name to download the file to the local computer. |
Record | |
Record | Click to start capturing audio data, and click the “Stop” button to end. Capturing the audio data of the device can help to locate audio issues. The default is not enabled. You can record up to 1-minute of audio data. |
Recording List | Choose the existing audio file. Click the “Delete” button on the right to delete this file. |
View Recording | Click on the “List” button to view. The captured audio data will be sorted by time. Click to download the data to the computer for analysis. |
Traceroute | |
Target Host | The IP address or URL for the Target Host of the Traceroute. Press Start to send a traceroute request to the configured target host. Press Stop to end the traceroute running process. |
Ping | |
Target Host | The IP address or URL for the Target Host of the Ping. Press Start to send a ping request to the configured target host. Press Stop to end the ping running process. |
NSLookup | |
Hostname | Enter a host name and find out the corresponding IP address. It will also do reverse name lookup and find the host name for an IP address you specify. |
Event Notification
Set the URL for events on the GAC2570 web GUI, and when the corresponding event occurs on the device, the device will send the configured URL to the SIP server. The dynamic variables in the URL will be replaced by the actual values of the device before sending it to the SIP server, to achieve the purpose of events notification. Here are the standards:
- The IP address of the SIP server needs to be added at the beginning and separate the dynamic variables with a “/”.
- The dynamic variables need to have a “$” at the beginning. For example: local=$local
- If users need to add multiple dynamic variables in the same event, users could use “&” to connect with different dynamic variables. For example: 192.168.40.207/mac=$mac&local=$local
- When the corresponding event occurs on the device, the device will send the MAC address and GAC2570 number to server address 192.168.40.207.
Boot Completed | Configures the event URL when GAC2570 boots up. |
Incoming Call | Configures the event URL when GAC2570 has an incoming call. |
Outgoing Call | Configures the event URL when GAC2570 has an outgoing call. |
Missed Call | Configures the event URL when the device has new a missed call. |
Connected | Configures the event URL when a call is established. |
Disconnected | Configures the event URL when a call is disconnected. |
DND On | Configures the event URL when the DND feature is enabled on the device. |
DND Off | Configures the event URL when the DND feature is disabled on the device. |
On Hold | Configures the event URL when the Hold key is pressed to hold the call. |
Unhold | Configures the event URL when the Hold key is pressed to unhold the call. |
Log On | Configures the event URL when users log on to the device successfully. |
Log Off | Configures the event URL when users log off the device. |
Register | Configures the event URL when an account in the device is registered successfully. |
Unregister | Configures the event URL when an account in the device is unregistered. |
Events Notifications
App Page Definitions
Programmable Key
Programmable Key | |
Format | |
Display Format | Configures the display format for the MPK. Users could select “Name”, “User ID”, “Name, User ID”, or “Name, User ID, Key mod”. “Name” is the one saved in GAC2570 contacts. The default setting is “Name, User ID, Key mode”. |
Show Display Name from Server | If selected, the display name on the server will replace the name users configured. |
BLF | |
Key Mode | The key modes are: Speed Dial: Press to dial the UserID when the accounts are configured as VPK. Busy Lamp Field: Monitor the UserID status when the accounts are configured as VPK. Call Intercom: Intercom/paging to the UserID when the accounts are configured as VPK. |
Account | Configures the SIP account or active account when the accounts are configured as VPK. |
Name | Configures the display name when the accounts are configured as VPK. |
User ID | Configures the UserID for the corresponding VPK mode when the accounts are configured as VPK. |
DTMF Content | When the key mode is set to Dial DTMF it configures the dialed DTMF content. |
Address | When the key mode is set to Multicast Paging, it configures the multiple broadcast address. |
Conference Name | Set the name of the quick meeting when the key mode is set to Quick Conference. |
Mute all | Enable or disable mute all meeting members when the key mode is set to Quick Conference. |
Operate | Configures the Number list when the key mode is set to Speed Conference. |
Programmable Key General Settings | |
Account | Displays account name if configured, otherwise, displays “Account X” where X is the account number. |
BLF Call-pick Prefix | Configures the prefix prepended to the BLF extension if the GAC2570 answers a call to the monitored party by the BLF key. The default setting is ** for each account. |
Eventlist BLF URI | Determines the event list BLF URI on the GAC2570 to monitor the extensions in the list with MPK keys. This feature is based on BroadSoft standards. It requires filling in the BLF ID to the box. |
Force BLF Call-pickup by Prefix | Uses the prefix for BLF Call-pickup. The default setting is “No”. |
Programmable key Settings
Contacts
General Settings | |
Sort Phonebook by | Sets which part of the name, first name or last name, will be sorted in alphabetical order to display. |
Default Contacts Tab | Controls the behaviors of the Phonebook key. It could be set to:
The default setting is “Default”, which set the Phonebook key to the Contacts menu. |
Emergency Call Numbers | Configures the emergency contact phone numbers. Input the number in the input box and click “Add” to add the number to the contacts list. To delete the existing emergency number, select the number in the contacts list and click “Delete”. |
Import/Export Contacts | |
Import |
|
Clear The Old List | Determines if the GAC2570 system will delete the previous contacts when a new contact file is imported. If set to “Yes”, the previous contacts will be removed. The default setting is “No”. |
Clear Old History Mode |
|
Replace Duplicate Items | Configures the GAC2570 system to keep the original contact entries when duplicated contact entries are included in the contact file. If set to “Yes”, the GAC2570 will replace the original entries with the new ones. Otherwise, the GAC2570 will save both contact entries. The default setting is “No”. |
Replace Duplicate Entries Mode | If set to “Replace by name”, replace the records of the same name automatically when importing new records. |
File Encoding | Specifies the encoding format for Phonebook file importing. The default setting is UTF-8. It can be selected from the dropdown list:
|
File Type | Sets the file type for Phonebook file importing. It can be selected from the dropdown list. The default setting is “XML”. |
Import Local File | Uploads the contact file (.xml) from the PC to the GAC2570. |
Export |
|
File Encoding | Specifies the encoding format for Phonebook file exporting. The default setting is UTF-8. It can be selected from the dropdown list:
|
File Type | Sets the type format for Phonebook file importing. It can be selected from the dropdown list.
The default setting is “XML”. |
Export | Downloads the Phonebook file (phonebook.xml) from the GAC2570 to PC. |
Download Contacts |
|
Clear The Old List | Sets the GAC2570 system to delete the previous contacts when a new contact file is downloaded. |
Clear Old History Mode | If set to “Clear all”, the GAC2570 will delete all previous records before downloading the new records. |
Replace Duplicate Items | Keeps the original contact entries when duplicated contact entries are included in the contact file. |
Replace Duplicate Entries Mode | If set to “Replace by name”, replace the records of the same name automatically when importing new records. |
Download Mode | Enables the GAC2570 system to download the Phonebook file and select the server and protocol to download the Phonebook file. It can be selected from TFTP, HTTP, and HTTPS. The default setting is “OFF”. |
File Encoding | Selects the encoding format for the Phonebook file download. The default setting is UTF-8. It can be selected from the dropdown list:
|
Download Server | Configures the server URL to download the Phonebook file. |
HTTP/HTTPS Username | Configures username for HTTP/HTTPS server to download the Phonebook file. |
HTTP/HTTPS Password | Specifies the password for the HTTP/HTTPS server to download the Phonebook file. |
Automatic Download Interval | Determines how the GAC2570 system sends the request to the server to download the Phonebook file. It can be selected from the dropdown list:
|
Download Now | Starts downloading the XML Phonebook to the GAC2570 immediately. |
Contacts Page Definitions
LDAP Phonebook
Connection Mode | Selects which protocol will be used for LDAP searching, LDAP or LDAPS. |
Server Address | Configures the URI of the LDAP (Lightweight Directory Access Protocol) server. |
Port | Configures the LDAP server port. The default LDAP port number is 389. |
Base DN | Determines the LDAP search base. This is the location in the directory where the search is requested to begin. |
Username | Configures the bind “Username” for querying LDAP servers. Some LDAP servers allow anonymous binds in which case the setting can be left blank. |
Password | Specifies the bind “Password” for querying LDAP servers. The field can be left blank if the LDAP server allows anonymous binds. |
LDAP Name Attributes | Configures the “name” attributes of each record which are returned in the LDAP search result. This field allows the users to configure multiple space-separated name attributes. Example: cn sn description |
LDAP Number Attributes | Configures the “number” attributes of each record which are returned in the LDAP search result. This field allows the users to configure multiple space-separated number attributes. Example: telephoneNumber telephoneNumber Mobile |
LDAP Mail Attributes | Determines the “mail” attributes of each record that are returned in the LDAP search result. |
LDAP Name Filter | Examples: (|(cn=%)(sn=%)) returns all records which have the “cn” or “sn” field starting with the entered prefix; (!(sn=%)) returns all the records which do not have the “sn” field starting with the entered prefix; (&(cn=%) (telephoneNumber=*)) returns all the records with the “cn” field starting with the entered prefix and “telephoneNumber” field set. |
LDAP Number Filter | Defines the filter used for number lookups. Examples: (|(telephoneNumber=%)(Mobile=%) returns all records which has the “telephoneNumber” or “Mobile” field starting with the entered prefix; (&(telephoneNumber=%) (cn=*)) returns all the records with the “telephoneNumber” field starting with the entered prefix and “cn” field set. |
LDAP Mail Filter | Determines the filter used for mail lookups. Example: (mail=%) |
Search Field Filter | Configures to filter according to which fields when searching on LDAP. Users can choose between ‘Name Filter’, ‘Number Filter’, ‘Mail Filter’, or ‘All Filter’. The default setting is “All Filter”. |
LDAP Displaying Name Attributes | Configures the entry information to be shown on GAC2570’s LCD. Up to 3 fields can be displayed. |
Max Hits | Specifies the maximum number of results to be returned by the LDAP server. If set to 0, the server will return all search results. The default setting is 50. |
Search Timeout (s) | Configures the interval (in seconds) for the server to process the request and the client waits for the server to return. The default setting is 4 seconds. |
LDAP Lookup When Dialing | Sets the GAC2570 system to do the LDAP number searching when making outgoing calls. The default setting is “No”. |
Search LDAP For Incoming Call | Sets the GAC2570 system to do LDAP number searching for incoming calls. The default setting is “No”. |
LDAP Dialing Default Account | Configures the default account that is used when dialing LDAP contacts. Users may choose Accounts 1-6; the default setting is “Default”. |
LDAP Phone settings
Recording
Call Recording | |
File name | Displays the name of the Call recording file |
Duration | Displays the duration of the phone call |
Date | Displays the date the call was recorded on |
Operation | Delete, Rename, download, or lock the recording file |
Normal Recording | |
File name | Displays the name of the recording file. |
Duration | Displays the duration of the recording. |
Date | Displays the date on which the file was recorded. |
Operation | Delete, Rename, download, or lock the recording file |
Call recording settings
EXPERIENCING THE GAC2570
Please visit our website: https://www.grandstream.com to receive the most up-to-date updates on firmware releases, additional features, FAQs, documentation, and news on new products.
We encourage you to browse our product-related documentation, FAQs, and User and Developer Forum for answers to your general questions. If you have purchased our products through a Grandstream Certified Partner or Reseller, please contact them directly for immediate support.
Our technical support staff is trained and ready to answer all of your questions. Contact a technical support member or submit a trouble ticket online to receive in-depth support.
Thank you again for purchasing the Grandstream Audio Conference System, it will be sure to bring convenience and color to both your business and personal life.
© 2002-2014 OpenVPN Technologies, Inc.
OpenVPN is a registered trademark of OpenVPN Technologies, Inc.
CHANGE LOG
This section documents significant changes from previous versions of the user manual for GAC2570.
Only major new features or major document updates are listed here. Minor updates for corrections or editing are not documented here.
Firmware Version 1.0.3.4
- Added prompt in the dial interface for duplicated numbers. [Making calls]
- Added related prompt when no more programmable key can be added. [Programmable key]
- Improved unknown source security prompt for apk installation. [Unknown sources]
- Added Presentation Parameter setting in Features. [Presentation]
- Added prompt for HDMI resolution negotiation failure. [Connection Configuration]
- Moved File Manager app to Settings -> Basic Settings. [File Manager]
- Added Audio Calibration icon in quick buttons from the notification bar. [Audio Calibration]
- Added new default apps, such as Clock, Schedule, Guidelines, and Conference Control. [Clock][Schedule] [Guidelines] [Conference Control]
- This is the initial version.