


Overview
The PBX Direct Line VLAN feature allows your device to connect to SIP trunk providers through dedicated VLAN interfaces, instead of routing everything through the default LAN/WAN network. This method is useful when SIP trunks are provided over separate subnets or private lines, and you want to ensure traffic uses the correct gateway, avoids NAT issues, and keeps routing clean and secure.
This guide explains how to configure that setup step by step by assigning VLANs to specific ports, giving the PBX its own IP on each VLAN, and binding SIP trunks to those interfaces.
Example Scenario – Topology
Below is a simple diagram showing three SIP trunk providers connected via different VLANs:
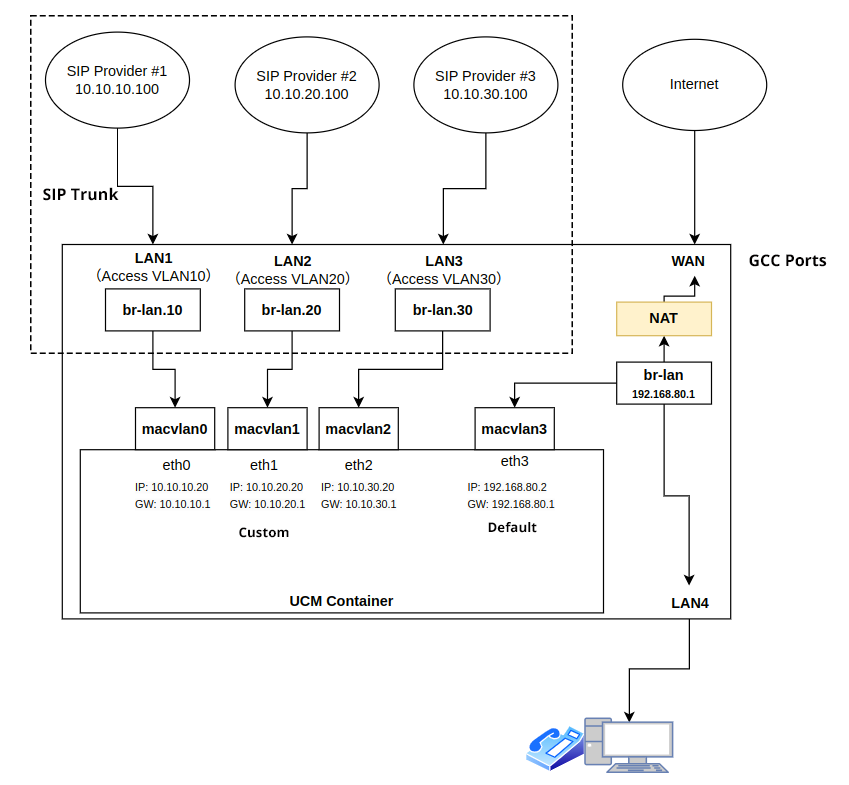
Each SIP provider has:
- Its own subnet (e.g.,
10.10.30.0/24) - A dedicated LAN port (e.g., LAN3 on the GCC)
- A corresponding PBX interface (e.g.,
macvlan2with IP10.10.30.20)
This design ensures each SIP trunk communicates directly from the correct VLAN and IP no NAT, no routing conflicts.
Prerequisites
To follow this guide, make sure the following conditions are met before starting the configuration:
- You’re using a supported GCC60xx series device with both the Networking and PBX modules enabled
- At least one physical LAN port is available for PBX VLAN use
- Your SIP provider has given you the VLAN ID, IP addressing, and gateway information
- The VLAN subnet used for the PBX must not conflict with the GCC’s LAN or WAN subnets
Important: The PBX Direct Line VLAN must be on a separate subnet from your default LAN or WAN interface to avoid routing issues.
Supported Devices
Series | Model |
GCC601x | GCC6010W, GCC6010, GCC6011 |
GCC602x | GCC6020, GCC6021 |
These devices support PBX Direct VLAN configuration and SIP trunk isolation via dedicated ports.
Step 1 – Create the PBX Trunk VLAN
To begin, you’ll create a dedicated VLAN interface that the PBX will use to communicate with the SIP trunk provider. This VLAN will be bound to a specific physical LAN port on your GCC60xx device.
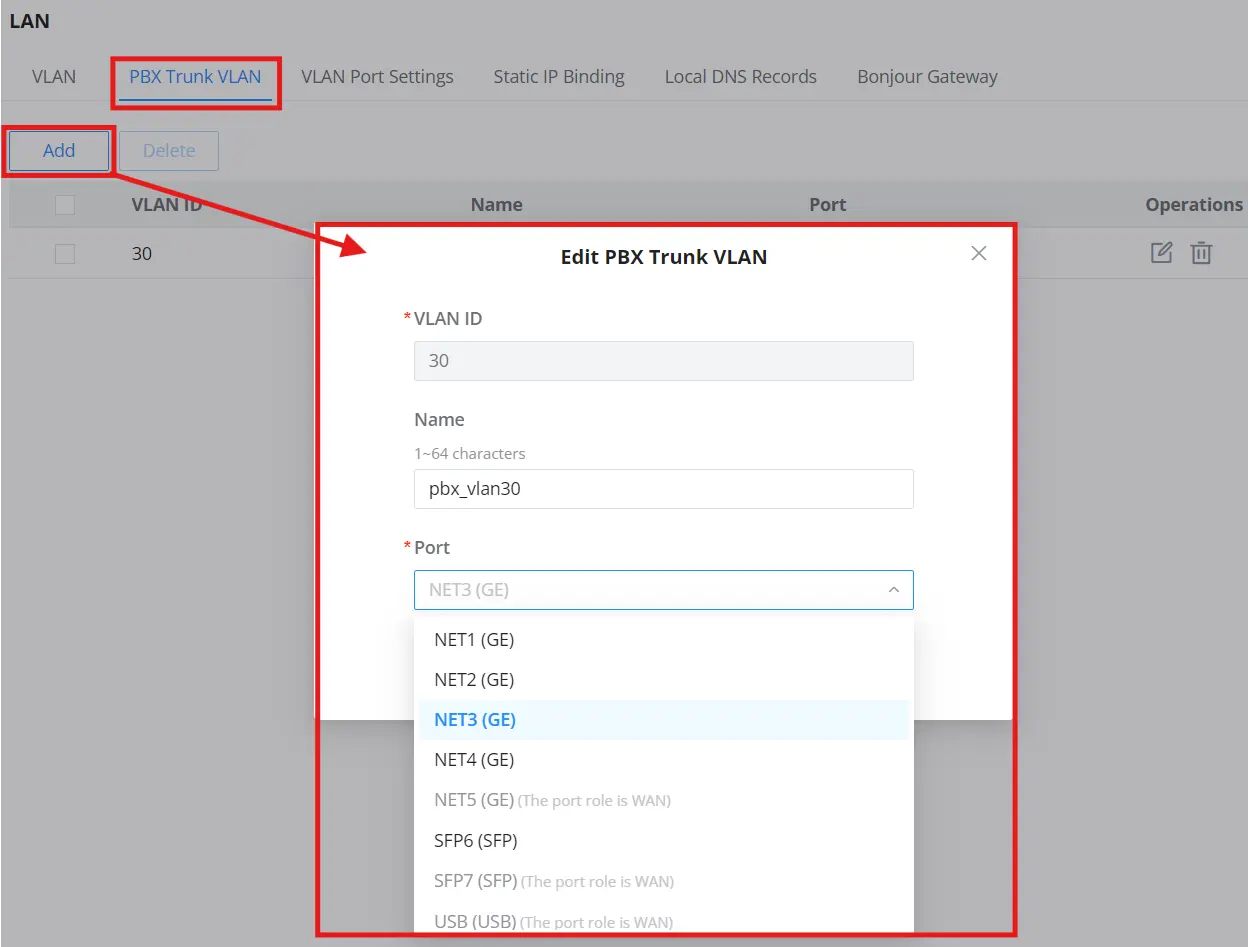
Navigate to: Networking module → Network Settings → LAN → PBX Trunk VLAN tab
- Click Add to create a new PBX Trunk VLAN.
- In the dialog that opens, fill out the following fields:
- VLAN ID: Enter the VLAN ID assigned by your SIP provider (e.g.,
30) - Name: Choose a descriptive name for easy reference (e.g.,
pbx_vlan30) - Port: Select the LAN port on the GCC that will carry this VLAN (e.g.,
NET3)
- VLAN ID: Enter the VLAN ID assigned by your SIP provider (e.g.,
Make sure the selected LAN port is physically connected to the switch or provider device where this VLAN is available.
- Click Save to apply the configuration.
Step 2 – Configure Static IP on PBX VLAN Interface
After creating the PBX Trunk VLAN in the Networking module, you now need to assign an IP address to the PBX module on that VLAN. This gives the PBX a network identity on the correct subnet so it can communicate with the SIP provider.
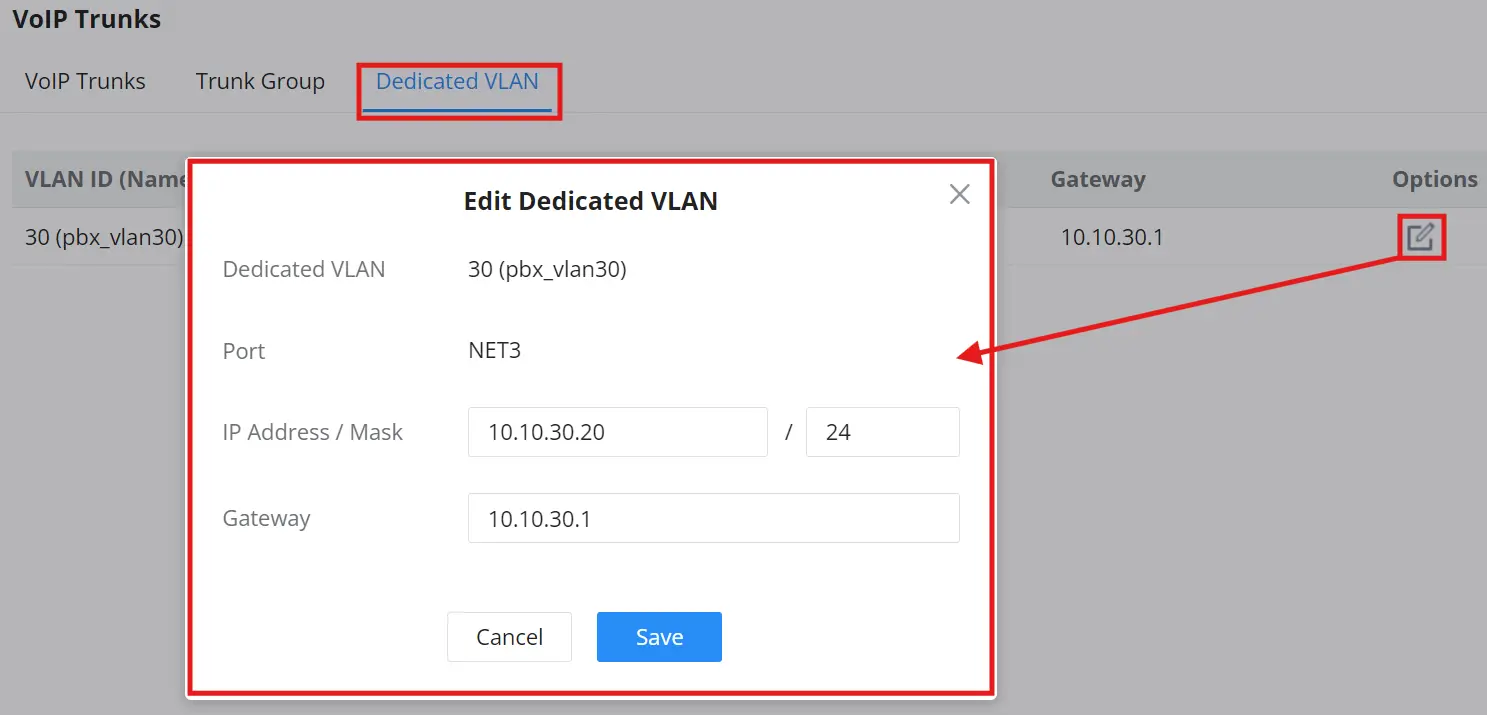
Navigate to: PBX module → Extension/Trunk → VoIP Trunks → Dedicated VLAN tab
- Locate the VLAN you created in Step 1 (e.g.,
30 (pbx_vlan30)) - Click the edit icon on the right
- In the Edit Dedicated VLAN window, enter the following:
- IP Address / Mask:
10.10.30.20with subnet mask/24 - Gateway:
10.10.30.1
- IP Address / Mask:
- Click Save
Note: Only static IP addressing is supported for PBX VLANs.
This step ensures that all SIP traffic sent or received through this trunk uses the correct VLAN interface and gateway, keeping your routing clean and isolated from your default LAN/WAN.
Step 3 – Create the SIP Trunk and Bind It to VLAN
In this step, you will create a SIP trunk and bind it to the Dedicated VLAN interface configured in Step 2. Binding the trunk to the VLAN ensures the PBX uses the VLAN IP/gateway for this trunk instead of routing through the default LAN/WAN path.
Navigate to: PBX module → Extension/Trunk → VoIP Trunks → VoIP Trunks, then click Add SIP Trunk.
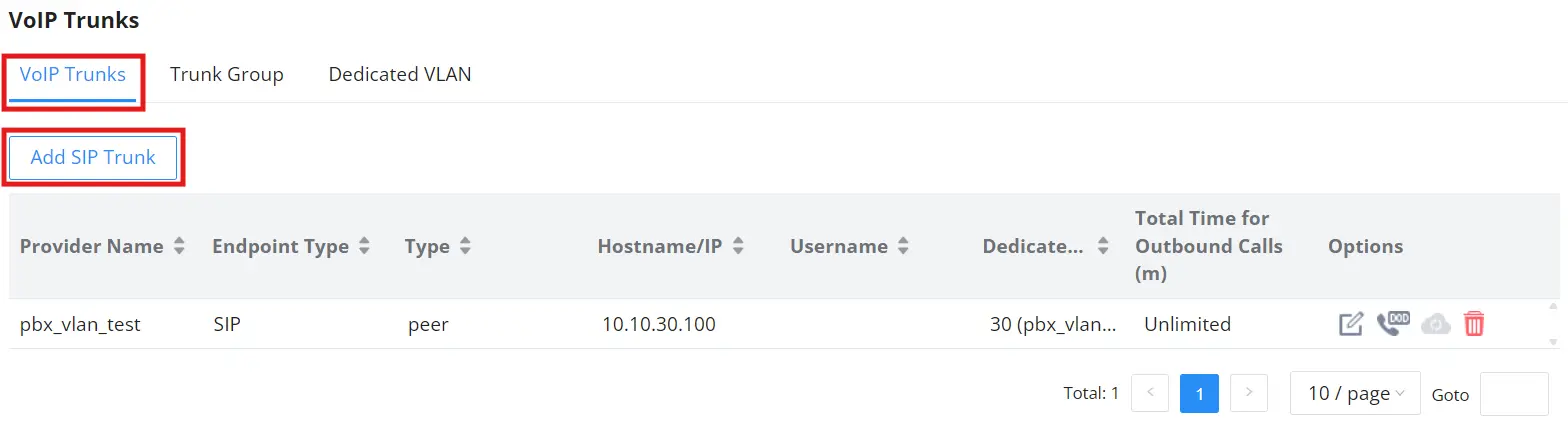
Under Basic Settings, configure the following:
- Provider Name: enter a label for the trunk (example:
pbx_vlan_test) - Host Name: enter the SIP provider IP/FQDN (example:
10.10.30.100) - Dedicated VLAN: select the VLAN created earlier (example:
30 (pbx_vlan30 | NET3))
Click Save (and Apply Changes if it appears at the top).
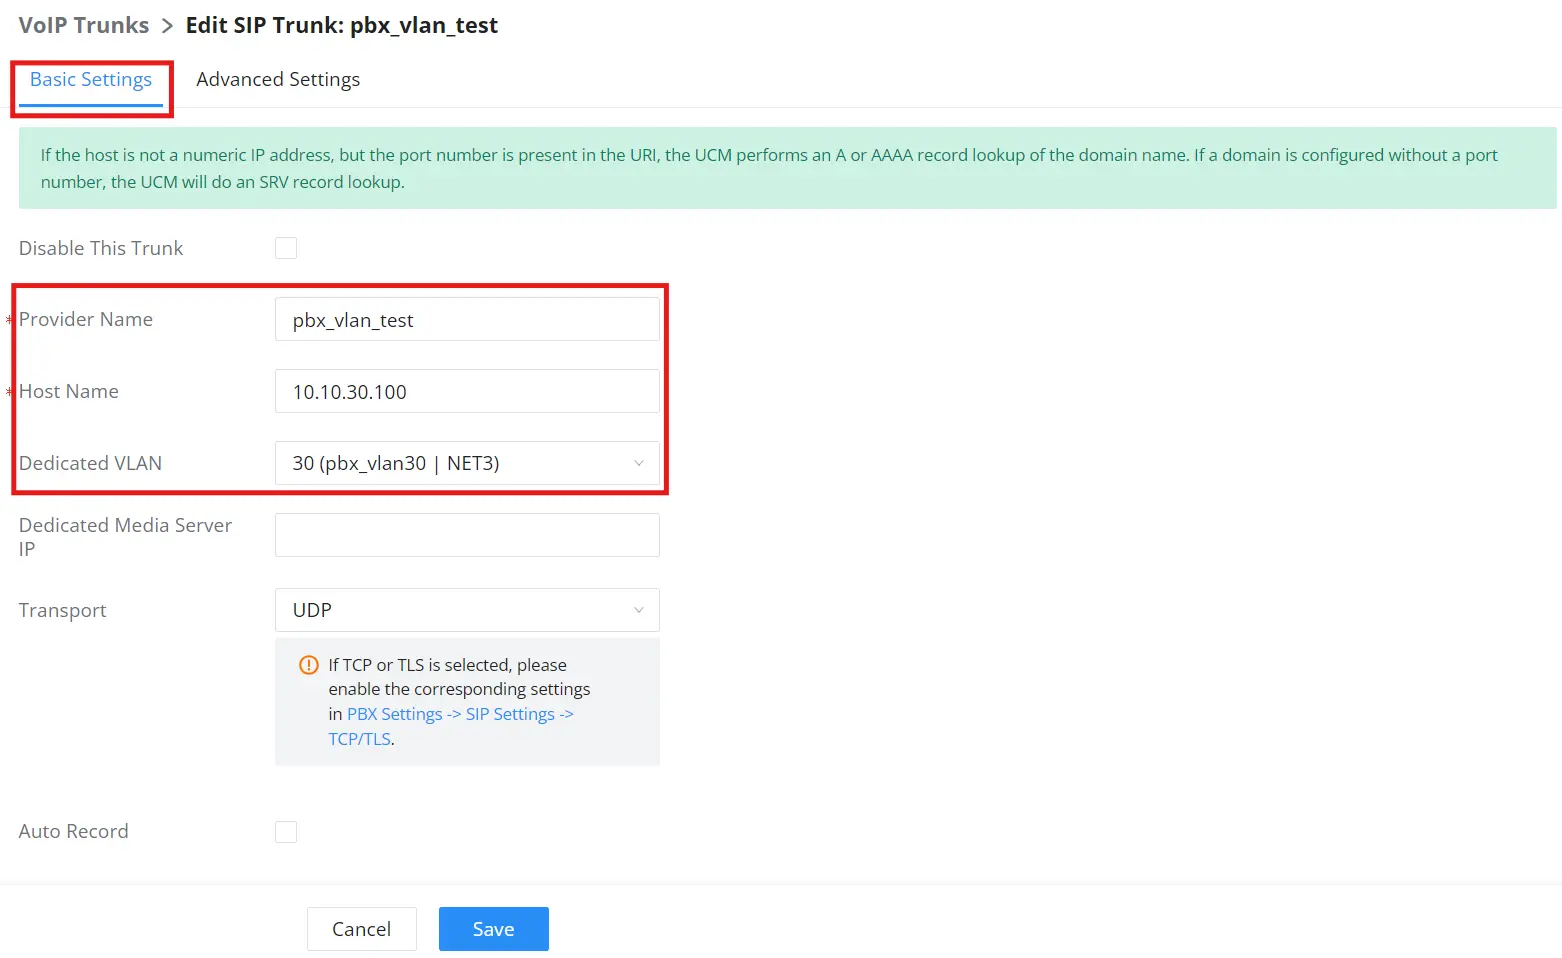
Optional: If your SIP provider uses a separate media server, configure the Dedicated Media Server IP as provided by the carrier.
Step 4 – Create Outbound Route
In this step, you will create an outbound route and assign it to the SIP trunk created in Step 3. This ensures outbound calls are sent through the correct trunk (and therefore through the Dedicated VLAN).
Navigate to: PBX module → Extension/Trunk → Outbound Routes, then click Add.
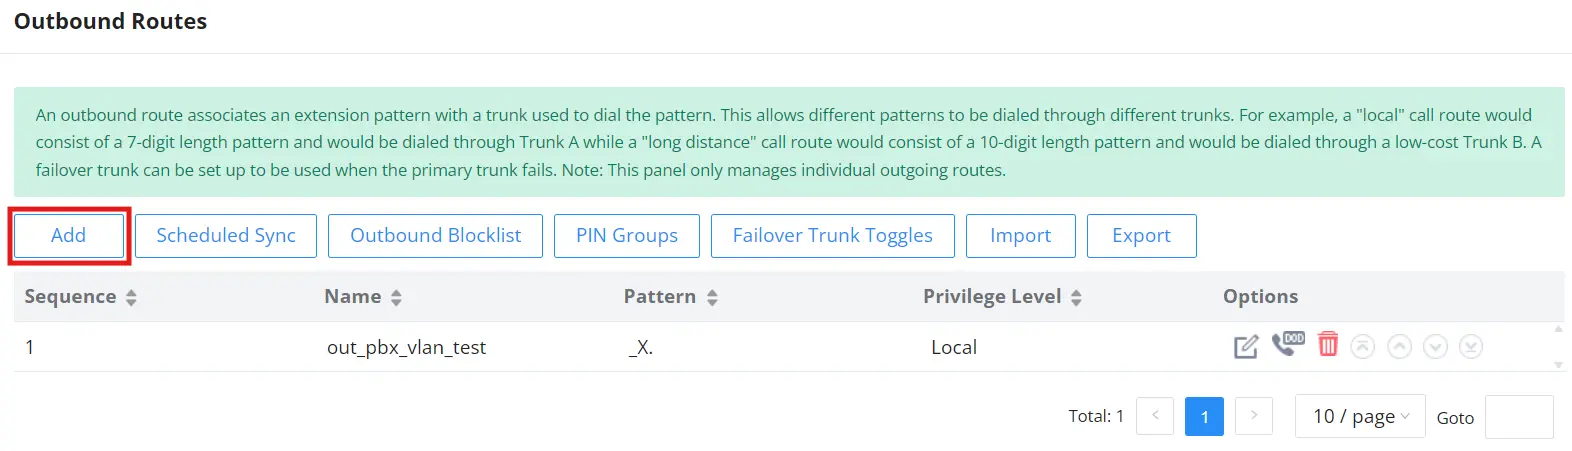
Set the following values (example values shown):
- Outbound Rule Name: Enter a name for the route (e.g.,
out_pbx_vlan_test) - Pattern: Enter the dial pattern you want to send through this trunk (e.g.,
_X.for testing)- Pattern tip:
_X.matches most dialed numbers. Replace it with the dialing pattern required in your deployment.
- Pattern tip:
- Privilege Level: Select the appropriate level for your policy (e.g.,
Local) - Trunk: Select the SIP trunk created in Step 3 (e.g., SIP Trunks —
pbx_vlan_test)
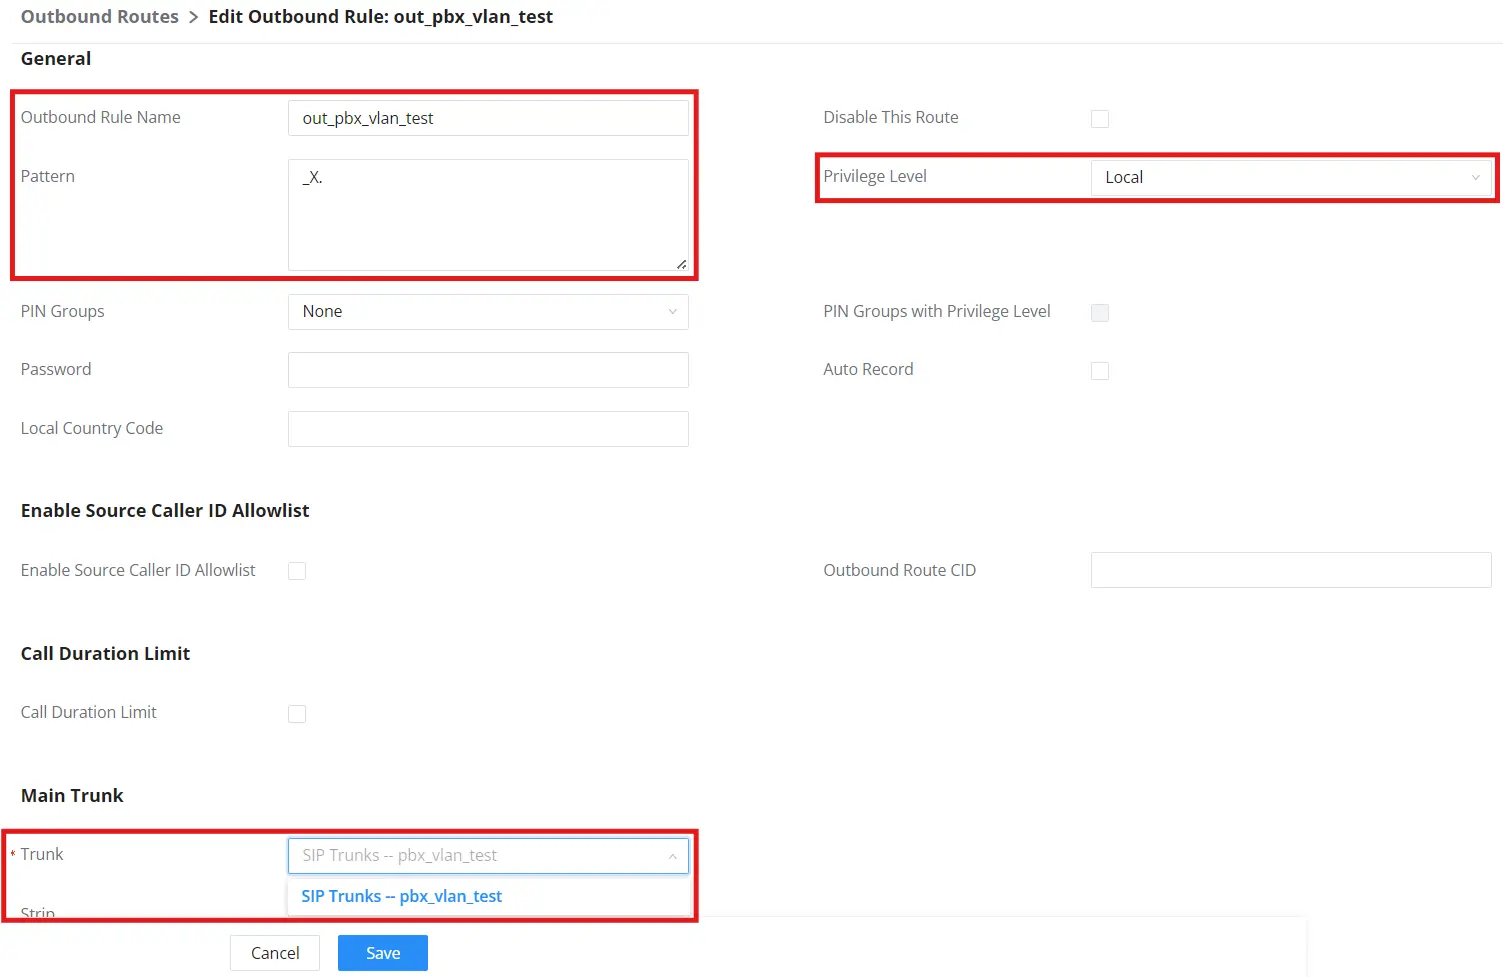
This route ensures outbound calls matching the pattern are sent using the SIP trunk bound to the Dedicated VLAN.
Step 5 – Create Inbound Route
In this step, you will create an inbound route and bind it to the SIP trunk created in Step 3. This ensures inbound calls arriving on that trunk (and Dedicated VLAN) are routed to the correct destination.
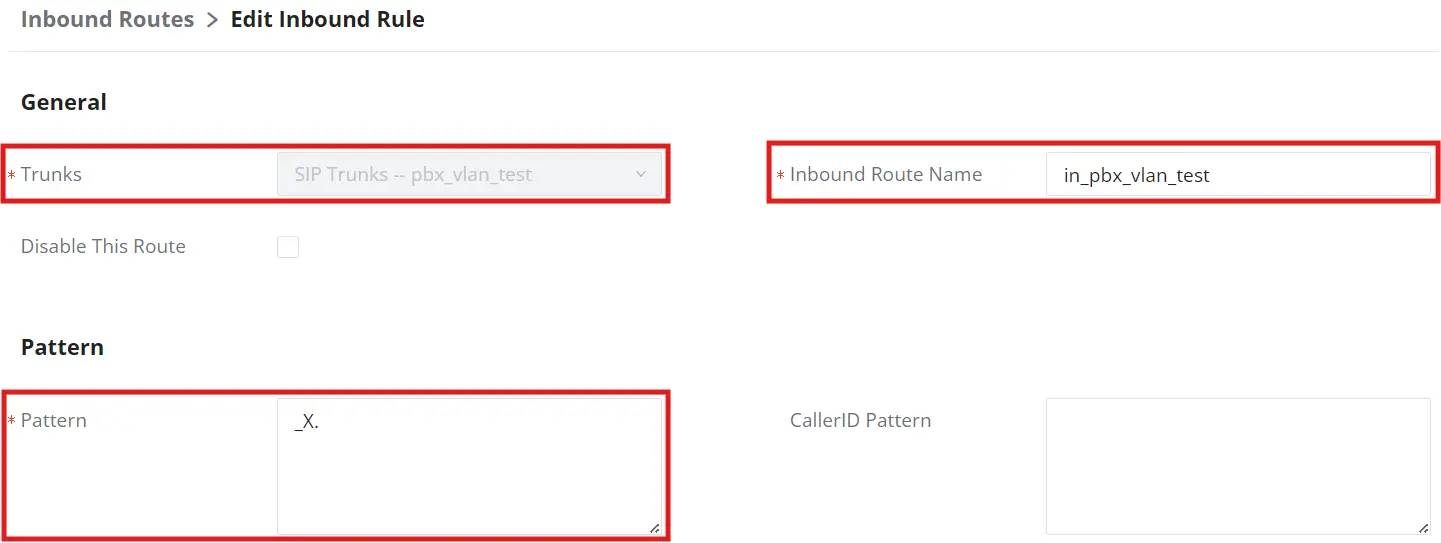
Navigate to: PBX module → Extension/Trunk → Inbound Routes, then click Add.
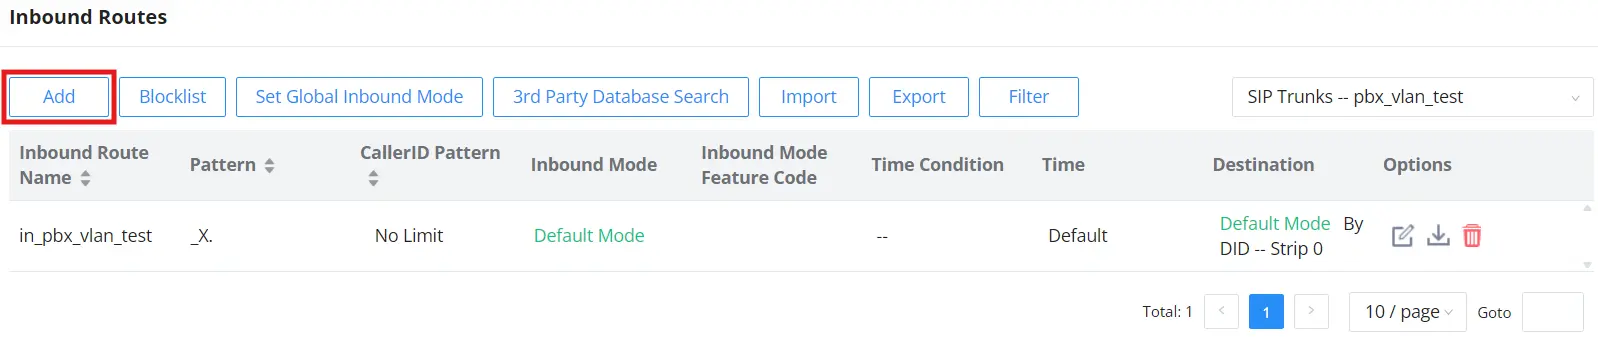
On the Edit Inbound Rule page, configure the following fields:
- Trunks: Select the SIP trunk created in Step 3 (example: SIP Trunks — pbx_vlan_test)
- Inbound Route Name: Enter a name (example: in_pbx_vlan_test)
- Pattern: Define which inbound numbers should match this route (Example for testing: _X.)
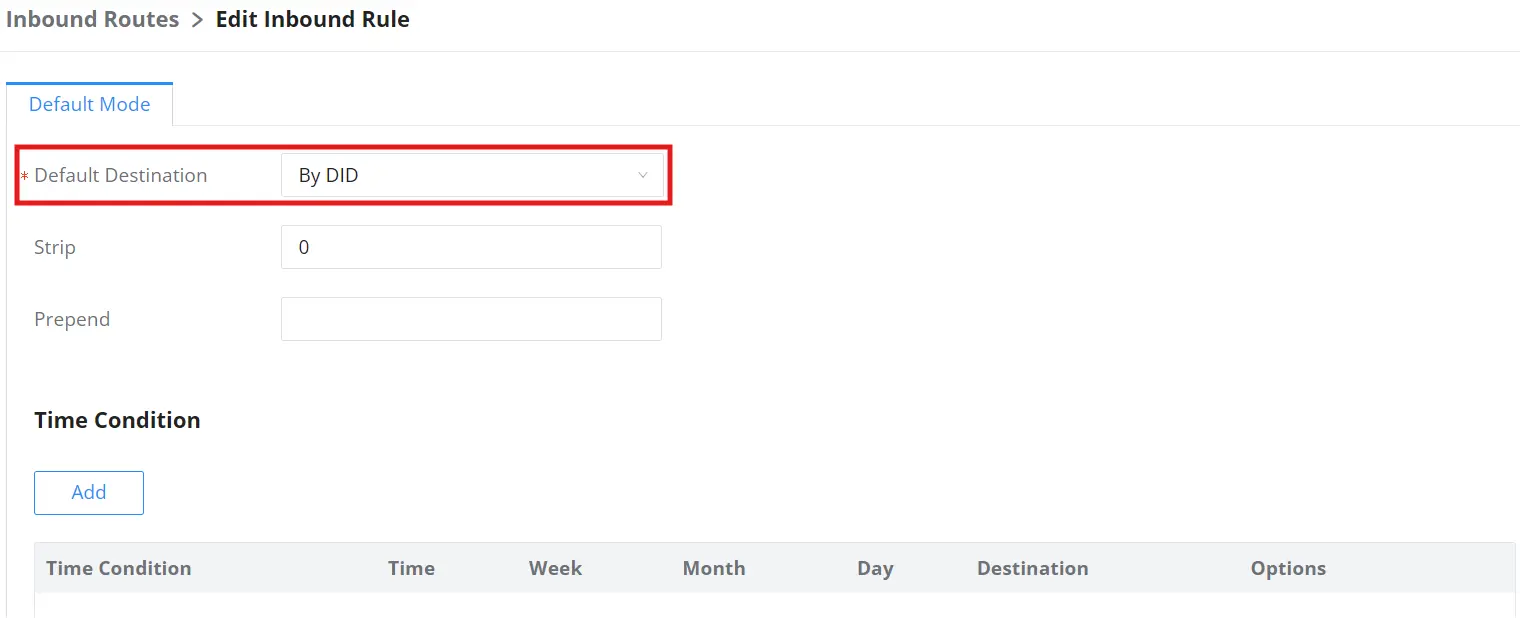
Scroll down to Default Destination, then choose where inbound calls should be routed (for example: an extension, ring group, IVR, or “By DID”).
Step 6 – Configure NAT (Local Network Address)
In this step, you will add your PBX Trunk VLAN subnet as a Local Network Address. This tells the PBX which networks are internal (behind the device), so it can handle SIP/SDP/NAT behavior correctly when trunks are on dedicated VLANs.
Navigate to: PBX module → PBX Settings → SIP Settings → NAT tab
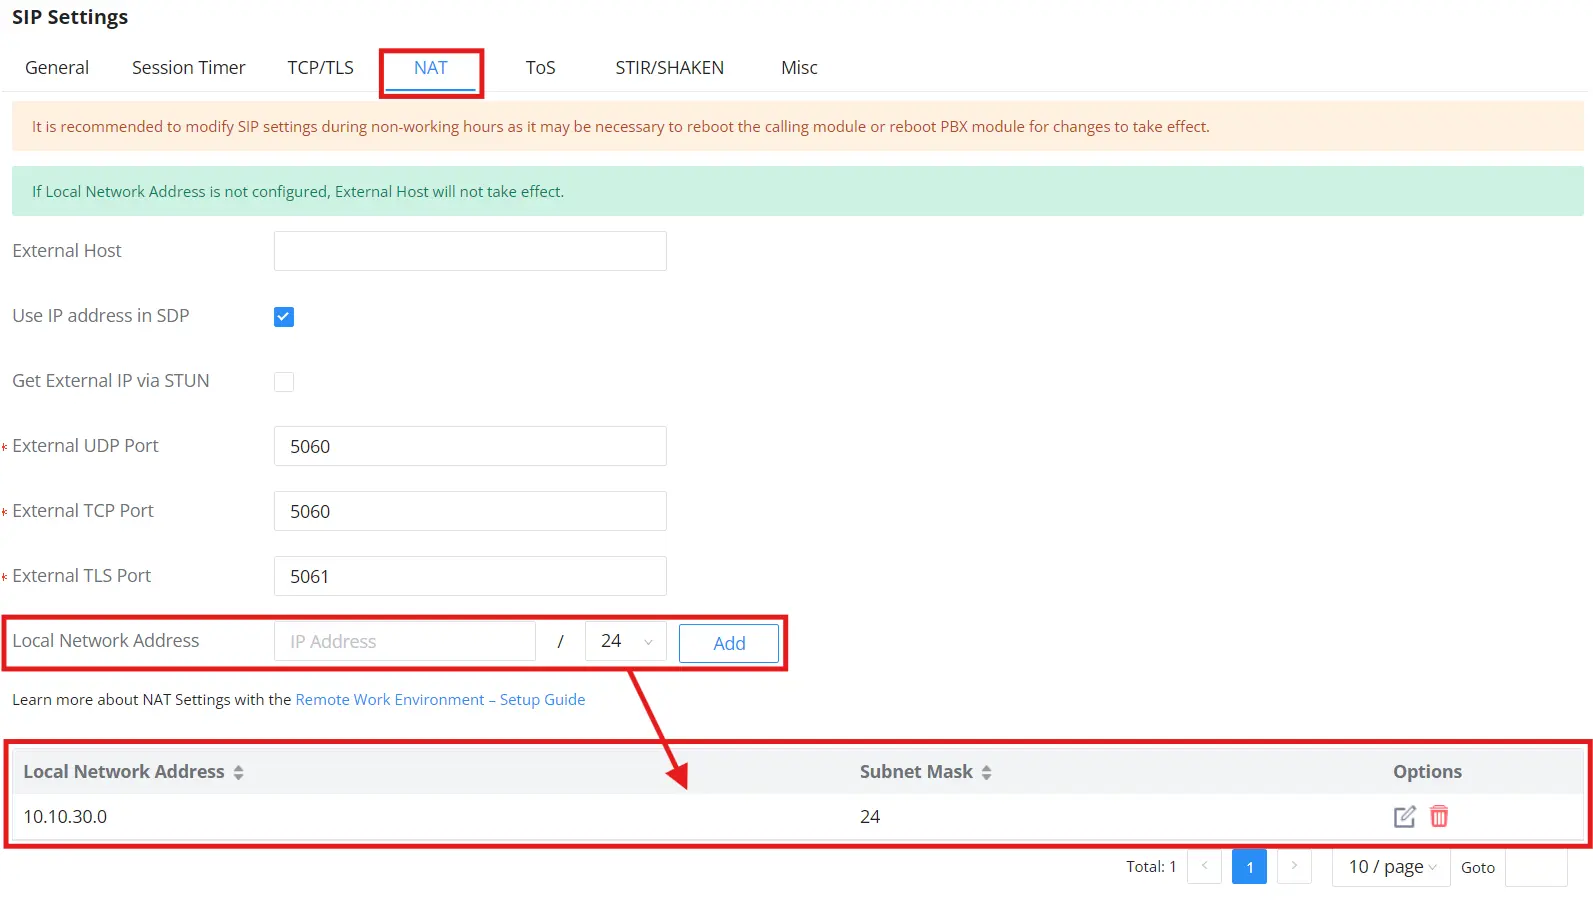
Under Local Network Address, enter the subnet used by your PBX Trunk VLAN:
- Local Network Address:
10.10.30.0 - Subnet Mask:
/24 - Click Add
You should then see the subnet added in the table below (for example, 10.10.30.0 with mask 24).
Use the subnet of the Dedicated VLAN you created earlier (Step 1/2). If your VLAN subnet is different, replace 10.10.30.0/24 with your VLAN network.