


Introduction
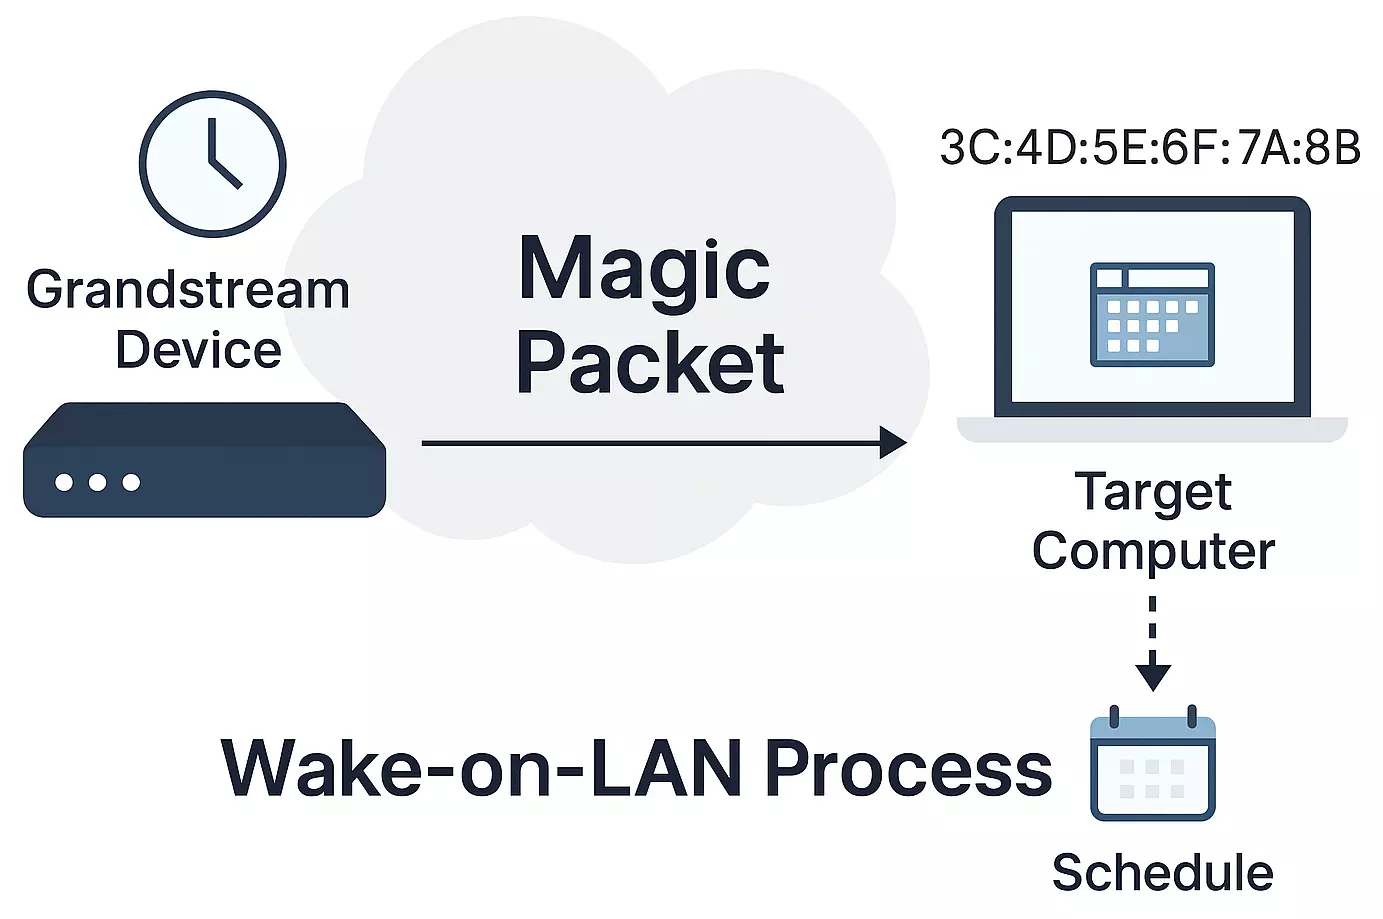
Wake-on-LAN (WOL) is a network standard that allows a powered-off or sleeping computer to be remotely powered on by sending a specially crafted network message known as a Magic Packet. This feature is commonly used in business environments to manage devices efficiently without physical access.
The WOL function requires proper configuration on both the controlling device and the target computer. Once configured, a Magic Packet can be sent over the local network to wake compatible devices.
This guide explains how to configure and use the Wake-on-LAN feature through supported devices, ensuring that your network environment is ready to send WOL signals effectively. For WOL to work correctly, the target computer must also be configured to accept Magic Packets, which includes enabling specific settings in the BIOS/UEFI and operating system.
Prerequisites
Supported Devices
The Wake-on-LAN (WOL) feature is available on devices in the Grandstream GCC6000 Series.
Ensure that you are using a supported device before proceeding with the configuration.
| Series | Models |
|---|---|
| GCC6000 Series | GCC6010, GCC6010W, GCC6011 |
Hardware & Network Requirements
To successfully use the Wake-on-LAN (WOL) feature, the following conditions must be met:
- Wired Ethernet Connection:
The target device must be connected to the network using a wired Ethernet cable. Wake-on-LAN over Wi-Fi is generally not supported and may not function reliably even if enabled. - Network Card (NIC) and Motherboard Support:
The target computer must have a network interface card (NIC) and motherboard that support Wake-on-LAN. This feature is common on most modern desktops, but not guaranteed on all hardware. - Wake-on-LAN Feature Enabled:
WOL support must be enabled in the computer’s BIOS/UEFI firmware settings and operating system. BIOS options may vary between vendors (e.g., WOL, PME, PCI-E Wake Up).
In the operating system (Windows or Ubuntu), appropriate network card properties must also be adjusted. - Persistent Power to Network Card:
After shutdown, the network card must continue receiving standby power to detect incoming Magic Packets. Power-saving features such as ERP Mode must be disabled in the BIOS if present. - Consistent MAC Address:
The target device must have MAC address randomization disabled. Wake-on-LAN requires a stable, hardware-based MAC address to function correctly. - Local Area Network (LAN) Environment:
The WOL Magic Packet must be sent on the same local network segment (LAN). The network must allow broadcast traffic. WOL may not work across different network segments, VLANs, or through certain firewall configurations unless specifically supported. - Accurate MAC Address Entry:
The MAC address of the target computer must be correctly configured in the Grandstream device’s WOL settings. Any mistake in the MAC address will prevent the wake-up signal from reaching the device.
BIOS/OS Preparation Notes
Before attempting to use the Wake-on-LAN feature, the target computer must be properly configured to support and respond to WOL requests. This typically requires enabling specific options in both the BIOS/UEFI firmware and the operating system.
- In the BIOS/UEFI settings, enable Wake-on-LAN (WOL), PME, or PCI-E Wake Up options, depending on how the manufacturer labels the setting. BIOS menus and terminology may vary—refer to your hardware documentation if needed.
- If present, disable ERP Mode or similar deep power-saving features that cut off power to the network card after shutdown.
- In the operating system, make sure the network interface card (NIC) is allowed to wake the system and that any required WOL options (e.g., Wake on Magic Packet) are enabled in device settings.
- MAC randomization should be disabled. WOL requires a stable hardware MAC address to function properly.
Without these settings correctly applied, the system may not respond to Wake-on-LAN signals even if the hardware supports it.
Configuring Wake-on-LAN on the Grandstream Device
To configure Wake-on-LAN (WOL) on your Grandstream device, follow the steps below to add the target computer to the Wake-on-LAN list and optionally assign a schedule.
From the Web UI, go to Maintenance → Network Tools, then click on the Wake on LAN tab.
1. Add a Target Computer
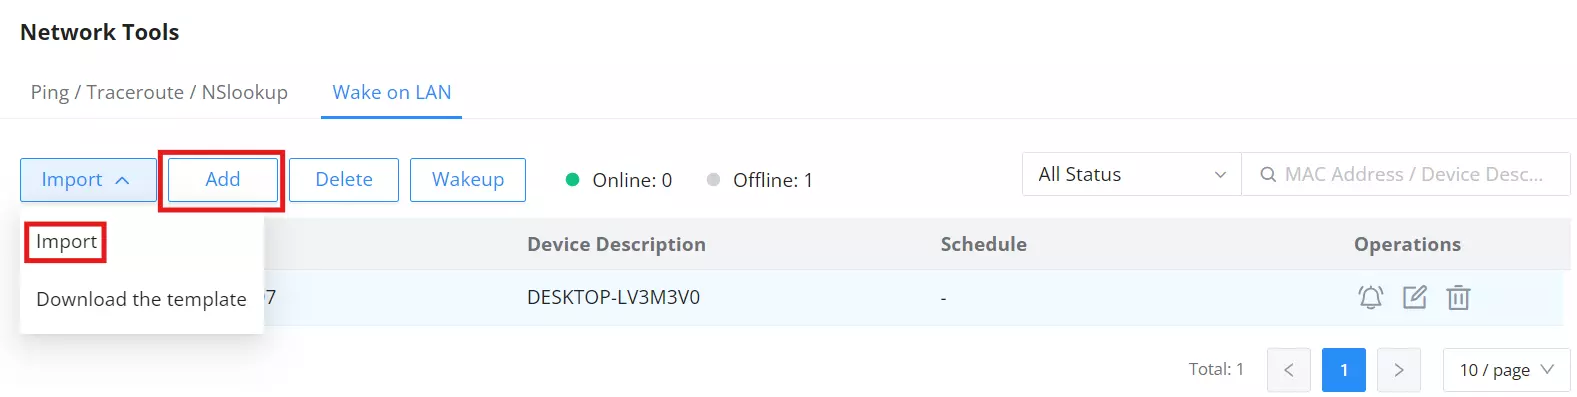
Click the Add button to register a new target computer for Wake-on-LAN. You can either add a device manually or import multiple entries using a CSV file through the Import dropdown.
For bulk setup, download the provided CSV template, fill in the required fields (MAC address and device description), and upload the file to register all devices at once.
3. Enter Device Information
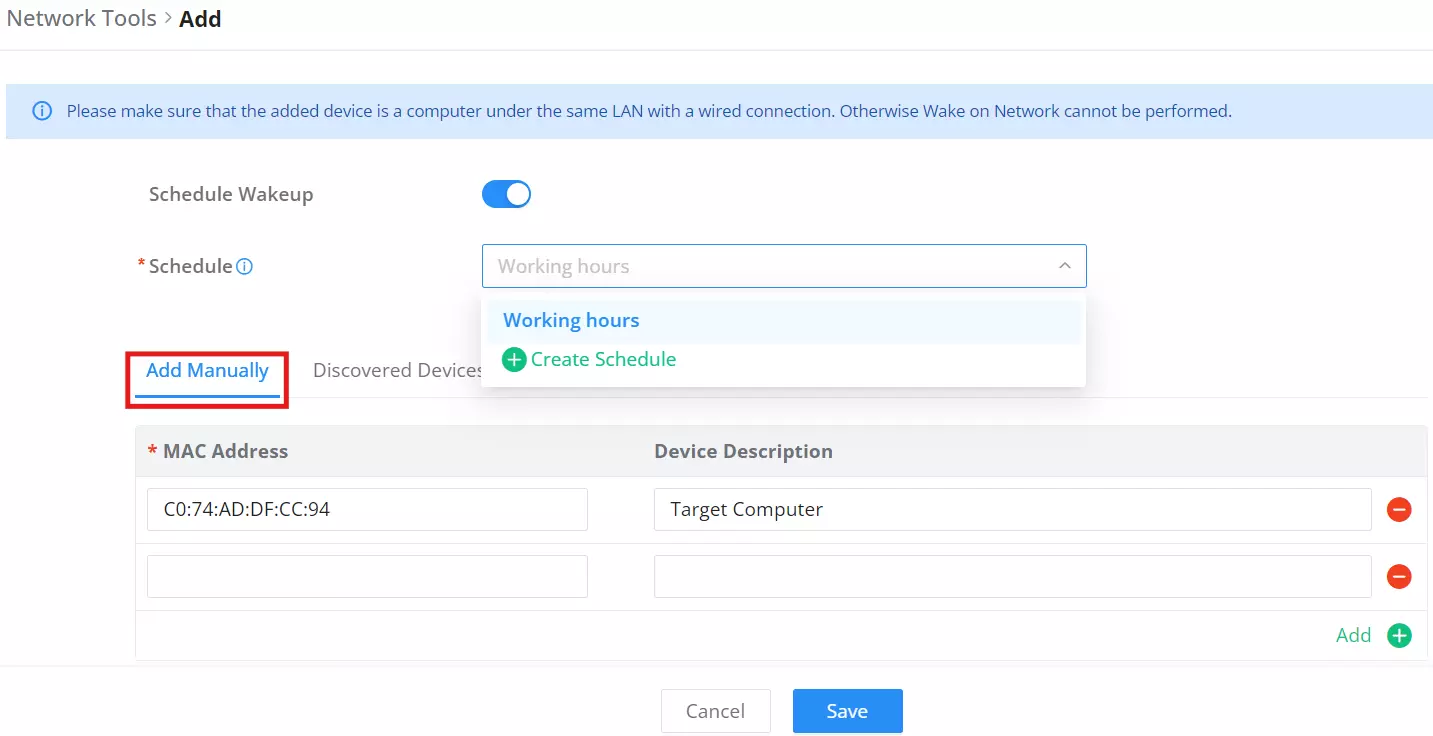
In the Add screen, choose Add Manually to input the target computer’s details:
- MAC Address – Must match the actual MAC of the target computer.
- Device Description – Friendly name to identify the machine.
- Schedule – Optional. Choose an existing schedule or create a new one. The wake-up command will be sent automatically at the scheduled time if configured.
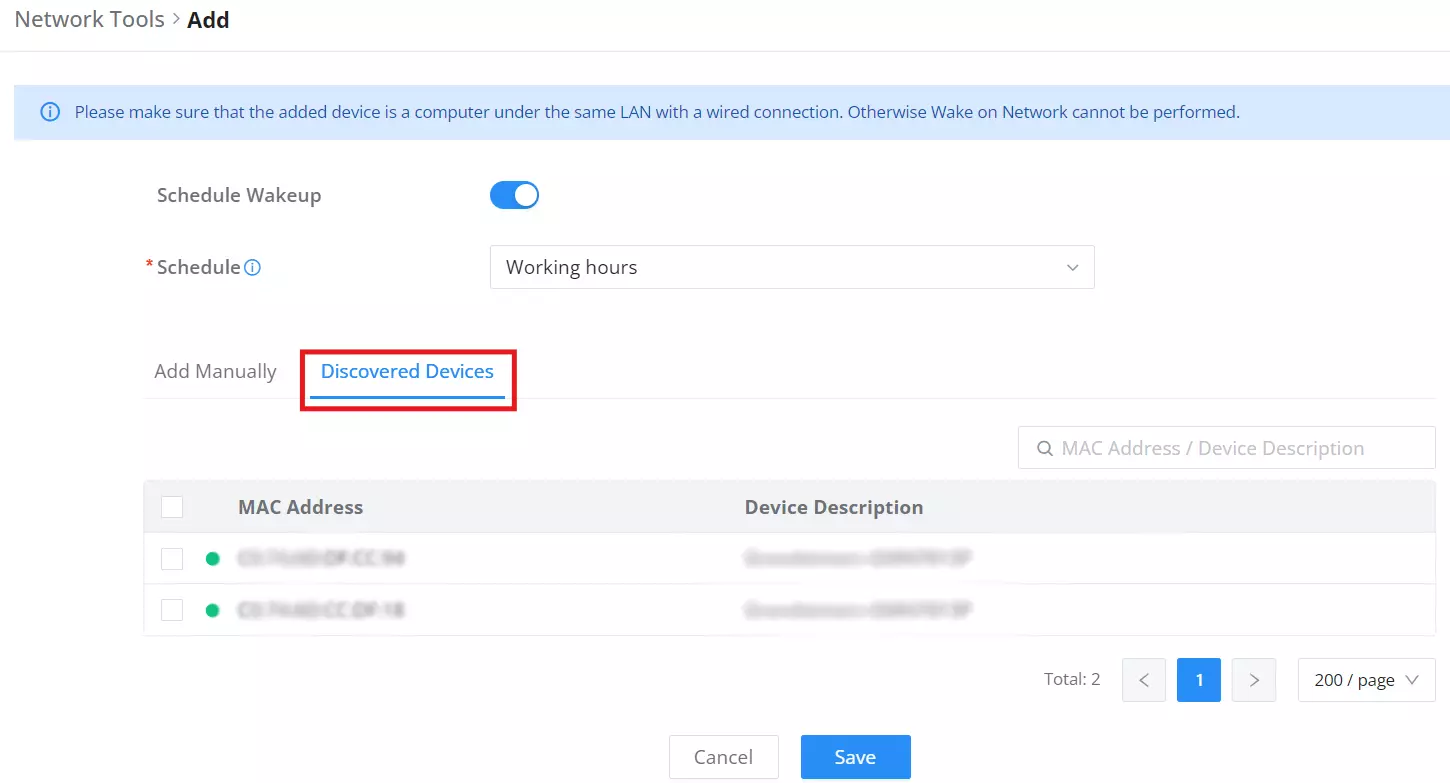
Alternatively, you can switch to the Discovered Devices tab to select a computer already detected on the LAN.
4. Trigger the Wake-Up Signal
Once a device has been added, you can:
- Click the Wakeup button on the toolbar
- Or use the Wakeup icon under the “Operations” column beside each device
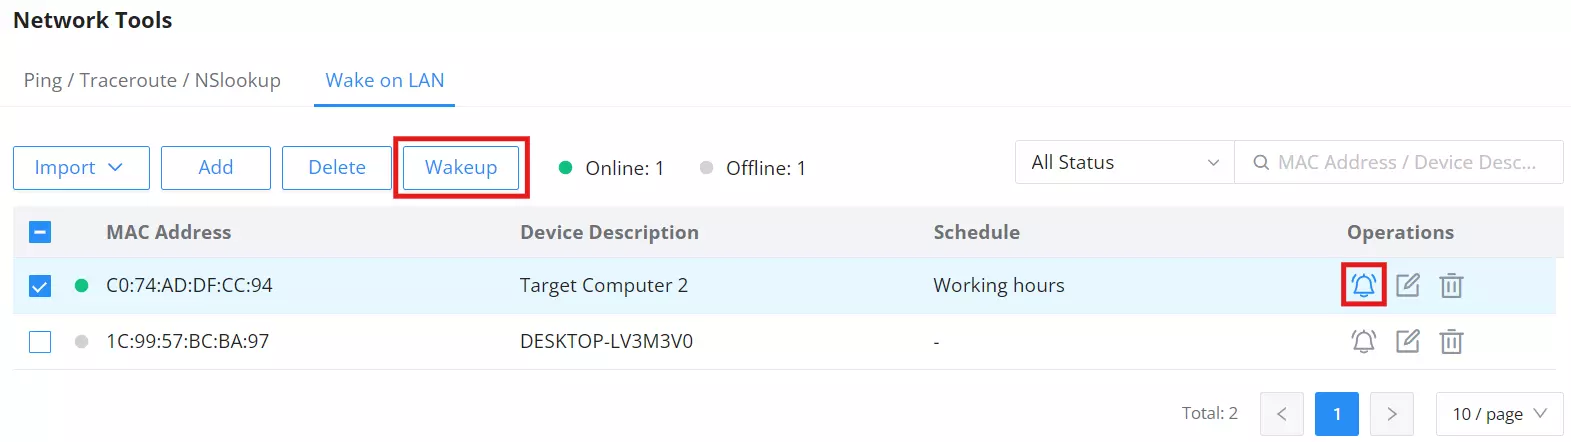
If a schedule has been assigned, the system will send the wake-up command automatically at the specified time.
✅ Once saved, your Grandstream device is ready to send Magic Packets to wake the registered computers.
Configuring the Target Computer
To successfully wake up a computer using Wake-on-LAN (WOL), the target computer must be properly configured at both the BIOS/UEFI firmware level and the operating system level.
The following instructions explain how to set up WOL, using Windows® 10/11 and Ubuntu® 24.04 as examples.
1. BIOS/UEFI Configuration
Before configuring the operating system, ensure that the target computer’s BIOS or UEFI settings allow WOL functionality.
Perform the following steps:
- Enter the BIOS/UEFI Setup Utility during system startup.
- Locate and enable options such as:
- Wake-on-LAN (WOL)
- Power Management Event (PME)
- PCI-E Wake Up
- Disable ERP Mode or any similar deep power-saving feature that cuts off power to the network card after shutdown.
- Save and exit BIOS settings.
2. Windows® 10/11 Configuration Example
After BIOS/UEFI configuration is complete, adjust the Windows® operating system settings as follows:
a. Configure the Network Card
- Open Device Manager.
- Expand Network Adapters and right-click the target network card.
- Select Properties.
In the Power Management tab:
- Enable “Allow this device to wake the computer.”
- Enable “Only allow a magic packet to wake the computer” if available.
In the Advanced tab:
- Configure the following:
- Wake on Magic Packet → Enabled
- PME (Power Management Event) → Enabled
- Wake Up Capabilities → Magic Packet
- Energy Efficient Ethernet → Disabled (if available)
b. Disable Fast Startup
Fast Startup can interfere with Wake-on-LAN functionality. To disable it:
- Open Control Panel → Power Options.
- Click Choose what the power buttons do.
- Click Change settings that are currently unavailable (administrator privileges required).
- Under Shutdown settings, uncheck “Turn on fast startup (recommended).”
- Save changes and restart the computer.
3. Ubuntu® 24.04 Configuration Example
The following steps demonstrate how to configure WOL on an Ubuntu® 24.04 system using the nmcli command-line tool.
a. Find the Network Connection UUID
nmcli connection showExample output:
NAME                UUID                                  TYPE      DEVICE
netplan-enp2s0      7ea6f90b-3495-3533-948a-ef0035687c34  ethernet  enp2s0
Identify the UUID corresponding to your Ethernet connection.
b. Check Current WOL Setting
nmcli connection show <UUID>Look for the setting:
802-3-ethernet.wake-on-lan: --(If --, no WOL setting is applied.)
c. Modify the WOL Setting
Enable WOL using Magic Packet:
sudo nmcli connection modify <UUID> 802-3-ethernet.wake-on-lan magicReplace <UUID> with your actual network connection UUID.
d. Apply the Changes
Reactivate the connection:
sudo nmcli connection down <UUID> && sudo nmcli connection up <UUID>e. Verify the Configuration
nmcli connection show <UUID> | grep wakeExpected output:
802-3-ethernet.wake-on-lan: magic✅ Once these steps are completed, the target computer is ready to respond to Wake-on-LAN signals.
Trademark Notice:
Microsoft®, Windows, and the Windows logo are trademarks or registered trademarks of Microsoft Corporation.
Ubuntu® is a registered trademark of Canonical Ltd.
Linux is the registered trademark of Linus Torvalds.