


Introduction
GDS Manager 2 is a comprehensive software platform designed to centrally manage and monitor GDS372x facility access systems deployed within the same local network through a unified and user-friendly interface.
It provides an overview of connected devices and alarm events. It enables access control management for device configuration, firmware upgrades, and synchronization of user, group, schedule, and holiday information. It supports user management for managing users associated with connected devices. It supports group management for managing User Groups and Device Groups. It provides access schedule management for configuring schedules and holidays. It offers live video monitoring of connected devices. It provides alarm event monitoring for viewing and managing alarm events triggered by connected devices. It maintains operation logs for tracking management activities performed within the application.
GDS Manager 2 does not support configuration of door opening, alarm, or call settings. These options can only be configured through the device’s local web UI or through GDMS SecureAccess Cloud or App.
Product Overview and Key Features
The GDS Manager 2 provides a wide range of features and tools designed to simplify facility access system management and administration. The key features of the GDS Manager 2 include:
- Batch firmware upgrade support without requiring direct interaction with each individual device.
- Device discovery and centralized management through manual addition or local network scanning.
- Centralized monitoring and visibility of connected devices, application activity, alarm events, and operation logs.
- User and group management with configurable access permissions.
- User management through manual entry, import, and Quick enrollment using a USB RFID Card Reader.
- Flexible user-to-device association for individual users or groups.
- Schedule-based access control for defining authorized door access timing.
- Provides live video preview and alarm linkage functionality.
Installation and Access
The GDS Manager 2 is available for download and installation on Windows operating systems. It requires a 64-bit version of Windows 10 or later.
Download and install the GDS Manager 2 package by pressing the link below:
Download GDSManager2 Software v1.1.16
Access the GDS Manager 2
After downloading and installing the application, follow the instructions below to complete the initial setup and log in to GDS Manager 2:
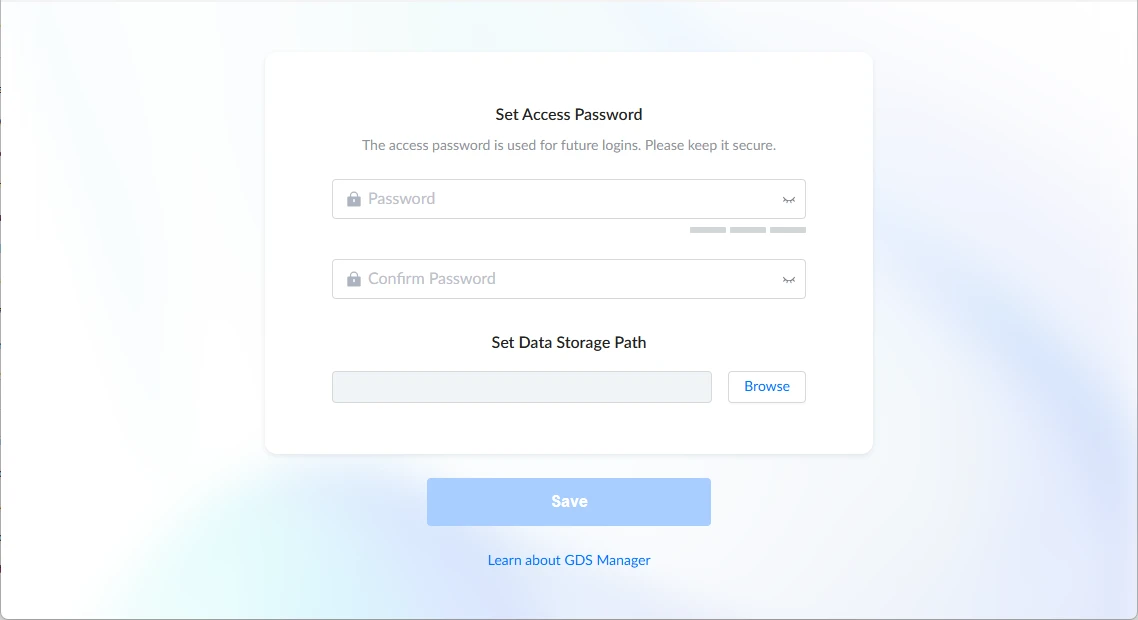
- Launch the application and set an Access Password, then re-enter it to confirm.
- Specify the storage path for the application data, then click Save.
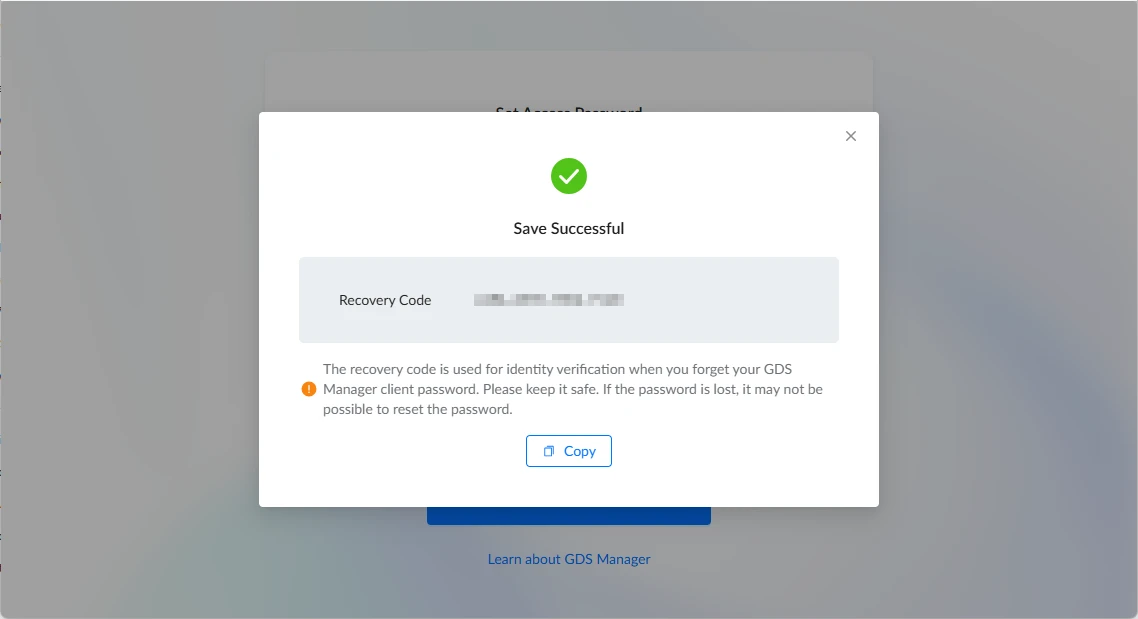
- Copy the generated Recovery Code and store it securely.
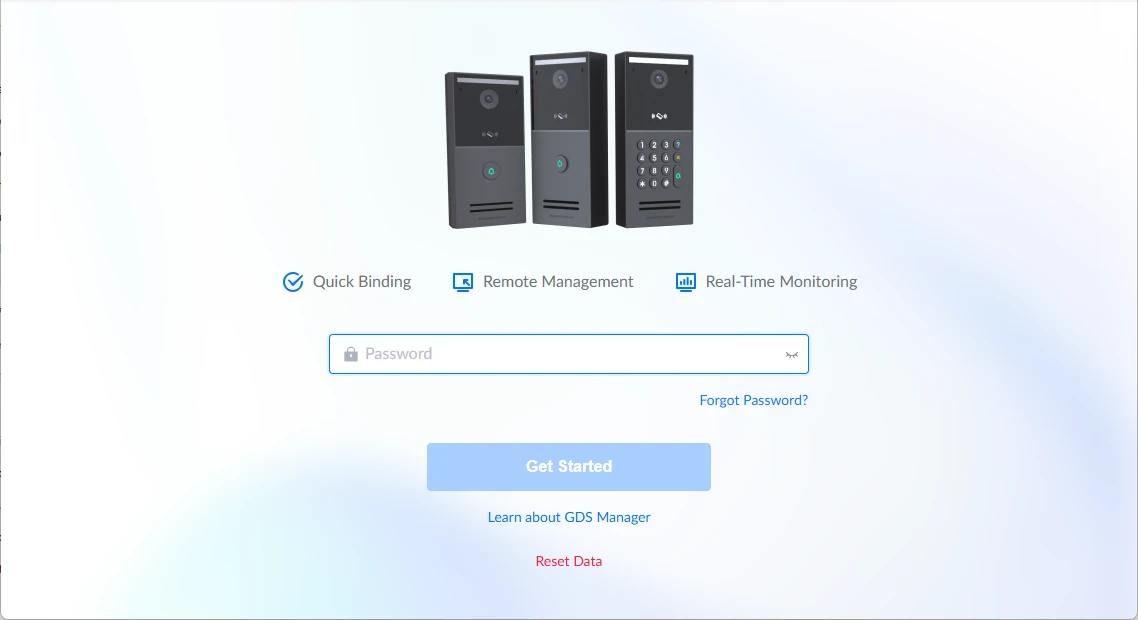
- On the login interface, enter the configured Access Password to log in to the application.
Reset Password
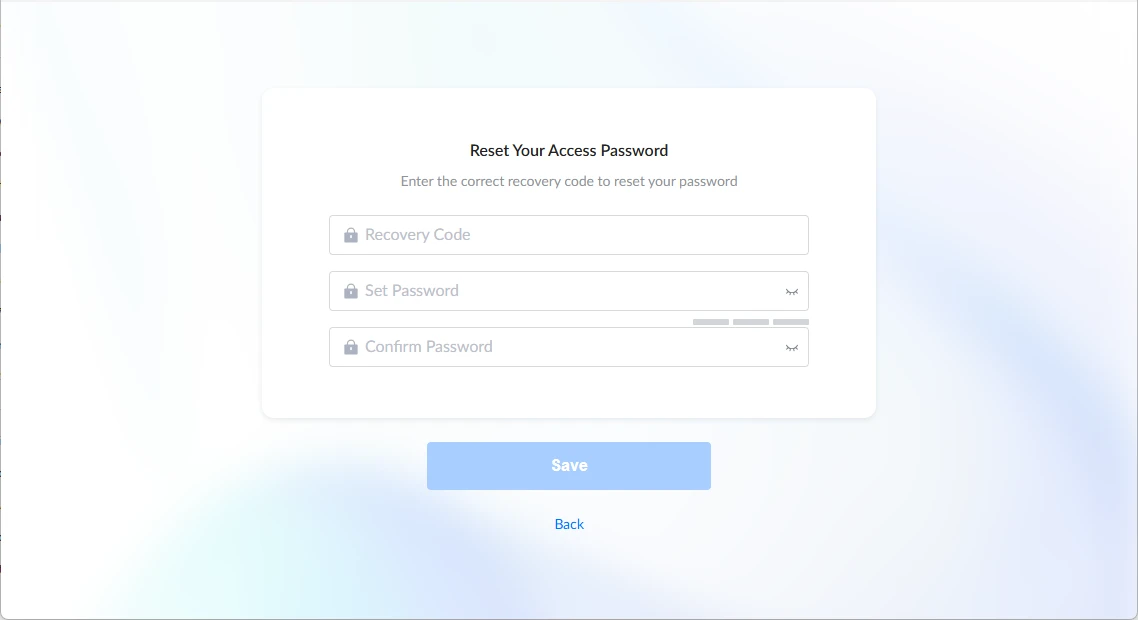
If the configured Access Password is forgotten, the previously generated Recovery Code can be used to reset it by following the steps below:
- On the login interface, click Forgot Password?.
- On the Password Reset interface, enter the Recovery Code, then set and confirm the new password, and click Save.
- On the login interface, enter the new password to regain access to the application.
Application Interface Overview
The application interface is structured into eight main functional tabs, in addition to the Settings and About sections. This layout provides users with an overview of the system and a centralized workspace to efficiently manage devices, users, access control, scheduling, live monitoring, alarms, and system operation records. Detailed information about each section is provided below.
Overview
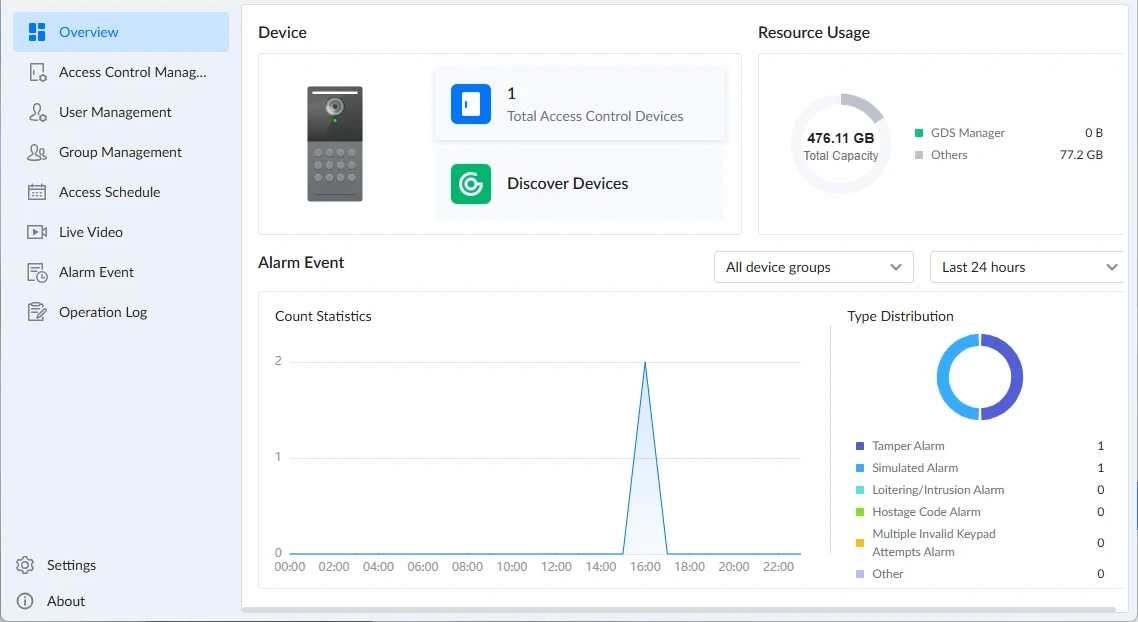
The Overview interface provides a centralized dashboard that gives users a quick summary of system status, device activity, storage usage, and alarm event statistics. It presents key information through interactive panels and charts, enabling efficient real-time monitoring of access control devices and system resources, as shown below:
Device
Displays a quantitative overview of devices and provides quick access to Device Discovery and Access Control Management for simplified monitoring and management.
- Total Access Control Devices: Displays the total number of configured access control devices and redirects to Access Control Management.
- Discover Devices: Opens the Discover Devices window in Access Control Management.
Resource Usage
Displays the total capacity of the storage path specified by the client application and the current percentage utilized by GDS Manager 2. This section presents data in chart form, intuitively illustrating the storage consumed by recorded events, snapshots, and other access control data.
Alarm Event
Displays alarm event statistics for a selected device, device group, or all device groups within a selected time range, including the last 24 hours, last 7 days, or last 30 days.
- Count Statistics: Displays a timeline view of recorded alarm events.
- Type Distribution: Displays the distribution of alarm event types in a chart format, visualizing the proportion of each alarm type.
Access Control Management
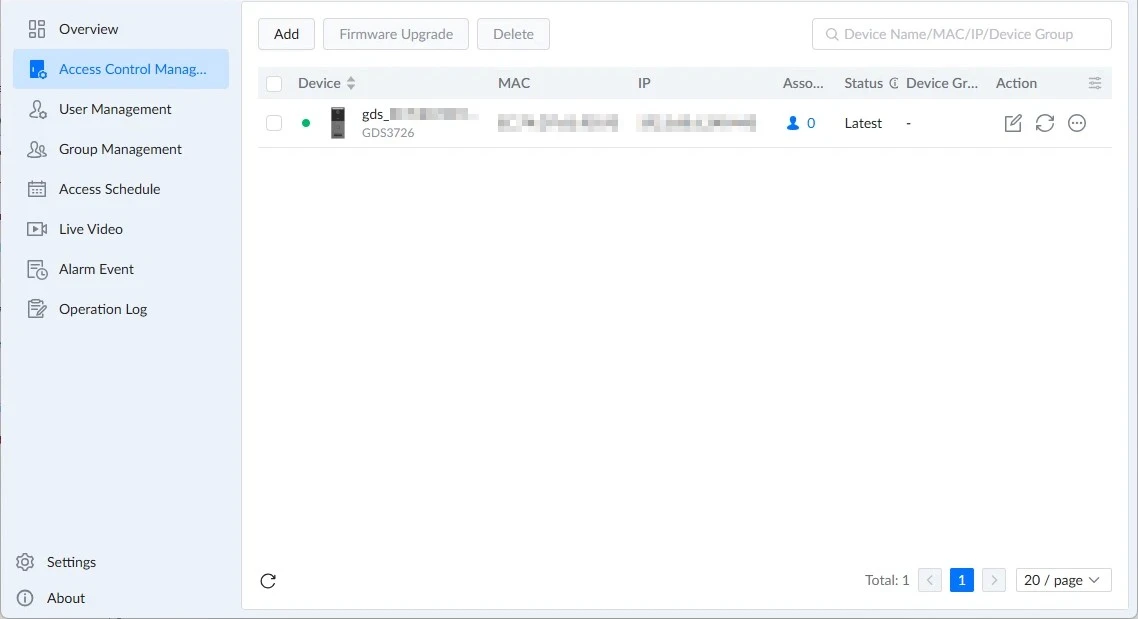
The Access Control Management interface provides centralized management and monitoring of connected access control devices. It enables users to add, delete, search, refresh, and manage devices, perform bulk firmware upgrades, and monitor device status and related information through the interface shown below:
Add a Device
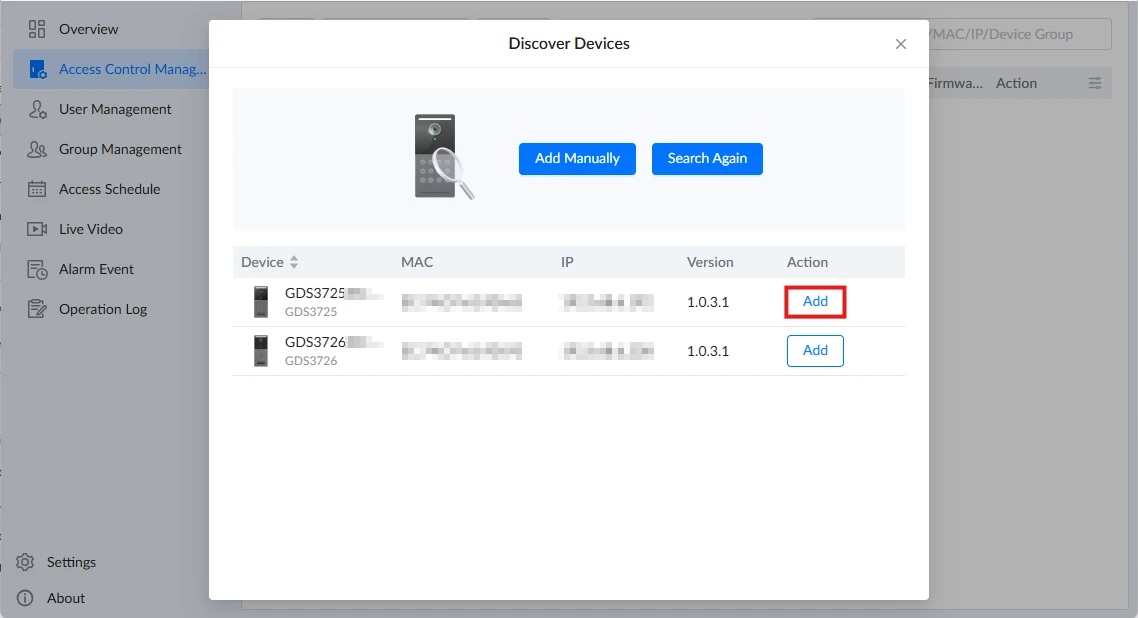
Devices can be added by pressing Add, which opens the Discover Devices window, where discovered devices can be added automatically or manually by pressing Add Manually.
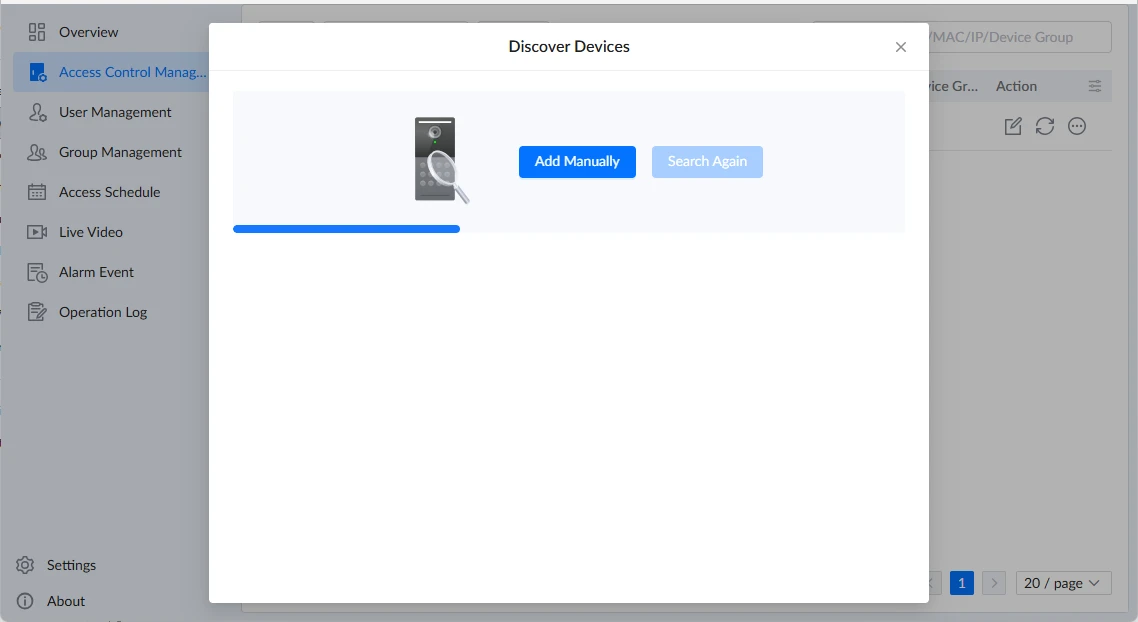
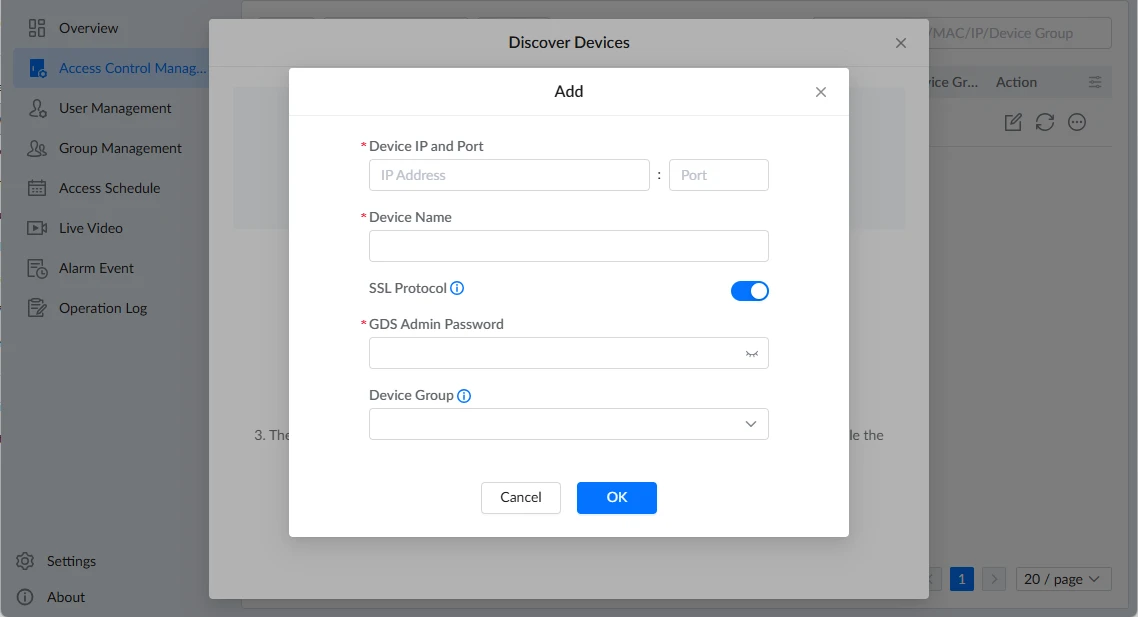
- Devices can be added manually by following the steps below:
- Select Add Manually in Discover Devices
- Specify the device’s IP Address and Port Number.
- Enter the device’s Name.
- Enable or disable the SSL protocol. When enabled, connections between the application and the devices are encrypted and transmitted through HTTPS.
- Enter the device’s Admin Password.
- Assign the device to a Device Group.
- Press OK.
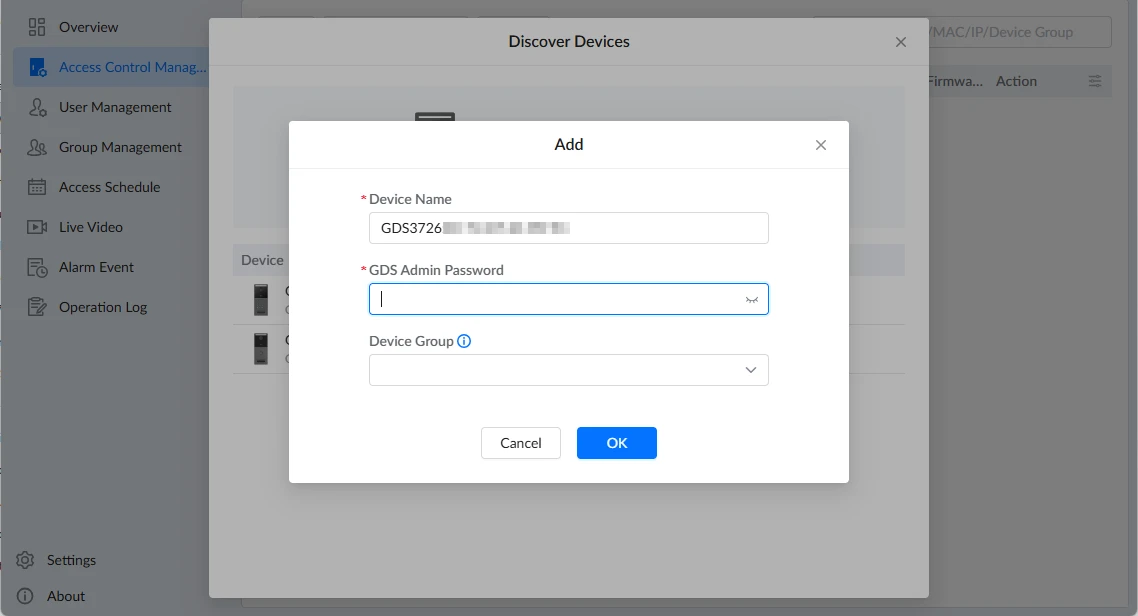
- Alternatively, devices can be added using the Search tool by following the steps below:
- Select Add on the target device.
- Enter the device’s Admin Password.
- Assign the device to a Device Group, if applicable.
- Press OK.

Upgrade a Device
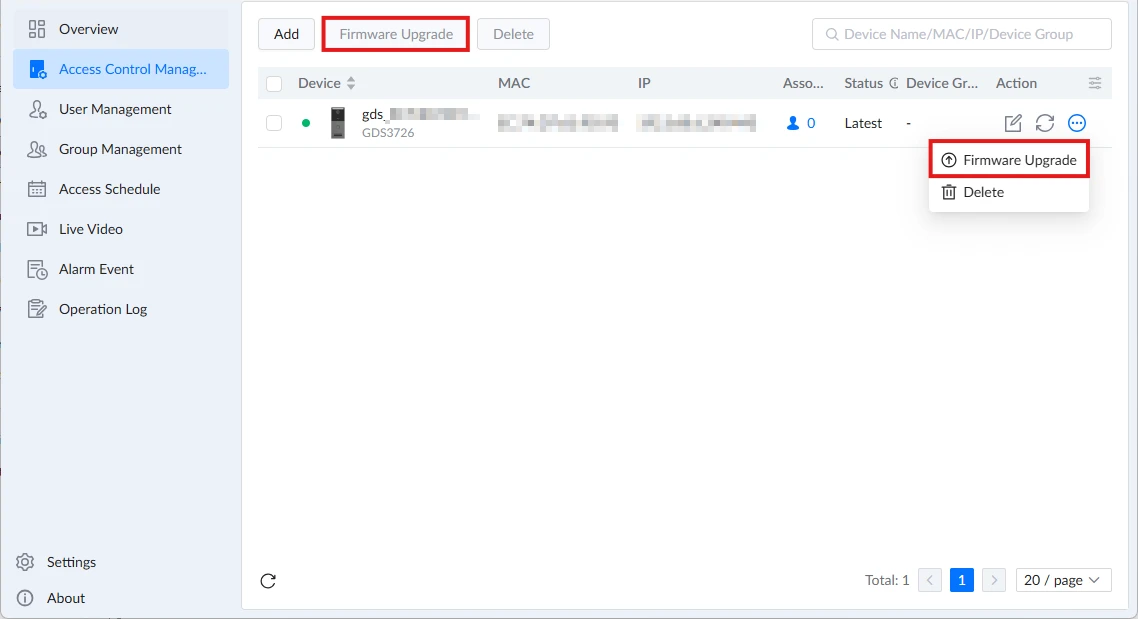
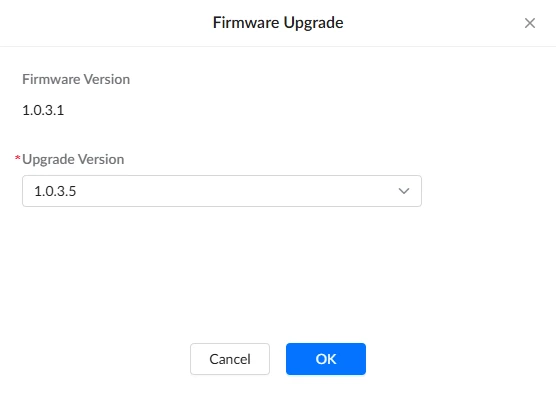
Users can upgrade device firmware for selected devices or all devices in bulk by selecting the target devices and clicking Firmware Upgrade. Upgrades can also be initiated for an individual device by clicking the device’s three-dot menu and selecting Firmware Upgrade. The upgrade window displays the current firmware version and provides a drop-down list of firmware files that have been uploaded to the application for selection.
For more information about uploading firmware files, refer to the Firmware Upload section.
Delete a Device
Users can delete selected devices or all devices in bulk by selecting the target devices, clicking Delete, and confirming the deletion. Individual devices can also be deleted by clicking the device’s three-dot menu and selecting Delete.
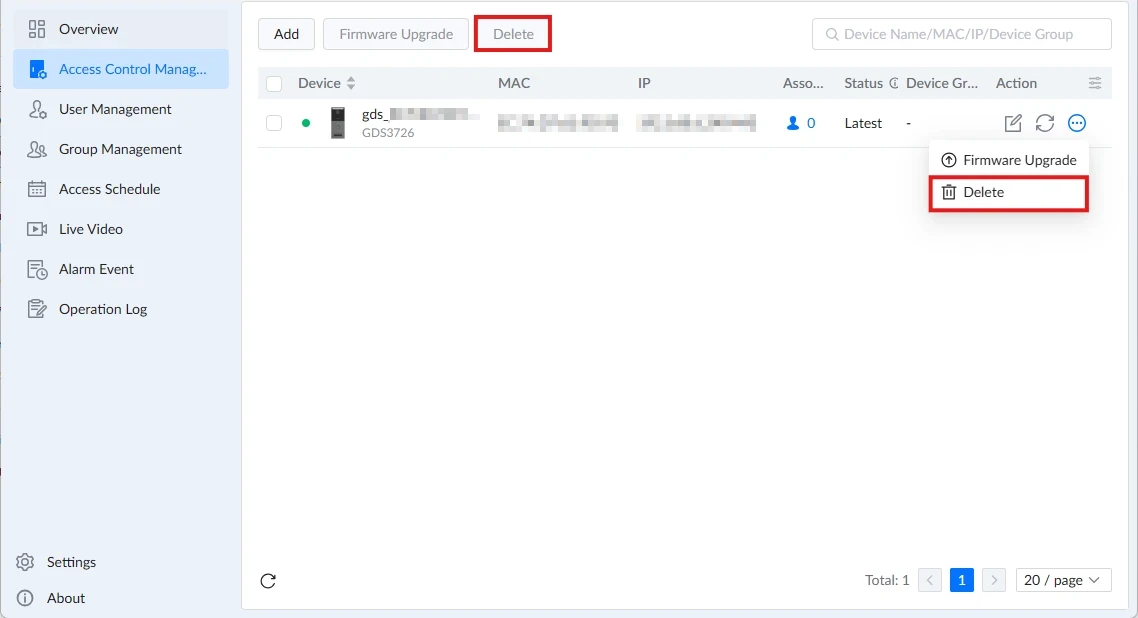
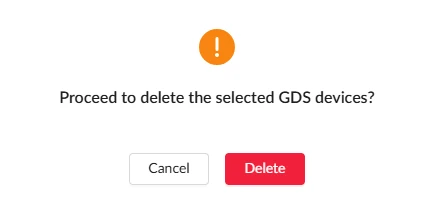
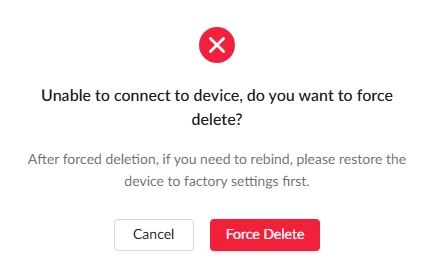
Offline devices must be Force Deleted. After force deletion, the device must be reset to factory settings before it can be re-added to GDS Manager 2.
Devices
Device | Displays the name of the device. |
MAC | Displays the MAC address of the device. |
IP | Displays the IP address and port number of the device. |
Associate User | Displays the user associated with the device. |
Status | Displays the current status of the device. |
Device Group | Displays the Device Group assigned to the device. |
Firmware Version | Displays the current firmware version of the device. |
Action | Provides management actions for the selected device. The available actions include:
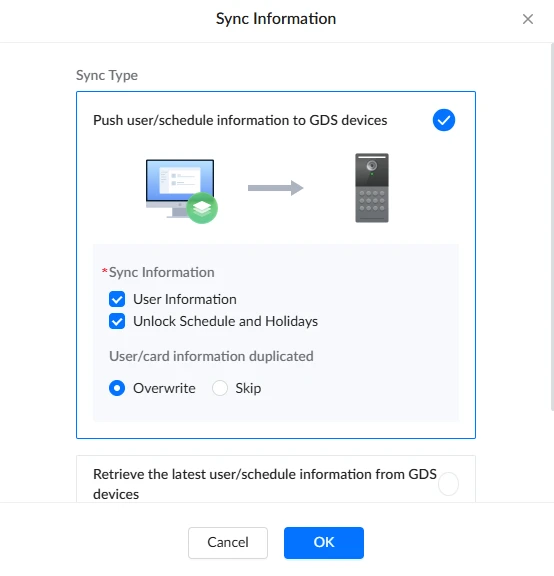
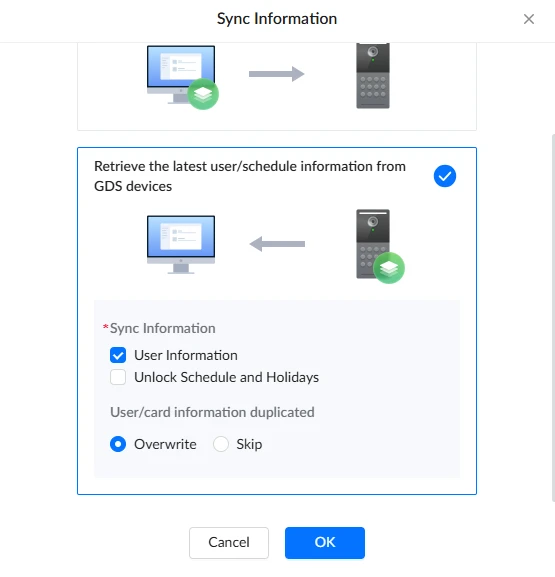
Push user/schedule information to GDS devices: Pushes user information, schedules and holidays information, or both from the GDS Manager 2 to the selected GDS devices. Retrieve the latest user/schedule information from GDS devices: Pulls user information, schedules and holidays information, or both from the selected GDS devices to the GDS Manager 2.
|
Access Control Management Controls
The interface provides tools that assist users in managing and navigating device data:
- Search Bar: Allows users to search for specific devices within the device list by Name, MAC, IP or Device Group.
- Refresh Icon: Updates the device list and device information.
Synchronizing and Pushing Configuration to Devices
GDS Manager 2 supports synchronizing user information, schedules, and holidays between the application and managed GDS devices. Users can either push information from GDS Manager 2 to selected devices or retrieve the latest information from devices and import it into GDS Manager 2.
To synchronize configuration:
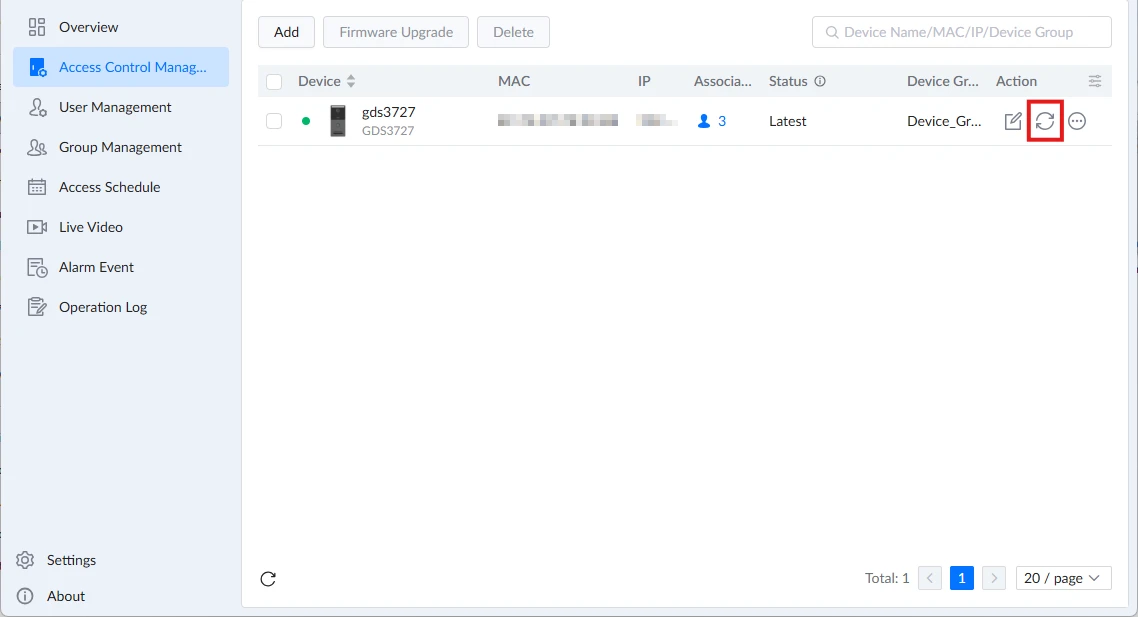
- Click the Sync icon on the target device.
- Select one of the following actions:
- Push User/Schedule Information to GDS Devices: Pushes configurations from GDS Manager 2 to the selected GDS devices.
- Retrieve the Latest User/Schedule Information from GDS Devices: Pulls configurations from the selected GDS devices and imports them into GDS Manager 2.
- Select the information to synchronize by choosing one or both of the following options:
- User Information
- Unlock Schedules and Holidays
- Choose whether duplicated user or card information should be overwritten or skipped.
- Click OK to start the synchronization process.
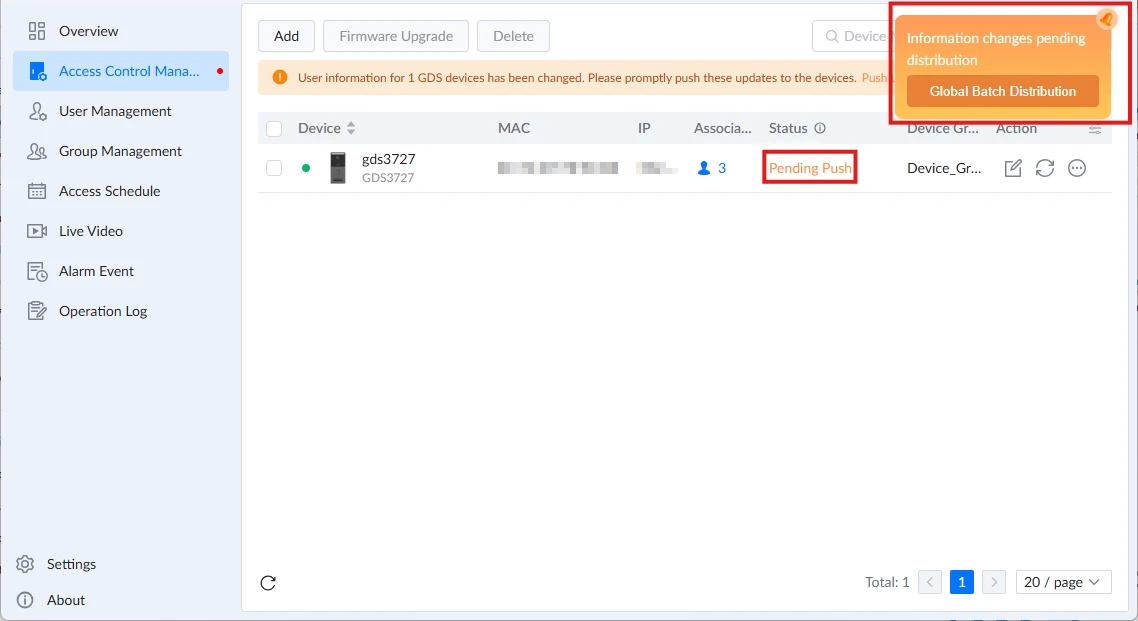
After configuration changes are made in GDS Manager 2, a notification is displayed, and the device status changes to Pending Push. This status indicates that the changes have not yet been synchronized to the device.
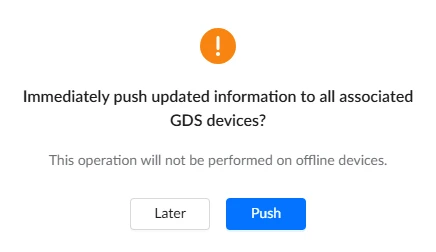
To push the configuration to the devices:
- Click the Push notification.
- Click Push to apply the pending configuration changes to the devices.
- Once the process is complete, the device status will be updated from Pending Push to Latest.
User Management
The User Management interface provides centralized administration of user profiles and access credentials within the system. It enables users to create, import, configure device group access permissions, and manage device associations. Users can also be maintained through batch operations, quick enrollment, filtering options, and additional functions such as batch configuration, export, and deletion, ensuring efficient user management across connected devices and device groups, as shown below:
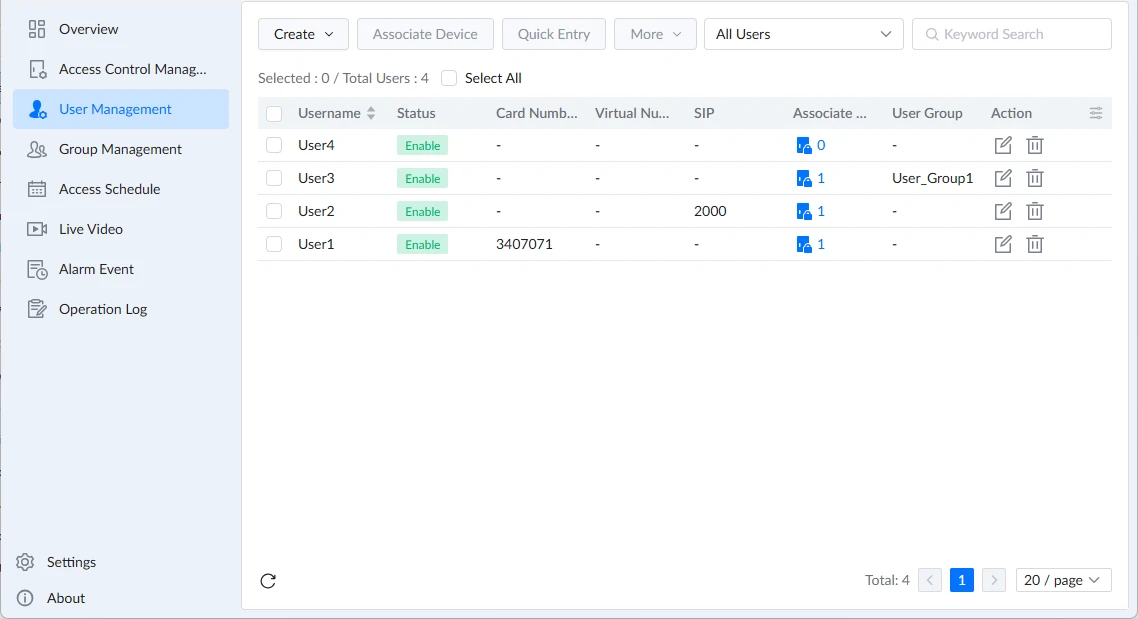
Create a User
Users can be created by pressing Create, either manually using Create User or Batch Import via a CSV file.
- Users can be created manually by pressing Create, then selecting Create User, and filling in the required fields documented in the table below. The information can be verified in the Overview section before clicking Create to complete the process.
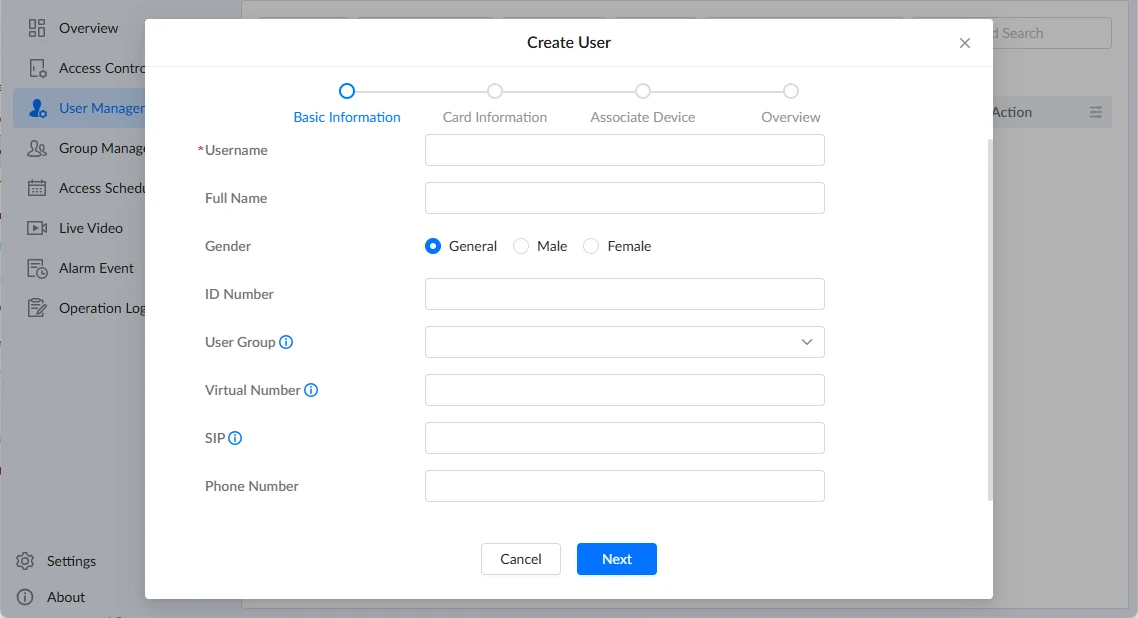
Basic Information | |
Username | Define the login/identity of the user (required field). |
Full Name | Enter the full name of the user. |
Gender | Select the user’s gender, the available options are:
|
ID Number | Enter an identifier such as employee number or badge ID. |
User Group | Assign the user to a user group for centralized management. |
Virtual Number | Define an internal extension used for intercom and internal calling. |
SIP | Enter a SIP extension number used for VoIP calling. |
Phone Number | Enter the user’s phone number. |
Card Information | |
Card Type |
|
Card Number | Enter the unique identifier of the access card. It can be obtained via a USB card reader. Note:
|
Card Notes | Add additional notes related to the card. |
Validity Start Time | Set the card validity start date. |
Validity End Time | Set the card validity end date. |
Associate Device | |
Associate Device | Select one or more devices associated with the user. Filter devices by device group or search by name, MAC address, or IP. |
Associated Device Group | Assign the user to a device group. |
Access Schedule | Select an access schedule from custom schedules created in the application (up to 50 schedules), or set it to All Day for unrestricted access. |
Device Call Number | Specify an account as the device call number or set it to Automatic. |
- Users can be imported by pressing Create, then selecting Batch Import, and uploading the CSV file as documented in the table below. The process is completed by clicking Import.
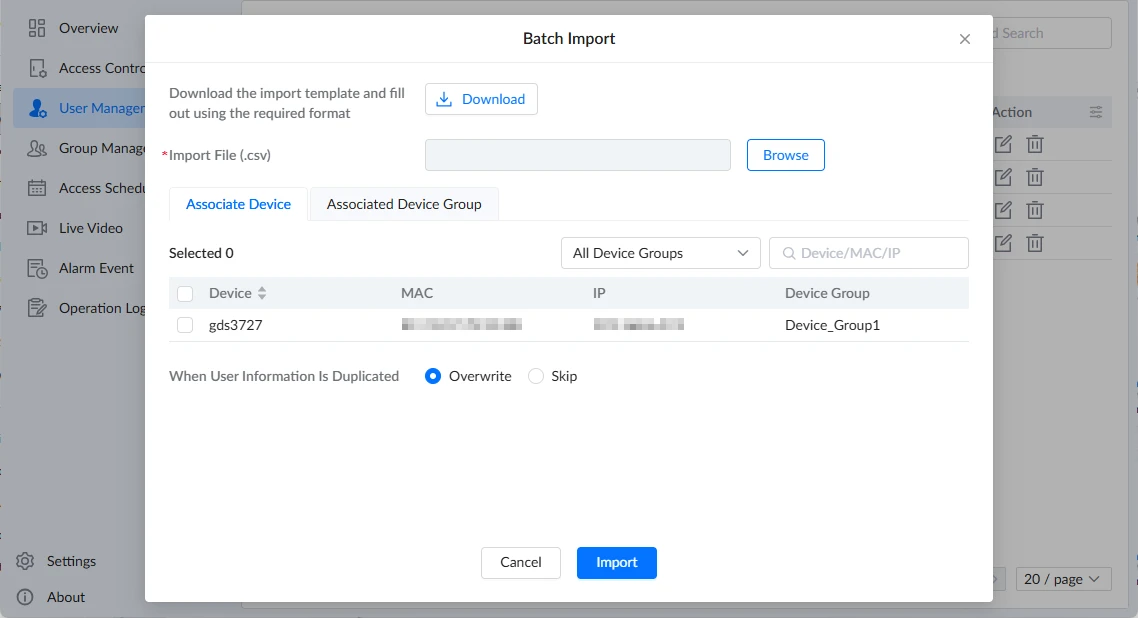
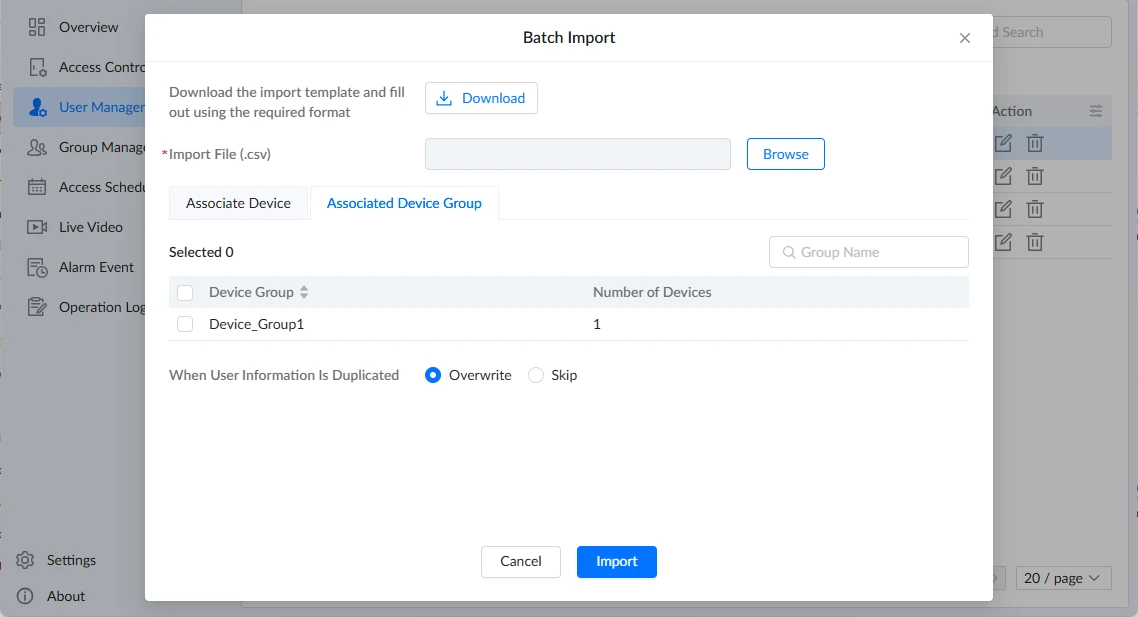
Download | Download the import template and fill it out using the required format. |
Import File | Upload the CSV file after filling in the information. |
Associate Device | Assign the batch of users to a device. |
Associated Device Group | Assign the batch of users to a device group. |
When User Information is Duplicated | When user information is duplicated, the following options are available:
|
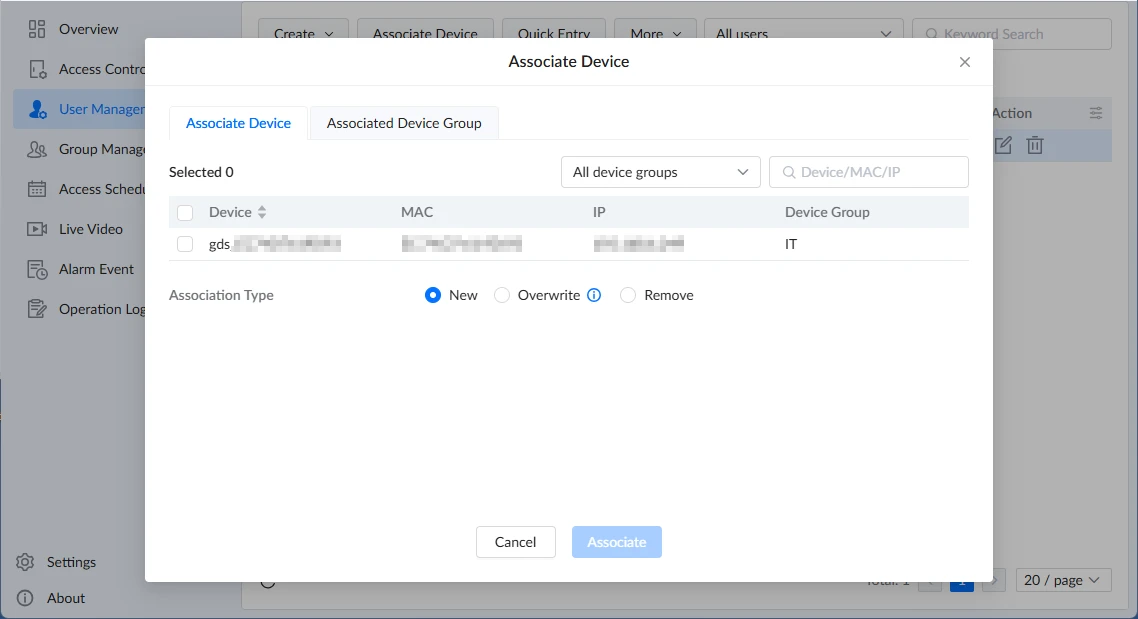
Associate Device
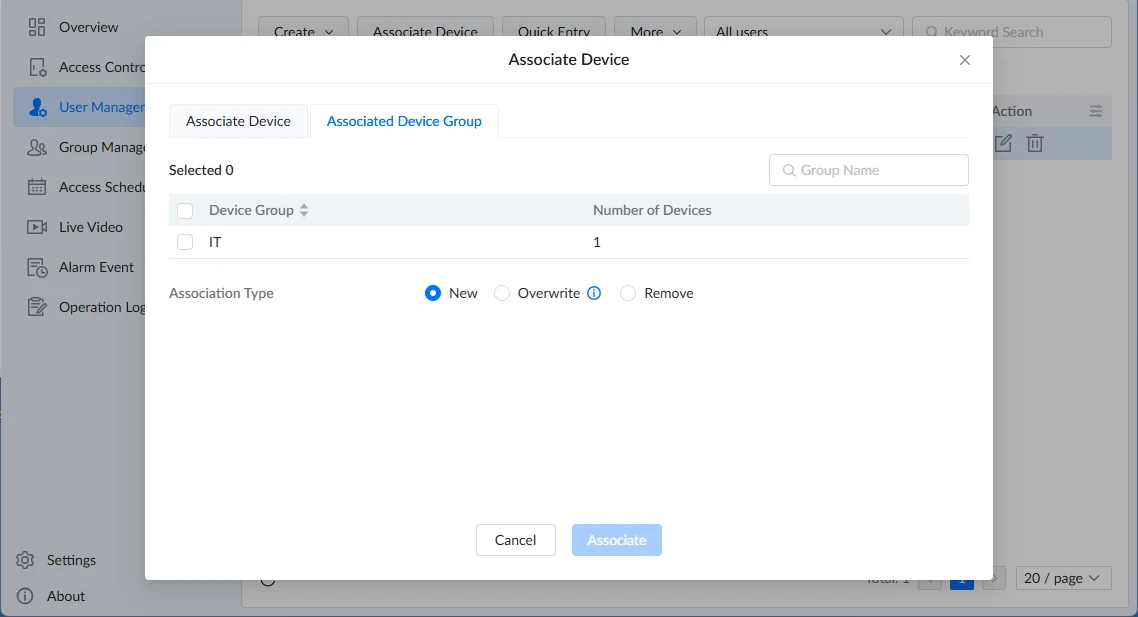
Previously added users can be associated or disassociated from devices and device groups by following the steps below:
- Select the user(s) from the list.
- Press Associate Device.
- In the Associate Device window, select the desired device(s) or device group(s).
- Select the association type:
- New: Adds new associations without removing existing ones.
- Overwrite: Removes all existing associations and applies the new selection.
- Remove: Removes the association between the selected device or device group and the user(s).
- Press Associate.
Quick Entry
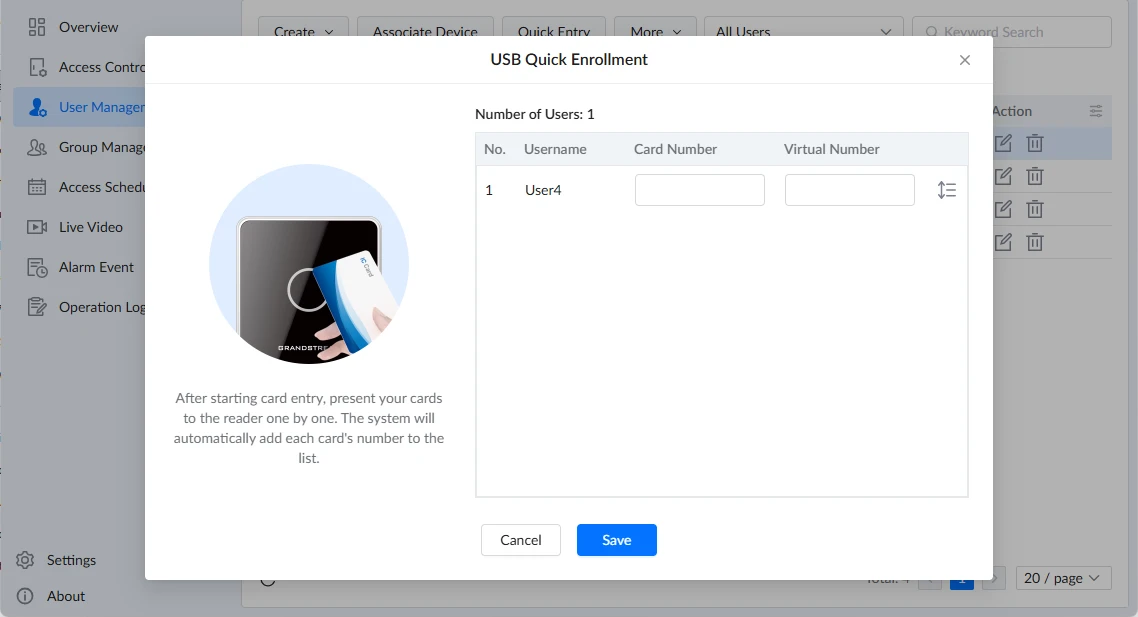
Users can use the Quick Entry tool to simplify card assignment using the Grandstream RFID card reader. After connecting the card reader to the computer, enrollment is performed by swiping the card. The scanned cards are automatically added to the system.
USB Quick Entry supports the following features (can be executed in parallel):
- Bind existing user cards: Select existing GDS Manager users. Drag and drop users to reorder them if needed, then swipe cards to bind them to the selected users.
- Quick add new users: Swipe cards to automatically create new users and edit their names during the enrollment process.
More
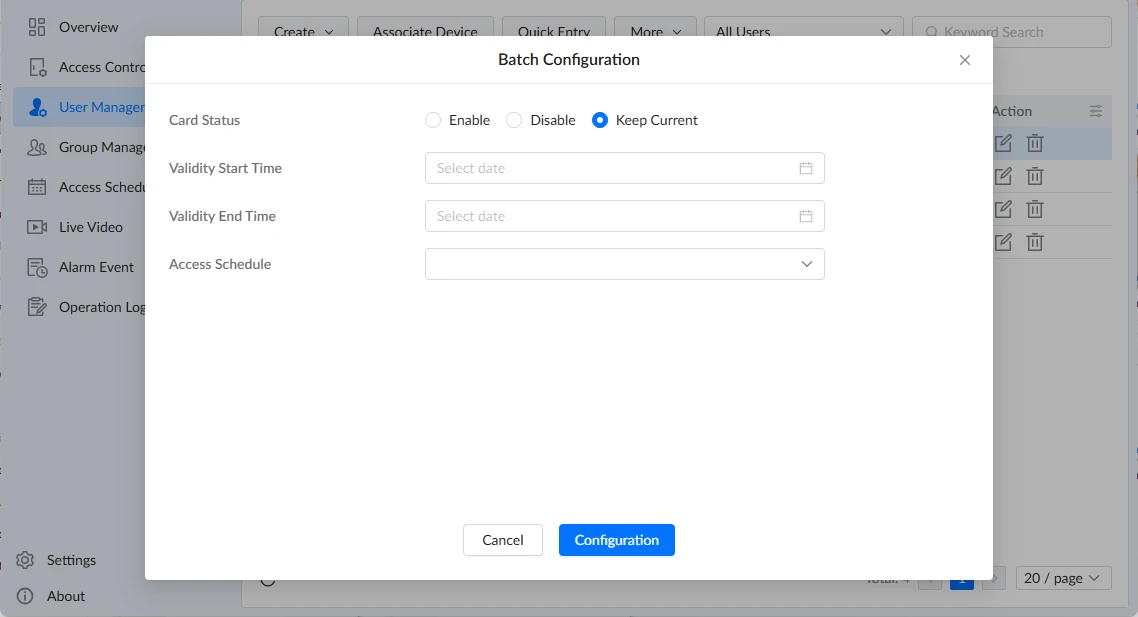
The More menu provides additional tools for managing users, including batch configuration, data export, and deletion operations, as shown below.
- Batch Configuration: Applies bulk changes to multiple users, including:
- Card Status: Enables, disables, or keeps the current card status.
- Validity Start/End Time: Sets or modifies the card validity period.
- Access Schedule: Assigns an access schedule to users for controlled access permissions.
- Export: Exports user data for backup, reporting, or external use.
- Delete: Deletes selected users from the system.
Users
Username | Displays the username used for login and identification. |
Status | Displays the current status of the user account. |
Full Name | Displays the full name of the user. |
Card Number | Displays the unique identifier of the access card assigned to the user. |
Virtual Number | Displays the abbreviated internal extension used for intercom and internal calling. |
SIP | Displays the SIP extension number used for VoIP communication. |
Associate Device | Displays the total number of devices linked to the user and allows editing via the icon. |
User Group | Displays the user group assigned to the user for centralized management. |
Validity Start Time | Displays the start date of the card validity period. |
Validity End Time | Displays the end date of the card validity period. |
Action | Allows editing of user details, including basic information, card information, and associated devices. |
User Management Controls
The interface provides tools that assist users in managing and navigating the user data:
- Filter by Users: Filters the list based on user association status, including all users, associated users, or users not associated with devices.
- Search Bar: Allows searching for users by username, name, card number, virtual number, SIP account, etc.
Group Management
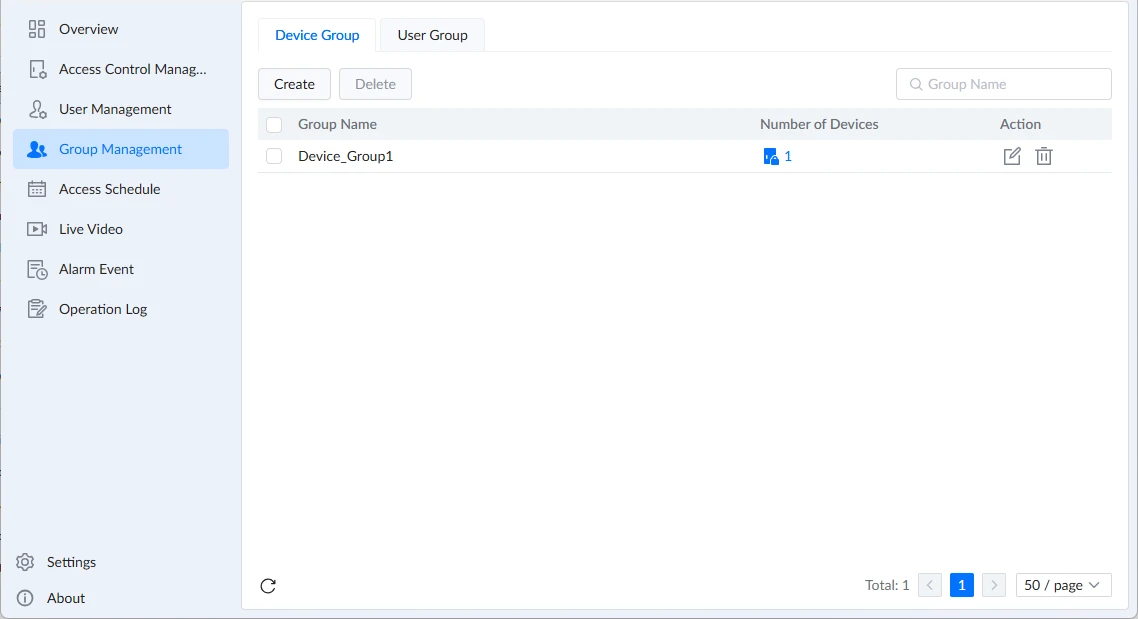
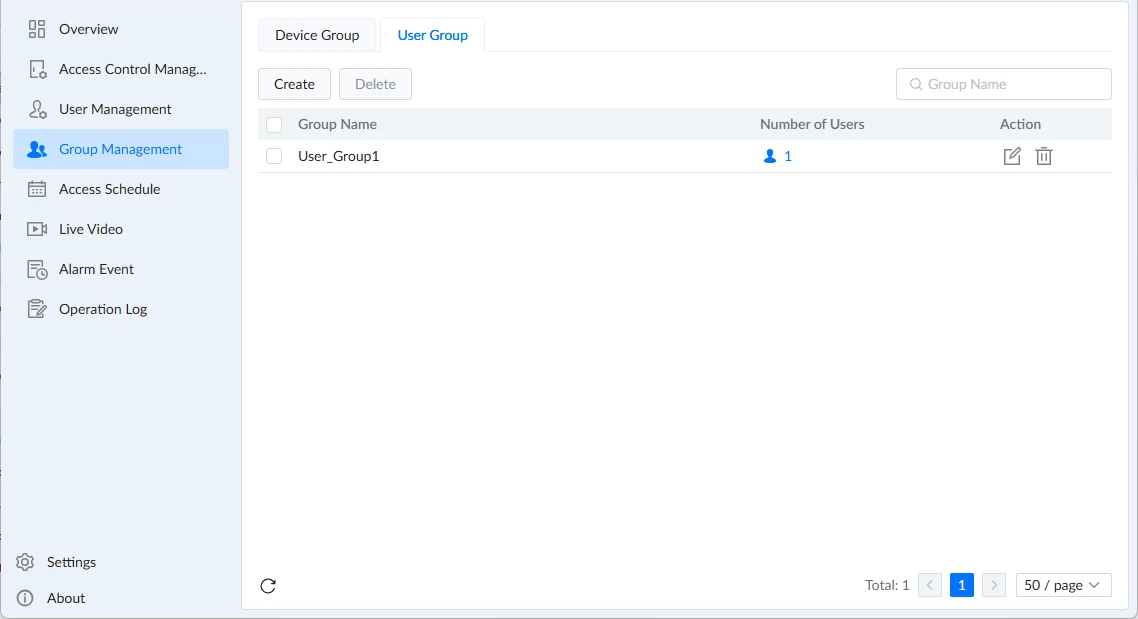
The Group Management interface provides centralized management of device groups and user groups, allowing users to organize devices and users for simplified administration and access management as shown below:
- Create Device Group: Creates a new device group by specifying the Group Name and selecting the devices to be added.
- Delete Device Group: Deletes the selected device group from the system.
- Create User Group: Creates a new user group by specifying the Group Name and selecting the users to be added.
- Delete User Group: Deletes the selected user group from the system.
Groups
Device Group | |
Group Name | Displays the name of the device group. |
Number of Devices | Displays the total number of devices assigned to the group and allows editing by adding or deleting devices from the group. |
Action |
|
User Group | |
Group Name | Displays the name of the user group. |
Number of Users | Displays the total number of users assigned to the group and allows editing by adding or deleting users from the group. |
Action |
|
Group Management Controls
The interface provides tools that assist users in managing and navigating data:
- Search Bar: Allows users to search for device groups or user groups by name.
Device Group and User Group Management
Device Groups and User Groups can be managed by adding or removing devices and users, enabling efficient control of group membership and permissions.
Add Devices to a Device Group
To add devices to a Device Group, follow the steps below:
- Press the Devices icon on the target Device Group.
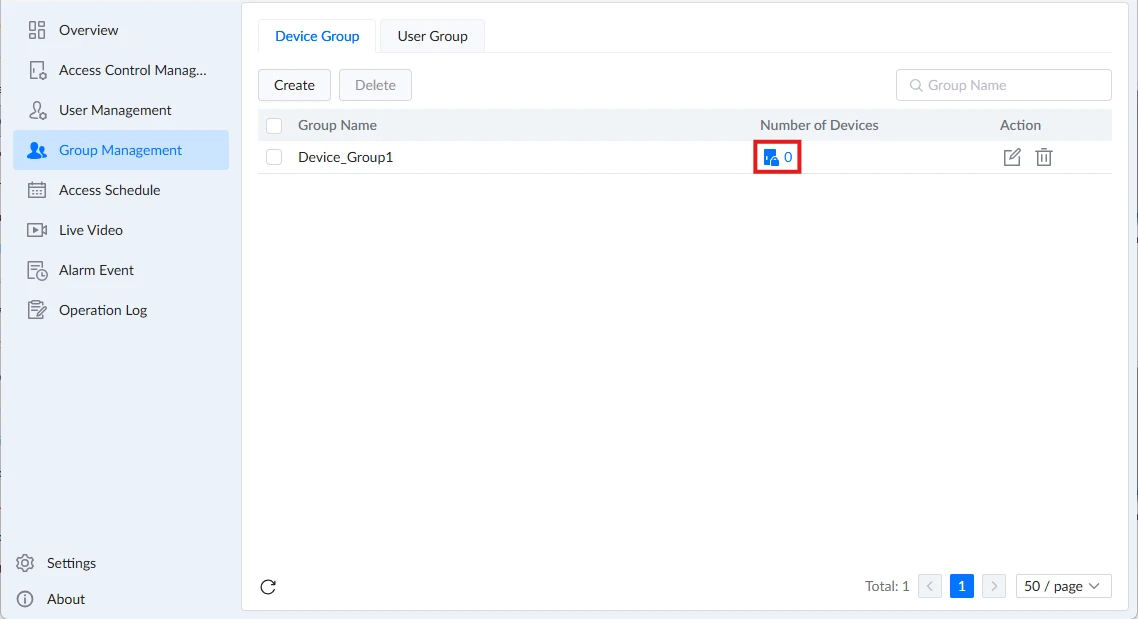
- In Device Management, click Go to Add or Add.
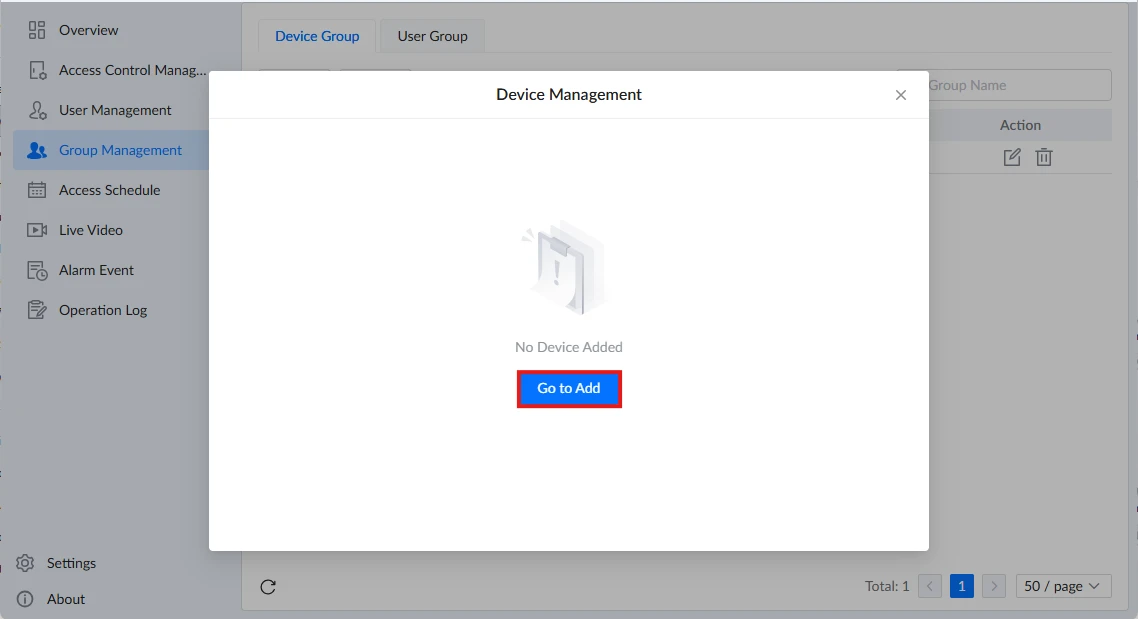
- Select the devices, then click Add.
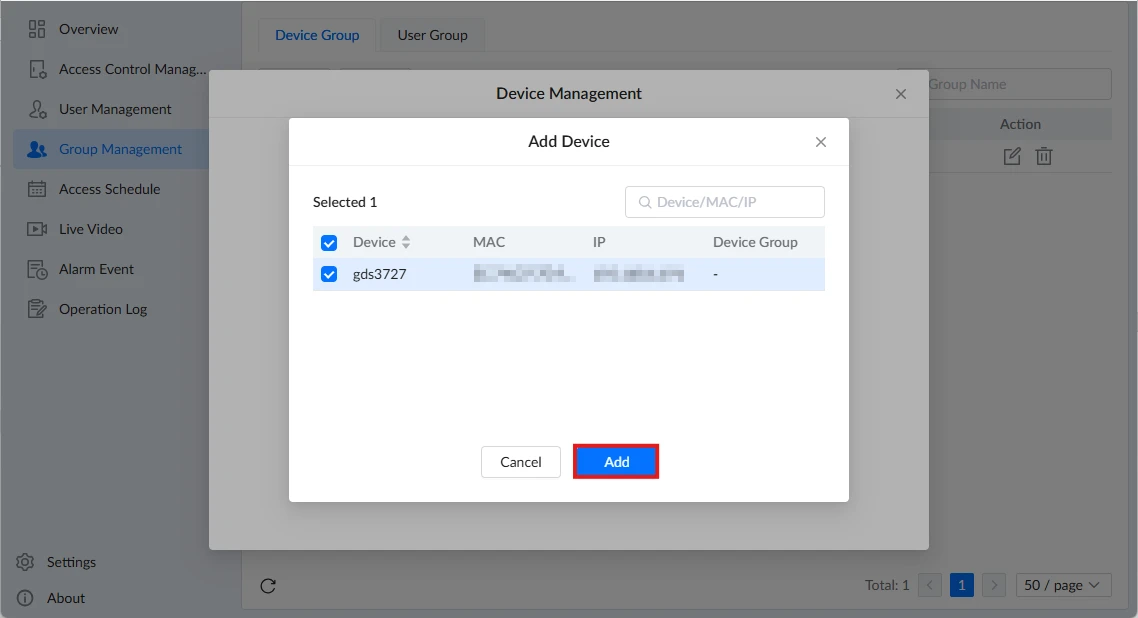
Delete Devices from a Device Group
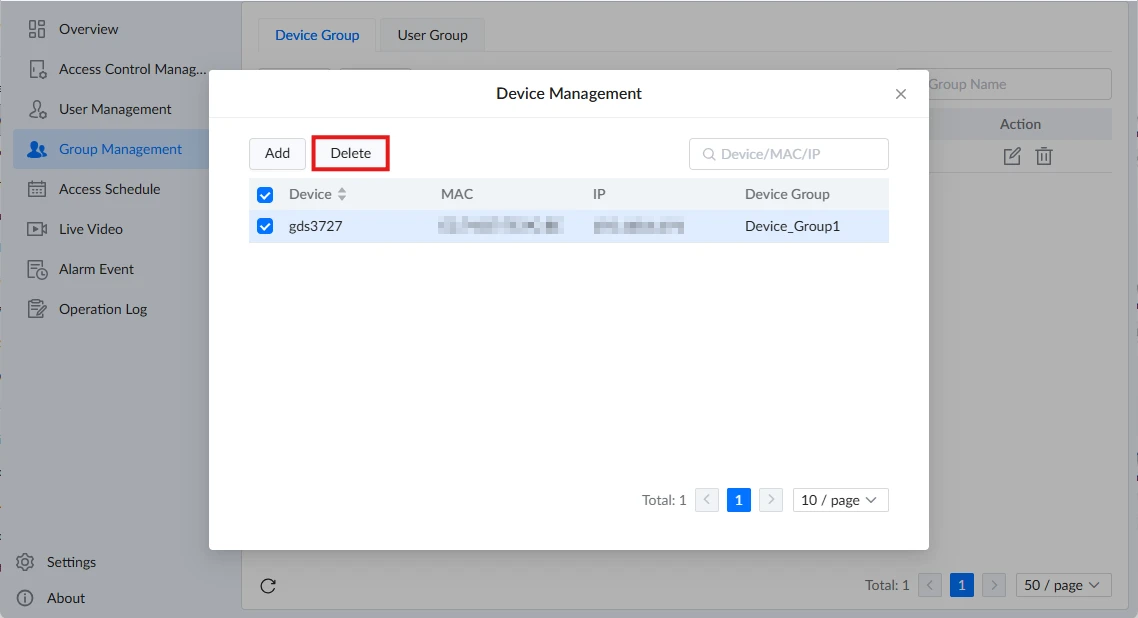
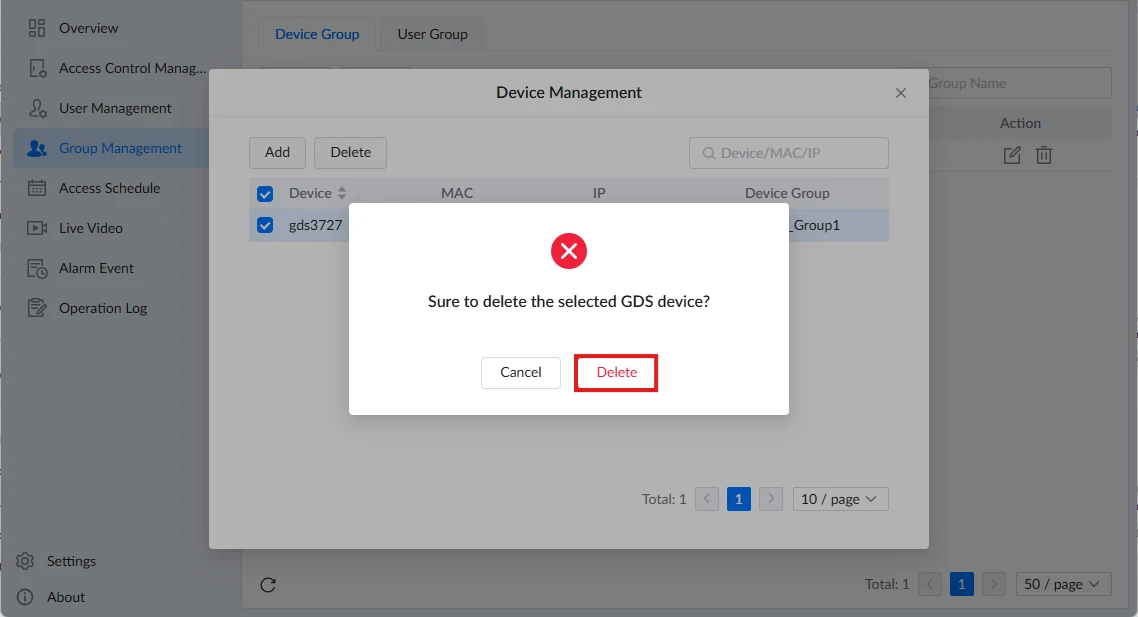
To remove devices from a Device Group, follow the steps below:
- Press the Devices icon on the target Device Group.
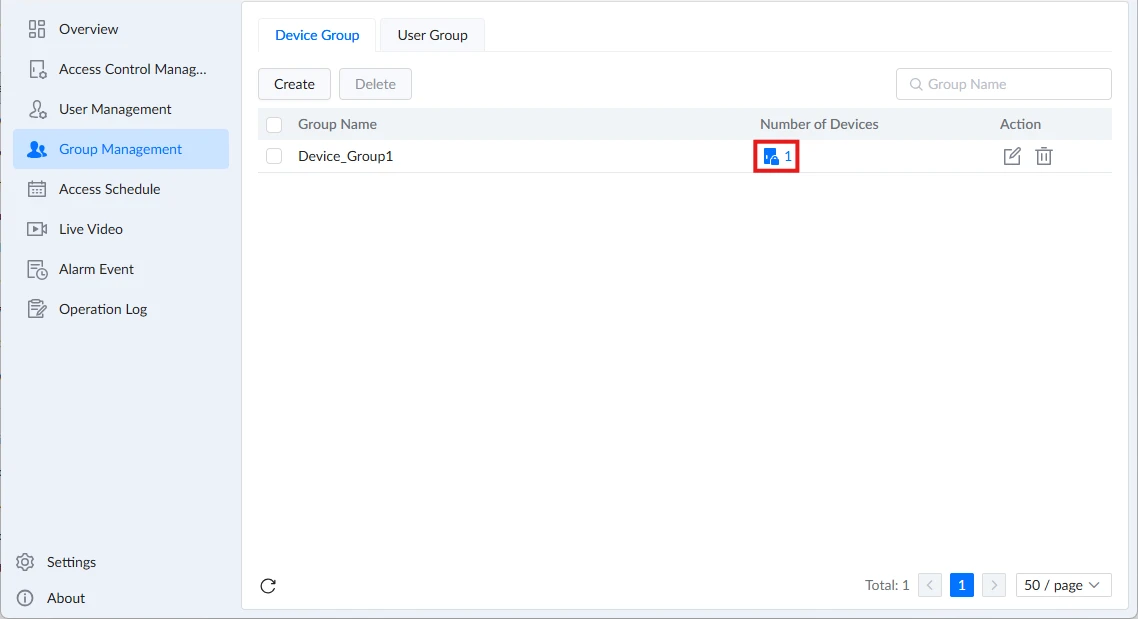
- In Device Management, select the devices, then click Delete.
- Confirm the deletion.
Add Users to a User Group
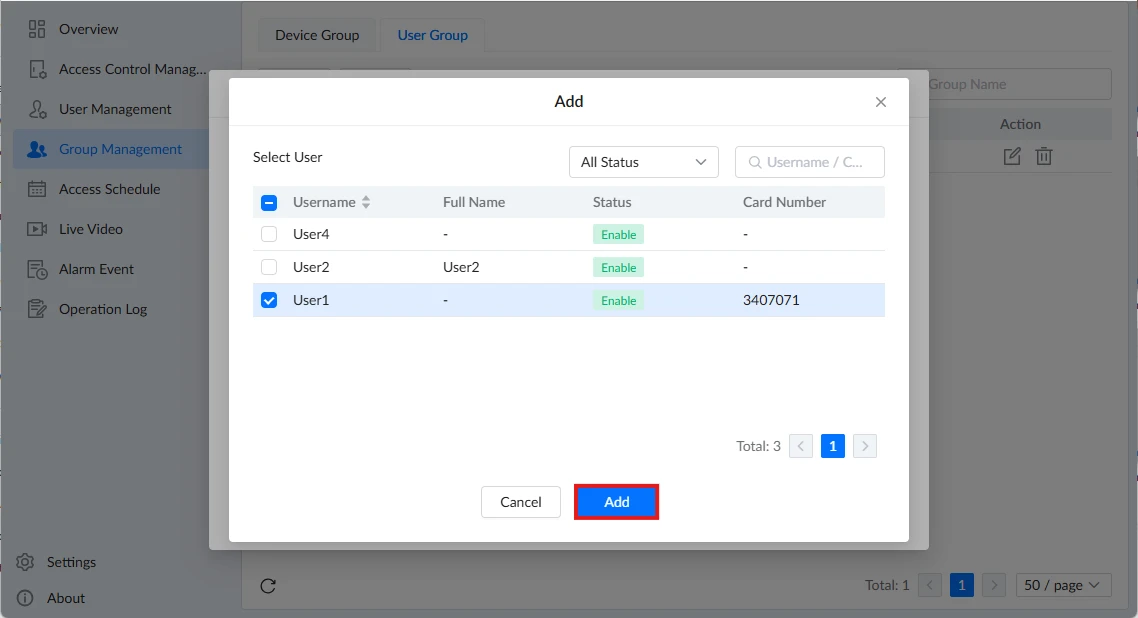
To add users to a User Group, follow the steps below:
- Press the Users icon on the target User Group.
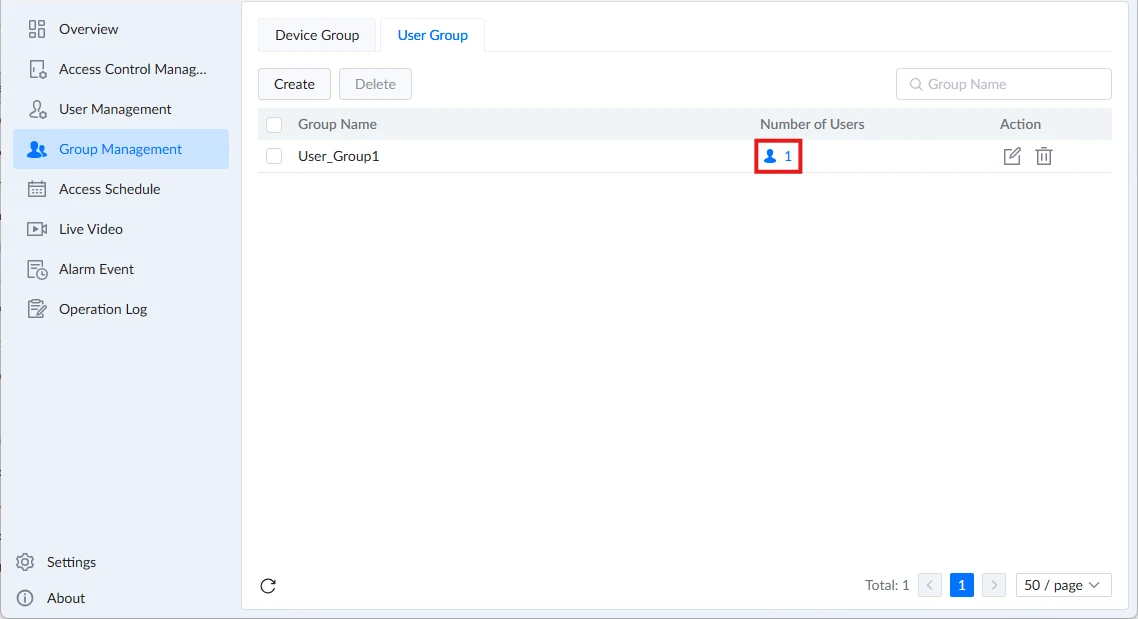
- In User Management, click Go to Add or Add.
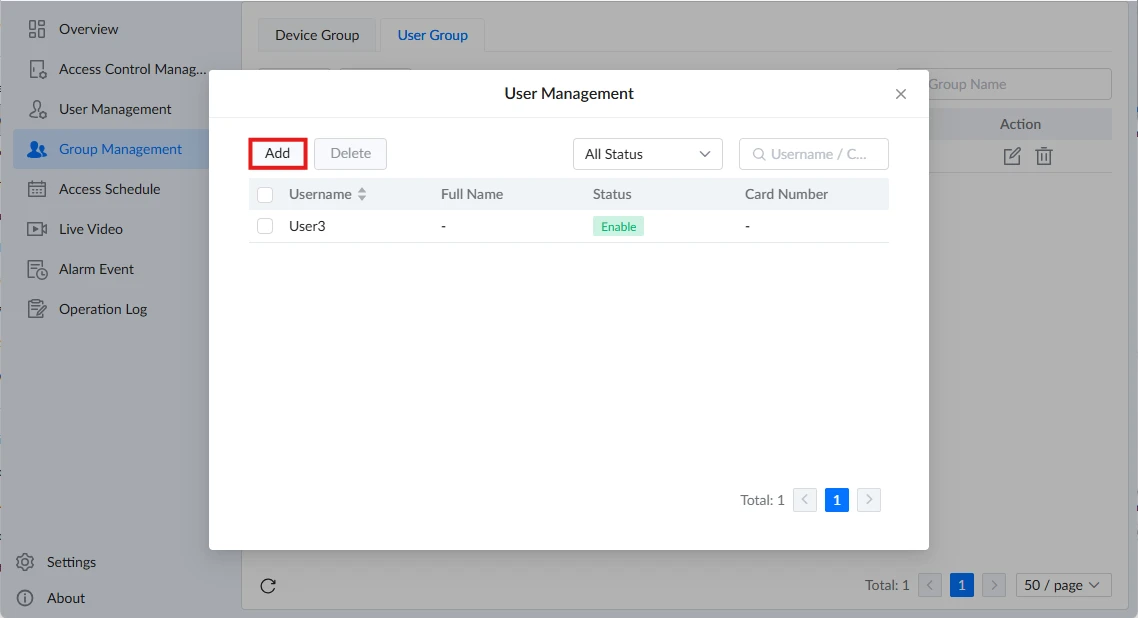
- Select the users, then click Add.
Delete Users from a User Group
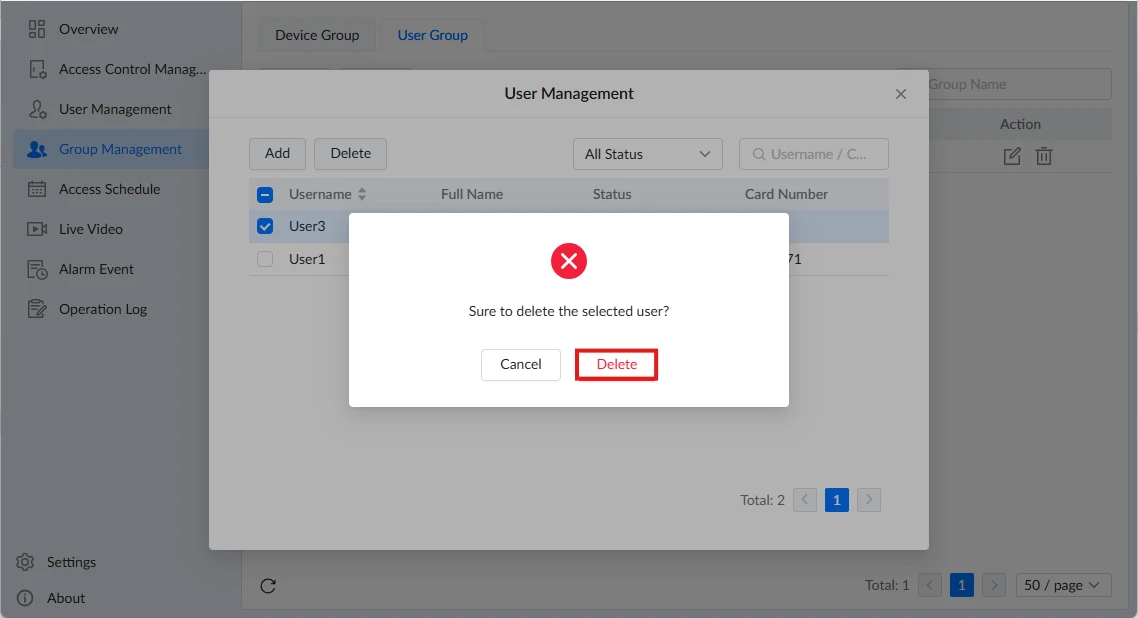
To remove users from a User Group, follow the steps below:
- Press the Users icon on the target User Group.
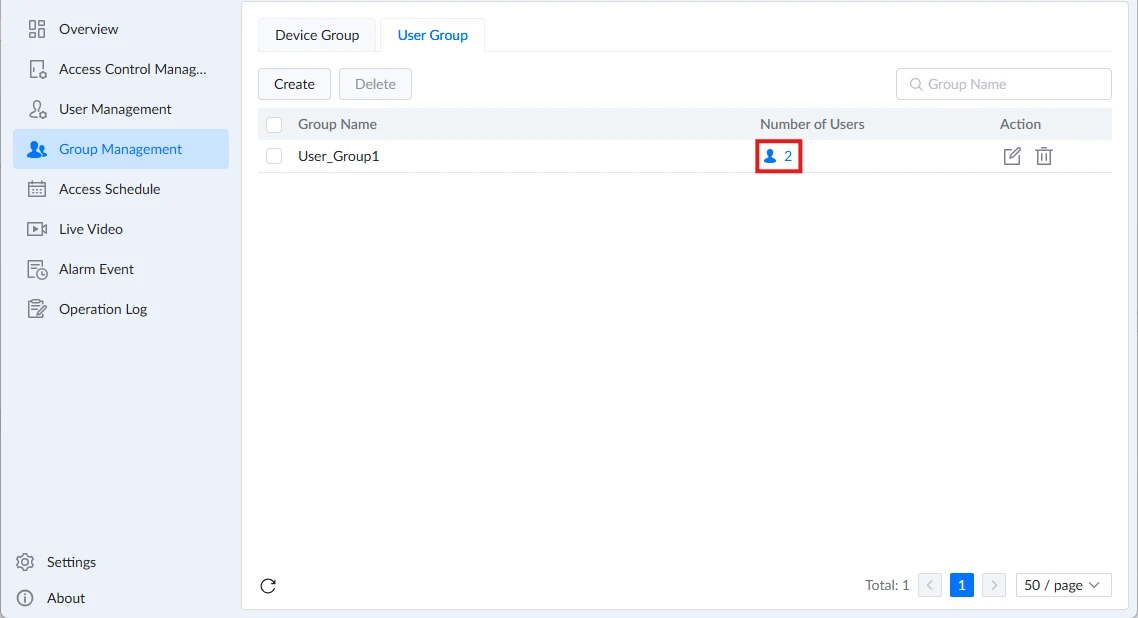
- In User Management, select the users, then click Delete.
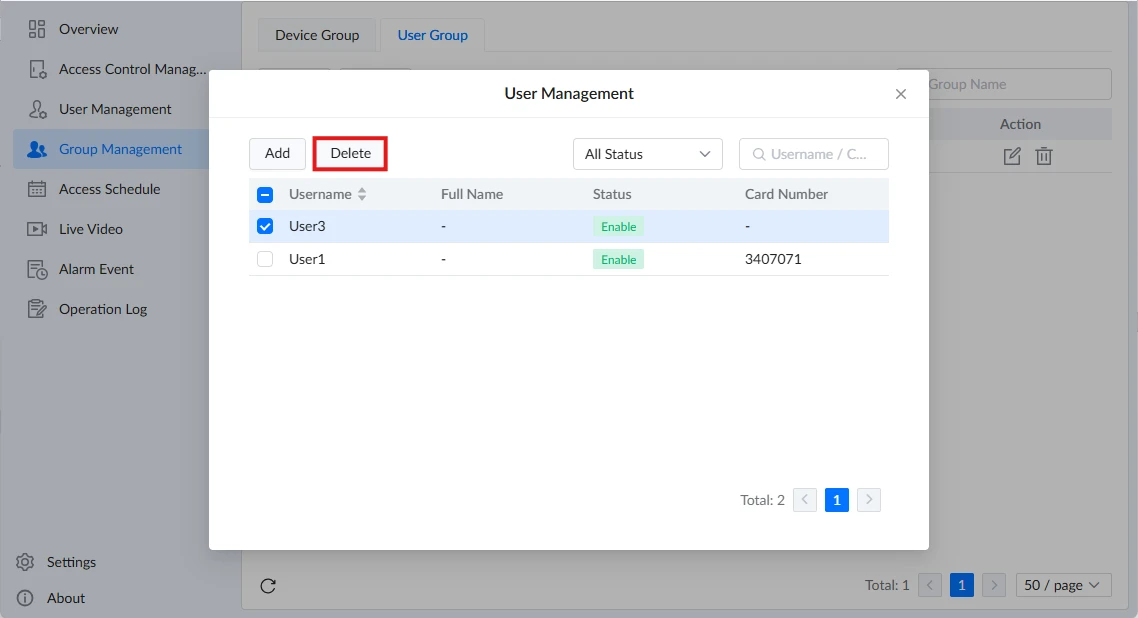
- Confirm the deletion.
Access Schedule
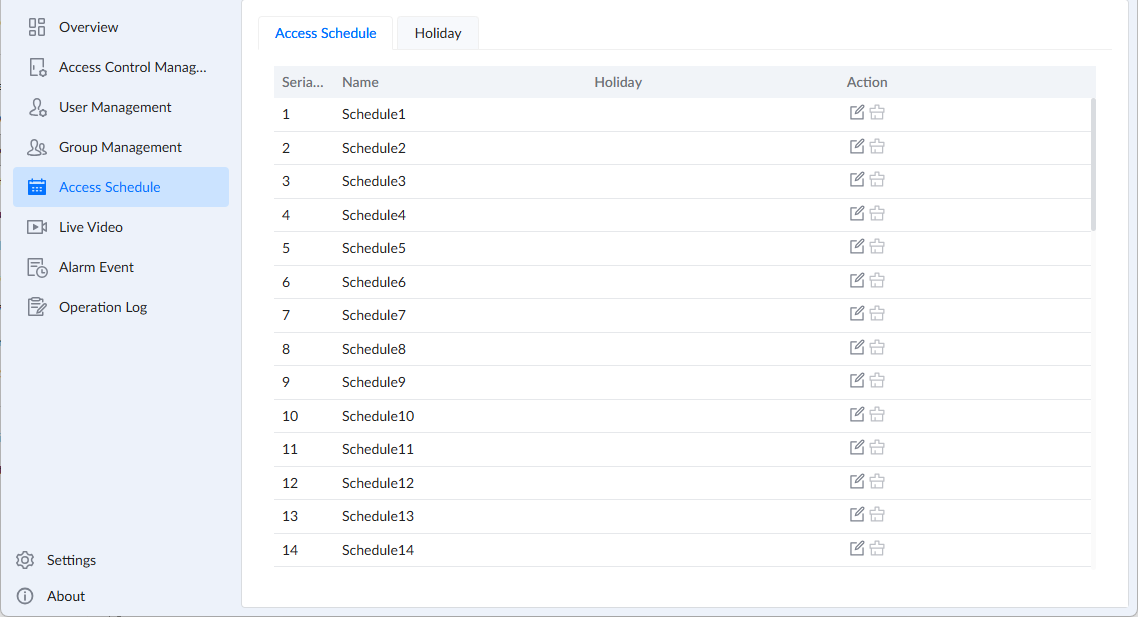
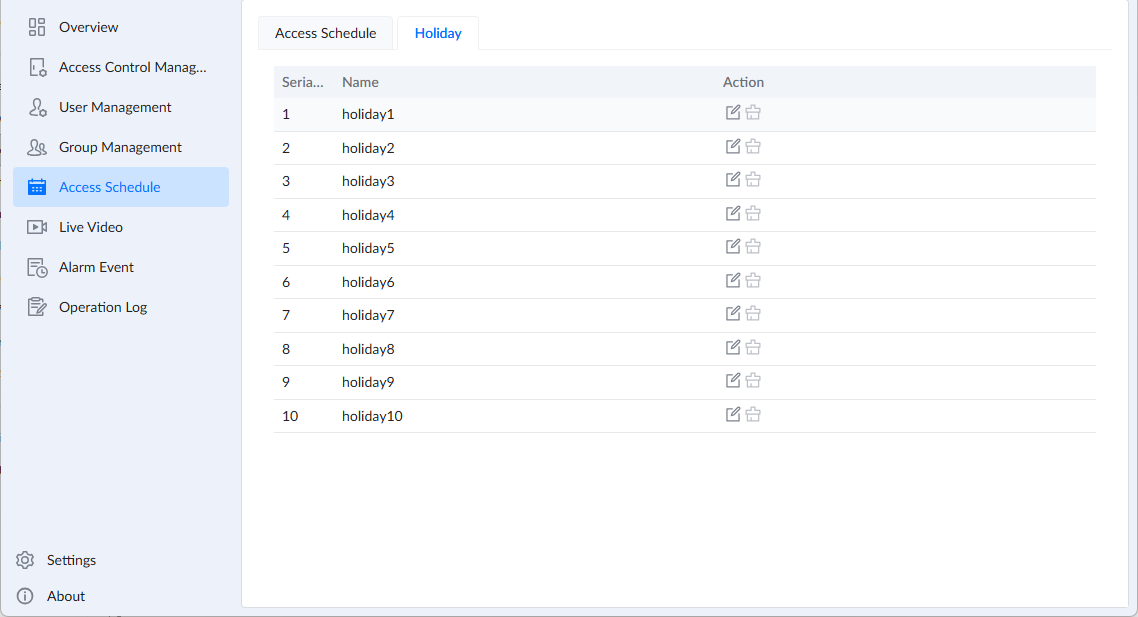
The Access Schedule interface provides centralized management of access time profiles and holiday definitions, allowing client users to configure the time periods during which system users can access the access control devices, as shown below:
Access Schedules & Holidays
Access Schedule | |
Serial Number | Displays the serial number of the access schedule. The application supports up to 50 access schedules. |
Name | Displays the name of the access schedule. |
Holiday | Displays the holiday assigned to the access schedule. |
Action |
|
Holiday | |
Serial Number | Displays the serial number of the holiday entry. The application supports up to 10 holiday entries. |
Name | Displays the name of the holiday. |
Action |
|
Live Video
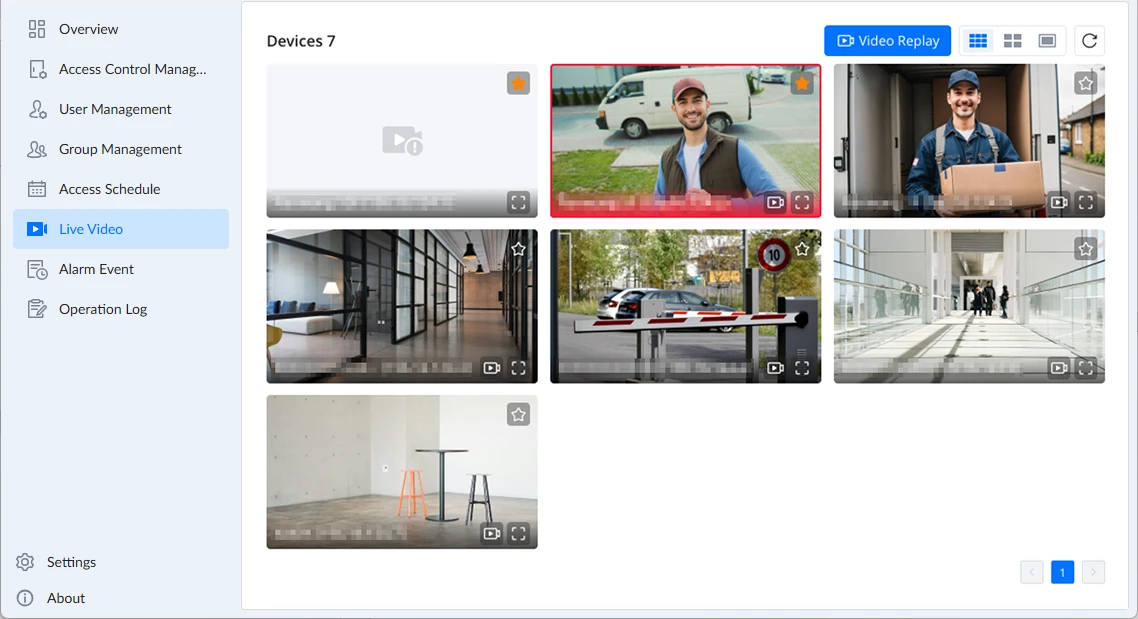
The Live Video interface provides real-time video streaming from connected GDS devices, enabling users to monitor live activity directly from the system, as shown below:
Live Video Controls
The interface provides tools that assist users in managing and navigating live video feeds:
- Layout: Allows users to change the layout of the video feed display, adjusting how multiple streams are arranged within the interface.
- Refresh Icon: Reloads the live video feed and updates the current stream status.
Alarm Event
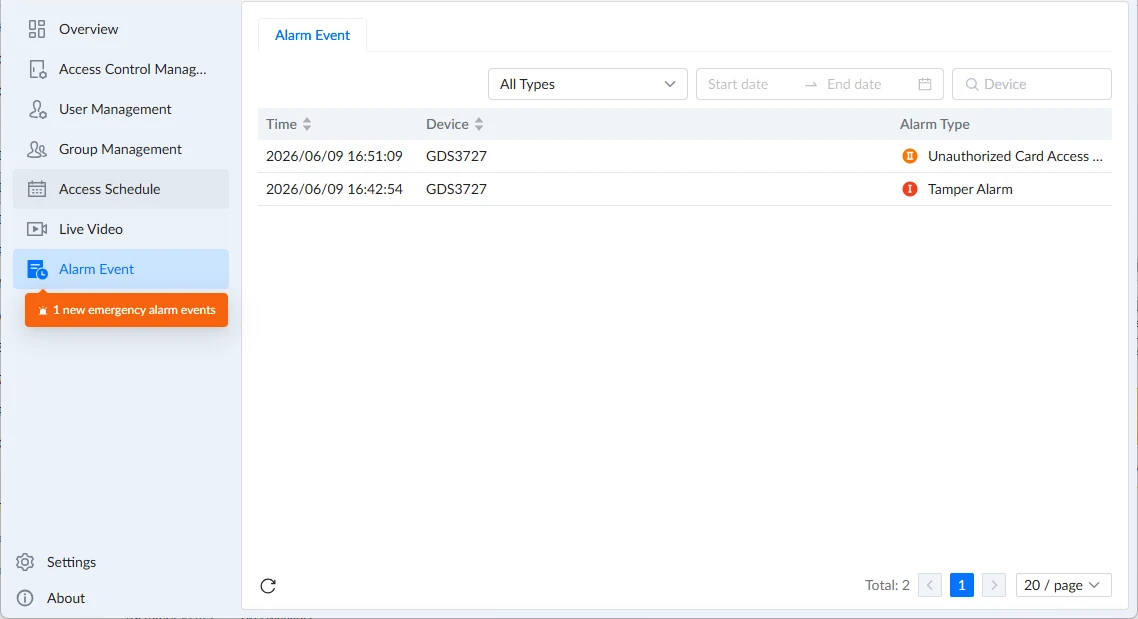
The Alarm Event interface provides a detailed overview of alarm activity across connected devices, allowing users to monitor and filter security-related events within a selected time range, as shown below:
Alarm Events
Time | Displays the date and time when the alarm event occurred. |
Device | Displays the name of the device associated with the alarm event. |
Alarm Type | Displays the type of alarm event. Available alarm types include:
|
Alarm Event Controls
The interface provides tools that assist users in managing and navigating the alarm data:
- Alarm Type Filter: Filters alarm events based on the selected alarm type.
- Start & End Dates: Filters alarm events within a defined time range by selecting the start and end date.
- Search by Device: Allows searching alarm events by device name.
Operation Log
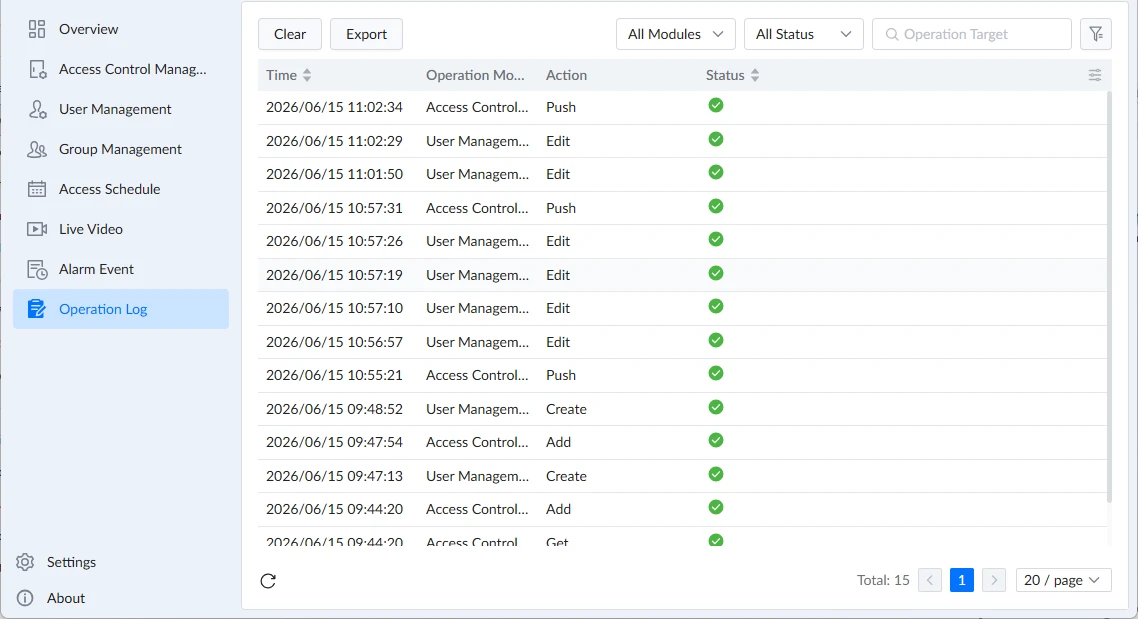
The Operation Log interface provides a centralized record of system activities, displaying all actions performed within the application for monitoring, auditing, and troubleshooting purposes. It allows users to filter logs by module, status, and target, as well as clear or export log data, as shown below:
- Clear: Deletes all operation logs from the system.
- Export: Exports operation logs for external use, reporting, or troubleshooting.
Operation Logs
Time | Displays the date and time when the operation was performed. |
Operation Module | Displays the application module related to the operation, such as User Management, Access Control Management, or Holiday. |
Action | Displays the type of operation performed, including configuration synchronization, upgrades, creation, deletion, modification, and other management actions. |
Target | Displays the target associated with the operation, such as a user, device, or device group. |
Status | Displays the operation status. Successful operations are shown in green, while failed operations are shown in red. Additional failure information can be viewed by hovering over the status icon. |
Operation Log Controls
The interface provides tools that assist users in managing and navigating the operation log:
- Filter by Module: Filters log entries based on the application module where the operation was performed.
- Filter by Status: Filters log entries based on operation status: success, failure, or all.
- Search by Target: Allows searching log entries by the name of the target, such as a user, device, or device group.
Settings
The Settings interface provides centralized configuration of system parameters, enabling users to manage system preferences, security settings, and firmware resources. It allows control over data storage, retention rules, device and card configuration, language options, and password management, as shown below:
Basic Settings
Configure the basic settings of the application, including the storage location of application data, retention parameters, card specifications, and application language, as documented in the table below:
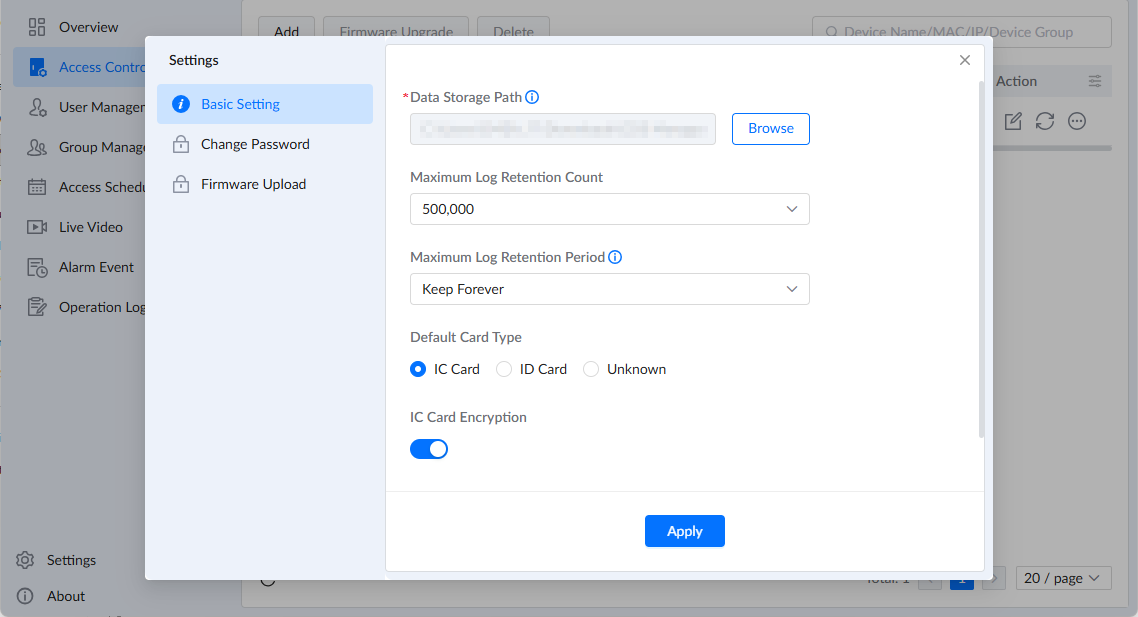
Data Storage Path | Defines the storage location of the application data. The path configured during installation can be modified by pressing Browse and selecting a different directory. Note: After the storage path is changed, historical data stored in the original path is not migrated to the new location and can no longer be accessed through GDS Manager. All subsequent data will be stored in the new path. |
Maximum Log Retention Count | Defines the maximum number of logs retained by the application. The default value is 500000. |
Maximum Log Retention Period | Defines how long logs are retained before automatic deletion. |
Default Card Type | Defines the default card type used when creating users. Available options are:
The default setting is “IC Card”. |
IC Card Encryption | Enables or disables IC card encryption. |
Language | Defines the application display language. Available options are:
|
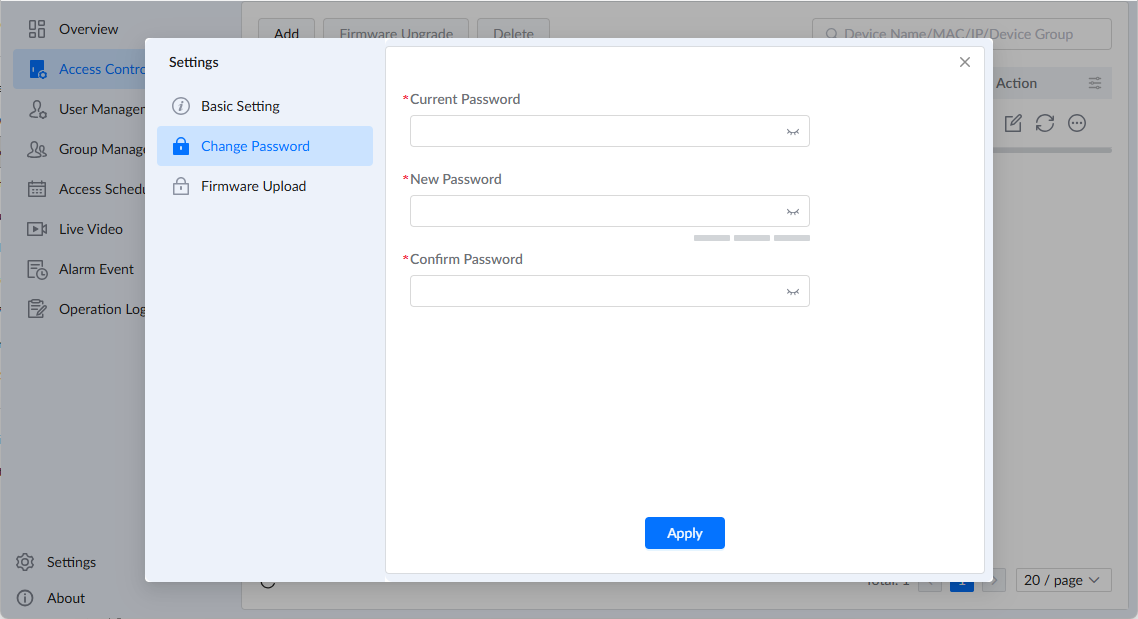
Change Password
Change the application password by entering the current password, specifying the new password, and re-entering the new password for confirmation.
Firmware Upload
Firmware files are used in the Access Control Management interface to upgrade GDS devices. To upload a firmware file, click Firmware Upload, browse the local directory, and select the desired .bin file.
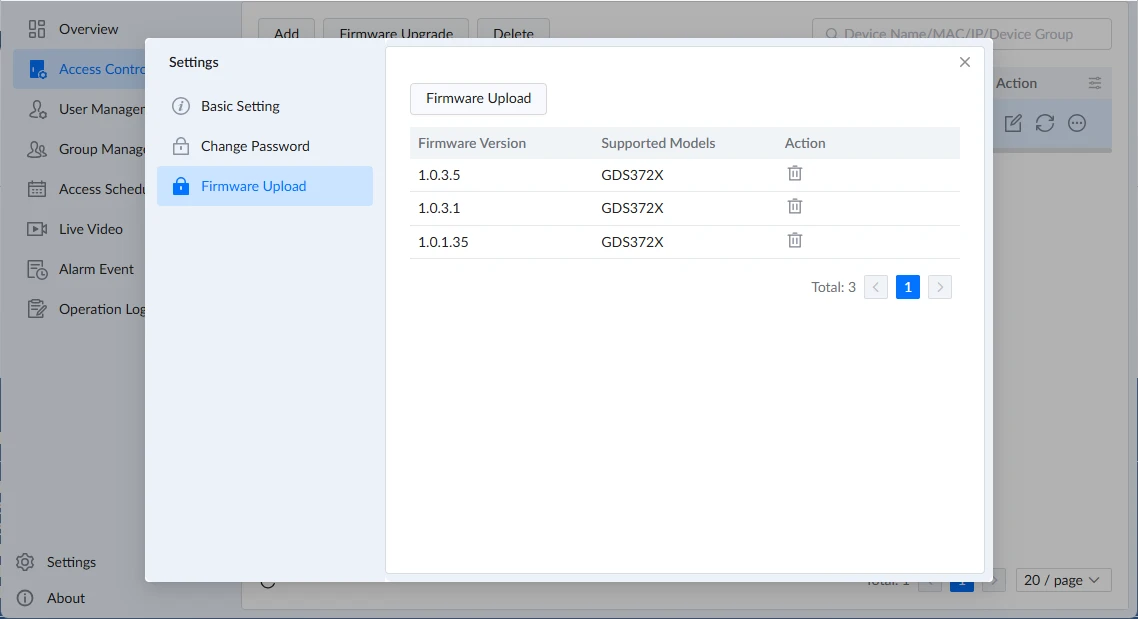
Firmware Version | Displays the firmware version of the uploaded firmware file. |
Supported Models | Displays the GDS device models supported by the firmware file. Firmware files are model-specific. |
Action | Delete: Deletes the selected firmware file from the application. |
About
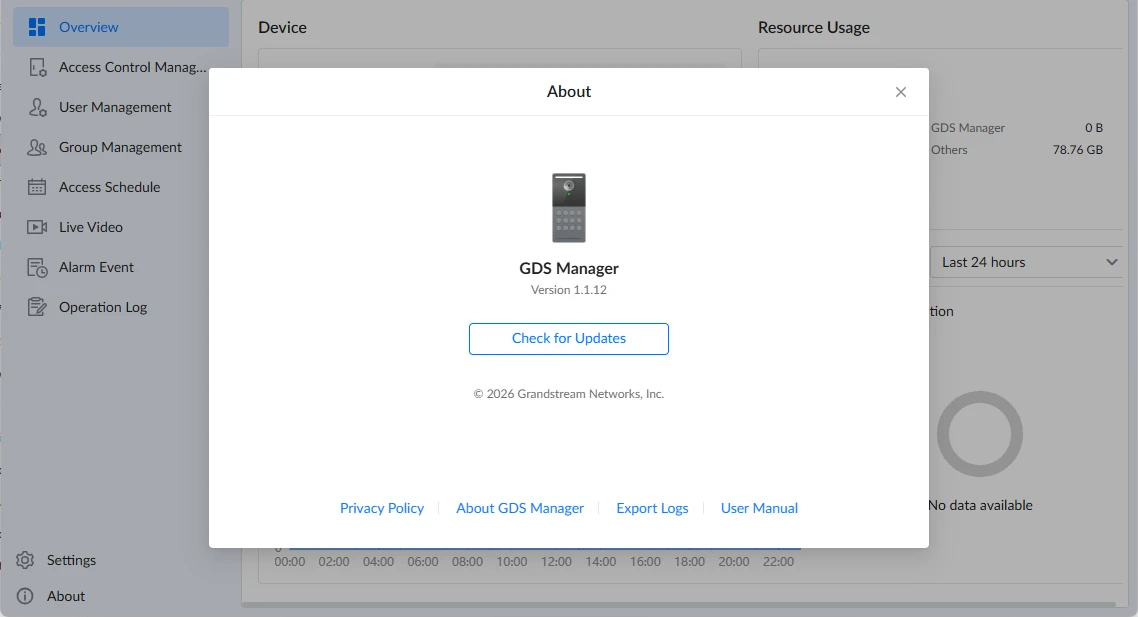
The About interface displays the application version and general information about GDS Manager 2. It also provides additional options, including:
- Privacy Policy: Opens the Grandstream Privacy Statement.
- About GDS Manager: Redirects to Grandstream’s Cloud Services website.
- Export Logs: Exports system logs in .ZIP format for troubleshooting and maintenance purposes.
- User Manual: Redirects to the GDS Manager 2’s user manual on the Grandstream documentation center for usage guidance.
Supported Devices
Model | Firmware Version |
GDS3725 / GDS3726 / GDS3727 | 1.0.3.9 or higher |
Changelog
Software Version 1.1.16
- This is the initial version.