


Scenario Overview
This scenario represents a large residential housing complex secured using GDS372X series IP video door systems deployed at two different access levels.
Visitors Management Rules
| Role | Can View Visitors | Can Edit Visitors | Can Delete Visitors |
|---|---|---|---|
| APP User (Resident) | Only their own | Only their own | Only their own |
| Administrator | Only their own | Only their own | Only their own |
| Super Administrator | Only their own | Only their own | Only their own |
Environment Description
The residential community contains:
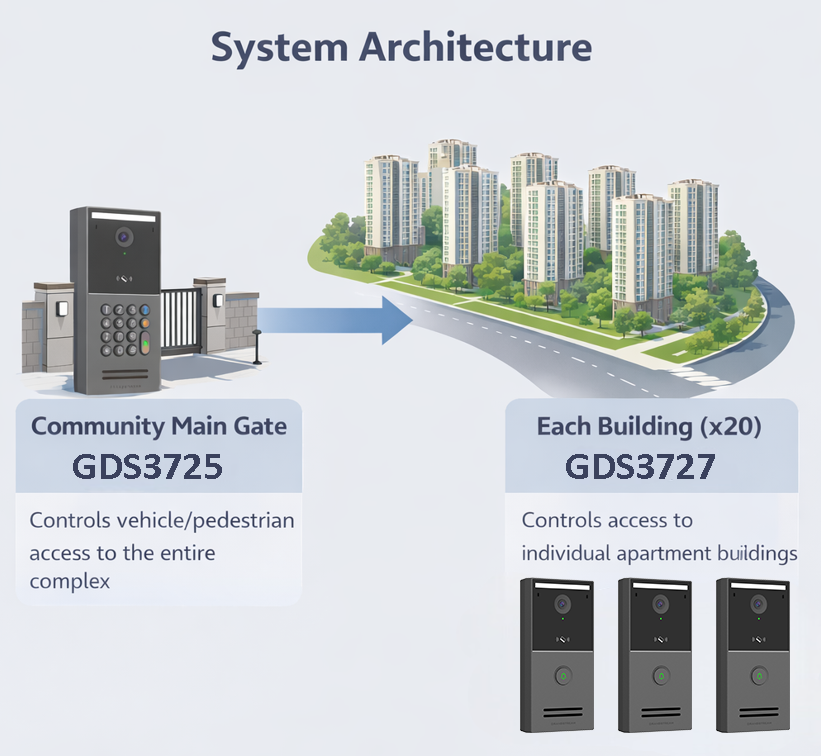
- 1 centralized main entrance gate controlling entry to the entire complex.
- 20 separate apartment buildings, each with its own independent entrance.
Each entrance point is secured by a GDS372X device, ensuring layered access control across the property.
Access Control Logic
The system is designed with a two-level access model:
Community-Level Access (Main Gate)
- A GDS3725/GDS3726 is installed at the main vehicle/pedestrian gate.
- This device verifies whether a resident or visitor is authorized to enter the community at all.
Building-Level Access (Per Building)
- Each apartment building entrance is equipped with its own GDS372X device (e.g., GDS3727).
- After entering the community, residents can only unlock their assigned building entrance.
- Access to other buildings is automatically restricted.
Resident Experience Flow
From a user perspective, the access journey works as follows:
- Resident arrives at the community’s main gate.
- Uses RFID card / NFC ( Android phones only) / Bluetooth / PIN (For the GDS3725 Access control device only) / APP to unlock the gate (via main GDS372X).
- Enters the complex.
- Walks to their own building.
- Uses credentials again on the building GDS372X.
- Access is granted only if they belong to that building’s access group.
This ensures:
- Controlled community entry.
- Strict building-level isolation.
- Enhanced overall security.
Visitor Experience Flow
A resident can create temporary access for a visitor only if an administrator has granted them permission to use the Visitor/Temp Key feature. Once this permission is enabled, the resident opens the app, goes to Visitor (Temp Key), and selects Create Visitor
They enter the visitor’s name, choose the door station(s) the visitor can use, and define a valid time period (mandatory, maximum 90 days). They may also set a limited number of unlocks if needed. After saving, the visitor credentials are automatically sent to the selected door stations.
The resident then shares the access using one of three methods:
- Temporary PIN code (visitor enters it on the keypad),
- QR code link (visitor opens the link and presents the QR), or
- Static QR code image (visitor scans it at the door station).
The visitor can unlock the door only within the defined time or usage limit. Once the time expires, the usage limit is reached, or the resident’s permissions are removed, the access is automatically revoked.
Centralized Cloud & APP Management
All devices are centrally managed through the Grandstream Secure Access platform and mobile Application, which provides:
- Unified organization-based management.
- Access Group mapping (Main Gate + Specific Building).
- Role-based permissions (Residents vs Administrators).
- Remote unlock and visitor invitation features.
This centralized architecture allows administrators to manage hundreds of residents and multiple buildings efficiently while maintaining precise access boundaries.
System Architecture
| Location | Device | Purpose |
|---|---|---|
| Community Main Gate | GDS372X | Controls vehicle/pedestrian access to the entire complex |
| Each Building (1–20) | GDS372X | Controls access to individual apartment buildings |
Configuration Workflow
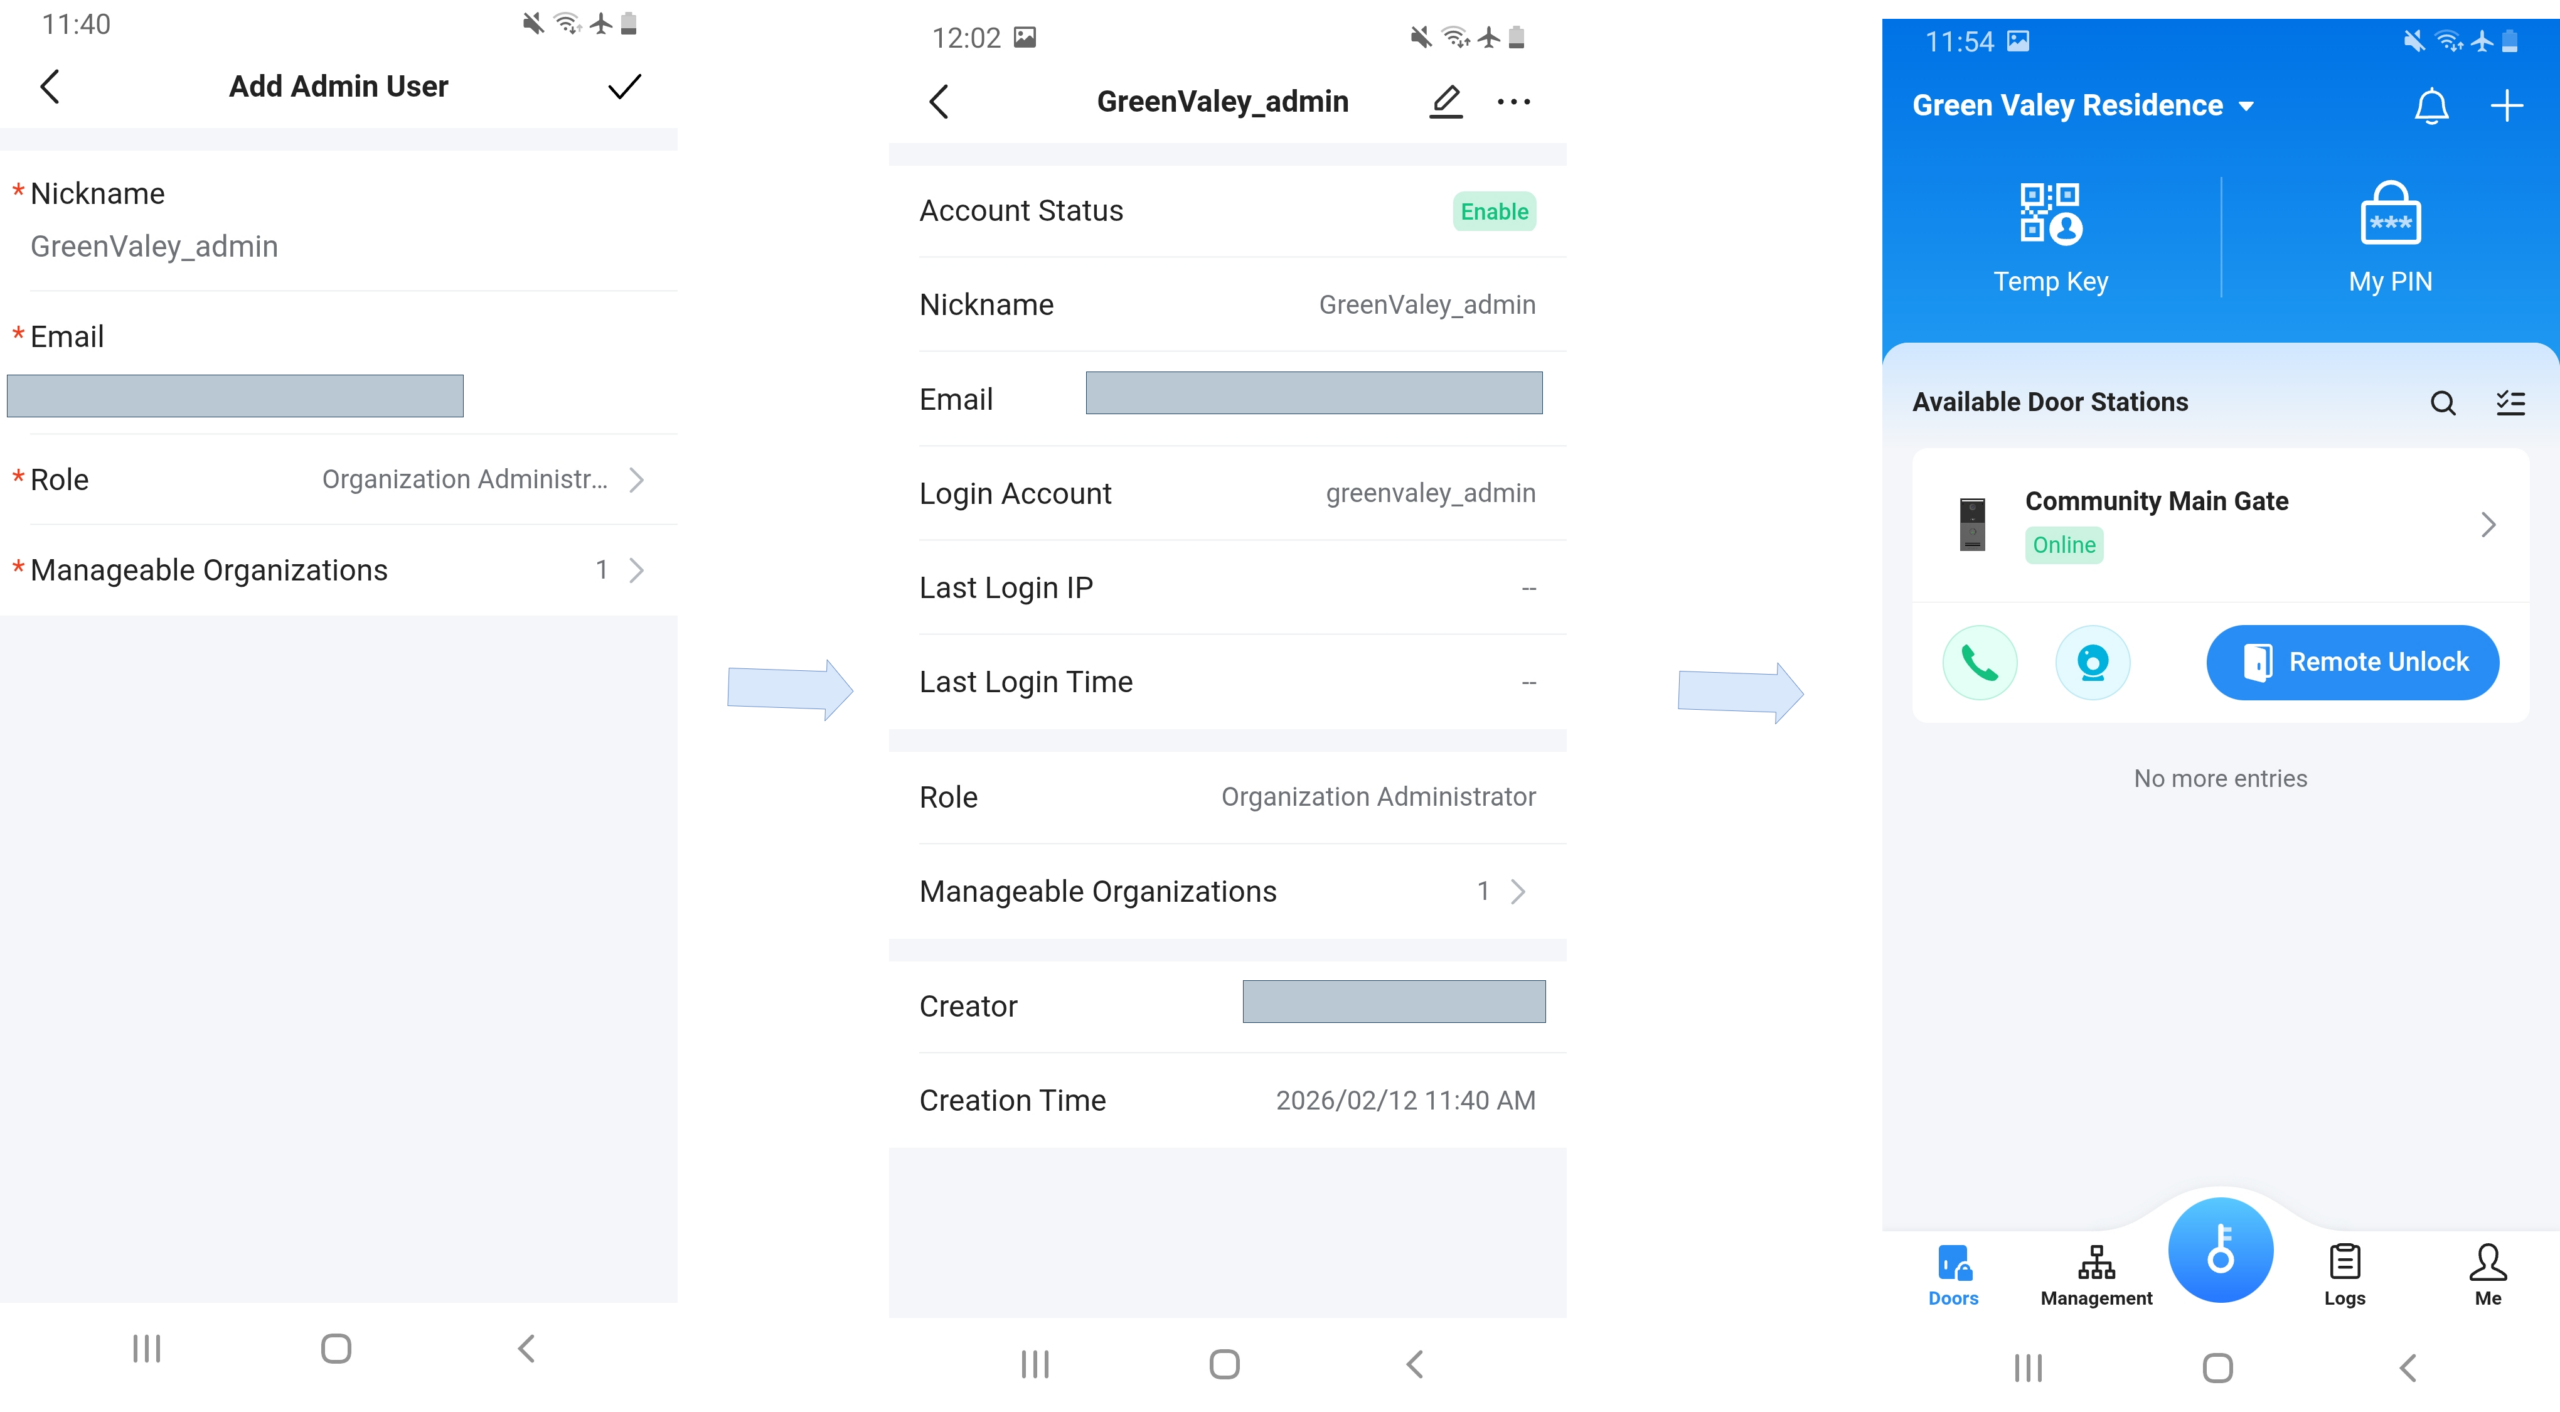
Step 1 – Create Super Administrator (Platform Level)
The Community Property Management must:
- Create a Super Administrator account on the Secure Access Management Application.
This user has full system control. Please check the guide: Grandstream SecureAccess Administration Guide for more information on how to register for the SecureAccess application as a Super Administrator.
Step 2 – Create Organization & Organization Admin
The Super Administrator then:
- Logs into the Secure Access APP.
- Creates a new Organization (e.g., “Green Valley Residence”).
- Assigns an Organization Administrator.
- Grants this admin management authority over the organization.
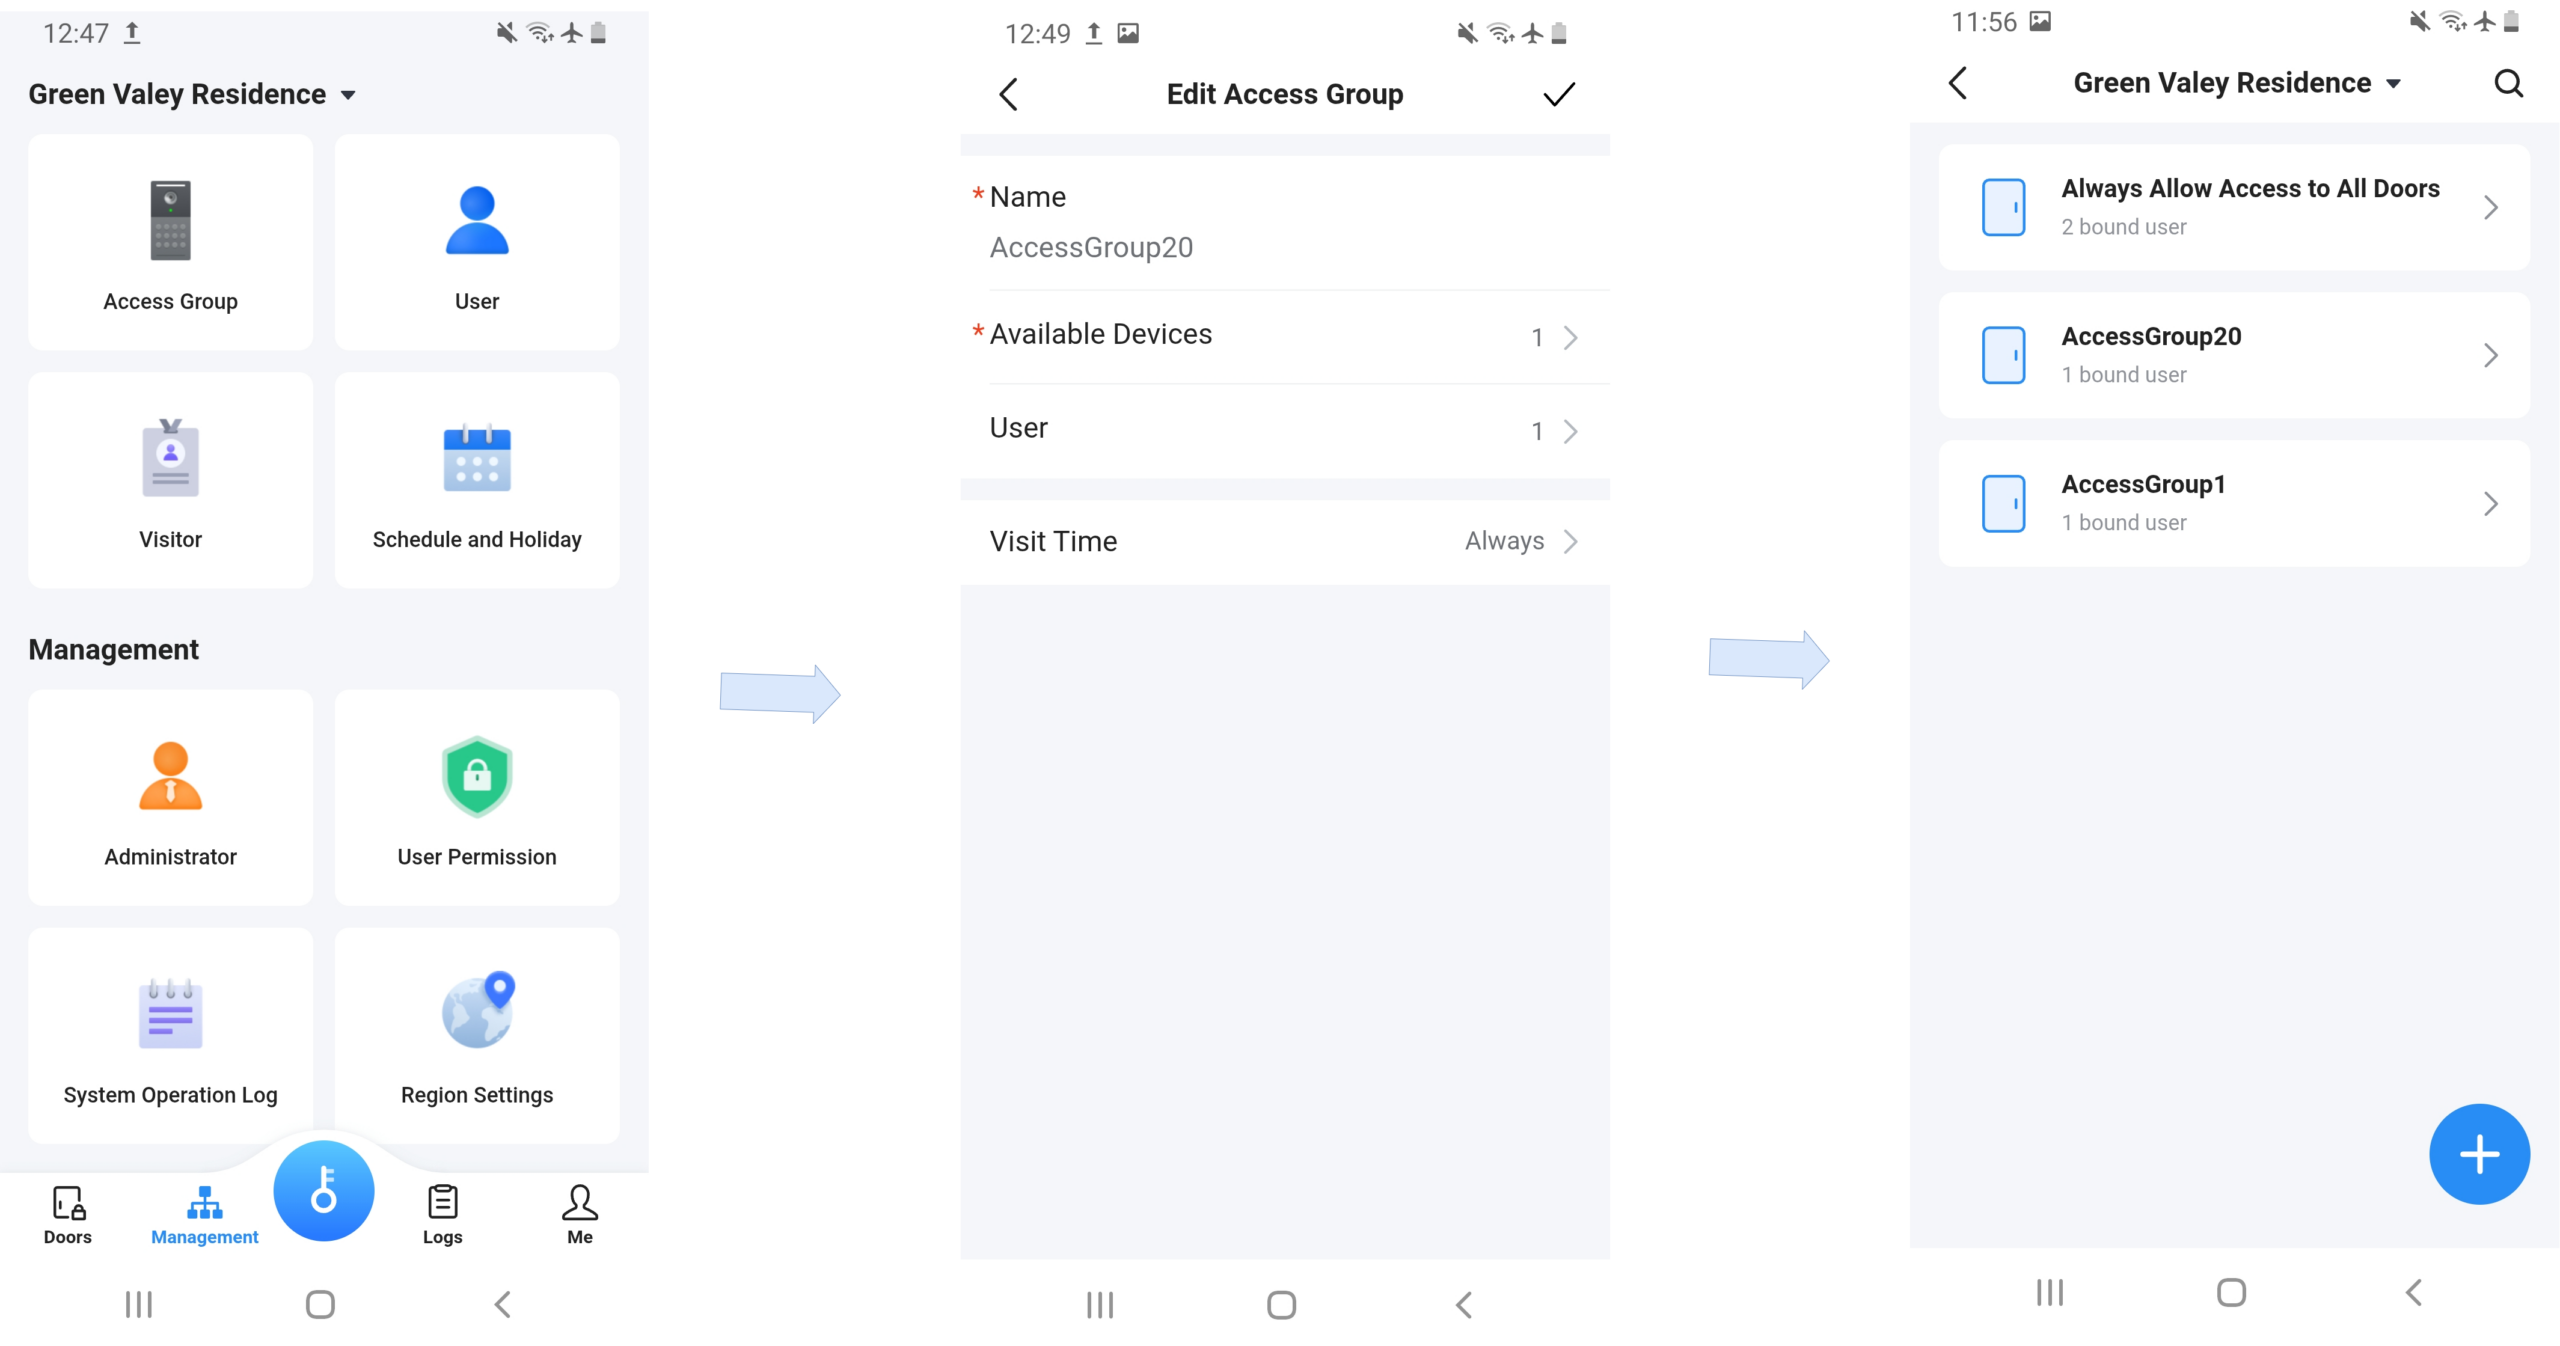
Step 3 – Create Access Groups (Key Step)
The Organization Administrator creates 20 Access Groups, one per building:
| Access Group | Includes Access To |
|---|---|
| AccessGroup1 | Community Gate + Building 1 |
| AccessGroup2 | Community Gate + Building 2 |
| … | … |
| AccessGroup20 | Community Gate + Building 20 |
This ensures:
- All residents can enter the main gate
- Residents can only access their own building
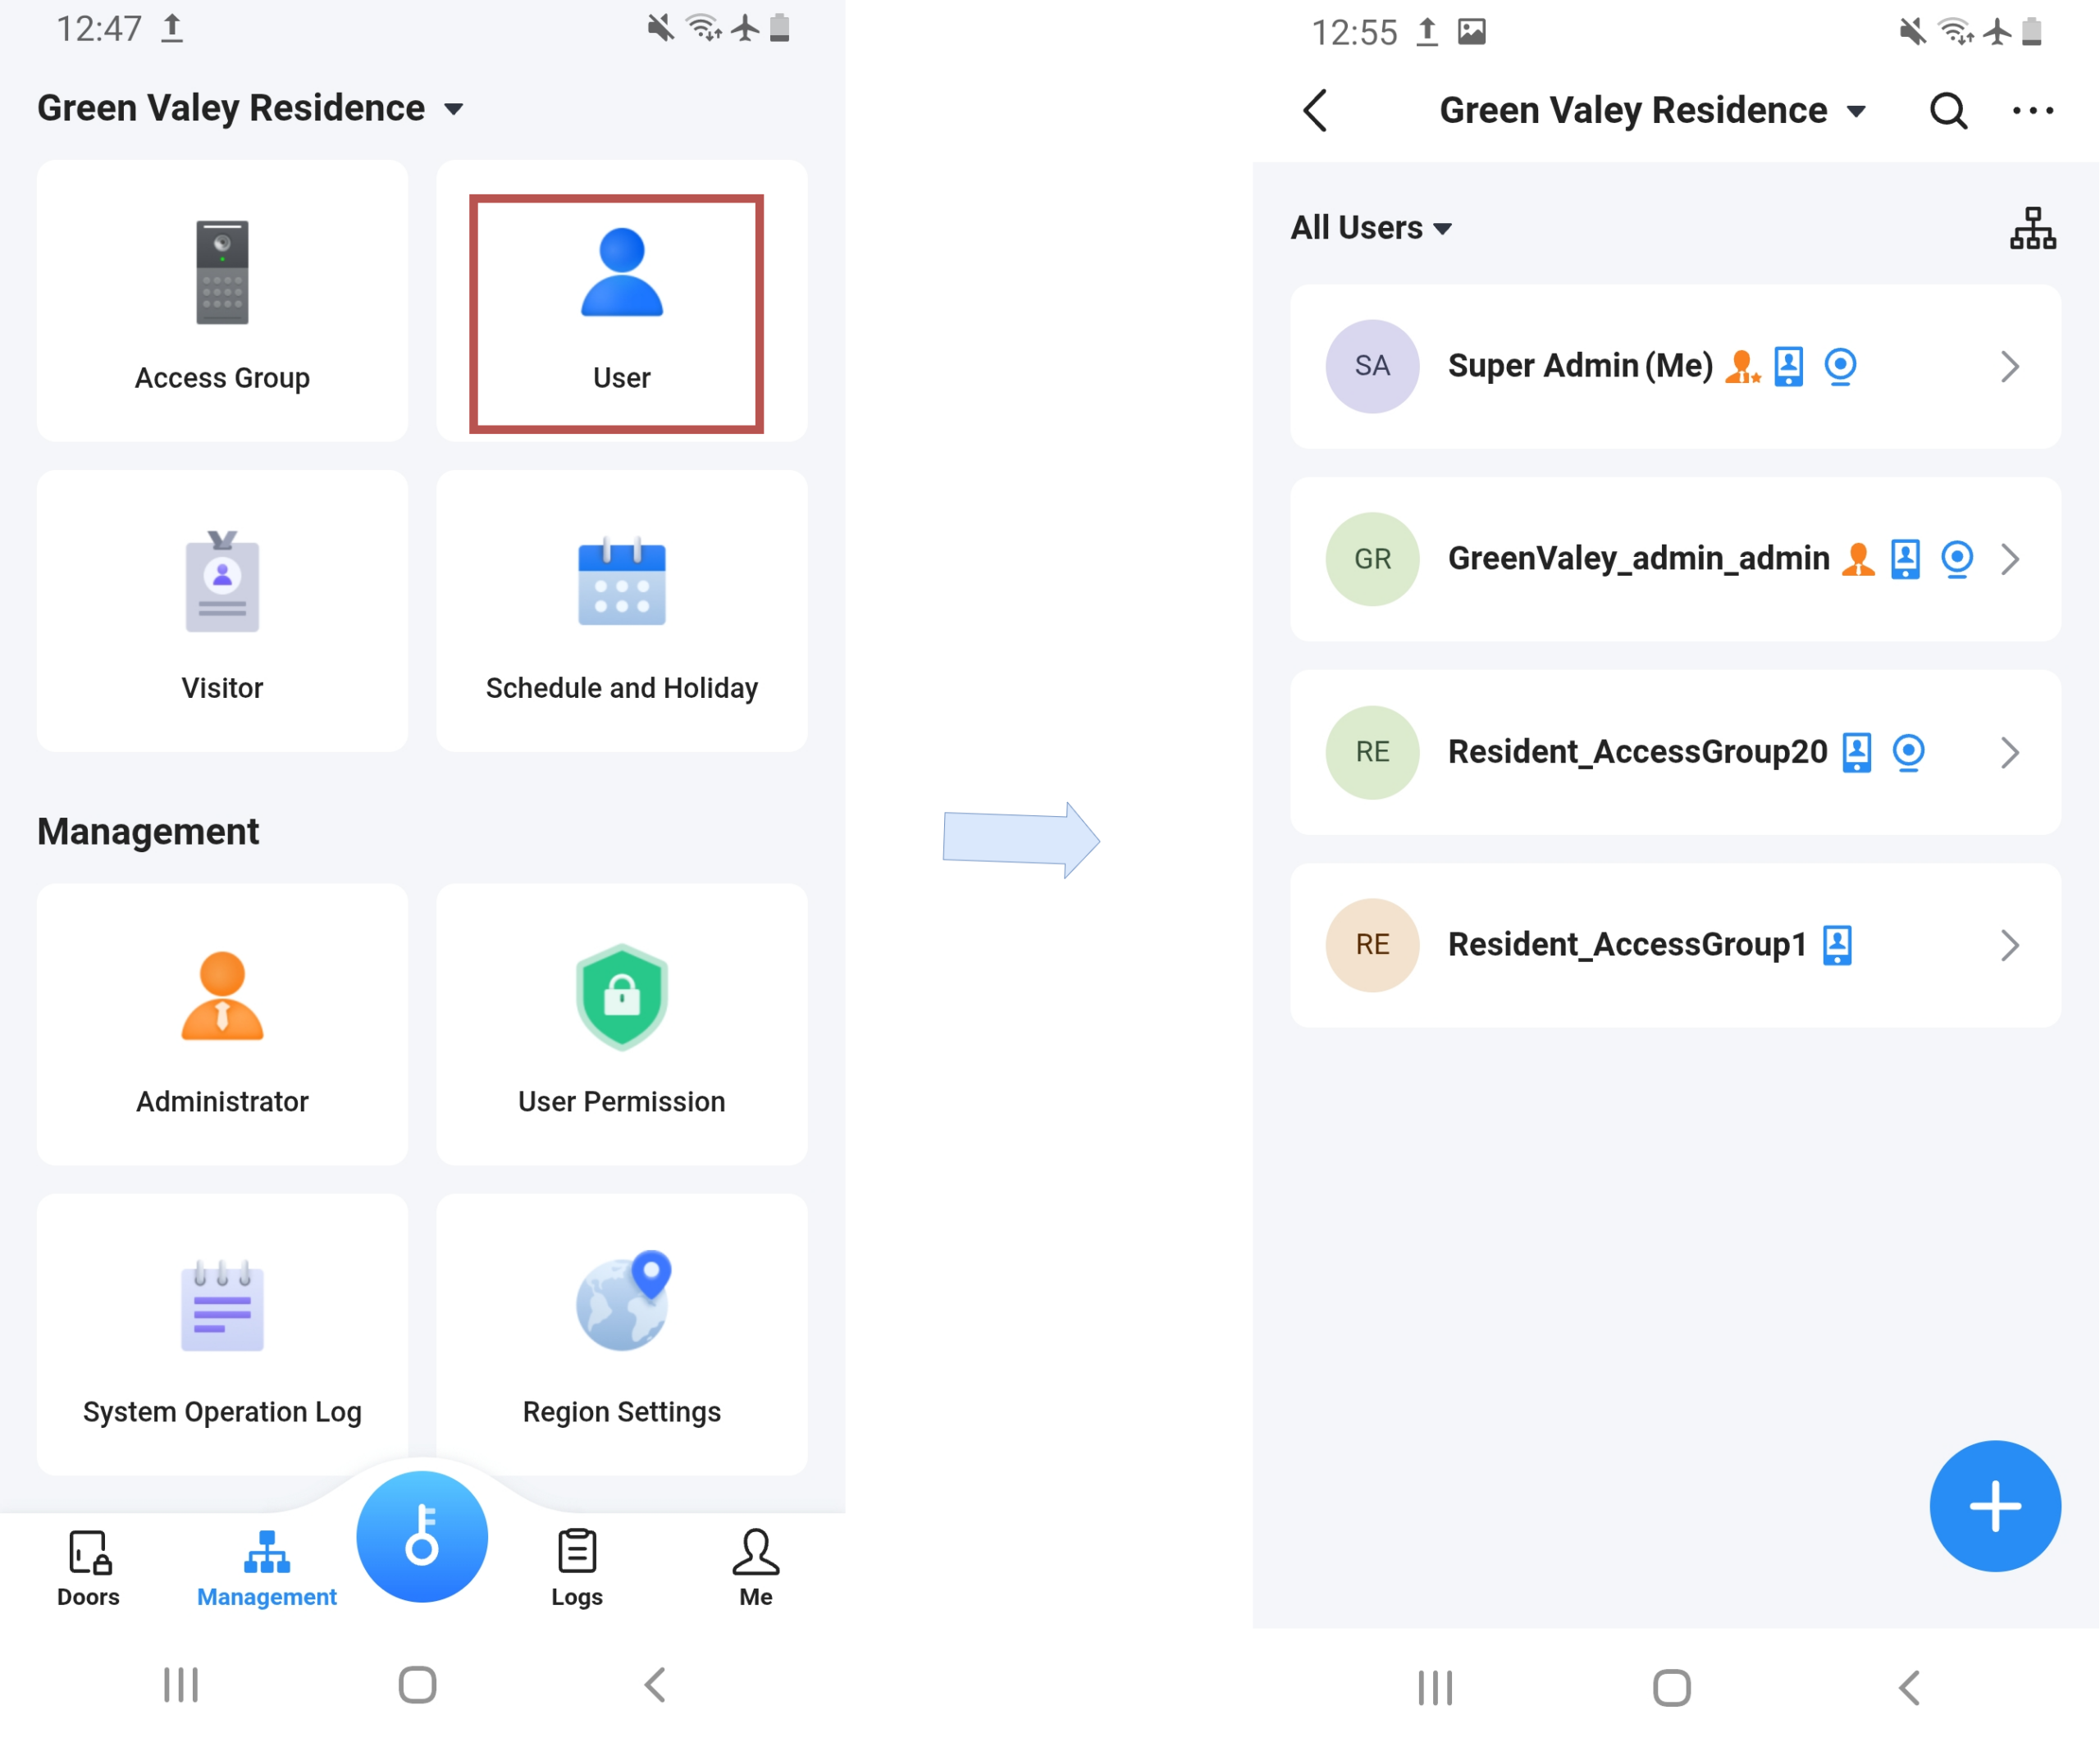
Step 4 – Create & Assign Resident Users
The Organization Administrator then:
- Creates user accounts for all residents
- Assigns each resident to the correct Access Group based on their building, and chooses to grant them access to different types of unlock methods, and monitor features.
Example:
- Building 1 residents → AccessGroup1
- Building 2 residents → AccessGroup2
- …
- Building 20 residents → AccessGroup20
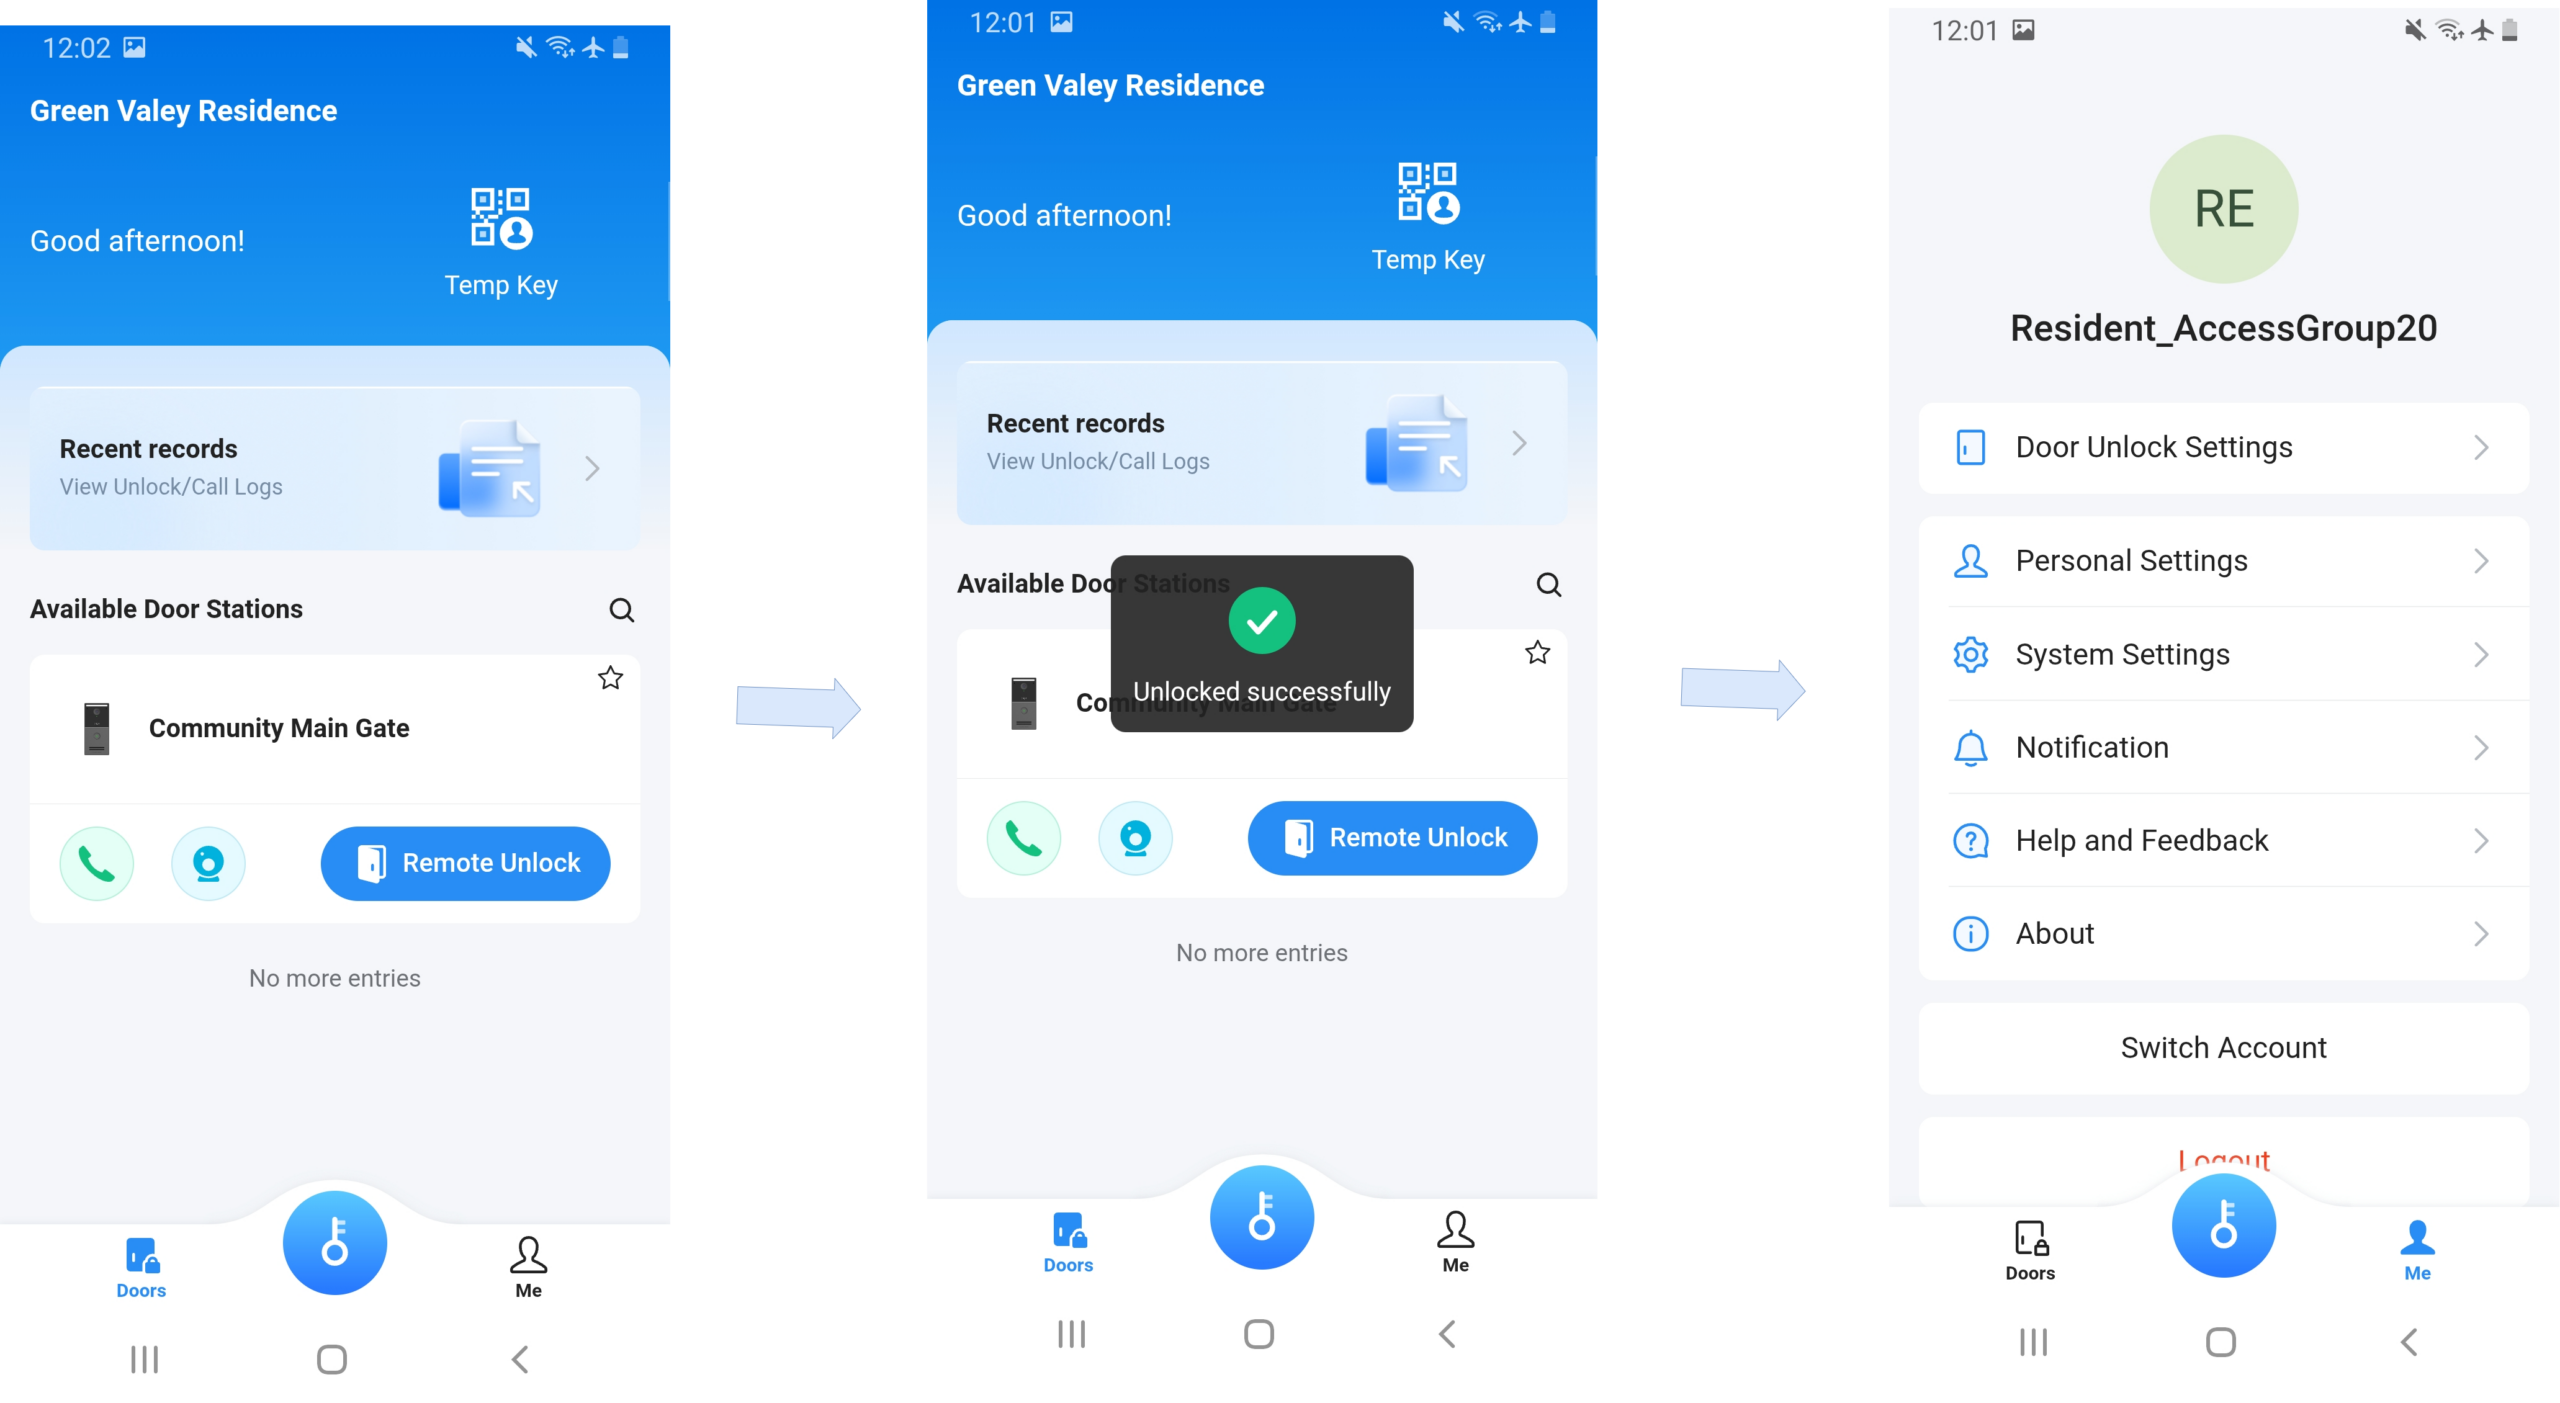
Step 5 – Enable APP User Functionality (Mobile Access & Visitors)
For residents who need mobile access or visitor management, the Admin must:
- Enable APP User functionality for selected users.
- Assign relevant permissions such as:
- Unlock doors via mobile.
- Create temporary visitors.
- Manage their own visitor list.
Step 6 – Manage User Permission
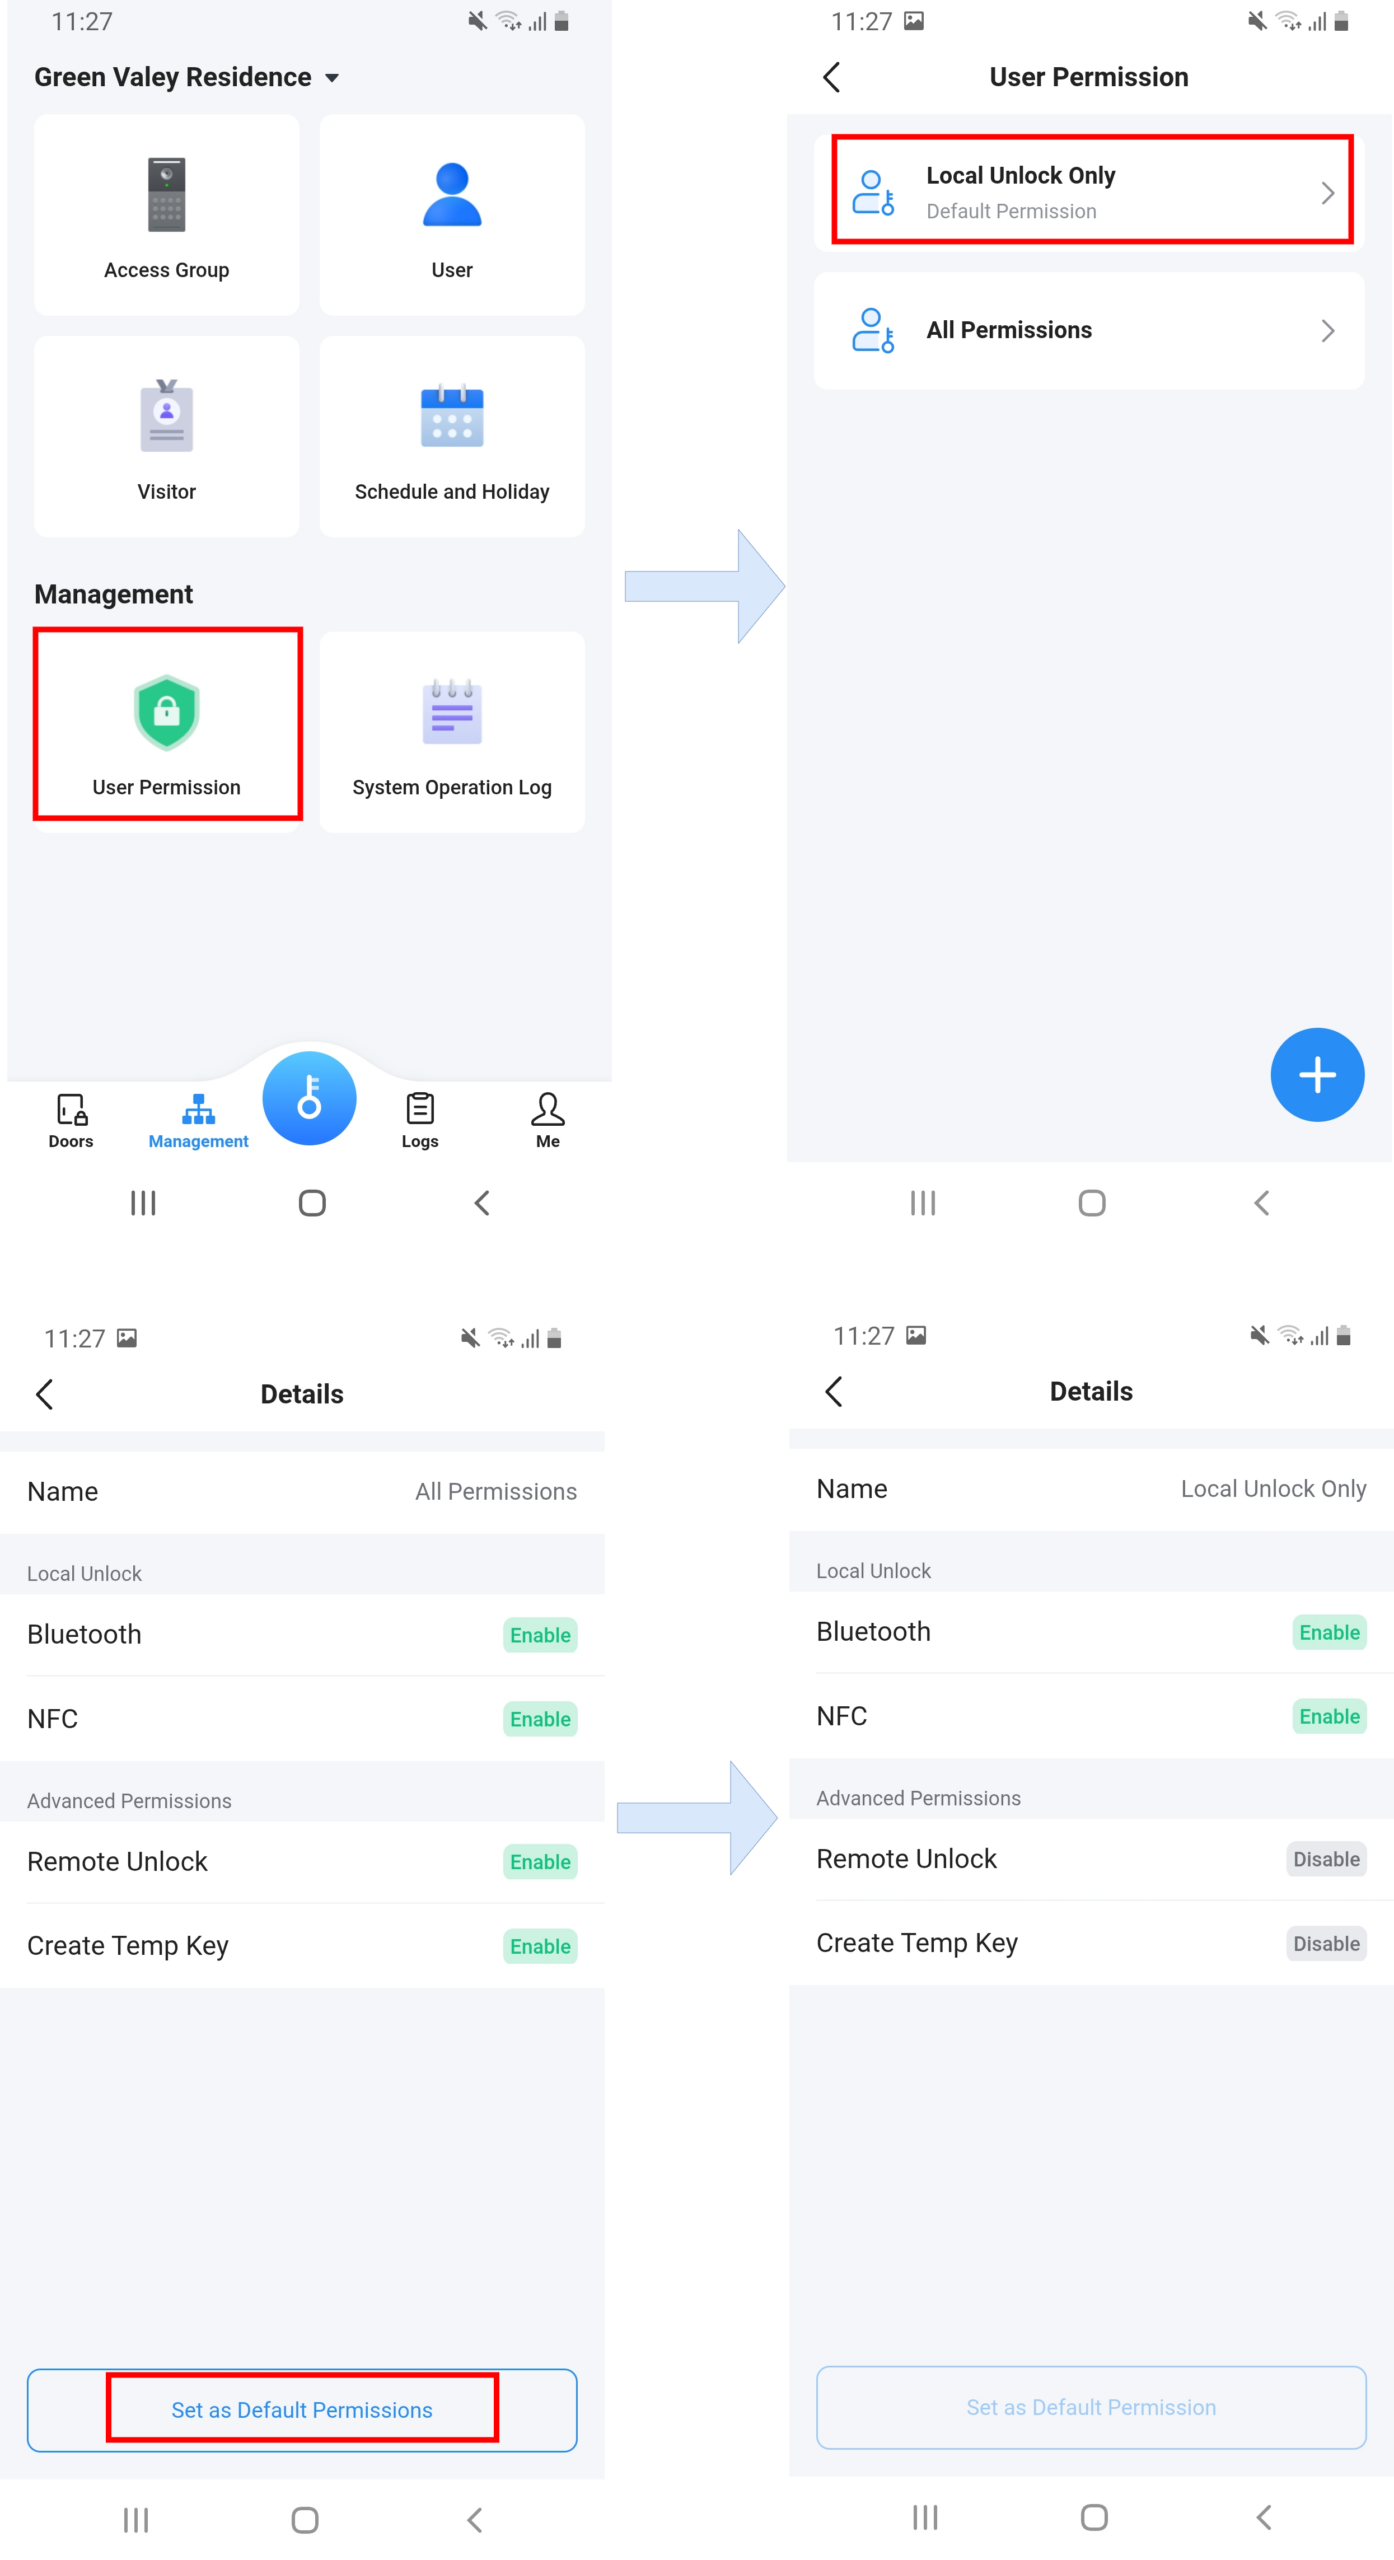
Once the users’ profiles are created for the residents, the organization’s administrator can manage how the residents can open the door. Under user permissions, there are two default permissions:
- Local unlock only: allows the resident who has this user permission level to unlock the door using Bluetooth and NFC (for Android users only).
- All permissions: allows the user to unlock the door using Bluetooth and NFC, in addition to the remote unlock button, open from the app, and create temporary keys for users as well
For residents who would like to give their visitors temporary keys, permission to open the door using a temporary key is necessary.
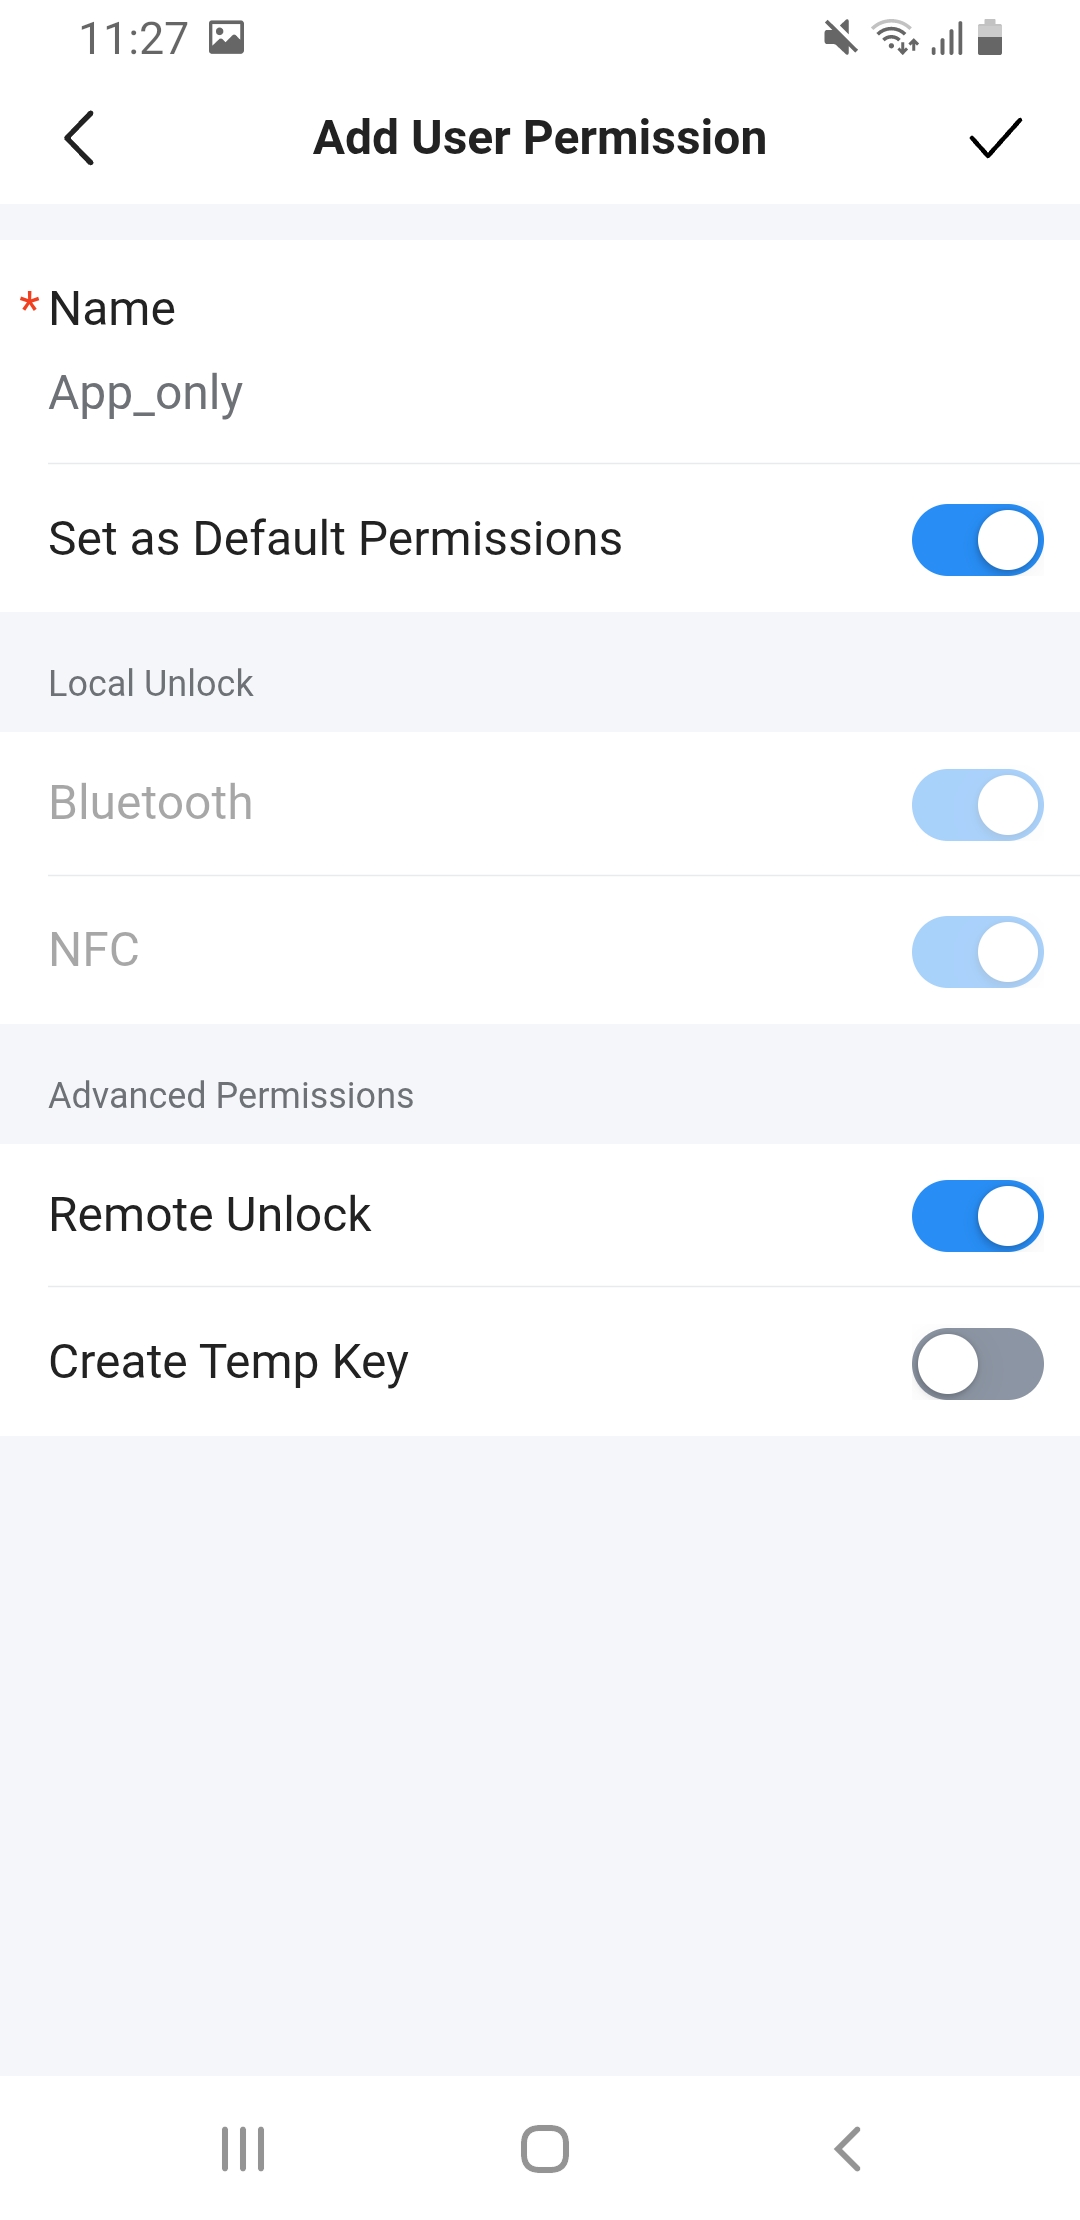
You can also create a custom permission access where you can enable opening the door only with one specific unlocking method
Step 7 – Create Visitor Access
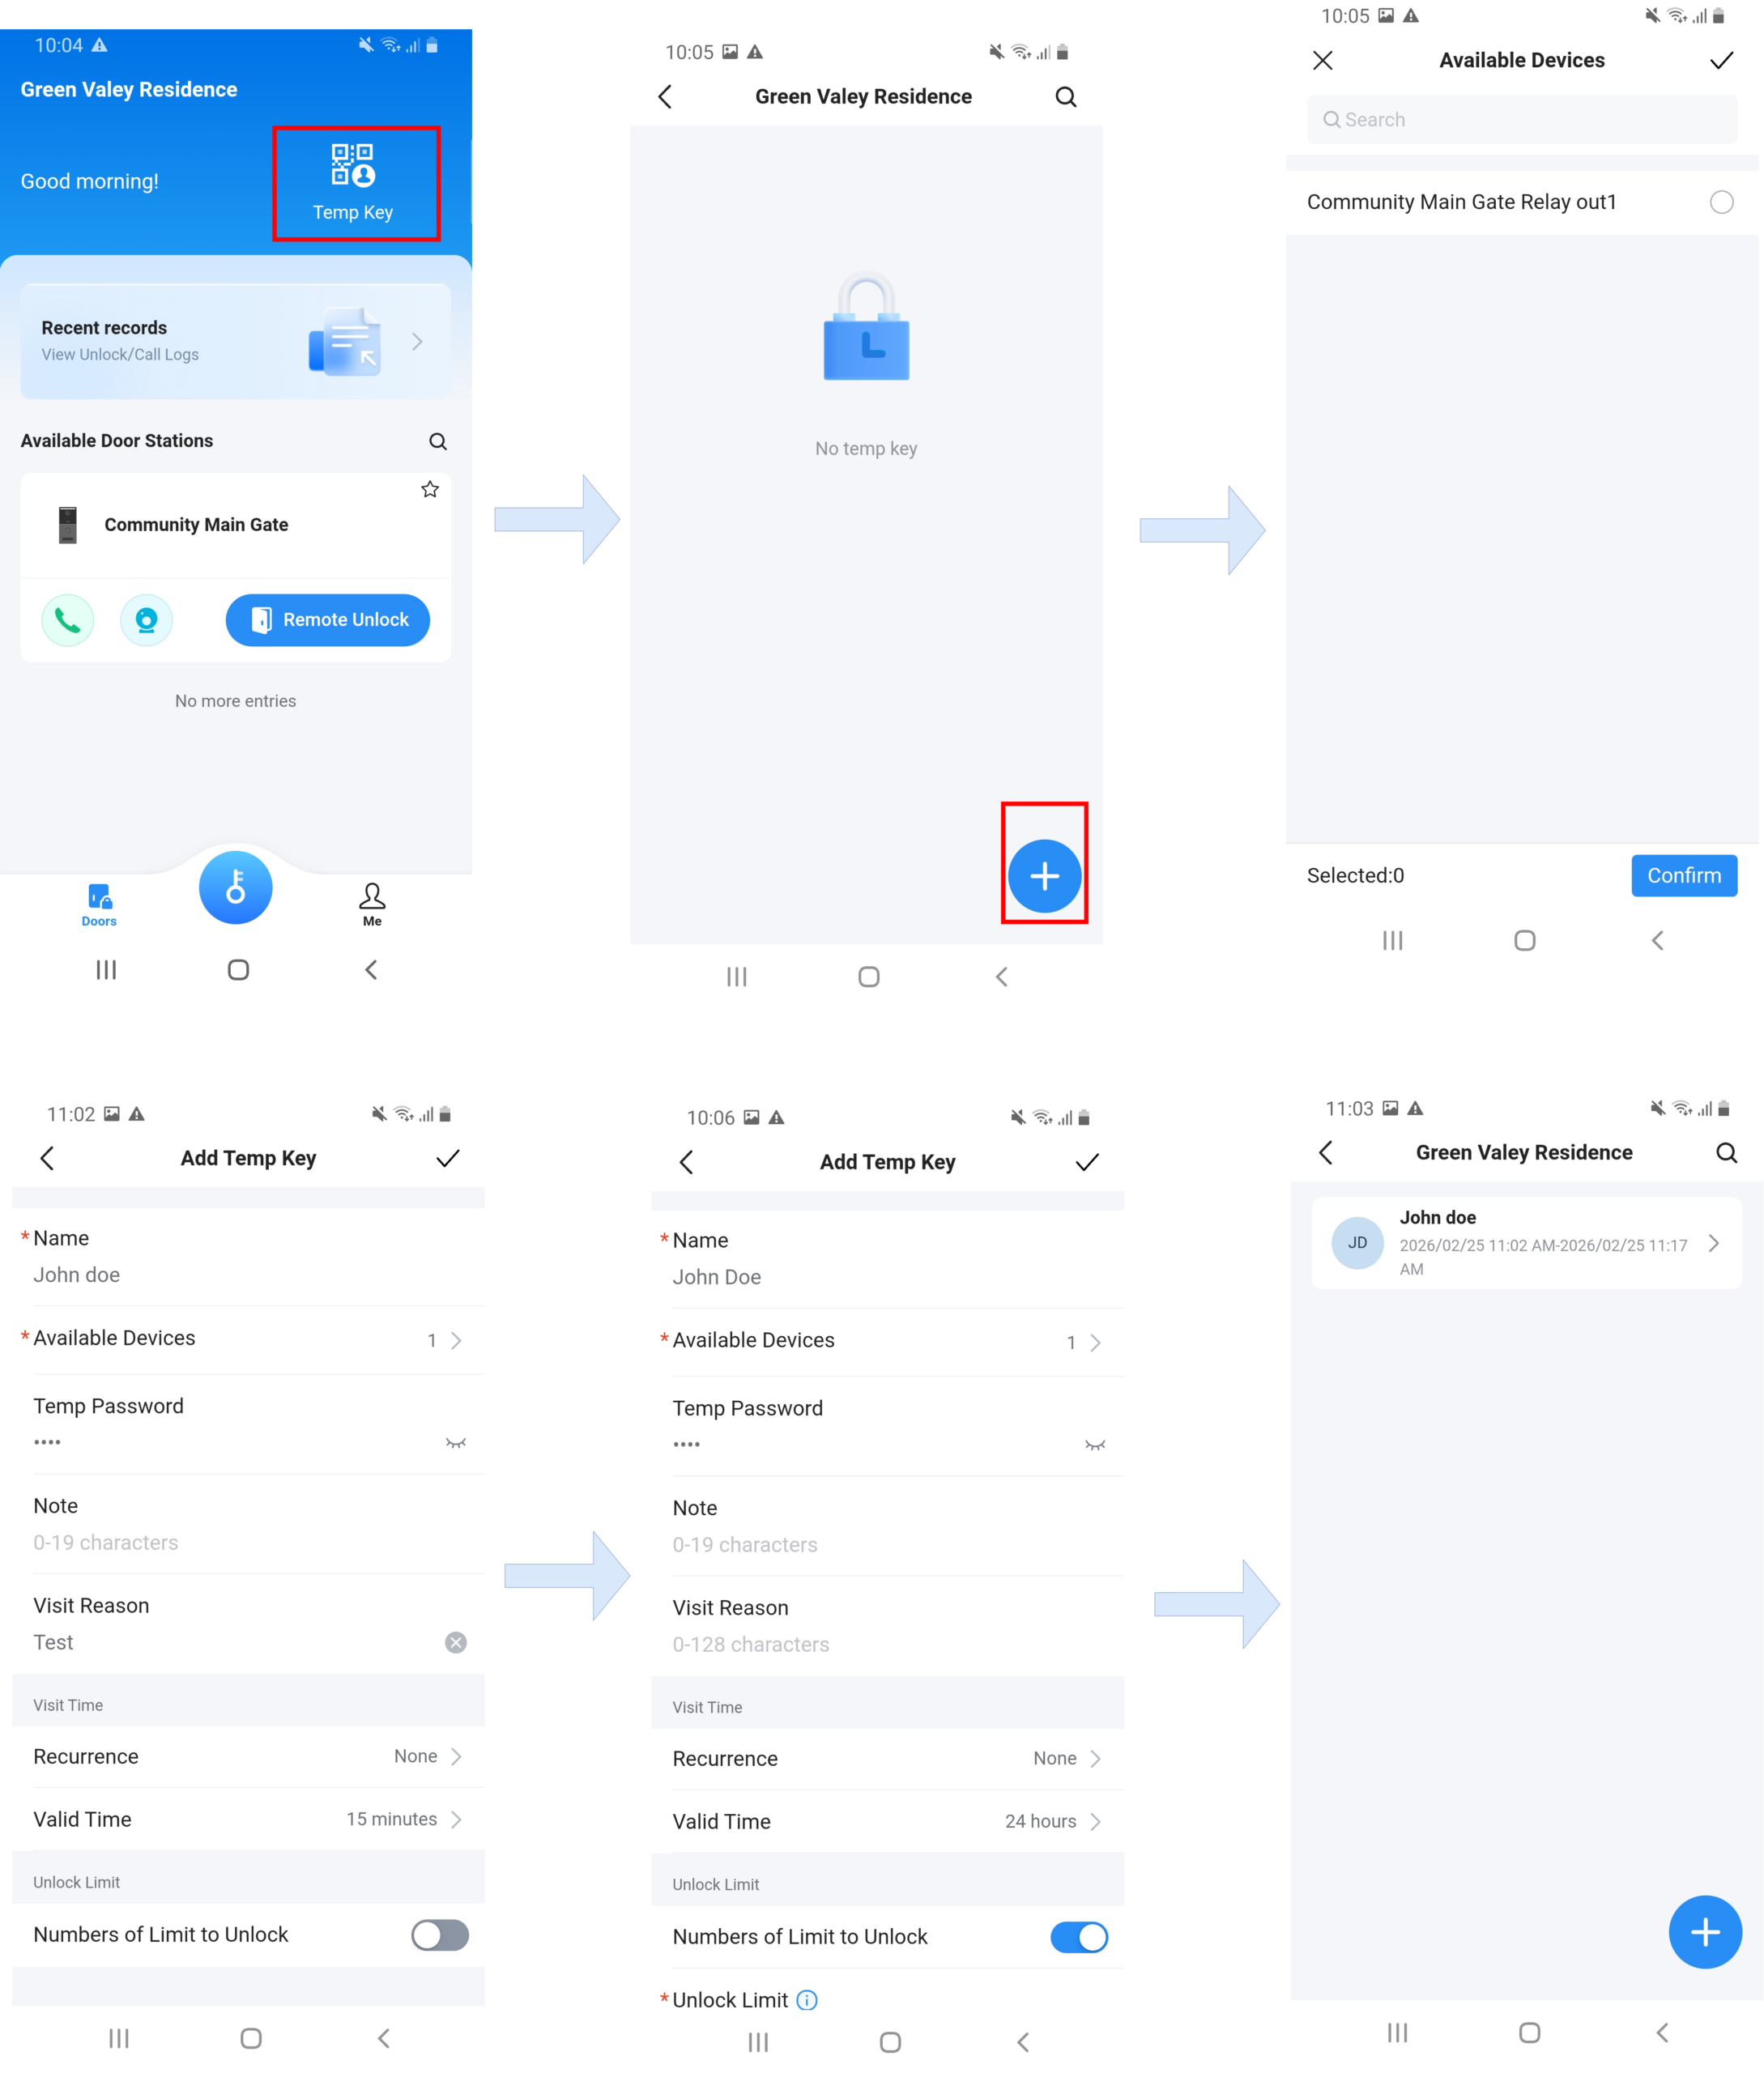
Residents with the appropriate rights can create temporary access keys for their visitors, following the steps below:
- Log in to the app as a user
- Go to the Temp Key icon in the top-right corner
- Tap the Add icon to create a new visitor access
- Enter the Visitor Name
- Select the Device – the door control device that will be opened using the visitor’s temporary code
- (Optional) Set a Temporary Password for GDS devices that support a keypad
- (Optional) Configure the Recurrence
- (Optional) Set the Validity Time for the access
- (Optional) Define the Unlock Limit – maximum number of times the visitor can unlock the door
Once all the settings are completed, the visitor’sprofile will be displayed on a list. Click on the visitor’s name to display the QR code to be scanned on the GDS device camera to open the door.
Results
With this configuration:
- Residents can:
- Enter the community gate.
- Enter only their own building.
- Use the Secure Access APP (if enabled).
- Create temporary visitors
- The Administrator can:
- Manage all users and access groups.
- Oversee visitor records.
- Control permissions centrally.