
Overview
Plug and Play (PnP) Service is a feature available on the GHP6xx that allows it to be set as a server terminal for provisioning other IP phones remotely, on the GHP6xx PNP centralized platform, either by setting the configuration locally by uploading local configuration files, or by obtaining the configuration files from a third party HTTP server.

Local vs Custom PNP Service
Two types of PNP (Plug-and-Play) services are available on the GHP6xx PNP Server, namely Local PNP and Custom PNP. The primary distinction between these services can be outlined as follows:
- Local PNP: Local PNP is a built-in PNP service on the GHP6xx that offers basic functionality. It can manually configure a list of IP phones from the same model specified in a CSV file by using their MAC addresses.
- Custom PNP: Custom PNP can discover and connect to devices on the local network and can also retrieve configuration files from a remote server, for example from an HTTP server.
Custom PNP Configuration
With Custom PNP setup, a configuration file is created, specifying its settings and configurations. The file is then uploaded to a central server, from which the GHP6xx retrieves and applies the settings during provisioning. While Custom PNP enables administrators to specify specific settings for each phone, it demands more initial configuration work as each phone necessitates a unique configuration file.
In order to do that, the administrator needs to provide the PNP URL which is the server address that is typically the IP address of the terminal that offers PNP services and cannot be set as a local parameter.
To set up the Custom PNP service, Please follow the below steps.
- Under Application => PNP Service => General settings, make sure the PNP feature is enabled.
- Set up the PNP URL mode to Custom.
- in the PNP URL, Enter the IP address of the terminal that provides PNP services. It cannot be configured as a locally related parameter, in this case, the terminal can be the IP Address of an HTTP Server.
- Once all fields are entered, Press save and apply.

Local PNP Configuration
A local PNP setup can be used where the GHP6xx is set up as the provisioning server within the local network. In this setup, The GHP6xx enables manual configuration of all IP phones added to the CSV file and applies the uploaded configuration to them.
To set up the Local PNP, Please follow the below steps:
- Under Application => PNP Service => General settings, Enable the PNP.
- Set the PNP URL mode to Local.
- Upload or Batch Configure, to do that we must go through the below steps :
Upload Profile Template
“Upload Profile Template” is a feature that allows administrators to create a template configuration file for a group of IP phones. The template specifies the settings and configurations that should be applied to each phone in the group during provisioning,

To use this feature, administrators can create the template file using a configuration tool, such as a text editor, and then upload it to the PNP server (GHP6xx), or simply edit the provided Template.xml file, The PNP server will then use this file as a blueprint for provisioning the phones in the designated group, below are the steps :
- Upload Profile Template, the template can be downloaded by clicking the
 icon, on the web UI, a .xml configurable file named “template.xml” will be downloaded and it can be edited manually based on the P-Values provided, Please make sure you are following the Profile Template content guidance when updating the configuration file.

2. In addition to the configuration file, the User can download a Help file named “Help.xml” that will guide the user on the specific steps to follow and give definitions of the purpose of each configuration parameter or P-Value. to do that the user must click the icon ![]() and a .xml file will be downloaded.
and a .xml file will be downloaded.

3. Once the configuration file is edited, you can upload it to the PNP service cloud by clicking  icon and choosing the Template.xml file,
4. After the file is uploaded, Click ![]() to move to the Batch Configure CSV step.
to move to the Batch Configure CSV step.
Batch Configure CSV
“Batch Configure CSV” is a feature that enables administrators to configure multiple IP phones at once using a CSV (Comma Separated Values) file.
To use this feature, administrators first create a CSV file containing the settings and configurations for each phone, with each row in the file representing a single phone. The file can be created using a spreadsheet program, such as Microsoft Excel or Google Sheets.
Another alternative to that is downloading the available template for configuration under the name “Template.csv”

Once the CSV file is available, administrators can upload it to the GHP6xx PNP server and initiate the batch configuration process. The PNP server will then read the CSV file and apply the settings and configurations to each phone listed in the file to do that :
- The User can either create his own CSV configuration file with the corresponding attributes or download the “template.csv” file with the parameters already included in the file:

2. After filling in the data about the phones that are going to be provisioned, the user then can upload that file to the cloud by clicking the icon

Once the file is uploaded the user can click ![]() to move to the “Effects view” step.
to move to the “Effects view” step.
Effects View
“Effects View” is a feature that shows the effects of a configuration change before applying it to the actual phones.
To use this feature, administrators can make a configuration change in the PNP configuration file and then view the “Effects View” to see how the change will affect the phones. This preview can be useful for testing and verifying that the intended configuration changes will have the desired effect.

The “Effects View” feature can also help administrators identify any potential issues or conflicts that may arise from the configuration change before it is applied to the actual phones. This can help to minimize the risk of misconfigurations or other issues that could impact the functionality of the phones.
Basic Operations
After the template has been uploaded, there will be a list of actions that can be taken on the added template, and these actions are :
- Enable/Disable the template.

2. Edit the configuration process manually by clicking the icon ![]()

3. Download the configuration template by clicking the icon ![]()

4. Download the Template CSV file by clicking the icon ![]()

5. Delete the Created template by clicking the icon ![]()
Progress Data
“Progress data” refers to information that is provided by the GHP6xx PNP server during the provisioning process to indicate the progress of the configuration changes being applied to the added phones.
This information can include details such as the number of phones that have been successfully provisioned, the number of phones that have encountered errors or issues during the provisioning process, and the status of each phone in the provisioning queue.
In our case, with that data being extracted from the uploaded CSV file, the user can filter and search for a specific device by entering its MAC address as an input, in addition, the user can view the Subscription Initiation Time, Send Notify Time and Request File Time, this feature is really useful when it comes to monitoring provisioned IP Phones.

MAC Discovery
The MAC address is a unique identifier assigned to the network interface of a device, and it is used to communicate with other devices on a network. By using the MAC discovery option, the PNP service can automatically identify the IP phones that need to be provisioned and streamline the provisioning process.
MAC discovery is an option in the Plug and Play (PNP) service for provisioning IP phones that allows the service to automatically discover the Media Access Control (MAC) addresses of the device that need to be provisioned.

How it works
The Mac discovery feature under the PNP service works in a similar fashion to the GS search for facility access devices, all connected devices under the same subnetwork, are going to be discovered with their respective MAC Address, IP Address, and Product Model.
For that to work, please follow the below steps :
- Under Application => PNP service, enable the option PNP service option.
- Choose a custom PNP URL mode.
- Enter the PNP URL, which is the URL of the PNP Server ( i.e: http://192.168.5.74 )
- after saving, the devices that are plugged in and connected under the same network as the PNP configuration unit and that have been rebooted will be listed under the MAC discovery tab and under the Progress data tab. with their system uptime.

The operation that can be done on a device is called the Redistribution operation, it can be done by choosing the device on which it will be operated from the listed discovered MAC addresses, and then clicking the icon ![]() to start the Redistribution process, once that is done you will receive the following success message :
to start the Redistribution process, once that is done you will receive the following success message : ![]()
The user can also Download the configuration file of the IP phone discovered by clicking the icon ![]()
Redistribution Operation
The redistribution operation in PNP (Plug and Play) service involves the automatic distribution of device configurations to multiple IP phones in a network. PNP allows network administrators to deploy new IP phones quickly and easily by automatically provisioning the devices with their configuration settings.
When a new IP phone is added to the network, the PNP service detects the device and automatically retrieves its configuration information from a central configuration server. The PNP service then redistributes this information to all other IP phones in the network, ensuring that all devices are configured in a consistent and efficient manner.
The redistribution operation in PNP also ensures that any updates or changes to device configurations are automatically propagated to all IP phones in the network. This helps to ensure that all devices are operating with the latest configuration settings and reduces the need for manual configuration updates.
Overall, the redistribution operation in PNP helps to streamline the process of provisioning and managing IP phones in a network, saving time and effort for network administrators and ensuring that all devices are operating optimally.
Configuration Example
We want to change the configuration on the GHP621W, we do that by editing the configuration file (.xml file) and changing the path on which the IP phone will request the configuration file, we do that by following the below steps:
- Download the GHP configuration template from https://www.grandstream.com/support/tools
- Rename the template to cfg<mac>.xml, where <mac> is the MAC address of the device being configured.
- Edit the Template based on your preferences.

- On an HTTP server such as HFS, upload the configuration file.
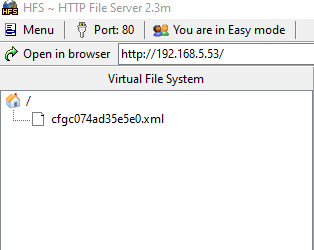
- On the PNP Server (GHP620W for example) , provide the PNP URL to be the HTTP server URL

- Once that is done, under the MAC discovery tab, click the Icon for the redistribution process to start

- Finally, the configuration file will be downloaded and applied to the GHP621W.

Supported Devices
Model | Supported | Firmware |
GHP610 | Yes | 1.0.1.37 or higher |
GHP610W | Yes | 1.0.1.37 or higher |
GHP611 | Yes | 1.0.1.37 or higher |
GHP611W | Yes | 1.0.1.37 or higher |
GHP620 | Yes | 1.0.1.37 or higher |
GHP620W | Yes | 1.0.1.37 or higher |
GHP621 | Yes | 1.0.1.37 or higher |
GHP621W | Yes | 1.0.1.37 or higher |
List of supported devices