
The GHP series of hotel phones feature the GHP610(W)/GHP620(W) and the GHP611(W)/GHP621(W), easy-to-use IP phones for any hotel room that can be programmed and customized based on the needs of the hotel and its guests. These devices are equipped with integrated dual-band Wi-Fi (GHP6XX/W).
The features of the GHP series include an HD speaker, 2 SIP accounts/lines, 6 programmable keys (3 programmable keys for GHP61X), 10-speed dial keys, 3-way voice conferencing, full band Opus voice codec, an advanced jitter-resilience algorithm that tolerates up to 30% packet loss without impacting voice quality.
The GHP series is supported by the Grandstream Device Management System (GDMS), which provides a centralized interface to configure, provision, manage and monitor the deployment of Grandstream endpoints.
The GHP series IP phones can be installed on a desktop or wall-mounted and can be powered by PoE (GHP610/GHP611/GHP620/GHP621), power adapter (GHP610W/GHP611W/GHP620W/GHP621W) and USB Type-C charger(GHP620/GHP621/GHP620W/GHP621W).
Its elegant and compact design makes it perfect for not only hotels but also hospitals, apartments, dormitories, and much more.
PRODUCT OVERVIEW
Feature Highlights
 GHP61X/W 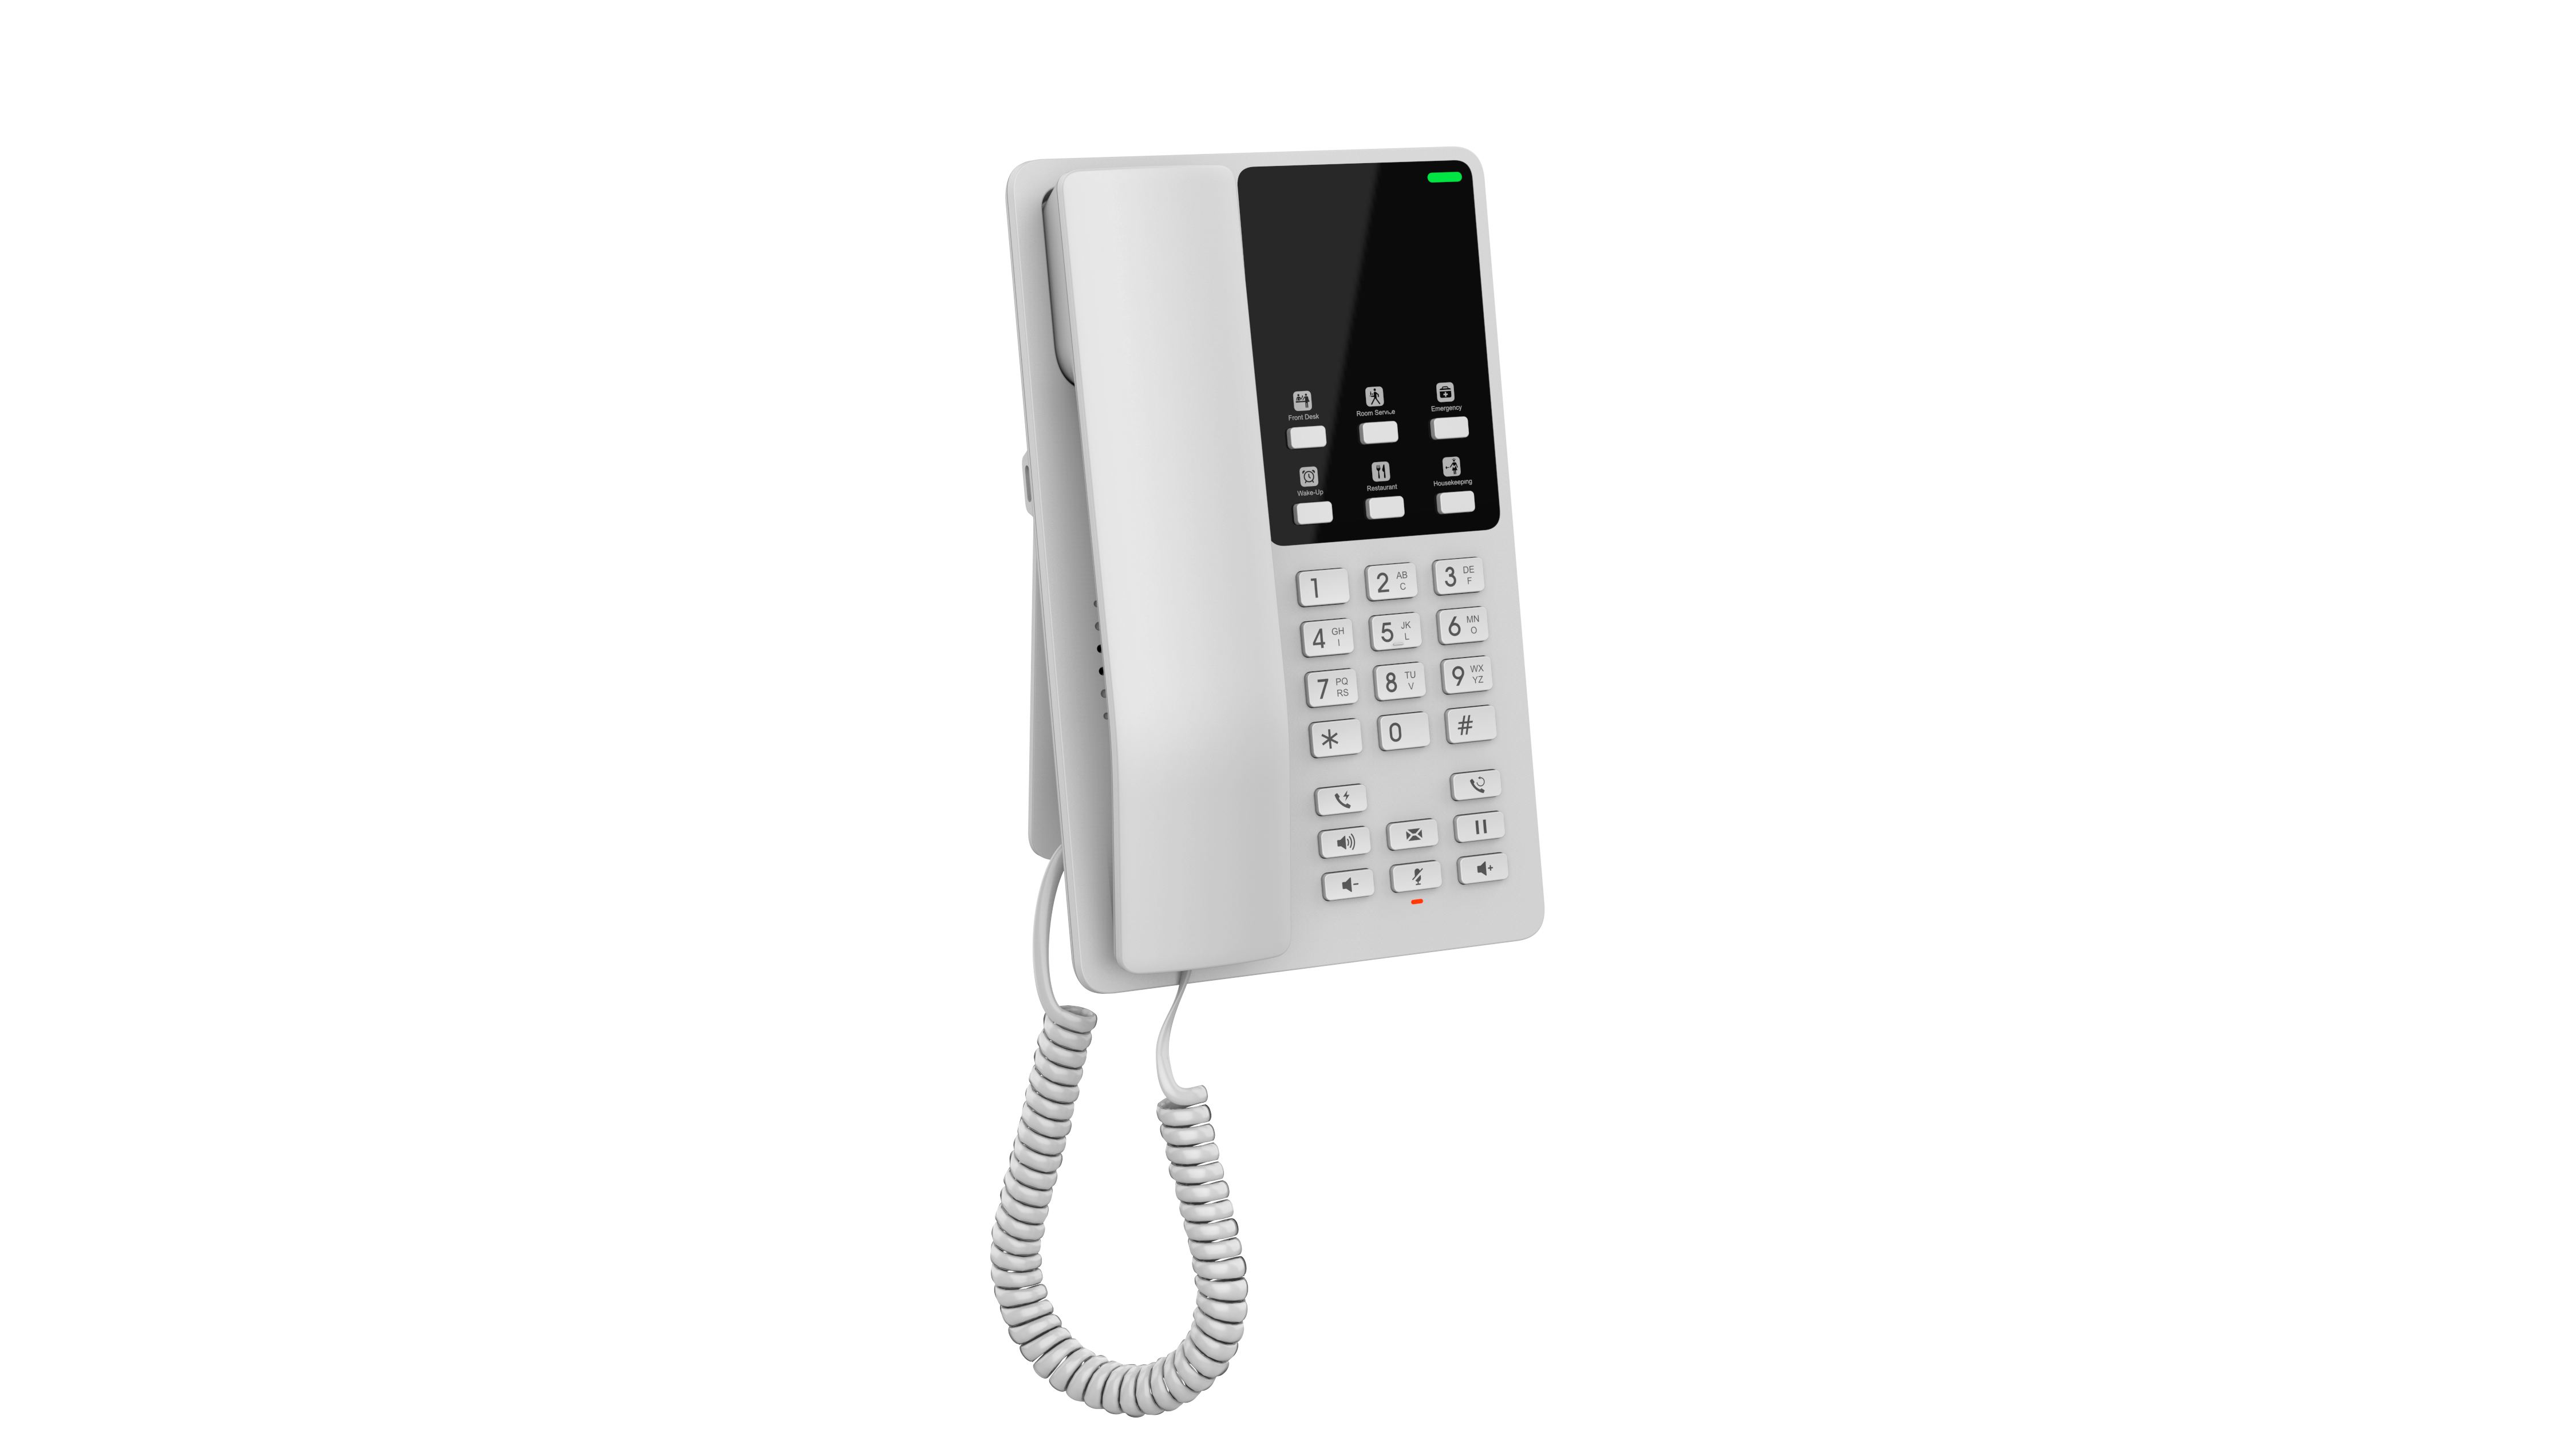 GHP62X/W |
|
Technical Specification
- GHP61X
Protocols/Standards | SIP: SIP RFC3261, TCP/IP/UDP, RTP/RTCP, RTCP-XR, Simple, TLS, SRTP. |
Network Interface | One Auto-Negotiation 10/100Mbps ethernet port, integrated PoE (Only GHP61X) |
Wi-Fi | GHP610W/GHP611W integrated dual-band 2.4Ghz & 5Ghz 802.11 a/b/g/n/ac. |
Keypad | 23 keys, including: - 3 Programmable keys. - 5 function keys (Flash, Redial, Hands-free, Voice Mail, Hold). |
HD Audio | One HD handset, support for wide band audio. |
Voice Conference | 2 SIP accounts and lines, up to 3-way conference. |
Voice Codecs | Support for the G.729A/B, G.711µ/a-law, G726, G.722(wide band), G723, iLBC, full band OPUS. |
Voice Capabilities | In-band and out-of-band DTMF (in audio, RFC2833, SIP INFO), VAD, AEC, CNG, PLC, AGC, AJB. |
Telephony Features | Dial, Answer, Redial, Flash, Hands-free, Voice mail (with the server) Hold/Unhold, Mute/Unmute, flexible dial plan, Speed dial server redundancy, fail-over Call out. |
Advanced Features | Support for multicast paging and E911 service. |
Base Stand | 1 wall-mountable base stand, can be put on a desk. |
QoS | Layer 2 QoS (802.1Q, 802.1p) and Layer 3 (ToS, DiffServ, MPLS) QoS |
Security | Secure boot, random default, unique security certificate per device, administrator level passwords, 256-bit AES encrypted configuration file, SRTP, TLS, 802.1x media access control. |
- GHP62X
Protocols/Standards | SIP: SIP RFC3261, TCP/IP/UDP, RTP/RTCP, RTCP-XR, Simple, TLS, SRTP. |
Network Interface | One Auto-Negotiation 10/100Mbps ethernet port, integrated PoE (Only GHP62X) |
Wi-Fi | GHP620W/GHP621W integrated dual-band 2.4Ghz & 5Ghz 802.11 a/b/g/n/ac. |
Keypad | 26 keys, including: - 6 Programmable keys. - 5 function keys (Flash, Redial, Hands-free, Voice Mail, Hold). |
HD Audio | One HD handset, support for wide band audio. |
Voice Conference | 2 SIP accounts and lines, up to 3-way conference. |
Voice Codecs | Support for the G.729A/B, G.711µ/a-law, G726, G.722(wide band), G723, iLBC, full band OPUS. |
Voice Capabilities | In-band and out-of-band DTMF (in audio, RFC2833, SIP INFO), VAD, AEC, CNG, PLC, AGC, AJB. |
Telephony Features | Dial, Answer, Redial, Flash, Hands-free, Voice mail (with the server) Hold/Unhold, Mute/Unmute, flexible dial plan, Speed dial server redundancy, fail-over Call out. |
Advanced Features | Support for multicast paging and E911 service. |
Base Stand | 1 wall-mountable base stand, can be put on a desk. |
QoS | Layer 2 QoS (802.1Q, 802.1p) and Layer 3 (ToS, DiffServ, MPLS) QoS |
Security | Secure boot, random default, unique security certificate per device, administrator level passwords, 256-bit AES encrypted configuration file, SRTP, TLS, 802.1x media access control. |
GETTING STARTED
This chapter provides basic installation instructions including the list of the packaging contents and also information for obtaining the best performance with the GHP6XX/W.
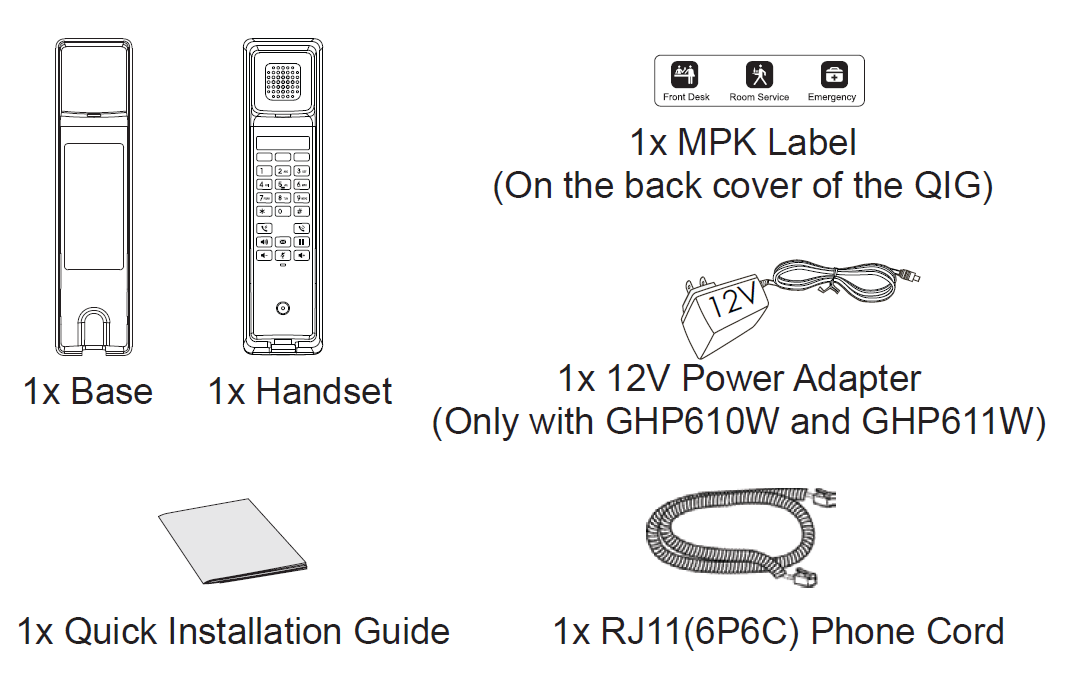
Equipment Packaging
GHP61X
GHP61X/W |
|
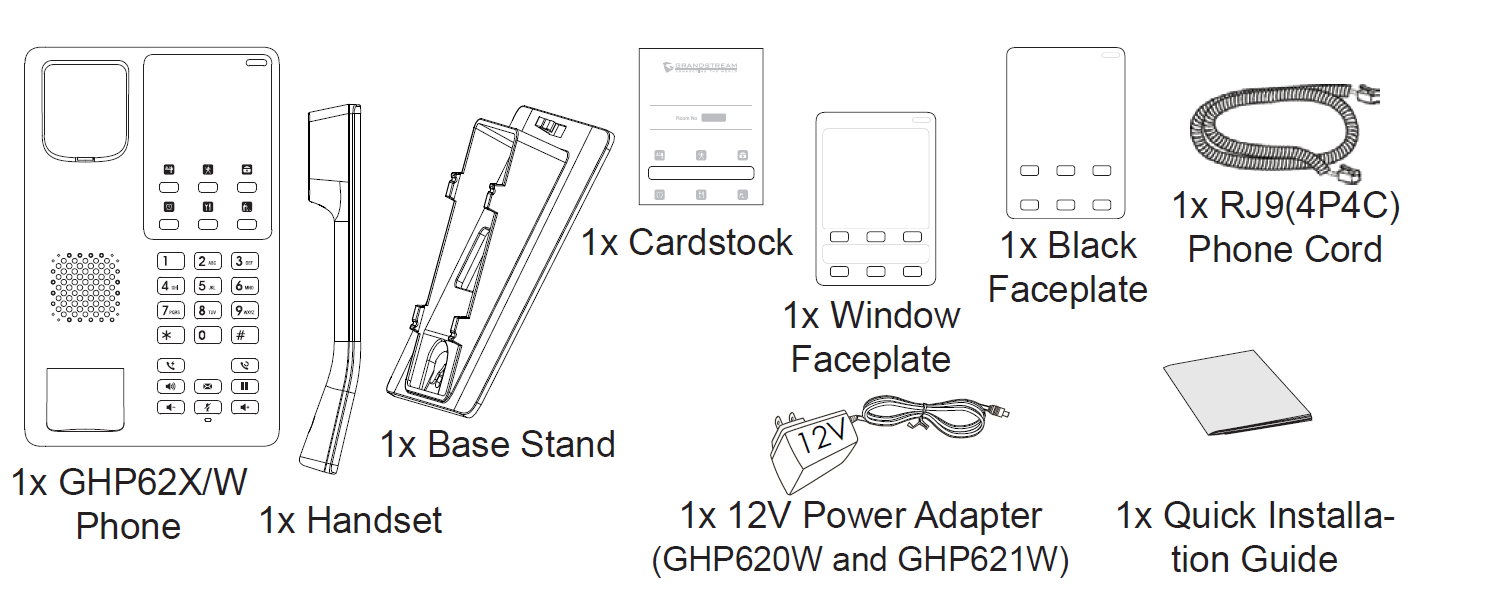
GHP62X
GHP62X/W |
|
GHP6XX/W Phone Setup
The GHP6XX/W can be installed on the desk or can be mounted on the wall. To mount the phone on the wall please follow the instructions below.
GHP61X/W
- Mark two dots horizontally with a 100 mm distance in between where to wall mount the GHP610/W & GHP611/W.
- Using a drill, make a hole on each marked dot. Put a plastic expansion bolt and screw (not provided) on each hole. Leave enough space to mount the GHP610/W & GHP611/W.
- Mount the GHP610/W & GHP611/W on the screws using the Wall Mount Slots.
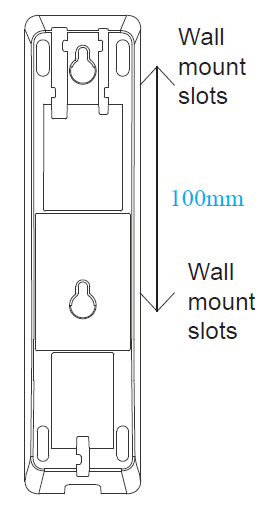
GHP62X/W

- On the wall where the GHP62X/W will be mounted, mark two dots with 100 mm distance in-between vertically.
- Using a drill, make a hole on each marked dot. Put a plastic expansion bolt and screw (not provided) into each hole. Leave enough space on the screws to mount the GHP62X.
- Attach the wall mount spacers to the slot for the wall mount spacer on the back of the phones.
- Mount the GHP62X on the screws using its “Wall Mount Slots”.
Connecting the GHP6XX/W
To set up the phone, follow the steps below:
- Connect the phone cord with the handset (RJ-11 port in GHP61X/W, RJ-9 port in GHP62X/W) and the base.
- Connect the LAN port of the phone to the RJ-45 socket of a hub/switch on a router ( LAN side of the router) using the Ethernet cable. This step can be skipped if using GHP6XXW with Wi-Fi.
- Powering the phone:
- For GHP6XXW: Connect the 12V DC output plug into the power jack if the phone; plug the power adapter into the electrical outlet.
- For GHP6XX: A PoE switch must be used in step 2.
Phone Configuration Via Web Browser
- Ensure your phone is powered up and connected to the internet.
- Locate the MAC address on the MAC tag of the unit which is on the underside of the device, or on the package.
- From a computer connected to the same network as the GHP6XX, type in the following address using GHP6XX’s MAC address on your browser: https://<mac>.local
Example: https://c074adffffff.local
Note: The user can dial **47# and the IP address will be read by the IVR. - Enter the admin’s username and password to access the configuration menu. (The factory default username is “admin” while the default random password can be found on the sticker at the back of the unit).
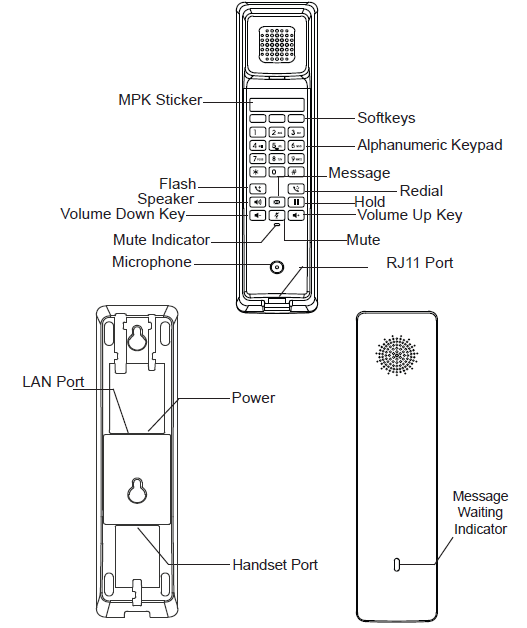
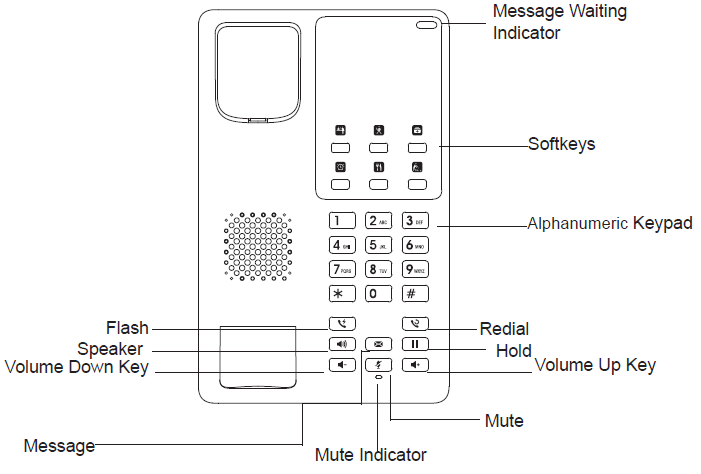
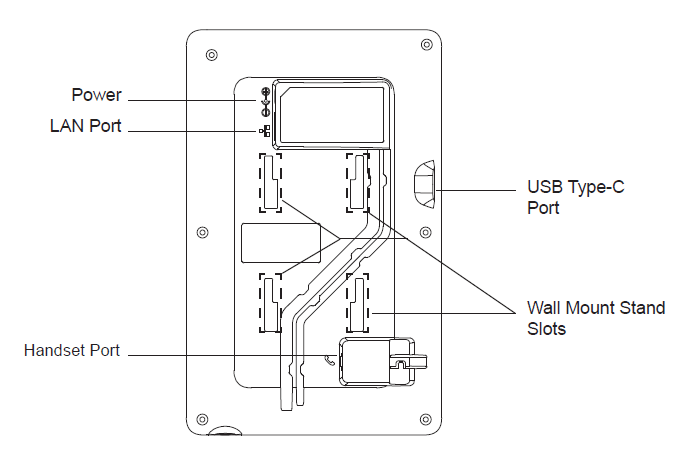
Phone Description
GHP61X
GHP62X
CONFIGURATION GUIDE
Status Page Definitions
Status → Account Status | |
Account Status | This interface indicates the information of the accounts which are configured on the IP phone. |
Status → Network Status | |
Ethernet | |
MAC Address | This field indicates the MAC address of the device. |
IPv4 Address Type | This field indicated whether the obtained IP address was configured by DHCP or set statically. |
IPv4 Address | This field indicates the IP address allocated to the IP phone. |
Gateway | This field indicates the default gateway allocated. |
IPv4 NAT Type | This field indicates the type of NAT of the network. |
IPv6 Address | This field indicates the IPv6 IP address allocated. |
Global Unicast Address | This field indicates the global unicast address. |
Link-Local Address | This field indicates the IPv6 unicast address. |
IPv6 Static Gateway | This field indicates the IPv6 static gateway address. |
IPv6 DUID | This field indicates the DHCP unique identifier. |
IPv6 NAT Type | This field indicates the IPv6 NAT type. |
Wi-Fi (Only for GHP62xW and GHP61xW) | |
WLAN MAC Address | This field indicates the WLAN MAC Address. |
SSID | This field indicates the SSID that the device is connected to. |
Country Code | This field indicates the Country Code. |
IPv4 Address Type | This field indicates theIPv4 Address Type, dynamic or static. |
IPv4 Address | This field indicates the IPv4 Address. |
Gateway | This field indicates the Gateway IP Address. |
IPv4 NAT Type | This field indicates the IPv4 NAT Type. |
IPv6 Address Type | This field indicates the IPv6 NAT Type. |
Global Unicast Address | This field indicates the Global Unicast Address. |
Link-Local Address | This field indicates the Link-Local Address, this is an automatically assigned IP address for local network communication without the need for a DHCP server. |
IPv6 Static Gateway | This field indicates a manually configured gateway address used for routing traffic on an IPv6 network. |
IPv6 DUID | This field indicates the IPv6 DUID, An IPv6 DUID (DHCP Unique Identifier) is a unique identifier assigned to a device by a DHCPv6 server for network configuration and identification purposes. |
IPv6 NAT Type | This field indicates the IPv6 NAT Type, IPv6 NAT Type refers to the Network Address Translation (NAT) configuration used for IPv6 connections, which may vary based on the network setup and the type of NAT employed. |
DNS & NAT | |
DNS Server | Displays the DNS Server and back up DNS server used. |
DNS Mode | Displays the DNS Mode used for both accounts. |
NAT Traversal | Displays whether NAT Traversal is enabled or not, for both accounts. |
Status → System Info | |
Information | |
Product model | This field indicates the product model. |
Part number | This field indicates the part number. |
Serial Number | Displays the GHP6xx's Serial Number. |
Certificate Type | Displays the certificate type. |
Software version | This field indicates the version of the firmware installed. |
Language | This field indicates the language used for displaying the web user interface. |
Recommended Time Zone | This field indicates the recommended time zone. |
System Up Time | This field indicates how long the devices has been turned on. |
System Time | This field indicates the time and date set on the system. |
System Time Zone | This field indicates the system time zone configured on the device. |
Download System Information | This option allows downloading all the the system information. |
Account Page Definitions
Basic Settings
Account Register | |
Account Active | Indicates whether the account is active. The default setting is “No”. |
Account Name | The name associated with each account to be displayed on the LCD. (e.g., MyCompany) |
SIP Server | The URL or IP address, and port of the SIP server. This is provided by your VoIP service provider (e.g., sip.mycompany.com, or IP address) |
Secondary SIP Server | The URL or IP address, and port of the SIP server. This will be used when the primary SIP server fails |
Outbound Proxy | IP address or Domain name of the Primary Outbound Proxy, Media Gateway, or Session Border Controller. If a symmetric NAT is detected, STUN will not work and ONLY an Outbound Proxy can provide a solution |
Secondary Outbound Proxy | Defines secondary outbound proxy that will be used when the primary proxy cannot be connected. |
SIP User ID | User account information, provided by your VoIP service provider. |
SIP Authentication ID | SIP service subscriber’s Authenticate ID used for authentication. It can be identical to or different from the SIP User ID. |
SIP Authentication Password | The account password required for the phone to authenticate with the SIP server before the account can be registered. After it is saved, this will appear as hidden for security purpose. |
Name | The SIP server subscriber’s name (optional) that will be used for Caller ID display (e.g., John Doe). |
TEL URI | If the phone has an assigned PSTN telephone number, this field should be set to “user=phone”. A “user=phone” parameter will be attached to the Request-URI and “To” header in the SIP request to indicate the E.164 number. If set to “Enable”, “tel:” will be used instead of “sip:” in the SIP request. |
Voice Mail Access Number | Allows users to access voice messages by pressing the MESSAGE button on the phone. This value is usually the VM portal access number. |
Failback Expiration (m) | Specifies the duration (in minutes) since failover to the current SIP server or Outbound Proxy before making failback attempts to the primary SIP server or Outbound Proxy. |
Network Settings | |
DNS Mode | This parameter controls how the Search Appliance looks up IP addresses for hostnames. If “Use Configured IP” is selected, please fill in Primary IP, Backup IP 1 and Backup IP 2.
|
Maximum Number of SIP Request Retries | Sets the maximum number of retries for the device to send requests to the server. In DNS SRV configuration, if the destination address does not respond, all request messages are resent to the same address according to the configured retry times. Valid range: 1-10. |
DNS SRV Failover Mode | Configures the preferred IP mode for DNS SRV. If set to “default”, the first IP from the query result will be applied. If set to “Saved one until DNS TTL”, previous IP will be applied before DNS timeout is reached. If set to “Saved one until no response”, previous IP will be applied even after DNS timeout until it cannot respond.
|
Failback Expiration (m) | Specifies the duration (in minutes) since failover to the current SIP server or Outbound Proxy before making failback attempts to the primary SIP server or Outbound Proxy. |
Register Before DNS SRV Failover | Configures whether to send REGISTER requests to the failover SIP server or Outbound Proxy before sending INVITE requests in the event of a DNS SRV failover. |
Primary IP | Configures the primary IP address where the phone sends DNS query to when “Use Configured IP” is selected for DNS mode. |
Backup IP 1 | Configures the backup IP 1 address where the phone sends DNS query to when “Use Configured IP” is selected for DNS mode. |
Backup IP 2 | Configures the backup IP 2 address where the phone sends DNS query to when “Use Configured IP” is selected for DNS mode. |
NAT Traversal | Set NAT traversal to activate the NAT penetration mechanism. options to be chosen are No, STUN, or Keep-Alive.
The Default value is set to "No". |
Support rport (RFC3581) | Configures to use symmetric response routing. If it is used, the "rport" field will be added to the Via header field in the SIP Request, and the information will be extracted from the SIP 200OK Response for SIP Register to rewrite the SIP Contact information and apply it in subsequent SIP Requests. |
Proxy-Require | A SIP Extension to notify the SIP server that the phone is behind a NAT/Firewall. |
SIP Settings
Basic Settings | |
SIP Registration | Selects whether the phone will send SIP Register messages to the proxy/server. The default setting is “Enabled”. |
UNREGISTER on Reboot |
|
REGISTER Expiration | Specifies the frequency (in minutes) in which the phone refreshes its registration with the specified registrar. The maximum value is 64800 minutes (about 45 days). The default value is 60 minutes. |
SUBSCRIBE Expiration | Specifies the frequency (in minutes) in which the phone refreshes its subscription with the specified registrar. The maximum value is |
Re-Register before Expiration | Specifies the time frequency (in seconds) that the phone sends re-registration request before the Register Expiration. The default value is 0. |
Registration Retry Wait Time | Specifies the interval to retry registration if the process is failed. The valid range is 1 to 3600. The default value is 20 seconds. |
Add Auth Header on Initial REGISTER | If enabled, the phone will add Authorization header in initial REGISTER request. Default is “Disabled”. |
Enable OPTIONS Keep Alive | Configures whether to enable SIP OPTIONS to track account registration status. If enabled, the phone will send periodic OPTIONS messages to server to track the connection status with the server. Default is “Disabled”. |
OPTIONS Keep Alive Interval | Configures the time interval the phone sends OPTIONS message to the server. If set to 30 seconds, it means the phone will send an OPTIONS message to the server every 30 seconds. |
OPTIONS Keep Alive Max Tries | Configures the maximum number of times the phone will try to send OPTIONS message consistently to server without receiving a response. If set to “3”, the phone will send OPTIONS message 3 times. If no response from the server, the phone will re-register. |
SUBSCRIBE for MWI | When set to “Yes”, a SUBSCRIBE for Message Waiting Indication will be sent periodically. The default setting is “No”. |
SUBSCRIBE for Registration | When set to “Yes”, a SUBSCRIBE for Registration will be sent out periodically. The default setting is “No”. |
Use Privacy Header | Configures whether the “Privacy Header” is present in the SIP INVITE message.
The default setting is “default”. |
Use P-Preferred- Identity Header | Configures whether the “P-Preferred-Identity Header” is present in the SIP INVITE message.
|
Use X-Grandstream-PBX Header | Configures to use X-Grandstream-PBX header in SIP request. Default setting is “Yes”. |
Use P-Access-Network-Info Header | Configures to use P-Access-Network-Info header in SIP request. Default setting is “Yes”. |
Use P-Emergency-Info Header | Configures to use P-Emergency-Info header in SIP request. Default setting is “Yes”. |
Use MAC Header |
The default setting is “No”. |
Add MAC in User-Agent |
The default setting is “No”. |
SIP Transport | Selects the network protocol used for the SIP transport. The default setting is “UDP”. |
Enable TCP Keep-alive | Configures whether to enable TCP Keep-alive for the TCP connection between the terminal and the SIP server. |
SIP Listening Mode | Configures whether or not to listen to multiple SIP protocols.
The default setting is “Transport Only”. |
Local SIP Port | Configures the local SIP port used to listen and transmit. |
SIP URI Scheme when using TLS | Specifies if “sip” or “sips” will be used when TLS/TCP is selected for SIP Transport. The default setting is “sips”. |
Use Actual Ephemeral Port in Contact with TCP/TLS | Configures whether the actual ephemeral port in contact with TCP/TLS will be used when TLS/TCP is selected for SIP Transport. The default setting is “No”. |
Support SIP Instance ID | Configures whether SIP Instance ID is supported or not. The default setting is “Yes”. |
SIP T1 Timeout | SIP T1 Timeout is an estimate of the round-trip time of transactions between a client and server. If no response is received the timeout is increased and request re-transmit retries would continue until a maximum amount of time define by T2. The default setting is 0.5 seconds. |
SIP T2 Timeout | SIP T2 Timeout is the maximum retransmit time of any SIP request messages (excluding the INVITE message). The re-transmitting and doubling of T1 continues until it reaches the T2 value. Default is 4 seconds. |
Outbound Proxy Mode | Configures whether to put the Outbound Proxy in the Route header, or if SIP messages should always be sent to Outbound Proxy.
Default is “in route”. |
Enable 100rel | When enabled, the 100rel tag is appended to the value of the Supported header of the initial signaling messages. The default setting is “No”. |
Use Route Set in Notify (Follow RFC 6665) | Configures whether to use route set in NOTIFY (follow RFC 6665).
|
Session Timer | |
Enable Session Timer | Configures whether to enable session timer function. It enables SIP sessions to be periodically “refreshed” via a SIP request (UPDATE, or re-INVITE). If there is no refresh via an UPDATE or re-INVITE message, the session will be terminated once the session interval expires. If set to “Yes”, the phone will use the related parameters when sending session timer according to “Session Expiration”. If set to “No”, session timer will be disabled. The default setting is “No”. |
Session Expiration | Session Expiration is the time (in seconds) where the session is considered timed out, provided no successful session refresh transaction occurs beforehand. The default setting is 180. The valid range is from 90 to 64800. |
Min-SE | The minimum session expiration (in seconds). The default value is 90 seconds. The valid range is from 90 to 64800. |
Caller Request Timer | If set to “Yes” and the remote party supports session timers, the phone will use a session timer when it makes outbound calls. The default setting is “No”. |
Callee Request Timer | If set to “Yes” and the remote party supports session timers, the phone will use a session timer when it receives inbound calls. The default setting is “No”. |
Force Timer | If set to “Yes”, the phone will use the Session Timer even if the remote party does not support this feature. Otherwise, Session Timer is enabled only when the remote party supports it. The default setting is “No”. |
UAC Specify Refresher | As a caller, select UAC to use the phone as the refresher, or select UAS to use the callee or proxy server as the refresher. When set to “Omit”, the refresh object is not specified. The default setting is “UAC”. |
UAS Specify Refresher | As a callee, select UAC to use caller or proxy server as the refresher, or select UAS to use the phone as the refresher. The default setting is “UAC”. |
Force INVITE | Select “Yes” to force using the INVITE method to refresh the session timer. The default setting is “No”. |
Codec Settings
Audio | |
Preferred Vocoder (Choice 1 – 8) | Multiple vocoder types are supported on the phone, the vocoders in the list is a higher preference. Users can configure vocoders in a preference list that is included with the same preference order in SDP message.
|
Codec Negotiation Priority | Configures the phone to use which codec sequence to negotiate as the callee. When set to “Caller”, the phone negotiates by SDP codec sequence from received SIP Invite. When set to “Callee”, the phone negotiates by audio codec sequence on the phone. The default setting is “Callee”. |
Use First Matching Vocoder in 200OK SDP | When set to “Yes”, the device will use the first matching vocoder in the received 200OK SDP as the codec. The default setting is “No”. |
iLBC Frame Size | Selects iLBC packet frame size. Users can choose from 20ms and 30ms. The default setting is “30ms”. |
iLBC Payload Type | Specifies iLBC payload type. Valid range is 96 to 127. Cannot be the same as Opus or DTMF payload type. Valid range is 96 to 127. The default setting is “97”. |
G. | Selects “ITU” or “IETF” for G The default setting is “ITU”. |
G. | Specifies G. |
Opus Payload Type | Specifies Opus payload type. Valid range is 96 to 127. It cannot be the same as iLBC or DTMF Payload Type. Default value is 123. |
Send DTMF | Specifies the mechanism to transmit DTMF digits. There are 3 supported modes:
Default setting is “RFC2833”. |
DTMF Payload Type | Configures the payload type for DTMF using RFC2833. Cannot be the same as iLBC or OPUS payload type. |
Enable Audio RED with FEC | If set to “Yes”, FEC will be enabled for audio call. If set to “Yes”, FEC will be enabled for audio call. |
Silence Suppression | If set to “Yes”, when silence is detected, a small quantity of VAD packets (instead of audio packets) will be sent during the period of no talking. For codec G.723 and G.729 only. Default setting is “No”. |
Jitter Buffer Type | Selects either Fixed or Adaptive for jitter buffer type, based on network conditions. The default setting is “Adaptive”. |
Jitter Buffer Length | Selects jitter buffer length from 100ms to 800ms, based on network conditions. The default setting is “300ms”. |
Voice Frames Per TX | Configures the number of voice frames transmitted per packet. It is recommended that the IS limit value of Ethernet packet is 1500 bytes or 120 kbps. When configuring this, it should be noted that the “ptime” value for the SDP will change with different configurations here. This value is related to the codec used in the codec table or negotiate the payload type during the actual call. For example, if set to 2 and the first code is G.729, G.711 or G.726, the “ptime” value in the SDP datagram of the INVITE request is 20 ms. If the “Voice Frame/TX” setting exceeds the maximum allowed value, the phone will use and save the maximum allowed value for the selected first codec. It is recommended to use the default setting provided, and incorrect setting may affect voice quality. The default setting is 2. |
G.723 Rate | Selects encoding rate for G723 codec. |
RTP Settings | |
SRTP Mode | Enable SRTP mode based on your selection from the drop-down menu.
The default setting is “No”. |
SRTP Key Length | Allows users to specify the length of the SRTP calls. Available options are:
Default setting is AES 128&256 bit |
Crypto Life Time | Enable or disable the crypto lifetime when using SRTP. If users set to disable this option, phone does not add the crypto lifetime to SRTP header. The default setting is “Yes”. |
RTCP Mode | Configure RTCP port negotiation rules.
|
RTCP Keep-Alive Method | Configures the RTCP channel keep-alive packet type.
|
RTP Keep-Alive Method | Configures the RTP channel keep-alive packet type.
|
Symmetric RTP | Configures whether Symmetric RTP is used or not. Symmetric RTP means that the UA uses the same socket/port for sending and receiving the RTP stream. The default setting is “No”. |
RTP Timeout (s) | Configures the RTP timeout of the phone. If the phone does not receive the RTP packet within the specified RTP time, the call will be automatically disconnected. The default range is 0 and 6-600. If set to 0, the phone will not hang up the call automatically. |
Account Call Settings
General | |
Key as Send | Pressing the selected key will immediately dial out. |
No Key Entry Timeout | Configures the timeout (in seconds) for no key entry. |
Send Anonymous | If set to "Yes", the "From" header in outgoing INVITE messages will be set to anonymous. |
Anonymous Call Rejection | If set to "Yes", anonymous calls will be rejected. |
Enable Call Waiting | Enables the call waiting feature. If set to "No", new incoming calls will be rejected after the call is established. |
RFC2543 Hold | If set to "Yes", c=0.0.0.0 will be used in INVITE SDP for hold. |
Ring Timeout | Configures the timeoput (in seconds) for the phone to ring when an incoming call is not answered. Valid range is 30 to 3600. |
Auto Answer | |
Auto Answer | If set to “Yes”, the phone will automatically turn on the speaker phone to answer incoming calls after a short reminding beep. Default setting is “No”. |
Auto Answer Numbers | Allows the user to configure specific numbers to auto answer. If not set, all numbers will be auto answered If auto answer is enabled. Up to 10 numbers can be configured. |
Intercom | |
Play warning tone for Auto-Answer Intercom | If enabled, phone will play warning tone when auto answering intercom. |
Custom Alert-Info for Auto Answer | Used exclusively to match the contents of the Alert-Info header for auto answer. The default auto answer headers will not be matched if this is defined. |
Allow Auto Answer by Call-Info/Alert-Info | If set to “Yes”, the phone will automatically turn on the speaker phone to answer incoming calls after a short reminding beep, based on the SIP Call-Info/Alert-Info header sent from the server/proxy. Default is “Yes”. |
Allow Barging by Call-Info/Alert-Info | When enabled, the phone will automatically put the current call on hold and answer the incoming call based on the SIP Call-Info/Alert-Info header sent from the server/proxy. However, if the current call was answered based on the SIP Call-Info/Alert-Info header, then all other incoming calls with SIP Call-Info/Alert-Info headers will be rejected automatically. Default setting is “No”. |
Mute on Intercom Answer | If enabled, the phone will mute the microphone after answering an intercom call via Call-Info/Alert-Info. |
Transfer | |
Transfer on Conference Hangup | Configures whether the call is transferred to the other party if the conference initiator hangs up. |
Enable Local Call Features | When enabled, the phone will use the local call function, dial *87 plus number to use local blind forwarding; When disable, the server-side call function code will be used. |
Enable Recovery on Blind Transfer | Enable Recovery to the call to the transferee on failing blind transfer to the target. |
Blind Transfer Wait Timeout | Configures the timeout (in seconds) when waiting for sipfrag response in blind transfer. Valid range is 30 to 300 |
Refer-To Use Target Contact | If enabled, the "Refer-to" hear uses the transferred target's Contact header information for attended transfer. |
Dial plan | |
Dial Plan Prefix | Configures a prefix added to all numbers when making outbound calls. |
Bypass Dial Plan | Bypass the dial plan when dialing from one of the available items:
|
Dial Plan | Configures the dial plan rule. For syntax and examples, please refer to user manual for more details. Dial Plan Rules:
Allow 311, 611, and 911 or any 11 digit numbers with leading digits 1617;
Block any number of leading digits 1900 or add prefix 1617 for any dialed 7 digit numbers;
Allows any number with leading digit 1 followed by a 3-digit number, followed by any number between 2 and 9, followed by any 7-digit number OR Allows any length of numbers with leading digit 2, replacing the 2 with 011 when dialed.
Explanation of example rule (reading from left to right):
Note: In some cases, where the user wishes to dial strings such as *123 to activate voice mail or other applications provided by their service provider, the * should be predefined inside the dial plan feature. An example dial plan will be: { *x+ } which allows the user to dial * followed by any length of numbers. Max length of dial plan is up to 1024 characters. |
Ringtone | |
Account Ring Tone | Allows users to configure the ringtone for the account. Users can choose from different ringtones from the dropdown menu. |
Ignore Alert-Info header | Configures to play default ringtone by ignoring Alert-Info header. The default setting is “No”. |
Match Incoming Caller ID | Specifies matching rules with number, pattern, or Alert Info text (up to 10 matching rules). When the incoming caller ID or Alert Info matches the rule, the phone will ring with selected distinctive ringtone. Matching rules:
xx+ : at least 2-digit number. xx : only 2-digit number. [345]xx: 3-digit number with the leading digit of 3, 4 or 5. [6-9]xx: 3-digit number with the leading digit from 6 to 9.
Users could configure the matching rule as certain text (e.g., priority) and select the custom ring tone mapped to it. The custom ring tone will be used if the phone receives SIP INVITE with Alert-Info header in the following format: Alert-Info: <http://127.0.0.1>; info=priority Selects the distinctive ring tone for the matching rule. When the incoming caller ID or Alert Info matches one of the 10 rules, the phone will ring with the associated ringtone. |
Account Advanced Settings
Security Settings | |
Check Domain Certificates | Configures whether the domain certificates will be checked when TLS/TCP is used for SIP Transport. The default setting is “No”. |
Validate Certificate Chain | Validate certification chain when TCP/TLS is configured. The default setting is “No”. |
Validate Incoming SIP Messages | Specifies if the phone will check the incoming SIP messages Caller ID and CSeq headers. If the message does not include the headers, it will be rejected. The default setting is “No”. |
Allow Unsolicited REFER | Configures whether to dial the number carried by Refer-to header after receiving out-of-dialog SIP REFER request actively. If set to “Disabled“, the phone will send error warning and stop dialing. If set to “Enabled/Force Auth“, the phone will dial the number after sending authentication. If the authentication fails, it will stop dialing. If set to “Enabled“, the phone will dial all numbers carried by SIP REFER. |
Accept Incoming SIP from Proxy Only | When set to “Yes”, the SIP address of the Request URL in the incoming SIP message will be checked. If it does not match the SIP server address of the account, the call will be rejected. The default setting is “No”. |
Check SIP User ID for Incoming INVITE | If set to “Yes”, SIP User ID will be checked in the Request URI of the incoming INVITE. If it does not match the phone’s SIP User ID, the call will be rejected. The default setting is “No”. |
Allow SIP Reset | Allow SIP Notification message to perform factory reset. The default setting is “No”. |
Authenticate Incoming INVITE | If set to “Yes”, the phone will challenge the incoming INVITE for authentication with SIP 401 Unauthorized response. The default setting is “No”. |
MOH ( Music on Hold ) | |
On Hold Reminder Tone | Configures to play reminder tone when the call is on hold. |
Music On Hold URI | Music On Hold URI to call when a call is on hold if server supports it. |
Special Feature | Specifies the server type for special requirements. |
Phone Settings Page Definition
Basic Settings
Local RTP Port | Configures the local RTP port used to listen and transmit. The valid range is 1024 to 65400 and it must be even. |
Local RTP Port Range | Configures the range of local RTP port. Valid value is from 24 to 10000. |
Use Random Port | If set to "Yes", the parameter will force random generation of both the local SIP and RTP ports. This is usually necessary when multiple phones are behind the same full cone NAT. This parameter must be set to "No" for incoming direct IP calls (outgoing IP calls are not affected). |
Keep-Alive Interval | Specifies how often the phone sends a blank UDP packet to the SIP server in order to keep "ping hole" on the NAT router to open. |
STUN Server | This option sets IP address or Domain name of the STUN server. Only non-symmetric NAT routers work with STUN. |
Use NAT IP | Configures the NAT IP address used in SIP/SDP messages. It should ONLY be used if required by your ITSP. |
Delay Registration | Configures the specific time that the account will be registered after booting up. |
Enable Outbound Notification | Configures whether to enable outbound notifications such as Action URL. |
Call Settings
General | |
Preferred Default Account | Select the preferred default account for on-hook or off-hook dialing. when the selected account is unavailable, system will use the first available account to dial out. |
Mute Key Functions While Idle | If set to 'Idle Mute", clicking the MUTE key while idle will cause the phone to be muted automatically when answering incoming calls. |
Do Not Escape '#' as %23 in SIP URI | Replaces # by %23 for some special situations. |
User-Agent Prefix | Configures the prefix in the User-Agent header |
Outgoing | |
Enable Direct IP Call | Enables Direct IP Call feature. |
Onhook Dial Barging | When the option is set to "Disabled", onhook dialing won't be interrupted by an incoming call. |
Off-hook Auto Dial | Configures the digits to be dialed via the first account when the phone is off-hook. |
Off-hook Auto Dial Delay | Configures the timeout (in seconds) for off-hook auo dial. Valid range is 0-10. If set to 0, it will be dialed out immediately. Otherwise, it will be dialed out after the configured timeout. |
Off-hook/On-hook Timeout (s) | If configured, when the phone is in the off-hook or on-hook, dialing state, it will go idle after the timeout (in seconds). Valid range is 10 to 60. |
Redial Expiration (min) | Sets a timeout in minutes for the redial key, after which the previous callout trace will be cleared and the redial key will be invalid. If set to 0, the previous callout trace will not be removed permanently unless the device is turned off. Note: This configuration item also affects the call return soft key timeout in MPK. The default value is set to 30mins. |
Incoming | |
Allow Incoming Call before Ringing | This allows incoming calls after dialed but before ringing. This can be used under custom user configuration based on need. |
Enable Call Waiting | Enables the call waiting feature. If set to "No", new incoming calls will be rejected after the call is established. |
Enable Call Waiting Tone | Enables Call Waiting alert tone when another incmong call is received while a call is in progress. |
Auto Answer Delay | Configures the delay for automatically answering the incoming call. Valid range is 0 to 10 (seconds). |
In Call | |
Enable Auto Unmute | If the option is enabled, automatically unmute phone when a user unholds the call or establishes a new call. |
Enable Busy Tone on Remote Disconnect | Playing busy tone when call is disconnected remotely. |
Enable Mute Key In Call | When set to "No", the mute key will not work while on call. |
Transfer | |
Enable Transfer | Enables Call Transfer feature. |
Hold Call Before Completing Transfer | When set to "No", the phone will not hold the current call or the transfer target for an Attended Transfer. |
Conference | |
Enable Conference | Enables the Conference feature. |
Ringtone
This section is used to customize ringtones for each specific phone feature
Call Progress Tones | ON is the period of ringing ("On time" in "ms") While OFF is the period of silence. Up to three cadences are supported. |
System Ringtone | |
Dial Tone | |
Second Dial Tone | |
Message Waiting | |
Ring Back Tone | |
Call Waiting Tone | |
Call Waiting Tone Gain | |
Busy Tone | |
Reorder Tone |
Multicast Paging
Paging Barging | During an active call if incoming multicast page has higher priority (1 being the highest) than this value, the call will be held and multicast page will be played. |
Paging Priority Active | If enabled, during a multicast page if another multicast is received with higher priority (1 being the highest) that one will played instead. |
Multicast Channel Number | Multicast channel number (0-50). 0 for normal RTP packets, 1-50 for Polycom multicast format packets. |
Multicast Listening | Multicast listening |
Network Settings
Ethernet Settings
Internet Protocol | Select Prefer IPv4 or Prefer IPv6 |
IPv4 Address | |
IPv4 Address | The IPv4 address obtained by the phone. |
Host name (Option 12) | Specifies the name of the client. This field is optional but may be required by Internet Service Providers. |
Vendor Class ID (Option 60) | Used by clients and servers to exchange vendor class ID. |
DNS Server 1 | Enter DNS Server 1 when static IP is used. |
DNS Server 2 | Enter DNS Server 2 when static IP is used. |
Preferred DNS Server | Enter the Preferred DNS Server. |
IPv6 Address | |
IPv6 Address | The IPv6 address obtained by the phone. |
DNS Server 1 | Enter DNS Server 1 when static IP is used. |
DNS Server 2 | Enter DNS Server 2 when static IP is used. |
Preferred DNS Server | Enter the preferred DNS server. |
Advanced Settings
Advanced Network Settings | |
DNS Refresh Timer (m) | Configures the refresh time (in minutes) for DNS query. If set to "0", the phone will use the DNS query TTL from DNS server response. |
DNS Failure Cache Duration (m) | Configures the duration (in minutes) of previous DNS query fails. If set to "0", the feature will be disabled. |
Enable LLDP | Controls the LLDP (Link Layer Discovery Protocol) service. |
LLDP TX Interval | Configures LLDP TX Interval (in seconds). Valid range is 1 to 3600. |
Enable CDP | If enabled, the device will use the Cisco Discovery Protocol feature. |
Layer 3 QoS for SIP | Configures the layer 3 QoS parameter for SIP. This value is used for IP Precendence, DiffServ, or MPLS. |
Layer 3 QoS for RTP | Configures the layer 3 QoS parameter for RTP. This value is used for IP Precendence, DiffServ, or MPLS. |
Enable DHCP VLAN | Configures to enable or disable auto-configure for VLAN settings via DHCP. |
Enable Manual VLAN Configuration | Allow phone to keep the VLAN configuration without applying them. |
Layer 2 QoS 802.1Q/VLAN Tag | Assigns the VLAN Tag of the Layer 2 QoS packets. |
Layer 2 QoS 802.1p Priority Value | Assigns the priority value of the Layer 2 QoS packets. Valid range is 0 to 7 |
Maximum Transmission Unit (MTU) | Configures the MTU in bytes |
Remote Control | |
Action URI Support | Configures whether to enable phone to handle action URI request. |
Action URI Allowed IP List | List of allowed IP addresses from which the phone receives the action URI. |
CSTA Control | Configures whether to enable the CSTA Control feature. |
Wi-Fi Settings (Only GHP6x0W and GHP6x1W)
Wi-Fi Function | This parameter enables/disables the Wi-Fi function. |
Wi-Fi Band | Set the type of Wi-Fi band. |
Country Code | Configures Wi-Fi Country Code |
Available Wi-Fi | Available Wi-Fi |
Programmable Keys
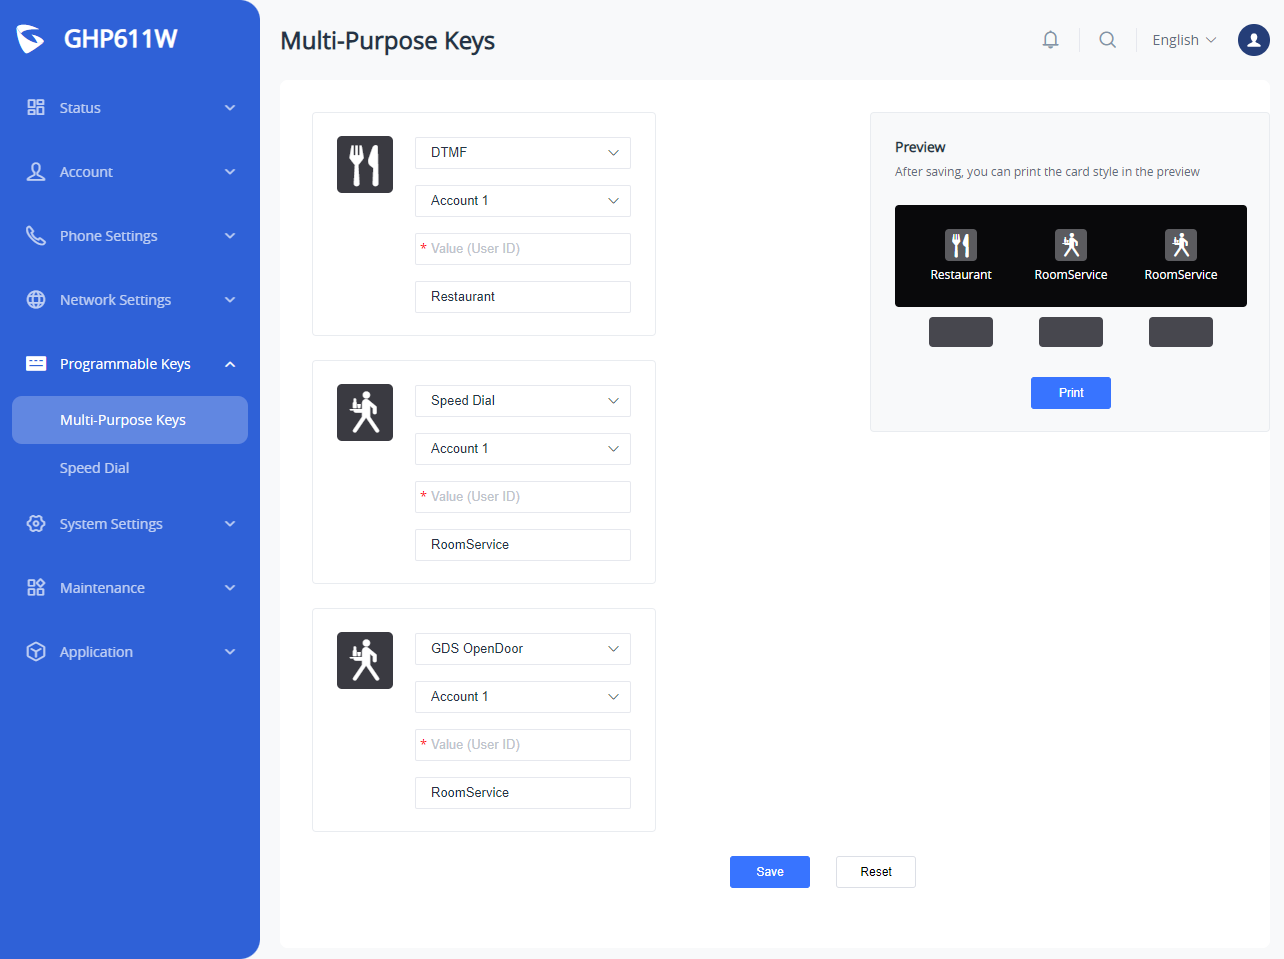
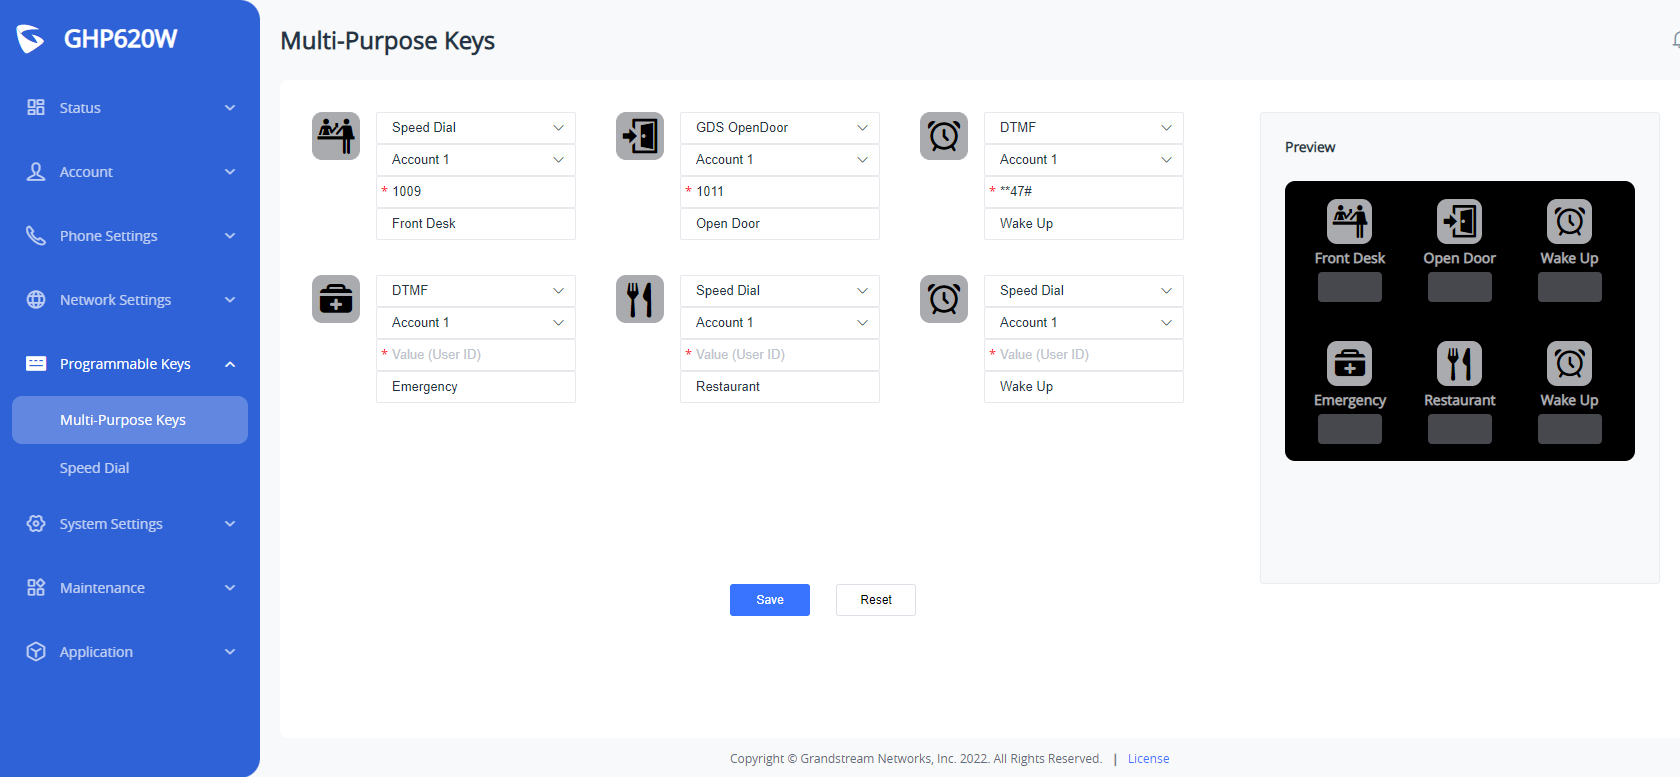
Multi-Purpose Keys
The admin can customize the multi-purpose keys functionality by accessing the web GUI Programmable Keys → Multi-Purpose Keys. The phone will generate a multi-purpose keys label based on the customization made by the administrator, which he/she can print and stick on the front side of the phone.
GHP61X
GHP62X
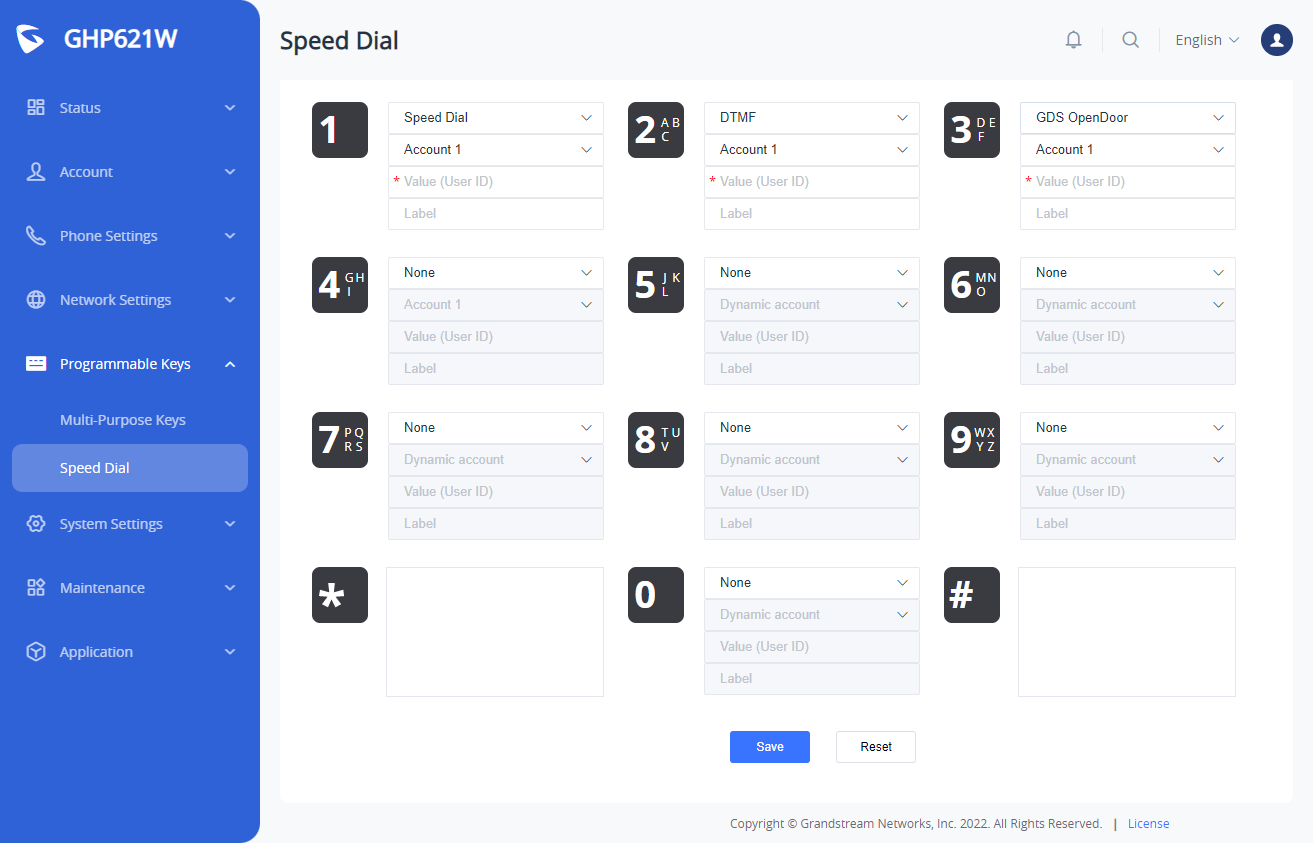
Speed Dial
System Settings
Time
Date and Time | |
NTP Server | Configures the URL or IP address of the NTP server. The phone may obtain the date and time from the server. |
Secondary NTP Server | Configures the URL or IP address of the NTP server. The phone may obtain the date and time from the server. |
Enable Authenticated NTP | Configures whether to enable NTP authentication. If enabled, a cryptographic signature is appended to each network packet. If the key is incorrectly configured, the phone will refuse to use the time provided by the NTP server. |
NTP Update Interval | Configures interval for updating time from the NTP server. The valid value is between 5 and 1440 minutes. |
Allow DHCP Option 42 to Override NTP Server | When enabled, DHCP Option 42 will override the NTP server if it is set up on the LAN. |
Time Zone | Configures the date/time used on the phone according to the specified time zone. |
Allow DHCP Option 2 to Override Time Zone Settings | Allows device to get provisioned for Time Zone from DHCP option 2 in the local server |
Self-Defined Time Zone | This parameter allows the users to specify their own time zone. For syntax and examples please refer to user manual. |
Security Settings
Web/SSH Access
SSH is often used to “log in” and perform operations on remote computers but it may also be used for transferring data.
Parameter | Description |
SSH Access | |
Enable SSH | If set to "Yes", the phone will allow any SSH access to the phone. |
SSH Public Key | If enabled, the phone will use public key authentication as an alternative option to password authentication. |
Web Access | |
HTTP Web Port | Configures the HTTP port under the HTTP web access mode. |
HTTPS Web Port | Configures the HTTPS port under the HTTPS web access mode. |
Web Access Mode | Sets the protocol for the web interface. |
Web Access Control | Restrict web access by using Whitelist or Blacklist on the incoming IP addresses. If set to "None", the web access is unrestricted. |
Web Session Timeout | Configures the timer to log out of the web session when idle. Default is 10 minutes. Range is 2-60 minutes. |
Validate Server Certificates | Configures whether to validate the server certificate when downloading the firmware/config file. If set to "Yes", the phone will download the firmware /config file only after the server is validated. |
Web/Restrict mode Lockout Duration | Specifies the time in minutes that the web login interface will be locked out to the user after five login failures. This lockout time is used for web login. The range is 0-60 minutes. |
Web Access Attempt Limit | Configures the number of failed web access attempts allowed before lockout. Default is 5. Range is 1-10. |
User Info Management
Parameter | Description |
Test Password Strength | Checks password strength to ensure better security |
Admin Password | |
Current Password | The current admin password is required to set a new admin password. |
New Password | Set new password for web GUI access as Admin. This field is case sensitive. |
Confirm Password | Enter the new Admin password again to confirm. |
IVR | |
Keypad Password | Configure the keypad password used in the IVR. |
Enable IVR | If enabled, IVR is available. If disabled, enable configuration item "Enable Basic Settings in IVR" cannot take effect. |
Enable Basic settings in IVR | If this option is enabled, IVR can modify the IP, gateway, subnet mask, DNS, profile download protocol and firmware download protocol of the phone. |
Client Certificate
Parameter | Description |
Minimum TLS Version | Configures the minimum TLS version supported by the phone. Minimum TLS version must be less than or equal to maximum TLS version. |
Maximum TLS Version | Configures the maximum TLS version supported by the phone. Maximum TLS version must be greater than or equal to minimum TLS version. |
Enable/Disable Weak Cipher Suites | Defines the function for weak cipher suites. If set "Enable Weak TLS Cipher Suites", allow users to encrypt data by weak TLS cipher suites. |
SIP TLS Certificate | The Cert File for the phone to connect to SIP Server via TLS. |
SIP TLS Private Key | The Cert Key for the phone to connect to SIP Server via TLS. |
SIP TLS Private Key Password | SSL Private key password used for SIP Transport in TLS/TCP. |
Custom Certificate | The uploaded custom certificate will be used for SSL/TLS communication instead of the phone default certificate. |
Trusted CA Certificate
Load CA Certificates | Phone will verify the server certificate based on the built-in, custom or both trusted certificates list. |
Preferences
Display Control
New Message LED Indicator | Configure the behaviour of the LED indicator when there is a new voice mail on the phone. If it is set to "off", the LED will not change in any state when there is a message. |
Audio Control
Parameter | Description |
Speaker Ring Volume | Configures speaker ring volume, the valid range is 1 to 8. |
Handset Sidetone Volume | Configures handset sidetone volume. The valid range is 0 to 30. |
Lock Speaker Volume | Lock volume adjustment when the option is enabled. |
Enable Warning Tone | Configures whether to enable the warning tone of the phone. If disabled, the network disconnection and voicemail will not generate any tone. |
Handset TX Gain (dB) | Configures the transmission gain of the handset. |
Enable HAC | If enabled, the phone will be compatible with nearby hearing aids. |
Enable Bootup Tone | If enabled, the phone will emit a sound effect when it boots up. |
LED
LED Brightness: Active | Configures the LED brightness when the phone is active. Valid range is 0 to 10 where 0 is off and 10 is the brightest. |
LED Brightness: Idle | Configures the LED brightness when the phone is idle. Valid range is 0 to 10 where 0 is off and 10 is the brightest. |
TR-069
A TR-069 client is a software application that allows service providers and equipment manufacturers to manage, configure, and update their customers’ network-connected devices remotely.
Parameter | Description |
Enable TR-069 | Enable or disable TR-069 |
ACS URL | URL of the TR-069 Auto Configuration Servers (e.g., http//acs.mycompany.com, or IP address). |
TR-069 Username | ACS username for TR-069. |
TR-069 Password | ACS password for TR-069. |
Periodic Inform Enable | Enables periodic inform. If set to "Yes", device will send inform packets to TR-069 Auto Configuration Server. |
Periodic Inform Interval | Configures periodic inform interval to send the inform packets to TR-069 Auto Configuration Server. |
Connection Request Username | The username for the TR-069 Auto Configuration Server to connect the phone. |
Connection Request Password | The password for the TR-069 Auto Configuration Sever to connect to the phone. |
Connection Request Port | The port for the TR-069 Auto Configuration Server to connect to the phone. |
CPE SSL Certificate | The Cert File for the phone to connect to the TR-069 Auto Configuration Sever via SSL. |
CPE SSL Private Key | The Cert Key for the phone to connect to the TR-069 Auto Configuration Sever via SSL |
Start TR-069 at Random Time | If enabled, TR-069 will send out the first INFORM message to the server on randomized timing between 1 to 3600 seconds after the phone boots up. |
Maintenance
Upgrade and Provisioning
Firmware
Parameter | Description |
Upgrade via Manual Upload | |
Upload Firmware File to Update | Configures to upload and upgrade firmware. |
Upgrade via Network | |
Firmware Uprgade via | Configures firmware upgrade method as TFTP, FTP, FTPS, HTTP, HTTPS. |
Firmware Server Path | Configures the server path for firmware download. |
Firmware Server Username | The username for the firmware server. |
Firmware Server Password | The password for the firmware server. |
Firmware File Prefix | If configured, only the firmware with the matching prefix will be downloaded and flashed into the phone. |
Firmware File Postfix | If configured, only the firmware with the matching postfix will be downloaded and flashed into the phone. |
Upgrade Detection | |
Upgrade | Start the upgrade. |
Config File
Parameter | Description |
Configure Manually | |
Download Device Configuration | Click to download the device configuration file in .txt format. |
Download Device Configuration (XML) | Click to download the device configuration file in .XML format. |
Download User Configuration | Click to download the user's configuration file. |
Upload Device Configuration | Upload configuration file to the phone. |
Export Backup Package | Export a backup package which contains device configuration and personal data. |
Restore from Backup Package | Restore from the uploaded backup package. |
Configure via Network | |
Configure Uprgade via | Choose the protocol that will be used for upgrading. |
Configure Server Path | Defines the server path for provisioning. |
Configure Sever Username | The username for the config server. |
Configure Sever Password | The password for the config server. |
Always Indicate before Challenge | If enabled, the phone will send credentials before being challenged by the server. This option only applies to HTTP/HTTPS. |
Config File Prefix | If configured, only the configuration file with the matching encrypted prefix will be downloaded and flashed into the phone. |
Config File Postfix | If configured, only the configuration file with the matching encrypted postfix will be downloaded and flashed into the phone. |
Authenticate Conf File | If enabled, the phone will authenticate configuration file before acceptance. |
XML Config File Password | Configures the password for encrypting the XML configuration file using OpenSSL. This is required for the phone to decrypt the encrypted XML configuration file. |
Provision
Parameter | Description |
Auto Upgrade | |
Automatic Upgrade | Enables automatic upgrade and provisioning. |
Start Upgrading at Random Time | Configures whether the phone will upgrade automatically at a random time within the configured time interval. |
Firmware Upgrade and Provisioning | Specifies how firmware upgrading and provisioning request to be sent. |
DHCP Option | |
Allow DHCP Option 43 and Option 66 to Override Server | If set to "Yes" on the LAN side, the phone will reset the CPE, upgrade, network VLAN tag and priority configuration according to option 43 sent by the server. At the same time, the upgrade mode and server path of the configuration mode will be reset according to option 66 sent by the server. If set to "prefer, fallback when failed", the phone can fallback to use the configured provisioning server under its Firmware and Config server path in case the server from DHCP Option fails. |
Allow DHCP Option 120 to Override SIP Server | Specifies the name of the client. This field is optional but may be required by Internet Service Provider. |
Additional Override DHCP Option | Configures additional DHCP Option to be used for firmware server instead of the configured firmware server or the server from DHCP Option 33 and 66. This option will be effective only when "Allow DHCP Option 43 and Option 66 to Override Server" is enabled. |
Config Provision | |
Download and Process All Available Config Files | By default, the device will follow cfgMAC.xml, cfgMAC, cfgMODEL.xml, cfg.xml, devMAC.cfg sequence searches for the first available configuration file and updates the configuration file, and the subsequent configuration files will be ignored.If this configuration item is enabled, the device will follow cfg.xml, cfgMODEL.xml, cfgMAC, cfgMAC.xml, devMAC.cfg downloads configuration files one by one and loads updates. If the same configuration items exist between files, the configuration items that are later in the download order will overwrite the previous contents. |
User Protection | When user protection is on, P-values that the user sets will not be changed by provision or provider. |
3CX Auto Provision | If enabled, the phone will send SUBSCRIBE requests to the multicast address in LAN during bootup for the automatic provisioning. This feature requires 3CX server support. |
Advanced Settings
Parameter | Description |
Validate Hostname in Certificate | Configures tp validate the hostname in the SSL certificate. |
Enable SIP NOTIFY Authentication | Device will challenge NOTIFY with 401 when set to "Yes". |
Factory Reset | Initiate factory reset. |
System Diagnostics
Syslog
Syslog is a protocol that computer systems use to send event data logs to a central location for storage. Logs can then be accessed by analysis and reporting software to perform audits, monitoring, troubleshooting, and other essential IT operational tasks
Parameter | Description |
Syslog Protocol | Allows sending syslog through secured TLS protocol to the syslog server. |
Syslog Server | The URL/IP address for the syslog server. |
Syslog Level | Selects the level logging of syslog. |
Syslog Keyword Filter | Syslog will be filtered based on the configured keywords. Multiple keywords can be separated by ",". |
Send SIP Log | Configures whether the SIP log will be included in the syslog messages. |
Notification Events
Action URL
The following section describes how we can use the settings present in the GHP to configure customizable notifications
Parameter | Description |
Phone Status | |
Setup Completed | Configures the Action URL to send when phone finishes setup process. |
Registered | Configures the Action URL to send when phone successfully registers as a SIP account. |
Unregistered | Configures the Action URL to send when phone unregisters a SIP account. |
Register Failed | Configures the Action URL to send when phone fails to register a SIP account. |
Idle to Busy | Configures the Action URL to send when the phone's state changes form idle to busy. |
Busy to Idle | Configures the Action URL to send when phone's state changes from busy to idle. |
Auto Provision Completed | Configures the Action URL to send when phone's auto provision process is completed. |
IP Change | Configures the Action URL to send when the IP address changes. |
Call Operation | |
Off-hook | Configures the Action URL to send when phone is in off-hook state. |
On-hook | Configures the Action URL to send when the phone is on-hook state. |
Incoming Call | Configures the Action URL to send when the phone receives an incoming call. |
Outgoing Call | Configures the Action URL to send when phone places a call. |
Missed Call | Configures the Action URL to send when phone has a missed call. |
Established a Call | Configures the Action URL to send when phone establishes a call. |
Terminated Call | Configures the Action URL to send when the phone terminates a call. |
Answered Call | Configures the Action URL to send when phone answers an incoming call. |
Blind Transfer | Configures the Action URL to send when the phone performs blind transfer. |
Attended Transfer | Configures the Action URL to send when the phone performs attended transfer. |
Transfer Completed | Configures the Action URL to send when the phone successfully transfers a call. |
Transfer Failed | Configures the Action URL to send when the phone fails to transfer a call. |
Hold Call | Configures the Action URL to send when the phone places a call on hold. |
Unhold Call | Configures the Action URL to send when the phone resumes the call on hold. |
Mute Call | Configures the Action URL when the phone mutes a call. |
Unmute Call | Configures the Action URL when the phone unmutes a call. |
Application
Hotel Service
This section contains the basic settings of Hotel Service Management, including the basic general information of the hotel where the GHP hotel phone is deployed and also the assigned room number.
Parameter | Description |
Hotel Name | Configures the hotel name. |
Hotel Address | Configures the hotel address. |
Hotel Phone Number | Configures the hotel phone number. |
Hotel Fax Number | Configures the hotel fax number. |
Hotel Room Number | Configures the hotel's room number. |
E911 Service
E911 (Enhanced 911) service allows configuring of the GHP6xx to allow emergency calls to be made while providing the location of of the user to be known to the call receiver.
Parameter | Description |
Enable E911 | Enable or disable E911. |
HELD Protocol | Configures HELD transfer protocol. |
HELD Synchronization Interval | The valid synchronization interval is between 30 to 1440 minutes. The synchronization is off when interval is 0. |
Location Server | Configures the primary Location Information Server (LIS) adderss. |
Location Server Username | Configures the username of the primary Location Information Server (LIS). |
Location Sever Password | Configures the password of the primary Location Information Server (LIS). |
Secondary Location Server | Configures the secondary Location Information Server. |
Secondary Location Server Username | Configure the username of the secondary Local Information Server. |
Secondary Location Server Password | Configure the password of the secondary Location Information Server. |
HELD Location Types | Configure "locationType" element in the location request. |
HELD Use LLDP Information | If set to "Yes", the information from LLDP-support switch is used to generate ChassisID and portID; otherwise |
HELD NAI | If set to "Yes", Network Access Identifier (NAI) is included as a device identity in the location request sent to the Location Information |
E911 Emergency Numbers | A user can configure multiple emergency numbers separated with the delimiter symbol ";". |
Geolocation-Routing Header | If set to "Yes", E.911 INVITE message includes the "Geolocation-Routing" header with the value "Yes". |
Priority Header | If set to "Yes", E.911 INVITE messages includes the "Priority" header with the value "emergency". |
Web Service
This section is utilized to enable the location services on the phone.
Parameter | Description |
Use Auto Location Service | Configures to enable or disable auto location services on the phone. |
GDS
GHP6XX can be paired with Grandstream’s facility access management system GDS to allow two-way communication, opendoor from the GHP6xx, and define a specific ringtone to be played when GDS doorbell rings and initiate a call to GHP6XX.
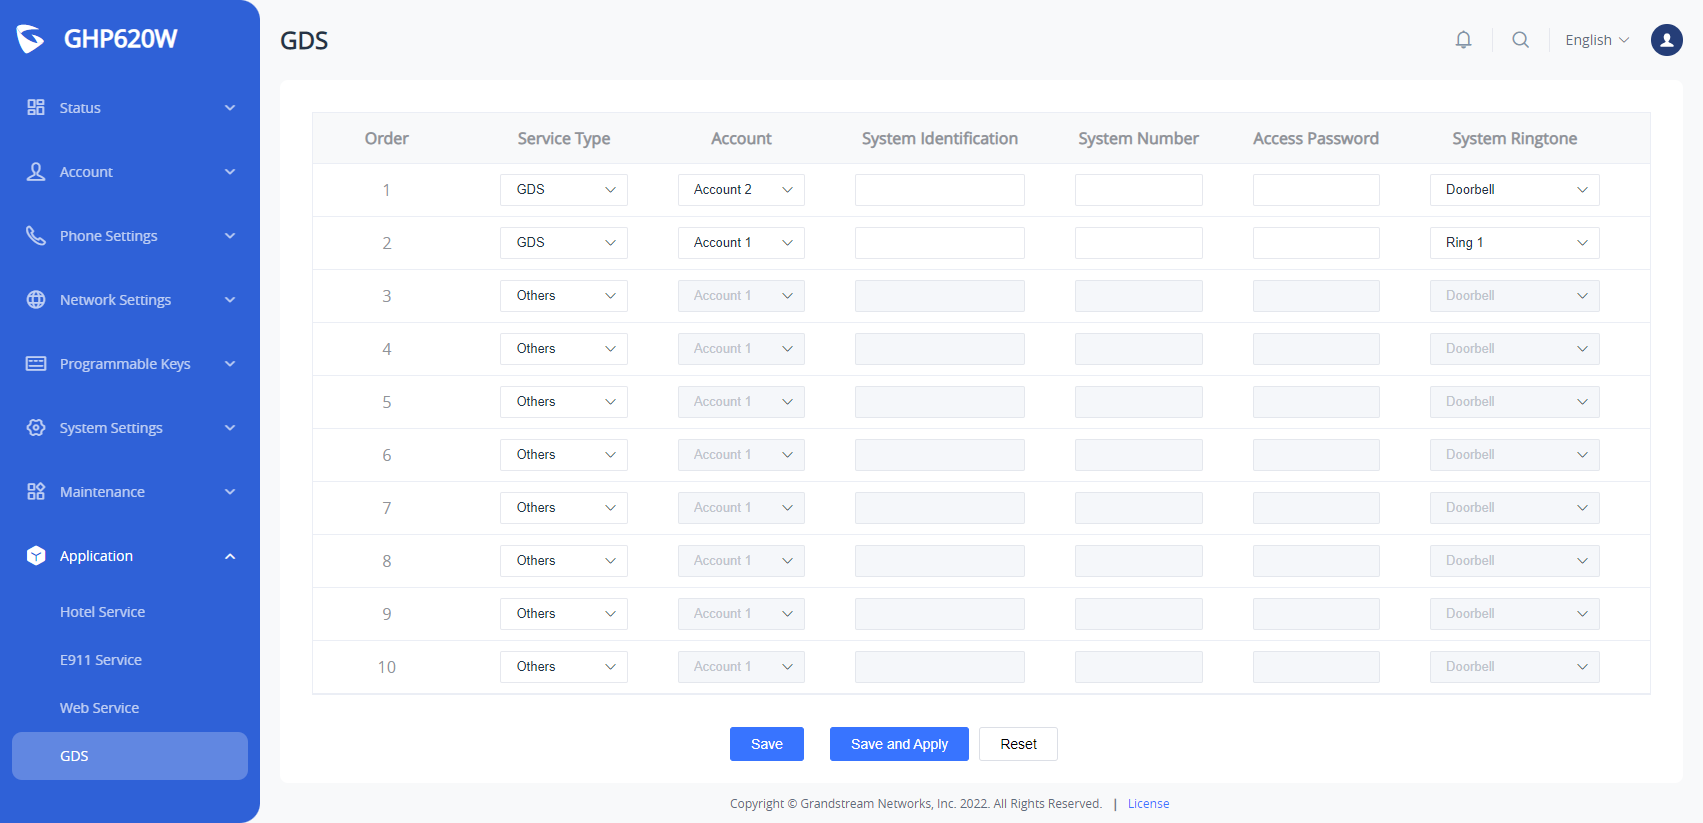
GDS | Connect to a GDS37XX and send OpenDoor request.
Notes:
The “Access Password” on GHP6XX should be matching “Remote PIN to Open the door” on GDS37XX. |
PNP Service
Plug and Play (PnP) Service is a feature available on the GHP6xx that allows it to be set as a server terminal for provisioning other IP phones remotely , on the GHP6xx PNP centralized platform , either by setting the configuration locally by uploading local configuration files , or by obtaining the configuration files from a third party HTTP server.
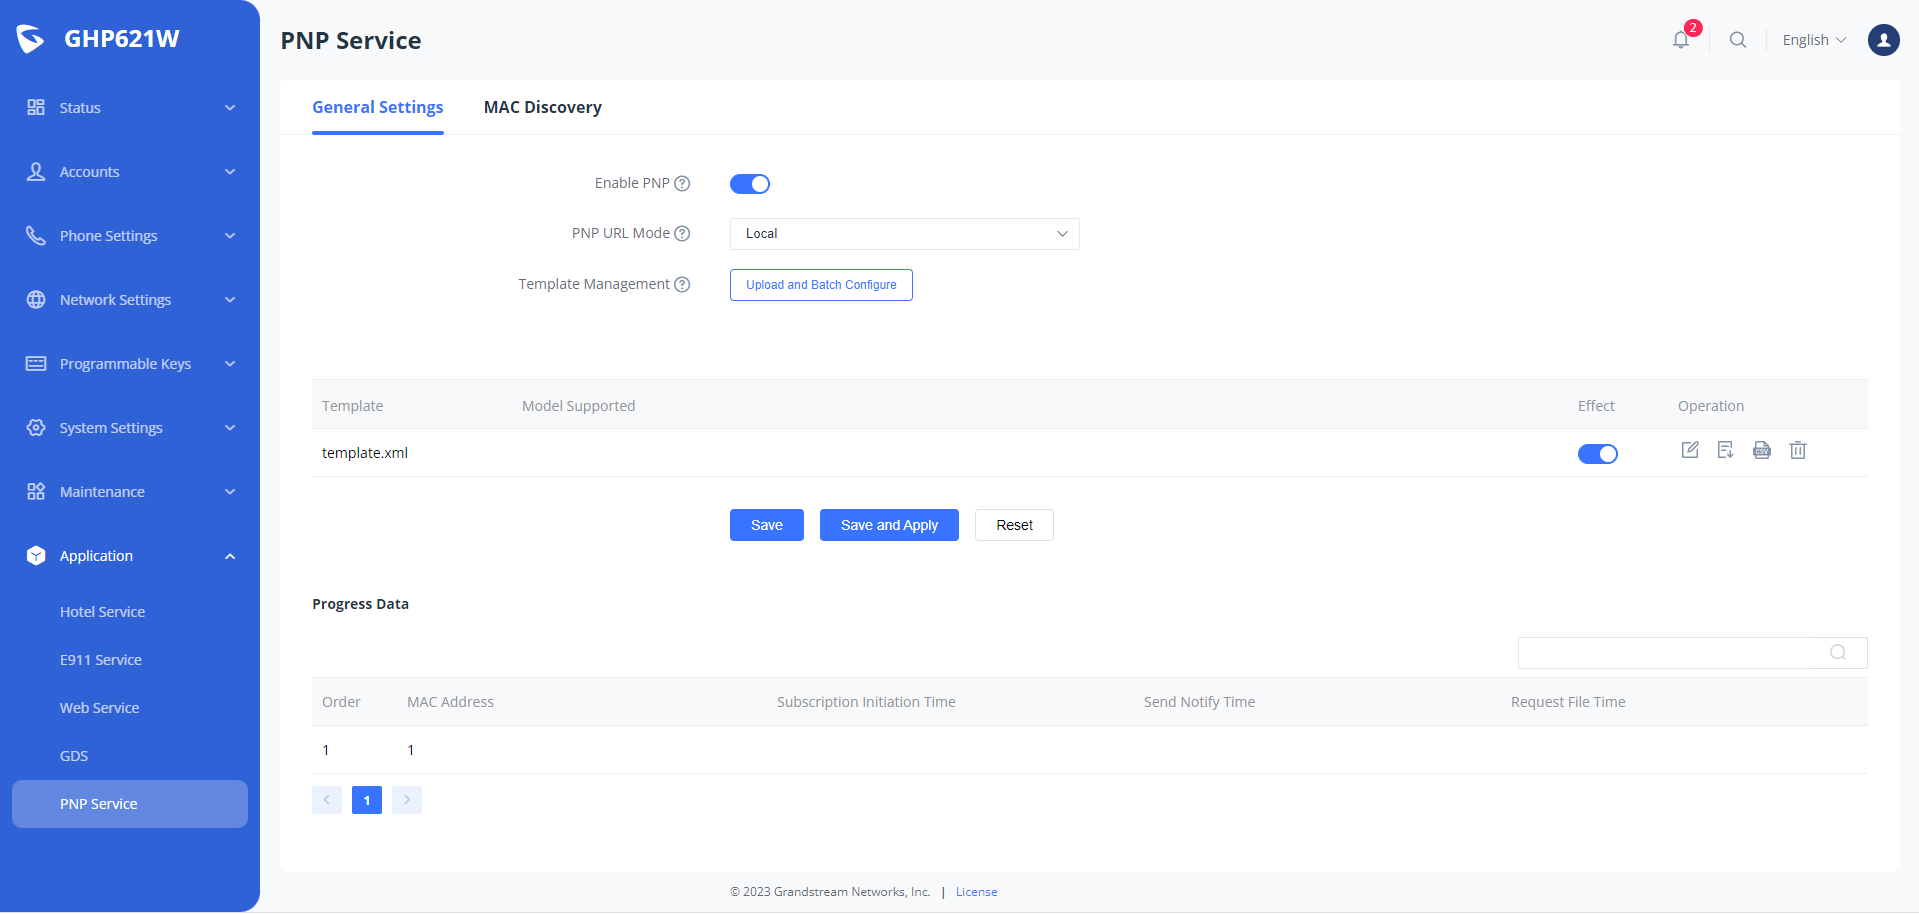
General Settings | |
Enable PNP | Configures whether to enable the PNP function. After enabling it, the automatic configuration is supported, and up to 100 devices can be configured. |
PNP URL Mode | Select the PNP URL mode, including local and custom, custom does not support filling in the local machine-related address. |
PNP URL | The configuration terminal can take the server address of the configuration file. The server address can be the IP address of the terminal that provides PNP services. It cannot be configured as a locally related parameter. |
Template Management | Profile templates can be managed in this module. The current model only supports the management of one profile template. It supports the generation of batch configuration CSV files based on the profile template. You can fill in the relevant parameter values in this file, and start the PNP batch configuration process after the application. |
Upload Profile Template | Users can upload a .xml template file downloaded by respecting the following guidelines:
|
Batch Configure CSV | Users can upload a .csv template file download while respecting the following guidelines:
|
Effects View | Displays the data inserted from the .csv template to the .xml configuration file. |
Progress Data | When connected to a network, the phone can automatically identify and configure itself with the appropriate settings for that network. This eliminates the need for manual configuration, making it faster and easier to set up and manage IP phone deployments. |
MAC Discovery | During the plug-and-play process, the network infrastructure uses the MAC Discovery feature to detect the IP phone's MAC address and automatically configure it with the appropriate settings, such as IP address, subnet mask, default gateway, and other network-related parameters. This eliminates the need for manual configuration and speeds up the deployment of IP phones in large-scale environments.
|
Account Sharing
This section is utilized to enable the account sharing feature.
Basic Settings | |
Enable Account Sharing | Select whether to enable Account Sharing. |
Role in Account Sharing | Select the role that the current device will play in the network, the guest device role does not need to register an account on IP PBX, and can make calls in and out of the network through the account set by the host device role. |
Group Name | Set the group name, in the host-guest mode, devices with the same group name can discover each other. Note: This item is mandatory if using Account Sharing. The verification format is domain type |
Group Password | In the host-guest mode, after setting the group password, the guest device with the same group password as the host device can successfully register an account on the host device. Note:This item is mandatory if using Account Sharing. |
Account Settings | |
Account | For the host device role, this setting determines which host device account will be used as the guest device outgoing and incoming account for calls outside the Account Sharing. For the guest device role, this setting determines which account the guest device will use to register on the host device. |
Account Name | This setting specifies the account name corresponding to the account used by the guest |
Sync Ringing In Group | Set whether to enable synchronization of all successfully registered guest device ringtones within the group. |
Discovered Host Device list | Shows registered devices on the local network for monitoring, it displays the following information about the discovered devices:
|
UPGRADING AND PROVISIONING
Unified Firmware
The GHP610, GHP610W, GHP611, GHP611W, GHP620, GHP621, GHP620W, and GHP621W support unified firmware.
Firmware Upgrade
The GHP6XX/W series can be upgraded via TFTP / FTP / FTPS / HTTP / HTTPS by configuring the URL/IP Address for the TFTP / HTTP / HTTPS / FTP / FTPS server and selecting a download method. Configure a valid URL for TFTP, FTP/FTPS, or HTTP/HTTPS, the server name can be FQDN or IP address.
Examples of valid URLs:
fw.mycompany.com
Upgrade via Web GUI
Open a web browser on a PC and enter the IP address of the phone. Then, log in with the administrator username and password. Go to Maintenance🡪Upgrade and Provisioning page, enter the IP address or the FQDN for the upgrade server in the “Firmware Server Path” field and choose to upgrade via TFTP or HTTP/HTTPS, or FTP/FTPS. Update the change by clicking the “Save and apply” button. Then “Reboot” or power cycle the phone to update the new firmware.
When upgrading starts, the screen will show upgrading progress. When done you will see the phone restart again. Please do not interrupt or power cycle the phone during the upgrading process.
Firmware upgrading takes around 60 seconds in a controlled LAN or 5-10 minutes over the Internet. We recommend completing firmware upgrades in a controlled LAN environment whenever possible.
No Local TFTP/FTP/HTTP Servers
For users that would like to use remote upgrading without a local TFTP/FTP/HTTP server, Grandstream offers a NAT-friendly HTTP server. This lets users download the latest software upgrades for their phones via this server. Please refer to the webpage:
http://www.grandstream.com/support/firmware
Alternatively, users can download a free TFTP, FTP, or HTTP server and conduct a local firmware upgrade. A free window version TFTP server is available for download from:
http://www.solarwinds.com/products/freetools/free_tftp_server.aspx
Instructions for local firmware upgrade via TFTP:
- Unzip the firmware files and put all of them in the root directory of the TFTP server.
- Connect the PC running the TFTP server and the phone to the same LAN segment.
- Launch the TFTP server and go to the File menu🡪Configure🡪Security to change the TFTP server’s default setting from “Receive Only” to “Transmit Only” for the firmware upgrade.
- Start the TFTP server and configure the TFTP server in the phone’s web configuration interface.
- Configure the Firmware Server Path to the IP address of the PC.
- Update the changes and reboot the phone.
End users can also choose to download a free HTTP server from http://httpd.apache.org/ or use the Microsoft IIS web server.
ZERO CONFIG NUMBER SELECTION PROCESS
The Grandstream Zero config tool allows you to automatically provision a range of Grandstream devices without having to configure each UC endpoint manually, this can be helpful in situations that require the mass deployment of UC endpoints, this method will make the provisioning process efficient and optimized, in our GHP6XX/W IP hotel phone series, the zero config is used to configure extension selection from a specifically defined range, the process of how to do it is as mentioned below :
- The administrator needs to log in to the UCM-Web server (SIP server IP address).
- Select menu “Other Services” – “Zero Configuration” – “Model Update”.
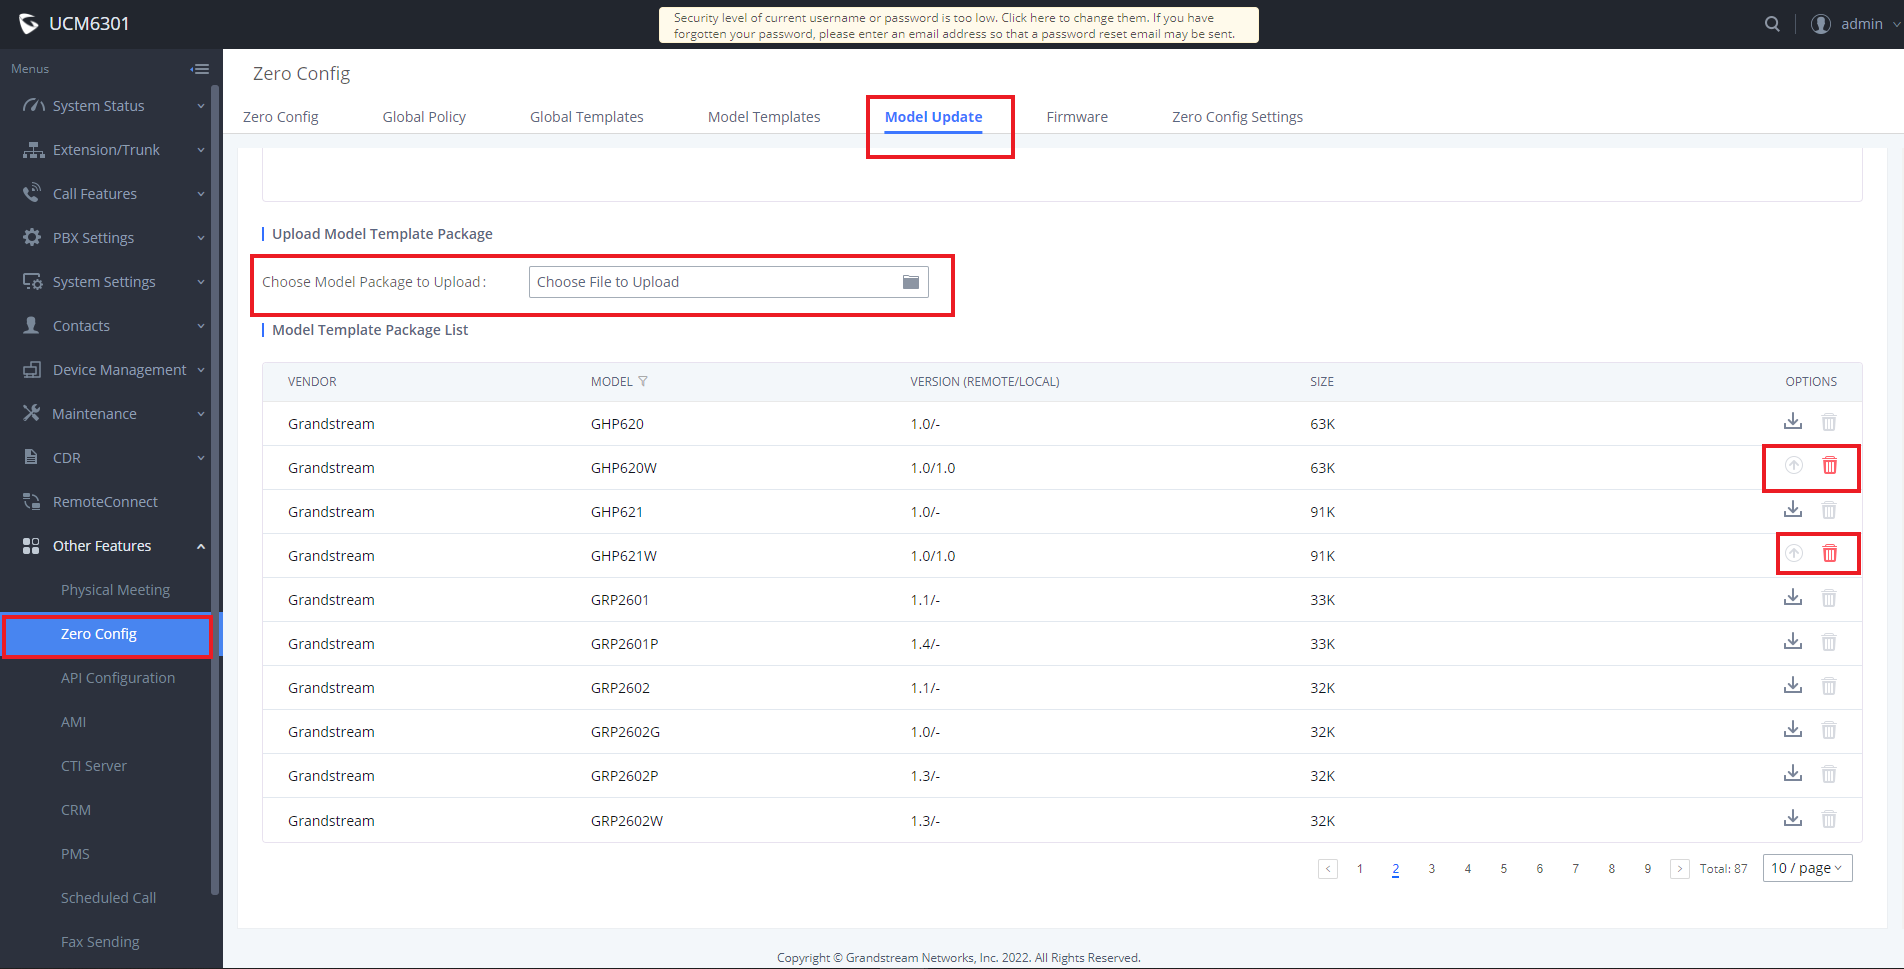
- Select a phone model and click the Download and Install button on the right of the list to download the model configuration file to the UCM.
- Select the menu “Other Services” – “Zero Configuration” – “Zero Configuration Settings”, Select “Enable Zero Config” (enabled by default) and “Enable Pick Extension”, and click “Pick Extension Segment” to set the optional number segment.

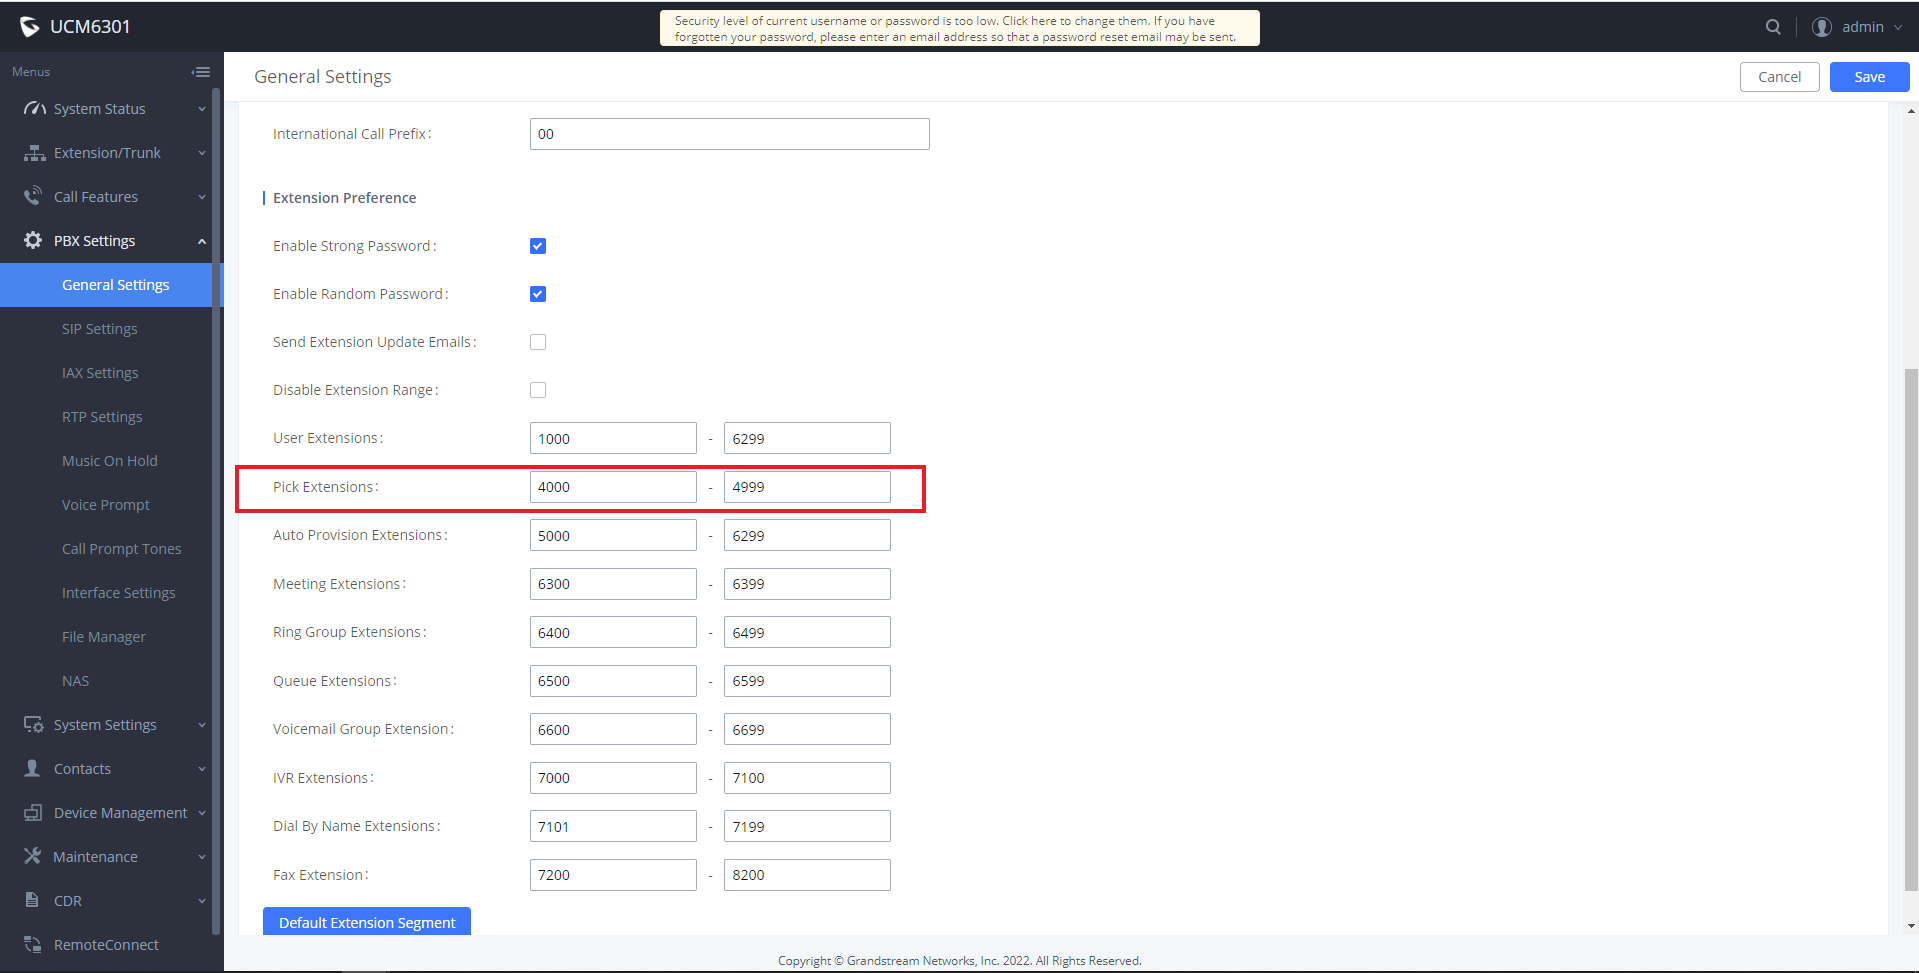
- Click “Pick Extension Segment” to switch to the menu “PBX Settings” – “General Settings”, and enter the corresponding number segment value. Make sure to click save afterward to save the changes.
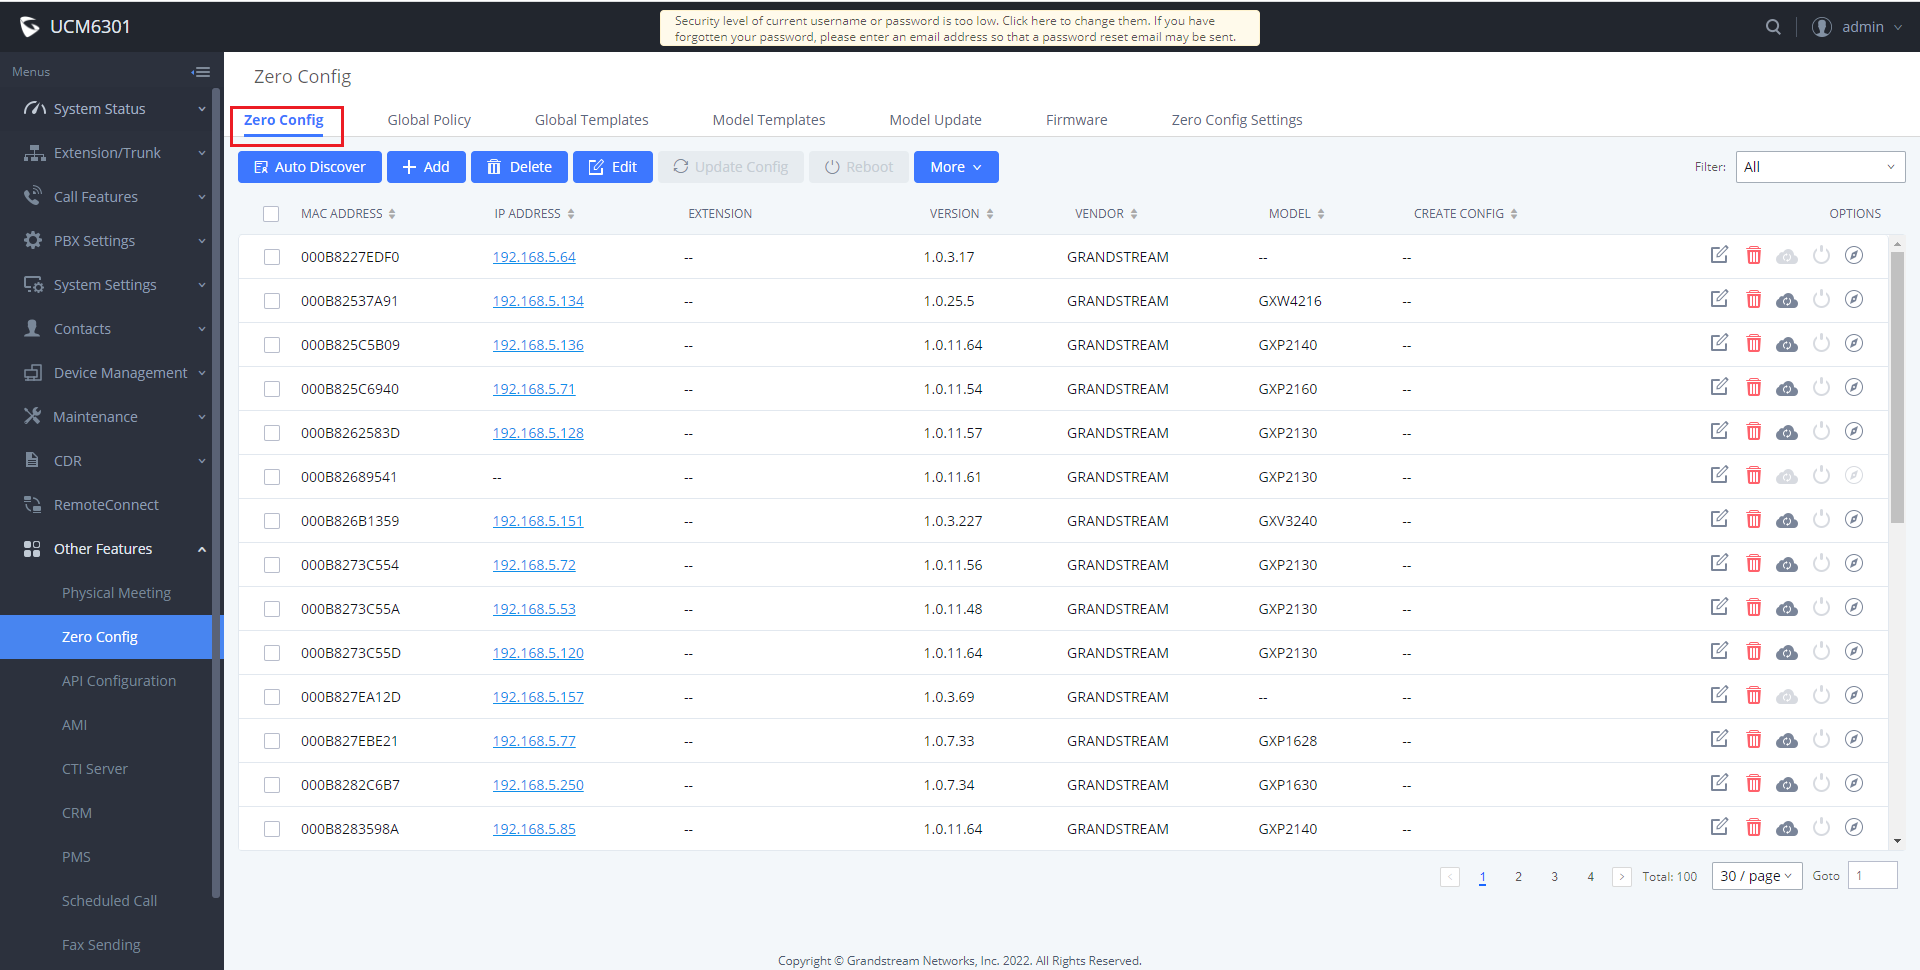
- The UCM6301 automatically discovers and manages device addresses on the same network segment. At the same time, UCM supports manual input of device IP to discover devices.
- Phone users can dial service code **766* + room number to set the room number, and dial service code **766# to hear the room number announcement. When the hotel room number is already in use, phone users should dial service code **766* + keypad password + room number + # to reset the room number.
- Phone users can dial **82# to enable the UCM zero-configuration number selection process. The UCM sends the room number as the selection number. After receiving the request, the UCM delivers the configuration and sets the room number as the preferred account to complete the selection process.
RESTORE FACTORY DEFAULT SETTINGS
Restore to Factory Default via Keypad
To restore the GHP6XX phone using the keypad, enter the code **37*{keypad password}#. The default keypad password is: 123
Restore to Factory Default via Web GUI
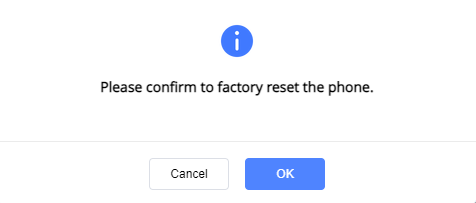
To reset the GHP6XX to its factory settings using the web GUI, please navigate to Upgrade and Provisioning → Advanced Settings then click on the Start button to start the factory reset process.
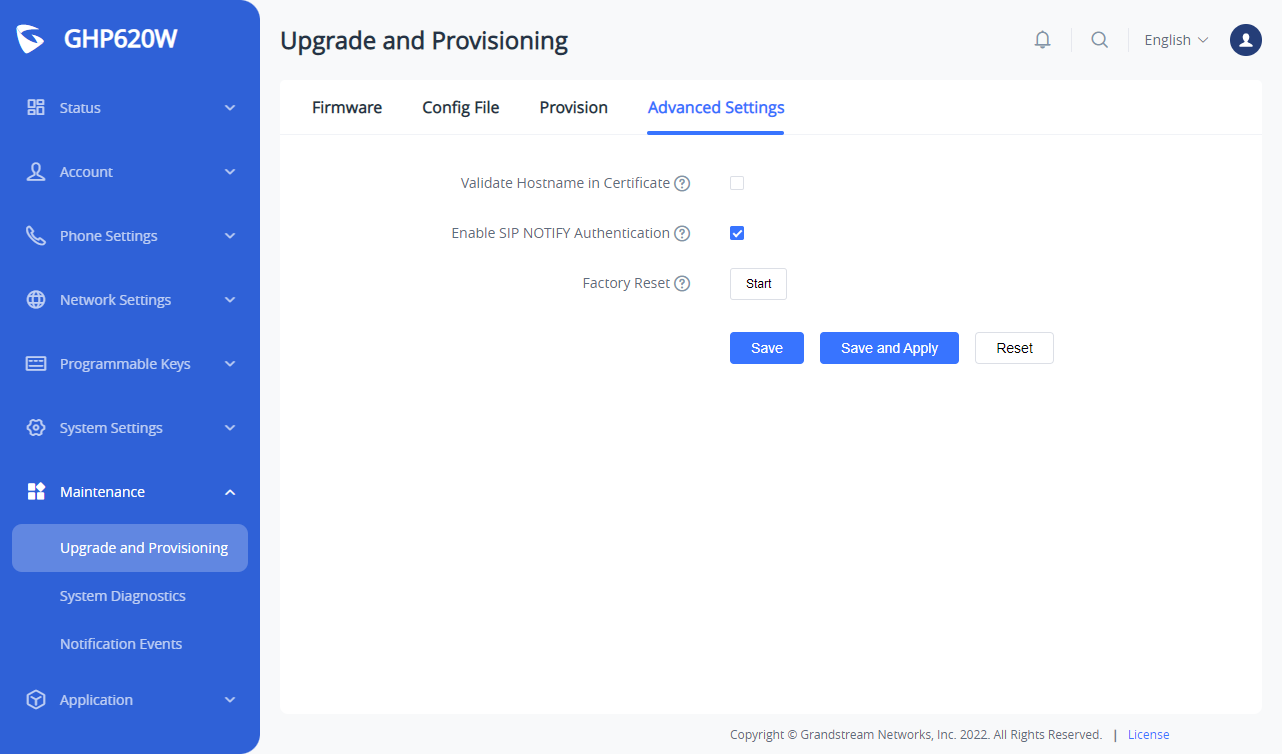
The factory reset will immediately start after you click OK.
HANDLING METHOD FOR PHONE FAILURE STARTUP
State definition of the phone startup phase
Phone startup includes the following four stages.
1. The U-boot is started successfully, and MWI LED and MUTE LED are always red.
2. Linux system starts successfully, MUTE LED is off, and MWI LED is yellow constant.
3. The upper application is successfully started, MUTE LED and MWI LED are off, and the status of the follow-up lights is controlled by the behavior of the phone itself.
4. Play startup music after a successful startup.
Introduction to the phone recovery process
1. The phone cannot be powered off during the upgrade process. If the upgrade fails due to power failure due to force majeure or other reasons, the partition file of the phone will fail to read and write, and the phone cannot be started. Therefore, a Recovery mechanism is provided to restore your phone to the maximum extent.
2. User needs to set up a TFTP server, set the address to 192.168.0.2, and store two files under the server address, ghp610recovery.bin, and ghp610fw.bin. Please download these two files from the link HERE.
3. During the startup phase of U-boot, some recoverable partition files will be verified. If the verification of partition files fails, the MWI LED will flash yellow for 3 seconds to enter the recovery process.
4. At this time, the device IP will be automatically set to 192.168.0.3, and a TFTP request will be sent to the fixed server 192.168.0.2, requesting the file ghp610recovery.bin.
– If there is no server, it will still request, and the yellow light stays always on.
– If the request fails, the yellow light is off, the MWI LED red light flashes for 3 seconds, and the Linux system is blocked and cannot be recovered.
– If the request is successful and the loading operation continues, the yellow light goes out, the MWI LED green light flashes for 3 seconds and the temporary Linux system starts to boot.
5. When the temporary Linux system starts up, the MWI light is always yellow. The system sets the IP address as fixed 192.168.0.3, and sends a TFTP request to the fixed server 192.168.0.2, requesting the file ghp610fw.bin for upgrading. The upgrade process takes about 5 minutes, during which the MWI LED flashes red.
6. After the upgrade is completed, the device automatically restarts and returns to normal. If the upgrade fails, the MWI LED will stay red.
CHANGELOG
Firmware 1.0.1.61
- No major changes.
Firmware 1.0.1.60
- No major changes.
Firmware 1.0.1.54
- Added Warning prompt if IPv4 set does not comply with the rules. [IPv4 Address]
- Added Support to display Serial Number in Web UI system info page. [Serial Number]
Firmware 1.0.1.49
- Added Support of Account Sharing. [Account Sharing]
- Added Support to enable IVR. [Enable IVR]
Firmware 1.0.1.37
- Added Support of Redial Expiration. [REDIAL EXPIRATION]
- Added Support of PNP Service. [PNP SERVICE]
- Added Support of keeping alive to NAT Traversal [NAT TRAVERSAL]
- Added Support for local call features. [LOCAL CALL FEATURES]
Firmware 1.0.1.33
- Added Support of “Enable Basic Settings in IVR” configuration [ENABLE BASIC SETTINGS IN IVR]
- Added Support for NAT Traversal. [NAT TRAVERSAL]
- Added Support for STUN server. [STUN SERVER]
Firmware 1.0.1.29
- This is the initial release.
COPYRIGHT
©2023 Grandstream Networks, Inc. https://www.grandstream.com
All rights reserved. Information in this document is subject to change without notice. Reproduction or
transmittal of the entire or any part, in any form or by any means, electronic or print, for any purpose without the express written permission of Grandstream Networks, Inc. is not permitted.
Grandstream is a registered trademark and the Grandstream logo is the trademark of Grandstream Networks, Inc. in the United States, Europe, and other countries.
CAUTION
Changes or modifications to this product not expressly approved by Grandstream, or operation of this product in any way other than as detailed by this guide could void your manufacturer warranty.
WARNING
Please do not use a different power adaptor with devices as it may cause damage to the products and void the manufacturer’s warranty.
CERTIFICATION
If any trouble is experienced with this equipment, please contact (Agent in the US):
Company Name: Grandstream Networks, Inc.
Address: 126 Brookline Ave, 3rd Floor Boston, MA 02215, USA
Tel: 1-617-5669300
Fax: 1-617-2491987
If the trouble is causing harm to the telephone network, the telephone company may request you remove the equipment from the network until the problem is resolved.
This equipment uses the following USOC jacks: RJ45C.
It is recommended that the customer install an AC surge arrester in the AC outlet to which this device is connected. This is to avoid damaging the equipment caused by local lightning strikes and other electrical surges.
Since this device has the HAC function, the earpiece is easy to absorb small, please take care to avoid scratching.
Caution: Exposure to Radio Frequency Radiation
This equipment complies with EU radiation exposure limits set forth for an uncontrolled environment. This equipment should be installed and operated with a minimum distance of 20 cm between the radiator and your body.
CE Authentication


Hereby, Grandstream Networks, Inc. declares that the radio equipment GHP6XX/W are in compliance with Directive 2014/53/EU.
The full text of the EU declaration of conformity is available at the following internet address:
https://www.grandstream.com/support/resources/
GNU GPL INFORMATION
GHP6XX firmware contains third-party software licensed under the GNU General Public License (GPL). Grandstream uses software under the specific terms of the GPL. Please see the GNU General Public License (GPL) for the exact terms and conditions of the license.
Grandstream GNU GPL-related source code can be downloaded from the Grandstream website:
https://www.grandstream.com/legal/open-source-software