


INTRODUCTION
Grandstream’s SecureAccess mobile application is a cloud‑based solution for managing and operating Grandstream door stations and interphone devices. The app allows administrators to provision door stations and interphones, create organizations and users, manage schedules and access groups, and remotely configure devices. End‑users can open doors using Bluetooth, NFC, IC/ID cards, or personal PINs, receive calls from the door station, preview live video, create temporary passwords for visitors, and track door‑unlock and call records.
SecureAccess integrates with Grandstream’s GDS Cloud service, so an Internet connection is required for remote management and push notifications.
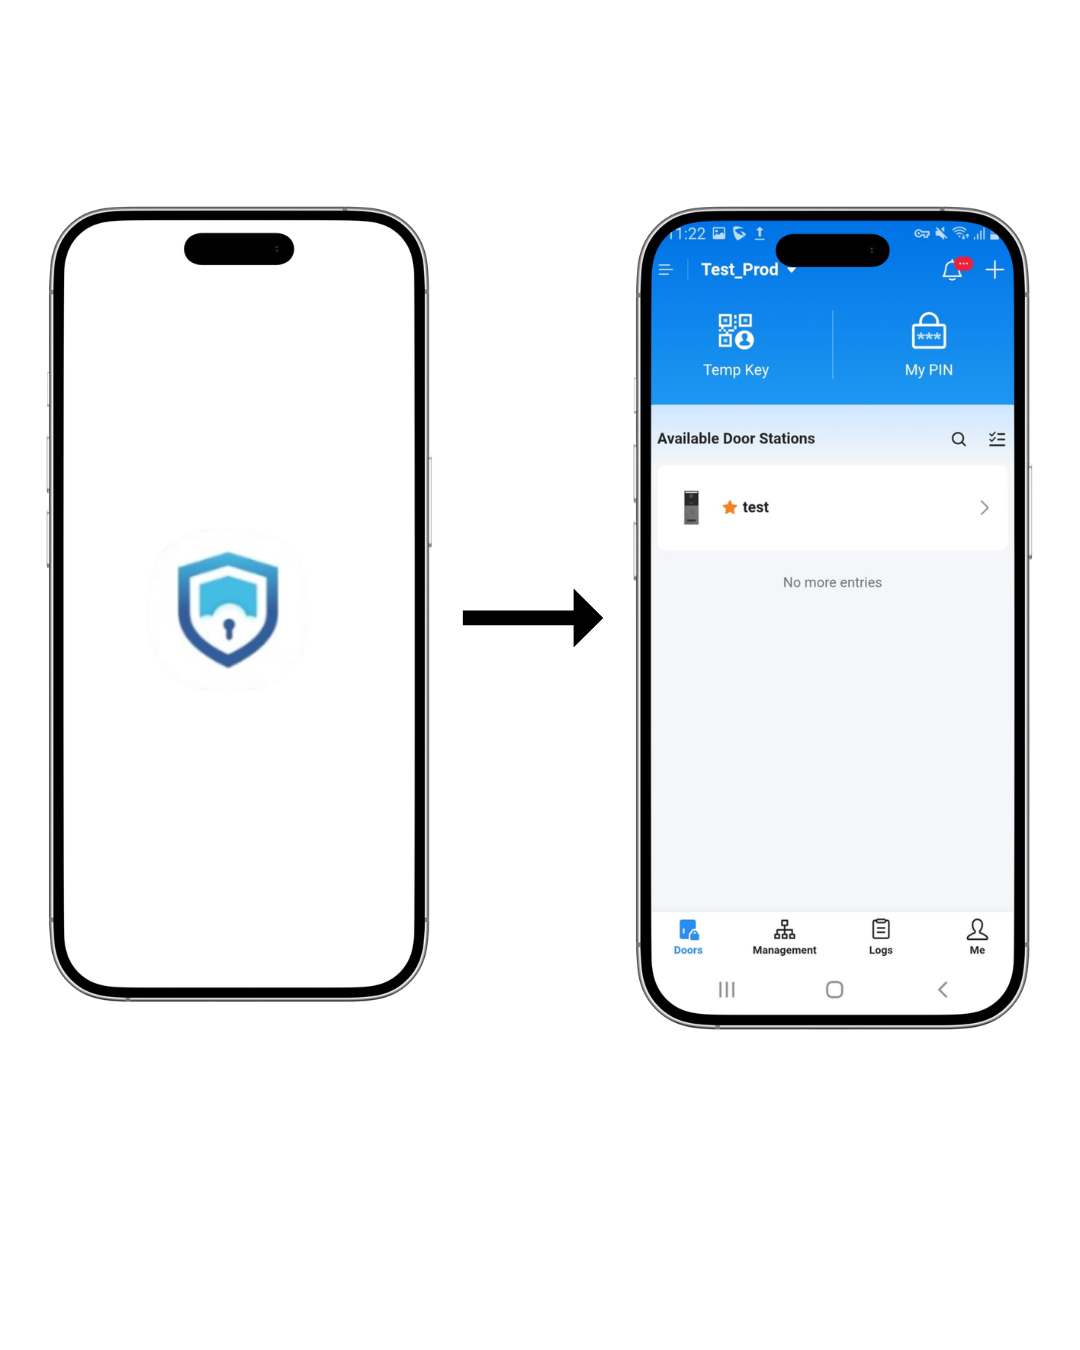
PRODUCT OVERVIEW AND KEY FEATURES
SecureAccess provides a unified interface for administrators and ordinary users to manage door station devices. The main capabilities are summarized below:
- Cloud service and remote management. Door station configuration and user management are performed via a cloud platform. Administrators can add, configure, or upgrade devices, create organizations, and share devices with other administrators.
- Precise door station management. The app lists each registered GDS372x device, showing connection status (online/offline) and enabling one‑tap or remote unlocking. Doorbell calls and preview streams are delivered via SIP to the app. Multi‑administrator access ensures that each organization’s devices and users are isolated.
- Real‑time preview and smart video intercom. When a visitor presses the doorbell, the app provides a real‑time video feed and allows two‑way audio communication. Administrators or authorized users can remotely open the door during a call.
- Multiple unlocking methods. Users can unlock doors via Bluetooth (approach or shake phone), NFC tapping (Android), IC/ID card, PIN code, temporary password, or remote unlock during a call.
- Comprehensive record query. Door unlock and call logs are stored in the cloud for up to 90 days; administrators can view system operation logs and export user information.
- Enhanced security. The app supports anti‑tamper alarms, keyboard error alarms, out‑of‑schedule alarms, unauthorized IC/ID card alarms, and high‑temperature alarms when devices are added. Two‑factor authentication (2FA) is available during login.
Typical Roles and Application Scenarios
SecureAccess supports different user roles and usage scenarios. Typical examples include:
Company
| Role | Usage |
| Office Building Property/Company Super Administrator | Register as a super administrator. If the office building has multiple companies or branches, you can create different organizations for multiple companies/branches to separate management. |
| Company Administrator/Property Staff | Create multiple sub-administrators for it, who can manage door station devices, users, visitors, access groups, user permissions, view door station logs and captured videos, push alarm notifications, etc. At the same time, it supports using the App to open the door with one-click, remotely open the door, real-time preview, answer doorbell calls, and call door station devices. |
| Company Employees | Create a common user. You can have a PIN code, IC card, or use the App to open the door with one-click/Bluetooth/NFC. You can also assign the following functional permissions: remote door opening, real-time preview, call, create temporary password |
| Temporary Visitors/Couriers/External Workers | Create a visitor and set the visit cycle time or number of visits. |
Housing Complex
| Role | Usage |
| Community Properties | Register as a super administrator. |
| Property Staff | Create multiple sub-administrators for it, who can manage door station devices, users, visitors, access groups, user permissions, view door station logs and captured videos, push alarm notifications, etc. At the same time, it supports using the App to open the door with one-click, remotely open the door, real-time preview, answer doorbell calls, and call door station devices. |
| Residents/Tenants | Create a common user. You can have a PIN code, an IC card, or use the App to open the door with one-click/Bluetooth/NFC. You can also assign the following functional permissions: remote door opening, real-time preview, call, and create a temporary password |
| Temporary Visitors/Couriers/External Workers | Create a visitor and set the visit cycle time or number of visits. |
Villa/Individual User
| Role | Usage |
| Family Main Account | Register as a super administrator. |
| Family Members | Create multiple sub-administrators for it, who can manage door station devices, view door station logs and captured videos, push alarm notifications, etc. At the same time, it supports using the App to open the door with one-click, remotely open the door, real-time preview, answer doorbell calls, and call door station devices. |
| Child | Create a common user. You can have a PIN code, an IC card, or use the App to open the door with one click/Bluetooth/NFC. You can also assign the following functional permissions: remote door opening, real-time preview, call, and create a temporary password |
| Temporary Visitors | Create a visitor and set the visit time or number of visits. |
GETTING STARTED
Download and Installation
SecureAccess can be downloaded from the App Store or Google Play. Search for “Grandstream SecureAccess” and install the app. The app requires Android 10.0+ or iOS 13+. When prompted, allow Bluetooth, Location (for Bluetooth unlocking), and Notification permissions.
Users can also install the application from the following direct link :
https://fw.gdms.cloud/gds/download/
Creating or Obtaining an Account
To use the app, you need a GDMS Account. There are two ways to obtain an account:
- Administrator / Property Manager: Contact your organization’s super administrator to create a cloud login account for you. The initial password will be emailed to you; change it after your first login.
- Ordinary User / Resident: Ask your building manager or landlord to create a user account via the administrator portal. Alternatively, if you are the homeowner, you can register a new account during sign‑up. Please refer to the SecureAccess user guide for more information on how to use the application as an ordinary user.
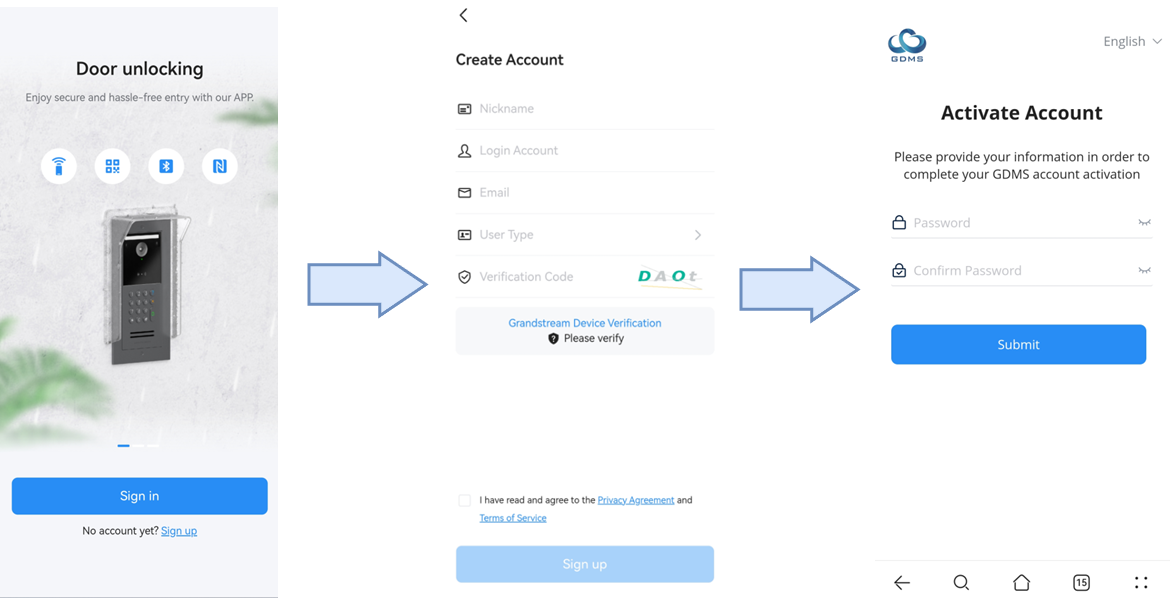
Registering The Account
Please follow the steps below to complete your account registration:
- Check if you already have an account
- If you already have a GDMS account, simply sign in directly. Registration is not required.
- Enter your registration details.
- Open the SecureAccess app and provide the required personal and account information in the registration form.
- Add a Grandstream device for verification
- Enter the device’s details for verification.
- The device must not be bound to any other GDMS account.
- Complete device verification
- Follow the on-screen steps to verify the device.
- Activate your account
- After verification, check your email for an account activation email.
- Click the activation link and set your login password.
- Sign in to SecureAccess
- Return to the SecureAccess app and log in using your new credentials.
Login and Multi‑Factor Authentication
You can also sign in with an Apple ID or a Google ID during registration.
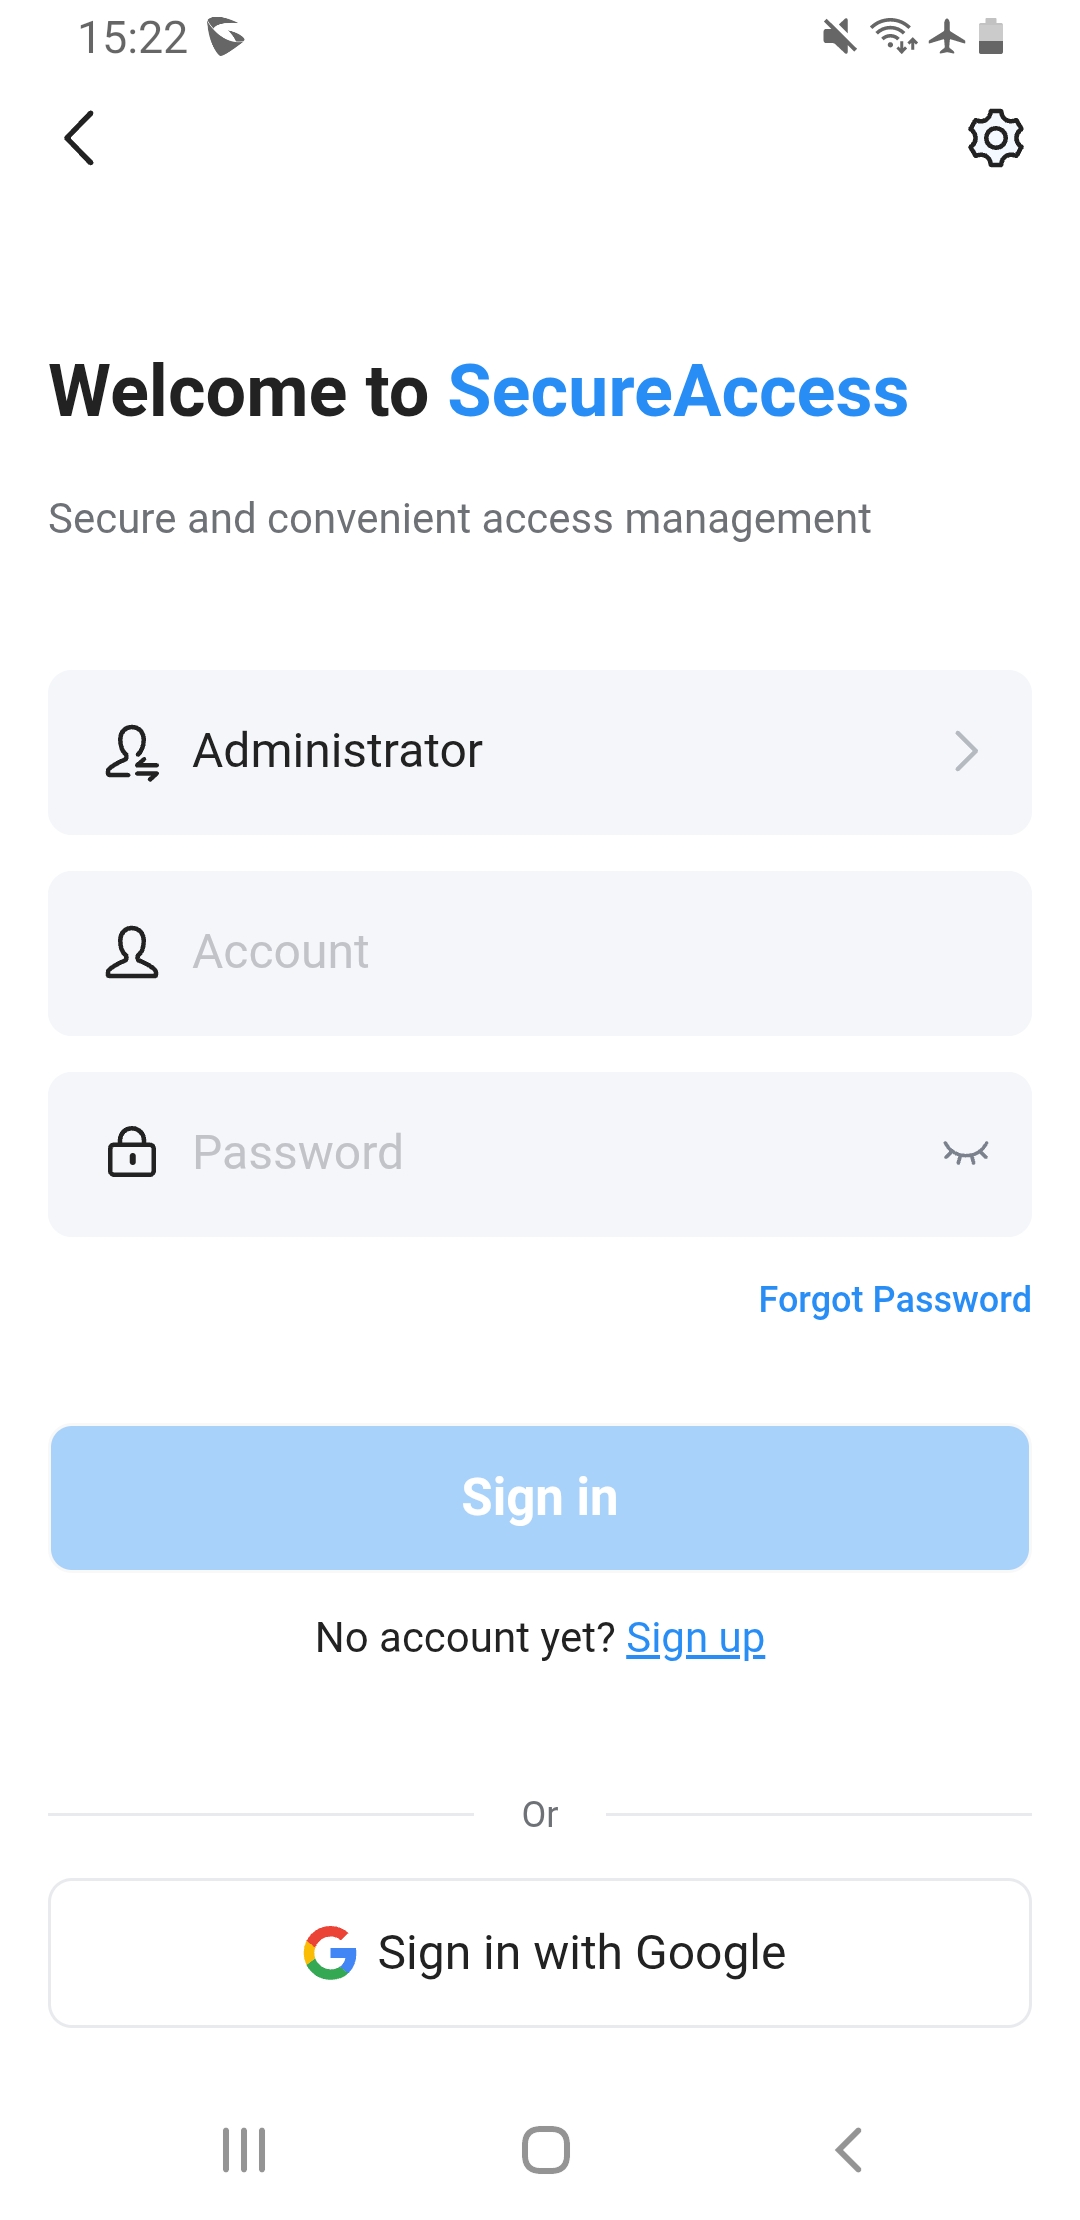
Open the app and select your User Type (Administrator or User). Enter your account and password. If multi‑factor authentication is enabled, a verification code will be sent to your registered email or phone. Enter this code to complete the login. The login screen also provides links for Sign up, Forgot Password, and Sign in with Google. The sign‑in screen is shown below:
ACCESSING OTHER GDMS CLOUD SOLUTIONS
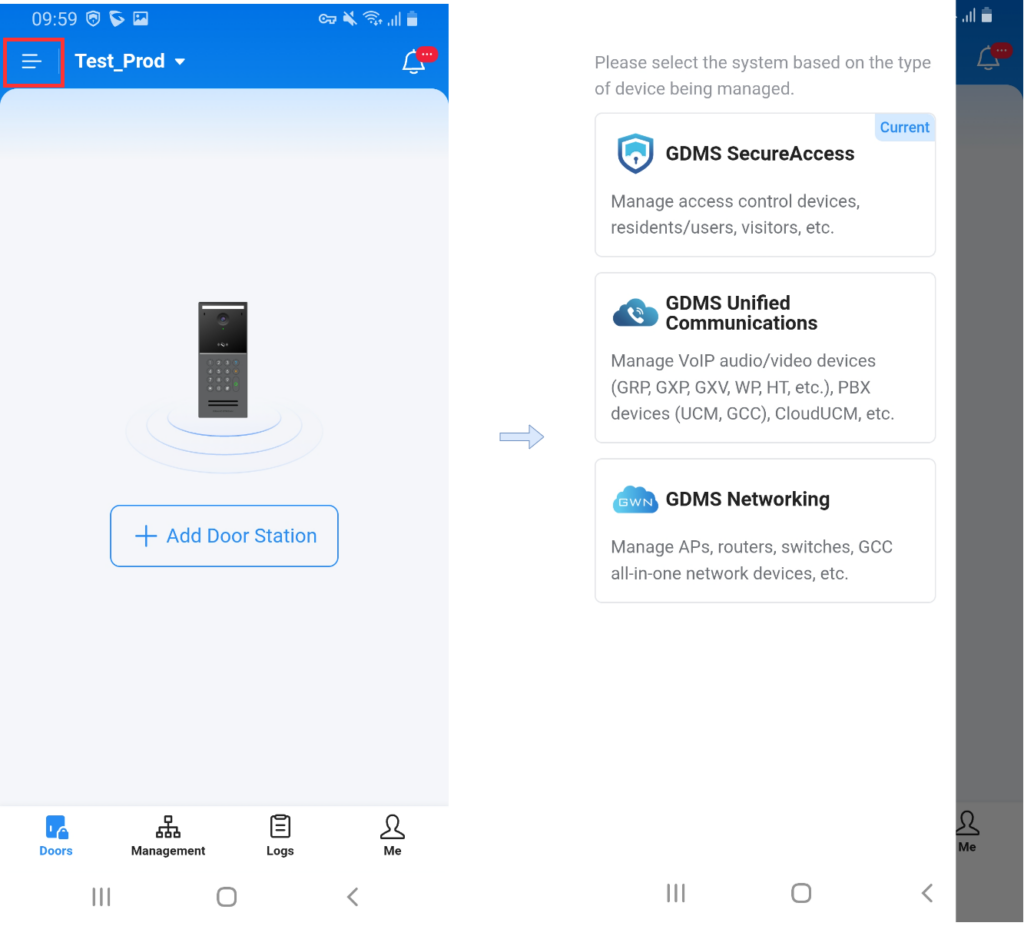
Administrators and users can directly access other Grandstream cloud solutions, such as GDMS UC and GDMS Networking, from within the application interface. This integration simplifies navigation between Grandstream cloud platforms based on the user’s operational needs.
To switch to another cloud solution, users can open the navigation menu from the top-left corner of the screen and select the desired Grandstream cloud application. The system will then redirect the user to the selected platform interface.
APPLICATION INTERFACE OVERVIEW
After logging in, the interface is divided into 5 main tabs: Doors, Management, Add Organization, Logs, and Me (shown at the bottom of the screen).
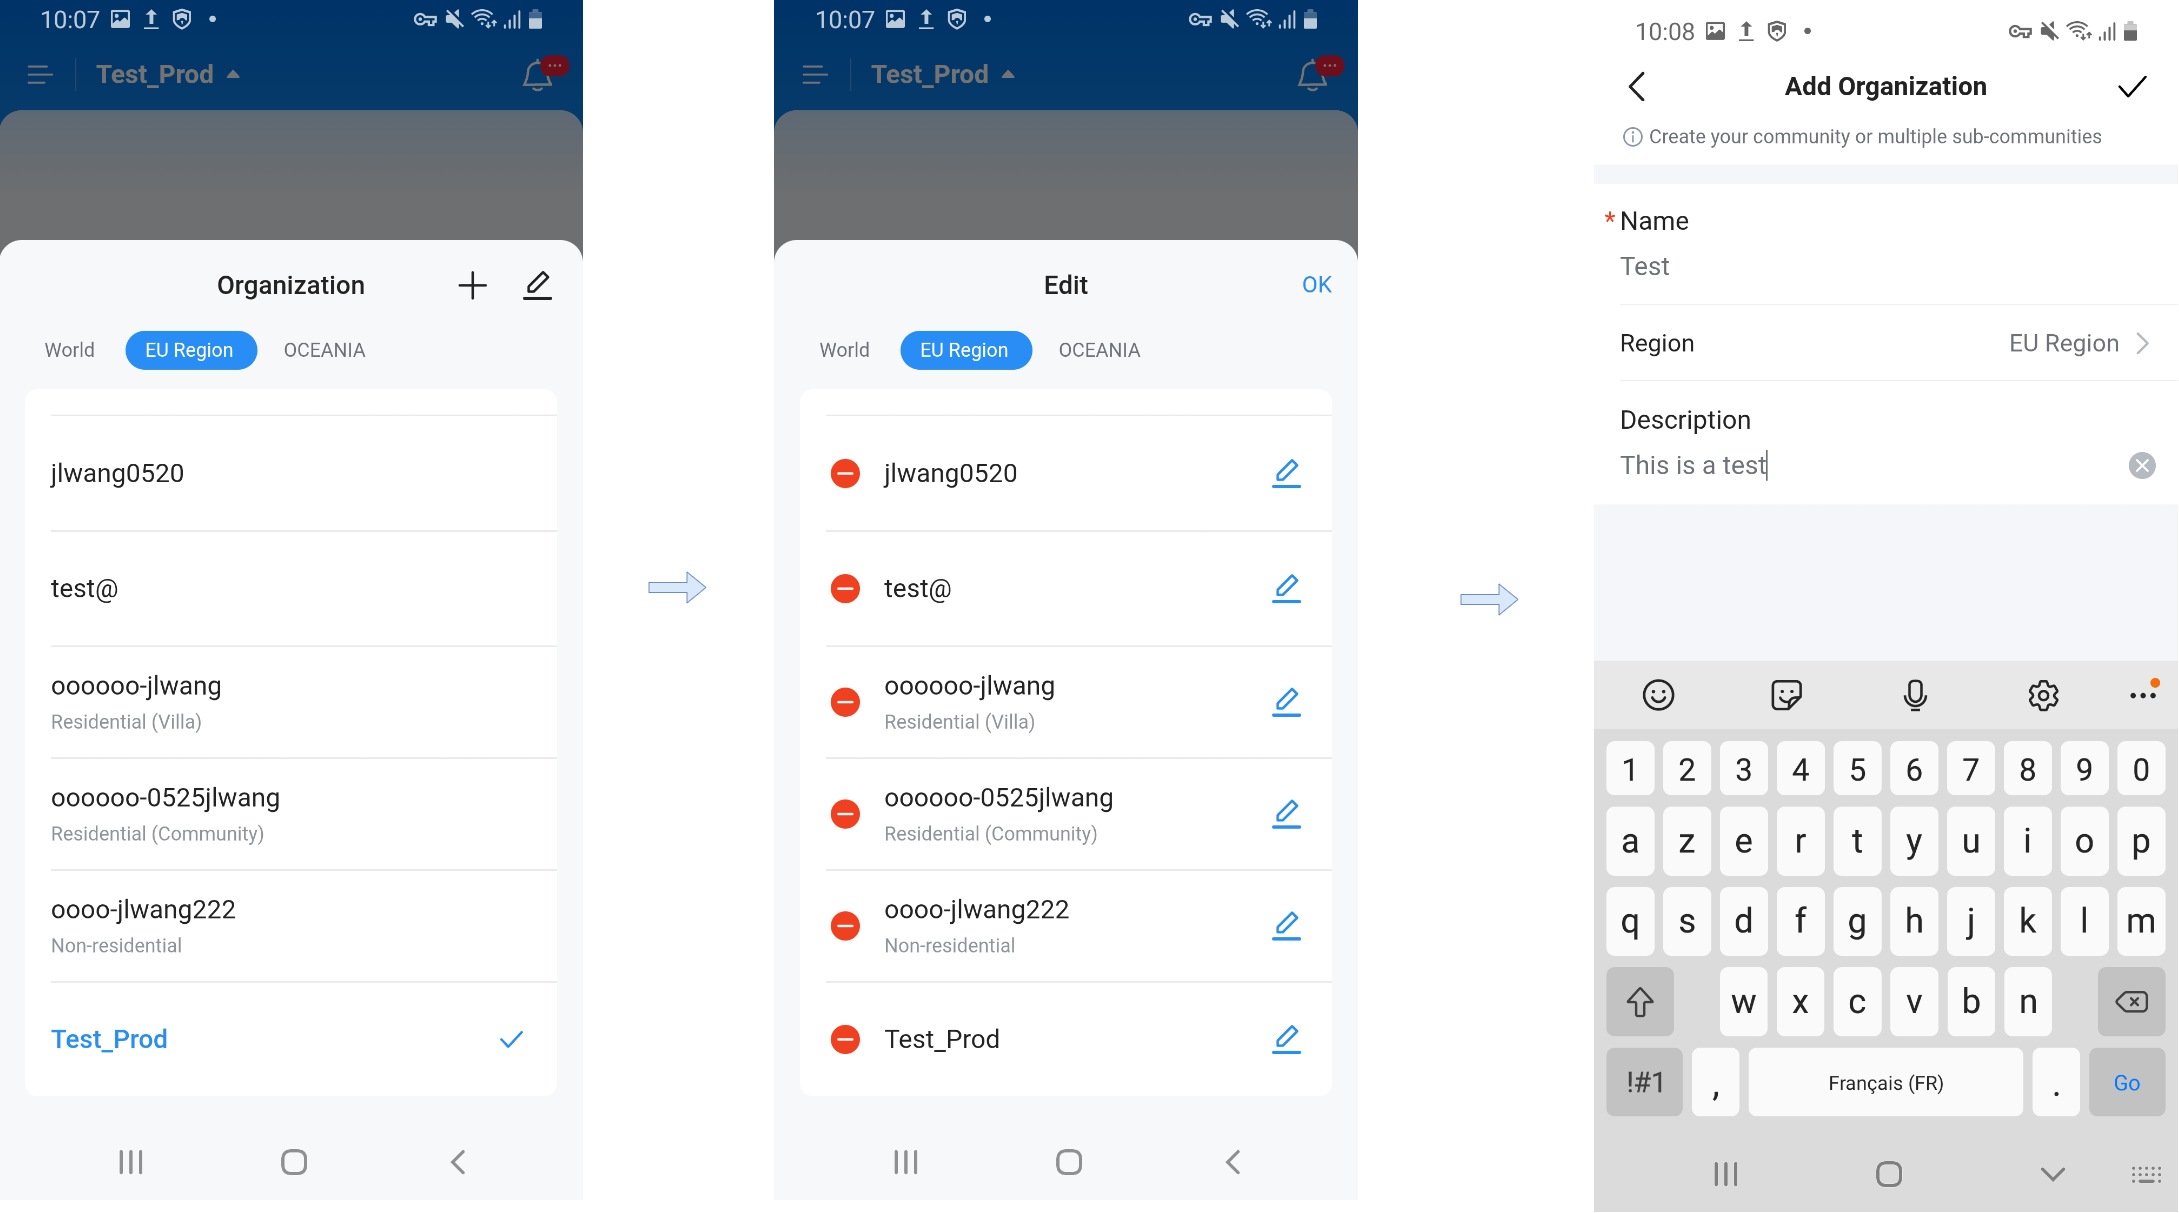
Add Organization
The Add Organization section allows administrators to create and manage organizations based on their assigned permissions.
- Platform Administrators can create new organizations, delete existing organizations, and assign organizations to the appropriate regional server, such as Europe, World, or Oceania. During organization creation, Platform Administrators can define the organization name, description, regional server, and organization type, including whether the organization is configured as a Residential organization or a Non-Residential organization.
- Organization Administrators have limited organization management permissions and can only manage organizations assigned within their authorized scope. They do not have permission to assign regional server locations or delete organizations.
Doors Tab (Home Page)
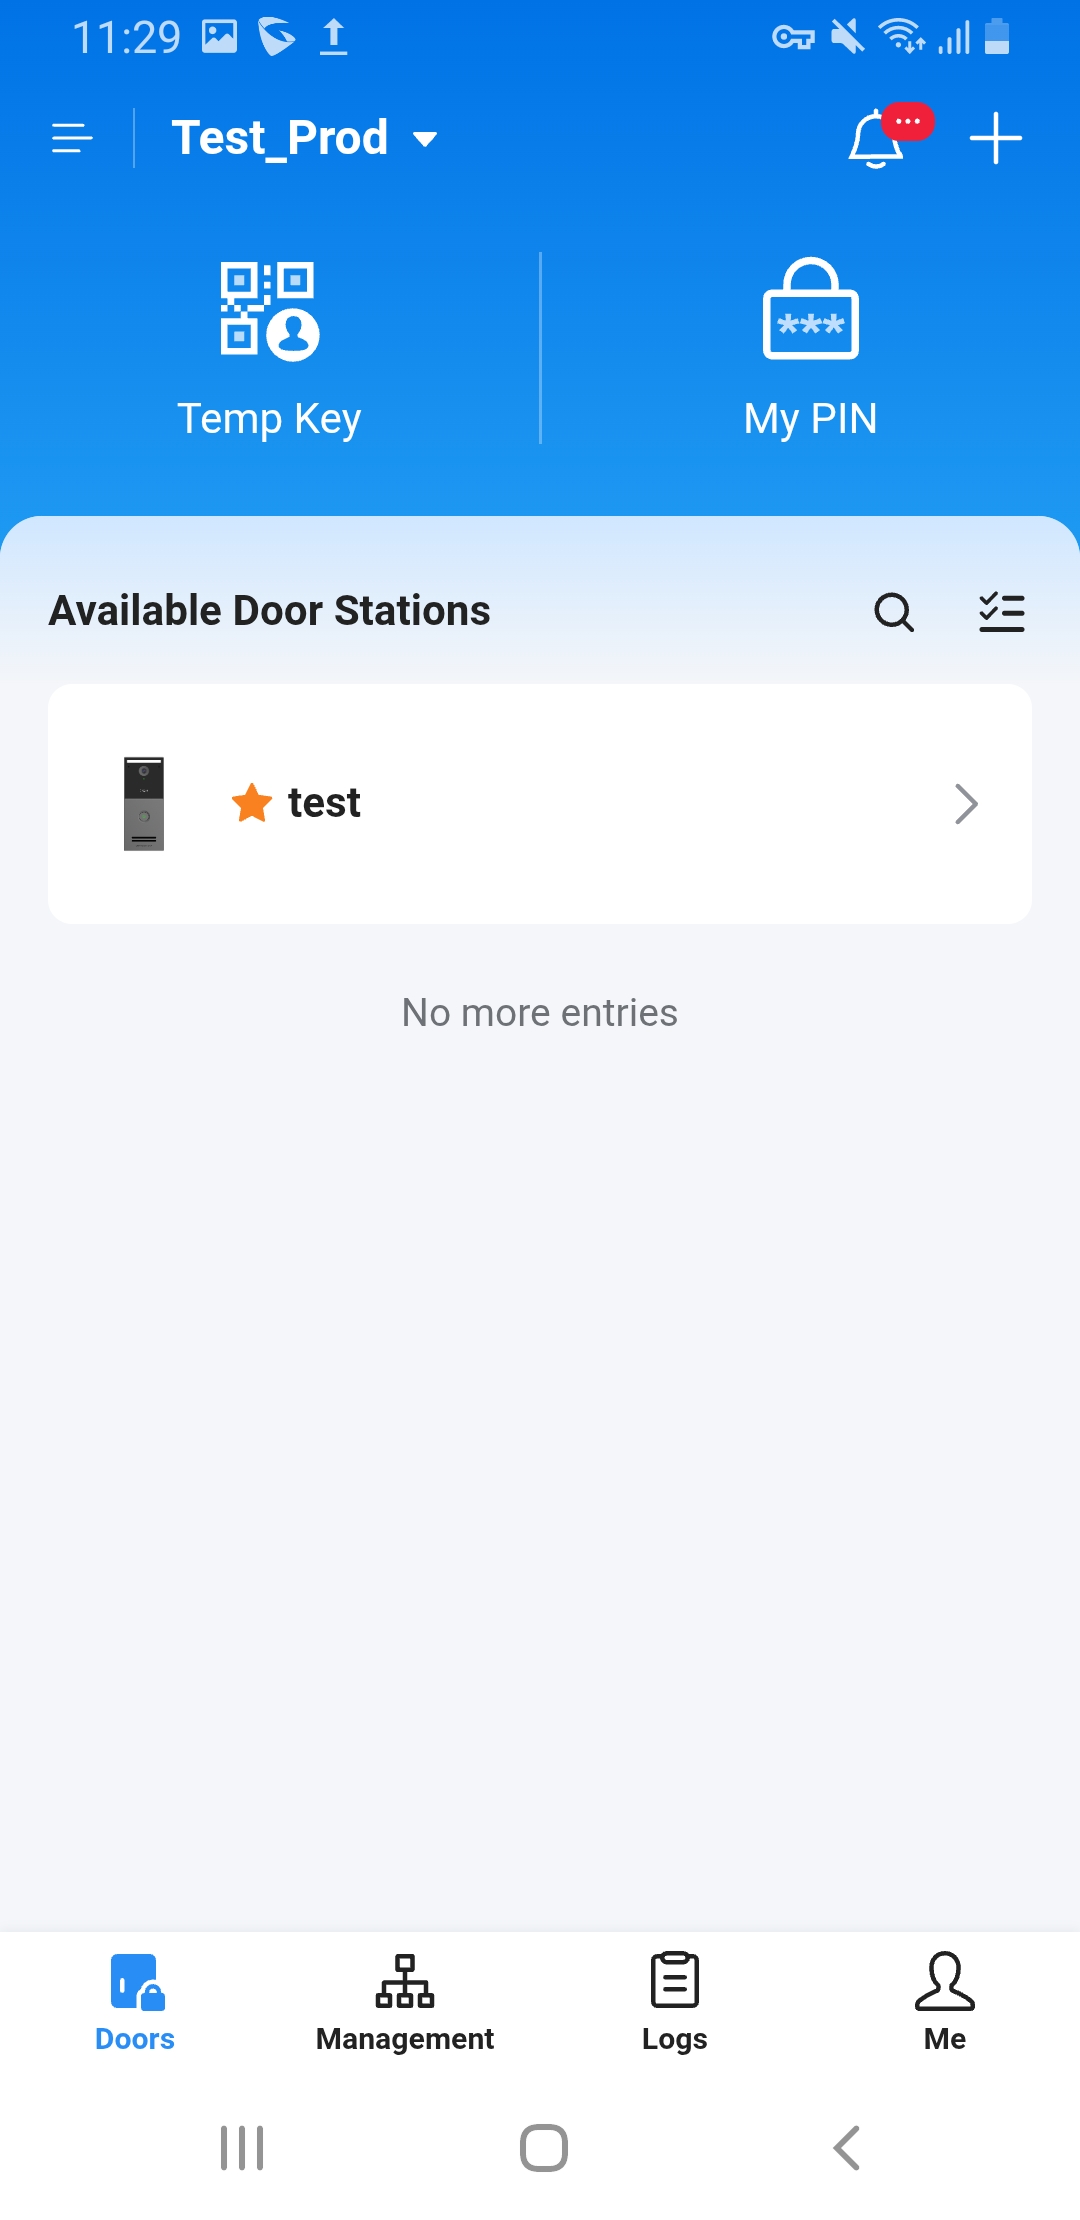
The Doors tab lists all door stations available to the current user. Each entry displays the added device.
At the top of the Doors page, there are two shortcuts:
- Temp Key (Temporary Password) – create a temporary unlocking password for visitors.
- My PIN – view or change your personal PIN used for PIN‑based unlocking.
The following screenshot illustrates the typical Doors page for the administrators’ and sub-administrators’ profiles, with recent records and available door stations:
Device Information
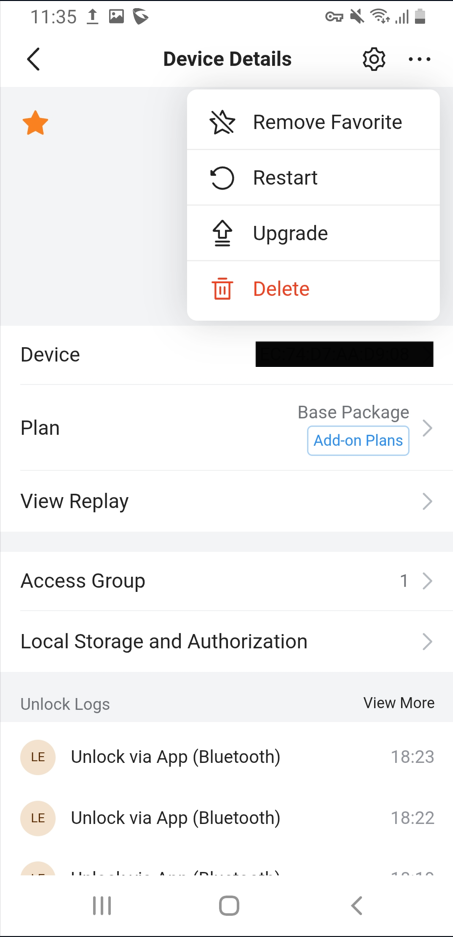
When you select a specific device from the list, the following management options are available:
- Favorite / Unfavorite – Marks the device as a favorite or removes it from the favorites list. Favorite devices are prioritized and displayed at the top of the device list for quicker access.
- Delete Device – Removes the door station from the organization. All related users, visitors, and logs tied to the device will be deleted. If the device is offline, deletion will only remove it from the cloud; a factory reset may still be required.
- Restart – Reboots the door station. Use this if the device becomes unresponsive or if configuration changes require a restart to apply. The device must be online for this option to work.
- Firmware Upgrade – Checks for available firmware updates and applies them via the GDMS cloud. The device must stay online throughout the upgrade.
Device Configuration
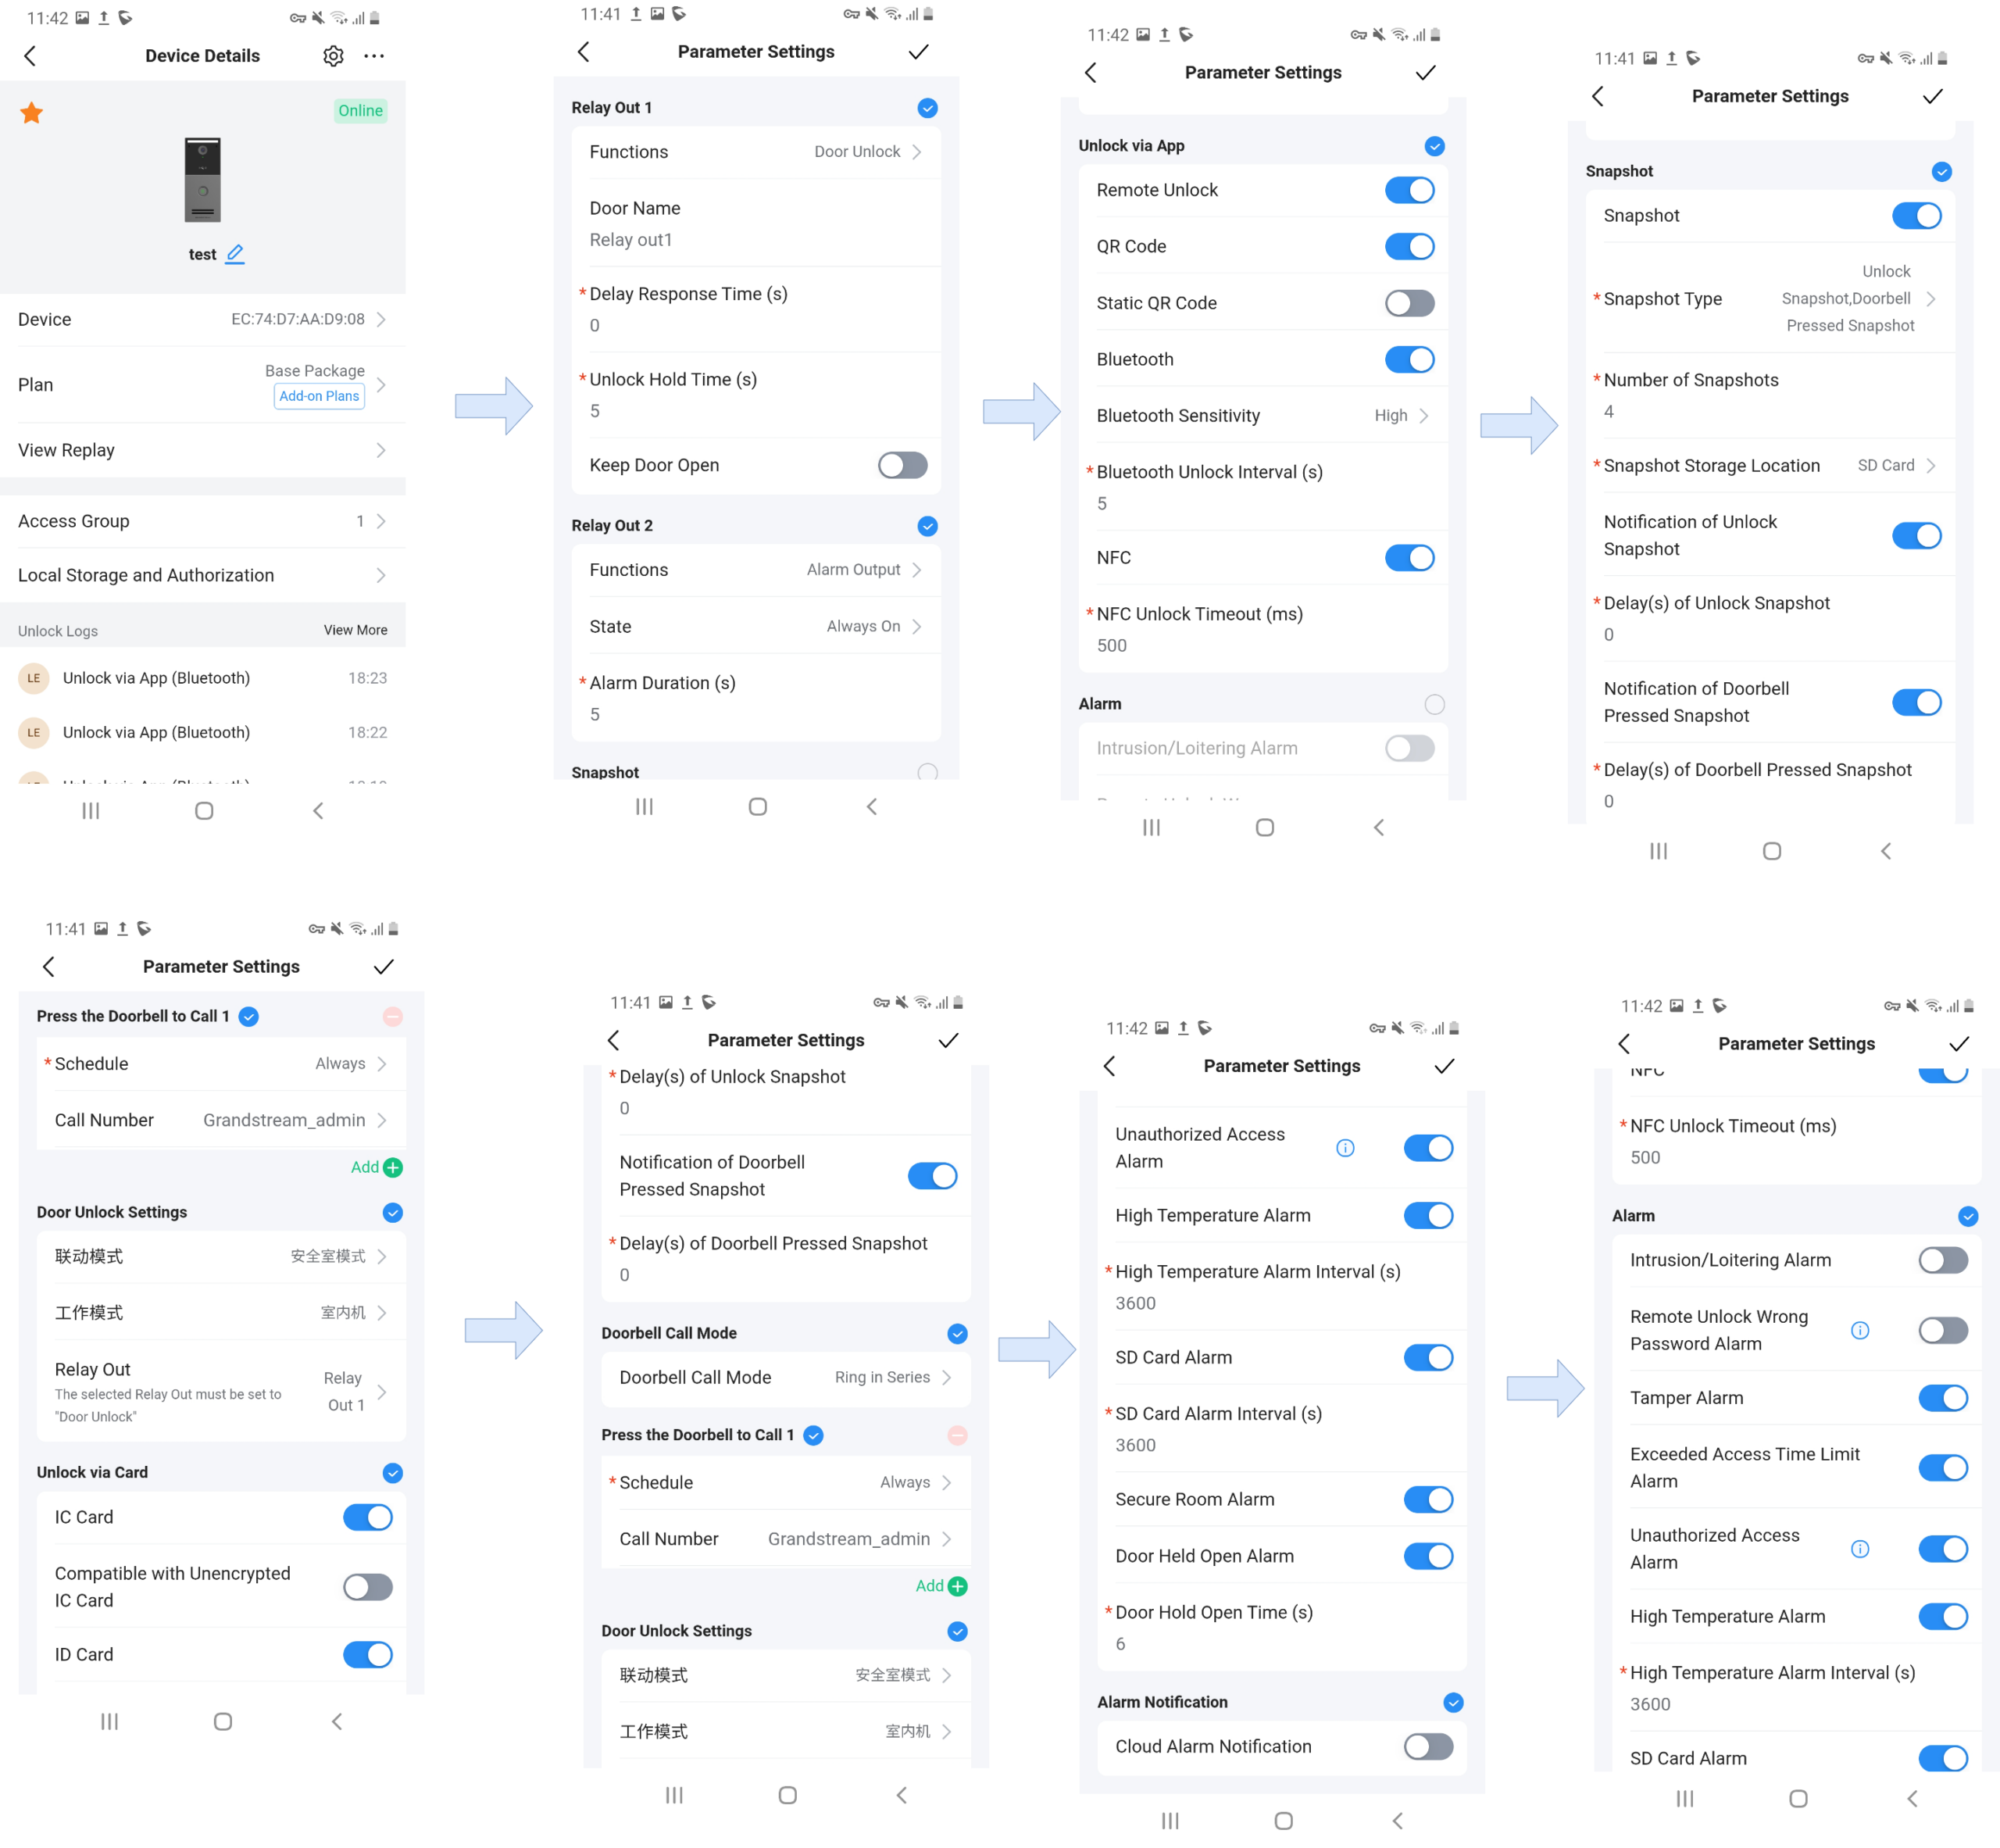
Open the device’s parameter settings, which allow detailed configuration. The available sub-menus include:
Open the device’s Parameter Settings menu to access advanced device configuration options. The available sub-menus include:
- Relay Output Settings – Configure Relay Out 1 and Relay Out 2 functions, such as Door Unlock or Alarm Output. Administrators can define the delay response time, unlock hold time, keep-door-open schedules, alarm duration, and relay behavior during alarm events.
- Keypad Settings – Enable or disable the keypad, configure the key timeout interval between key presses, and define the dial type, such as Virtual Number mode. This configuration is only for the GDS3725 model.
- Snapshot Settings – Configure snapshot capture behavior for events such as door unlocking or doorbell presses. Administrators can define the snapshot type, number of snapshots captured per event, storage location, notification settings, and snapshot delay intervals.
- Doorbell Call Mode – Configure the doorbell call mode to operate in parallel or series, and define up to four numbers to be called when the doorbell is pressed.
- Door Unlock Settings – Configure the door linkage mode as disabled or Safe Room Mode. When Safe Room Mode is enabled, select the station type (Outdoor Station or Indoor Station) and prevent the door from being opened from outside while the room is occupied.
- Unlock via Card – Configure card-based access control settings, including supported card types, unlock permissions, card authentication behavior, and card swipe intervals.
- Unlock via App – Configure application-based unlock methods, including App Button, QR Code, Static QR Code, NFC, and Bluetooth unlocking. Additional parameters such as NFC timeout, Bluetooth sensitivity, and unlock interval can also be adjusted.
- Alarm Settings – Configure and manage alarm-related features, including Loitering/Intrusion Alarm, Hijacking Code Alarm, Anti-Tampering Alarm, Multiple Error Input Alarm, Out-of-Schedule Access Alarm, Unauthorized RFID/QR Code Access Alarm, and High Temperature Alarm. Alarm snapshots can also be stored locally on the SD card if authorized.
- Alarm Notifications – Configure alarm notification behavior for supported alarm events. Administrators can enable or disable notifications and define how alarm alerts are delivered within the application.
For more information on the options, please refer to the section [Configuring Door Station Parameters]
Switching Organizations
As a Super Administrator, you can manage multiple independent organizations within the same platform. Each organization contains its own set of devices, users, and permissions. These organizations are completely separate: a Sub-Administrator assigned to Organization A cannot manage devices in Organization B unless they are also granted Super Administrator privileges.
To create or switch organizations:
- Tap the menu icon in the top-left corner of the app.
- Select the organization you want to access from the list.
- To create a new organization, tap the “+” icon. You can choose one of two methods:
- Manual Creation – Add the organization first, then assign devices to it later.
- Import from UC System – Import the organization together with its devices directly from an existing UC system.
- Enter the required details and assign devices to the new organization.
This structure allows Super Administrators to oversee multiple sites while keeping device management and user permissions clearly separated between organizations.

Alarms and Notifications
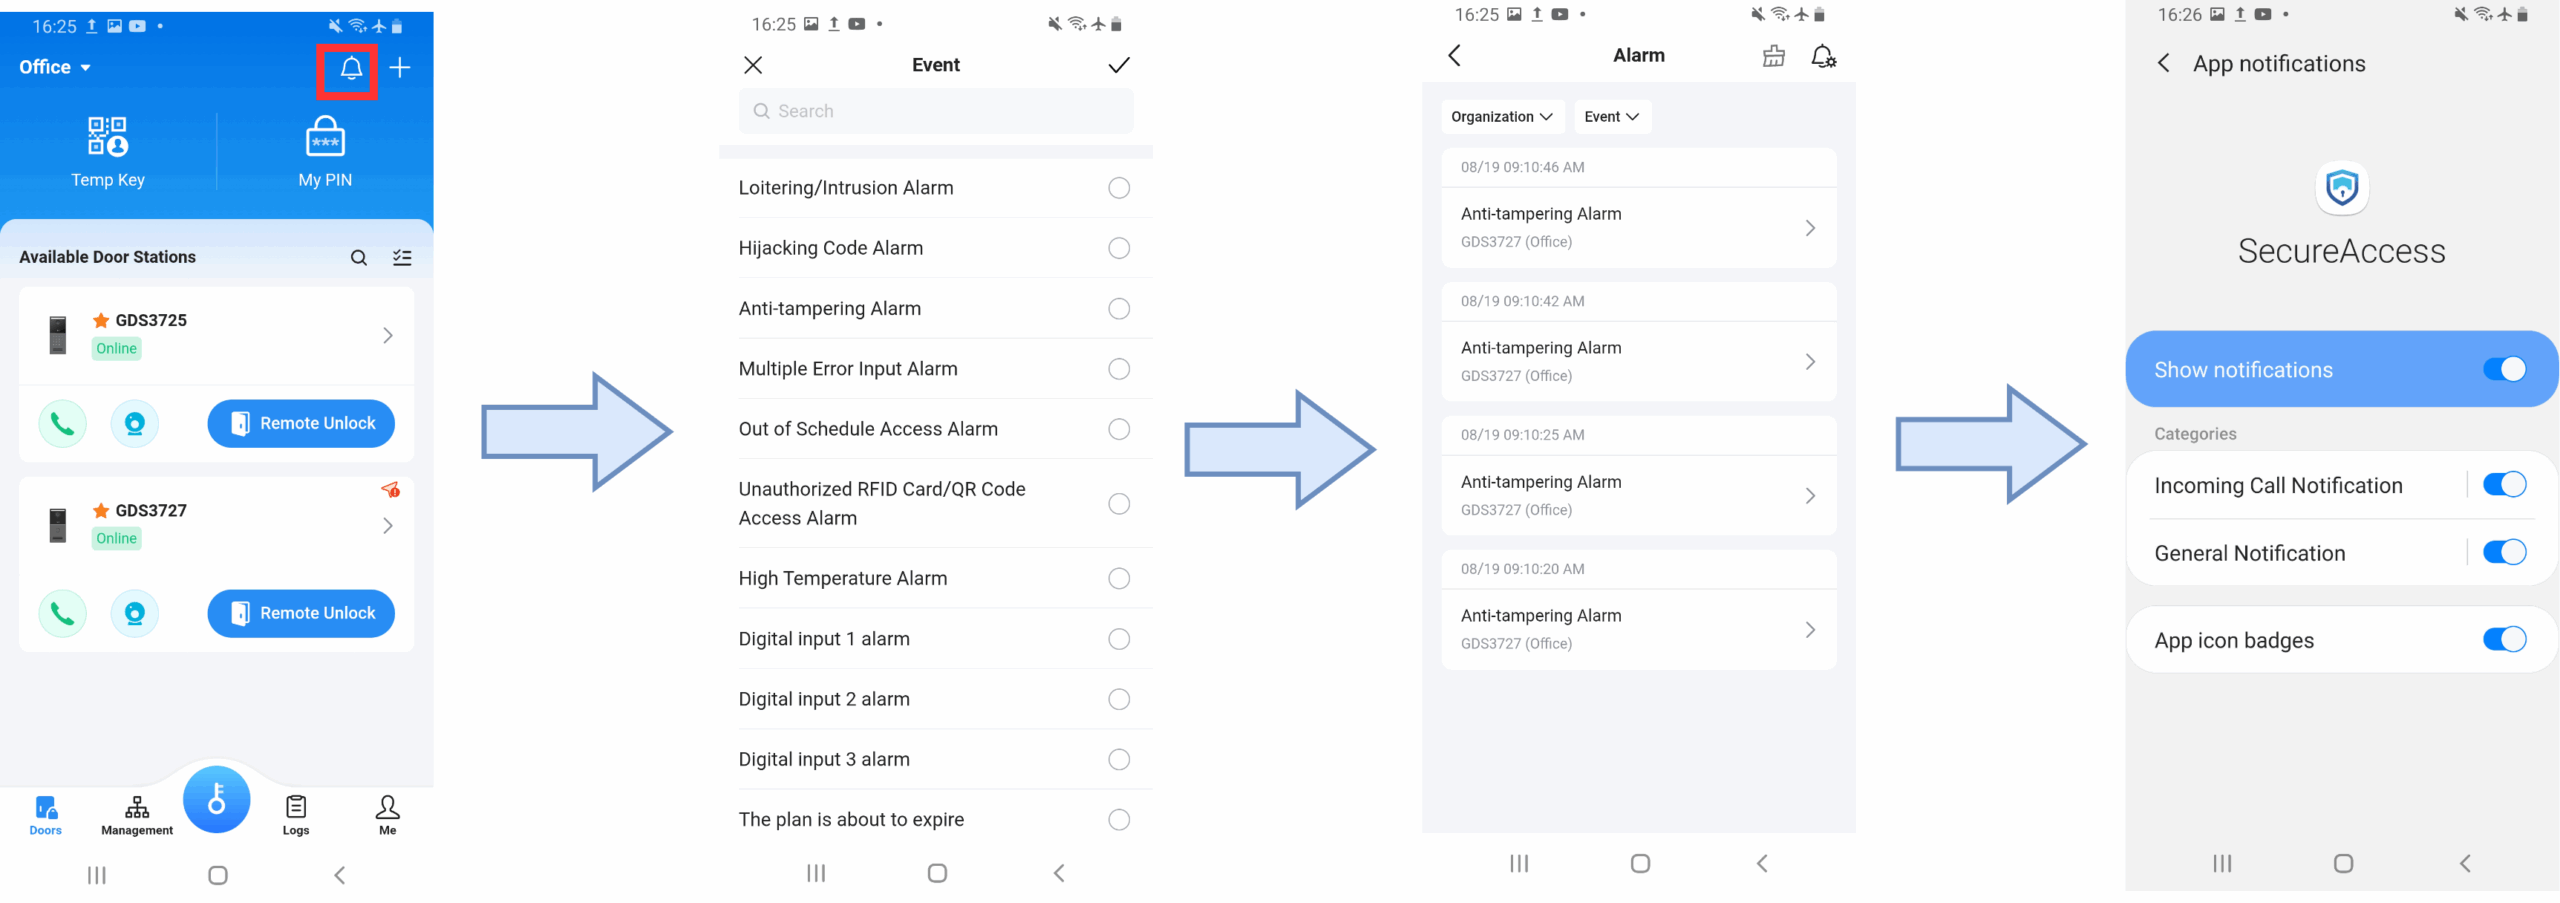
By clicking the highlighted icon, you can display all alarms and notifications across the platform.
- Filter by Organization – View events related to a specific organization.
- Filter by Event – Choose from the full list of alarm events supported by the SecureAccess app and display only the ones you need.
- Notification Settings – Enable or disable specific alarms so that only the selected notifications are delivered to your smartphone.
Management Tab (Administrator Only)
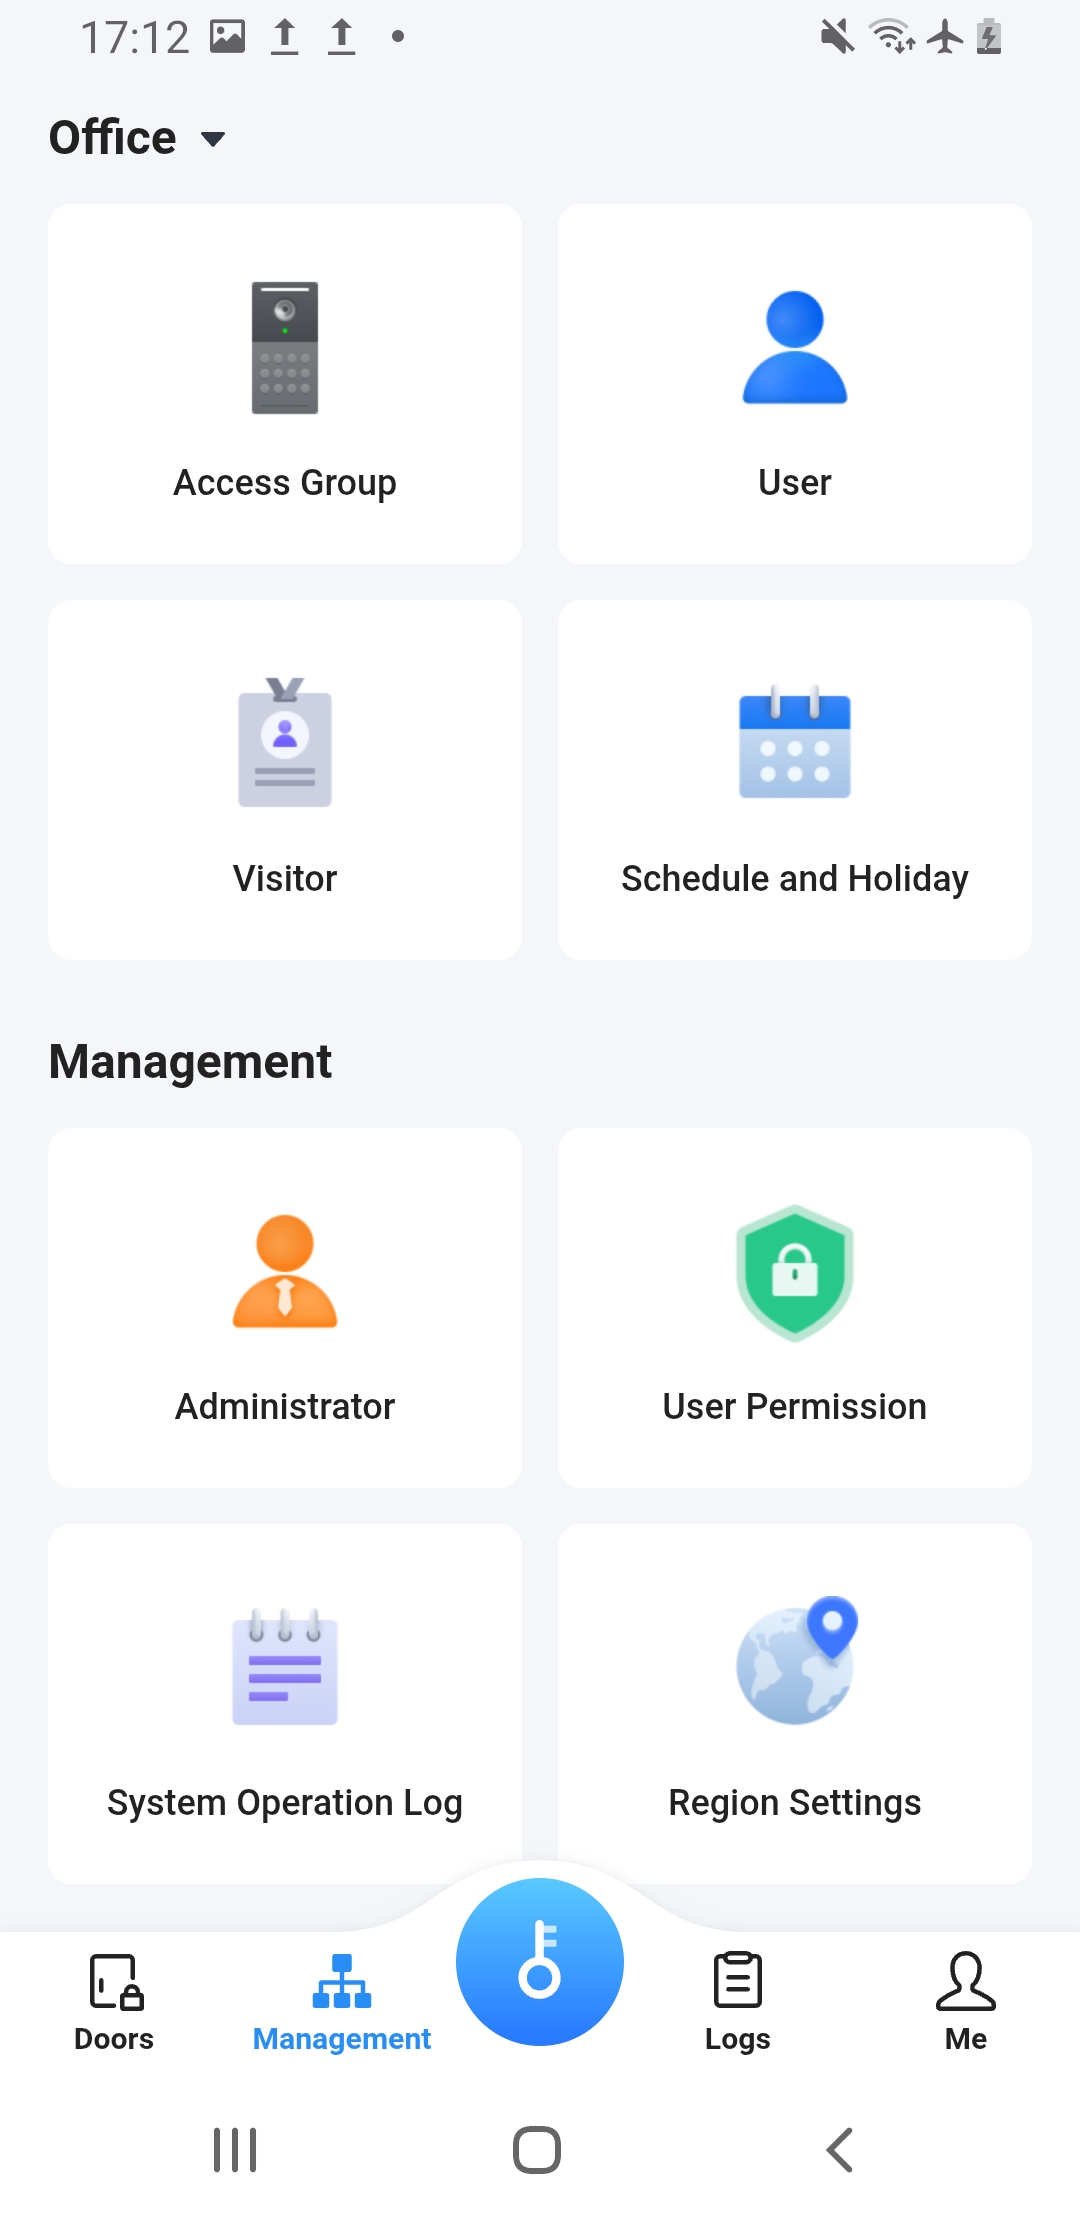
The Management tab is available to administrators and sub‑administrators. It provides access to high‑level functions such as Access Group, User, Visitor, Schedule, Holiday, Administrator, User Permission, System Operation Log, and Region Settings. Selecting a module opens the corresponding management page. An example of the Management tab is shown below:
Access Group Management
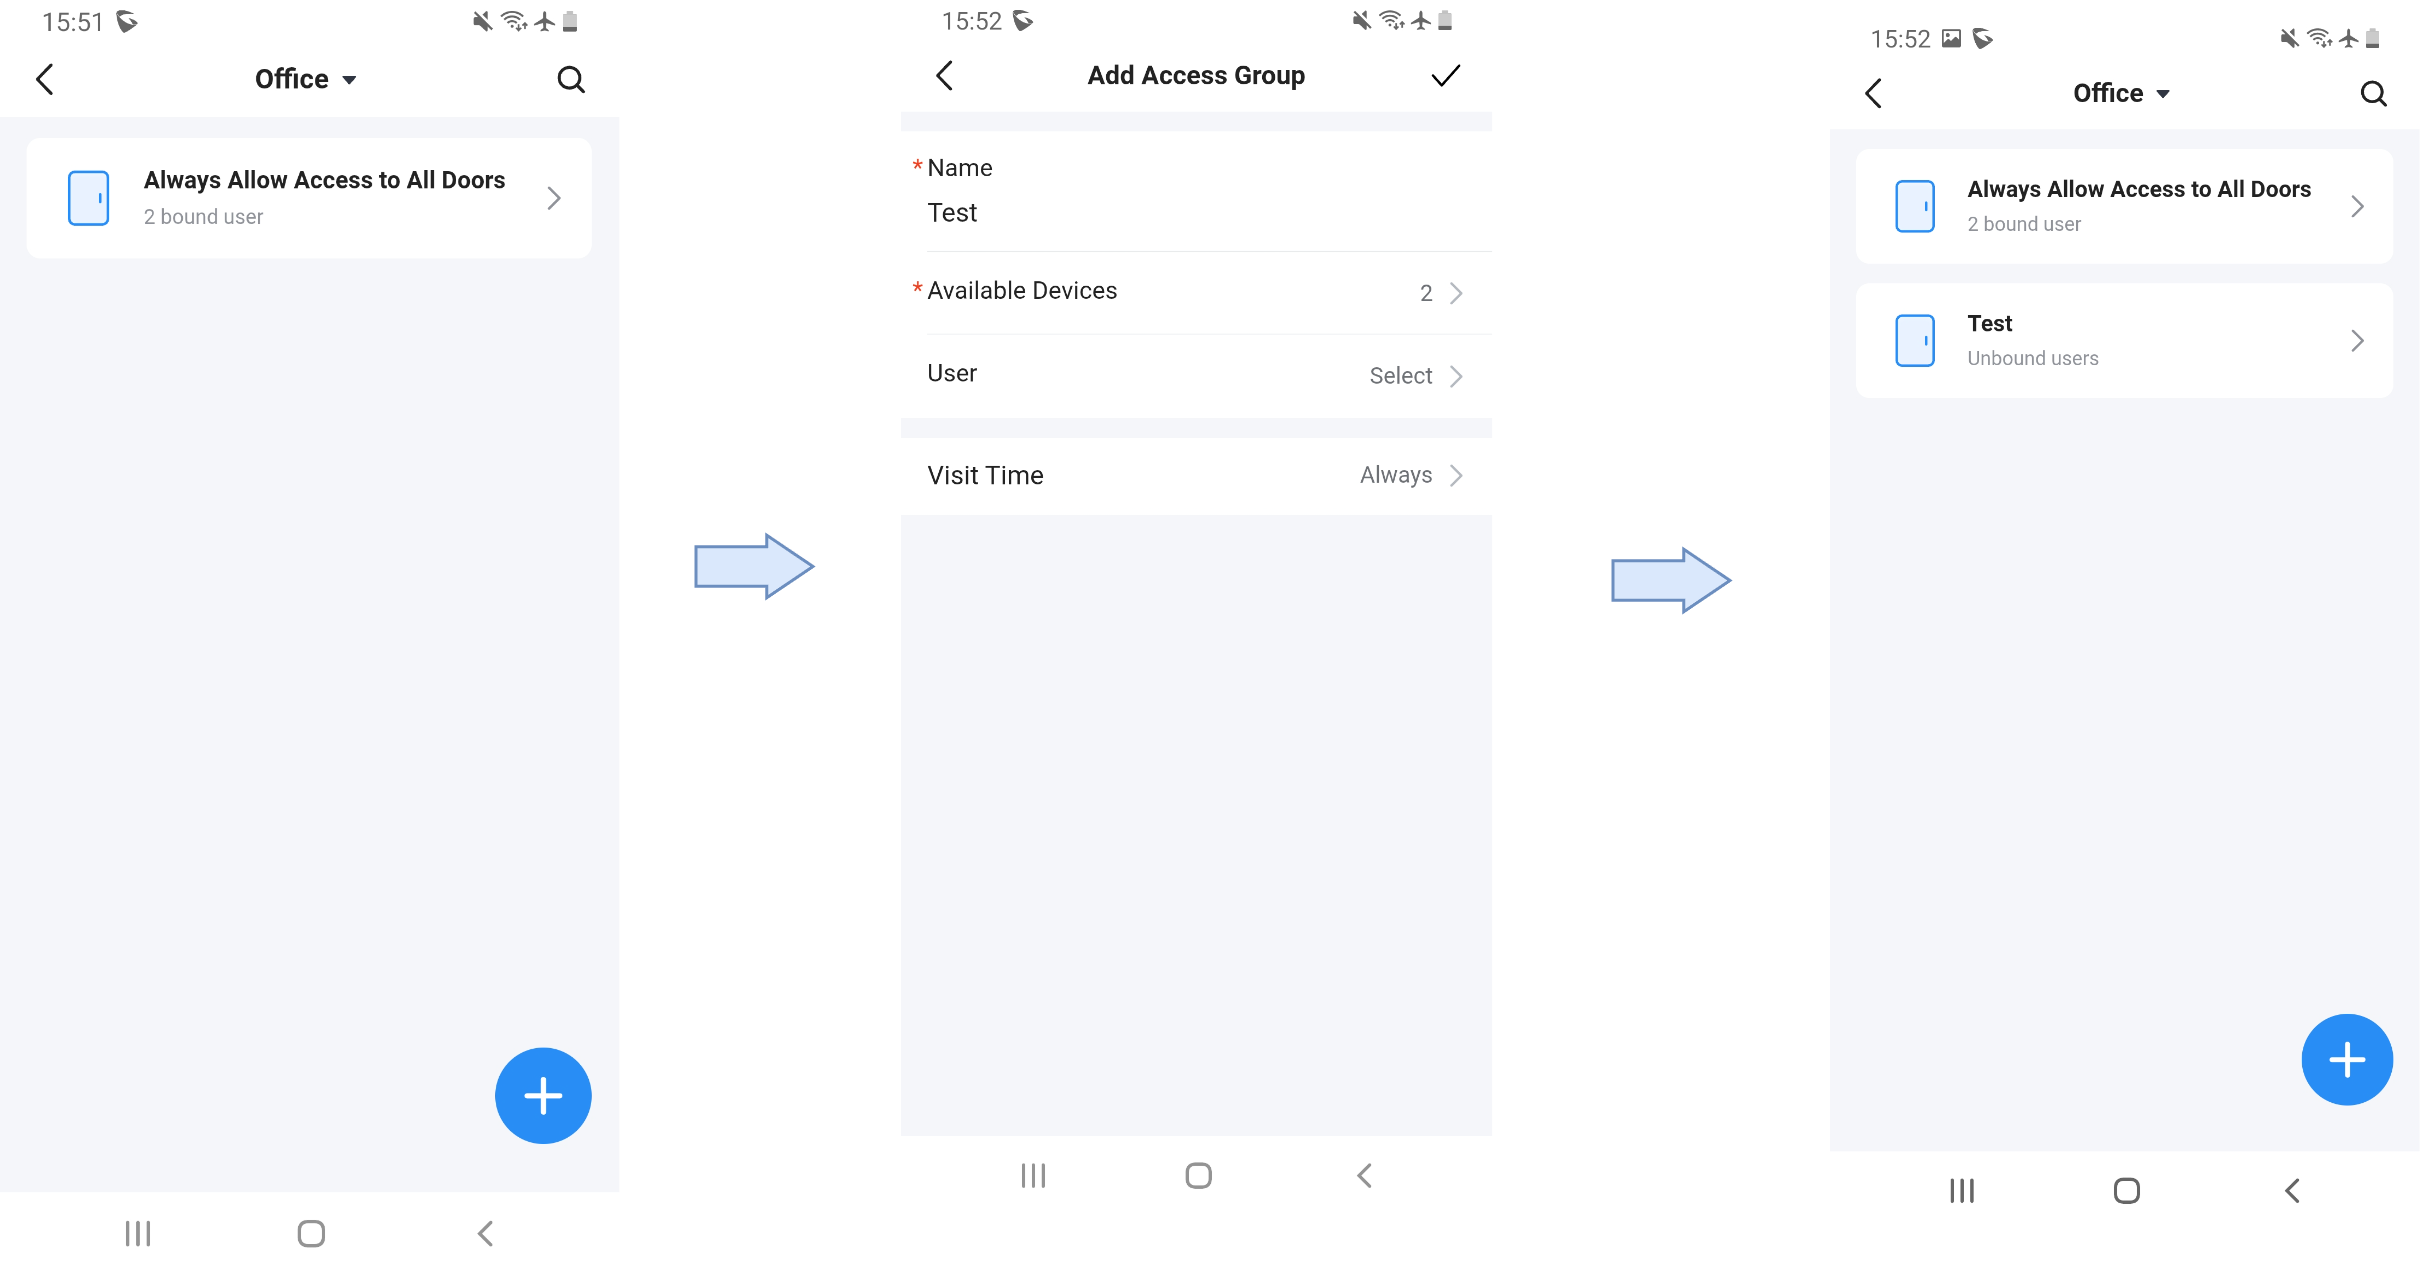
Access groups define which door stations a set of users can operate and when. To create an access group: navigate to Management → Access Group → Add and specify a Name, select the Available Devices, choose the User List, and assign a Schedule (normal schedule or holiday schedule). Access groups can be edited or deleted later. This feature allows administrators to quickly grant or revoke door access to multiple users.
When creating a new regular user, administrators can bind the user to multiple access groups simultaneously, allowing the same user account to inherit different access permissions across multiple buildings, apartments, departments, or controlled access areas.
The system automatically generates four default access groups during organization initialization. In addition, the maximum supported number of access groups within an organization has been increased from 50 to 500, allowing larger-scale access control deployments and more granular permission segmentation.
Schedule and Holiday Management
Schedules define allowed access times. Administrators can create schedules with multiple time segments and specify whether they apply on weekdays, weekends, or special dates. Holiday schedules can be created separately or imported from pre-configured national holiday sets.
Schedules are assigned to access groups or individual users. A Holiday entry automatically denies access when the schedule is out of range.
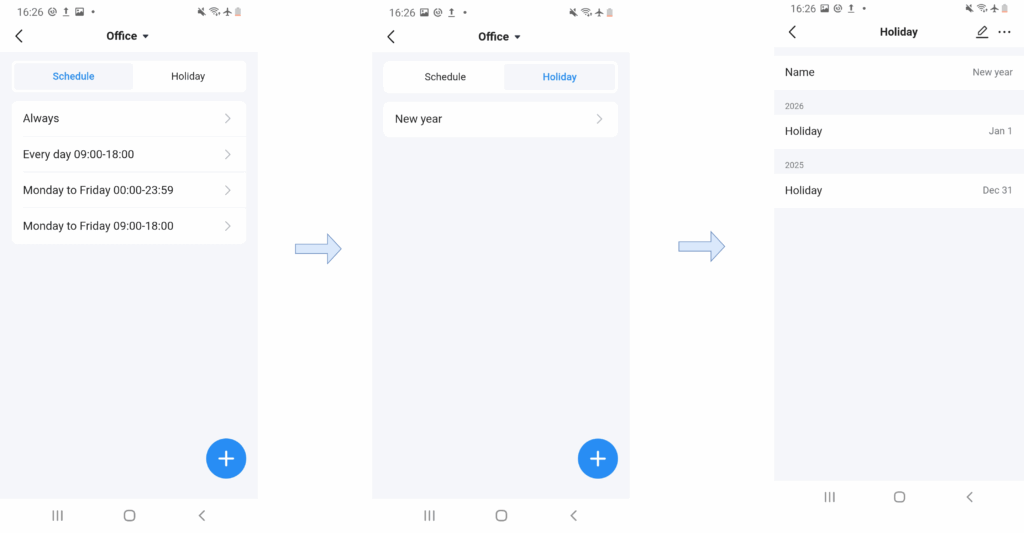
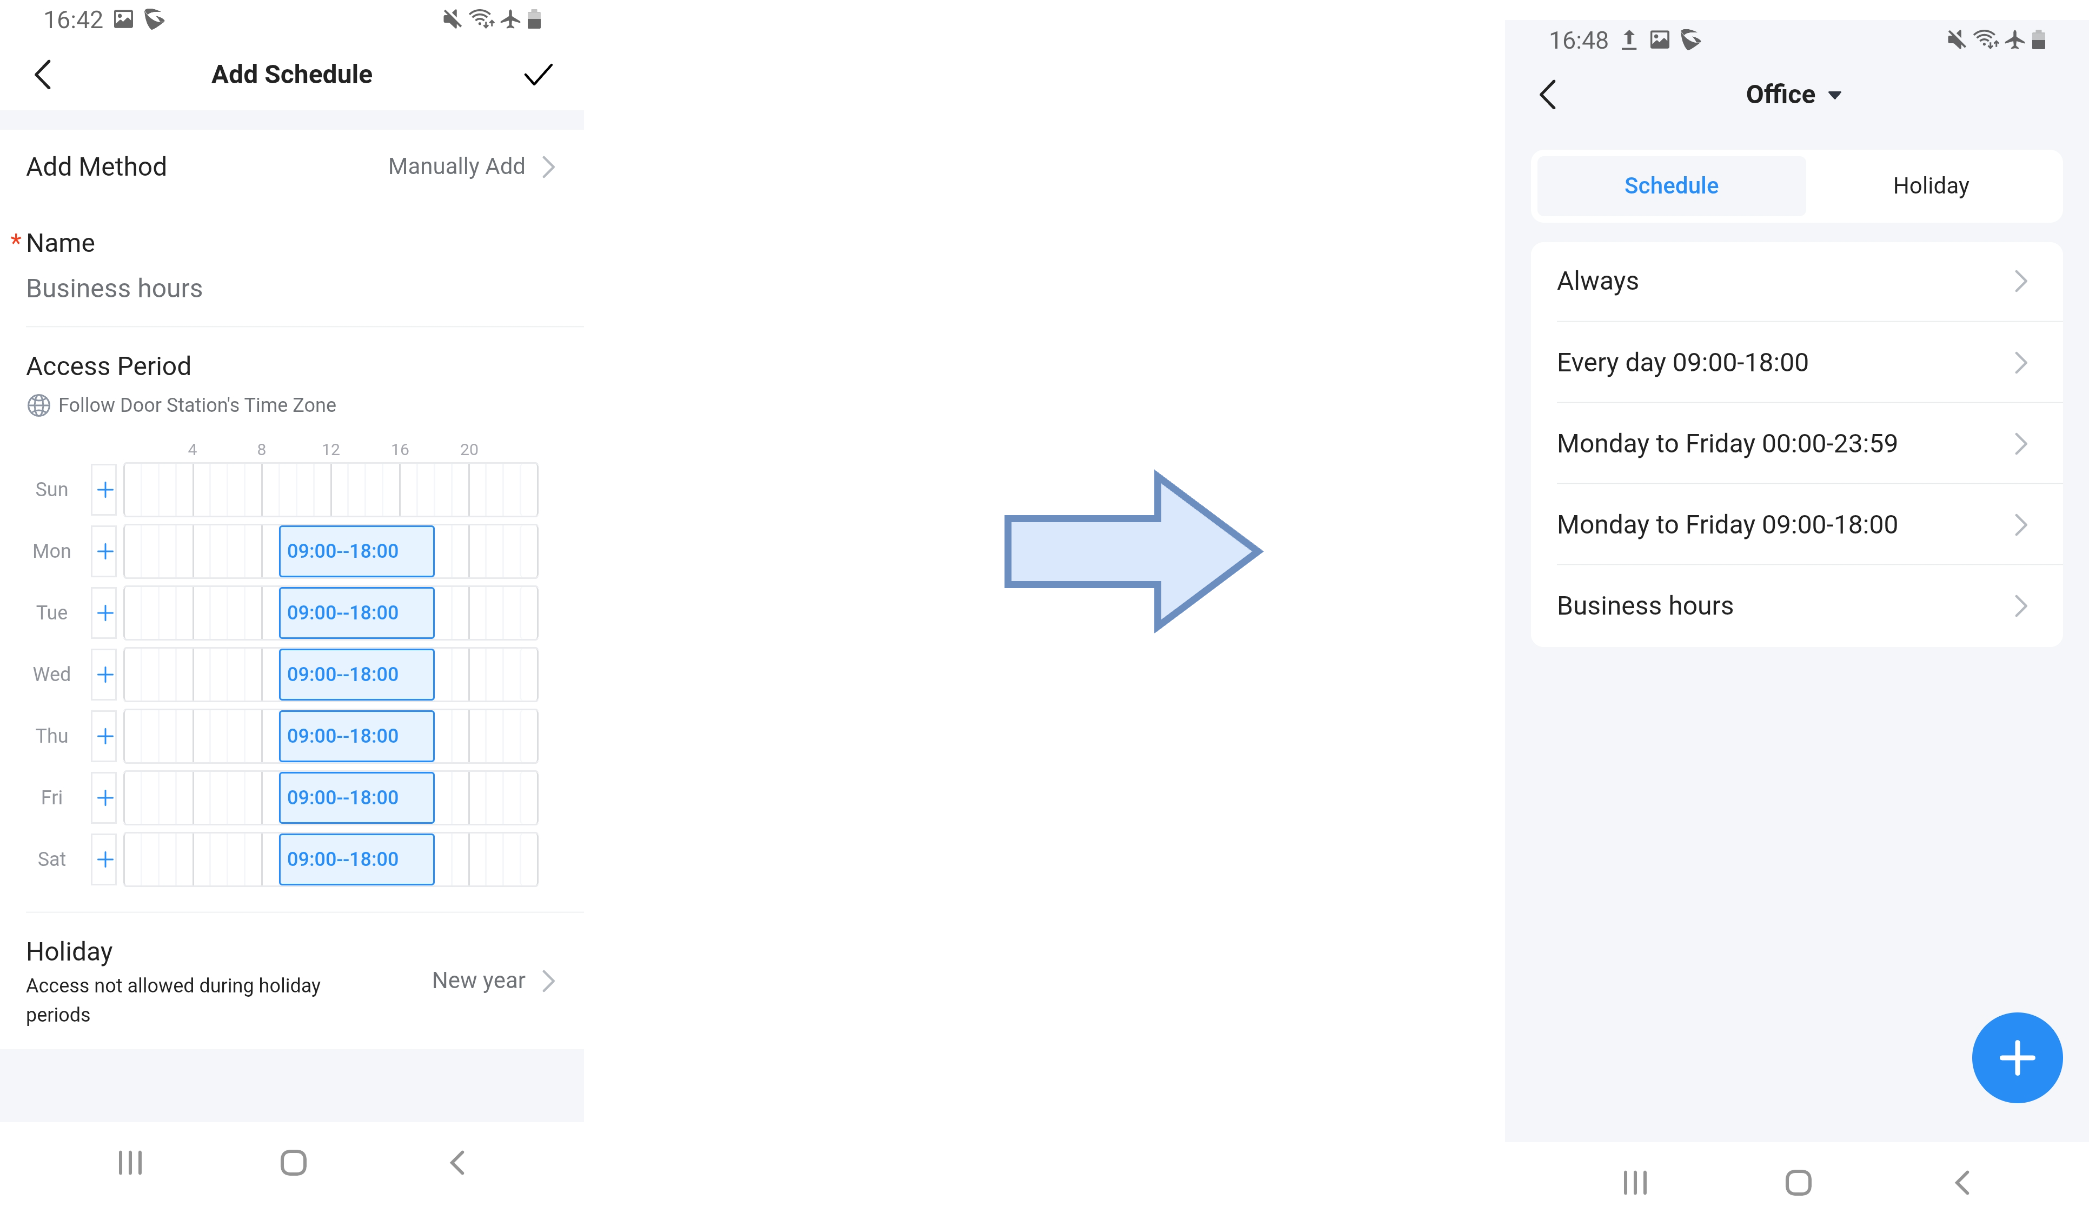
To add a custom schedule (other than the predefined ones), click the “+” icon at the bottom right of the page:
- Adding Method – Choose whether to manually define the access period or import schedules from another organization.
- Schedule Name – Enter a descriptive name for the new schedule.
- Access Period – Set the time ranges during which access will be granted to users and administrators.
- Clicking the “+” icon adds 2 hours to the existing timeframe, or applies the defined period to a day that does not yet have one.
- Clicking an existing timeframe (highlighted in blue) deletes it.
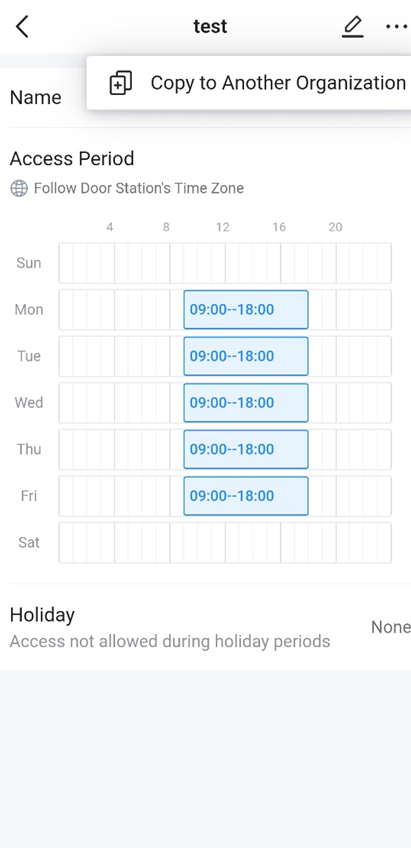
System-generated schedules cannot be copied to other organizations. The “Copy to Other Organizations” option is only supported for manually created schedules and is unavailable for schedules automatically generated by the system.
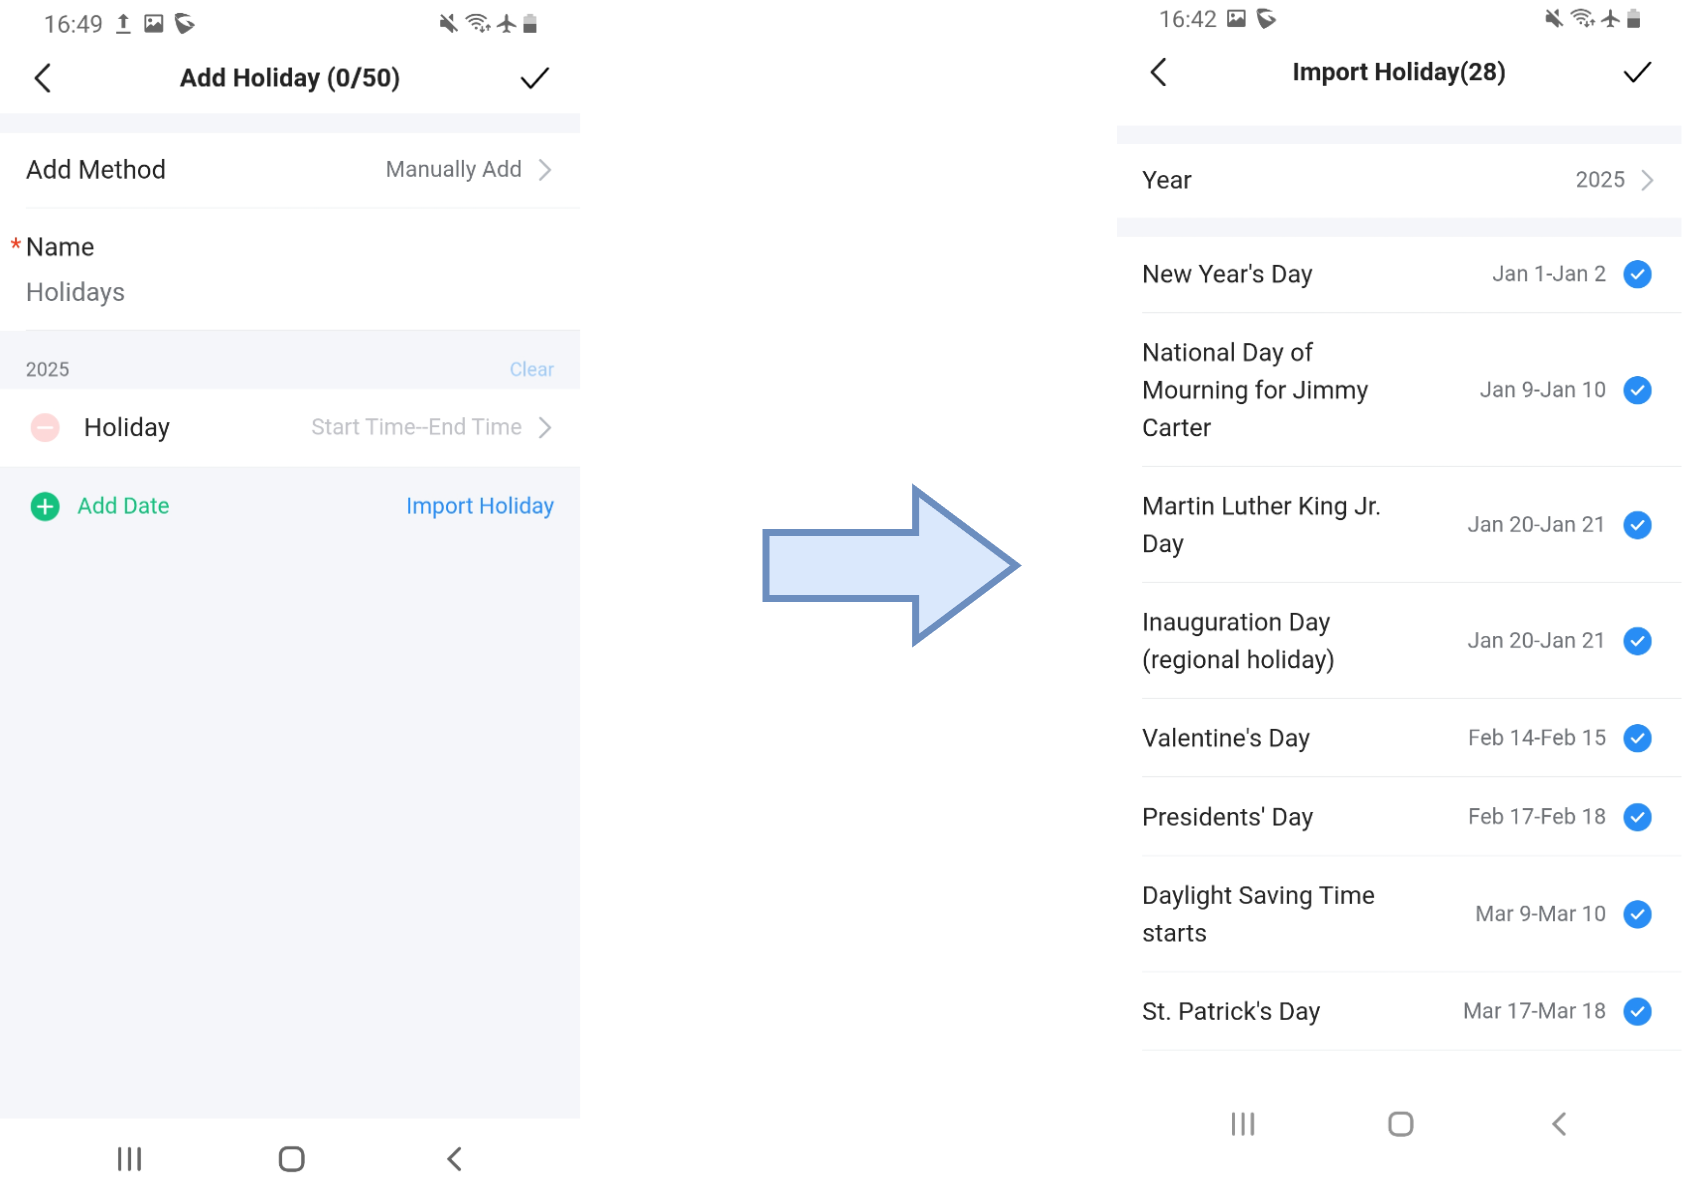
By default, the system includes the New Year holiday. To customize the holiday list, you can add entries based on your country:
- Add Individually – Manually enter each holiday and define its date.
- Import by Country – Select your country from the list to automatically display all available public holidays, then add them to the system in one step.
This ensures that access rules are aligned with the official holidays of your region.
User (Resident) Management
The administrator has the capabilities to add new users to the system.
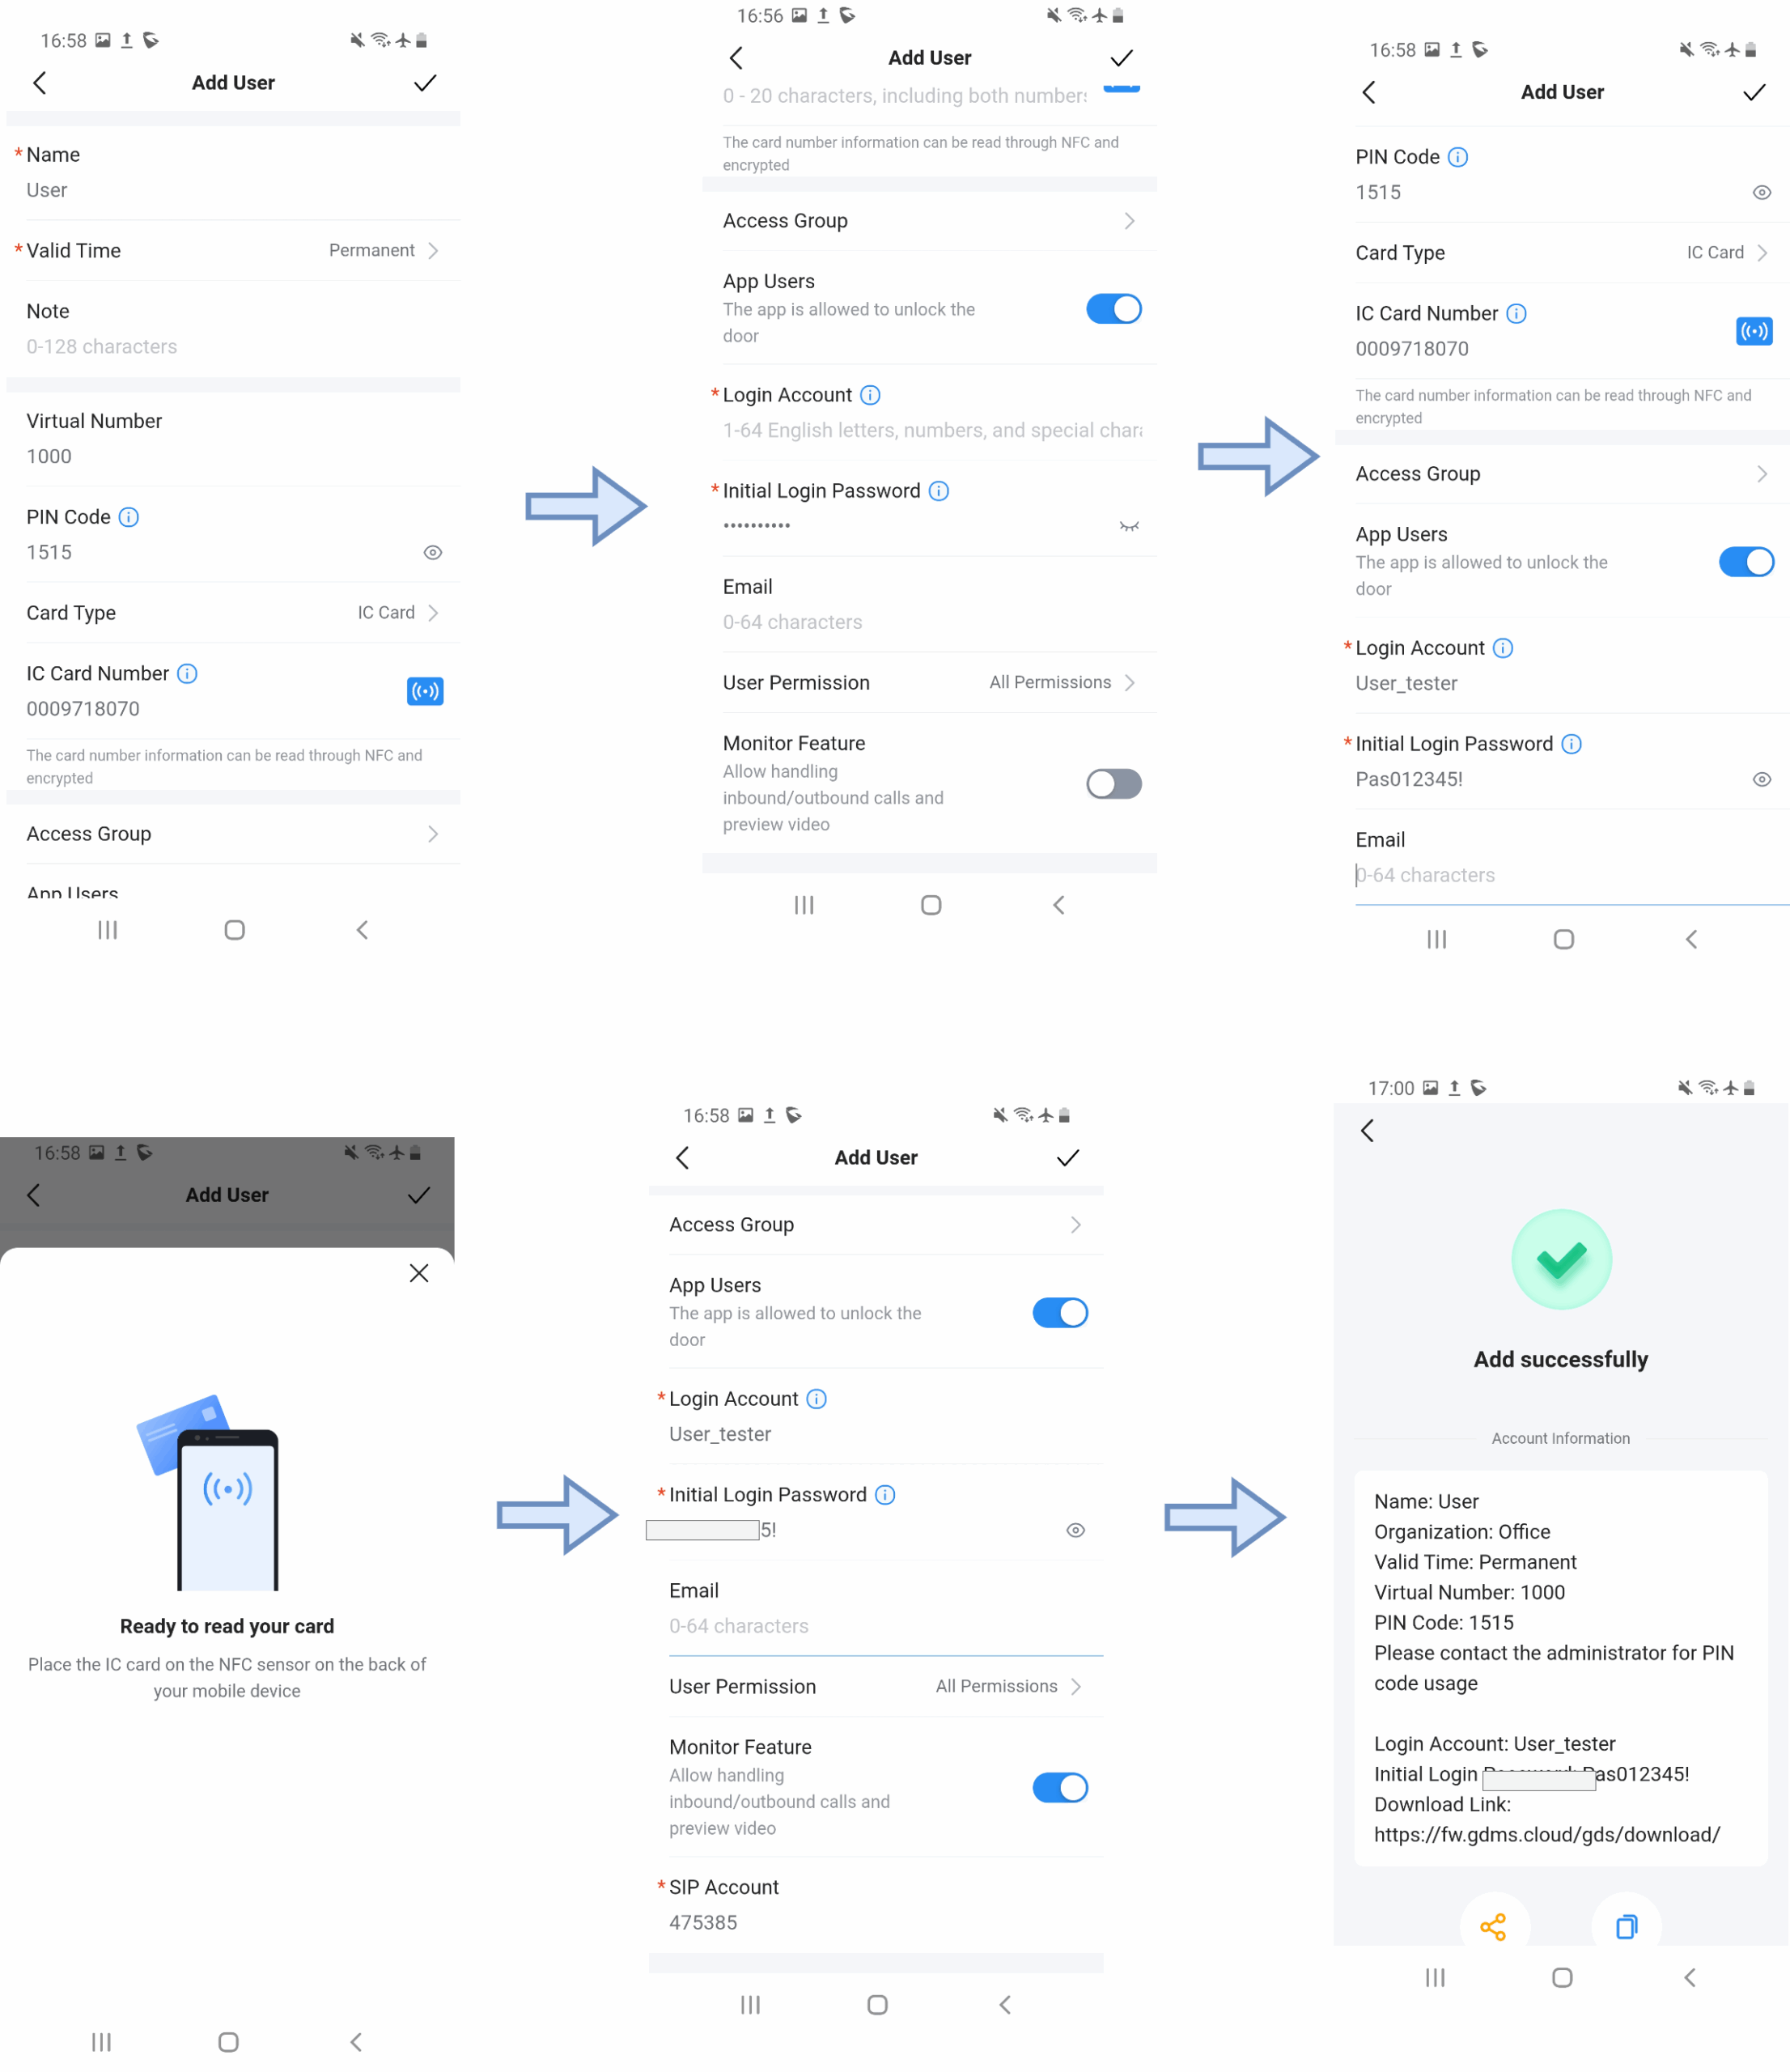
To add a user, go to Management → User → Add User and complete the required fields:
Enter Basic Information
- Name (required) – Enter the user’s name (1–64 characters).
- Valid Time (required) – Choose how long the account is valid:
- Permanent – The user never expires.
- Custom Period – Set start and end dates/times.
- Note – Optional field (0–128 characters) for remarks or labels.
Assign Numbers and Codes
- Virtual Number – A short internal number (0–9 digits) used for call routing or keypad dialing.
- PIN Code – A numeric code (4–11 digits) for door unlock via keypad.
- Card Type – Select the credential type (e.g., IC Card, ID Card).
- IC Card Number – Enter or scan the card number (0–20 digits). Card details can be read automatically via NFC and support encryption.
Set Access Rights
- Access Group – Assign the user to an access group that defines which doors they can use and when.
- App Users – Enable this option if the user should unlock doors via the mobile app.
Create Login Credentials
- Login Account (required) – Define the user’s app login (1–64 English letters, numbers, or special characters).
- Initial Login Password (required) – Set a starting password. The user should change it after the first login.
- Email – Optional, for notifications or account recovery.
Define Permissions and Features
- User Permission – Select the level of access:
- Basic – Limited features (unlock only).
- All Permissions – Full rights, including creating visitor access.
- Monitor Feature – Enable if the user should handle inbound/outbound calls and preview video streams from door stations.
Assign SIP Account (Optional)
- SIP Account – The SIP account is assigned by the cloud server (randomly or manually) and functions independently of the user’s own SIP/UC system.
Search Users/Residences
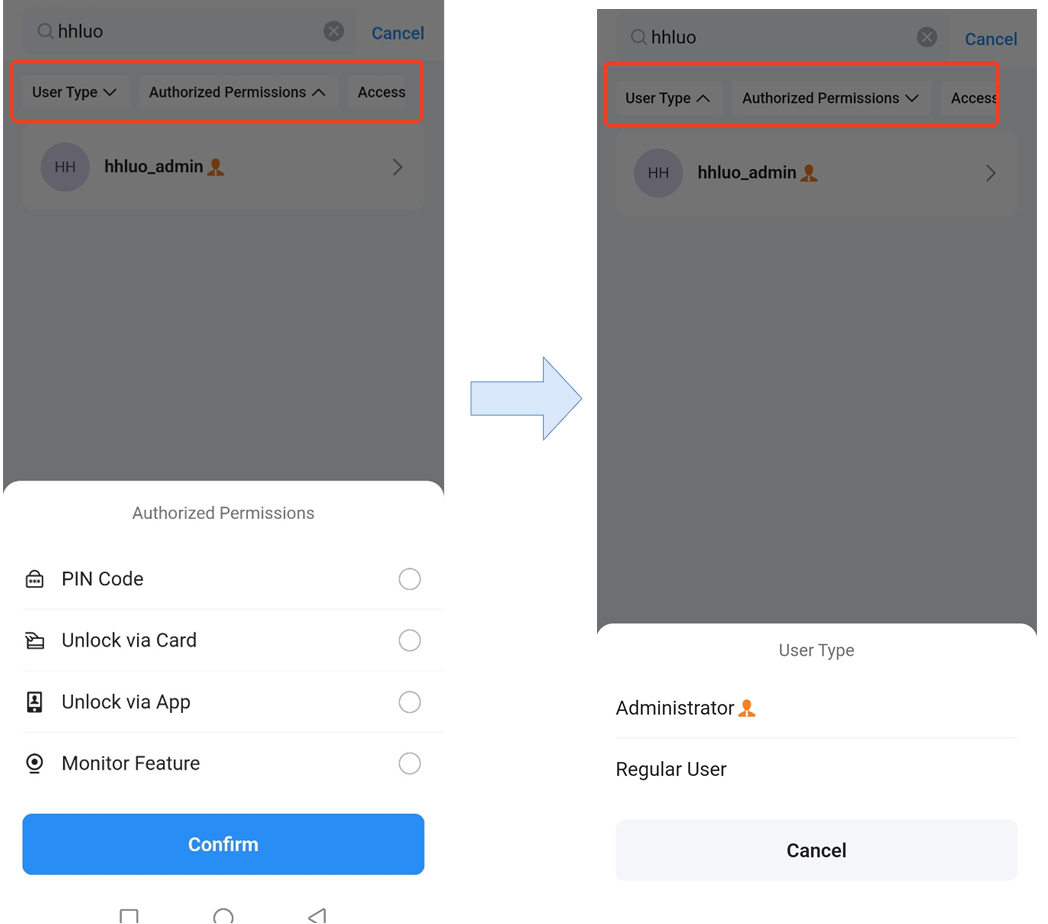
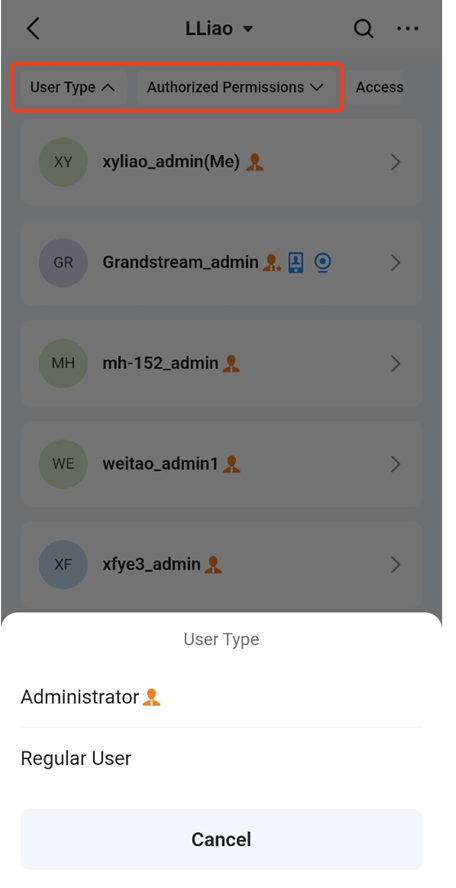
The Search Users/Residences function provides advanced filtering capabilities to simplify user and residence management within large deployments. Administrators can efficiently locate specific users, residences, or access assignments by applying filters such as User Type (single selection), Access Group (multiple selection), Building (single selection), Apartment (multiple selection), and Department (single selection). This enhanced filtering system improves management efficiency, especially in multi-building residential environments and large non-residential organizational deployments.
Save and Confirm
- Tap the ✔ icon to save.
- The system will display a success message showing the user’s credentials:
- Name
- Organization
- Valid Time
- Virtual Number
- PIN Code
- Login Account & Initial Password
- Download link for the app
User information can be imported or exported using Excel templates, edited in batches, or removed entirely. When a user is deleted, their cloud account is disabled, and door access is revoked.
Scanning IC Cards
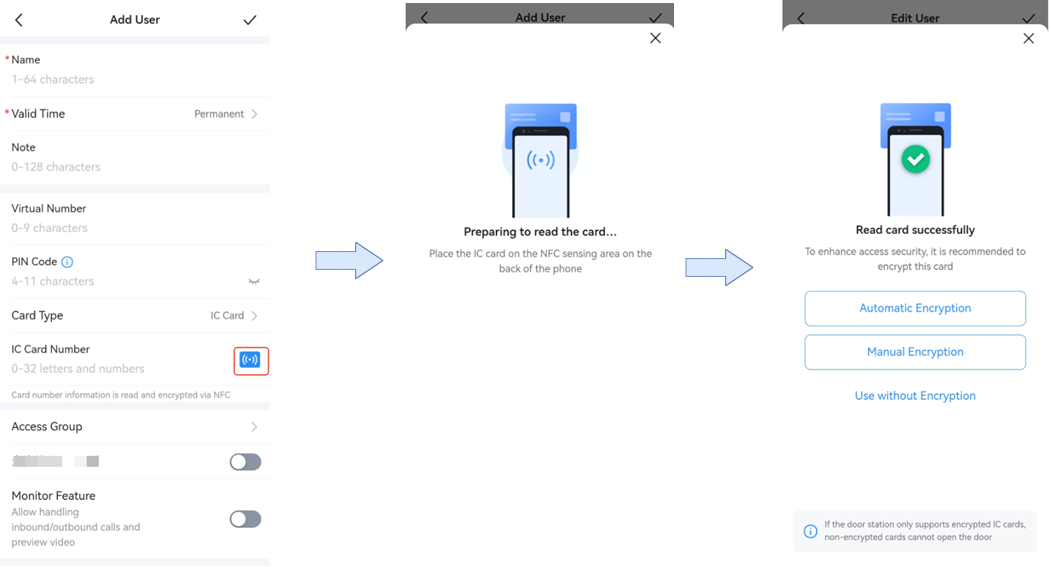
Android phones support writing IC card codes and reading IC cards via NFC, which provides enhanced security for users.
Prerequisites:
- The Android phone must have NFC enabled.
- A blank IC card is required.
Steps and Notes:
Bind an IC Card – When adding or editing a user, an IC card can be bound to their profile. An encryption key is automatically generated and stored on the server for reuse within the same organization.
Reallocate a Card – The same card can be reassigned to another user within the same organization, but not across organizations. Supported card types: MIFARE Classic 1K/4K and MIFARE DESFire.
Remove a Card – To unbind a card, edit the user profile and delete the assigned IC card.
Device Synchronization – After saving the user, updates are synced to all devices in the access group. If a device is offline, changes apply once it reconnects.
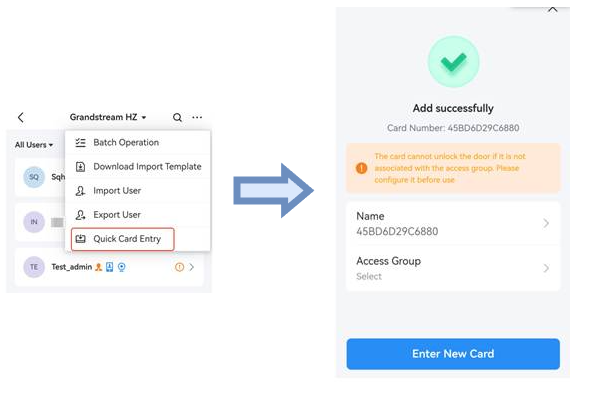
In addition to adding IC cards individually, users can take advantage of the Quick Card Entry feature. This allows multiple cards to be added to the platform quickly by scanning them on an NFC-enabled phone.
The Quick Card Entry and successful user addition interfaces support assigning multiple access groups during user creation, allowing administrators to configure broader and more flexible access permissions directly during the enrollment process.
Filter Based on user type
User and residence filtering supports filtering by user type, including Administrator and Regular User accounts, as well as authorization permissions such as PIN Access, Card Access, Pass Access, App Access, and Monitor permissions, allowing administrators to quickly identify users based on their assigned access methods and privileges.
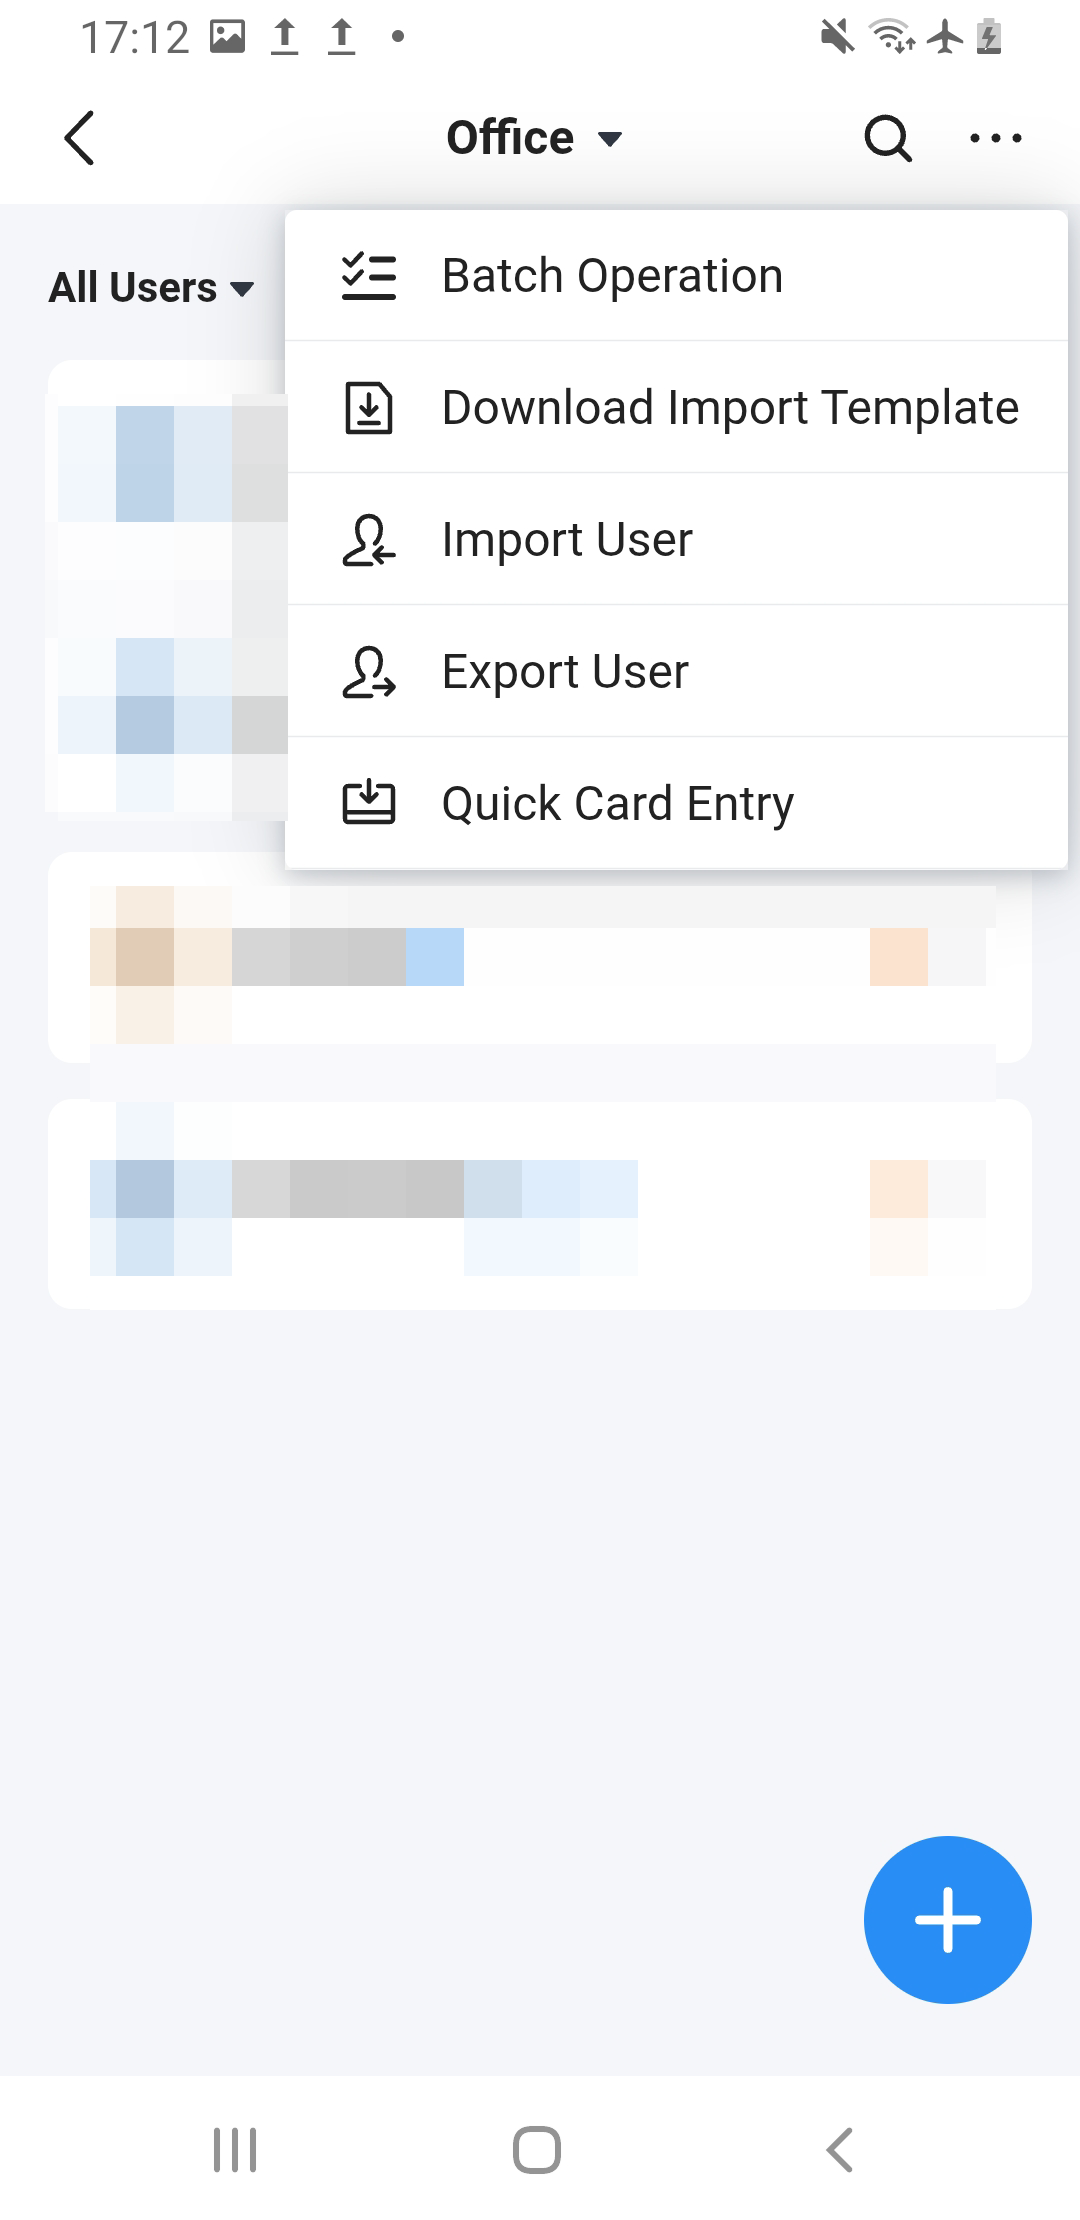
Import/Export Users
The Import/Export feature allows administrators to manage large groups of users more efficiently. You can export existing users to a file for backup or reference, and use the provided template file to prepare bulk user data offline. Once completed, the template can be imported back into the system, automatically creating or updating multiple user accounts at once. This is especially useful for large organizations where manual entry would be time-consuming.
Visitor Management
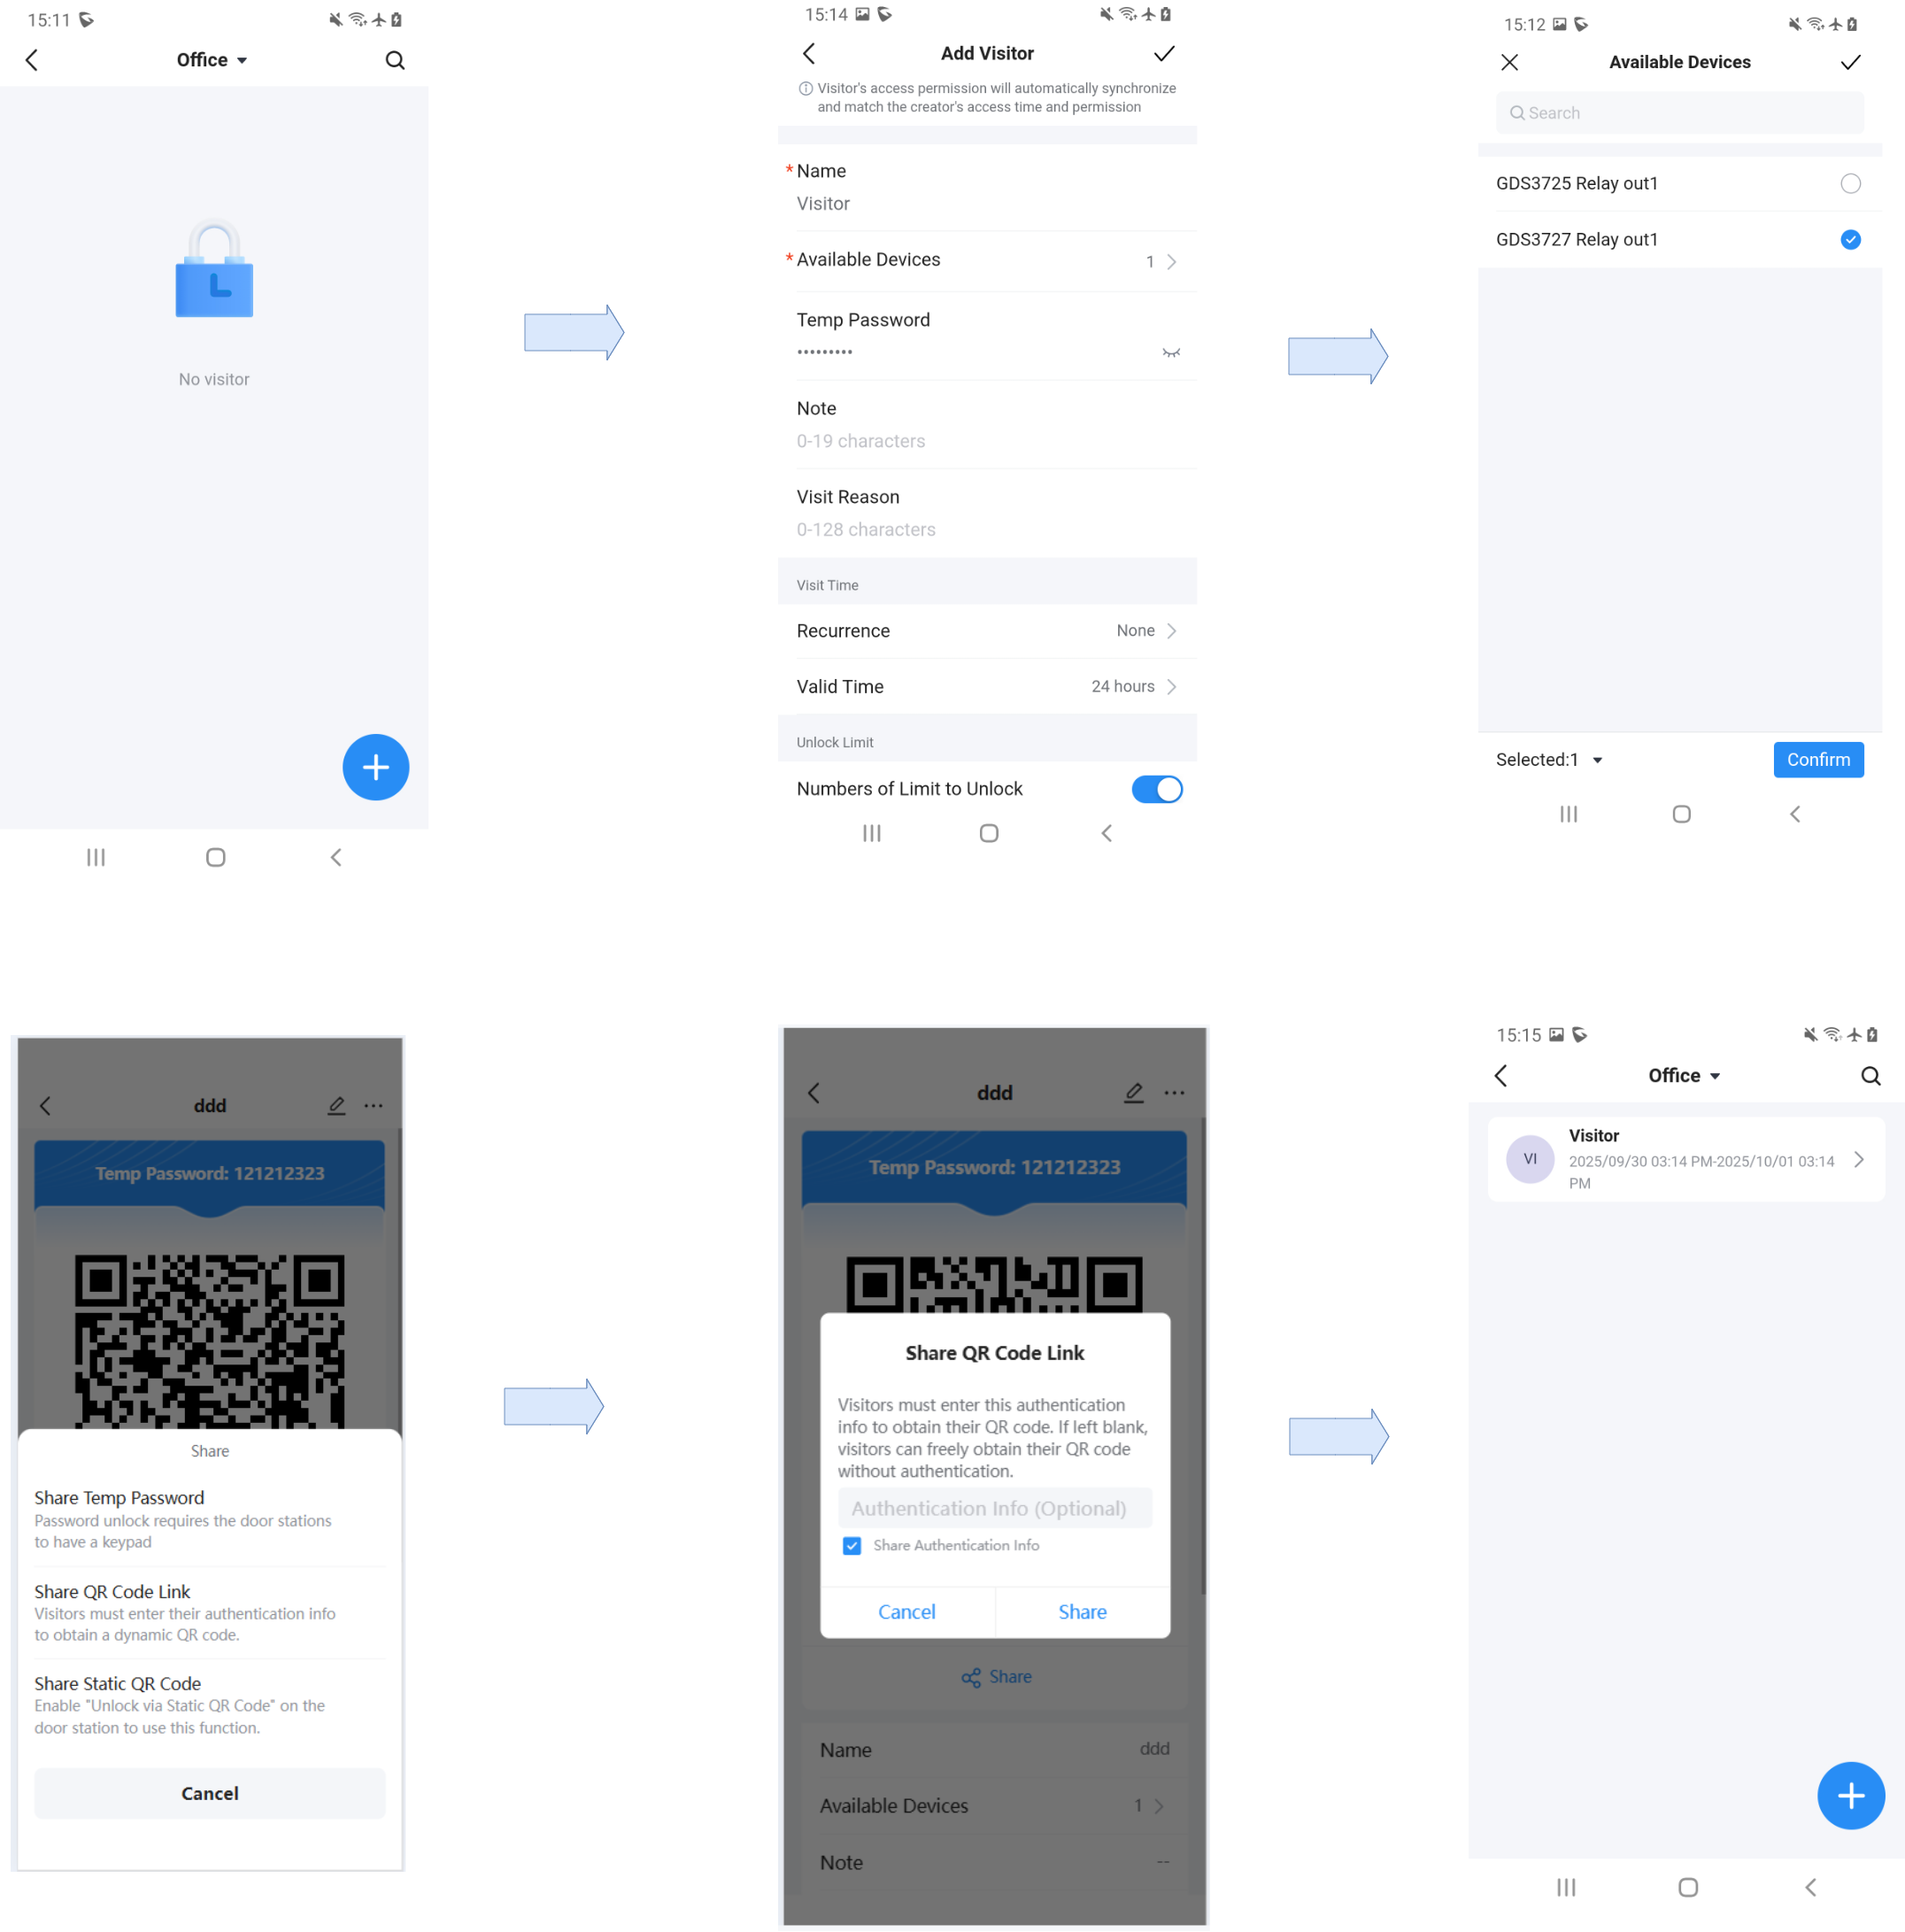
Visitors are temporary guests who need limited access. Administrators or normal users who are granted the right to create temporary access can create a visitor entry under Visitor, specifying the visitor’s Name, Available Devices, Temporary Password, Visit Reason, Recurrence, Valid Time, and optional Unlock Limit (maximum number of unlocks). Visitors do not require an app account; they can open the door by entering the code on the door station keypad. Or displaying the QR Code to the door station camera.
When a QR code is generated, it can be shared in one of three ways :
- Share Temporary Password: this option shares the digital pin created (e.g., 04766999). It requires the door station to have a keypad to enter the PIN code
- Share QR Code Link: When this option is enabled, the visitor must enter their authentication details (such as name, phone number, or other required information) before the QR code is shared. If authentication is not required, the visitor can retrieve and use the QR code directly without entering any information.
- Static QR Code: The admin or user with the corresponding rights can share the static image of the QR code that can be used by the visitor to open the door.
Administrator Management
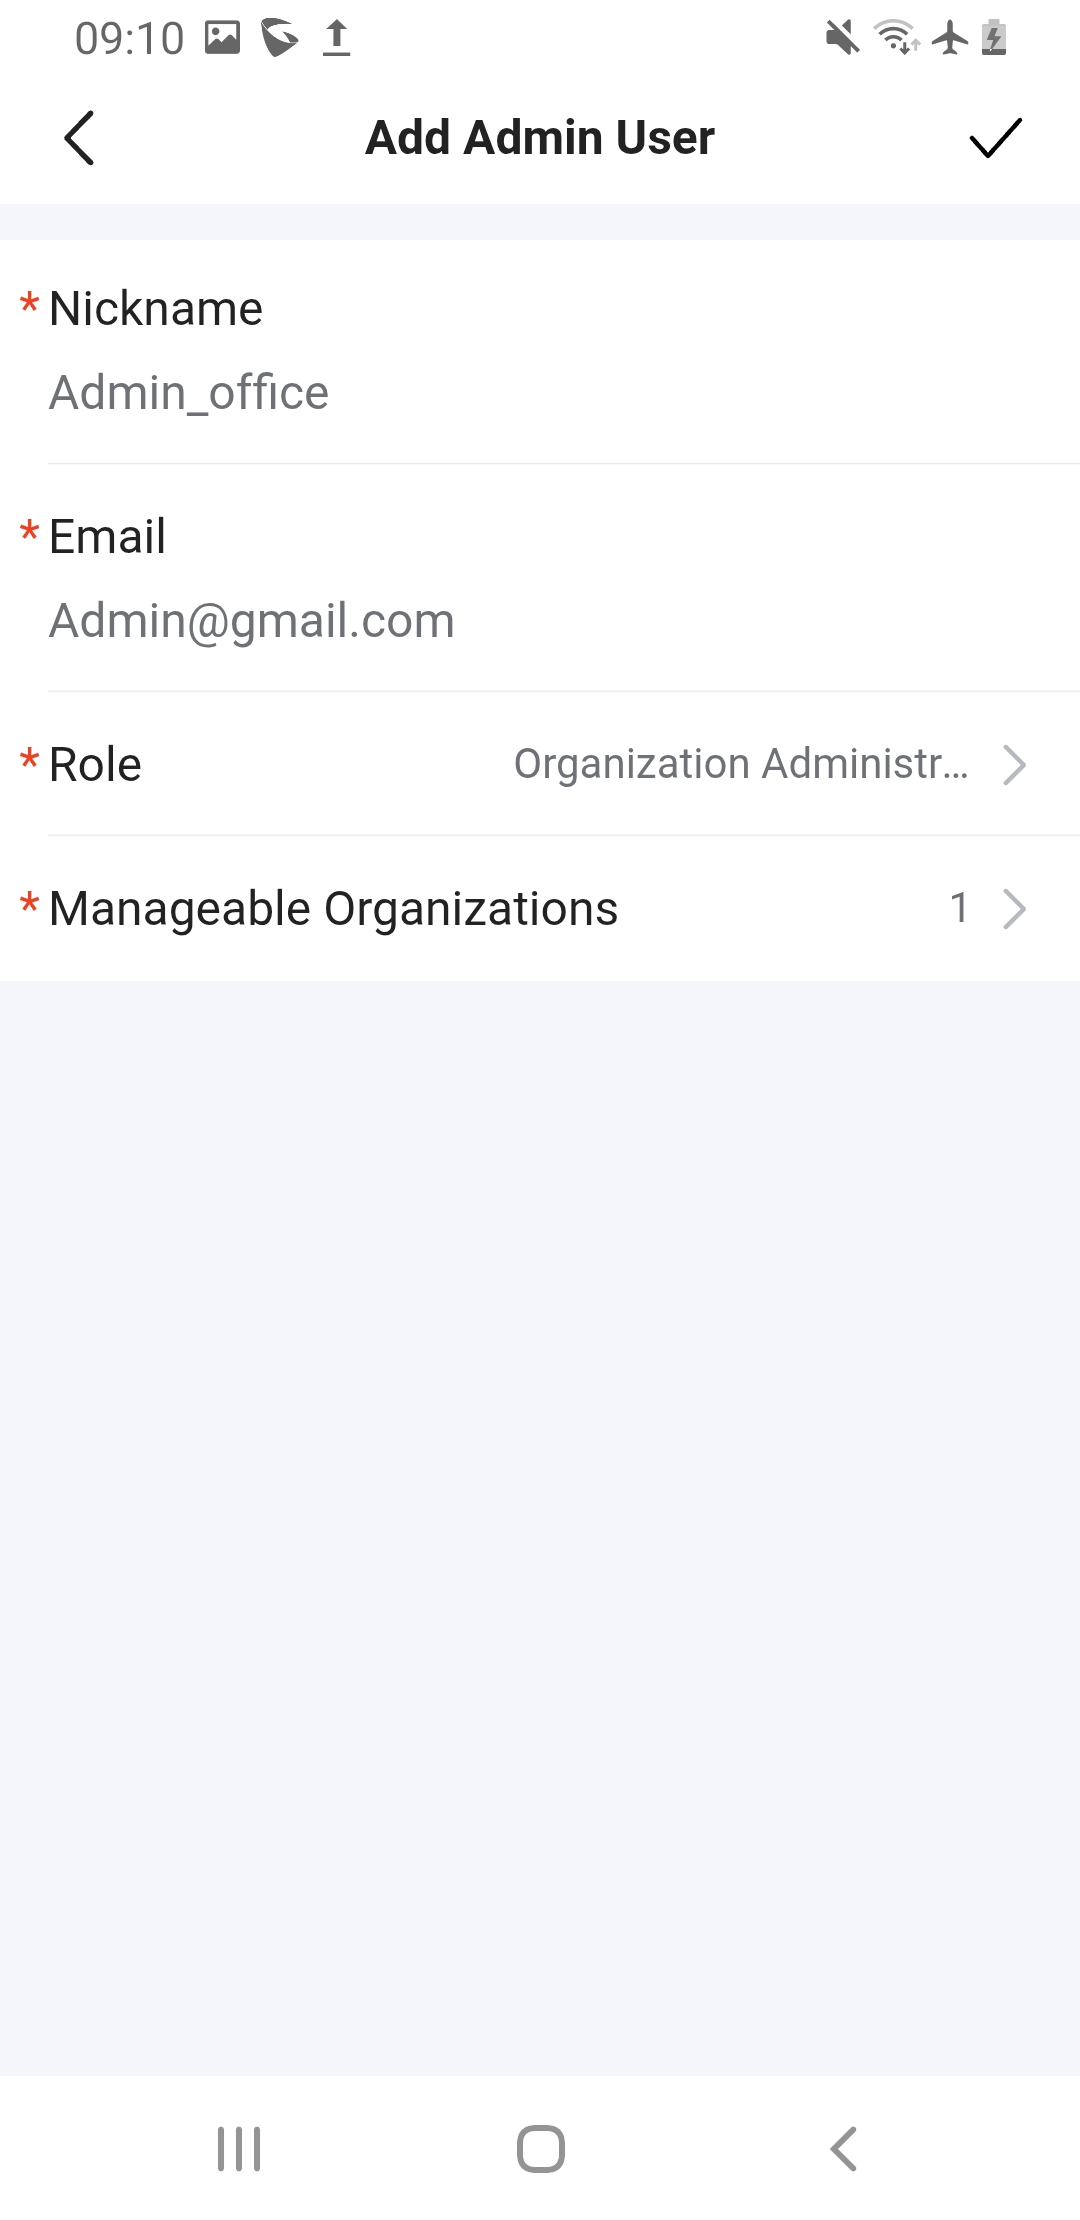
The Administrator module lists sub‑administrators. The super administrator can create new administrators and assign them the type of control they can have. The options are:
- Organization Administrator: Can only manage devices and users within a single organization created by the Super Administrator.
- Platform Administrator (Super Administrator): Has full control across all organizations. Can create new organizations, assign administrators, and manage all devices and users.
To add a new administrator :
- Click the Add button.
- Enter a nickname for the new administrator.
- Enter a valid email address:
- Select the type of administrator (Organization Administrator or Platform Administrator).
- The account will be created. The administrator must confirm their account via email before activation. Once confirmed, they can manage either their assigned organization or the entire platform, depending on the role granted.
User Permission
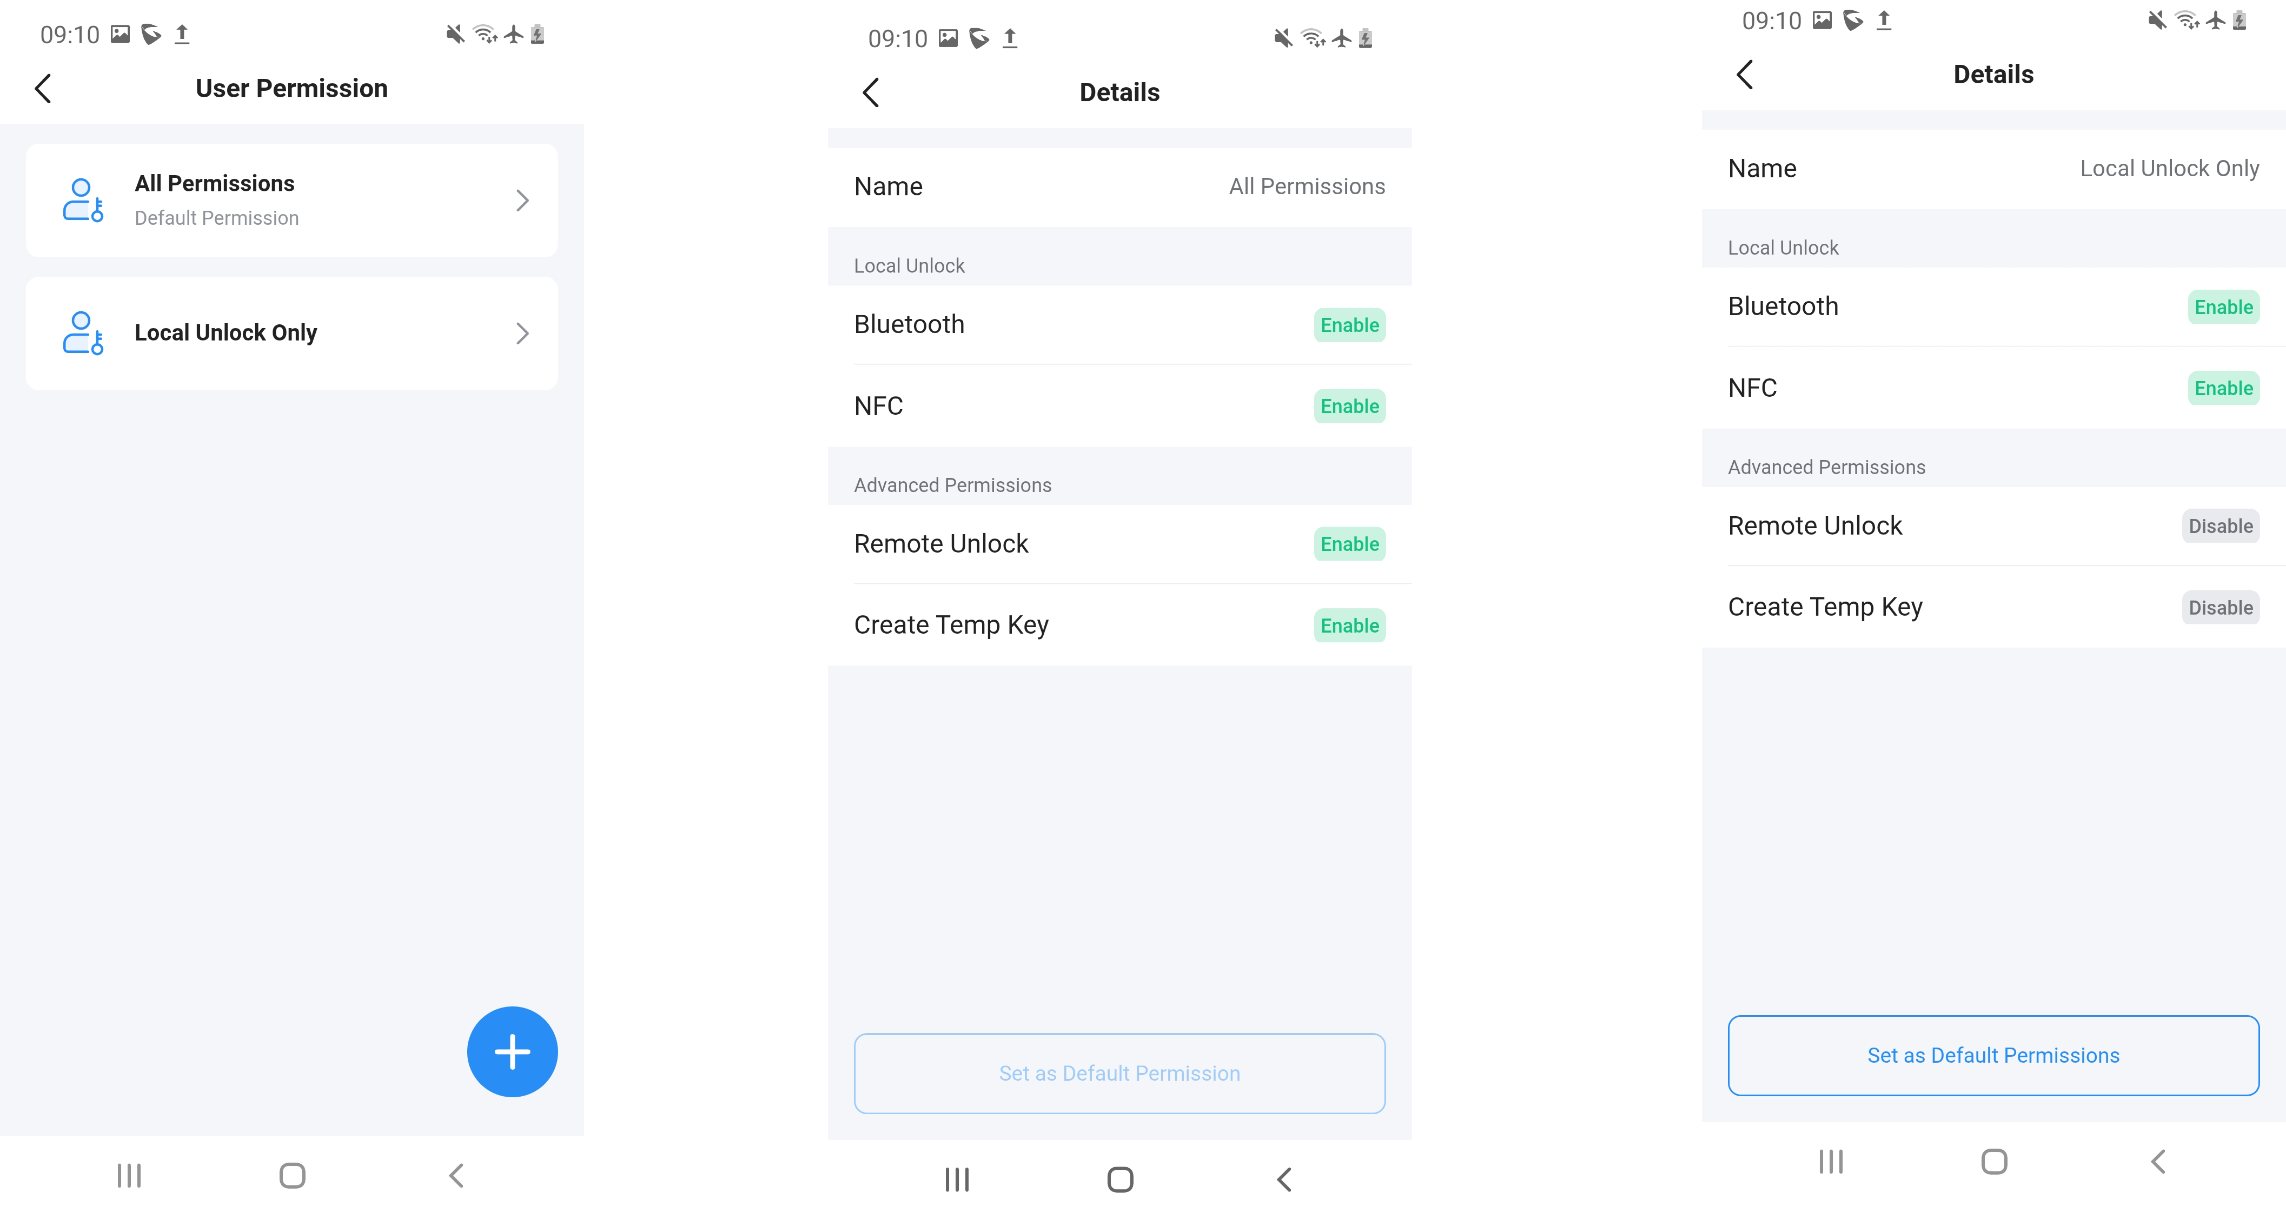
The User Permission module defines which functions are available to each ordinary user, such as remote unlock, monitoring, video preview, or creating temporary keys.
Available Options:
- All Permissions – Grants full access. The user can unlock doors via Bluetooth or NFC (Android only), remotely unlock through the app’s Open Door button, and create temporary keys for visitors.
- Local Unlock Only – Limits access to Bluetooth and NFC unlocking. The user cannot remotely unlock doors through the app and cannot create visitor keys.
- Custom – Allows administrators to selectively enable or disable specific functions, creating a tailored permission set that can also be saved as the user’s default level.
System Operation Log and Region Settings
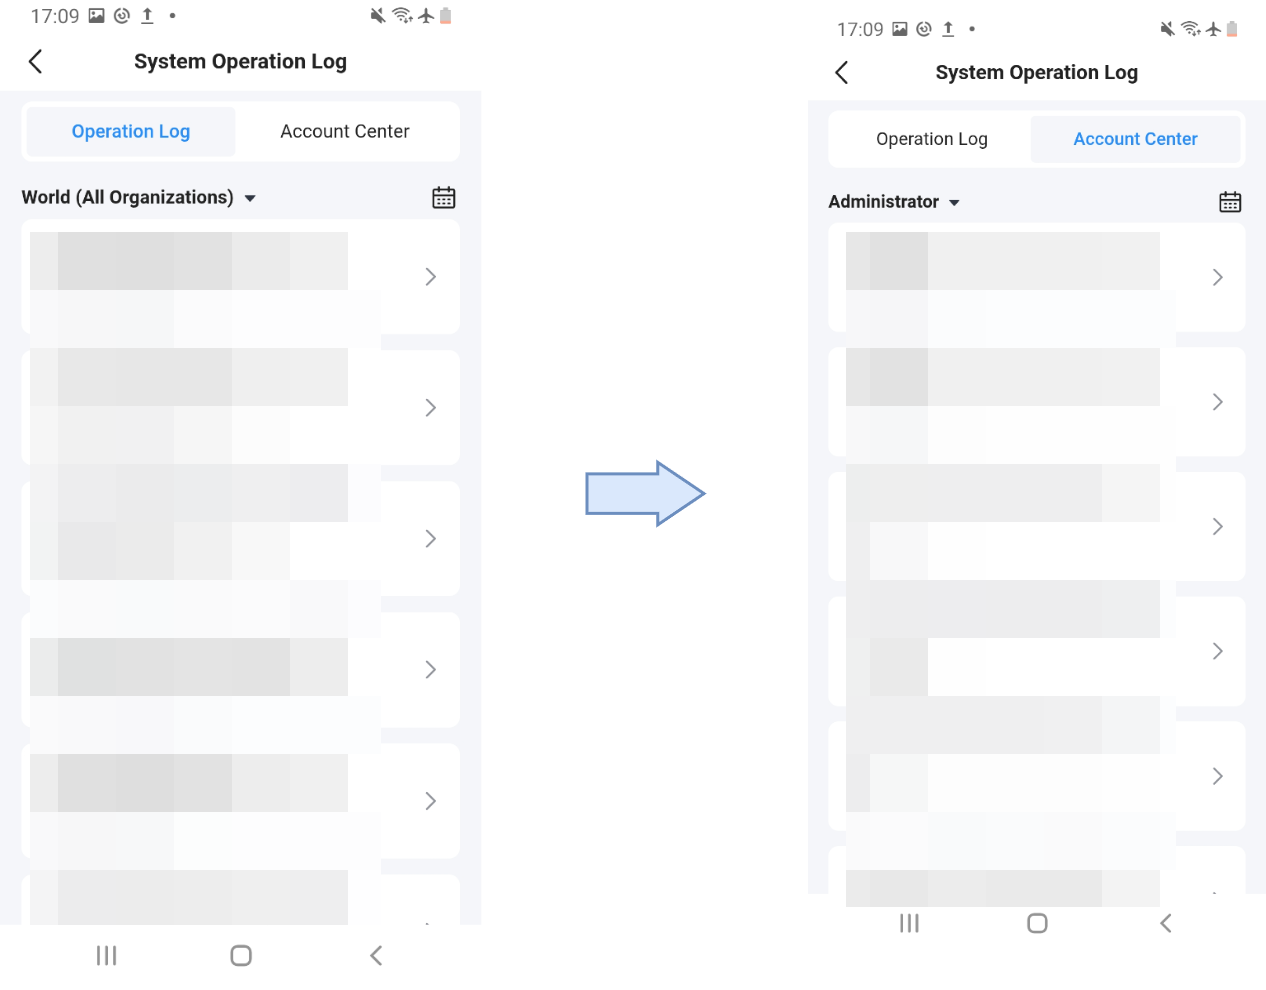
The system operation log records user actions such as adding devices, editing users, granting permissions, and modifications related to Building & Apartment or Department assignments. Logs are stored for 60 days, but only data within the most recent 30 days can be queried and can be filtered by time, operation type, and related management activities for easier auditing and troubleshooting.
You can filter operation logs by region and organization, and filter account center logs by user type (admin or regular user).
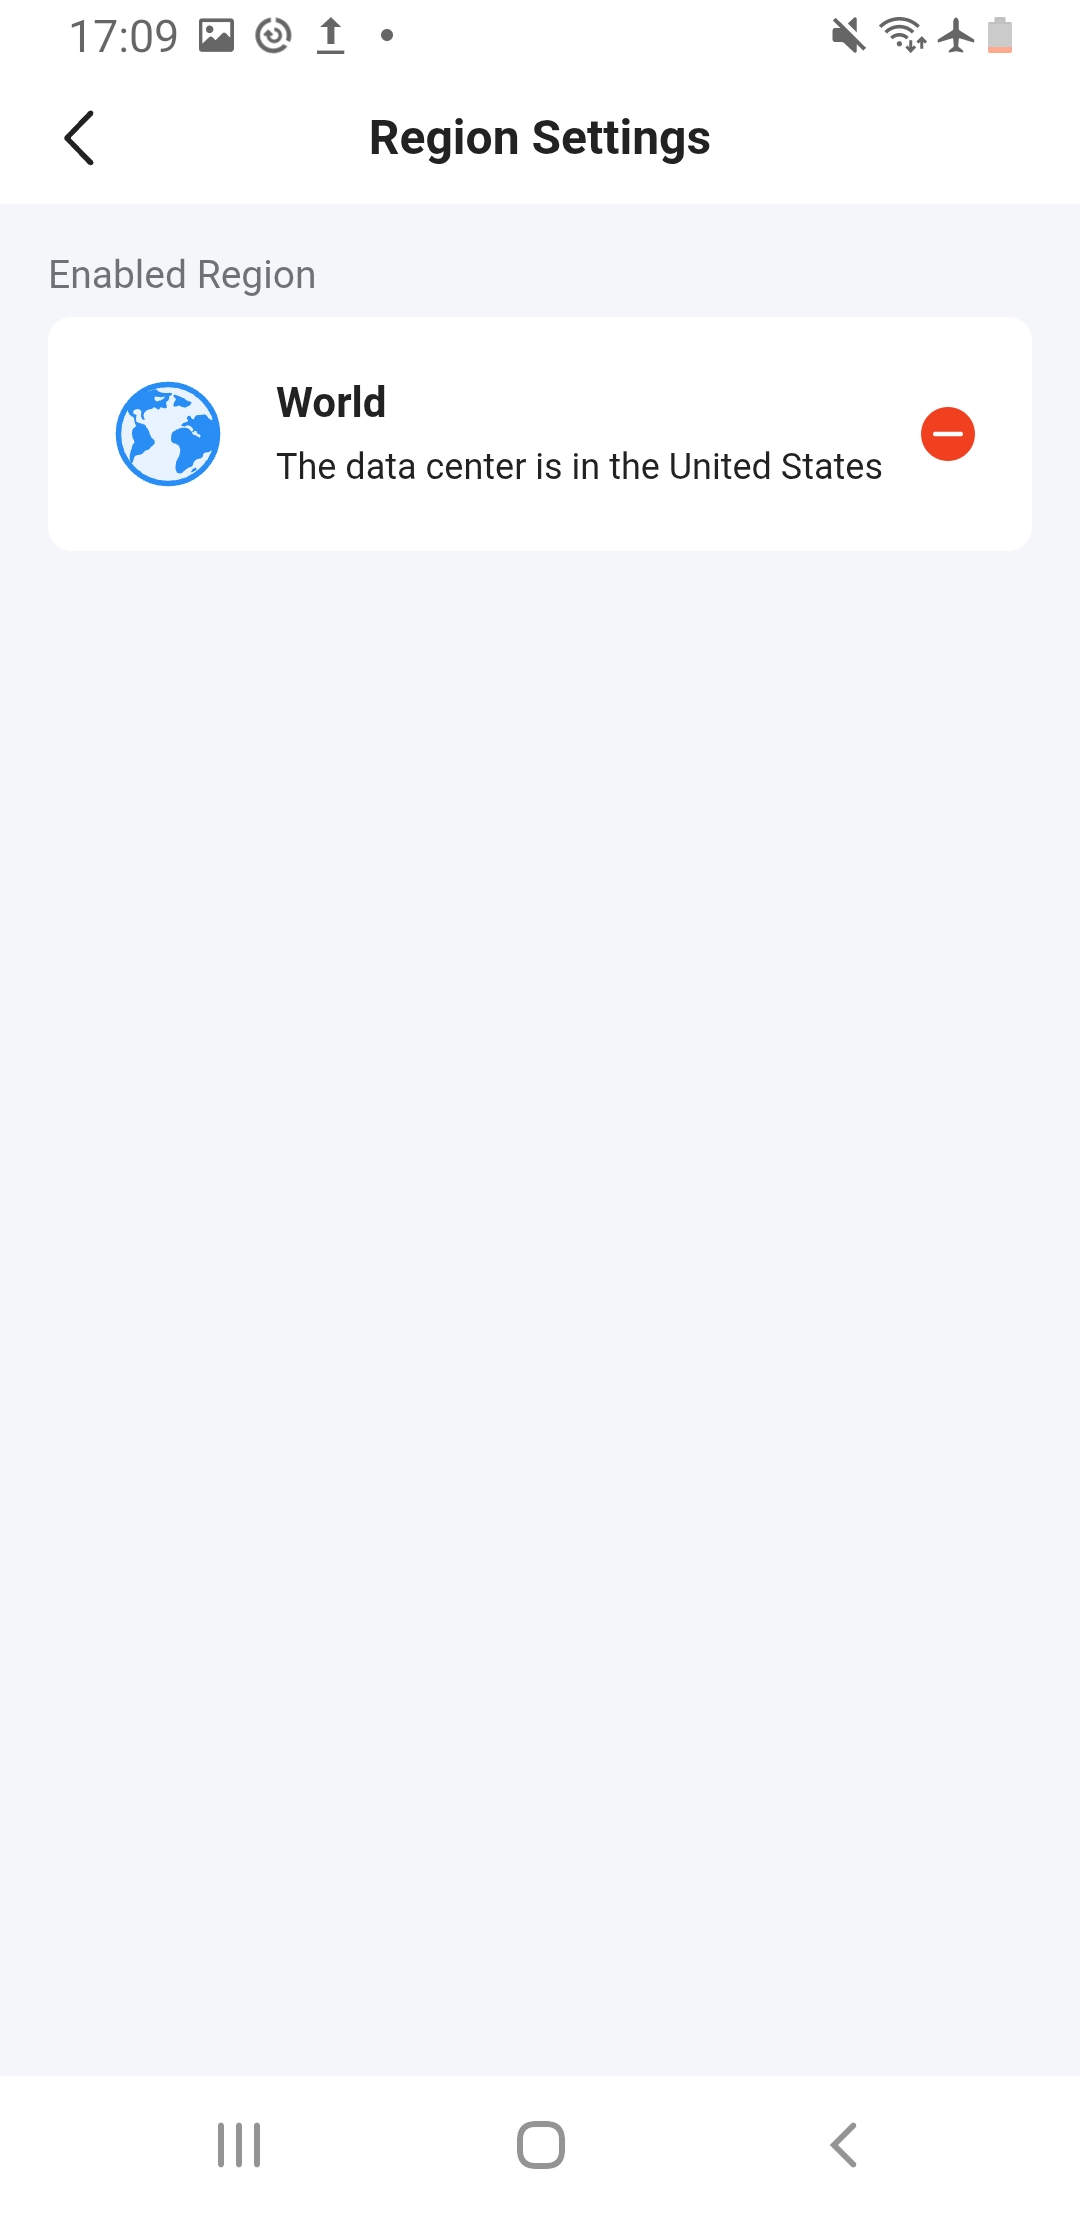
The Region Settings module defines the service region used by the organization, consistent with the configuration in GDMS. It specifies the region where the company will operate and use the service. To ensure proper management, create an organization under the corresponding region and then add devices to that same region. Two regions are available: World Region and Europe Region.
Logs Tab
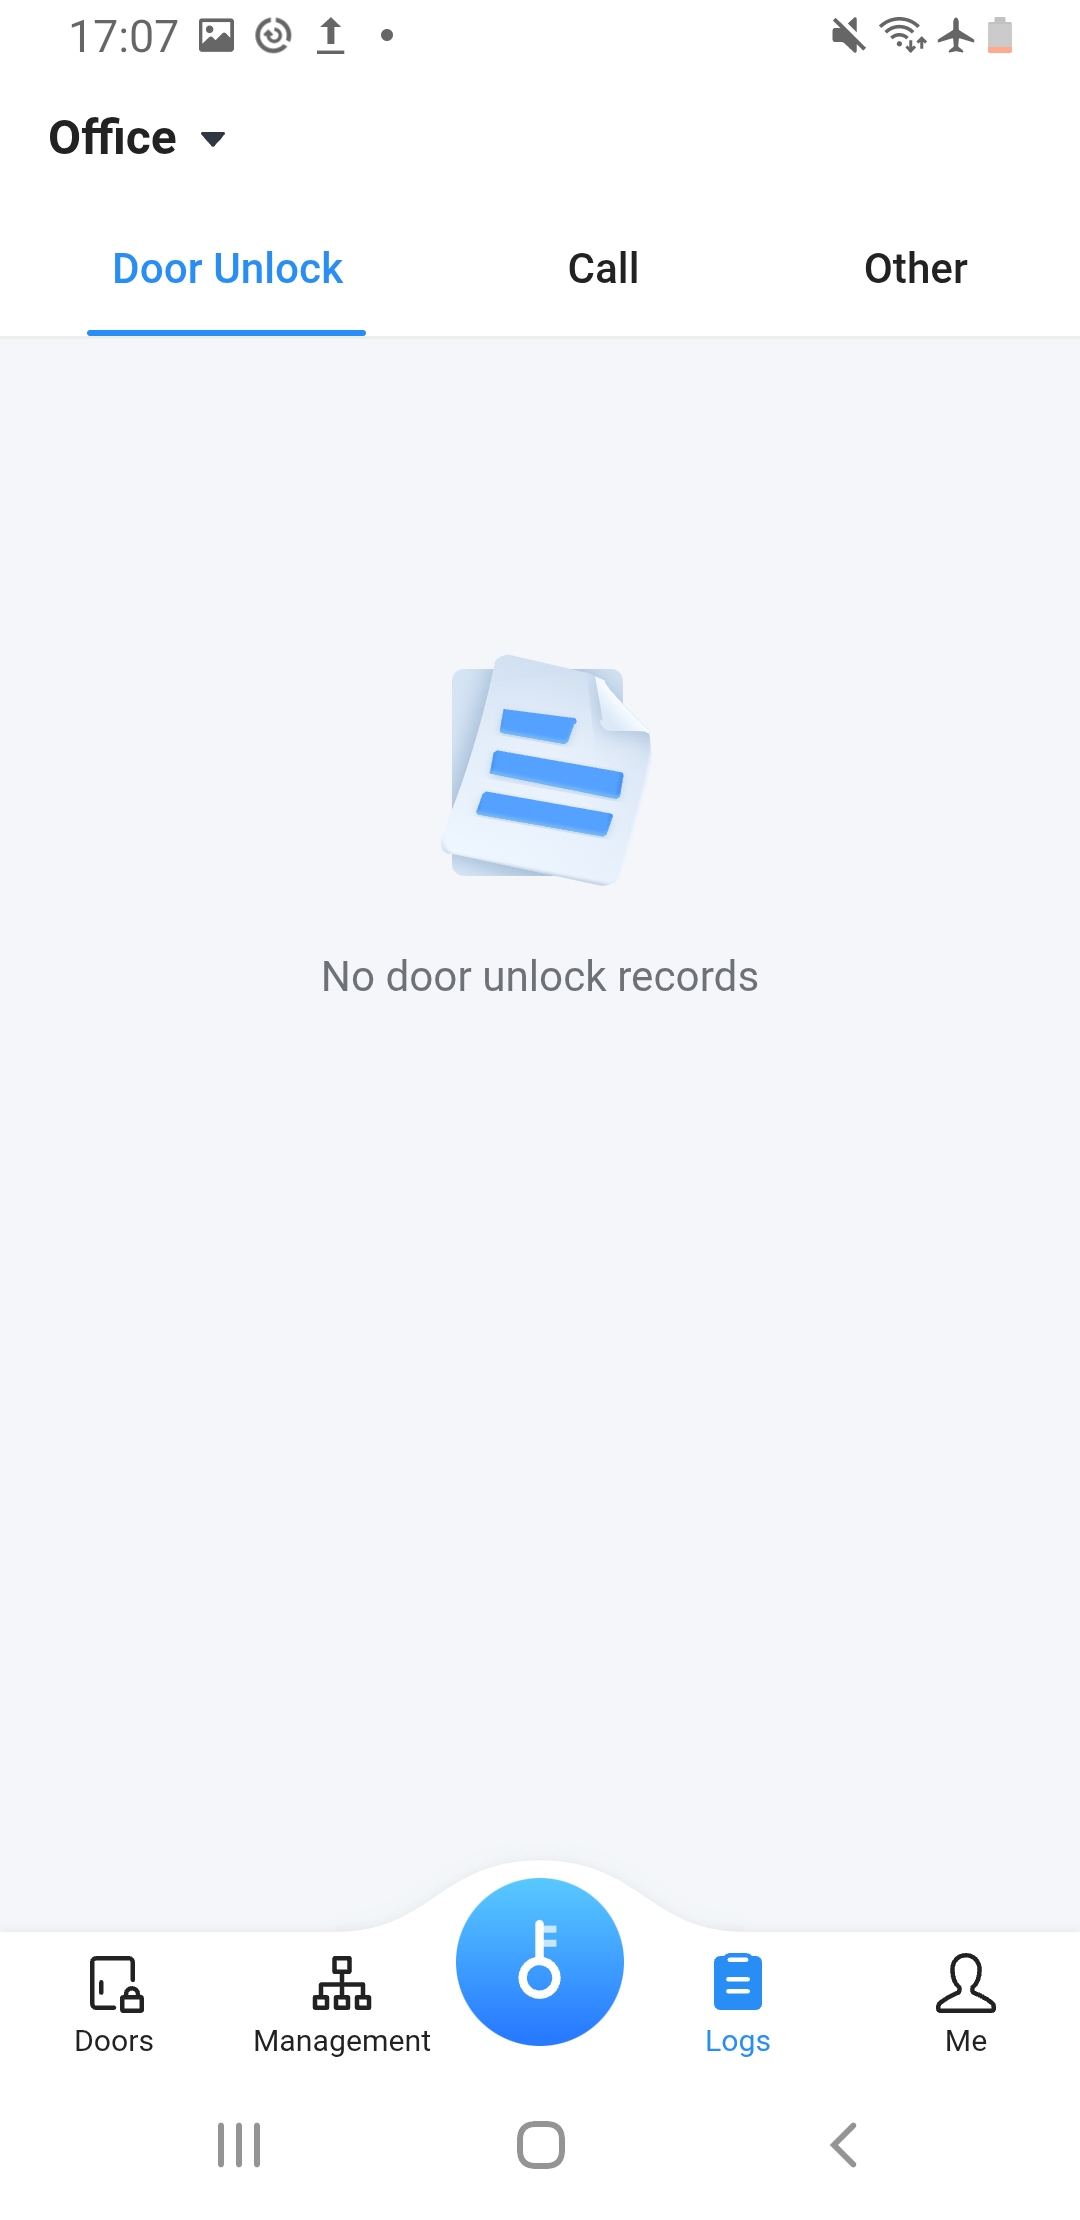
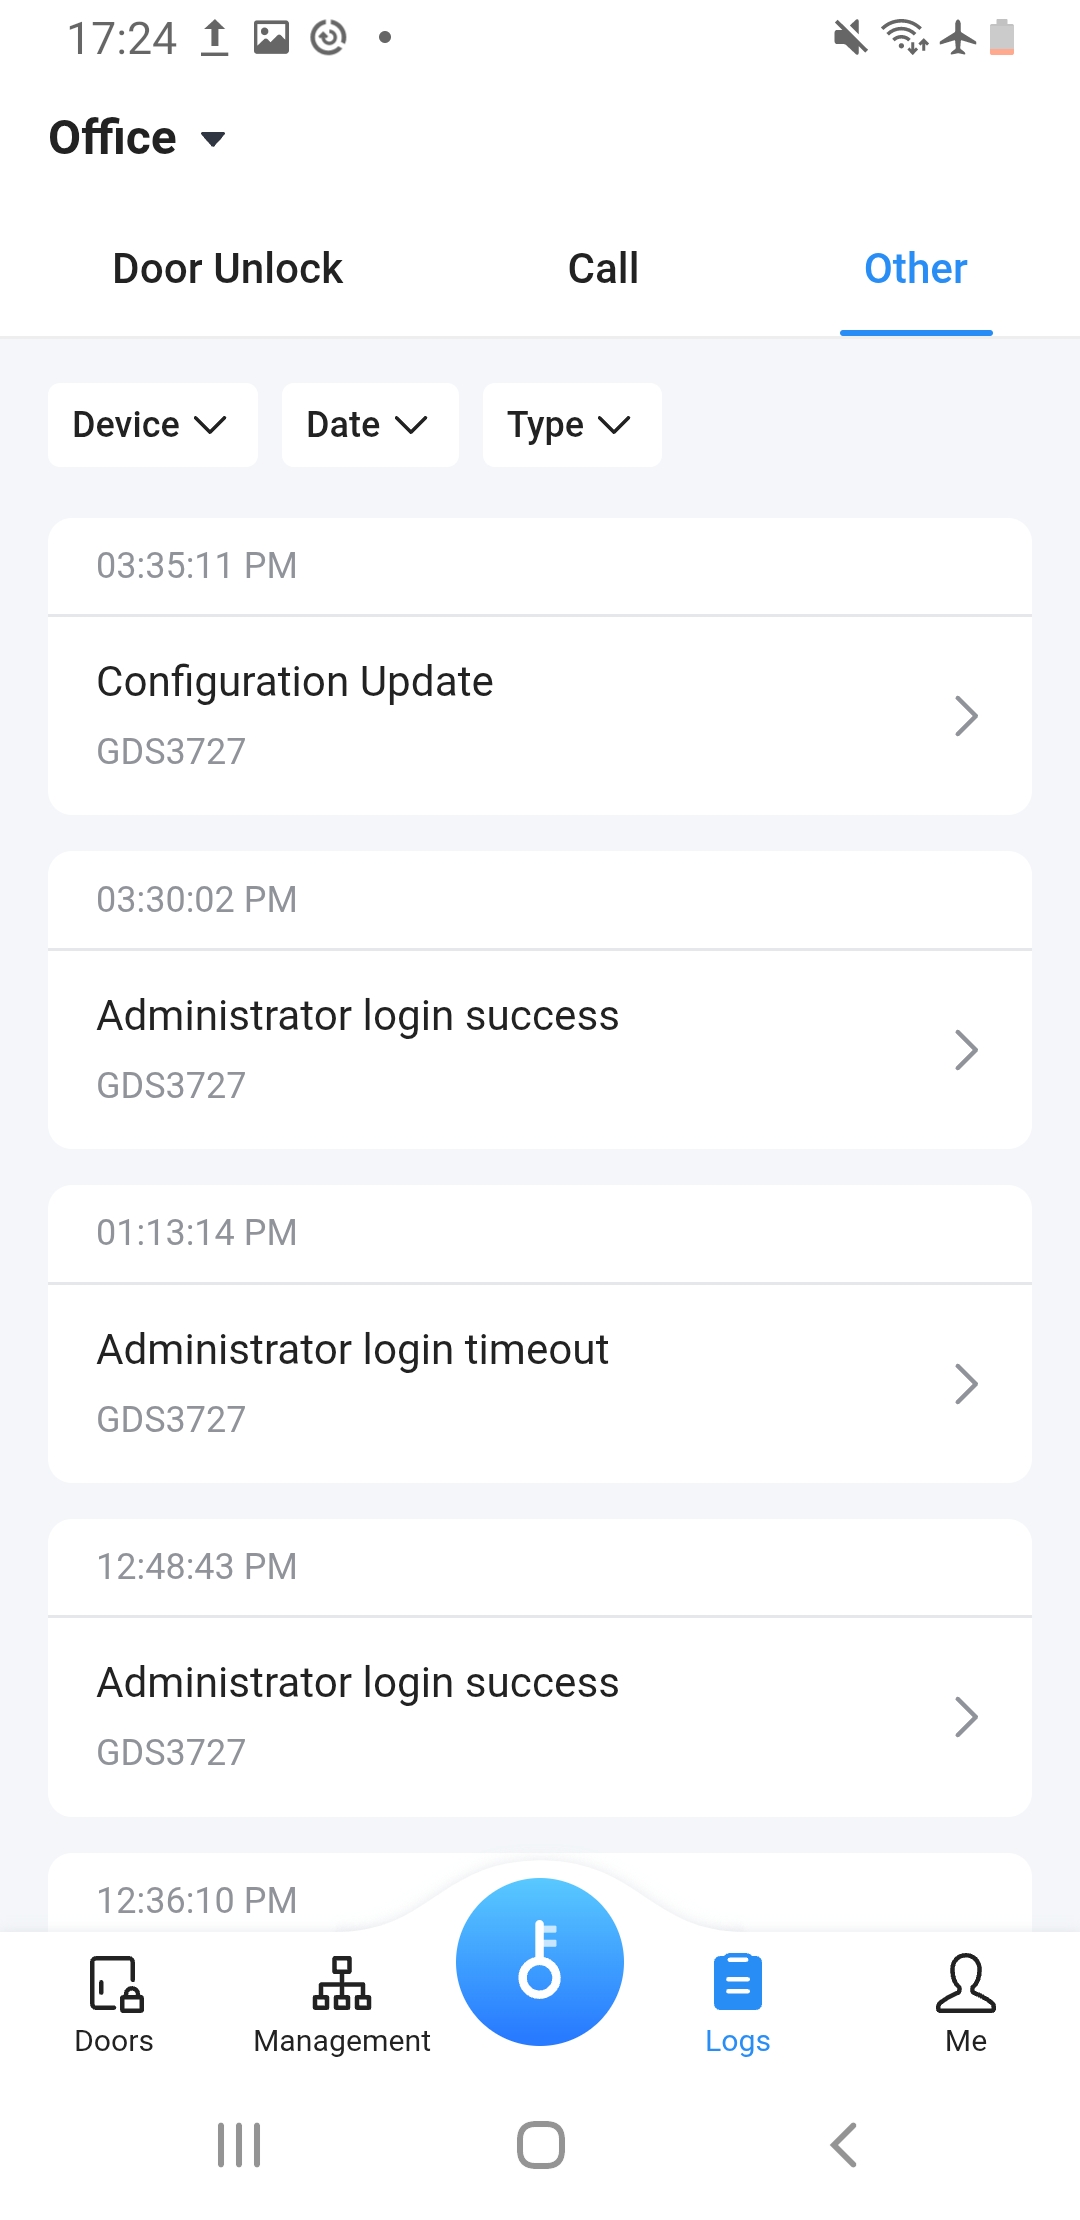
The Logs tab divides records into Door Unlock, Call, and Other categories. Door unlock logs show the time, door station, and unlocking method (Bluetooth, NFC, PIN, etc.). Call logs list incoming and outgoing calls, while the Other tab stores temporary password usage and system messages. Only the most recent 90 days of logs are visible. When no records are available, the page shows a placeholder:
Door Unlock Logs
All door unlock events are recorded in the cloud, including the door station, user, time, and unlocking method (Bluetooth, NFC, card, PIN, remote, etc.). In addition, when you get information about the snapshots configured for the alarm action, it will be displayed here. If you have no permission to access snapshots, you need to be authorized by the door station (enter the administrator account and password of the device Web UI Portal):
Logs are stored for 90 days and can be exported via the administrator portal. Use the filters in the Logs tab to view specific periods or methods.
Call Logs
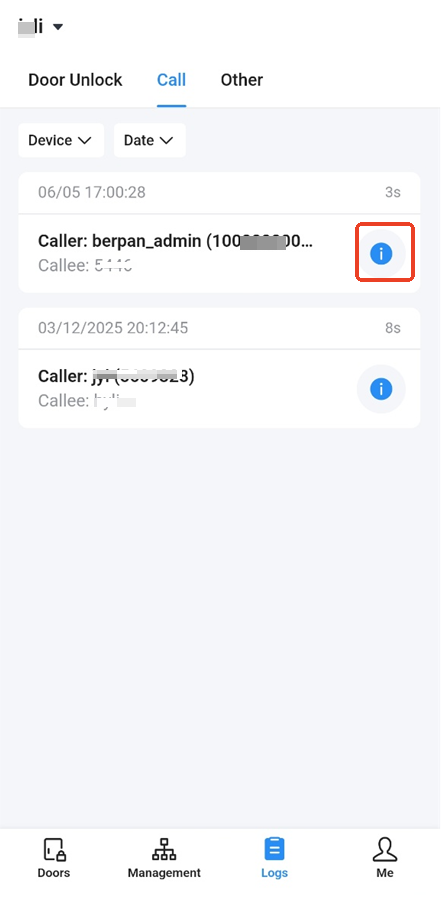
Call logs include missed calls, answered calls, and outgoing calls. Only users with Monitor Permission can view call logs. If a call is missed, a notification appears in the call tab.
Administrator and Regular User call logs include a detailed view option for supported call records, allowing administrators to review additional call information directly from the call log interface for easier monitoring and troubleshooting.
Other Logs
The Other Logs section records system-level events related to the door station, including device firmware updates, configuration changes, startups, restarts, factory resets, and administrator or user logins to the device Web UI. These logs help monitor system activity and ensure security auditing.
Alarm Notifications
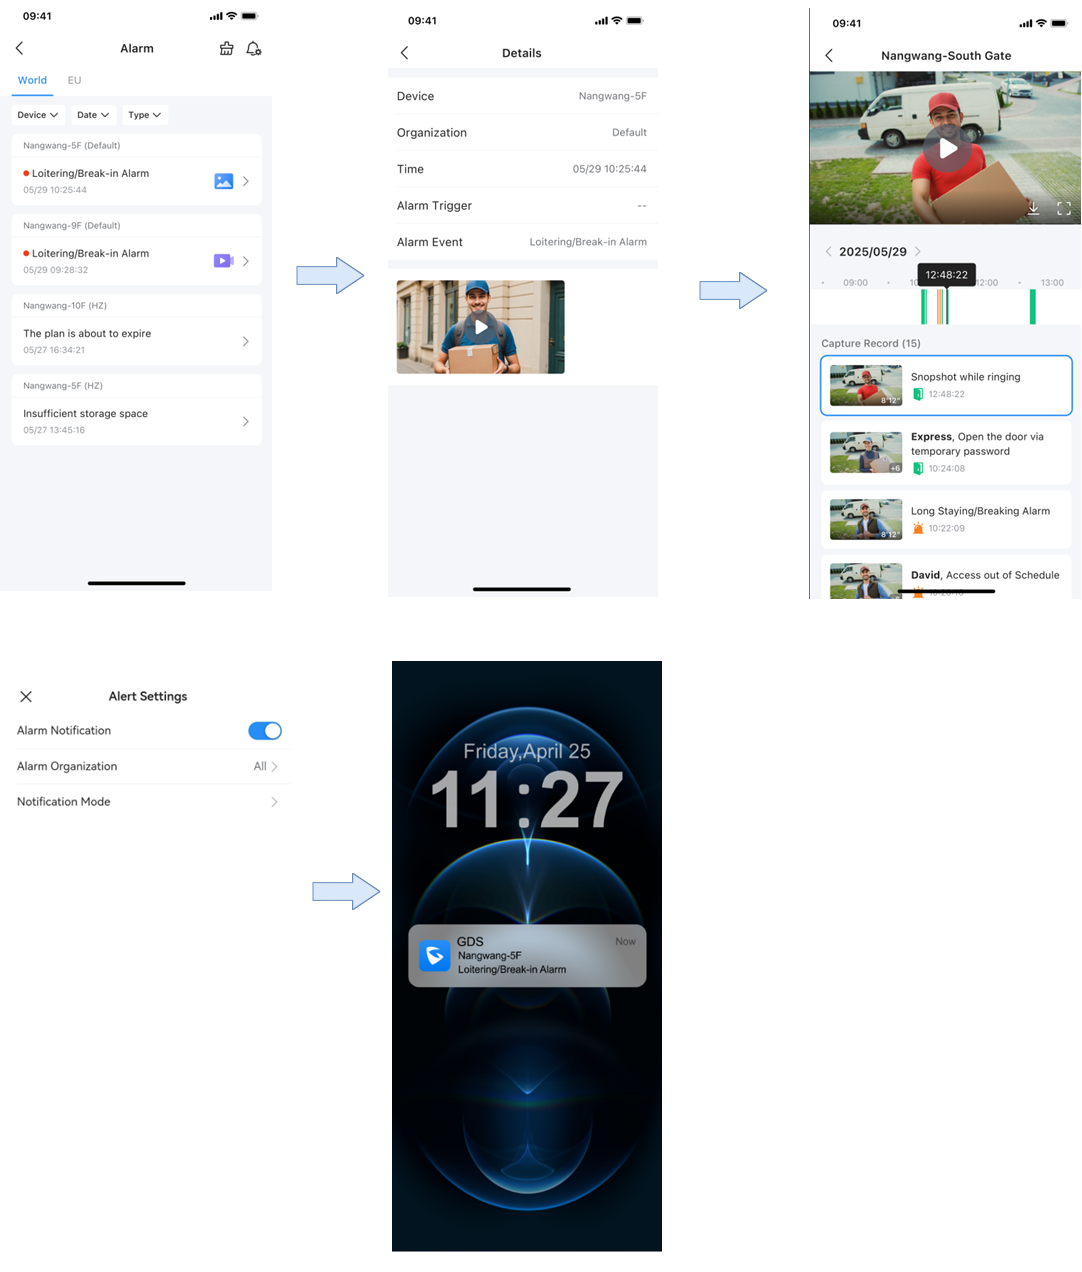
The Alarm List provides detailed records of alarm events. Users can access associated snapshots and video recordings from the door station device at any time. The timeline bar allows you to drag and navigate through the recorded footage for a more precise review of the events.
Administrators can configure which organizations are subscribed to alarm notifications. By default, all organizations are automatically subscribed. Once an organization is subscribed, any alarm event triggered by the door station device will generate an alarm notification that is sent directly to the App.
Device Provisioning
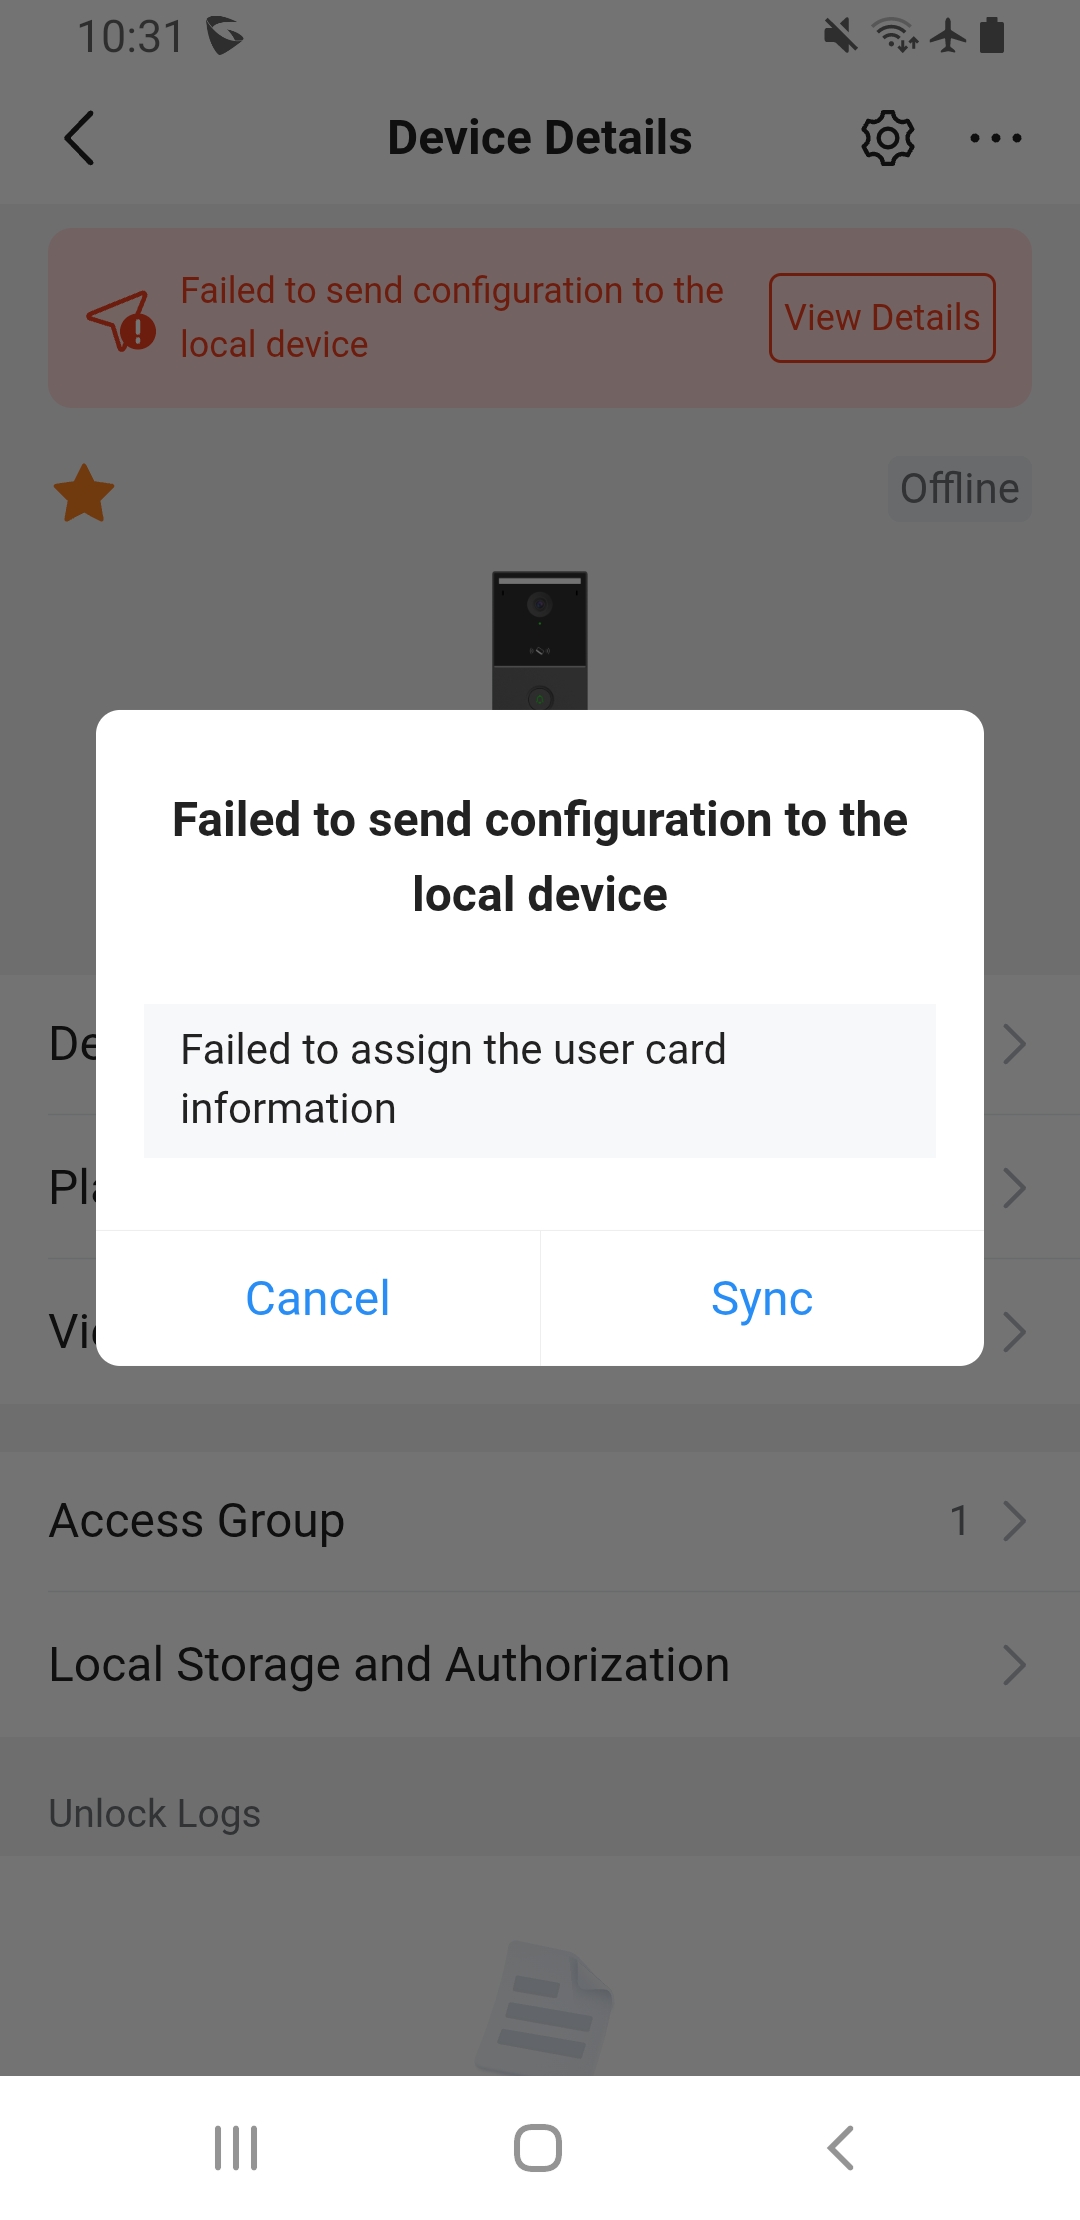
In the Device Management module, all changes made through the SecureAccess platform, such as adding a new user, creating a visitor entry, or modifying device parameters, must be pushed to the door station to take effect. If the push configuration fails, the updates will be invalid, meaning the new user or visitor will not be able to unlock the door.
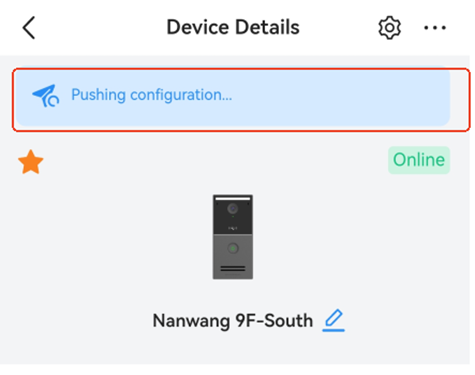
When the status shows “Pushing,” it indicates that the updated information is still being delivered to the door station and has not yet taken effect. Administrators should verify network connectivity and device status if configurations remain pending or fail to apply.
Me Tab (Settings)
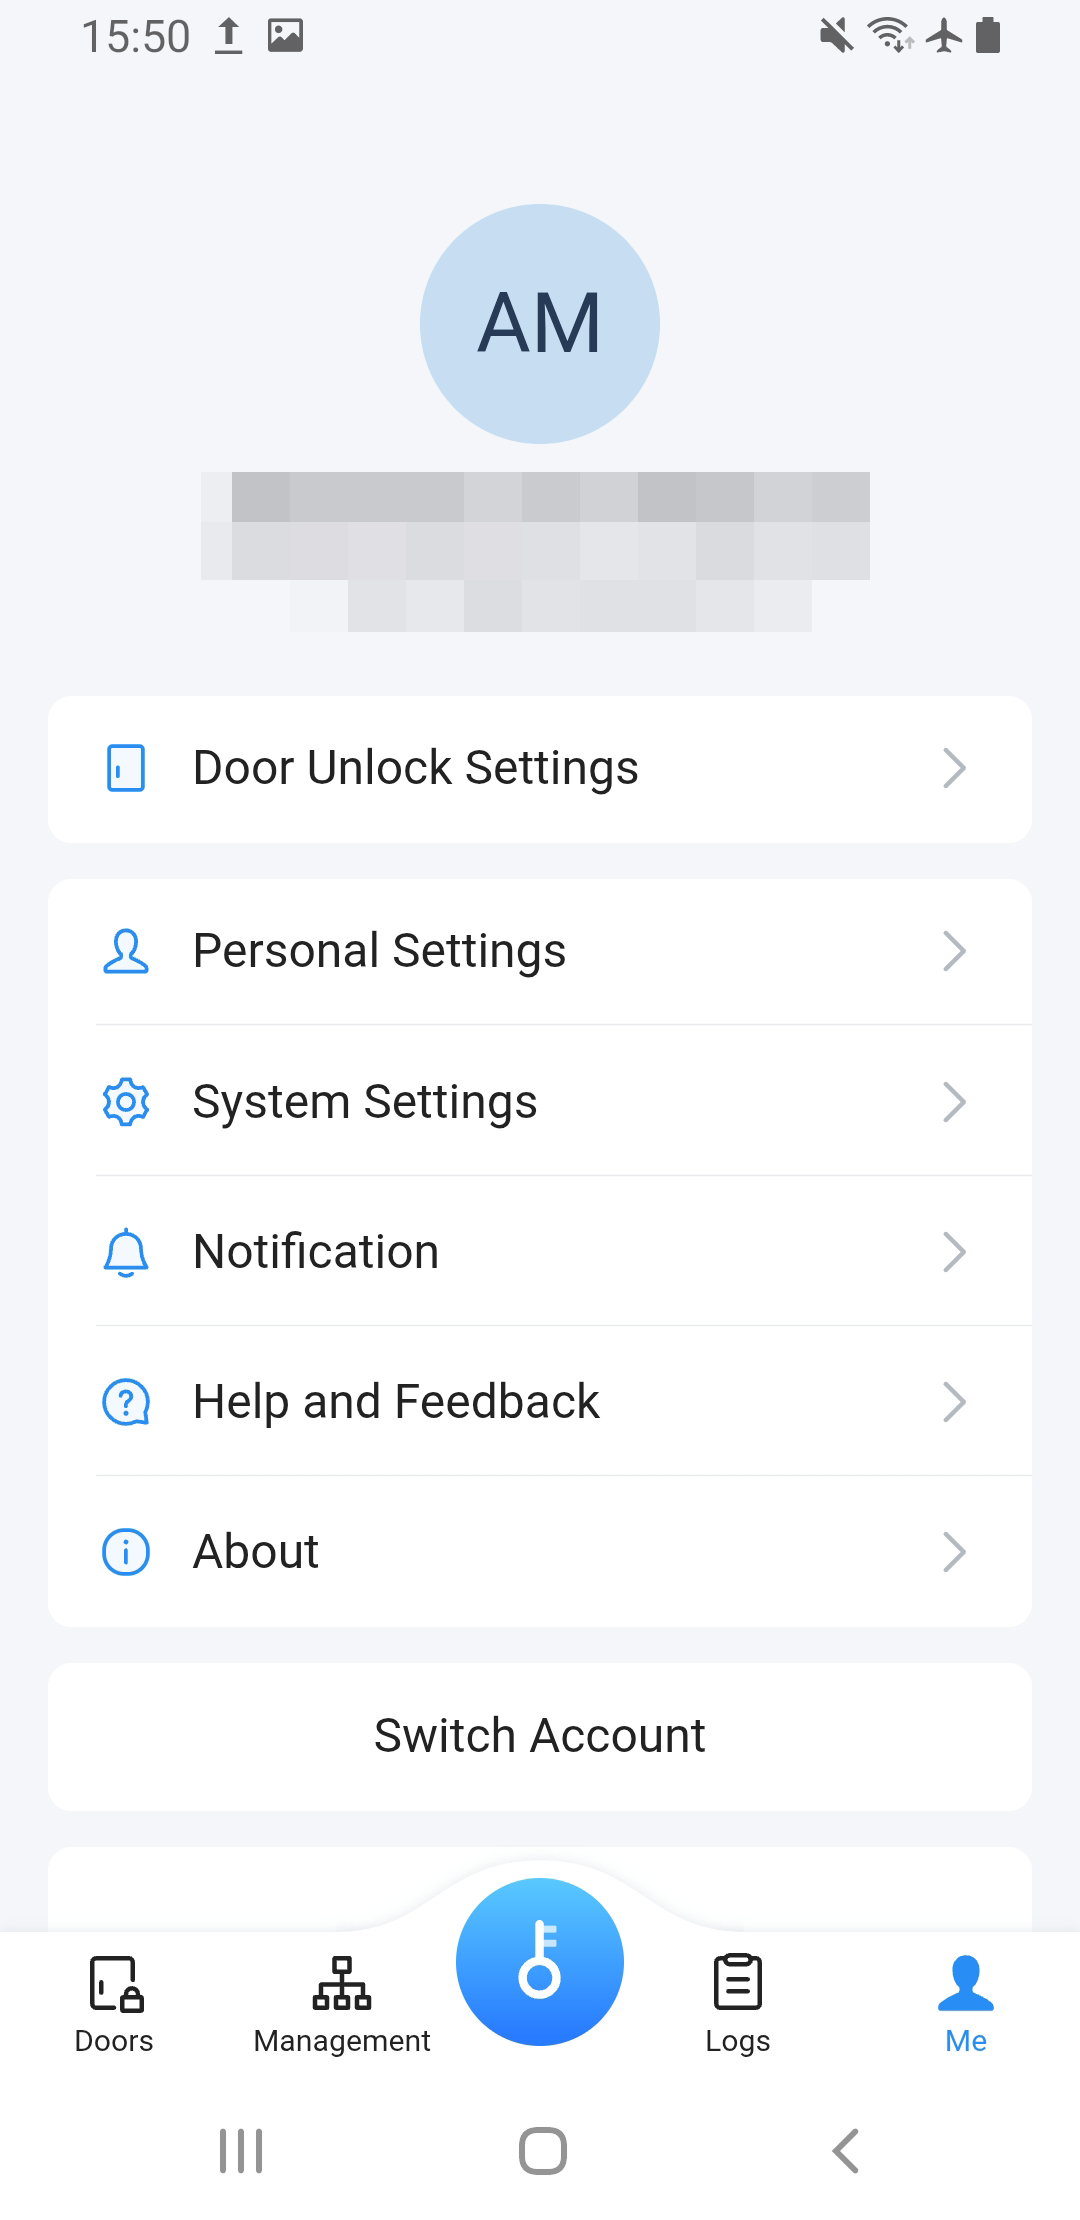
The Me tab contains user settings such as Door Unlock Settings, Personal Settings, System Settings, Notification, Help and Feedback, About, and Switch Account. The user’s name and masked email address are displayed at the top. Selecting each option opens the corresponding configuration page.
DOOR STATION MANAGEMENT
Adding Devices
Administrators can add a device using the following methods:
- Bluetooth Scan – Press and hold the door station’s doorbell for approximately 10 seconds until the voice prompt announces “Bluetooth configuration mode.” In the application, navigate to Doors → Add Device and select Scan via Bluetooth. The application will automatically detect nearby devices and add the selected device.
- Manual Entry – Select Add via MAC Address and manually enter the device’s MAC Address along with the device’s Initial Password. Administrators may also optionally define a custom device name during onboarding.
- QR Code / Barcode Scan – Scan the QR code or barcode located on the back label of the door station to automatically detect and populate the device’s MAC Address and Initial Password. This method simplifies and accelerates the onboarding process by avoiding manual data entry.
Once the device is added, the administrator agrees to the door station cloud service terms and conditions.
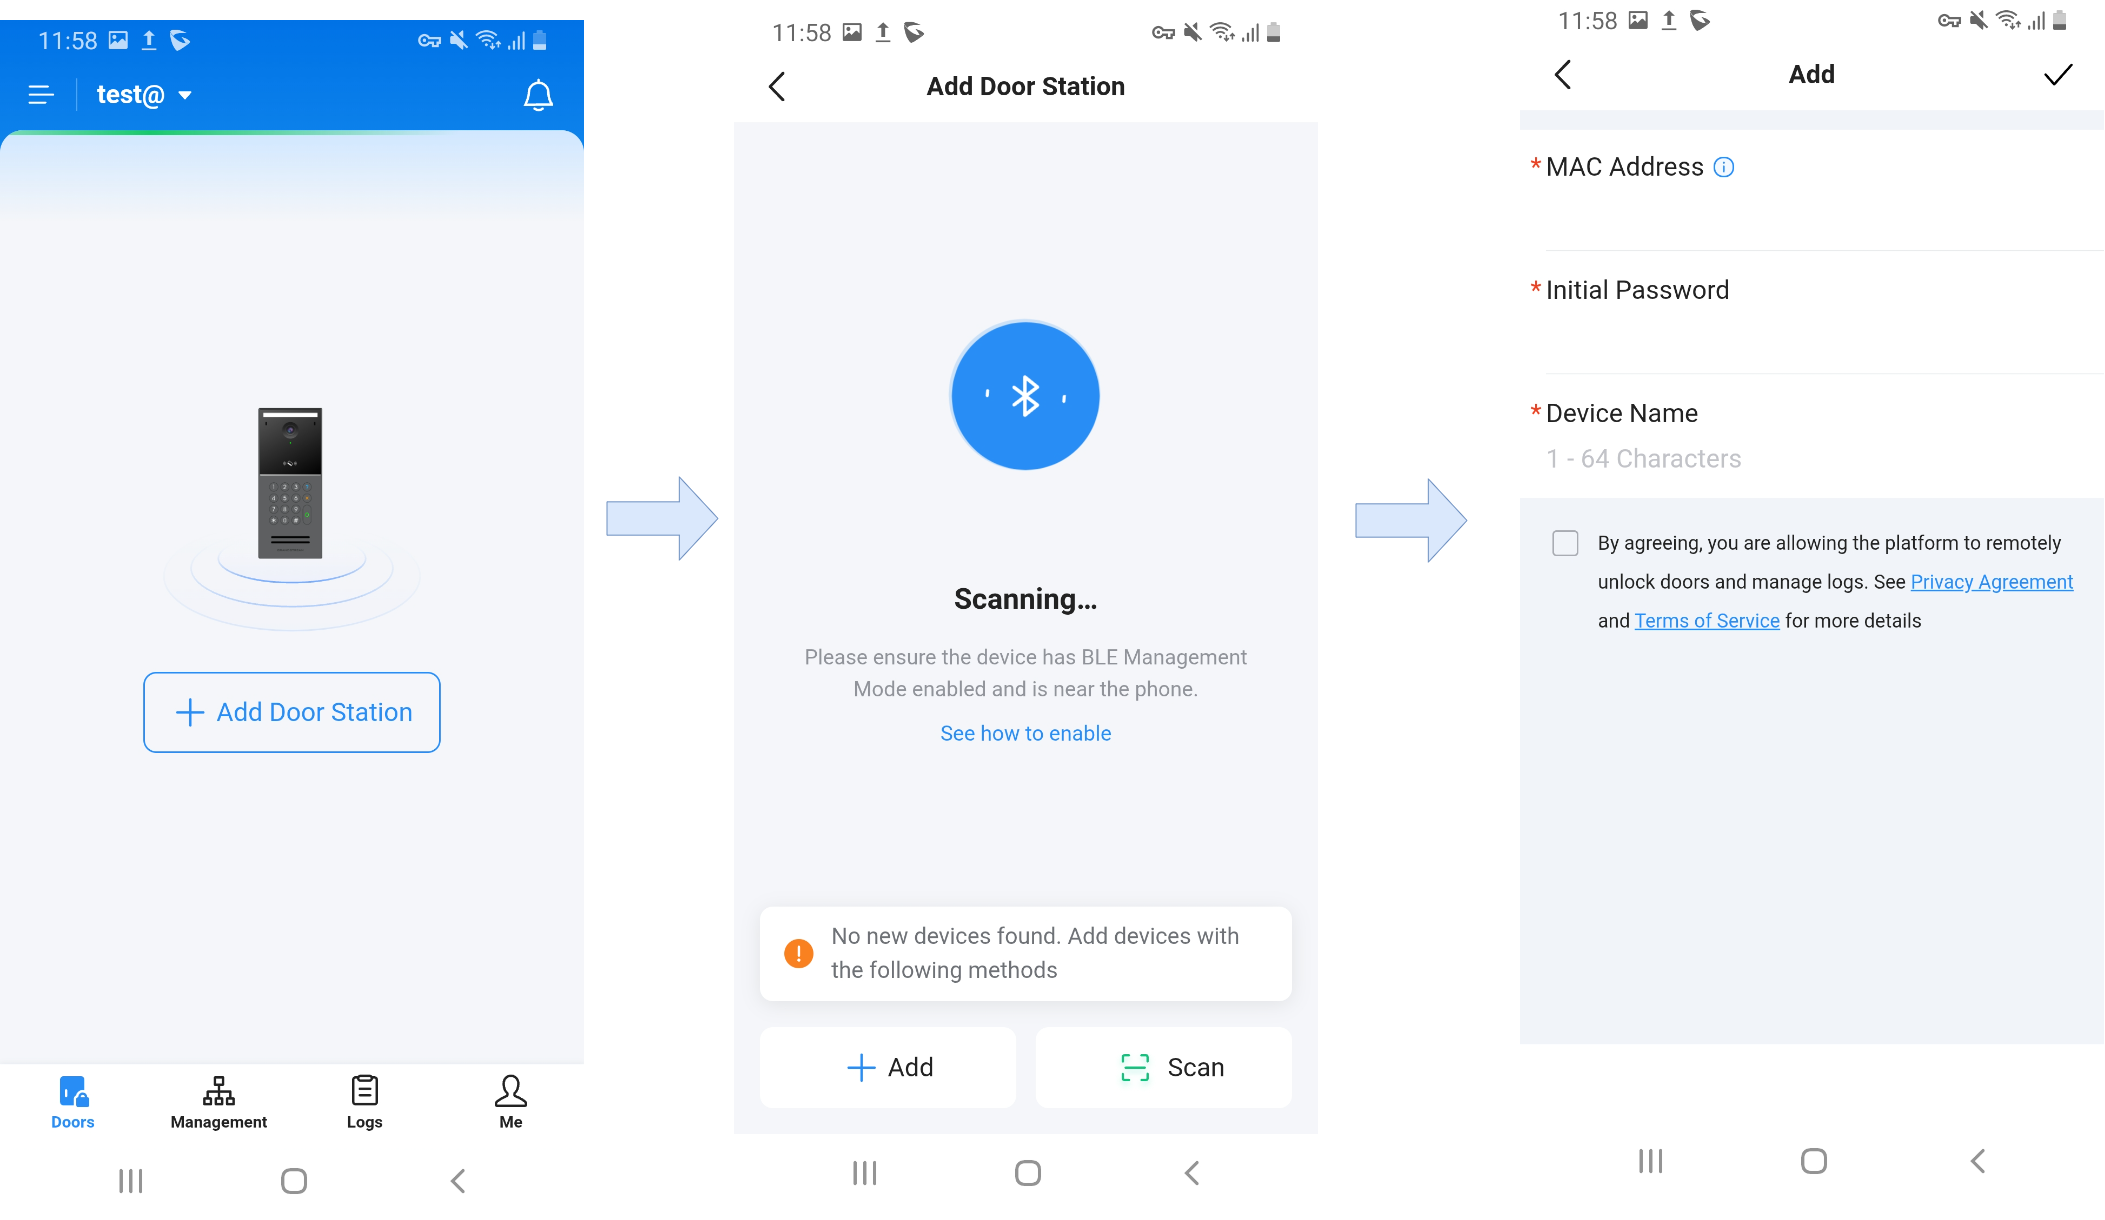
After adding the device, you can further configure its parameters as described below.
Configuring Door Station Parameters
Door stations offer extensive configuration options accessible through Doors → Device Settings.
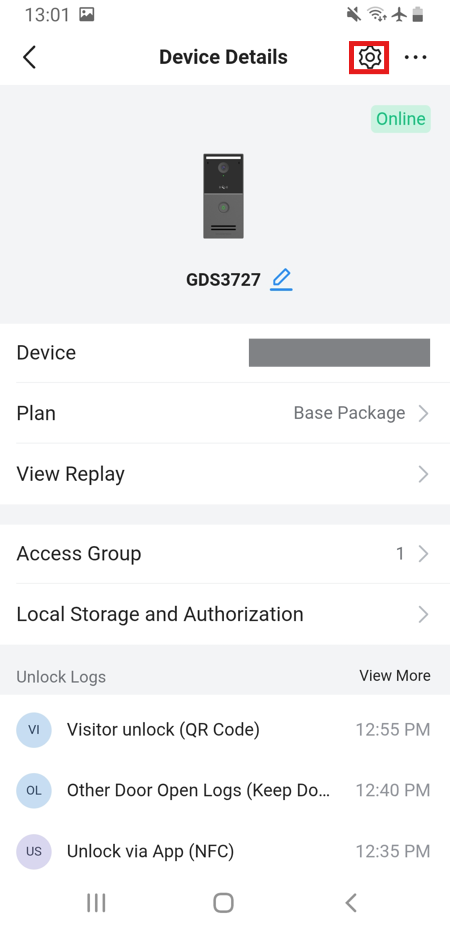
From the device details page, administrators can view device information, including the associated Building & Apartment information for Residential organizations or Department information for Non-Residential organizations, depending on the configured organization type.
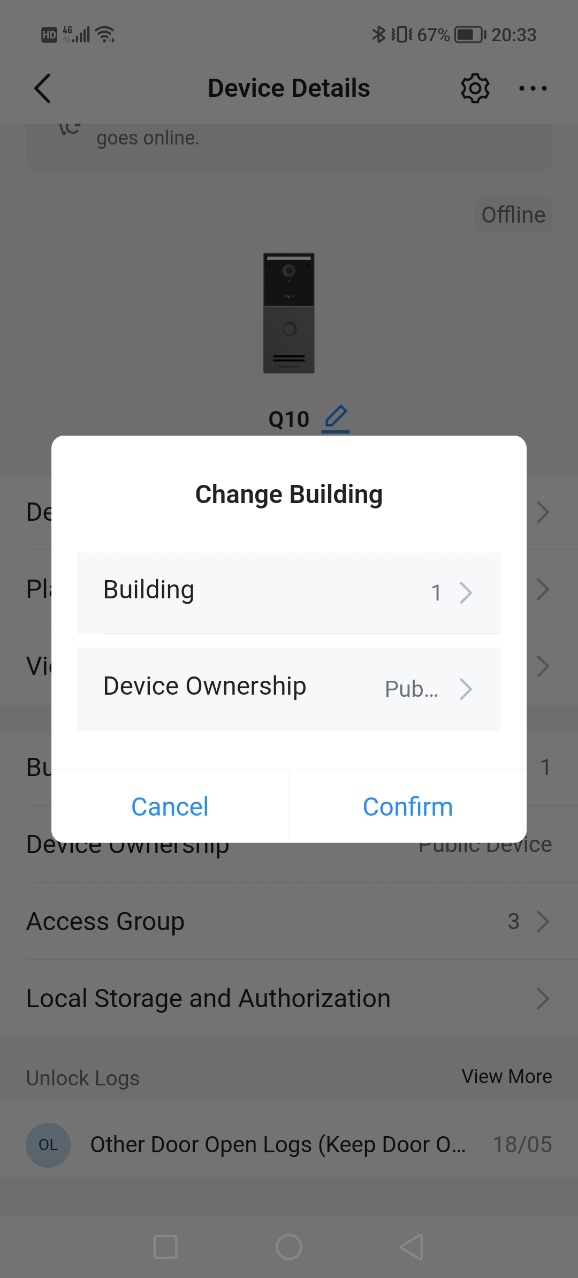
The online and offline device list display styles have been optimized, and the access control device list includes associated Building & Apartment or Department information for improved device identification and management.
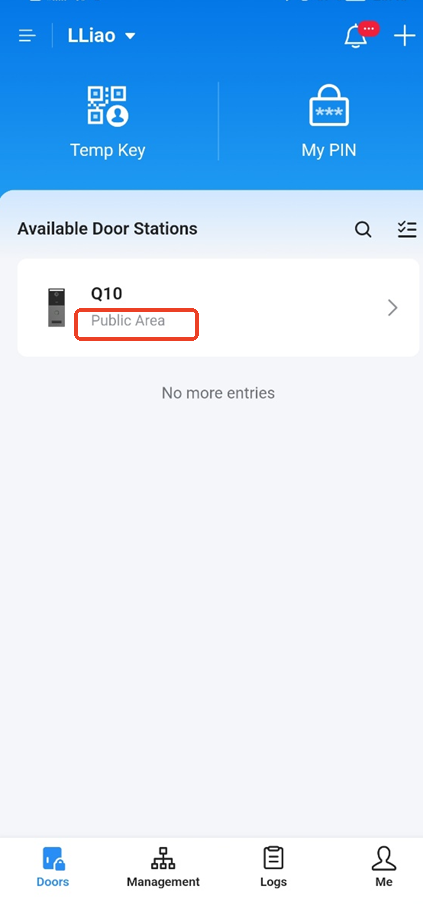
Click the Settings option to access the available device configuration parameters and management options.
Door Unlock / Relay Settings
| Functions | Defines the purpose of the relay, such as Door Unlock or Alarm Output, and determines what action the relay output controls. |
| State | Defines the relay output status when Alarm Output is enabled. Available modes are Always On and Always Off. |
| Alarm Duration (s) | Defines how long the alarm output remains active after an alarm is triggered. |
| Delay Response Time (seconds) | Sets the delay before the relay activates after receiving a trigger event. |
| Unlock Hold Time (seconds) | Defines how long the relay remains active, keeping the door unlocked after activation. |
| Keep Door Open | Keeps the door continuously unlocked while enabled. |
| Validity Start Time / End Time | Defines the schedule window during which Keep Door Open mode remains active. |
| Open Door Schedule | Configures predefined schedules for automatic door unlocking periods. |
Snapshot Settings
| Snapshot | Enables or disables snapshot capture during events such as unlock, doorbell press, or alarms. |
| Snapshot Type | Defines which events trigger snapshot capture. |
| Number of Snapshots | Defines how many images are captured for each event trigger. |
| Snapshot Storage Location | Defines where snapshots are stored, such as local storage, SD card, or server storage. |
| Notification of Unlock Snapshot | Sends a notification when an unlock snapshot is captured. |
| Delay(s) of Unlock Snapshot | Adds a configurable delay before capturing unlock snapshots. |
| Notification of Doorbell Pressed Snapshot | Sends a notification when a doorbell press snapshot is captured. |
| Delay(s) of Doorbell Pressed Snapshot | Adds a configurable delay before capturing doorbell press snapshots. |
Doorbell Call Mode
| Doorbell Call Mode | Defines how calls are placed when the doorbell button is pressed, such as Ring in Series or Ring in Parallel. |
| Press the Doorbell to Call# | Defines which user or device receives the doorbell call. |
| Schedule | Defines the schedule during which doorbell calls are allowed. |
| Call Number | Displays or configures the destination number or account associated with the doorbell call. |
Door Unlock Settings
| One-way Interlocking Doors Mode | Configures interlocking door behavior to prevent multiple connected doors from being unlocked simultaneously. |
| Linkage Mode | Configures the door linkage mode, which can be disabled or set to Safe Room Mode. When Safe Room Mode is enabled, the door cannot be opened from outside while the room is occupied. Note: Safe Room Mode does not take effect during Forced Open Door. |
| Working Mode | Defines the station operating mode when Safe Room Mode is enabled, with options for Outdoor Station or Indoor Station. |
Unlock via Card
| IC Card | Enables or disables door unlocking using IC cards. |
| Compatible with Unencrypted IC Card | Enables compatibility with unencrypted IC cards. |
| ID Card | Enables or disables door unlocking using ID cards. |
| Card Swipe Interval (ms) | Defines the minimum interval between consecutive card swipes to prevent unintended repeated access triggers. |
Unlock via App
| Remote Unlock | Enables or disables remote door unlocking through the mobile application. |
| QR Code | Enables or disables door unlocking using QR codes. |
| Static QR Code | Enables or disables door unlocking using a predefined static QR code. |
| Bluetooth | Enables or disables Bluetooth-based door unlocking. |
| Bluetooth Sensitivity | Configures the Bluetooth signal sensitivity for proximity-based door unlocking, with High, Medium, and Low options. |
| Bluetooth Unlock Interval (s) | Defines the minimum interval between consecutive Bluetooth unlock attempts. |
| NFC | Enables or disables NFC-based door unlocking. |
| NFC Unlock Timeout (ms) | Defines the timeout period for NFC authentication requests. |
Alarm Settings
| Alarm Snapshot | Enables snapshot capture when alarm events occur. |
| Snapshot Storage Path | Defines where alarm snapshots are stored, such as the SD card. |
| Loitering/Intrusion Alarm | Enables alarms when intrusion or loitering activity is detected. |
| Detection Area | Defines the monitored detection region for intrusion and loitering alarms. |
| Duration of Loitering (s) | Defines how long a person must remain detected before triggering a loitering alarm. |
| Alarm Schedule | Defines the schedule during which alarms remain active. |
| Tamper Alarm | Triggers alarms when physical tampering with the device is detected. |
| Exceeded Access Time Limit | Triggers alarms when access attempts occur outside authorized schedules. |
| Unauthorized RFID Card/QR Code Access Alarm | Triggers alarms when unauthorized RFID cards or QR codes are used. |
| High Temperature Alarm | Enables alarms when the device temperature exceeds the configured threshold. |
| High Temperature Alarm Interval (seconds) | Defines the interval between repeated high-temperature alarm notifications. |
| SD Card Alarm | Enables alarms related to SD card abnormalities, failures, or storage issues detected by the device. |
| SD Card Alarm Interval (seconds) | Defines the interval between repeated SD card alarm notifications. |
| Secure Room Alarm | Enables security room alarm functionality for secured or interlocked room deployments. |
| Door Held Open Alarm | Triggers an alarm when the door remains open longer than the configured allowed duration. |
Alarm Notification Settings
| Call App User | Places a Cloud SIP call to selected app users when configured alarms are triggered. |
| App Users | Defines which application users receive alarm calls and notifications. |
Device Batch Configuration
Batch update functionality allows administrators to modify the assigned Building & Apartment information for multiple devices simultaneously in Residential organizations, or update the assigned Department information for multiple devices in Non-Residential organizations. This feature simplifies large-scale device management by eliminating the need to edit devices individually. Administrators can select multiple door stations from the device list and apply the same Building, Apartment, or Department assignment to all selected devices in a single operation.
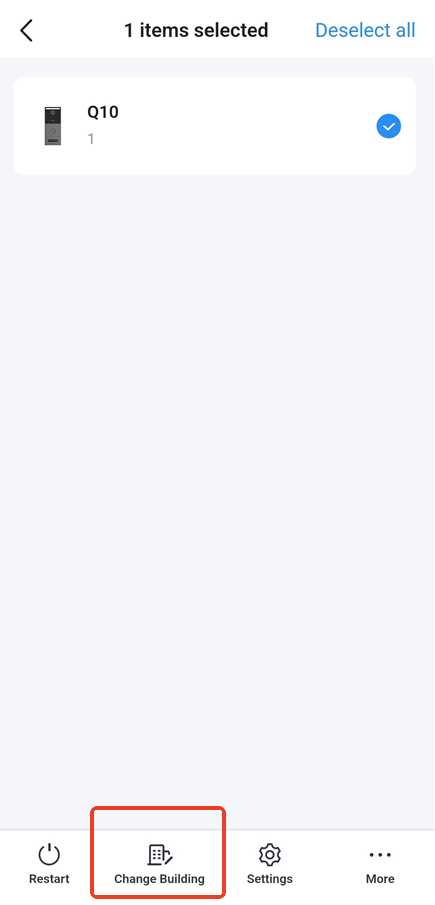
Filter Added Devices
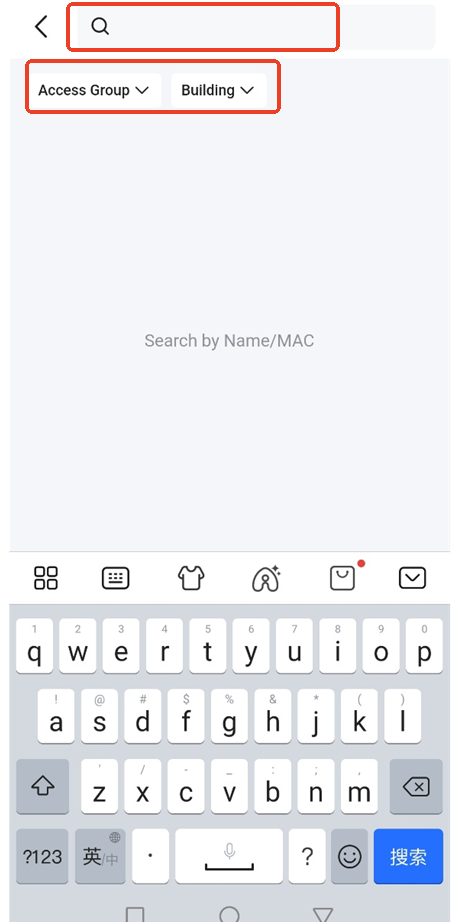
Device list filtering now supports filtering devices by assigned Building & Apartment information in Residential organizations or by Department in Non-Residential organizations, allowing administrators to quickly locate and manage devices based on their organizational assignment or physical deployment location.
SD Card and Local File Management
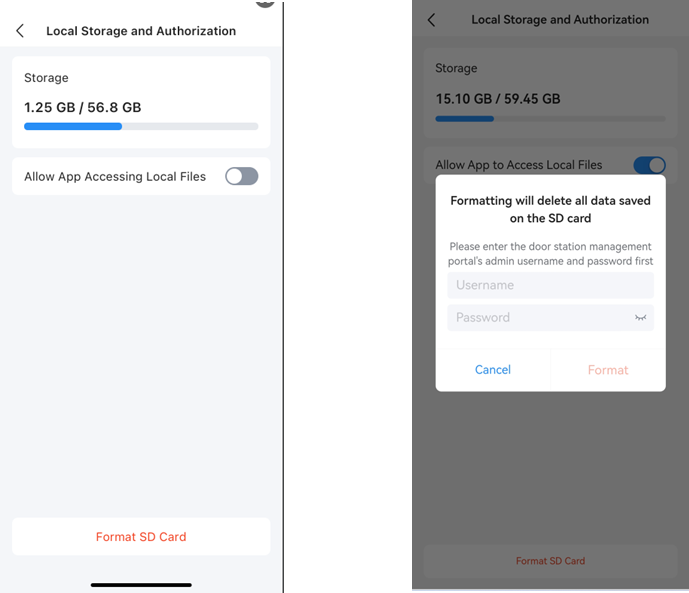
The door station supports the use of an SD memory card for local storage. This storage can be used to save snapshots, video recordings, and alarm event data directly on the device.
When inserting an SD memory card into the door station device for the first time, it is recommended to format the card to ensure compatibility and normal operation. Formatting requires administrator authorization through the device’s Web UI portal (administrator account and password must be entered).
UNLOCKING METHODS
SecureAccess supports multiple door‑opening methods. Users may only see the methods enabled by the administrator.
Bluetooth Unlocking
- Enable Bluetooth on your phone.
On iOS, swipe down to open the Control Center and tap the Bluetooth icon; on Android, turn on Bluetooth from the quick settings panel. The door station must have Bluetooth Unlock enabled. - Choose an unlocking mode:
- One-Tap Unlock: Open the app and tap the blue Key icon on the bottom navigation bar to unlock the nearest door station.
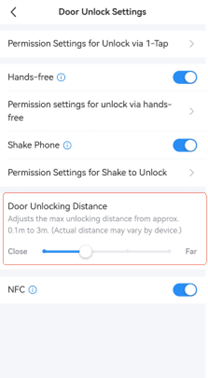
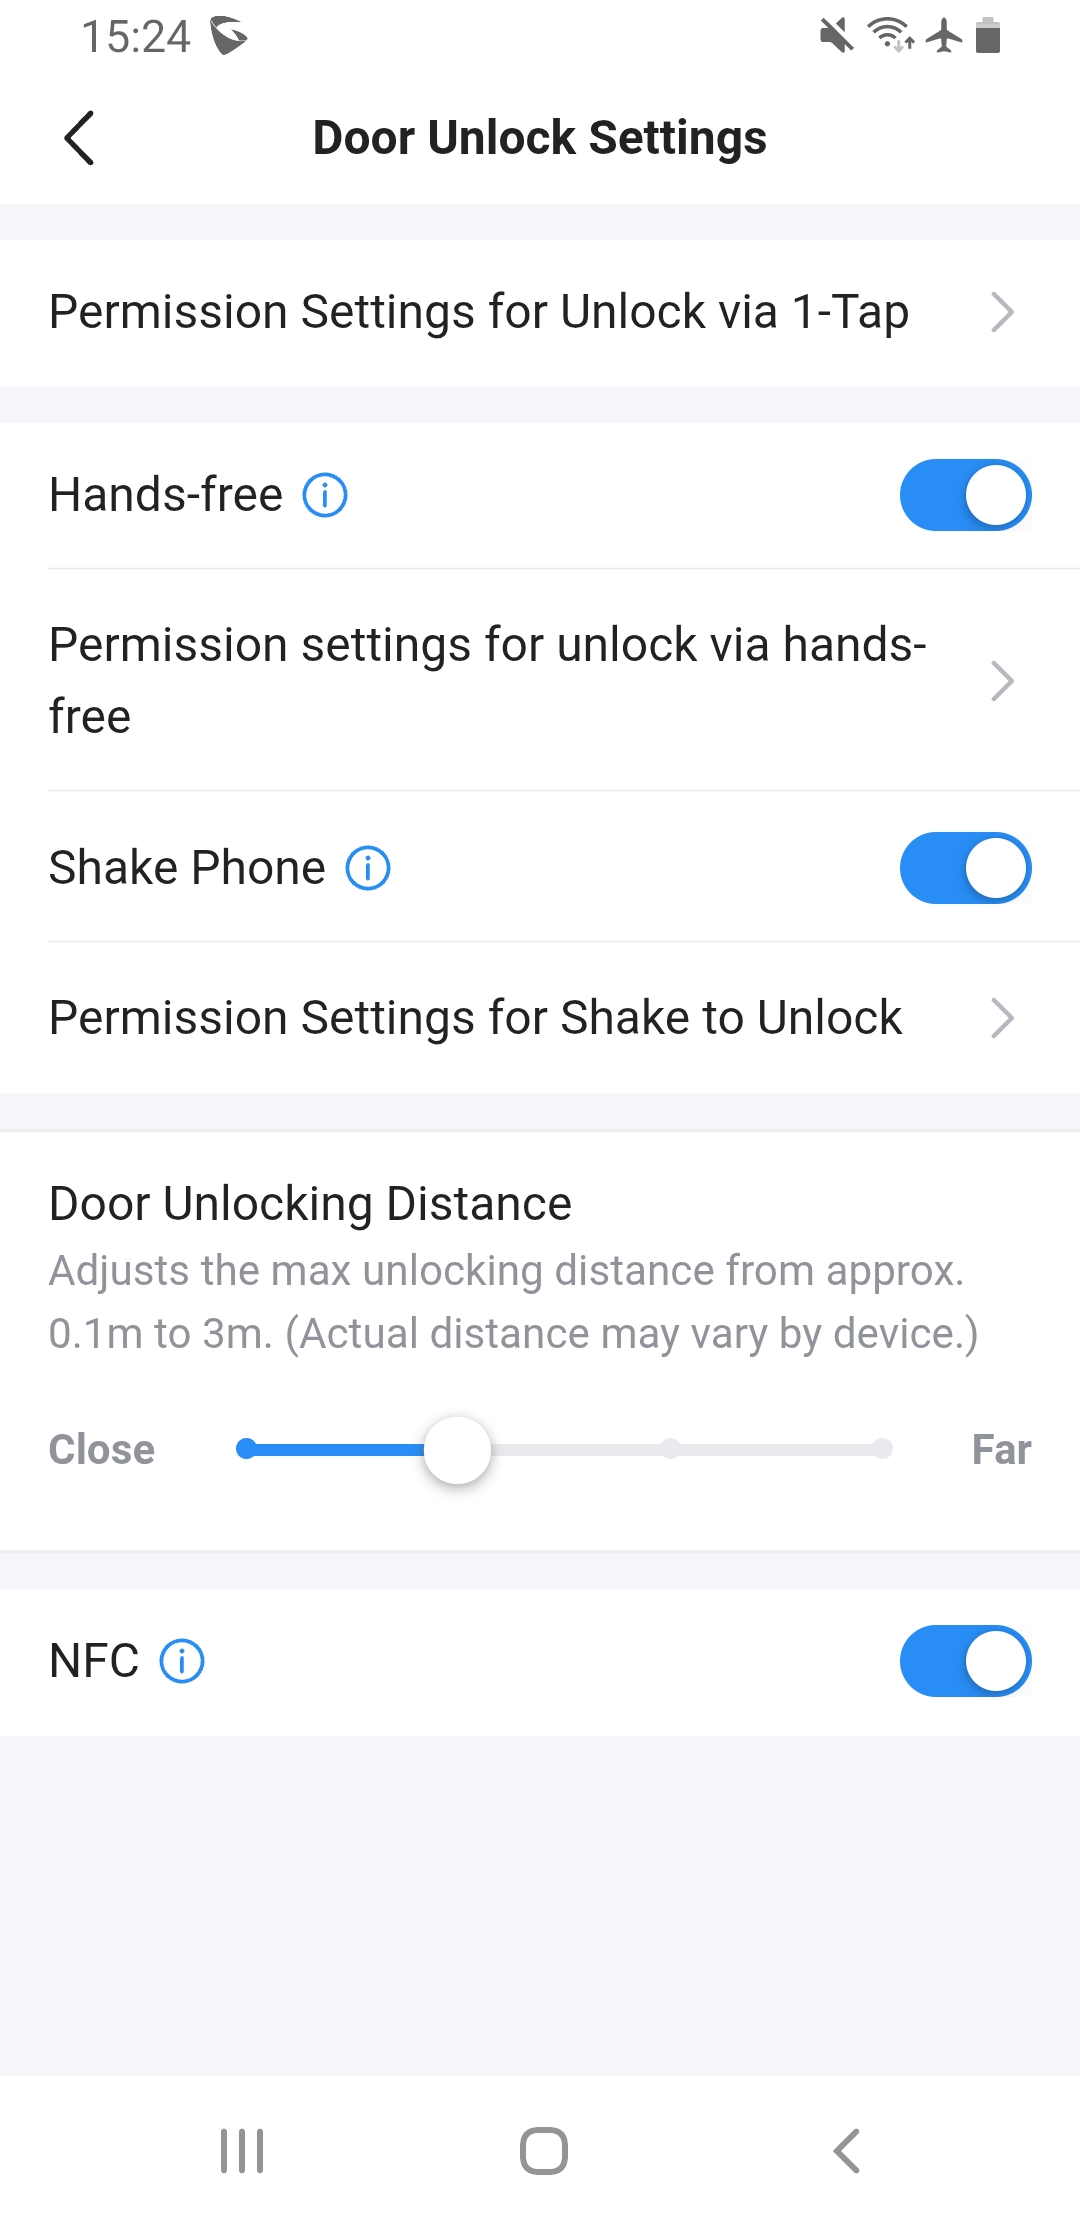
- Hands-Free (Approach to Open): Walk toward the door; the app will automatically unlock when the phone is detected within range. This mode requires enabling Hands-Free in Door Unlock Settings and may require permission settings for each door.
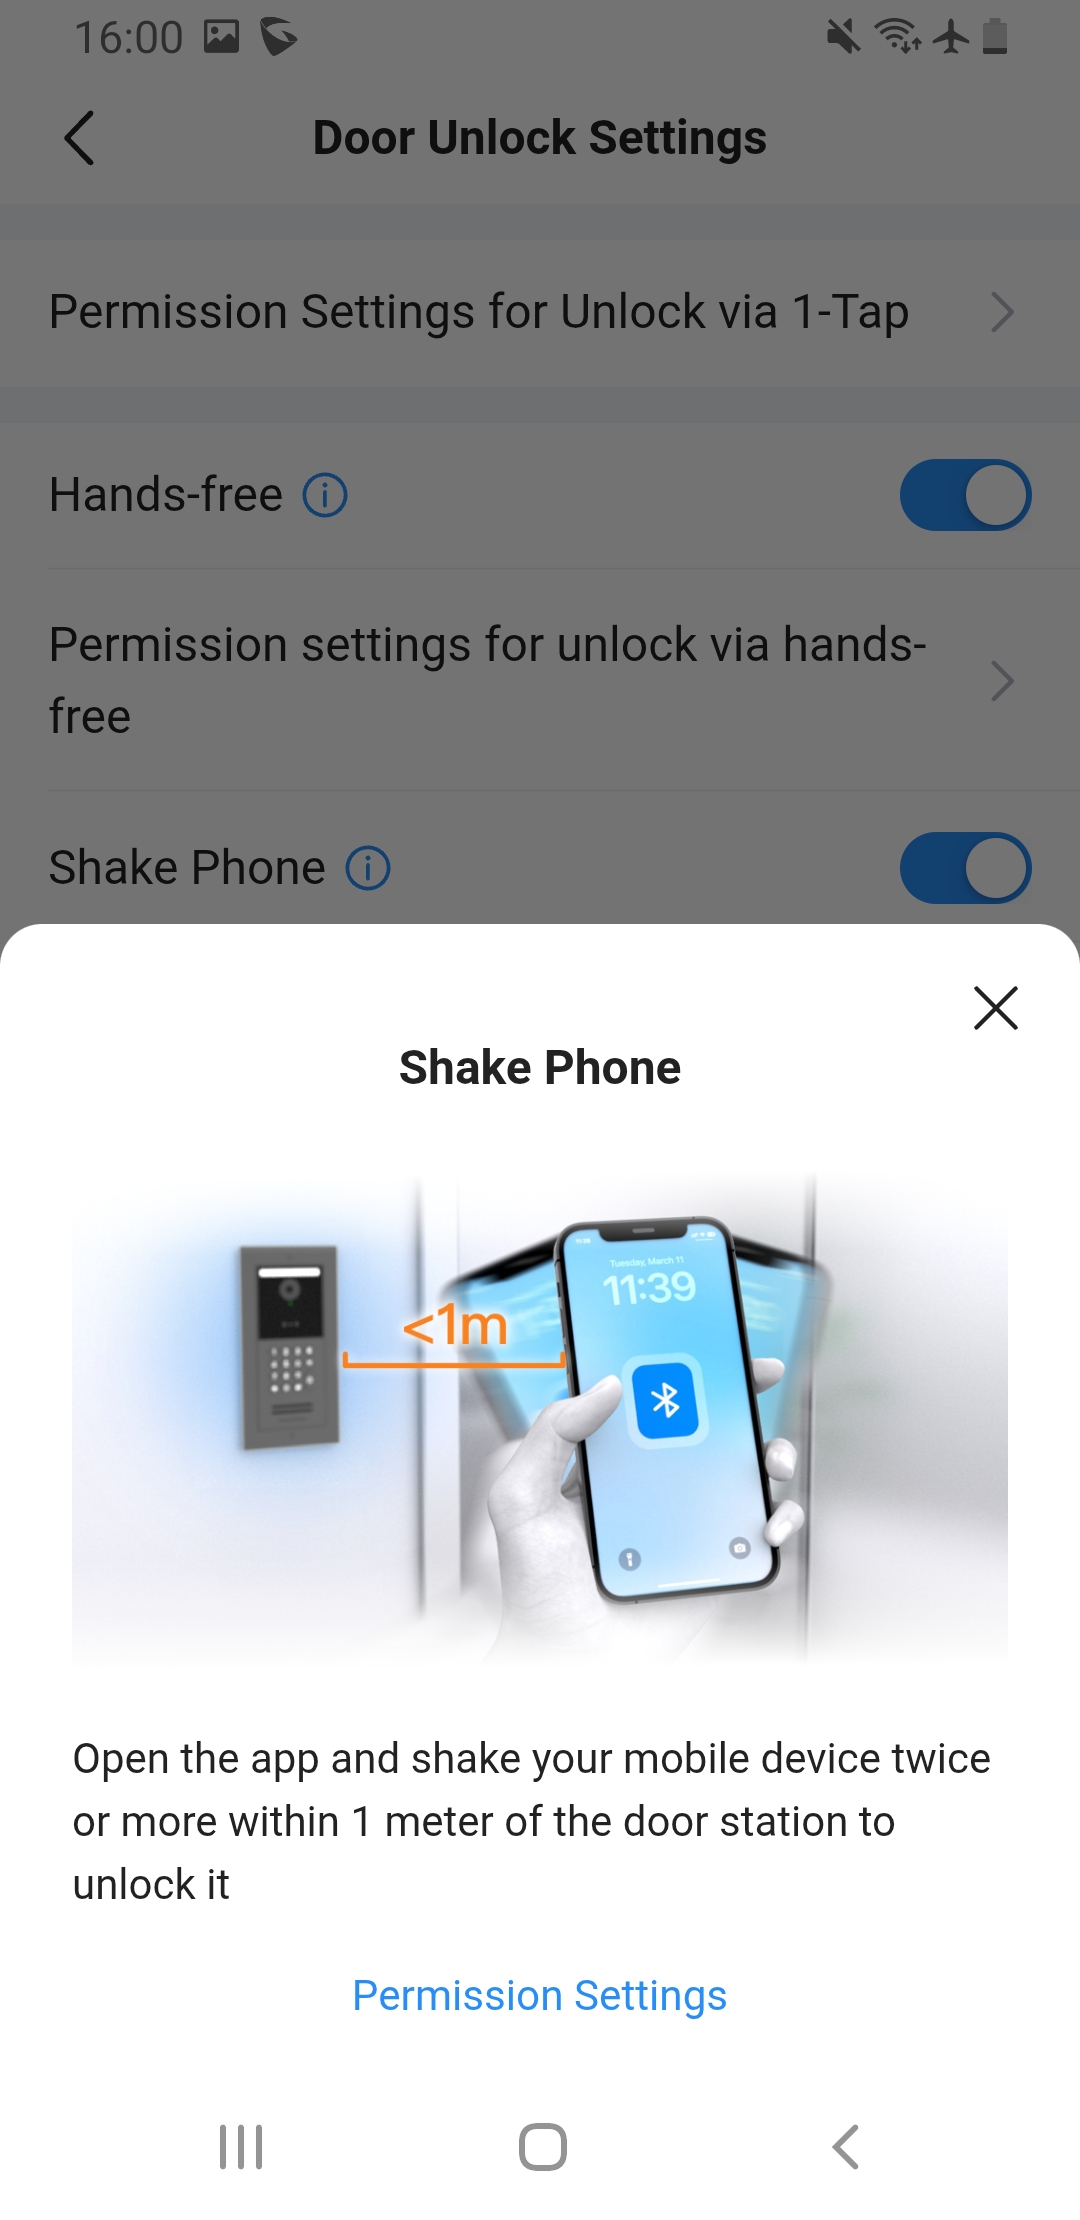
- Shake Phone: Shake your phone to unlock the nearest door station. This requires enabling the Shake Phone option.
- Door Unlocking Distance: Adjusts the maximum unlocking distance from approximately 0.1 to 3m from the GDS device. This configures the farthest distance that the device needs to be from the door to unlock it.
- Device-specific requirements:
- Android Devices: To unlock the door via Bluetooth, users must manually open the App interface. Once the App is active, the door can be opened either by approaching the door with Bluetooth enabled or by shaking the phone.
- iOS Devices: To unlock the door without manually opening the App (when the App is running in the background), the required permission must be enabled in iOS settings. This ensures the App can use Bluetooth in the background to detect and unlock the door.
Door Unlock settings can be customized via Me → Door Unlock Settings. You can enable or disable each mode and set which doors can be opened via 1-tap, hands-free, or shake. The NFC toggle is available on Android for NFC unlocking. An example of the configuration page is shown below.
NFC Unlocking
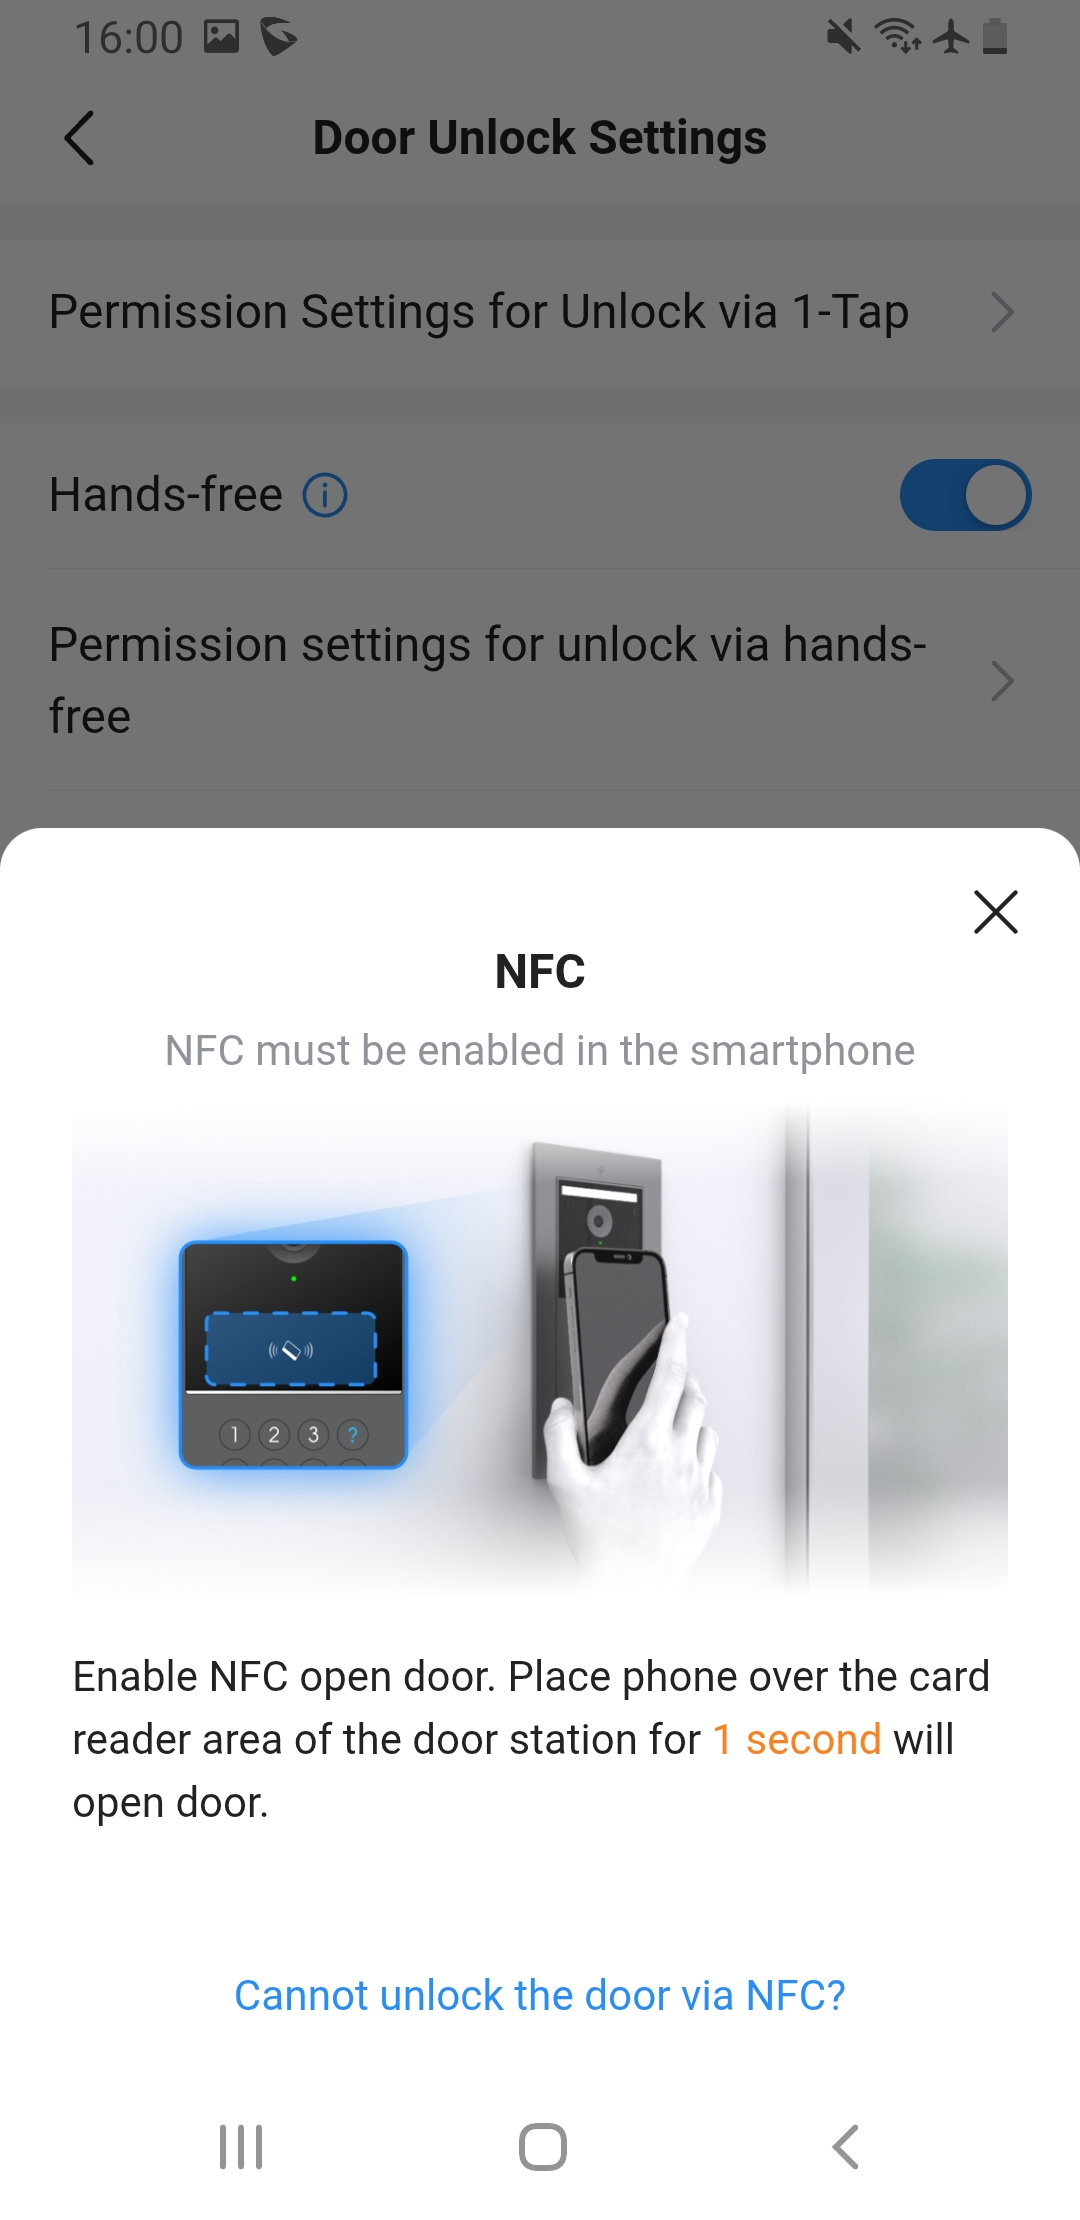
NFC unlocking allows users with Android phones to open the door by tapping the phone near the door station’s reader. To use this method:
- Enable NFC on your phone (usually found in System Settings → Connections). iOS does not support NFC unlocking.
- In Door Unlock Settings, enable the NFC toggle.
- Ensure the door station’s Allow NFC setting is enabled via the administrator interface.
- Approach the door and hold the phone near the NFC reader until the door unlocks. No app interaction is required.
IC/ID Card Unlocking
Users can unlock doors with IC cards (13.56 MHz) or ID cards (125 kHz). To bind a card to a user:
- In the administrator portal, edit the user and select Add IC/ID Card.
- Present the card to the phone’s NFC sensor; the app reads the card number.
- Assign the card to the user and save. The card can now unlock doors in the assigned access group. If encryption is enabled, the card cannot be used on other devices without rewriting the keys.
PIN Unlocking
Each user may have a PIN code (4–11 digits). To unlock via PIN, the user or administrator can enter their Virtual Number, followed by * and the PIN configured, then press #. For example, if your virtual number is 1001 and your PIN is 1234, enter 1001*1234# on the door station keypad.
Unified Password Mode allows all users to share the same PIN; Card + Personal Password mode requires scanning the IC card followed by the user’s personal PIN.
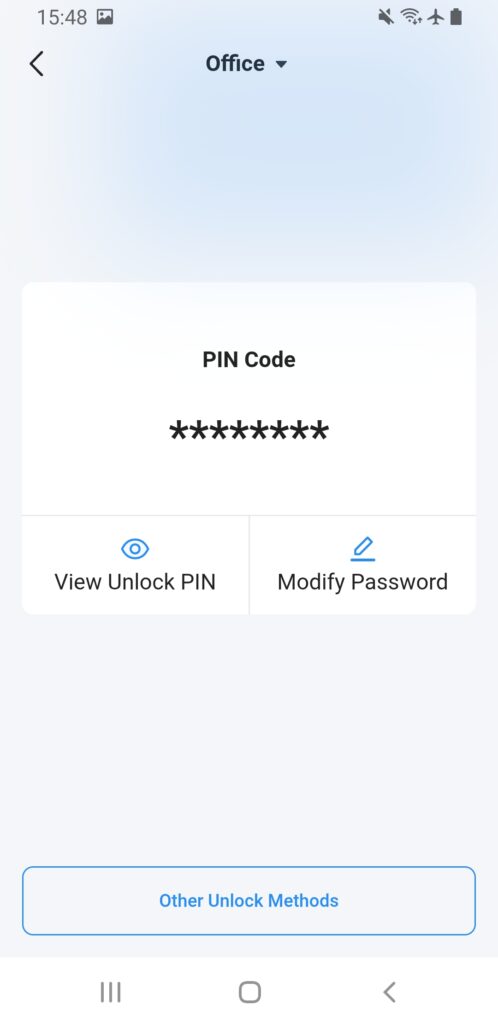
Administrators can view and modify their own PIN in the My PIN section of the app:
Temporary Passwords (Temp Key)
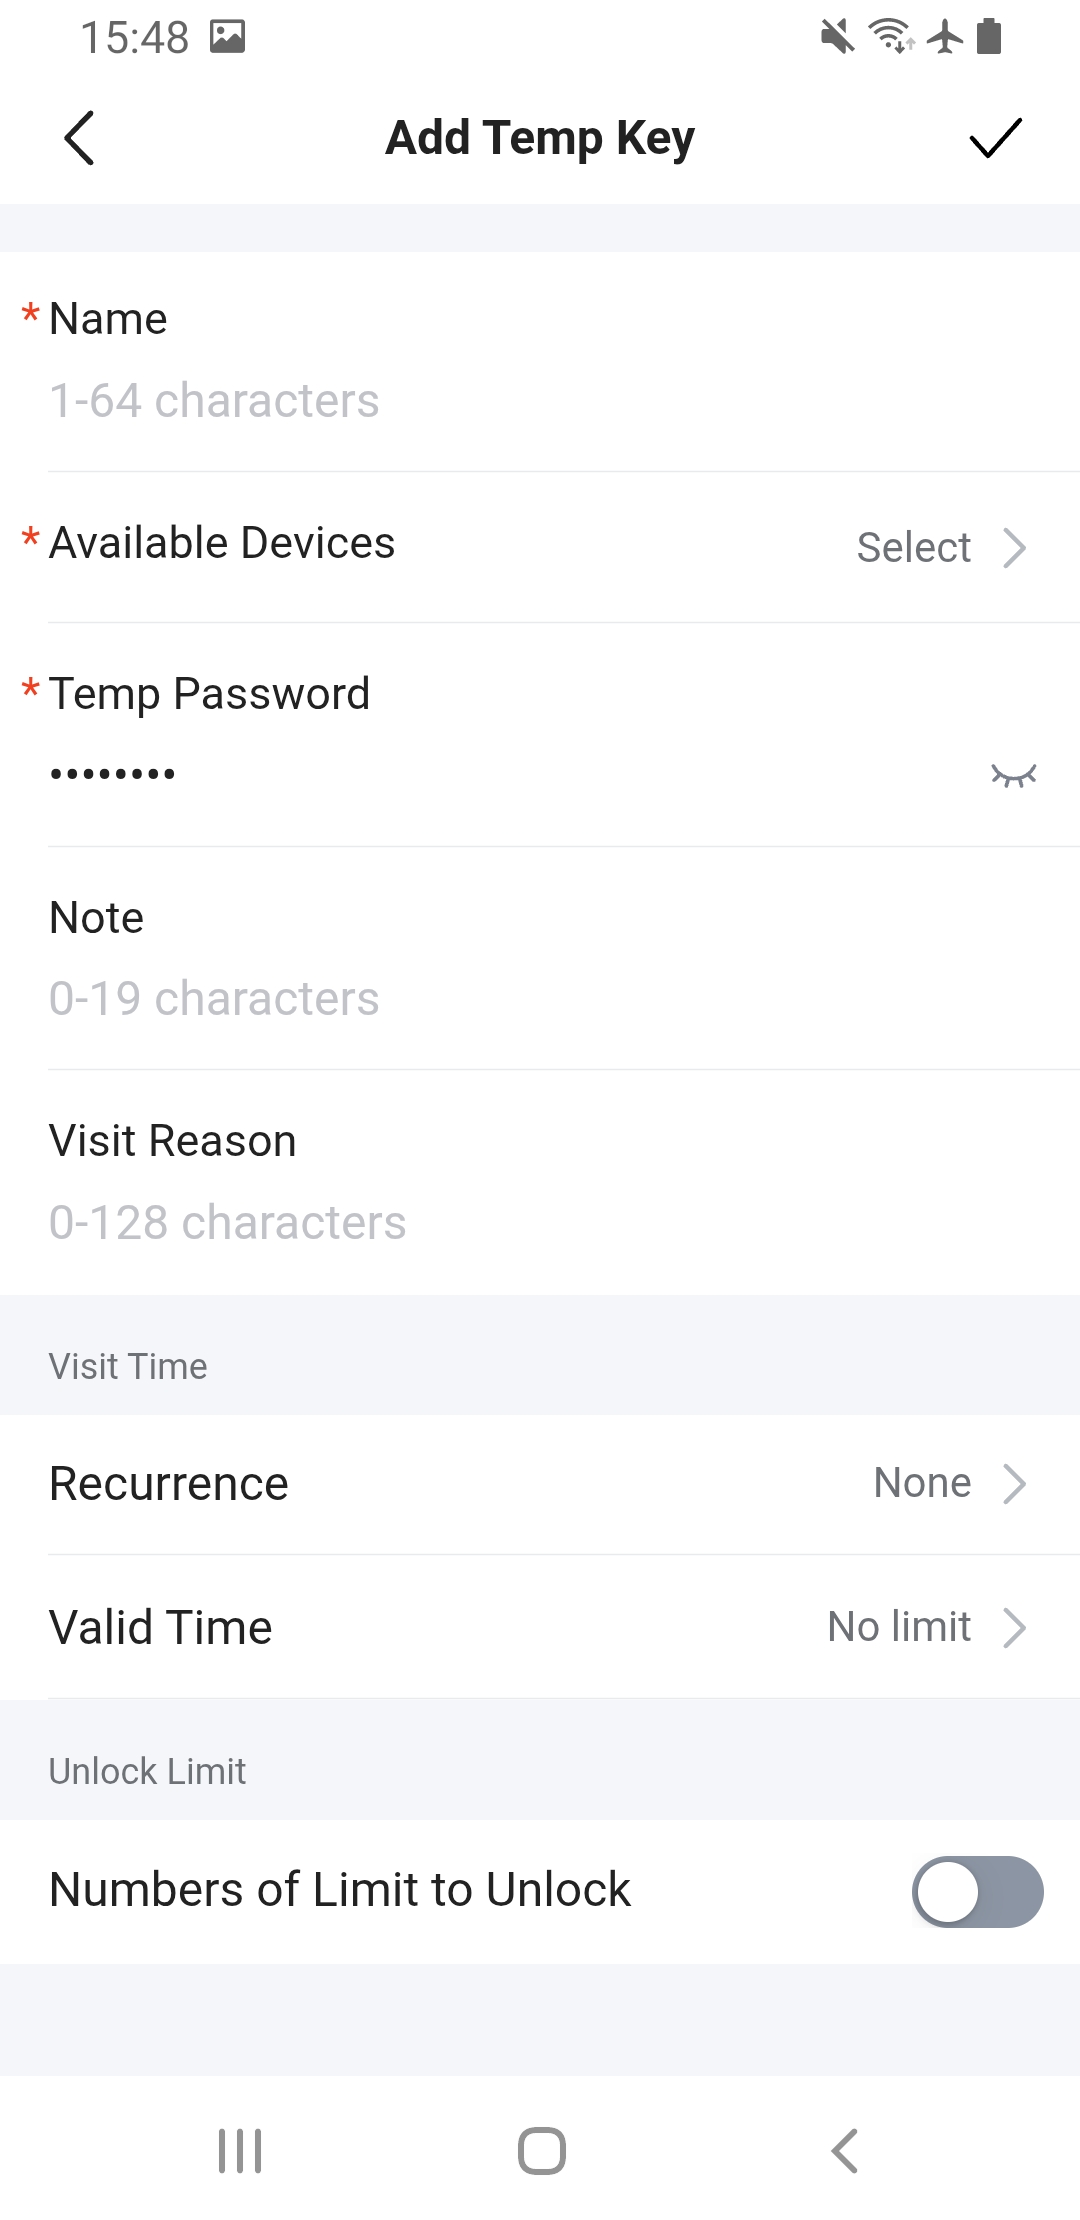
Temporary passwords are used to grant one‑time or time‑limited access to visitors. To create a temporary password:
- Tap Temp Key on the Doors page or Visitor → Add in the Management tab.
- Enter the Name of the visitor and select the Available Devices.
- Generate or enter a Temp Password (4–11 digits). Optionally set Visit Reason, Recurrence, Valid Time, and Unlock Limit.
- Save and share the password with the visitor (e.g., via message). The visitor enters the password on the door station keypad to unlock the door.
Shake Phone and Approach to Open
On Android and iOS, you can enable Shake Phone or Hands‑Free (Approach to Open) to unlock doors when your phone is near a door station. These features require Bluetooth and may be less reliable in noisy RF environments. Adjust the sensitivity in Door Unlock Settings; high sensitivity means the phone will unlock earlier.
CALLING AND VIDEO PREVIEW
Incoming Calls
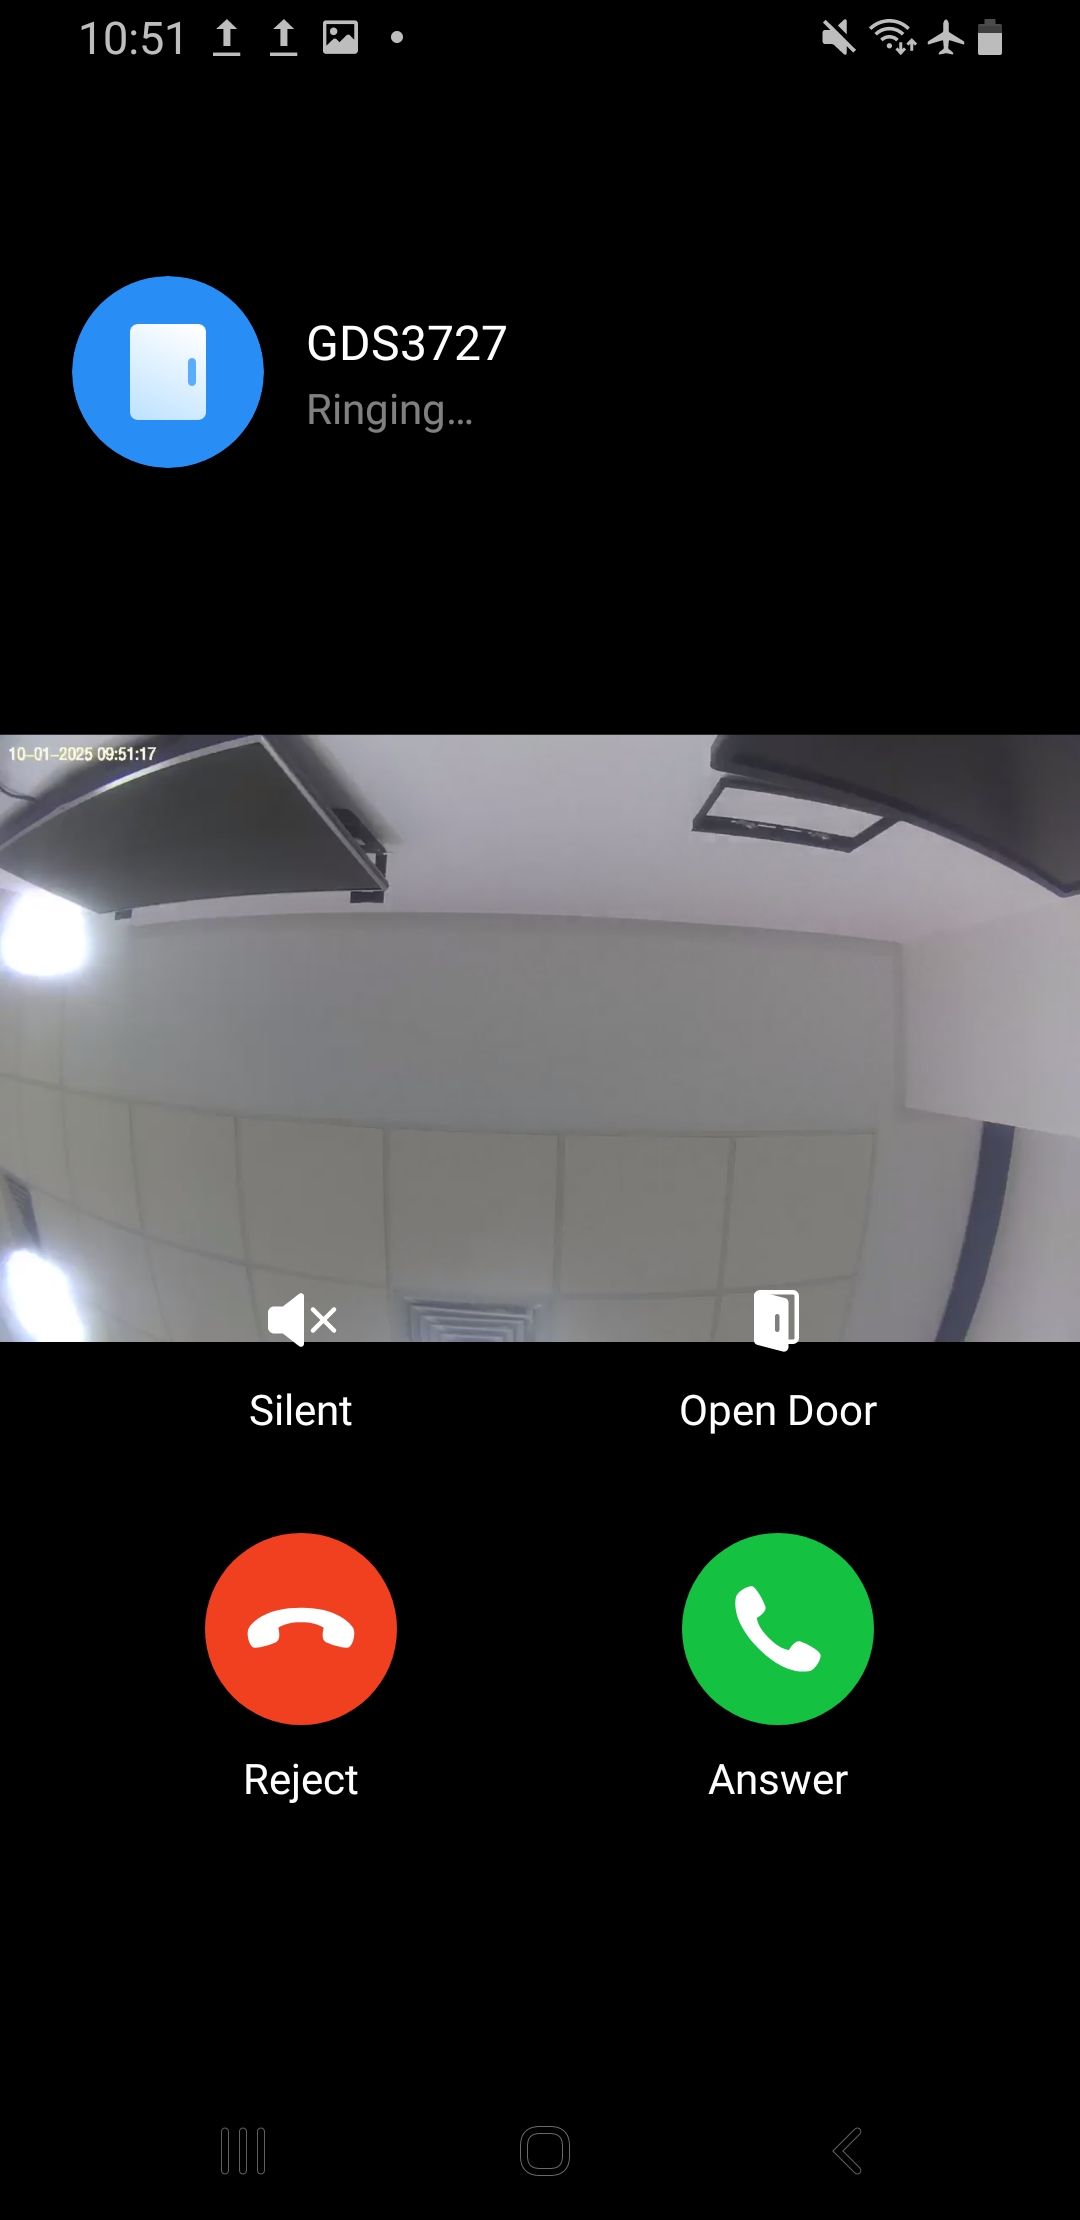
When a visitor presses the doorbell, the app rings and displays a live video preview (if monitor permission is enabled). You can Answer, Reject, Silence the call, or Unlock. If two‑way audio is available, you can talk to the visitor, then tap Unlock to open the door remotely.
If your device has notifications turned off or is in Do Not Disturb mode, incoming calls may not ring. On iOS, calls may not appear on the lock screen unless Call Notification is enabled in Me → Notification Settings.
Alarm Calls
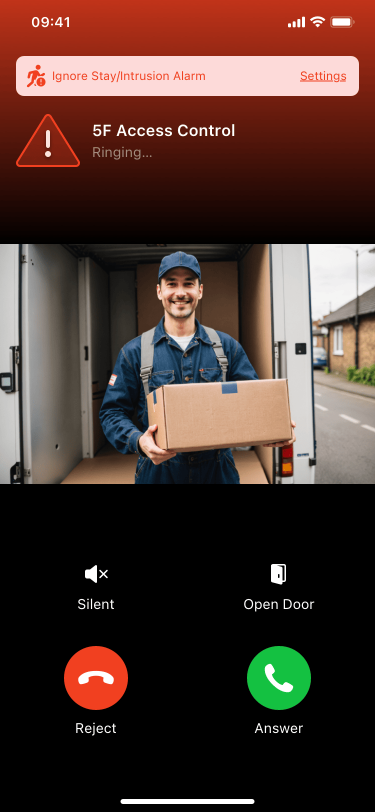
Alarm calls are automated calls triggered by specific alarm events detected by the door station, such as intrusion detection, loitering detection, tampering, or unauthorized access attempts. These calls are used to immediately notify administrators or designated users through the application for faster response and monitoring.
Call Settings and Notifications
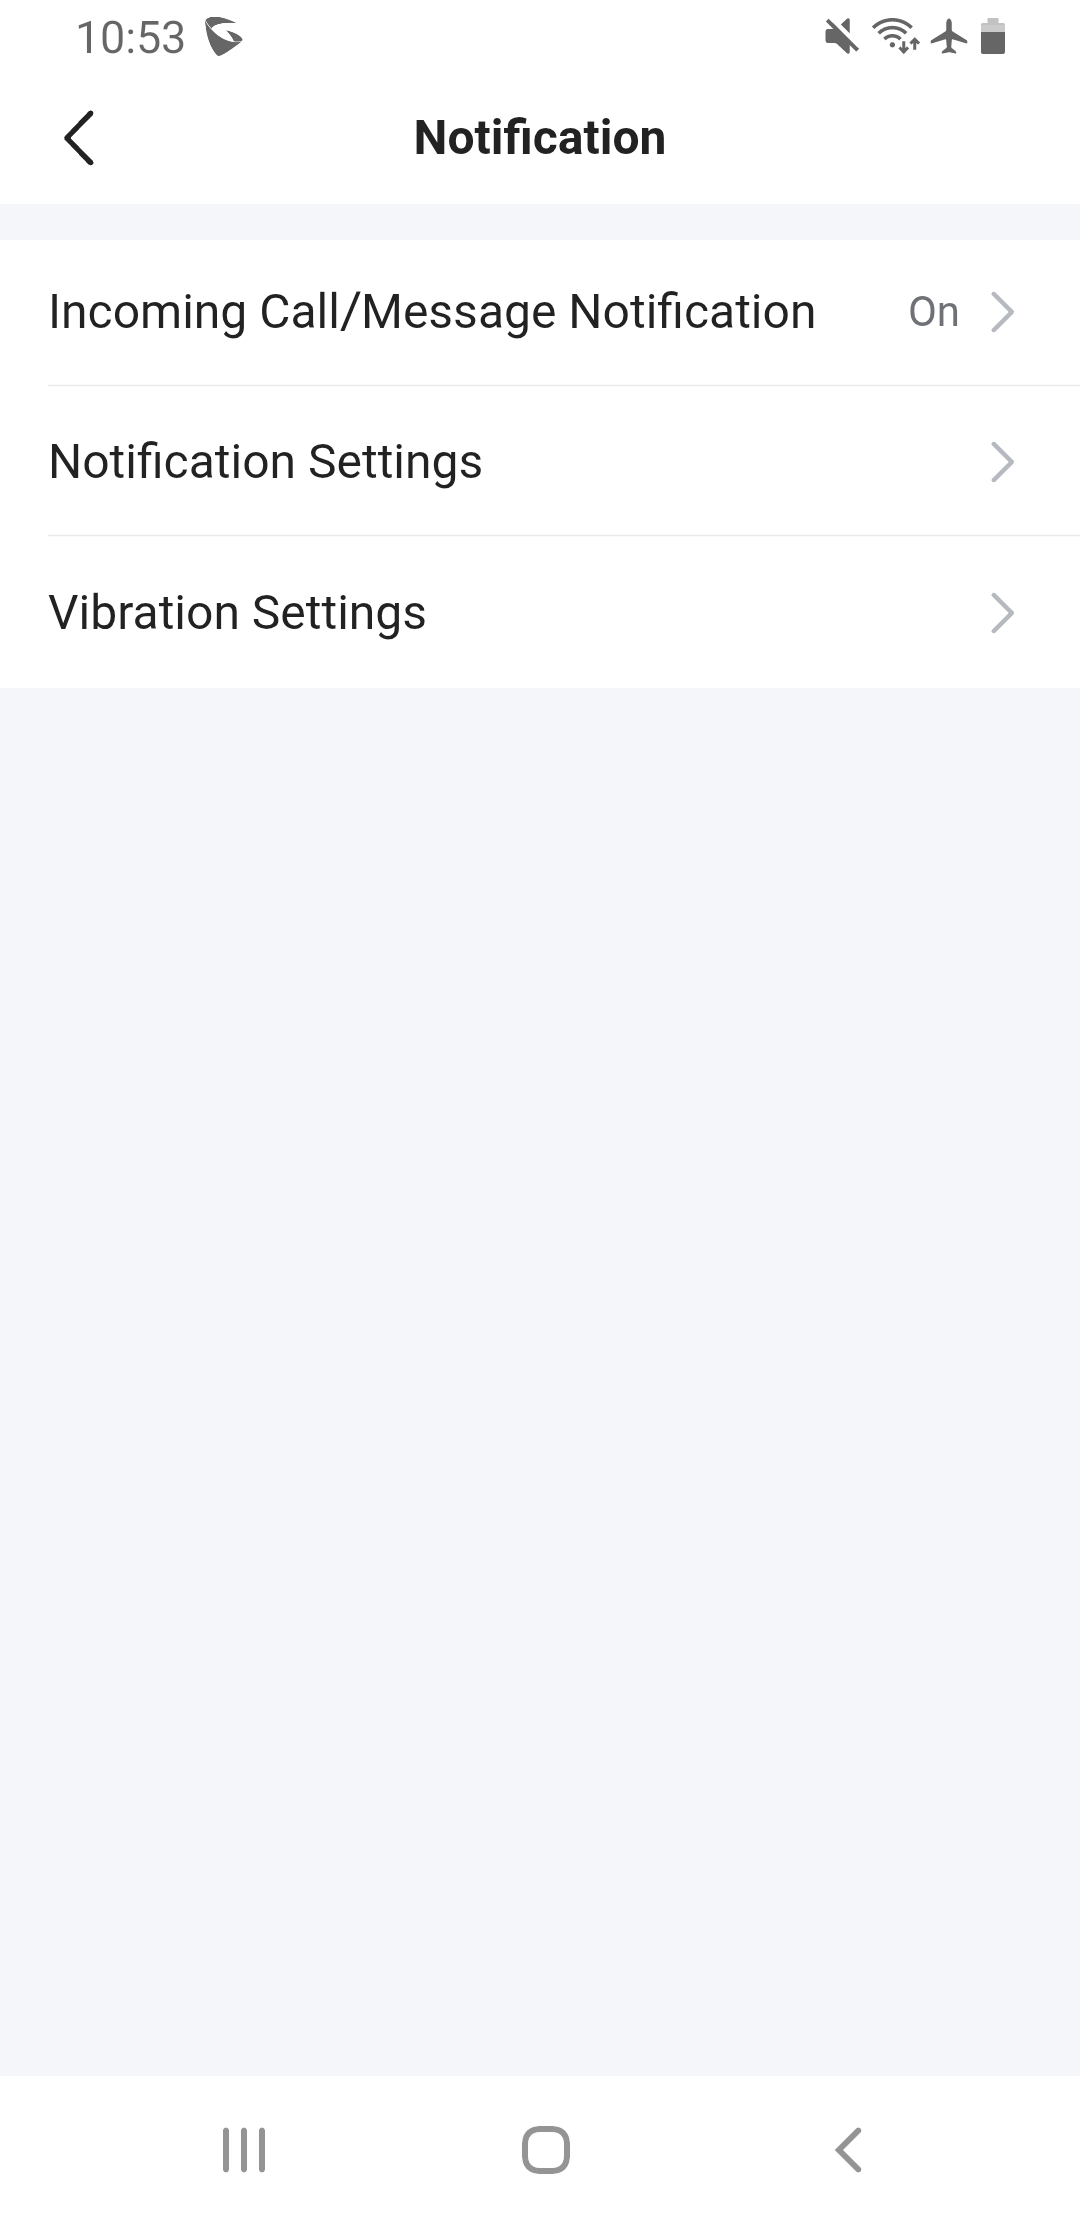
In Me → Notification, you can configure whether the app should display pop‑up notifications for incoming calls, message notifications, and unlock success prompts. On Android, the app can keep running in the background to ensure timely notifications; on iOS, the system may suspend background tasks, so enabling critical alerts may improve call reliability.
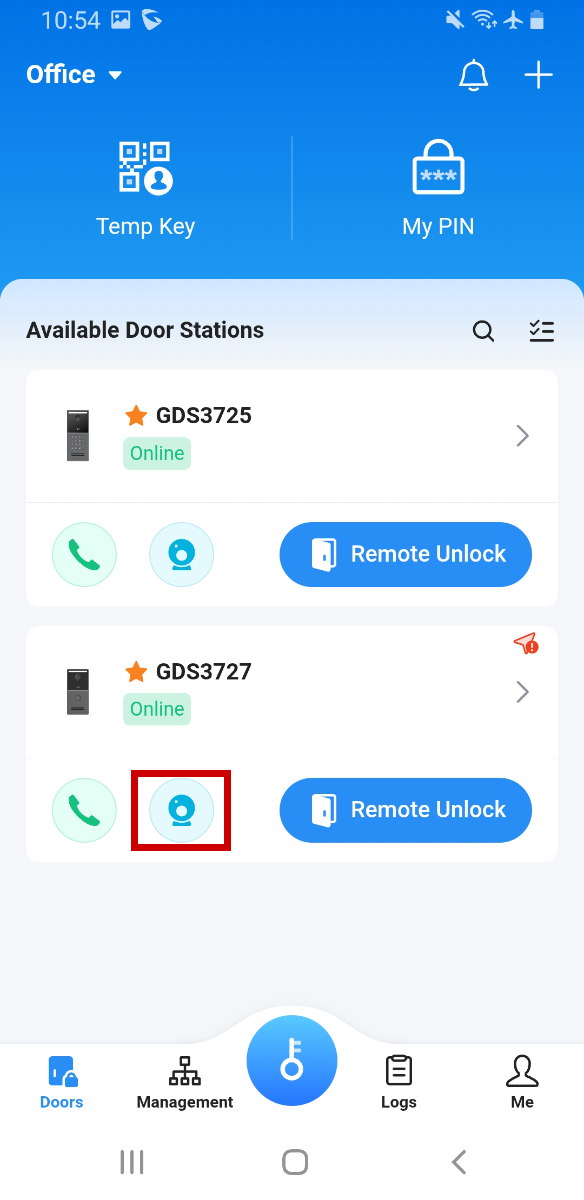
Preview Video
Authorized users can preview the door station’s live video by tapping Preview on the Doors page. This requires Monitor Permission to be enabled in the user profile.
Video resolution and bitrate can be adjusted in System Settings → Video Resolution.
PERSONAL AND SYSTEM SETTINGS
Door Unlock Settings
Accessible from Me → Door Unlock Settings, these settings allow you to enable or disable unlocking modes (1‑tap, hands‑free, shake phone, NFC), specify which doors can be unlocked via each method, and adjust sensitivity. When a mode is disabled, the corresponding option will not appear in the Doors page.
Personal Settings
The Personal Settings page allows users to manage their account information and preferences. Here, you can set a nickname, view or update your email and login account, change your password, and adjust regional settings such as time zone, 24-hour clock format, and date format. The User Type indicates whether the account is a personal user or administrator, while the Country field sets the regional profile. Additional login methods, such as linking a Google account, can also be managed from this page. At the bottom, the Delete Account option permanently removes the account and all associated data.
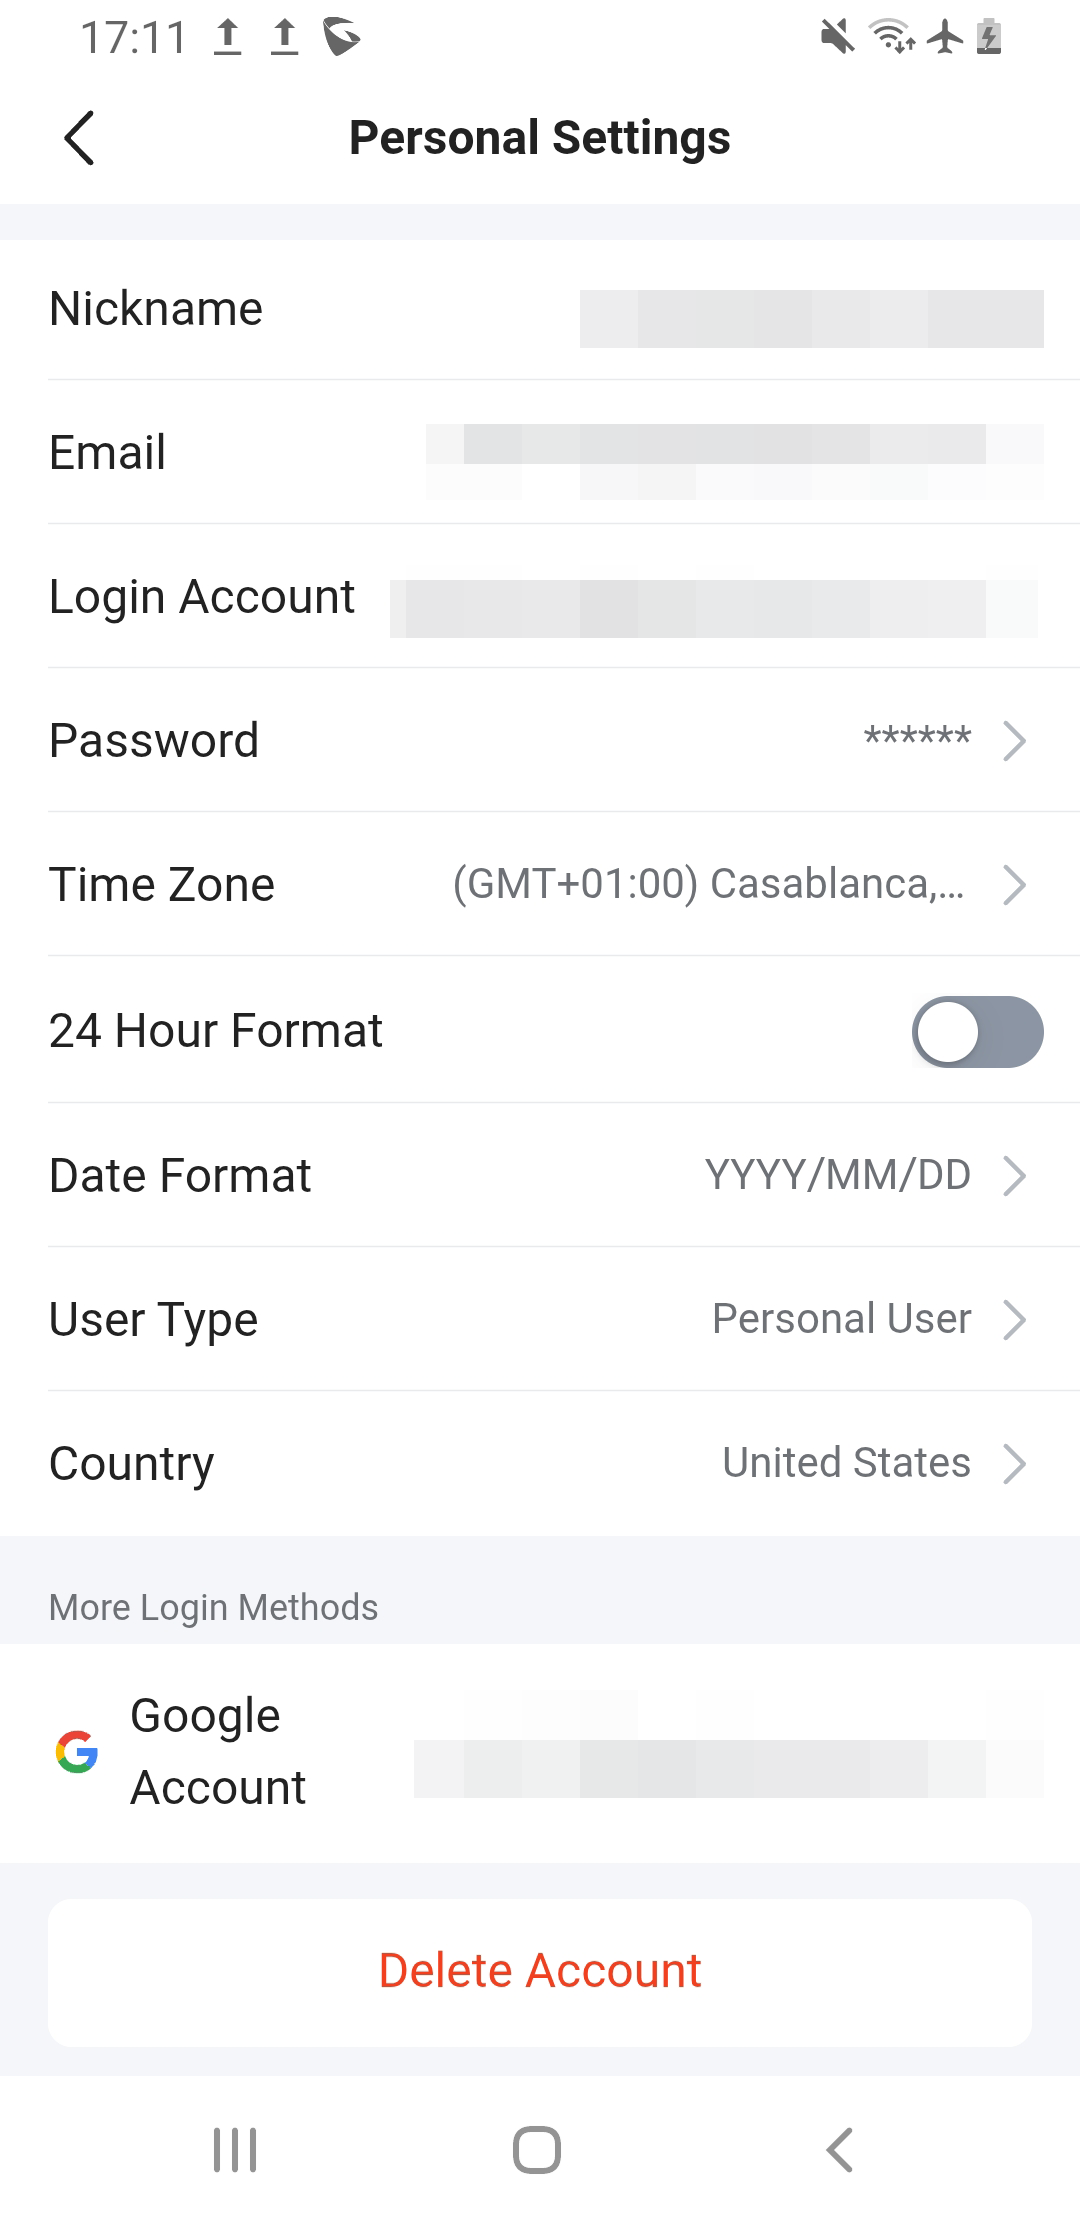
| Option | Description |
|---|---|
| Nickname | The display name of the account, shown in the app interface. |
| The registered email address for the account. Partially masked for security. Used for login, notifications, and password recovery. | |
| Login Account | The primary login credential (email or username) linked to the account. |
| Password | The account password (hidden for privacy). It can be changed by editing this field. |
| Time Zone | Sets the account’s time zone. Impacts timestamps for events, logs, alarms, and scheduling. |
| 24 Hour Format | Toggle to switch between 24-hour clock (e.g., 14:30) and 12-hour clock (e.g., 2:30 PM). |
| Date Format | Sets how dates are displayed (e.g., YYYY/MM/DD, DD/MM/YYYY, or MM/DD/YYYY). |
| User Type | Defines the role of the user. Example: Personal User vs Enterprise user vs Community Manager. Controls the available permissions and settings. |
| Country | Country/region associated with the account. May be used for localization, time zone defaults, or service region compliance. |
| More Login Methods | Shows additional linked login options (e.g., Google Account, Apple ID, or other SSO methods). |
| Google Account / Apple ID | Displays a connected Google account or Apple ID used as an alternative login method. |
| Delete Account | Permanently removes the user account from the system. This will delete associated data, and the action is irreversible. |
System Settings
The System Settings menu allows users to configure language, audio, video, and power-related options to optimize the app’s performance and ensure smooth communication with the door station.
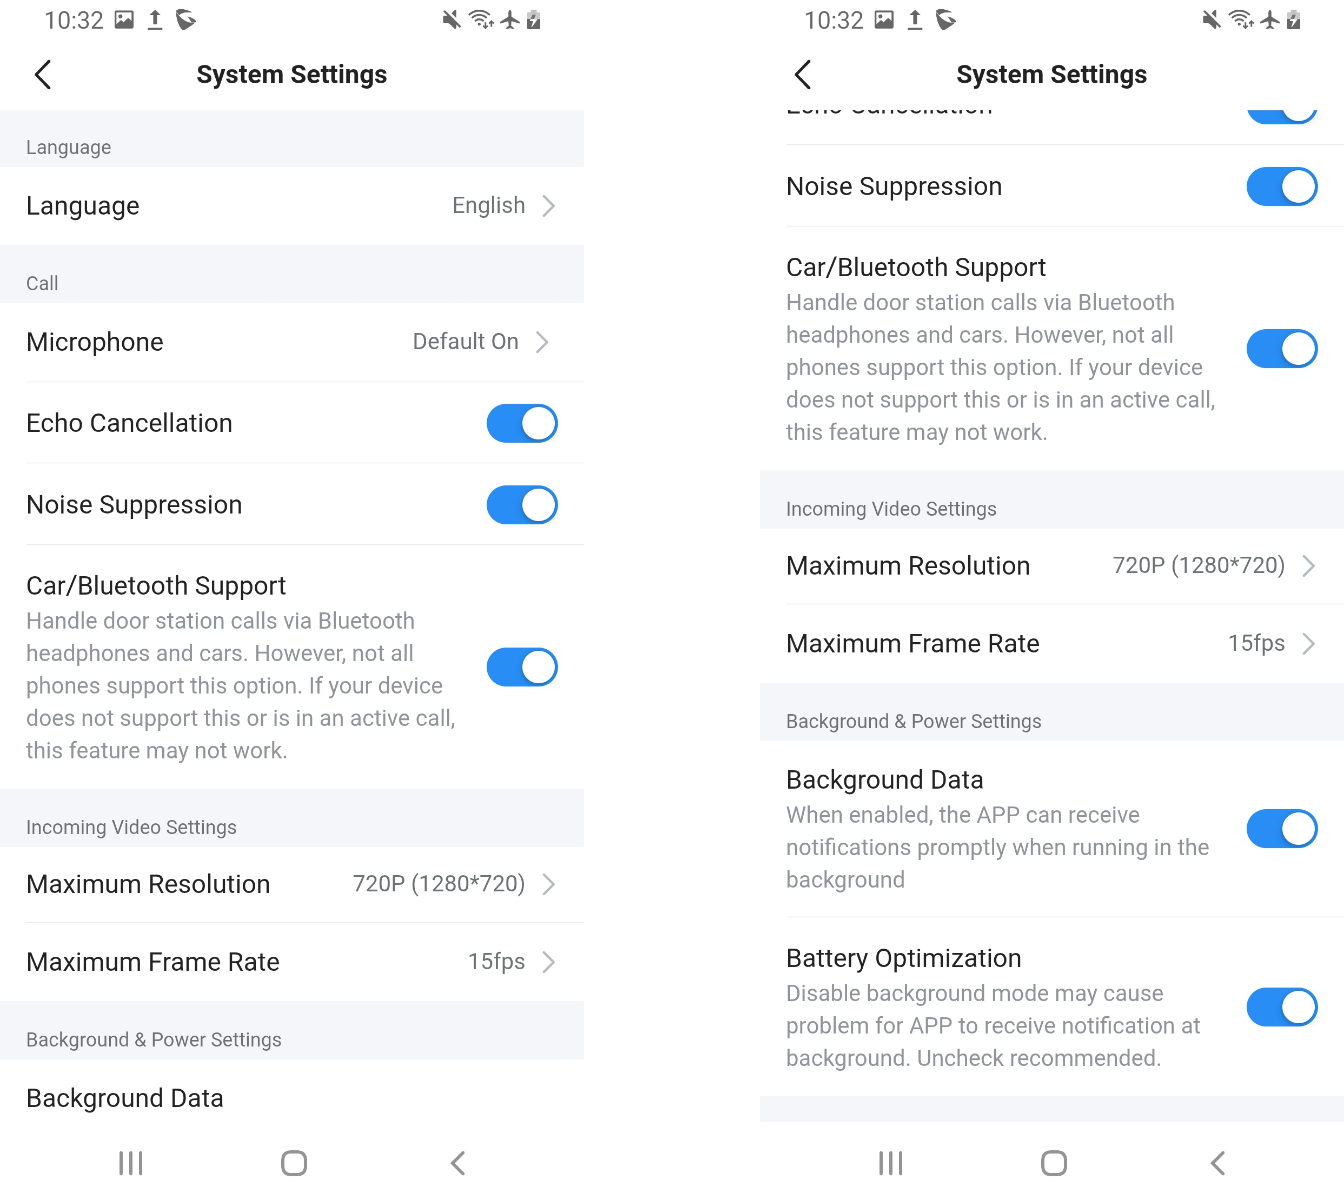
| Option | Description |
|---|---|
| Language | Sets the display language of the app interface (e.g., English, French, etc.). |
| Microphone | Controls the microphone status for door station calls. “Default On” means the microphone is automatically enabled during calls. |
| Echo Cancellation | Reduces echo during two-way communication to improve audio clarity. Recommended to keep enabled. |
| Noise Suppression | Filters background noise (such as wind or traffic) to ensure clearer voice transmission. |
| Car/Bluetooth Support | Defines the maximum frames per second (fps) for incoming video. Higher fps makes the video smoother but can increase data usage. |
| Maximum Resolution | Sets the maximum incoming video resolution (e.g., 720p HD). Higher resolution improves video quality but may use more bandwidth. |
| Maximum Frame Rate | Defines the maximum frames per second (fps) for incoming video. Higher fps makes the video smoother, but can increase data usage. |
| Background Data | When enabled, allows the app to receive notifications even when running in the background. |
| Battery Optimization | Ensures the app continues to function properly in the background. If disabled, the app may not receive notifications on time. Recommended to keep enabled. |
Notification Settings
The Notification menu allows users to manage how they receive alerts for incoming calls, messages, and app events. These options ensure users are promptly informed while giving flexibility to adjust the style and behavior of notifications.
| Option | Description |
|---|---|
| Incoming Call/Message Notification | Enables or disables notifications for incoming calls and messages. When turned off, the user will not be alerted for new calls or messages. |
| Notification Settings | Opens detailed notification options, such as sound, display style, and whether to allow pop-up or banner notifications. |
| Vibration Settings | Allows customization of vibration alerts for incoming calls and messages. Users can enable, disable, or choose a vibration pattern. |
Help And Feedback
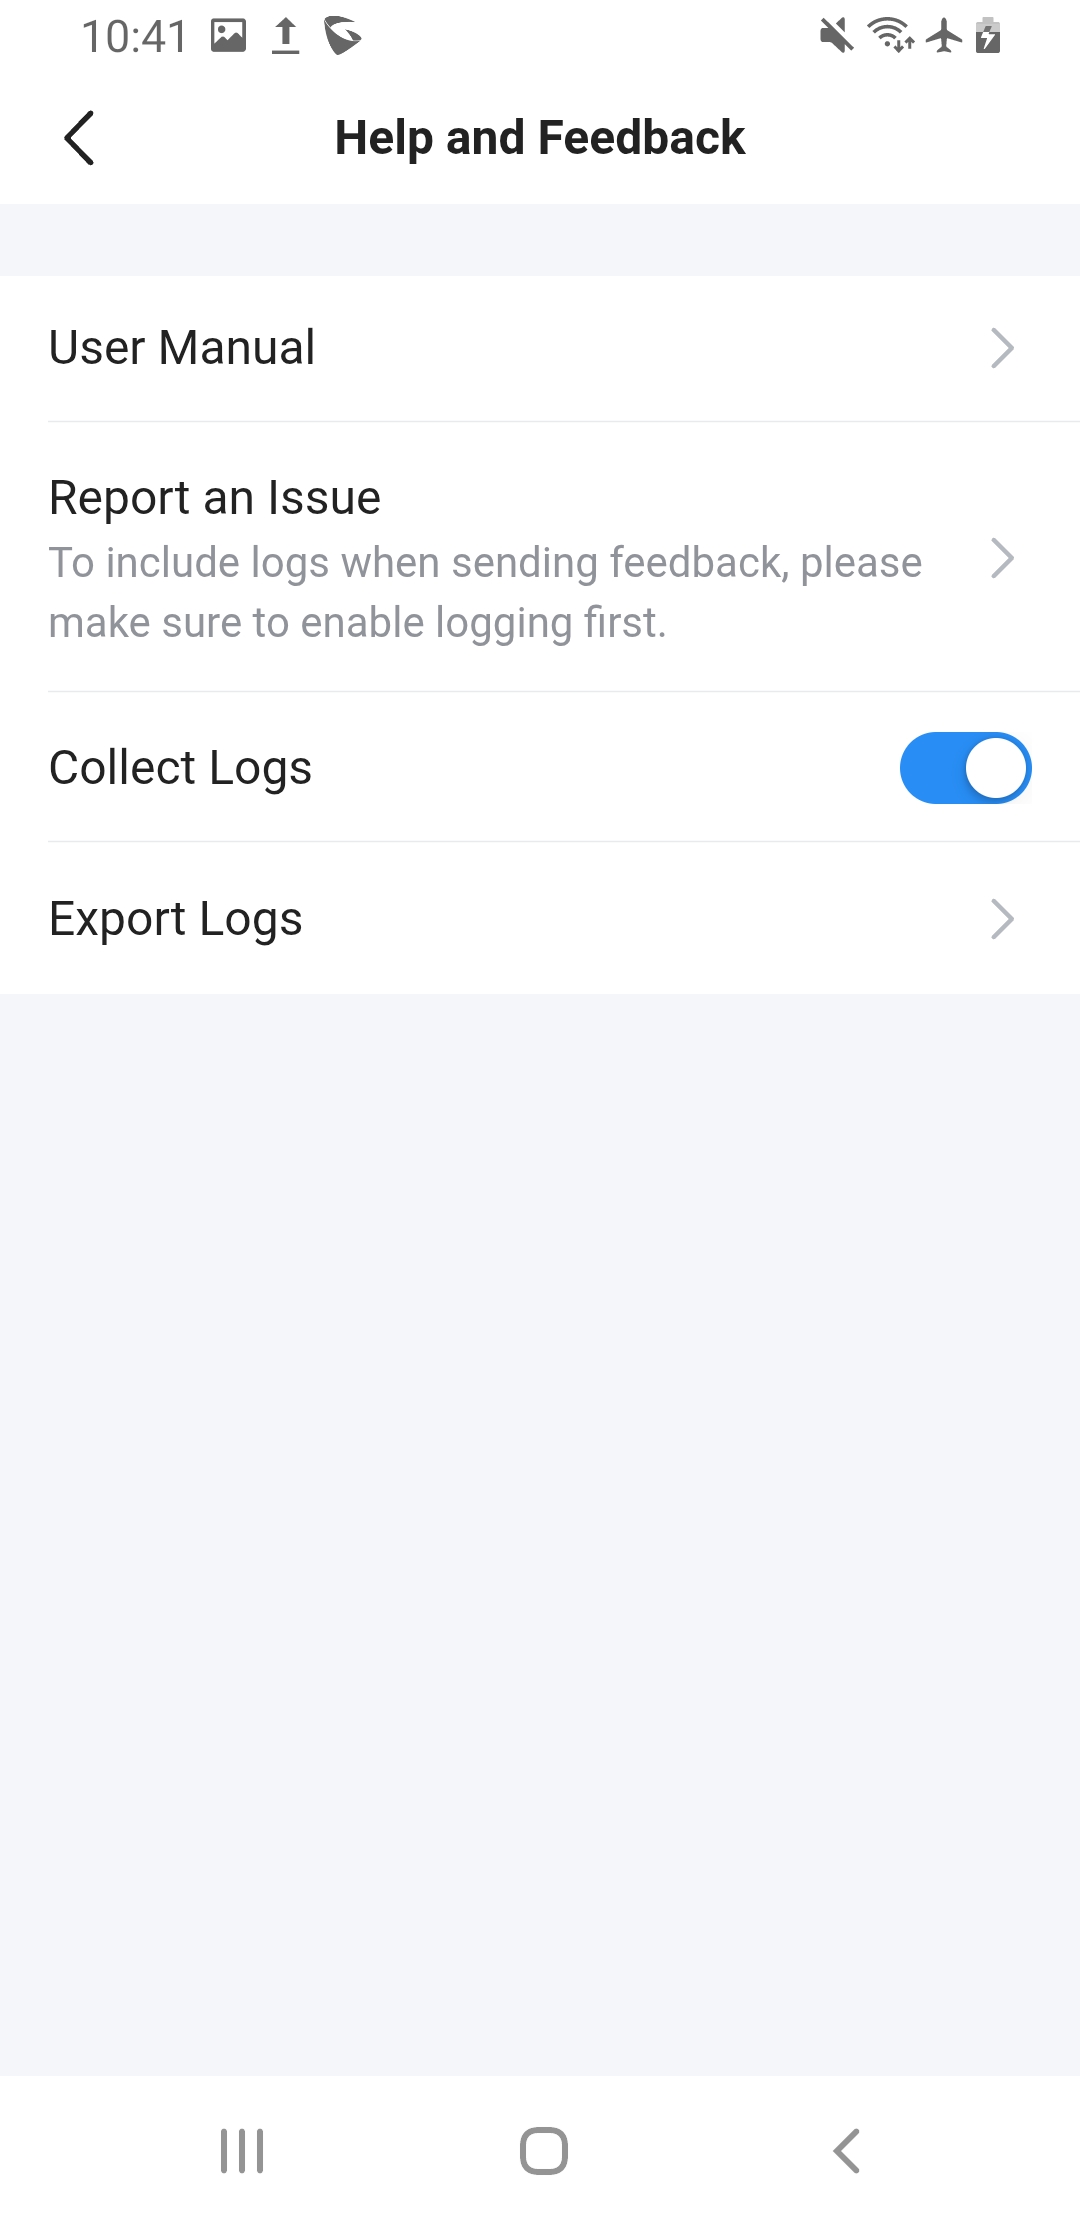
The Help and Feedback menu provides users with access to documentation, support, and troubleshooting tools. It allows you to review the user manual, report issues, and collect or export diagnostic logs to assist in resolving problems.
| Option | Description |
|---|---|
| User Manual | Opens the digital user manual for guidance on using the app and device features. |
| Report an Issue | Allows users to send feedback or report problems directly to support. To include diagnostic data, logging must be enabled beforehand. |
| Collect Logs | When enabled, the app begins recording system logs and activity details. These logs are useful for diagnosing issues. |
| Export Logs | Exports the collected logs for analysis or to send to technical support when troubleshooting a problem. |
About
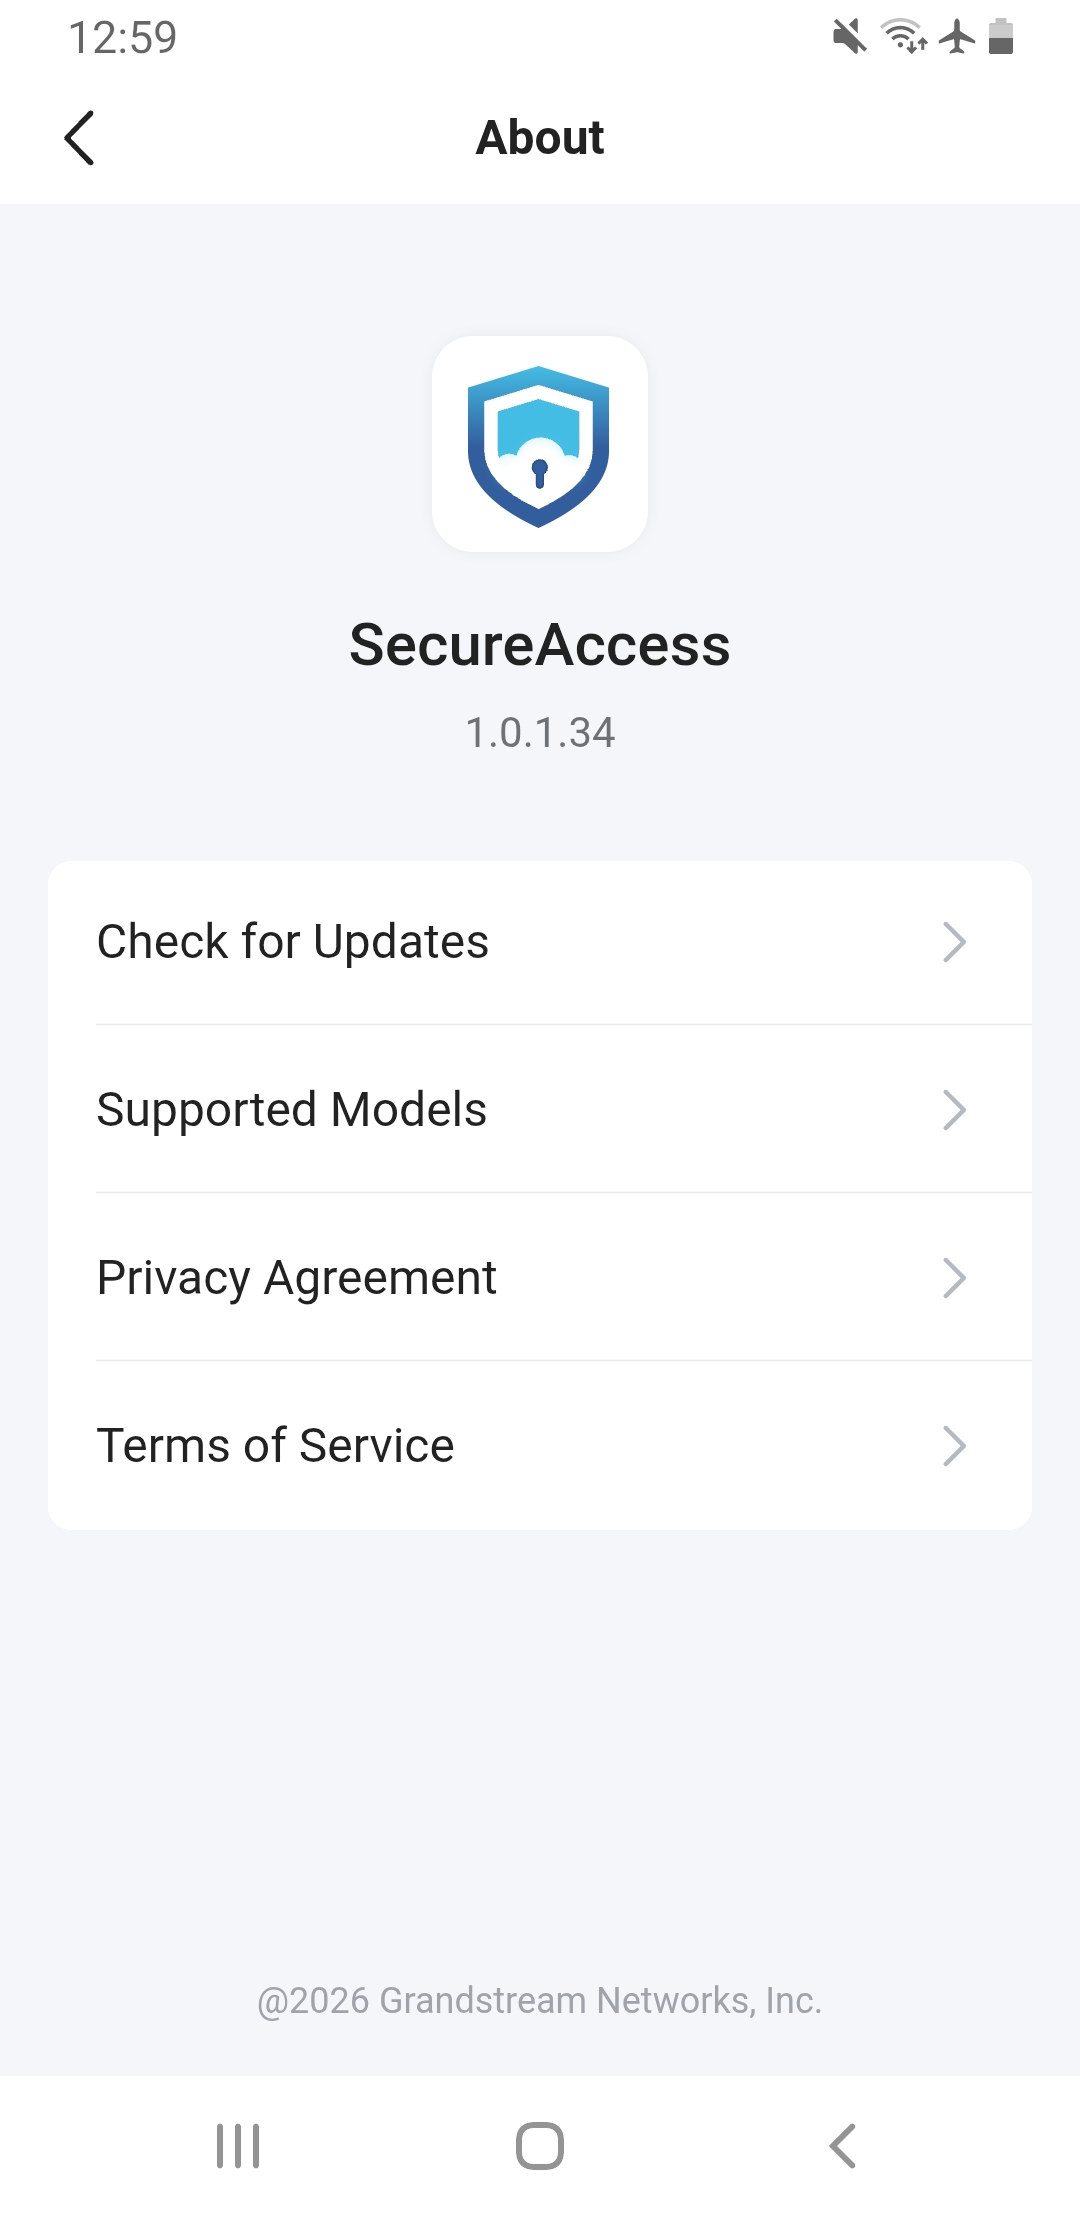
The About page provides general information about the SecureAccess application, including its version number, supported models, legal policies, and update options. This section helps users verify compatibility and stay informed about the app’s usage terms.
| Option | Description |
|---|---|
| App Logo and Version | Displays the application logo and current version number (e.g., 1.0.1.30). Useful for troubleshooting and confirming the latest release. |
| Check for Updates | Allows users to manually check if a newer version of the app is available. |
| Supported Models | Lists the Grandstream door station devices compatible with the SecureAccess app. |
| Privacy Agreement | Opens the app’s privacy policy, explaining how user data is collected, stored, and used. |
| Terms of Service | Provides the legal terms and conditions for using the app. |
Switch Account and Logout
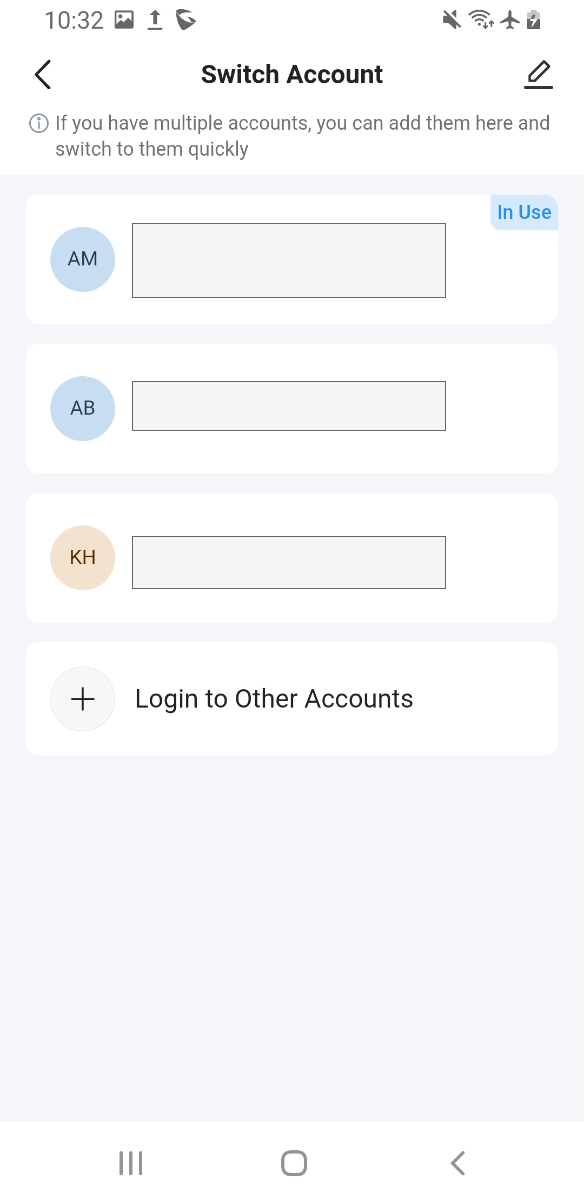
At the bottom of the Me tab, you can Switch Account to log into another organization or user account without closing the app. Select Login to Other Accounts to add new accounts.
ADDITIONAL NOTES AND TIPS
- Network Connectivity: The app requires a stable Internet connection to receive remote unlock commands, call notifications, and video previews. Local Bluetooth/NFC unlocking will still operate without Internet, but logs will sync when the connection resumes.
- Security Best Practices: Use strong passwords and change them regularly. Do not share your PIN or temporary passwords publicly. When enabling Hands‑Free or Shake Phone, reduce sensitivity to minimize accidental unlocking.
- Troubleshooting: If Bluetooth unlocking fails, verify that Bluetooth is enabled on the phone and the door station, and that you are within range (approximately 0.1 m to 3m, depending on your unlocking distance configuration under My – Door Unlock Settings). For NFC unlocking, ensure the phone supports NFC and the door station has Allow NFC enabled. If you do not receive calls or notifications, check notification settings and confirm the app is allowed to run in the background.
SUPPORTED DEVICES
Device | Firmware Required |
GDS3725 | 1.0.1.26+ |
GDS3726 | 1.0.1.26+ |
GDS3726Q | 1.0.3.9+ |
GDS3727 | 1.0.1.26+ |
GSC3565 | 1.0.1.8+ |
GSC3560 | 1.0.1.8+ |
CHANGE LOG
This section documents significant changes from previous versions of the user manual for the SecureAccess App. Only major new features or major document updates are listed here. Minor updates for corrections or editing are not documented here.
Version 1.0.3.19 (Android) / 1.3.19 (iOS)
- Added support for multiple MFA methods for platform/organization admins. [Login and Multi‑Factor Authentication]
- Added support for the GDS3726Q model. [GDS3726Q]
- Added configuration options for Safe Room Mode and Door-Open Timeout Alarm, which are now always available regardless of the Security Room Mode toggle status. [Linkage Mode]
- Safe Room Mode and Force-Open Function can now be enabled independently, allowing the Force-Open function to remain active when Safe Room Mode is enabled. [Linkage Mode]
- Fixed several known issues and improved overall performance and user experience.
Version 1.0.3.7 (Android) / 1.3.7 (iOS)
- Added feature: Support for organization-based device configuration options. Residential-Community organizations now support Building and Apartment assignment, while Non-Residential organizations support Department assignment. [Add Organization]
- Modified feature: Device onboarding method has been updated from using MAC Address + SN to MAC Address + Initial Password. [Adding Devices]
- Added feature: Scan-to-Add functionality for device onboarding, supporting both dual barcodes and QR code scanning. [Adding Devices]
- Added feature: Device details page now displays Building & Apartment or Department information based on the organization type. [Configuring Door Station Parameters]
- Added feature: Batch update functionality for device Department/Building information. [Device Batch Configuration]
- Added feature: Device list filtering by Building & Apartment or Department. [Filter Added Devices]
- Added feature: Added Building/Department information display in the access control device list. [Associated Building & Apartment]
- Modified feature: Organization type is now configured only from the Web interface and displayed in the App interface. [Add Organization]
- Added feature: User and residence search now supports filtering by User Type, Access Group, Building, Apartment, and Department. [Search Users/Residences]
- Added feature: Regular users can now be associated with multiple access groups. [Access Group Management]
- Added feature: Quick card enrollment and successful user addition pages now support assigning multiple access groups. [Scanning IC Cards]
- Added feature: Added new filter criteria for Administrator and Regular User types, as well as authorization permissions including PIN Access, Card Access, Pass Access, App Access, and Monitor. [Filter Based on User Type]
- Added feature: Added system operation logs related to Building & Apartment and Department operations. [System Operation Logs]
- Removed option: Password unlocking has been removed from Door Opening Settings.
- Removed option: Card unlocking configuration has been removed from Door Opening Settings.
- Added feature: Added a dedicated card unlocking configuration item. [Door Unlock Methods]
- Added feature: Added Linkage Mode configuration with the following options: Disabled, One-Way Interlocking Door Mode, and Security Room Mode. [One-way Interlocking Doors Mode]
- Added feature: Added SD card alarm support. [SD Card Alarm]
- Added feature: Added Security Room alarm support. [Secure Room Alarm]
- Removed option: Cloud capture storage method has been removed.
- Modified feature: Card Swipe Interval configuration has been moved from the Door Opening Settings module to the Card-Based Door Opening module. [Card Swipe Interval (ms)]
- Added feature: The system now automatically generates four default access groups. [Access Group Management]
- Added feature: Added a “View Details” function for selected call records in Administrator/Regular User call logs. [Call Logs]
- Modified feature: Access Group interaction logic in the App has been synchronized with the Web interface due to shared APIs. [Access Group Management]
- Modified feature: One-Touch Door Opening Bluetooth mode has been changed to broadcast mode. [Bluetooth Unlocking]
- Removed feature: Bluetooth door opening result feedback is no longer provided.
- Modified requirement: Organizations must now be added before they can be managed. [Accessing Other GDMS Cloud Solutions]
- Added feature: Administrator users can now ignore loitering and intrusion detection alarms during alarm calls and conversations. [Alarm Calls]
- Added restriction: Only administrator users are allowed to switch subsystems. [Accessing Other GDMS Cloud Solutions]
- Removed option: Deletion of schedules is no longer supported from the app. [Copy to Other Organizations]
- Added Option: “Copy to Other Organizations” for system-generated schedules. [Copy to Other Organizations]
- Removed option: Deletion of holidays is no longer supported from the app. [Copy to Other Organizations]
Version 1.0.1.35 (Android) / 1.1.35 (iOS)
- Removed installation restrictions in the Google Play Store for certain Android devices; Bluetooth and NFC are now optional. [Download and Installation]
Version 1.0.1.34 for Android® / Version 1.1.35 for iOS®
- Added support for Alarm Notifications Settings in Access Control Device Settings [Alarm Notifications Settings]
Version 1.0.1.30 for Android® / Version 1.1.31 for iOS®
- This is the initial release.