OVERVIEW
The GXV3370/GXV3380/GXV3350/WP820 operating system is developed on the AndroidTM platform. Besides inheriting the Android interface functions, more interfaces have been supported from users’ requirements. This document describes how to use the APIs for users’ application development on GXV3370/GXV3380/GXV3350/WP820.
APPLICATION BUILDING
With GS JAR files, users can start building apps with Android Studio (or another IDE) following the steps in this guide.
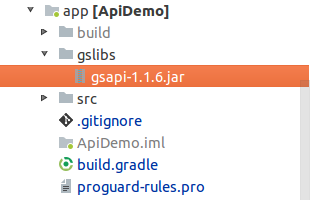
Create dir “gslibs” under App Module
Under App module, create the “gslibs” directory. Then copy the JAR files “gsapi-1.1.6.jar” under “gslibs” directory so the JAR files are reachable from the app files.
Build.gradle
Add dependencies in the build.gradle file using compileOnly or provided. Please see the JAR file path below for reference:
dependencies {
    . . . . . .
    compileOnly files (’gslibs/gsapi-1.1.6.jar’)
}
Please refer to below table that has listed the JARs that can be included when compiling your app. They should be added in “build.gradle” file if used.
API | Description |
AudioRoutetApi | APIs related to audio route. This is used for switching audio route and checking audio route. |
BaseAccountApi | APIs related to accounts. This is used for calls. |
BaseLineApi | APIs related to lines. This is used for creating line channel upon outgoing call and incoming call. |
BaseCallApi | APIs related to calls. This is used for making a call, receiving a call and etc. |
BasePhoneService | APIs for the target app as default phone app. |
ContactsContext | Useful API constants for Create-Read-Update-Delete (CRUD) contacts. |
CalllogContext | Useful API constants for Create-Read-Update-Delete (CRUD) call logs. |
SmsManagerAPI | APIs related to SMS. This is used for sending SMS, adding SMS lis and etc. |
CallToneApi | Useful API constants for playing the call tones, such as incoming call ringtone, call waiting tone, busy tone, dial tone, DTMF tone, confirmation tone, auto-answer tone, DND tone, reorder tone, etc. |
Main API list in JARs
Here is a list of main APIs included in the above JARs:
API | Description |
AudioRoutetApi | APIs related to audio route. This is used for switching audio route and checking audio route. |
BaseAccountApi | APIs related to accounts. This is used for calls. |
BaseLineApi | APIs related to lines. This is used for creating line channel upon outgoing call and incoming call. |
BaseCallApi | APIs related to calls. This is used for making a call, receiving a call and etc. |
BasePhoneService | APIs for the target app as default phone app. |
ContactsContext | Useful API constants for Create-Read-Update-Delete (CRUD) contacts. |
CalllogContext | Useful API constants for Create-Read-Update-Delete (CRUD) call logs. |
SmsManagerAPI | APIs related to SMS. This is used for sending SMS, adding SMS lis and etc. |
CallToneApi | Useful API constants for playing the call tones, such as incoming call ringtone, call waiting tone, busy tone, dial tone, DTMF tone, confirmation tone, auto-answer tone, DND tone, reorder tone, etc. |
USE APIs
All APIs are named as XXXApi, such as: BaseAccountApi, BaseCallApi, BaseLineApi, SmsMAnagerApi.
- Before using the APIs, users must initialize ApiClient first
- Use a function such as XXXApi.function1()
- Use a monitor such as XXXApi.function2(callback2)
Details of the API functions can be found under gsApiExternal-en directory.
Initialize ApiClient
Supported Products: GXV3370, GXV3380, GXV3350 and WP820.
App can use ApiClient by com.gs.com. To initialize ApiClient, use setContext, addApi and build functions in the Application block.
Please follow below code to initialize ApiClient:
public class DemoApplication extends Application {
    @Override
    public void onCreate() {
        super.onCreate();

        ApiClient.builder.setContext (getApplicationContext())
            .addApi(BaseAccountApi.API)
                .addApi(BaseCallApi.API)
                .addApi(BaseLineApi.API)
                .addApi(SmsManagerApi.API)
                .addApi(AudioRouteApi.API)
            .build();
    }
}
BaseAccountApi
Supported Products: GXV3370, GXV3380, GXV3350 and WP820.
Account API can be used to obtain account information, modify account information and monitor account changes.
Account Information
You can get all account information by using BaseAccountApi.getAllSipAccounts. Here is an example on how to use Account Info APIs:
public void getAllAccount() {
    List<SipAccount> sipAccounts = BaseAccountApi.getAllSipAccounts();
}
Monitor Account Status
Users can monitor account status by using BaseAccountApi.addStatusListener and BaseAccountApi.removeStatusListener. Here is an example on how to use monitor account status APIs.
Start Account Status Monitor
private void startMonitorAccountChange() {
    mAccountStatusListener = new AccountStatusListener();
    BaseAccountApi.addStatusListener (“MonitorAccount”,
        mAccountStatusListener.callback,
        AccountContext.ListenType.SIP_ACCOUNT_STATUS, false);
}
Stop Account Status Monitor
private void stopMonitorAccountChange() {
    BaseAccountApi.removeStatusListener (mAccountStatusListener.callback);
    mAccountStatusListener.callback.destroy();
    mAccountStatusListener.callback = null;
}
Monitor Account using AccountStatusListener
private class MyAccountStatusListener extends AccountStatusListener {
    @Override
    public void onSipAccountStatusChanged(List<SipAccount> list, SipAccount sipAccount) {
    }
};

AccountStatusListener mAccountStatusListener = null;
Update Account
Account information can be updated using BaseAccountApi.updateSipAccount. Here is an example showing how to use Update Account function:
public void updateAccount() {
    BaseAccount account= BaseAccountApi.getAccountbyId(0);
    Log.d(TAG,”updateAccount,original:”+account);
    if(account != null && account instanceof SipAccount){
    account.setAccountName(”Test Account”);
    boolean ret = BaseAccountApi.updateSipAccount((SipAccount) account);
    if(ret){
        Log.d(TAG,”updateAccount,changed to:”+account);
    }
    }
}
BaseCallApi
Call functions allow users to make calls, end calls and monitor call status.
Make a Call
Supported Products: GXV3370, GXV3380, GXV3350 and WP820.
Users can make a call by using BaseCallApi.makeCalls. Here is an example on how to use Call function API to make a call:
public void call(String num) {
    List<DialingInfo> dialingInfos = new ArrayList<DialingInfo>();
    DialingInfo dialingInfo = new DialingInfo();
    dialingInfo.setAccountID(BaseAccountApi.getDefaultAccount().getAccountID());
    dialingInfo.setOriginNumber(num); dialingInfos.add(dialingInfo);
    DialResults dialResults = BaseCallApi.makeCalls(dialingInfos);
    int result = dialResults.getDialResult(dialingInfo);
}
End a Call
Supported Products: GXV3370, GXV3380, GXV3350 and WP820.
User can end a call by using BaseCallApi.endCall. Here is an example on how to use Call function API to end a call:
Monitor Incoming Call
Supported Products: GXV3370, GXV3380, GXV3350 and WP820.
In order to answer incoming call, users need monitor the incoming call first. Here is an example of monitoring an incoming call.
public void endCall(View view) {
    DemoApplication app = (DemoApplication) getApplication();
    int lineId = app.getCurLineId();
    BaseCallApi.endCall(lineId);
}
Start Call Status Monitor
To start monitoring a line’s status, use BaseCallApi.addStatusListener with LINE_STATUS, and monitor a call line which has id LINE_ID.
private void startMonitorCallLines() {
    mCallStatusListener = new MyCallStatusListener();
    BaseCallApi.addStatusListener (“MonitorCall”,
        mCallStatusListener.callback,
        PhoneContext.ListenType.LINE_ID|PhoneContext.ListenType.LINE_STATUS,
        false);
}
Stop Call Status Monitor
private void stopMonitorCallLines() {
    BaseCallApi.removeStatusListener (mCallStatusListener.callback);
    mCallStatusListener.callback.destroy();
    mCallStatusListener.callback = null;
}
Monitor Call Status using CallStatusListener
private class MyCallStatusListener extends CallStatusListener {
    @Override
    public void onLineStatusChanged(int notifyType, BaseLine baseline, List<BaseLine> list) {
    }

    @Override
    public void onLineIdChanged(int oldLineId, int newLineId) {
    }
}

private CallStatusListener mCallStatusListener = null;
Monitor Handset Hook ON/OFF
Supported Products: GXV3370, GXV3380 and GXV3350.
Similar to monitoring incoming call, handset monitoring uses add/removeStatusListener. Here is an example of monitoring the hook event status:
Start Handset Hook Event Monitor
Users can monitor handset hook event status by using BaseCallApi.addStatusListener with HOOK_EVENT_STATUS.
private void startMonitorHandsetChange() {
    mHookStatusListener = new MyHookStatusListener();
    BaseCallApi.addStatusListener (“MonitorHandset”,
        mHookStatusListener.callback,
        PhoneContext.ListenType.HOOK_EVENT_STATUS, false);
}
Stop Handset Hook Event Monitor
private void stopMonitorHandsetChange() {
    BaseCallApi.removeStatusListener (mHookStatusListener.callback);
    mHookStatusListener.callback.destroy();
    mHookStatusListener.callback = null;
}
CallStatusListener Implement
private class MyHookStatusListener extends CallStatusListener {
    @Override
    public void onHookEventChanged(int device, boolean isOffHook) {
    }
}

private CallStatusListener mHookStatusListener = null;
Transfer a Call
Supported Products: GXV3370, GXV3380, GXV3350 and WP820
Users can perform blind transfer and attended transfer through transferBlind/transferAttended. The current call needs to be held before transfer.
After blind transfer, the current call ends directly, and the transferred party directly calls the transfer target.
After attended transfer, the current call will not be ended after the specified transfer, and the phone will call the transfer target. When the transfer target does not answer the call, the transfer can be cancelled/completed immediately; the phone can transfer immediately or split after the transfer target answers.
The relevant interfaces are as follows:
BaseCallApi.transferBlind(int lineId, String number) ;
BaseCallApi.transferAttended(int lineId, String number) ;
BaseCallApi.transferAttendedCancel(int lineId) ;
BaseCallApi.endCall(int lineId) ;
BaseCallApi.transferAttendedEnd(int lineId) ;
BaseCallApi.transferSplit() ;
Default Phone App
Supported Products: GXV3370, GXV3380 and GXV3350
Multiple phone applications are allowed in Grandstream phone system, and all of them can take control of calls using BaseCallApi functions. However, only one phone application can respond to line events and on/off-hook events, which is the default phone application. A default phone application is required to handle the logic of a call.
In general, System Phone is the default phone application and it can meet most needs. However, users can also develop your own phone application and make it the default phone APP.
Implement Customized Phone Service
Customizing your own phone service requires extending BasePhoneService and handling onhook/offhook events.
public class DemoService extends BasePhoneService {
    @Override
    public void onHookEvent(boolean OffHook) {
        super.onHookEvent(offHook);
        //TODO:do something
    }

    public void onEhsHookEvent(boolean OffHook) {
        super.onEhsHookEvent(offHook);
        //TODO:do something
    }

    public void onLineStateChanged(int lineId, int status) {
        super.onLineStateChanged(lineId, status);
        //TODO:do something
    }

    /**
    * return true means this click event was cost by this service.
    * else this event will call the system emergency dialer.
    */
    public boolean onEmergencyCallButtonClicked(int lineId, int status) {
        super.onLineStateChanged(lineId, status);
        //TODO:do something
        return true;
    }

    /**
    * This method will be called when clicking “Touch to return to call” in the top status bar, and you can start the call interface here.
    **/
    @Override
    public void onShowCallingView() {
        super.onShowCallingView();
    }
}
Register Customized Phone Service
<service android:name=“.DemoService”>
    <intent-filter>
        <action android:name=”com.gs.phone.service”/>
    </intent-filter>
</service>
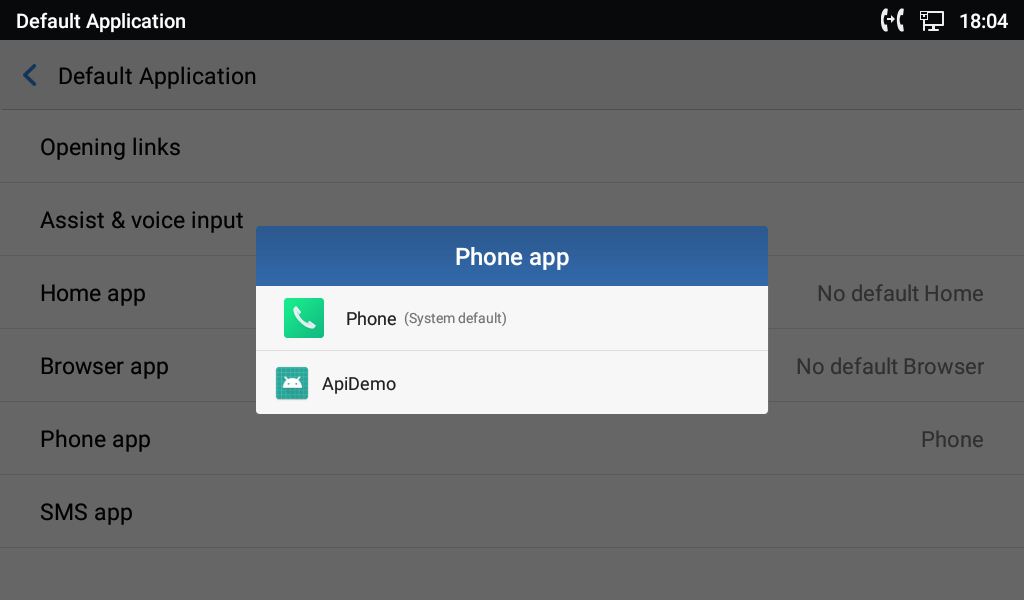
Configure the Default Phone App
- Install the target phone app.
- Open System Settings and go under APPs 🡪 Default Application 🡪 Phone app.
- Choose the target phone app as the default phone app.
SmsManagerApi
Supported Products: GXV3370, GXV3380, GXV3350 and WP820
SMS functions allow users to send/receive SMS as well as handle failed SMS.
Send an SMS
Use SmsManagerApi.sendSmsAfterSaved to send an SMS to a single contact or a group of contacts.
int accountId = 0;
String numberStr = "36324";
String content = "Test SMS to single one.";
long msgId = SmsManagerApi.sendSmsAfterSaved(accountId, numberStr, content);
if(msgId > -1){
    Log.d(TAG,"Sending sms(" + msgId + ")..");
}

String group = numberStr + "_," + "36325";
content = "Test SMS to a group of contacts.";
msgId = SmsManagerApi.sendSmsAfterSaved(accountId, group, numberStr, content);
if(msgId > -1){
    Log.d(TAG,"Sending sms(" + msgId + ")..");
}
The sending result can be monitored using SmsManagerApi.addSmsListener.
SmsManagerApi.addSmsListener(new SmsListener() {
    @Override
    public void onSend(long msgId, boolean sendOk) {
        Log.d(TAG,"This is main thread.");
        Log.d(TAG,"sms("+msgId+") is send "+(sendOk ? "success" : "fail"));
    }
});
Resend Failed SMS
Use SmsManagerApi.resendFailedSms to resend a failed SMS.
boolean ret = SmsManagerApi.resendFailedSms(msgId);
if(ret){
    Log.d(TAG,"ReSending sms(" + msgId + ")..");
}else{
    Log.e(TAG,"ReSending sms(" + msgId + ") fail.");
}
Receive SMS
Users can register a BroadcastReceiver with an SmsContext.SMS_RECEIVED_ACTION to receive SMS and use the constants defined in SmsContext.ReceiveSms to get the content of the received SMS.
private SmsReceiver smsReceiver;
private void registerSmsReceiver(){
    IntentFilter filter = new IntentFilter();
    filter.addAction(SmsContext.SMS_RECEIVED_ACTION);
    smsReceiver = new SmsReceiver();
    registerReceiver(smsReceiver, filter);
}
private void unRegisterSmsReceiver(){
    if(smsReceiver != null){
        unregisterReceiver(smsReceiver);
    }
}
class SmsReceiver extends BroadcastReceiver{
    @Override
    public void onReceive(Context context, Intent intent) {
        if(SmsContext.SMS_RECEIVED_ACTION.equals(intent.getAction())){
            long id = intent.getLongExtra(SmsContext.ReceiveSms.ID,-1);
            String number = intent.getStringExtra(SmsContext.ReceiveSms.NUMBER);
            int accountId = intent.getIntExtra(SmsContext.ReceiveSms.ACCOUNT_ID,-1);
            String content = intent.getStringExtra(SmsContext.ReceiveSms.CONTENT);
        }
    }
}
Delete SMS
Use SmsManagerApi.removeSmsById and SmsManagerApi.removeSmsByType to delete a SMS. The interfaces are defined as follows:
public static int removeSmsById(long smsId);
Delete SMS based on smsId;
Parameter: smsId, SMS ID;
Return Value: int <0: error; ≥0: the number of deleted sms;
Return 0: there is no such message in the database; Return ≥0: delete successfully.
public static int removeSmsByType(int removeType);
Delete SMS based on removeType;
Parameter removeType: 0 – delete received messages,1 – delete sent messages, 2 – delete draft messages;
Return Value: int <0: error; ≥0: the number of deleted sms;
Return 0: there is no such message in the database; Return ≥0: delete successfully.
AudioRouteApi
Supported Products: GXV3370, GXV3380, GXV3350 and WP820
With AudioRouteApi, the audio route can be switched or checked by the app.
Switch Audio Route
Use AudioRouteApi.switchVoiceToXXX to switch audio route. Please make sure the route switched to is supported by the product. Otherwise, it will fail to switch.
AudioRouteApi.switchVoiceToSpeaker();
AudioRouteApi.switchVoiceToHandset();
AudioRouteApi.switchVoiceToRJ9Headset();
AudioRouteApi.switchVoiceToBlueToothHeadset();
AudioRouteApi.switchVoiceToHdmi();
AudioRouteApi.switchVoiceToEarphone();
AudioRouteApi.switchVoiceToUsbHeadset();
Check Audio Route
Use AudioRouteApi.isVoiceOnXXX to check the current audio route.
AudioRouteApi.isVoiceOnSpeaker();
AudioRouteApi.isVoiceOnHandset();
AudioRouteApi.isVoiceOnRJ9Headset();
AudioRouteApi.isVoiceOnBlueToothHeadset();
AudioRouteApi.isVoiceOnHdmi();
AudioRouteApi.isVoiceOnEarphone();
AudioRouteApi.isVoiceOnUsbHeadset();
EHS Headset
- setEhsHookStatus: to set the EHS status.
- isEhsOffHook: to check whether the EHS headset is off hook.
- isEhsHeadsetConnected: check whether the EHS headset connected or not.
Always Ring Speaker
If the config WebUI 🡪 Phone Settings 🡪 Call Settings 🡪 “Always Ring Speaker” is checked, this means an incoming call will ring with speaker, even though current voice channel is not on speaker.
In order to perform as above, the custom phone app should use the api switchCurrentVoiceWithSpeaker and switchCurrentVoiceWithoutSpeaker when the ringing finished.
Below is a sample code when a new call is incoming.
private class MyCallStatusListener extends CallStatusListener {
    @Override public void onLineStatusChanged(int notifyType, BaseLine baseLine, List<BaseLine> list) {
        final BaseLine line = baseLine;
        if (line.getStatus() == 2) { // 2 means ringing
            if (CallSettingApi.isAlwaysRingSpeaker()) {
                AudioRouteApi.switchCurrentVoiceWithSpeaker();
                startTone(); // start ringing
            }
        } else {
            if (mPrevStatus == 2) {
                stopTone(); // stop ringing
                AudioRouteApi.switchCurrentVoiceWithoutSpeaker();
            }
        }
        mPrevStatus = line.getStatus();
    }
}
CallSettingApi
Supported Products: GXV3370, GXV3380, GXV3350 and WP820
With CallSettingApi, the config status about call can be checked by the app.
DeviceApi
Supported Products: GXV3370, GXV3380, GXV3350 and WP820
DeviceApi provides the management and information SDK about the device.
Below is a sample code to get the system information.
SystemInfo systemInfo = DeviceApi.getSystemInfo();
String productBaseName = systemInfo.getProductBase();
String systemVersion = systemInfo.getSystemVersion();
CallToneApi
Supported Products: GXV3370, GXV3380, GXV3350 and WP820
Below are the related CallToneApi interfaces:
//Check if the tone is playing
public static boolean isAnyToneInPlay();

//Check if the ringtone is playing
public static boolean isRingToneInPlay();

//Check if the dialtone is playing
public static boolean isDialToneInPlay();

//Check if the dtmf tone is playing
public static boolean isDtmfToneInPlay();

//Stop all tone
public static void stopAllTone();

//Stop all ringtone
public static void stopRingtone();

//Start play dtmf tone
public static void startDtmfTone(int keyValue);

//Stop play dtmf tone
public static void stopDtmfTone(int keyValue);

//Start play call waiting tone
public static void startCallWaitingTone();

//Stop play call waiting tone
public static void stopCallWaitingTone();

//Start play ringback tone
public static void startRingbackTone();

//Stop play ringback tone
public static void stopRingbackTone();

//Start play busy tone
public static void startBusyTone();

//Stop play busy tone
public static void stopBusyTone();

//Start play dial tone
public static void startDialTone();

//Stop play dial tone
public static void stopDialTone();

//Start play second dial tone
public static void startSecondDialTone();

//Stop play second dial tone
public static void stopSecondDialTone();

//Start play confirm tone
public static void startConfirmTone();

//Stop play confirm tone
public static void stopConfirmTone();

//Start play reorder tone
public static void startReorderTone();

//Stop play reorder tone
public static void stopReorderTone();

//Play the matched ringtone according to the line
public static void startRingtone(int lineId);

//Start play system ringtone
public static void playSystemRingtone();

//Start play the ringtone in the DND mode
public static void playDndTone();

//Start play dial tone when there is unread voice mail
public static void startVMDialTone();

//Stop play dial tone when there is unread voice mail
public static void stopVMDialTone();

//Start play auto answer tone
public static void startAutoAnswerTone();

//Stop play auto answer tone
public static void stopAutoAnswerTone();

//Gets the type of tone currently playing
public static int getCurToneType();
Gs Core SDK
These SDK can be used without init ApiClient. These SDKs are named as XXXManager, such as: GsDevStateManager.
Device Manager
Supported Products: GXV3370, GXV3380 and GXV3350
Get device connected state.
// is 3.5mm earphone device connected
GsDevStateManager.instance().isDeviceConnected(GsDevStateManager.NAME_EARPHONE
);

// is ehs device connected
GsDevStateManager.instance().isDeviceConnected(GsDevStateManager.NAME_EHS);

// is hdmi device connected
GsDevStateManager.instance().isDeviceConnected(GsDevStateManager.NAME_HDMI);

// is hdmi in device connected
GsDevStateManager.instance().isDeviceConnected(GsDevStateManager.NAME_HDMI_IN)
;

// is usb headset device connected
GsDevStateManager.instance().isDeviceConnected(GsDevStateManager.NAME_USB_HEAD
SET);
Reboot device
GsDevStateManager.instance().reboot();
DND Manager
DndManager.instance().setDndOn(); //开启全局DND功能
DndManager.instance().setDndOff(); //关闭全局DND功能
DndManager.instance().isDndOn(); //查询当前DND在功能是否为开启状态
Get Device MAC
GsDevStateManager.instance().getDeviceMac();
CONTACTS
Supported Products: GXV3370, GXV3380, GXV3350 and WP820
android.content.ContentResolver has already provided Create-Read-Update-Delete (CRUD) APIs for operating contacts. Please refer to below links for the APIs information:
https://developer.android.google.cn/reference/android/content/ContentProvider
For more details of the contacts database, please refer to:
https://developer.android.google.cn/reference/android/provider/ContactsContract
By using android.content.ContentResolver to CRUD contacts, it should be able to meet most of the needs.
Changes for ContactsContract.Data
Here is the change in contacts database table ContactsContract.Data:
Key | Type | Description |
ContactsContext.ContactsItem#ITEM_ACCOUNT_ID | INTEGER (long) | Special use. |
Changes for ContactsContract.RawContacts
Here is the change in contacts database table ContactsContract.RawContacts:
Key | Type | Description |
ContactsContext.ContactsItem#ITEM_SORT_KEY_T9 | TEXT | New Column. |
ContactsContext.ContactsItem#ITEM_SORT_KEY_T9_FL | TEXT | New Column. |
Changes for ContactsContract.Contacts#CONTENT_FILTER_URI
In addition to the Android native filter, a function for fuzzy searching is also added. With fuzzy searching, users can query by a condition such like “number=123” to get all matching results with 123 included in the number such as “123456” or “0123” instead of only “123”. This filter can be enabled by setting ContactsContext.SearchSnippets.FUZZY_KEY as follows:
Uri.Builder builder = ContactsContract.Contacts.CONTENT_FILTER_URI.buildUpon();
builder.appendPath(query);
builder.appendQueryParameter(ContactsContract.DIRECTORY_PARAM_KEY,String.valueOf(directoryId));
builder.appendQueryParameter(ContactsContract.SearchSnippets.DEFERRED_SNIPPETING_KEY,”1”);
builder.appendQueryParameter(com.gs.contacts.context.ContactsContext.SearchSnippets.FUZZY_KEY,”1”);
Uri uri = builder.build();
Cursor cursor = mContext.getContentResolver().query(uri,null,null,null,null);
}
Create a Contact
A contact can be added and all the parameters can be manipulated. Here is an example:
public void addContact(String name,String number,long accountId) {
    <ContentProviderOperation> ops = new ArrayList<ContentProviderOperation>();
    int rawContactInsertIndex = ops.size();
    ops.add(ContentProviderOperation
        .newInsert(ContactsContract.RawContacts.CONTENT_URI)
        .withValue(ContactsContract.RawContacts.ACCOUNT_TYPE,null)
        .withValue(ContactsContract.RawContacts.ACCOUNT_NAME,null)
        .withYieldAllowed(true).build());
    ops.add(ContentProviderOperation
        .newInsert(ContactsContract.Data.CONTENT_URI)
        .withValue(ContactsContext.ContactsItem.ITEM_ACCOUNT_ID,accountId)
        .withValueBackReference(ContactsContract.Data.RAW_CONTACT_ID,rawContactInsertIndex)
        .withValue(ContactsContract.Data.MIMETYPE,ContactsContract.CommonDataKinds.StructuredName.CONTENT_ITEM_TYPE)
        .withValue(ContactsContract.CommonDataKinds.StructuredName.DISPLAY_NAME,name)
        .withYieldAllowed(true).build());
    ops.add(ContentProviderOperation
        .newInsert(android.provider.ContactsContract.Data.CONTENT_URI)
        .withValueBackReference(ContactsContract.CommonDataKinds.Phone.RAW_CONTACT_ID,rawContactInsertIndex)
        .withValue(ContactsContract.CommonDataKinds.Phone.MIMETYPE,ContactsContract.CommonDataKinds.Phone.CONTENT_ITEM_TYPE)
        .withValue(ContactsContract.CommonDataKinds.Phone.TYPE,ContactsContract.CommonDataKinds.Phone.TYPE_MOBILE)
        .withValue(ContactsContract.CommonDataKinds.Phone.NUMBER, number)
        .withYieldAllowed(true).build());
    try {
        contentResolver.applyBatch(ContactsContract.AUTHORITY,ops);
    } catch (Exception e) {
        e.printStackTrace();
    }
}
Update a Contact
A contact can be added and all the parameters can be manipulated. Here is an example:
public void updateContact(long rawContactId,String name) {
    ArrayList<ContentProviderOperation> ops = new ArrayList<ContentProviderOperation>();
    ops.add(ContentProviderOperation
        .newUpdate(ContactsContract.Data.CONTENT_URI)
        .withSelection(ContactsContract.Data.RAW_CONTACT_ID+"=?",new String[]{rawContactId+""})
        .withValue(ContactsContract.CommonDataKinds.StructuredName.DISPLAY_NAME,name)
        .build());
    try {
        contentResolver.applyBatch(ContactsContract.AUTHORITY,ops);
    } catch (Exception e) {
        e.printStackTrace();
    }
}
Read Contacts
Here is an example to read contacts and manipulate all the parameters:
public void getContacts() {
    String[] projection = new String[]{
        ContactsContext.ContactsItem.ITEM_CONTACT_ID_IN_DATA,
        ContactsContext.ContactsItem.ITEM_ACCOUNT_ID,
        ContactsContext.ContactsItem.ITEM_PHONE_NUMBER,
        ContactsContext.ContactsItem.ITEM_DISPLAY_NAME
    };
    Cursor cursor = contentResolver.query(ContactsContract.CommonDataKinds.Phone.CONTENT_URI,projection,null,null,null);
    if(cursor != null) {
        while (cursor.moveToNext()) {
            long contactId = cursor.getLong(cursor.getColumnIndex(ContactsContext.ContactsItem.ITEM_CONTACT_ID_IN_DATA));
            long accountId = cursor.getInt(cursor.getColumnIndex(ContactsContext.ContactsItem.ITEM_ACCOUNT_ID));
            String number = cursor.getString(cursor.getColumnIndex(ContactsContext.ContactsItem.ITEM_PHONE_NUMBER));
            String name = cursor.getString(cursor.getColumnIndex(ContactsContext.ContactsItem.ITEM_DISPLAY_NAME));
        }
        cursor.close();
    }
}
Delete a Contact
The following is an example of deleting contacts:
public void deleteContactById(long contactId) {
    ArrayList<ContentProviderOperation> ops = new ArrayList<ContentProviderOperation>();
    ops.add(ContentProviderOperation
        .newDelete(ContactsContract.RawContacts.CONTENT_URI)
        .withSelection(ContactsContract.RawContacts.CONTACT_ID + "=" + contactId, null)
        .build());
    ops.add(ContentProviderOperation
        .newDelete(ContactsContract.Data.CONTENT_URI)
        .withSelection(ContactsContract.Data.CONTACT_ID + "=" + contactId, null)
        .build());
    try {
        contentResolver.applyBatch(ContactsContract.AUTHORITY,ops);
    } catch (Exception e) {
        e.printStackTrace();
    }
}
CALL LOGS
Supported Products: GXV3370, GXV3380, GXV3350 and WP820
android.content.ContentResolver has already provided Create-Read-Update-Delete(CRUD) APIs for operating calllogs. Please refer to below link for the APIs information:
https://developer.android.google.cn/reference/android/content/ContentProvider
For more details about calllog database, please refer to:
https://developer.android.google.cn/reference/android/provider/CallLog
In general, after calling the APIs in BaseCallApi, calllogs will be added or changed by default. Gs JARS do not provide additional APIs for independent calllog function. Using android.content.ContentResolver to CRUD calllogs should be able to meet most of the needs.
Changes for CallLog.Calls
The changes applied to CallLog.Calls are listed in below table:
Key | Type | Description |
CallLogContext.CallLogItem#ITEM_ACCOUNT | INTEGER(long) | New Column. |
CallLogContext.CallLogItem#ITEM_CALL_MODE | INTEGER(int) | New Column. |
CallLogContext.CallLogItem#ITEM_MEDIA_TYPE | INTEGER(int) | New Column. |
CallLogContext.CallLogItem#ITEM_NUMBER_ORIGINAL | TEXT | New Column. |
CallLogContext.CallLogItem#ITEM_CONTACT_CACHE_NAME | TEXT | New Column. |
CallLogContext.CallLogItem#ITEM_END_TIME | TEXT | New Column. |
CallLogContext.CallLogItem#ITEM_IS_IN_CONFERENCE | INTEGER(int) | New Column. |
CallLogContext.CallLogItem#ITEM_GROUP_ID | INTEGER(long) | New Column. |
Create a Call Log
As call log is closely related to call, we strongly suggest using BaseCallApi to make a call and save the call log by default. Here is an example:
public void addCalllog(String name,String number,long accountId) {
    ArrayList<ContentProviderOperation> ops = new ArrayList<ContentProviderOperation>();
    ops.add(ContentProviderOperation.newInsert(CallLogContext.CALL_LOG_URI)
        .withValue(CallLogContext.CallLogItem.ITEM_ACCOUNT, accountId)
        .withValue(CallLogContext.CallLogItem.ITEM_CACHE_NAME, name)
        .withValue(CallLogContext.CallLogItem.ITEM_CALL_MODE,PhoneContext.CallMode.SIP_CALL)
        .withValue(CallLogContext.CallLogItem.ITEM_START_TIME,System.currentTimeMillis())
        .withValue(CallLogContext.CallLogItem.ITEM_IS_IN_CONFERENCE,false)
        .withValue(CallLogContext.CallLogItem.ITEM_NUMBER_ORIGINAL,number)
        .withValue(CallLogContext.CallLogItem.ITEM_NUMBER,number)
        .withValue(CallLogContext.CallLogItem.ITEM_CALL_TYPE,CallLogContext.CallLogType.TYPE_MISSED)
        .withValue(CallLogContext.CallLogItem.ITEM_DURATION, 0)
        .withValue(CallLogContext.CallLogItem.ITEM_MEDIA_TYPE,CallLogContext.MediaType.AUDIO)
        .build());
    try {
        contentResolver.applyBatch(CallLog.AUTHORITY,ops);
    } catch (Exception e) {
        e.printStackTrace();
    }
}
Read Call Logs
The following is an example of reading call logs using ContentResolver:
public void getCallLogs() {
    Cursor cursor = contentResolver.query(CallLogContext.CALL_LOG_URI,null,null,null,null);
    StringBuilder res = new StringBuilder("");
    if(cursor!= null){
        if(cursor.moveToFirst()){
            do{
                long calllogId = cursor.getLong(cursor.getColumnIndex(CallLogContext.CallLogItem.ITEM_ID));
                String cacheName = cursor.getString(cursor.getColumnIndex(CallLogContext.CallLogItem.ITEM_CACHE_NAME));
                int mediaType = cursor.getInt(cursor.getColumnIndex(CallLogContext.CallLogItem.ITEM_MEDIA_TYPE));
            }while (cursor.moveToNext());
        }
        cursor.close();
    }
}
Update Call Logs
Here is an example to update call logs using ContentResolver:
public void updateCalllogById(long callId) {
    ArrayList<ContentProviderOperation> ops = new ArrayList<ContentProviderOperation>();
    ops.add(ContentProviderOperation
        .newUpdate(CallLogContext.CALL_LOG_URI)
        .withSelection(CallLogContext.CallLogItem.ITEM_ID+"="+callId,null)
        .withValue(CallLogContext.CallLogItem.ITEM_DURATION,1000)
        .build());
    try {
        contentResolver.applyBatch(CallLog.AUTHORITY,ops);
    } catch (Exception e) {
        e.printStackTrace();
    }
}
Delete call logs
Here is an example to delete call logs using ContentResolver:
public void deleteCalllogById(long callId) {
    ArrayList<ContentProviderOperation> ops = new ArrayList<ContentProviderOperation>();
    ops.add(ContentProviderOperation
        .newDelete(CallLogContext.CALL_LOG_URI)
        .withSelection(CallLogContext.CallLogItem.ITEM_ID + "=" + callId,null)
        .build());
    try {
        contentResolver.applyBatch(CallLog.AUTHORITY,ops);
    } catch (Exception e) {
        e.printStackTrace();
    }
}
LED
Supported Products: GXV3370, GXV3380 and GXV3350
In the Android standard interface, notification is the only method is use LED. Here is an example to use notification with LED:
int color = 0xFF00FF00;
int onMs = 1000;
int offMs = 1000;
NotificationManager manager = (NotificationManager)
getSystemService(NOTIFICATION_SERVICE);
Notification notification = null;
notification = new Notification.Builder(this)
    .setContentTitle("This is content title")
    .setContentText("This is content text")
    .setWhen(System.currentTimeMillis())
    .setSmallIcon(R.mipmap.ic_launcher)
    .setLargeIcon(BitmapFactory.decodeResource(getResources(),R.mipmap.ic_launcher))
    .setLights(color,onMs,offMs)
    .build();

manager.notify(1,notification);
Please find a list of supported colors and frequencies for the LED on GXV3370, GXV3380 and GXV3350. If the color or the frequency setting is not supported by the device, the device will automatically choose the default color or the nearest frequency.
Product | GXV3370 | GXV3380 | GXV3350 |
Red LED | On/Off | On/Off | On/Off |
Green LED | On/Off | On/Off | On/Off |
Blue LED | N/A | N/A | N/A |
Keep On Frequency | onMs: 1000, offMs: 0 | onMs: 1000, offMs: 0 | onMs: 1000, offMs: 0 |
Slow Splash Frequency | onMs: 1000, offMs: 3000 | onMs: 1000, offMs: 3000 | onMs: 1000, offMs: 3000 |
Fast Splash Frequency | onMs: 1000, offMs: 1000 | onMs: 1000, offMs: 1000 | onMs: 1000, offMs: 1000 |
GsLightsManager
Except controlling LED with Notification, the GsLightsManager provided functions to control the LED freely. The following are method definition:
public void openCustom(int color, int shineType);
public void closeCustom();
The parameters are:
shineType: control the shine type with fast splash, slow splash or keep on.
color: the LED color to open. According to the product, it can support red, green or blue.
Programmable Keys
Supported Products: GXV3350
Programmable Keys API can be used to monitor extension module click events, etc.
Monitor Extension Module Click Event
Users can monitor extension module click event by using MpkApi.addStatusListener and MpkApi.removeStatusListener.
Here is an example on how to use monitor extension module click event APIs.
Start Ext Click Event Monitor
private void initExtClickListener() {
    mMpkStatusListener = new MpkStatusListener();
    MpkApi.addStatusListener (“ExtEvent”,
        mMpkStatusListener.callback,
        MpkContext.ListenType.EXT_EVENT);
}
Stop Ext Click Event Monitor
private void removeExtClickListener() {
    MpkApi.removeStatusListener (mMpkStatusListener.callback);
    mMpkStatusListener.destroy();
    mMpkStatusListener = null;
}
Monitor Ext Event Using MpkStatusListener
private class MyMpkStatusListener extends MpkStatusListener {
    @Override
    public void onExtItemClick(MpkEntity entity) {
    }
};

MpkStatusListener mMpkStatusListener = null;
SPECIAL INTERFACES FOR WP820
Supported Products: WP820
SAFE Monitoring
SAFE monitoring function sends standard Android broadcast to the app.
SAFE Monitoring Broadcast definitions
- SAFE monitoring broadcast Action
public static final String SAFE_MONITORING_STATE_CHANGED_ACTION = “android.sensor.monitoring.STATE_CHANGED”;
- Action Extra key
public static final String EXTRA_STATE = “android.intent.extra.STATE”;
- SAFE monitoring Type: run
public static final int SENSOR_MONITORING_TYPE_RUN = 1;
- SAFE monitoring Type: tilt
public static final int SENSOR_MONITORING_TYPE_TILT = 2;
- SAFE monitoring Type: no move
public static final int SENSOR_MONITORING_TYPE_NOMOVE = 3;
public static final int SENSOR_MONITORING_TYPE_PANIC = 4;
Enable SAFE Monitoring
On the WP820 LCD menu, please go to Settings🡪Advanced settings🡪SAFE/Panic Call🡪SAFE monitoring settings, enable “Monitoring” and other items as needed. Once “Monitoring” and other needed items are enabled, the broadcast will be sent.
Handling SAFE Monitoring Broadcast
Examples:
- Register broadcast receiver
<receiver android:name=”.SafeMonitorReceiver”>
    <intent-filter>
        <action android:name=”android.sensor.monitoring.STATE_CHANGED”/>
    </intent-filter>
</receiver>
- Receive broadcast
public class SafeMonitorReceiver extens BroadcastReceiver {
    private static final String TAG= ”SafeMonitorReceiver”;
    @Override
    public void onReceive(Context context, Intent intent) {
        String action = intent.getAction();
        Log.i(TAG, “onReceive:”+action);
        if(“android.sensor.monitoring.STATE_CHANGED”.equals(action)){
            int type = intent.getIntExtra(“sensor_monitoring”, 0);
            if(type==1){
                Log.i(TAG, “type run”);
            }else if(type==2){
                Log.i(TAG, “type tilt”);
            }else if(type==3){
                Log.i(TAG, “type not move”);
            } else if(type==4){
                Log.i(TAG, “type panic”);
            }
        }
    }
}
KEY Code Definitions
- Left Key
public static final int KEY_CODE_LEFT = 1803;
- Middle Key
public static final int KEY_CODE_MID = 1804;
- Right Key
public static final int KEY_CODE_RIGHT = 1805;
DEVELOP APPS WITH ADB
Developing apps on Grandstream android devices requires the device to be connected to network. This is different from development using USB connection to the Android device directly.
Enable Developer Mode on Device
Please enable developer mode under device web UI. Log in device web UI and go to Settings🡪System security🡪Developer mode.
ADB Connect
Use the command “adb connect IP” to connect to the device. For example:
adb connect 192.168.100.1
Allow Debug on Device
After successful “adb connect”, the device will show a prompt requesting to allow debugging. Please choose “OK” to proceed. It is suggested to check “Always allow from this computer” so that the dialog will not show again when the device is connected to the same computer next time.
Check ADB Connect Status
Use the command “adb devices” to check the adb connect status. If below content is displayed, it means connection is successful:
List of devices attached
192.168.100.1:5555    device
ADB Disconnect
Use the command “adb disconnect” to disconnect all devices.
API DEMO
In the SDK package, users can find a Demo Application using the SDK APIs of GXV3370, named ApiDemo.
SUPPORTED DEVICES
The following table shows Grandstream products supporting SDK APIs listed on this guide:
Model | Supported | Firmware |
GXV3370 | Yes | 1.0.2.6 or Higher |
GXV3380 | Yes | 1.0.1.9 or Higher |
WP820 | Yes | 1.0.3.5 or Higher |
GXV3350 | Yes | 1.0.1.8 or Higher |
CHANGE LOG
This section documents significant changes from previous versions of the SDK Framework Service guide for GXV3370/WP820/GXV3380/GXV3350. Only major new features or document updates are listed. Minor updates for corrections or editing are not documented here.
- Added DndManager. [Gs Core SDK]
- Added onShowCallingView function in BasePhoneService. [BasePhoneService]
- Added call tones interface. [CallToneApi]
- Added dialId and localNumber in BaseLine. [BaseLine]
- Added registerStatus in BaseAccount. [BaseAccount]
- Added transfer functions. [Transfer a Call]
- Added LineStatus in PhoneContext.
- Added Programmable Keys for special products. [Programmable Keys]
- Added DeviceApi for device management and system information. [DeviceApi]
- Now supports GXV3350.
- Added a function to delete message. [SmsManagerApi]
- Added a function to control the LEDs. [GsLightsManager]
- Added a function to get device MAC address. [Get Device MAC]
- Removed NvramManager, NvramApi.
- Added NvramManager, NvramApi for NVRAM.
- Added GsDevStateManager for device manager including device connection state and reboot device. [Gs Core SDK]
- Updated default phone for emergency dialer. [Default Phone App]
- Updated BaseCallApi about send DTMF. [BaseCallApi]
- Updated other details.
- Added new APIs for “Always Ring Speaker”. [Always Ring Speaker]
- Added CallSettingApi. [CallSettingApi]
- Added more function to AudioRouteApi. [AudioRouteApi]
- This is the initial version.