
INTRODUCTION
The GSC3570 device comes with a newly developed feature called the “Meeting Room Panel Mode”, this feature sets the GSC3570 to reflect the meeting room occupancy status and manage the manage the onsite meetings. The GSC3570 can act in a “Self-host mode” or “Host Mode”.

This guide will help to configure your GSC3570 to use the “Meeting Room Panel Mode” feature.
ENABLING MEETING ROOM PANEL MODE
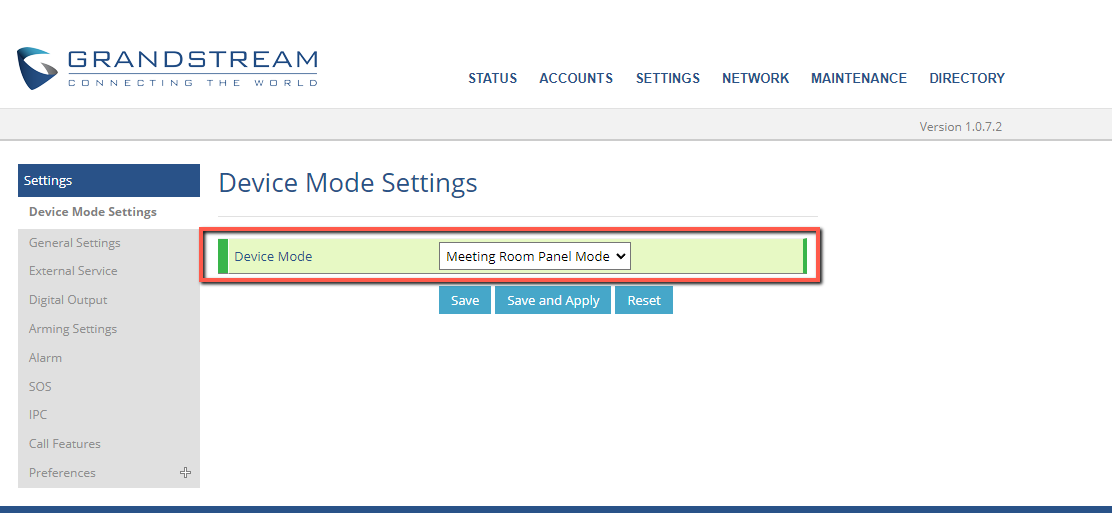
By default, the GSC3570 is set to the control station mode, this means that it will function by default as an intercom and facility control station, to set it to meeting room mode, please follow the below steps:
- Connect to the GSC3570 Web UI platform.
- Under Settings => Device Mode Settings, select the device mode to be “Meeting Room Panel Mode”
- Click on Save and Apply, then reboot the device for the action to take effect.
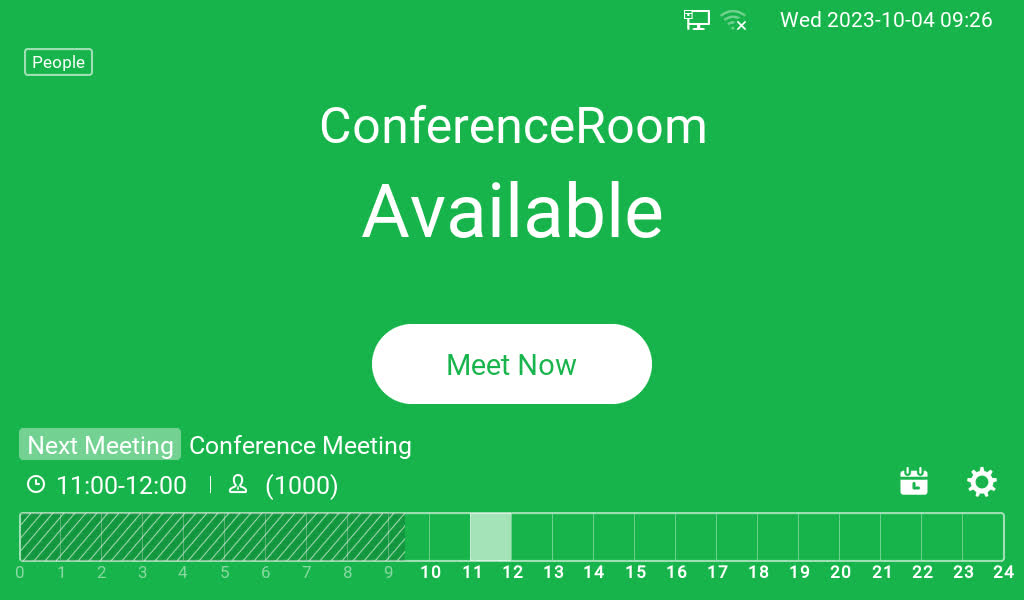
- After the device is rebooted, the following view will be shown on the GSC3570 LCD Display:
MEETING ROOM PANEL TYPES
The two meeting room deployment options are listed below:
- UCM Host Mode: On this mode, the onsite meetings are scheduled on the UCM63xx platform, after the control panel is added to the Room devices section, and the meetings scheduled are automatically synchronized with the GSC3570 meeting room panel, with an overview of the occupied and available time slots, in order for this option to function, a server connection to the UCM63xx is required.
- Self-Host Mode: When the GSC3570 operates independently without a SIP Server and no UCM63xx is in use, users can configure it as a standalone device. In this scenario, individuals intending to use the meeting room must indicate their occupancy on the control panel. They can specify the desired duration for their use, marking the room as ‘occupied’ during this time frame. If they need more time, they have the option to extend the duration. Alternatively, if the meeting concludes before the initially specified time, users can select ‘End now’ to make the room available again, releasing it from occupancy status.
UCM HOST MODE
The UCM Host Mode configuration will require a UCM63xx unit to complete this setup.
Prerequisites
- GSC3570 on firmware 1.0.7.2 or higher.
- UCM63xx on firmware 1.0.21.9 or higher.
Host Mode Configuration
Since we are on UCM Host Mode set up, the onsite meeting is scheduled on the SIP server. First, we will set up the onsite meeting on the UCM63xx, then we will establish the connection to the SIP server from the GSC3570 in order to synchronize the scheduled meetings data.
Configuring the Meeting Room
- Access the UCM63xx WEB UI configuration platform.
- Go to Other Features => Onsite Meeting
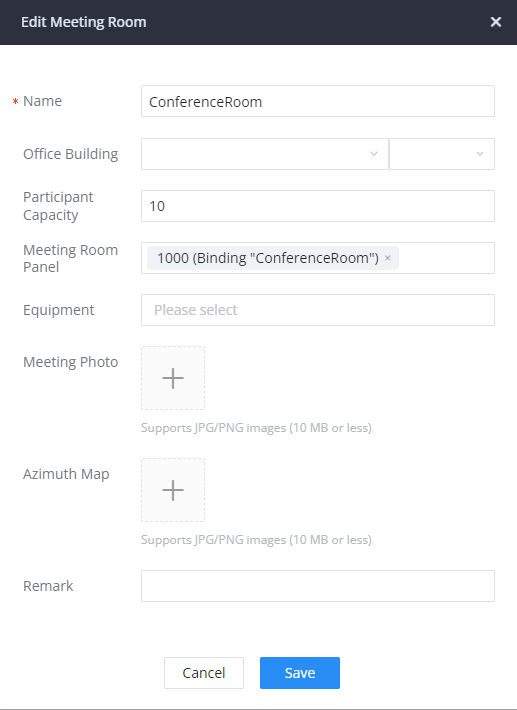
- Create a room in which the GSC3570 will be installed, to do that:
- Go to Other Features => Onsite Meeting => Room Management.
- Click on
 to create a New Room.
 - Define the Room’s name, we will name it “ConferenceRoom”.
- Define some optional settings such as the Office building, the Participant Capacity, and the Equipment…
- Click on Save.
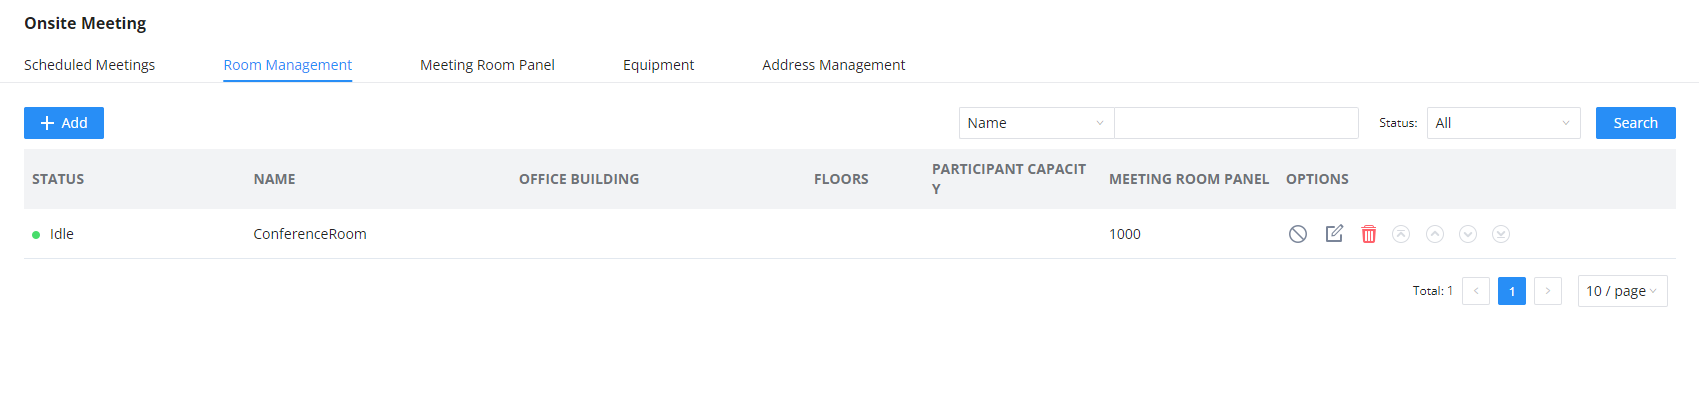
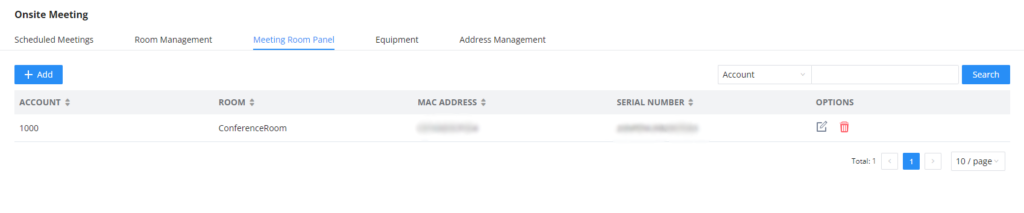
The room will be set as idle:
Adding the GSC3570 as a Meeting Room Panel
The next step is to add the GSC3570 to the UCM Meeting Room Panel section, to do that:
- Go Under Other Features => Onsite Meeting => Meeting Room Panel.
- Click on to create a new Meeting Room Panel.
- Enter the Account of the Host.
- Select the Room in which the device will be installed.
- Enter the name of the device.
- Enter the Device’s Mac Address.
- Enter the Device’s Serial Number
- Click on save to save the Meeting device.
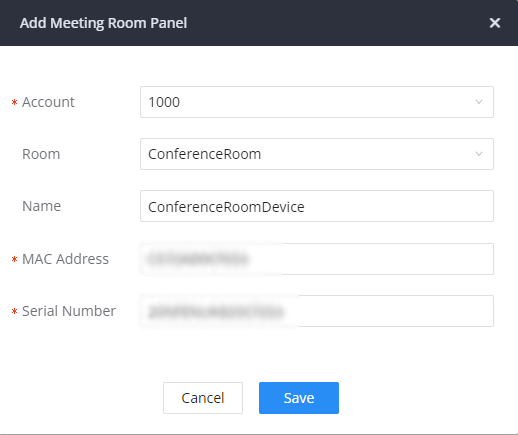
Now, the device is recognized by the UCM as the meeting control panel device.
Scheduling an Onsite Meeting on UCM63xx
The last step is to schedule an onsite meeting on the UCM63xx, to do that:
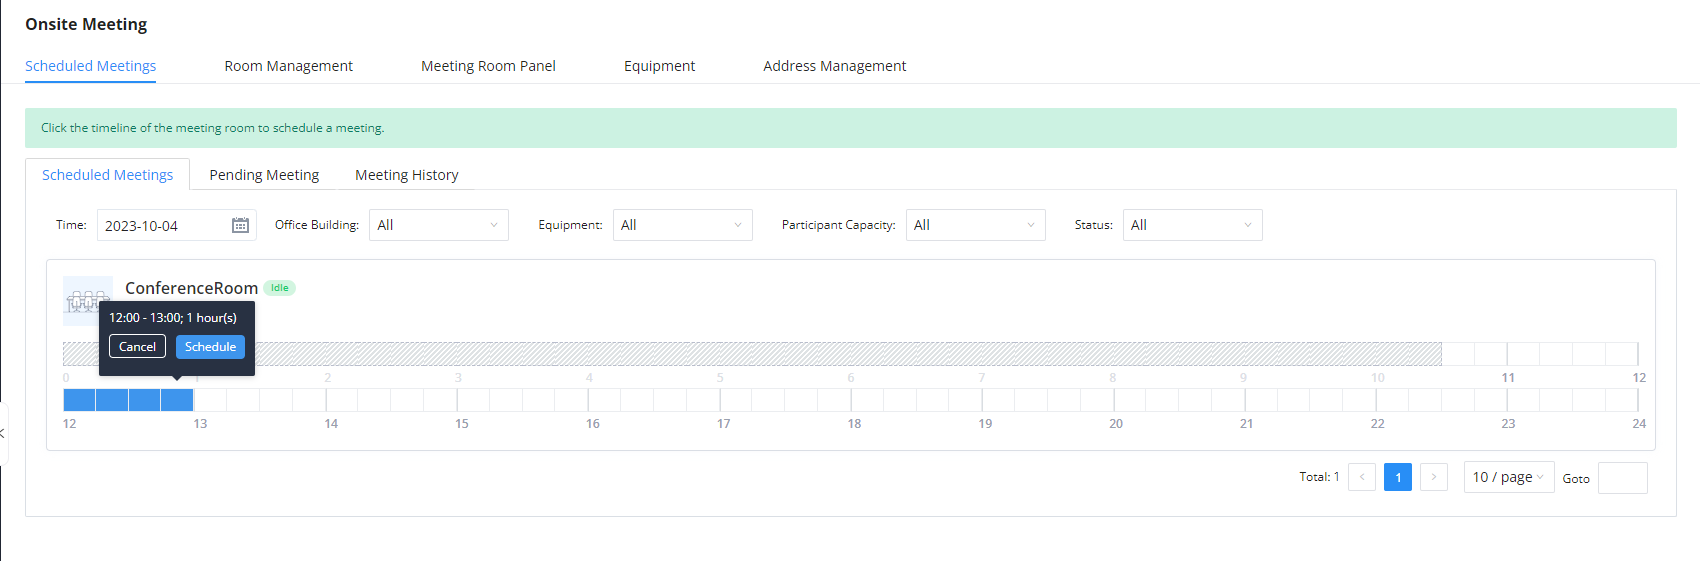
- Go to Other Features => Onsite Meeting => Scheduled Meetings.
- Hover over the time slot that you want to book for the meeting, then click on
 .
.
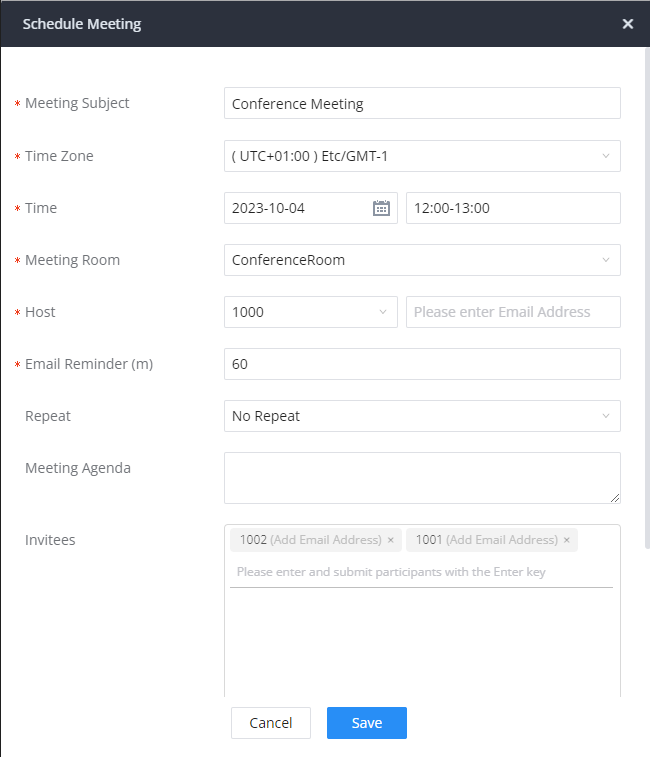
- After this is done, enter the Host Account.
- Specify the meeting’s members.
- Specify the room in which the meeting will be held, this will help synchronize the meeting data to the GSC3570.
- Click on save and apply.
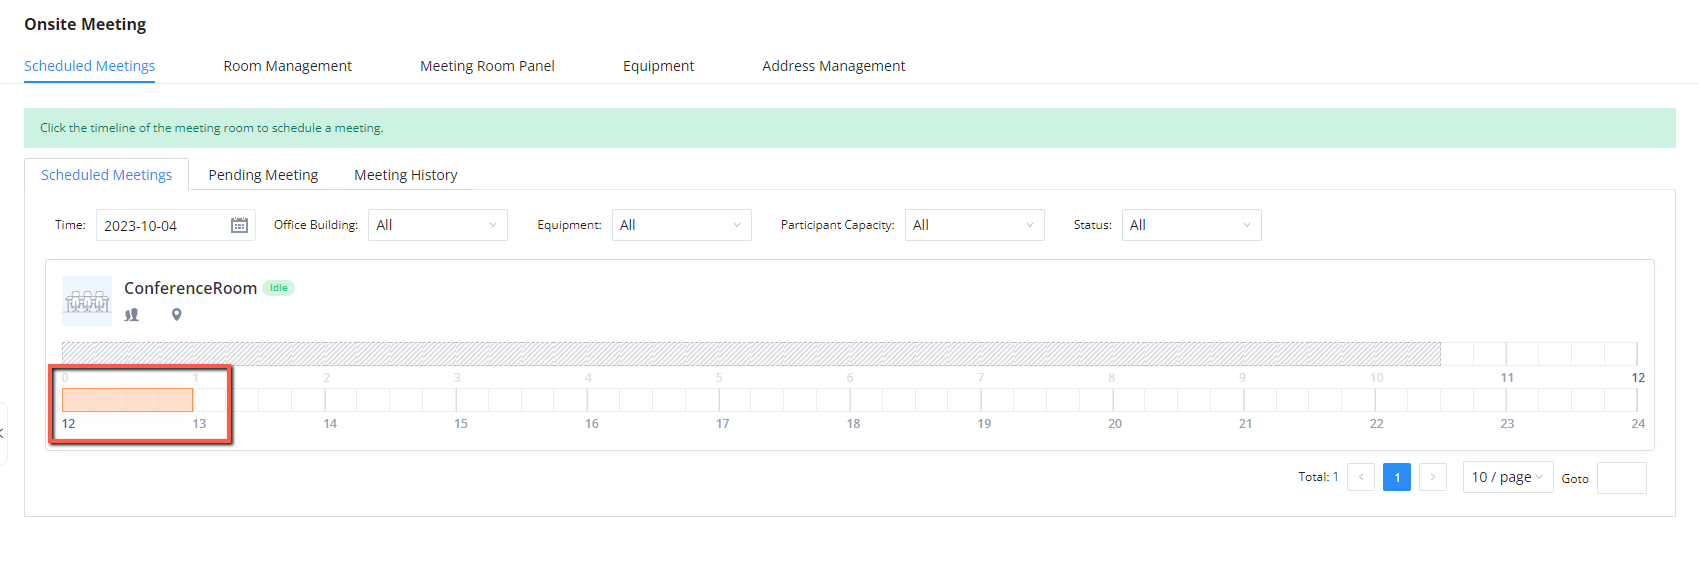
Once the meeting is created, the following view of the time slot availability will be displayed based on the meetings scheduled on the UCM63xx.
Establishing Server Connection
Now we can establish the server connection to the GSC3570, in order to display the meetings data registered in the UCM63xx, there are two methods to go about this:
LCD Configuration:
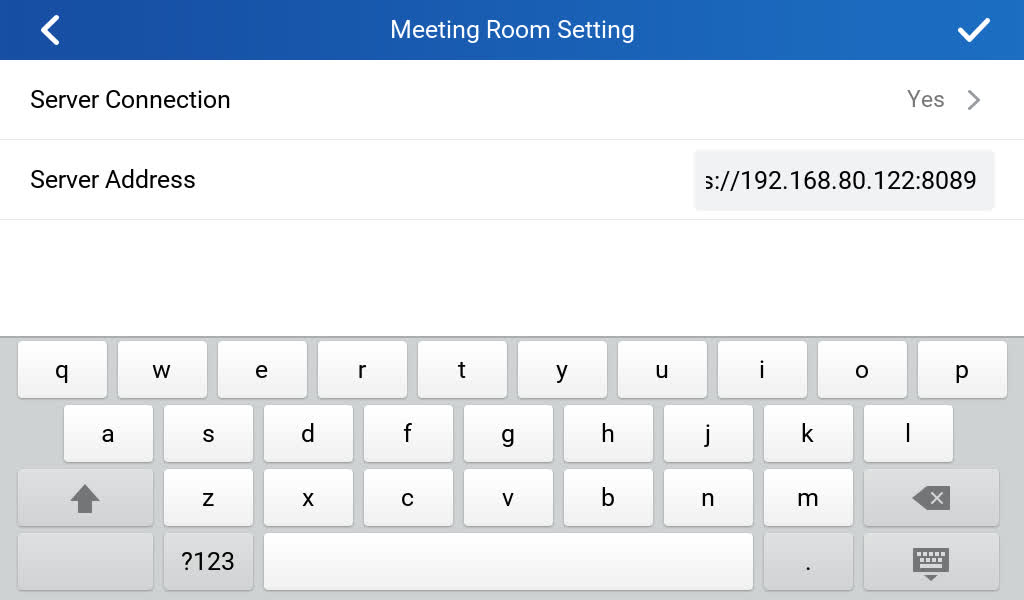
- Access the settings configuration on the GSC3570 panel by clicking the icon

- Go to Meeting Room settings under advanced settings.
- Set the server connection to “Yes”
- Define the server address, which is the URL of the SIP server; For Example: https://192.168.5.71:8090
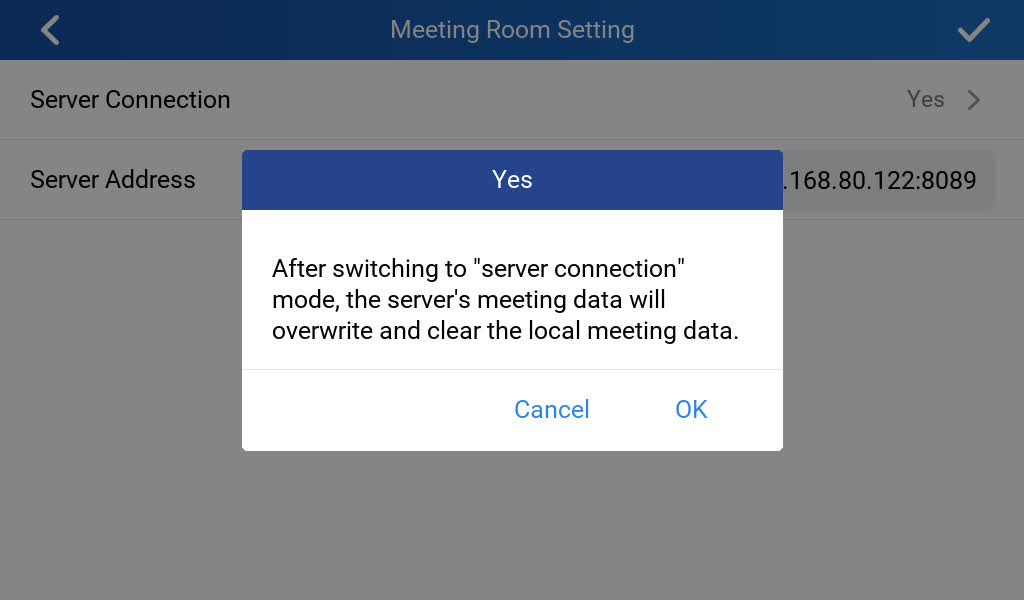
- Click on the icon
 to save the changes.
 - After this, you will be prompted to confirm the mode change, please confirm it by clicking “OK”
WEB UI Configuration:
- Access the WEB UI platform of the GSC3570, by entering the IP Address of the unit on your favorite browser.
- Make sure the device is on Meeting Room Panel Mode, which was covered in the section [Enabling Meeting Room Panel Mode]
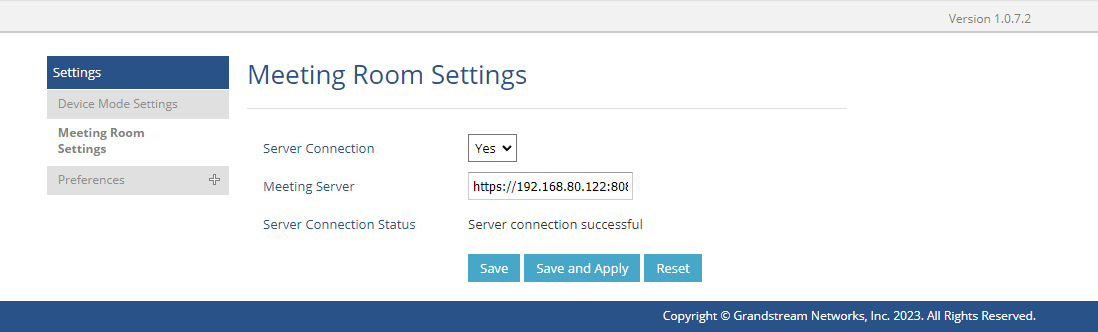
- Go to Settings => Meeting Room Settings, and set the server connection to “Yes”
- Enter the server address: the URL of the SIP Server.
- Click on Save and Apply.
After some time, the settings will be saved and the connection to the server will be established, where the server Connection status will be marked as Server connection successful.
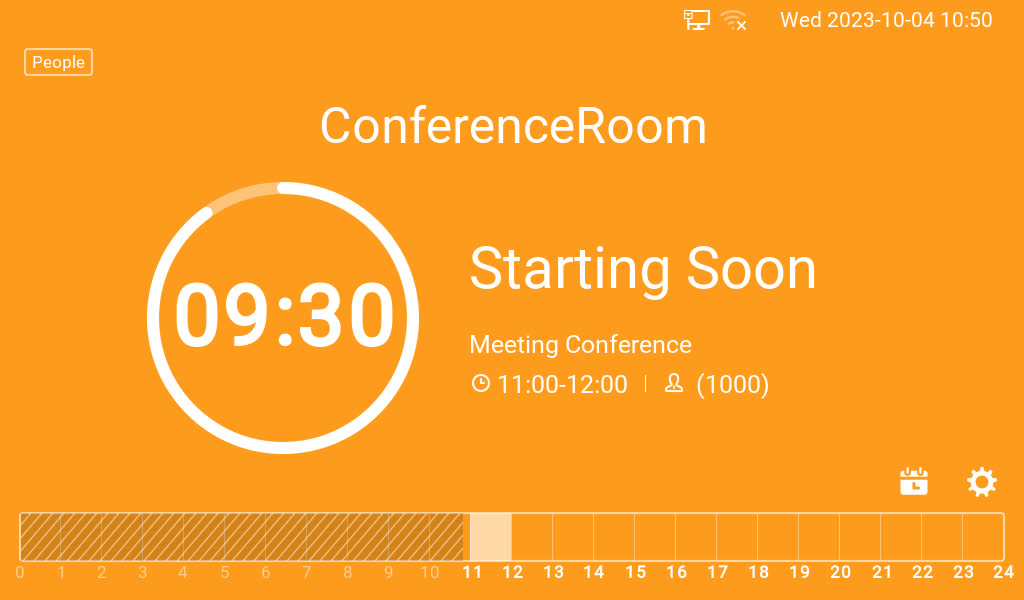
The control panel will now display the time slots available on the main screen, those time slots are synchronized from the UCM63xx:

10 minutes before the scheduled conference starts, a reminder saying that the conference will start in under 10 minutes will be displayed.
Meeting Operations in Host Mode
Viewing the Scheduled Meetings List
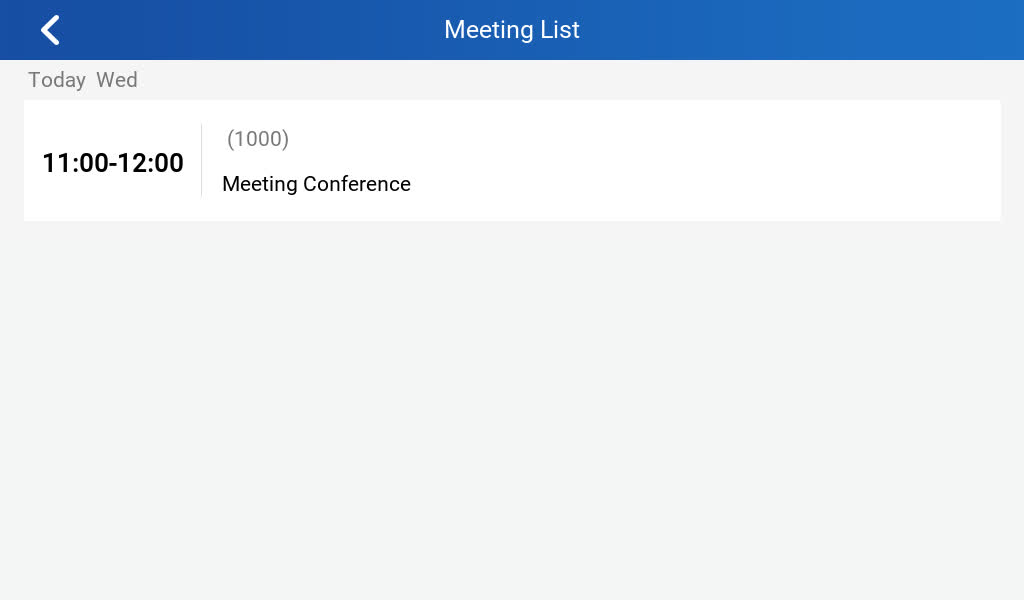
You can also view a detailed list of the upcoming meetings with their time slots in detailed manner by clicking the icon  , this will display a list as follows:
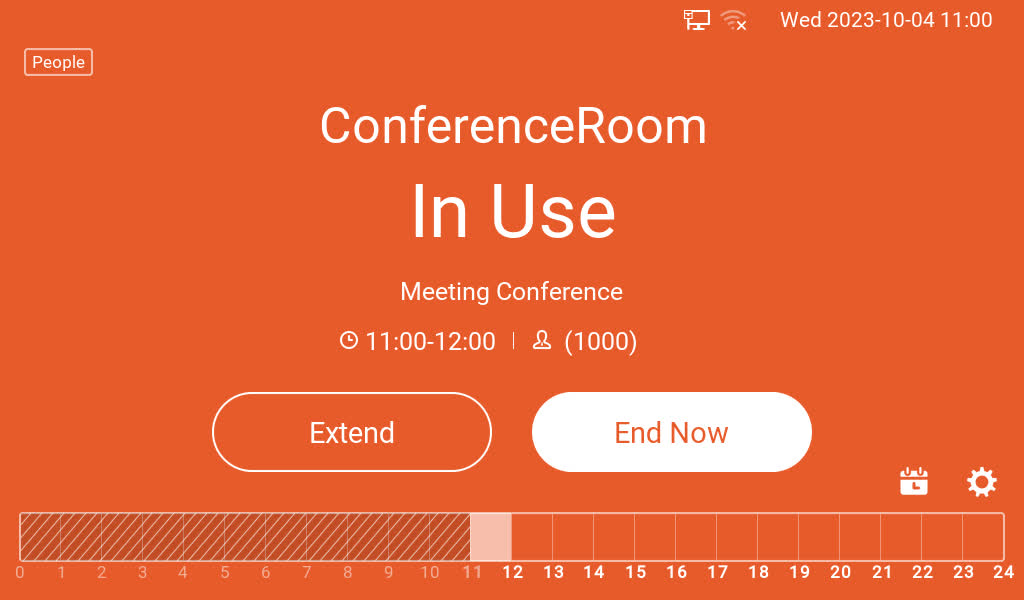
Once the meeting starts, the Control panel will display the room to be unavailable, in this situation, the user can not manually create a new conference, until the current conference has concluded.
Extending the Meeting
During the held meeting, if the host needs extra time, he can extend the meeting duration, to do that :
- Click on
 .
. - Choose the duration of the extension
 .
.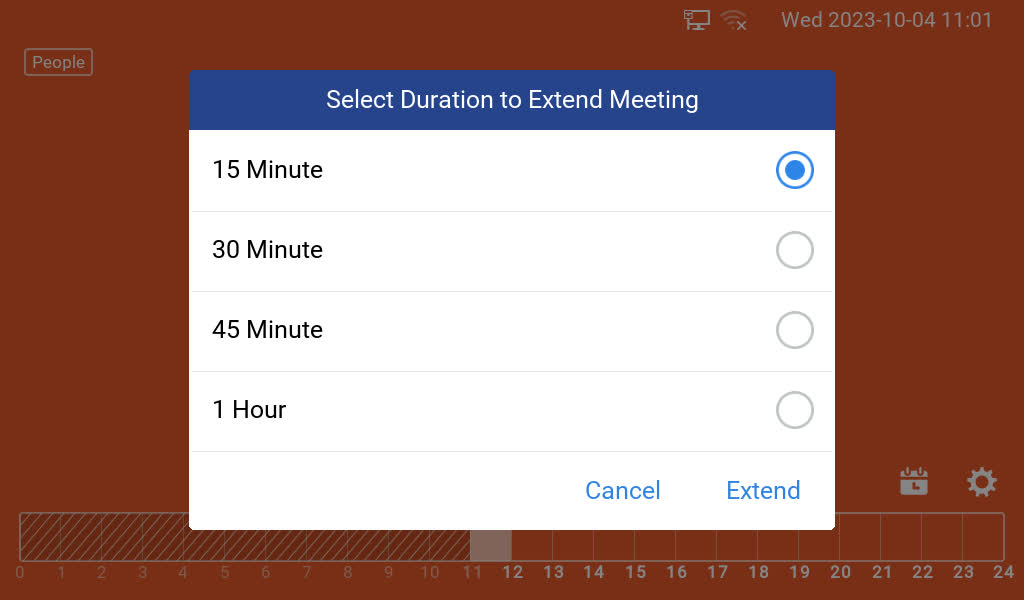
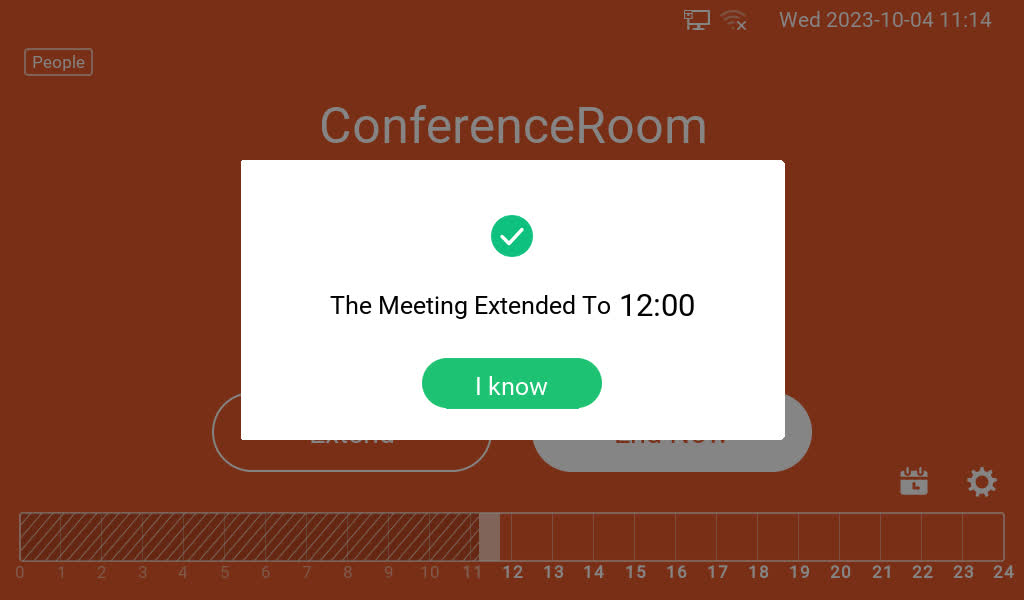
- Click on Extend.
- The meeting will be extended, with a confirmation displaying the new ending time of the meeting.
Ending the Meeting Earlier
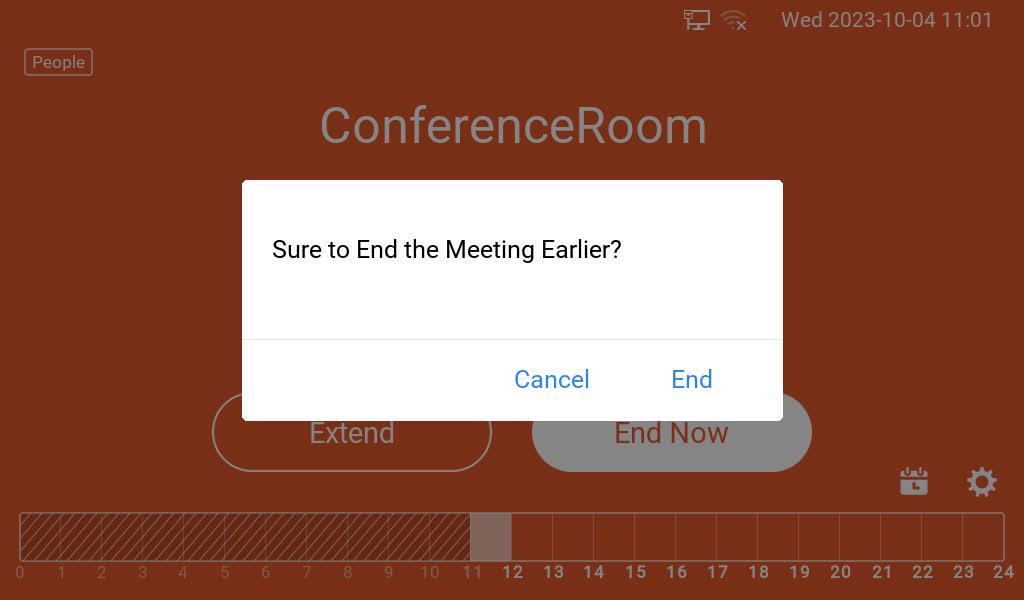
In case the host needs to stop the meeting earlier than the scheduled time, the following steps can be followed:
- Click on
 .
. - Confirm the ending of the meeting.
 .
.
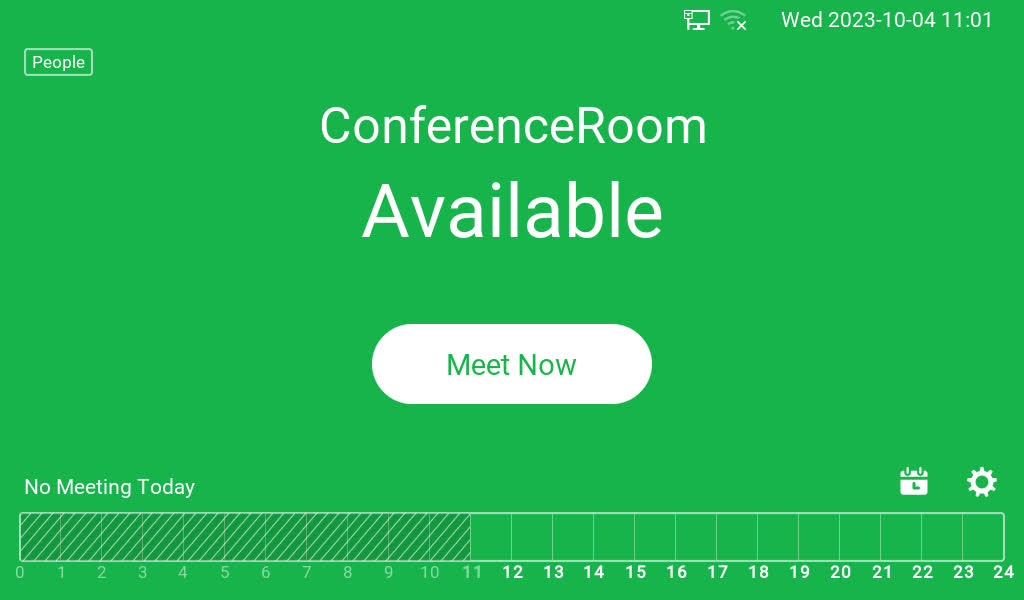
- The Room will be available again:
Manually Creating a Meeting on GSC3570
Even while the device is connected to the UCM63xx, users can still manually and immediately start meetings with a specified duration as long as the room is not occupied and as long as the specified duration does not interfere with an already created meeting’s time slot.
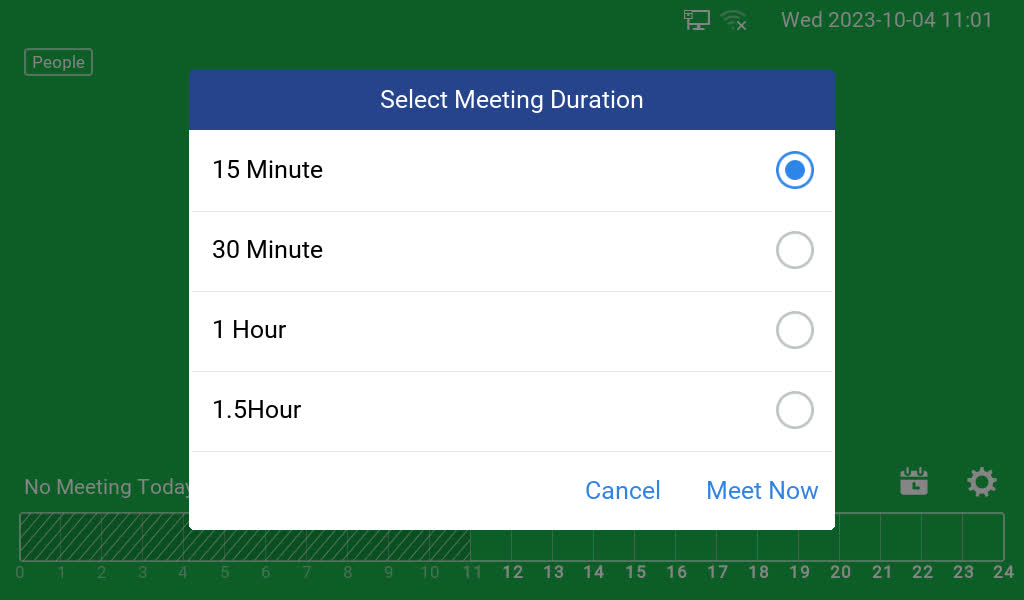
In the following example, we have the room status marked as Available, and we see that we do not have any meetings scheduled in the next 30 minutes, in this example we can set a meeting manually to start immediately for a duration of 30 minutes, to do that:
- Click on
 .
. - Specify the duration of the meeting, we will set it to 30 minutes.
 .
.
- Click on Meet now.
- The Meeting will be created, and a confirmation pop-up will be displayed
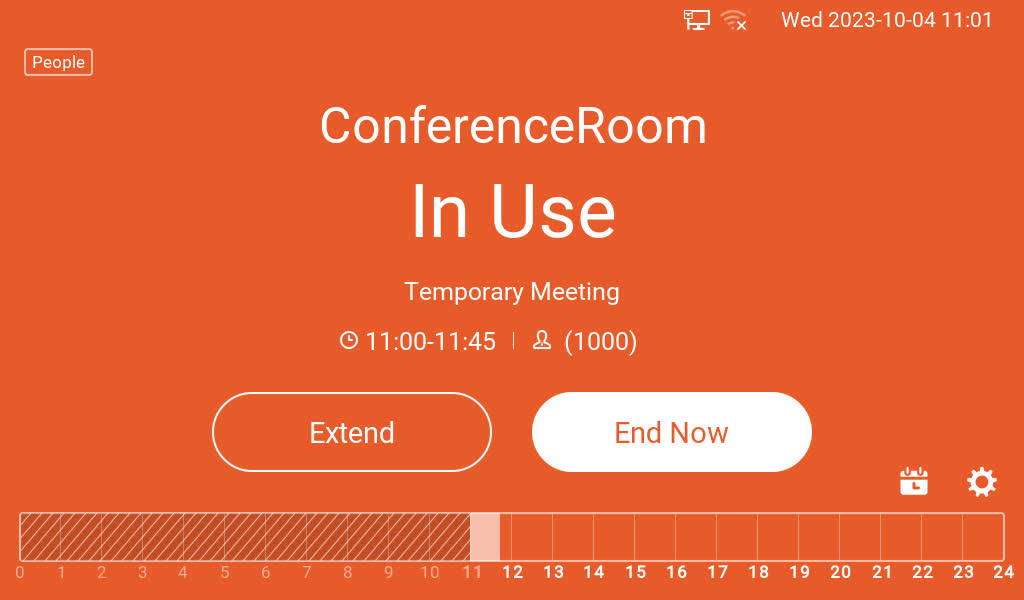
- After this, the room status will change to “In Use”.
SELF-HOST MODE
In this configuration, the only device required is a GSC3570, Powered on, and installed, in the room where the meetings will be held.
Prerequisites
- GSC3570 on Firmware 1.0.7.2 or higher.
Self-Host Configuration
Since on this configuration, we will only need a powered-on GSC3570 on Meeting Room Panel Mode, the option available will be to create an immediate meeting whenever the meeting room needs to be used, to do that:
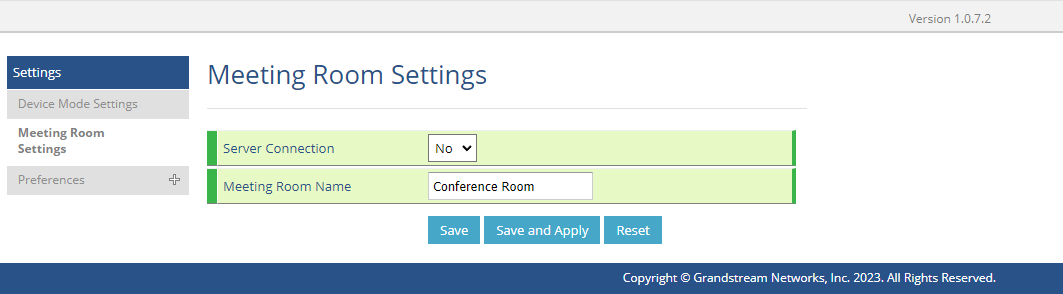
- Make sure to disable the server connection on the GSC3570:
- On the Web UI, go to Settings => Meeting Room Settings, and set the server connection to “No”
- Choose a Room name, please note that the Room name specified here will override the Room name specified on the UCM63xx Room settings.
- Click on “Save and Apply” to save the changes.
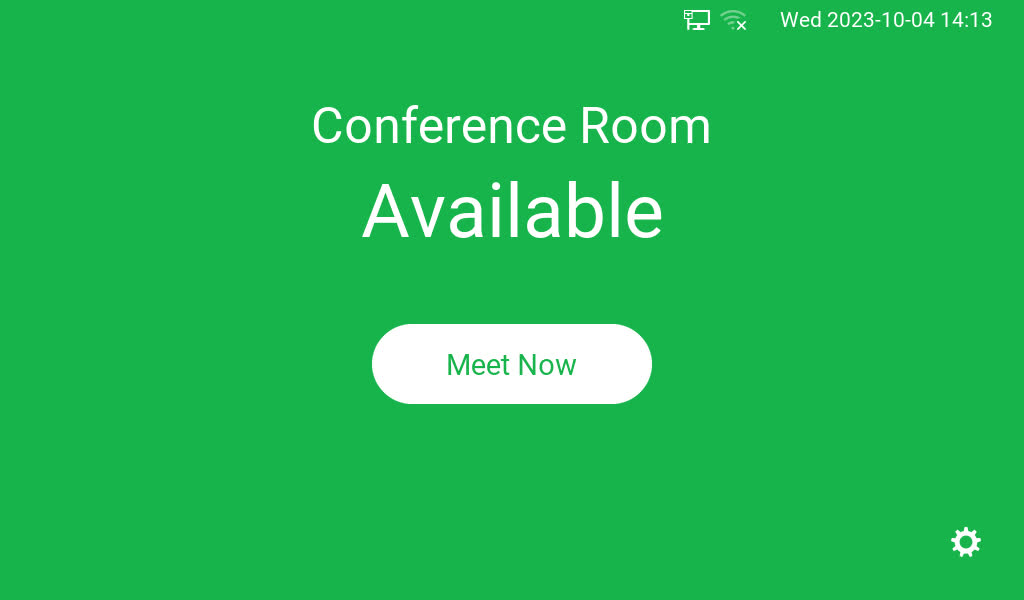
The new view of the GSC3570 Control Panel will be as follows:
Meeting Operations in Self-Host Mode
Creating a Meeting
To create a meeting on the GSC3570 without a SIP Server, please follow the below steps:
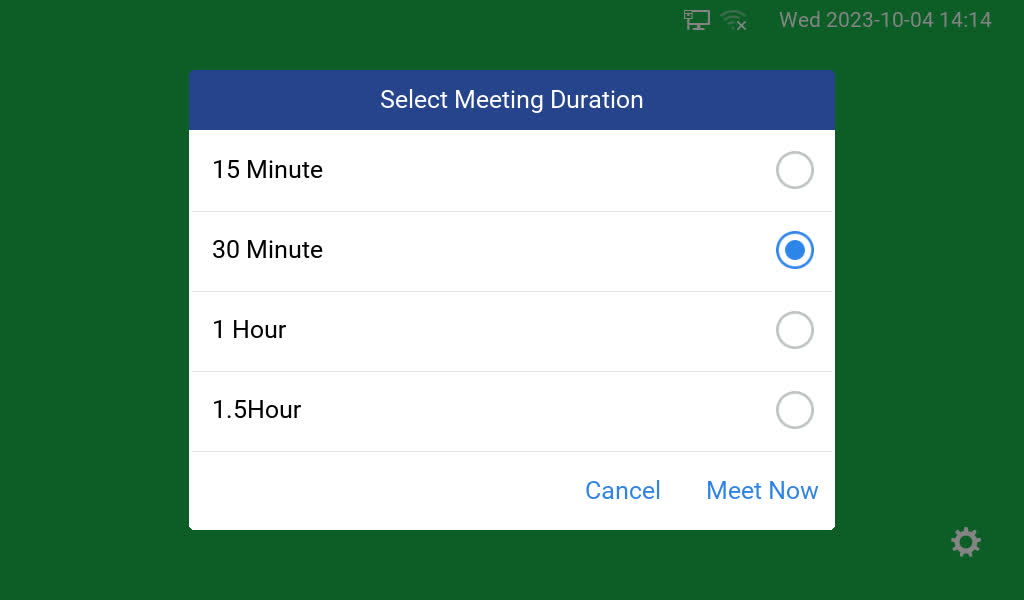
- Click on .
- Specify the Duration of the Meeting and confirm, we will set it to 30 minutes.
 .
.
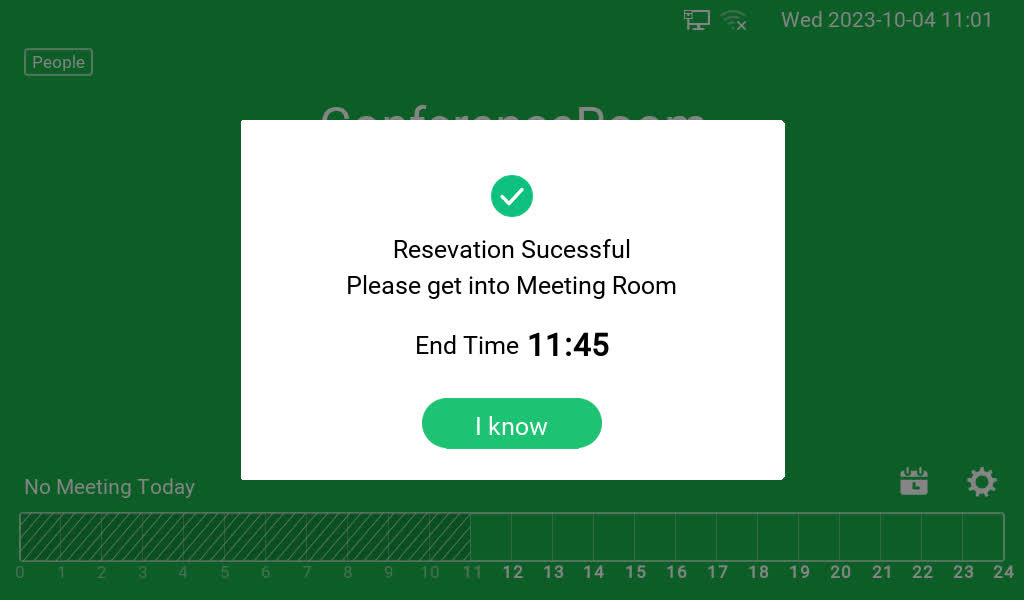
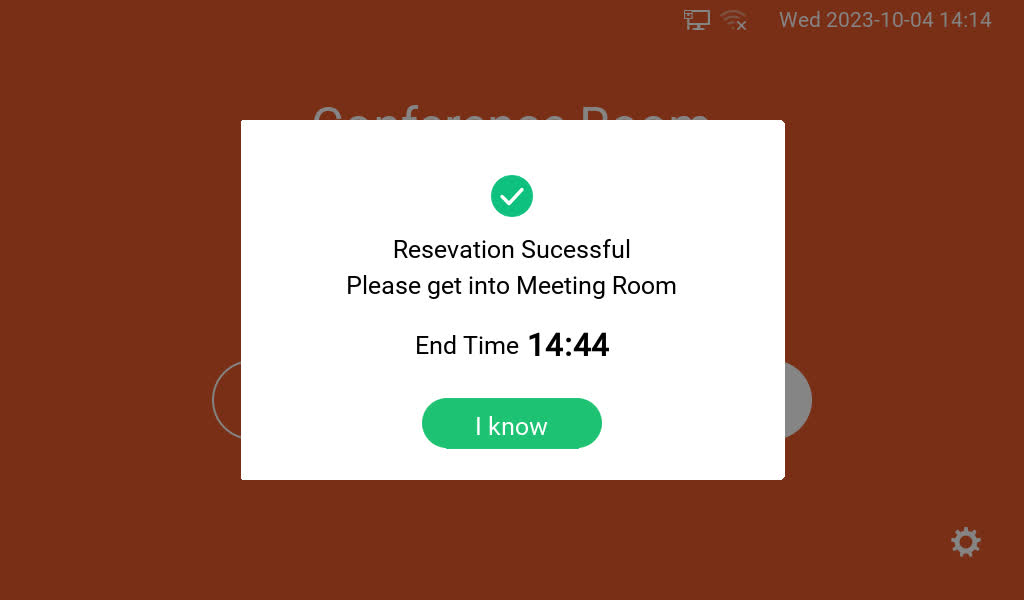
- The reservation will be confirmed and the following message will be displayed:
Extending a Meeting
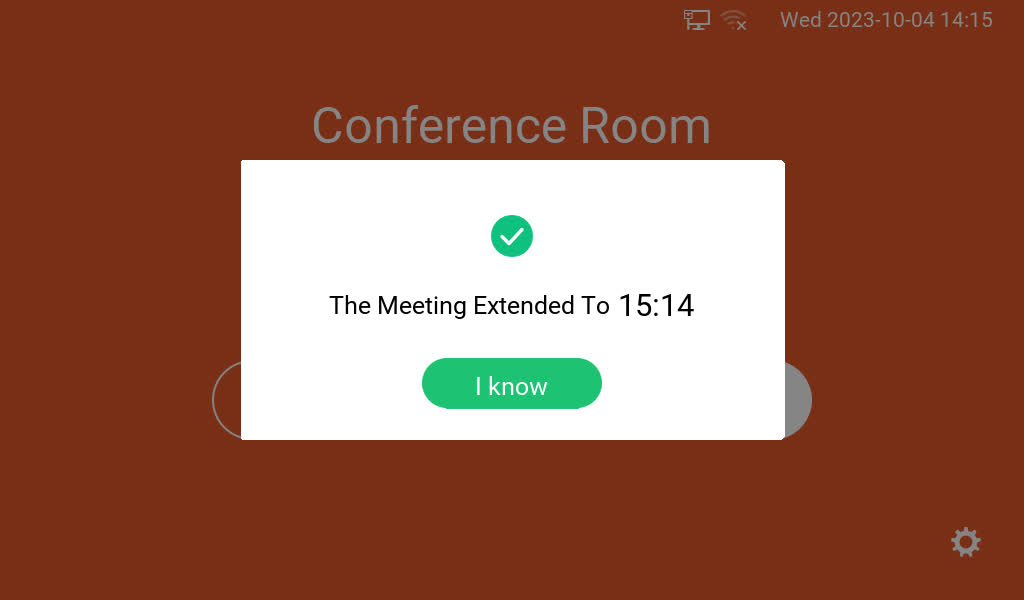
During the held meeting, if the host needs extra time, he can extend the meeting duration, to do that :
- Click on .
- Choose the duration of the extension, we will set it to another 30 Minutes.
- Click on Extend.
- The meeting will be extended, with a confirmation displaying the new ending time of the meeting.
Ending a Meeting Earlier
In case the host needs to stop the meeting earlier than the scheduled time, the following steps can be followed:
- Click on .
- Confirm the ending of the meeting.
- The Room will be available again:
Supported Devices
Device Name | Firmware Required |
GSC3570 | Firmware 1.0.7.2 or higher |
Supported devices