Overview
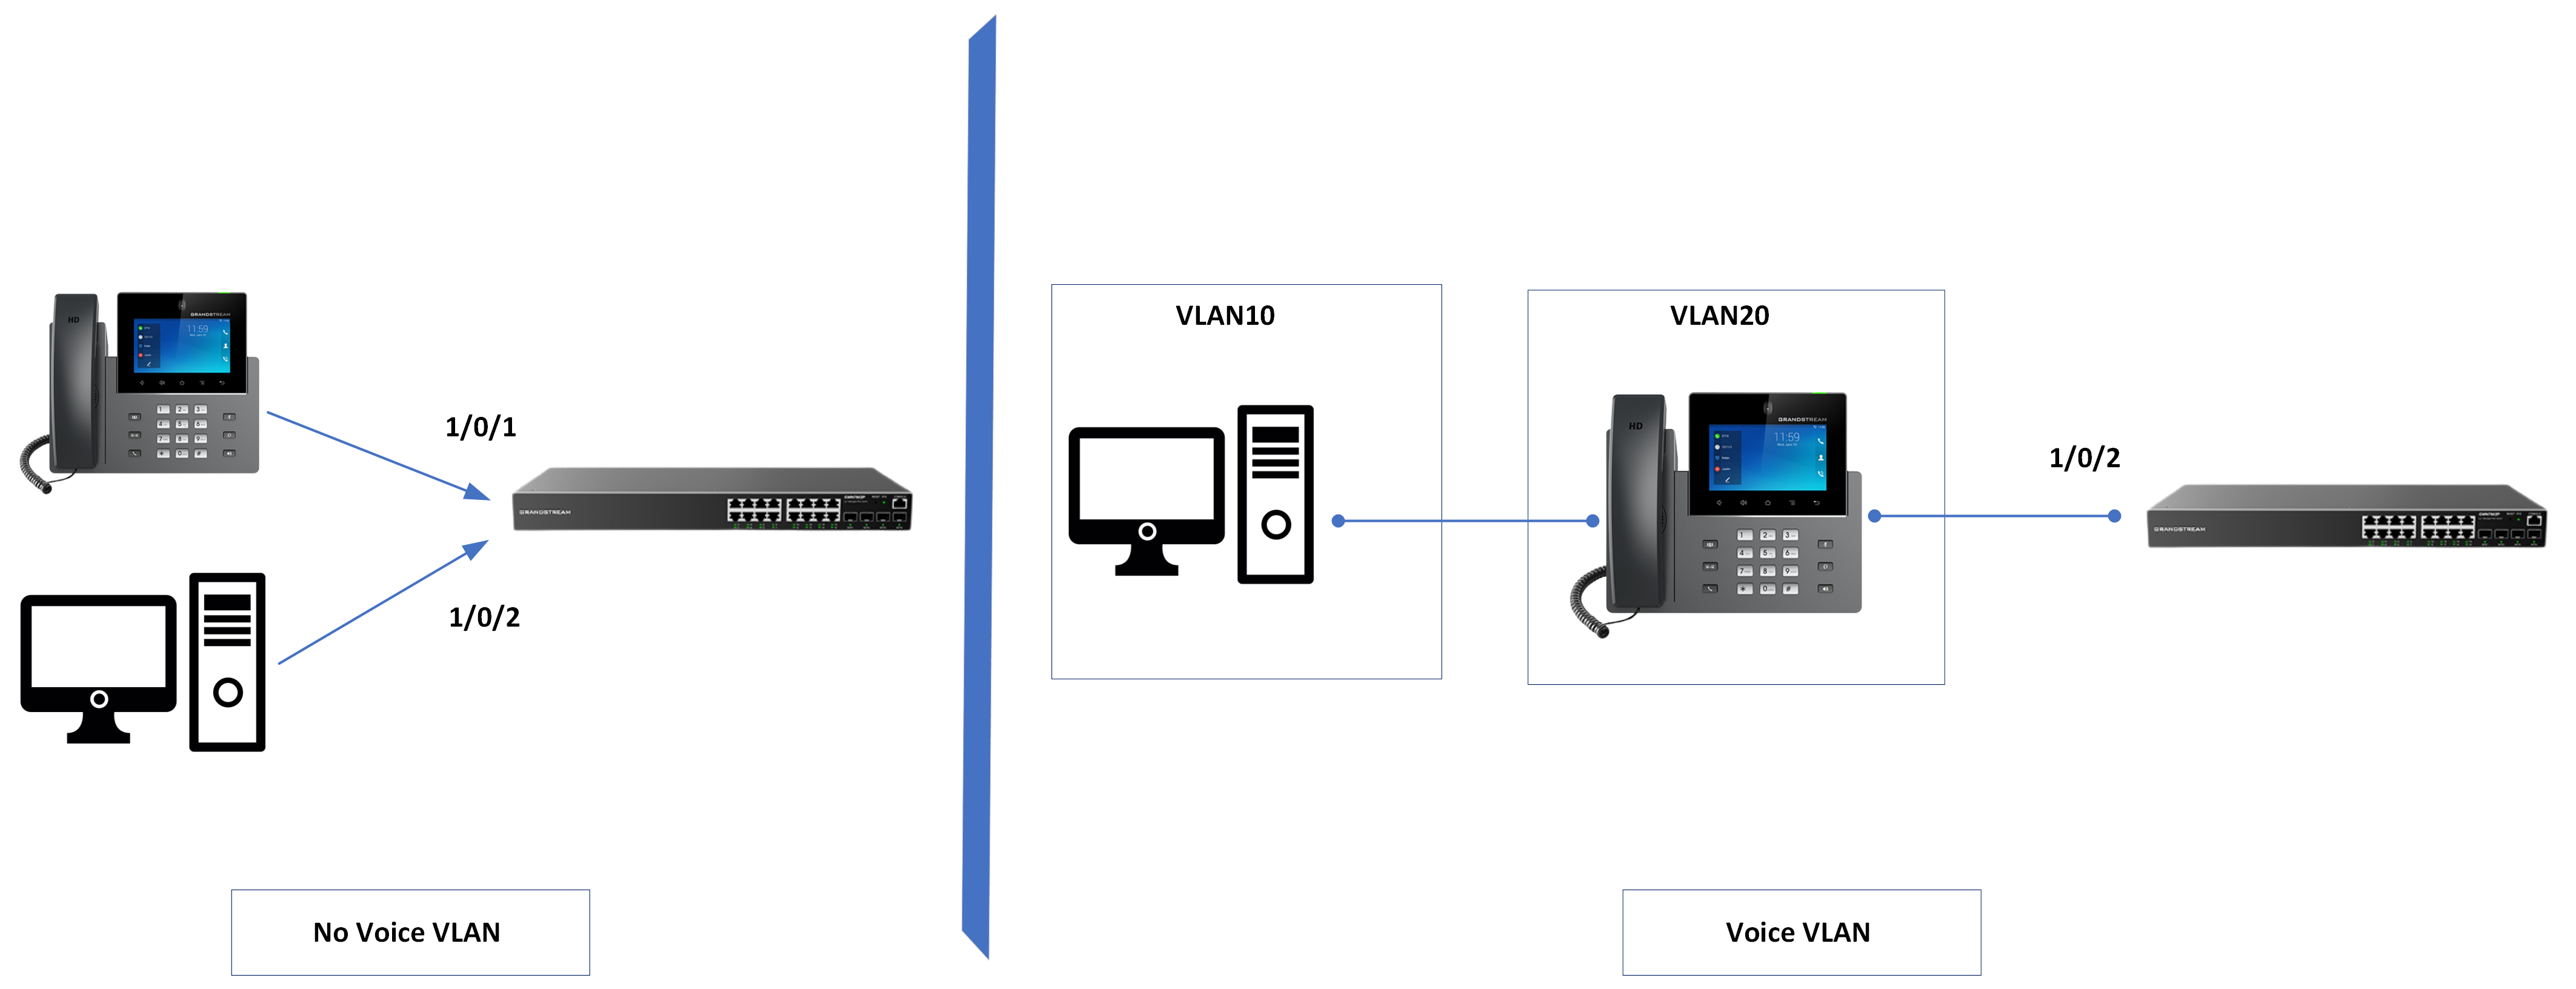
Consider the following scenario, we have an IP phone and a desktop, and we want to connect them to our managed switch, what we can do is connect each device by Ethernet cable to a designated switch port and set both switch ports to access ports, this will be costly as more ports of the switch will be used.
There is another way to go about this and that is by using Voice VLAN which means the traffic will be going through the IP phone to the desktop and they will be separated by VLANs, we will set a Voice VLAN20 for the IP phone, and a data VLAN10 for the desktop.
Setting up VLANs
To configure the above set up please follow the below steps:
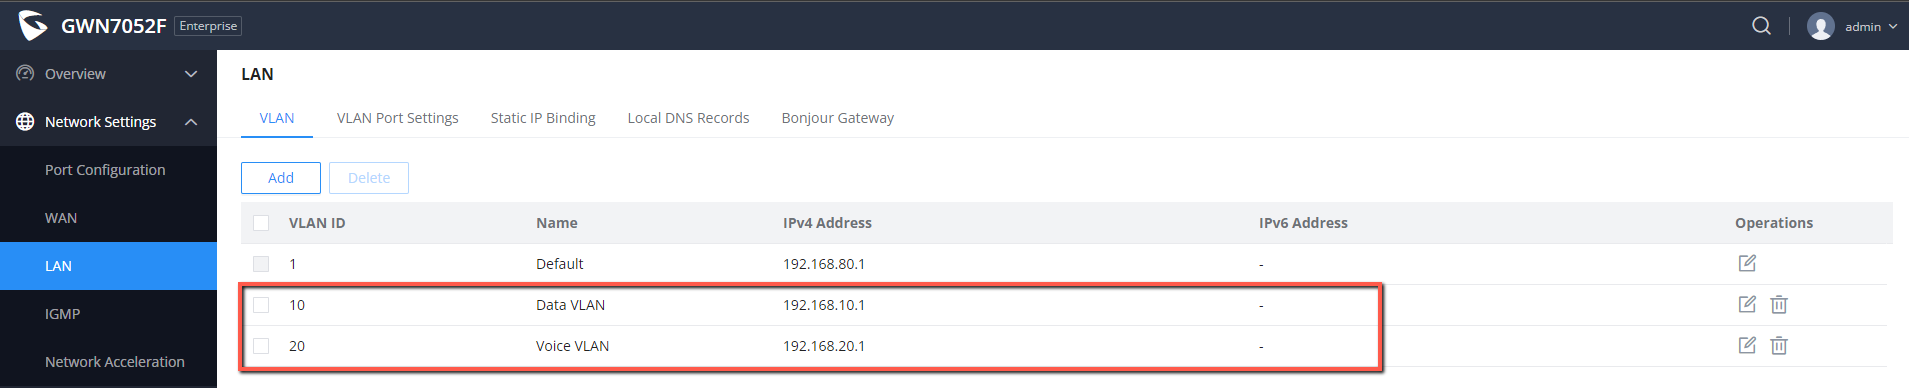
- On the router interface, under Network Settings => LAN => VLAN, Create two VLANs, a Voice VLAN with VLAN ID 20, and a Data VLAN with VLAN ID 10, Please refer to the VLAN guide for more information regarding creating VLANs on the router’s interface.
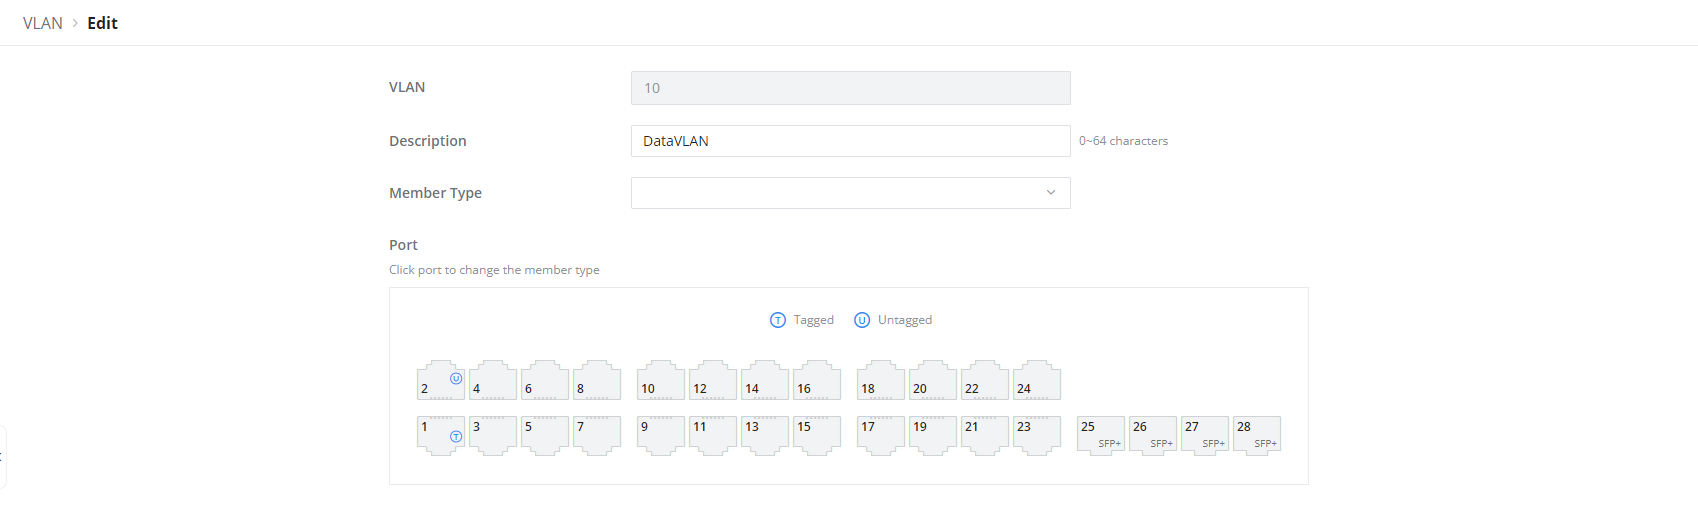
2. On the Switch interface, create in the same manner two VLANs, a Voice VLAN with VLAN ID 20 and a Data VLAN with VLAN ID 10.
Voice VLAN

Data VLAN
3. Go to Port settings, and set 1/0/2 as a Hybrid port with PVID 10, since it will receive both traffic, tagged and untagged, leave the rest of the ports as trunk ports and enable the Ingress Filtering Option.

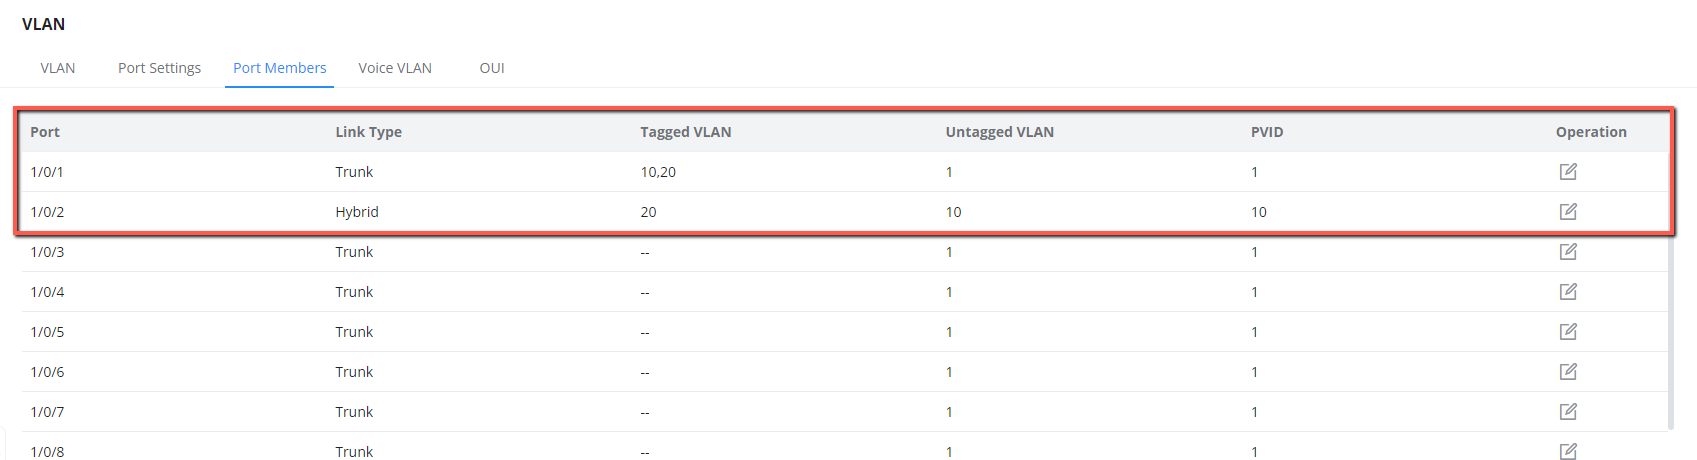
4. Under Port Members settings, set 1/0/1 and 1/0/2 as follows:
1/0/1 is a trunk port , the tagged VLANs are 10, 20 , the untagged VLAN is the Default VLAN: VLAN1, and the PVID is 1.
1/0/2 is a hybrid port, the tagged VLAN is the Voice VLAN (VLAN20), and untagged VLAN is the data VLAN (VLAN10), with PVID 10.
Configuring Voice VLAN mode
At this step, the user can select more than one way to set up the voice VLAN:
Auto Voice VLAN using LLDP
The Auto Voice VLAN configuration simplifies the process of setting up Voice VLAN by eliminating the necessity to manually enable OUI port settings on each specific port.
To configure the Auto voice VLAN, please follow the below steps:
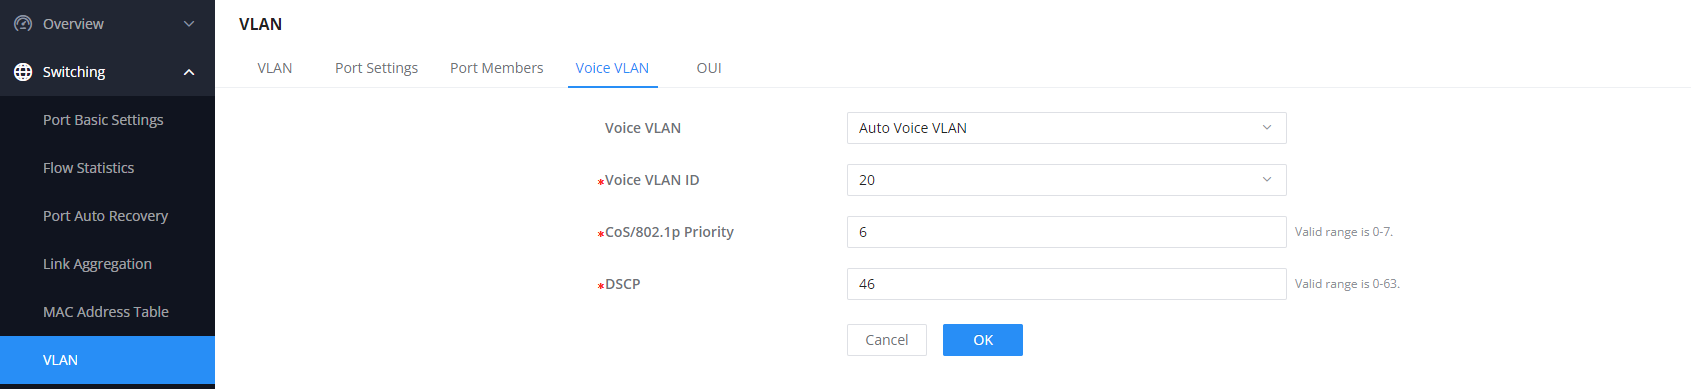
- Go to Voice VLAN tab under Switching => VLAN => Voice VLAN
- Select Auto Voice VLAN as an option.
- Set Voice VLAN ID to 20.
- Set the Class of Service value to 6.
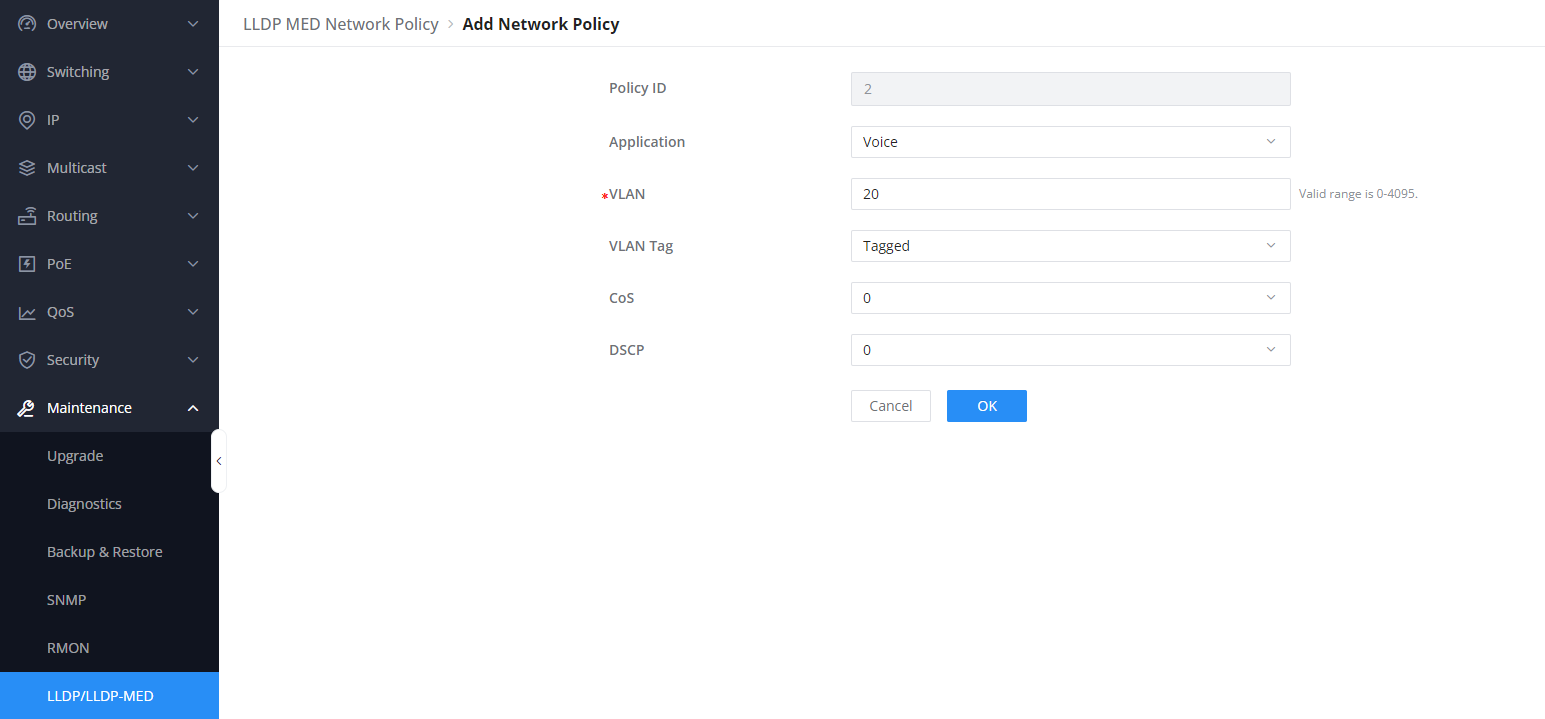
5. Once enabled, go to Maintenance => LLDP-LLDP-MED => LLDP MED Network policy , and create a network policy for tagging the voice VLAN (VLAN 20) as follows :
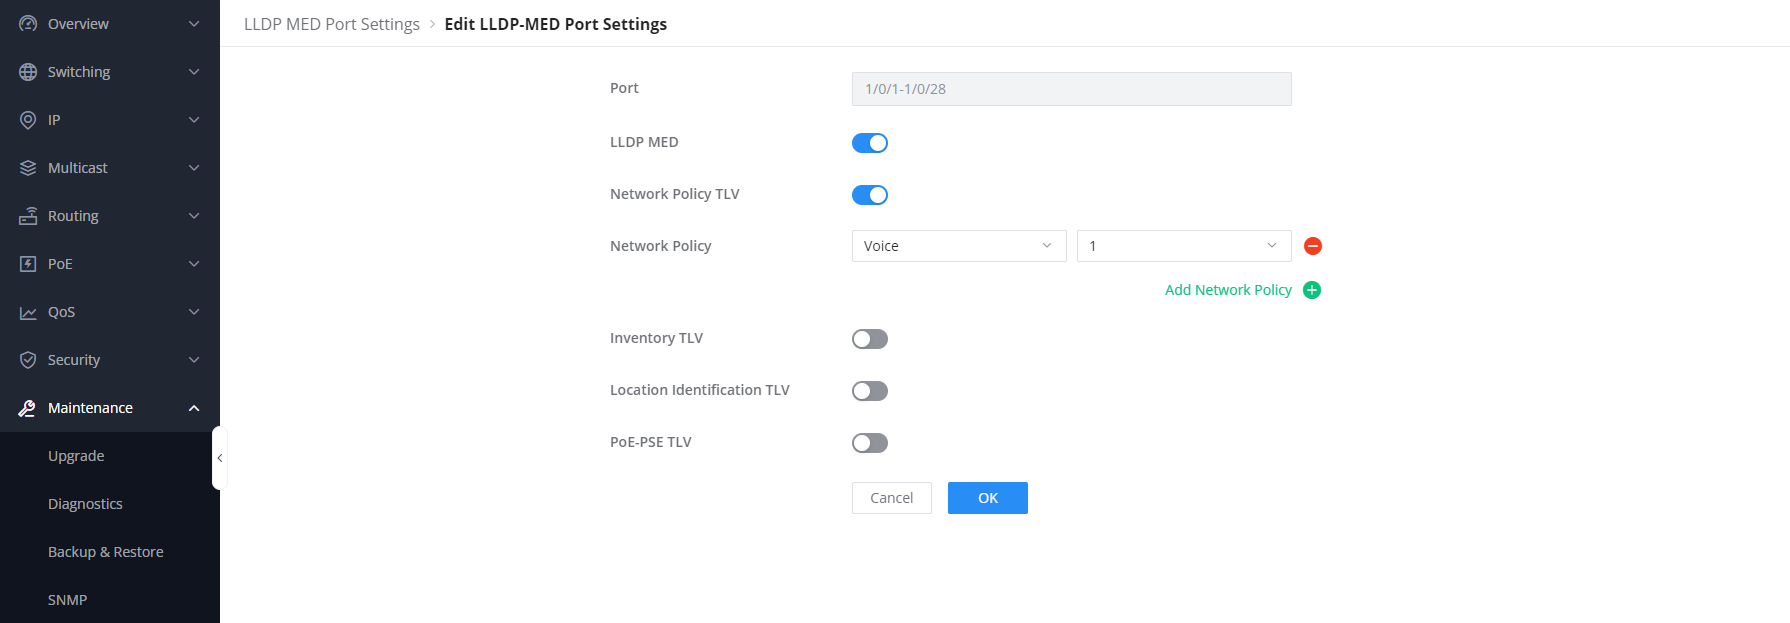
6. Under Maintenance => LLDP-LLDP-MED =>LLDP MED Port settings, select all ports of the switch, and apply the network policy created above:
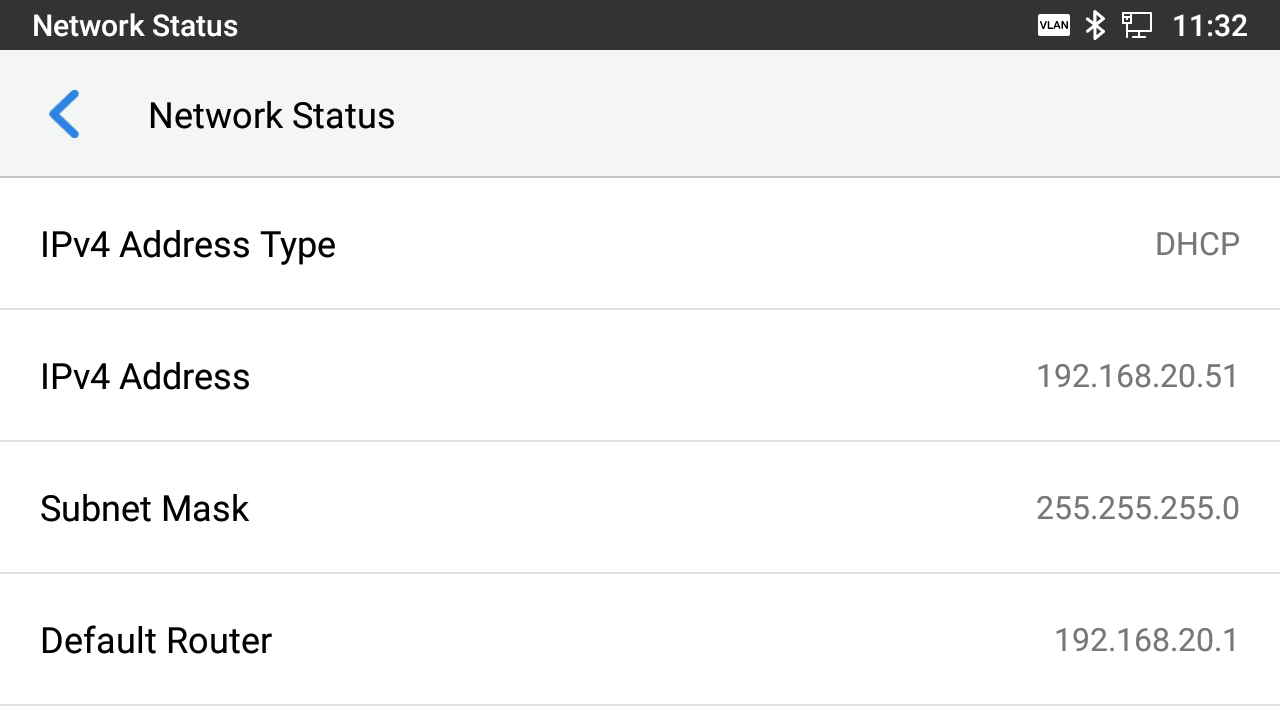
The voice device now will be tagged with VLAN 20 and will take IP Address 192.168.20.x, on any specific port on the switch that you select.
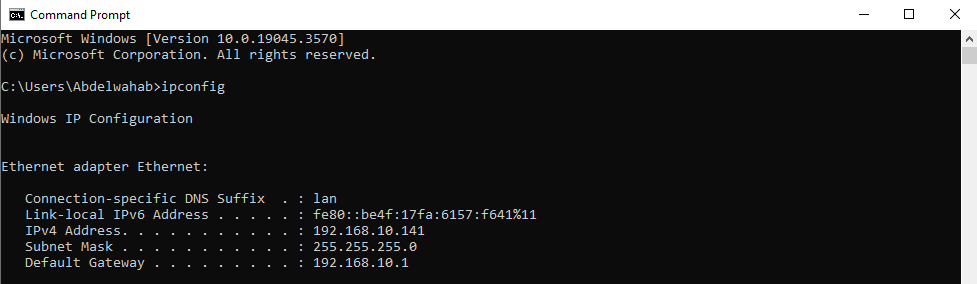
The connected desktop on the PC port will take IP 192.168.10.x
Tagged OUI using LLDP
Setting up a voice VLAN using LLDP is the method where you use the link layer discovery protocol to discover connected devices to the switch and automatically tag the voice devices with the specific voice VLAN tag , this can be done by creating a voice policy on the LLDP MED Network policy section.
The configuration can be done as shown below:
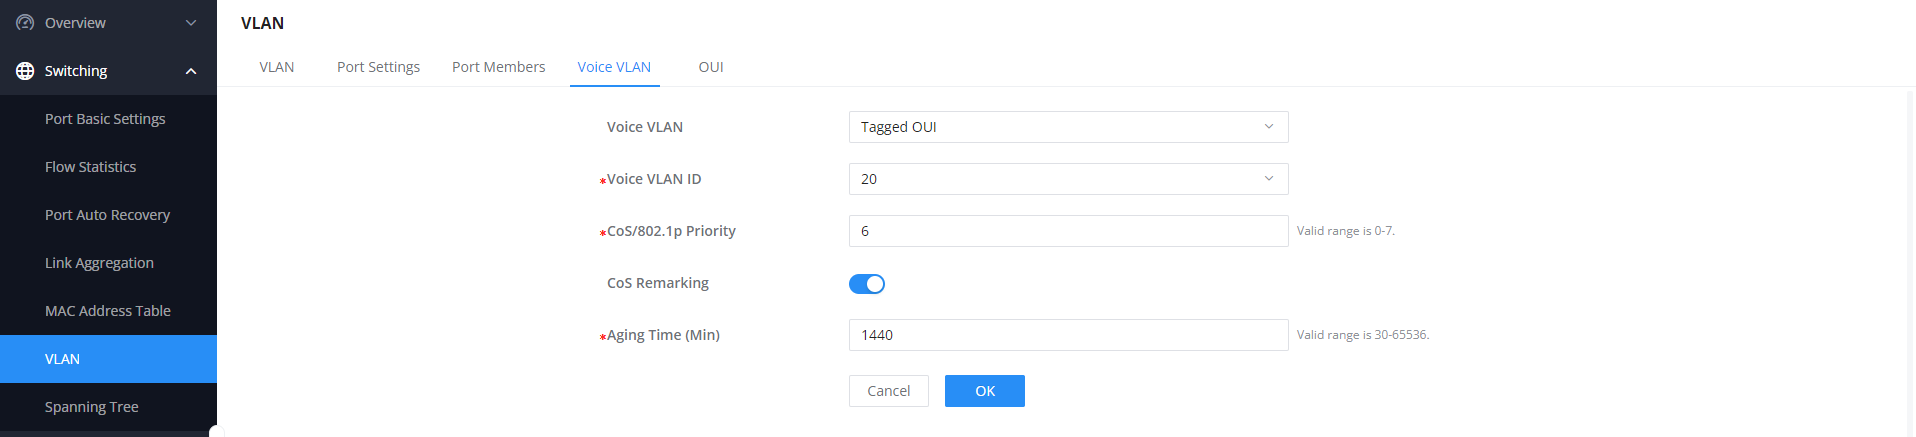
- Go to Voice VLAN tab under Switching => VLAN => Voice VLAN
- Select Tagged OUI as an option.
- Set Voice VLAN ID to 20.
- Enable Cos Remarking and leave the Class of Service value to 6.
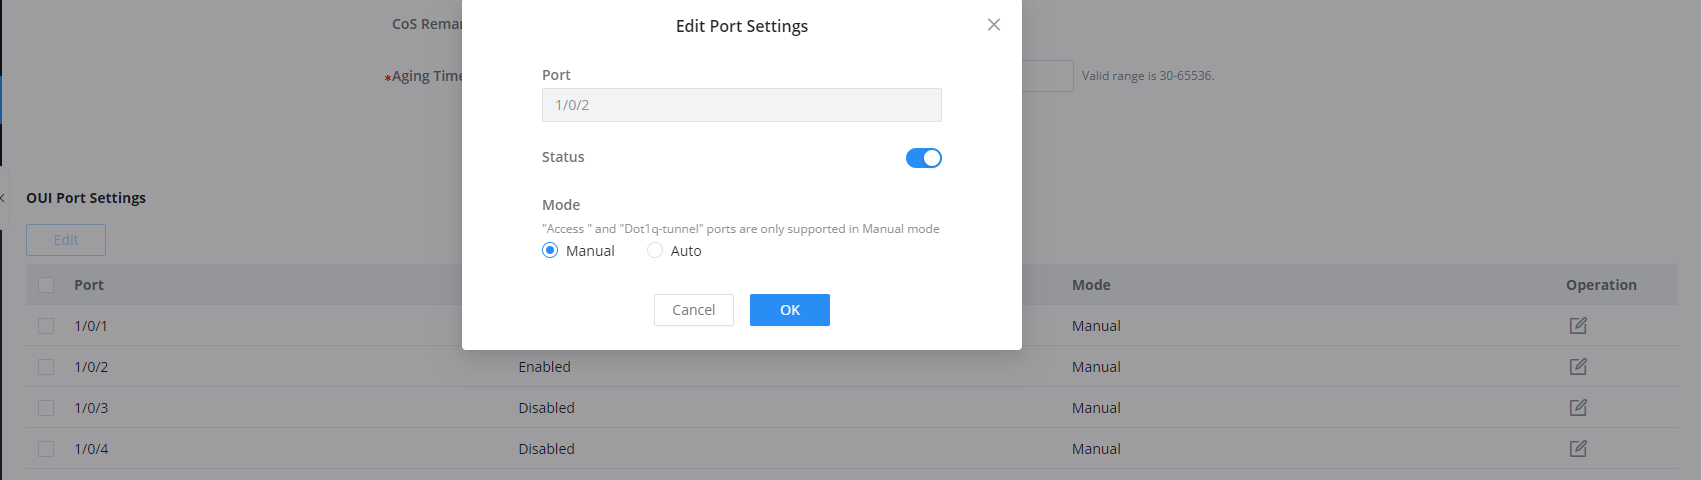
5. Go to 1/0/2 port settings and enable it for OUI port Settings.
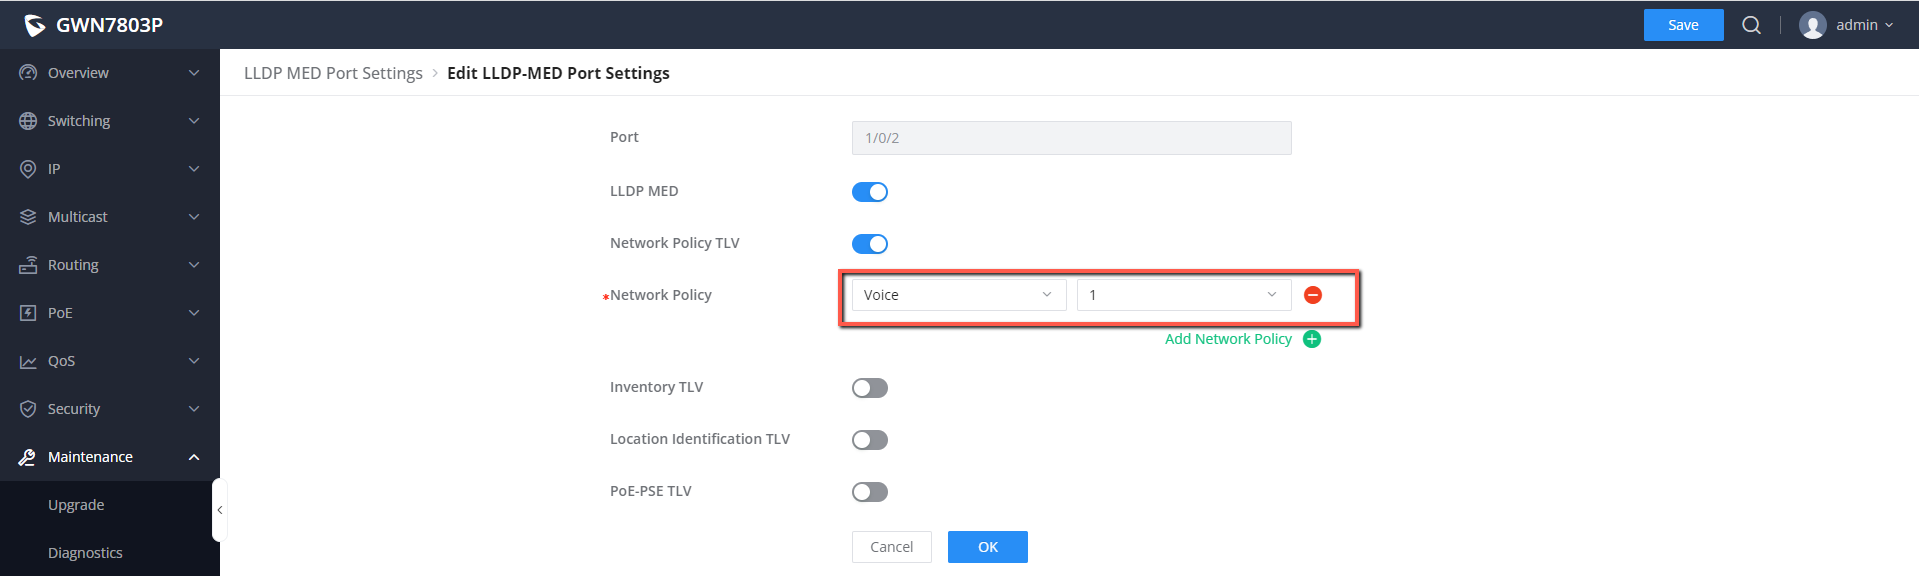
6. Once enabled, go to Maintenance => LLDP-LLDP-MED => LLDP MED Network policy , and create a network policy for tagging the voice VLAN (VLAN 20) as follows :
7. Under Maintenance => LLDP-LLDP-MED =>LLDP MED Port settings, select port 1/0/2 on which the IP phone is plugged and apply the network policy created above:
The voice device now will be tagged with VLAN 20 and will take IP Address 192.168.20.x
The connected Desktop on the PC pot will take IP 192.168.10.x
Tagged OUI using VLAN Tag
Using LLDP is the automatic way of tagging voice devices with the voice VLAN, you can do it manually using the VoiP calls VLAN Tag on the IP phone, depending on the IP phone model, this configuration procedure might be different, in our example we will use the GXV3450:
On the switch:
- Go to Voice VLAN tab under Switching => VLAN => Voice VLAN
- Select Tagged OUI as an option.
- Enable Cos Marking and leave the Class of Service value to 6.
On the IP Phone:
4. Go to Network Settings => Ethernet Settings => Network Configuration of VoIP Calls
5. Enable the option “Different Networks for Data and VoIP Calls”

6. Set the Layer 2 QoS 802.1Q/VLAN Tag (Ethernet) for VoIP Calls to 20, which is the voice VLAN
7. Set the Priority value to 6 , which is the same value configured on the CoS on voice vlan settings

Click on save and now the IP Phone will be tagged with VLAN20.
The voice device will take IP 192.168.20.x
The desktop will take IP 192.168.10.x
Untagged OUI
In this method, we use a MAC-Address based approach, devices that are recognized by the switch as voice devices, based on their MAC address defined on the OUI (Organizationally Unique Identifier) section, will be automatically tagged with the Voice VLAN 20, We set it up by following the procedure below:
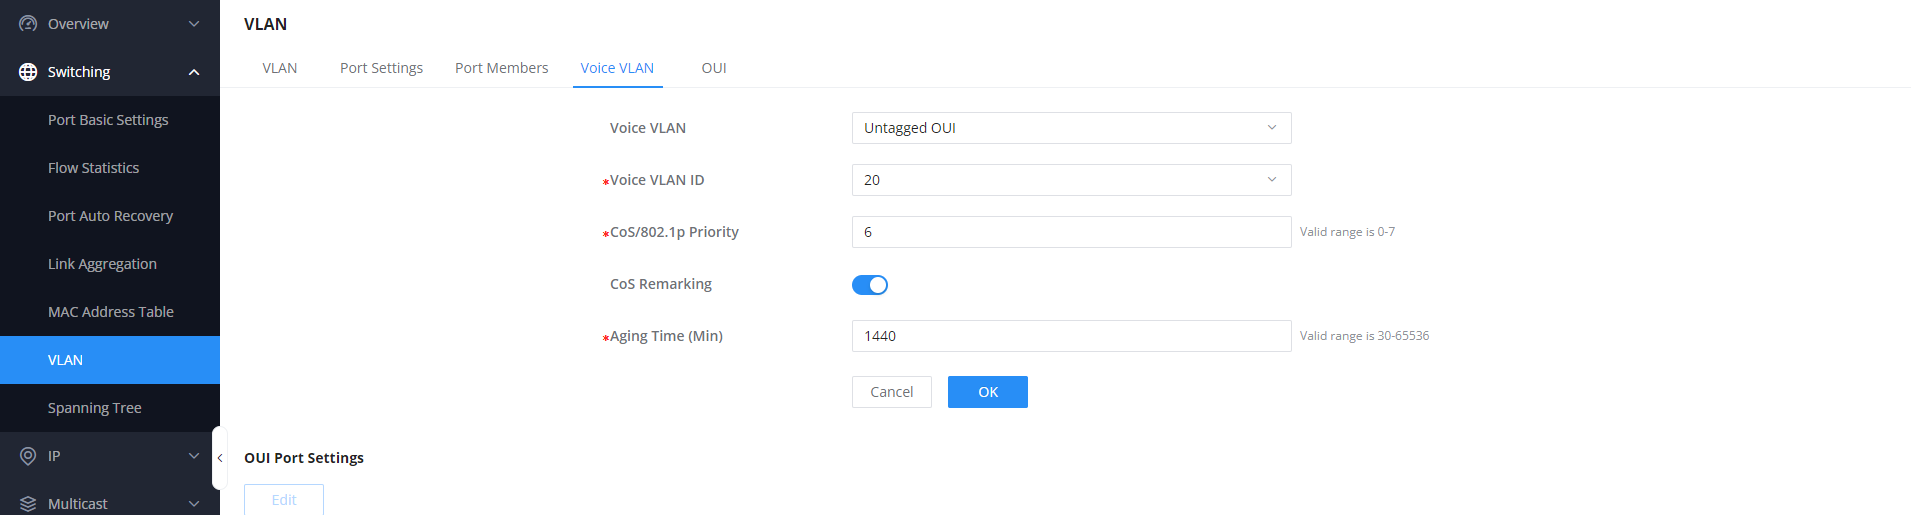
- Go to Voice VLAN tab under Switching => VLAN => Voice VLAN
- Select untagged OUI as an option.
- Select Voice VLAN ID to be 20.
- Enable Cos Marking and leave the Class of Service value to 6.
5. Go to 1/0/2 port settings and enable it for Voice VLAN

Once the phone is rebooted,
The IP phone will automatically take the IP 192.168.20.x
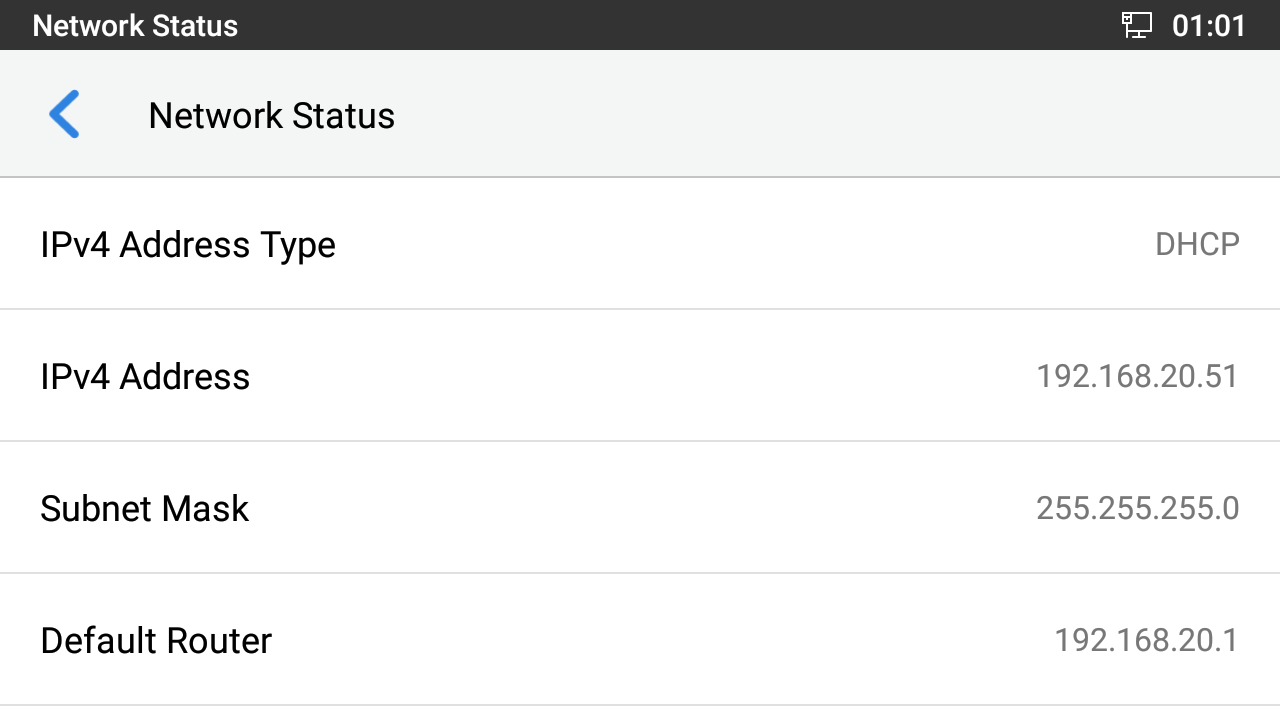
The connected desktop will automatically get the IP 192.168.10.x
- Adding OUI of a new Device
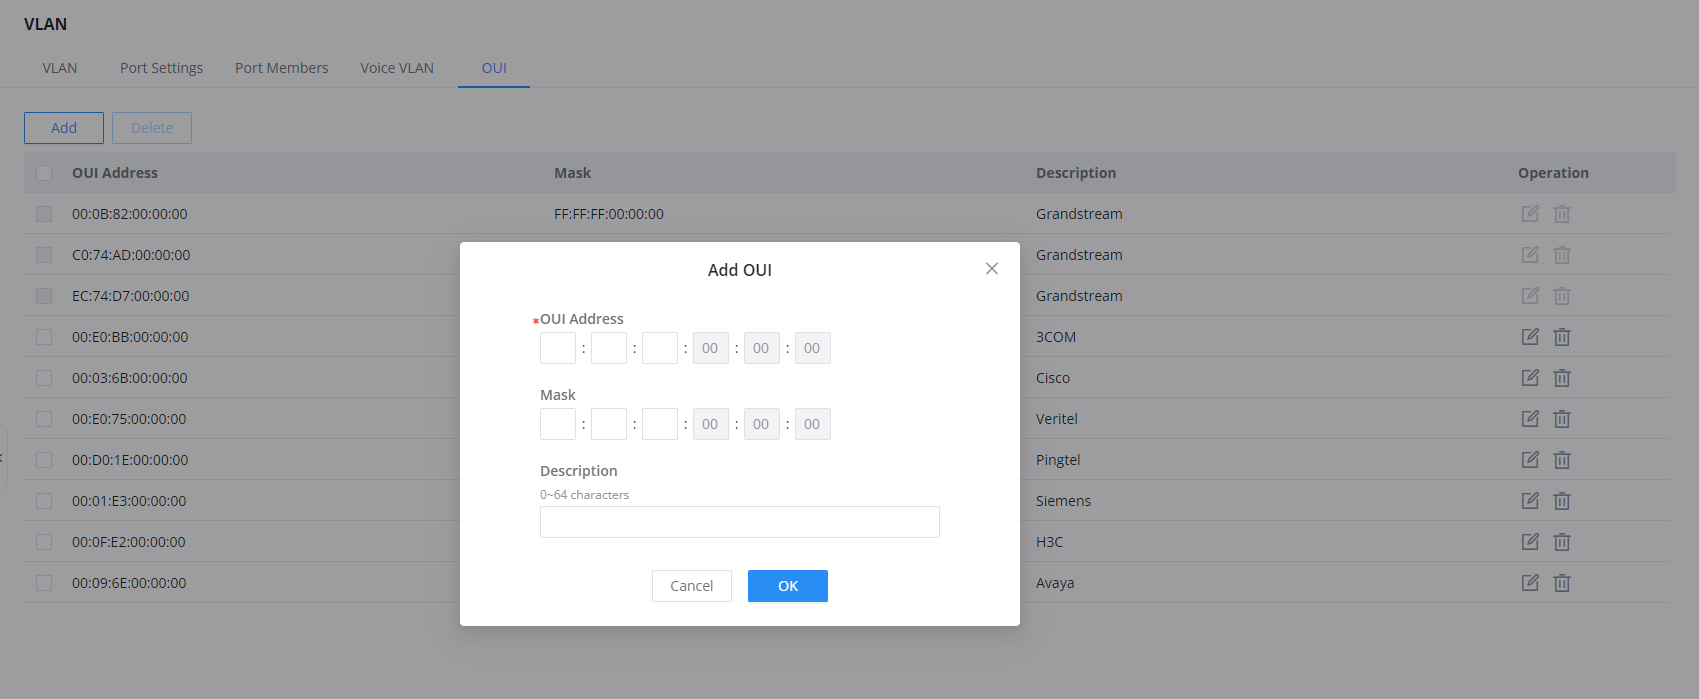
Incase of using a voice device with a MAC address that is not defined on the list of known OUIs , you can add it manually by following the below steps:
- Go to Switching => VLAN => OUI
- Click
 to add a new OUI
 - Define the OUI Address and Mask
- Add a description for the specific IP phone name or brand.
After saving the configuration, the device added will be considered as a Voice device when defining the Voice VLAN.
Results Interpretation
When traffic is sent from the switch to the computer through the IP phone, any traffic designated to the IP phone itself will be tagged with a VLAN identifier which in our case is the Voice VLAN Tag 20, the rest will be untagged and will be forwarded to the device connected on the PC port of the IP Phone.
Only two VLANs are allowed to pass through this set-up: the Data VLAN ( VLAN10), which is responsible for providing network access to the connected device, and the Voice VLAN (VLAN20), which carries voice traffic for the IP phone. This configuration ensures that the network is optimized for efficient communication between the IP phone and connected devices, while also maintaining security and minimizing potential issues with network congestion.
Supported Devices
Device Name | Supported | Firmware Required |
GWN7801 | Yes | 1.0.3.19 or higher |
GWN7801P | Yes | 1.0.3.19 or higher |
GWN7802 | Yes | 1.0.3.19 or higher |
GWN7802P | Yes | 1.0.3.19 or higher |
GWN7803 | Yes | 1.0.3.19 or higher |
GWN7803P | Yes | 1.0.3.19 or higher |
GWN7811 | Yes | 1.0.1.8 or higher |
GWN7811P | Yes | 1.0.1.8 or higher |
GWN7812 | Yes | 1.0.1.8 or higher |
GWN7812P | Yes | 1.0.1.8 or higher |
GWN7813 | Yes | 1.0.1.8 or higher |
GWN7813P | Yes | 1.0.1.8 or higher |
GWN7806 | Yes | 1.0.1.14 or higher |
GWN7806P | Yes | 1.0.1.14 or higher |
GWN7830 | Yes | 1.0.3.3 or higher |
GWN7831 | Yes | 1.0.3.3 or higher |
GWN7832 | Yes | 1.0.3.3 or higher |
List of supported devices