INTRODUCTION
IPVideoTalk Portal is a web-based online management center, on which users could manage video devices or internal contacts, check devices online status, make meeting reservation… for IPVideoTalk meeting service. This document introduces how to configure and use IPVideoTalk portal for IPVideoTalk meetings.
For more information about IPVideoTalk usage, please refer to the links below:
- IPVideoTalk https://documentation.grandstream.com/knowledge-base/ipvideotalk-user-guide/
- IPVideoTalk website: http://www.ipvideotalk.com/
OVERVIEW
Users need to have an IPVideoTalk Portal account before using the configuration options in IPVideoTalk Portal. The IPVideoTalk Portal Web UI includes Devices, Meetings, Contacts, Plans, Statistics, Settings, and System configuration sections. This document provides instructions for all sections.
Sign Up
- Log in our official website http://www.ipvideotalk.com to sign up.
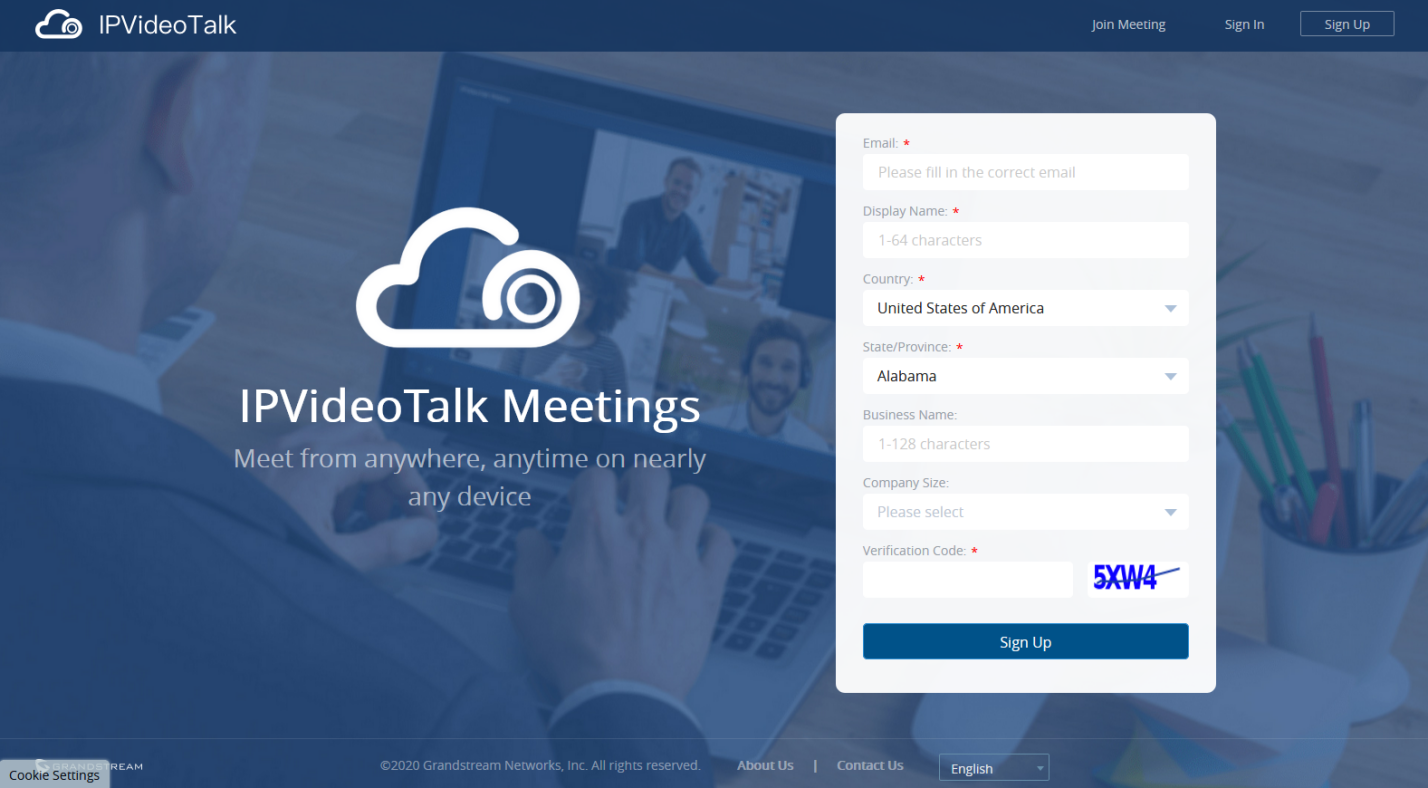
- Fill in related information as shown below:
- Display Name: Enter current company name. If the company already has an account signed up, the users will not be able to sign up again. It is recommended to sign up one account per company so that all devices can be centrally managed under the same account.
- Email: Fill in company Email or Work Email address.
- Country: Fill in the located country of the company.
- State/Province: Fill in the located State/Province of the company if USA is set as country.
- Business Name: Fill in the user’s contact name.
- Company Size: Fill in the users’ amount size of the company.
- Verification Code: Fill in the characters on the right for verification purpose.
3. Click on “Sign Up” button. A prompt will pop up to remind users to log in Email to activate IPVideoTalk account.
4. Click in activation Email to set up login account and password.
5. The users can now successfully access IPVideoTalk Portal.
Sign In
- Go to IPVideoTalk official website http://www.ipvideotalk.com.
- Fill in account name and password.
- Click on “Sign In”.
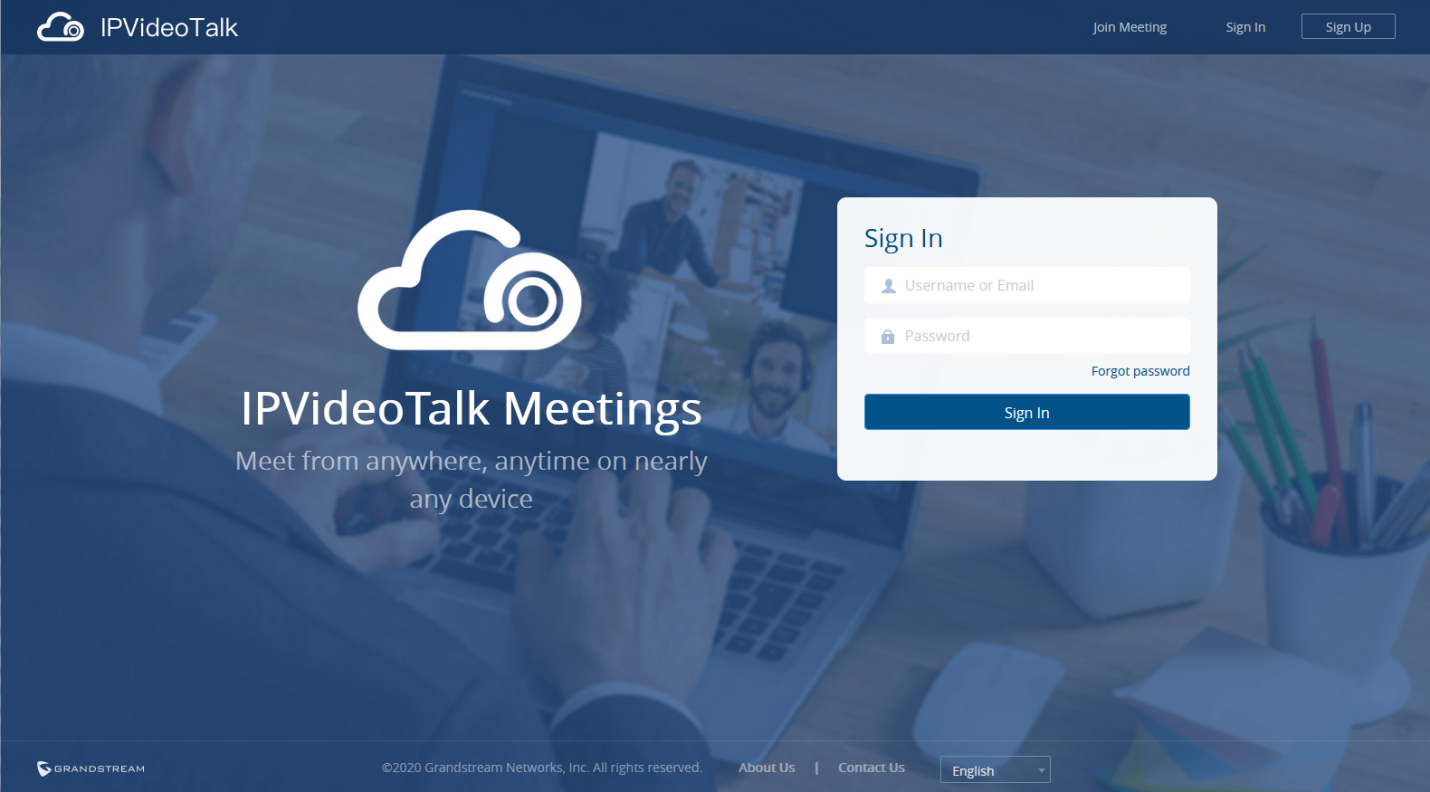
Users can set language to English, Chinese, Japanese or Spanish in the language drop-down menu.
Definitions
This section describes the 5 sections in the IPVideoTalk Portal on the top menu. Please see Devices, Meetings, Contacts, Plans and System sections below.
Tool Bar
The login account is displayed on the upper right corner once logged in. Click on account (for instance
as shown in below figure), there will be a drop-down menu. Users could click “Admin Center” (including sub-user management and enterprise information management), and update Settings (including personal information settings and instant meetings template settings).

- Click “Sign Out” to exit.
Messages on IPVideoTalk Portal
The main page of IPVideoTalk Portal displays important notification messages of IPVideoTalk, such as plan expiration notification, low firmware notification, temporarily out of service for maintenance notification, which may cause the users to be unable to use IPVideoTalk service properly.

- Plan expiration notification. It will prompt how many plans have expired or about to be expired, click on “View now” to enter the Plans page to view details.
- Low firmware notification. It will prompt how many devices have low firmware versions, click on “View now” to enter the Devices page to view details.
- System upgrade maintenance notification. Click on “View now” to check the maintenance time, please avoid holding meeting during maintenance.
The messages are only for querying the background data when you log in, it is not updated in real time but it will be updated when you log in next time.
DEVICES
Users can add, view, edit, delete or search devices on Devices screen.

- All devices
Users could check devices according to different categories: Authenticated, Failed, Pending.
- Toolbar
Users could link device (s), import/batch import device (s).
- Search device
Users could search device by MAC address or IPVideoTalk ID, or the device user, or search the online/offline status of the device.
Display all linked devices. The displayed contents are: MAC Address, IPVideoTalk ID, Personal Room ID (Each GVC32xx device has a Personal Room Number, the instant meeting will use this Personal Room Number as the meeting ID), Alias, Device Type, Firmware Version, and Status (If the device is online, the internal or external IP address of the device will be displayed).
Link GVC320x to IPVideoTalk Portal
Add Device via Device Code
Users could link device via device code or MAC address of the device. It is recommended to use device code because the latter requires authentication. Follow the steps below to link device via device code:
-
Click on
.
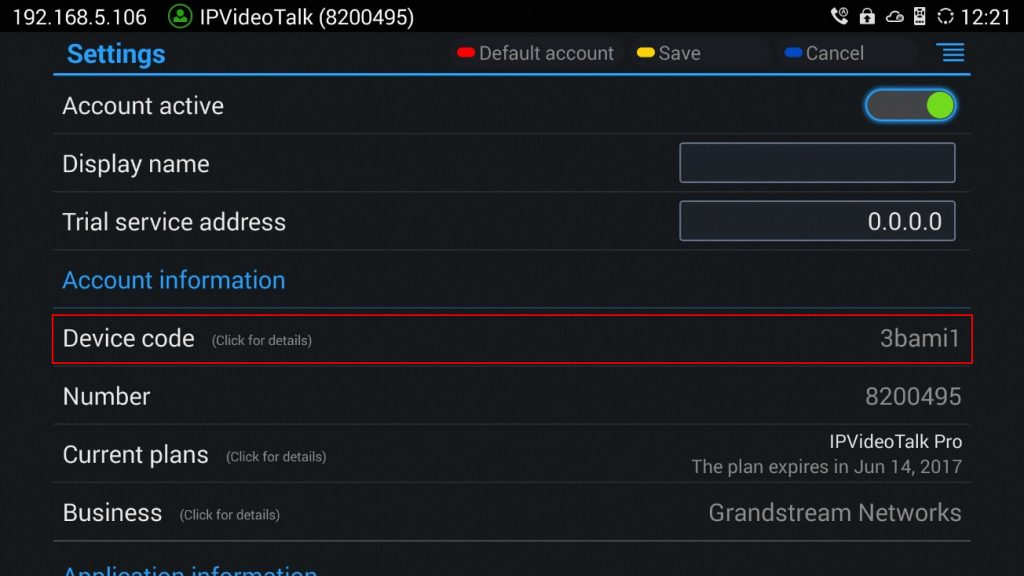
- Choose “Link via Device Code”, fill in device code and alias in the pop-up dialog.
- Device Code: To find device code for your GVC3200/GVC3202/GVC3210, please go to GVC3200/GVC3202/GVC3210 LCD menu->Applications->IPVideoTalk application->Settings and check “Device code”.
- Alias is used to identify and distinguish among different devices.
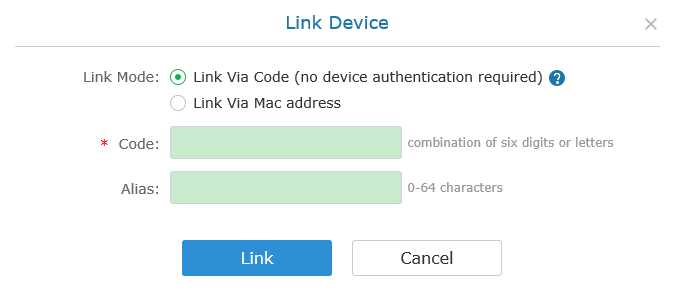
3. Click “Link” button to link the device. The GVC3200/GVC3202 will receive a message if it is linked successfully. On the GVC3200/GVC3202, please go to LCD idle screen->Applications->IPVideoTalk application, and click on “Notices” to retrieve the message as shown below.
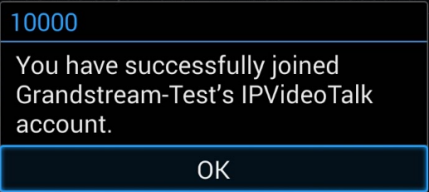
4. Once linked successfully, users could check the status of the device (online/offline) by signing in IPVideoTalk Portal.
Add Device via MAC Address
Users could follow the steps below to link device via MAC address:
-
Click on
.
- Choose “Link via Mac Address”, fill in MAC Address, Alias in the pop-up dialog.
- MAC Address: The MAC address of the GVC3200/GVC3202/GVC3210 device. It can be found on the back of the device, or GVC3200/GVC3202 web UI->Status->Network Status, or GVC3200/GVC3202 LCD menu->Settings->Status->Network.
- Alias is used to identify and distinguish among different devices.
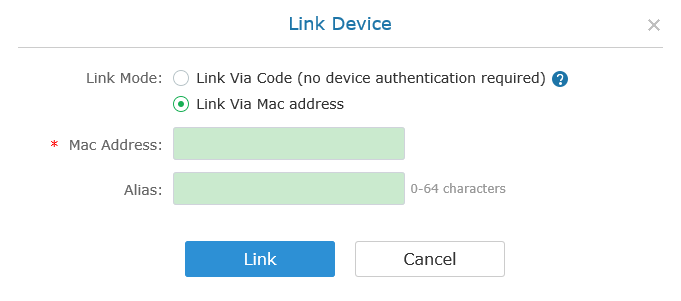
3. Click on “Link” button and the system will send authentication message to GVC3200/GVC3202. The GVC3200/GVC3202 will receive the message if it is connected to Internet and has IPVideoTalk ID registered. On the GVC3200/GVC3202, please go to LCD idle screen->Applications->IPVideoTalk application, and click on “Notices” to retrieve the message.
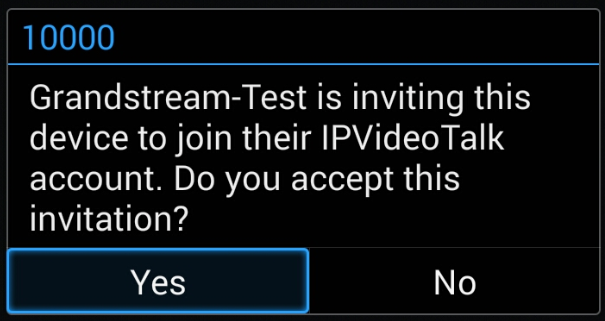
4. On GVC3200/GVC3202, click on “Yes” to link device. If linked successfully, users could check the online/offline status of the linked device on IPVideoTalk Portal. If users click “No” to refuse the authentication request, the device will be shown as “Failed. Authentication is rejected” on the IPVideoTalk Portal. If there is no response for a long time from the device, the status will show “Failed. Authentication timeout” on the IPVideoTalk Portal.

Device Status
Status | Specifications |
Authenticated | The device is authenticated. Users can monitor the online status of the device, schedule meeting or set privilege for the device. |
Pending | No response received from the GVC3200/GVC3202 device. Please check your GVC3200/GVC3202 device LCD idle screen->Applications->IPVideoTalk application. If the device does not receive the message after sending the message from the IPVideoTalk Portal, the users can send the authentication again to the device from the IPVideoTalk Portal. |
Failed (Timeout) | The GVC3200/GVC3202 device does not reply within 7 days. |
Failed (Refuse) | The GVC3200/GVC3202 device has refused the authentication request or the device is already linked to another company. |
Manage Authenticated Devices
Assign Devices
Admin could assign the devices to certain users. When the device is assigned to a user, only this user could schedule meetings and view the meeting histories with this allocated device. Other users cannot use this device.
- Access to the device menu.
- Select a certain device, and click to access the Device Details page, as the figure shows below:
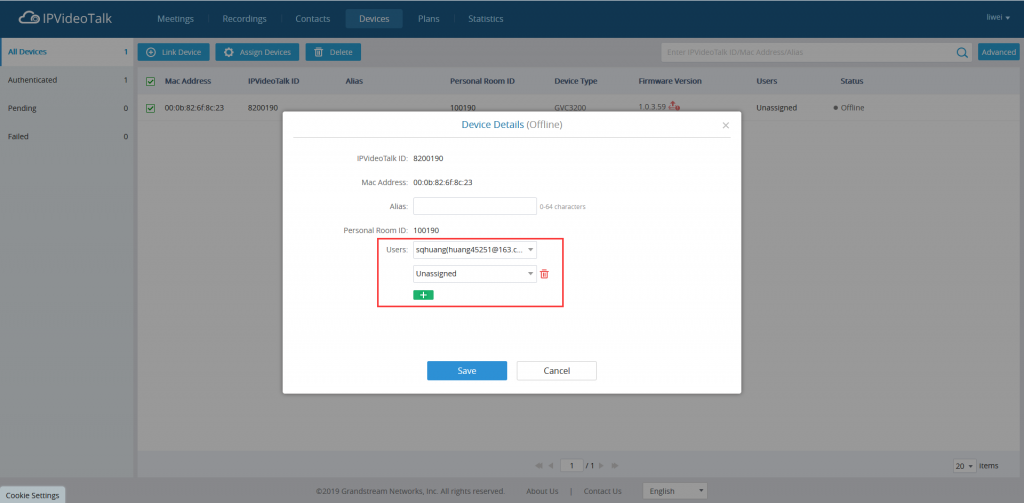
3. Users could assign the certain device to multiple users.
4. Or, users could select multiple devices in the device’s menu, and click on “Assign devices”, then select the one or multiple users on the popped-out window for the multiple devices.
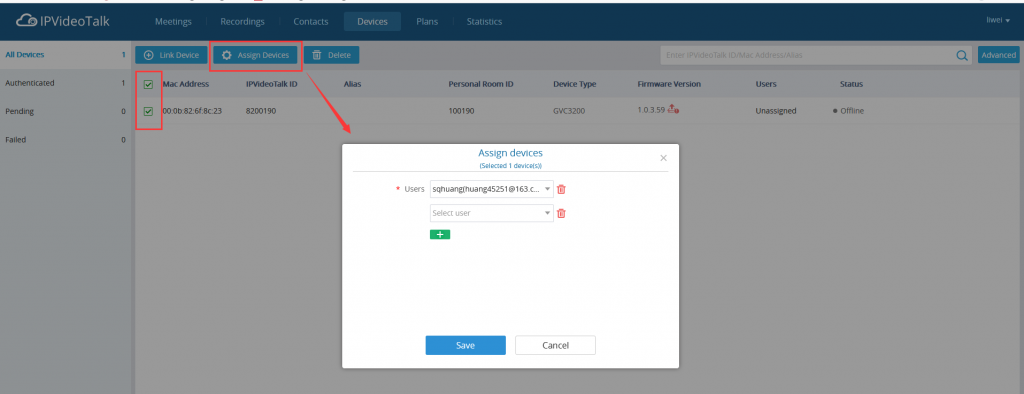
5. When the user confirms to assign the device, only the certain user could use this device to schedule meetings or view the meeting histories on this device.
Users could also follow the steps above to change the owner of the device.
Remote Control
Users could factory reset or reboot the authenticated device remotely from the IPVideoTalk Portal.
- Move the mouse cursor on one device to bring up the “Operate” button.

2. Click on “Operate” -> “Synch Meeting Record”, then all the scheduled meetings will be pushed into the GVC3200/GVC3202 device. When done, users could see the scheduled meetings in the meeting list in GVC3200/GVC3202.
3. Click “Factory Reset” or “Reboot Device”. Please note the device must be online before any operations, otherwise, the operation will fail.
4. Click on “View Personal Room Template”, users could check/edit the device’s personal conference template, such as the meeting tile and meeting password.
Delete Device
Users could delete or batch delete devices:
-
To delete one device, please access the devices list, move the mouse cursor on one device and click
button on the right side of the device name.
-
To batch delete devices, please access the devices list, click the checkbox for the devices to select devices in batch and then click
button on the top of the device list
MEETINGS
Users could schedule new meetings with linked device as the meeting host, check upcoming or history meetings. The meeting screen is shown below:
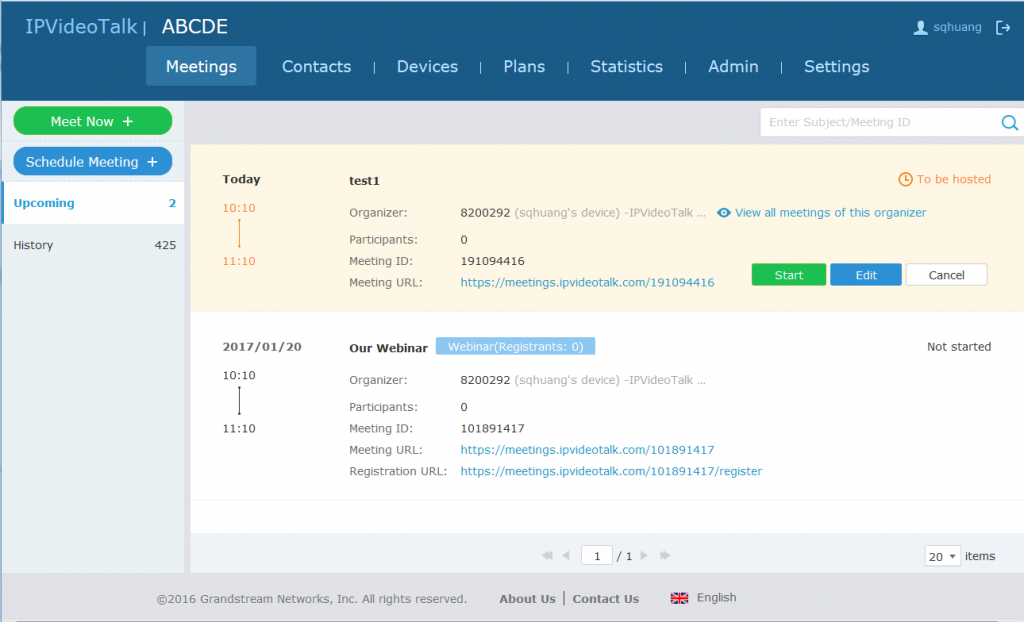
Personal Room
Each Room Device has a Personal Room Number. Once the device registers the IPVideoTalk ID, the IPVideoTalk system will assign a Personal Room Number to the device.
- Meeting Now will use the Personal Room Number to start the meeting.
- If the scheduler wants to schedule a meeting, the scheduler could select to use the Personal Room Number.
-
Each IPVideoTalk ID has a personal conference template, and users could update the template in “Devices”, select the device, click menu option 🡪 “View Personal Room Template”. Here are the default settings:
- The default setting of conference password is none for the Personal Room. If the user needs to set a conference password, the user could set the preferred password in the template.
- Users could check the Personal Room Number here.
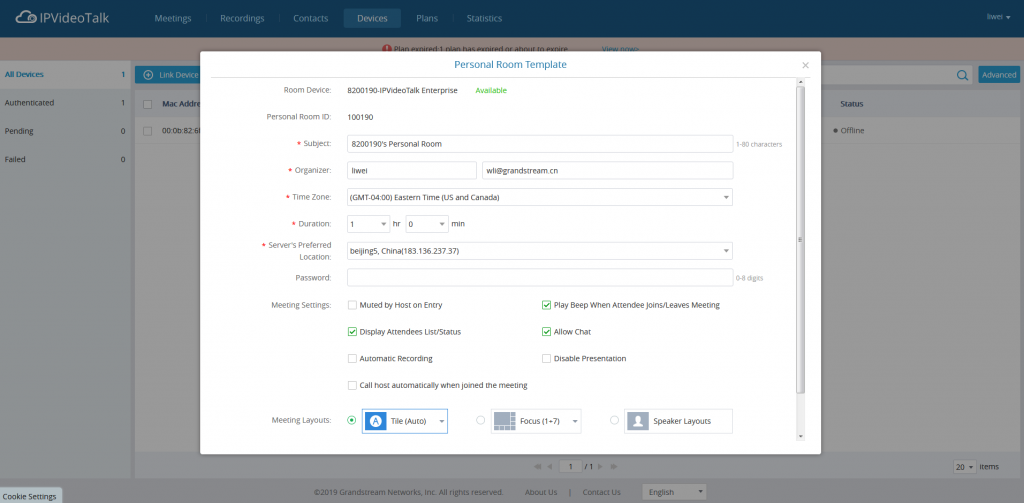
4. All the scheduled Personal Room will use this “Personal Room Template”. If the user changes the conference password, server location, participants control, the scheduled Personal Room will be updated with this updated template.
5. If the conference password is updated, the meeting system will send Emails to the meeting host and panelists/meeting invitees.
Meet Now
Users can start an instant meeting on IPVideoTalk Portal.
-
Go to IPVideoTalk Portal and click on
.
- Enter the meeting information into the appropriate fields, and the meeting will be considered as an instant meeting by default:
- Plan/Room Device: Select the host device or web meeting plan for the meeting. Users can choose from the authenticated devices, input alias or input IPVideoTalk ID of the authenticated device. Or, select the purchased/assigned web meeting plan.
- If the user selects “Room Device”, the default setting is “Personal Room”, and the meeting title and password will be loaded with the information in the “Personal Room Template”. If the user wants to update the information, please click on “Edit Personal Room Template”.
- If the current plan or room device has a meeting in progress, the user cannot start an instant meeting. If the room device has a “To be hosted” Personal Room, the user cannot start an instant meeting.
- Subject: Fill in the subject of the meeting.
- Password: Users can set meeting password for the meeting. This is optional. Setting meeting password can prevent meeting from being interrupted by any unexpected callers.
- Invitees: The user could input the Email or IPVideoTalk ID to invite the participant. The user could also click on “Frequent Contacts” to select the invitees.
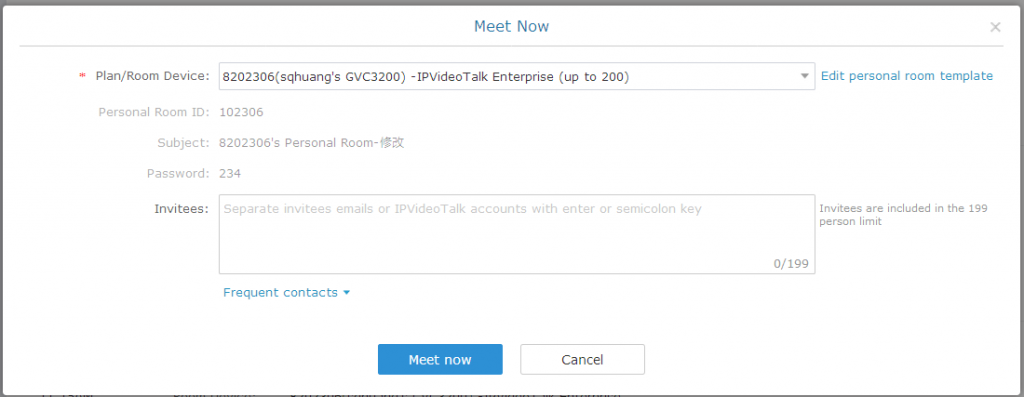
3. When done, click “Meet now” to confirm. Then, users will be directed to the WebRTC meeting starting interface, and will automatically initiate a call to the host device.
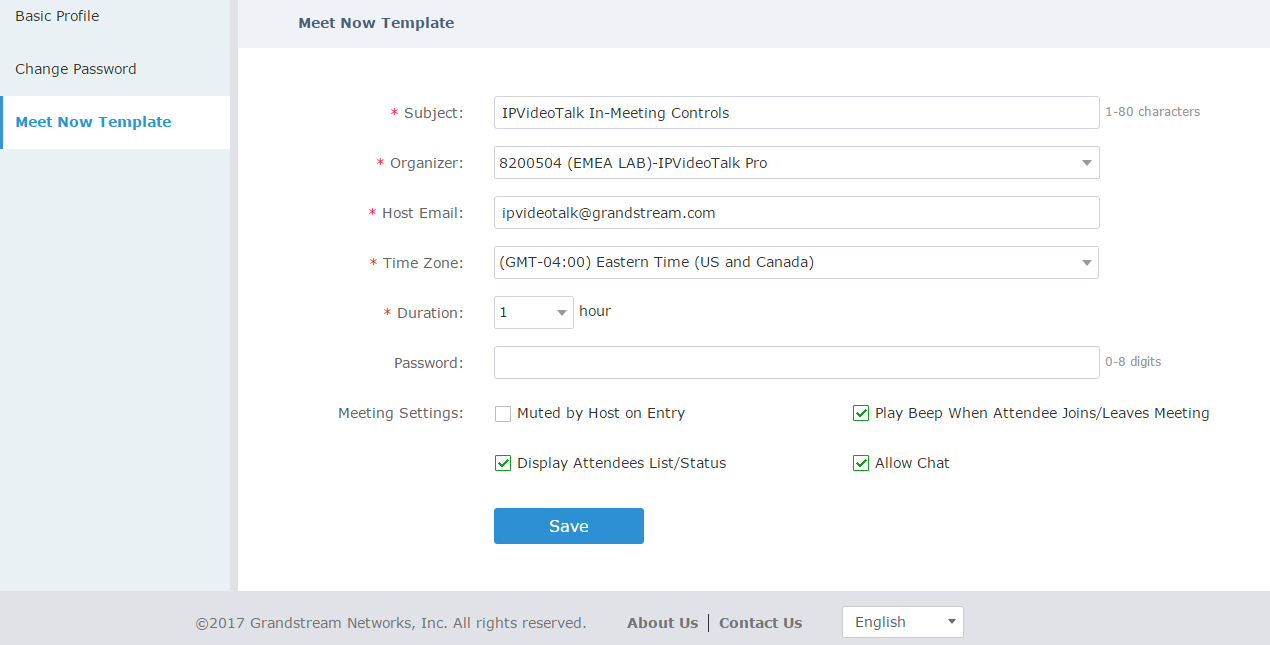
4. Users could modify the default information for “Meet Now”. Go to IPVideoTalk Portal -> Settings -> Meet Now Template, users could modify the default meeting information.
Schedule IPVideoTalk Meetings
Schedule a New Meeting
-
Access Meeting screen and click on
, and select the meeting type.
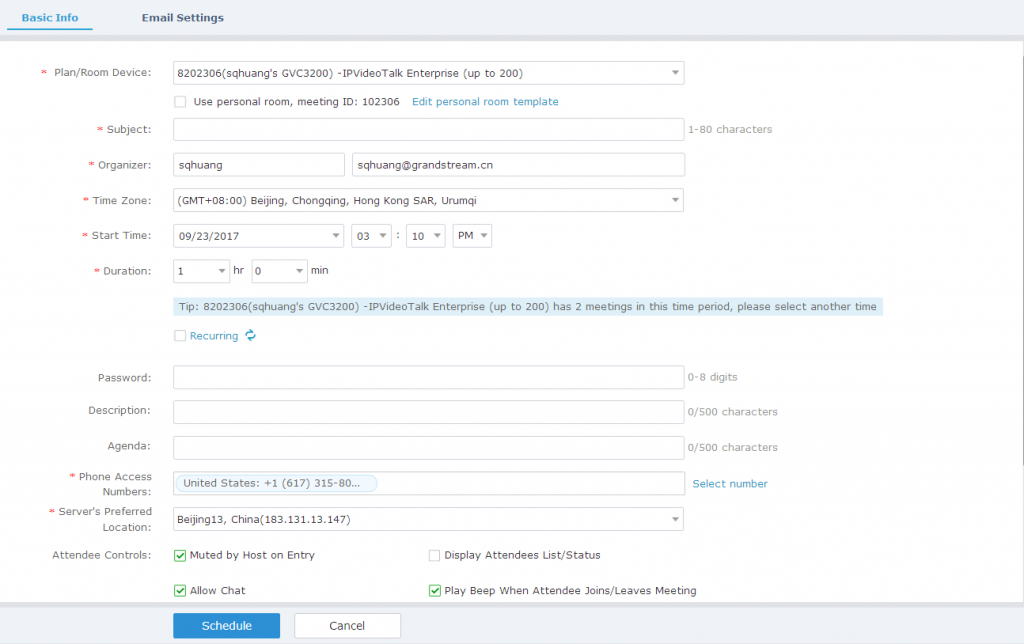
- Fill in meeting information.
Basic Info:
- Plan/Room Device: Select the host device or web meeting plan for the meeting. Users can choose from the authenticated devices, input alias or input IPVideoTalk ID of the authenticated device. Or, select the purchased/assigned web meeting plan.
- Personal Room: If the user selects Room Device, the user could also select to use the Personal Room Number. This Conference ID is the personal conference room, and the Conference Password, Attendees Control, Server Location will be loaded from the Personal Room Template. If the user wants to update the information, please click on “Edit Personal Room Template”.
- Subject: Fill in the subject of the meeting.
- Time Zone: Select time zone for the meeting.
- Start Time: Set start time for the meeting.
- Duration: Set the expected meeting duration and it is visible to other participants. Users can end the meeting in advance or delay the meeting, the meeting is not restricted by the configured duration.
- Recurring: Recurring meeting on regular time basis. Please refer to chapter If the Webinar is scheduled successfully, the system will send notification Email to the panelists and participants automatically. Users can also check the Webinar details on the host device schedule interface on LCD or Web UI. The host device will initiate Webinar automatically at scheduled Webinar starting time.
- If the Webinar time of two scheduled Webinars are overlapping during the same period, there will a prompt to indicate users to change the schedule. Users can still schedule the Webinar and ignore the overlap.
- Schedule a Recurring Meeting for more information.
- Password: Users can set meeting password for the meeting. This is optional. Setting meeting password can prevent meeting being interrupted by any unexpected callers.
- Description: Users could input the descriptions of the meeting, in order to mark the meeting.
- Agenda: Users could enter the agenda of the meeting. The participants will see it in the meeting invitation Email.
- Meeting Settings – Automatic Recording: If this option is selected, the meeting will be recorded automatically once the meeting is started.
- Meeting Settings – Meeting Locked: If the option is enabled, the meeting is locked by the meeting host, and only the invitees can join into the meeting. The meeting host still can invite other participants join into the meeting at this time.
- Attendees Control – Mute Attendees on Entry: If checked, all participants will be muted when entering the meeting.
- Attendees Control – Display Attendees List: If set to “Yes”, WebRTC participants could view the participants list during the meeting. If set to “No”, WebRTC participants can only see the host in the participants list.
- Attendees Control – Allow Chat: If checked, all participants can chat.
- Attendees Control – Play Beep When Join/Leave Meeting: If checked, when there is a meeting participant join/leave the meeting, other participants will hear the beep notification.
- Attendees Control – Disable Presentation: If selected, Presentation will be disabled during the meeting.
- Attendees Control – Call host automatically when joined the meeting: Only available when GVC is the meeting host. When selected, a call will be made immediately by the attendee who joined the meeting before the host did until the meeting started.
- Host Email:Users could enter the Email of the host who will receive an Email that contains host code and reminds him/her about the meeting to be hosted.
- Server Location:Specify the server where the meeting will be hosted. When the meeting starts, it will automatically connect to the specified server region, and all participants will connect to it. To ensure the meeting quality, users should select the closest sever to the meeting location, or where most participants are located. e.g., Oregon for US area, Frankfurt for EU area, and Sydney for Asia and Pacific area.
- Participants: Users can enter Email to invite meeting participants, or enter IPVideoTalk ID of other GVC32XX devices. Users can also input name or the key words to search for company contacts. The user could also click on “Frequent Contacts” to select the invitees.
- Meeting Layout: Users can pre-select the layout of the meeting, and the meeting will apply this meeting layout by default when the meeting starts. The Meeting Layout supports: Tiling (1+1, 2*2, 3*3, 4*4, Automatic Mode), Focus Mode (Solo, 1 (large) +3 (small), 1+5, 1+7), and Speaker Mode (The speaker will see the other participants’ video in sequence, and the other participants will see the speaker’s video in full screen).
If the selected Meeting Layout is Speaker Mode, the user needs to configure the speaker’s IPVideoTalk ID or email address, and the user needs to select them among panelists or invitees. The “Speaker Display Name” is the name displayed in the meeting video image when the speaker has not joined into the meeting yet.

Email settings:
- Email Reminder: If set to “Yes”, the notification Email will be sent to the host and all invited participants 15 minutes before the meeting starts. Users could also configure the Email reminder, set the sending time before the meeting. Users could set 3 Email reminders for each meeting.
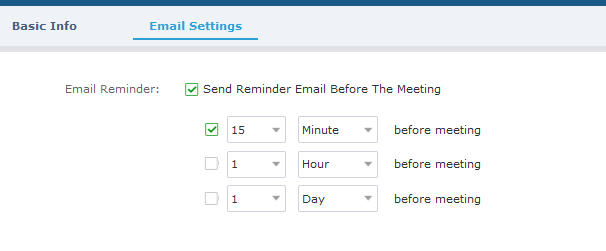
3. If the meeting is scheduled successfully, the system will send notification Email to the Email participants automatically. Users could also check the meeting detailed on the host GVC3200/GVC3202 schedule interface on LCD or Web UI. The host GVC3200/GVC3202 will initiate meeting automatically when the meeting time starts.
4. If the two scheduled meetings time are overlapped during the same period, there will a prompt to indicate users to change the schedule. Users still can schedule the meeting and ignore the overlap.
Schedule a New Webinar
- Access Meeting screen and click on
, and select the meeting type.
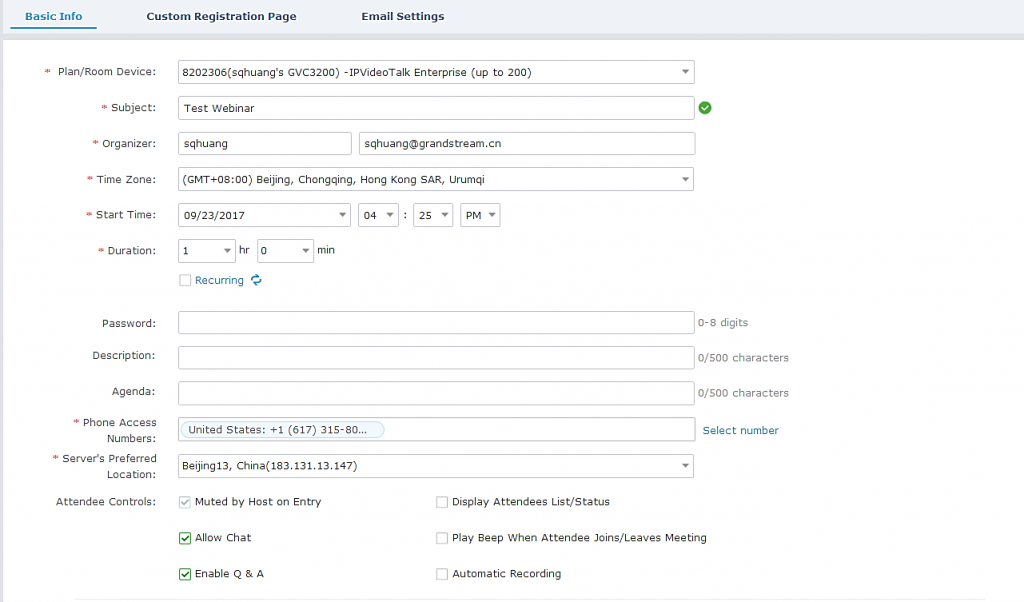
- Fill in meeting information.
Basic Info:
- Plan/Room Device: Select the host device or web meeting plan for the Webinar. Users can choose from the authenticated devices, input alias or input IPVideoTalk ID of the authenticated device. Or, select the purchased/assigned web meeting plan.
- Subject: Fill in the subject of the Webinar.
- Time Zone: Select time zone for the Webinar.
- Start Time: Set start time for the Webinar.
- Duration: Set the expected Webinar duration and it is visible to other participants. Users can end the Webinar in advance or delay the Webinar, the Webinar is not restricted by the configured duration.
- Recurring: Recurring Webinar on regular time basis. Please refer to chapter If the Webinar is scheduled successfully, the system will send notification Email to the panelists and participants automatically. Users can also check the Webinar details on the host device schedule interface on LCD or Web UI. The host device will initiate Webinar automatically at scheduled Webinar starting time.
- If the Webinar time of two scheduled Webinars are overlapping during the same period, there will a prompt to indicate users to change the schedule. Users can still schedule the Webinar and ignore the overlap.
- Schedule a Recurring Meeting for more information.
- Password: Users can set Webinar password for the Webinar. This is optional. Setting Webinar password can prevent Webinar being interrupted by any unexpected callers.
- Description: Users could input the descriptions of the Webinar, in order to mark the Webinar.
- Agenda: Users could enter the agenda of the Webinar. The participants will see it in the Webinar Invitation Email.
- Phone Access Number: In the Invitation Emails, it will show the default Phone Access Numbers. The scheduler could also select to show only 2 default Phone Access Numbers.
- Attendees Control – Mute Attendees on Entry: If checked, all participants will be muted when entering the Webinar.
- Attendees Control – Display Attendees List: If set to “Yes”, WebRTC participants could view the participants list during the Webinar. If set to “No”, WebRTC participants can only see the host in the participants list.
- Attendees Control – Allow Chat: If checked, all participants can chat.
- Attendees Control – Play Beep When Join/Leave Meeting: If checked, when there is a Webinar participant join/leave the Webinar, other participants will hear the beep notification.
- Attendees Control – Enable Q&A: If this option is selected, the Q&A feature is supported during the Webinar. The Q&A module will be shown up on the Webinar interface. The Webinar participants could send questions for the Webinar host/panelists, and the Webinar host/panelists could select to answer the questions.
- Attendees Control – Automatic Recording: If this option is selected, the Webinar will be recorded automatically once the Webinar is started.
- Host Email:Users could enter the Email of the host who will receive an Email that contains host code and reminds him/her about the Webinar to be hosted.
- Server Location:Specify the server where the Webinar will be hosted. When the Webinar starts, it will automatically connect to the specified server region, and all participants will connect to it. To ensure the Webinar quality, users should select the closest sever to the Webinar location, or where most participants are located. e.g., Oregon for US area, Frankfurt for EU area, and Sydney for Asia and Pacific area.
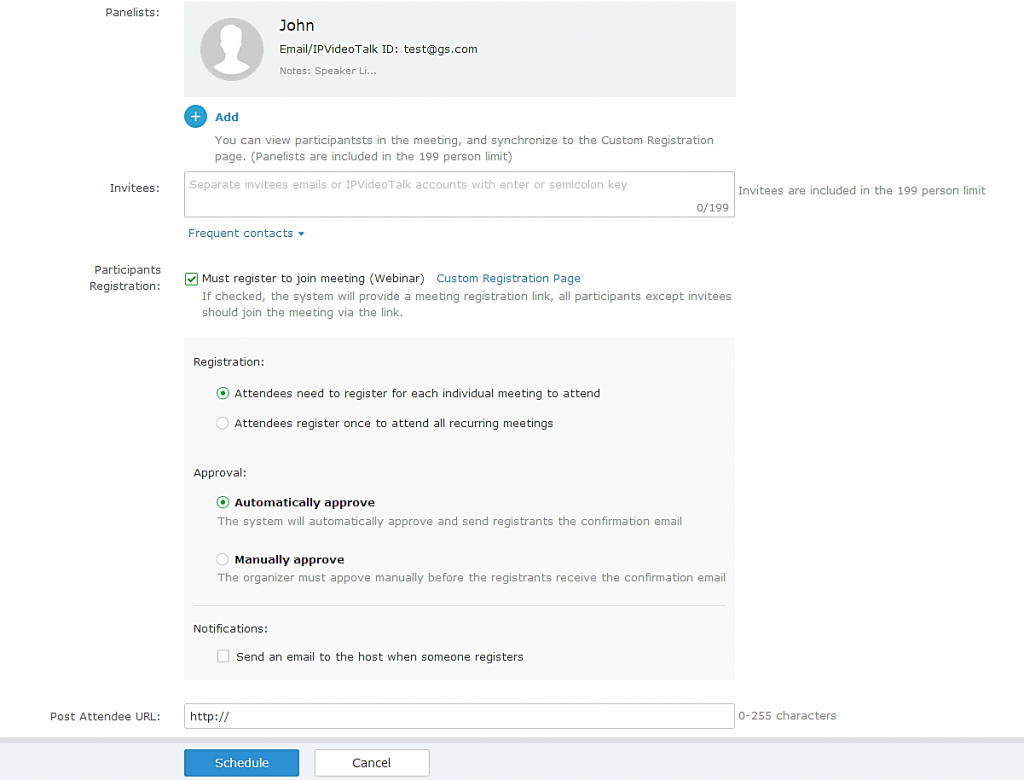
- Add Panelists: Users could add panelists (meeting host) with their names, Email addresses, photos and introductions. Other participants will see the information of the invited panelists (meeting host). And, when users customize the registration page, users could add the information of the panelists (meeting host) into the registration page. In this case, other participants will see the Webinar host/panelists information when joining into the Webinar.
- Participants: Users can enter Email to invite Webinar participants or enter IPVideoTalk ID of other device devices. Users can also input name or the key words to search for company contacts. The number of invitees is depending on the plan of the organizer.
- Participants Registration: If checked, the participants except invitees should register before joining the Webinar, this feature will help the host to collect the participants’ information. The system will provide Webinar registration link, all participants except invitees need to register the Webinar via the link. Users could customize the registration page.
- Registration: If the Webinar is recurring Webinar, the user could also select to allow the invitee to register only once and join all recurring Webinars, or only for the next Webinar.
- Approval: Users could set to get verified automatically or verified manually. If it is set to get verified manually, the participant will not receive the confirmation Email immediately after registering, and the participant cannot join into the Webinar until passing the verification.
- Notifications: If this option is checked, when someone registers for this Webinar, the Webinar system will send a notification automatically to the Webinar host.
- Meeting Layout: Users can pre-select the layout of the meeting, and the meeting will apply this meeting layout by default when the meeting starts. The Meeting Layout supports: Tiling (1+1, 2*2, 3*3, 4*4, Automatic Mode), Focus Mode (Solo, 1 (large) +3 (small), 1+5, 1+7), and Speaker Mode (The speaker will watch the other participants’ video in sequence, and the other participants will see the speaker’s video in full screen).
If Meeting Layout is set to Speaker Mode, user needs to configure the speaker’s IPVideoTalk ID or email address, and the user needs to select them among panelists or invitees. The “Speaker Display Name” is the name displayed in the meeting video image when the speaker has not joined into the meeting yet.
5. Fill in Webinar information:Custom Registration Page.
i. Users could customize the banner, the information options from the participants, the Webinar host/panelists’ business card and so on.
ii. The figure below shows the registration page for Webinar participants. Users could drag the items from “Register Items” / ”Options” from the right side to the left-side page. When done, users could click on the button on the bottom page to preview the registration page.
- Banner: The size is up to 1000*200, and the image format includes png, jpg, jpeg and another common image format.
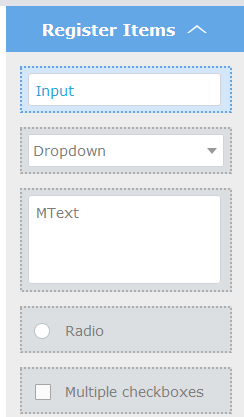
- Register Items: The default displaying items are Name, Email address and Country. Users could customize and add up to 20 options. The Registration Items include Input, Drop-down, MText, Radio, and Multiple Checkboxes. Users could customize and add the items by requirements, and users could also define the customize option is a required option or not.
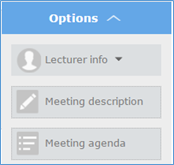
- Options: Users could drag options “Lecturer Info”, “Meeting Description” and “Meeting Agenda” to the registration page. Users could add up to 5 lecturers on the registration page. Users need to select the lecturers from the invited Webinar panelists. Users could move the panelist to the registration page or add a new lecturer. The new added lecturer will not be moved to the Webinar panelists.
- Move Options: Move the mouse to the option, and there will be an icon
shown on the right upper side of the option. Click on the icon and drag the option to the location where you preferred.
- Edit Options: Move the mouse to the option, and there will be an icon
shown on the right upper side of the option. Click on the icon and start to edit this option such as the option name, the sub-options, and whether if the option is required.
- Delete Options: Move the mouse to the option, and there will be an icon
shown on the right upper side of the option. Click on the icon and users could delete this option.

iii. The language on the customized registration page is depending on the language of Webinar scheduler. For example, if the person who schedules this Webinar is using French, the registration page for the participants is in French, and this cannot be updated.
6. Fill in Webinar information:Email Settings.
- Email Reminder: If set to “Yes”, the notification Email will be sent to the host and all invited participants 15 minutes before the Webinar starts. Users could configure the time when users want to send the notification Emails, up to 3 times.
- Thank-you Email: If checked, the system will send a Thank-you Email to the Webinar participants, the host can also customize the contents in the Email. Users could customize the Thank-you Email and preview the Email.
- Missed-you Email: If this option is selected, the Webinar system will send the Emails to the users who registered/invited but miss the Webinar.

7. If the Webinar is scheduled successfully, the system will send notification Email to the panelists and participants automatically. Users can also check the Webinar details on the host device schedule interface on LCD or Web UI. The host device will initiate Webinar automatically at scheduled Webinar starting time.
8. If the Webinar time of two scheduled Webinars are overlapping during the same period, there will a prompt to indicate users to change the schedule. Users can still schedule the Webinar and ignore the overlap.
Schedule a Recurring Meeting
Users could schedule a recurring meeting if users want to have a meeting on daily/weekly/monthly basis.
Select “Recurring” below “Duration” option when scheduling a meeting as the figure shown below:
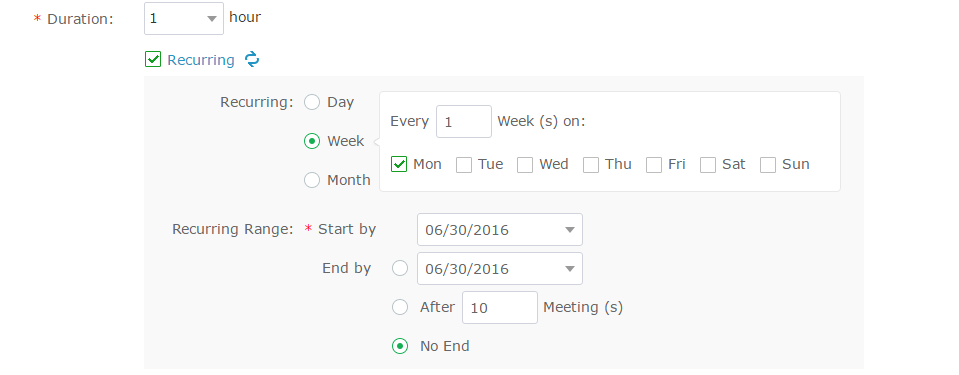
Users can set the following recurring range:
Recurring | Options | Examples |
Day | Every N day (s) | e.g.: have meeting per day |
Every workday (Monday to Friday) | e.g.: have meeting per day from Monday to Friday | |
Week | Every N week (s) + weekday (Optional: from Sunday to Saturday) | e.g.: have meeting on Monday every two weeks |
Month | Every N month (s) + one exact day (day-of-month, weekday-of-month) | e.g.: have meeting on the first day of every month, or on the fourth Friday of each March |
Start by | Start recurring meeting since this day | |
End by | No end: recurring meeting always takes effect | |
End by date: set the date until when the recurring meeting will end | ||
End by times: the meeting ends recurring after N meeting (s) |
When one of the recurring meetings ends, it will automatically display the next upcoming one in the recurring meeting schedule.
View Meeting
Users could view upcoming or history meetings of all linked devices, and filter meetings for different host devices to view available time frames of each device.
- Click on “Upcoming” tab on the left to view upcoming meetings or the “History” tab to view history meetings.
Status | Specifications | |
Upcoming | Not started | The meeting is not started, users can edit or cancel meeting. |
To be hosted | The meeting is about to start, waiting for the host to start meeting. Users can edit or cancel meeting. | |
In process | The meeting is in process, users can end meeting. | |
History | Ended | The meeting is held successfully and ended. If the meeting ended unexpected, users could restart or reschedule meeting. |
Expired | The meeting is not started in the scheduled time period. The meeting is expired automatically. Users can reschedule meeting. | |
Canceled | The meeting is canceled. Users can reschedule meeting. | |
2. If the meeting is marked with “Invite” icon, it means that someone invited the user to the meeting through the email. The user can click the “Invite” button to join the meeting immediately.
3. If the meeting requires the participants to register before joining the meeting, then, the user could check the number of registrants on the IPVideoTalk Portal.

4. If there is a participant joining into the waiting room, there will be a prompt showing “Waiting Room: N” to indicate how many participants are waiting in the waiting room. The participants could join into the waiting only if the meeting status is changed to “To be hosted”.
5. Move the cursor on the meeting, and click on button , users could copy the meeting information.

6. Click on one meeting’s subject to view its details.
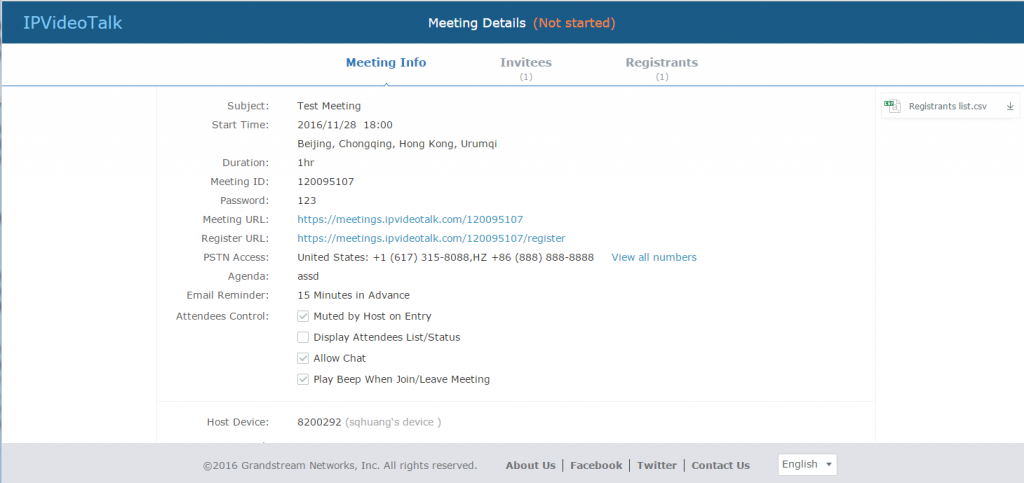
7. In Meeting Details page, users could check the invitees and registrants list (If the meeting does not require registering, the registered users list will be hidden). If users have customized some options on the registration page, the customized options will be shown on Meeting Details page. Users could also download the Registrants List on this page. Before the meeting starting time, it allows users to resend the invitation Emails to the invitees or registrants.
If it is set to get approval manually, the meeting host has to verify the registration. The participants who pass the approval can receive the Invitation Emails and join into the meeting any time. Otherwise, the participants cannot receive the Invitation Emails, and cannot join into the meeting. The rejected participants could register again on the IPVideoTalk Portal, and renew the registration information, and wait for the verification by the meeting host. The participants who pass the approval could only renew the registration; the status of approval is still passed.

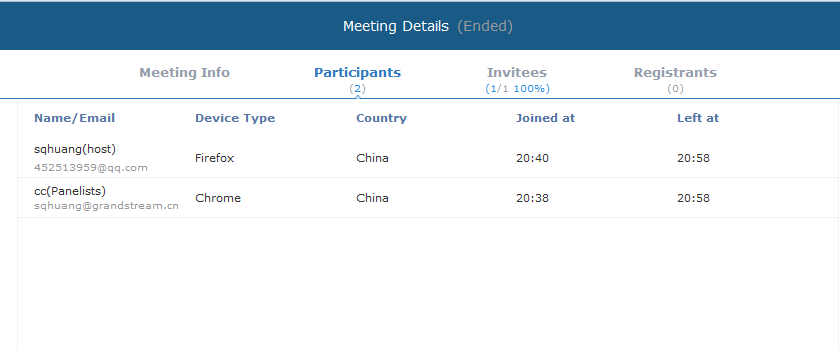
8. Once the meeting is ended, the user could check the detailed information of the meeting. It will show the actual attendees list, including participants’ names, Email addresses (numbers), client’s type, country, meeting duration and the leaving time.
If the meeting is cancelled or expired, it will also show the Participants List of the conference waiting room.
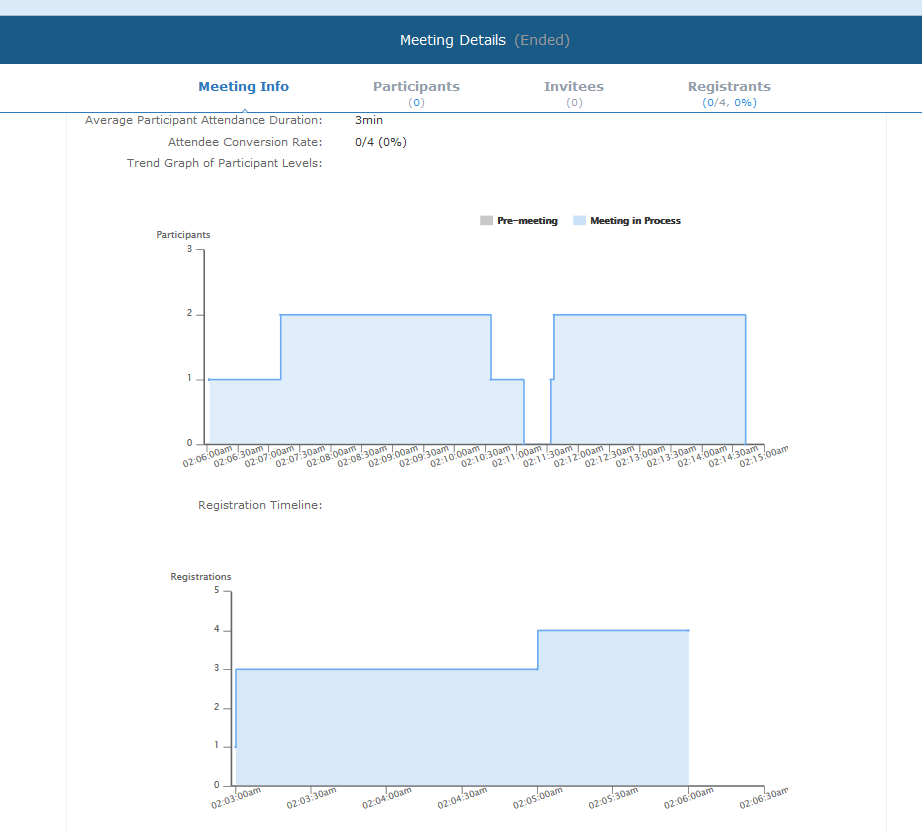
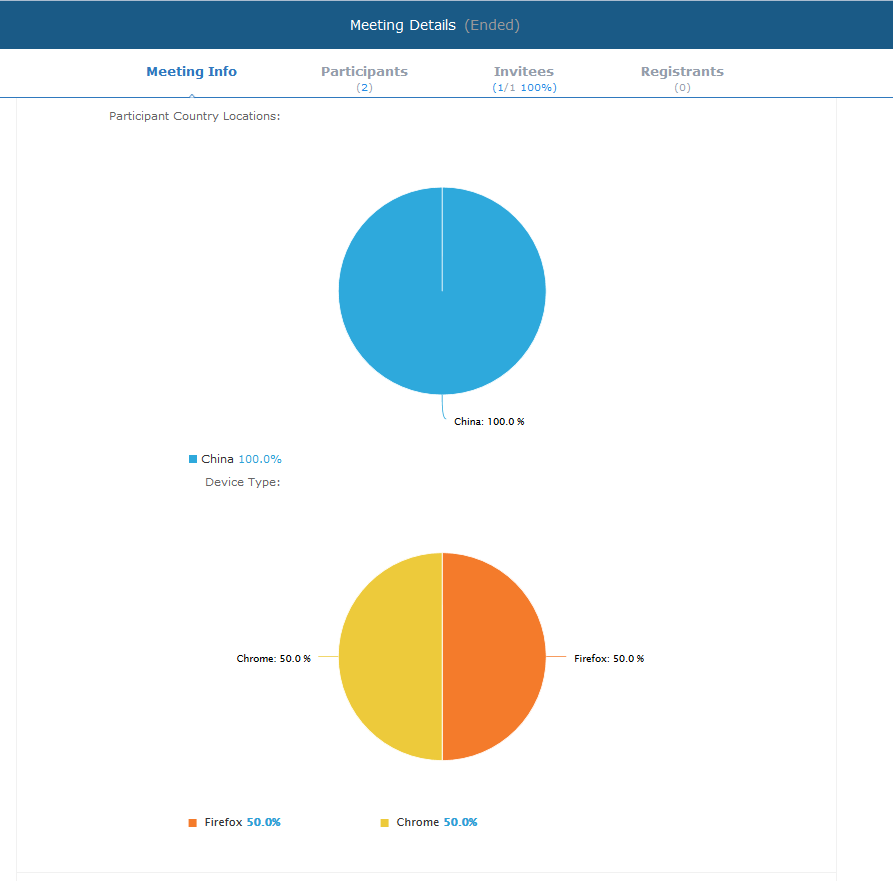
9. In the meeting detailed information, it will show the joining meeting timeline for all participants, and the registration timeline for registrants. The “Pie statistics graph” including the countries of all participants, and the clients’ type of the participants.
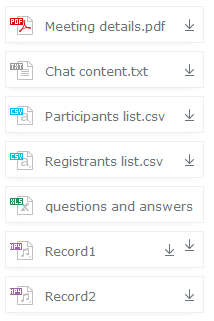
10. After the meeting is ended, users could export the meeting report, including Meeting Details, Chat Content, Participants List and Registrants List, Q&As, Recording files (it will show all recording files if users have multiple recording operation). If the meeting does not request the participants to register, there will be no Participants List.
Start Meeting or Webinar Manually
Users can start an IPVideoTalk meeting or Webinar manually before the starting time.
-
Access Upcoming meetings list, move the mouse cursor on the meeting and click on
button.
- If the current organizer is in an ongoing IPVideoTalk meeting, or the meeting is in time conflict with another one, it cannot be started manually.
- When the meeting is started, the user will join the meeting automatically, and becomes a meeting host by default.
- If the meeting organizer is a GVC320x device, it will receive the call automatically if the meeting is started before the starting time.
Edit Upcoming Meeting
Follow the steps below to edit scheduled meeting:
- Access Upcoming meetings list, move the mouse cursor on the meeting and click on
button.
- Fill in the new meeting information and click “Save”. Once the meeting is saved, the users can edit all fields, including the meeting organizer.
- If the meeting status is “To be Hosted”, the user can only add invitees, and other information cannot be revised.
- When users try to edit a recurring meeting, users could only “Edit this meeting”, or “Edit the recurring meeting”.
Cancel Upcoming Meeting
- Access “Upcoming” meetings list and move the mouse cursor on the meeting. Then click the
button
- To confirm canceling the meeting, click “OK” in the pop-up dialog. Otherwise, click “Cancel”.
- If it is a recurring meeting, users could cancel all the repeated meetings or the meeting only to be held this time.
Reschedule Meeting
If users would like to host a meeting that has the same meeting information as the past meetings, the users could find the past meeting in history meeting list and reschedule it from there.
- Access History meetings list, move the mouse cursor on the meeting and click “Reschedule” button.
- Users could import the previous participants, registrants, or invitees. Once the option is checked, the participants/registrants/invitees will be filled into the corresponding section, and users could edit the section if needed.
- Fill in the new meeting information and click “Save”. The users can edit all fields including the host device when editing the meeting for rescheduling.
- After the meeting is saved, a new meeting ID will be generated. Email notifications will be sent to Email participants.
Restart Meeting
- Access History meetings list, put the mouse cursor on the meeting and click “Restart” button.
- Users will see the meeting in Upcoming meeting list with the same meeting ID, and a notification Email will be sent to Email participants automatically.
After-Meeting Report Email
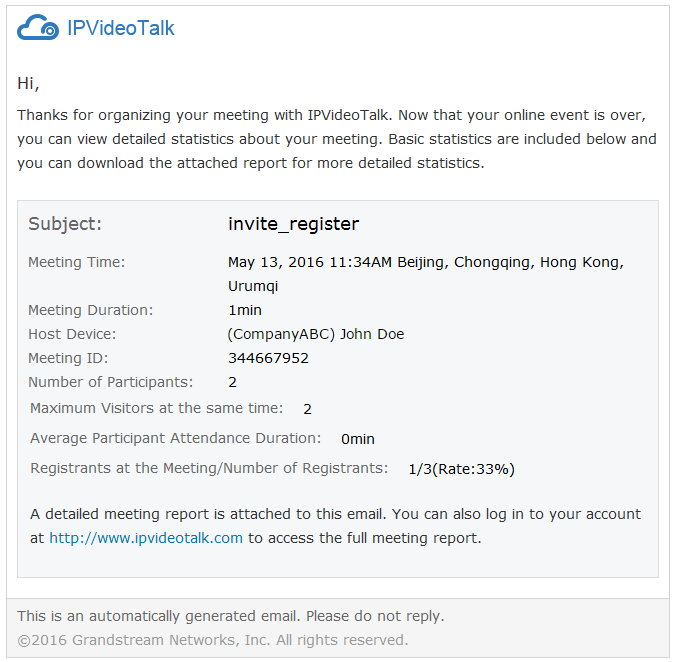
When the meeting is ended, a report Email will be sent to the registered Email address and the host Email address.
The Email contains the meeting information such as meeting duration, the number of participants and registrants list as shown in figure below, host Email will also get a pdf attachment containing detailed report statistics. You can also log in to www.ipvideotalk.com to view the meeting details.
Notification Email
When the plan has expired or about to be expired, the device firmware version is too low, or the device is frozen by IPVideoTalk server, a notification Email will be sent to the registered Email address to inform the users.
CONTACTS
Users could save the contacts or public devices to the IPVideoTalk cloud system. It provides the following convenience and benefits to the users:
- Quickly add participants when scheduling a new meeting.
- All the linked devices could share the same contacts centrally managed in the cloud system. The device can view contacts in GVC3200/GVC3202 LCD idle screen->Applications->IPVideoTalk application.
- Quickly search contacts in the IPVideoTalk Cloud Platform when calling other IPVideoTalk IDs.
Users could create business contacts or personal contacts in Contacts:
- Business Contacts: The contacts under this section are common contacts for the same business. Users in the same business and sub-users will see the contacts.
- My Contacts: The contacts under this section are only for current login account, other users cannot see the contacts even though they are in the same business group.
My Contacts
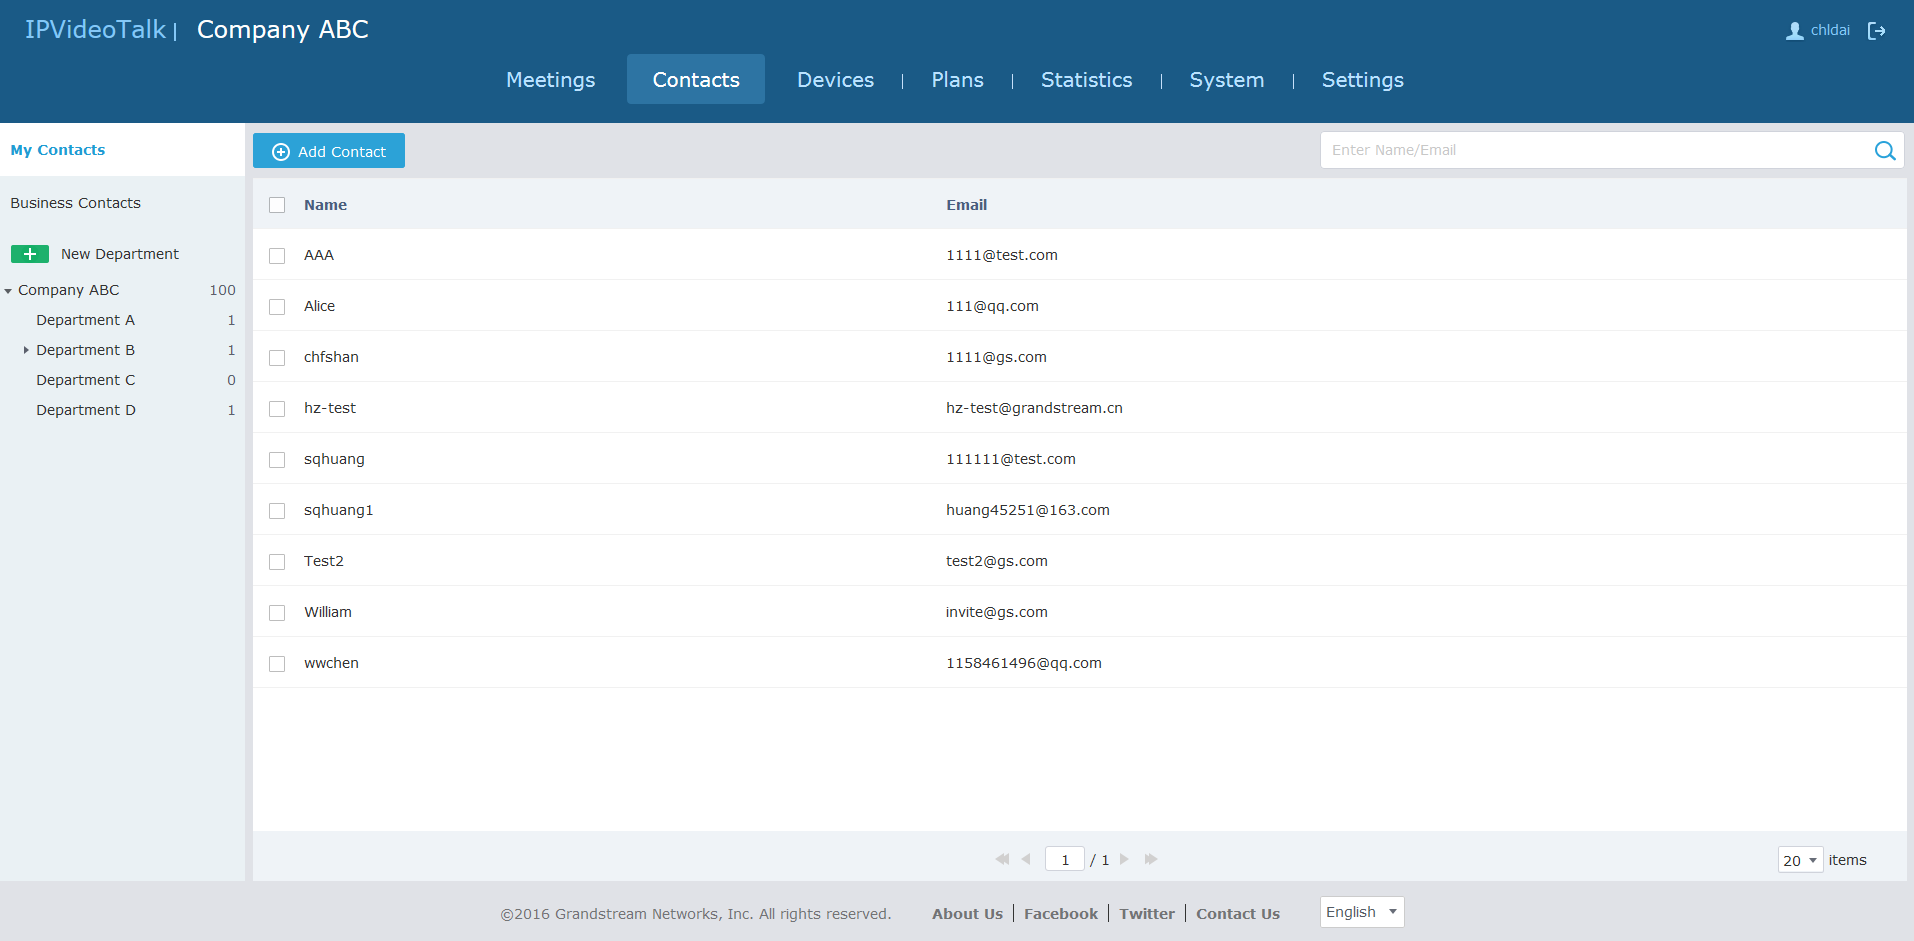
The contacts under this section are only for current login account, and the user cannot create groups and manage the contacts. When the user schedules a meeting and adds invitees, the system will search “My Contacts” quickly and match the contacts.
- Add Contacts
The invitees’ Email address in scheduled meetings will be saved into “My Contacts” automatically. The user could also “Add Contacts” in IPVideoTalk Admin Portal.
- Edit Contacts
The user could edit the contacts information at any time, including contacts name and Email address.
- Delete Contacts
This is used to delete the contacts.
Business Contacts
The contacts under this section are common contacts for the same business. Users in the same business and sub-users will see the contacts.
Contacts/Public Devices
Users can check all contacts and devices of company as shown below:
- Company contacts
The green icon indicates “ONLINE” status while the gray icon indicates “OFFLINE” status or no IPVideoTalk ID.
Public devices
The green icon indicates “ONLINE” status while gray icon indicates “OFFLINE” status.

Add Contact
Users could add contact from its own company.
-
Click
on top and select “Add Contact” in the drop-down menu.
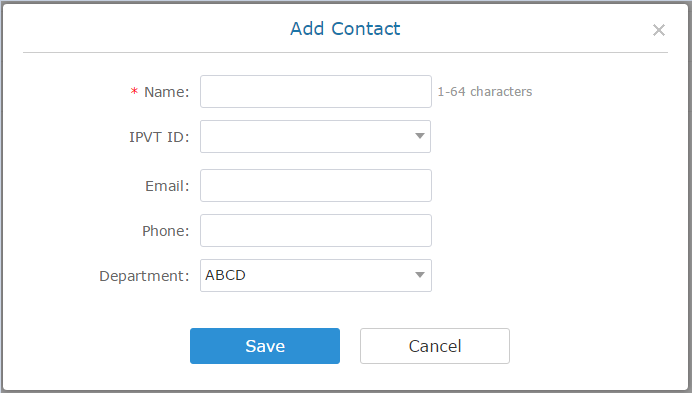
- Fill in contact information.
- Name: Enter the name of the contact.
- IPVT ID: Enter a random IPVideoTalk ID, e.g. the IPVideoTalk ID of the GVC3200/GVC3202 from the customer/partner.
- Department: Select the department that the contact belongs to, so that the contacts can be managed in groups.
3. Click on “Save” to save contact.
Add Public Device
Users could add public devices, and the devices should have a registered IPVideoTalk ID such as GVC3200/GVC3202.
-
Click
on top and select “Add Public Device” in the drop-down menu.
- Fill in public device information.
- Device: Enter the name of the device.
- IPVT ID: Choose IPVideoTalk ID of the device.
- Department: Select the department the contact belongs to so that the contacts can be managed in groups.
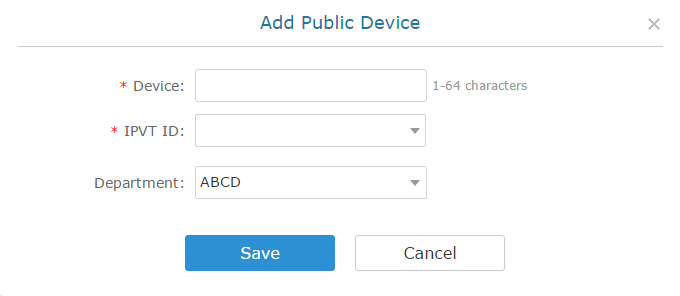
3. Click “Save” to save public device.
Edit Contact/Public Device
To edit contact or public device, click on one contact or public device and edit the information in the pop-up dialog. Click on “Save” to save the changes.
Delete Contact/Public Device
- Move the cursor on one contact or public device to bring up the “Delete” button to delete.
-
To batch delete contacts or public devices, batch check the contacts or public devices and click
button.
Departments
Company groups could be managed using “Departments”, which are displayed in tree structure as shown below.

Add Department
-
Click
on top and fill in department and superior department information.
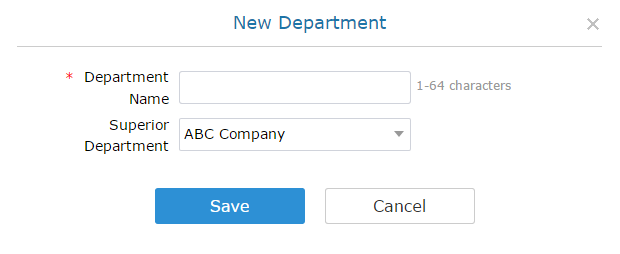
2. Click “Save” to save department.
Edit Department
Users could change department name or superior department.
-
Move the cursor on one department in tree structure and click
.
- Edit department name or change superior department in the pop-up dialog.
- Click “Save” to save changes.
Delete Department
-
Put the cursor on one department in tree structure and click on
.
- Click “OK” to confirm or click “Cancel” to cancel.
Import Contacts
-
Click on
;
-
Download the template Excel form by clicking the link
in the pop-up window.
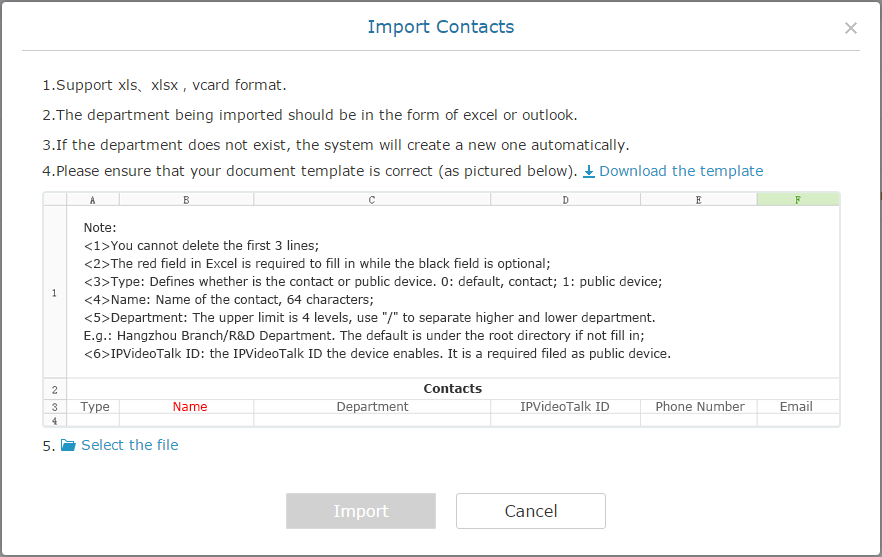
- Fill in required information in Excel form.
- Type: Fill in “0” for contact and fill in “1” for public device. The default value is 0.
- Name: This field is required. Otherwise, the entry cannot be imported.
- Department: Users can fill in department. If there is no department, the system will fill in automatically.
- IPVideoTalk ID: If Type is “1”, it is required to fill IPVideoTalk ID number here. Otherwise, the entry cannot be imported.
-
Click
to import Excel form.
- A message will prompt to remind users the quantity of the entries successfully imported, and failed to import. The GVC3200/GVC3202 devices imported successfully will receive authentication message in LCD idle screen->Applications->IPVideoTalk->Notices.
Export Contacts
-
Click on
.
- The system will download the exported Excel form.
PLANS
In “Plans” page, users could perform the following operations. The table below lists plan status definitions.
Status | Specifications |
About to expire | The plan is about to expire in 15 days. |
Expired | The plan has expired and unable to start meeting. |
Available | The plan is in normal status. |
- Click plan name to view details.
- Input IPVideoTalk ID in search box to search for device by IPVT ID.

Purchase Plan
Prerequisites: Users need to have a PayPal account before purchasing plans.
- Log in to IPVideoTalk Portal (https://account.ipvideotalk.com) with login username and password. If the user does not have access, he can register a Free Basic Plan account, and bind the GVC device to the registered IPVideoTalk Portal account.
- Users can view all plans on Plans menu.

3. Click button “Buy a New Plan” to go to the plan purchasing page. Then fill-in the required information accordingly.
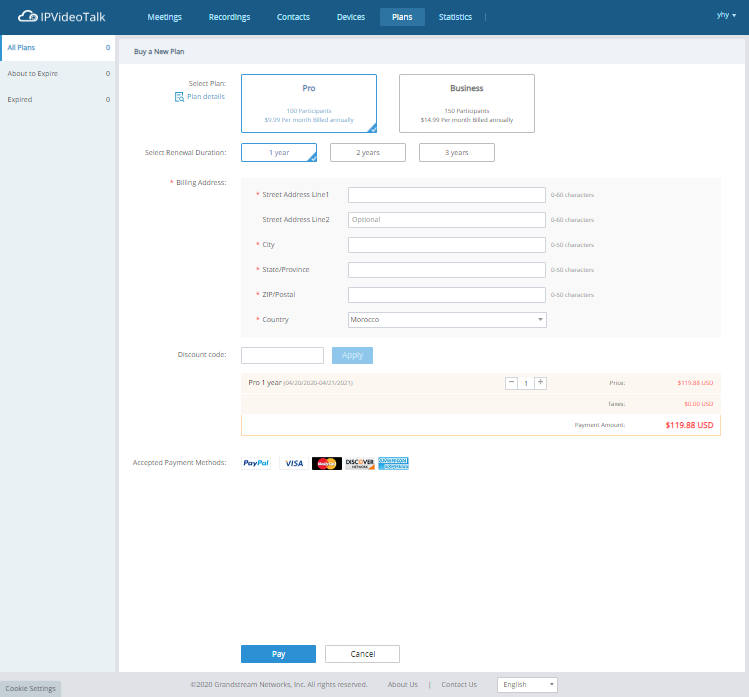

4. Select the plan which the user wants to purchase. Users can select any plan on the page.
5. If the user wants to increase the participants limit or storage limit, the user can select to add an additional plan.

6. Select the duration of the plan (e.g. 1 year).
7. Billing Address is a necessary option. Please fill this option with the actual address. Users could change the Billing Address in “System” 🡪 “Business Profile”. This Billing address will be updated from your next bill.
8. Discount code: If the user receives a discount code, please input the code and click on “Apply” to redeem the discount. It will show the updated price with the discount.
9. Select the amount of the plans the user wants to purchase.

10. View the total amount of the purchase order, including taxes.
11. Click the “Pay” button to enter the PayPal payment page and confirm the payment.
12. When the payment is proceeded successfully, this order will be completed, the user can use the new plan immediately, or the user can click button “Assign Plan” to assign the plan to the sub-user.

13. When the order is approved by Grandstream, there will be a confirmation email sent to the user’s mailbox as follows:
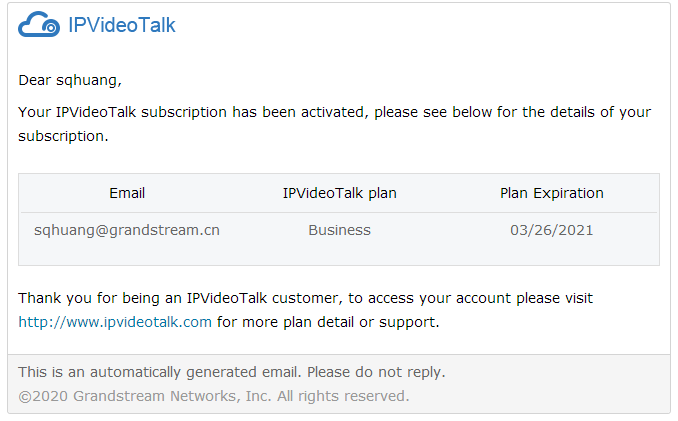
Note:
Grandstream will review the order and contact the user if there is any problem. If the purchasing operation is failed, the user will receive an email as follows:

View Plan Status
Users can view all plans status of all GVC devices, and order records for each GVC device.
- Log in to IPVideoTalk Portal (https://account.ipvideotalk.com) with login username and password.
- View all plans on the Plans menu. There are total three types of status:
- Active
- Expired
- About to expire (Less than 15 days from expiration date)
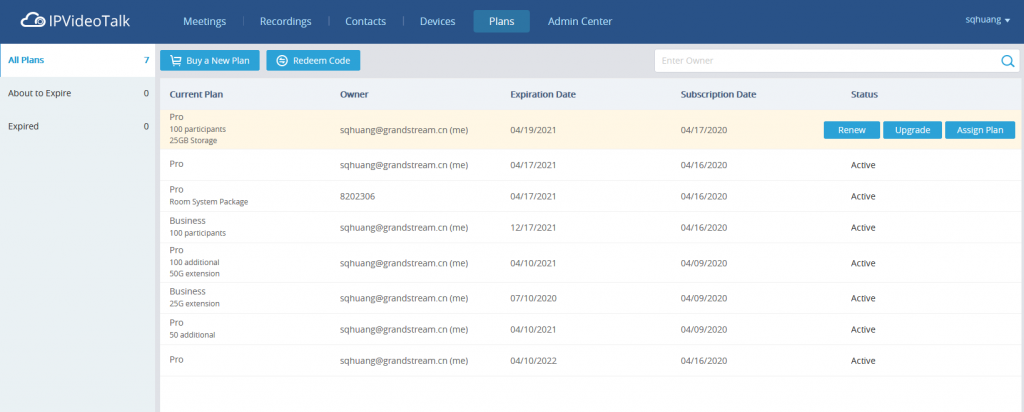
3. Click the plan to view the order records, as the figure shows below:
- Users could check the order date, order number, upgraded plan, the duration of the new plan/upgraded plan, total price, tax, and billing address.
- The user can view all the additional plans under the current plan, as well as the record of orders of the additional plans.
- If the payment status is “pending”, it means the payment is processed successfully, and the user could start to use the new plan. If the order cannot be processed, it will be regarded as “Invalid”, and Grandstream team will contact the user.
- If the user wants to pay with discount code, the discount percentage will be shown besides the final price.
- The user will receive an Email with the notification no matter the reviewing is successful or failed.
- If the purchasing behavior passes the verification, the user could download the invoice from IPVideoTalk Portal. If the user purchases the plan from the distributor, please contact with the distributor to get the invoice.

Download Invoice
Users can download the invoices for all orders.
- Log in to IPVideoTalk Portal (https://account.ipvideotalk.com) with login username and password.
- View all plans on the Plans menu.
- Click the plan to go to the order details page.

4. Click the “Download Invoice” button to download the invoice in PDF format.
Plan Expired Notification
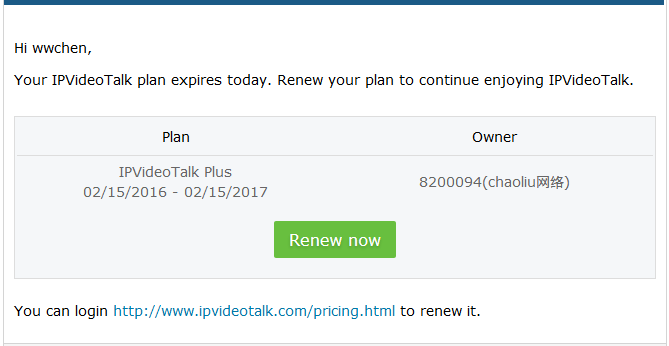
If the plan in the account will be expired after 15 days or already expired, the user will receive a notification through registered email.
An example of plan expired email notification:
Renew Plan
If the plan is about to expire, or has already expired, the user can renew it at any time.
1. On the “Plan” page, select the plan the user wants to renew.
2. Click the “Renew” button to go to the plan renewal page.

3. On the plan renewal page, the user can only select to renew the current plan and the additional plan.
4. Select the duration of the renewal, such as 1 year.
5. Fill in the billing address.
6. Fill in the discount code if the user has one.
7. Review the price and click the “Pay” button to enter the PayPal payment page and confirm the payment.

Upgrade Plan
If user wants to upgrade the current plan to a higher-level plan immediately, or add/upgrade an additional plan, please do as following:
Prerequisites: PayPal account is required before purchasing plans.
- Log in to IPVideoTalk Portal (https://account.ipvideotalk.com) with login username and password.
- View all plans on Plans menu.
- Select the plan to upgrade, click the “Upgrade” button to access to the plan upgrade page:

4. Select the pre-upgraded plan on the purchase page. Users can only select the plan which is higher-level than the current plan.
5. Or, select the additional plan to upgrade.
6. If the current plan is about to expire, or has already expired, the user can also purchase more time for the current plan. The user can select to purchase 1 year, 2 year, or 3 years for the current plan. If the current plan has already expired, the user must select to renew the plan in order to continue using IPVideoTalk services.
7. Fill in the billing address.
8. If there is a discount code, please fill in the discount code.
9. View the total amount of the purchase order, including taxes.
- The user needs to pay for the price difference, the calculation method is:
Price Difference = (the monthly fee of the Upgraded Plan – the monthly fee of the current plan) / 30 * the remaining days of the current plan.
If the current plan has expired, there is no price difference. - The price difference of the upgraded additional plan shall be calculated in the same way as the main plan.
- For the newly added additional plan, the plan owner needs to pay the price difference.
The price difference = the price of the additional plan * the rest days (from today to the expired date of the main plan). - If the user renews more time at the same time, the user needs to pay for such the long duration. The total amount of renewal = the unit price of the plan * the purchase duration.
10. Click “Pay” button to enter the PayPal payment page and confirm the payment.
11. When the payment is proceeded successfully, this order will be completed, and the new plan will be available for the specific GVC device.
12. When the order is approved by Grandstream, there will be a confirmation email sent to the user’s mailbox as follows:
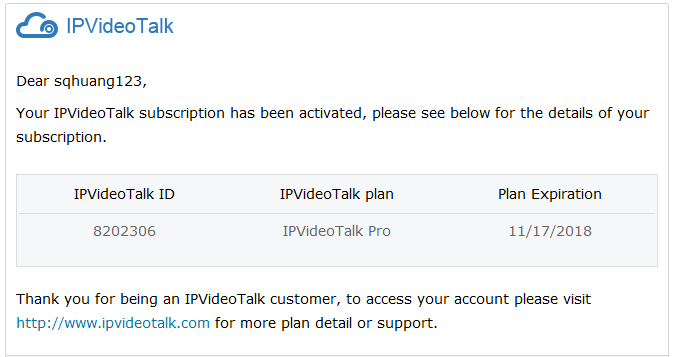
Notes:
- Grandstream will review the order and contact the user if there is any problem. If the purchasing operation is failed, the user will receive an email as follows:
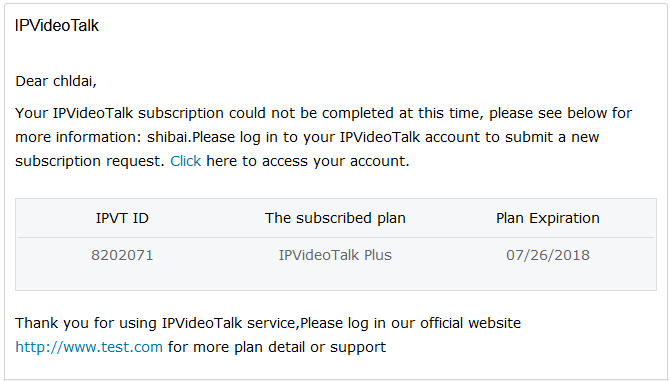
2. The tax will be charged based on the billing address, and the rate is requested by the local government.
Purchase/Upgrade Additional Plan
User can purchase additional plans or upgrade plans to existing plans.
The user can click the “Upgrade plan” for a specific plan and purchase an additional plan or upgrade the current plan. For more details, please refer to [Upgrade Plan] section.
Assign Plan
The administrator can assign the purchased plan to another sub-user.
- Log in to IPVideoTalk Portal.
- Select the plan to be assigned to the sub-user and click button “Assign Plan” to go to the plan assigning page
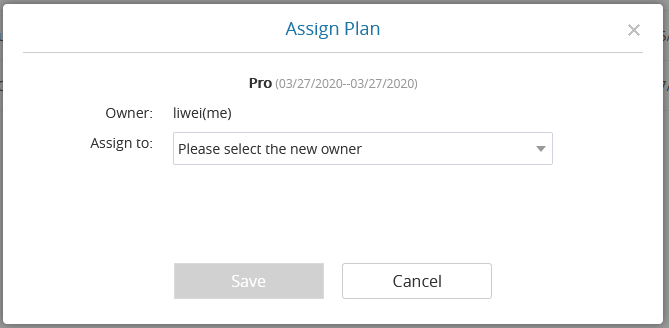
3. Select the user which the administrator wants to assign the plan to.
4. After clicking the “Save” button, the plan will be assigned to the sub-user, and the sub-user will receive a notification email.
If the administrator wants to modify the user of the plan, the administrator can proceed following the steps above. After updating the user of the plan, the previous plan owner will receive a notification email, and the user cannot use this plan anymore.
ADMINISTRATION
Business Profile
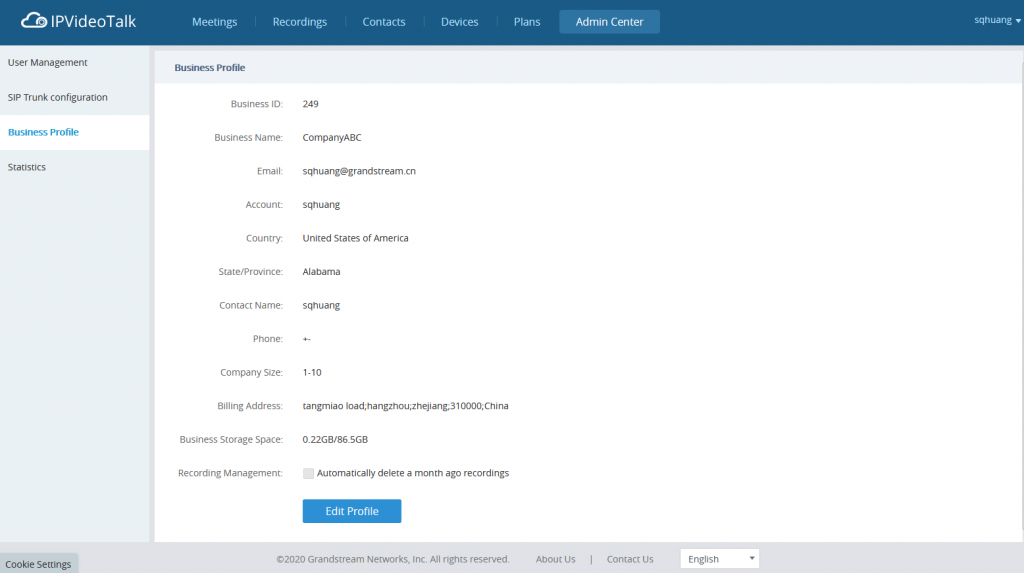
Users could access System screen and click on “Business Profile” to view company information. Profile information such as Business name, Email, country, and contact name and phone number can be edited after clicking on “Edit Profile”. Users could check the total storage space and the available storage space for the enterprise account and set that if users want to delete the recording files which are 1 month ago. If this option is enabled, the system will delete the recording files which are over 1 month automatically during a specified period.
User Management
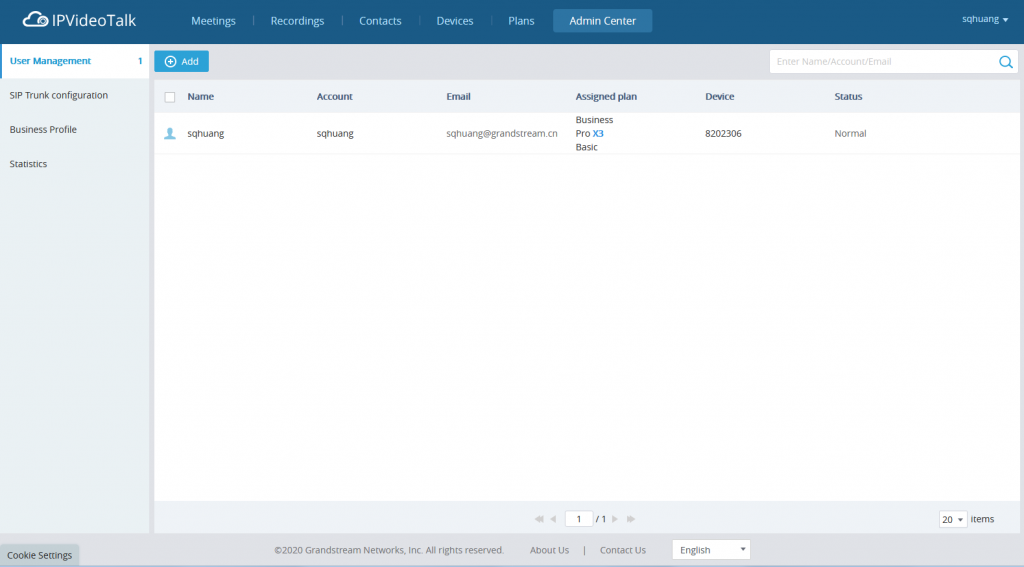
Users could add Users and allocate privilege for Users. Users could be granted privileges such as scheduling meeting, managing contacts, managing devices and plans.
Add Users
-
Go to admin Center-> User Management, Click on
.
- Fill in required information for user.
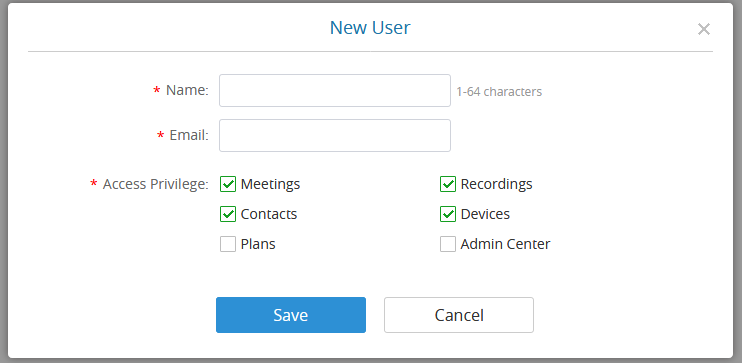
- Name: It is required to fill in.
- Email: It is required to fill in. The Email could be used to retrieve password.
- Access Privilege: Check to assign the corresponding privilege to user.
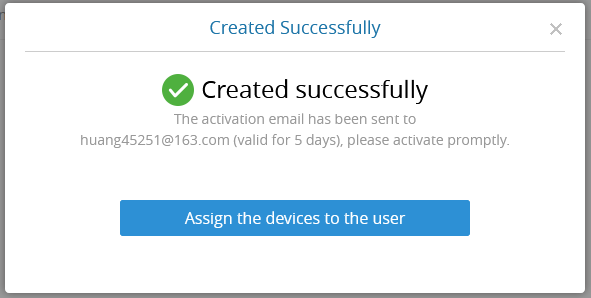
3. Click “Save” button to save, IPVideoTalk system will send the activated Email to the Email address. When the user activates via the Email, then the user could login IPVideoTalk Portal successfully.
4. Click in activation Email to set up login account and password. When it is over 5 days, the user needs to contact with the administration to resend another activated Email.
5. The users can now successfully access IPVideoTalk Portal.
6. After users created, the administrator could assign the available devices to the new created users. As shown in figure below:
Edit Users
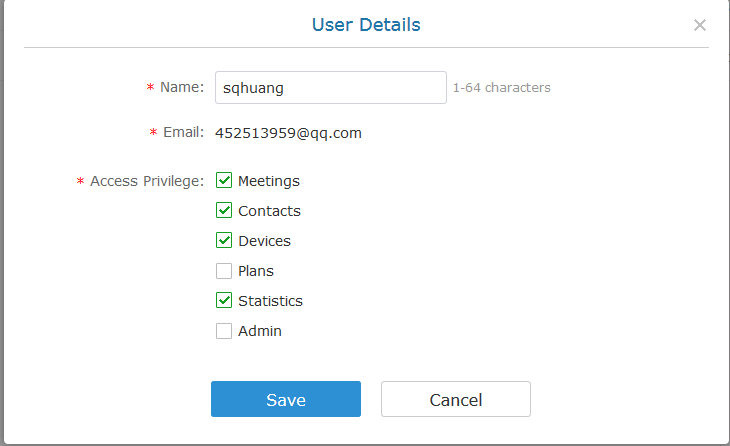
Click on the user in the user list and edit in the pop-up dialog as shown below. Once editing is finished, click on “Save” button to save the change.
Delete Users
Move the mouse cursor on one user to bring up the “Delete” button, click “OK” to confirm or click “Cancel” to cancel.
SIP Trunk Configuration
Prerequisite: The function only available when current plan has SIP Trunk access capability or authority.
SIP Trunk account can dial IVR or call IPVideoTalk meeting number directly to access the IPVideoTalk meeting room.
Steps:
- Go to “Admin Center” 🡪 ” SIP Trunk Config” interface in IPVideoTalk webUI .
- Input the IP address of the SIP Trunk Server which used to access the IPVideoTalk meeting system. The SIP Trunk Server address must be able to connect to IPVideoTalk server via public network.
- After confirmation and clicking “Save” to save the configuration, the accounts in the SIP Trunk Server can now dial IVR number “900”, or dial IPVideoTalk meeting number directly, to access and enter the meeting room.

Settings
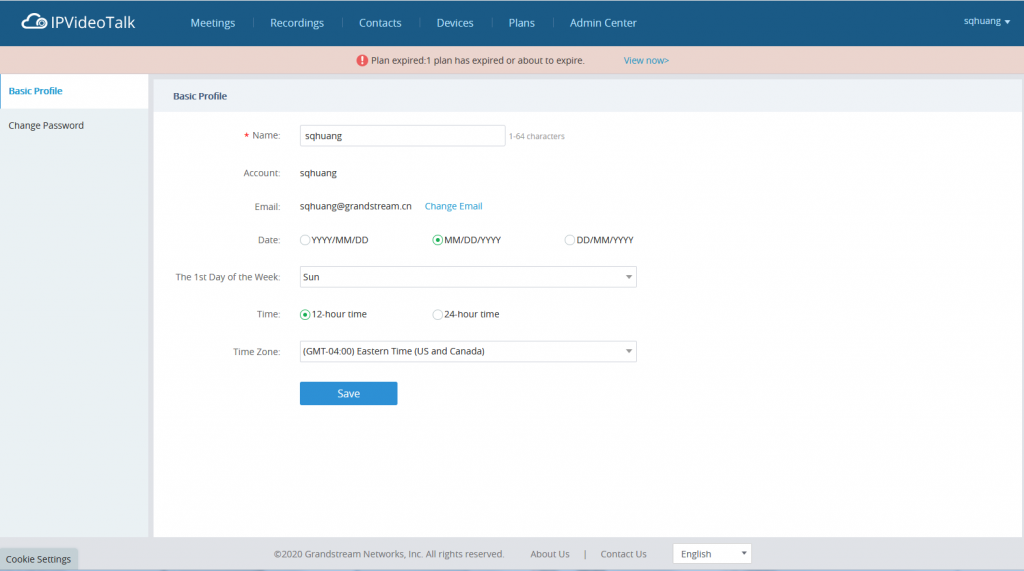
Users could check and edit the login account information in Settings.
- Name: Users could modify the User Name. This user name will be displayed as displaying name during an IPVideoTalk meeting.
- Time: Users could set the time format between 12-hours and 24-hours.
- Date: Users could also set the system date format between YYYY/MM/DD, MM/DD/YYYY, and DD/MM/YYYY.
- The 1st Day of the Week: When this setting is configured, the calendar on the meeting platform will be set accordingly, and the default setting is “Sunday”.
- Time Zone: This is used to change the system time zone. Users could change the time zone based on location.
- Change Password: This is used to change the login password for users.
- Language: Users could select the displaying language on the IPVideoTalk Portal right bottom corner
. Currently, it only supports Chinese, English, Japanese and Spanish. The language in the Email notification will be selected by this setting.
Multiple Languages
IPVideoTalk supports French, German, English, Spanish, Japanese and Chinese. Default language can be changed from the bottom bar on any page on IPVideoTalk Portal.

Plug-in
Schedule Meeting on Google Calendar
Users could schedule/start/edit/cancel IPVideoTalk meetings in Google Calendar.
- Google Calendar Plug-in has to be installed first. The plug-in can be downloaded from IPVideoTalk Portal (at the bottom of the Schedule Meeting Page), or click HERE to go to Chrome Plug-in Market to download and install.
-
Go to the Create Task interface of Google, and click on button
with the IPVideoTalk account.
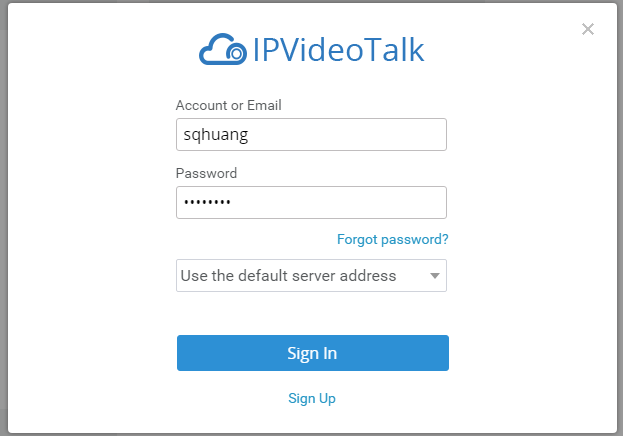
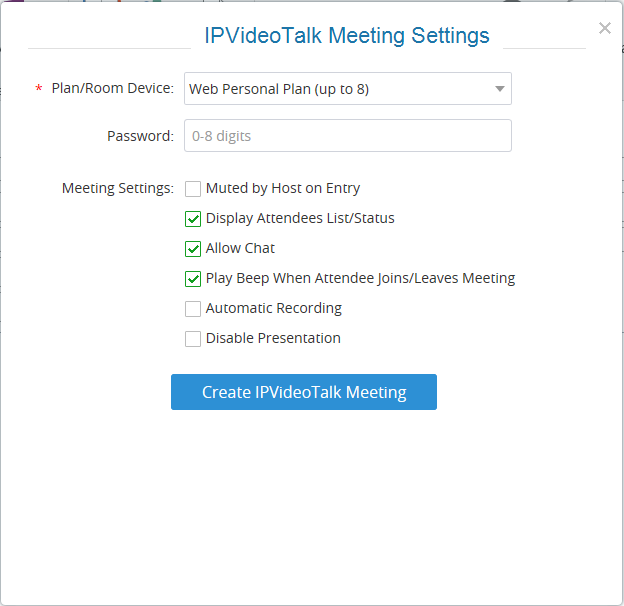
3. Click the button to create an IPVideoTalk meeting. Fill in the following parameters:
- Plan/Room Device: Select the host device or web meeting plan for the meeting. Users can choose from the authenticated devices, input alias or input IPVideoTalk ID of the authenticated device. Or, select the purchased/assigned web meeting plan.
- Personal Room: If the user selects Room Device, the user could also select to use the Personal Room Number. This Conference ID is the personal conference room, and the Conference Password, Attendees Control, Server Location will be loaded from the Personal Room Template. If the user wants to update the information, please click on “Edit Personal Room Template”.
- Password: Users can set meeting password for the meeting. This is optional. Setting meeting password can prevent meeting being interrupted by any unexpected callers.
- Attendees Control – Mute Attendees on Entry: If checked, all participants will be muted when entering the meeting.
- Attendees Control – Display Attendees List: If set to “Yes”, WebRTC participants could view the participants list during the meeting. If set to “No”, WebRTC participants can only see the host in the participants list.
- Attendees Control – Allow Chat: If checked, all participants can chat.
- Attendees Control – Play Beep When Join/Leave Meeting: If checked, when there is a meeting participant join/leave the meeting, other participants will hear the beep notification.
- Attendees Control – Automatic Recording: If this option is selected, the meeting will be recorded automatically once the meeting is started.
- Attendees Control – Disable Presentation: If selected, Presentation will be disabled during the meeting.
- Attendees Control – Call host automatically when joined the meeting: Only available when GVC is the meeting host. When selected, a call will be made immediately by the attendee who joined the meeting before the host did until the meeting started.

4. Click to create an IPVideoTalk meeting, and the meeting will be created successfully. If the task is a recurring task, the created IPVideoTalk meeting will be a recurring meeting.
5. Users could view the created IPVideoTalk meeting in Google Calendar. As the figure shows below:
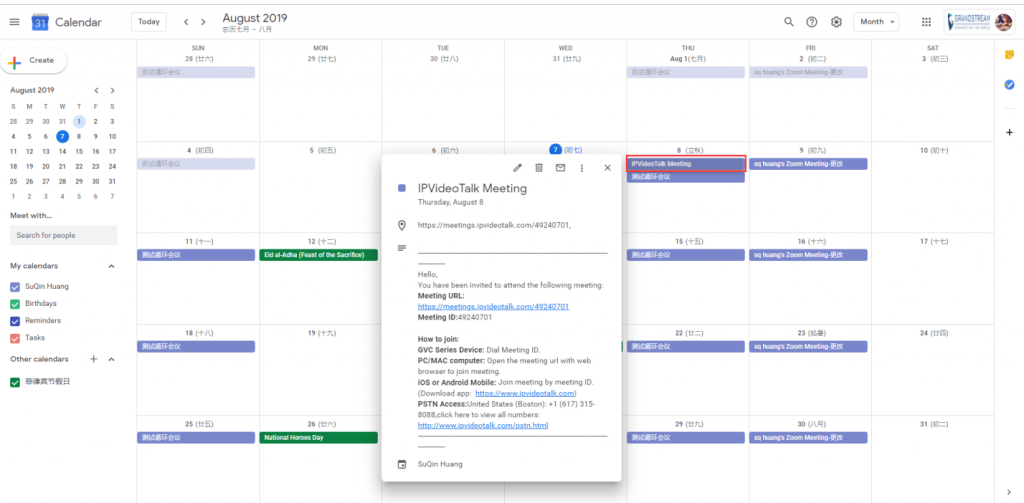
6. Go to Task Details, users could click on the button at any time to start the IPVideoTalk meeting. Users could also edit the IPVideoTalk meeting parameters on Google Calendar.
Schedule Meeting on Outlook Calendar
Users could schedule/start/edit/cancel IPVideoTalk meetings in Outlook Calendar.
Prerequisites:
- Supported Outlook versions: Outlook2010, Outlook2013 and Outlook2016.
Steps:
- Outlook Calendar Plug-in has to be installed first. The plug-in can be downloaded from IPVideoTalk Portal (at the bottom of the Schedule Meeting Page), or click HERE to go to IPVideoTalk Portal to download and install.
- Enter Outlook and select the date/time, click on the button
at the top of the interface, and log in with IPVideoTalk account.
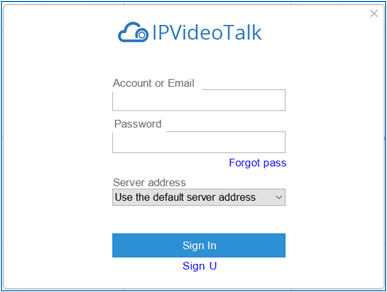
3. When creating the meeting task, just click on button 
at the top of the interface to create the instant IPVideoTalk meeting.
Please fill the following parameters:
- Plan/Room Device: Select the host device or web meeting plan for the meeting. Users can choose from the authenticated devices, input alias or input IPVideoTalk ID of the authenticated device. Or, select the purchased/assigned web meeting plan.
- Personal Room: If the user selects Room Device, the user could also select to use the Personal Room Number. This Conference ID is the personal conference room, and the Conference Password, Attendees Control, Server Location will be loaded from the Personal Room Template. If the user wants to update the information, please click on “Edit Personal Room Template”.
- Password: Users can set meeting password for the meeting. This is optional. Setting meeting password can prevent meeting being interrupted by any unexpected callers.
- Attendees Control – Mute Attendees on Entry: If checked, all participants will be muted when entering the meeting.
- Attendees Control – Display Attendees List: If set to “Yes”, WebRTC participants could view the participants list during the meeting. If set to “No”, WebRTC participants can only see the host in the participants list.
- Attendees Control – Allow Chat: If checked, all participants can chat.
- Attendees Control – Play Beep When Join/Leave Meeting: If checked, when there is a meeting participant join/leave the meeting, other participants will hear the beep notification.
- Attendees Control – Automatic Recording: If this option is selected, the meeting will be recorded automatically once the meeting is started.
- Attendees Control – Disable Presentation: If Selected, Presentation will be disabled during the meeting.
- Attendees Control – Call host automatically when joined the meeting: Only available when GVC is the meeting host. When selected, a call will be made immediately by the attendee who joined the meeting before the host did until the meeting started.
4. Click to create an IPVideoTalk meeting, and the meeting will be created successfully. If the task is a recurring task, the created IPVideoTalk meeting will be a recurring meeting.
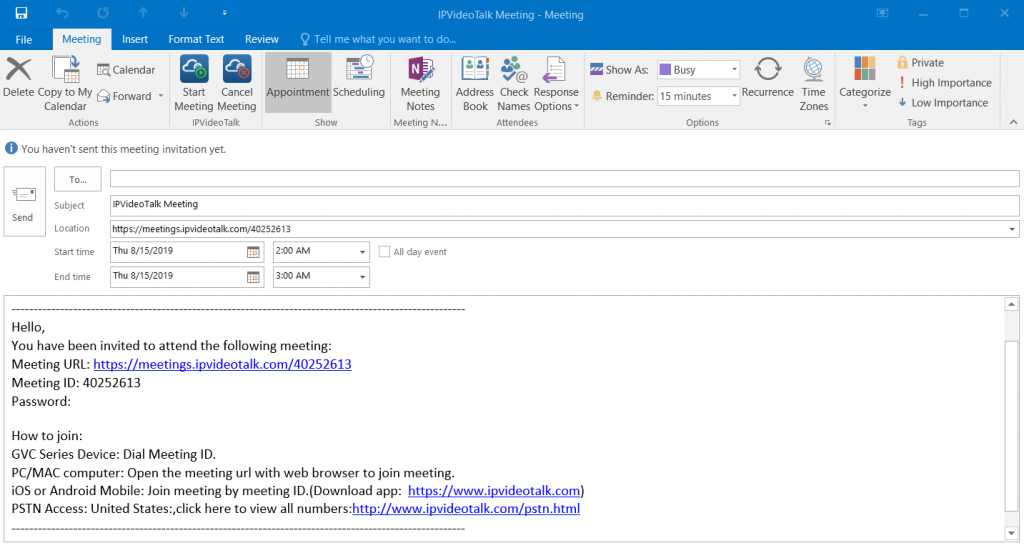
5. Users could view the created IPVideoTalk meeting in Outlook Calendar.
6. Go to Task Details, users could click on the button to start the IPVideoTalk meeting, or click on the button
to cancel the IPVideoTalk meeting. Users could also edit the IPVideoTalk meeting parameters on Outlook Calendar.