
Introduction
This document describes the basic configuration to peer the HT8XX series with HT841/HT881. This configuration applies to users seeking to add an HT841/HT881 as an external PSTN trunk.
The document will demonstrate how to set up the HT8XX series with the HT841/HT881:
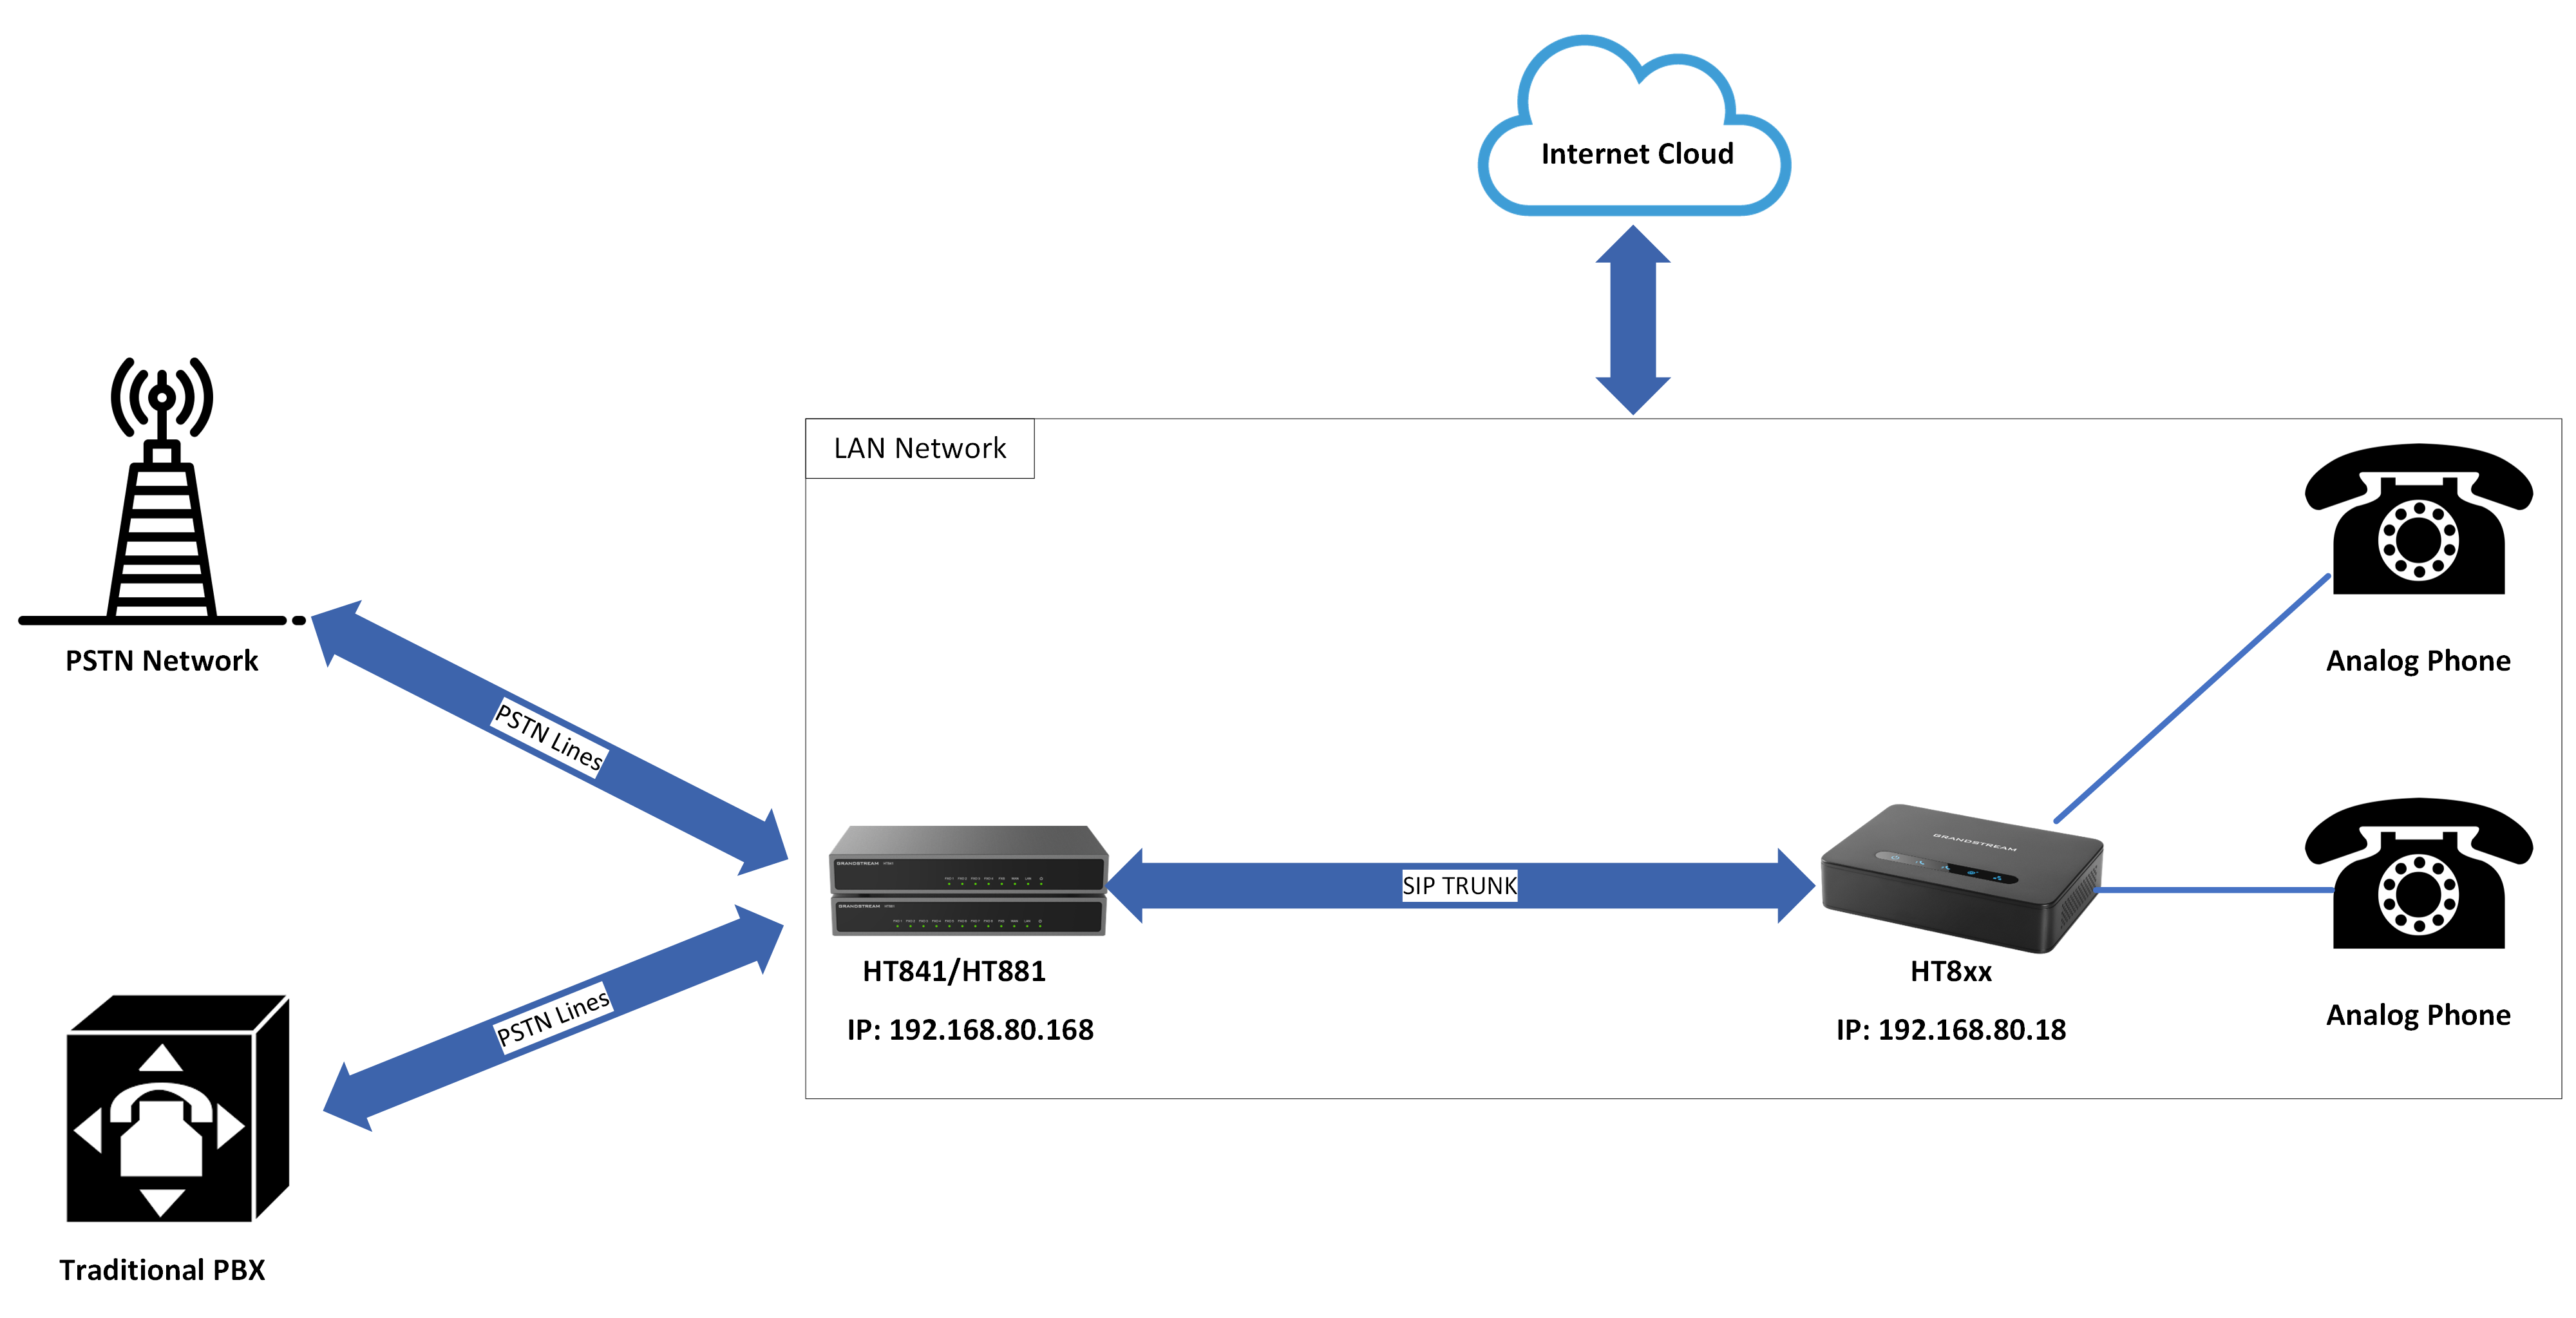
A common scenario involves one HT8XX (ATA) and HT841/HT881(FXO gateway) but doesn’t involve any SIP server. This scenario allows an organization to access FXO trunks through an IP network.
In this scenario, we will proceed first from the web GUI of HT8XX, then from HT841/HT881 to configure the Peer Trunk on both sides.
HT8XX Configuration
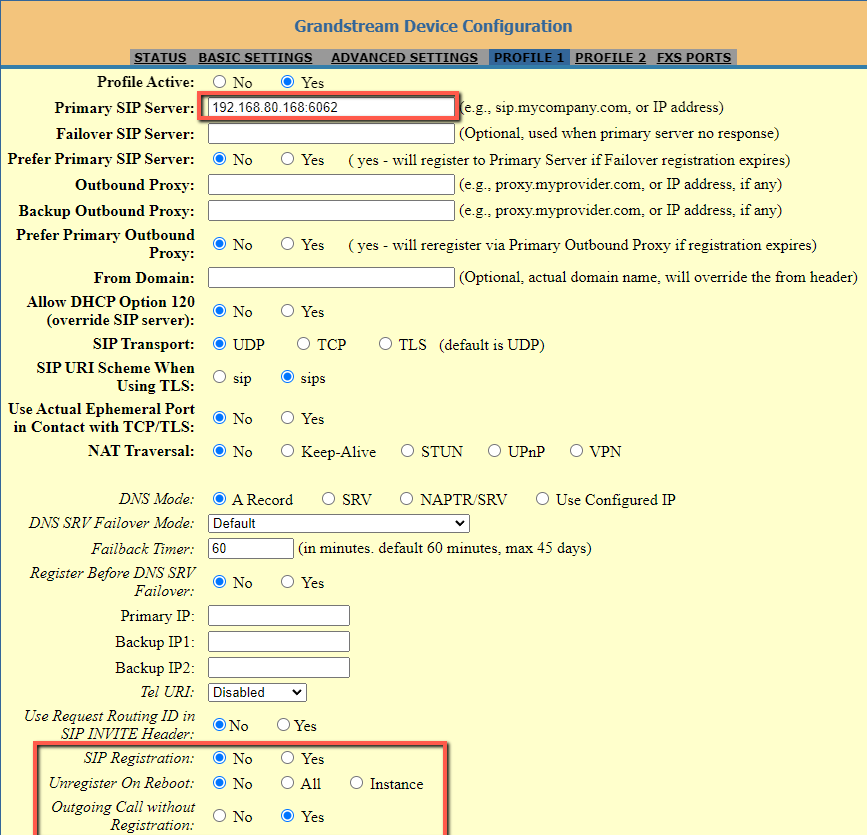
On the HT8XX web GUI, access to “Profile1”, then set the following:
- Profile Active 🡪 YES
Activates this account to make Profile1 operational. - Primary SIP Server 🡪 Enter the IP address of the HT841/HT881 followed by port 6062 which is the default listening port for FXO port 1, we will enter the following value: 192.168.80.168:6062
- SIP Transport 🡪 UDP
In our example, we will use the protocol UDP as the transport protocol. - NAT Traversal 🡪 NO
This setting will force the HT8XX to use its private IP address while making calls through a peering link with HT841/HT881. - SIP Registration 🡪 NO
Registration is not needed since this example is a peering between HT841/HT881 and HT8XX. - Outgoing Call without Registration 🡪 YES
This enables the ability to place outgoing calls even if the account is not registered.
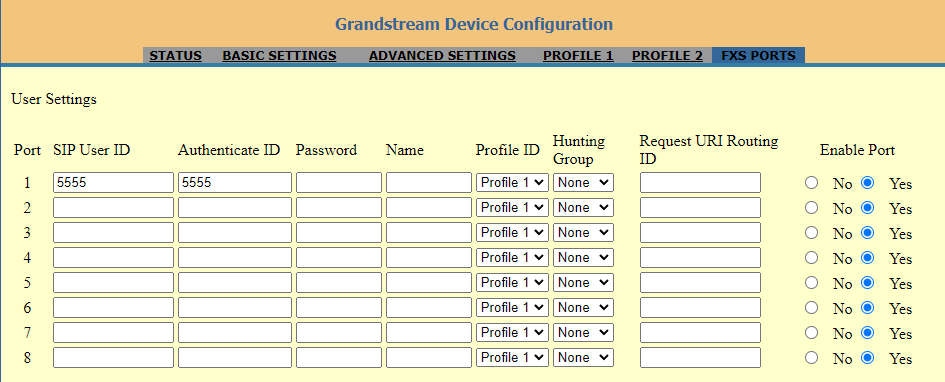
FXS Ports Settings:
Go to FXS Port settings, and enter the following information:
- Port 1: SIP User ID: 5555 | Authenticate ID: 5555 | Profile ID: Profile 1 | Enable Port: Yes
HT841/HT881 Configuration
- To activate the profile configured on HT841/HT881, please access to HT841/HT881 web GUI under “FXO Profile 1” and then set the following:
- Profile Active 🡪YES
- SIP Server 🡪 Enter the IP address of the HT8XX that you are peering with HT841/HT881, in our case it is 192.168.80.18
- Now under “FXO Profile 1”
- NAT traversal (STUN) 🡪 NO
This setting will force the HT841/HT881 to use its private IP address while making calls through a peering link with HT8XX.
- NAT traversal (STUN) 🡪 NO
- Under “FXO Profile 1”:
- SIP Registration 🡪 NO
Registration is not needed since this example is a peering between HT841/HT881 and HT8XX. - SIP Transport 🡪 UDP
In our example, we will use the protocol UDP as the transport protocol, which is the default protocol.
- SIP Registration 🡪 NO

- Set the following:
- Number of Rings 🡪 4
This is the number of rings the gateway will wait to send the call to the VOIP side in case the Caller ID has yet to be detected. - PSTN Ring Thru FXS 🡪 No
Disable this option to prevent calls from being routed through the FXS port.
- Number of Rings 🡪 4

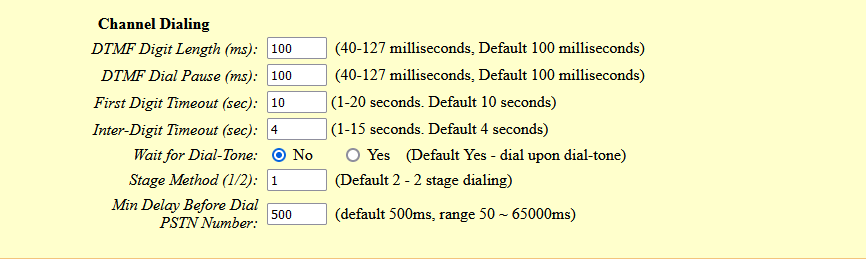
- Under “FXO Profile1” 🡪 “Channel Dialing”, set the following:
- Wait For Dial Tone 🡪 No
This option determines whether the HT8x1 waits for a dial tone from the connected telephony provider before it starts dialing out, we will set it to “No” - Stage Method 🡪 1
Setting this parameter to 1 will direct the PSTN call from the VOIP endpoint. - Min Delay Before Dial PSTN Number 🡪 500
It’s the time that HT841/HT881 will wait before dialing out; available range 500ms to 65000ms).
- Wait For Dial Tone 🡪 No
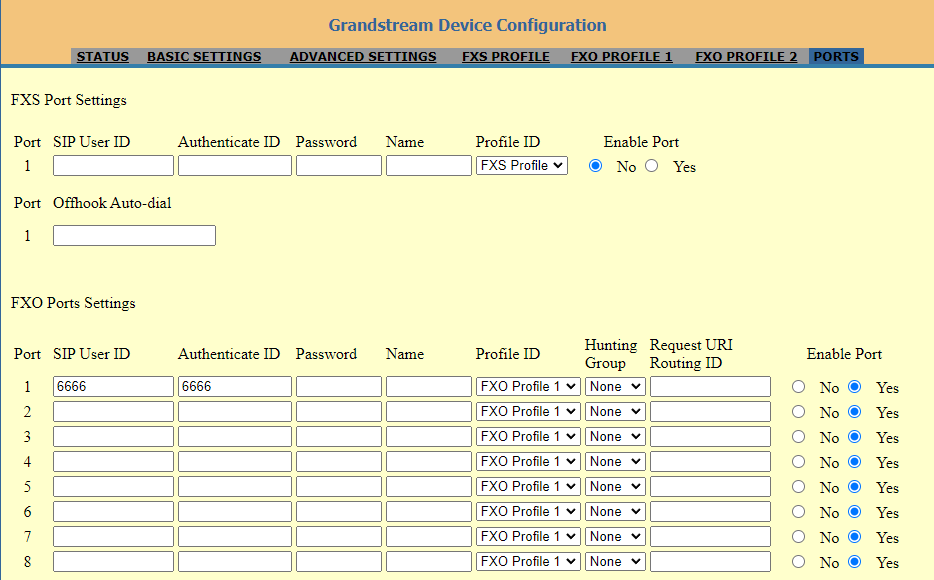
- Under “Ports”, set the following:
Port 1: SIP User ID: 6666 | Authenticate ID: 6666 | Profile ID: FXO Profile 1 | Enable Port: Yes
Set up the unconditional call forward
Under “Ports”, set the following:
- User ID 🡪 7000;
This parameter allows users to configure a User ID or extension number to be automatically dialed upon FXO line off-hook. (In our example, we will send it to User ID 7000) - Sip Server 🡪 192.168.80.18;
Specify the IP Address of the HT8xx. - SIP Destination Port 🡪 5060;
Setting this port to 5060 will allow this HT841/HT881 to always redirect the incoming PSTN calls to the HT8XX which is reachable via port 5060

One-To-One mapping
The One-to-One mapping feature will allow the HT8XX FXS port to specify the port number ‘x’ that the user will use to access HT841/HT881 FXO port ‘x’ for outbound calls.
To enable this One-To-One Mapping feature between HT8XX FXS ports and HT841/HT881 FXO ports, you will need to access to HT841/HT881 web GUI under “FXO Profile 1”, then set it as follows:
Dial Plan Prefix 🡪 99
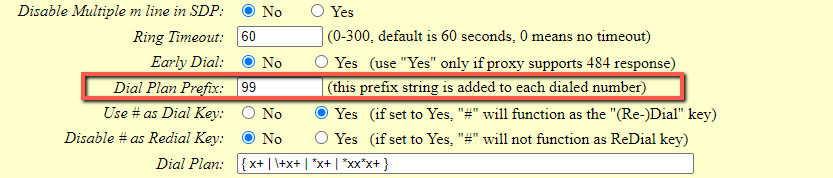
This setting allows you the power to send outbound calls from the VOIP endpoint to a specific FXO line. With this setting, the HT841/HT881 will behave as follow:
- The user tries to make an outbound call to an external number 5669300 via HT841/HT881 FXO port 1
- The user should add the prefix 991 to the external called numbers.
- In this case, the user will dial 99-1-5669300 where :
- 99: represents the prefix
- 1: represents port number 1
- 5669300: represents the external number
- Once received, the HT841/HT881 gateway will strip off 991 from the dialed number 9915669300
- HT841/HT881 will route the call to port 1 and make a call to 5669300 over the PSTN network connected to FXO1.

Port-To-Port mapping
Port-to-port mapping feature will force all calls placed on a specific FXS port “x” to be completed through the PSTN network that is connected to a specific FXO port “x”. This is similar to a one-to-one mapping configuration except it is hardcoded to be always routed through a specific FXO port. In this case, the end user is not required to dial any extra numbers.
Port-to-port mapping is configured using the Dial Plan feature on the HT8XX. The HT8XX supports $P, and $p as port numbers. Port to port mapping from the HT8XX to HT841/HT881 is configured as follows:
- HT841/HT881: prefix to specific port: 99 —- default settings on FXO Profile 1.
- HT8XX: dial plan: { <=99$P>x+ }
So, if the HT8XX is configured with this dial plan, any number dialing from a specific port will be prefixed with 99 and a port number:
- The user dials 5669300 from his analog phone which is connected to port 1
- HT8XX will append this number with the appropriate dial plan configured (HT8XX will be 9915669300)
- Once received, The HT841/HT881 gateway will strip off 991 from the dialed number 9915669300
- HT841/HT881 will route the call to port 1 and make a call to 5669300 over the PSTN network connected to FXO1.

Supported Devices
Device | Firmware Required |
HT841 | 1.0.1.2+ |
HT881 | 1.0.1.2+ |
HT818 | 1.0.49.2+ |
HT814 | 1.0.49.2+ |
HT812 | 1.0.49.2+ |
HT802 | 1.0.49.2+ |
HT801 | 1.0.49.2+ |
Supported devices