INTRODUCTION
The UCM Multi-Factor Authentication (MFA) feature adds a simple and secure method to protect the system on top of requiring username and password for login. If enabled, the UCM will require login credentials (the 1st factor) and a verification code from an MFA device (the 2nd factor), increasing security for the UCM system.
To use MFA, users will need to install a virtual MFA application or purchase a physical MFA device. MFA is configured and applied per account, not all accounts.
Virtual MFA Device
Virtual MFA devices refer to software applications that are run on mobile devices or others to substitute physical MFA devices. An MFA application will generate a six-digit code via a time-based one-time password (TOTP) algorithm. This code will be required when logging into the UCM. The virtual MFA device assigned to each user must be unique. A user cannot use a code from another user’s MFA device or application to log into his own account.
Since MFA applications may run on insecure hardware, they may not provide the same level of security as physical MFA devices.
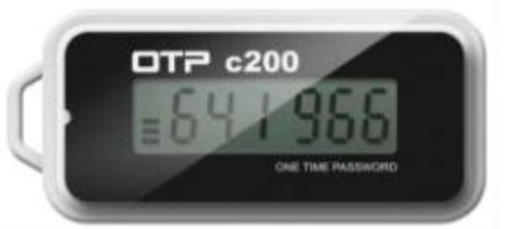
Physical MFA Device
A physical MFA device will generate a six-digit code via a time-based one-time password (TOTP) algorithm. This code will be required when logging into the UCM. The physical MFA device assigned to each user must be unique. A user cannot use a code from another user’s MFA device or application to log into his own account.
MFA device Specifications
Table 2: MFA Device Specifications
Virtual MFA Device | Physical MFA Device | |
Device | See Table 3 below | Purchase required |
Cost | Free | Price determined by 3rd party vendor |
Device Specifications | Any mobile device or tablet that can install and run applications supporting the TOTP standard | 3rd party vendor device that supports TOTP standard such as Microcosm MFA devices |
Application Scenario | Multiple tokens can be supported on one device | Many financial institute and enterprise IT organizations use the same device type |
VIRTUAL MFA APPLICATIONS
Please go to your mobile device or tablet’s app store to download and install MFA applications. The below table lists some example applications.
Table 3: Virtual MFA Applications
Android Mobilde Devices | |
iOS Mobile Devices | |
Windows Mobile Devices | Authenticator (by Microsoft) |
Using MFA Device
It is highly recommended to configure Multi-Factor Authentication (MFA) to provide higher level security of the UCM system. Super admins and admins can toggle on MFA for their own accounts but not for others’ accounts.
Using Virtual MFA Device
First, download an MFA application from your app store (e.g., Apple App Store or Google Play Store). See Table 3 for examples of available MFA applications.
Follow these steps to configure MFA on UCM:
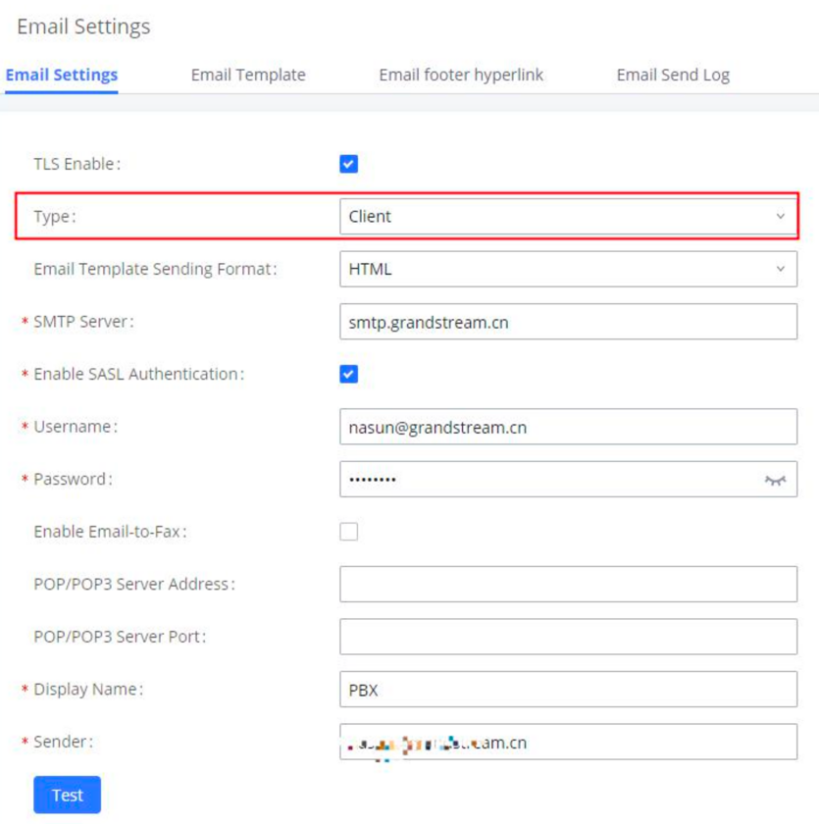
- Log into the UCM management portal with the super admin account. Navigate to System Settings🡪Email Settings and configure valid email settings that will allow UCM to send out emails. Make sure that the Type field is set to Client.
2. On UCM web UI, navigate to Maintenance->User Management page, click to edit the user information. Configure email address for the admin.

3. Enable Multi-Factor Authentication and select Virtual MFA device certification in the prompt. Then click on next.
4. The Virtual MFA device certification window will provide step-by-step instructions on setting everything up. Users can either scan a QR code or manually enter a key via their MFA app.
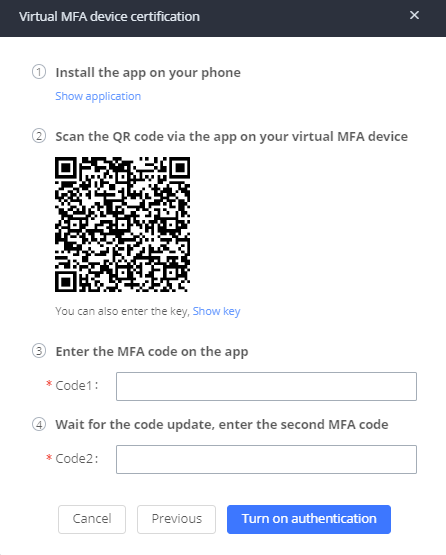
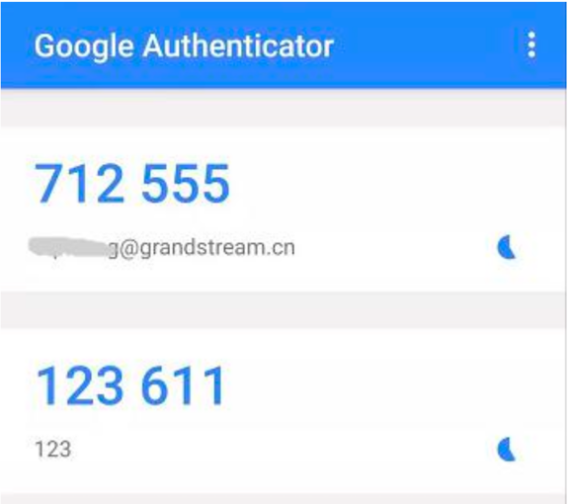
5. Open your virtual MFA app and follow the steps below.
- If your MFA application supports QR code, scan the provided QR code. Some mobile devices can scan and detect QR code using camera app.
- If your MFA application does not support QR code, click on “Show key” and then manually enter the key on the MFA application. If the MFA requires selecting how the code is generated, please select “Time-based”.
6. The MFA will periodically generate one-time passwords. Enter the displayed one-time password displayed on the MFA app into the Code 1 field. Wait approximately 30 seconds for the app to generate another one-time password. Enter this new password into the Code 2 field.
7. Click on start authentication. After passing the authentication, click on Save and Apply Changes buttons for the settings to take effect. The account has now been successfully bound to the virtual MFA device. An MFA code will now the required to log into the account.
Using Physical MFA Device
Users will need to purchase a physical MFA device and confirm that the UCM has valid email settings configured with the Type field set to Client. The account being set up for MFA must also have a valid email address configured.
Here are the steps to configure MFA on UCM.
- Log into the UCM management portal with the super admin account. Navigate to System Settings🡪Email Settings and configure valid email settings that will allow UCM to send out emails. Make sure that the Type field is set to Client.
- On UCM web UI, navigate to Maintenance->User Management page, click to edit the user information. Configure email address for the admin.
- Enable Multi-Factor Authentication and select Virtual MFA device certification in the following prompt. Then click on Next.
- The following hardware MFA device certification window will appear:
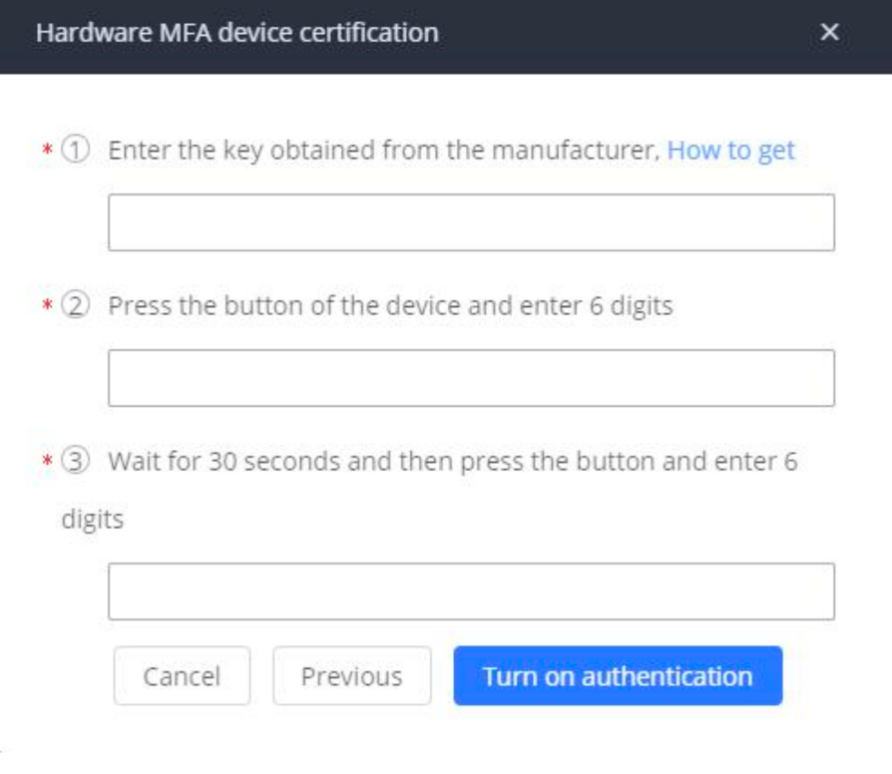
5. Enter the device secret key. Please contact your vendor to obtain the secret key.
6. In Code 1 field, enter the six-digit code displayed on the MFA device. You will need press the button on the front of the MFA device to display the code. Wait approximately 30 seconds for the device to generate a new code. Enter this second six-digit code into the Code 2 field.
7. Click on start authentication. After passing the authentication, click on save and apply for the settings to take effect. Now your account is successfully bind to the MFA device. MFA device code must be entered for the user to log in successfully.
Removing MFA Device
If MFA is no longer needed, MFA can be disabled for the account at any time.
Removing MFA via User Management
- Log into the admin account to disable MFA for. Navigate to Maintenance🡪User Management and edit the appropriate account.
- Uncheck Multi-Factor Authentication.
Removing MFA via Login Page
- On the login page, enter the account credentials. Once the Multi-Factor Authentication window appears, click on the Reset certification link below the Login button.
- An MFA removal email will be sent to the user’s associated email address. In the email, click on the Reset Now button to confirm and disable MFA.
- This reset email will be valid for 10 minutes and will expire immediately after a user clicks on it.
FAQ
MFA Device Lost or Invalidated
If your MFA device has been lost or no longer works, please follow the instructions below to unbind the MFA device and use a new MFA device.
- On the login page, enter the account credentials. Once the Multi-Factor Authentication window appears, click on the Reset certification link below the Login button.
- An MFA removal email will be sent to the user’s associated email address. In the email, click on the Reset Now button to confirm and disable MFA.
- This reset email will be valid for 10 minutes and will expire immediately after it is clicked on.
SUPPORTED DEVICES
The following table shows all the UCM models which support multi-factor authentication feature:
UCM Models Supporting Multi-Factor Authentication | |
UCM6300 Series | |
UCM6300 | Firmware 1.0.10.5 or higher |
UCM6300 | Firmware 1.0.10.5 or higher |
UCM6300 | Firmware 1.0.10.5 or higher |
UCM6300 | Firmware 1.0.10.5 or higher |
UCM6300 Audio Series | |
UCM6300A | Firmware 1.0.10.5 or higher |
UCM6302A | Firmware 1.0.10.5 or higher |
UCM6304A | Firmware 1.0.10.5 or higher |
UCM6308A | Firmware 1.0.10.5 or higher |