
WELCOME
The WP810 is a portable Wi-Fi IP phone designed to suit a variety of enterprises and vertical market applications, including retail, logistics, medical and security. This basic cordless Wi-Fi phone comes equipped with integrated dual-band 802.11a/b/g/n/ac Wi-Fi, an advanced antenna design and roaming support. By adding 6-hour talk time and HD voice with dual-MICs, the WP810 offers an affordable option and comes equipped with a combination of features, mobility and durability to suit all portable telephony needs.
The WP822 is a portable Wi-Fi IP phone designed to suit a variety of enterprises and vertical market applications, including retail, logistics, medical and security. This business-grade Wi-Fi phone comes equipped with integrated dual-band 802.11a/b/g/n/ac Wi-Fi, an advanced antenna design and roaming
support. By adding 8-hour talk time, HD voice with dual-MICs, and a configurable push-to-talk button, the WP822 comes equipped with a combination of features, mobility and durability to suit all portable telephony needs.
The WP825 is a ruggedized portable Wi-Fi IP phone designed to suit a variety of enterprises and vertical market applications, including retail, logistics, medical and security. This cordless Wi-Fi phone comes equipped with integrated dual-band 802.11a/b/g/n/ac Wi-Fi, an advanced antenna design and roaming
support. By adding 8-hour talk time and HD voice with dual-MICs, the WP825 offers an affordable option and comes equipped with a combination of features, mobility and durability to suit all portable telephony needs.
PRODUCT OVERVIEW
Feature Highlights
The following table contain the major features of the WP810, WP822 and WP825:
 WP810 |
|
 WP822 |
|
 WP825 |
|
Table 1: WP810/WP822/WP825 Features at a Glance
Technical Specifications
The following table resumes all the technical specifications including the protocols/standards supported, voice codecs, telephony features, languages and upgrade/provisioning settings.
- WP810
Protocols/Standards | SIP RFC3261, TCP/IP/UDP, RTP/RTCP, HTTP/HTTPS, ARP, ICMP, DNS (A record, SRV, NAPTR), DHCP, SSH, TFTP, NTP, STUN, SIMPLE, 802.1x, TLS, SRTP, IPv6 |
Voice Codecs and Capabilities | Support for G.711μ/a, G.729A/B, G.722 (wide-band), iLBC, Opus, in-band and out-of-band DTMF (In audio, RFC2833, SIP INFO), VAD, CNG, AEC, PLC, AJB, AGC, ANS |
Graphic Display | 1.8-inch (128×160) TFT color LCD |
Peripherals | 2 soft keys, dial, hangup, speakerphone, phonebook, backlit keypad, proximity senor, vibration motor, volume button and navigation keys |
Push-to-Talk | Customizable button for push-to-talk. |
Auxiliary Ports | 3.5 mm headset jack, Micro-USB port for charging, dual-MIC, dual-color MWI LED. |
Telephony Features | Hold, transfer, forward, 3-way audio conference, downloadable phonebook XML (up to 500 items), call waiting, call log (up to 100 records), off-hook auto dial, auto answer, flexible dial plan, personalized music ringtones, server redundancy and fail-over, push to talk |
Security | User and administrator level passwords, MD5 and MD5-sess based authentication, 256-bit AES based secure configuration file, SRTP, TLS, 802.1x media access control |
HD Audio | Yes, both on handset and speakerphone with support for wideband audio, HAC supported |
QoS | 802.11e and Layer 3 (ToS, DiffServ, MPLS) QoS |
Multi-language | English, Chinese, German, French, Italian, Portuguese, Russian, Spanish, Turkish, Japanese, Hewbrew and more |
Upgrade/ Provisioning | Firmware upgrade via TFTP/HTTP/HTTPS/FTP/FTPS, mass provisioning using encrypted XML configuration file, manual upload. |
Power & Green Energy Efficiency | Universal power adapter included Input: 100-240VAC; Output: +5VDC, 1A (5W) 1500mA Li-ion battery, 120h standby time and 6h talk time |
Physical | Handset Dimensions : 158.5 x 50 x 22.5mm Charger cradle dimensions : 81.15 x 75.89 x 36.36mm Handset weight: 120g Handset package weight (not including QIG): 340g |
Temperature and Humidity | Operating Temperature: 0~45°C; Operating Humidity: 10~90%(non-condensing) Storage Temperature: -20~60°C; Storage Humidity:10~90%(non-condensing |
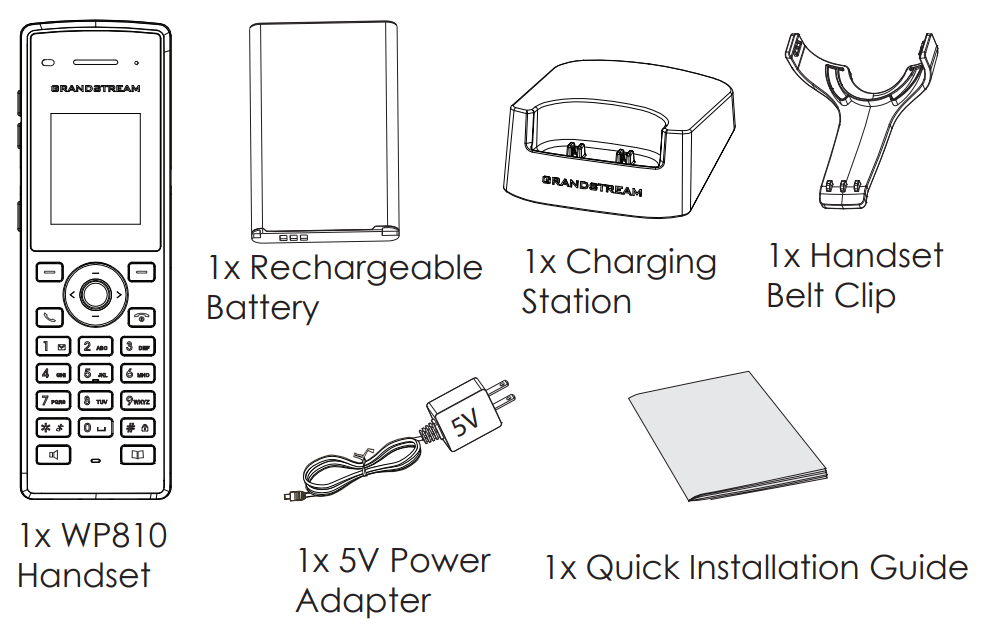
Package Contents | Handset unit, universal power supply, charger cradle, belt clip, 1 Li-ion battery. Quick Installation Guide. |
Compliance | FCC, CE, RCM, IC |
Table 2: WP810 Technical Specifications
- WP822
Protocols/Standards | SIP RFC3261, TCP/IP/UDP, RTP/RTCP, HTTP/HTTPS, ARP, ICMP, DNS (A record, SRV, NAPTR), DHCP, SSH, TFTP, NTP, STUN, SIMPLE, 802.1x, TLS, SRTP, IPv6 |
Voice Codecs and Capabilities | Support for G.711μ/a, G.729A/B, G.722 (wide-band), iLBC, Opus, in-band and out-of-band DTMF (In audio, RFC2833, SIP INFO), VAD, CNG, AEC, PLC, AJB, AGC, ANS |
Graphic Display | 2.4 inch (240x320) TFT color LCD |
Peripherals | 3 soft keys, dial, hang-up, speakerphone, phonebook, backlit keypad, proximity sensor, vibration motor, volume button, navigation keys, and accelerometer supporting configurable gestures |
Push-to-Talk | Customizable button for push-to-talk. |
Auxiliary Ports | 3.5 mm headset jack, Micro-USB port for charging, dual-MIC, dual-color MWI LED. |
Telephony Features | Hold, transfer, forward, 3-way audio conference, call waiting, call log (up to 100 records), downloadable phonebook (XML, up to 500 items) off-hook auto dial, auto answer, flexible dial plan, personalized music ringtones, server redundancy and fail-over, push to talk, LDAP |
Security | User and administrator level passwords, MD5 and MD5-sess based authentication, 256-bit AES based secure configuration file, SRTP, TLS, 802.1x media access control |
HD Audio | Yes, both on handset and speakerphone with support for wideband audio, HAC supported |
QoS | 802.11e (WMM) and Layer 3 (ToS, DiffServ, MPLS) QoS |
Multi-language | English, Chinese, German, French, Italian, Portuguese, Russian, Spanish, Japanese, Hewbrew and more |
Upgrade/ Provisioning | Firmware upgrade via TFTP/HTTP/HTTPS/FTP/FTPS, mass provisioning using encrypted XML configuration file, manual upload. |
Power & Green Energy Efficiency | Universal power adapter included |
Physical | Handset dimensions: 164.0 x 52.0 x 25.8mm |
Temperature and Humidity | Operating Temperature: 0ºC to 45ºC; Operating Humidity: 10-90% (non-condensing) |
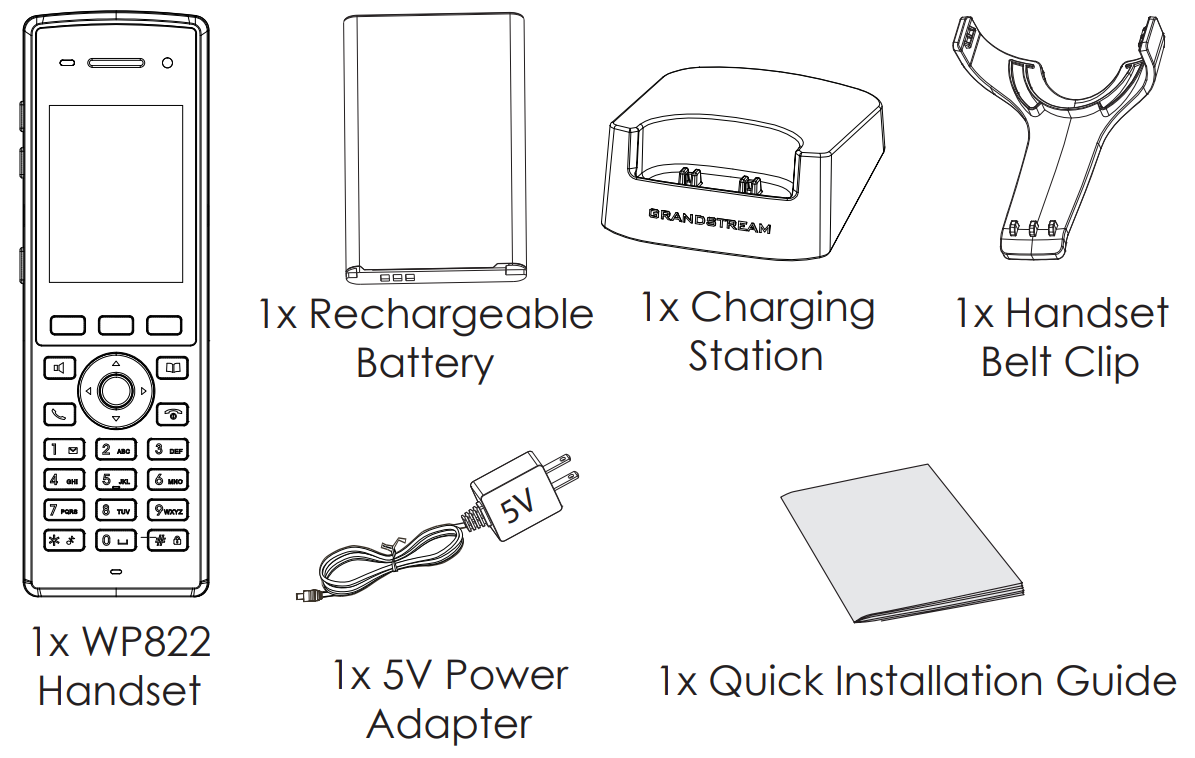
Package Contents | Handset unit, universal power supply, charger cradle, belt clip, 1 Li-ion battery, Quick Start Guide |
Compliance | FCC, CE, RCM, IC, UKCA |
Table 3: WP822 Technical Specifications
- WP825
Protocols/Standards | SIP RFC3261, TCP/IP/UDP, RTP/RTCP, HTTP/HTTPS, ARP, ICMP, DNS (A record, SRV, NAPTR), DHCP, SSH, TFTP, NTP, STUN, SIMPLE, 802.1x, TLS, SRTP, IPv6 |
Voice Codecs and Capabilities | Support for G.711μ/a, G.729A/B, G.722 (wide-band), iLBC, Opus, in-band and out-of-band DTMF (In audio, RFC2833, SIP INFO), VAD, CNG, AEC, PLC, AJB, AGC, ANS |
Graphic Display | 2.4 inch (240x320) TFT color LCD |
Peripherals | 3 soft keys, dial, hang-up, speakerphone, phonebook, backlit keypad, proximity sensor, vibration motor, volume button, navigation keys, and accelerometer supporting configurable gestures |
Push-to-Talk | Customizable button for push-to-talk. |
Auxiliary Ports | 3.5 mm headset jack, Micro-USB port for charging, dual-MIC, dual-color MWI LED. |
Telephony Features | Hold, transfer, forward, 3-way audio conference, call waiting, call log (up to 100 records), downloadable phonebook (XML, up to 500 items) off-hook auto dial, auto answer, flexible dial plan, personalized music ringtones, server redundancy and fail-over, push to talk, LDAP |
Security | User and administrator level passwords, MD5 and MD5-sess based authentication, 256-bit AES based secure configuration file, SRTP, TLS, 802.1x media access control |
HD Audio | Yes, both on handset and speakerphone with support for wideband audio, HAC supported |
QoS | 802.11e (WMM) and Layer 3 (ToS, DiffServ, MPLS) QoS |
Multi-language | English, Chinese, German, French, Italian, Portuguese, Russian, Spanish, Hewbrew, Japanese and more |
Upgrade/ Provisioning | Firmware upgrade via TFTP/HTTP/HTTPS/FTP/FTPS, mass provisioning using encrypted XML configuration file, manual upload. |
Power & Green Energy Efficiency | Universal power adapter included |
Physical | Handset dimensions: 164.0 x 52.0 x 25.8mm |
Weatherproof | IP67 Rated -Water-proof, dust-proof, cleaning chemical resistant, anti-microbial casing and 2.5m drop safe |
Temperature and Humidity | Operating Temperature: 0ºC to 45ºC; Operating Humidity: 10-90% (non-condensing) |
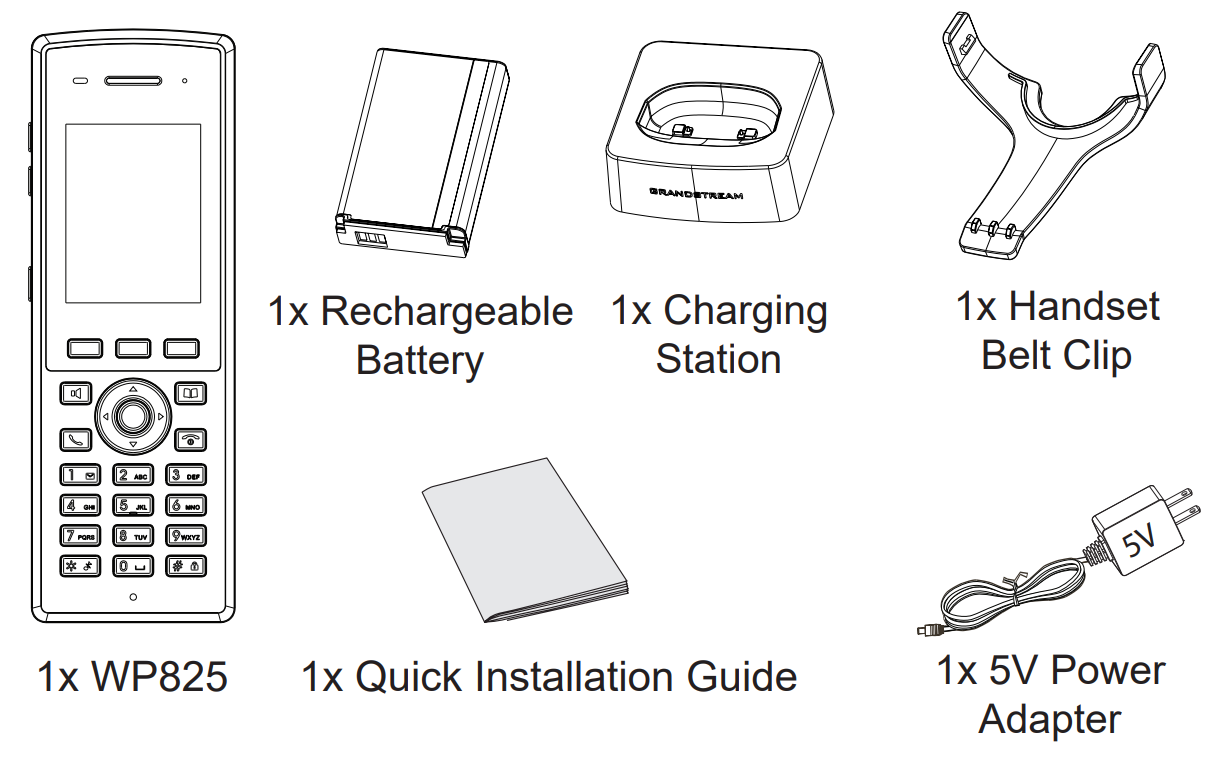
Package Contents | Handset unit, universal power supply, charger cradle, belt clip, 1 Li-ion battery, Quick Start Guide |
Compliance | FCC, CE, RCM, IC, UKCA |
Table 4: WP825 Technical Specifications
GETTING STARTED
This chapter provides basic installation instructions including the list of the packaging contents and also information for obtaining best performance with the WP810, WP822 and WP825.
Equipment Packaging
WP810/WP822/WP825 |
|
Table 5: Equipment Packaging
- WP822
- WP825
Setting up the Phone
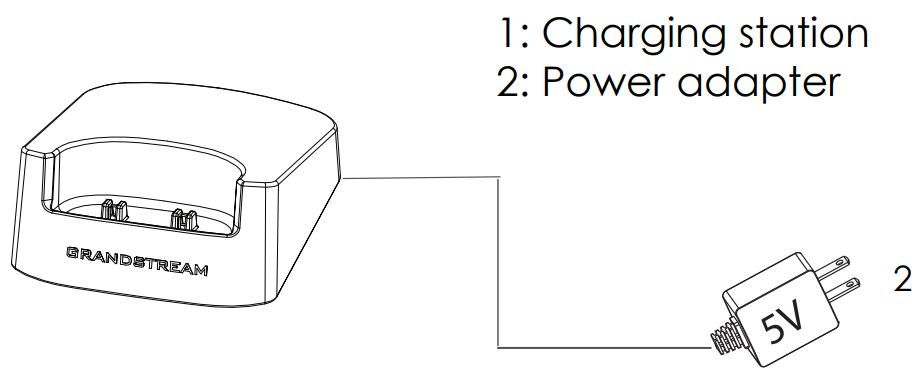
Charging Station
Plug the power adapter into a power source socket to start using the charging station.
Handset
Please refer to the following steps in order to setup your WP810/WP822/WP825 phone:
- Open the battery cover.
- Insert the battery with the electrodes in the bottom left corner.
- Close the battery cover.

Battery Information
WP810
- Technology: Rechargeable Li-ion Battery
- Voltage: 3.8V (Nominal Voltage 3.8V / Limited charge Voltage: 4.35V)
- Capacity: 1500mAh
- Standby time: up to 120 hours
- Talk time: up to 6 hours’ active talk time
WP822
- Technology: Rechargeable Li-ion Battery
- Voltage: 3.8V (Nominal Voltage 3.8V / Limited charge Voltage: 4.35V)
- Capacity: 2000mAh
- Standby time: up to 200 hours
- Talk time: up to 8 hours’ active talk time
WP825
- Technology: Rechargeable Li-ion Battery
- Voltage: 3.8V (Nominal Voltage 3.8V / Limited charge Voltage: 4.35V)
- Capacity: 2000mAh
- Standby time: up to 200 hours
- Talk time: up to 8 hours’ active talk time
In order to get the best performance of your WP810/WP822/WP825, we recommend using original battery provided in the package. The specifications may differ depending on the age and capacity of the battery used.
Handset Keys Description
The WP810/WP822/WP825 Wireless IP phone enhances communication and combines usability and scalability in industries such as warehousing, catering and retail as well as in factory settings. The following screenshot describe the the handsets LCD screen and the main hardware components.
- WP810
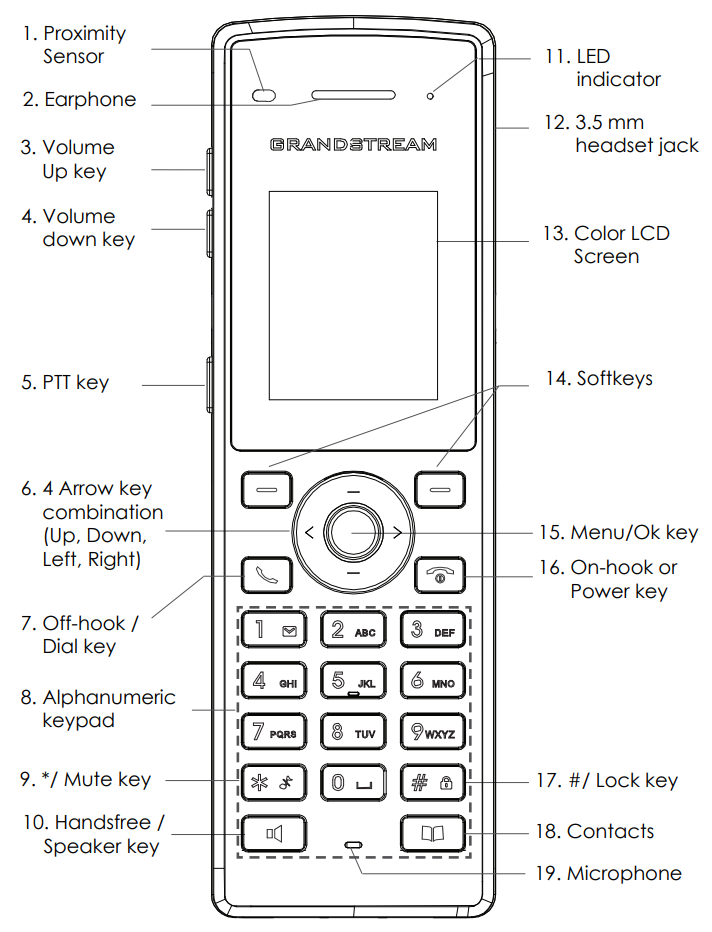
The following table describe the WP810 keypad keys.
Reference | Key | Description |
1 | Proximity sensor | The proximity senor can detect and measure gravitational acceleration, tilt, vibration, altitude changes, and static position. |
2 | Earphone | Delivers audio output. |
3,4 | Volume up / Down Keys | Configure the handset and ringtone volume. |
5 | PTT Key | PTT (Push-to-Talk) button, to initiate PTT call. |
6 | Arrow key combination (Up, Down, Left, Right) | Allows navigation of the cursor through the displayed menu options. |
7 | Off-hook / Dial key | Enters dialing mode, or dials number entered. |
8 | Alphanumeric Keypad | Provides the digits, letters, and special characters in context-sensitive applications. For + sign, press and hold key 0. |
9 | * / Mute key | Keep pressing on * in idle screen to mute/unmute the ringtone. |
10 | Hands-free / Speaker key | Activates or deactivates the mute feature when pressing on * in idle screen. |
11 | LED indicator | 1dual-color LED indicator indicating power, call, battery, message waiting… |
12 | 3.5 mm headset jack | Phone connector for the headphones/headsets. |
13 | Color LCD Screen | 1.8-inch (128×160) color LCD |
14 | Softkeys | Correspond to functions displayed on the LCD. These functions change depending on the current context. |
15 | Menu/OK key | Displays the main menu |
16 | On-hook or Power key | Selects the option chosen by the cursor or enters the main menu from the home screen. |
17 | # / Lock key | Does one of the following:
|
18 | Contacts | Access to contacts list |
19 | Microphone | Picks up audio earpiece and hands-free calls |
WP810 keypad keys Description
- WP822
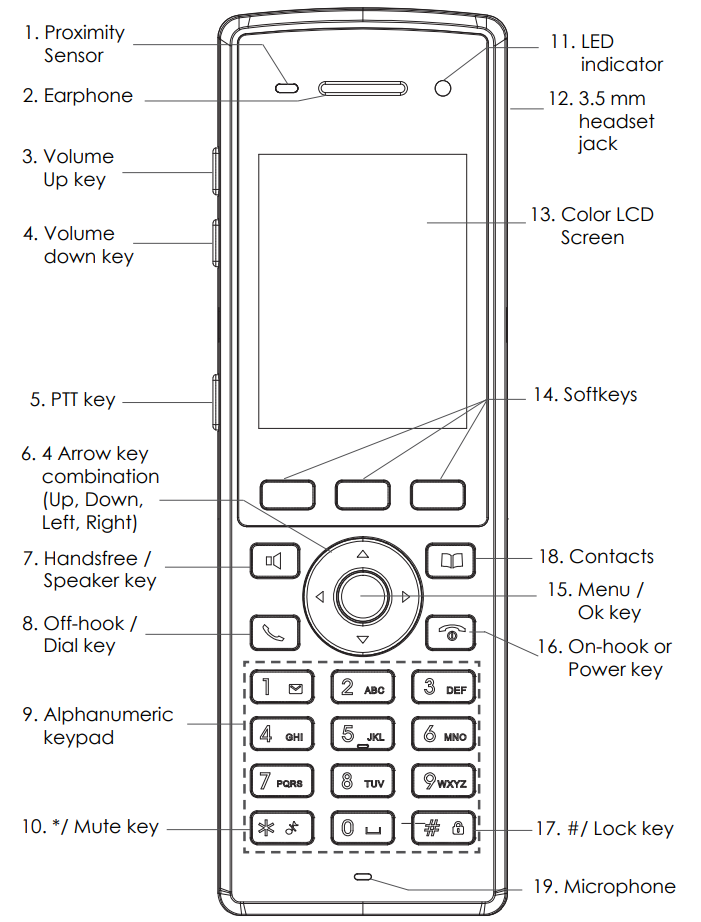
The following table describe the WP822 keypad keys.
Reference | Key | Description |
1 | Proximity sensor | The proximity senor can detect and measure gravitational acceleration, tilt, vibration, altitude changes, and static position. |
2 | Earphone | Delivers audio output. |
3,4 | Volume up / Down Keys | Configure the handset and ringtone volume. |
5 | PTT Key | PTT (Push-to-Talk) button, to initiate PTT call. |
6 | Arrow key combination (Up, Down, Left, Right) | Allows navigation of the cursor through the displayed menu options. |
7 | Hands-free / Speaker key | Activates or deactivates the mute feature when pressing on * in idle screen. |
8 | Off-hook / Dial key | Enters dialing mode, or dials number entered. |
9 | Alphanumeric Keypad | Provides the digits, letters, and special characters in context-sensitive applications. For + sign, press and hold key 0. |
10 | * / Mute key | Keep pressing on * in idle screen to mute/unmute the ringtone. |
11 | LED indicator | 1dual-color LED indicator indicating power, call, battery, message waiting… |
12 | 3.5 mm headset jack | Phone connector for the headphones/headsets. |
13 | Color LCD Screen | 1.8-inch (128×160) color LCD |
14 | Softkeys | Correspond to functions displayed on the LCD. These functions change depending on the current context. |
18 | Contacts | Access to contacts list. |
15 | Menu/OK key | Displays the main menu |
16 | On-hook or Power key | Selects the option chosen by the cursor or enters the main menu from the home screen. |
17 | # / Lock key | Does one of the following:
|
19 | Microphone | Picks up audio earpiece and hands-free calls |
WP822 keypad keys Description
- WP825
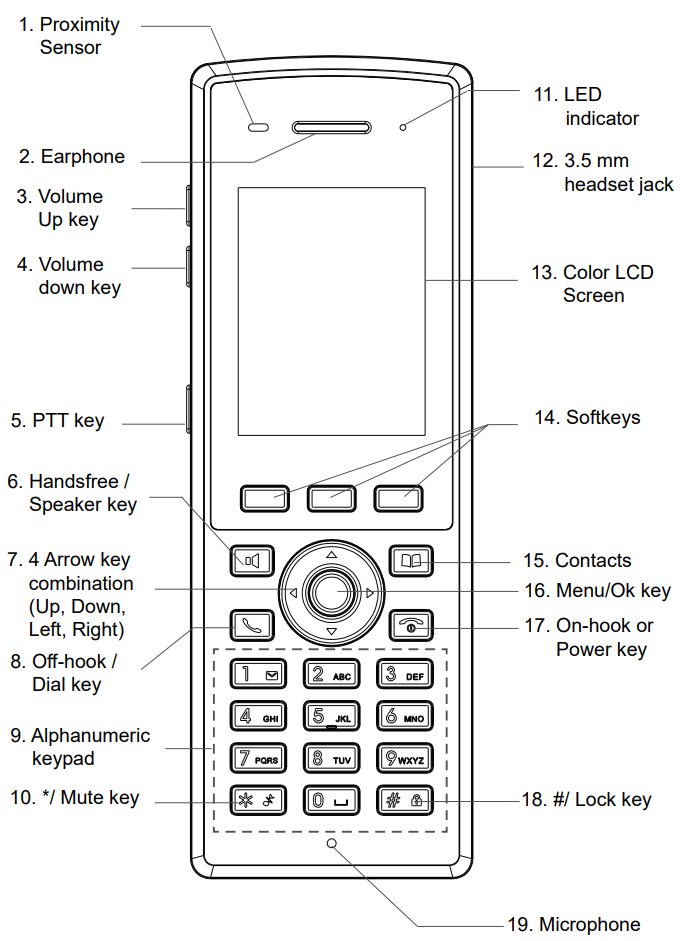
The following table describe the WP825 keypad keys.
Reference | Key | Description |
1 | Proximity sensor | The proximity senor can detect and measure gravitational acceleration, tilt, vibration, altitude changes, and static position. |
2 | Earphone | Delivers audio output. |
3,4 | Volume up / Down Keys | Configure the handset and ringtone volume. |
5 | PTT Key | PTT (Push-to-Talk) button, to initiate PTT call. |
6 | Arrow key combination (Up, Down, Left, Right) | Allows navigation of the cursor through the displayed menu options. |
7 | Hands-free / Speaker key | Activates or deactivates the mute feature when pressing on * in idle screen. |
8 | Off-hook / Dial key | Enters dialing mode, or dials number entered. |
9 | Alphanumeric Keypad | Provides the digits, letters, and special characters in context-sensitive applications. For + sign, press and hold key 0. |
10 | * / Mute key | Keep pressing on * in idle screen to mute/unmute the ringtone. |
11 | LED indicator | 1dual-color LED indicator indicating power, call, battery, message waiting… |
12 | 3.5 mm headset jack | Phone connector for the headphones/headsets. |
13 | Color LCD Screen | 1.8-inch (128×160) color LCD |
14 | Softkeys | Correspond to functions displayed on the LCD. These functions change depending on the current context. |
15 | Contacts | Access to contacts list. |
16 | Menu/OK key | Displays the main menu |
17 | On-hook or Power key | Selects the option chosen by the cursor or enters the main menu from the home screen. |
18 | # / Lock key | Does one of the following:
|
19 | Microphone | Picks up audio earpiece and hands-free calls |
WP825 keypad keys Description
Icons Description
Following table contains description of each icon that might be displayed on the screen of the WP810/WP822/WP825.
Battery status Charging | |
Wi-Fi not enabled/configured | |
Wi-Fi signal status | |
Outgoing Call notification | |
Missed Call notification | |
Rejected Call notification | |
Incoming Call notification | |
Mute enabled icon | |
DND enabled icon | |
SRTP & TLS enabled icon | |
 | Contacts |
 | SMS |
 | Call History |
 | Voice Mail |
 | Diagnosis |
 | Settings |
 | Status |
LED Status
Red Fast Flashing |
|
Green Slow Flashing |
|
Green Blinking |
|
Green Solid |
|
Red Slow Flashing |
|
Red Solid |
|
LED OFF |
|
Handset Menu
The handset has an easy-to-use menu structure. Every menu opens a list of options. To open the main menu, unlock first the handset and press “Menu” (softkey in the middle). Press Arrow keys to navigate to the menu option you require. Then press “Select” (left softkey) or OK/Selection key to access further options or confirm the setting displayed. To go to the previous menu item, press “Back” (right softkey). You can press Power key at any time to cancel and return to standby mode.
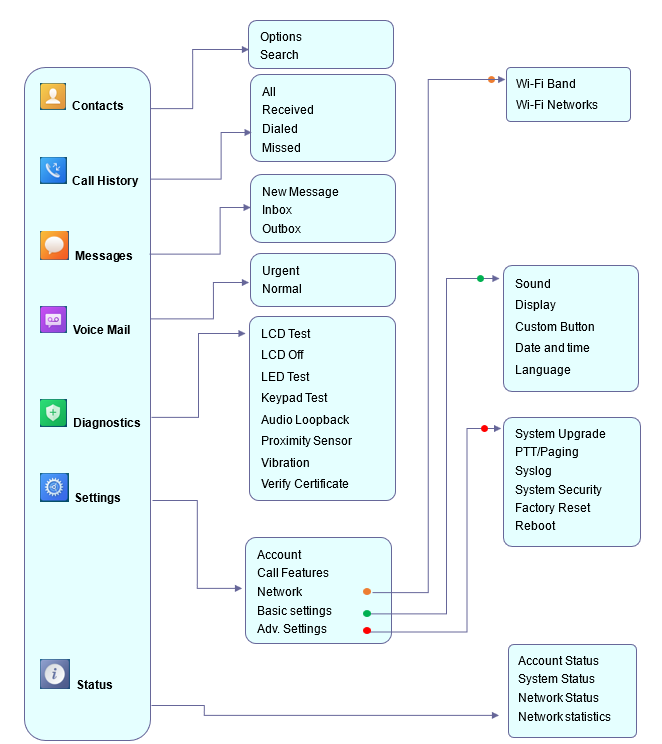
Contacts | Display the list of the registered contacts and also the groups contacts with the ability of searching, adding or editing the entries and also deleting the selected contacts. |
Call History | Display the call history: Missed Calls, Accepted Calls, Outgoing Calls or All Calls. You can add contacts to Shared Contacts directly from call logs. |
SMS | SMS stands for Short Message Service and referred to as a “text message”. With a SMS, you can send a message by pressing “New Message” of up to 160 characters to another device or check the received ones. |
Voice Mail | Select: Play voice mail messages received.
|
Diagnostics |
|
Settings |
|
Status | Displays account status, system info, Network status and network statistics
|
Keypad
The WP810/WP822/WP825 keypad can be used by tapping on an input field. The keypad has 4 modes “Ab3”, “ABC”, “abc” and “123”. Default mode is “Ab3”.

- “Ab3” Mode:
This mode allows to enter capital letters, small letters, digits and symbolic characters.
Following table describes allowed characters for each key.
| Key | Description | Key | Description | Key | Description |
1 | . , ’ ? ! ” – 1 | 2 | A B C a b c 2 | 3 | D E F d e f 3 |
4 | G H I g h i 4 | 5 | J K L j k l 5 | 6 | M N O m n o 6 |
7 | P Q R S p q r s 7 | 8 | T U V t u v 8 | 9 | W X Y Z w x y z 9 |
* | . , ‘ ? ! “ – ( ) @ / : _ ; + % * = < > $ [ ] { } \ ~ ^ # | ` & | 0 | Space | # | Switch mode |
- “ABC” Mode:
This mode allows to enter capital letters, digits and symbolic characters.
Following table describes allowed characters for each key.
| Key | Description | Key | Description | Key | Description |
1 | . , ’ ? ! ” – 1 | 2 | A B C 2 | 3 | D E F 3 |
4 | G H I 4 | 5 | J K L 5 | 6 | M N O 6 |
7 | P Q R S 7 | 8 | T U V 8 | 9 | W X Y Z 9 |
* | . , ‘ ? ! “ – ( ) @ / : _ ; + % * = < > $ [ ] { } \ ~ ^ # | ` & | 0 | Space | # | Switch mode |
- “abc” Mode:
This mode allows to enter small letters, digits and symbolic characters.
Following table describes allowed characters for each key.
| Key | Description | Key | Description | Key | Description |
1 | . , ’ ? ! ” – 1 | 2 | a b c 2 | 3 | d e f 3 |
4 | g h i 4 | 5 | j k l 5 | 6 | m n o 6 |
7 | p q r s 7 | 8 | t u v 8 | 9 | w x y z 9 |
* | . , ‘ ? ! “ – ( ) @ / : _ ; + % * = < > $ [ ] { } \ ~ ^ # | ` & | 0 | Space | # | Switch mode |
- “123” Mode:
This mode allows to enter digits only.
Following table describes allowed characters for each key.
| Key | Description | Key | Description | Key | Description |
1 | 1 | 2 | 2 | 3 | 3 |
4 | 4 | 5 | 5 | 6 | 6 |
7 | 7 | 8 | 8 | 9 | 9 |
* | . | 0 | 0 | # | Switch mode |
Tips using the keypad:
- To switch between the modes, users could press the # key.
- Press multiple times on same key to move forward between the allowed characters.
- Use Right/Left arrow keys to change the cursor’s position on the text entered.
- For languages that support letters with accents, the handset now supports typing letters with accents on modes “AB3”, “abc”, and “ABC”.
WEB GUI ACCESS CONFIGURATION
The WP810/WP822/WP825 can be configured using:
- Web GUI embedded on the handset using PC’s web browser.
- LCD Configuration Menu using the WP810/WP822/WP825 keypad.
Configuration via Web Browser
The WP810/WP822/WP825 embedded Web server responds to HTTP/HTTPS GET/POST requests. Embedded HTML pages allow a user to configure the handset through a Web browser such as Google Chrome, Mozilla Firefox.
Accessing the Web UI
- Connect the computer to the same network as WP810/WP822/WP825.
- Make sure the handset is booted up and powered correctly.
- You may check the IP address on the phone LCD menu Status 🡪 Network Status. Please see Obtain WP810/WP822/WP825 IP Address
- Open Web browser on your computer and enter the WP810/WP822/WP825 IP address in the address bar of the browser.
- Enter the administrator’s username and password to access the Web Configuration Menu.
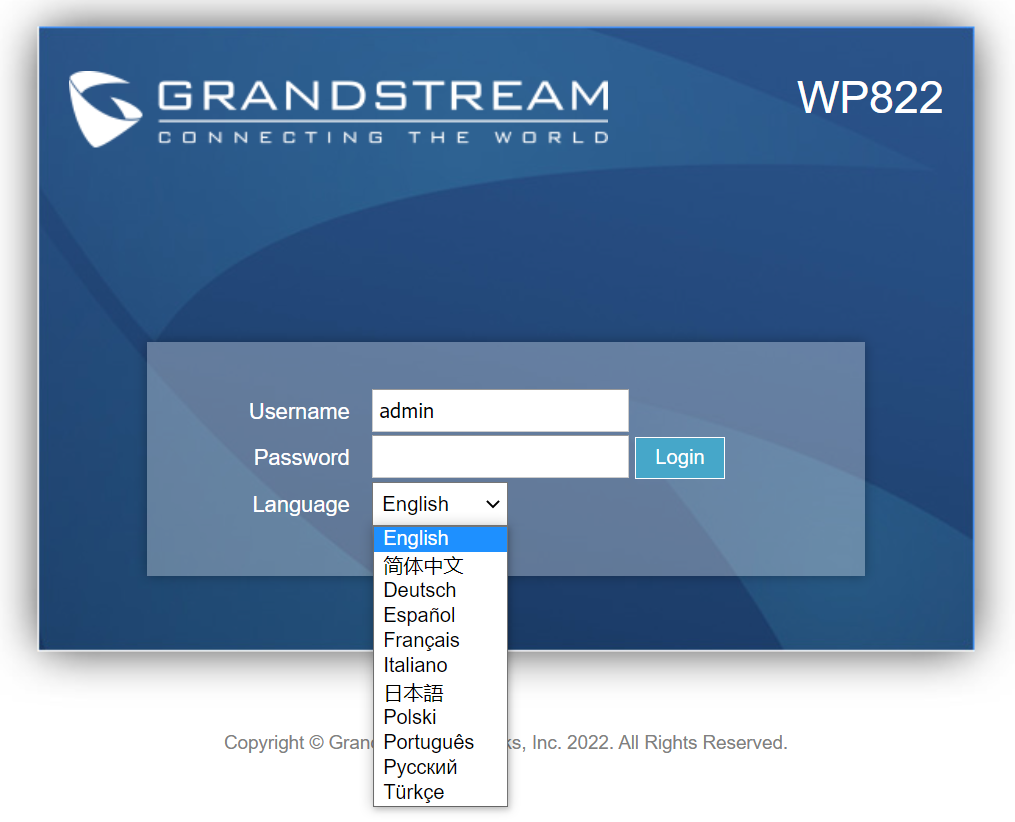
Web GUI Languages
Users can select the language in web GUI login page, or at the upper right of the web GUI after logging in.
Saving the Configuration Changes
When changing any settings, always submit them by pressing Save and Apply buttons. If using the Save button, after making all the changes, click on the Apply button on top of the page to submit.
Web UI Access Level Management
There are two default passwords for the login page:
User Level | User Name | Password | Web Pages Allowed |
End User Level | user | Defined by admin | Only Status, Phone Settings, System Settings, Maintenance and System Application with limited options. |
Administrator Level | admin | Random password generated after entering a numbers combination on the keypad | All pages |
Table 16: Web UI Access Level
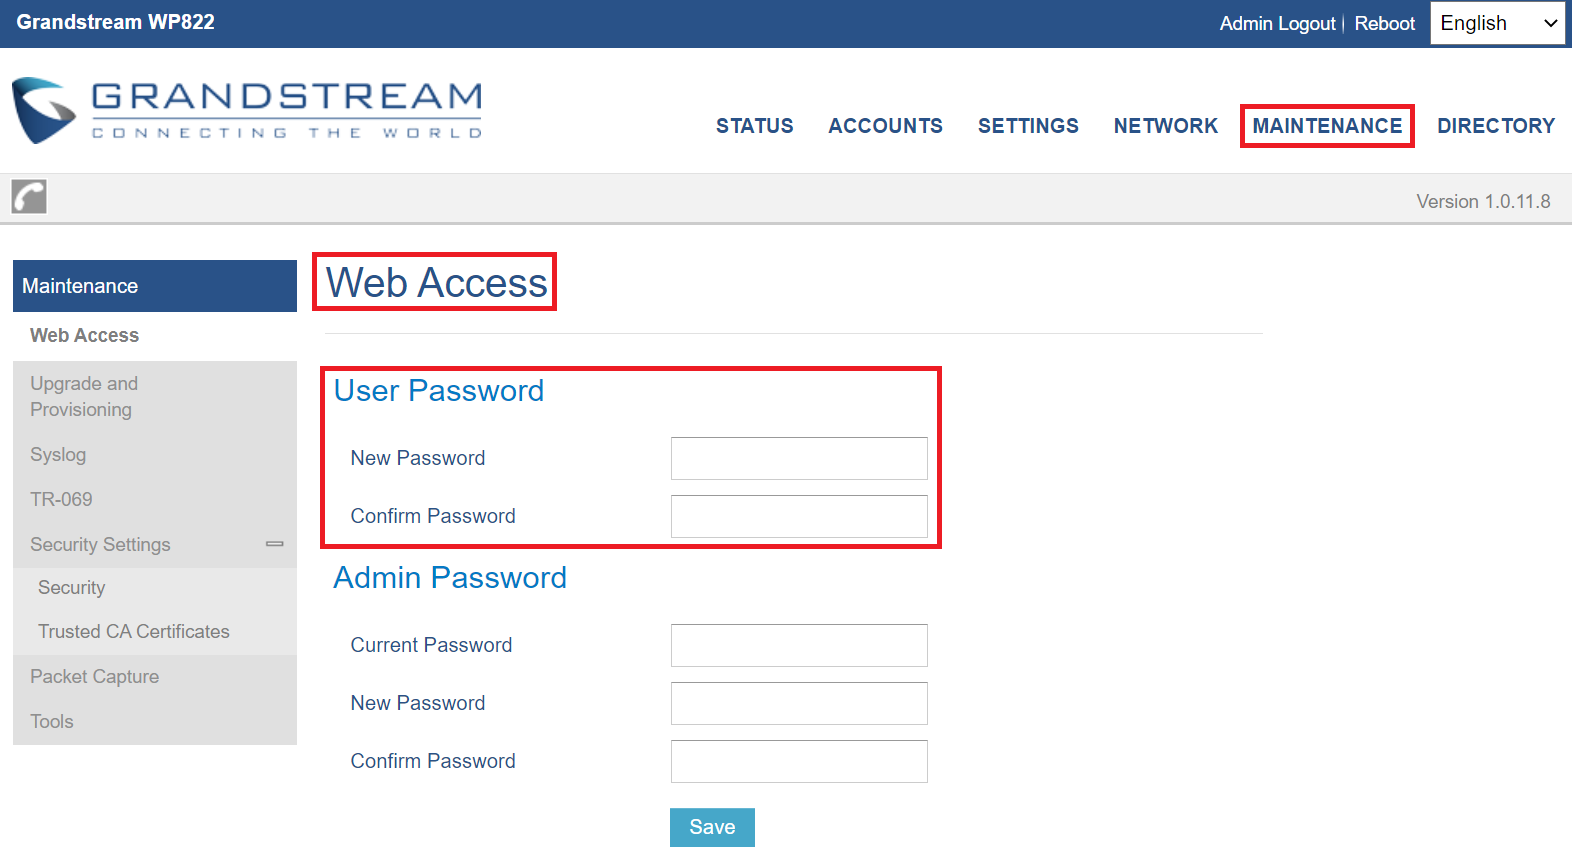
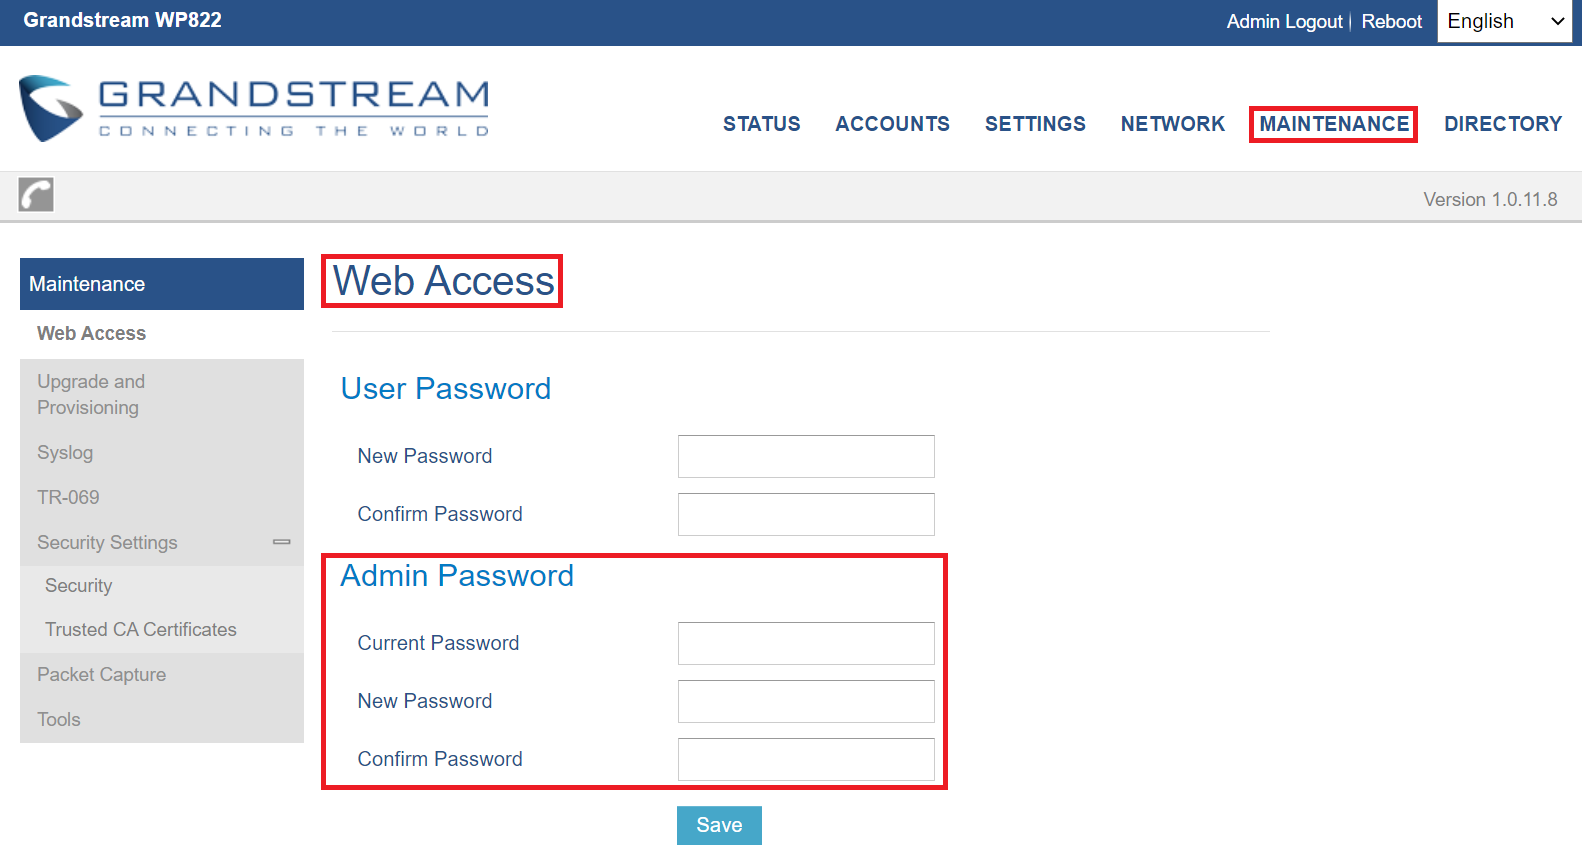
Changing User Level Password
- Access the Web GUI of your phone using the admin’s username and password.
- Press Login to access your settings.
- Go to Maintenance 🡪 Web Access.
- locate User Password section:
- Type in your new user password in New Password field.
- Type in again same entered password in Confirm Password field.
- Press Save button to save your new settings.
Changing Admin Level Password
- Access the Web GUI of your WP810/WP822/WP825 using the admin’s username and password. (Default username and password is admin/Random Password from the sticker on the back of the unit).
- Press Login to access your settings.
- Go to Maintenance 🡪 Web Access.
- locate Admin Password section:
- Type in the admin password in the Current Password field
- Type in your new admin password in New Password field.
- Type in again same entered password in Confirm Password field.
- Press Save button to save your new settings.
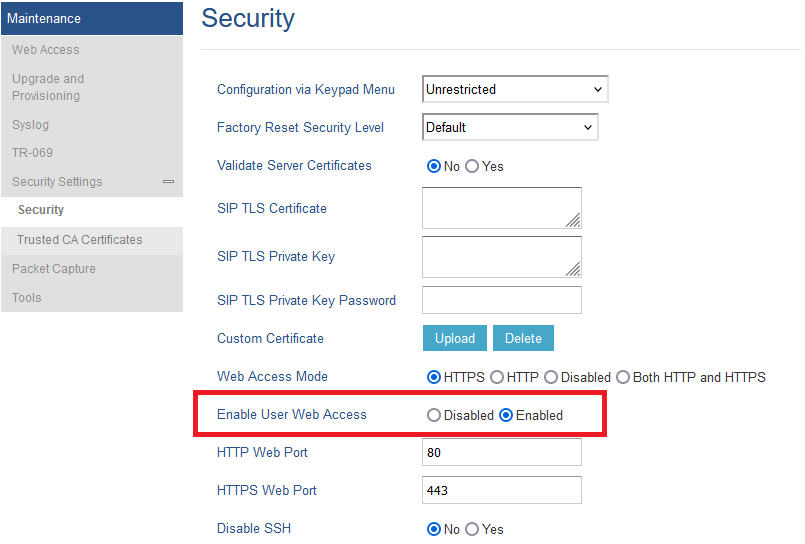
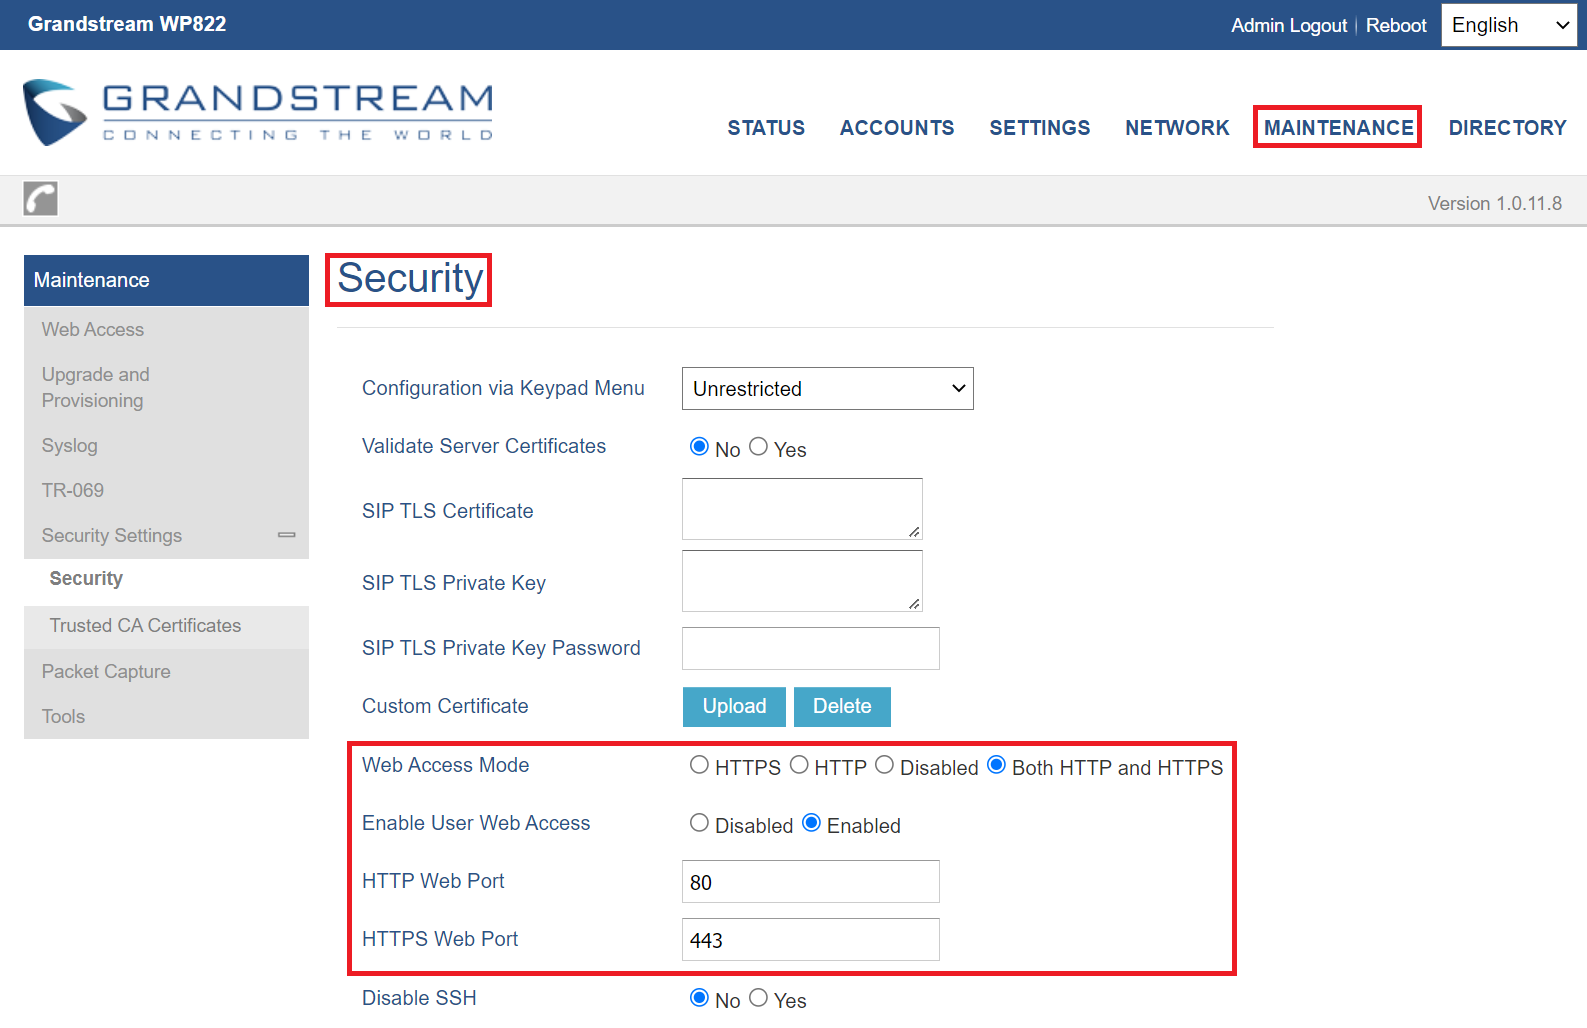
Changing HTTP/HTTPS Web Access Port
- Access the Web GUI of your handset using the admin’s username and password. (Default username and password are admin/Random password from the sticker on the back of the unit.).
- Press Login to access your settings.
- Go to Maintenance 🡪 Security Settings 🡪 Security
- In Web Access Mode, select the access method depending on desired protocol (HTTP or HTTPS or Both)
- Locate HTTP / HTTPS Web Port field and change it to your desired/new HTTP / HTTPS port.
Note: By default, the HTTP port is 80 and HTTPS is 443. - Press Save button to save your new settings.
BASIC OPERATIONS
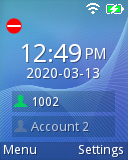
Home Screen
The Home screen comprises three pages that make it easy for the customer to access some settings, parameters or notifications. Please refer to the following screenshots:
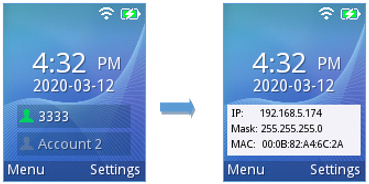
Home Screen Page:
- This page lists the SIP account status, for example on the screenshot above account 3333 is registered.
- Users can press the UP key to display the IP address and MAC information of the handset.
Turning the Handset ON/OFF
To turn ON the handset: Long press on Power key ![]() until the LCD screen lights up.
until the LCD screen lights up.
To turn OFF the handset: Long press on Power key ![]() again when the handset is idle and press the softkey to choose to power off or reboot.
again when the handset is idle and press the softkey to choose to power off or reboot.
Connecting to Wi-Fi Network
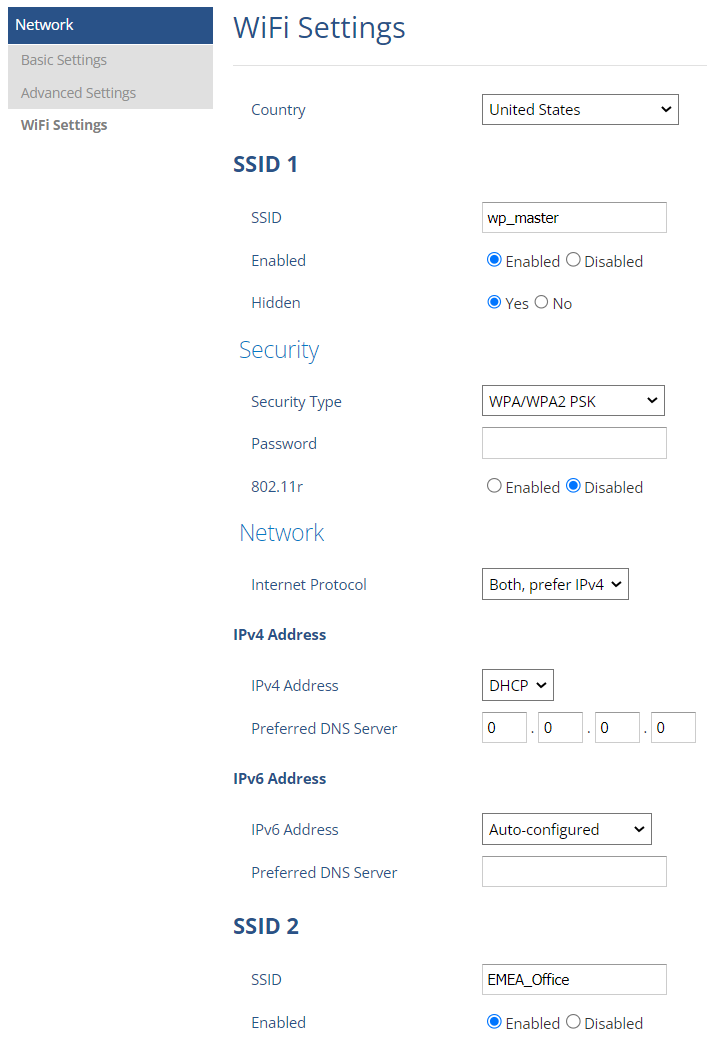
Auto Connection
Go under the web interface of the “Network 🡺 Wi-Fi Settings”.
For example, the user can pre-configure the WP to automatically connect to the Wi-Fi network at the client site, making it easier for the client to use the phone without going through the setting up manually the Wi-Fi network. Also, the client could have the SSID hidden by default, and the handset would still be able to connect to the Wi-Fi network since they have SSID and password information configured. Up to 20 SSIDs are supported.
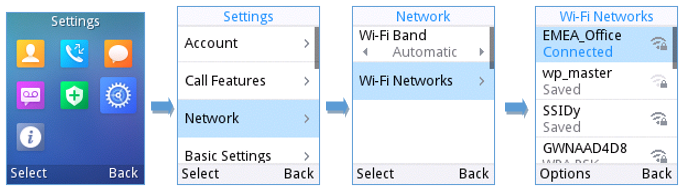
Manual connection
The WP810/WP822/WP825 support dual-band 802.11a/b/g/n/ac Wi-Fi, please refer to the following steps in order to connect to the Wi-Fi networks:
- On LCD menu, press Menu key and navigate to Settings → Network.
- Navigate to “Wi-Fi Networks”. A list of Wi-Fi networks will be displayed.
- Select the desired network to connect to. (Enter the correct password to connect if requested)
The handset will display Wi-Fi icon on the main LCD menu if the connection to the Wi-Fi network is successful.
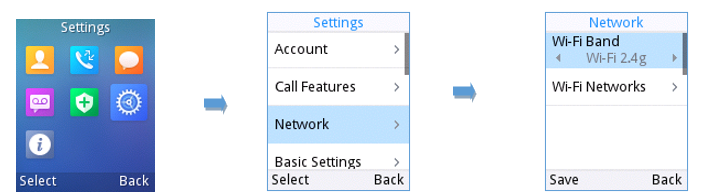
Wi-Fi Band Configuration
If 5GHz and 2.4Ghz are both available, the handset will use 5GHz, but it may switch to 2.4GHz if the signal of 5GHz is poor. Users may also specify the Wi-Fi Band in order to fix it or to keep it Dual Band (Automatic) under Settings 🡪 Network 🡪 Wi-Fi Band.
Checking Status
Account Status
To check the SIP accounts status, follow these steps:
- Press Menu key to bring up operation menu.
- Use arrow keys to Reach Status menu and navigate to Account status.
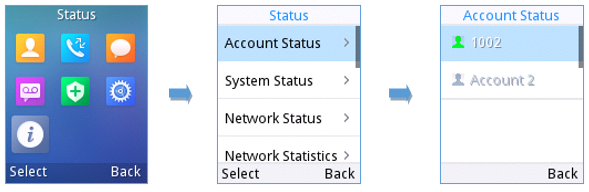
The following information will be displayed:
Item | Description |
| Account 1 | Displays the information about the first account including name, number and the status of its registration. |
Account 2 | Displays the information about the second account including name, number and the status of its registration. |
System Status
To check the system info, follow these steps:
- Press Menu key to bring up operation menu
- Use arrow keys to reach Status menu and navigate to System Status section.
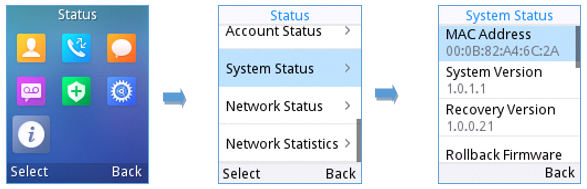
The following information will be displayed:
Setting | Description |
MAC Address | Displays the MAC Address of the phone. |
System Version | Displays the current firmware version installed. |
Recovery Version | Displays the recovery version installed. |
Rollback Firmware | Click to roll back the firmware to the “Recovery Version” firmware. |
U-boot Version | Displays the u-boot version installed. |
Kernel Version | Displays the kernel version installed. |
Hardware Version | Displays the hardware version installed. |
PN Number | Displays the Part Number. |
Country code | Displays the country code. |
Running Time | Displays the time during which the handset is powered on and working. |
Network Status
To check the handset network information status, follow these steps:
- Press Menu key to bring up operation menu.
- Use arrow keys to reach Status menu and navigate to Network Status.

Setting | Description |
IPv4 Info | |
IPv4 Address Type | Displays the IPv4 address type. |
IPv4 Address | Displays the IPv4 address. |
Subnet mask | Displays the subnet mask address. |
Default router | Displays the IPv4 address of the router. |
Primary DNS | Displays the IPv4 address of the primary DNS Server. |
Alternate DNS | Displays the IPv4 address of the secondary DNS Server. |
IPv6 Info | |
IPv6 Address Type | Displays the IPv6 address type. |
IPv6 Address 1 | Displays the IPv6 address. |
Primary DNS | Displays the IPv6 address of the primary DNS Server. |
Alternate DNS | Displays the IPv6 address of the secondary DNS Server. |
Other Info | |
MAC address | Displays the handset’s MAC address. |
Network Statistics
To check the handset network information status, follow these steps:
- Press Menu key to bring up operation menu.
- Use arrow keys to reach Status menu and navigate to Network Statistics.

The following information will be displayed:
Setting | Description |
Network SSID | Displays the SSID Name on which the handset is connected. |
BSSID | Displays the MAC address of the Access Point on which the handset is connected. |
IPv4 Address | Displays the IP address of the handset. |
IPv6 Address 1 | Displays the IPv6 address. |
Signal strength | Displays the Wi-Fi signal strength. |
Connections Speed | Displays the link speed (Mbps) |
Channel | Displays the channel used. |
Frequency | Displays the channel frequency. |
Other Information | Tx/Rx Packets, Tx/Rx Error Packets, Tx/Rx Error Rate, Tx/Rx Drop Packets and Tx/Rx Drop Rate. |
Network Monitor
To view the network monitor parameters, follow these steps:
- Press Menu key to bring up operation menu.
- Use arrow keys to reach Status menu and navigate to Network Monitor.
The following information will be displayed:
RSSI | RSSI (Received Signal Strength Indicator) measures the strength of the wireless signal, helping in signal quality assessment and troubleshooting connectivity issues. |
Noise Level | Noise Level measures
background interference, impacting signal quality and network
performance. Lower noise levels are preferable for a more stable
connection. |
MAC Address | Displays the MAC Address of the unit. |
Network monitor table
Configuring the LCD Brightness and Screen Timeout
- Press Menu to bring up operation menu.
- Use arrow keys to reach Settings.
- Navigate to Basic Settings, and then select Display.
- Configures the LCD brightness, key backlight, lock screen, screen time out and the font size.
- Press “Back” (right softkey) to save and apply the new settings.

Return to Idle Screen
Press the Power Key ![]() to quickly exit the menu and return back to the main idle screen.
to quickly exit the menu and return back to the main idle screen.
When you are navigating on the handset’s menu, and you receive an incoming call, the LCD screen will automatically exit the menu and you can either accept or reject the call, when the call is terminated, the LCD screen will return back to the idle screen.
Register a SIP Account
The WP810/WP822/WP825 supports up to 2 SIP accounts and they can be configured either using the web GUI or via the keypad menu as described on the following section.
Register Account via Web User Interface
- Access your handset base station web UI by entering its IP address in your favorite browser.
- Enter your admin’s username and password (default username and password: admin/ Random Password from the sticker on the back of the unit).
- Press Login to access your settings.
- Go to Account tab and select the account to configure.
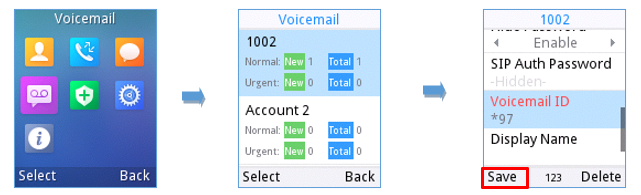
- In General Settings, set the following:
- Account Active to Yes.
- Account Name: Any name to identify this specific user.
- SIP Server field with your SIP server IP address or FQDN.
- Secondary SIP Server with your secondary SIP server IP address or FQDN. Leave empty if not available.
- SIP User ID: User account information, provided by VoIP service provider (ITSP). Usually in the form of digit similar to phone number or actually a phone number.
- Authenticate ID: SIP service subscriber authenticate ID used for authentication. Can be identical to or different from SIP User ID.
- Authenticate Password: SIP service subscriber’s account password to register to SIP server of ITSP. For security reasons, the password field will be shown as empty.
- Outbound Proxy with your outbound proxy IP address or FQDN. Leave empty if not available.
- Press Save and Apply to save your configuration.
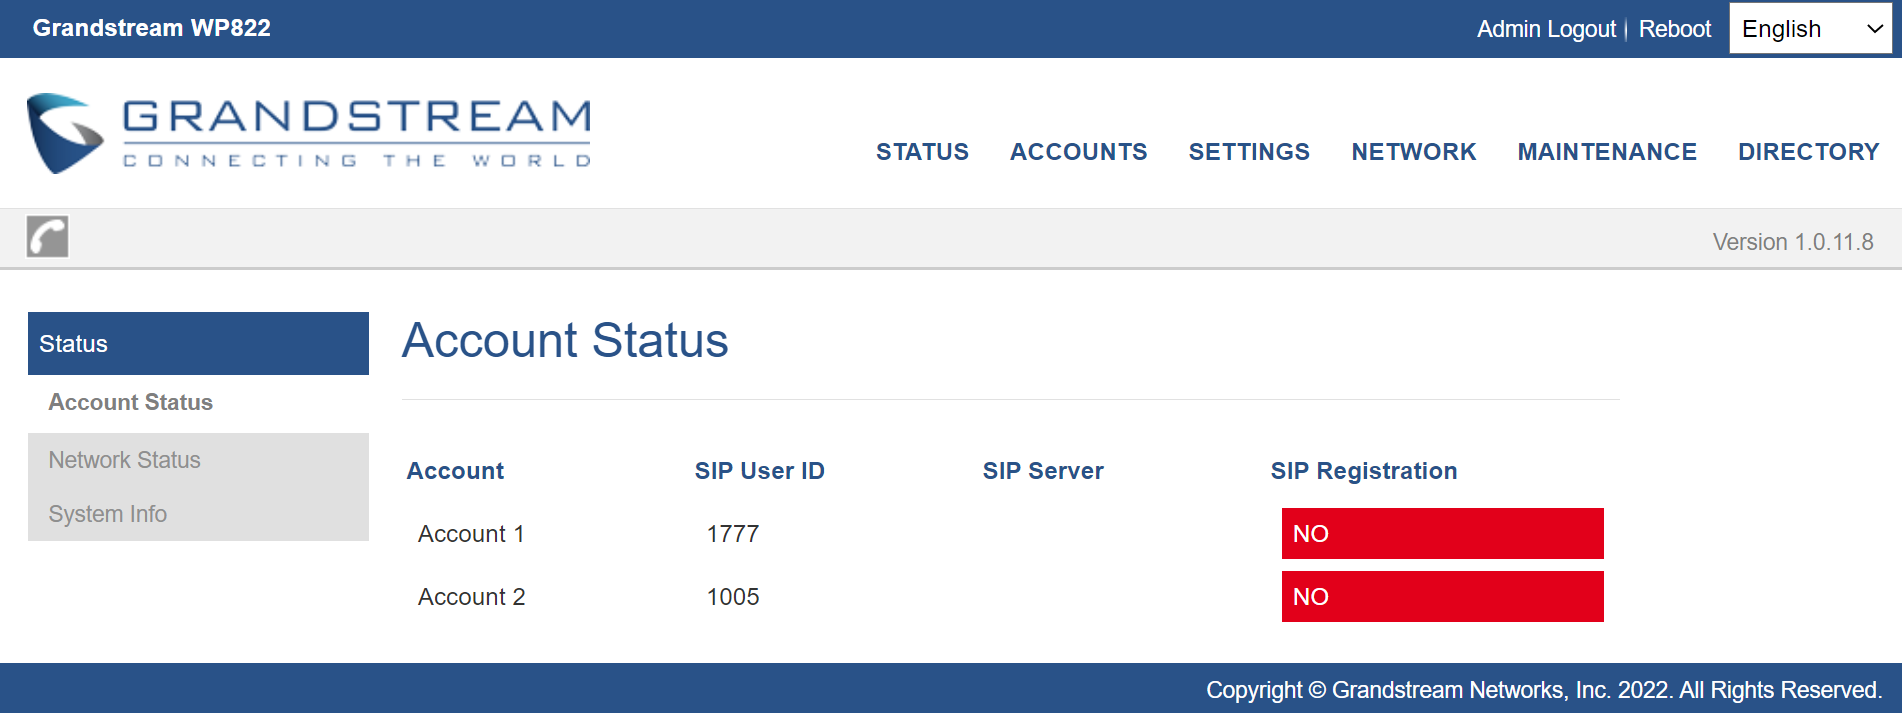
After applying your configuration, your phone will register to your SIP Server. You can verify if your device has registered with your SIP server from its web interface under Status 🡪 Account Status (“Registered” with green color when the account is correctly registered, or “Unregistered” with red when the account is not properly registered)
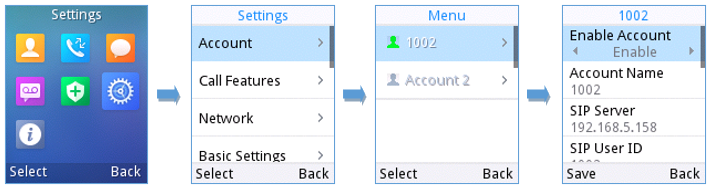
Register Account via LCD Menu
To register your SIP account via the LCD menu, please refer to following steps:
- Unlock your handset and press Menu to bring up operation menu.
- Use arrow keys to reach Settings and then select Account tab.
- Select which account you want configure and then set the following:
- Enable Account to “Enable”.
- Account Name: Any name to identify this specific user.
- SIP Server field with your SIP server IP address or FQDN.
- SIP User ID: User account information, provided by VoIP service provider (ITSP). Usually in the form of digit similar to phone number or actually a phone number.
- SIP Authenticate ID: SIP service subscriber authenticate ID used for authentication. Can be identical to or different from SIP User ID.
- SIP Authentication Password: SIP service subscriber’s account password to register to SIP server of ITSP. For security reasons, the password field will be shown as empty.
- Voicemail Access Number: The voicemail number of your account.
- Display Name: The name that will be used for caller ID name in SIP INVITE.
- Account Ringtone: Choose the preferred ringtone for this account.
- Press “save” softkey to apply the configuration
PHONE SETTINGS
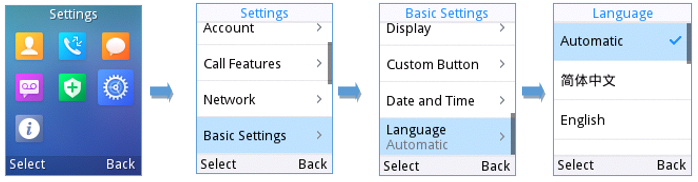
Selecting Phone Language
The WP810/WP822/WP825 support different languages. The default language of the handset is English. To change the language of the handset, please proceed as follows:
- Press Menu to bring up operation menu.
- Use arrow keys to reach Settings.
- Navigate to Basic Settings, and then select Language.
- Choose the desired language from the available list and press “Select” and then the phone will apply the selected language.
Activate/Deactivate Hands-Free Mode
- Press the Hands-free key
 while making a call or on the idle screen to activate hands free mode.
 - Press the Hands-free key again to deactivate the hands-free function.
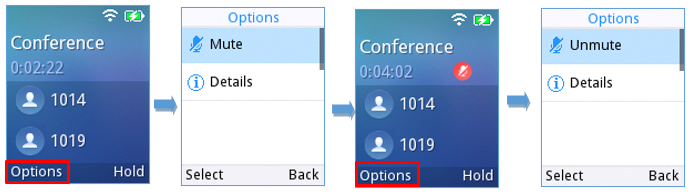
Muting the Microphone
- Press the button “Options” (Left softkey) during an established call and a list of the options will be displayed.
- Choose” Mute” and press “Select” button (left softkey / OK button) to switch on the microphone.
Notes:
- While muted, the icon
 will be displayed on the screen.
 - To unmute the microphone during an established call, press the button “Options” (Left softkey), choose “Unmute” and press “Select” button (left softkey or OK button) to switch off the microphone.

Adjusting Speaker and Earpiece Volume
Press volume up and down keys on the left side of your phone while you are on an established call to set the volume of the earphone / speaker. You can choose between 8 different levels. The default level is 4.
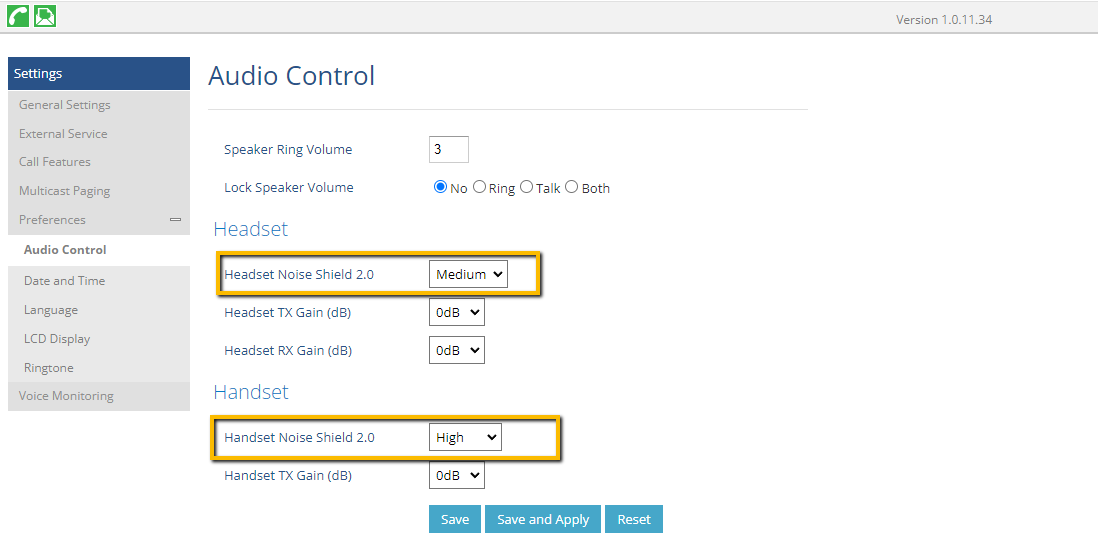
Audio Control
This new feature could let user configures Headset Noise Shield 2.0. When enabling the Noise Shield
feature, it creates a virtual “noise shield” which blocks the sounds outside. When the value is set to “high” power, the shield is created closer to the user which filters more noise. When the value is set to “low” power, the shield is created further from the user which filters less noise. Users can find the configuration in Web UI ->Settings-> General Settings > Preferences> Audio Control.
In addition to that, some other parameters can be configured such as the Headset transmission and receiving gain, as well as the Speaker ring volume and the lock speaker volume.
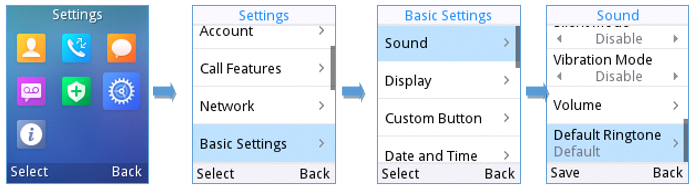
Ringtones
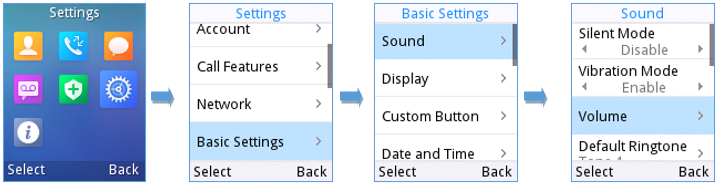
Setting the Ringer Volume
To configure the desired ringer volume, proceed as follows:
- Press Menu to bring up operation menu and go to Settings.
- Navigate to Basic Settings, and then select Sound tab.
- User can configure the silent and vibrate modes and also the voice ringtones by pressing the left and right arrow keys to change repeatedly and set the desired volume.
- Press “Back” (right softkey) to confirm the new configuration settings.
Notes:
- 8 levels are supported. Level 8 is the highest level. Level 5 is the default.
-
 appears when silent mode is enabled. In this mode no ring will be played for incoming calls.
Setting the Ringtones
You can change the ringer melody for an incoming call. The device has different ringer melodies and in order to configure the desired melody, proceed as follows:
- Press Menu to bring up operation menu.
- Use arrow keys to reach Settings 🡪 Basic Settings, and then select Sound tab.
- Go to “Default Ringtone”, and choose the desired ringtones, press “Save” to confirm the ringtones selected and the new ringtones will be set successfully.
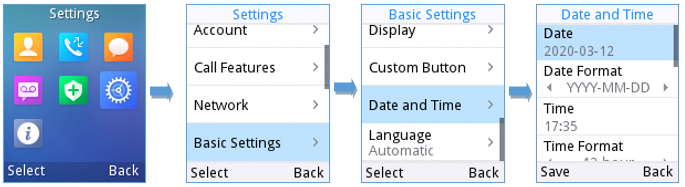
Date and Time
On the WP810/WP822/WP825 the Date and time are displayed on the idle screen and it obtains the date and time from the Simple Network Time Protocol (SNTP) server by default. If your phone cannot obtain the date and time from the SNTP server, you need to configure the date and time manually. You can configure the time format and date format respectively. The handset supports two formats for time (12 Hour or 24 Hour) and three date formats (DD/MM/YYYY; MM/DD/YYYY; YYYY/MM/DD).
To configure date and time manually
- Press Menu to bring up operation menu.
- Use arrow keys to reach Settings 🡪 Basic Settings, and then select Date and Time tab.
- Press “Back” softkey to apply your changes.
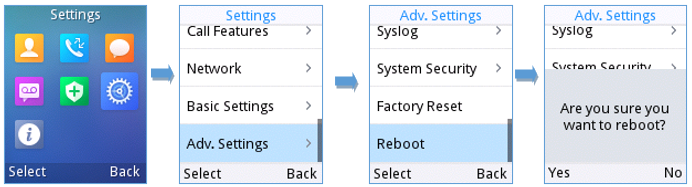
Reboot
To reboot the handset, please refer to following steps:
- Access the handset menu 🡪 Settings 🡪 Advanced Settings 🡪 Reboot.
- A confirmation LCD message will be displayed to confirm the reboot, press “Reboot” button to reboot the phone or “Cancel” to cancel the reboot.
CALL OPERATIONS
Placing calls
To place calls, you can use the following mode:
- Earpiece mode: pressing the off-hook / dial key to dial out.
- Speakerphone mode: pressing the speakerphone key to dial out.
- Headset mode: pressing the off-hook / dial key to dial out using connected headset.
During the call, you can switch the call mode by pressing the corresponding keys or connecting a headset.
Make a Call using a Line
Making calls require the use of SIP lines. So, you should first register the SIP account to the handset beforehand, after registering the sip lines, you can choose between them while trying to make calls by pressing the “Accounts” button displayed on the call screen. Please refer to the following methods to make calls using a line:
- Enter the desired number using the keypad.
- Toggle between the available lines by pressing the “Account” button to choose the line for making calls. (The account name will change on the screen when press “Account” button).
-
Press Dial key
 , left softkey “Call”, # (Use # as dial key” must be configured in web configuration) to initiate the call or wait for 4 seconds and the call will be initiated automatically.
 , left softkey “Call”, # (Use # as dial key” must be configured in web configuration) to initiate the call or wait for 4 seconds and the call will be initiated automatically.
Note: Users can also initiate calls with handsfree mode using Speaker key
 .
.
-
To terminate the call, press Hang-Up key
 .
.
 .
.
Notes:
- To dial from contacts list, choose a contact using navigation keys and press Dial key .
- When having un-read voicemails on the handset, once accessing the dialing interface a stutter tone will be heard to notify users about voicemails that need to be read.
- The maximum length of dialed digits is limited to 30 characters.
 .
. Dialing from Call history
Users may use their call history entries to initiate calls. Please refer to following steps:
- Press Menu to bring up operation menu.
- Use arrow keys to reach Call History.
- Select the desired entry and press Dial key to establish the call.
Dialing from Phonebook
Users may use their contacts list to initiate calls.
- Press Menu to bring up operation menu and use arrow keys to reach Contacts or press Contacts key
 to access directly the contacts list.
 - Select the contact to call and press Dial Key to initiate the call.
 to access directly the contacts list.
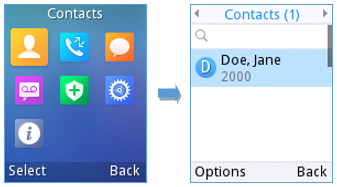
Direct IP Call
Direct IP Call allows two phones to talk to each other in an ad-hoc fashion without a SIP proxy. VoIP calls
can be made between two phones if:
- Both phones have public IP addresses; or
- Both phones are on the same LAN/VPN using private or public IP addresses; or
- Both phones can be connected through a router using public or private IP addresses (with necessary port forwarding or DMZ).
To make a direct IP call, dial *47 followed by the IP address of the target. Following the below syntax (Example target IP is 192.168.1.10):
– Dialing *47192*168*1*10 (to use 5060 port by default)
– Users can specify the port number as follows *47192*168*1*10#5062.
Answering Calls
When receiving an incoming call, you can answer the call using following steps:
- Earpiece mode:
Press Dial Key to pick up the call, or “Accept” softkey (left softkey).
- Speakerphone mode:
Press Speaker Key to pick up the call.
- Headset mode:
Press Dial Key to pick up the call, or “Accept” softkey (left softkey) using a connected headset.
Note:
To answer an incoming call during an established call, press Dial Key, or the Speaker Key, or the “Answer” softkey. The incoming call is answered, and the original call is placed on hold.
Auto Answer
Users can enable Auto Answer feature to accept and automatically answer incoming calls.
If enabled, the WP810/WP822/WP825 will automatically answer incoming calls using speaker mode.
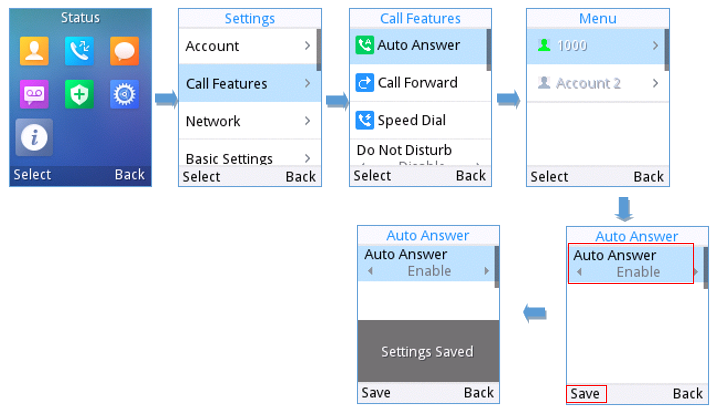
To activate / deactivate the auto answer feature:
- Using LCD Menu
- Press Menu to bring up operation menu.
- Use arrow keys to reach Settings 🡪 Call Features 🡪 Auto answer.
- Select which account will be enabling the Auto answer feature.
- Set “Auto–Answer” to “Enabled” and configure the auto-answer mode and press “Save” button.
- Using Web Interface
- Access Web GUI Interface.
- Navigate to Account 🡪 Call Settings.
- Set “Auto Answer” to “Yes”. (By default, set to “No”).
Ending Calls
To terminate the calls, press Hang-Up key  .
.
Rejecting Calls
To reject an incoming call, press Hang-Up key
 .
.
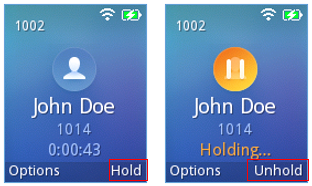
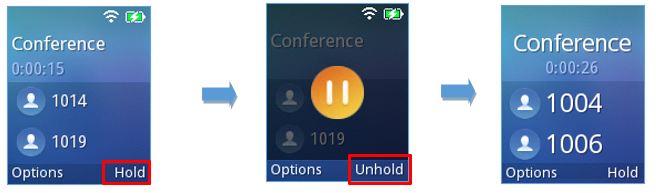
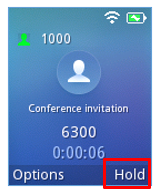
Call Hold/Resume
- During active call, press the right softkey “Hold” to put the established call on hold.
- To resume the call, press the right softkey “Unhold” while the established call is being on hold.
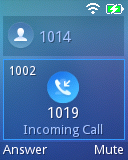
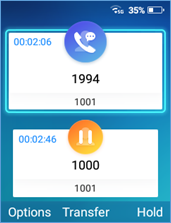
Call Waiting
This feature will notify you of a new incoming call during an established call and display the incoming call information visually on the LCD screen and a call waiting tone will be heard. If this feature is disabled, the new incoming call will be automatically rejected.
This feature is enabled from the Web GUI:
- Access Web Interface.
- Go to Settings 🡪 Call Features
- Set “Disable Call Waiting” and “Disable Call Waiting Tone” to “No”. (Default is No).
- Press Save and Apply buttons to confirm the new settings.
Users now will be able to hear the call waiting tone and it will be visible as well on the LCD screen as displayed on the following screenshot.
Do Not Disturb
You can activate or deactivate the DND mode for your accounts registered on the handset from its LCD menu. If DND mode is activated, all incoming calls will receive busy treatment depending on your configuration (forward to voice mail, busy tone…).
To enable or disable the DND mode, Access LCD Menu 🡪 Settings 🡪 Call Features🡪 Do not disturb and set Do not disturb to Enabled.
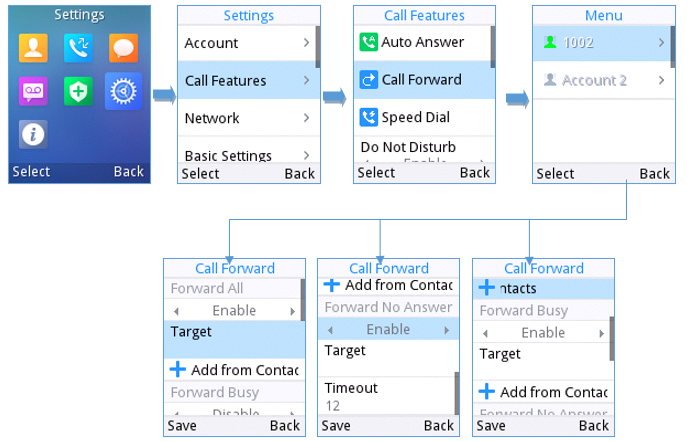
Call Forward
The call forward feature will allow you to forward all the incoming calls to the desired number. Three possible call forward types are available.
- Unconditional: All the incoming calls are immediately forwarded to the desired number.
- Time Based: Incoming calls are immediately forwarded to the desired number based on the configured time.
- Others: Incoming calls are forwarded to the desired number when Busy, when DND is enabled or when there is no response.
To enable the call forward, please refer to the following steps:
- Press Menu to bring up operation menu.
- Use arrow keys to reach Settings 🡪 Call Settings 🡪 Call forward.
- Select which account will be enabling the call forwarding feature and navigate to “Call forwarding”.
- Set “Call Forward” to “On” and select the call forwarding mode.
- Configure the parameters of the call forward mode and press “Save” button.
- Unconditional: All the incoming calls will be forwarded to the number set up in “All To” field.
- Time Based: All the incoming calls will be forwarded to the number as schedule in the time period. During the setup time, the call will be forwarded to the number in “In Time Forward To:” field. Other period the call will be forwarded to the number in “Out Time Forward To:” field.
- Others: The incoming call will be forwarded when the handset is busy or no answer after certain interval “Delayed Call Forward Wait Time (s)” or if the phone is set to DND mode.
Call Transfer
The WP810/WP822/WP825 support the call transfer feature, you can transfer a call to another party using one of the following ways:
- Blind transfer: Transfer a call directly to another party without consulting
- Attended transfer: Transfer a call with prior consulting.
Blind Transfer
- Press “Transfer” softkey during a call, and then enter the number you want to transfer the call to.
- Select Blind transfer by pressing on Blind key.
- The call is connected to the number you specified, and the LCD screen prompts Call Transferred.

Attended Transfer
- WP810
Using New Call softkey
- During an established call, press Options > New call.
- Choose the line and enter the number you want to transfer the call to, then press
 (Dial Key).
* The initial call will be put on hold - Once the second call is established, press Options > Transfer
- Select the initial call on hold, and press Transfer to complete the transfer.
 (Dial Key).
Using Attended Transfer softkey
- During an established call, press Options > Attended Transfer.
- Choose the line and enter the number you want to transfer the call to, then press the “Attended” key.* The initial call will be put on hold
- Once the second call is established, Press the “Transfer” key to complete the transfer.
- WP825/WP822
- Press “Transfer” softkey during a call, and then enter the number you want to transfer the call to.
- Select Attended transfer by pressing on Attended key.
- After transfer target answers the call, the following screen will be shown up. If the transferor taps on Confirm, the call wil be transferred, and the WP825/WP822 will hang up the call
- If the user taps on “Split” soft key to separate the calls, the user will talk to the second established call while the first call is on hold.
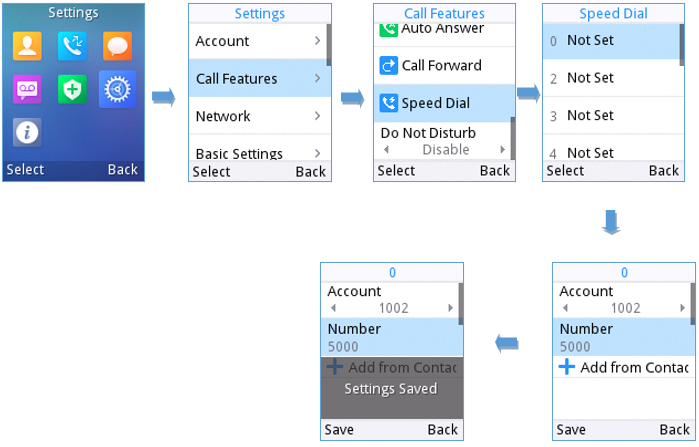
Speed Dial
Speed dial allows users to perform single-digit dialing to predefined numbers. This feature is particularly useful to speed up dialing frequently used or hard-to-remember numbers. A maximum of 10 speed dial numbers is allowed. For example, the digit key 2 is configured as a speed dial key and assigned the number 4000, the phone will dial out the number 4000 directly when you long press digit key 2.
To configure the speed dial (create, edit or delete) numbers, proceed as the following steps:
- Press Menu to bring up operation menu and use arrow keys to reach Settings 🡪 Call Features 🡪 Speed dial.
- Select the speed dial key to be configured and press “Select” softkey.
- Select the associated account and the number to be dialed.
- Press “Save” softkey to save the configured speed dial numbers.
Off-hook Auto Dial
This new feature could let the user configures the digits to be dialed via the first account when the phone is off-hook and defines the timeout (in seconds) for the off-hook auto dial.
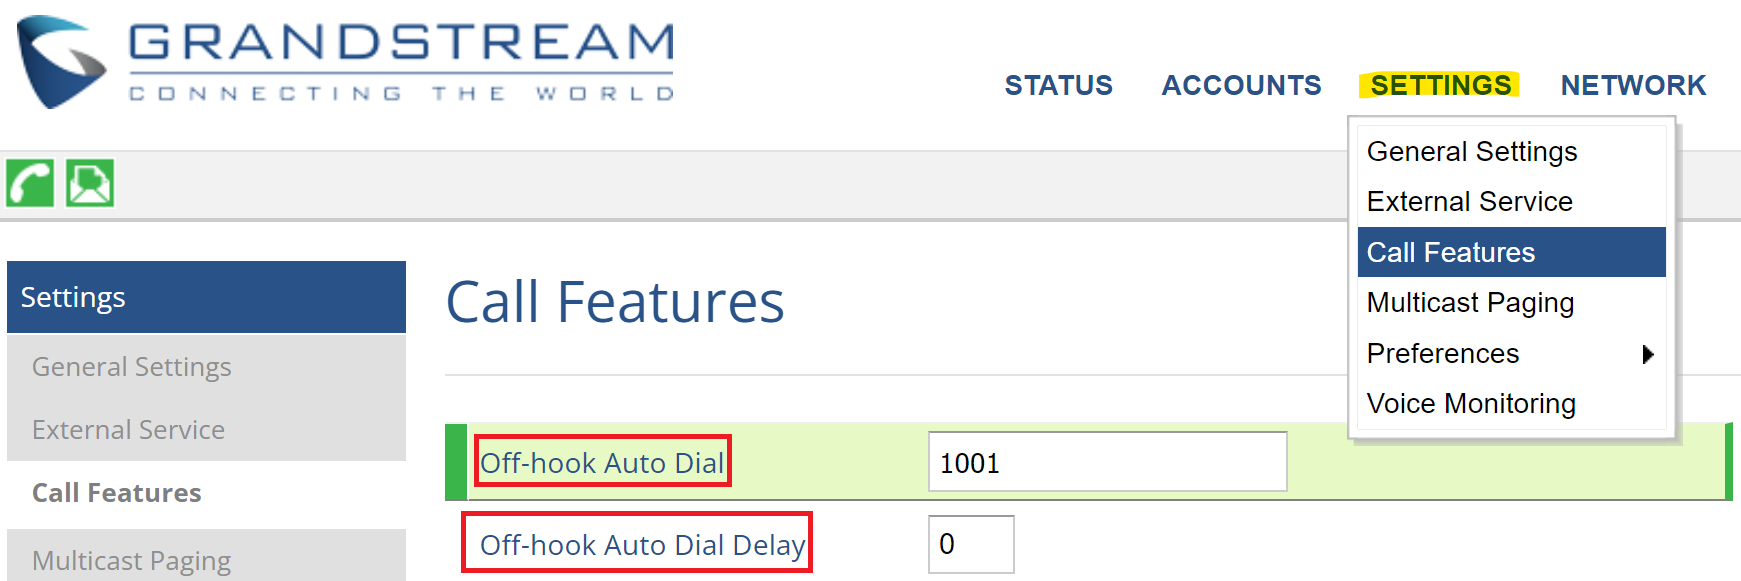
Off-hook Auto Dial Delay defines the timeout (in seconds) for off-hook auto dial. Valid range is 0-30. If set to 0, it will be dialed out immediately; If set to other values, it will be dialed out after the delay. Users can find the configuration in Web UI ->Settings-> Call Features.
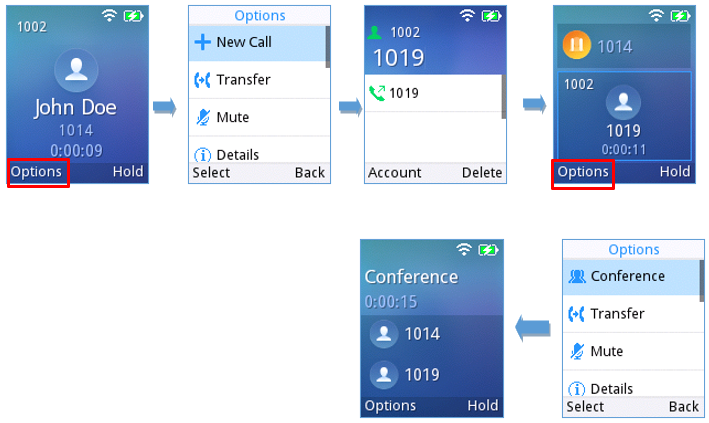
3-Way Conference
The WP810/WP822/WP825 support creating a local conference with other parties (including handset starting the conference). To start a 3 Way conference, follow below steps:
- Place a call to the first party and press left softkey “Options”, then select “Conference”.
- Enter the number of the second party you want to add to the conference and press Join Conf.
- The conference will automatically be bridged before the third party answers the call.
Please refer to the following screenshots for more details.
UCM Conference
Participate in UCM Conference Room
Users could dial the UCM conference room extension to join the conference. If password is required, enter the password to join the conference as a normal user, or enter the admin password to join the conference as administrator.
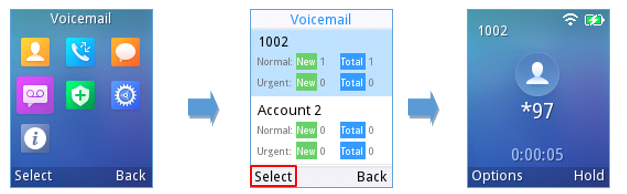
Voice Mail
The voice mail feature ensures that you will never miss any important messages. It permits either to leave voice mails to someone else or receive and listen to voice mails via the handset
Set Voice Mail ID
There are 2 ways to set Voice Mail Feature Code, either using the Handset Menu or Web Interface.
Note: The Voice Mail Feature Code depends on the service provider or IP-PBX used. For example, if UCM6xxx as SIP server, the Voice Mail Feature Code is *97.
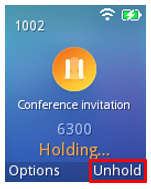
- Using LCD Menu
- Press Menu to bring up operation menu.
- Use arrow keys to reach VoiceMail tab.
- Select the desired account and configure the Voicemail ID number, then press “Save” softkey.
- Using Web Interface
- Access Web GUI Interface.
- Go to Accounts 🡪 Account x 🡪 General Settings
- Configure Voice Mail Access Number.
Play Voice Mail Messages
- Press Menu to bring up operation menu.
- Use arrow keys to reach Voicemail tab.
- Choose the account, press “Select” button and enter Voicemail password then you can select visually and retrieve your voice messages saved on your voice mail and listen to each individual voicemail.
Note: this feature is compatible with UCM6xxx on v.1.0.20.6 or higher.
CONTACTS
Users can manage local contacts by adding, deleting and modifying every single contact. Users could access contacts under the handset Menu. Please, refer to the following screenshots:
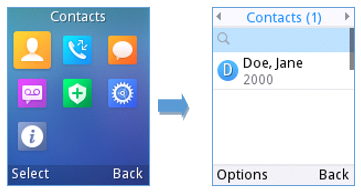
The following operations can be done under local contacts screen:
- New contact: Under “Option”, users can select “New Contact” in order to manually add the contacts information and details. Please, see the following screenshots and table:
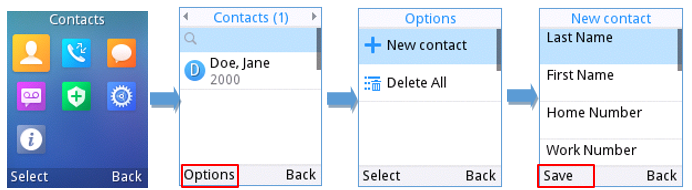
Last Name | Enter the contact’s last name. |
First Name | Enter the contact’s first name |
Work Number | Enter the contact’s work phone number. |
Home Number | Enter the contact’s home phone number. |
Mobile Number | Enter the contact’s mobile phone number. |
Groups | Choose the group you want to include your contact into. |
Ringtone | Choose a specific ringtone for the account’s received calls. |
Account | Choose the default account you want to dial with this contact. |
Primary | Select which number is the primary choice. |
- Search for a contact: in case finding a specific contact among a batch of contacts is difficult, users can press the middle button for “Search” and enter the name of the contact to find it easily.
- Send Message: Select a contact to send IM message, up to 160 characters.
- Dial out from Contacts: Select the needed contact and tap on the dial key
to call it directly. The phone will use the configured account on contact’s information to dial out with.
- Delete: Users can delete a specific contact by tapping on “Delete contact”.
- Delete All: Users can delete the whole list of local contacts by tapping on “Clear all contacts”.
 to call it directly. The phone will use the configured account on contact’s information to dial out with.
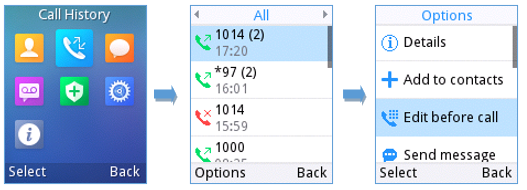
CALL HISTORY
Call history provides users access to phone’s call logs in different categories and help users to make some operations directly. Call history can be accessed under menu as shown on the following figure:
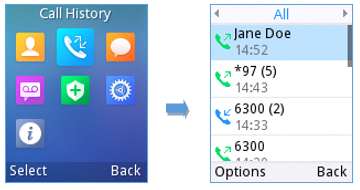
There are four different categories in the call history. Users could use the phone’s right and left arrows to view the following categories: All Calls, Missed Calls, Dialed Calls, Received Calls.
Dial Out from Call History
Select one of the call history log and tap on the dial key
 to call this number directly. The phone will use the same account as the call log to dial out.
Call History Options
- Add to contacts: Users can tap on this option to add the number listed on the selected call history entry to local contacts.
- Edit before dialing: Users could copy the number to the dial screen in order to edit it before dialing.
- Delete: Users could delete the selected call history log by tapping on “Delete”.
- Delete all: This option helps users to clear all the call history.
MESSAGES
The WP810/WP822/WP825 has built-in SMS application to send/receive message, if the SIP server supports SMS message. Users can create, edit draft and delete one or all the messages. Tap  on phone’s menu to launch SMS application.
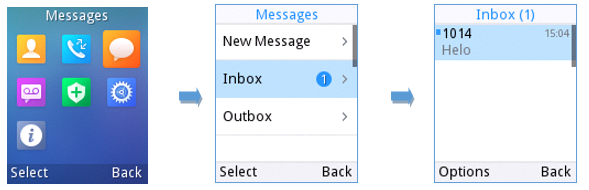
View Messages
On the Messages list screen, under Inbox tap on one of the messages using the OK button to view the Messages details.
Create Messages
Tap on “New” in Messages application to start composing a new message.
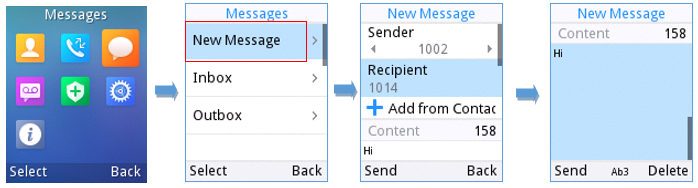
- Select the account to send the message from by tapping on “Account”.
- Add number to send the message to in Recipient section. (Note: Users could click on “Add” to add existing contacts to Recipient list.
- Input content: Enter the message content on the next field of the screen. Tap on “Send” once finished, a “Sending” message will prompt and the message is confirmed as sent once the “Sending” message prompt disappears.
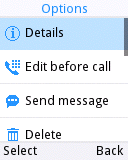
Delete Messages
- On the messages list, tap on “Options” to show more options.
- Tap on “Delete message” to delete the selected message, or on “Delete all” to delete all the messages/drafts.
CALL FEATURES
The WP810/WP822/WP825 support traditional and advanced telephony features including call forward and etc.
Unconditional Call Forward. To set up unconditional call forward:
| |
*73 | Cancel Unconditional Call Forward. To cancel the unconditional call forward:
|
*74 | Paging Call. To establish a paging call:
|
*90 | Busy Call Forward. To set up busy call forward:
|
*91 | Cancel Busy Call Forward. To cancel the busy call forward:
|
*92 | No Answer Call Forward. To set up delayed call forward:
|
*93 | Cancel No Answer Call Forward. To cancel the delayed call forward:
|
PTT (PUSH-TO-TALK) FUNCTIONALITY
The WP810/WP822/WP825 support the Push to talk (PTT) features which is a technology based on the instantaneous communication commonly employed in wireless cellular phone services using a button to switch the device from voice transmission mode to voice reception mode. This feature is similar to “walkie talkie” use and the PTT mode switches a phone from full duplex mode, where both parties can hear each other simultaneously, to half duplex mode, where only one party can speak at one time. Multiple parties to the conversation may also be included.
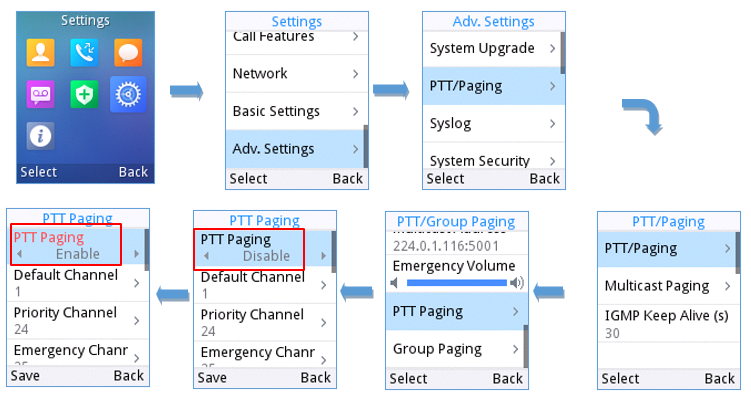
Enabling PTT mode
You can enable and configure the PTT settings using the handset LCD menu:
- Press Menu to bring up operation menu.
- Use arrow keys to reach Settings 🡪 Advanced settings 🡪 PTT and paging.
- Choose PTT settings and enable the PTT function.
- Press Save button to enable PTT mode.
Using the PTT Functionality
To send a PTT broadcast:
- Unlock your handset.
- Make sure the multi-function button is configured to be a Push-To-Talk button.
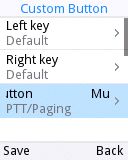
- Press the Push-to-Talk key (one time) to access PTT/Paging Page.
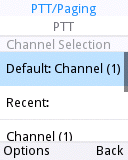
- Press and hold the Push-to-Talk key to initiate PTT/Paging call (and to speak).
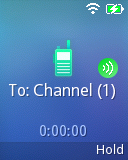
- The devices which are in the same channel will receive the PTT call.
- Release the Push to Talk soft key when you have finished speaking. The channel will wait 10 seconds before release.
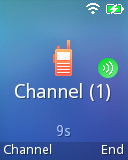
- You should press the Push to Talk soft key only when the channel status indicates Waiting. Otherwise, you may interrupt another person’s message.
PTT Configuration Settings
Please refer to the following Settings for more details about the configuration of the PTT functionality:
Settings
- Multicast address: The multicast IP address to send page audio to and receive page audio from. Default value is 224.0.1.116.
- Port: The port to send audio to and receive audio from. Default value is 5001
- Emergency volume: The Volume of the emergency cannel. Default value is 8
PTT Parameters
- PTT function: Enable or disable the PTT function.
- Default channel: The PTT channel used to transmit an outgoing page if the user does not explicitly specify a channel.
- Priority channel: The channel assigned for priority pages.
- Emergency channel: The channel assigned for emergency pages.
- Accept while busy: If no, incoming PTT sessions do not produce standard call waiting. If yes, incoming PTT sessions produce standard call waiting behavior on the active audio channel.
- CallerID(*): Caller ID number for identification.
- PTime: The audio payload size in milliseconds.
- Audio codec: The audio codec to use for outgoing PTT broadcasts. Incoming PTT audio will be decoded according to the codec specified in the incoming message.
- Channel: Set the channel whether to be usable, transported, acceptable, joined and the channel display name.
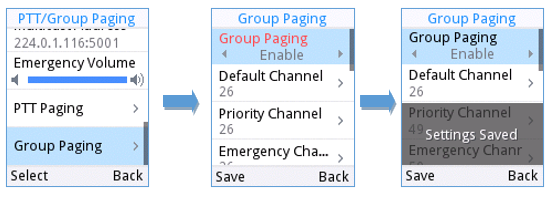
Group Paging
Enabling Group Paging Feature
You can enable and specify settings for the Group Paging feature through the phone’s user interface.
To specify the Group Paging feature settings:
- Using your phone’s interface, navigate to the Group Paging Configuration menu by pressing Settings🡪 Advanced setting🡪 PTT and paging🡪PTT and group paging.
- Choose Group Paging Configuration.
- Set Group Paging function to Enabled.
Please, refer to the following screenshots:
To send a Group Paging broadcast:
- Unlock your handset.
- Press the Talk soft key.
- Set Default mode to Group paging.
- Scroll to the group you wish to send a broadcast to.
- Press and hold the Talk soft key before speaking.
The group status will change to Sending group paging to indicate you are transmitting.
The devices which are in the group will receive the paging.
- Release the Talk soft key, press the on-hook/power key when you have finished speaking.
Group Paging Parameters
- Paging function: Enable or disable the Group paging function.
- Default group: The group used to transmit an outgoing page if the user does not explicitly specify a group.
- Priority group: The group assigned for priority pages.
- Emergency group: The group assigned for emergency pages.
- Accept while busy: If no, incoming Group paging sessions do not produce standard call waiting. If yes, incoming PTT sessions produce standard call waiting behavior on the active audio group.
- Caller ID(*):Caller ID number for identification.
- P-Time: The audio payload size in milliseconds.
- Audio codec: The audio codec to use for outgoing Group paging broadcasts. Incoming Group paging audio will be decoded according to the codec specified in the incoming message.
- group: Set the group whether to be available, transmit, subscribe, join group and the group name.
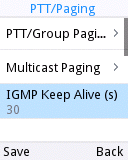
IGMP Settings
Users could specify how often the phone will report IGMP when PTT/ Paging function is turned on. IGMP reporter help to keep PTT/ Paging receivable in a dormant state. The interval may take some effect to standby time. The default setting is 30 s.
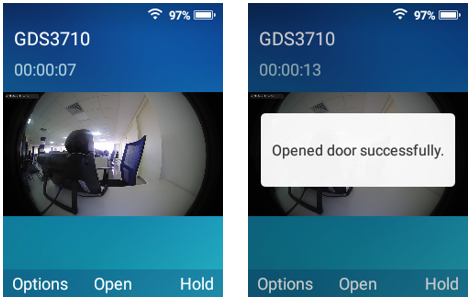
Connecting WP8xx to Grandstream Door System (GDS)
The WP8xx offers a powerful integration with Grandstream Door System (GDS) and allows users to open the door, initiates call to the GDS and gets real time audio/video stream from the door system.
The WP8xx can be connected with the GDS in two different ways, either using peering mode (without a SIP server) or through a SIP server.
For more details, please, refer to:
https://documentation.grandstream.com/knowledge-base/connecting-gds37xx-with-wp820/
UPGRADING AND PROVISIONING
The WP810/WP822/WP825 can be upgraded via TFTP/HTTP/HTTPS by configuring the URL/IP Address for the TFTP/HTTP/HTTPS server and selecting a download method. Configure a valid URL for TFTP, HTTP or HTTPS; the server name can be FQDN or IP address.
Examples of valid URLs:
fw.mycompany.com
Upgrade and Provisioning Configuration
There are two ways to setup upgrade and provisioning on WP810/WP822/WP825. They are Keypad Menu and Web GUI.
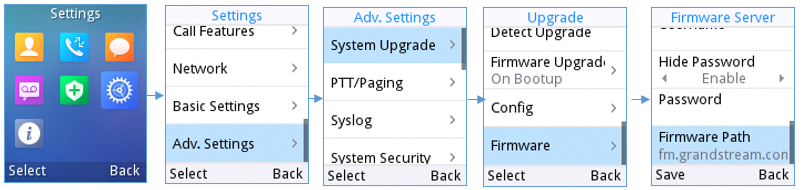
Configure via keypad Menu
- In handset Settings, select Advanced Settings 🡪 System Upgrade.
- Navigate to Firmware/Config and configure the firmware upgrade and config settings.
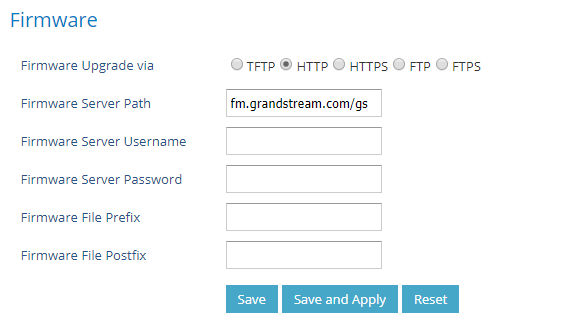
Configure via Web GUI
Open a web browser on PC and enter the IP address for the handset. Then login with the administrator username and password. Go to Maintenance 🡪 Upgrade and Provisioning 🡪 Firmware. In the Upgrade web page, enter the IP address or the FQDN for the upgrade server and choose to upgrade via TFTP, HTTP, HTTPS, FTP or FTPS (The default setting is HTTP). Save and apply the changes, press Save and apply button then reboot the phone to initiate firmware upgrade process.
Upload Firmware Locally
If there is no HTTP/TFTP server, users could also upload the firmware to the device directly via Web GUI. Please follow the steps below to upload the firmware locally.
- Download the latest firmware file from the following link and save it in your PC.
https://www.grandstream.com/support/firmware
- Log in the Web GUI as administrator in the PC.
- Go to Web GUI🡪Maintenance🡪Upgrade and Provisioning 🡪 Firmware.
- Click the “Start” button under “Upgrade Firmware”, a window will be prompted to select firmware file to upload.
- Select the firmware file from your PC. Then uploading progress will show on the window.
- When uploading is done, users can see the upgrading process starts on the device LCD.
- The phone will reboot again with the new firmware version upgraded.
No Local Firmware Servers
Service providers should maintain their own firmware upgrade servers. For users who do not have a TFTP/HTTP/HTTPS server, some free Windows version TFTP servers are available for download from:
https://www.solarwinds.com/free-tools/free-tftp-server and https://www.tftpd64.com/.
Please check our web site at https://www.grandstream.com/support/firmware for latest firmware.
Instructions for local firmware upgrade via TFTP:
- Unzip the firmware files and put all of them in the root directory of the TFTP server.
- Connect the PC running the TFTP server and the device to the same LAN segment.
- Launch the TFTP server and go to the File menu🡪Configure🡪Security to change the TFTP server’s default setting from “Receive Only” to “Transmit Only” for the firmware upgrade.
- Start the TFTP server and configure the TFTP server in the phone’s web configuration interface.
- Configure the Firmware Server Path on your device to the IP address of the PC.
- Update the changes and reboot the device.
End users can also choose to download a free HTTP server from https://httpd.apache.org/ or use Microsoft IIS web server.
Provisioning and Configuration File Download
Grandstream SIP Devices can be configured via the Web Interface as well as via a Configuration File (binary or XML) through TFTP or HTTP/HTTPS FTP/FTPS. The “Config Server Path” is the TFTP, HTTP or HTTPS, FTP or FTPS server path for the configuration file. It needs to be set to a valid URL, either in FQDN or IP address format. The “Config Server Path” can be the same or different from the “Firmware Server Path”.
A configuration parameter is associated with each particular field in the web configuration page. A parameter consists of a Capital letter P and 1 to 5 (could be extended to more in the future) digit numeric numbers. i.e., P2 is associated with the “Admin Password” in the Web GUI🡪Maintenance🡪 Web Access page. For a detailed parameter list, please refer to the corresponding firmware release configuration template in the following link:
https://www.grandstream.com/support/tools
When the handset boots up, it will issue TFTP or HTTP(S) request to download a configuration XML file named “cfgxxxxxxxxxxxx” followed by “cfgxxxxxxxxxxxx.xml”, where “xxxxxxxxxxxx” is the MAC address of the phone, i.e., “cfg000b820102ab” and “cfg000b820102ab.xml”. If downloading “cfgxxxxxxxxxxxx.xml” file is not successful, the provision program will download a generic cfg.xml file. The configuration file name should be in lower case letters.
For more details on XML provisioning, please refer to the following document:
https://documentation.grandstream.com/knowledge-base/sip-device-provisioning-guide/
FACTORY RESET
Restore to Factory Default via LCD Menu
There are two methods to restore the device to the factory default settings.
- On the handset idle screen, go to Settings 🡪 Advanced Settings 🡪 Factory reset.
- In the new window, confirm the reset using the left softkey.
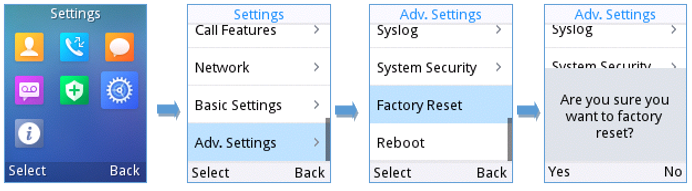
3. Once confirming the factory reset, the device will reboot with the default factory settings.
Restore to Factory Default via the Web GUI
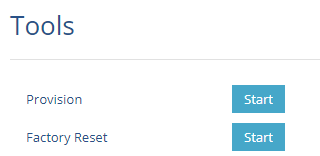
- Login to Web GUI and go to Maintenance 🡪 Tools.
- Click on the Start button in front of field “Factory Reset” to perform a Factory reset.
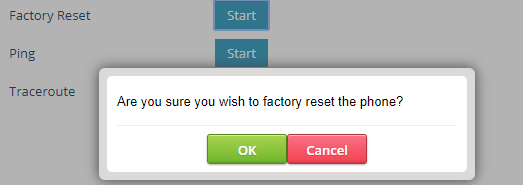
3. A dialog box will pop up to confirm factory reset.
4. Click OK to restore the phone to factory settings.
CHANGE LOG
This section documents significant changes from previous firmware versions. Only major new features or major document updates are listed here. Minor updates for corrections or editing are not documented here.
Firmware Version 1.0.11.60
- Discard the default user password. [Web UI Access Level Management]
Firmware Version 1.0.11.59
- No Major changes.
Firmware Version 1.0.11.57
- No Major changes.
Firmware Version 1.0.11.51
- Added support for new LCD modules through hardware versions on WP822 and WP825 models. [Configuring the LCD]
- Added support for Hebrew language. [Hebrew]
Firmware Version 1.0.11.43
- No Major changes.
Firmware Version 1.0.11.40
- No Major changes.
Firmware Version 1.0.11.34
- Added support for attended transfer feature on WP810 as WP822/WP825. [Attended Transfer]
- Added support for new Audio control configuration parameters. [Audio control]
- Added support for 802.11k and 802.11v Wi-Fi Standards. [Wi-Fi settings]
Firmware Version 1.0.11.28
- Added support to allow PTT audio to come through the 3.5 mm audio jack output. [PTT]
- Added support to disable/enable the function to hang up the call when the device is placed upside down. [Ending a call]
- Added support for attended Transfer before the answer. [Attended Transfer]
Firmware Version 1.0.11.22
- No major changes.
Firmware Version 1.0.11.20
- Added support to connect up to 20 SSIDs [Auto Connection]
- Added door system support and GDS settings [Grandstream Door System Integration]
- Added support for Off-hook Auto Dial [Off-hook Auto Dial]
- Added support for Audio Control [Audio Control]
Firmware Version 1.0.11.8
- No major changes
Firmware Version 1.0.11.2
Firmware Version 1.0.9.23
- No major changes.
Firmware Version 1.0.7.83
- No major changes.
- Added support for letters with accent. [Keypad]
- Added support to differentiate rejected calls icon from missed calls. Now the rejected calls will be logged as received calls with different icon. [Icons Description]
- Added support to display contacts with no numbers in the phonebook. [CONTACTS]
- No major changes.
- No major changes.
- This is initial version.