
IEEE 802.1x is a standard for port-based Network Access Control (PNAC), designed to provide an authentication mechanism for network devices to connect to LAN or WAN. The IEEE 802.1x protocol includes the encapsulation of the Extensible Authentication Protocol (EAP) over LAN (known as “EAPOL” or “EAP over LAN”) for messages exchange during the authentication process.
802.1x is implemented to accommodate the following:
- Authentication based on Network Access Identifier and credentials.
- Centralized authentication, authorization and accounting.
- Public Network Security.
- Distribution of dynamic encryption keys.
This guide will outline the use and configuration of 802.1x authentication on Grandstream IP phones.
802.1X AUTHENTICATION PROCESS
802.1x Elements
The main elements interacting in 802.1x process are:
- Supplicant: PC, Laptop, IP phones and any other device aiming to connect to the network.
- Authenticator: Network switches/Wireless access points providing first connection level to supplicants.
- Authentication server: Server or device (Radius server, AD etc…) that can hold authentication credentials for all users and verify provided information exchanged by end points during authentication process.
Authentication Process
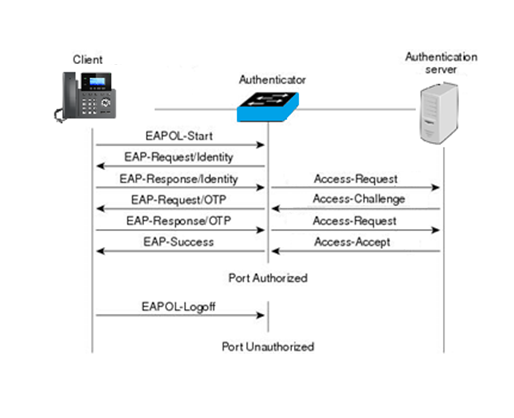
Please refer to following process describing how IEEE 802.1x operates:

- The client/supplicant sends an EAP-start message and a series of messages are exchanged to authenticate the client.
- The access point forwards the EAP-request identity message.
- The client sends an EAP-response packet that contains his identity to the authentication server.
- The server uses a specific authentication algorithm to verify the client’s identity.
- The authentication server sends either an accept message or a reject message to the access point.
- The access point sends an EAP-success packet or reject packet to the client.
- When authentication server accepts the client, the access point transits the client’s port to an authorized state and forwards additional traffic.
Additional information:
- All messages between supplicant and authenticator are delivered in EAPOL (Extensible Authentication Protocol Over LAN) form.
- Authenticator converts messages to RADIUS messages and send them to RADIUS server (Authentication Server)
- Authentication Server negotiates the type of EAP authentication that is acceptable to both the supplicant and itself and starts communicating with the supplicant via EAP messages to carry out the authentication process. Some authenticators may not support all types of EAP and hence would act as an EAP pass through where the supplicants directly communicate with Authentication Servers to complete the authentication process.
Authentication Flowchart
Please refer to following diagram describing and summarizing an implementation of 802.1x authentication process:
EAP Methods for 802.1x Authentication
The following are the main types of EAP protocol for the 802.1x authentication supported:
- EAP-MD5 (EAP-Message Digest 5): Basic authentication method using Username/Password combination to verify authentication credentials and offering basic protection for the messages exchanged. This type offers lowest security level and can be used in wired networks only requiring basic security.
- EAP-TLS (EAP-Transport Level Security): Client and Server authentication need to have pre-installed certificates to be authenticated, since those certificates are required and TLS tunnel is created between the authentication server and client. This method is more secure and can be used for wired and wireless networks.
- EAP-PEAPv0/MSCHAPv2: The most common method form of PEAP; MSCHAP (Microsoft Challenge Handshake Authentication Protocol) allows authentication to databases supporting MS-CHAPv2 format, including Microsoft NT and Microsoft Active Directory and using a CA certificate at each client to authenticate with the server. It’s a mutual authentication method that supports password-based user or computer authentication. During the authentication process, both the server and client must prove that they have knowledge of the user’s password in order for authentication to succeed.
802.1X AUTHENTICATION CONFIGURATION
The configuration can be done either using the webGUI or via phone keypad.
In this guide, we will use the GRP26xx model as example to configure the 802.1x authentication from web GUI and the GXV33xx for configuration via phone keypad.
Via Web User Interface
In this example we will be using the GRP2615 model, To enable and configure 802.1x authentication using the web user interface, please refer to the following steps:
- Access to web GUI of your device.
- Navigate to Network Settings 🡪 Ethernet Settings 🡪 802.1X.
- Choose from drop down list the 802.1x method desired (EAP_MD5, EAP_TLS or EAP-PEAPv0/MSCHAPv2)
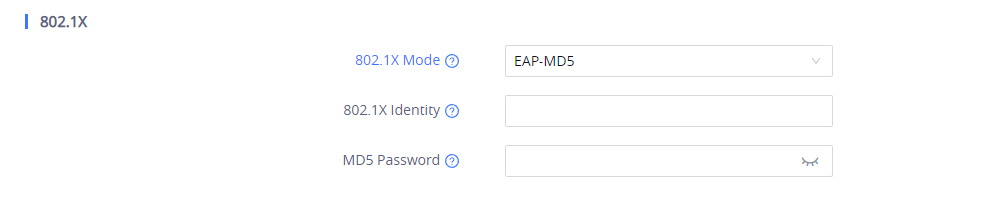
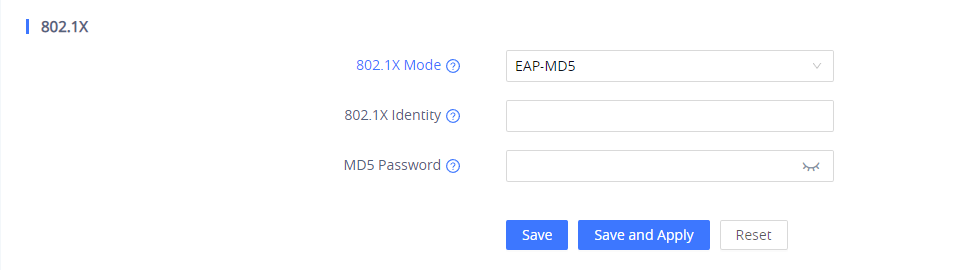
- If EAP-MD5 is selected:
- Enter the user name in 802.1x Identity field for authentication.
- Enter the password in MD5 Password field for authentication.
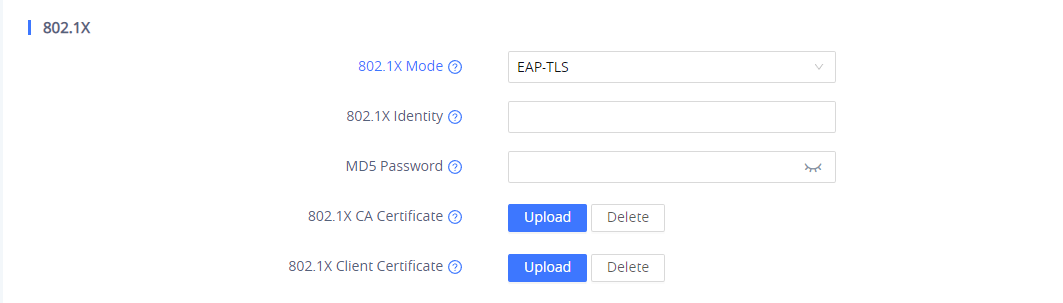
- If EAP-TLS is selected:
- Enter the user name in 802.1x Identity field for authentication.
- Enter the password in 802.1x MD5 Password field for authentication.
- Click Upload button to browse and load 802.1x CA Certificate (*.pem file) from your local system.
- Click Upload button to browse and load the 802.1x Client Certificate (*.pem file with both certificate and private key) from your local system.
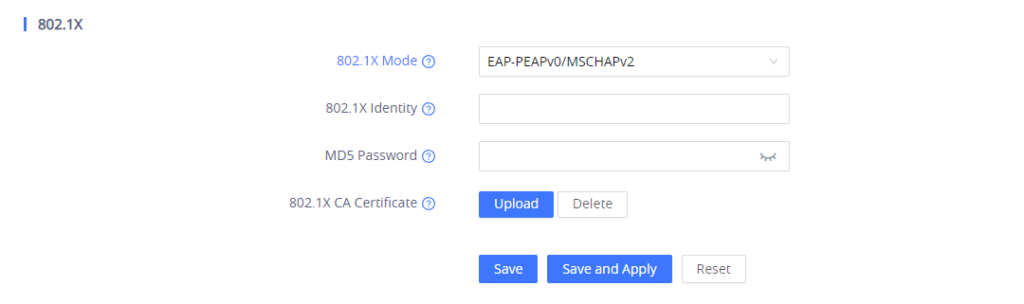
- If EAP-PEAPv0/MSCHAPv2 is selected:
- Enter the user name in 802.1x Identity field for authentication.
- Enter the password in 802.1x Secret field for authentication.
- Click Upload button to browse and load 802.1x CA Certificate (*.pem file) from your local system.

- Press Save and Apply buttons and reboot your device to apply the new settings.
Via Phone Keypad
In this example we will be using the GXV3370 model to enable and configure the 802.1x authentication using the keypad menu on GXV3370, please refer to following steps:
- Press Settings button.
- Access to Ethernet Settings under Network Settings.
- Access to 802.1x mode and select the method desired from the drop down list.
- If EAP-MD5 is selected:
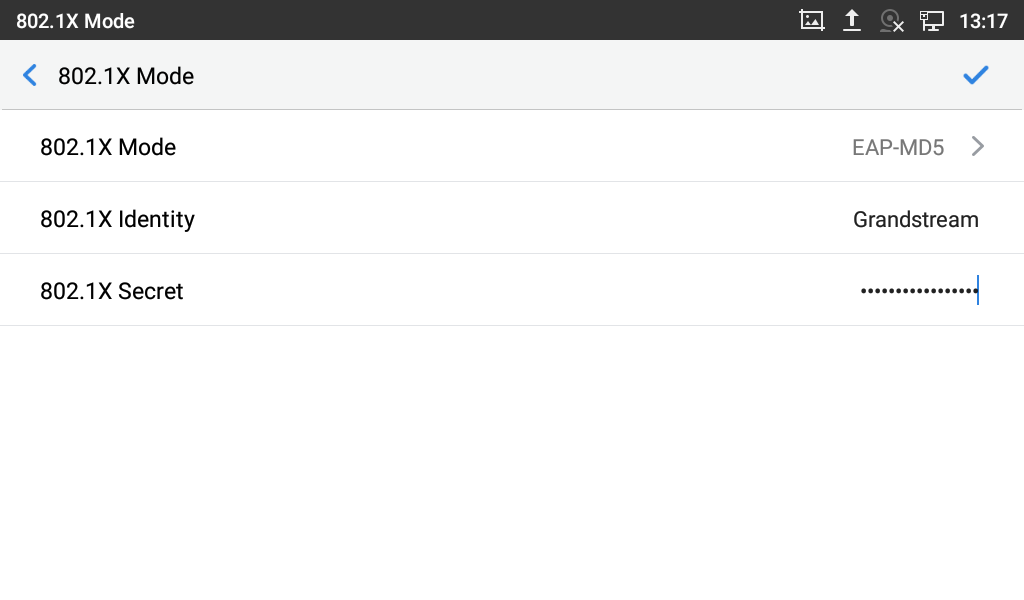
- Enter the user name in the Identity field for authentication.
- Enter the password in 802.1X Secret field for authentication.
- Press OK for saving and applying the new settings.
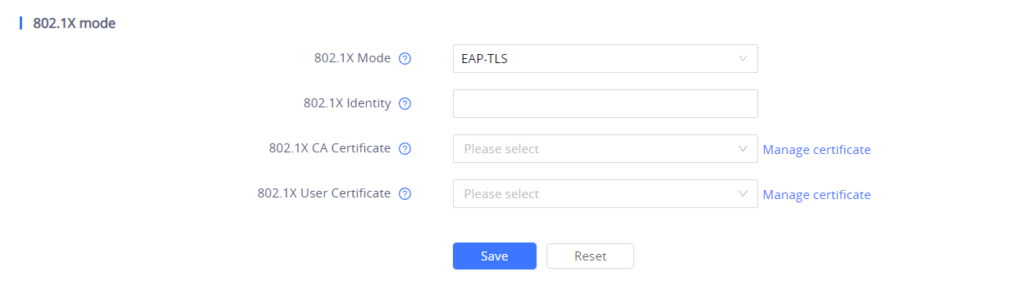
- If EAP-TLS is selected:
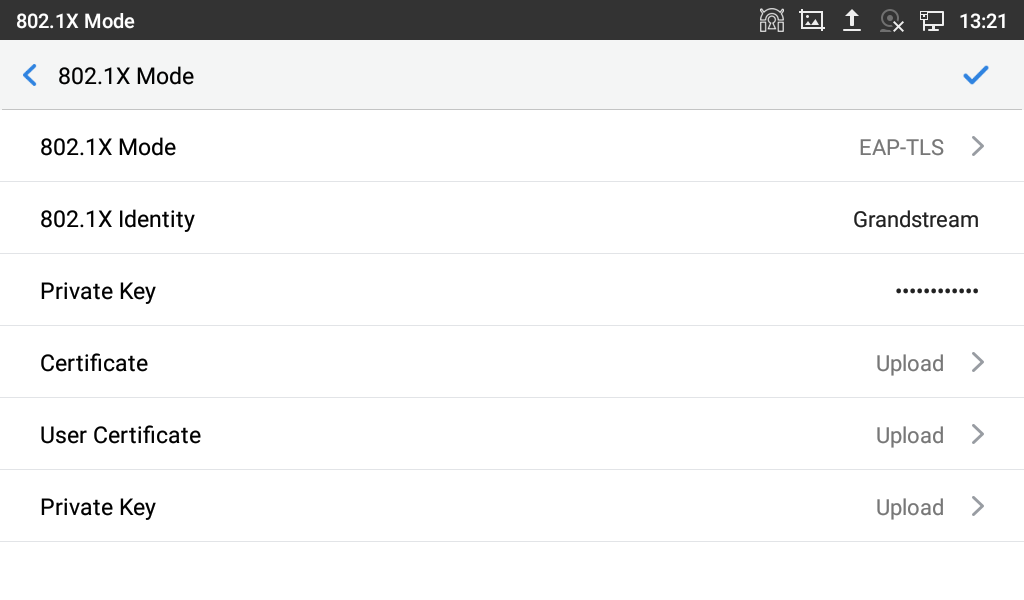
- Enter the user name in 802.1x Identity field for authentication.
- Enter the password in 802.1x Private Key field for authentication.
- Click Upload button to browse and load 802.1x Certificate (*.pem, *.cer, *.crt or *.der) from your local system.
- Click Upload button to browse and load the 802.1x User Certificate (*.pem, or *.cer) from your local system.
- Click Upload button to browse and load the 802.1x Private key from your local system.
- Press OK for saving and applying the new settings.
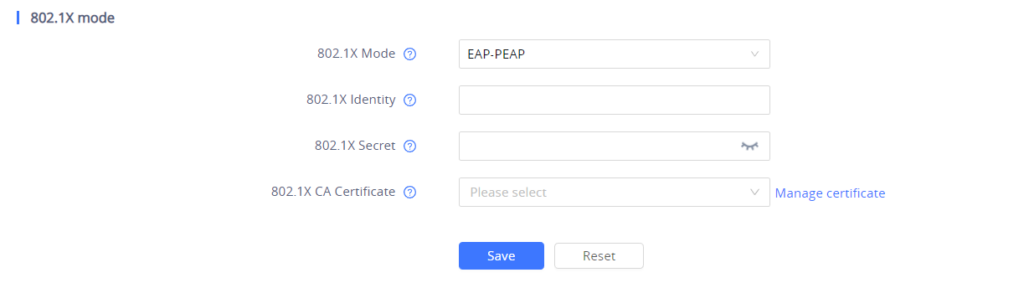
- If EAP-PEAP is selected:
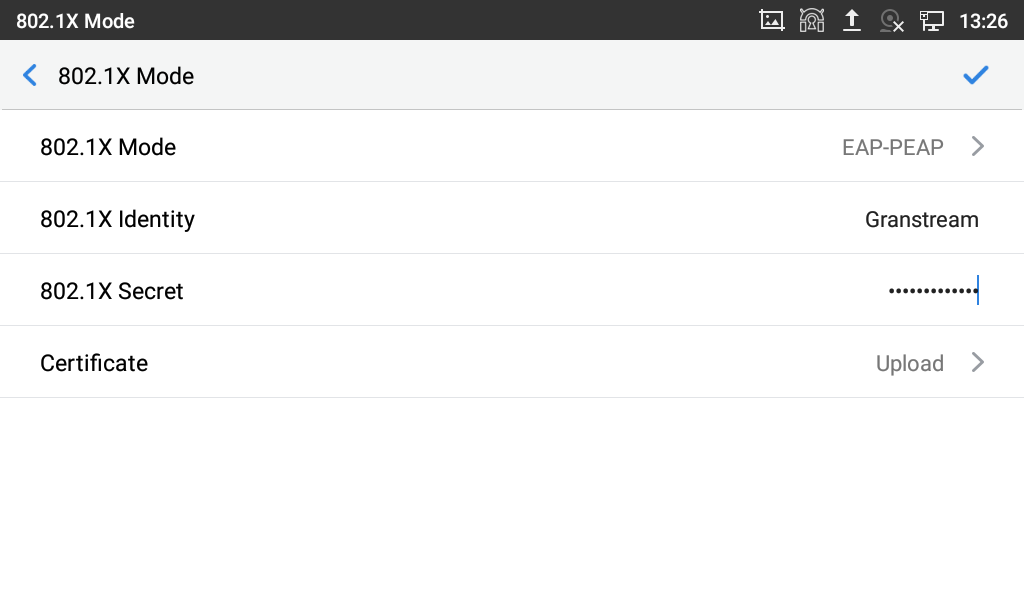
- Enter the user name in 802.1x Identity field for authentication.
- Enter the password in 802.1x Secret field for authentication.
- Click Upload button to browse and load 802.1x CA Certificate (*.pem, *.cer, *.crt or *.der) from your local system
- Press OK for saving and applying the new settings.
Different 802.1X Configuration modes
Depending on the model of the endpoint, we must define different parameters for each 802.1X configuration. We will distinguish between models based on the web UI. since the 802.1X configuration parameters vary from one endpoint to another.
GXP16XX Series
For the 802.1X configuration procedure, the same steps shown in the 802.1X AUTHENTICATION CONFIGURATION will be applied with different UI experiences.
In this example we will be using the GXP1630 model, To enable and configure 802.1x authentication using the web user interface, please refer to the following steps:
- Access to the web GUI of your device.
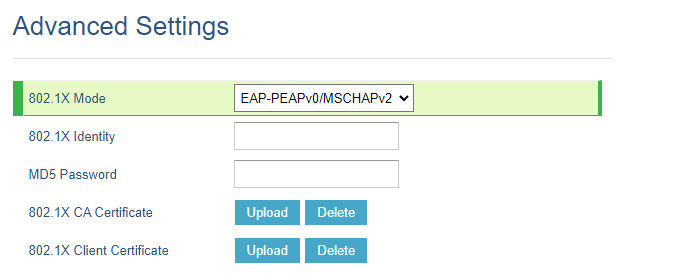
- Navigate to Network 🡪 Advanced Settings.
- Choose from drop-down list the 802.1x method desired (EAP_MD5, EAP_TLS or EAP-PEAPv0/MSCHAPv2)
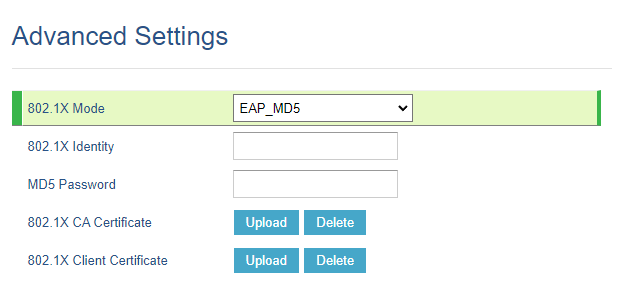
- If EAP-MD5 is selected:
- Enter the user name in the 802.1x Identity field for authentication.
- Enter the password in the MD5 Password field for authentication.
- Click Upload button to browse and load 802.1x CA Certificate (*.pem file) from your local system.
- Click Upload button to browse and load the 802.1x Client Certificate (*.pem file with both certificate and private key) from your local system.
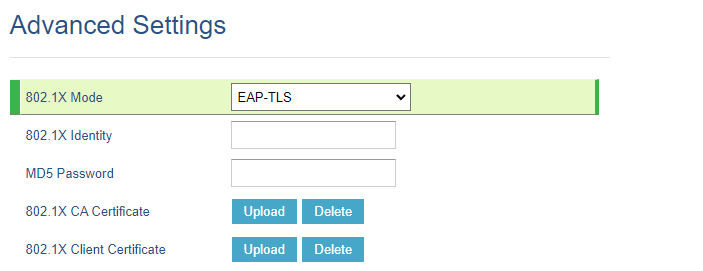
- If EAP-TLS is selected:
- Enter the user name in 802.1x Identity field for authentication.
- Enter the password in 802.1x MD5 Password field for authentication.
- Click Upload button to browse and load 802.1x CA Certificate (*.pem file) from your local system.
- Click Upload button to browse and load the 802.1x Client Certificate (*.pem file with both certificate and private key) from your local system.

- If EAP-PEAPv0/MSCHAPv2 is selected:
- Enter the user name in 802.1x Identity field for authentication.
- Enter the password in 802.1x Password field for authentication.
- Click Upload button to browse and load 802.1x CA Certificate (*.pem file) from your local system.
- Click Upload button to browse and load the 802.1x Client Certificate (*.pem file with both certificate and private key) from your local system.

- Press the Save and Apply button and reboot your device to apply the new settings.
GXP17XX Series
In this example we will be using the GXP1782 model, To enable and configure 802.1x authentication using the web user interface, please refer to the following steps:
- Access to the web GUI of your device.
- Navigate to Network 🡪 Advanced Settings.
- Choose from drop-down list the 802.1x method desired (EAP_MD5, EAP_TLS or EAP-PEAPv0/MSCHAPv2)
- If EAP-MD5 is selected:
- Enter the user name in the 802.1x Identity field for authentication.
- Enter the password in the MD5 Password field for authentication.
- Click Upload button to browse and load 802.1x CA Certificate (*.pem file) from your local system.
- Click Upload button to browse and load the 802.1x Client Certificate (*.pem file with both certificate and private key) from your local system.

- If EAP-TLS is selected:
- Enter the user name in 802.1x Identity field for authentication.
- Enter the password in 802.1x MD5 Password field for authentication.
- Click Upload button to browse and load 802.1x CA Certificate (*.pem file) from your local system.
- Click Upload button to browse and load the 802.1x Client Certificate (*.pem file with both certificate and private key) from your local system.
- If EAP-PEAPv0/MSCHAPv2 is selected:
- Enter the user name in 802.1x Identity field for authentication.
- Enter the password in 802.1x Password field for authentication.
- Click Upload button to browse and load 802.1x CA Certificate (*.pem file) from your local system.
- Click Upload button to browse and load the 802.1x Client Certificate (*.pem file with both certificate and private key) from your local system.
- Press the Save and Apply button and reboot your device to apply the new settings.
GXP21XX Series
For the 802.1X configuration procedure, the same steps shown in the 802.1X AUTHENTICATION CONFIGURATION will be applied with different UI experiences.
In this example we will be using the GXP2170 model, To enable and configure 802.1x authentication using the web user interface, please refer to the following steps:
- Access to the web GUI of your device.
- Navigate to Network 🡪 Advanced Settings.
- Choose from drop-down list the 802.1x method desired (EAP_MD5, EAP_TLS or EAP-PEAPv0/MSCHAPv2)
- If EAP-MD5 is selected:
- Enter the user name in the 802.1x Identity field for authentication.
- Enter the password in the MD5 Password field for authentication.
- Click Upload button to browse and load 802.1x CA Certificate (*.pem file) from your local system.
- Click Upload button to browse and load the 802.1x Client Certificate (*.pem file with both certificate and private key) from your local system.

- If EAP-TLS is selected:
- Enter the user name in 802.1x Identity field for authentication.
- Enter the password in 802.1x MD5 Password field for authentication.
- Click Upload button to browse and load 802.1x CA Certificate (*.pem file) from your local system.
- Click Upload button to browse and load the 802.1x Client Certificate (*.pem file with both certificate and private key) from your local system.

- If EAP-PEAPv0/MSCHAPv2 is selected:
- Enter the user name in 802.1x Identity field for authentication.
- Enter the password in 802.1x Password field for authentication.
- Click Upload button to browse and load 802.1x CA Certificate (*.pem file) from your local system.
- Click Upload button to browse and load the 802.1x Client Certificate (*.pem file with certificate key) from your local system.

- Press the Save and Apply button and reboot your device to apply the new settings.
GXV33XX Series
For the 802.1X configuration procedure, the same steps shown in the 802.1X AUTHENTICATION CONFIGURATION will be applied with different UI experiences.
In this example we will be using the GXV3350 model, To enable and configure 802.1x authentication using the web user interface, please refer to the following steps:
- Access to the web GUI of your device.
- Navigate to Network Settings 🡪 Ethernet Settings 🡪 802.1X Mode .
- Choose from drop-down list the 802.1x method desired (EAP_MD5, EAP_TLS or EAP-PEAP)
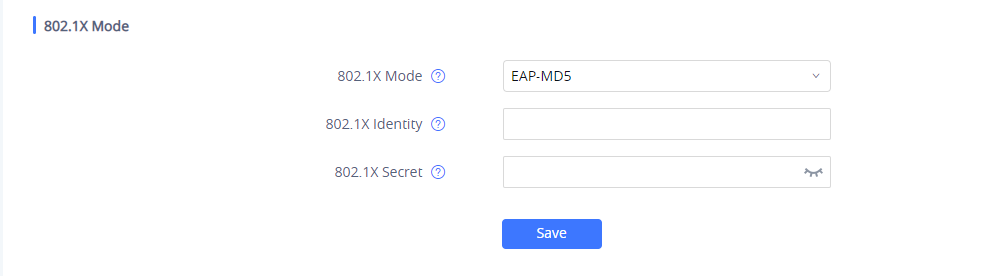
- If EAP-MD5 is selected:
- Enter the user name in the 802.1x Identity field for authentication.
- Enter the password in the 802.1x Secret field for authentication.
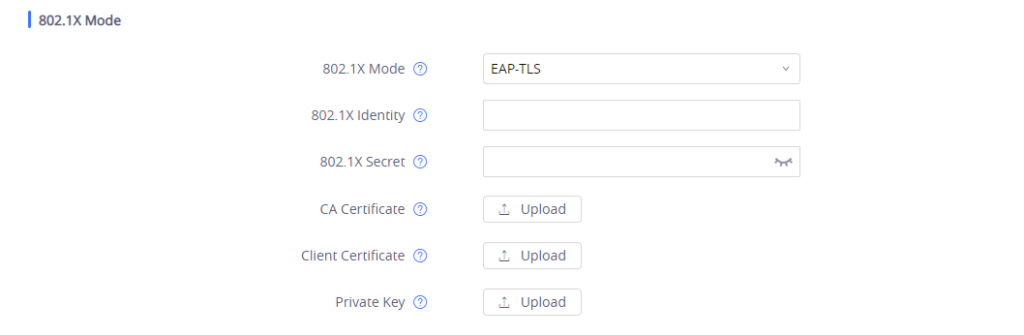
- If EAP-TLS is selected:
- Enter the user name in 802.1x Identity field for authentication.
- Enter the password in 802.1x Secret field for authentication.
- Click Upload button to browse and load 802.1x CA Certificate (*.pem file) from your local system.
- Click Upload button to browse and load the 802.1x Client Certificate (*.pem file ) from your local system.
- Click Upload button to browse and load the 802.1x Private Key (*.pem file ) from your local system
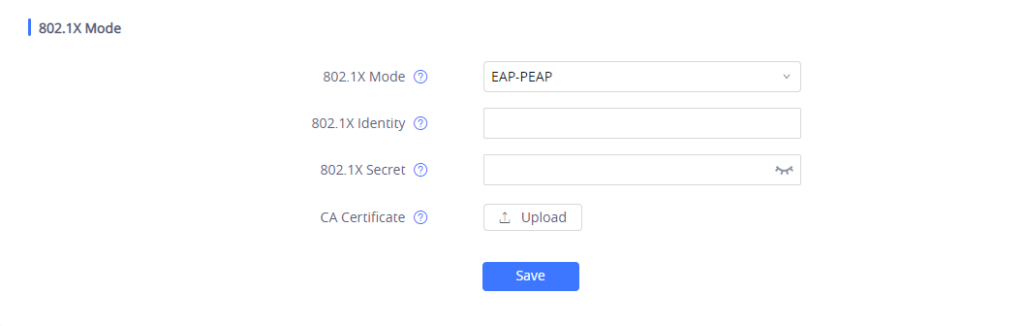
- If EAP-PEAPis selected:
- Enter the user name in the 802.1x Identity field for authentication.
- Enter the password in the 802.1x Secret field for authentication.
- Click Upload button to browse and load 802.1x CA Certificate (*.pem file) from your local system.
- Press the Save and Apply button and reboot your device to apply the new settings.
GXV34XX Series
For the 802.1X configuration procedure, the same steps shown in the 802.1X AUTHENTICATION CONFIGURATION will be applied with different UI experiences.
In this example we will be using the GXV3450 model, To enable and configure 802.1x authentication using the web user interface, please refer to the following steps:
- Access to the web GUI of your device.
- Navigate to Network Settings 🡪 Ethernet Settings 🡪 802.1X Mode .
- Choose from drop-down list the 802.1x method desired (EAP_MD5, EAP_TLS or EAP-PEAP)
- If EAP-MD5 is selected:
- Enter the user name in the 802.1x Identity field for authentication.
- Enter the password in the 802.1x Secret field for authentication.

- If EAP-TLS is selected:
- Enter the user name in 802.1x Identity field for authentication.
- Enter the password in 802.1x Secret field for authentication.
- Click Upload button to browse and load 802.1x CA Certificate (*.pem file) from your local system.
- Click Upload button to browse and load the 802.1x Client Certificate (*.pem file ) from your local system.
- If EAP-PEAP is selected:
- Enter the user name in the 802.1x Identity field for authentication.
- Enter the password in the 802.1x Secret field for authentication.
- Click Upload button to browse and load 802.1x CA Certificate (*.pem file) from your local system.
- Press the Save and Apply button and reboot your device to apply the new settings.
GRP260X Series
For the 802.1X configuration procedure, the same steps shown in the 802.1X AUTHENTICATION CONFIGURATION will be applied with different UI experiences.
In this example we will be using the GRP2603 model, To enable and configure 802.1x authentication using the web user interface, please refer to the following steps:
- Access to the web GUI of your device.
- Navigate to Network Settings 🡪 Ethernet Settings 🡪 802.1X Mode .
- Choose from drop-down list the 802.1x method desired (EAP_MD5, EAP_TLS or EAP-PEAPv0/MSCHAPv2)
- If EAP-MD5 is selected:
- Enter the user name in the 802.1x Identity field for authentication.
- Enter the password in the MD5 Password field for authentication.
- If EAP-TLS is selected:
- Enter the user name in 802.1x Identity field for authentication.
- Enter the password in MD5 Password field for authentication.
- Click Upload button to browse and load 802.1x CA Certificate (*.pem file) from your local system.
- Click Upload button to browse and load the 802.1x Client Certificate (*.pem file ) from your local system.

- If EAP-PEAPv0/MSCHAPv2 is selected:
- Enter the user name in the 802.1x Identity field for authentication.
- Enter the password in the MD5 Password field for authentication.
- Click Upload button to browse and load 802.1x CA Certificate (*.pem file) from your local system.
- Press the Save and Apply button and reboot your device to apply the new settings.
802.1X AUTHENTICATION FLOW
Once 802.1x settings are configured on the phone either via web GUI or via phone Keypad and device is rebooted. The authentication process is divided into two stages:
Prior to Authentication
The only messages that will be accepted by the client are the EAP messages, which will be forwarded to the authentication Server. The authenticator will block access to the network for the phone, it will try to establish a security negotiation with the IP phone and create an 802.1X session. The IP phone provides its authentication information to the authenticator, then the authenticator forwards the information to the authentication server.
Authentication Process
After the 802.1x client is powered on, it will transmit the EAP message to the authenticator. It will forward then the client’s request to the authentication server without changing its contents. The server will verify the user credentials and transmit back its response to the authenticator, which will determine whether the port remains in blocked mode or will grant access to the client, if the server response is “Access granted” then the client port state will have access to the network. If the authentication fails, the authenticator port will remain blocked, and in some cases, the port will be disabled (depending on vendor implementation).
Authentication Process Using EAP-MD5 Protocol
Authentication Process
The following figure shows a successful 802.1x authentication process using EAP-MD5 protocol (RADIUS is used as authentication server).
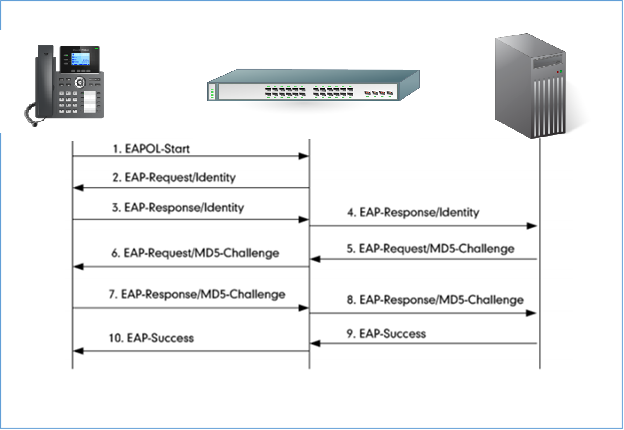
- The client starts by sending an “EAPOL-Start” packet to the switch.
- The switch reply to the client with an “EAP-Request/Identity” packet.
- The client sends back an “EAP-Response/Identity” packet to the switch.
- The switch strips the Ethernet header and encapsulates the remaining EAP frame in the RADIUS format, and then sends it to the RADIUS server.
- The RADIUS server recognizes the packet as an EAP-MD5 type and sends back a Challenge message to switch.
- The switch strips the authentication server’s frame header, encapsulates the remaining EAP frame into the EAPOL format, and sends it to the client.
- The client responds to the Challenge message.
- The switch passes the response to the RADIUS server.
- The RADIUS server validates the authentication information and sends an authentication success message.
- The switch passes the successful message to the client.
Once the phone is authenticated successfully, the switch provides network access permissions. If the phone does not provide proper identification, RADIUS server will reply with a rejection message. The switch relies the message to the phone and blocks access to the LAN. When the phone is disabled or reset, it will send an EAPOL-Logoff message, which prompts the switch to block access to the LAN Success message.
Flow Example
The following figure shows a trace of EAP-MD5 process.

Figure 7: EAP MD5 Challenge
Authentication Process Using EAP-TLS Protocol
Authentication Process
The following figure shows a successful 802.1x authentication process using EAP-MD5 protocol (RADIUS is used as authentication server).
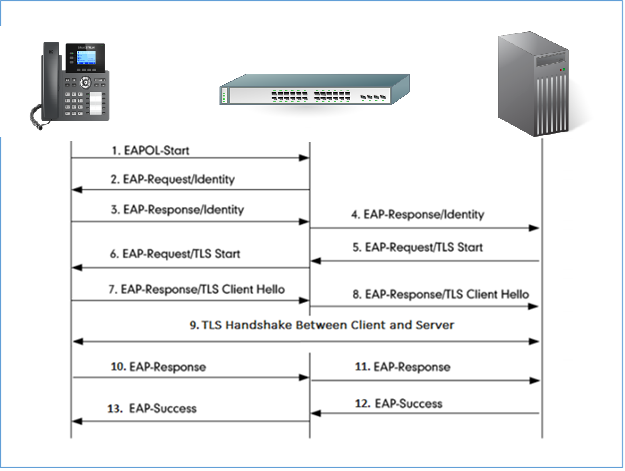
- The phone sends an “EAPO-Start” packet to the switch.
- The switch reply with an “EAP-Request/Identity” packet.
- The phone sends back an “EAP-Response/Identity” packet to the switch.
- The switch strips the Ethernet header and encapsulates the remaining EAP frame in the RADIUS format, and then sends it to the server.
- The authentication server recognizes the packet as an EAP-TLS type and sends an “EAP-Request” packet with a TLS start message to the switch.
- The switch strips the authentication server’s frame header, encapsulates the remaining EAP frame in the EAPOL format, and then sends it to the phone.
- The phone responds with an “EAP-Respond” packet containing a TLS client hello handshake message to the switch. The client hello message includes the TLS version supported by the phone, a session ID, a random number and a set of cipher suites.
- The switch passes the response to the authentication server.
- TLS handshake between the phone and RADIUS server (phone and server exchange key and cipher).
- The phone responds with an “EAP-Response” packet to the switch.
- The switch passes the response to the server.
- The server responds with a success message indicating that the phone and the RADIUS server have successfully authenticated each other.
- The switch passes the message to the phone.
After the phone’s successful authentication, the switch provides network access permissions. If the phone does not provide proper identification, the RADIUS server responds with a rejection message. The switch relies the message to the phone and blocks access to the LAN. When the phone is disabled or reset, it will send an EAPOL-Logoff message, which tell the switch to block access to the LAN.
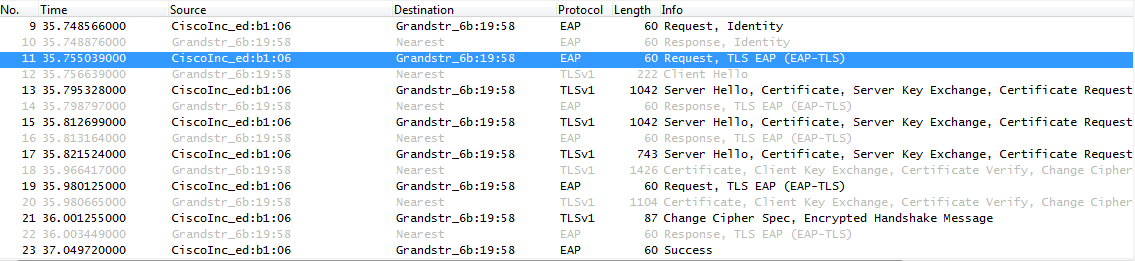
Flow Example
Bellow trace example of EAP-TLS authentication.
Authentication Process Using EAP-PEAP (MSCHAPv2) Protocol
Authentication Process
The following figure shows a successful 802.1x authentication process using EAP-PEAPv0/MSCHAPv2 protocol (RADIUS is used as authentication server).
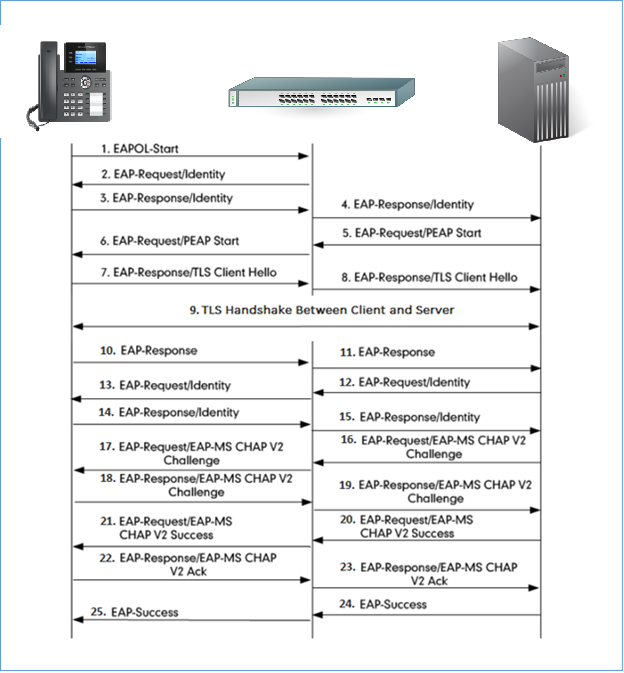
- The phone sends an “EAPO-Start” packet to the switch.
- The switch reply with an “EAP-Request/Identity” packet.
- The phone sends back an “EAP-Response/Identity” packet to the switch.
- The switch strips the Ethernet header and encapsulates the remaining EAP frame in the RADIUS format, and then sends it to the server.
- The authentication server recognizes the packet as an EAP-TLS type and sends an “EAP-Request” packet with a TLS start message to the switch.
- The switch strips the authentication server’s frame header, encapsulates the remaining EAP frame in the EAPOL format, and then sends it to the phone.
- The phone responds with an “EAP-Respond” packet containing a TLS client hello handshake message to the switch. The client hello message includes the TLS version supported by the phone, a session ID, a random number and a set of cipher suites.
- The switch passes the response to the authentication server.
- TLS handshake between the phone and RADIUS server (phone and server exchange key and cipher).
- The phone responds with an “EAP-Response” packet.
- The switch passes the response to the server.
- The RADIUS server sends an “EAP-Request/Identity” packet.
- The switch relies the request to the phone.
- The phone replies with an “EAP-Response/Identity” packet.
- The switch passes the response to the RADIUS server.
- The RADIUS server sends an “EAP-Request” packet that includes a MSCHAPv2 challenge message.
- The switch passes the request to the phone.
- The phone sends back a challenge message to the switch.
- The switch relies the message to the server.
- The RADIUS server sends a success message indicating that the phone provided the proper identity.
- The switch relies the message to the phone.
- The phone responds with an ACK message to the switch.
- The switch relies the respond message to the server.
- The RADIUS server sends a successful message to the switch.
- The switch passes the message to the phone.
After the phone’s successful authentication, the switch provides network access permissions. If the phone does not provide proper identification, the RADIUS server responds with a rejection message. The switch relies the message to the phone and blocks access to the LAN. When the phone is disabled or reset, it will send an EAPOL-Logoff message, which tell the switch to block access to the LAN.
Flow Example
Bellow trace example of EAP-PEAPv0/MSCHAPv2 authentication.
Please note that the trace contains two phases, the first one is similar to the EAP TLS challenge, after the “EAP-Response” in step 10, the server sends another “EAP-Request/Identity” protected by the TLS ciphersuite negotiated in phase 1 to exchange the phone user and password.

SUPPORTED DEVICES
The following table shows Grandstream products supporting the 802.1x feature:
Model | Supported | Firmware |
GXP16XX Series | ||
GXP1610 | Yes | 1.0.3.28 or higher |
GXP1620/25 | Yes | 1.0.3.28 or higher |
GXP1628 | Yes | 1.0.3.28 or higher |
GXP1630 | Yes | 1.0.3.28 or higher |
GXP17XX Series | ||
GXP1780/82 | Yes | 1.0.0.13 or higher |
GXP1760 | Yes | 1.0.0.37 or higher |
GXP21XX Series | ||
GXP2130 | Yes | 1.0.7.25 or higher |
GXP2140 | Yes | 1.0.7.25 or higher |
GXP2160 | Yes | 1.0.7.25 or higher |
GXP2135 | Yes | 1.0.7.25 or higher |
GXP2170 | Yes | 1.0.7.25 or higher |
GXV33XX Series | ||
GXV3370 | Yes | 1.0.3.30 or higher |
GXV3380 | Yes | 1.0.3.29 or higher |
GXV3350 | Yes | 1.0.3.30 or higher |
GXV34XX Series | ||
GXV3470 | Yes | 1.0.0.4 or higher |
GXV3480 | Yes | 1.0.0.4 or higher |
GXV3450 | Yes | 1.0.0.4 or higher |
GRP261x/GRP262x/GRP263X/GRP2650/GRP2670 Series | ||
GRP2612 | Yes | 1.0.0.16 or higher |
GRP2613 | Yes | 1.0.0.16 or higher |
GRP2614 | Yes | 1.0.0.16 or higher |
GRP2615 | Yes | 1.0.0.16 or higher |
GRP2616 | Yes | 1.0.0.16 or higher |
GRP2624 | Yes | 1.0.5.67 or higher |
GRP2634 | Yes | 1.0.5.67 or higher |
GRP2636 | Yes | 1.0.5.67 or higher |
GRP2650 | Yes | 1.0.5.67 or higher |
GRP2670 | Yes | 1.0.5.67 or higher |
GRP260X Series | ||
GRP2601 | Yes | 1.0.1.18 or higher |
GRP2602 | Yes | 1.0.1.18 or higher |
GRP2603 | Yes | 1.0.1.18 or higher |
GRP2604 | Yes | 1.0.1.18 or higher |