
SNMP (Simple Network Management Protocol) is an Internet-standard protocol for managing devices on IP networks. It is used mostly in network management systems to monitor network-attached devices for conditions that warrant administrative attention. SNMP exposes management data in the form of variables on the managed systems, which describe the system configuration. These variables can then be queried (and sometimes set) by managing applications. The variables accessible via SNMP are organized in hierarchies, which are described by Management Information Bases (MIBs).
Three significant versions of SNMP have been developed and deployed. SNMPv1 is the original version of the protocol. More recent versions, SNMPv2c and SNMPv3, feature improvements in performance, flexibility, and security.
SNMP COMPONENTS
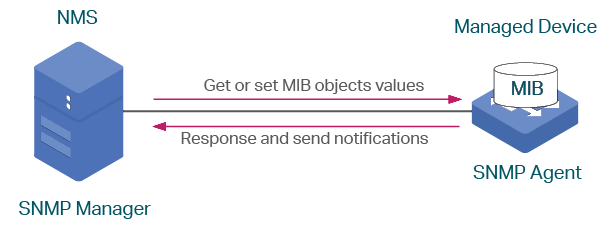
Manager (NMS)
The Manager component is simply a piece of software that is installed on a machine (which when combined, is called the Network Management System) that polls devices on your network however often you specify for information.
The Manager has the correct credentials to access information stored by Agents (which is explained in the next section) and then compiles them in a readable format for the Network Engineer or Administrator to monitor or diagnose for problems or bottlenecks. Some NMS software suites are more complex than others, allowing you to configure Email or SMS messages to alert you of malfunctioning devices on your network, while others simply poll devices for more basic information.
Agents
SNMP Agent is a piece of software that is bundled with the network device (router, switch, IP phone, server, etc..) that, when enabled and configured, does all the Heavy work for the Manager, by compiling and storing all the data from its given device into a database (MIB).
This database is properly structured to allow the Manager software to easily poll information and even send information to the Manager if an error has occurred.
Management Information Base (MIB)
In short, MIB files are the set of questions that a SNMP Manager can ask the agent. Agent collects these data locally and stores it, as defined in the MIB. So, the SNMP Manager should be aware of these standard and private questions for every type of agent.
Agents, as explained above, maintains an organized database of its devices parameters, settings, and more. The NMS (Network Management system) polls/requests the Agent of a given device, which then shares its organized information from the database it is made with the NMS, which then further translates it into alerts, reports, graphs and more. The database that the Agent shares between the Agent is called the Management Information Base, or MIB.
SNMP VERSIONS
SNMPv1
Version 1 was the first version of the protocol defined in RFCs 1155 and 1157. This version is the simplest of the 3 versions of the protocol, and the most insecure, due to its plain text authentication.
SNMPv2c
This is the revised protocol, which includes enhancements of SNMPv1 in the areas of protocol packet types, transport mappings, MIB structure elements but using the existing SNMPv1 administration structure (“community based” and hence SNMPv2c). It is defined in RFC 1901, RFC 1905, RFC 1906, RFC 2578.
SNMPv3
Version 3 of the protocol has made greater strides to securing the protocol suite by implementing what is called “user-based security”. This security feature allows you to set authentication based on the user requirements. The 3 levels of authentication are as follows:
- NoAuthNoPriv: Users who use this mode/level have No Authentication and No privacy when they send/receive messages.
- AuthNoPriv: This Level requires the user to Authenticate but will not Encrypt Sent/Received Messages.
- AuthPriv: Finally, the most secure level, where Authentication is Required and Sent/Received Messages Are Encrypted.
SNMP MESSAGES
Get
A Get message is sent by a manager to an agent to request the value of a specific OID. This request is answered with a Response message that is sent back to the manager with the data.
GetNext
A GetNext message allows a manager to request the next sequential object in the MIB. This is a way that you can traverse the structure of the MIB without worrying about what OIDs to query.
Set
A Set message is sent by a manager to an agent in order to change the value held by a variable on the agent. This can be used to control configuration information or otherwise modify the state of remote hosts. This is the only write operation defined by the protocol.
GetBulk
This manager to agent request functions as if multiple GetNext requests were made. The reply back to the manager will contain as much data as possible (within the constraints set by the request) as the packet allows.
Response
This message, sent by an agent, is used to send any requested information back to the manager. It serves as both a transport for the data requested, as well as an acknowledgement of receipt of the request. If the requested data cannot be returned, the response contains error fields that can be set with further information. A response message must be returned for any of the above requests, as well as Inform messages.
Inform
To confirm the receipt of a trap, a manager sends an Inform message back to the agent. If the agent does not receive this message, it may continue to resend the trap message.
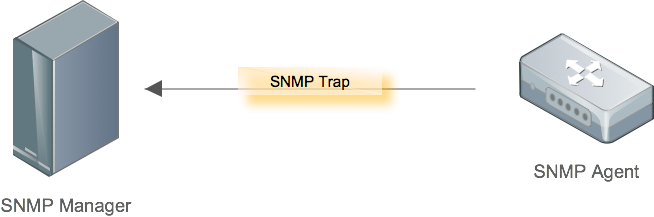
Traps
The Trap messages are the main form of communication between an SNMP Agent and SNMP Manager. They are used to inform an SNMP manager when a significant event occurs at the Agent level.
What makes the Trap unique from other messages is that they are triggered instantaneously by an agent, rather than waiting for a status request from the SNMP Manager.
GRANDSTREAM CLIENT CONFIGURATION EXAMPLES
GRP261X Example
Please refer to below steps to configure SNMP feature in GRP261x:
- Access phone’s web GUI under Network 🡺 SNMP Settings.
- Set Enable SNMP to Yes.
- Choose the Version and enter the Community string (Should be the same as set in the receiver station).
- Enter the IP address of the NMS (Monitoring station) in SNMP Trap IP field (in our example it is 192.168.5.106)

The Table below is describing all the SNMP parameters available on the GRP261x:
| Setting | Description |
|---|---|
Enable SNMP | Enables/Disables the SNMP feature. Default settings is “No”. |
Version | SNMP version. Select Version 1, Version 2 or Version 3. Default is “Version 3”. |
Port | SNMP port. The valid range is 161, 1025-65535. The default value is “161”. |
Community | SNMP Community. |
SNMP Trap Version | Trap version of the SNMP trap receiver.
The default is “Trap Version 2”. |
SNMP Trap IP | IP address of the SNMP trap receiver. |
SNMP Trap Port | Port of the SNMP trap receiver. The valid range is 162, 1025-65535. The default value is “162”. |
SNMP Trap Interval | The interval between each trap sent to the trap receiver. The valid range is 1 – 1440.The default value is “5”. |
SNMP Trap Community | Community string associated to the trap. It must match the community string of the trap receiver. |
SNMP Username | Username for SNMPv3 |
Security Level |
|
Authentication Protocol | Select the Authentication Protocol:
The default setting is “None”. |
Privacy Protocol | Select the Privacy Protocol:
The default setting is “None”. |
Authentication Key | Enter the Authentication Key. |
Privacy Key | Enter the Privacy Key. |
SNMP Trap Username | Username for SNMPv3 Trap. |
Trap Security Level |
|
Trap Authentication Protocol | Select the Trap Authentication Protocol:
The default setting is “None”. |
Trap Privacy Protocol | Select the Trap Privacy Protocol:
The default setting is “None”. |
Trap Authentication Key | Enter the Trap Authentication Key |
Trap Privacy Key | Enter the Trap Privacy Key. |
GXW42XX Example
Please refer to below steps to configure SNMP feature in GXW42XX:
- Access gateway’s web GUI under Maintenance 🡺 SNMP
- Set Enable SNMP to Yes.
- Choose the Version and enter the Community string (Should be the same as set in the receiver station).
- Enter the IP address of the NMS (Monitoring station) in SNMP Trap IP field (in our example it is 192.168.5.182)
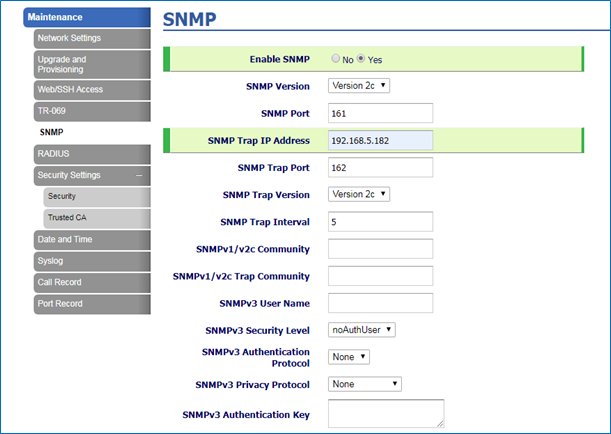
The Table below is describing all the SNMP parameters available on the GXW42xx series:
| Setting | Description |
|---|---|
Enable SNMP | Enables/Disables the SNMP feature. Default settings is No. |
Version | Version of SNMP Agent. |
Port | SNMP port (Default 161). |
IP address of the SNMP trap receiver. Users can set up to 3 different servers to send SNMP trap to. The trap servers’ addresses should be separated by a comma. | |
SNMP Trap Port | Port of the SNMP trap receiver (Default 162). |
SNMP Trap version | Version of SNMP Trap. |
SNMP Trap Interval | The interval between each trap sent to the trap receiver. |
SNMPv1/v2c Community | Name of SNMPv1/v2c community. |
SNMPv1/v2c Trap Community | Name of SNMPv1/v2c trap community. It must match the community string of the trap receiver. |
SNMPv3 User Name | User Name for SNMPv3. |
SNMPv3 Security Level |
|
SNMPv3 Authentication Protocol | Select the Authentication Protocol: “None” or “MD5” or “SHA”. |
SNMPv3 Privacy Protocol | Select the Privacy Protocol: “None” or “DES” or “AES”. |
SNMPv3 Authentication Key | Enter the Authentication Key. |
SNMPv3 Privacy Key | Enter the Privacy Key. |
SNMPv3 Trap Username | User name for SNMPv3 Trap. |
SNMPv3 Trap Security Level |
|
SNMPv3 Trap Authentication Protocol | Select the Authentication Protocol: “None” or “MD5” or “SHA”. |
SNMPv3 Trap Privacy Protocol | Select the Privacy Protocol: “None” or “DES” or “AES”. |
SNMPv3 Trap Authentication Key | Enter the Trap Authentication Key |
SNMPv3 Trap Privacy Key | Enter the Trap Privacy Key. |
Download MIB | Click on download to download the MIB file. |
TESTING SNMP FEATURE
After configuring SNMP on client devices, you can test SNMP feature using your enterprise management system or a free SNMP test tool.
In this document we will be using “iReasoning MIB browser” which is a free and easy to use SNMP tester that include a Trap receiver.
You can follow the steps below in order to test SNMP Traps using iReasoning TRAP receiver:
- Download MIB Browser Personal Edition from this link: http://ireasoning.com/download.shtml
- Double click “setup.exe” to start the installation
- Once the installation is done, the tool will be launched.
- Click on the “Trap receiver settings” menu as shown in the below screenshot
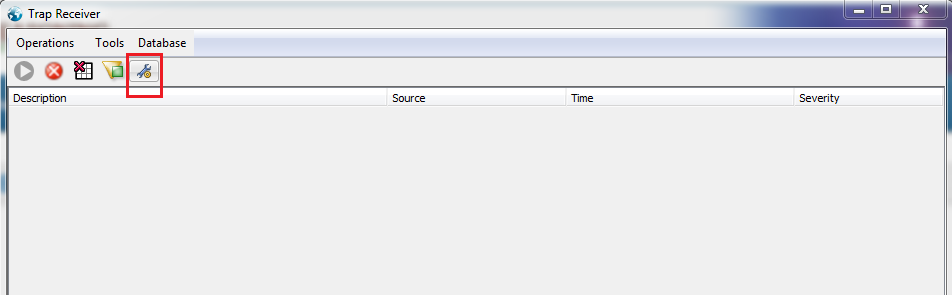

- Enter the Community password (It should be the same as set on the client device)
- Enter the IP address and SNMP port for Trap receiving (162 is the default)
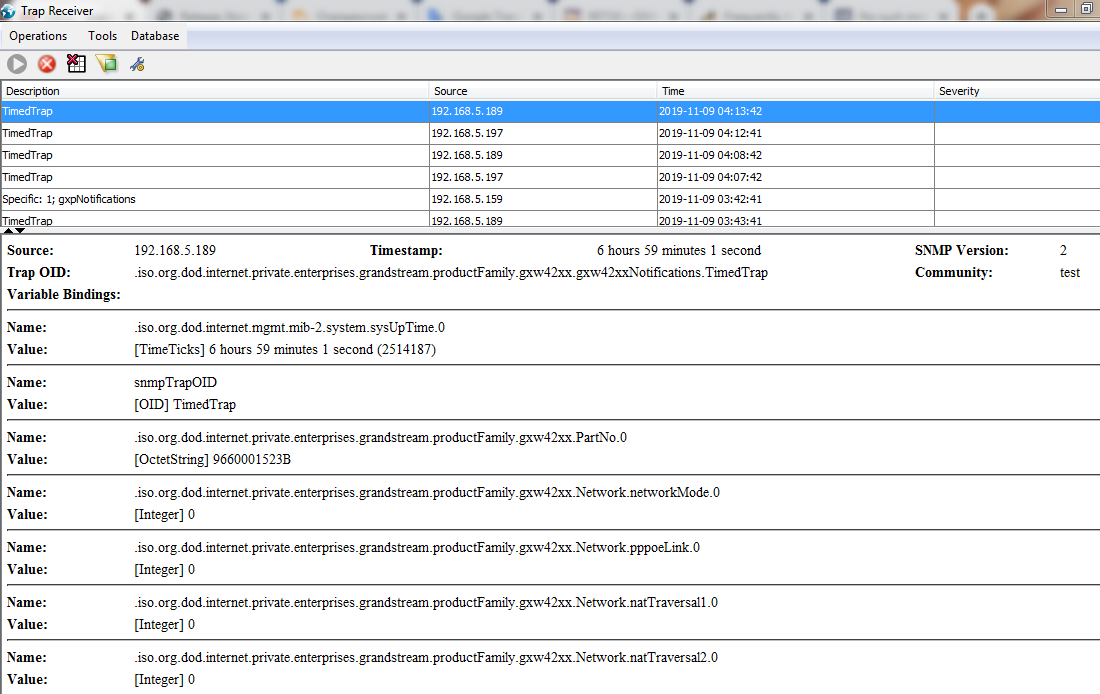
After configuring the parameters as shown above, you will start receiving traps at the interval set on the client devices.
Below screenshot is an example of the Traps received from the GXW42XX device:
PRODUCT MIB REFERENCE
To retrieve the MIB of a certain Grandstream product, please Submit a technical support ticket at https://helpdesk.grandstream.com/
SUPPORTED DEVICES
| Model | Supported | Firmware |
|---|---|---|
Model | Supported | Firmware |
GXP16xx | Yes | 1.0.4.128 or higher |
GXP21xx | Yes | 1.0.9.148 or higher |
GRP261x/GRP2624/GRP2634 | Yes | 1.0.1.7 or higher |
GRP260x | Yes | 1.0.3.18 or higher |
DP75X/GRP | Yes | 1.0.13.0 or higher |
HT8XX | Yes | 1.0.5.11 or higher |
GXW42XX | Yes | 1.0.5.5 or higher |
| GXV3370 | Yes | 1.0.3.44 or higher |
SUPPORTED SNMP VERSIONS
| Model / SNMP Version | Version 1 | Version 2 | Version 3 |
|---|---|---|---|
GXP16xx | Yes | Yes | Yes |
GXP21xx | Yes | Yes | Yes |
GRP261x/GRP2624/GRP2634 | Yes | Yes | Yes |
GRP260x | Yes | Yes | Yes |
DP75x | Yes | Yes | Yes |
HT8xx | Yes | Yes | Yes |
GXW42xx | Yes | Yes | Yes |
| GXV3370 | Yes | Yes | Yes |
SUPPORTED SNMP MESSAGES
| Model / SNMP Message | Get | GetNext | GetBulk | Set | Response |
|---|---|---|---|---|---|
GXP16xx | Yes | Yes | Yes | No | Yes |
GXP21xx | Yes | Yes | Yes | No | Yes |
GRP261x/GRP2624/GRP2634 | Yes | Yes | Yes | No | Yes |
GRP260x | Yes | Yes | Yes | No | Yes |
DP75x | Yes | Yes | Yes | No | Yes |
HT8xx | Yes | Yes | Yes | No | Yes |
GXW42xx | Yes | Yes | Yes | No | Yes |
| GXV3370 | Yes | Yes | Yes | No | Yes |