


Overview
BGP (Border Gateway Protocol) is a flexible and scalable routing protocol used to exchange network information between different systems, known as autonomous systems (AS). It uses path-vector routing to ensure optimal data paths and allows fine-grained control over routing policies. This flexibility makes BGP essential for connecting organizational networks or internet service providers (ISPs), enabling efficient traffic management and global data exchange.
Supported Devices
The following device series support BGP, providing robust and dynamic routing capabilities for modern network environments:
Device Type | Series |
Switches | GWN78xx Layer 3 Series |
Routers | GWN700x Series |
Convergence Solutions | GCC601x Series, GCC602x Series |
Supported Devices
For more information about these devices, visit Grandstream.
Networking Scenario
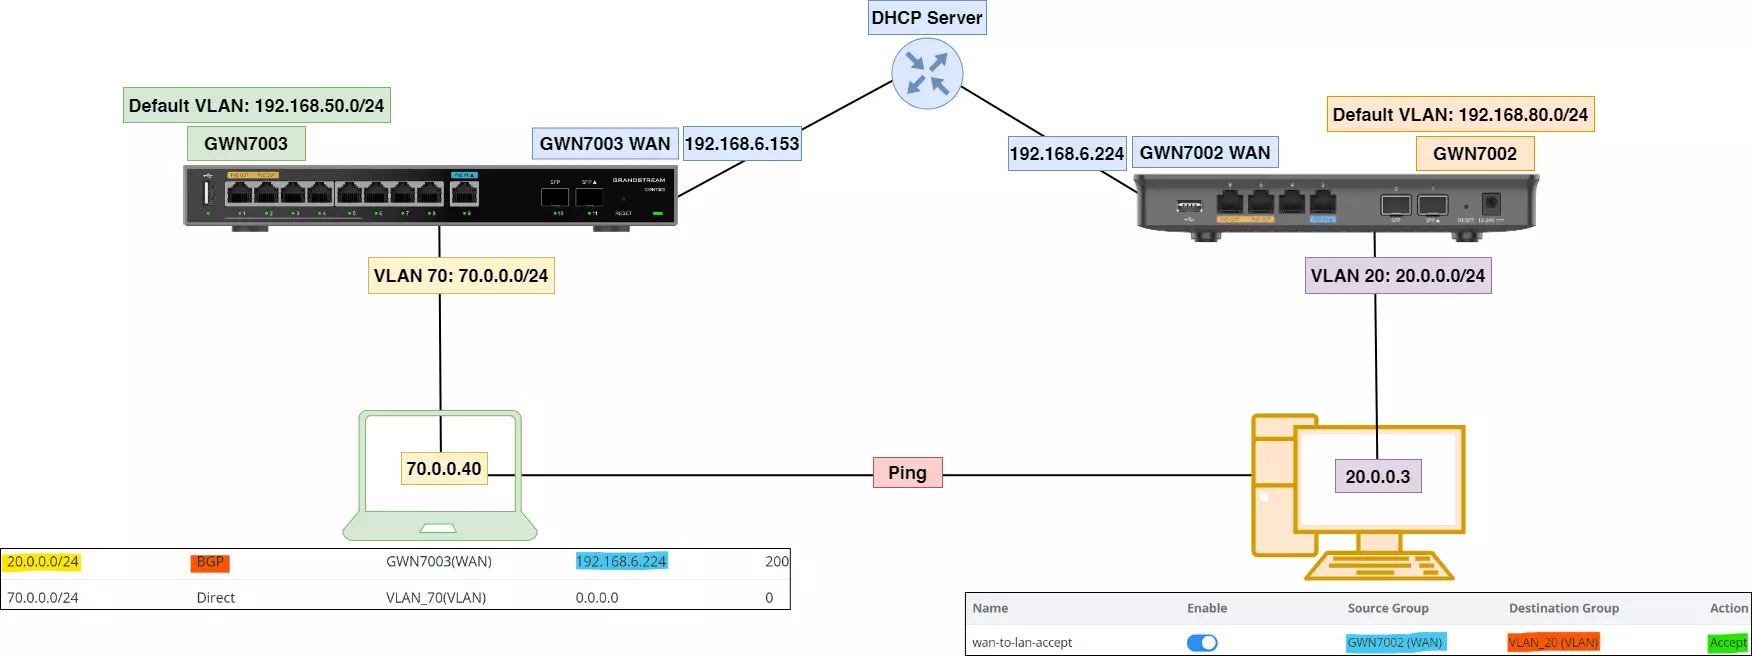
Overview:
- Devices:
- Router 1 (GWN7003): Default VLAN: 192.168.50.0/24, WAN IP: 192.168.6.153, VLAN 70: 70.0.0.0/24.
- Router 2 (GWN7002): Default VLAN: 192.168.80.0/24, WAN IP: 192.168.6.224, VLAN 20: 20.0.0.0/24.
- BGP Details:
- Router 1 (AS 1) peers with Router 2 (AS 1).
- Router 1 advertises VLAN 70.
- Router 2 advertises VLAN 20.
- Firewall Rule: A WAN-to-LAN rule is enabled to permit communication between the routers.
Global Settings
Follow these steps to configure BGP Global Settings for the router (e.g, GWN7002 and GWN7003). Additionally, enabling direct routing allows the router to dynamically learn and manage routes directly from connected networks or protocols without relying on intermediary configurations. This ensures seamless communication by automatically updating routing tables with the most accurate and efficient paths:
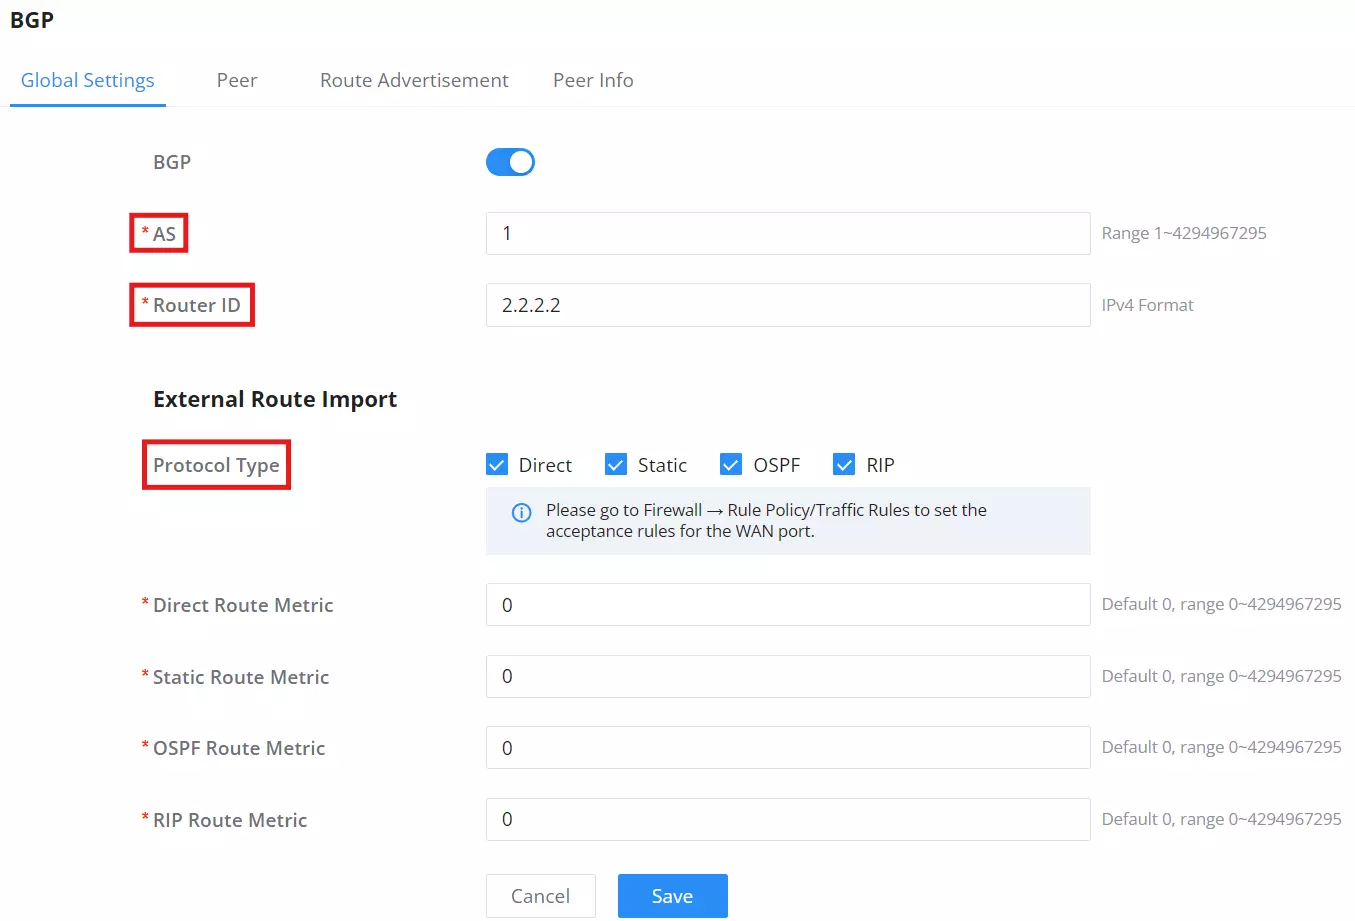
- Navigate to Routing → BGP → Global Settings to access the global configuration options.
- Enable BGP Protocol: Check the option to enable BGP.
- Set the AS Number: Enter the unique Autonomous System number.
- Assign a Router ID: This should be a unique identifier for the device.
- Optionally, import external routes from Direct, Static, OSPF, or RIP protocols.
Configuring Firewall Rules
To allow BGP to function correctly, appropriate firewall rules must be configured to permit WAN-to-LAN traffic based on VLANs:
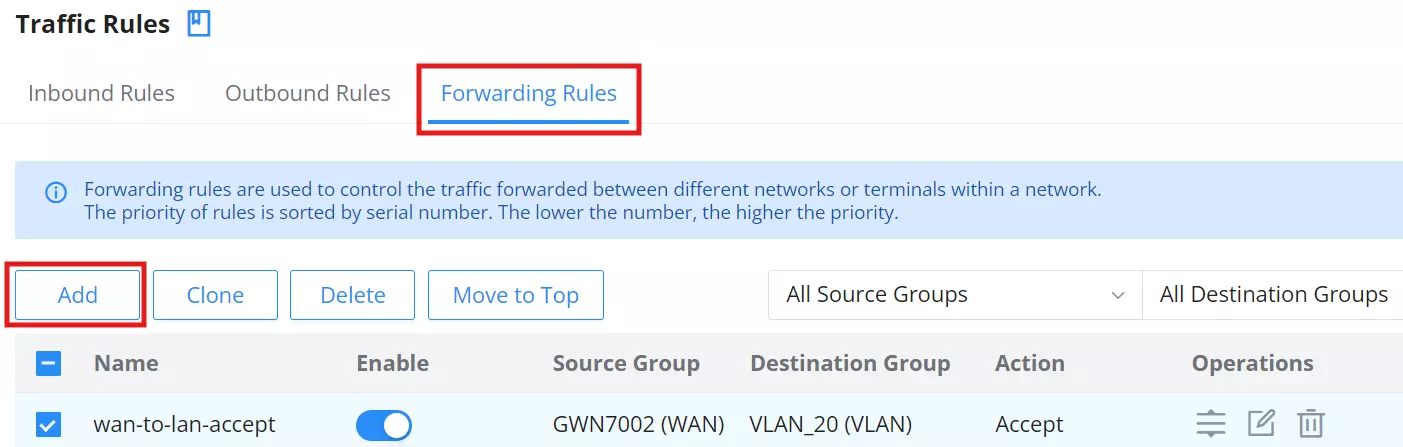
- Navigate to Firewall → Traffic Rules → Forwarding Rules.
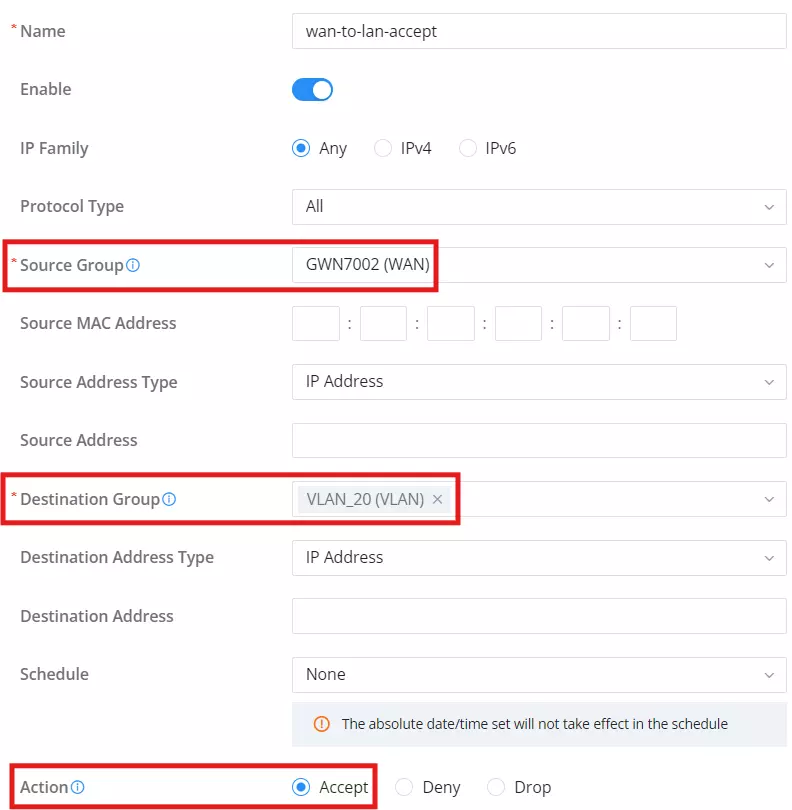
- Add a new rule with the following settings:
- Name: Assign a descriptive name, e.g., wan-to-lan-accept.
- Source Group: Select the WAN interface of the router, e.g., GWN7003 (WAN).
- Destination Group: Select the VLAN created on the router, e.g., VLAN_70
- Action: Set to
Acceptto allow traffic. - Protocol Type: Set to All or specify the necessary protocol.
Establishing Peers
Navigate to Routing → BGP → Peer to configure peer relationships:
To exchange BGP messages between devices, establish a peer relationship. For example, Router 1 (GWN7003) can be configured to peer with Router 2 (GWN7002) by setting Router 1’s Remote AS to match Router 2’s AS (1) and using Router 2’s WAN IP (192.168.6.224) as the peer address. The configuration is the same for both GWN7002 and GWN7003 routers.

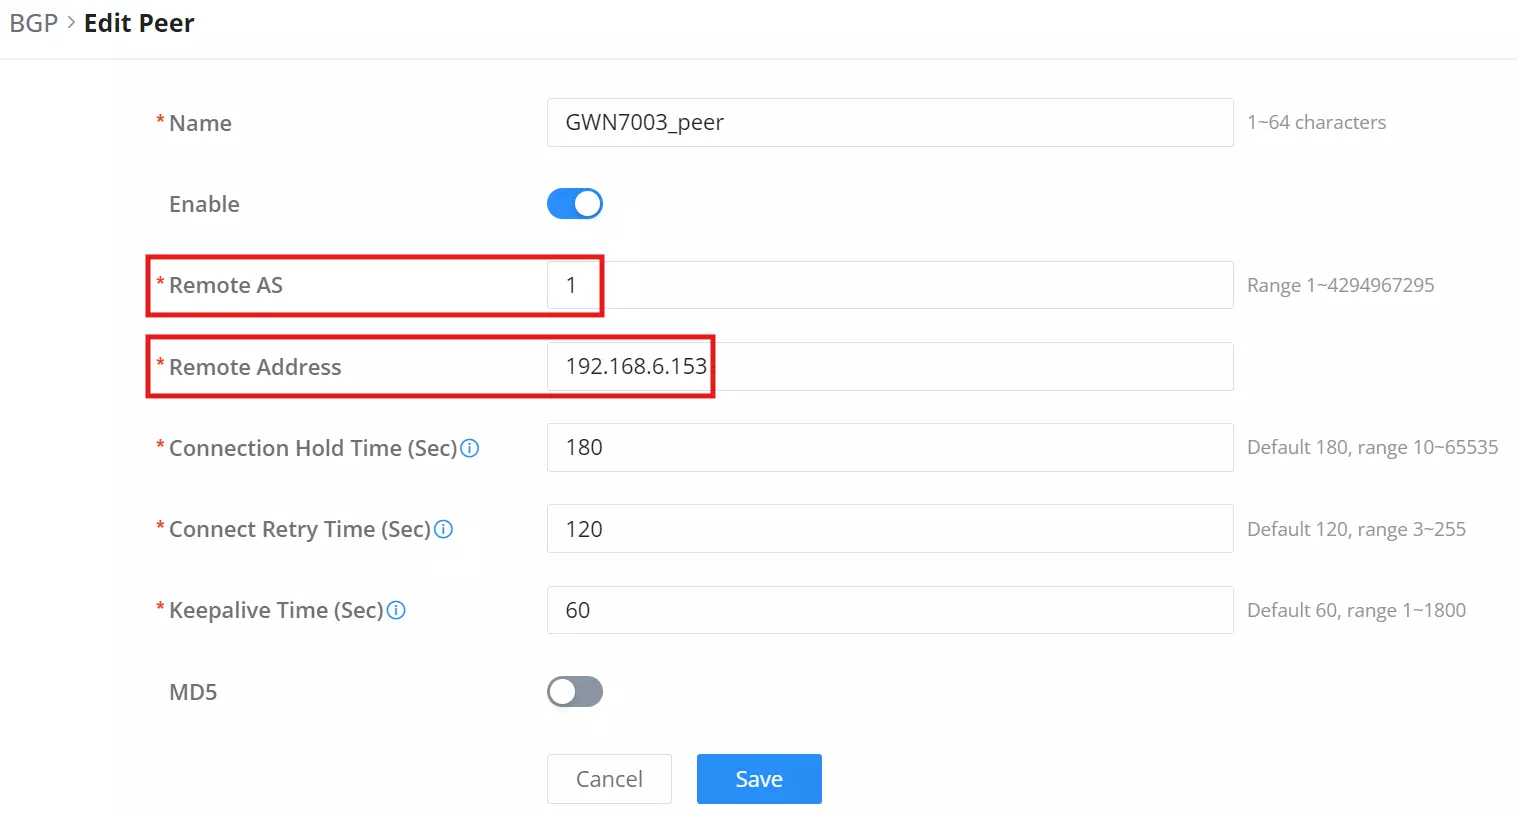
- Navigate to the Peer tab.
- Click the Add button.
- Configure the following:
- Name: Assign a descriptive name, e.g., GWN7003_peer.
- Enable: Toggle to enable the peer.
- Remote AS: Set to 1.
- Remote Address: Use the WAN IP of the peer router, e.g., 192.168.6.153 for GWN7003.
- Connection Hold Time (Sec): Set to 180 (default).
- Connect Retry Time (Sec): Set to 120 (default).
- Keepalive Time (Sec): Set to 60 (default).
Route Advertisement
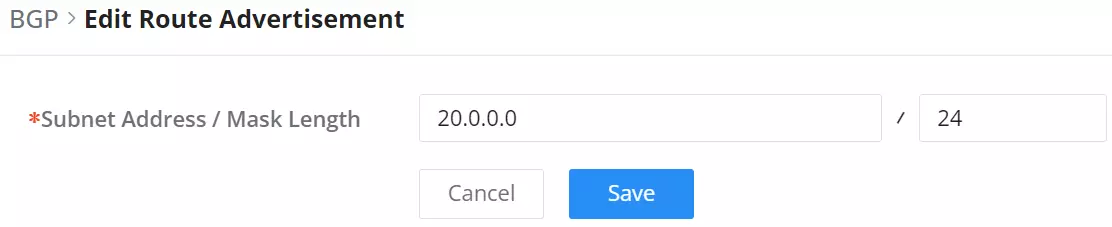
Navigate to Routing → BGP → Route Advertisement to configure subnets that will be advertised to peers. The configuration is the same for both routers.
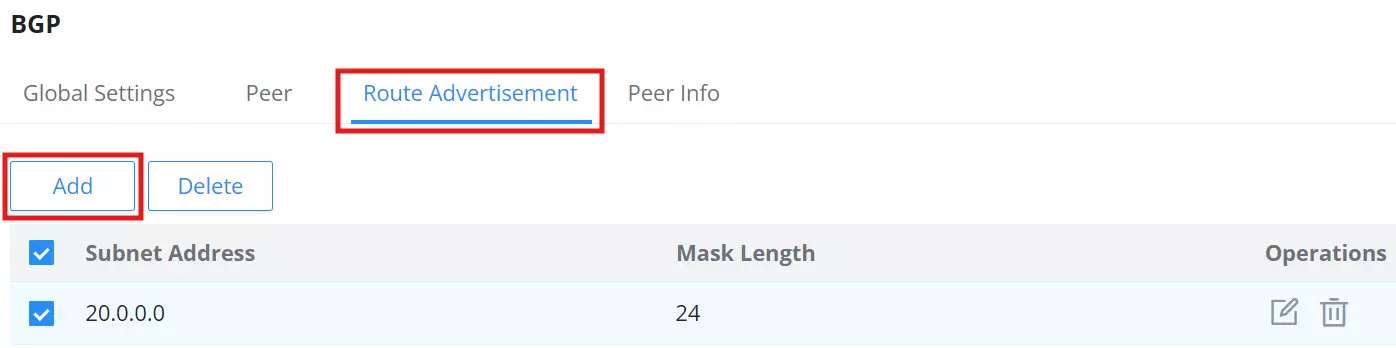
- Navigate to the Route Advertisement tab.
- Click the Add button.
- Enter the following details:
- Subnet Address: Specify the subnet address, e.g., 20.0.0.0 for GWN7002 or 70.0.0.0 for GWN7003.
- Mask Length: Set to 24.
- Save the configuration.
Monitoring Peer Information
Navigate to Routing → BGP → Peer Info to monitor the status of BGP peers. The configuration and view are the same for both routers.
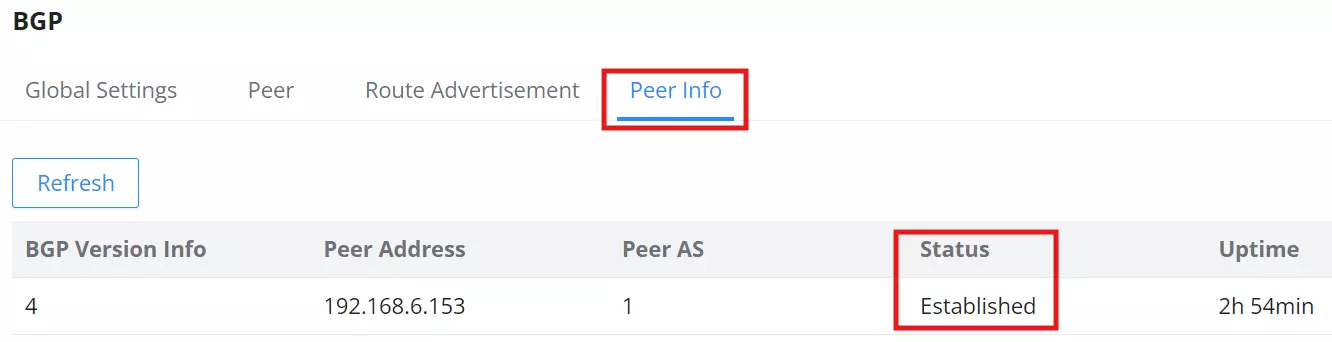
- Peer Address: Confirm the IP address of the peer, e.g., 192.168.6.153 for GWN7002.
- Status: Check if the connection status is
Established.
Viewing Routing Tables
Navigate to Routing → Routing Table to view and verify BGP routes. The configuration and view are the same for both routers.
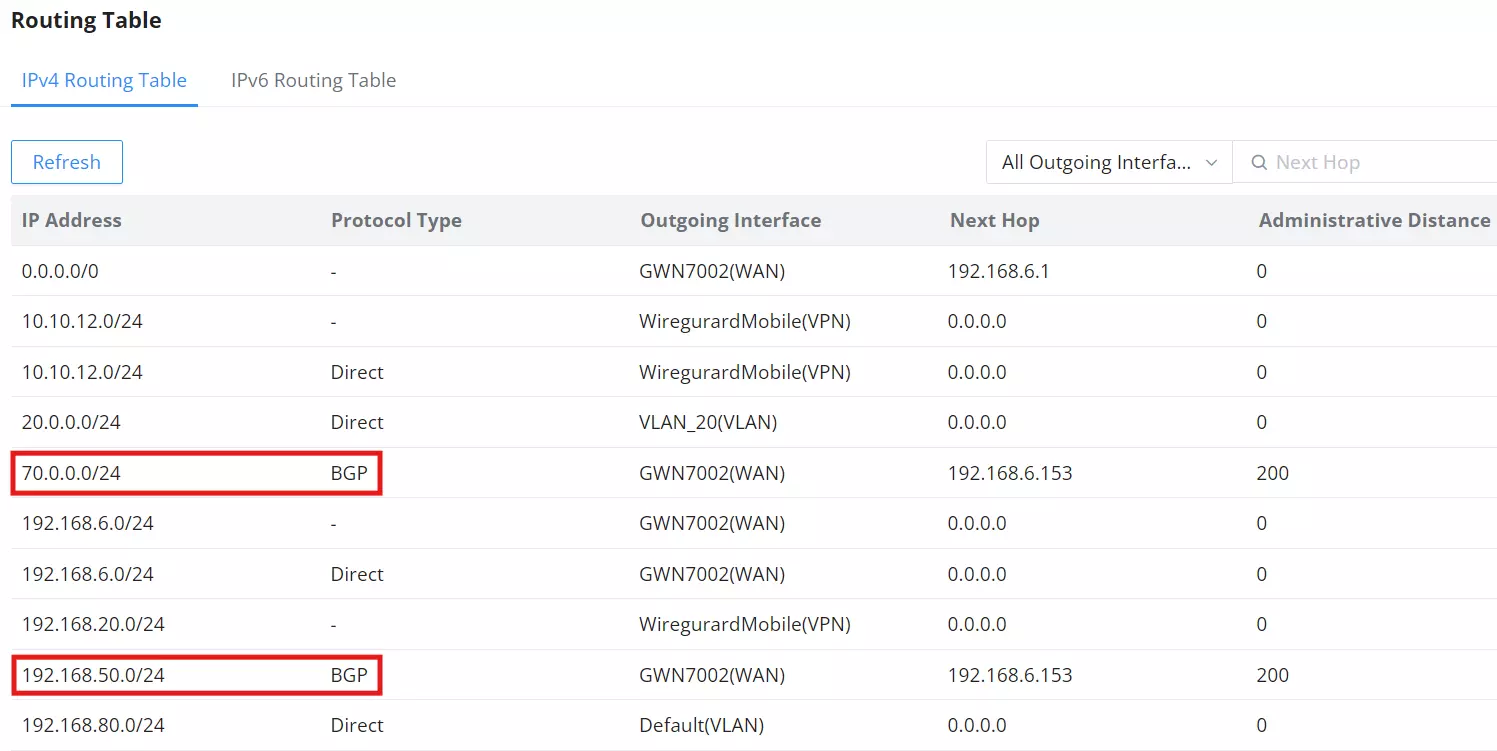
Inspect the table to ensure the following routes are learned.
- Subnet: 20.0.0.0/24 via BGP on GWN7003.
- Subnet:
70.0.0.0/24via BGP on GWN7002.