Overview
RIP (Routing Information Protocol) is one of the oldest and simplest dynamic routing protocols used in networks. It operates by periodically broadcasting the entire routing table to its neighboring routers, ensuring that all devices share a consistent view of the network topology. Using a hop-count metric, RIP determines the best path to a destination, with a maximum allowable hop count of 15, making it ideal for small to medium-sized networks.
Supported Devices
The following device series support RIP, providing robust and dynamic routing capabilities for modern network environments:
Device Type | Series |
Switches | GWN78xx Layer 3 Series |
Routers | GWN700x Series |
Convergence Solutions | GCC601x Series, GCC602x Series |
Supported Devices
For more information about these devices, visit Grandstream.
Networking Scenario
RIP facilitates automatic learning and updating of routes in a network. It shares routing information periodically, ensuring updated and efficient communication paths. Below is an example scenario to illustrate RIP in action:
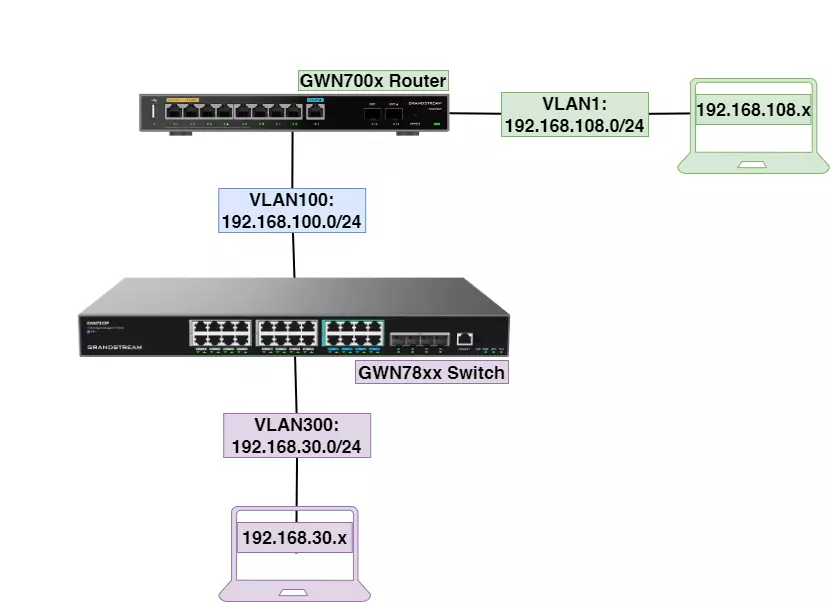
- Network Topology: Refer to the diagram below for a visual representation of the network setup. The topology includes:
- A GWN700x Router connected to multiple VLANs through a GWN78xx Switch.
- VLAN1: 192.168.108.0/24 (connected to PC1).
- VLAN100: 192.168.100.0/24.
- VLAN300: 192.168.30.0/24 (connected to PC2).
- Objective: Ensure seamless communication between devices across VLANs using RIP.
Global Settings
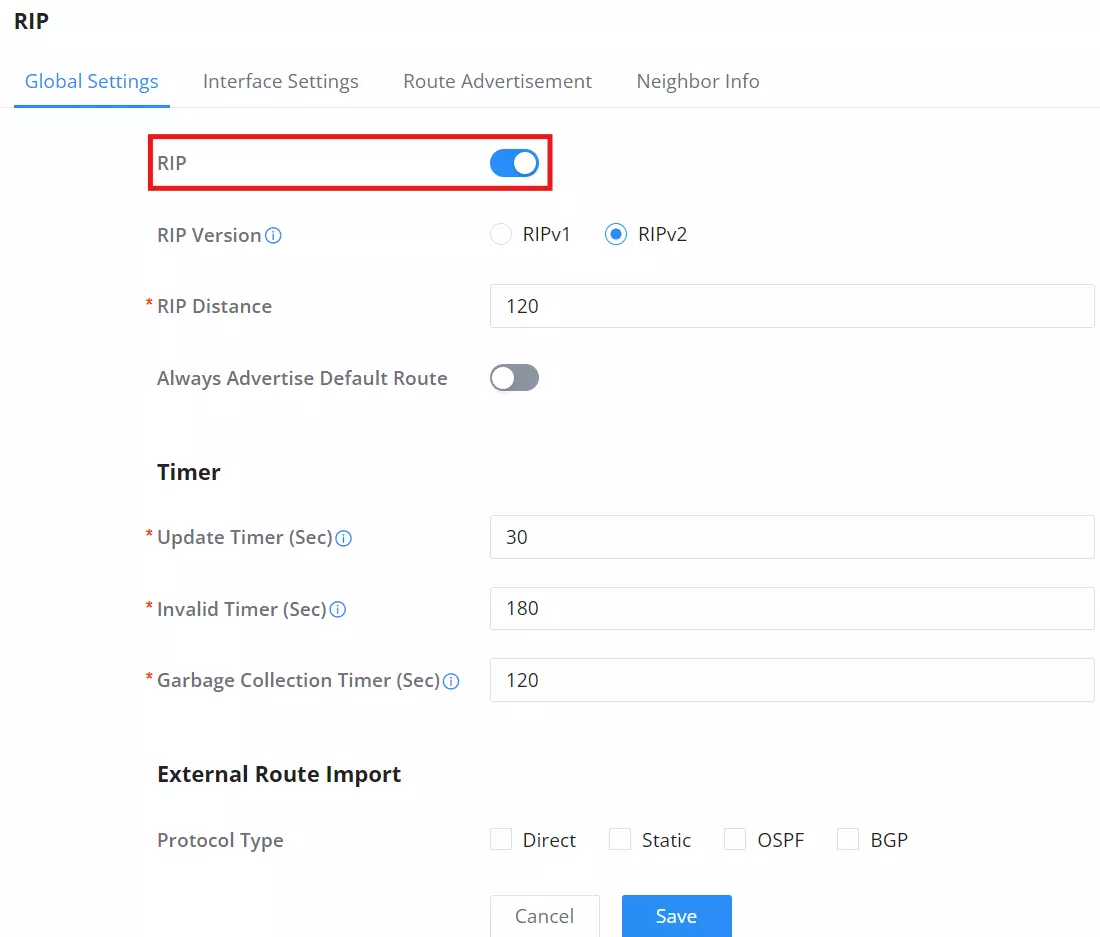
To configure global parameters for RIP, navigate to Routing → RIP → Global Settings. The global settings include:
- Enable RIP: Turn on RIP for the router.
- RIP Distance and Timers: Configure parameters like Update Timer, Invalid Timer, and Garbage Collection Timer. The screenshot below illustrates the available options for RIP global configuration.
Interface Settings
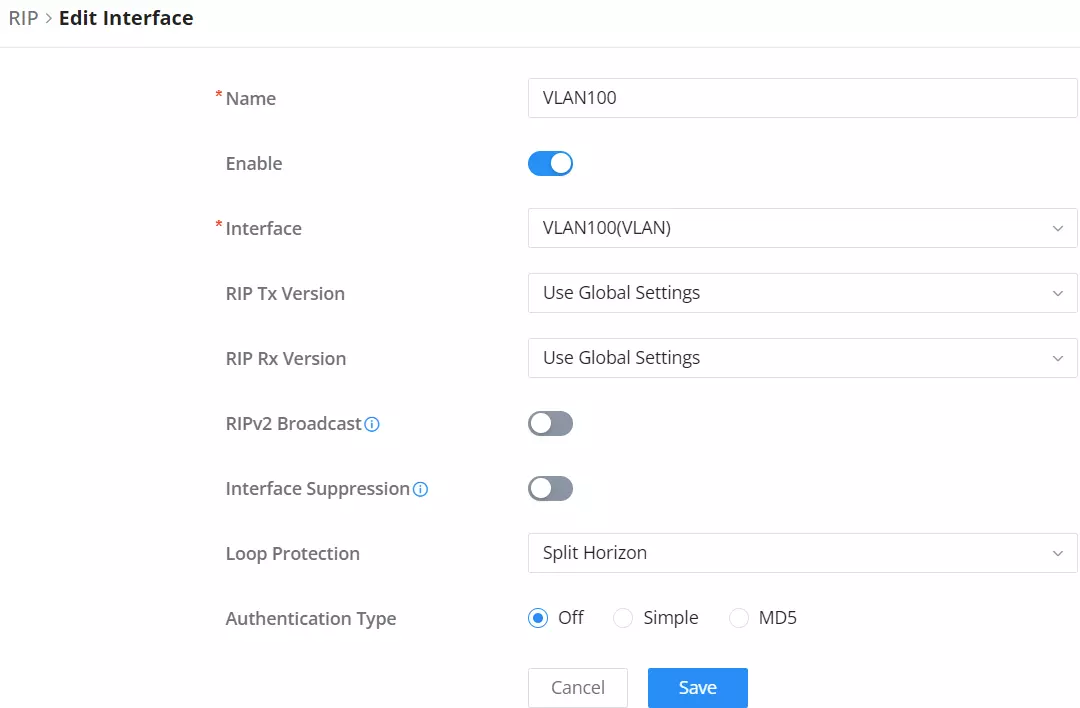
The Interface Settings tab enables you to configure individual interfaces efficiently. Key settings include adding or editing interfaces (e.g., VLANs), enabling RIP, and adjusting configurations like RIP Tx/Rx versions and loop protection. These options ensure seamless route propagation and network stability in hybrid environments.
To add an interface, navigate to Routing → RIP → Interface Settings tab, then click on “Add” button.

The screenshot below provides an example of the Interface Settings tab, where VLAN100 is configured for RIP:
Route Advertisements
RIP periodically broadcasts route information to neighboring routers. To manage route advertisements:
- Navigate to the Route Advertisements tab.
- View the advertised routes. The screenshot below shows the advertised subnets configured for RIP:

- To add a new advertisement, click the Add button and specify the Subnet Address and Mask Length. The screenshot below demonstrates the configuration for a specific route advertisement:

Neighbor Information
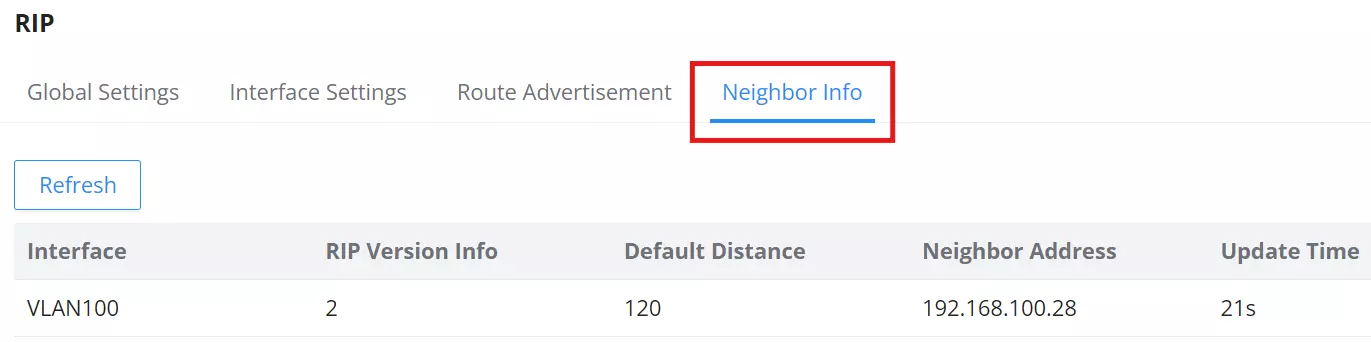
To view details of neighboring routers participating in RIP, navigate to the Neighbor Info tab. This step is crucial for confirming connectivity with other routers and troubleshooting issues in the RIP process. This table provides an overview of neighbors detected under the current RIP process. The screenshot below shows an example of neighbor information:
Verifying Route Learning
To ensure that RIP is functioning correctly and routes are being learned:
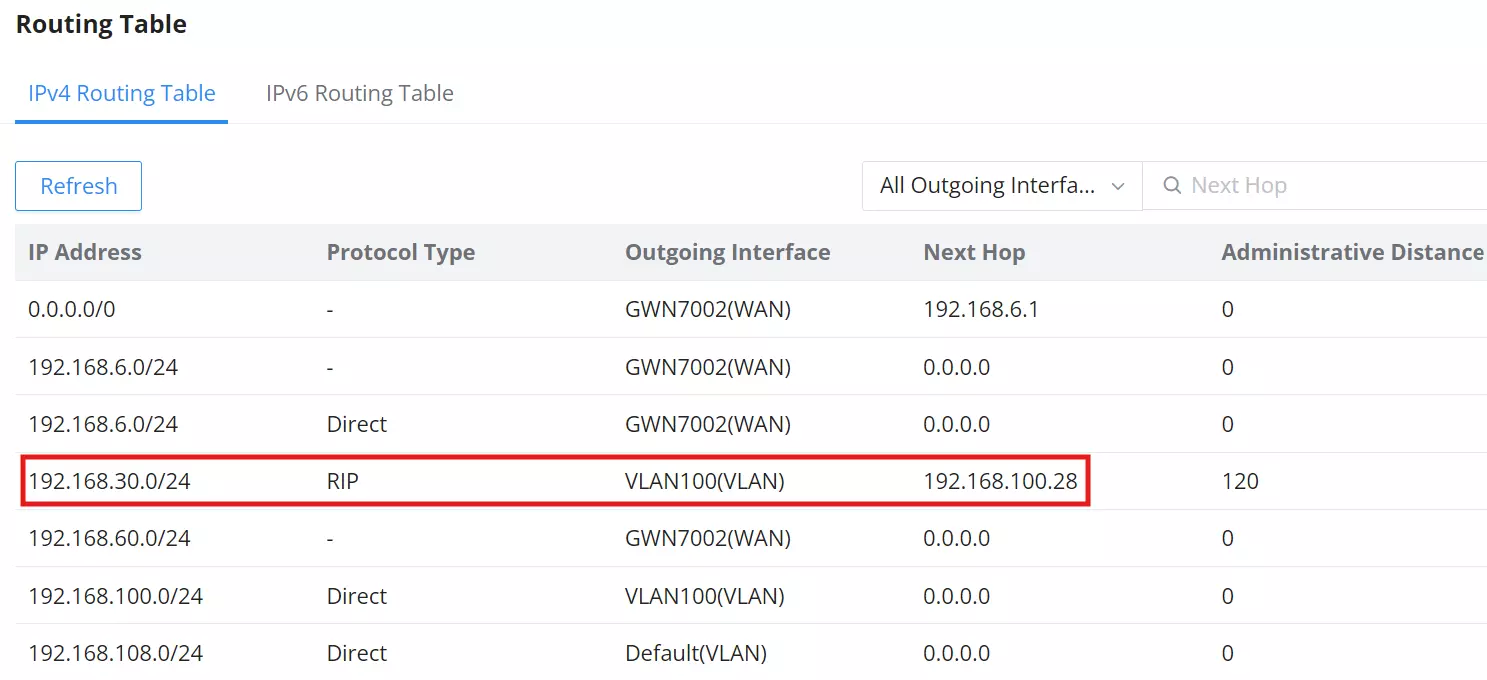
- Navigate to Routing → Routing Table on the router or switch. Check for common issues, such as missing RIP entries, incorrect next-hop addresses, or mismatched administrative distances, which can indicate configuration or connectivity problems.
- Review the routing table entries.
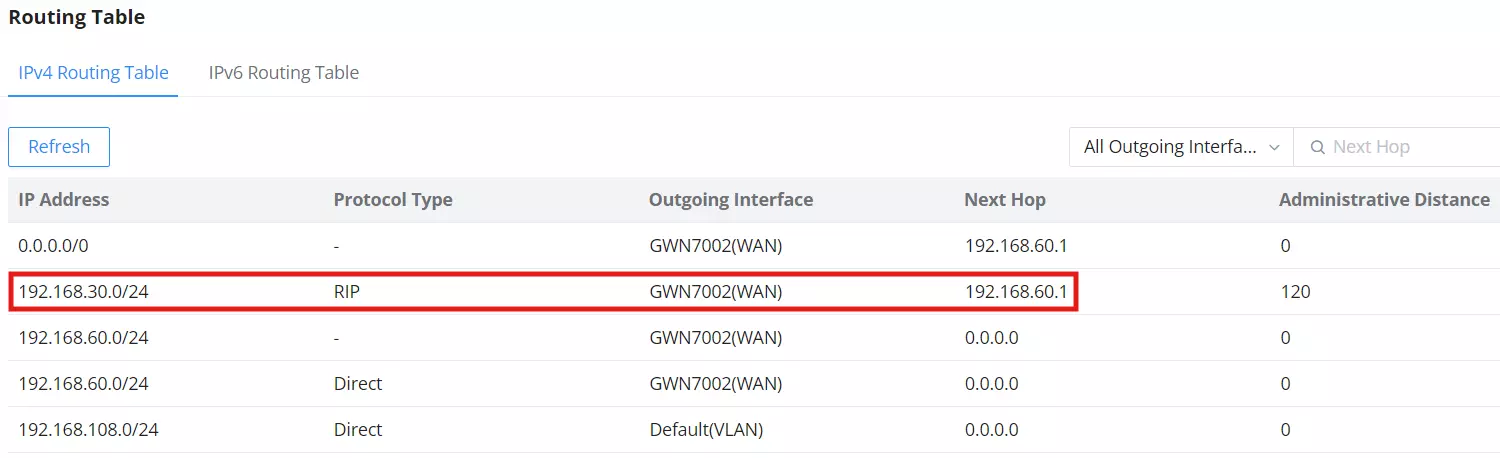
- Verify that routes learned via RIP are listed under the “Protocol Type” column as “RIP.”
- Confirm the next hop and administrative distance values for the RIP-learned routes.
The screenshot below provides an example of a routing table with RIP-learned routes highlighted:
Importing External Routes
This section focuses on scenarios where the router connects to external networks, such as using the WAN port or integrating with another dynamic protocol. Enabling external route import facilitates seamless route exchange and enhances network integration by allowing the router to advertise and learn routes dynamically from diverse sources. This capability is particularly useful for maintaining efficiency in mixed protocol environments or when routing traffic across distinct network segments like WAN and LAN.
Networking Scenario (External Route Import)
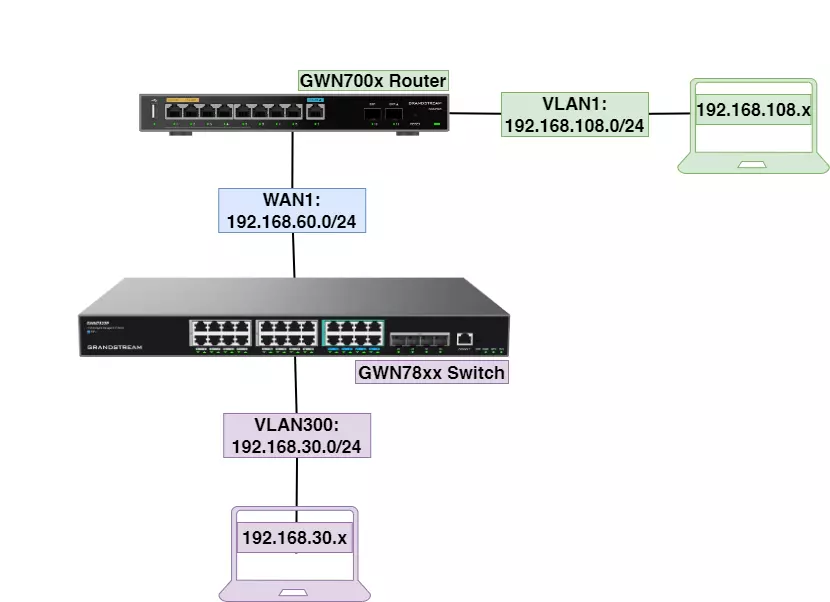
- Topology: Refer to the diagram below:
- The GWN700x Router connects to the GWN78xx Switch via the WAN interface (192.168.60.0/24).
- VLAN300 on the switch is 192.168.30.0/24, connected to PC2.
- Objective: Enable communication between devices across the WAN and VLAN using RIP and external route imports.
- Enable External Route Import
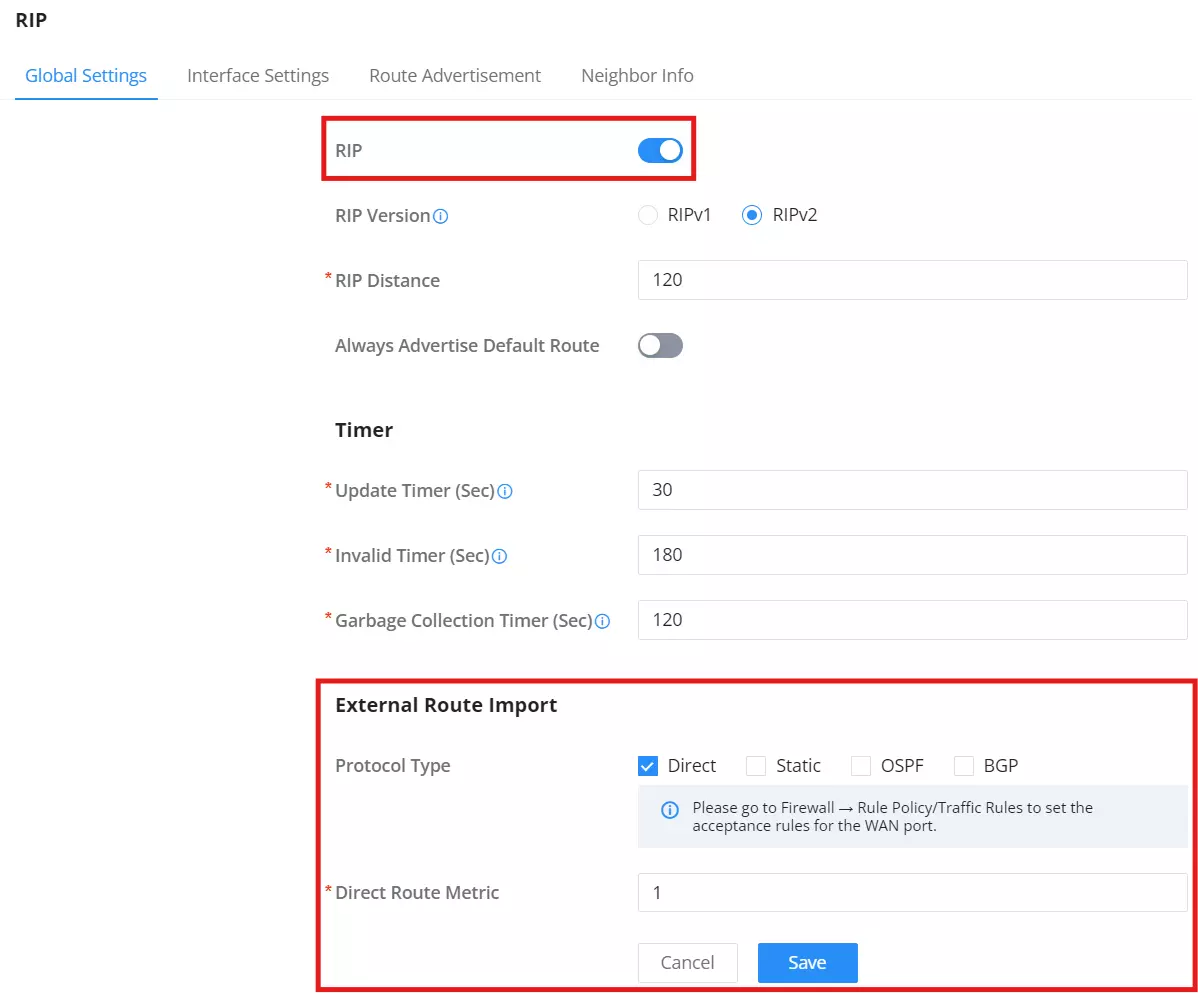
Enabling external route import simplifies the integration of different routing protocols and allows for seamless inclusion of directly connected networks into the routing process. For example, enabling the “Direct” option allows the router to advertise directly connected routes through RIP. This approach improves network flexibility by facilitating efficient route propagation across dynamic and hybrid topologies. It also supports environments with mixed routing protocols, such as BGP and OSPF, enhancing scalability and optimizing resource use.
To start, navigate to Routing → RIP → Global Settings on the router.
- Enable External Route Import and select the necessary protocol types (e.g., Direct, Static, OSPF, BGP).
- Configure the Route Metric for imported routes to prioritize them in the routing table.
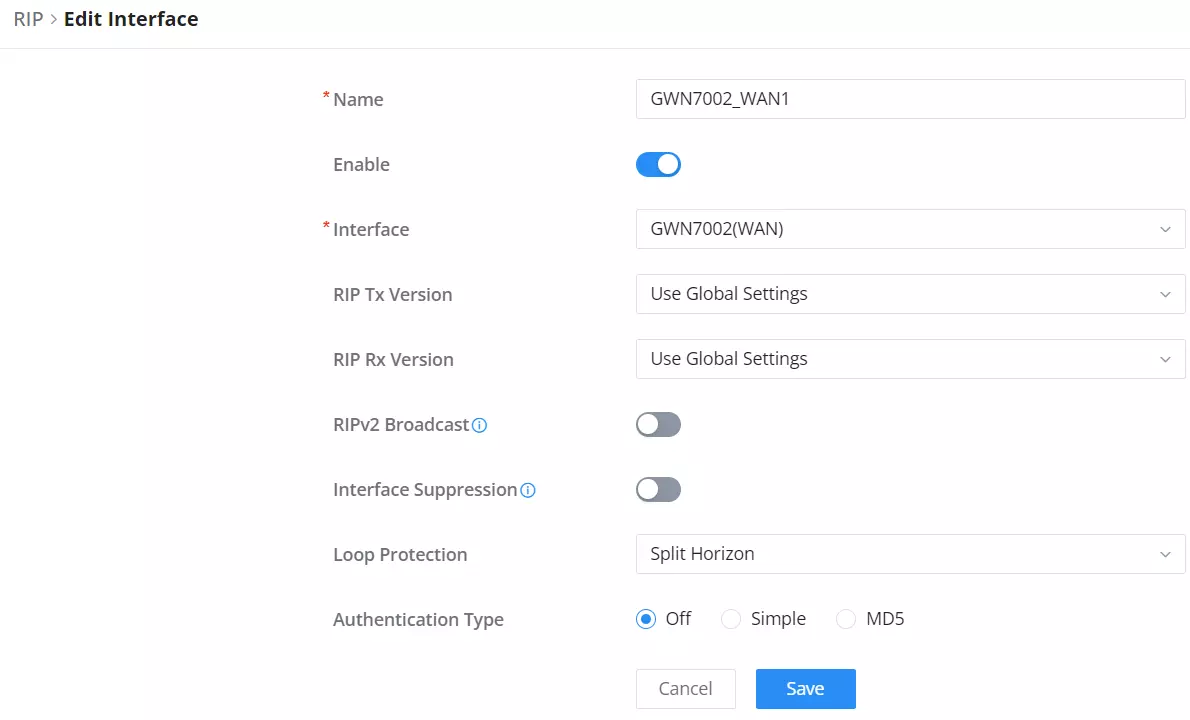
- Enable the WAN Interface
The Router is connected to the Switch using the WAN port, thus the WAN interface has to be enabled under Interface Settings tab.

Configuring Firewall Rules
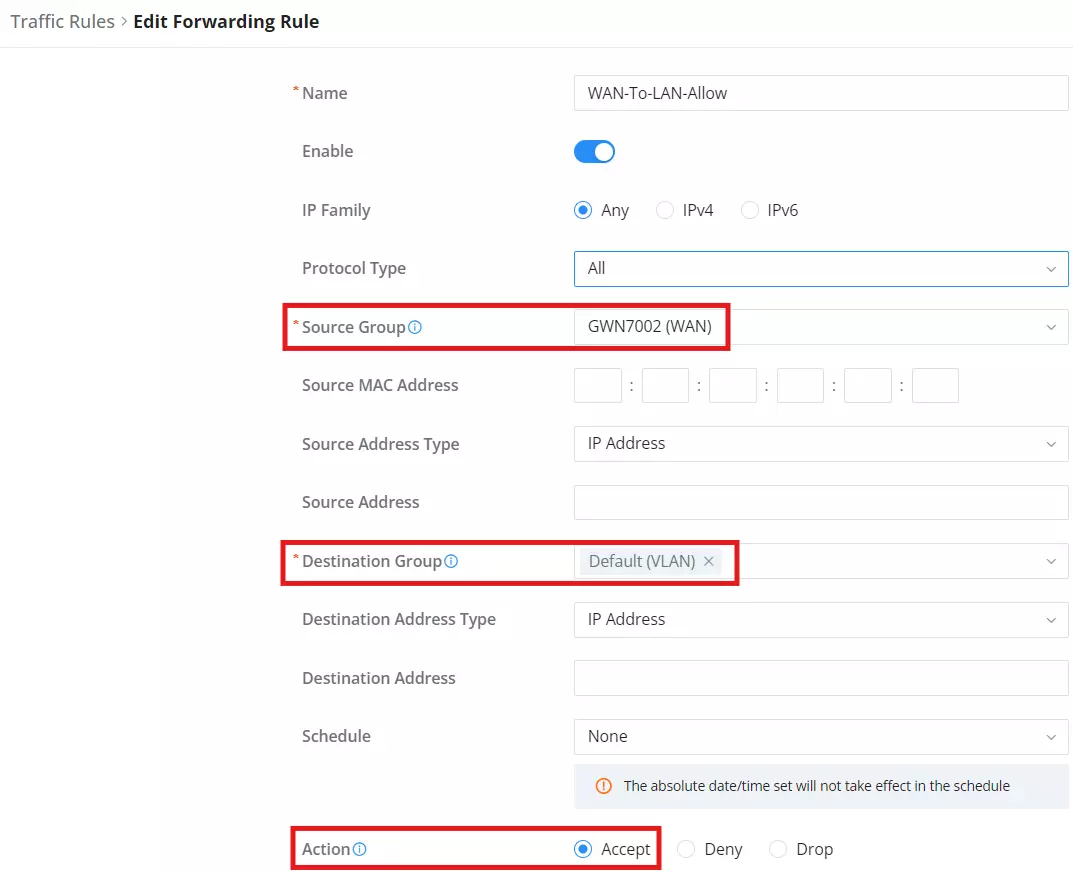
To allow RIP to function correctly, appropriate firewall rules must be configured to permit WAN-to-LAN traffic based on VLANs:
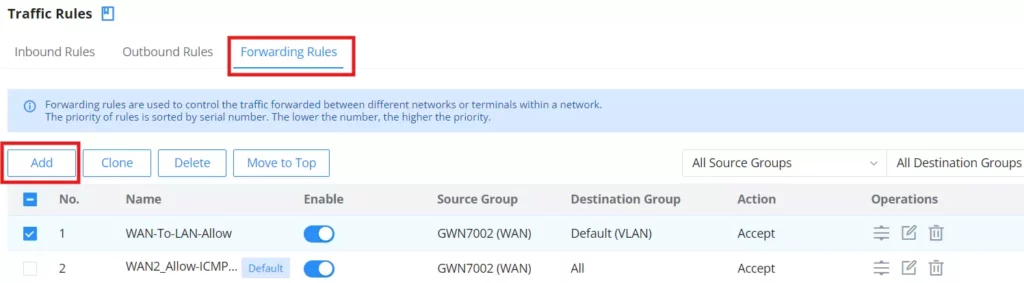
- Navigate to Firewall → Traffic Rules → Forwarding Rules.
- Add a new rule with the following settings:
- Name: Assign a descriptive name, e.g., wan-to-lan-accept.
- Source Group: Select the WAN interface of the router, e.g., GWN7002 (WAN).
- Destination Group: Select the VLAN created on the router, e.g., Default(VLAN) for GWN7002.
- Action: Set to
Acceptto allow traffic. - Protocol Type: Set to All or specify the necessary protocol.
Verify External Route Propagation
Check the routing table to confirm that external routes are being advertised via RIP.
Ensure proper communication across network segments.