Thank you for purchasing the Grandstream DECT VoIP Handset.
The DP735 is a ruggedized DECT cordless IP phone that allows users to mobilize their VoIP network throughout any business, warehouse, retail store, or residential environment. It is supported by Grandstream’s DP750, DP752, and DP755 DECT VoIP base stations and delivers a combination of mobility and top-notch telephony performance. Up to 10 DP735 handsets are supported on each base station (DP755) while each DP735 supports a range of up to 400 meters outdoors (with DP755) and 50 meters indoors with 65 hours of talk time and 650 hours standby time. It features a suite of robust telephony features including support for up to 20 SIP accounts per handset (with DP755), full HD audio, a 2.4-inch color TFT LCD display, a 3.5mm headset jack, push-to-talk, a speakerphone, and more. When paired with Grandstream’s DECT Base Stations, the DP735 is a high-end handset that offers a powerful cordless DECT solution for any business or residential user.
The DP730 is a DECT cordless IP phone offering mobility and top telephony performance, compatible with Grandstream’s DP750, DP752, and DP755 DECT VoIP base stations. Each base station supports up to 10 DP730 handsets, with a range of up to 400 meters outdoors and 50 meters indoors. Features include support for up to 20 SIP accounts per handset, full HD audio, a 2.4-inch color display, a 3.5mm headset jack, push-to-talk, and speakerphone, making it ideal for businesses or homes when paired with Grandstream’s DECT Base Stations.
The DP725 is a DECT cordless IP phone offering mobility and top telephony performance, compatible with Grandstream’s DP750, DP752, and DP755 DECT VoIP base stations. Each base station supports up to 10 DP725 handsets, with a range of up to 400 meters outdoors and 50 meters indoors. Features include support for up to 20 SIP accounts per handset, full HD audio, a 1.8-inch color display, a 3.5mm headset jack, push-to-talk, and speakerphone, making it an affordable mid-range cordless DECT solution for business or residential users when paired with Grandstream’s DECT Base Stations.
The DP722 is a DECT cordless IP phone providing mobility and top telephony DP72x/DP73x – Headset Compatibility performance, compatible with Grandstream’s DP750, DP752, and DP755 DECT VoIP base stations. Each base station supports up to 10 DP722 handsets, with a range of 350 meters outdoors and 50 meters indoors. Features include support for up to 20 SIP accounts per handset, full HD audio, a 1.8-inch color display, a 3.5mm headset jack, push-to-talk, and speakerphone, making it an ideal cordless DECT solution for business or residential users when paired with Grandstream’s DECT Base Stations.
The DP720 is a DECT cordless VoIP phone offering mobility and top telephony performance, compatible with Grandstream’s DP750, DP752, and DP755 DECT VoIP base stations. Each base station supports up to 10 DP720 handsets, with a range of 300 meters outdoors and 50 meters indoors. Features include support for up to 20 SIP accounts per handset, full HD audio, a 1.8-inch color display, a 3.5mm headset jack, push-to-talk, and speakerphone, making it an ideal cordless VoIP solution for business or residential users when paired with Grandstream’s DECT Base Station.
Important
DP75x
For all DP series, once upgraded to 1.0.19.X, downgrading to 1.0.17.5 or lower firmware versions is not supported.
For all DP series, once upgraded to 1.0.17.X, downgrading to 1.0.15.6 or lower firmware versions is not supported.
For all DP series, once upgraded to 1.0.13.10 or higher, downgrading to 1.0.13.8 or lower firmware versions is not supported. It is recommended not to downgrade from 1.0.15.2 to 1.0.13.10.
For all DP series, once upgraded to 1.0.7.5 or higher, downgrading to 1.0.4.10 or lower firmware versions is not supported.
Since firmware 1.0.7.5, support has been added for a new format of P values. For the old <Pxx>value</Pxx> format in the XML configuration file, use <config version=”1″>. For the new format <item name=”xx.xx.xx.xx.xx”>value</item>, use <config version=”2″>. DP7xx supports both XML configuration formats but will not work if the version number is incorrect.
DP730/DP720/DP722
Upgrading from 1.0.7.5 to 1.0.9.1 or higher requires updating both firmware and resource images. The device will download and reboot twice. After upgrading to 1.0.9.1 or higher, the upgrade process will occur only once as usual.
DP720
After the base station (DP750 or DP752) is upgraded to 1.0.7.5, the DP720 handset will not automatically upgrade because the GUI has changed since 1.0.4.10. Users must manually upgrade the handset firmware via Menu → Settings → Firmware Upgrade.
DP750/DP720/DP760
Once upgraded to 1.0.4.2 or higher, downgrading to 1.0.3.40 or lower firmware versions is not supported.
DP750/DP720
Once upgraded to 1.0.3.23 or higher, downgrading to 1.0.3.17 or lower firmware versions is not supported.
Once upgraded to 1.0.3.17 or higher, downgrading to 1.0.2.16 or lower firmware versions is not supported.
Once upgraded to 1.0.2.16 or higher, downgrading to 1.0.1.x or lower firmware versions is not supported.
Firmware 1.0.0.99 (the first publicly released beta firmware) and all later versions can upgrade directly to 1.0.4.7 without requiring transitional firmware.
PRODUCT OVERVIEW
Feature Highlights
The following tables contain the major features of the DP handsets:
DP735
DP735
DECT cordless HD.
2.4 inch (240×320) color TFT LCD.
650 hours standby / 65 hours talk time .(Laboratory data)
21 languages embedded.
Up to 20 accounts.
3-way audio conferencing.
Ruggedized design with IP67 Rated-Water-proof and dust-proof.
The following table resumes all the technical specifications including the protocols/standards supported, voice codecs, telephony features, languages, and upgrade/provisioning settings for the DP735 handset:
Air Interface
Telephony standards: DECT Frequency bands:
1880 – 1900 MHz (Europe), 1920 – 1930 MHz (US), 1910 – 1920 MHz (Brazil), 1786 – 1792 MHz (Korea), 1893 – 1906 MHz (Japan), 1880 – 1895 MHz (Taiwan) Number of Channels: 10 (Europe), 5 (US, Brazil or Japan), 3 (Korea), 8 (Taiwan) Outdoor Range: up to 400 meters (DP752/DP755) or up to 300 meters (DP750) Indoor Range: up to 50 meters
Peripherals
2.4 inch (240×320) color TFT LCD 27 keys including 3 soft keys, 5 navigation/ menu keys, 4 dedicated function keys for SPEAKERPHONE, MUTE, SEND, POWER/END, 3 side keys including 2 volume (up and down) and 1 Push-to-Talk key 3-color MWI LED 3.5mm headset jack Proximity and accelerometer sensors Removable belt clip Micro-B USB port for alternative charging and non-battery operation Vibration Ring Mode
Protocol/Standards
Hearing Aid Compatibility (HAC) compliant
Voice Codecs
G.722 codec for HD audio and G.726 codec for narrow band audio (G.711μ/a-law,G.723.1, G.729A/B, iLBC and OPUS are supported via companion DECT base station), AEC, AGC, Ambient noise reduction on handset mic, advanced noise suppression forincoming audio
Telephony Features
Hold, transfer, forward, 3-way conference, push-to-talk, intercom, downloadable phonebook, call waiting, call log, auto answer, click-to-dial, flexible dial plan
HD Audio
Yes, both on Handset and Speakerphone
Security
DECT authentication & encryption
Multi-language
English, Czech, German, Spanish, French, Hebrew, Italian, Dutch, Polish, Portuguese, Russian, Turkish, Arabic, Chinese Simple, Chinese Tradition, Japanese, Korean, Slovakian, Serbian, Greek, Swedish
Universal Power Supply Input AC 100-240V 50/60Hz; Output 5VDC 1A; Micro-B USB Connector; Rechargeable 2000mAh Li-ion battery, 650 hours of standby time and 65 hours of talk time (laboratory data)
Package Content
Handset unit, universal power supply, charger cradle, belt clip, 1 battery, Quick Start Guide
Dimensions (H x W x D)
Handset:166.00 x 57.80 x 26.30mm; Charger cradle: 82.00 x 80.00 x 30.60mm
IP67 Rated-Water-proof, dust-proof, cleaning chemical resistant, anti-microbial casing and 2.5m drop safe
Temperature and Humidity
Operation: -10º to 45ºC (14 to 113ºF); Charging: 0 to 45ºC (32 to 113ºF) Storage: -20º to 60ºC (-4 to 140ºF); Humidity: 10% to 90% non-condensing
Compliance
FCC, CE, RCM, IC
DP735 Technical Specifications
DP725 Technical Specifications
The following table resumes all the technical specifications including the protocols/standards supported, voice codecs, telephony features, languages, and upgrade/provisioning settings for the DP725 handset:
Air Interface
Telephony standards: DECT Frequency bands: 1880 – 1900 MHz (Europe), 1920 – 1930 MHz (US), 1910 – 1920 MHz (Brazil), 1786 – 1792 MHz (Korea), 1893 – 1906 MHz (Japan), 1880 – 1895 MHz (Taiwan) Number of Channels: 10 (Europe), 5 (US, Brazil or Japan), 3 (Korea), 8 (Taiwan) Outdoor Range: up to 400 meters (DP752/DP755) or up to 300 meters (DP750) Indoor Range: up to 50 meters
Peripherals
1.8 inch (128×160) color TFT LCD 27 keys including 2 soft keys, 5 navigation/ menu keys, 5 dedicated function keys for SPEAKERPHONE, MUTE, SEND, POWER/END, 3 side keys including 2 volume (up and down) and 1 Push-to-Talk key, 3-color MWI LED 3.5mm headset jack Removable belt clip Type C USB port for alternative charging and non-battery operation
Protocols/Standards
Hearing Aid Compatibility (HAC) compliant
Voice Codecs
G.722 codec for HD audio and G.726 codec for narrow band audio (G.711μ/a-law, G.723.1, G.729A/B, iLBC and OPUS are supported via companion DECT base station), AEC, AGC, Ambient noise reduction on handset mic, advanced noise suppression for incoming audio
Telephony Features
Hold, transfer, forward, 3-way conference, push-to-talk, intercom, downloadable phonebook, call waiting, call log, auto answer, click-to-dial, flexible dial plan
HD Audio
Yes, both on Handset and Speakerphone
Security
DECT authentication & encryption
Multi-language
English, Czech, German, Spanish, French, Hebrew, Italian, Dutch, Polish, Portuguese, Russian, Turkish, Arabic, Chinese Simple, Chinese Tradition, Japanese, Korean, Slovakian, Serbian, Greek, Swedish
Operation: -10º to 45ºC (14 to 113ºF); Charging: 0 to 45ºC (32 to 113ºF) Storage: -20º to 60ºC (-4 to 140ºF); Humidity: 10% to 90% non-condensing
Compliance
FCC, CE, RCM, IC
DP725 Technical Specifications
DP730 Technical Specifications
The following table resumes all the technical specifications including the protocols/standards supported, voice codecs, telephony features, languages, and upgrade/provisioning settings for the DP730 handset:
Air Interface
Telephony standards: DECT
Frequency bands:
1880 – 1900 MHz (Europe), 1920 – 1930 MHz (US)
1910 – 1920 MHz (Brazil), 1786 – 1792 MHz (Korea)
1893 – 1906 MHz (Japan), 1880 – 1895 MHz (Taiwan)
Number of channels: 10 (Europe), 5 (US, Brazil or Japan), 3 (Korea), 8 (Taiwan)
Outdoor Range: up to 400 meters (DP752/DP755) or up to 300 meters (DP750)
Indoor Range: up to 50 meters
Peripherals
2.4 inch (240×320) color TFT LCD
27 keys including 3 soft keys, 5 navigation/ menu keys, 4 dedicated function keys for SEND, POWER/END, SPEAKERPHONE, MUTE, 3 side keys including 2 volume (up and down) and 1 Push-to-Talk key
3-color MWI LED
3.5mm headset jack
Proximity and accelerometer sensors
Backlit keypad
Removable belt clip
Micro-USB port for alternative charging and non-battery operation
Protocols/Standards
Hearing Aid Compatibility (HAC) compliant
Voice Codecs
G.722 codec for HD audio and G.726 codec for narrow band audio (G.711μ/a-law, G.723.1, G.729A/B, iLBC and OPUS are supported via companion DECT base station), AEC, AGC, Ambient noise reduction on handset mic, advanced noise suppression for incoming audio
Telephony Features
Hold, transfer, forward, 3-way conference, push-to-talk, intercom, downloadable phonebook, call waiting, call log, auto answer, click-to-dial, flexible dial plan
Universal Power Supply Input AC 100-240V 50/60Hz; Output 5VDC 1A; Micro-USB connection;
Rechargeable Li-ion battery, 500 hours of standby time and 40 hours of talk time. (laboratory data)
Package Content
Handset unit, universal power supply, charger cradle, belt clip, 1 battery, Quick Installation Guide
Dimensions (H x W x D)
Handset: 168.5 x 52.5 x 21.8mm;
Charger cradle: 76 x 73 x 81mm
Weight
Handset: 180g;
Charger cradle: 78g;
Universal power supply: 50g;
Package: 465g
Temperature and Humidity
Operation: -10º to 50ºC (14 to 122ºF); Charging: 0 to 45ºC (32 to 113ºF); Storage: -20º to 60ºC (-4 to 140ºF); Humidity: 10% to 90% non-condensing
Compliance
FCC, CE, RCM, IC
DP730 Technical Specifications
DP722 Technical Specifications
The following table resumes all the technical specifications including the protocols/standards supported, voice codecs, telephony features, languages, and upgrade/provisioning settings for the DP722 handset:
Air Interface
Telephony standards: DECT
Frequency bands:
1880 – 1900 MHz (Europe), 1920 – 1930 MHz (US)
1910 – 1920 MHz (Brazil), 1786 – 1792 MHz (Korea)
1893 – 1906 MHz (Japan), 1880 – 1895 MHz (Taiwan)
Number of channels: 10 (Europe), 5 (US, Brazil or Japan), 3 (Korea), 8 (Taiwan)
Outdoor Range: up to 350 meters (with DP755 and DP752) or up to 300 meters (DP750)
Indoor Range: up to 50 meters
Peripherals
1.8 inch (128×160) color TFT LCD
23 keys including 2 softkeys, 5 navigation / menu keys, 4 dedicated function keys for SEND, POWER/END, SPEAKERPHONE, MUTE
3-color MWI LED
3.5mm headset jack
Removable belt clip
Micro-USB port for alternative charging and non-battery operation
Protocols/Standards
Hearing Aid Compatibility (HAC) compliant
Voice Codecs
G.722 codec for HD audio and G.726 codec for narrow band audio (G.711μ/a-law, G.723.1, G.729A/B, iLBC and OPUS are supported via companion DECT base station), AEC, AGC, Ambient noise reduction on handset mic, advanced noise suppression for incoming audio
Telephony Features
Hold, transfer, forward, 3-way conference, push-to-talk, intercom, downloadable phonebook, call waiting, call log, auto answer, click-to-dial, flexible dial plan
Universal Power Supply Input AC 100-240V 50/60Hz; Output 5VDC 1A; Micro-USB connection; Rechargeable 800mAh Ni-MH Low Self-Discharge (LSD) AAA batteries (250 hours of standby time and 20 hours of talk time) (laboratory data)
Package Content
Handset unit, universal power supply, charger cradle, belt clip, 2 batteries, Quick Start Guide
Dimensions (H x W x D)
Handset: 158 x 50 x 28.1mm;
Charger cradle: 81.15 x 75.89 x 36.36mm
Weight
Handset: 110g;
Charger cradle: 44g;
Universal power supply: 50g;
Package: 328g
Temperature and Humidity
Operation: -10º to 50ºC (14 to 122ºF); Charging: 0 to 45ºC (32 to 113ºF); Storage: -20º to 60ºC (-4 to 140ºF); Humidity: 10% to 90% non-condensing
Compliance
FCC, CE, RCM, IC
DP722 Technical Specifications
DP720 Technical Specifications
The following table resumes all the technical specifications including the protocols/standards supported, voice codecs, telephony features, languages, and upgrade/provisioning settings for the DP720 handset:
Air Interface
Telephony standards: DECT
Frequency bands:
1880 – 1900 MHz (Europe), 1920 – 1930 MHz (US)
1910 – 1920 MHz (Brazil), 1786 – 1792 MHz (Korea)
1893 – 1906 MHz (Japan), 1880 – 1895 MHz (Taiwan)
Number of channels: 10 (Europe), 5 (US, Brazil or Japan), 3 (Korea), 8 (Taiwan)
Outdoor Range: up to 350 meters (with DP755 and DP752) or up to 300 meters (DP750)
Indoor Range: up to 50 meters
Peripherals
1.8 inch (128×160) color TFT LCD
23 keys including 2 softkeys, 5 navigation / menu keys, 4 dedicated function keys for SEND, POWER/END, SPEAKERPHONE, MUTE
3-color MWI LED
3.5mm headset jack
Removable belt clip
Micro-USB port for alternative charging and non-battery operation
Protocols/Standards
Hearing Aid Compatibility (HAC) compliant
Voice Codecs
G.722 codec for HD audio and G.726 codec for narrow band audio (G.711μ/a-law, G.723.1, G.729A/B, iLBC and OPUS are supported via companion DECT base station), AEC, AGC, Ambient noise reduction on handset mic, advanced noise suppression for incoming audio
Telephony Features
Hold, transfer, forward, 3-way conference, push-to-talk, intercom, downloadable phonebook, call waiting, call log, auto answer, click-to-dial, flexible dial plan
HD Audio
Yes, in both Handset and Speakerphone modes
Security
DECT authentication & encryption
Multi-language
English, Czech, German, Spanish, French, Hebrew, Italian, Dutch, Polish, Portuguese, Russian, Turkish, Arabic, Chinese Simple, Chinese Tradition, Japanese, Korean, Slovakian, Serbian, Greek, Swedish
Operation: -10º to 50ºC (14 to 122ºF); Charging: 0 to 45ºC (32 to 113ºF); Storage: -20º to 60ºC (-4 to 140ºF); Humidity: 10% to 90% non-condensing
Compliance
FCC, CE, RCM, IC
DP720 Technical Specifications
GETTING STARTED
This chapter provides basic installation instructions including the list of the packaging contents and also information for obtaining the best performance with the DECT Cordless HD Handsets.
Equipment Packaging
DP735
DP735
1 Handset unit
1 Universal power supply 5V
1 Charging Station
1 Handset Belt Clip
1x Rechargeable Battery
1 Quick Installation Guide
Equipment Packaging – DP735
DP735 Package Content
DP725
DP725
1 Handset unit
1 Universal power supply 5V
1 Charging Station
1 Handset Belt Clip
1 Rechargeable li-ion Battery
1 Quick Installation Guide
Equipment Packaging – DP725
DP725 Package Content
DP730
DP730
1 Handset unit
1 Universal power supply 5V
1 Charging station
1 Handset Belt
1 Rechargeable Li-ion battery
1 Quick Installation Guide
Equipment Packaging – DP730
DP730 Package Content
DP722
DP722
1 Handset unit
1 Universal power supply 5V
1 Charging station
1 Handset Belt
2 Rechargeable batteries
1 Quick Installation Guide
Equipment Packaging – DP722
DP722 Package Content
DP720
DP722
1 Handset unit
1 Universal power supply 5V
1 Charging station
1 Handset Belt
2 Rechargeable batteries
1 Quick Installation Guide
Equipment Packaging – DP720
DP720 Package Content
Note
Check the package before installation. If you find anything missing, contact your system administrator.
Connecting Base Station
To set up the DP75x DECT Cordless VoIP Base Station, please follow the steps below:
DP755DP752 Back View
DP750 Back view
You have two options for power and network connection of the base station: AC power or Power over Ethernet (PoE).
Note
For better signal range, we recommend installing DP75x with LED side facing toward the usage area. Ceiling mount for DP755/DP752 is recommended for better coverage.
Connecting via AC power
Connect the micro-USB connector to the related port on the base station and connect the other end of the power adapter to an electrical power outlet.
Connect the supplied Ethernet cable between the Internet port on the base station and the Internet port in your network or the switch/hub device port.
Connecting via PoE
To connect the base station using PoE, you need to connect the Ethernet cable provided (or 3rd party network cable) between the Network Socket on the base station to the Ethernet port of your PoE switch/hub.
Setting up DP Handsets
Please follow the below steps to insert batteries into the Handsets:
Open the battery compartment cover.
For DP730/DP725/DP735: Inset the Li-ion battery with the electrodes in the bottom left corner.
For DP722/DP720: Insert AAA batteries with the correct polarity (+ / -).
Close the battery compartment cover.
Note
Please charge the batteries fully before using the Handsets for the first time.
DP735
DP735 Battery installation
DP725
DP725 Battery installation
DP730
DP730 Battery Installation
DP722
DP722 Battery Installation
DP720
DP720 Battery installation
Battery Information
DP720 battery specifications
DP722 Batteries Specifications
DP730 battery specifications
DP735 Batteries Specifications
DP725 battery specifications
Technology: Nickel Metal Hydride (Ni-MH)
Size: AAA
Voltage: 1.2V
Capacity: 800mAh
Standby time: up to 250 hours (laboratory data)
Talk time: up to 20 hours of active talk time (laboratory data)
Technology: Nickel Metal Hydride (Ni-MH)
Size: AAA
Voltage: 1.2V
Capacity: 800mAh
Standby time: up to 250 hours (laboratory data)
Talk time: up to 20 hours of active talk time (laboratory data)
Technology: Li-ion
Nominal Voltage: 3.8V
Capacity: 1500mAh
Standby time: up to 500 hours (laboratory data)
Talk time: up to 40 hours of active talk time (laboratory data)
Technology: Li-ion
Voltage:3.8V
Capacity: 2000mAh
Standby time: up to 650 hours (laboratory data)
Talk time: up to 65 hours of active talk time (laboratory data)
Technology: Li-ion
Nominal Voltage: 3.8V
Capacity: 1500mAh
Standby time: up to 500 hours (laboratory data)
Talk time: up to 50 hours of active talk time (laboratory data)
DP Handset Battery Specifications
To get the best performance of your DP Handsets, we recommend using the original batteries provided in the package or batteries compliant with the above specifications.
Disclaimer
The above-mentioned battery specifications can vary and depend on many factors (age of the battery, number of recharge cycles, real capacity…). The recharge cycles of the battery are limited; thus, it might need to be replaced if the battery performance is low. The number of charge cycles and battery life are affected by usage and configuration.
Important Note
Be careful when inserting the batteries into your handset to avoid any risk of short-circuit, which leads to damage your batteries and/or the handset itself. Do not use damaged batteries which can increase the risk of serious harm.
Setting up the Charge Station
Please refer to the following steps for setting up the charge station and charging the Handsets:
Connect the DC plug on the power adapter to the micro-USB or Type-C connector on the charge station.
Connect the other end of the power adapter to an electrical power outlet.
After setting up the Handsets and the charge station, place the Handsets in the charge station.
DP Handsets Charging Stations
DP Base Station LED Patterns
DP755/DP752
The DP755/DP752 has 3 LED lights on it. Please refer to the following table for the meaning of each light.
DP755 LED Patterns
LED Light
Status
Indicates Power ON/OFF.
Indicates the status of SIP account registration and network.
Solid ON: SIP account registered.
Blinking: SIP account not registered or network error.
Indicates the status of the DECT handset registration:
Solid ON: Handset registered to thebase.
Fast Blinking (0.25s ON/0.25s OFF): Paging handset.
Blinking (0.5s ON/0.5s OFF): Pairing mode.
Indicates the status if 3 LEDs are blinking:
Blinking (0.5s ON/0.5s OFF): Firmware upgrade.
Fast Blinking (0.25s ON/0.25s OFF): Factory reset.
DP750
The DP750 has 5 LED lights on it. Please see in the following table the meaning of each light.
DP750 Led Patterns
LED Light
Status
Indicates Power ON/OFF.
Indicates access to the network. Remains ON while there is access to the network.
Indicates if a SIP account is registered.
Indicates the status of the lines.
Blinking: A line is in use.
Solid ON: All lines are free.
The Radio icon for pairing the handsets and DP750; when holding the Radio button, blinking indicates a pairing attempt.
Indicates the status if 4 LEDs are blinking:
Blinking (0.5s ON/0.5s OFF): Firmware upgrade.
Fast Blinking (0.25s ON/0.25s OFF): Factory reset.
DP Handsets Description
The LCD screen and the Keypad are the main hardware components of the DP handsets.
DP720
DP720 Handset Keys
Key
Description
1
Power and Charging Indication Light
Red: Charging. Green: Charge completed.
Blinking: Missed call(s) or Voice Mail received.
2, 10
Left and right softkeys
Correspond to functions displayed on the LCD. These functions change depending on the current context.
3
4 Arrow key combination
Correspond to functions displayed on the LCD. These functions change depending on the current context.
4
Off-hook / Dial key
Shows call information, handset status icons, prompt messages, etc.
5
Alphanumeric Keypad
Permits navigation of the cursor through the displayed menu options.
6
Hands-free / Speaker key
Selects the option chosen by the cursor. (Enters the main menu from the home screen.)
7
3.5mm Headset jack
Enters dialing mode, or dials number entered.
8
Earphone
Delivers audio output.
11
OK/Selection key
Selects the option chosen by the cursor. (Enters the main menu from the home screen.)
12
On-hook / Power key
Terminates calls, or turns the handset on / off.
13
Mute key
Activates or deactivates the mute feature.
14
Microphone
Picks up audio earpiece and hands-free calls.
DP720 Handset Keys Description
DP722
DP722 Keys Description
Key
Description
1
Earphone
Delivers audio output.
2,12
Left and right softkeys
Correspond to functions displayed on the LCD. These functions change depending on the current context.
3
4 Arrow key combination
Permits navigation of the cursor through the displayed menu options.
4
Off-hook / Dial key
Enters dialing mode, or dials number entered.
5
1 / Voicemail
Provides quick access to your voicemail inbox when pressed.
6
Mute key
Activates or deactivates the mute feature.
8
3.5 mm headset jack
Phone connector for the headphones/headsets.
9
LED Indicator
1 dual-color LED indicator indicating power, call, battery, message waiting…
10
Color LCD Screen
1.8 inch (128×160) color TFT LCD
11
Micro USB port
The charging port is used to connect a charger for powering the device and recharging the battery.
13
Menu/OK key
Selects the option chosen by the cursor or enter the main menu from the home screen.
14
Hands-free / Speaker key
Switches between handset and hands-free/speaker modes.
15
On-hook or Power key
Picks up audio earpiece and hands-free calls.
16
# / Lock key
Locks keypad against unintentional entries when keep pressing #.
Press and hold the
# key for approximately 2 seconds to lock the keys. Press Unlock Softkey
and then # to unlock the keys.
17
Mute
Mute the microphone during the conversation.
18
Microphone
Picks up audio earpiece and hands-free calls.
DP722 Handset Keys Description
DP725
DP725 Handset Keys
Key
Description
1
LED Indicator
Red: Charging Green: Charge completed Blinking green: Missed call(s) or Voice Mail received Blinking red: Low Battery
2
Earphone
Delivers audio output.
3
Volume Up key
Increases the audio volume during calls or while using other audio features.
4
Volume down key
Decreases the audio volume during calls or while using other audio features.
5
PTT key
Used for instant communication similar to a walkie-talkie, allowing the user to press and hold to talk and release to listen.
6
Off-hook /Dial key
Initiates a call or dials the number entered. It can also bring the handset into dialing mode from the home screen.
7
4 Arrow key combination (Up, Down, Left, Right)
Allows the user to navigate through the menu options and settings on the LCD screen.
8
1 / Voicemail key
Directly accesses the voicemail system, allowing the user to listen to and manage their voice messages.
9
Handsfree / Speaker key
Switches the call to the hands-free speaker mode, enabling the user to speak and listen without holding the handset.
10
Microphone
Captures the user’s voice during calls, ensuring clear communication.
11
Type C USB port
Used for charging the handset.
12
Dedicated function key
Executes a specific function that varies depending on the current context or application being used.
13
Mute key
Toggles the mute feature on or off, allowing the user to mute their microphone during a call.
14
# / Lock key
Locks the keypad to prevent accidental key presses. To lock the keypad, press and hold the # key for about 2 seconds. To unlock, press the Unlock softkey and then the # key.
15
Alphanumeric keypad
Provides numbers, letters, and special characters for dialing phone numbers, entering text, or navigating through the menu.
16
Menu /OK key
Opens the main menu from the home screen and confirms selections or actions within the menu.
17
On-hook /Power key
Ends calls or turns the handset on and off. When the handset is off, holding this key will power it on; pressing it during a call will end the call.
18
Softkeys
Perform functions displayed on the LCD screen directly above them. The functions change depending on the current menu or application.
19
Color LCD Screen
Displays all relevant information such as call details, status icons, prompt messages, and menu options. It is the main interface for interacting with the handset.
20
3.5 mm headset jack
Allows the user to connect a wired headset for audio input and output, providing an alternative to the built-in microphone and speaker.
DP725 Handset Key Descriptions
DP730
DP730 Handset Keys
Key
Description
1
Proximity sensor
The proximity sensor can detect and measure gravitational acceleration, tilt, vibration, altitude changes, and static position.
2
Earphone
Delivers audio output.
3,4
Volume up / Down Keys
Configure the handset and ringtone volume.
5
PTT Key
PTT (Push-to-Talk) button, to initiate a PTT call.
6
Hands-free / Speaker key
Switches between Handset and Hands-free / Speaker modes.
7
Arrow key combination (Up, Down, Left, Right)
Allows navigation of the cursor through the displayed menu options.
8
Off-hook / Dial key
Enters dialing mode, or dials number entered.
9
1 / Voicemail Key
Accesses the list of voicemail messages.
10
* / Silent Mode key
Activates or deactivates the silent mode (no ringtone heard during an incoming call) when keep pressing on * in idle screen.
11
Charging port
The charging port is used to connect a charger for powering the device and recharging the battery.
12
3.5 mm headset jack
Phone connector for the headphones/headsets.
13
LED indicator
1 dual-color LED indicator indicating power, call, battery, message waiting…
14
Color LCD Screen
2.4-inch (240×320) TFT color LCD
15
Softkeys
Perform functions displayed on the LCD screen directly above them. The functions change depending on the current menu or application.
16
Mute
Mute the microphone during the conversation.
17
Menu/OK key
Selects the option chosen by the cursor or enter the main menu from the home screen.
18
On-hook /Power key
Terminates calls or turns the handset on / off.
19
Alphanumeric Keypad
Provides the digits, letters, and special characters in context-sensitive applications. For the + sign, press and hold key 0.
20
# / Lock key
Locks keypad against unintentional entries when keep pressing #.
Press and hold the
# key for approximately 2 seconds to lock the keys. Press Unlock Softkey
and then # to unlock the keys.
21
Microphone
Picks up audio earpiece and hands-free calls.
DP730 Keys Description
DP735
DP735 Handset Keys
Key
Description
1
Proximity Sensor
The proximity sensor can detect and measure gravitational acceleration, tilt, vibration, altitude changes, and static position.
2
Earphone
Delivers audio output.
3
Volume Up key
Increases the audio volume during calls or while using other audio features.
4
Volume down key
Decreases the audio volume during calls or while using other audio features.
5
PTT key
Used for instant communication similar to a walkie-talkie, allowing the user to press and hold to talk and release to listen.
6
Handsfree /Speaker key
Switches between handset and hands-free / speaker modes.
7
4 Arrow key combination (Up, Down, Left, Right)
Allows the user to navigate through the menu options and settings on the LCD screen.
8
Off-hook /Dial key
Initiates a call or dials the number entered. It can also bring the handset into dialing mode from the home screen.
9
Alphanumeric keypad
Provides numbers, letters, and special characters for dialing phone numbers, entering text, or navigating through the menu.
10
*/ Silent Mode key
Activates or deactivates the silent mode (no ringtone heard during an incoming call) when keep pressing on * in idle screen.
11
LED indicator
Red: Charging Green: Charge completed Blinking green: Missed call(s) or Voice Mail received Blinking red: Low Battery
12
3.5 mm headset jack
Allows the user to connect a wired headset for audio input and output, providing an alternative to the built-in microphone and speaker.
13
Color LCD Screen
2.4-inch (240×320) TFT color LCD
14
Softkeys
Perform functions displayed on the LCD screen directly above them. The functions change depending on the current menu or application.
15
Mute key
Activates or deactivates the mute feature.
16
Menu/Ok key
Selects the option chosen by the cursor or enter the main menu from the home screen.
17
On-hook or Power key
Terminates calls or turns the handset on / off.
18
#/ Lock key
Locks keypad against unintentional entries when keep pressing #.
Press and hold the
# key for approximately 2 seconds to lock the keys. Press Unlock Softkey
and then # to unlock the keys.
19
Microphone
Picks up audio earpiece and hands-free calls.
DP735 Handset Key Descriptions
DP Handset Icons Description
The following table contains the description of each icon that might be displayed on the LCD screen of the DP Handsets.
Battery status
Not equipped with a battery
Battery status
Battery empty
Battery status
Battery low
Battery status
Battery normal
Battery status
Battery full
Battery status
Charging
Signal status
Not subscribed
Signal status
Not in range
Signal status
Signal very low
Signal status
Signal low
Signal status
Signal normal
Signal status
Signal good
Signal status
Signal very good
Microphone MUTE Status
OFF – Not muted
ON – Muted
Speaker status
OFF – The speaker
is inactivated ON – The speaker
is activated
Headset icon
Missed Call icon
Voicemail icon
Ringtone status
OFF – Ringtone off (Silent mode)
ON – Ringtone on
Keypad Lock status
OFF – Keypad unlock
ON – Keypad locked
DND Status.
OFF – Do Not Disturb disabled
ON – Do Not Disturb enabled
Call waiting
Information
Account not registered
Account Registered
Error message
Handset number
Incoming Call notification
Outgoing Call notification
Missed Call notification
Voicemail notification
Contacts
Call History
Registration
Voice Mail
Preferences
Shortcut
Call Features
Status
Settings
Handsets Icon Descriptions
DP Handsets Menu
The Handsets has an easy-to-use menu structure. Every menu opens a list of options. To open the main menu, press “Menu” (left softkey) when the Handsets is on and in standby mode. Press the Arrow keys to navigate to the menu option you require. Then press “Select” (left softkey) or OK/Selection key to access further options or confirm the setting displayed. To go to the previous menu item, press “Back” (right softkey). You can press the Power key at any time to cancel and return to standby mode. If you do not press any key, the Handsets automatically revert to standby mode after 20 seconds.
Note
Users can navigate through the handset menu by pressing the menu number when displayed.
DP Handset Menu Structure
Contacts
Private: Private contacts include contacts visible in the current Handsets only.
Global: Global phonebook contacts are the contacts shared between the Handsets subscribed to the base station.
Notes:
Private/Global Phonebooks will be merged on the handset.
When searching contacts for handsets subscribed to a DP750/DP752 base station, only the contacts starting with the searched letter will be displayed.
Call History
Display the call history with each entry including the call duration:
Missed Calls.
Accepted Calls.
Outgoing Calls.
All Calls.
Notes:
You can add contacts to Shared Contacts directly from call logs.
When deploying a BroadSoft XSI directory, users can access and view call logs recorded by the BroadSoft SIP server. The call logs are equipped with sorting functionality, allowing them to be organized by name or date, and can also be deleted as needed.
In parallel ringing mode, the missed call indicator is automatically cleared on all handsets once any device in the group checks the call history.
Registration
Register: Register your handset to base station.
Deregister: Deregister your handset from base station.
Select Base: Select base station.
Voice Mail
Play Message: Play voice mail messages received.
Set Voice Mail: Configure voice mail parameters.
Set Key 1: Configure Key 1 as VM speed dial for selected account.
Preferences
Outgoing Default Line: Select account to be use by default for outgoing calls.
Auto Answer: Enable/Disable Auto Answer. (Default is Disabled).
Off-Cradle Pickup: Enable/Disable Off-Cradle Pickup. If enabled, users can answer the calls by picking up the handset off-cradle. (Default is Disabled).
On-Cradle Hangup: Enable/Disable On-Cradle Hangup. If enabled, users can end the call by placing the handset on-cradle. (Default is Disabled).
Mute as DND: Enable/Disable Mute as DND. If enabled, pressing mute key on idle state will set the phone to DND mode (Default is Enabled). This option can also be controlled by the “Enable Handset Configuration Control” setting on the base station’s Web UI, if set to No, the “Mute as DND” option will be greyed out on the handset.
Disable Busy Tone: Enable/Disable Busy Tone. If set to enabled, busy tone will not be played. (Default is Disabled).
Disable CW Tone: Enable/Disable CW Tone. If set to enabled, Call Waiting Tone will not be played. (Default is Disabled).
Onhook Backlight: Enable/Disable Onhook Backlight. If enabled, pressing “Hangup” key on idle screen will switch off LCD screen. (Default is Disabled)
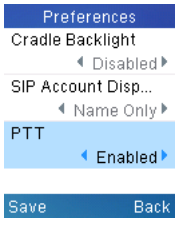
Cradle Backlight: Enable/Disable/Dim Cradle Backlight. If enabled, LCD will remain backlit when the handset is placed on-cradle/charging. If set to “Dim”, LCD brightness will be reduced when the handset is placed on-cradle/charging. (Default is Disabled)
SIP Account Display: Select which SIP Account information will be displayed on the screen.
Name Only: Display SIP Account Name only. (Default)
ID Only: Display SIP User ID only.
None: No account information will be displayed.
PTT (Push To Talk): Enable/Disable Push To Talk. If set to enabled, pressing and hold PTT hard/soft key, a PTT call will be initiated. Pressing the PTT hard/soft key, it will redirect you to the setting to enable or disable it. (Default is Disabled)
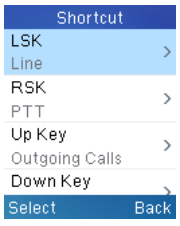
Customizing keys functions
Customizing keys functions:
L : Configure Left Softkey function in idle. Function can be set as Menu, History, Contacts, Line or PTT. Default is Menu.
R : Configure Right Softkey function. Function can be set as History, Contacts, Line or PTT Default is Contacts.
⯅ : Configure Arrow UP Key function. Default is Outgoing Calls (Call History).
⯆ : Configure Arrow DOWN key function. Default is Accepted Calls (Call History).
⯇ : Configure Arrow LEFT key function. Default is Ringer Volume Down.
⯈ : Configure Arrow RIGHT key function. Default is Ringer Volume Up.
Select key and press OK button to configure function. Following functions are available for arrow keys: 1. Disabled, 2. Missed Calls, 3: Accepted Calls, 4: Outgoing Calls, 5: History, 6: Contacts, 7: Status, 8: Line, 9: Voice Mail, 10: Ringer Volume Up, 11: Ringer Volume Down, 12: Audio Volume Up, 13: Audio Volume Down, 14: Intercom.
Speed Dial: Assign contact numbers as speed dial.
Select a key [2], [3], [4], [5], [6], [7], [8] or [9] and press OK button. Select “Edit” to manually specify the destination number or select “From Contacts” to select a contact as speed dial destination.
Call Features
Do Not Disturb: Enable/disable do not disturb mode on the phone.
Call Forward: Configure call forward feature.
Call Waiting: Configure call waiting feature.
Paging: Configures Inter-Handsets paging feature.
Status
Base Status: Display Base status (Firmware, IP address, Subnet mask, Gateway, MAC Address, Serial Number)
Handset Statut: Display Handsets status (Model RF, Firmware, IPEI)
Line Status: Display Line status (Account name, Status)
Settings
Handset Name: Change the Handset name.
Phone Language: Select the language to be displayed on the phone’s LCD. (Default is English.)
Date/Time: Configure date and time on the Handsets.
Audio & Vibration: Specify ringtones for internal/external calls, the volume, advisory tones (Keypad, Confirmation, Low battery notifications), Handset TX Gain (-6dB, 0dB, +6dB), and Vibration mode (DP735/DP730 only).
Display: Configure backlight, LCD timeout (Idle/Call), LCD brightness, Message Waiting Prompt and menu key timeout.
Gestures (DP735/DP730 only): Configure Close-to-Ear Backlight and Facedown Hangup.
Network Settings: Configure IP addresses and select DHCP/Static IP mode.
All LEDs will light up, and the LCD will display a table listing the names of all keys in red. Press any key to diagnose; the key’s name will display in blue. After all keys are diagnosed, a prompt message (“PASS”) will display; press “Back” (right softkey) to exit.
Note: User can long press arrow UP key to exit at any time.
Audio Loopback: Speak to the phone using speaker/Handsets/headset. If you can hear your voice, your audio is working fine. Press “Exit” softkey to exit audio loopback mode.
LCD ON / OFF: Select this option to turn off LCD. Press any button to turn on LCD.
LCD Diagnostic: Select this option to enter LCD Diagnostic mode. Press “Next” (left softkey) to display white screen. Continue pressing the left softkey to view all remaining screens (black, blue, red, and green) and then exit. End the test early by pressing the right softkey.
LED Diagnostic: Enters this option and press “1” to start LED Diagnostic (you will notice that the color of the LED will be changing). Press “2” to quit.
System Monitoring: Displays RSSI with its corresponding frequency, battery voltage and RPN information.
Vibration (DP735/DP730): Test vibration on DP735/DP730.
Acceleration Sensor (DP735/DP730): Displays X, Y, Z coordinates.
Proximity Sensor (DP735/DP730): Test proximity sensor on DP735/DP730.
DP Handset Menu Structure Definitions
BASIC OPERATIONS
Turning the Handsets ON / OFF
To turn ON the handsets
Long press on Power key until the LCD screen lights up.
To turn OFF the handsets
Long press on Power key again when the handset is idle until the display turns off.
Setup Wizard
The setup wizard shows at first access to DP Handset or factory reset allowing users to configure handset language and date/time. Users can quit at any time by pressing “Skip” (left softkey).
Register DP Handsets to DP75x Base Station
Before attempting to register a DP handset, users need to open the base station subscription using one of the following methods:
Open Subscription from DP75x
To initiate the subscription process on the DP75x Base Station, press and hold the Radio/Page button for 4 seconds until the Radio icon starts blinking. Alternatively, users can reboot the base station, as the subscription window remains open for 2 minutes each time the device restarts.
Open Subscription from the Web UI
Users can open the subscription by accessing the web UI and clicking the “Open Subscription” icon. Once the action is completed successfully, a prompt will appear confirming that the subscription window has been opened, and the icon will change to green.
Open Subscription Icon
Open Subscription through GDMS
To open the DP75x subscription using this method, follow these steps:
Log in to GDMS and navigate to the VoIP Device section under the organization where the base station device is registered.
Locate the base station device, then click the three dots under the Options menu.
Select Open Subscription from the dropdown.
GDMS VoIP Device Page
Once the subscription is successfully opened, a confirmation prompt will appear, notifying users that the subscription is active for 2 minutes.
Open Subscription Prompt
Registering the DP Handsets
Open the subscription using one of the methods mentioned above.
On the DP Handset, press the “Subscribe” softkey if available on the main screen or access Menu 🡪 Registration 🡪 Register while the DP75x Radio icon is blinking.
Note: The “Subscribe” softkey appears only if the DP Handset is not registered to any DP75x base station.
Select BaseX (X=1-4) corresponding to the desired base station DP75x, then press Subscribe.
The DP Handset will search for nearby base stations and will display the RFPI code and Base station name of the discovered DP75x.
Press Subscribe to pair with the displayed DP75x.
The DP Handset will display Easy Pairing on the LCD and play an audible buzz when successful. Then it will return to the home screen, displaying the Handsets name and number assigned by the registered base station.
Registration Process
Using DP Handset with Multiple DP Base Stations
DP Handset can be registered to up to four different DP base stations.
Registering DP Handset to an additional DP base station
Considering DP Handset is previously registered to an initial base station, please follow the below steps to register a Handset to an additional base station:
Press Menu (left softkey or the selection key) to bring up the operation menu.
Use the arrow keys to reach Registration and select Register.
Navigate to an unsubscribed base using arrow keys, and click on Subscribe.
Make sure that the subscription is opened on the new base station.
Multiple Base Stations Registration
Switching Between Different Base Stations
Press “Menu” (left softkey or the selection key) to bring up the operation menu.
Use arrow keys to reach Registration.
Navigate to Select Base using the arrow keys.
Select the desired base station and press Select.
Switching Between Base Stations
Unregister the DP Handset
Using DP Handsets:
On the DP Handset, press “Menu” (left softkey or the selection key) to bring up the operation menu.
Press the arrow keys to move the cursor to Registration, then press “Select” (left softkey).
Navigate to Deregister.
Select the Handsets to be unregistered and press “Deregister” (left softkey).
Enter the system PIN code (default: 0000).
Press “Done” (left softkey) to confirm or “Back” (right softkey) to cancel.
Using DP75x Base Station UI:
Access DP75x Web Interface.
Go to Status 🡪 DECT Base Status.
Locate the Handsets to unregister and press the “Unsubscribe” button.
Unregister DP Handset from DP75x web UI
Setting the Key Lock
You can lock the keypad against unintentional entries. It is, however, still possible to pick up incoming calls even with the keypad locked.
To enable the Keypad Lock
Press the Pound key“#” and hold for approximately 2 seconds.
The display shows Keypad Locked briefly and the key lock icon appears in the display.
To disable the Keypad Lock
Press and hold the Pound key “#” to unlock the keys.
Keypad Unlocked appears briefly in the display and a window prompt will be displayed to confirm that the keypad is unlocked.
Locating a DP Handset from the DP Base station
In some situations, you may have a DP Handsets incorrectly positioned and you don’t know its current location. You can locate a DP Handsets from his registered DP75x base station using the below steps:
Locate via DP Base station Web UI
Access the Web GUI of your DP75x using the admin’s username and password.
Press Login to access your settings and navigate to the Status 🡪 DECT Base Status tab.
Choose which Handsets to locate and press the corresponding Page button.
A paging call will be received on the selected DP Handsets. Note: If you press the Page All icon , all registered DP Handsets will be receiving paging calls.
Once located, you can press the End Softkey on the DP Handset to end the paging call.
Locate Handsets via Web UI
Locate via DP Base station
On the DP75x Base station front side, press Radio/Page button.
All registered Handsets will receive a Paging call.
Once located, you can end the paging calling by pressing any key on the Handsets or by pressing again Radio/Page button.
Checking System Status
You can view the system status on your handsets including the following information about the system:
Item
Description
Firmware
Current firmware version installed on DP Handset.
IP Address
The IP address of the base station DP75x if registered.
Subnet Mask
Subnet Mask of the base station DP75x if registered.
Gateway
Gateway IP of the base station DP75x if registered.
MAC address
MAC address of the base station DP75x if registered.
DP75x Info Description
Item
Description
Model (RF)
Displays the product model, hardware version, and DECT region of DP Handset. i.e.: DP722/DP730 1.4A (EU)
Firmware
Current firmware version installed on DP Handset.
IPEI
International Portable Equipment Identifier.
Unique “serial number” for DECT handsets.
DP Handset Info Description
To check the handset status
Press Menu to bring up the operation menu.
Use arrow keys to reach the Status menu , then select Handset Status.
To check the Base Status
Press Menu to bring up the operation menu.
Use arrow keys to reach the Status menu , then select Base Status.
Basic Network Settings
Once connected to the network, the DP75x base station will attempt to contact a DHCP server to obtain valid network settings (e.g., IP address, subnet mask, gateway address, and DNS address) by default.
The users could also configure basic network settings manually from registered DP Handsets. To configure the network settings manually, please follow the steps below:
Press Menu to bring up the operation menu.
Use arrow keys to reach Settings and access the Network Settings menu.
Enter the system PIN code (default: 0000) and press the softkey “Done”.
To change to static IP, press ⯇ or ⯈ to select Static from the IP Settings field.
Enter valid values in the IP Address, Subnet Mask, Gateway, DNS Server fields.
Press the softkey “Save” to save and apply the new changes. Note: A prompt message will be displayed to confirm that the new settings are saved successfully
The DP Handset will display a reboot confirmation message, select “Yes” to apply the new settings or “No” to avoid rebooting the DP75x.
Network Settings Configuration
Change Menu and LCD Timeout
Press Menu to bring up the operation menu.
Use arrow keys to reach Settings .
Navigate to Display, and then press “Select” (left softkey).
Set desired time in seconds for Backlight timeout and for Menu timeout. Available value: 15 seconds, 30 seconds, 60 seconds or disabled. (Default is disabled)
Press Save (left softkey) to save and apply the new settings.
Return to Idle Screen
Press the Power Key to quickly exit the menu and return to the main idle screen.
If you do not press any key in a period of time, the LCD screen will automatically exit the menu and return to the idle screen as well.
When you are navigating on the handset’s menu, and you receive an incoming call, the LCD screen will automatically exit the menu and you can either accept or reject the call. When the call is terminated, the LCD screen will return to the idle screen.
Register SIP Account
Register Account via Web User Interface
Access the Web GUI of your DP75x using the admin’s username and password.
Press Login to access your settings, navigate to the Accounts tab, and select an account to use. Note: DP75x supports up to 20 accounts. An account is a set of settings including general settings, network settings, SIP settings, audio settings, call settings, ring tones, etc.
In General Settings, set the following:
Account Active to Yes.
SIP Server field with your SIP server IP address or FQDN.
Failover SIP Server with your Failover SIP Server IP address or FQDN. Leave empty if not available.
Prefer Primary SIP Server to No or Yes depending on your configuration. Set to No if no Failover SIP Server is defined. If “Yes”, the account will register to Primary SIP Server when failover registration expires.
Outbound Proxy with your Outbound Proxy IP Address or FQDN. Leave empty if not available.
SIP User ID: User account information, provided by the VoIP service provider (ITSP). Usually in the form of digits similar to a phone number or actually a phone number.
Authenticate ID: SIP service subscriber’s Authenticate ID is used for authentication. Can be identical to or different from the SIP User ID.
Authenticate Password: SIP service subscriber’s account password to register to the SIP server of ITSP. For security reasons, the password field will be shown as empty.
Name: Any name to identify this specific user.
Press Save and Apply to save your configuration.
SIP Settings
Go to DECT 🡪 ACCOUNT ASSIGNEMENT
Select the corresponding Ringing mode (HS mode) of the assigned account: (which handset will ring when extension 1070 is called)
Parallel Mode: selecting parallel will mean all selected handsets will be ringing at the same time.
Circular Mode: all selected phones ring in sequence, beginning with the phone that follows the one that rang last.
Linear mode: all phones ring sequentially in the predetermined order, starting with the first phone each time.
Group: all phones ring simultaneously, if one handset rejects the call, the call will be rejected for the entire group.
HS x: the selected handset will ring.
Press Save and Apply to save your configuration.
Account Status
After applying your configuration, your phone will register to your SIP Server.
You can verify if your DECT phone has registered with your SIP server from your DP75x web interface under Status 🡪Account Status (a green background with Yes under the SIP Registration column for the corresponding account indicates the account(s) has been successfully registered).
Account registered
PHONE SETTINGS
This chapter will help you with the instructions for configuring and changing the settings of your DP Handset.
Editing the Handset Name
The procedure to change the handset name is as follows:
Using DP Handsets:
Press Menu to bring up the operation menu.
Use arrow keys to reach Settings .
Navigate to select Handsets Name, and then press “Select”.
Enter the desired name and press “Rename” and then the DP Handset will display a confirmation message that the rename operation was successful.
Handsets Name editing
Using DP75x Base Station UI:
Access DP75x Web Interface.
Go to DECT 🡪 Handset Settings.
In the “Handsets Settings” section for a specific handset, change the Handset Name to the desired name.
Edit Handsets Name from DP75x
Note
Handset firmware can NOT downgrade to 1.0.19.15 or below.
Changing the Base PIN Code
Users can change their code PIN by following the steps below:
Using DP Handsets:
Press Menu to bring up the operation menu.
Use arrow keys to reach Settings .
Navigate to select System Settings, and then press “Select”.
Enter the current code PIN (By Default is 0000), a new window will be displayed inviting you to enter the new password, when done press “Save” (left softkey) and a prompt message will be displayed to confirm that the new code PIN has been saved successfully.
Changing Admin Base PIN Code from DP Handset
Using DP75x Base Station UI:
Access DP75x Web interface.
Go to DECT 🡪 General Settings.
Set a new PIN code in the Admin PIN Code field.
Note: Only digits are accepted. The minimum allowed length is 4 digits.
Changing Admin Base PIN Code from DP75x
Selecting Phone Language
The DP Handset supports displaying texts in different languages. The handsets support 20 languages (see the table of the technical specifications). The default language of the handsets is English. You can change the language according to your requirements. To change the language of the handsets, please proceed as follows:
Press Menu (left softkey or the selection key) to bring up the operation menu.
Use arrow keys to reach Settings .
Navigate to select Phone language, then select the desired language and press “Select” (Left softkey). The LCD screen prompts “Change phone language to xxx (xxx it’ the language you selected)”
Press “Yes” (left softkey) to accept the change. Text displayed on the handsets will change to the selected language.
Handsets Language
Activate/Deactivate Hands-Free Mode
This function allows you to make a call without having to hold the handsets in your hand.
Press the Hands-free key while you are making a call or on the idle screen to activate hands-free mode.
Press the Hands-free key again to deactivate the hands-free function.
Muting the Microphone
Press the Mute key to switch off the microphone during an established call. You can now talk freely without the other party hearing you and the icon of mute will be displayed on the screen. Press the Mute key again to switch the microphone back on.
Adjusting Speaker and Earpiece Volume
Press the left key ⯇ or right key ⯈ while you are on an established call to set the volume of the earphone/speaker. You can choose between 5 different levels. The default level is 3:
Volume 1 Volume 4
Volume 2 Volume 5
Volume 3
Ringtones
Setting the Ringer Volume on the Handsets
You can adjust the ringer volume for an incoming call to one of 6 levels (level 1 to 5 and off). Level 5 is the highest. (The DP Handsets are set to level 3 by default).
To configure the desired ringer volume, proceed as follows:
Press Menu to bring up the operation menu.
Use arrow keys to reach Settings .
Navigate to select Audio (For DP722/DP725/DP720) and Audio & Vibration (for DP730/DP735) 🡪 Volume.
Press the left and right arrow keys to change repeatedly and set the desired volume.
Press “Save” to confirm the volume, and a message prompt will be displayed to confirm that the new volume has been successfully saved.
If you select OFF, the icon appears in the display and the handsets will not ring for incoming calls.
Ringer Volume
Setting Ringtones on the Handsets
You can change the ringtone for an incoming call. The device has 9 different ringer melodies for you to choose from (System Ring, Ring 1-8). The default setting for the ringtone for a call is Melody 1.
To configure the desired melody, proceed as follows:
Press Menu (left softkey or the selection key) to bring up the operation menu.
Use arrow keys to reach Settings .
Navigate to select Audio 🡪 Ringtones.
Press “Select” (left softkey) to confirm the ringtones selected and a message prompt will be displayed
to confirm that the new ringtones have been set successfully.
The default ringtone selected is “Ring 8”
Calls Ringtones
Advisory Tones
Advisory tones are acoustic signals, which inform you of different actions and states on your handsets. The following advisory tones can be configured independently of each other:
Keypad tone: it’s played when a user presses any key of the keypad (even during calls).
Confirmation: it’s played when a user saves settings or places the handsets in the charger cradle.
Low battery: it’s played if the capacity of the batteries is low or the handsets require charging.
To configure the advisory tones
Press Menu (left softkey or the selection key) to bring up the operation menu.
Use arrow keys to reach Settings .
Navigate to select Audio 🡪 Advisory tones, and choose which tone you want to change it.
Press the left and right arrow keys to either enable or disable the desired tones.
Press “Save” (left softkey) to confirm, and a message prompt will be displayed to confirm that the new settings have been successfully saved.
Advisory Tone
Ringtones Customization
DP base stations allow users to use custom ringtones. Custom ringtones will be stored on the DP75x base station and only selected custom ringtones will be downloaded to specific DP handsets.
DP75x base station supports up to 10 custom ringtones.
The custom ringtone should be generated using GS Ringtone Tool and named ring[1-10].bin (example: ring1.bin, ring6.bin).
Run the tool and select your ringtone file to convert.
Generating Custom Ringtone Windows
Note
Currently only 16-bit linear PCM audio is supported for .wav files. The sampling rate should be automatically detected and the audio will automatically be down-sampled to 8kHz. Stereo channels are also detected and mixed to produce mono output.
.pcm files should be pre-formatted to 16-bit 8kHz mono format.
Press “Generate Ringfile” to finish the process. A ringtone with the filename “ring1.bin” will be created at the same location as the ringtone tool.
Step 2: Download Custom Ringtone(s) to DP75x Base Station
Make generated ringtone files available in your FTP, HTTP, or HTTPS server.
Access DP75x Web GUI and go Maintenance 🡪 Firmware Upgrade page.
Set “Upgrade Via” to HTTP/HTTPS or FTP/FTPS (depending on server type hosting ringtone files).
Set “Firmware Server Path” to the IP address or the FQDN of the server.
Set “FirmwareUpgrade and Provisioning” to “Always Check for New Firmware”.
Update the change by clicking the “Save and Apply” button. Then “Reboot” or power cycle the base station to download the ringtone(s).
Downloading Custom Ringtones
Step 3: Assigning a Custom Ringtone for a DP Handsets
Access DP75x Web GUI and go the DECT 🡪 HS Settings 🡪 HS# Settings page.
In Custom Ringtone, select a custom ringtone from the dropdown list. Note: If the list is not showing downloaded custom ringtone(s), press and check again.
Press “Save and Apply”. DP handsets will download the ringtone locally before using it. (Handset LCD screen will display download progress at this stage).
Note
DP handsets can use one custom ringtone only.
Date and Time
On the DP Handset, the Date and time are displayed on the idle screen and it obtains the date and time from the Simple Network Time Protocol (SNTP) server by default. If your handsets cannot obtain the date and time from the SNTP server, you need to configure the date and time manually. You can configure the time format and date format respectively. The handsets support two formats for time (12 Hours or 24 Hours) and three date formats (DD/MM/YYYY; MM/DD/YYYY; YYYY/MM/DD).
To configure date and time manually
Press Menu to bring up the operation menu.
Use arrow keys to reach Settings .
Navigate to Date and time. Edit the current values in the Date & Time fields (you can change the date/time format using the left key ⯇ or right key ⯈ and press “Set”.
Press the “Save” softkey to apply your changes.
Date and Time Settings
Gestures (DP730/DP735 only)
To configure Gesture options, follow the instructions below:
On DP730/DP735 LCD Menu Settings, select Settings 🡪 Gestures.
Set “Close-to-Ear Backlight” to On, to enable the LCD backlight when the handset is close to the ear.
Set “Facedown Hangup” to On, to enable the call hangup when the handset is put down on its face.
DP730 Gestures
Facedown Hangup
If the “Facedown Hangup” option is set to ON, if DP730/DP735 is placed face down it will:
Reject incoming calls.
Hang up ongoing call.
DP730DP735 Gestures Facedown Hangup
Close-to-Ear Backlight
DP730DP735 Gestures Close to Ear Backlight
Factory Functions
The factory functions include the following diagnostic options:
Keypad Diagnostic (on DP730/DP735) / Diagnostic Mode (on DP722/DP720/DP725)
Audio loopback
LCD on / off
LCD diagnostic
System Monitoring
Vibration (DP730/DP735 only)
Acceleration Sensor (DP730/DP735 only)
Proximity sensor (DP730/DP735 only)
Press Menu (left softkey or the selection key) to bring up the operation menu.
Use arrow keys to reach Settings .
Navigate to select Factory Functions and choose which diagnostic, you need to perform:
Diagnostic Mode / Keypad Diagnostic All LEDs will light up. All keys’ names will be displayed in red on the LCD screen before diagnosis. Press any key on the keypad to diagnose the key’s function. When done, the key’s name will display in blue on the LCD with a prompt message (PASS). To exit press “Back” (right softkey). Note: Long arrow UP key at any time to exit diagnostic mode.
Audio loopback: Speak to the phone using speaker/handsets/headset. If you can hear your voice, your audio is working fine. Press “Back” (left softkey) to exit audio loopback mode.
LCD On/Off: Select this option to turn off the LCD. Press any button to turn on the LCD.
LCD Diagnostic: Enter this option and press the Left/Right arrow key to do LCD Diagnostic (you will notice that the color of the LCD will be changing). Press the right softkey to quit.
System Monitoring: Displays RSSI, battery voltage, and RPN information.
Vibration (DP730/DP735 only): Press the “Vibrate” key to test if the device vibrates normally. Press the right softkey to quit.
Acceleration Sensor (DP730/DP735 only): Displays X, Y, Z coordinates. Change the handset position and check new values. Press the right softkey to quit.
Proximity Sensor (DP730/DP735 only): Cover the proximity sensor, when the sensor is covered, the gray dot displayed on the screen will become green. Press the right softkey to quit.
Factory Functions
DP Handsets Firmware Upgrade
Important
DP75x
For all DP series, once upgraded to 1.0.19.X, downgrading to 1.0.17.5 or lower firmware versions is not supported.
For all DP series, once upgraded to 1.0.17.X, downgrading to 1.0.15.6 or lower firmware versions is not supported.
For all DP series, once upgraded to 1.0.13.10 or higher, downgrading to 1.0.13.8 or lower firmware versions is not supported. It is recommended not to downgrade from 1.0.15.2 to 1.0.13.10.
For all DP series, once upgraded to 1.0.7.5 or higher, downgrading to 1.0.4.10 or lower firmware versions is not supported.
Since firmware 1.0.7.5, support has been added for a new format of P values. For the old <Pxx>value</Pxx> format in the XML configuration file, use <config version=”1″>. For the new format <item name=”xx.xx.xx.xx.xx”>value</item>, use <config version=”2″>. DP7xx supports both XML configuration formats but will not work if the version number is incorrect.
DP730/DP720/DP722
Upgrading from 1.0.7.5 to 1.0.9.1 or higher requires updating both firmware and resource images. The device will download and reboot twice. After upgrading to 1.0.9.1 or higher, the upgrade process will occur only once as usual.
DP720
After the base station (DP750 or DP752) is upgraded to 1.0.7.5, the DP720 handset will not automatically upgrade because the GUI has changed since 1.0.4.10. Users must manually upgrade the handset firmware via Menu → Settings → Firmware Upgrade.
DP750/DP720/DP760
Once upgraded to 1.0.4.2 or higher, downgrading to 1.0.3.40 or lower firmware versions is not supported.
DP750/DP720
Once upgraded to 1.0.3.23 or higher, downgrading to 1.0.3.17 or lower firmware versions is not supported.
Once upgraded to 1.0.3.17 or higher, downgrading to 1.0.2.16 or lower firmware versions is not supported.
Once upgraded to 1.0.2.16 or higher, downgrading to 1.0.1.x or lower firmware versions is not supported.
Firmware 1.0.0.99 (the first publicly released beta firmware) and all later versions can upgrade directly to 1.0.4.7 without requiring transitional firmware.
The DP handsets can detect if new firmware is available when it is registered to a base station.
Firmware Notification
The user can also provide the HTTP/HTTPS server username and password from the handset for provisioning purposes, this can be done on the handset under Settings → System Settings → Provision Auth.
Users can disable handset firmware downgrade from the base station by choosing the option “Enable, But Downgrade not Allowed” under Maintenance → Firmware Upgrade → Handset Firmware.
To upgrade the firmware on your handsets, follow the steps below:
Press Menu to bring up the operation menu.
Use arrow keys to reach Settings .
Navigate to select Firmware Upgrade and press the softkey “Select”.
The LCD screen will display a prompt message to confirm the firmware downloading / upgrading press the right softkey “Back” to dismiss the upgrade process.
Firmware Upgrade
Reboot DP Base Station
Press Menu to bring up the operation menu.
Use arrow keys to reach Settings .
Navigate to select Settings 🡪 System Settings and choose Reboot Base.
Enter the Base PIN code (by default the PIN code is: 0000).
The LCD screen will display a prompt message to confirm rebooting the base station, press “Yes” (left softkey) to confirm or press “No” (right softkey) to cancel.
Rebooting the Base Station
Reset DP Handsets
The users can reset the new settings made on the handsets after performing a factory reset. To reset your handsets to the default settings:
Press Menu to bring up the operation menu.
Use the arrow keys to reach Settings .
Navigate to select Settings 🡪 System Settings and choose Factory Reset.
The LCD screen will display a prompt message to confirm restoring factory settings, press “Yes” (left softkey) to confirm, and then the handsets will reboot to apply the default settings or press “No” (right softkey) to cancel.
Resetting the Base Station
CALL OPERATIONS
Outgoing Default Line
When a Handset is configured with more than one line, users can change the default outgoing line on the DP Handset handset using the keypad Menu 🡪 Preferences 🡪Outgoing Default Line.
Outgoing Default Line
Placing calls
To place calls, you can use the following mode:
Earpiece mode: pressing the off-hook key to dial out.
Speakerphone mode: Press the speakerphone key to dial out.
Headset mode: Press the off-hook key to dial out using a connected headset.
During the call, you can switch the call mode by pressing the corresponding keys or connecting a headset.
Make a Call using a Line
Making calls requires the use of SIP lines. So, you should first register the SIP account to the handsets beforehand, after registering the SIP lines, you can assign one or more outgoing lines for the handsets. The handsets can only use the assigned outgoing line(s) to place calls.
Please refer to the following methods to make calls using a line:
Method 1:
Via default outgoing line:
Enter the desired number using the keypad.
Press the Dial key or Speaker key . The handsets will use the default outgoing line to dial out.
To terminate the call, press the Hang-Up key .
Note: To change the default outgoing line, please refer to [Outgoing Default Line].
Selecting the outgoing line:
Enter the desired number using the keypad.
Press the left softkey “Call”.
Select the desired line to dial out.
To terminate the call, press the Hang-Up key .
Method 2:
Press Dial key or Speaker key to enter the pre- dialing screen.
Enter the number to dial using the keypad.
Press Dial key , # key (“Use # as dial key” must be configured in web configuration) or wait for 4 seconds and the call will be initiated automatically.
To terminate the call, press the Hang-Up key .
During the call, you can switch the call mode by pressing the corresponding keys and cancel the dialing operation by pressing the on-hook key. During the call conversations, you can press the left and right navigation keys to adjust the volume. The call duration is displayed on the LCD screen while the call is in progress and the call summary will be displayed once the call is terminated.
Note
To dial “+” please keep pressing the “0” key for about 2 seconds.
To dial from the contacts list, choose a contact using the navigation keys and press the Dial key.
Dialing from Call history
Users may use their call history entries to initiate calls.
Press Menu to bring up the operation menu.
Use arrow keys to reach the Call History icon and then press “Select”.
Select the desired entry, then press the Dial key to establish the call.
Note: In step 3, users can press the “Options” softkey followed by the “Edit Dial” option to initiate the call.
The call history list stores the last dialed phone numbers. When the memory of the redial number list is full, the handsets will automatically erase the oldest dialed number when a new number is dialed
Dialing from Phonebook
Users may use their private or shared contacts to initiate calls.
Press Menu to bring up the operation menu.
Press Contacts to access the phonebook menu.
Select the contact to call.
Press Dial Key to initiate the call.
Note: In step 4, users can press the “Options” softkey followed by the “Edit Dial” option to initiate the call.
Notes
Redialing can be performed via the pound key “#” when configured accordingly.
Intercommunication
Users may make phone calls between different handsets directly without remembering each user’s phone number.
Go to Handset GUI -> Shortcut
Configure a navigation key (up, down, left, or right key) to “Intercom”.
Press the key just configured at the idle state.
Choose the handset name that you want to call.
Shortcut Setting
Answering Calls
When receiving an incoming call, you can answer the call using the following steps:
Earpiece mode:
Press Dial Key to pick up the call, or “Accept” softkey (left softkey).
Speakerphone mode:
Press Speaker Key to pick up the call.
Headset mode:
Press Dial Key to pick up the call, or the “Accept” softkey using a connected headset.
Notes
To answer an incoming call during an established call, press Dial Key , or the Speaker Key , or the “Answer” softkey. The incoming call is answered, and the original call is placed on hold.
You can switch off the ringer temporarily by pressing Silent softkey.
Auto Answer
Users can enable the Auto Answer feature to accept and automatically answer incoming calls.
If enabled, DP Handsets will automatically answer incoming calls using speaker mode.
To activate/deactivate the auto answer feature:
Using DP Handsets Menu
Press Menu to bring up the operation menu.
Select Preferences 🡪 and navigate to Auto Answer using the up/down arrow keys.
Switch between Enabled/Disabled using the left/right arrow keys and “Save” after Enabling / Disabling the option.
Using DP75x Base Station Web Interface
Access DP75x Base Station Web Interface.
Go to DECT 🡪 Handsets Settings 🡪 HS# Settings.
Set “Enable Auto Answer” to “Yes”. (By default, set to “No”).
Off-Cradle Pickup
Users can enable the Off-Cradle Pickup feature to automatically answer incoming calls after picking up DP Handsets from its cradle. Incoming calls will be automatically answered using earpiece mode.
Note
DP Handsets should be resting on their cradling and then picked up for this feature to work.
The “Auto Answer” feature should be set to “No” to work properly.
To activate/deactivate the off-cradle pickup:
Using DP Handsets Menu
Press Menu to bring up the operation menu.
Select Preferences 🡪 and navigate to Off-Cradle Pickup using the up/down arrow keys.
Switch between Enabled/Disabled using the left/right arrow keys and “Save” after Enabling / Disabling the option.
Using DP75x Base Station Web Interface
Access DP75x Base Station Web Interface.
Go to DECT 🡪 Handsets Settings 🡪 HS# Settings.
Set “Enable Onhook on Cradle Reposition” to “Yes”. (By default, set to “No”).
Ending Calls
To terminate the calls, press the Hang-Up key .
On-Cradle Hang-up
Users can enable the On-Cradle Hang-up feature to automatically end ongoing calls after placing DP Handsets on its cradle.
To activate/deactivate the on-cradle hang-up feature:
Using DP Handsets Menu
Press Menu to bring up the operation menu.
Select Preferences 🡪 and navigate to On-Cradle Hang-up using the up/down arrow keys.
Switch between Enabled/Disabled using the left/right arrow keys and “Save” after Enabling / Disabling the option.
Using DP75x Base Station Web Interface
Access DP75x Base Station Web Interface.
Go to DECT 🡪 Handsets Settings 🡪 HS# Settings.
Set “Enable Off-hook on Cradle Pickup” to “Yes”. (By default, set to “No”).
Rejecting Calls
To reject an incoming call, press the Hang-Up key or “Reject” softkey (right softkey)
Direct IP Call
Direct IP calling allows two parties, that is, a handset and another VoIP device, to talk to each other in an ad hoc fashion without a SIP proxy.
Elements necessary to complete a Direct IP Call:
Both DP Base station and other VoIP Devices, have public IP addresses, or
Both DP Handsets and other VoIP Devices are on the same LAN using private IP addresses, or
Both DP Handsets and other VoIP Devices can be connected through a router using public or private IP addresses (with necessary port forwarding or DMZ).
Users can perform IP calls using Star code following the below steps:
Pick up the handsets and press the Dial key .
Dial *47 followed by the target IP Address.
Note
You can enter directly *47 + target IP address, and then press the dial key to initiate the call.
Examples of direct IP calls
If the target IP address is 192.168.0.160, the dialing convention is *47 then 192*168*0*160, followed by pressing the “#” key if it is configured as a send key or wait 4 seconds. In this case, the default destination port 5060 is used if no port is specified.
If the target IP address/port is 192.168.1.20:5062, then the dialing convention would be: *47 or Voice Prompt with option 47, then 192*168*0*160*5062 followed by pressing the “#” key if it is configured as a send key or wait for 4 seconds.
Note
To accept incoming direct IP calls, Use Random Port setting should be set to NO. If set to YES, it can only dial out. The setting is available on the DP Base station web interface 🡪 Settings 🡪 General Settings.
Call Hold/Resume
During an established call, you can put the call on hold and resume the below steps:
Press the left softkey to access the call Options and then navigate to Hold.
Press “Select”, the left softkey to put the call on hold.
To resume the call, access the options menu again and navigate to Resume, then press Select.
Or you can press the softkey Hold to hold the call and Resume to resume it.
Call Waiting
This feature will notify you of a new incoming call during an established call and display the incoming call information visually on the LCD screen and a call waiting tone will be heard. If this feature is disabled, the new incoming call will be automatically rejected.
There are 2 ways to activate the call waiting feature either using the DP Handsets Menu or using DP Base Station Web Interface.
Using DP Handsets Menu
Press Menu to bring up the operation menu.
Use arrow keys to reach Call Features 🡪 navigate to Call waiting sub-menu.
Select the account for which you want to enable the Call waiting feature, and then press the left softkey “Select”.
Choose between Enabled and Disabled options and press the softkey “Save”, a prompt message will be displayed to confirm that the call waiting is enabled / disabled.
During an established call, press (dial key) to put the first call on hold and answer the second incoming call. If no second incoming call, pressing will give the ability to initiate another call while the first one is on hold.
Note
You can switch between active/on-hold calls by pressing Options 🡪 Swap.
Using DP75x Base Station Web Interface
Access DP75x Base Station Web Interface.
Go to DECT 🡪 Handsets Settings 🡪 HS# Settings.
Set “Disable Call Waiting Tone” to “No”. (Default is No).
Press the “Save and Apply” button to confirm.
Do Not Disturb
You can activate or deactivate the DND mode for your accounts registered on the handsets under the call settings. If DND mode is activated for a specific line, all incoming calls will receive busy treatment depending on your configuration (forward to voice mail, busy tone…)
To enable or disable the DND mode, follow the next steps
Press Menu to bring up the operation menu.
Use arrow keys to reach Call Features 🡪 navigate to the Do Not Disturb sub-menu.
Select the account on which you want to enable/disable the DND mode and then press “Select”
Choose between Enabled and Disabled options and press softkey “Save” to accept the changes, a prompt message will be displayed to confirm that the DND is enabled / disabled.
You can navigate to Status 🡪 Line status to check if the DND mode is enabled on the base station.
You can also navigate via the web interface of DP Base Station 🡪 Status 🡪 Line Options.
Call Forward
The call forward feature will allow you to forward all incoming calls to the desired number. Three possible call forward types are available on the DP Handsets.
Forward all Dest: All incoming calls are immediately forwarded.
Forward Busy Dest: Incoming calls are immediately forwarded if the line is busy.
Forward No Answer Dest: Incoming calls are forwarded if not answered after a configured period of time.
To enable the call forward, please refer to the following steps:
Press Menu to bring up the operation menu.
Use arrow keys to reach Call Features 🡪 navigate to the Call Forward sub-menu.
Select the account on which you want to enable/disable the call forward feature and press “Select”.
Select the type of call forwarding enter the number to forward the calls. For Forward No Answer, set “No Answer Timeout (s)“, which will determine how long the handset will keep ringing before the call is forwarded to the configured destination. (The valid range is 1 to 120 seconds, the default setting is 20)
Press “Save” (left softkey) to apply the settings, a prompt message will be displayed to confirm that the new settings have been saved successfully.
Paging
The DP Handsets support paging other handsets internally without having any sip Account registered. Similarly to the base station paging button, Inter-Handsets paging features enable handsets to ring other handsets. The feature can be enabled from the LCD menu 🡪 Call Features 🡪 paging.
Call Transfer
The DP Handsets support the Call Transfer feature, you can transfer a call to another party using one of the following ways:
Blind transfer: Transfer a call directly to another party without consulting
Attended transfer: Transfer a call with prior consulting.
Blind Transfer
1. Press the “Options” softkey during a call, and then select Blind Transfer, or press the softkey Transfer for DP Handset.
2. The initial call will be on hold, enter the number you want to transfer the call to.
3. Press the Dial key . The call is connected to the number or the handsets you specified, and the LCD screen prompts Call Transferred.
Attended Transfer
1. Press the Left softkey “Options” during a call, and then select Attended Transfer.
2. Enter the number you want to transfer the call to, then press the Dial key or press the Call Softkey.
3. Once the second call is established, press left softkey Transfer to finish the Attended transfer.
Transfer between handsets
The Call Transfers can also be done between handsets without a SIP account. The DP75x can transfer a call to another handset even if it has no SIP account registered.
Speed Dial
Speed dial allows users to perform single-digit dialing to predefined numbers. This feature is particularly useful to speed up dialing frequently used or hard-to-remember numbers. A maximum of 8 speed dial numbers is allowed.
For example, the digit key 2 is configured as a speed dial key and assigned the number 2000, the phone will dial out the number 2000 directly when you long press digit key 2.
To assign the frequently used numbers as speed dial keys:
Press Menu to bring up the operation menu.
Access to Shortcut and then use the Arrow keys to reach the Speed Dial sub-menu.
Or;
Long press the representative number from 2 to 9 to set. (Note: The Speed dial number should not be already set on the chosen representative number, otherwise long press will initiate a call to the configured speed dial number).
Choose the digit key (2-9) to set and press Options or OK button. Three options will be available:
Edit: To configure manually a contact as speed dial. Users need to enter “First Name”, “Last Name” and “Number”. (Note: First Name + Number or Last Name + Number are accepted).
From Contacts: To set a contact from the phonebook directory to be a speed dial.
To Modify a Speed Dial:
Repeat the above 2 steps.
In step 2, re-edit /re-assign a contact from the shared or private directory as a speed dial on the selected key.
To Delete a Speed Dial:
Repeat the above 2 steps.
At step 2, select the Clear Entry option and press OK or Select to confirm.
3-Way Conference
The DP Handstes supports creating a local conference with other parties (including handsets starting the conference).
To start a 3-Way conference, follow the below steps:
Press the Dial key to place a call to the first party.
Press the left softkey “Options”, then select Conference.
Enter the second party number you want to add to the conference and press the Dial Key .
To drop the conference call, press or “End” softkey.
Note
Conference can be bridged before third-party answers.
Voice Mail
The voice mail feature ensures that you will never miss any important messages. It permits either to leave voice mails to someone else or receive and listen to voice mails via the handsets
Set Voice Mail Feature Code
There are 2 ways to set the Voice Mail Feature Code, either using the DP Handsets Menu or using the DP75x Base Station Web Interface.
Note: The Voice Mail Feature Code depends on the service provider or IP-PBX used. For example, if UCM6xxx is the SIP server, the Voice Mail Feature Code is *97.
Using DP Handsets Menu
Press Menu (left softkey or the selection key) to bring up the operation menu.
Access to Voice Mail and then select Set Voice Mail sub-menu.
Select the account and enter the “VM Access Number”, then press the “Save” softkey.
Using DP75x Base Station Web Interface
Access DP75x Base Station Web Interface.
Go to Accounts🡪 General settings.
Configure Voice Mail Access Number.
Play Voice Mail Messages
Press “Menu” to bring up the operation menu.
Access to Voice Mail and then select the Play Message sub-menu.
Select the account to retrieve your voice messages saved on your voicemail.
Or;
Long press the digit “1” key to dial the configured Voice Mail feature code using Default Line.
Notes
Users can access directly voicemail menu directly to play messages, by clicking on “View” (left softkey) when the notification of a new voicemail pops up on the DP Handstet’s LCD screen.
If the VM is protected by a password, users can enter the password using the DP Handset keypad after reaching the Voice Mail system. The password is defined on the service provider or IP-PBX side.
Push to talk (PTT)
The DP Handsets support the push-to-talk (PTT) features which is a technology based on the instantaneous communication commonly employed in wireless cellular phone services using a button to switch the device from voice transmission mode to voice reception mode. This feature is similar to the “walkie-talkie” used and the PTT mode switches a phone from full duplex mode, where both parties can hear each other simultaneously, to half duplex mode, where only one party can speak at one time. Multiple parties to the conversation may also be included.
Users could press and hold the Push-to-talk key from any screen to quickly initiate a PTT call.
PTT Call Establishment
2. Available handsets (subscribed to the same base station) will receive the PTT call.
3. Keep holding the PTT key while speaking. The channel status will change to Sending PTT to indicate that you are transmitting as displayed on the following screenshot.
PTT Transmission
To terminate PTT call, press button.
Note
The User should expect a delay of 6-8 seconds to establish PTT call due to DECT signaling, which will not exist once PTT call is established.
Configuration:
The PTT feature is always enabled on the base station, to use this feature, users need to enable the PTT on the handset at: Handset Menu → Preferences → PTT → set “Enabled”.
Enable PTT
Also, to use PTT, the DP722 needs a dedicated button to push and then to talk, user can choose to use either LSK (Left Softkey) or RSK (Right Softkey) in Shortcuts settings. (If you forgot to enable the PTT, when you press the PTT softkey, it will redirect you to the setting to enable it before you can use it.)
Set a Softkey for PTT
Users can configure the “DECT PTT Silence Timer” on the Web UI at → DECT → General Settings. When a PTT call is established, any handset that enabled the PTT feature will automatically join the PTT call. if there is no one talking, after a certain time, the PTT call will be closed. This timeout setting is to determine how long the PTT call will be closed after being idle status. If set to 0, the timer will be disabled, and the PTT will remain forever until all parties exit the PTT call.
Call Features
The DP Handsets support traditional and advanced telephony features including caller ID, caller ID with caller Name, call forward, etc.
*30
Block Caller ID (for all subsequent calls)
Off hook the phone;
Dial *30.
*31
Send Caller ID (for all subsequent calls)
Off hook the phone;
Dial *31.
*67
Call with Caller ID Blocked (per call)
Off hook the phone;
Dial *67 and then enter the number to dial out.
*82
Call with Caller ID Enabled (per call)
Off hook the phone;
Dial *82 and then enter the number to dial out.
*72
Unconditional Call Forward. To set up unconditional call forward:
Off hook the phone;
Dial *72 and then enter the number to forward the call;
Press OK softkey or SEND key.
*73
Cancel Unconditional Call Forward. To cancel the unconditional call forward:
Off hook the phone;
Dial *73;
Hang up the call.
*90
Busy Call Forward. To set up a
busy call forward:
Off hook the phone;
Dial *90 and then enter the number to forward the call;
Press the
OK softkey or SEND key.
*91
Cancel Busy Call Forward. To cancel the busy call forward:
Off hook the phone;
Dial *91;
Hang up the call.
*92
Delayed Call Forward. To set up a delayed call forward:
Off hook the phone;
Dial *92 and then enter the number to forward the call;
Press OK softkey or SEND key.
*93
Cancel Delayed Call Forward. To cancel the delayed call forward:
Off hook the phone;
Dial *93;
Hang up the call.
Call Features
RESTORE FACTORY DEFAULT SETTINGS
Warning
Restoring the factory default settings will delete all configuration information on the phone. Please backup or print all the settings before you restore to the factory default settings. Grandstream is not responsible for restoring lost parameters and cannot connect your device to your VoIP service provider.
Please follow the instructions below to reset the phone:
Press the MENU button to bring up the keypad configuration menu;
Select Settings and enter;
Select System Settings 🡪 Factory Reset;
A warning window will pop out to make sure a reset is requested and confirmed;
Press the Yes softkey to confirm and the phone will reboot.
To cancel the Reset, press No softkey instead.
Users also can perform a factory reset using combo keys on DP Handsets during booting up before it is fully booted, to give DP Handsets the ability to recover from some extreme cases like self-reboot or stuck right after booted up.
Please refer to the following procedure for DP Handsets factory reset using the combo key:
Connect the USB cable and power off the DP Handsets.
Power on the DP Handset and wait for the Green LED.
Press 3 times Central Key (OK/Selection Key) quickly after the Green LED is on.
Press the Speaker Key (left bottom) first and then the Mute Key (right bottom) after the Red LED is on.
DP Handset LED will start blinking in 3 colors: Green, Red, and Orange if the factory reset successfully triggered.
Wait for about 1-3 minutes, the DP Handset will boot up with the setup wizard for initial language and date format settings.
CHANGE LOG
This section documents significant changes from previous versions of the user guide for DP735/DP730/DP722/DP725/DP720. Only major new features or major document updates are listed here. Minor updates for corrections or editing are not documented here.
Firmware Version 1.0.3.33
Product Name: DP720, DP722, DP725, DP730
No major changes.
Firmware Version 1.0.3.25
Product Name: DP755
No major changes.
Firmware Version 1.0.3.23
Product Name: DP755
No major changes.
Firmware Version 1.0.21.33
Product Name: DP750, DP752, DP760
No major changes.
Firmware Version 1.0.21.31
Product Name: DP750/DP752
Added option to hide “Mute as DND” setting on the handset. [Mute as DND]
Added call duration display in Call History. [Call History]
Added ability to manage 3-way conference from handset. [3-way conference]
Firmware Version 1.0.17.1
Product Name: DP752/DP750
No major changes.
Firmware Version 1.0.15.15
Product Name: DP752/DP750
No major changes.
Firmware Version 1.0.15.6
Product Name: DP752/DP750
No major changes.
Firmware Version 1.0.15.3
Product Name: DP752/DP750
No major changes
Firmware Version 1.0.15.2
Product Name: DP752/DP750
Add support to input provisioning server username and password on handset UI when the base station is trying to download a config file from a password-protected server.
Added support to delete a paired base station from the handset.
Firmware Version 1.0.13.8
Product Name: DP752/DP750
Added support for handsets to internally page other handsets without accounts registered. [Paging][Call Features]
Updated the CPE to 1.0.1.141 to better support GDMS.
Firmware Version 1.0.13.0
Product Name: DP752/DP750
No major changes
Firmware Version 1.0.11.12
Product Name: DP752/DP750
Added support for intercom feature without SIP account. [Intercommunication]



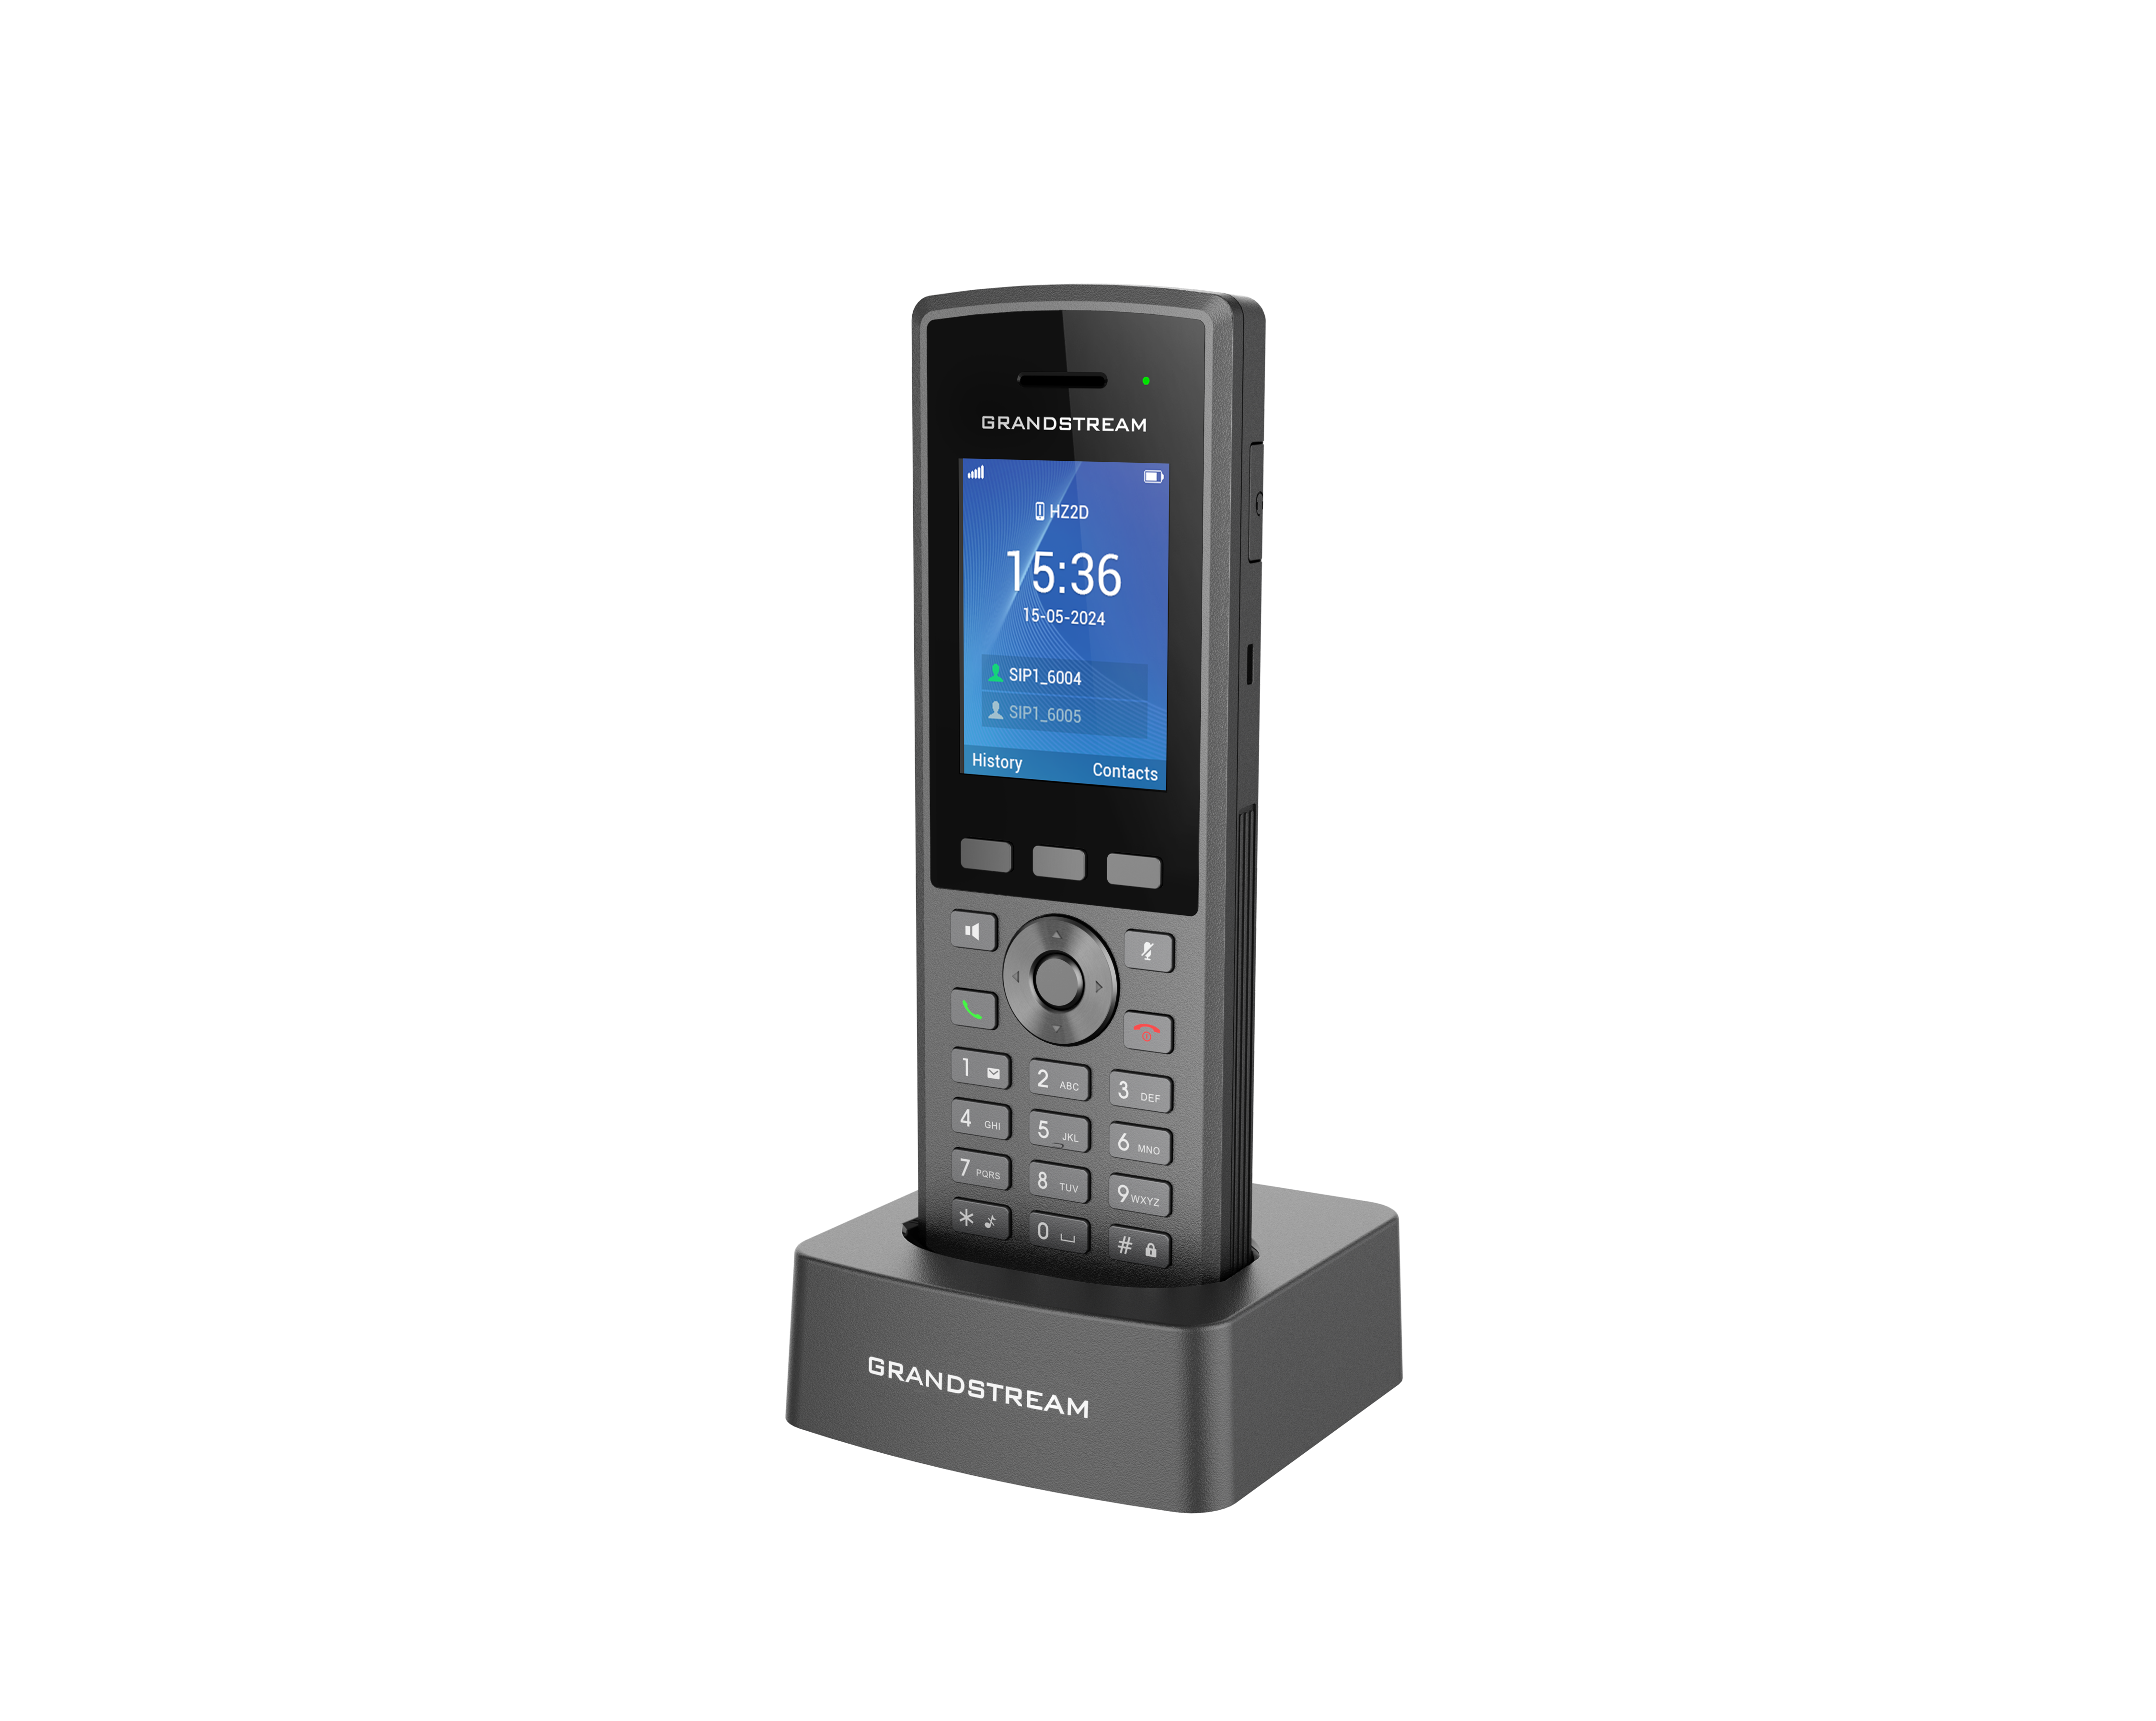
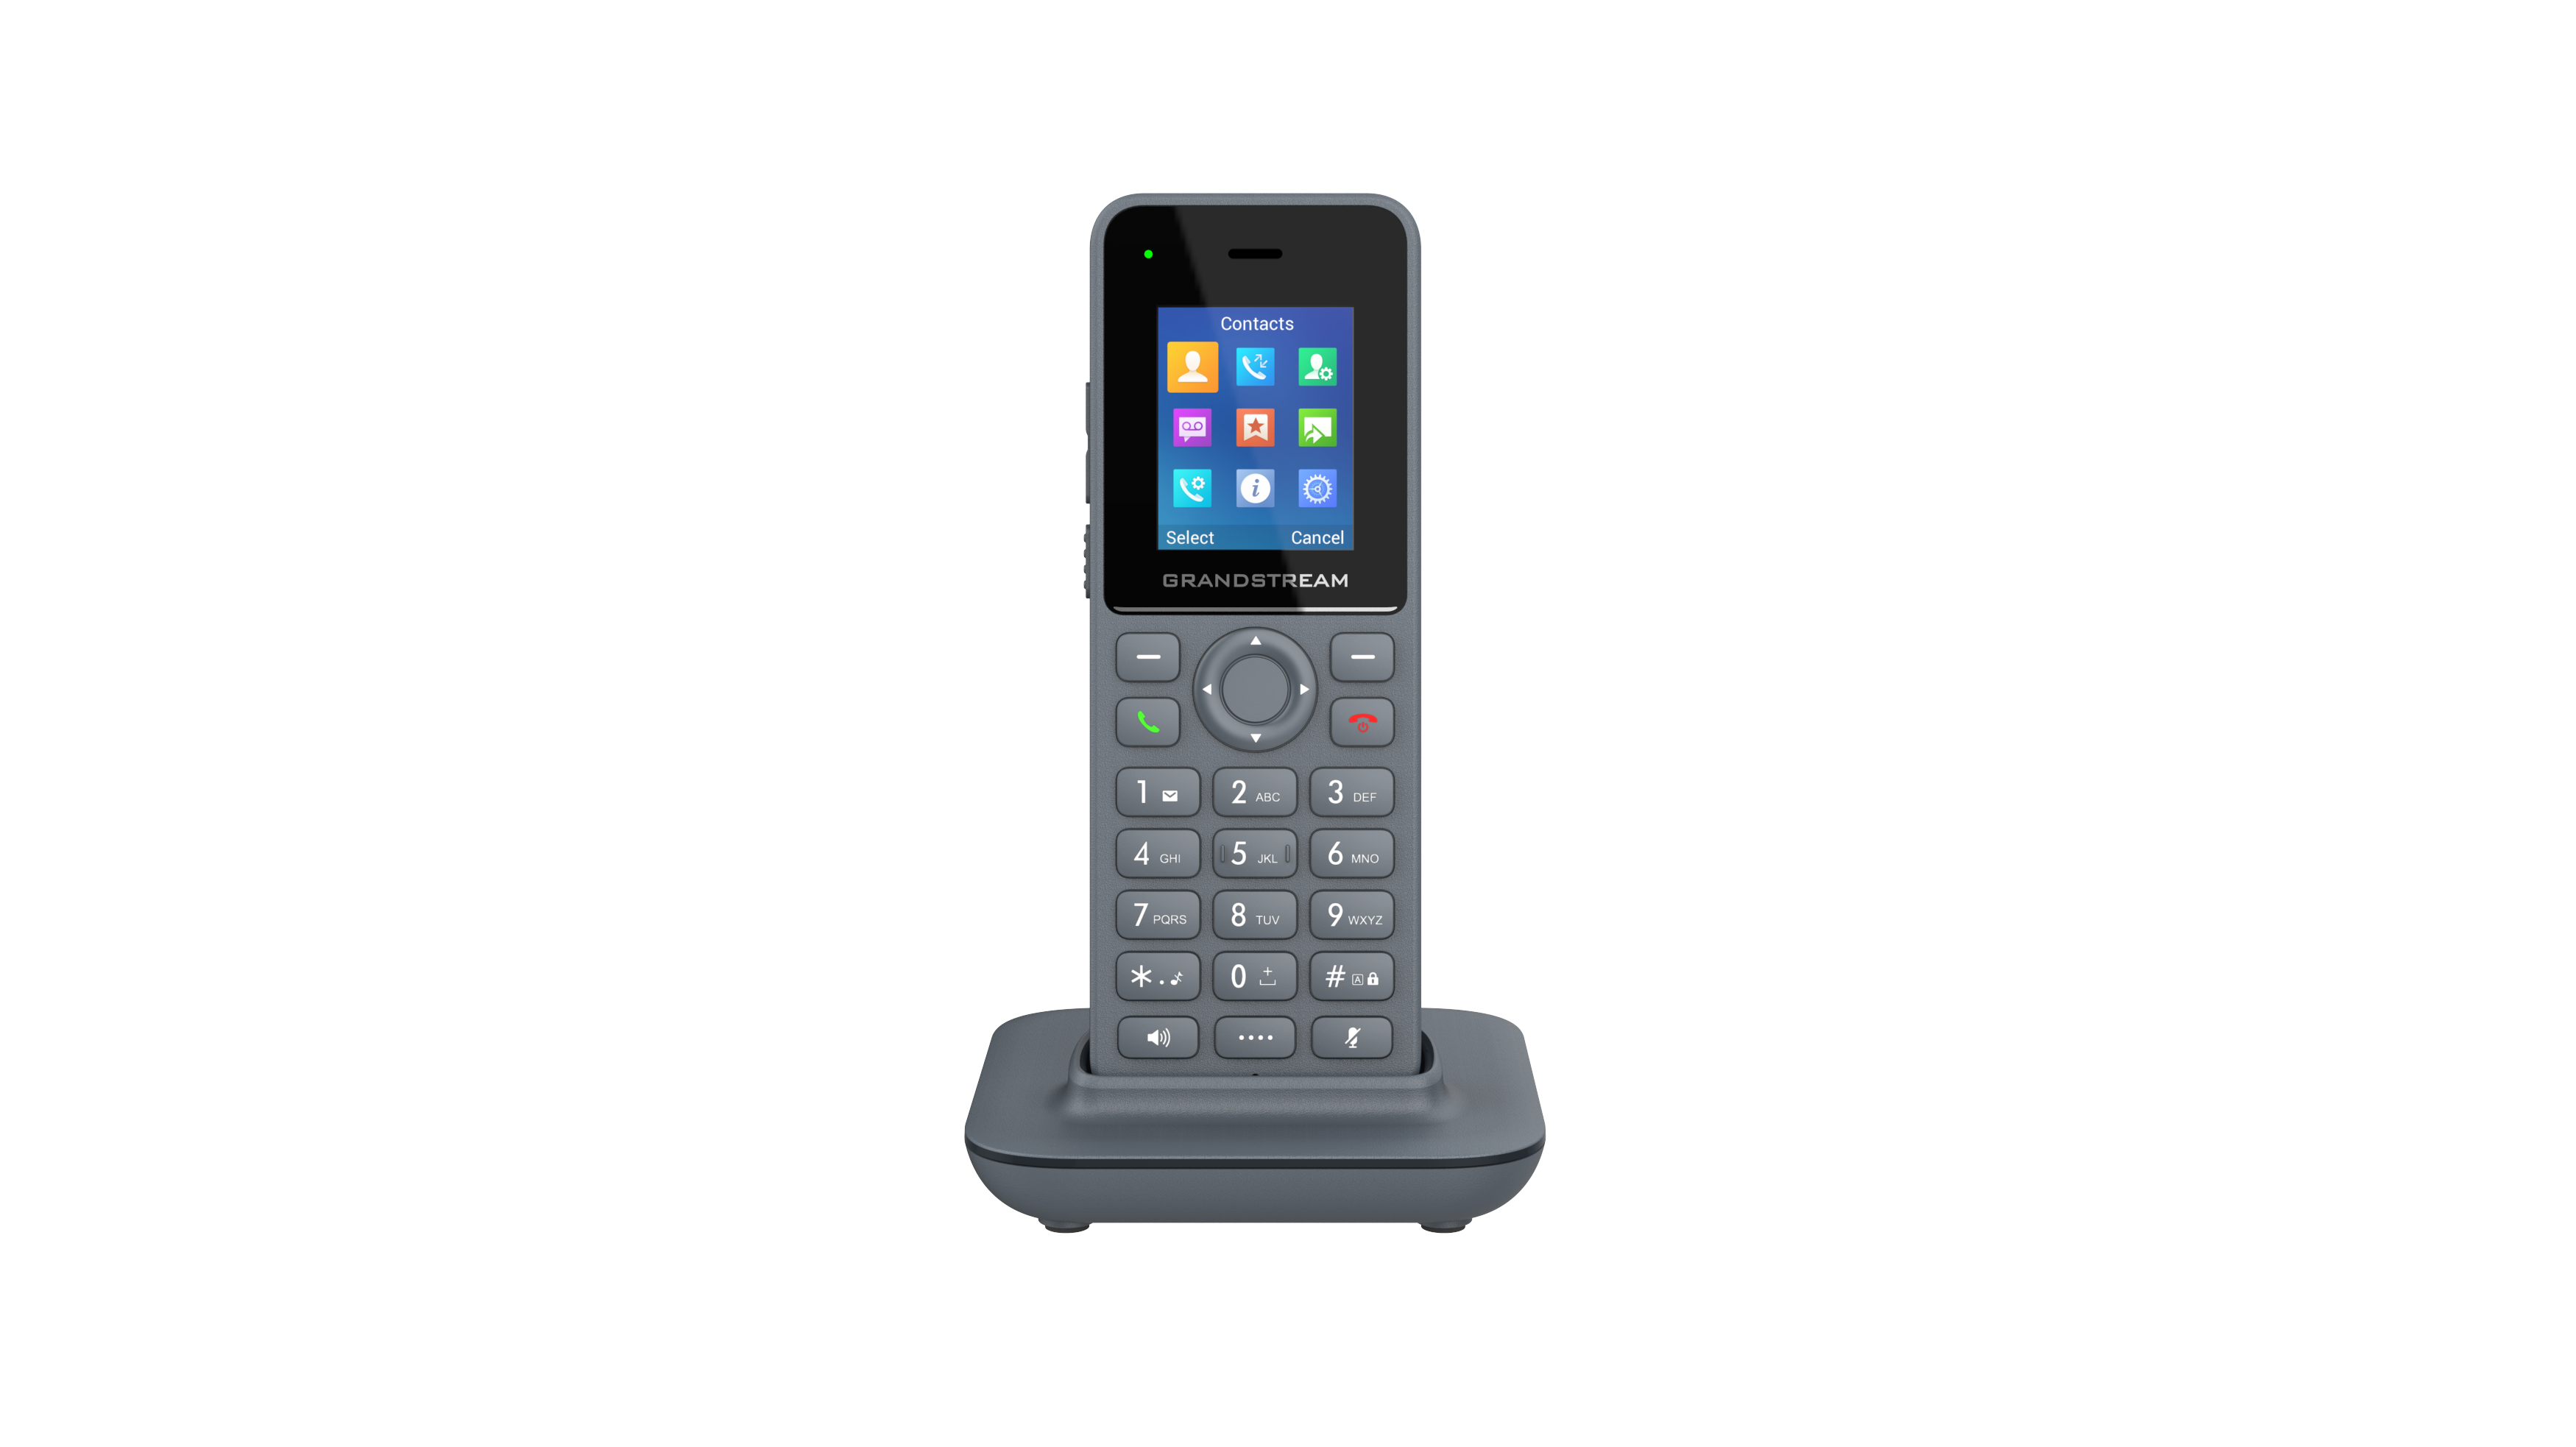


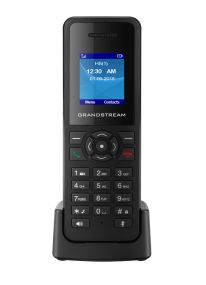

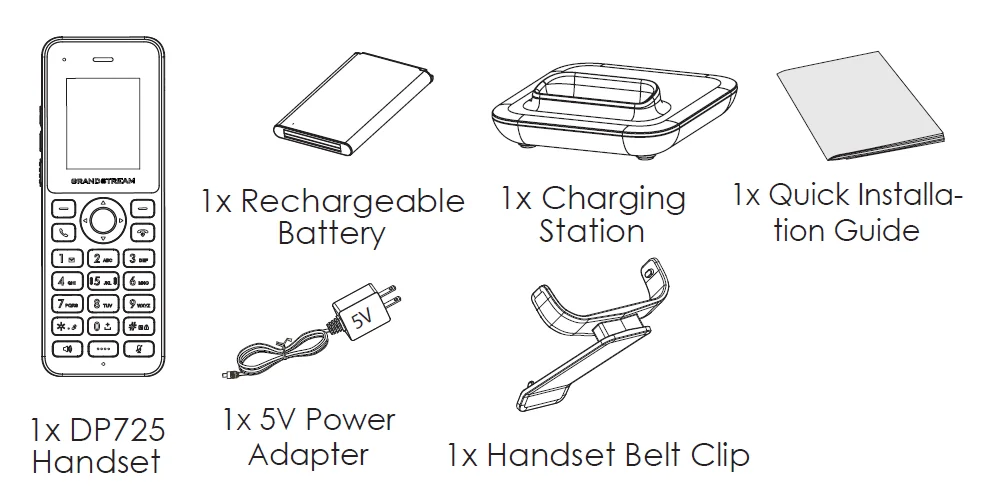
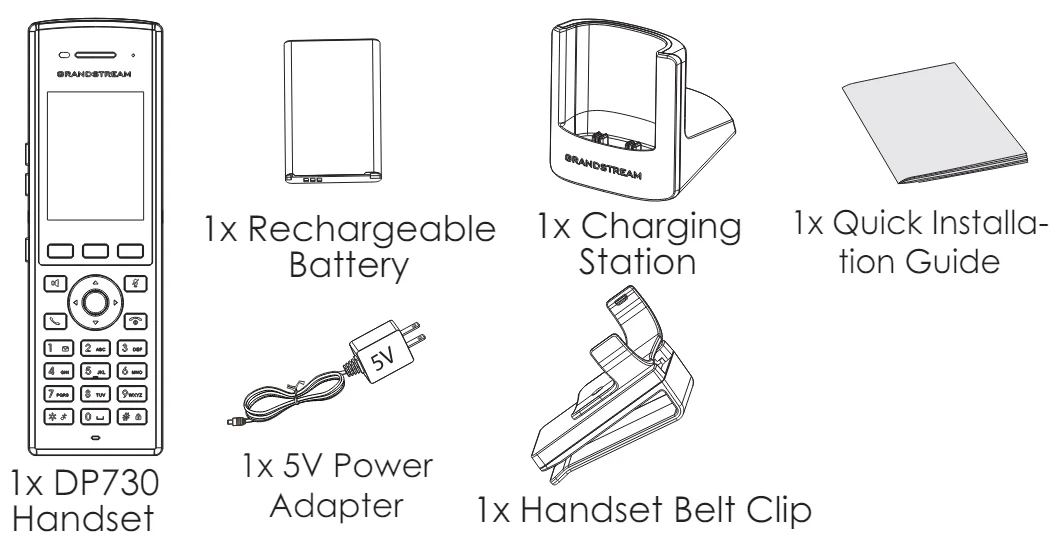
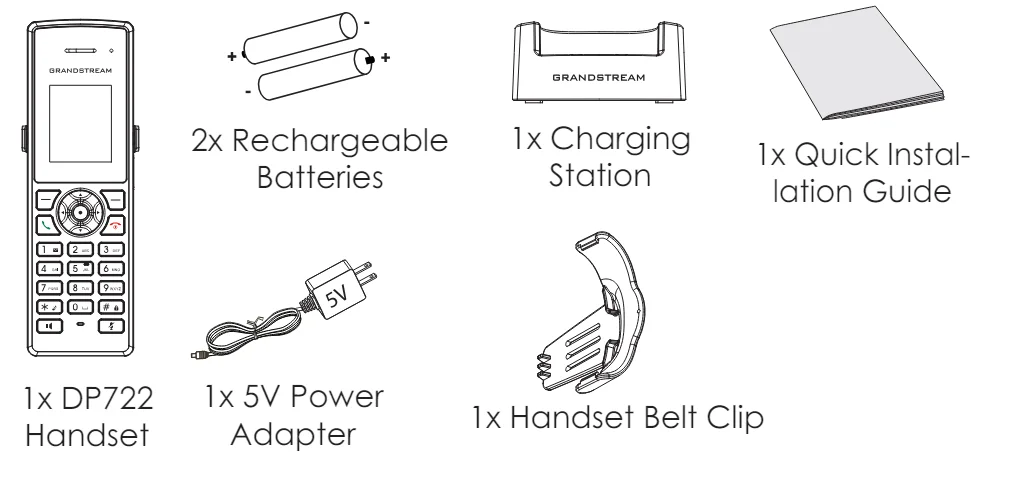
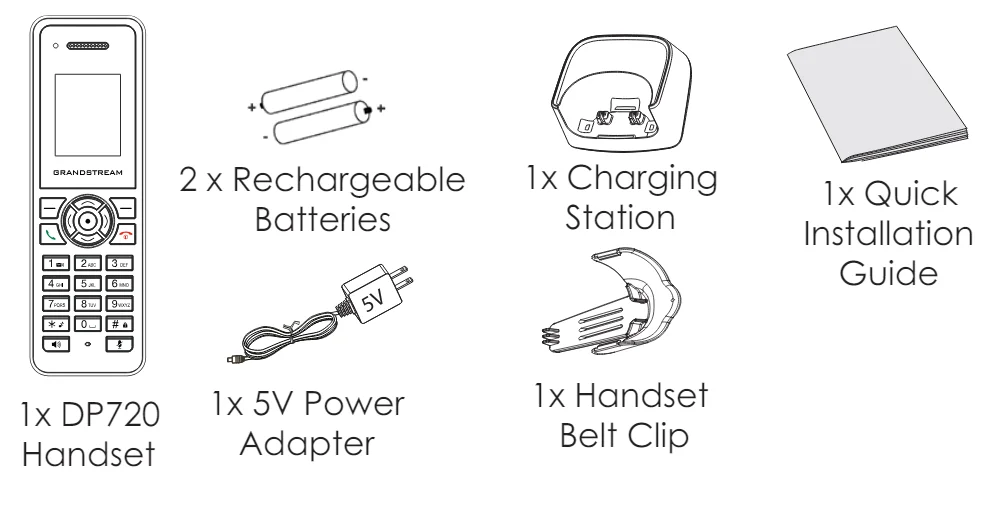

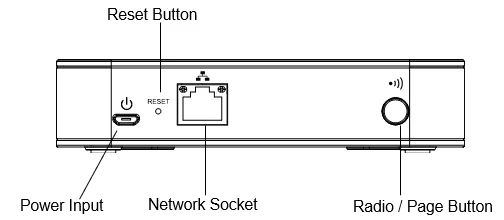

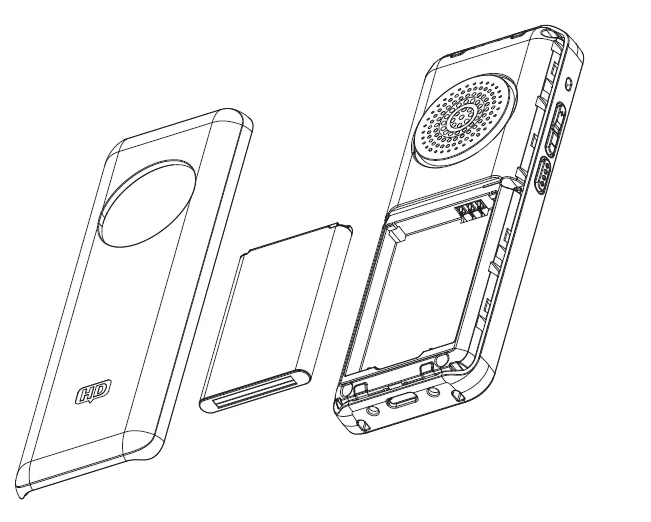
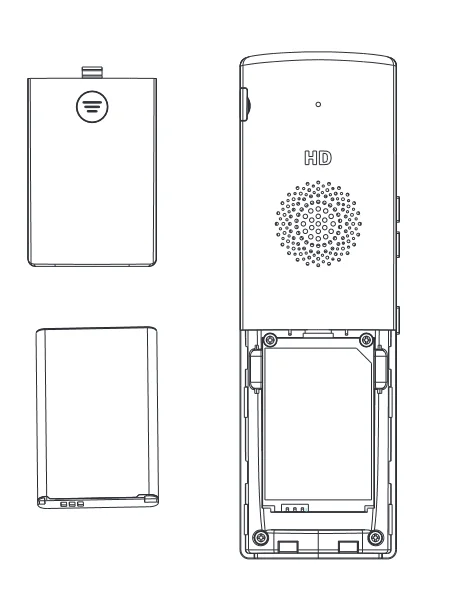
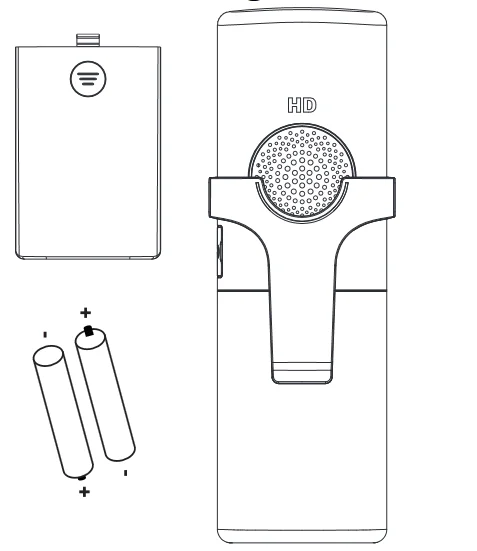
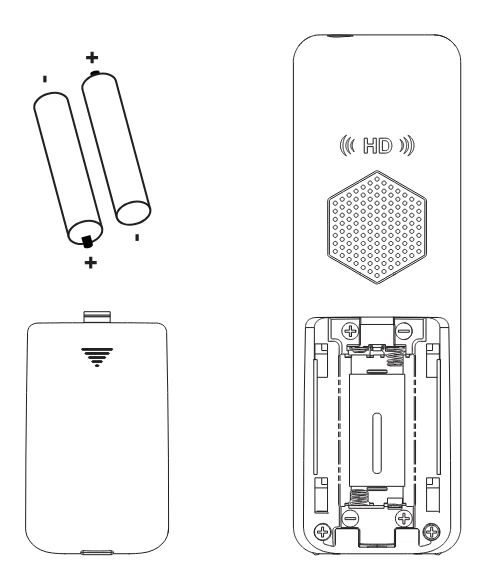

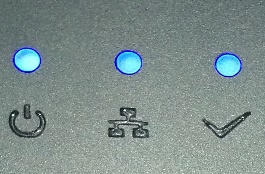





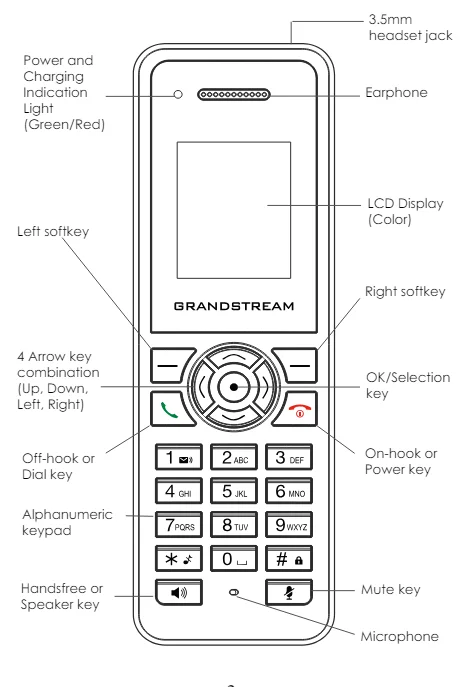
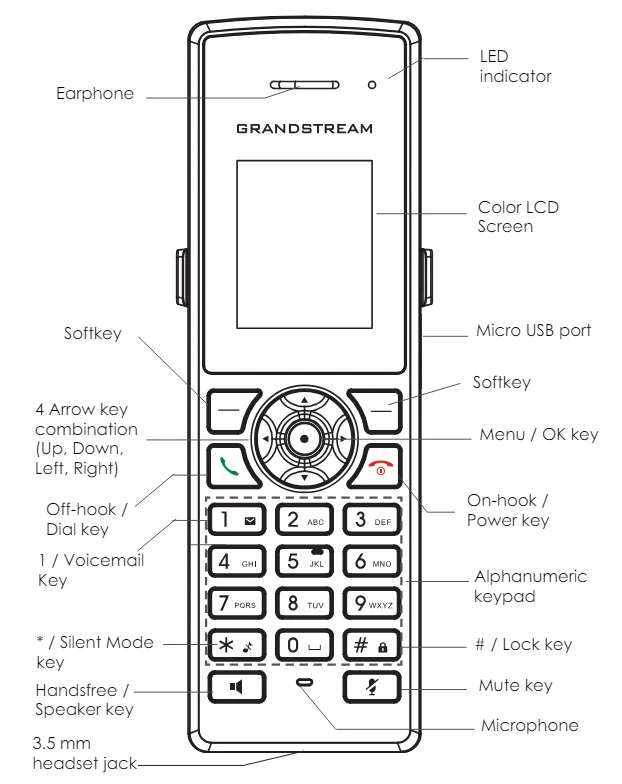
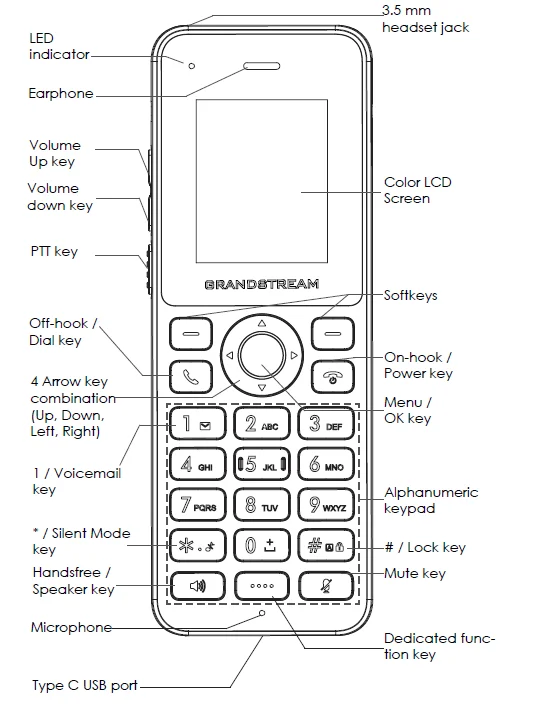
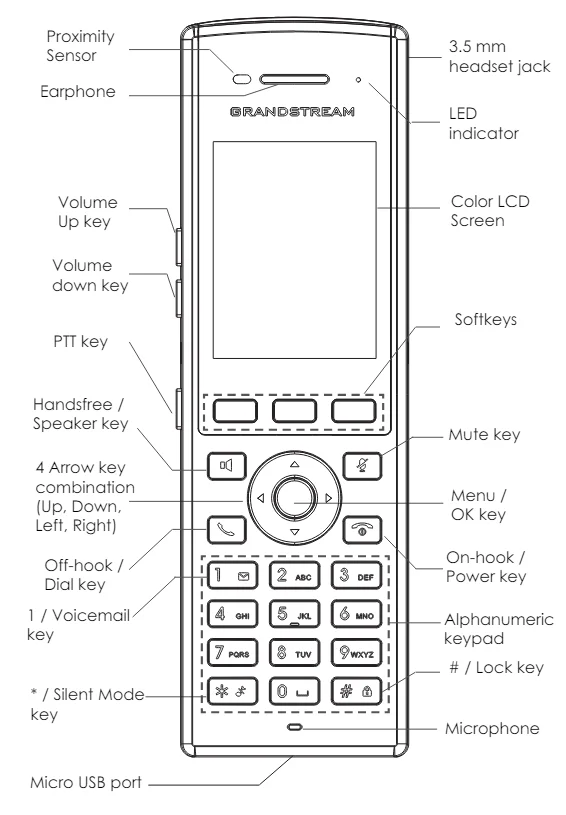


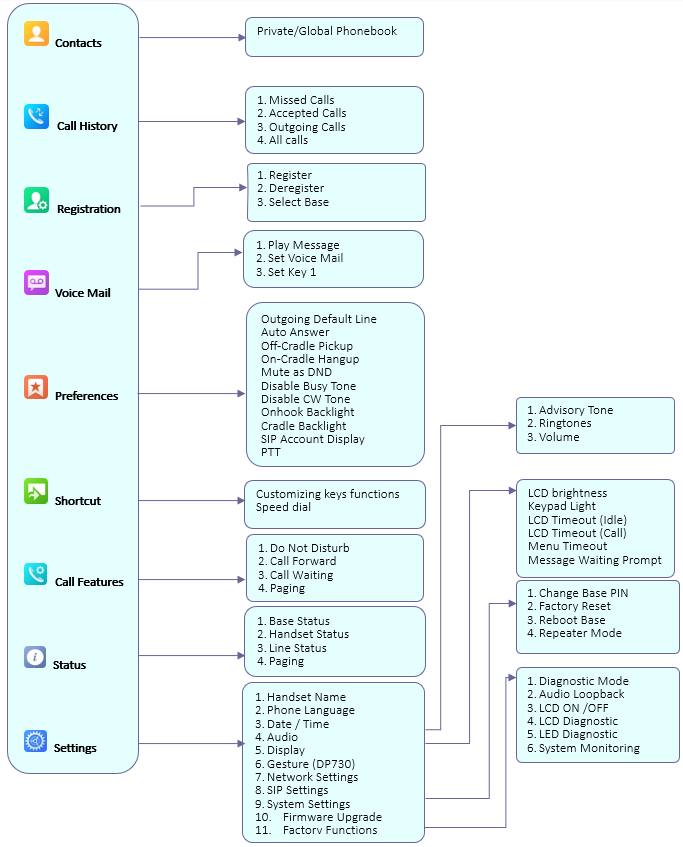


 button for 4 seconds until the Radio icon starts blinking. Alternatively, users can reboot the base station, as the subscription window remains open for 2 minutes each time the device restarts.
 icon. Once the action is completed successfully, a prompt will appear confirming that the subscription window has been opened, and the icon will change to green.

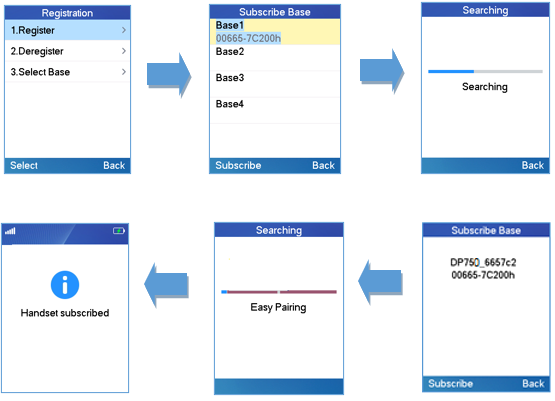
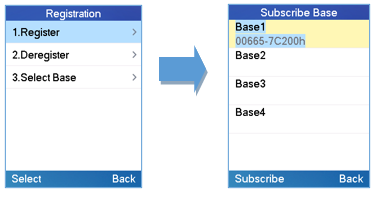
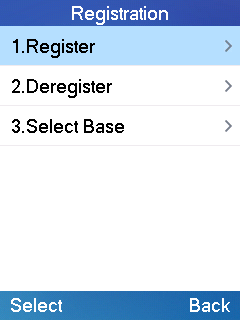
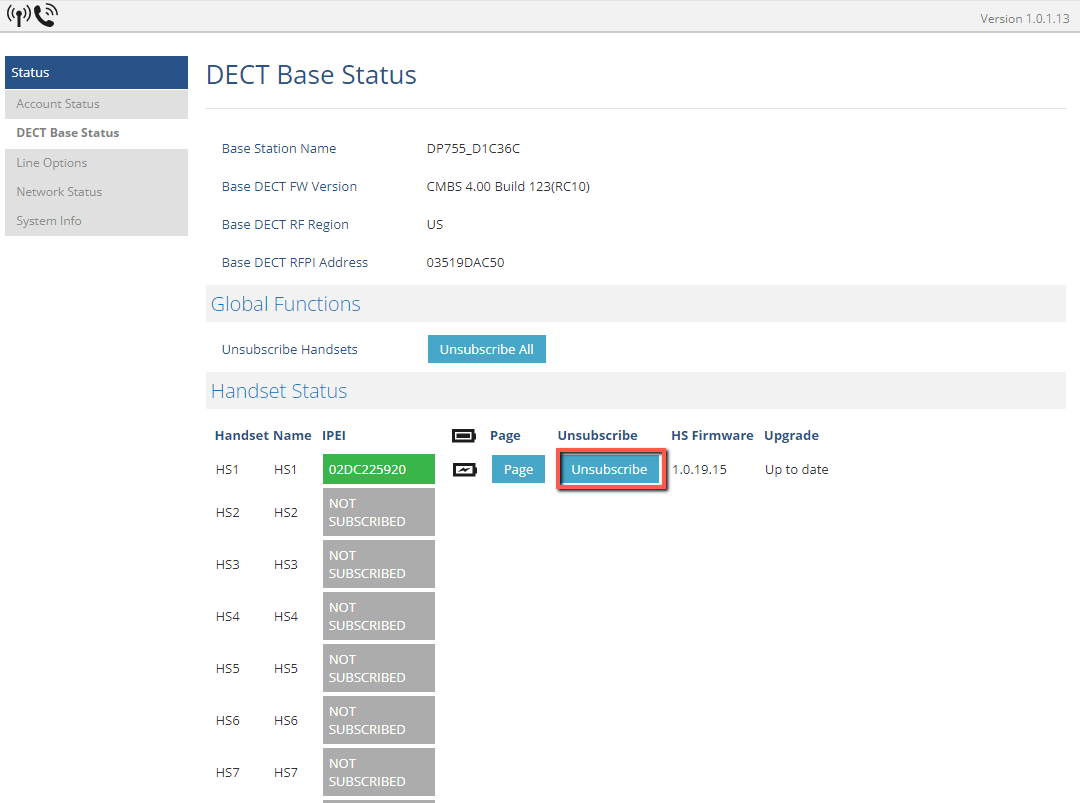


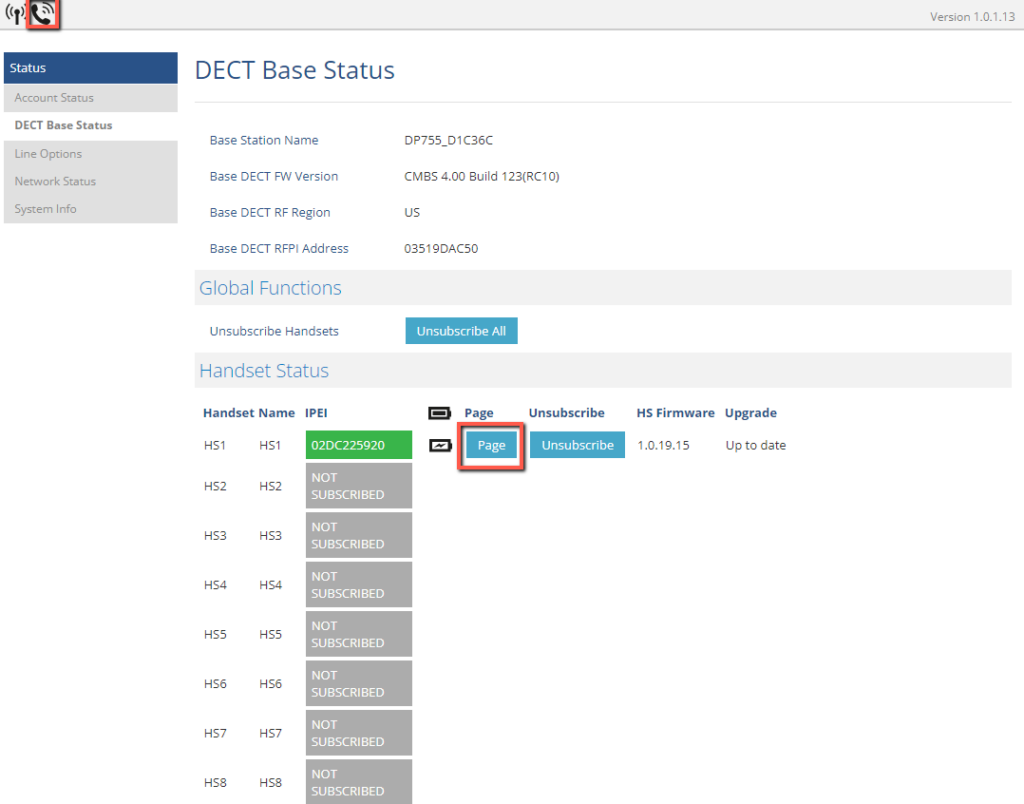


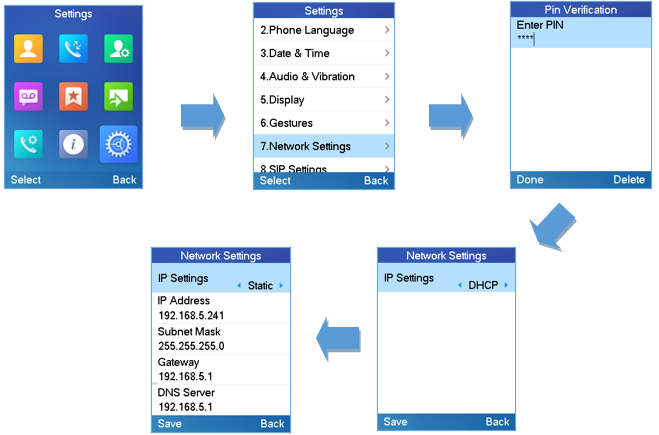

 to quickly exit the menu and return to the main idle screen.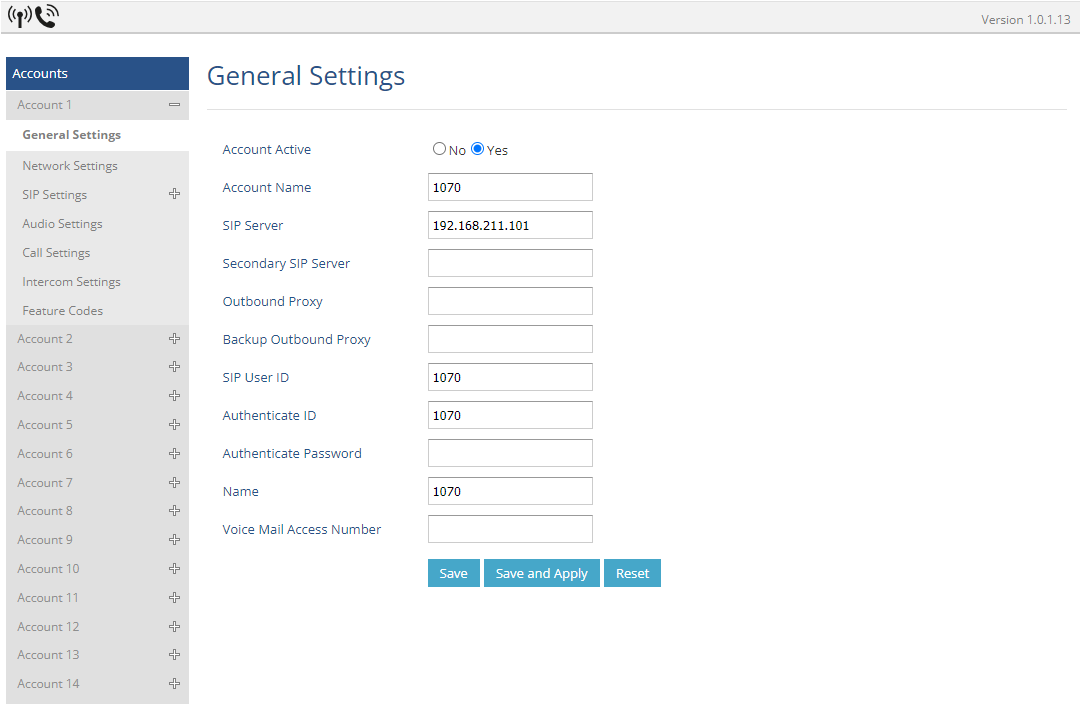
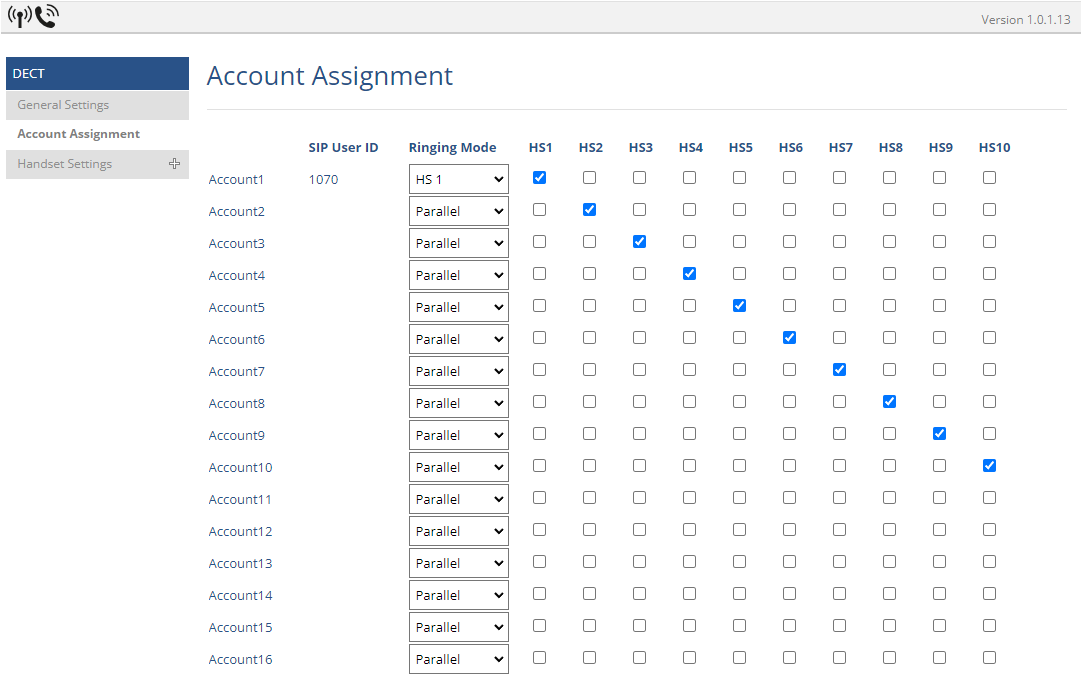
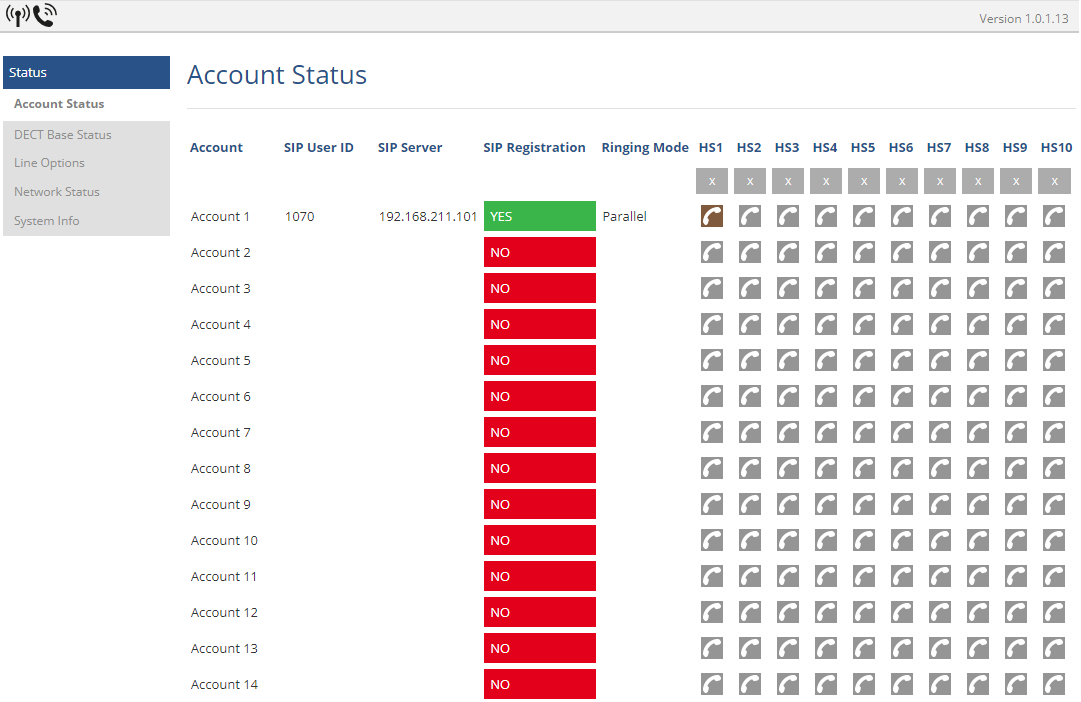

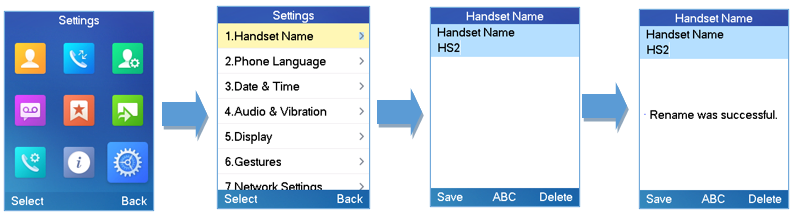
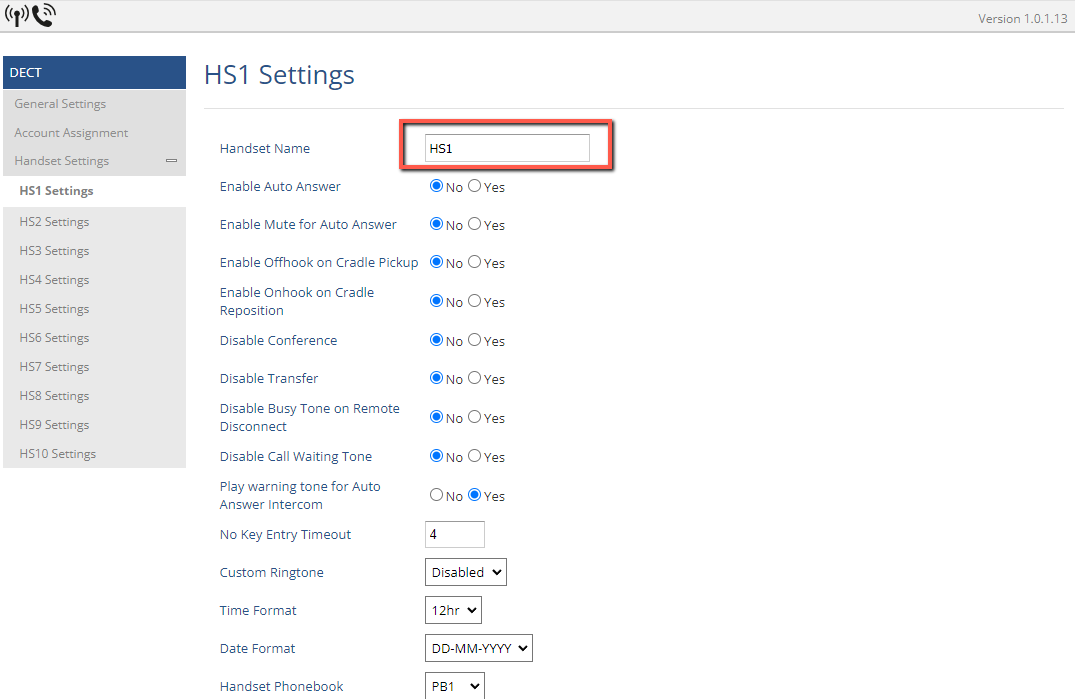

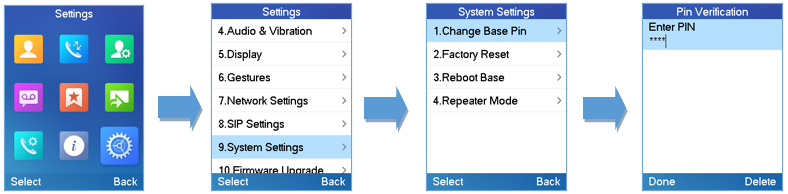


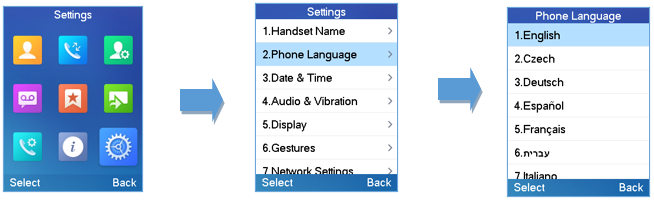


 to switch off the microphone during an established call. You can now talk freely without the other party hearing you and the icon of mute
  will be displayed on the screen. Press the Mute key
  again to switch the microphone back on.
 Volume 1
  Volume 4
 Volume 2
  Volume 5
 Volume 3
 If you select OFF, the icon appears in the display and the handsets will not ring for incoming calls.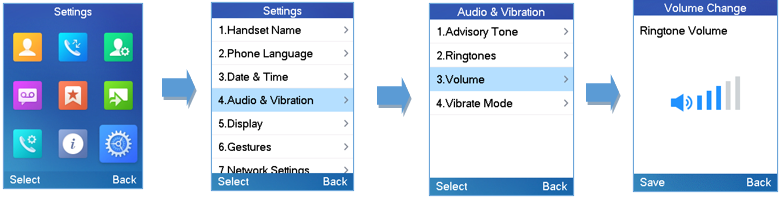

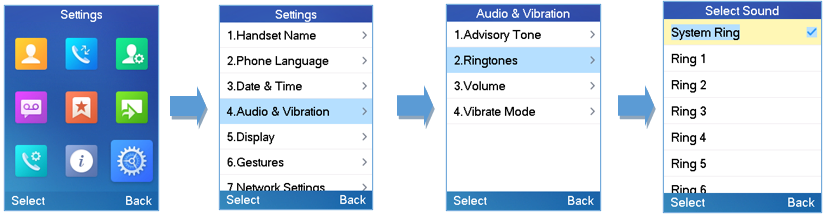

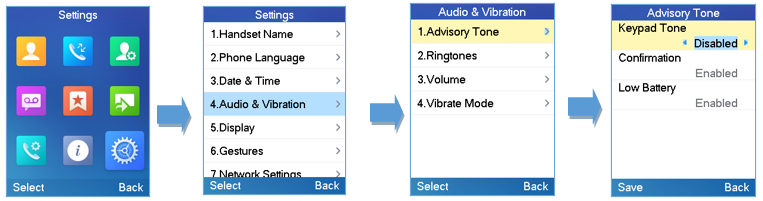
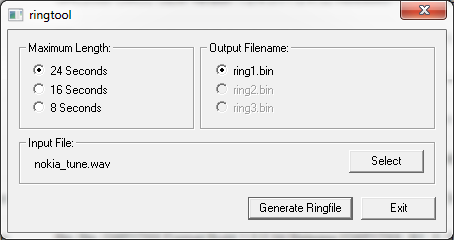
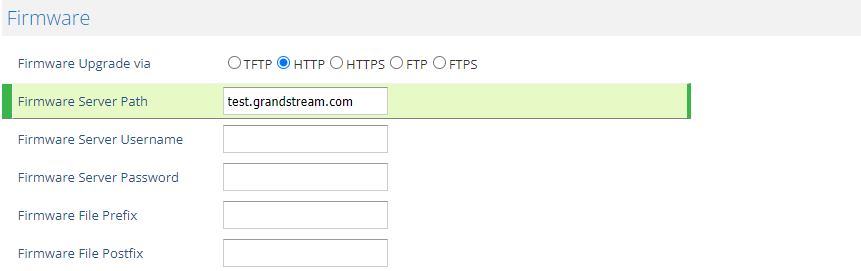


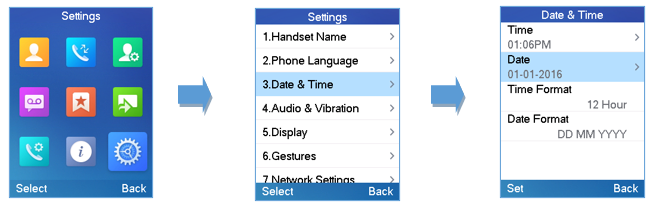
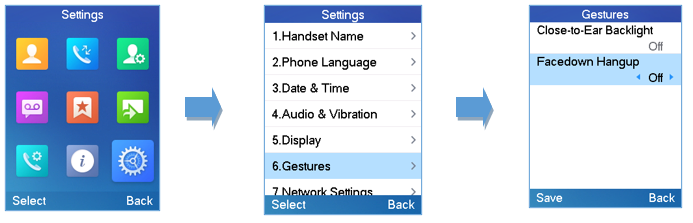
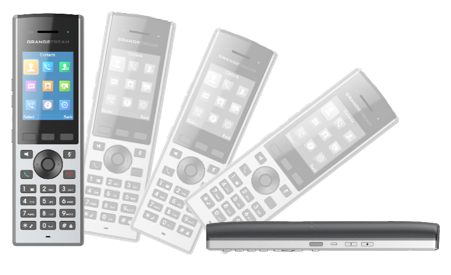
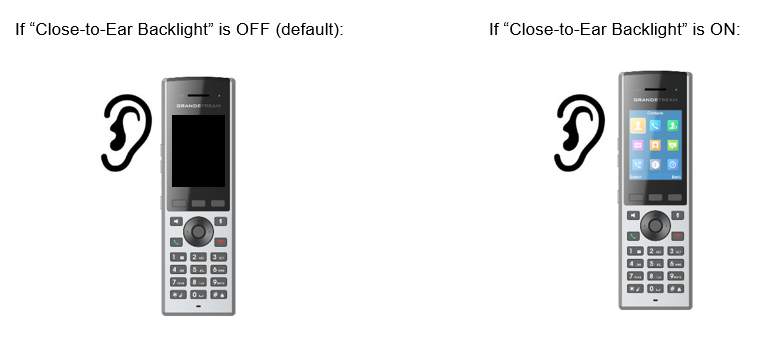

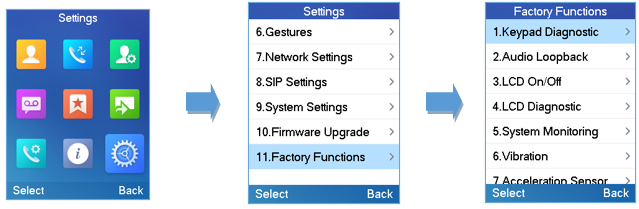
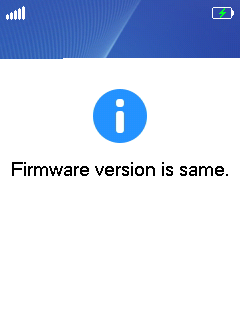

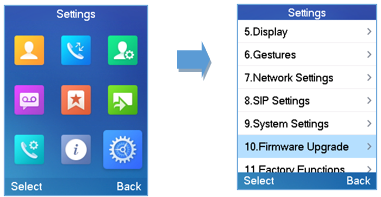

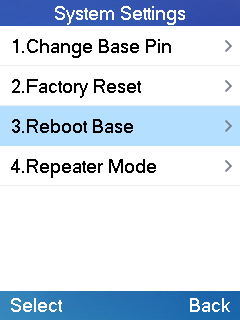
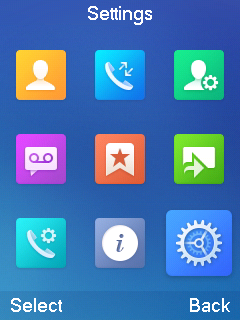

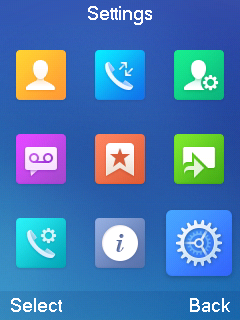
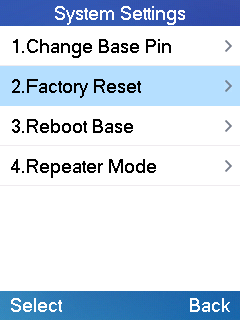
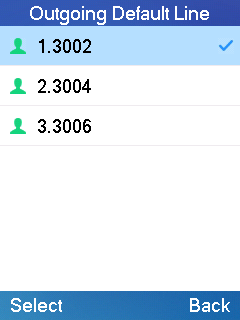
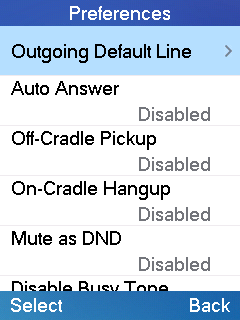


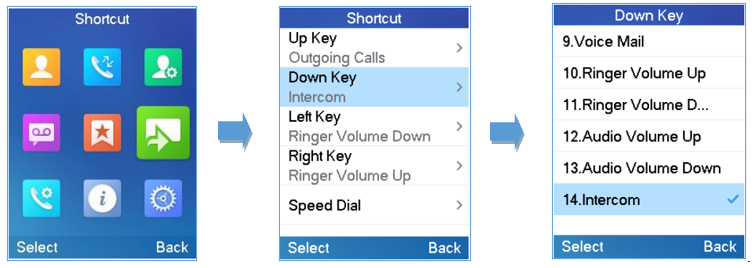
 to pick up the call, or “Accept” softkey (left softkey).
 to pick up the call.
 to pick up the call, or the “Accept” softkey using a connected headset.
 , or the Speaker Key
  , or the “Answer” softkey. The incoming call is answered, and the original call is placed on hold.
 .
. or “Reject” softkey (right softkey)


 . The call is connected to the number or the handsets you specified, and the LCD screen prompts Call Transferred.
 or press the Call Softkey.


 or “End” softkey.


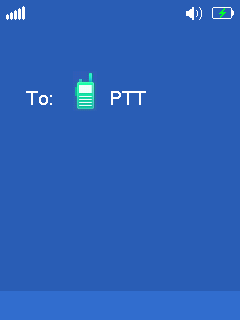
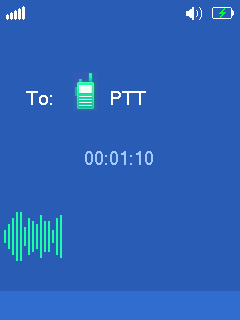
 button.