
The GHP series of hotel phones feature the GHP610(W)/GHP620(W) and the GHP611(W)/GHP621(W), easy-to-use IP phones for any hotel room that can be programmed and customized based on the needs of the hotel and its guests. These devices feature are equipped with integrated dual-band Wi-Fi (GHP6XX/W).
The features of the GHP series include an HD speaker, 2 SIP accounts/lines, 6 programmable keys (3 programmable keys for GHP61X), 10-speed dial keys, 3-way voice conferencing, full band Opus voice codec, an advanced jitter-resilience algorithm that tolerates up to 30% packet loss without impacting voice quality.
The GHP series is supported by the Grandstream Device Management System (GDMS), which provides a centralized interface to configure, provision, manage and monitor the deployment of Grandstream endpoints.
The GHP series IP phones can be installed on a desktop or wall-mounted and can be powered by PoE (GHP610/GHP611/GHP620/GHP621), power adapter (GHP610W/GHP611W/GHP620W/GHP621W) and USB Type-C charger(GHP620/GHP621/GHP620W/GHP621W).
Its elegant and compact design makes it perfect for not only hotels but also hospitals, apartments, dormitories, and much more.
PRODUCT OVERVIEW
Feature Highlights
 GHP61X/W 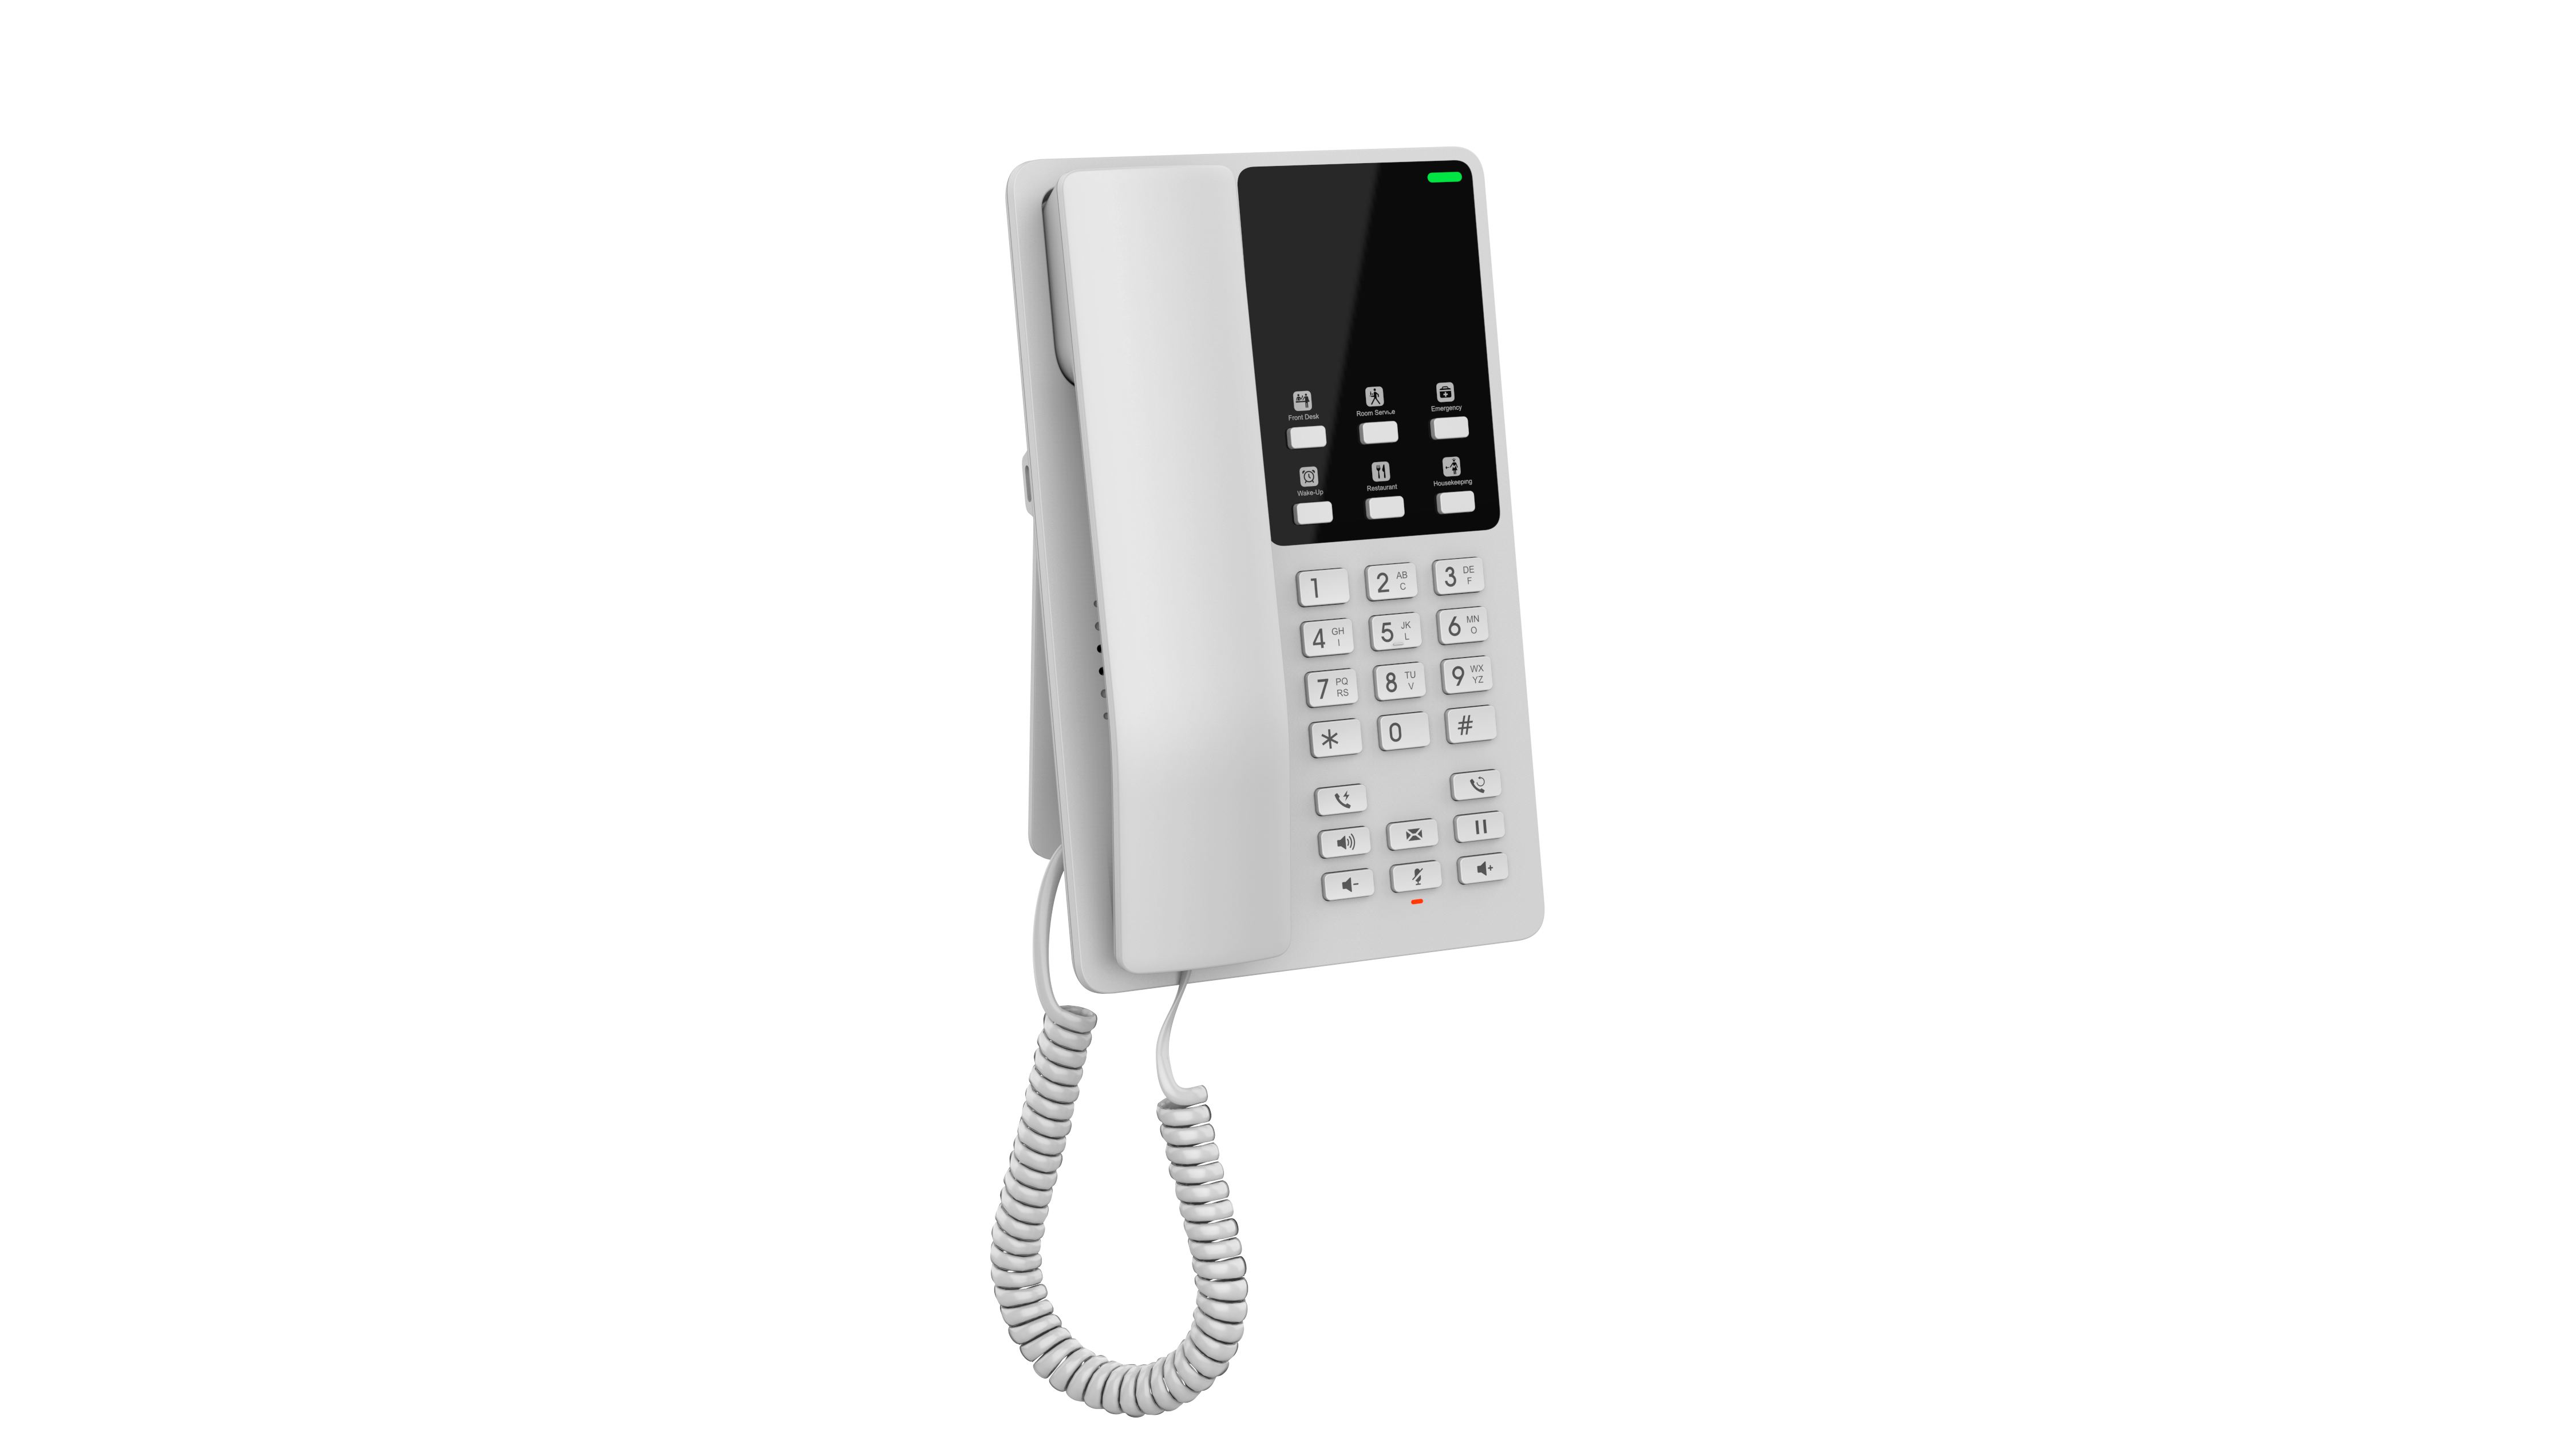 GHP62X/W |
|
Technical Specification
- GHP61X
Protocols/Standards | SIP: SIP RFC3261, TCP/IP/UDP, RTP/RTCP, RTCP-XR, Simple, TLS, SRTP. |
Network Interface | One Auto-Negotiation 10/100Mbps ethernet port, integrated PoE (Only GHP61X) |
Wi-Fi | GHP610W/GHP611W integrated dual-band 2.4Ghz & 5Ghz 802.11 a/b/g/n/ac. |
Keypad | 23 keys, including: - 3 Programmable keys. - 5 function keys (Flash, Redial, Hands-free, Voice Mail, Hold). |
HD Audio | One HD handset, support for wide band audio. |
Voice Conference | 2 SIP accounts and lines, up to 3-way conference. |
Voice Codecs | Support for the G.729A/B, G.711µ/a-law, G726, G.722(wide band), G723, iLBC, full band OPUS. |
Voice Capabilities | In-band and out-of-band DTMF (in audio, RFC2833, SIP INFO), VAD, AEC, CNG, PLC, AGC, AJB. |
Telephony Features | Dial, Answer, Redial, Flash, Hands-free, Voice mail (with the server) Hold/Unhold, Mute/Unmute, flexible dial plan, Speed dial server redundancy, fail-over Call out. |
Advanced Features | Support for multicast paging and E911 service. |
Base Stand | 1 wall-mountable base stand, can be put on a desk. |
QoS | Layer 2 QoS (802.1Q, 802.1p) and Layer 3 (ToS, DiffServ, MPLS) QoS |
Security | Secure boot, random default, unique security certificate per device, administrator level passwords, 256-bit AES encrypted configuration file, SRTP, TLS, 802.1x media access control. |
- GHP62X
Protocols/Standards | SIP: SIP RFC3261, TCP/IP/UDP, RTP/RTCP, RTCP-XR, Simple, TLS, SRTP. |
Network Interface | One Auto-Negotiation 10/100Mbps ethernet port, integrated PoE (Only GHP62X) |
Wi-Fi | GHP620W/GHP621W integrated dual-band 2.4Ghz & 5Ghz 802.11 a/b/g/n/ac. |
Keypad | 26 keys, including: - 6 Programmable keys. - 5 function keys (Flash, Redial, Hands-free, Voice Mail, Hold). |
HD Audio | One HD handset, support for wide band audio. |
Voice Conference | 2 SIP accounts and lines, up to 3-way conference. |
Voice Codecs | Support for the G.729A/B, G.711µ/a-law, G726, G.722(wide band), G723, iLBC, full band OPUS. |
Voice Capabilities | In-band and out-of-band DTMF (in audio, RFC2833, SIP INFO), VAD, AEC, CNG, PLC, AGC, AJB. |
Telephony Features | Dial, Answer, Redial, Flash, Hands-free, Voice mail (with the server) Hold/Unhold, Mute/Unmute, flexible dial plan, Speed dial server redundancy, fail-over Call out. |
Advanced Features | Support for multicast paging and E911 service. |
Base Stand | 1 wall-mountable base stand, can be put on a desk. |
QoS | Layer 2 QoS (802.1Q, 802.1p) and Layer 3 (ToS, DiffServ, MPLS) QoS |
Security | Secure boot, random default, unique security certificate per device, administrator level passwords, 256-bit AES encrypted configuration file, SRTP, TLS, 802.1x media access control. |
GETTING STARTED
This chapter provides basic installation instructions including the list of the packaging contents and also information for obtaining the best performance with the GHP6XX/W.
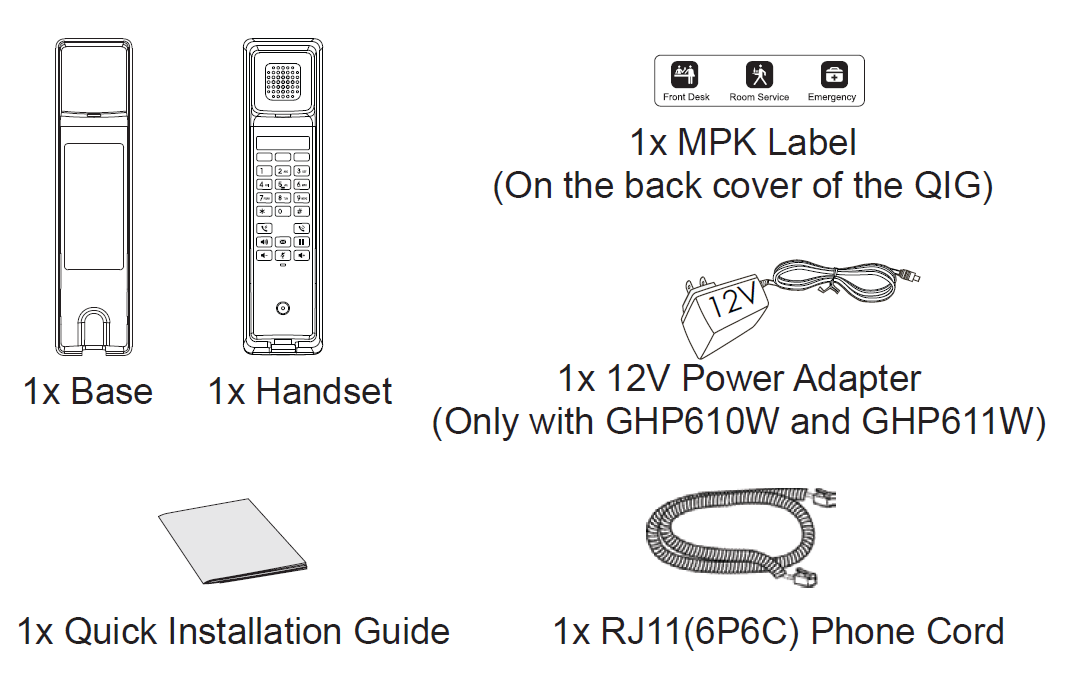
Equipment Packaging
GHP61X
GHP61X/W |
|
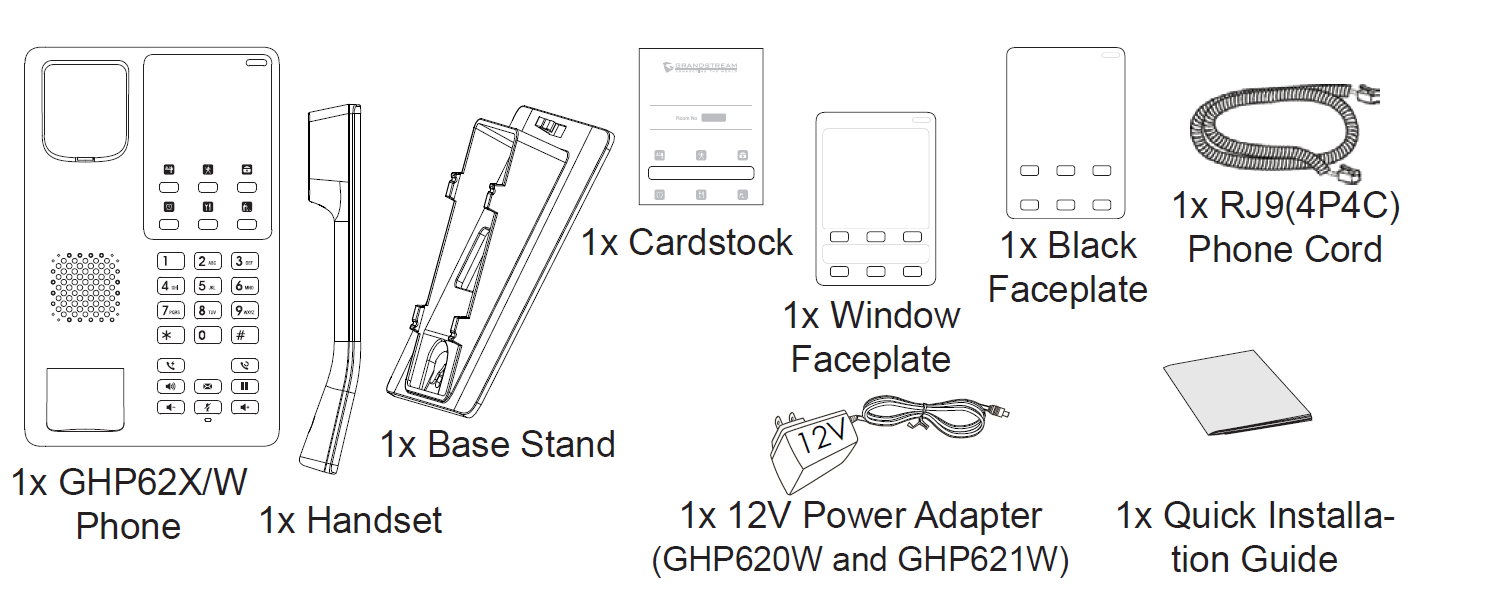
GHP62X
GHP62X/W |
|
GHP6XX/W Phone Setup
The GHP6XX/W can be installed on the desk or can be mounted on the wall. To mount the phone on the wall please follow the instructions below.
GHP61X/W
- Mark two dots horizontally with a 100 mm distance in between where to wall mount the GHP610/W & GHP611/W.
- Using a drill, make a hole on each marked dot. Put a plastic expansion bolt and screw (not provided) on each hole. Leave enough space to mount the GHP610/W & GHP611/W.
- Mount the GHP610/W & GHP611/W on the screws using the Wall Mount Slots.
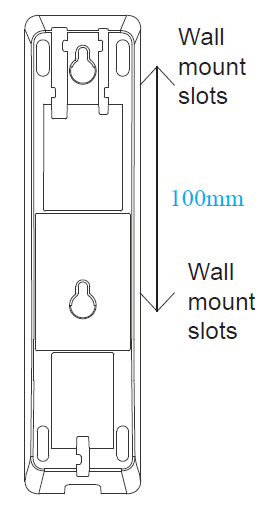
GHP62X/W
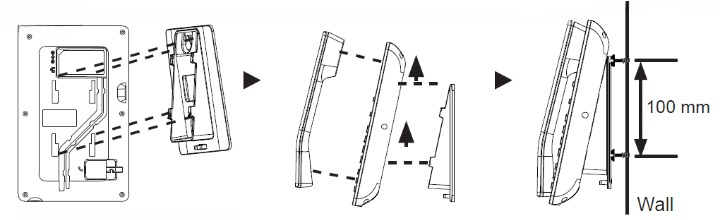
- On the wall where the GHP62X/W will be mounted, mark two dots with 100 mm distance in-between vertically.
- Using a drill, make a hole on each marked dot. Put a plastic expansion bolt and screw (not provided) into each hole. Leave enough space on the screws to mount the GHP62X.
- Attach the wall mount spacers to the slot for the wall mount spacer on the back of the phones.
- Mount the GHP62X on the screws using its “Wall Mount Slots”.
Connecting the GHP6XX/W
To set up the phone, follow the steps below:
- Connect the phone cord with the handset (RJ-11 port) and the base.
- Connect the LAN port of the phone to the RJ-45 socket of a hub/switch on a router ( LAN side of the router) using the Ethernet cable. This step can be skipped if using GHP6xxW with Wi-Fi.
- Powering the phone:
- For GHP6XX/W: Connect the 12V DC output plug into the power jack if the phone; plug the power adapter into the electrical outlet.
- For GHP6XX & GHP6XX: A PoE switch must be used in step 2.
Phone Configuration Via Web Browser
- Ensure your phone is powered up and connected to the internet.
- Locate the MAC address on the MAC tag of the unit which is on the underside of the device, or on the package.
- From a computer connected to the same network as the GHP6XX, type in the following address using GHP6XX’s MAC address on your browser: https://<mac>.local
Example: https://c074adffffff.local
Note: The user can dial **47# and the IP address will be read by the IVR. - Enter the admin’s username and password to access the configuration menu. (The factory default username is “admin” while the default random password can be found on the sticker at the back of the unit).
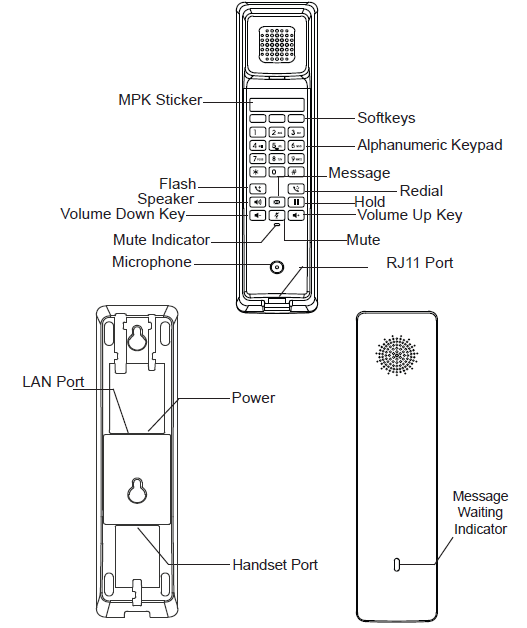
Getting To Know The GHP6XX/W
GHP61X/W
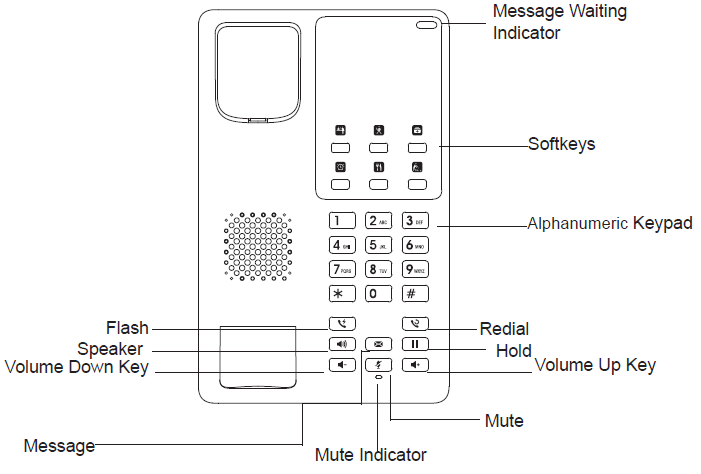
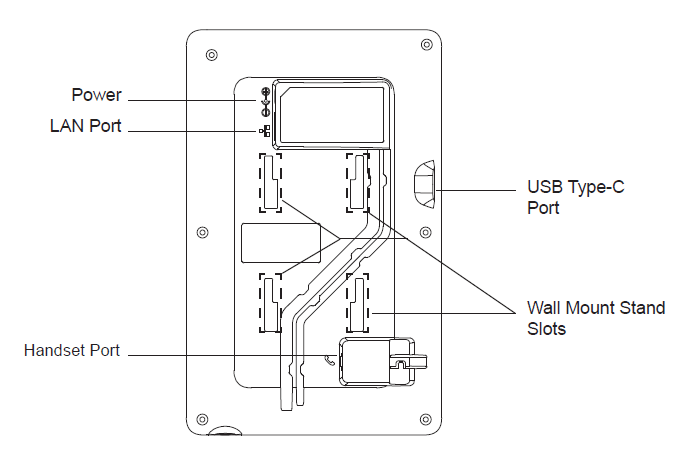
GHP62X/W
TELEPHONY FEATURES
Making Phone Calls
Handset and Speaker Mode
- The GHP6XX allows switching between the handset and the speaker when making calls. Please press the speaker button to start using the speaker
 . If you wish to switch to the handset after activating the speaker, just unhook the handset and the audio will be emitted through the handset’s speaker.
 - Dial the number that you wish to call and press # to send the call, or wait for a second for the number to be sent.
SIP Accounts and Lines
The GHP6XX supports 2 SIP accounts and 2 lines; Each account is capable of independent SIP servers, and users. One account is configured by the administrator to initiate calls and receive calls. While the other account is configured to receive calls. The default account can be switched only by the administrator.
Completing Calls
There are several ways to complete a call.
- On-hook dialing. Enter the number when the phone is on-hook and then send it out.
- When the phone is idle, enter the number to be dialed out;
- Take the handset off-hook, Press the Speaker button, or Press the Headset button on the headset plugged in.
- The call will be dialed out.
- Off-hook and dial. Off-hook the phone, enter the number and send it out.
- Take handset off-hook; or
- Press the Speaker button
- You shall hear the dial tone after off-hook
- Enter the number;
- Press the # key to dial out.
- Redial. Redial the last dialed number.
- Take handset off-hook
- Press the Speaker button, or
- Press the Headset button with the headset plugged in, or
- Press an available LINE key to activate the speaker, or
- When the phone is in an idle state
- In Order to redial a number you can either :
- press the redial key, this will compose the last entered number
- Press the # key, this will trigger a DTMF call to the last composed number
- Multi-Purpose Keys: Multi-purpose keys can be configured to quickly dial a certain extension. When the MPK has been pressed the number will be quickly dialed and the call sent out.
Answering Phone Calls
Receiving Calls
The phone rings with the selected ringtone. Unhook the handset or press the speaker button  to answer the call.
During a Phone Call
Call Waiting/Hold Call
- User can use the hold button
 to put the call on hold.
 - When receiving a call on the second line, the user can use the Flash key
 to hold the call on the first line and switch to the call on the second line. If the user wants to unhold the first call, the user may press the Flash key again to recover the call.
 to put the call on hold.
 to hold the call on the first line and switch to the call on the second line. If the user wants to unhold the first call, the user may press the Flash key again to recover the call.
Mute
During an active call, press the MUTE button  to mute/unmute the microphone. The LED will light up in red to indicate that your microphone is muted.
Call Transfer
- Attended Transfer
- Alice is talking with Bob.
- Alice presses Flash to initiate a new call to Carl, and Bob is held automatically.
- Carl answers the call, and Alice talks with Carl about Bob, then Alice hangs up the call, and Bob will be transferred to Carl.
- If Carl rejects or does not answer the call, Alice could press Flash to retrieve the call with Bob.
- If the call is still ringing, Alice could cancel the new call by pressing “FLASH”, and retrieve the call with Bob automatically.
- Attended Transfer Before Answer
- Alice is talking with Bob.
- Alice presses Flash to initiate a new call to Carl, and Bob is held automatically.
- Carl answers the call, and Alice talks with Carl, then Alice hangs up the call, and Bob will be transferred to Carl.
- If Carl rejects or does not answer the call, Alice could press Flash to retrieve the call with Bob.
- If the call is still ringing, Alice could cancel the new call by pressing “FLASH”, and retrieve the call with Bob automatically. If Alice hangs up the call while the call to Carl is still ringing, the call will be transferred to Carl before Carl answers. This explains why it is an attended transfer “before answer”.
Three-way Conference
- If there is one line in use, press the Flash button to start a new call, and long-press Flash to set up a conference after the new call is answered:
- Alice is talking with Bob
- Alice starts a new call with Carl by pressing Flash, and Bob is held
- There are three situations:
- If Carl does not answer the call, Alice could press Flash to retrieve Bob.
- Alice also could press Flash to cancel the call, and back to the call with Bob.
- Once Carl answer the call, Alice could long-press Flash to set up the conference
- If Alice wants to end to call with Carl on the conference, she could press Flash.
- If Alice wants to end the conference and keep calls, she could long press Flash, then Bob will be held, and Alice will back to the call with Carl.
- If Bob or Carl hangs up his call, Alice will back to the call with whoever stayed on the line.
- Once Alice hangs up the phone, all calls and the conference are ended.
- If there are two lines in-use, to set up a conference:
- If Alice holds Bob and is talking with Carl
- Alice could press Flash to switch lines, and also could long press Flash to set up a conference.
- If Alice holds Bob and Carl’s calls
- Alice could press Flash to switch the line, and also could long press Flash to set up a conference. Bob and Carl will be unheld automatically
- If Alice holds Bob and is talking with Carl
Voicemail
The Waiting Message Indicator will blink in a green color when there is a new voicemail. To listen to the voicemail, please press the Voicemail button on the phone.
IVR Button Function
GHP6XX supports keypad codes to perform a number of actions like retrieving information or configuring the phone. An IVR will respond to the codes dialed accordingly. Please refer to the table below to see all the possible functions that can be performed.
Function | Operation | Phone Feedback |
Get IP address (IP) |
| The phone broadcasts the current IP address |
Modify IP address (IP) | **47*{IP}# | Phone changes IP |
Get Subnet Mask (SM) | **76# | Phone broadcasts subnet mask |
Modify Subnet Mask (SM) | **76*{SubnetMask}# | Phone modifies subnet mask |
Get Gateway (GW) | **49# | Phone broadcast gateway |
Modify Gateway (GW) | **49*{Gateway}# | Phone modify gateway |
Get DNS Servers (DNS) | **367# | Phone broadcast DNS server address |
Modify DNS Server (DNS) | **367*{DNS}# | Phone modify DNS server address |
Get Firmware (FW) | **39# | The phone announces the current firmware version |
View the hardware part number (HN) | **46# | Phone broadcast hardware PN |
Get MAC (MA) | **62# | Phone broadcast MAC address |
Get Account Directory Number (DN) | **36# | The phone announces the account number |
Reboot (RB) | **72# | The phone performs a restart |
Factory Reset (FR) | **37*{keypad password}#(Password is required for this operation) | The phone performs factory recovery |
VLAN ID (VI) | **84*{keypad password}*{VLAN ID}# | Configure VLAN ID: 0-4094, 0 means off |
Firmware Upgrade (FU) | **38*{keypad password}# | Trigger a firmware upgrade |
Firmware Upgrade 2 (FU) | **38*{keypad password}*{server IP address}# | Trigger the upgrade of the specified upgrade firmware path |
Get Firmware Upgrade Server Address (FA) | **32# | Broadcast firmware server URL addr |
Configuration File Download 1 (CU) | **28*{keypad password}#(Password is required for this operation) | The phone downloads the configuration |
Configuration File Download 2 (CU) | **28*{keypad password}**{prefix}# | The phone downloads the configuration |
Configuration File Download 3 (CU) | **28*{keypad password}**{prefix}*{postfix}# | The phone downloads the configuration |
Configuration File Download 4 (CU) | **28*{keypad password}*{server IP address}#(Password is required for this operation) | The phone downloads configuration from the specified server |
Configuration File Download 5 (CU) | **28*{keypad password}*{server IP address}*{prefix}# | The phone downloads configuration from the specified server |
Configuration File Download 6 (CU) | **28*{keypad password}*{server IP address}*{prefix}*{postfix}# | The phone downloads configuration from the specified server |
View Profile Server Address (CA) | **22# | URL address of phone broadcast configuration file server |
Get TR069 Status (TR) | **87# | Phone broadcast TR069 is available |
Reset Network (NR) | **67*{keypad password}# | The phone resets the network configuration |
Set Profile Download Protocol Type | **28x# | Set and broadcast the current protocol nameThe values of X can be: 1, 2, 3, 4, 5TFTP [1]; HTTP [2]; HTTPS [3]; FTP [4]; FTPS [5] |
Set the firmware upgrade protocol type | **38x# | Set and broadcast the current protocol nameThe values of X can be: 1, 2, 3, 4, 5TFTP [1]; HTTP [2]; HTTPS [3]; FTP [4]; FTPS [5] |
Get HAC On Status (HAC) | **422# | Broadcast number: 0 (off), 1 (on) |
Set HAC on or off (HAC) | **422*x# | Set HAC on or off: 0 (off), 1 (on) |
Set Room number | **766*{room number} | Set Room number to be added under : Hotel Service =>Hotel Room Number |
Get Room number | **766# | Return the room number that has been defined |
Reset Room number | **766*{keypad password}+ {room number}# | Reset the hotel room number if number is already in use , the default keypad password is 123 |
Enable the UCM zero-configuration number selection process | **82# | UCM delivers the configuration and sets the room number as the preferred account to complete the selection process. |
RESTORE FACTORY DEFAULT SETTINGS
Restore to Factory Default via Keypad
To restore the GHP6XX phone using the keypad, enter the code **37*{keypad password}#. The default keypad password is: 123
Restore to Factory Default via Web GUI
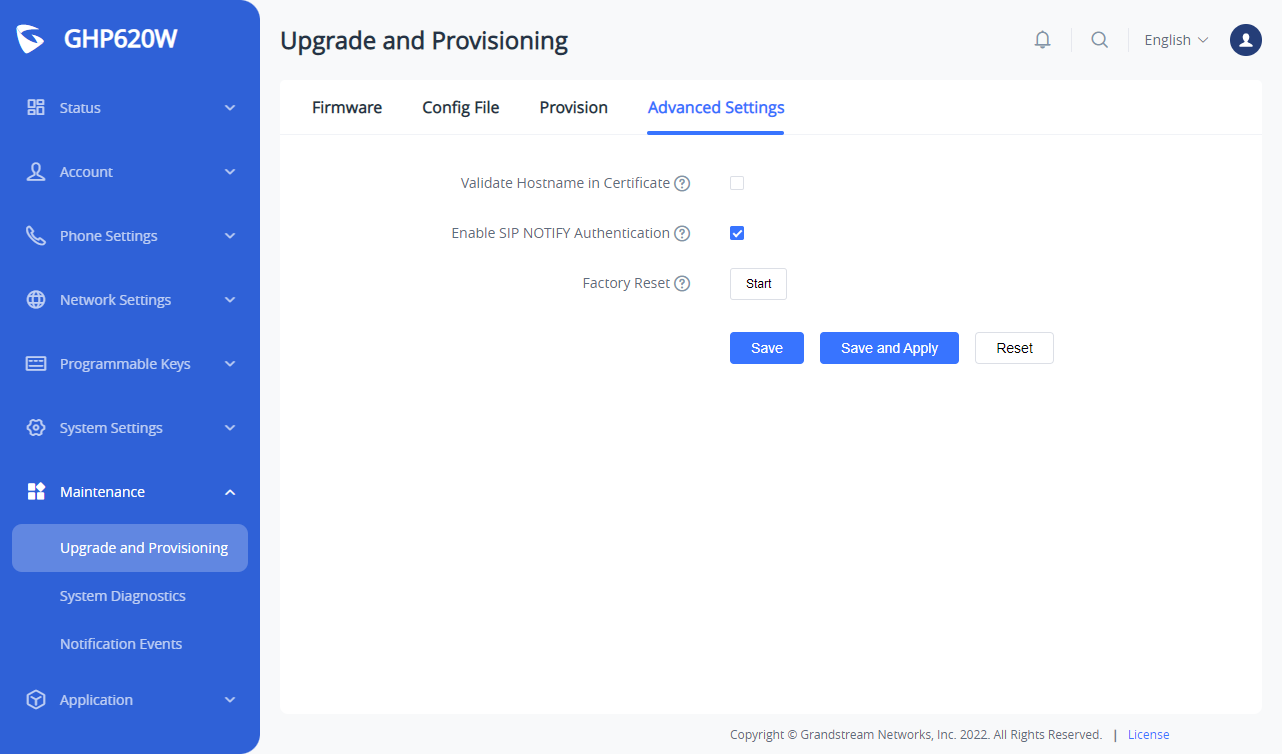
To reset the GHP6XX to its factory settings using the web GUI, please navigate to Upgrade and Provisioning → Advanced Settings then click on the Start button to start the factory reset process.
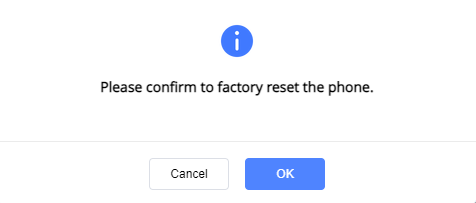
The factory reset will immediately start after you click OK.
CHANGELOG
Firmware 1.0.1.61
- No major changes.
Firmware 1.0.1.60
- No major changes.
Firmware 1.0.1.54
- No Major changes.
Firmware 1.0.1.49
- No Major changes.
Firmware 1.0.1.37
- No Major changes.
Firmware 1.0.1.33
- No Major changes.
Firmware 1.0.1.29
- This is the initial release.
COPYRIGHT
©2023 Grandstream Networks, Inc. https://www.grandstream.com
All rights reserved. Information in this document is subject to change without notice. Reproduction or
transmittal of the entire or any part, in any form or by any means, electronic or print, for any purpose without the express written permission of Grandstream Networks, Inc. is not permitted.
Grandstream is a registered trademark and the Grandstream logo is the trademark of Grandstream Networks, Inc. in the United States, Europe, and other countries.
CAUTION
Changes or modifications to this product not expressly approved by Grandstream, or operation of this product in any way other than as detailed by this guide could void your manufacturer warranty.
WARNING
Please do not use a different power adaptor with devices as it may cause damage to the products and void the manufacturer’s warranty.
CERTIFICATION
If any trouble is experienced with this equipment, please contact (Agent in the US):
Company Name: Grandstream Networks, Inc.
Address: 126 Brookline Ave, 3rd Floor Boston, MA 02215, USA
Tel: 1-617-5669300
Fax: 1-617-2491987
If the trouble is causing harm to the telephone network, the telephone company may request you remove the equipment from the network until the problem is resolved.
This equipment uses the following USOC jacks: RJ45C.
It is recommended that the customer install an AC surge arrester in the AC outlet to which this device is connected. This is to avoid damaging the equipment caused by local lightning strikes and other electrical surges.
Since this device has the HAC function, the earpiece is easy to absorb small, please take care to avoid scratching.
Caution: Exposure to Radio Frequency Radiation
This equipment complies with EU radiation exposure limits set forth for an uncontrolled environment. This equipment should be installed and operated with a minimum distance of 20 cm between the radiator and your body.
CE Authentication

Hereby, Grandstream Networks, Inc. declares that the radio equipment GHP6XX/W are in compliance with Directive 2014/53/EU.
The full text of the EU declaration of conformity is available at the following internet address:
https://www.grandstream.com/support/resources/
GNU GPL INFORMATION
GHP6XX firmware contains third-party software licensed under the GNU General Public License (GPL). Grandstream uses software under the specific terms of the GPL. Please see the GNU General Public License (GPL) for the exact terms and conditions of the license.
Grandstream GNU GPL-related source code can be downloaded from the Grandstream website:
https://www.grandstream.com/legal/open-source-software