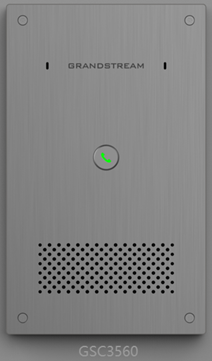
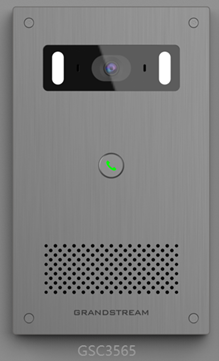
Thank you for purchasing the Grandstream GSC3560/GSC3565.
The GSC3560/GSC3565 is a smart outdoor intercom that functions as an advanced access control system, delivering secure facility access and real-time monitoring for buildings of all sizes.
Key features include:
A durable metal casing with IP66 weatherproofing and IK10 vandal resistance for reliable operation in harsh environments
Built-in dual microphones and a high-power 10W speaker for clear two-way intercom communication
PoE support for streamlined installation with a single network cable
Multiple alarm interfaces (alarm-in, relay-out, RS485, line-out) for integration with existing security systems
Support for various door access methods, including mobile app, SIP call, HTTP API, and QR code (GSC3565 only)
The GSC3560/GSC3565 can be integrated with Grandstream multimedia phones, GSC3570/GSC3574/GSC3575 indoor control stations, and GS Wave soft phones and desk phones, which enables a complete, unified building security solution.
With advanced security design, including Solid State Relay (SSR) technology, the device provides strong protection against magnetic interference and unauthorized access attempts.
Additional capabilities include:
Support for multiple intelligent alarms such as intrusion detection, loitering detection (GSC3565 only), tamper alerts, and high-temperature warnings…
AI-based motion detection (GSC3565 only) for enhanced monitoring and automation
Built-in white LED lighting for improved visibility in low-light conditions (GSC3565 only)
Event-triggered snapshots sent to email, FTP servers, or mobile applications (GSC3565 only)
Support for cloud management and access control mobile applications
The GSC3565 model further enhances functionality with 4MP HDR imaging, H.264 video compression, and a wide 152° field of view, providing high-quality 1080p video for clear identification and monitoring.
With its robust design, flexible integration options, and intelligent security features, the GSC3560/GSC3565 is an ideal solution for smart offices, residential complexes, industrial parks, and small-to-medium enterprises seeking reliable and scalable access control.
PRODUCT OVERVIEW
Feature Highlights
The following table contains the major features of the GSC356X series.
Audio-only intercom with no camera or video-related features
Dual microphones with 5.5m pickup range and high-power 10W HD speaker
SIP-based communication with door control via integrated SSR relay
Supports Grandstream SecureAccess app and cloud connectivity
Multiple alarm input/output ports with built-in tamper protection
Rugged outdoor design with IP66 weatherproof and IK10 vandal resistance
Full HD video intercom with 4MP HDR camera supporting H.264 and 1080p streaming
AI-based motion detection with up to 120dB wide dynamic range for clear imaging
Multiple door access methods including mobile app, QR code, SIP call, and HTTP API
Advanced alarm system supporting intrusion, tamper, temperature, and security alerts
Dual microphones with 5.5m pickup range and high-power 10W HD speaker
ONVIF Profile S support with SIP, RTSP streaming, and cloud/app integration
GSC356X Features at a Glance
Technical Specifications
The following table summarizes all the technical specifications, including the protocols/standards supported, voice codecs, telephony features, and upgrade/provisioning settings for GSC356X.
GSC3560
GSC3565
Image Sensor Resolution
Not Supported
1/3”, 4MP, HDR
Lens Type
Not Supported
4M CMOS sensor, LENS: 127(H) x70(V)x 152°(D)
Day & Night
Not Supported
6x White LED
Max Resolution
Not Supported
Video: 1920*1080, Snapshots: 1920*1080
Minimum Illumination
Not Supported
30 frames per second
Wide Dynamic Range
Not Supported
Yes, up to 120db
Embedded Analytics
Not Supported
AI-based Motion detection
Microphone
Two mics, pickup distance up to 5.5m
Speaker
90dB hands-free call and 100dB broadcast. max 10W
APP
Support Cloud, Grandstream SecureAccess Mobile App
Snapshots
Triggered upon events, sent to Email, FTP Server, Grandstream SecureAccess App and/or Local
Network Protocol
TCP/IP/UDP , RTP/RTCP , HTTP/HTTPS local upload and mass provisioning using TR-069 , ARP/RARP, ICMP, DNS (A record, SRV, NAPTR) ,DHCP ,SSH ,SMTP, TFTP, NTP, STUN, SIMPLE, TLS, SRTP
Telephony Features
SIP Paging, Multicast Paging, call-waiting with priority override
Audio Codecs
G.711µ/a, G.722 (wide-band), G.726-32, G.729 in-band and out-ofband DTMF (In audio, RFC2833, SIP INFO), VAD, CNG, AEC, PLC, AJB, AGC, ANS
Video Codecs
Not Supported
H264 High Profile / Main Profile / Base Profile, Motion JPEG
User and administrator level passwords, Ed25519 and X25519 based authentication, 256-bit AES encrypted configuration file, TLS, SRTP, HTTPS, 802.1x media access control
Upgrade/ Provisioning
Firmware upgrade via TFTP/HTTP/HTTPS, mass provisioning using TR-069 or AES encrypted XML configuration file
Button
1x anti-tamper button
1x doorbell key
1x reset button
Access Control
1xSSR
Auxiliary Ports
2x Alarm in ports, 2x Relay out ports, 1x differential line out port
Network Interface
1x RJ45, One 10/100 Mbps port with integrated PoE
Expansion Interface
RS485, SD card slot (up to 256GB)
Power & Green Energy Efficiency
DC power supply: 12-48V/2A 24W PoE: 802.3at class4
Dimensions (H x W x D) and Weight
Unit: 200mm x 120mm x 40mm Weight: 0.732KG Package Weight: 1.551KG
Interoperability
ONVIF (Profile S)
Package
1* GSC3560/65 Device,
1* Quick Installation Guide,
1* Certification Regulatory Information,
1* Install Positioning Sticker,
5* (PA 3.5 x 33 mm )Screw,
1* ( PM 3 x 6 mm ) Ground Wire Screw, 5* (KM4*14mm)Screw,
IP66 (EN60529) IK10 (IEC62262) for metal surface/buttons
IP66 (EN60529) IK10 (IEC62262) for both metal surface/buttons and lens area
Multilingual
English, German, Italian, French, Spanish, Portuguese, Russian, Chinese
Compliance
FCC/CE/RCM/IC
GSC3560/GSC3565 Technical Specifications
GETTING STARTED
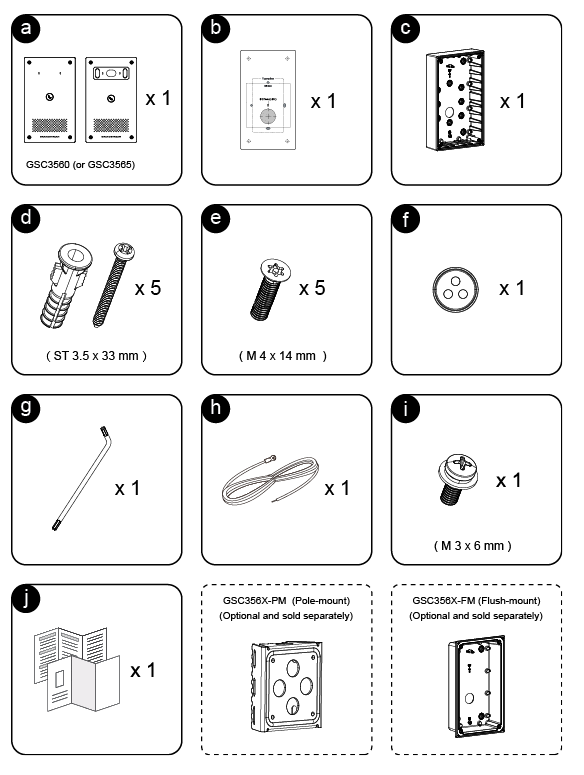
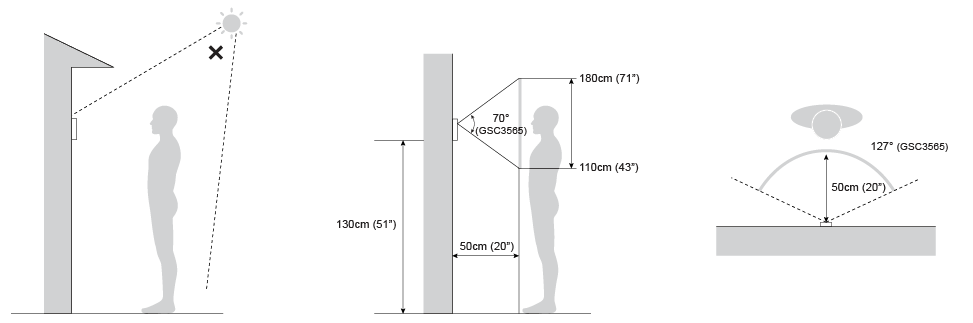
This chapter provides basic installation instructions, including the list of the packaging contents and information for obtaining the best performance using the GSC356X series of smart outdoor intercoms.
Equipment Packaging
GSC3565 / GSC3560
GSC3565GSC3560 Package Content
A : 1 x GSC3565/GSC3560.
B : 1 x Positioning Sticker.
C : 1 x Wall Bracket.
D : 5 x (ST 3.5 x 32mm) Screws and Screw Anchors.
E : 5 x (M 4 x 14mm) Screws.
F : 2 x Dual-Port Waterproof Silicone Plug.
G : 1 x Wrench.
H : 1 security bolt.
I : 1 x (M3 x 6mm) Screw.
J : 1 x Quick Installation Guide, and 1 x Regulatory Paper.
Note
Check the package before installation. If you find anything missing, contact your system administrator.
Description of the GSC356X
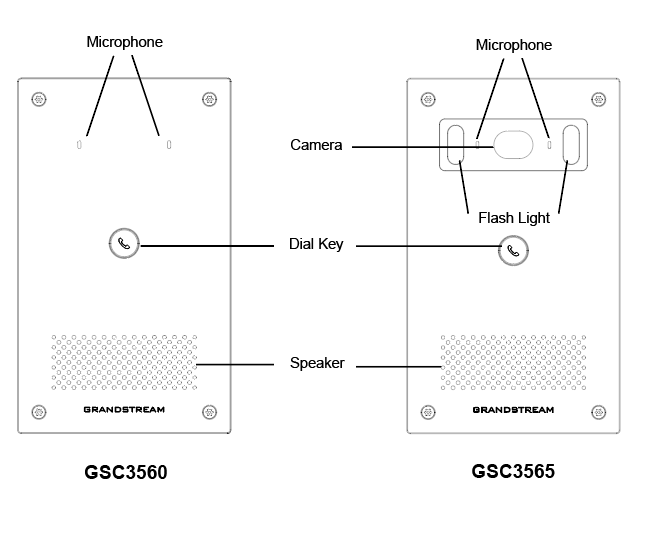
The figure below shows a description of the front views of the GSC356X series of smart outdoor intercom devices:
GSC356X Front View
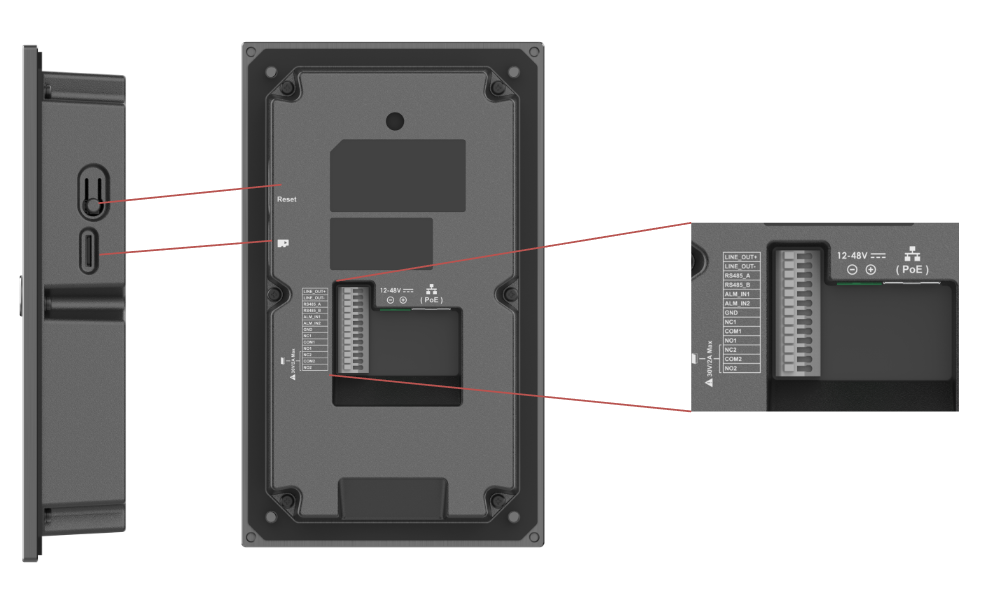
GSC356X Wiring Connection
The GSC3565/GSC3560 provides a terminal block interface for power, relay control, alarm integration, and RS-485 communication. Below is a detailed explanation of each pin and its function:
GSC356X Wiring Connection
Connector
Function
Note
Network Port(PoE)
Ethernet and PoE Supply
Single 10/100Mbps network port, supports 802.3 at PoE power supply.
DC IN+
Power Supply (+)
Positive terminal for DC power input. Supports a wide voltage range DC 12V–48V.
DC IN-
Power Supply (-)
Negative terminal for DC power input.
LINE OUT +
Audio Line Output (+)
Positive audio output terminal for connecting external amplifiers, speakers, or audio systems.
LINE OUT –
Audio Line Output (-)
Negative audio output terminal for connecting external amplifiers, speakers, or audio systems.
RS485A
RS485 Communication (+)
Positive line for RS485 differential signal.
RS485B
RS485 Communication (-)
Negative line for RS485 differential signal.
ALARM1
Alarm Input 1
Input for external devices (e.g., door contacts, sensors, or exit buttons).
ALARM2
Alarm Input 2
GND
Alarm Ground
Common ground reference for alarm inputs.
NO2
Relay Output2
For “Fail Secure” (Locked when Power Lost) Strike, connect COM2 & NO2.
For “FailSafe” (Open when No Power) Magnetic Lock, connect COM2 & NC2.
Relay: Maximum current allowed is 30VDC/2A.
Note: Relay Output 2 uses a Solid State Relay (SSR), which provides electronic switching instead of mechanical contacts. Verify that the connected lock is compatible with the SSR output specifications and voltage requirements (30V/2A MAX)
COM2
NC2
NO1
Relay Output1
For “Fail Secure” (Locked when Power Lost) Strike, connect COM1 & NO1.
For “FailSafe” (Open when No Power) Magnetic Lock, connect COM1 & NC1.
Relay: Maximum current allowed is 30VDC/2A.
COM1
NC1
SD Card Slot
Data Storage
Maximum capacity 256GB.
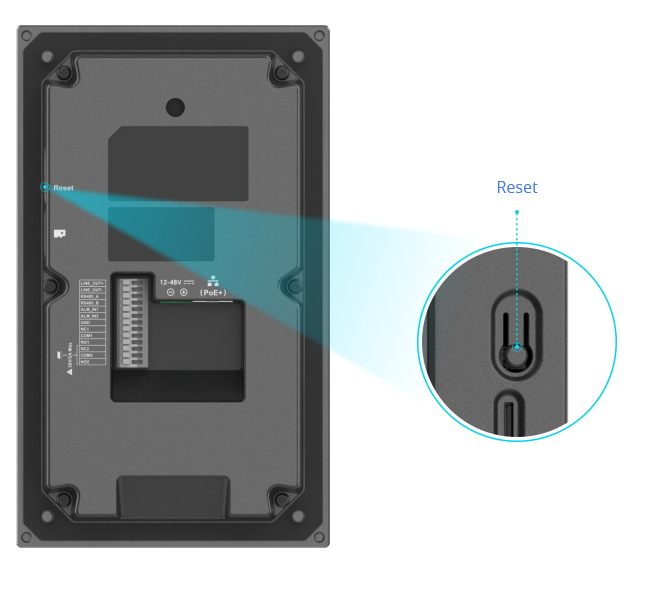
Reset Button
System Reset
Press and hold to restore to factory defaults.
Tamper Button
Tamper Detection
It prevents violent demolition.
GSC3565/GSC3560 Wiring Connection
GSC356X Wall Mount Installation
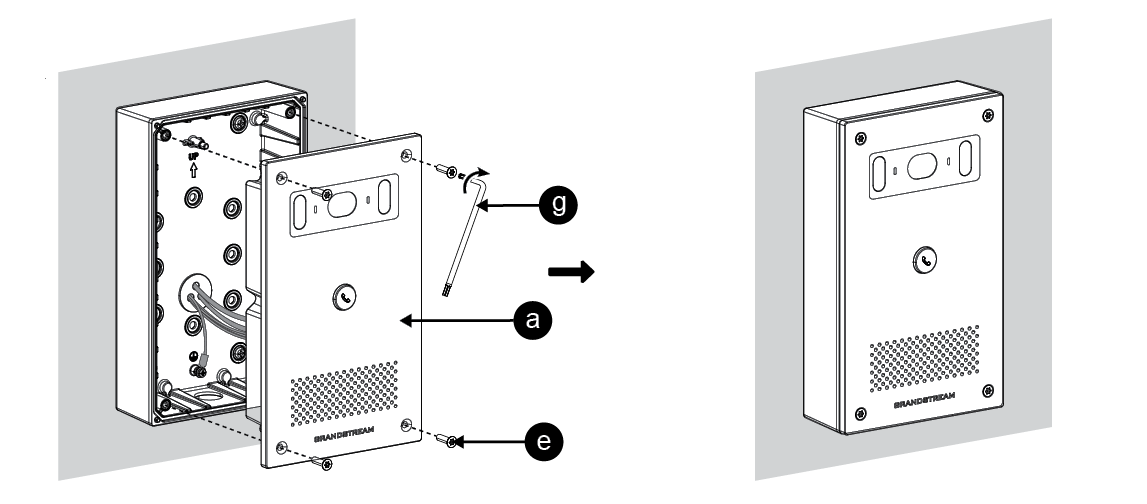
This section provides step-by-step instructions for the IN-wall mounting of the the GSC356X IP intercom device, using the GSC3565 model as an example, on a wall using one of the available installation methods:
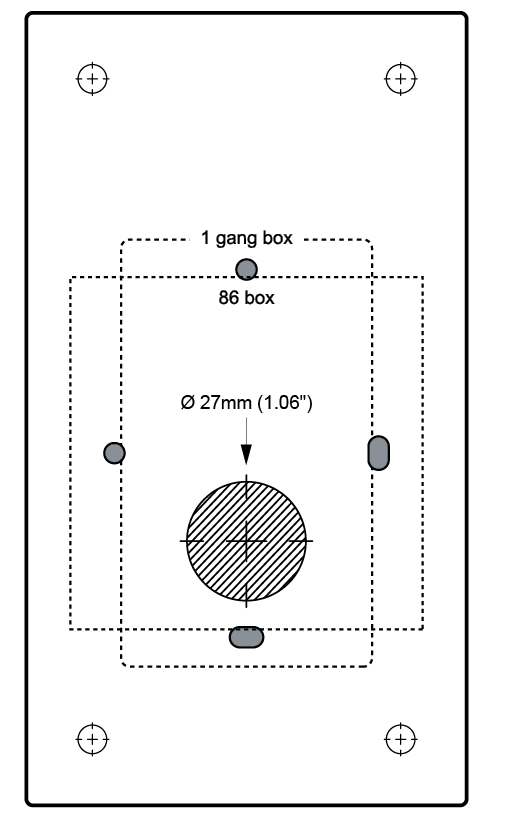
A positioning sticker is included in the package to ensure accurate and aligned mounting across all installation types.
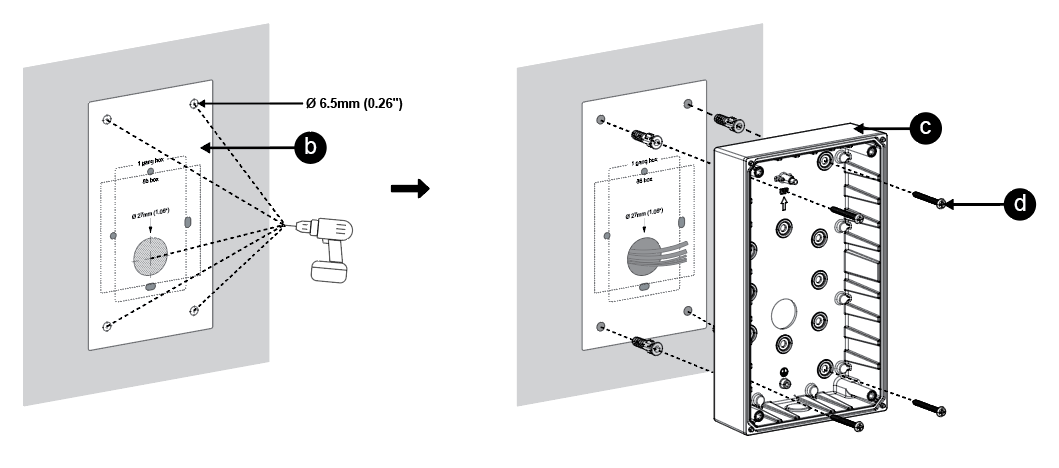
Please follow these steps carefully to ensure a weather-protected and tamper-resistant installation:
Place the provided positioning sticker on the wall at the desired mounting height.
Using the markings on the sticker as a guide, drill holes at the indicated positions.
Note
Drill patterns may vary depending on the selected installation method (1-gang box, 86 box, or direct wall mount).
Insert the supplied screw anchors into the holes.
Secure the wall-mounted bracket using the included ST 3.5 × 33mm self-tapping screws, along with their screws.
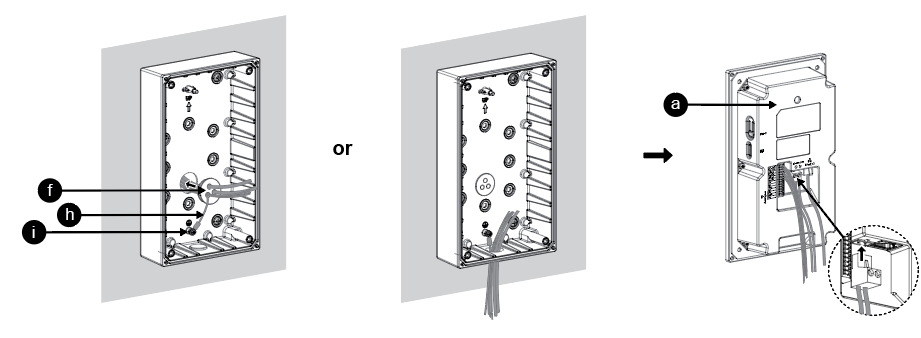
Route the necessary cables (power, network, door strike, etc.) through the center opening or the bottom opening of the bracket, depending on the wires’ source.
Insert the waterproof silicone port plug into the cable exit area at the bottom of the rear cover to protect and organize the cables.
Place the rear cover onto the bracket, aligning it with the screw holes.
Secure the rear cover by placing the securing clip on top of it.
Optionally, connect the DC POWER outlet to power on the device, or use an Ethernet cable connected to a PoE switch.
Place the device onto the wall-mounted bracket.
Use a wrench to tighten the M 4 × 14mm screws, securing the door station to the bracket.
Powering the GSC356X
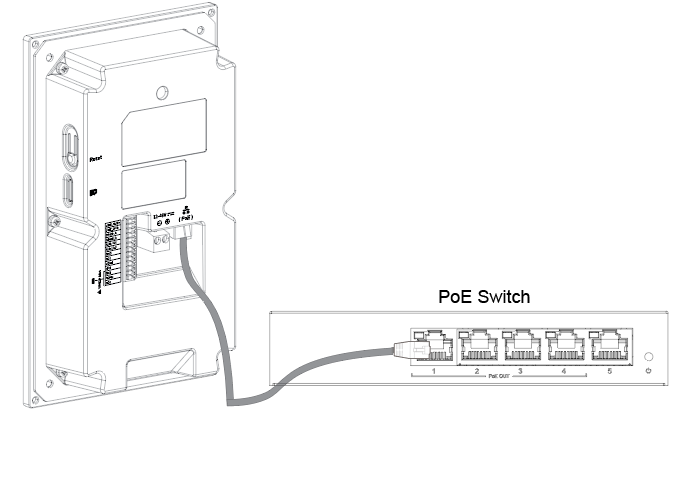
The GSC356X IP Smart outdoor intercom can be powered using PoE or PSU:
Using PoE (Suggested)
Connect the other end of the RJ45 cable to the PoE switch.
A PoE injector can be used if a PoE switch is not available.
Powering the GSC356X Using PoE
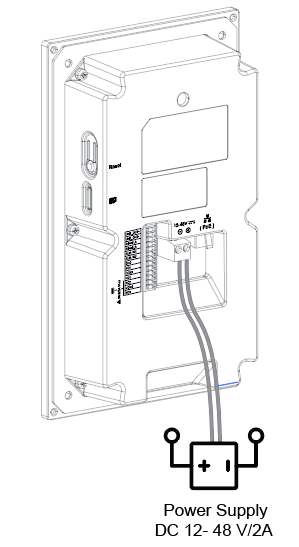
Using Power Supply Unit (Not Provided)
Connect the other end of the RJ45 cable to a network switch or router, for data transmission only, not to power on the device.
Connect a DC 12-48V power source via the related cable to the correct pins of the GSC356X to power on the device.
Using a Power Supply Unit
GSC356X ACCESS AND CONFIGURATION
The GSC356X includes an embedded web server that responds to HTTP/HTTPS GET and POST requests. This allows users to configure and manage the device through any standard web browser.
To begin configuration, please refer to the sections below.
Notes:
To access the GSC356x web interface, your computer must be connected to the same local network (subnet) as the GSC356x. (This is typically done by connecting your computer to the same router, hub, or network switch as the device.)
If no hub or switch is available (or if all ports are in use), you can also connect the GSC356x directly to your PC’s Ethernet port using a network cable and configure both devices with compatible static IP addresses.
Accessing the GSC356X via Dynamic IP (DHCP)
By default, the GSC356X is configured to automatically obtain an IP address from a DHCP server, such as your network router. This method is suitable for most typical office or home setups.
To connect the GSC356X to your network, please follow the instructions below:
Use an Ethernet cable to connect the GSC356X to a router, network switch, or access point with DHCP enabled.
Power the device using one of the following methods:
PoE (Power over Ethernet): The GSC356X supports IEEE 802.3at Class 4, allowing it to receive power and data over a single Ethernet cable.
Power Adapter: Connect a DC 12V power source via the related cable to the correct pins of the GSC356X.
After the device powers on, it will receive an IP address from the DHCP server. You can locate this IP using the tools mentioned in the following sections.
Using GS Search to Retrieve the GSC356X IP Address
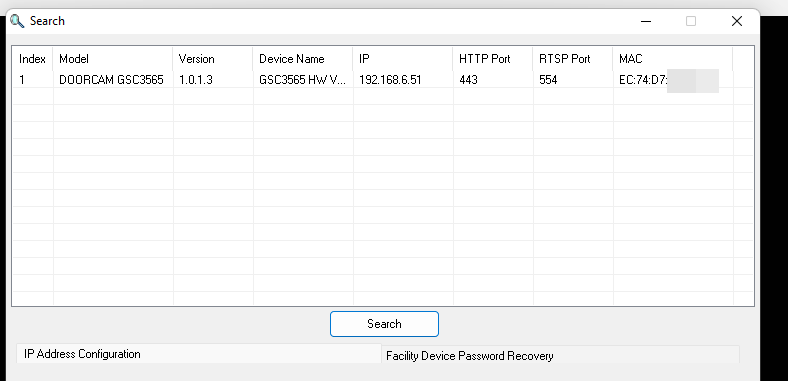
GS search is a program that is used to detect and capture the IP address of the Grandstream facility management solution devices. Below are instructions for using the “GS Search” utility tool:
Download the GS Search utility tool from the Grandstream website using the following link: GS_Search
Double-click on the downloaded file, and the search window will appear.
Click on the “Search” button to start the discovery for Grandstream devices.
The detected devices will appear in the output field as shown below.
GS Search Discovery
Accessing the GSC356X via Static IP
If there is no DHCP server in the network, or the GSC356X does not get an IP from the DHCP server, users can connect the GSC356X to a computer directly, using a static IP to configure the GSC356X.
If no DHCP server is available or the DHCP request times out (after 3 minutes), the GSC356x will use its default static IP address: 192.168.0.160
Connect the Ethernet cable from GSC356X to the computer network port directly.
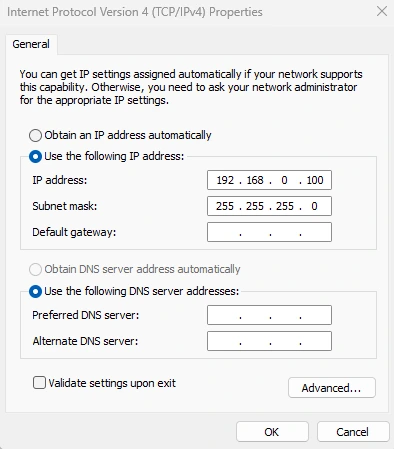
Configure the computer using Static IP: 192.168.0.XXX (1<XXX<255, except for 160) and configure the “Subnet mask” to “255.255.255.0”. Leave the “Default Gateway” to “Blank” like below:
Static IP on Windows
4. Power on the GSC356X, using a PoE injector or external DC power.
5. Enter 192.168.0.160 in the address bar of the browser to access the GSC356X Web UI.
GSC356X Web UI Login
Once the GSC356X is accessed through its IP address (whether static or dynamically assigned), the embedded Web User Interface (Web UI) will load in the browser. This interface allows administrators to configure and manage the device.
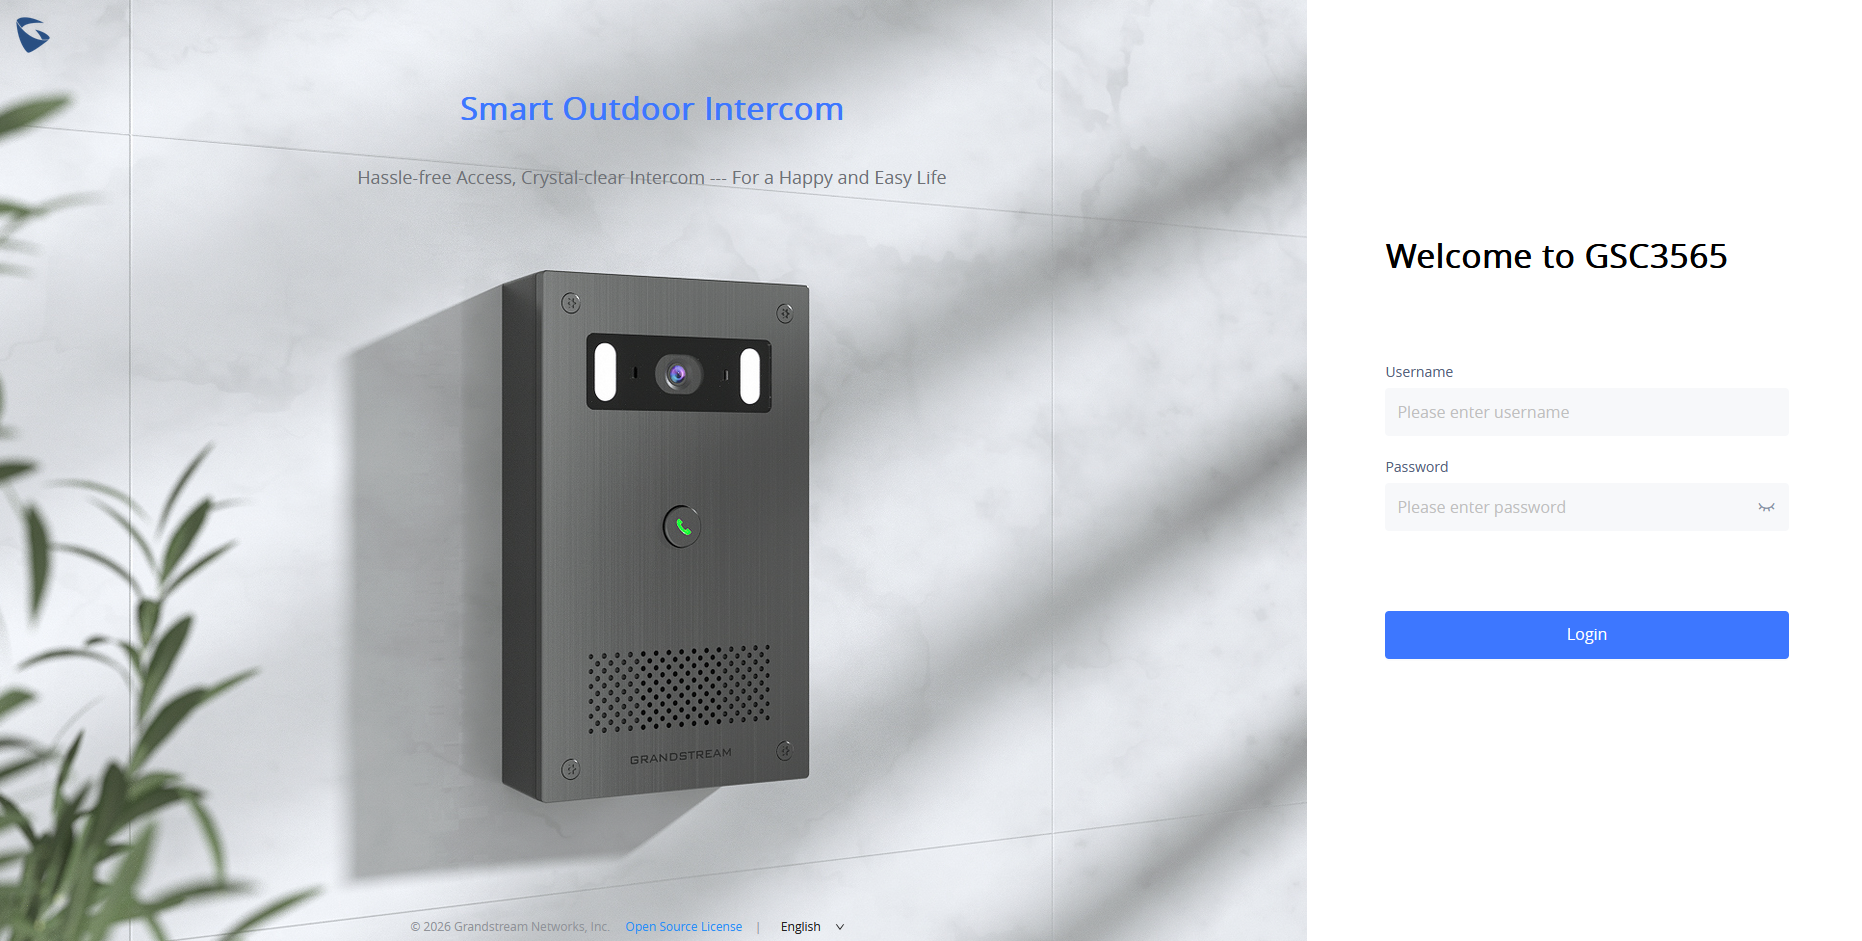
Upon accessing the Web UI, a login screen will appear, prompting for credentials:
GSC356x Web UI Login
There are two default passwords for the login page:
User Level
User
Password
Web Pages Allowed
End User Level
user
123
Status
Real-time Preview
Calls
Phone Settings
Network Settings
System Settings
Maintenance
Diagnostic
Administrator Level
admin
Random password available on the sticker at the back of the unit.
All pages
Note:
Upon first logging into the Web UI, users will be prompted to change the default administrator/user password. This is a mandatory step for security purposes and must be completed before proceeding with any configuration.
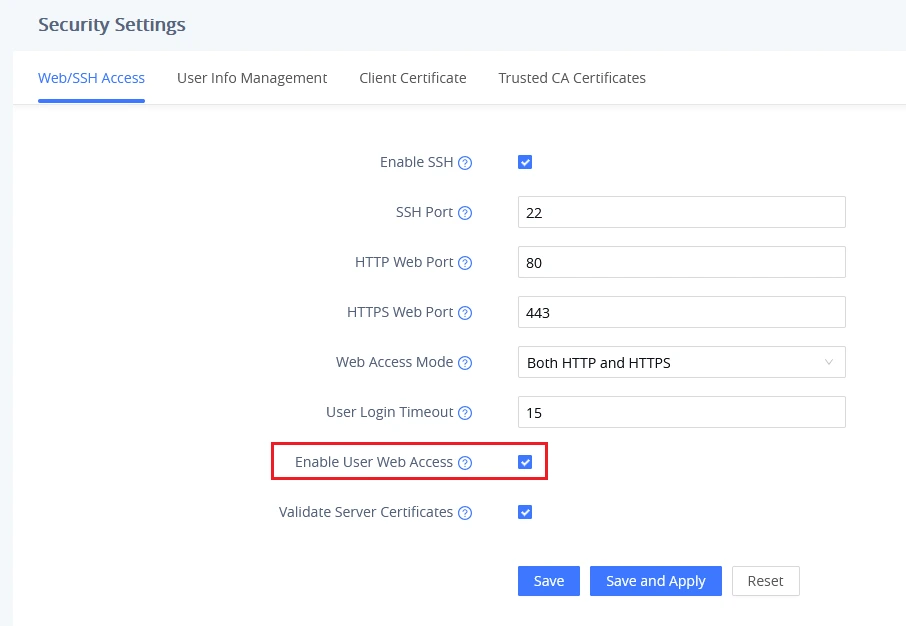
User-level access requires the option “Enable User Web Access” to be enabled in the security settings of the device (disabled by default).
Enable User Web Access
Saving and Applying Configuration Changes
After logging into the GSC356X Web UI and making any configuration changes, users must take action to ensure those changes are saved and applied correctly.
Pressing the “Save” button will store the changes temporarily, but they will not take effect until the user clicks the “Apply” button at the top of the Web UI.
Alternatively, users can simply click “Save and Apply” to save the settings and apply them immediately.
Note:
While most settings take effect after applying changes, it is recommended to reboot or power cycle the device to ensure all configurations are fully loaded and operational. This step is essential to finalize configurations that require a reboot, such as network settings.
To reboot the device remotely:
Click the “Reboot” button located in the top-right corner of the Web UI.
The browser will display a reboot message. Wait approximately 1 minute before logging in again.
GSC356X APPLICATION SCENARIOS
The GSC356X IP Smart Door Intercom can be used in different scenarios.
Emergency Call
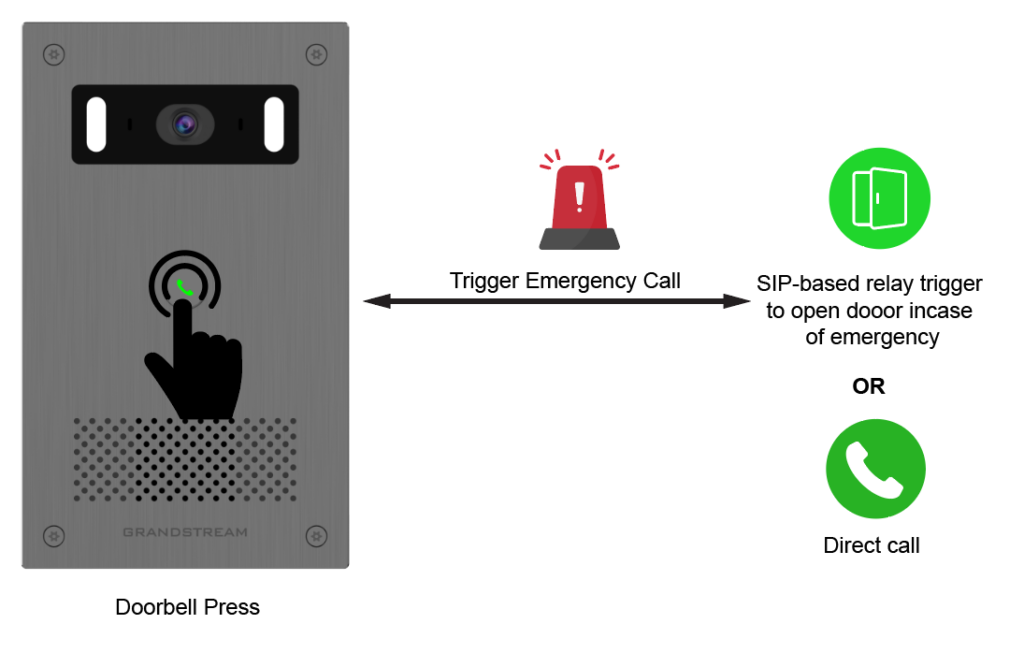
The Emergency Call scenario is designed to provide an immediate response mechanism in critical situations by automatically placing a call when the intercom button is pressed. This feature ensures that users can quickly reach a predefined contact such as security staff, reception, or emergency services. In addition to initiating the call, the device can also trigger a relay output simultaneously to perform actions like unlocking a door or activating an alarm system, enabling both communication and physical response at the same time.
Emergency call
To configure the device to trigger an emergency call, follow the steps below:
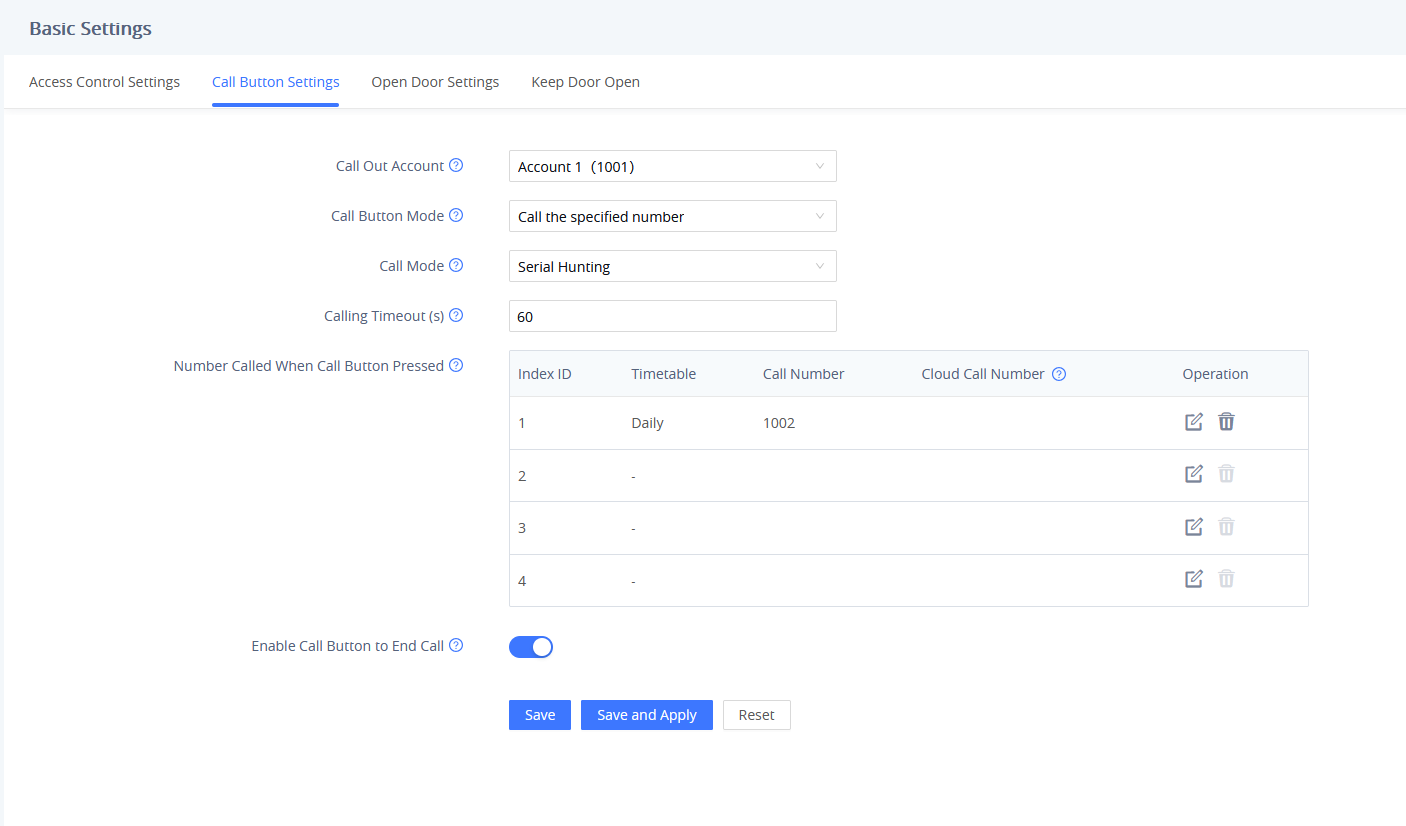
Navigate to Basic Settings → Call Button Settings.
Locate “Number Called When Call Button Pressed”.
Enter the target number (SIP extension, IP, or external number) for emergency handling. Set Call Button Mode to Call the specified number. if you would like just to trigger or a call with no alarm, or to Both, if you would like to launch a call and trigger a relay output simultaneously.
Choose Call Mode (e.g., Serial Hunting if multiple numbers are configured). Define Calling Timeout as needed (e.g., 60 seconds) (Optional).
Configure backup numbers to determine where calls are routed when the primary defined number (Number Called When Call Button Pressed) is unavailable. Navigate to Access Control Settings → Basic Settings → Open Door Settings to define the 2nd, 3rd and 4th numbers to be called.
Select the desired action (unlock door, trigger siren, or activate external alarm) on the alarm action profile.
Click Save and Apply to activate the settings.
Press the call button on the intercom to test the configuration.
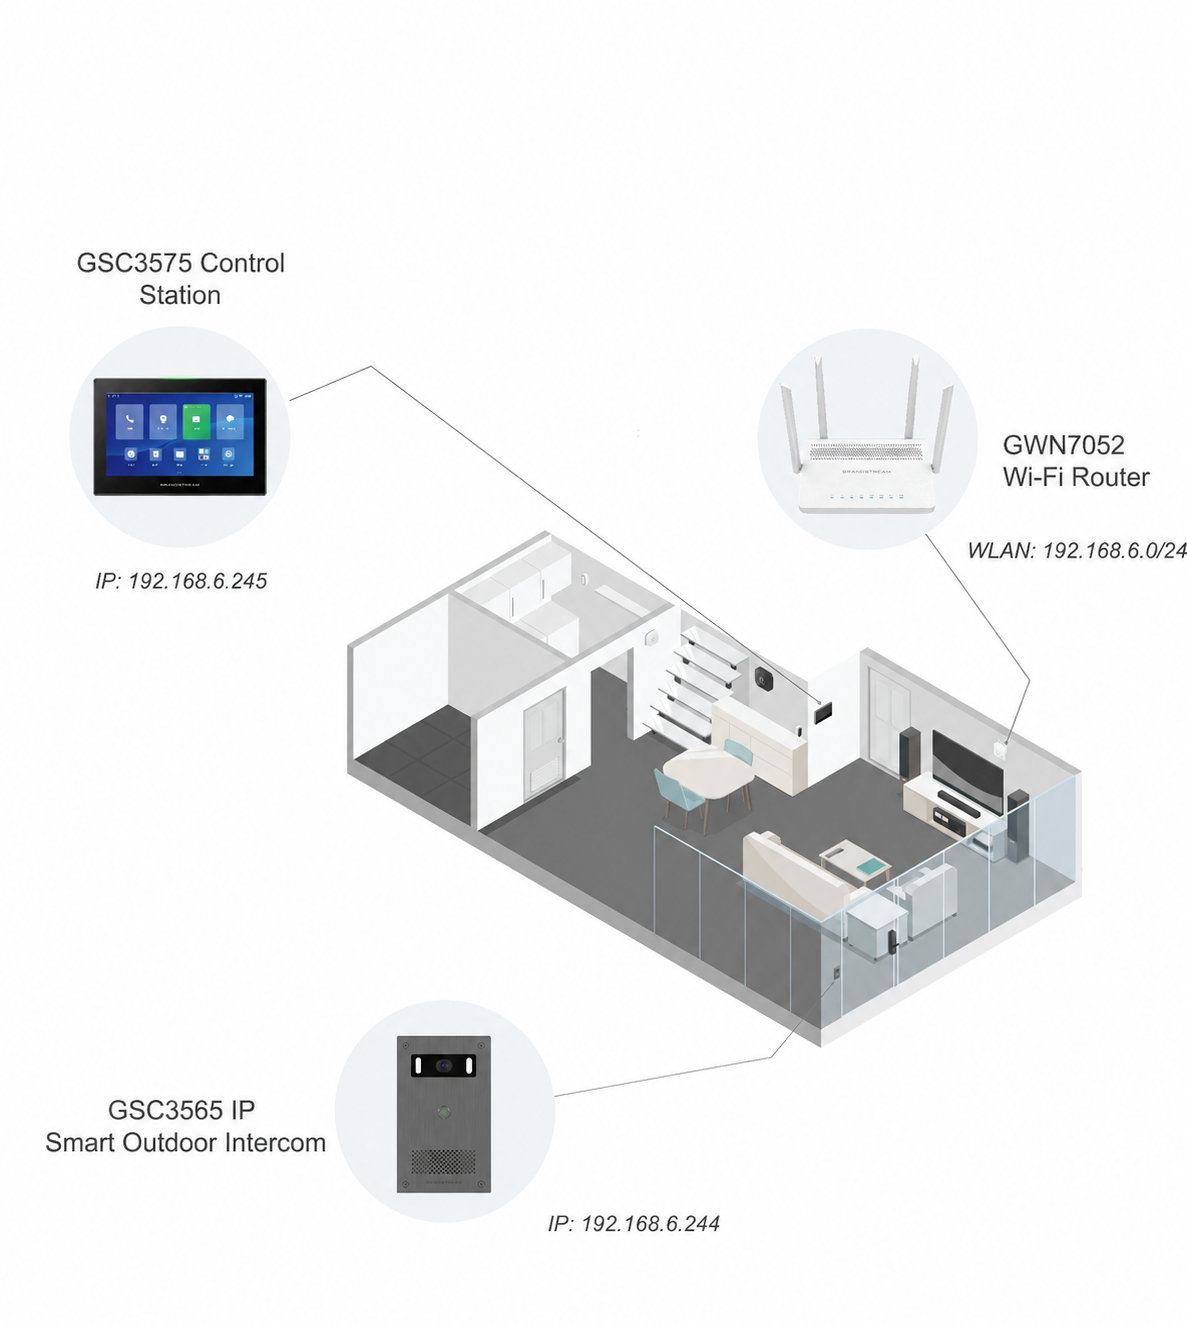
Peering Mode without SIP Server
The GSC356X can operate in Peering Mode, enabling direct IP communication without relying on a SIP server. This setup is ideal for standalone deployments on local networks where centralized SIP infrastructure is not available or not needed.
This is the solution to upgrade the traditional analog Intercom and CCTV security system. All you need is a Power source, a Switch or a PoE Switch, and a compatible Grandstream device such as the GXV series video phones or WP8x6 Wi-Fi phones.
In this section, we will use the GSC3575 Control Station to demonstrate the peering process. However, the same principles apply when using other compatible Grandstream devices.
Peering Mode without SIP Server
Prerequisites
Before configuring peering mode, ensure the following:
Power Supply Options
The GSC356X supports:
PoE (802.3at, Class 4) via Ethernet
12V DC (1A) via rear pin connectors
For the door strike or magnetic lock:
Can be powered using the same PSU as the GSC356X (if power rating allows)
Or separately, if PoE is used for GSC356X, and a dedicated PSU is used for the lock
Networking
GSC356X and the receiving device must be on the same local subnet
Static or dynamic IP addressing is supported
Connected Hardware
For door unlock functionality, ensure the relay pins (NO, NC, COM) are wired to a functional lock device.
Configuration Steps
On GSC356X
To enable direct IP communication with the GSC3575, configure the GSC356X using the steps below.
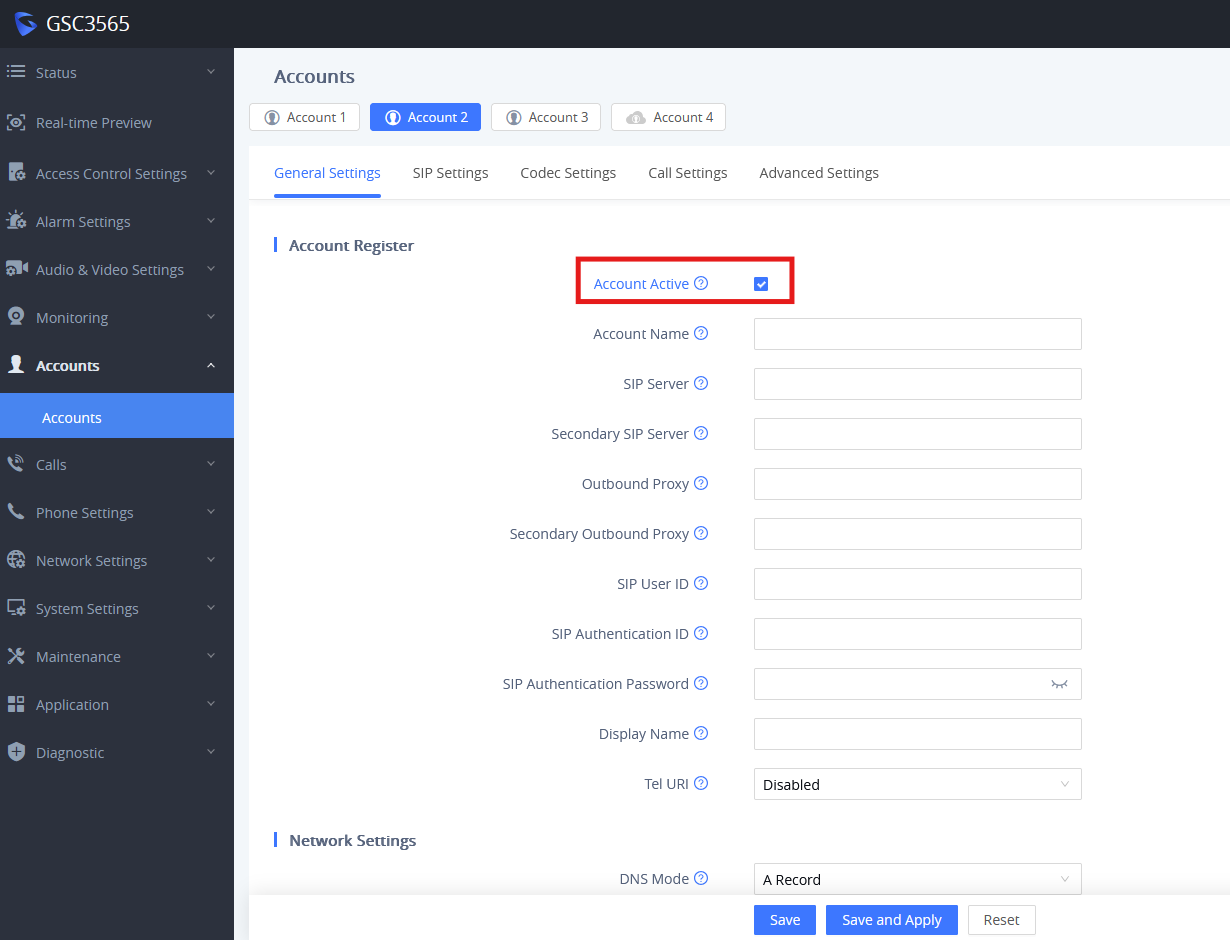
Enable the SIP account by navigating to Account → Basic Settings.
Enable the account by setting “Account Active” to Yes, and leave all SIP credential fields empty. In peering mode, the device communicates directly via IP, so registration to a SIP server is unnecessary.
GSC356X General Account Settings Page
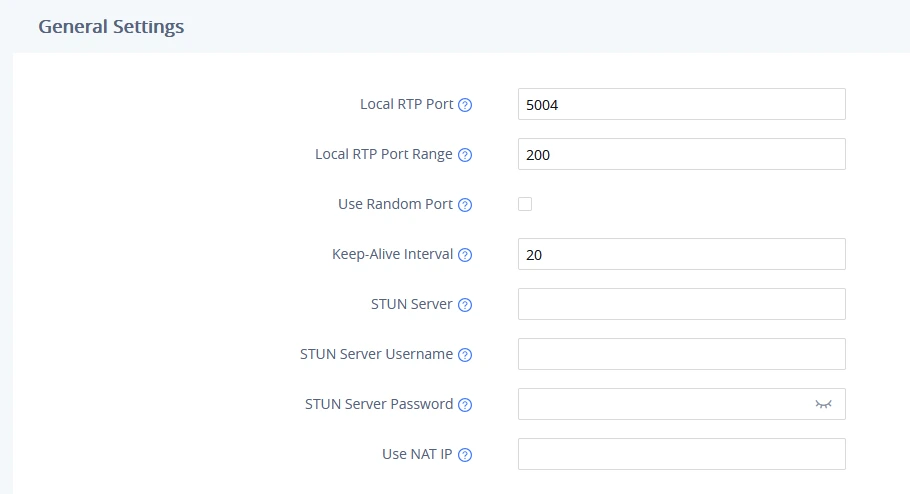
Navigate to Phone Settings → General Settings and set Use Random Port to No. Fixed RTP ports ensure reliable audio and video transmission between static IP devices in direct IP mode.
GSC356X General Phone Settings Page
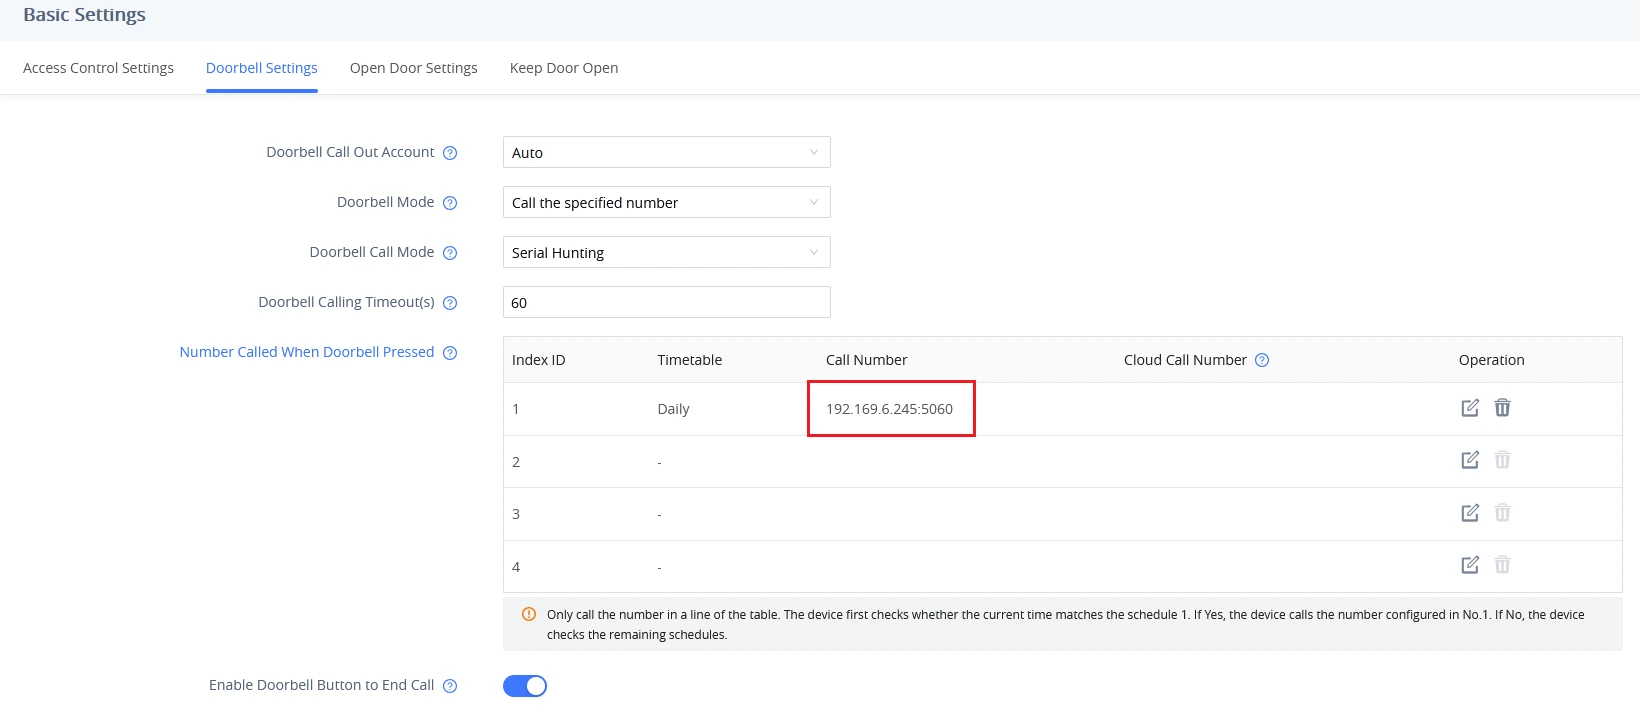
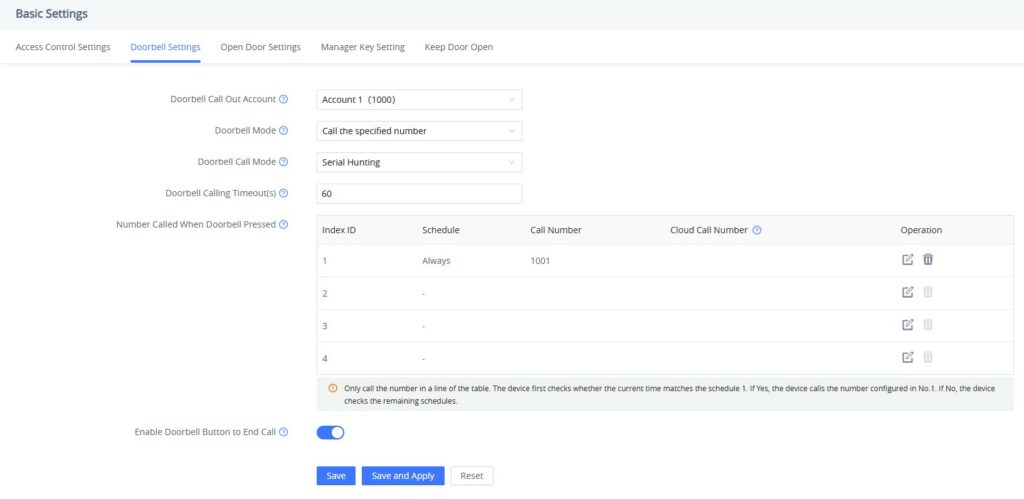
Go to Access Control Settings → Doorbell Settings and enter the IP address or SIP URI of the target device (e.g., 192.168.1.88 or sip:192.168.1.88) in Number Called When Doorbell Pressed. This defines where the GSC356X should send calls when the doorbell is pressed.
GSC356X Doorbell Settings
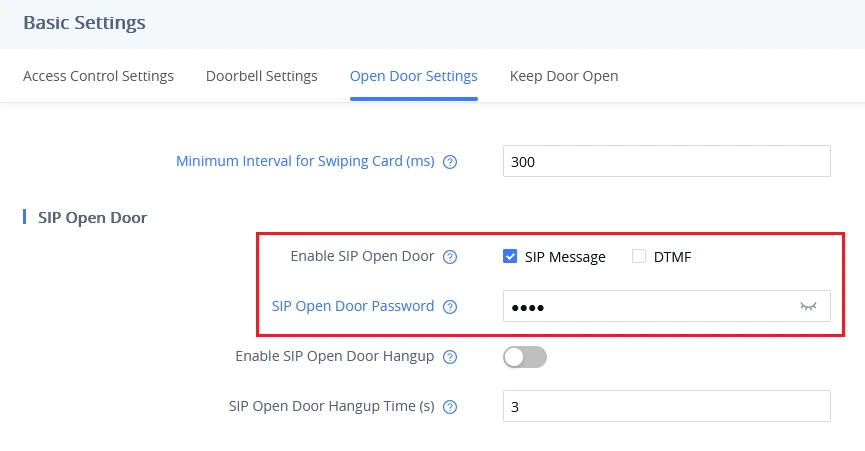
Set the Remote Open Door PIN under Access Control Settings → Open Door Settings. This enables users to remotely unlock the door from the receiving device using either SIP signaling or DTMF input.
Click Save and Apply to ensure all settings are committed and activated.
GSC356X Open Door Settings
On GSC3575 Control Station
To enable two-way direct IP calling, repeat steps 1, 2, and 3 from the GSC356X configuration on the receiving device.
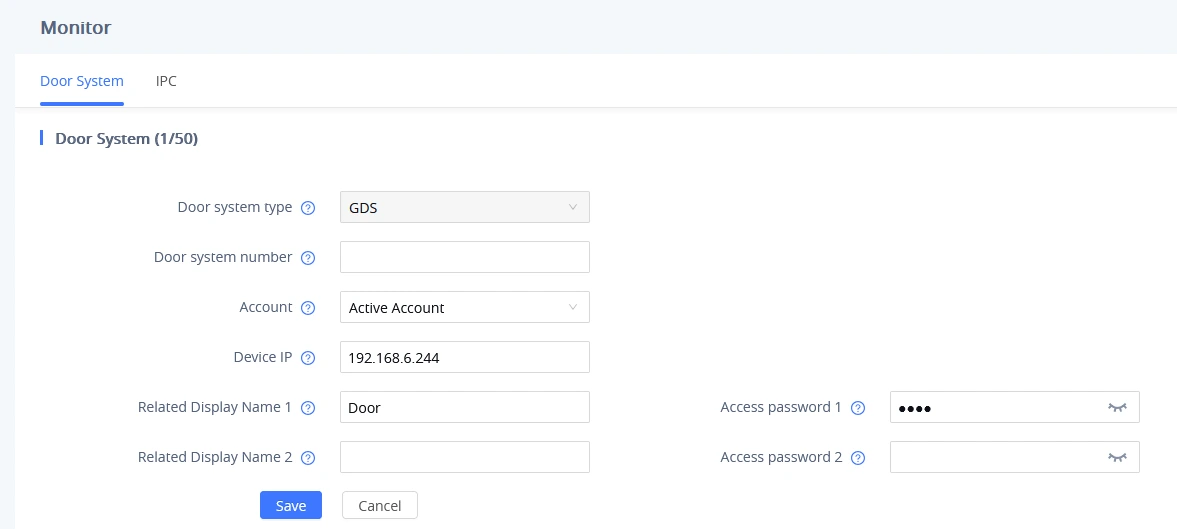
For the SIP-based relay trigger, users need to add the GSC356X door station to the list of monitored devices on the GSC3575 control station, as shown in the screenshot below.
Choose a door system number or leave the field blank.
Select the active account for monitoring.
Enter the GSC356X IP address under device IP.
Configure the Remote Open Door PIN as the access password.
GSC3575 Door System Monitor Settings
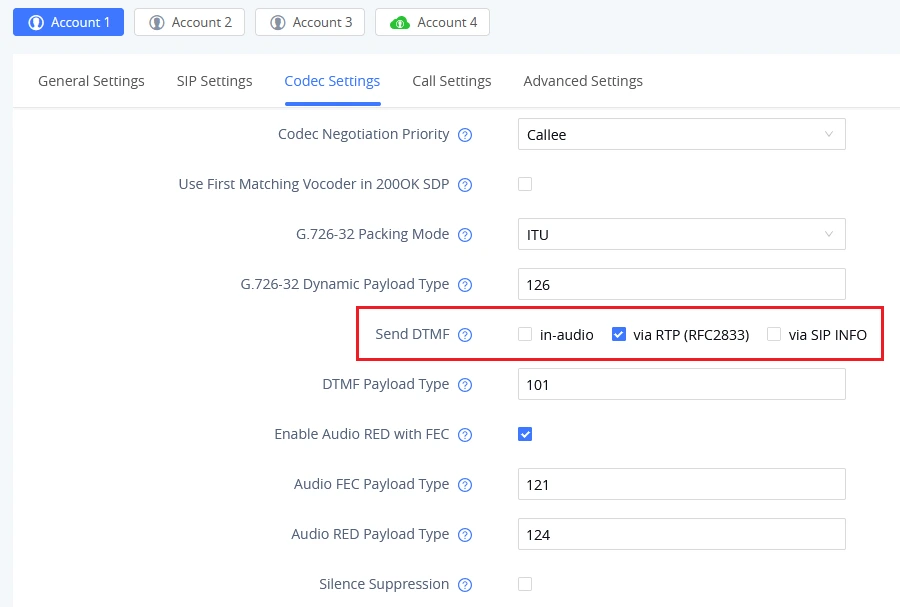
To enable door unlocking via DTMF, select the DTMF mode based on your GSC356X config in the codec settings configuration of the active account.
GSC3575 Account Codec Settings
Remotely Unlocking the Door
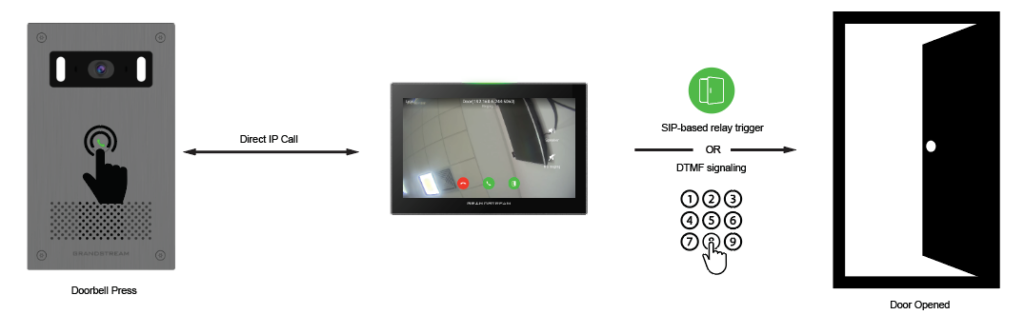
The diagram below shows the flow of the remote door unlocking using a direct IP call.
Direct IP Call for Remote Unlock
Once the doorbell is pressed:
The GSC3575 receives the call and shows a video stream from the GSC356X
The user can:
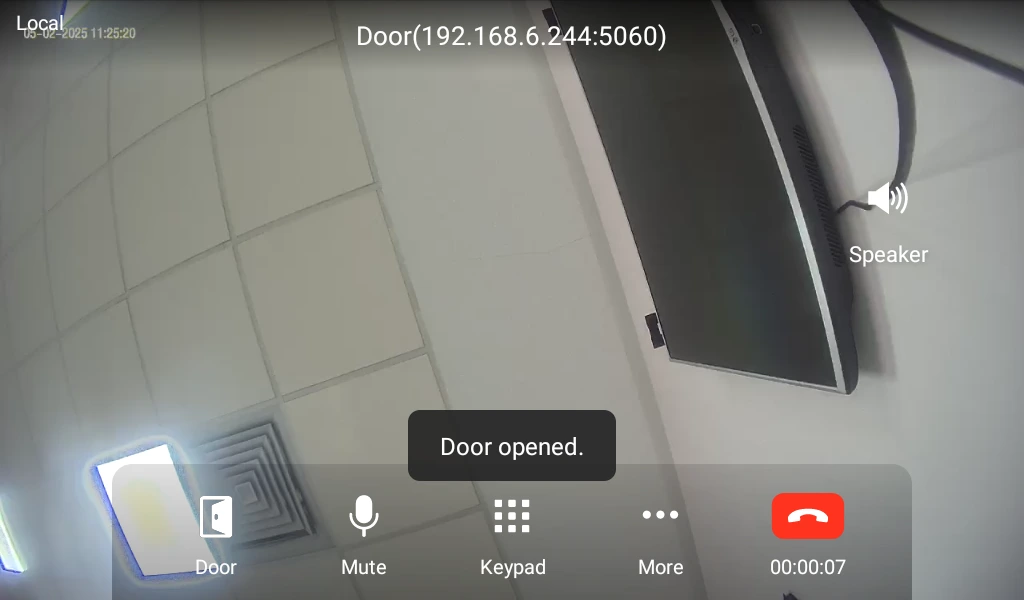
Tap the unlock icon during the incoming call or active call screen to trigger the door relay via SIP.
Enter the Remote Open Door PIN followed by the pound key (#) during the active call to unlock the door using DTMF.
Door Opened Prompt
Peering Mode with SIP Server
For medium to large-scale deployments, especially when multiple GSC356X units are deployed across a facility, Direct IP peering is not recommended due to limitations in maintaining simultaneous peer connections.
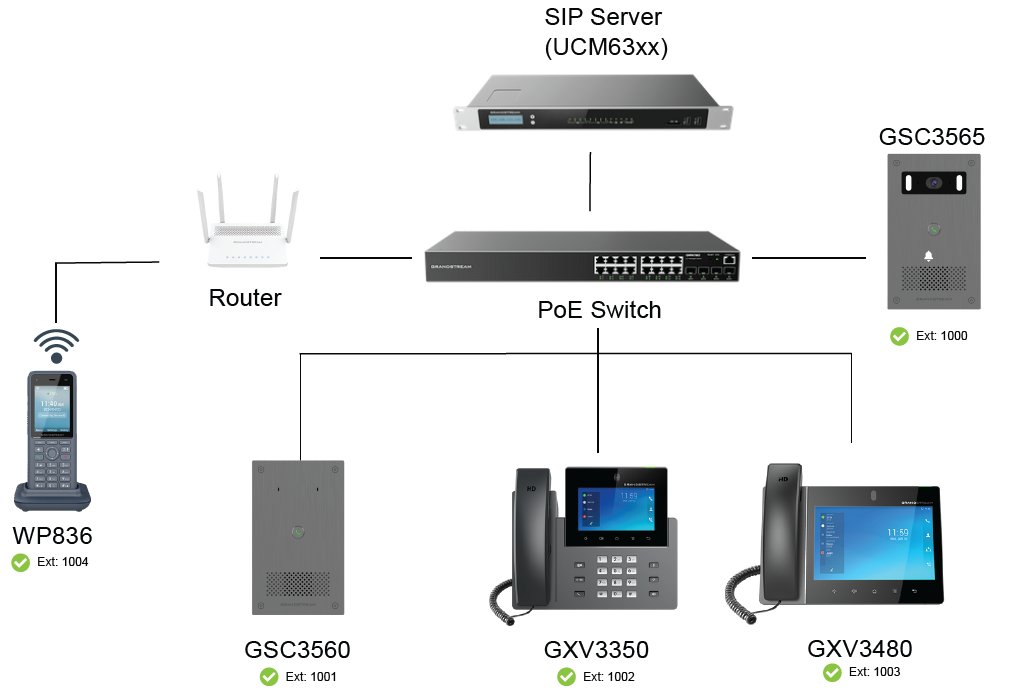
In such cases, using a central SIP server, like Grandstream’s UCM6300, SoftwareUCM, or GCC IPPBX, or a compatible SIP proxy, is strongly advised to manage call routing, access control, and video intercom functionality efficiently. The SIP server acts as the core system to register all devices, allowing centralized management.
For a typical deployment, the following might be needed:
Multiple GSC356X door systems (e.g., GSC3565)
A UCM6300 IPPBX or other compatible SIP Server
GXV33xx/GXV34xx video phones, GSC357x intercom stations, WP8x6 Wi-Fi phones, or any compatible devices.
PoE switch with proper Cat5e/Cat6 cabling
Power supply unit (PSU) if not using PoE.
If remote access is needed—for viewing live video feeds or unlocking doors remotely—a router with internet connectivity is essential. Additional requirements:
Router with WAN access
Internet connection (Fiber, DSL, 4G/5G, etc.)
Mobile device (Android/iPhone) with SIP client or IP camera app (e.g., GS Wave)
Peering GSC356X with SIP Server
Peering Mode using NVR
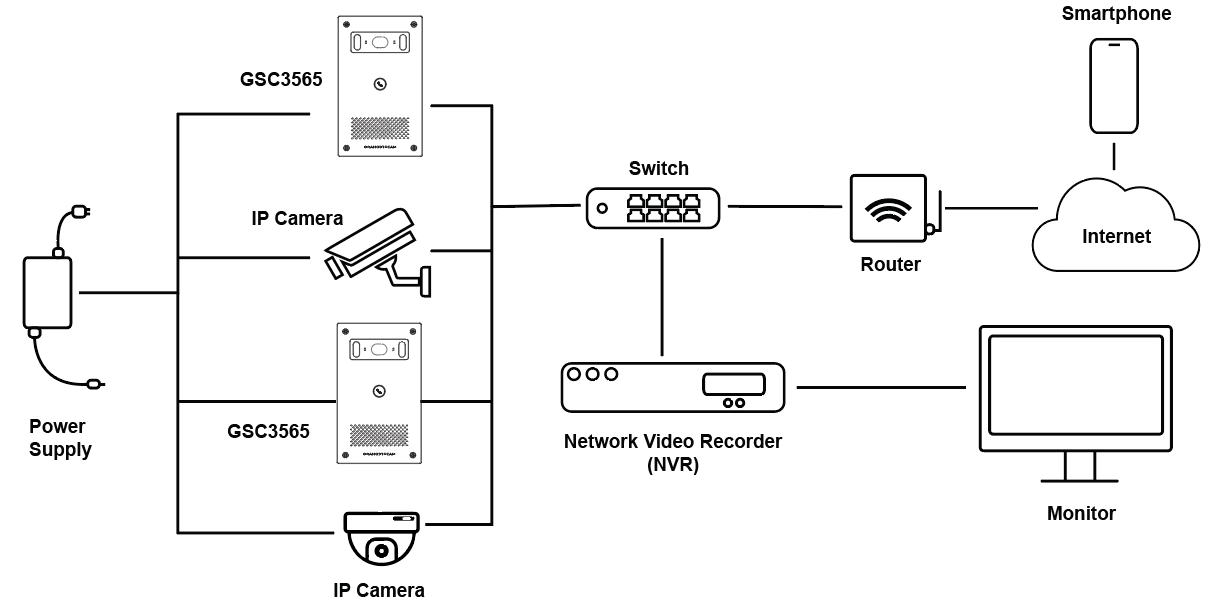
The GSC356X series supports seamless integration with third-party Network Video Recorders (NVRs) using the ONVIF Profile S standard, only for the GSC3565 model with an HD Camera. This enables centralized live monitoring, video recording, and event management for facility access and surveillance applications.
The key protocols used in this scenario are:
ONVIF Profile S: Enables device discovery, stream configuration, and event handling.
RTSP (Real-Time Streaming Protocol): Used to stream live video to the NVR once authenticated and configured via ONVIF.
The recommended equipment list is:
One or more GSC3565 devices.
ONVIF-compliant NVR.
PoE switch or DC power supply.
Router (for Internet access if remote viewing is needed)
Optional: Android/iOS phone with compatible viewing app (e.g., IP Cam Viewer)
Peering GSC356X with an Onvif Profile S NVR
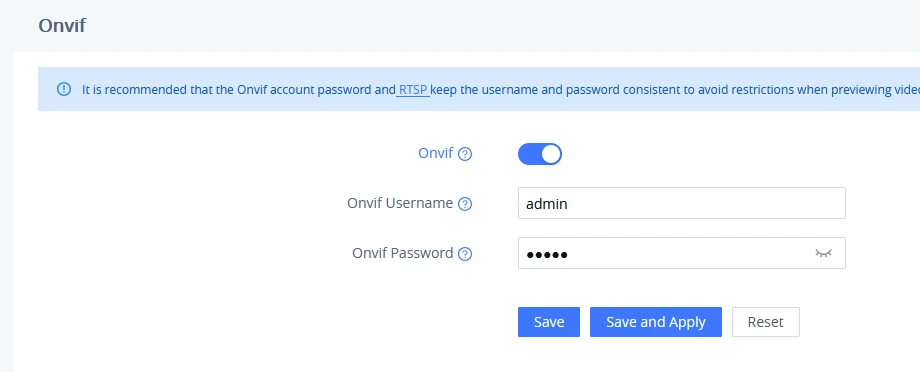
The GSC356X Web UI provides options to configure ONVIF access credentials, which are essential for secure integration with NVRs or third-party ONVIF-compatible software. Under Monitoring → ONVIF, you will find:
ONVIF Username: This is the account the NVR or ONVIF client will use to authenticate with the GSC356X.
ONVIF Password: The corresponding password for that username.
These credentials are used during the ONVIF device discovery, stream setup, and event service access phases.
GSC356X ONVIF Settings
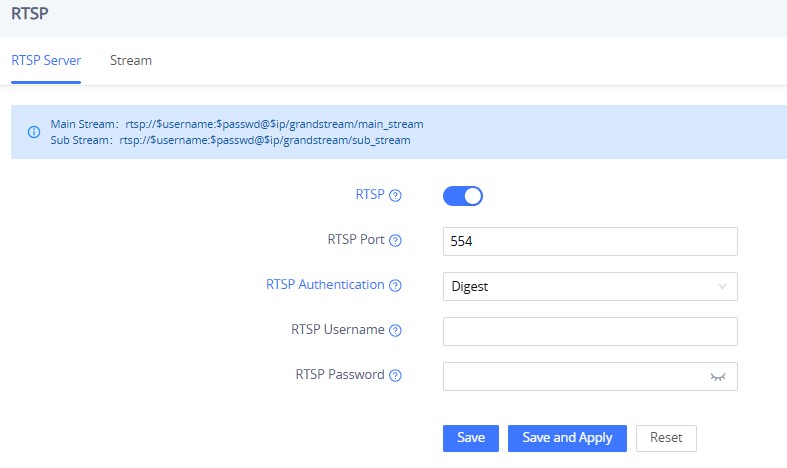
If the NVR or viewing client supports direct RTSP connections, the GSC356X acts as an RTSP server, streaming live video to the NVR. The NVR acts as an RTSP client, pulling the live video feed using the RTSP URL (which includes the username/password).
To configure RTSP settings, go to Monitoring → RTSP:
RTSP Port (default: 554)
RTSP Authentication: define how credentials (username/password) are sent
RTSP Username
RTSP Password
GSC356X RTSP Settings
Note:
It is recommended that the ONVIF account and the RTSP account use the same username and password to avoid access issues when previewing video from third-party NVRs or VMS (Video Management Systems). Some systems will attempt RTSP authentication using the ONVIF credentials.
GSC356X PERIPHERAL CONNECTIONS
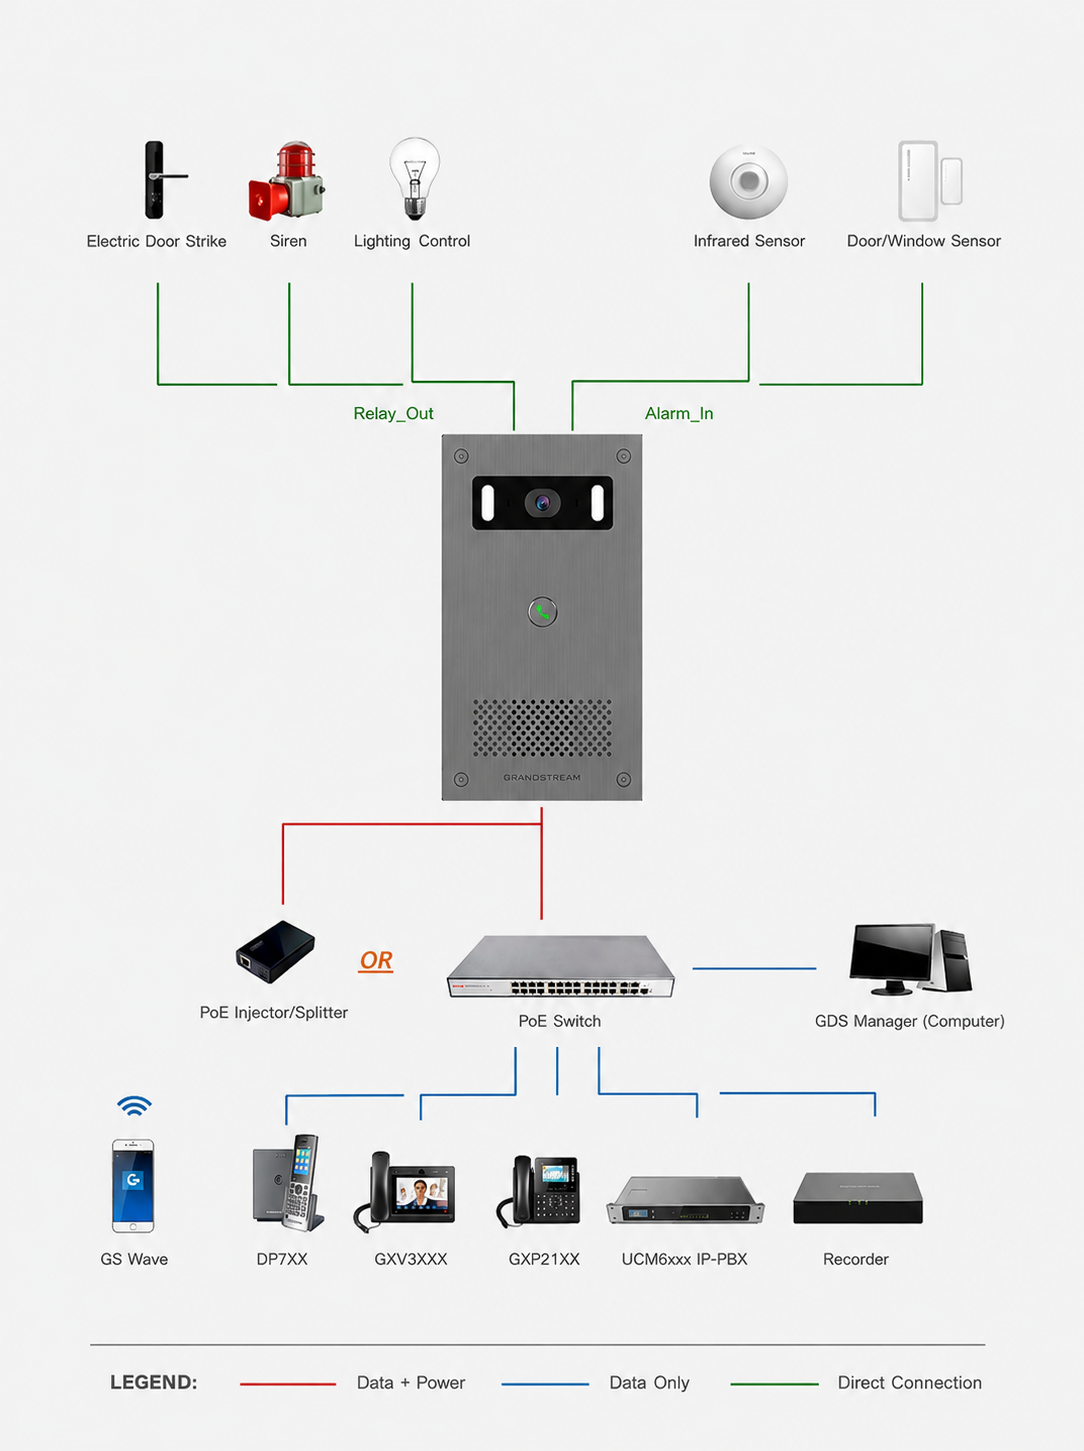
Below is the illustration of GSC356X peripheral connections for related applications. We will take the GSC3565 as our testing unit.
Peripheral Connections for GSC356x
Alarm IN/ Relay OUT
Alarm_In can be connected to 3rd-party sensors (such as an IR Motion Sensor, door contact switch, or panic button).
Relay_Out can be connected to devices such as a 3rd-party siren, strobe light, or an electric door striker.
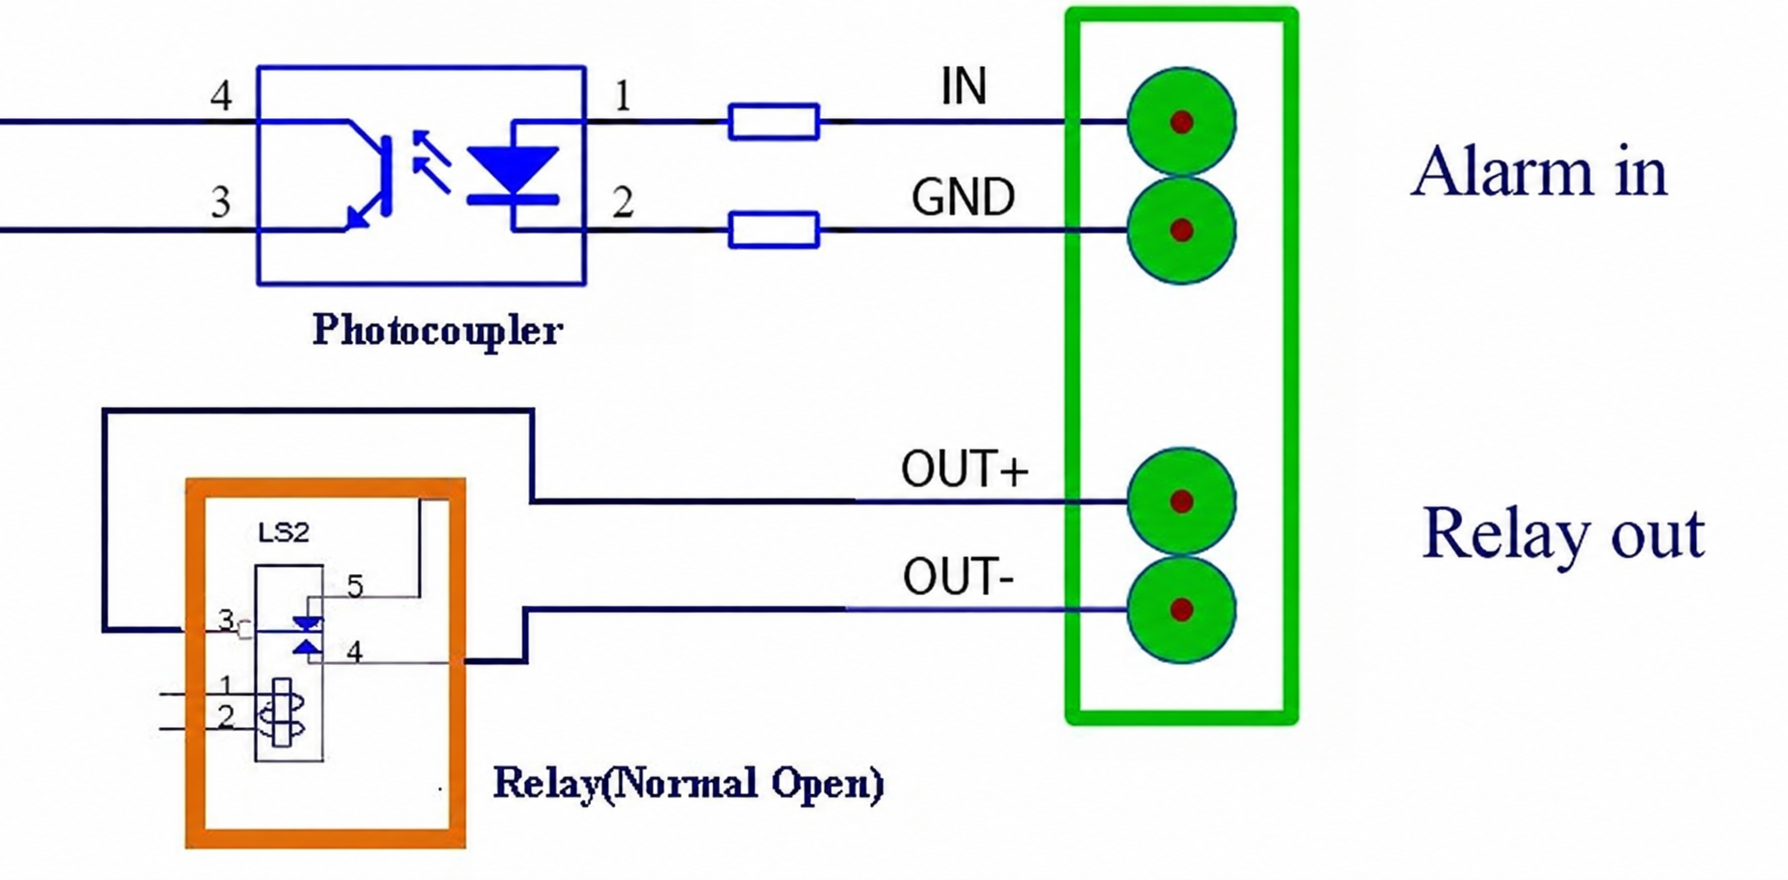
The figure below shows an illustration of the Circuit for Alarm_In and Relay_Out.
Alarm In Relay Out Circuit for GSC356X
The Alarm_In and Alarm_Out circuit for the GSC356X should meet the following requirements:
Alarm Input
Dry contact (switch) input only.
Relay Output
125VAC/0.5A, 30VDC/2A, Normal Open, PINs
Note:
Higher voltage and wrong polarity connections are prohibited because this will damage the devices.
Protection Diode
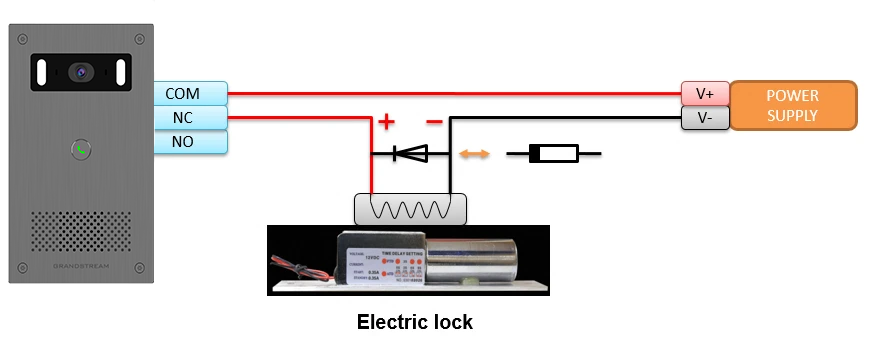
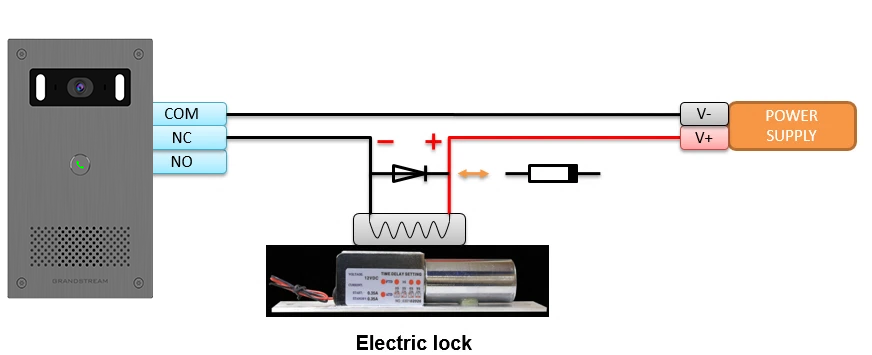
When connecting the GSC356X to a door strike, it is recommended to set an EMF protection diode in reverse polarity for secure use. Below are examples of deploying the GSC356X for the protection diode.
Protection Diode Example 1
The reverse EMF protection diode must always be installed in reverse polarity across the door strike.
Protection Diode Example 2
Note
Power polarity connection: Diode: SS24 or If>=2A, Vr>=40V.
Connection Examples
This section illustrates different connection scenarios for the GSC356X IP Video Door Station, with explanations and practical use cases for each wiring setup.
While the wiring principles apply across both models in the series, the GSC3565 is used in this section as the representative example in the diagrams for visual consistency.
Power Supply Note:
PoE (802.3at Class 4) can be used to power the GSC356x directly through the network cable, simplifying installation and cabling.
Shared Power Supply (e.g., a 12V DC PSU) can be used to power both the GSC356X and connected devices like electric strikes or relays, provided the total current draw does not exceed the PSU’s capacity.
For fail-safe/fail-secure locks requiring higher current, it’s often recommended to use a dedicated power supply for the lock, while using PoE or a separate PSU for the GSC356X to prevent voltage drops or instability.
Important:
Do not reverse 12V and GND pins when powering the GSC356x using an external power supply. This can permanently damage the GSC356X or any attached devices. Always verify polarity before powering the unit.
If door strike/siren shares a PSU that doesn’t provide enough amperage, voltage drops or reboots may occur, especially during activation events. This can lead to failed unlocking, corrupted config, or device damage over time.
Exceeding the relay output limit (above 30V or 2A) can push the internal relay beyond its safe operating range, potentially leading to welded or burned contacts, complete relay failure, and, in extreme cases, a fire hazard.
Failing to isolate high- and low-voltage circuits can lead to unprotected mixing of power and control signals, increasing the risk of electrical noise, system malfunctions, or even shock hazards.
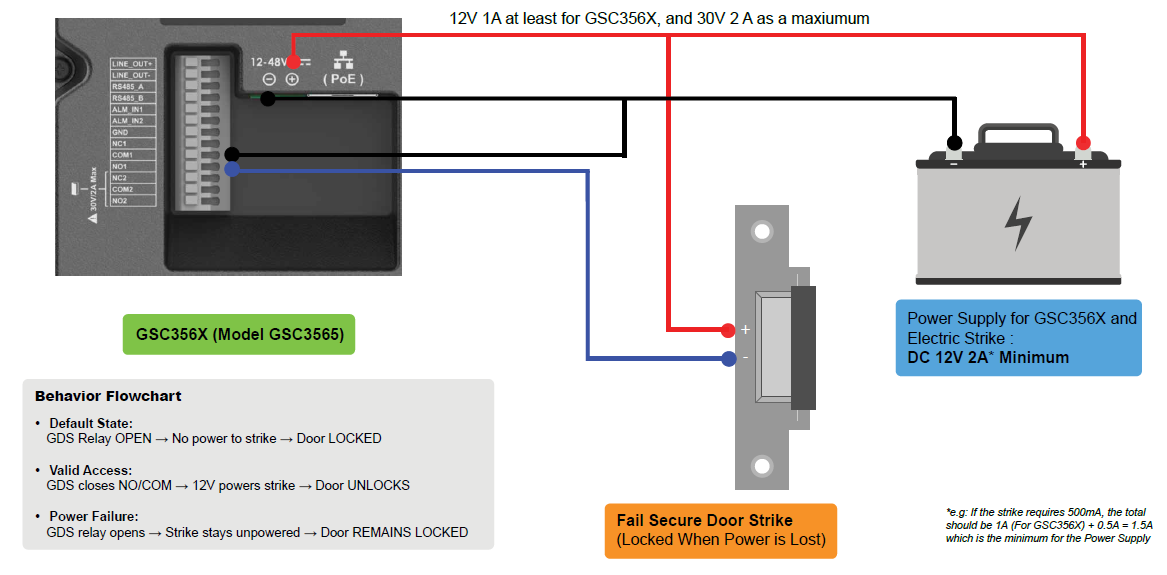
GSC356X with Fail-Secure Electric Strike
Pins used: NO (Normally Open) and COM (Common)
Fail-secure strikes require power to unlock.
When the GSC356X sends an unlock signal, it closes the circuit between NO and COM, energizing the strike to unlock the door.
This setup is ideal for high-security environments, such as server rooms or storage areas, where doors stay locked in case of power failure to prevent unauthorized entry.
Note:
Avoid using NC (Normally Closed) for this setup. As a fail-secure lock needs power to unlock, using NC will supply power continuously, keeping the lock in an open (unsecured) state when idle.
GSC3565 with Fail Secure Door Strike
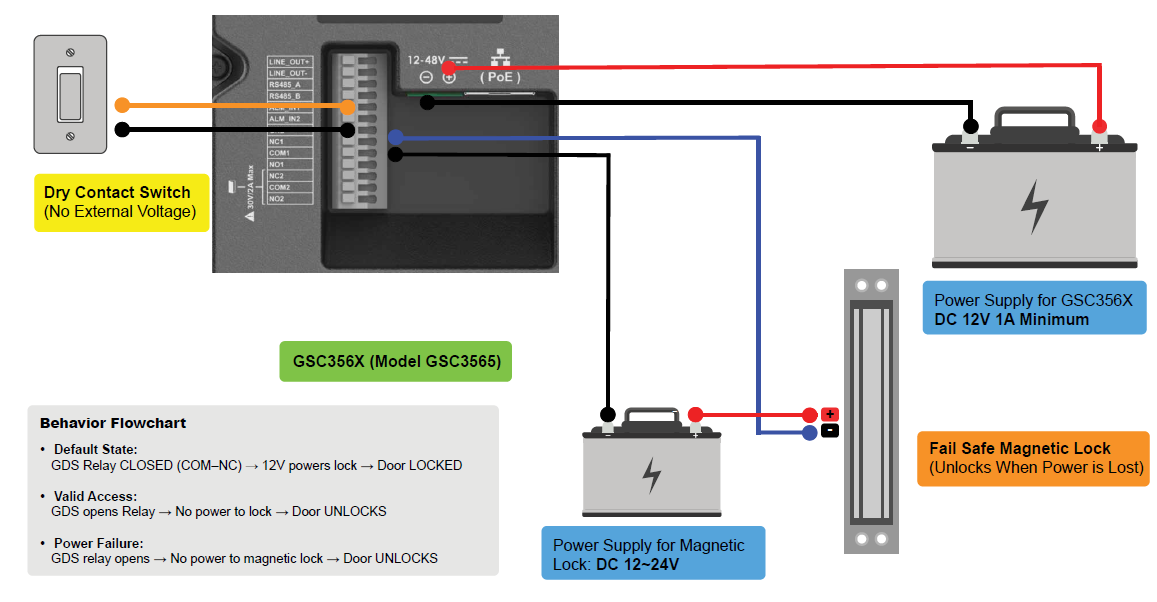
GSC356X with Fail-Safe Magnetic Lock and Dry Contact Switch
Pins used: For the magnetic lock → NC (Normally Closed) and COM (Common), for the dry contact switch → ALARM1 (Alarm input 1) and GND (Ground).
Fail-safe locks stay locked when powered, and unlock when power is cut.
When the GSC356X triggers the relay (e.g., from button press or remote access), it opens the circuit, cutting power and unlocking the door.
This setup is especially effective in environments such as Emergency exits, where doors must remain locked by default and only unlock temporarily when access is granted.
Note:
Avoid wiring Fail-Safe Locks to NO (Normally Open) Without a Timed Cutoff. If the relay stays closed (power applied continuously), the lock may overheat or wear out, especially electromagnetic locks designed for short bursts of power.
GSC356X with Fail Safe Magnetic Lock and Dry Contact Switch
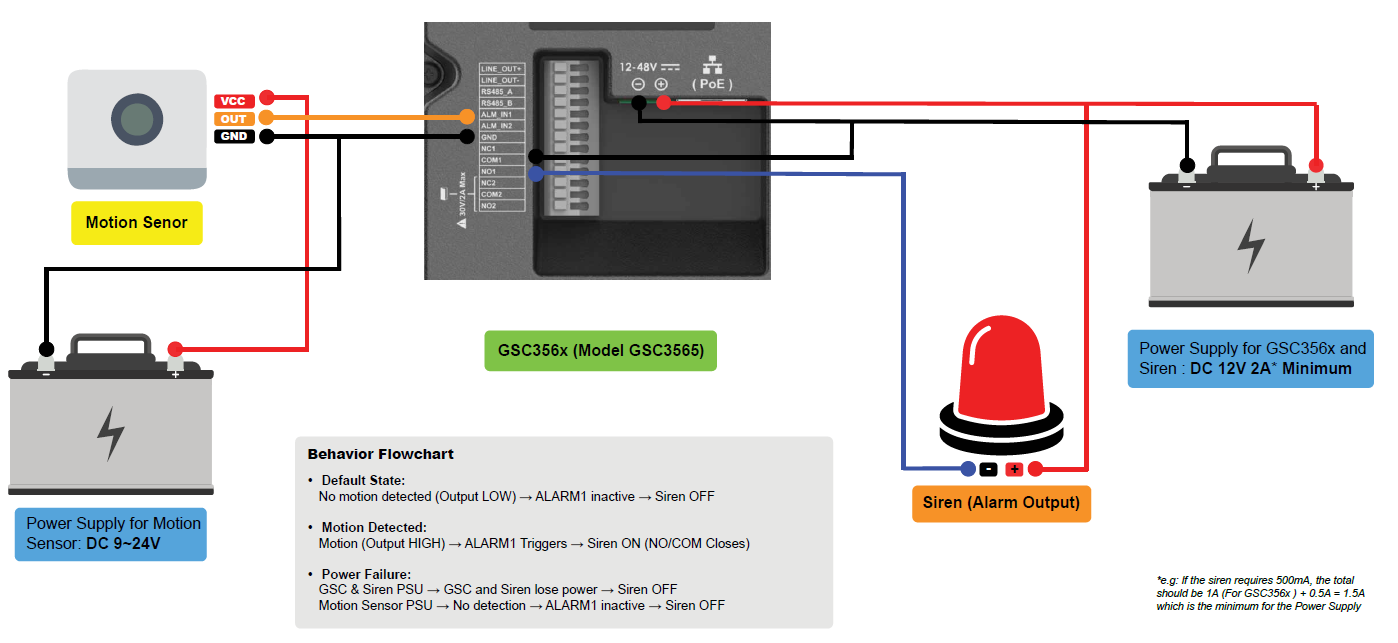
GSC356X with Siren and Motion Sensor
Pins used: For the siren → NO (Normally Open) and COM (Common), for the motion sensor → ALARM1 (Alarm input 1) and GND (Ground).
Most electronic sirens are active when powered.
When the GSC356X triggers the relay (e.g., due to motion detection or alarm input), the NO contact closes with COM, powering the siren.
Note:
If you accidentally wire a siren to NC (Normally Closed), it will sound continuously, unless the relay is activated to break the circuit. This is typically not desired for siren applications.
GSC356X with Siren and Motion Sensor
Secure Open Door Peering with GSC357x
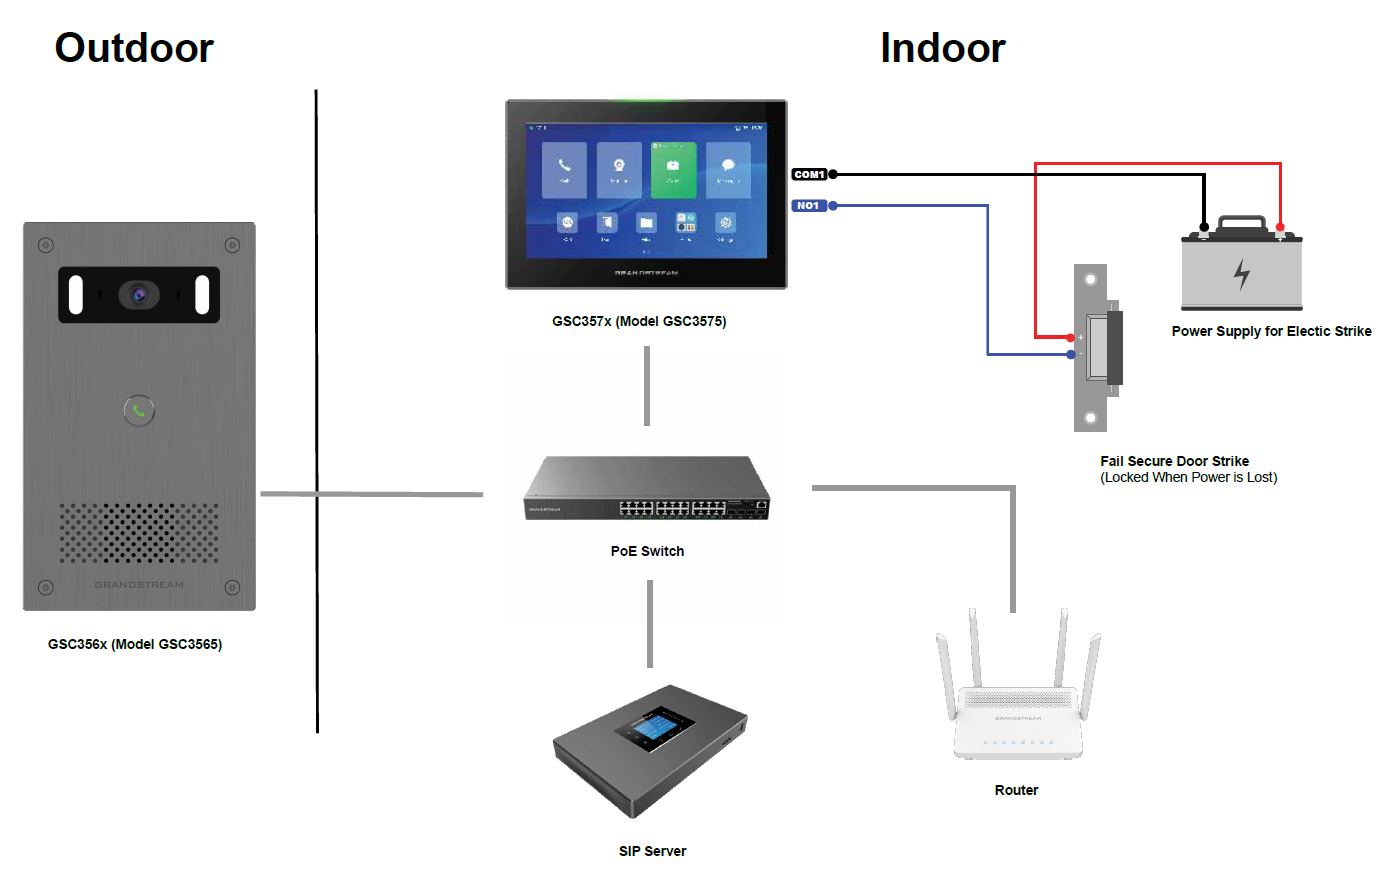
In this enhanced access control setup, the GSC357x Series functions as the secure internal relay controller for unlocking doors, with the GSC356X door system installed outside. This configuration is ideal for increasing physical security by relocating the unlocking relay circuit indoors, where it is less vulnerable to tampering.
In this section, we will be using the GSC3575 control station with the GSC3565 door intercom for secure open door peering (SIP-Based Connection).
GSC356X is installed outside the entry point (e.g., main gate or door).
GSC3575 is installed indoors, beyond the secured entry.
The electric lock or strike is connected to the GSC3575’s Alarm_Out (relay) interface, not the GSC356X device.
Communication between devices is established using SIP accounts registered to a SIP server.
This configuration ensures secure access control by moving the unlocking relay indoors while utilizing centralized SIP server management.
GSC357x Secure Open Door with GSC356X
GSC356X Configuration Steps
Log in to GSC356X Web UI
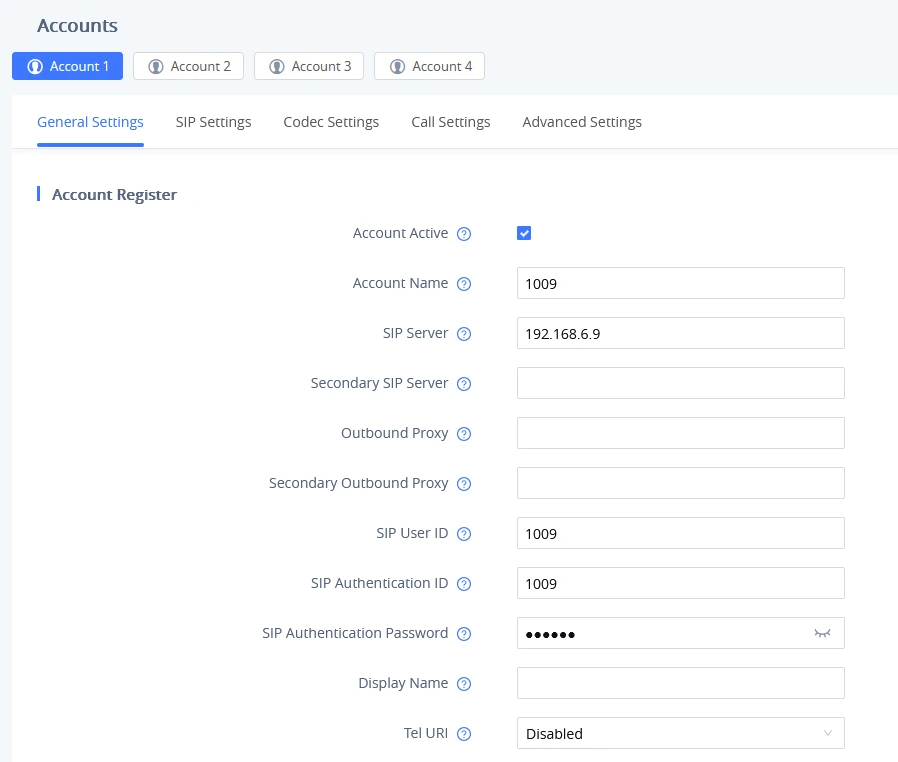
Under Account 1 Settings, register to the SIP server using the SIP credentials.
GSC356X Account Registration
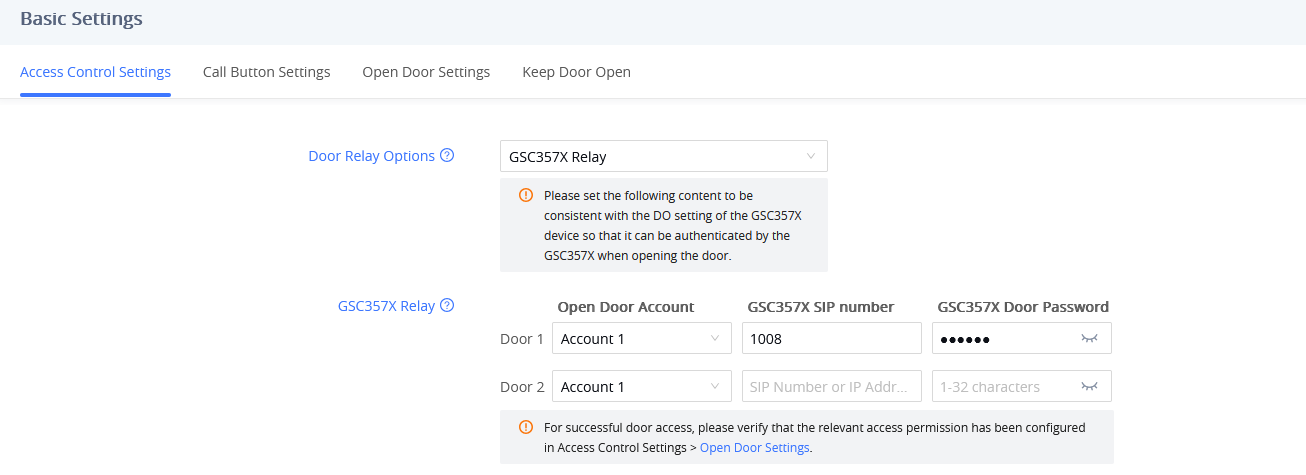
Navigate to Access Control Settings → Basic Settings:
Set Door Relay Options to “GSC357X Relay”
Set Account to Account 1.
Set the GSC357X SIP number to its SIP extension.
Set a GSC357X Door Password (shared with GSC3575)
GSC356X GSC Relay Configuration
GSC357x Configuration Steps
Log in to GSC357x Web UI.
Register the GSC357x account on the same SIP server as the GSC356X.
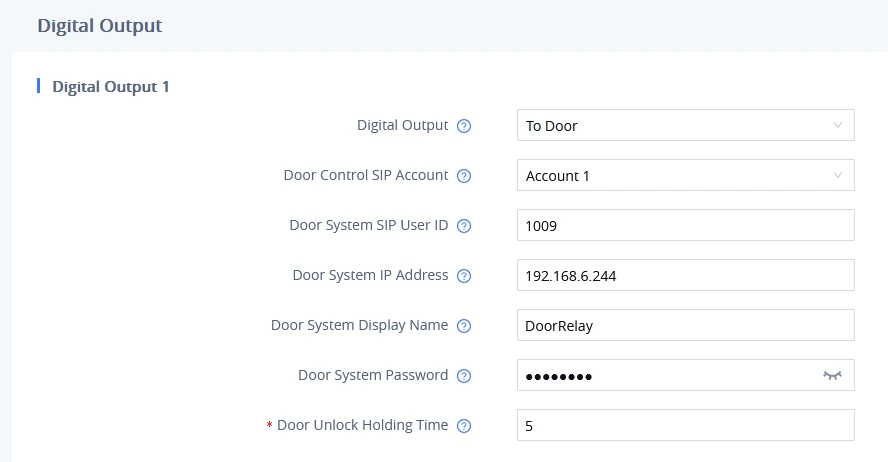
Navigate to Settings → Digital Output:
Set Output Mode to “To Door”.
Set Door Control SIP Account to Account 1.
Set Door System SIP User ID to GSC356X SIP extension.
Set the Door System IP Address to the GSC356X IP.
Set Door System Password (same as on GSC356X).
GSC357x Digital Output Settings
GSC356X BUILT-IN ALARM FUNCTIONS
The GSC356X Series includes a range of built-in alarms that can detect security events such as tampering, unauthorized access, or environmental conditions. These alarms trigger user-defined response actions through configurable Alarm Profiles.
Each alarm event can be linked to one profile set under the Alarm Action Profile section in the GSC356X web UI. A profile defines which combination of responses should occur when an alarm is triggered.
Intrusion/Loitering Alarm (GSC3565)
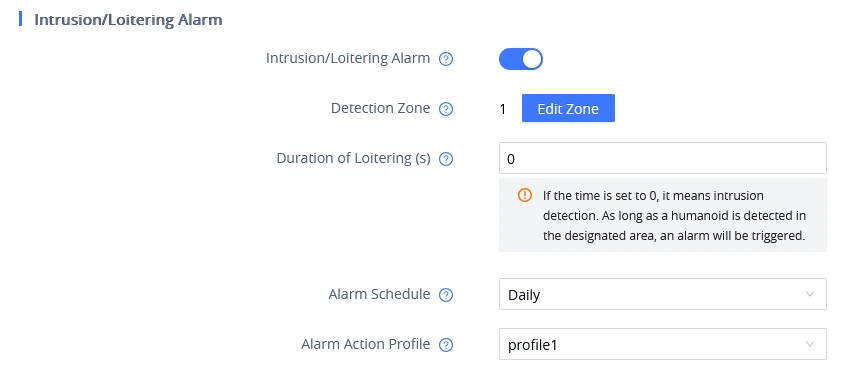
This alarm monitors designated zones in the camera’s field of view for unauthorized presence.
IntrusionLoitering Alarm GSC3565
Users can configure the following:
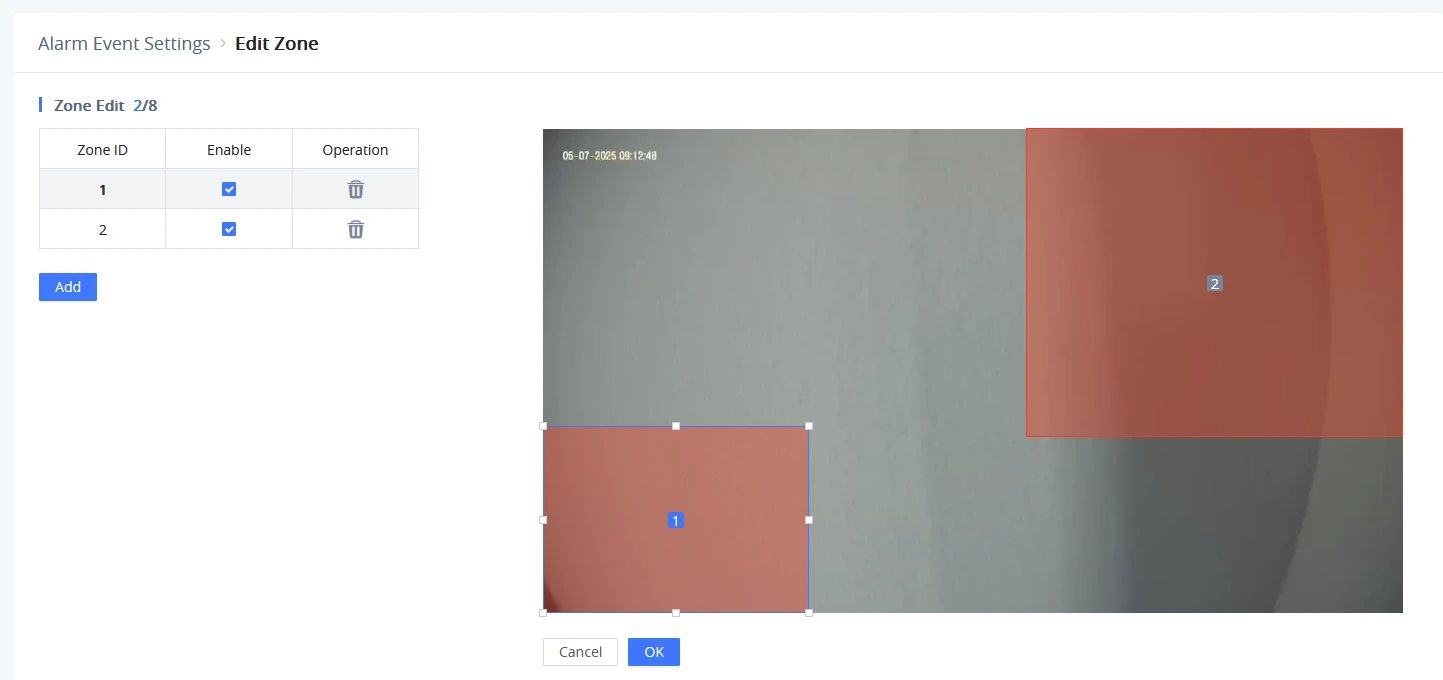
Zone Configuration: Up to 8 zones can be configured for intrusion or loitering detection.
Duration of Loitering (s): Specifies the time a person must stay within a zone to trigger a loitering alarm. If set to 0, the system will act as an intrusion alarm, triggering as soon as a humanoid is detected.
Alarm Schedule: Defines the active monitoring period for the intrusion/loitering detection. (e.g., Office hours)
Custom Alarm Tone: Enables customization of the audio alarm tone. (An audio alarm action profile must be assigned for the intrusion/loitering alarm to hear this prompt)
Alarm Prompt Tone: Configures the alarm prompt tone that will play when an alarm is triggered. (Supported audio file formats: mp3, wav, ogg, wma, mid, m4a)
Play Rules: Specifies how the alarm will play when triggered by choosing one of the following methods:
Maximum Duration: Sets the maximum time the alarm can play.
Number of Loops: Sets how many times the alarm will repeat (up to 10 times).
IntrusionLoitering Alarm Settings
Tamper Alarm
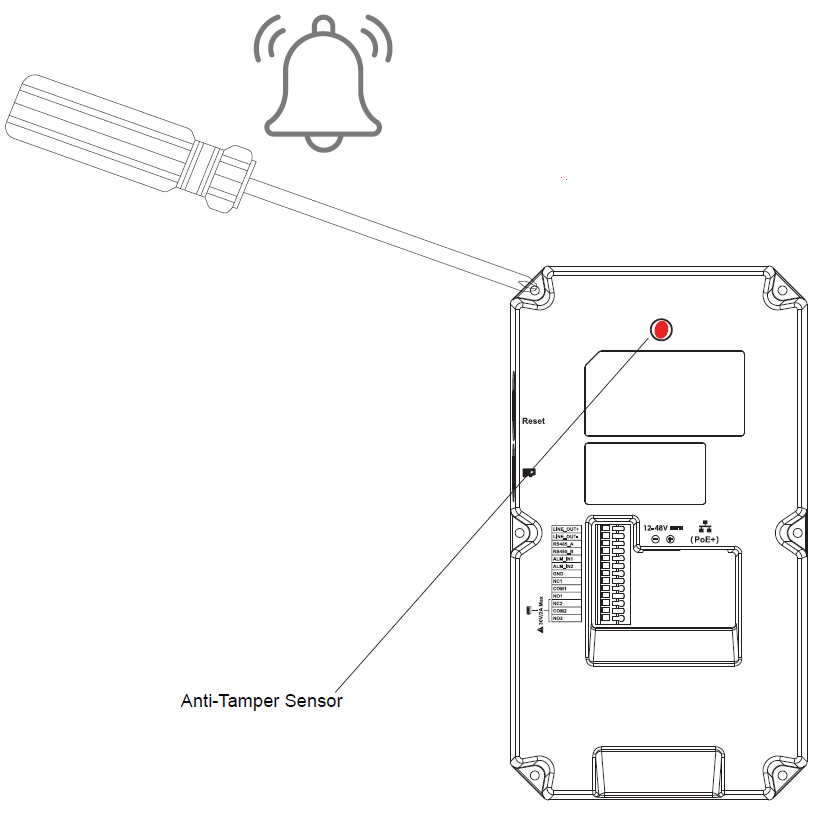
The GSC356X is equipped with a mechanical tamper detection button on the back panel that triggers an alarm if the device is forcefully detached or tampered with.
Tamper Alarm
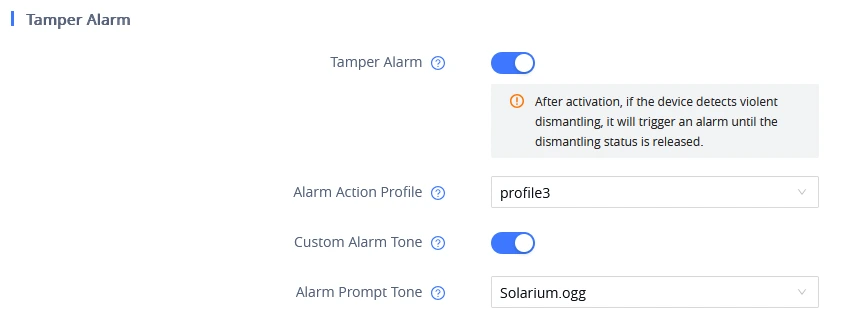
For tamper alarm settings, users have the option to either customize their own alarm tone or select from a predefined system list by using the following parameters:
Custom Alarm Tone: Enables customization of the audio alarm tone. (An audio alarm action profile must be assigned for the tamper alarm to hear this prompt).
Alarm Prompt Tone: Configures the alarm prompt tone that will play when an alarm is triggered. (Supported audio file formats: mp3, wav, ogg, wma, mid, m4a)
Tamper Alarm Settings
Remote Unlock Wrong Password Alarm
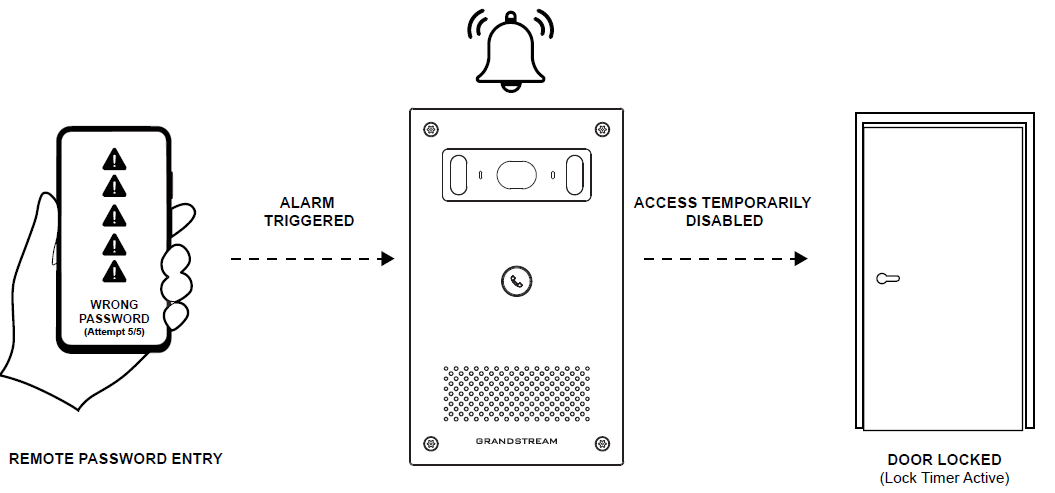
The Remote Unlock Wrong Password Alarm improves security for remote access methods such as SIP calls, HTTP API, or mobile app unlock. This feature prevents brute-force attempts or repeated incorrect password entries when unlocking doors remotely through the SecureAccess app.
When a user enters an incorrect password five consecutive times during a remote unlock attempt, the system will automatically trigger the configured alarm action. Additionally, the device will temporarily disable remote door opening for a specified lock time to prevent further unauthorized attempts.
Remote Unlock Wrong Password Alarm
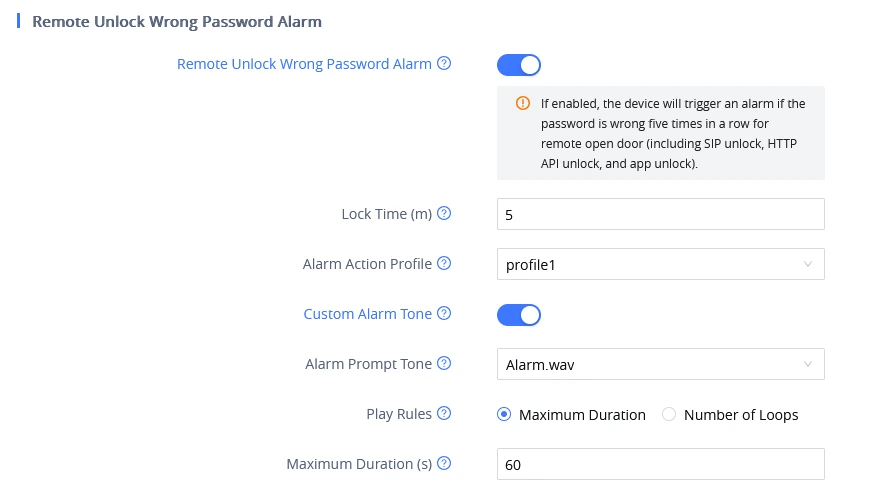
To enable this alarm, navigate to Alarm Event Settings → Remote Unlock Wrong Password Alarm and configure the following parameters:
Lock Time (m): Defines the period (in minutes) that the remote door opening is locked after the alarm is triggered. Once this time expires, the counter resets, and remote unlock attempts are re-enabled.
Alarm Action Profile: Assigns the set of actions (e.g., trigger relay, SIP Alarm, Email Alarm) that the alarm will perform when activated.
Custom Alarm Tone: Enables uploading and selecting a personalized alarm sound.
Alarm Prompt Tone: Plays a predefined or uploaded prompt tone when the alarm is triggered (Supports MP3, WAV, OGG, WMA, MID, M4A).
Play Rules: Defines how the alarm behaves when triggered:
Maximum Duration (s): The maximum number of seconds the alarm will sound.
Number of Loops: Specifies how many times the alarm will repeat (up to 10 times).
Remote Unlock Wrong Password Alarm Settings
High Temperature Alarm
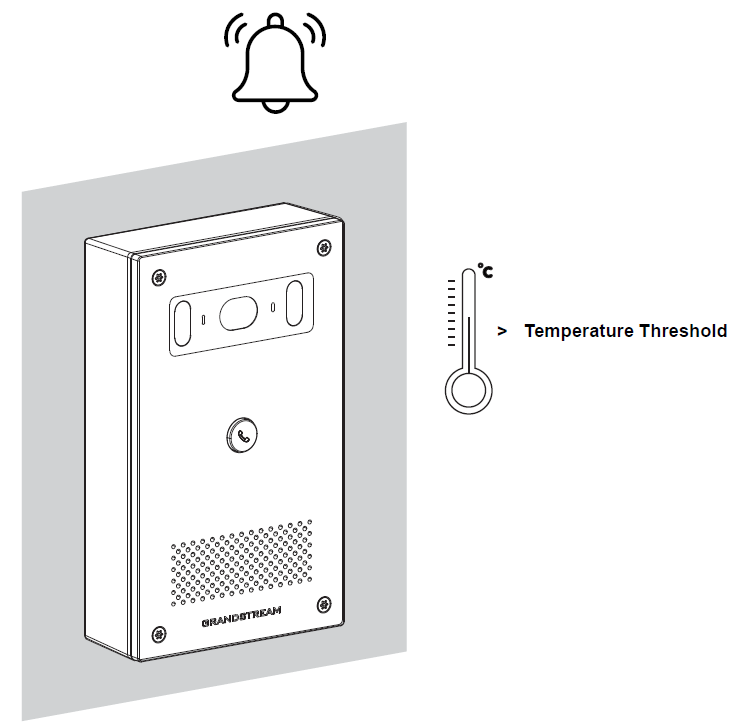
The GSC356X utilizes an internal sensor that detects excessive heat and triggers an alarm to protect the device from overheating.
High Temperature Alarm
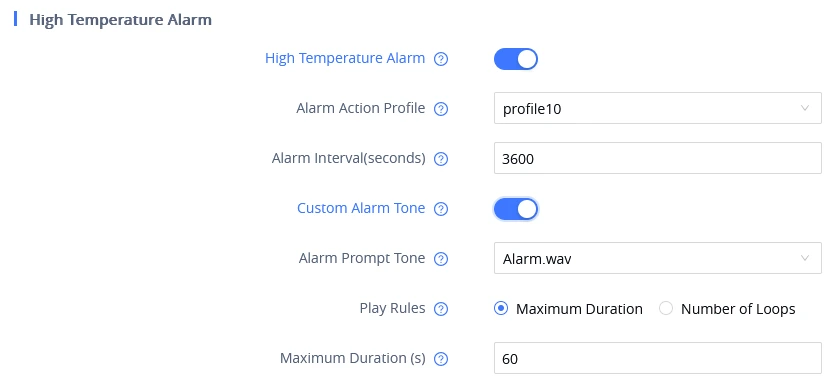
Users can enable and configure the High Temperature Alarm under Alarm Event Settings → High Temperature Alarm, where they can set a Custom Alarm Tone and the Alarm Interval (seconds) to control how frequently the alarm is triggered.
High Temperature Alarm Settings
Silent Alarm
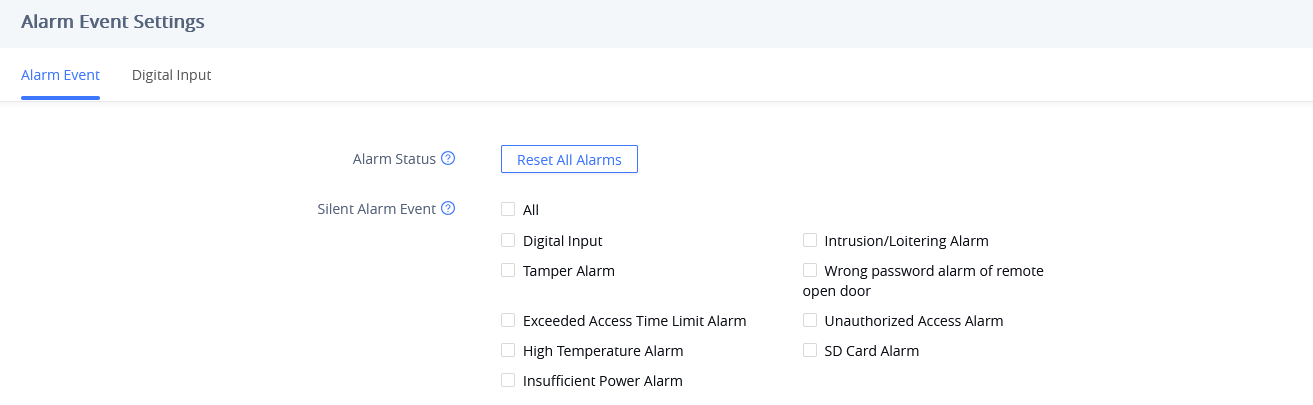
Users can specify which alarms should operate in silent mode, triggering the assigned actions without producing an audible sound. This is useful in scenarios where discreet alerts are required without disturbing the environment.
To set silent alarms, users can select the events that will trigger the silent alarm under Alarm Event Settings by checking the corresponding check boxes (multiple selections are allowed).
Note:
The Hostage Code Alarm is inherently a silent alarm by design. Therefore, it cannot be selected under the Silent Alarm Event settings.
Silent Alarm Event
Reset All Alarms
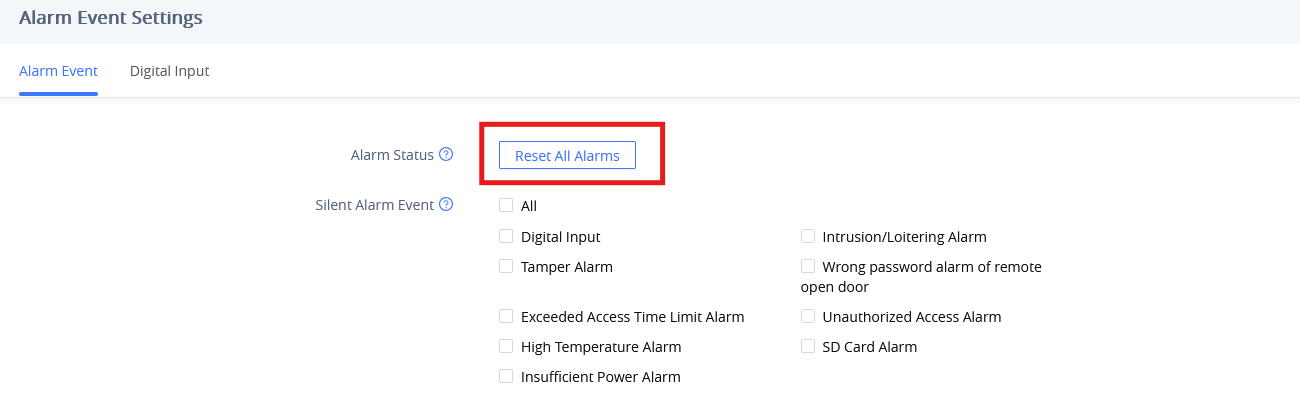
This feature allows users to restore all alarm statuses on the GSC356X device and clear any active alarms with a single click, returning the system to a neutral state and ensuring accurate monitoring.
To reset all alarms, navigate to the Alarm Event Settings page and click the “Reset All Alarms” button.
Reset All Alarms Button
Alarm Profile Association
Each alarm is mapped to a profile number (e.g., Profile 1, Profile 2, etc.) in the GSC356X settings. Each profile defines a set of response actions, such as:
Audio Alarm – Triggers built-in audio alarm.
SIP Alarm – Calls a designated SIP endpoint (e.g., a video intercom).
Linked Alarm Output – Activates relay/digital output (e.g., a siren).
Email Alarm – Sends email notification.
Snapshot Actions – Captures images and performs one or more of the following:
Upload to FTP server
Save locally
Sync Alarm Info to App – Sends the alarm information to the mobile app.
Sync Alarm Info to Home Assistant – Sends alarm event information to the Home Assistant platform for automation and monitoring.
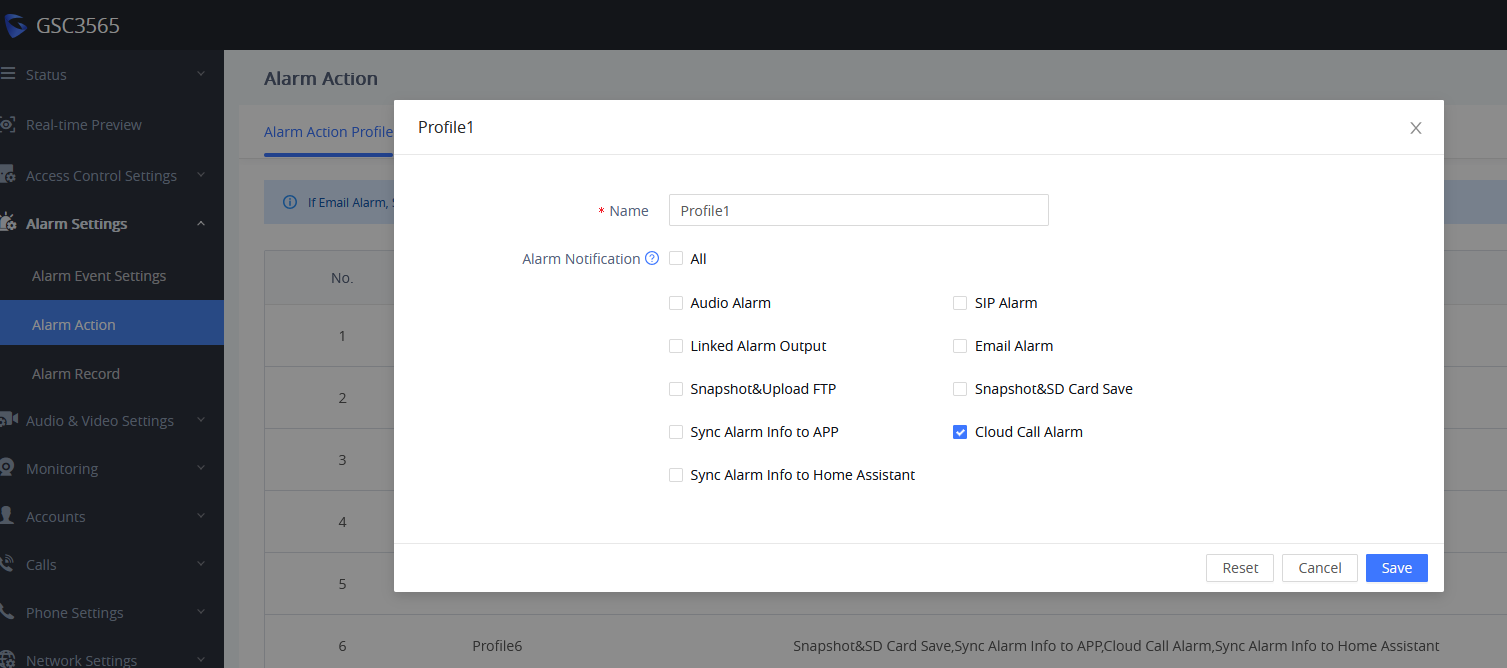
Cloud Call Alarm – Initiates a cloud-based call notification to designated users or devices through the cloud service platform when an alarm event occurs.
Note:
Users can select one or more actions for an alarm by checking the corresponding boxes. To quickly select all available actions, users can check the “All” box.
GSC356X Alarm Action Profile Settings
GSC356X WEB UI SETTINGS
This section describes the options in the GSC356X Web GUI, summarized below:
Status: Display the Account status, Network status, and System Info of the GSC356X.
Real-time Preview: View the live video streams of the GSC356X using your browser.
Access Control Settings: Configure door-related access and output settings, including door unlock methods, doorbell behavior, door opening schedules, and access logs that record all door entry activities.
Alarm Settings: Configure digital alarm input settings, built-in GSC356X alarm functions, action profiles, notification settings, alarm scheduling, and view logs of all triggered alarms.
Audio & Video Settings: Configure audio settings and video-related functions such as OSD (On-Screen Display), CMOS parameters, and privacy masking.
Monitoring: Configure ONVIF and RTSP settings for video streaming and integration with third-party systems.
Account Settings: Configure the SIP account settings for the GSC356X.
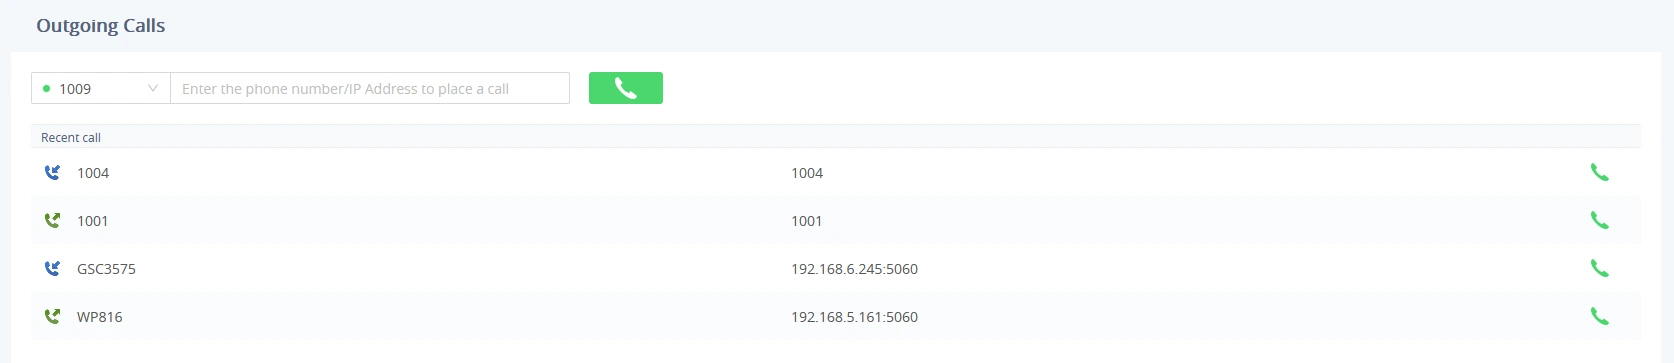
Calls: Place outgoing calls directly from the Web UI, review call history logs, and manage the call allowlist for enhanced control over incoming and outgoing call permissions.
Phone Settings: Configure various call-related features such as ringtones, auto answer, DND options, multicast paging, and other preferences.
Network Settings: Configure network-related parameters, including IPv4 address mode (DHCP, Static, PPPoE), Wi-Fi settings, and advanced options such as OpenVPN® for secure remote access.
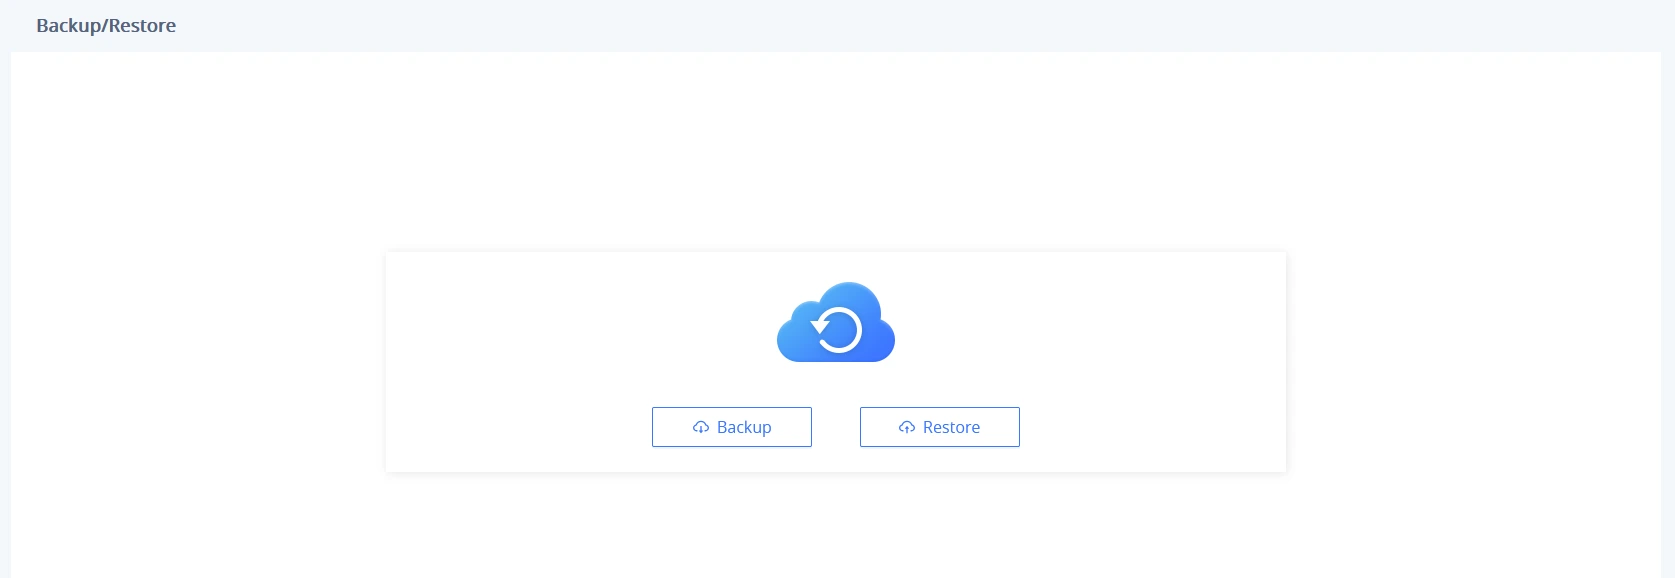
System Settings: Manage system-level configurations such as time, Web/SSH access permissions, LED behavior, audio control, TR-069, backup and restore, email notifications, and FTP settings.
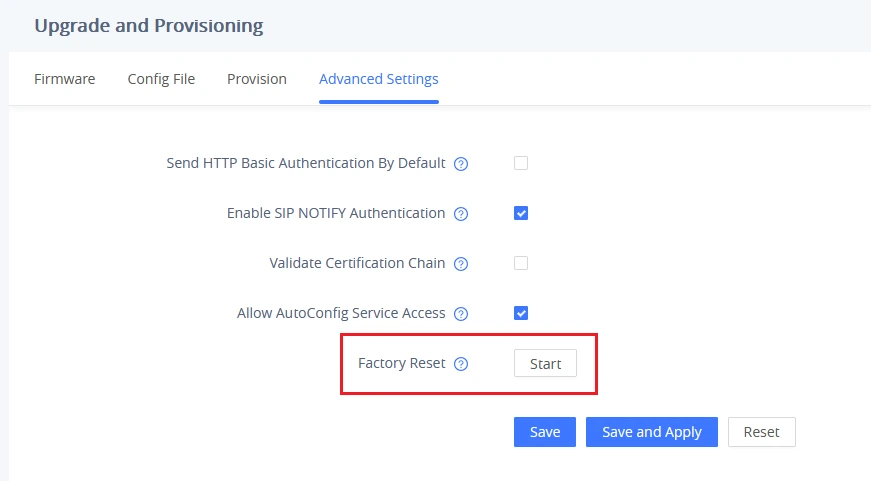
Maintenance: Perform system maintenance tasks, including firmware upgrades, configuration provisioning, factory reset, event notification setup, and system diagnostics.
Application: Configure account sharing on the GSC356X to synchronize SIP credentials with other supported Grandstream devices.
Diagnostic: Provides built-in tools to test and verify device functionality, such as microphone test, relay out test, tamper test, etc.
Status Page Definitions
System Info
System Info→Information
Product Model
Product model of the GSC356x.
Part Number
Product part number.
Software Version
Software Version
Boot: boot version number.
Core: core version number.
Prog: program version number. This is the main firmware release number, which is always used for identifying the software system of the GS356x.
Locale: locale version number.
Res: Resolution version number.
IP Geographic Information
Recommend Time Zone
Represent the time zone detected based on the IP address.
System Time
System Up Time
System up time since the last reboot.
System Time
Current system time on the GSC356x system.
System Time-Zone
Displays the time zone that is configured by user.
SD Card Storage Status
Total Space
Displays the total space of the connected SD card.
Used Space
Displays the used space of the connected SD card.
Available Storage
Displays the available space of the connected SD card.
PoE Detection
PoE Status
Indicates that the device is powered using Power over Ethernet (PoE).
System Information
Download System Information
Click to download system information.
Security Version
Displays the GSC356x security version.
System Info→Status
User Space
Shows the percentage of the user space used and the status of the Database.
Core Dump
Shows the status of the core dump and the core dump files generated if any. It also gives the ability to generate GUI/AVS/CPE/Phone core dump files manually.
Special Feature
OpenVPN® Support: displaying if the GSC356x supports OpenVPN®.
System Info→Cloud Service
Cloud Service
The Cloud Service page under System Info displays information about the device’s cloud service registration and associated subscription packages. It allows administrators to view the organization to which the device belongs, check the status of assigned cloud service packages, and monitor package expiration dates. This information helps verify that the device is properly enrolled in cloud-based services and that the required licenses remain active.
Clicking A description of the package opens the SecureAccess License Fees page, which provides detailed information about the selected subscription package, including its features, supported services, license scope, and subscription details. This allows administrators to understand the capabilities and benefits included in their current SecureAccess plan.
Network Status
Network Status→Ethernet
LAN Port
Indicates the current status and speed (e.g., 100Mbps/Full) of the device’s LAN connection.
MAC Address
Displays the unique hardware address assigned to the device’s Ethernet interface.
PPPoE Link Up
Shows whether the PPPoE connection is established.
IPv4
IPv4 Address Type
Indicates how the IPv4 address is obtained (e.g., DHCP, Static, PPPoE).
IPv4 Address
Displays the current IPv4 address assigned to the device.
Gateway
Shows the IPv4 default gateway used for routing external traffic.
IPv4 NAT Type
Displays the Network Address Translation type.
IPv6
IPv6 Address Type
Indicates how the IPv6 address is assigned (e.g., Auto Config, Static).
Global Unicast Address
The device’s public IPv6 address used for external communication.
Link-Local Address
An automatically assigned local IPv6 address valid only within the local network segment.
IPv6 Gateway
Shows the default IPv6 gateway address.
IPv6 DUID
DHCP Unique Identifier used for IPv6 DHCP communication.
IPv6 NAT Type
Indicates the IPv6 NAT behavior.
Network Status→DNS & NAT
DNS Server
Displays the Primary and secondary DNS servers used
DNS Mode
Displays the DNS mode used by each account
NAT Traversal
Displays the NAT traversal mode used
Account Status
Account
Account index, shows the list of supported accounts. 4 acounts are supported, the 4th account is dedicated for cloud account management.
SIP User ID
Displays the configured SIP User ID for the account.
SIP Server
Displays the configured SIP Server address, URL or IP address, and port of the SIP server.
Operation
Displays the different types of operations that can be performed on each SIP account, including editing the account, accessing the voicemail….
Real-time Preview Page Definitions
Note
This configuration is exclusive for the GSC3565 model.
Stream 1
Displays the first video stream from the GSC356x real-time preview. The default set resolution is 1920*1080.
Stream 2
Displays the second video stream from the GSC356x real-time preview. The default set resolution is 1280*720.
Redirects to the RTSP stream page to configure the prefrences for stream 1 and stream 2.
Allows to refresh the video stream.
Allows speed dialing by selecting both the calling account and the destination phone number or IP address.
Adjusts the brightness for both streams.
Adjusts the contrast for both streams.
Adjusts the saturation for both streams.
Opens the stream in full-screen mode.
Access Control Settings Page Definitions
Basic Settings
Access Control Settings
Access Control Settings Basic Settings Access Control Settings
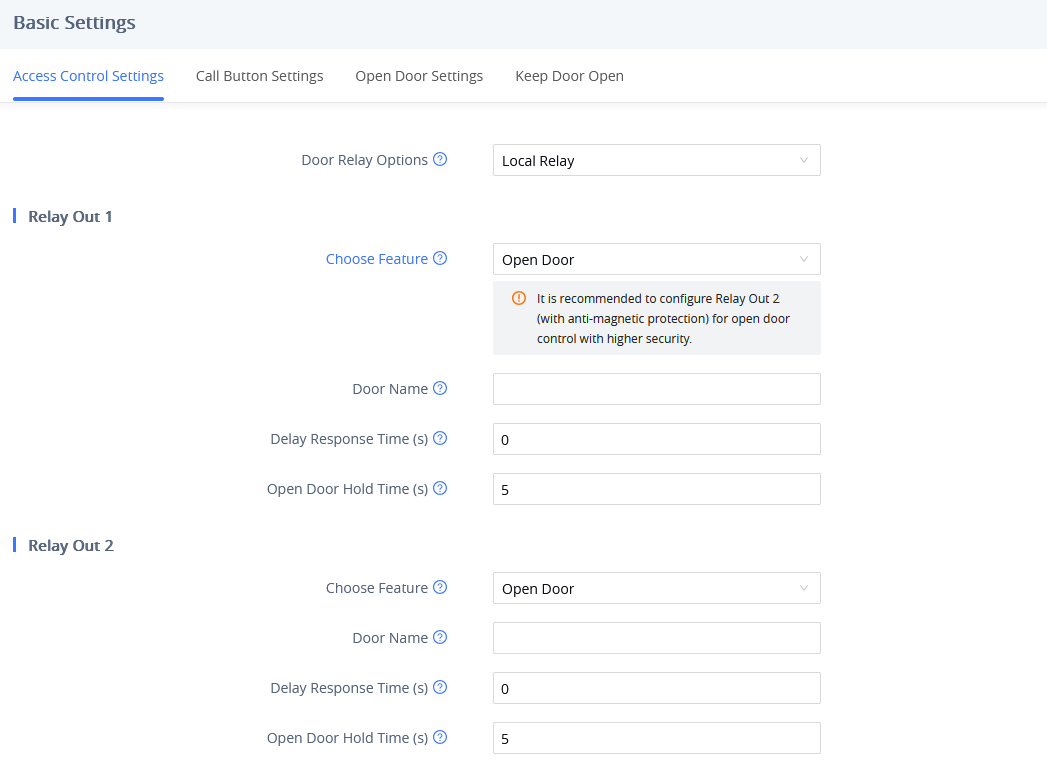
Door Relay Options
Configure the door relay option:
Local Relay: Local Relay refers to the GSC356X controlling the relay. The strike is connected to either the COM1 or COM2 port, depending on whether one or two doors need to be controlled.
Web Relay: Triggers URLs for controlling the door relay. The configured web relay will get the communication from GSC356X, and will operate the strike to open door for the authenticated open door request
GSC357X Relay: Allows connecting a GSC357X control station to ensure consistency with the DO digital output on the GSC357X. This requires entering the phone number and door password for proper integration and relay control.
The default setting for the door relay option is “Local Relay”.
WebRelay On URL
Enter the URL that is triggered to activate (turn on) the door relay through WebRelay.
WebRelay Off URL
Enter the URL that is triggered to deactivate (turn off) the door relay through WebRelay.
WebRelay Username
Enter the username required for authentication when accessing the WebRelay URLs for controlling the door relay.
WebRelay Password
Enter the password associated with the WebRelay Username, used for authentication to control the door relay via the WebRelay URLs.
GSC357X Relay
Configures the following GSC357x relay information:
Open Door Account: The account from the GSC356X side used to control the door relay.
GSC357X SIP number: The SIP number associated with the GSC357X control station
GSC357X Door Password: A password set on both the GSC356X and the GSC357X control station that is required to open the door.
Relay Out 1 / Relay Out 2
Choose Feature
Selects the function of this relay output for the GSC356X. The Options include:
Alarm Output: Configures the relay to trigger an external alarm device.
Open Door: Configures the relay to control a door strike or lock for access control.
The default feature is “Open Door”. Note: Only Relay Out 2 supports SSR (Solid-State Relay) functionality. For enhanced security, it is recommended to use Relay Out 2, which includes anti-magnetic protection, for door lock control and door opening operations.
Door Name
Enter the door name to be used with the Open Door feature.
Delay Response Time (seconds)
The time delay between receiving a door open command and activating this relay to unlock the door. The valid range is 0 to 20 seconds and default value is 0 which means instant.
Open Door Hold Time (s)
The duration in which this relay remains active (i.e., how long the door stays unlocked) before automatically locking again. The valid range is 1 to 1800 seconds and default value is 5.
State
Sets the default state of this alarm relay output. The options are:
Always On: The relay is normally open and closes when triggered.
Always Off: The relay is normally closed and opens when triggered.
Alarm Duration (seconds)
The duration that this alarm output remains active when triggered. The valid range is 1 to 1800 seconds and default value is 5.
Snapshot
Snapshot Type
Specifies when the device captures an image. Options include:
Open Door Snapshot: Takes a snapshot when the door is opened.
Doorbell Snapshot: Takes a snapshot when the doorbell button is pressed.
Both options are enabled by default.
Number of Snapshotd Photos
Specifies how many photos will be taken per snapshot event. The default number is 4.
Snapshot Storage Method
Determines where the snapshots are stored (FTP, Local).
Snapshot when Door Opened
Select the notification method of door opening snapshot.
APP notification: Requires device management by the APP.
Sets a delay (in seconds) before taking a snapshot after the doorbell is pressed. The valid range is 0 to 10 seconds and default value is 0.
Home Assistant
Home Assistant
Once enabled, devices can be discovered, monitored, and managed through the Home Assistant platform. Enabled by default
Call Button Settings
Access Control Settings Basic Settings Call Button Settings
Call Out Account
Specifies the SIP account used to place the call when the doorbell is pressed. The default setting is “Auto”.
Call Button Mode
Defines the action triggered when the doorbell is pressed. Options include:
Call the Specified Number: Initiates a call to the configured number, IP address, or SIP extension.
Relay Out: Triggers the configured relay output.
Both: Calls the specified number and triggers the relay output.
The default option is “Call the Specified Number”.
Call Mode
Determines how calls are placed to multiple numbers when the doorbell is pressed. Options include:
Serial Hunting: Calls the listed numbers one by one in sequence until one answers.
Parallel Hunting: Calls all listed numbers simultaneously; the call is connected to the first one that answers.
The default option is “Serial Hunting”.
Calling Timeout(s)
Specifies the timeout for calling a single number. If the remote party does not answer within this time, the call will automatically disconnect. The valid range is 10 to 90, and the default value is 60 seconds.
Note: This setting takes precedence over the call timeout configured in the account settings.
Number Called When Doorbell Pressed
Defines the phone number, IP address, or SIP extension that the device will call when the doorbell is pressed, based on the table below:
Index ID: A unique identifier for each call number configuration (up to 4 different index IDs can be set).
Schedule: Specifies the schedule for when the call number is active (e.g., daily, schedule1, schedule2, etc).
Call Number: The phone number, IP address, or SIP extension to be called when the doorbell is pressed (up to 15 numbers can be configured).
Cloud Call Number (up to 5): Specifies cloud-based call numbers that can be used for remote access or communication (up to 5 numbers can be configured).
Operation (Edit/Delete): Allows the user to modify (edit) or remove (delete) the call number entries from the configuration.
Enable Call Button to End Call
When enabled, which is the default setting, pressing the call button again will end the current active call.
Open Door Settings
Access Control Settings Basic Settings Open Door Settings
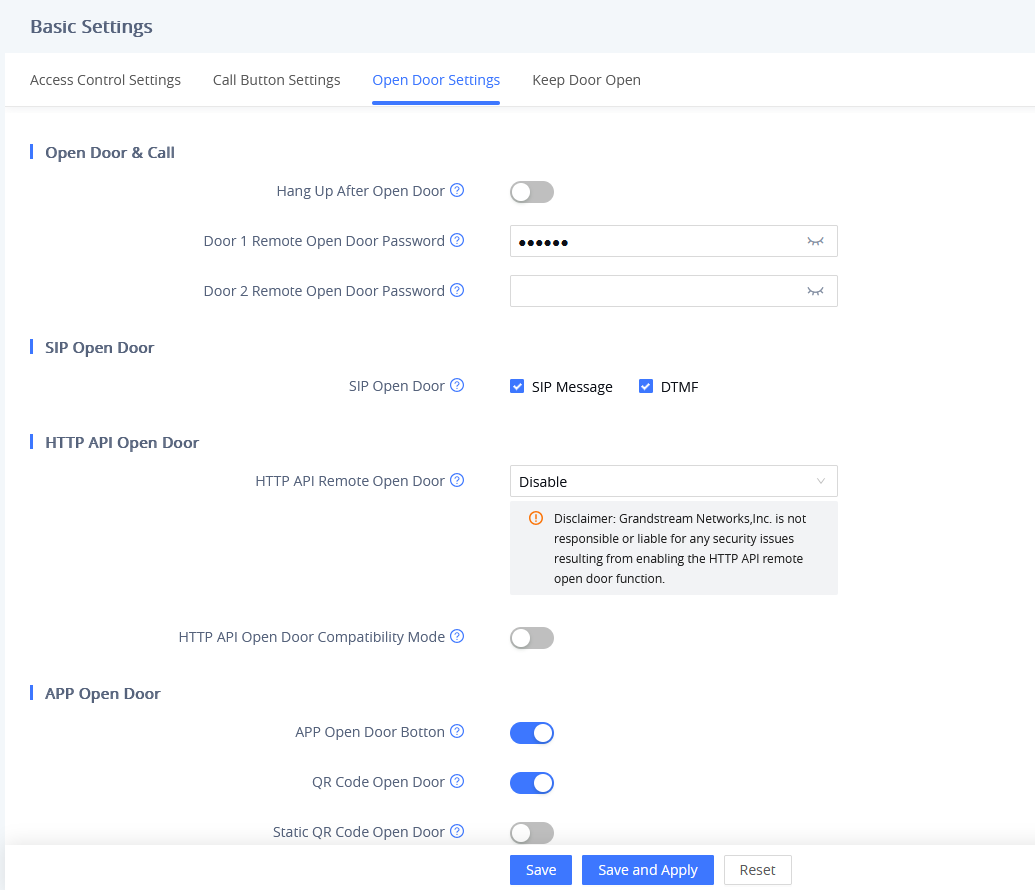
Hang Up After Open Door
If enabled, the call (excluding ringing) will automatically end when the door is opened.
Enabled by default.
Call Hang Up Delay After Door Open (s)
Sets the time to automatically end the call after the door is opened.. The valid range is 3 to 1800 and the default value is 3.
Door 1 Remote Open Door Password
Specifies the password required to remotely unlock Door 1.
Door 2 Remote Open Door Password
Specifies the password required to remotely unlock Door 2.
SIP Open Door
Enable SIP Open Door
Enables the use of a PIN code (sent via SIP Message or DTMF tones) to remotely open the door. The default option is “SIP Message” only.
HTTP API Open Door
Enable HTTP API Remote Open Door
Configures the method for remotely opening the door via the HTTP API. Options include:
Disable (default): Disables the HTTP API for remote door opening.
Challenge+Response Authentication: Requires a challenge-response process for authentication before the door is opened.
Basic Authentication: Requires a username and password for authentication before the door is opened.
! Disclaimer: Grandstream Networks,Inc. is not responsible or liable for any security issues resulting from enabling the HTTP APl remote open door function.
HTTP API Open Door Compatibility Mode
Enables compatibility with HTTPS for HTTP API calls. When enabled, the system supports secure HTTPS mode for opening the door remotely via the API. Disabled by default.
APP Open Door
APP Open Door Button
Enables or disables the use of the button within the mobile app to open the door.
QR Code Open Door
If enabled, the QR code generated by the app will be used to open the door.
Static QR Code Open Door
If enabled, the door can be opened using a static QR code generated by the app.
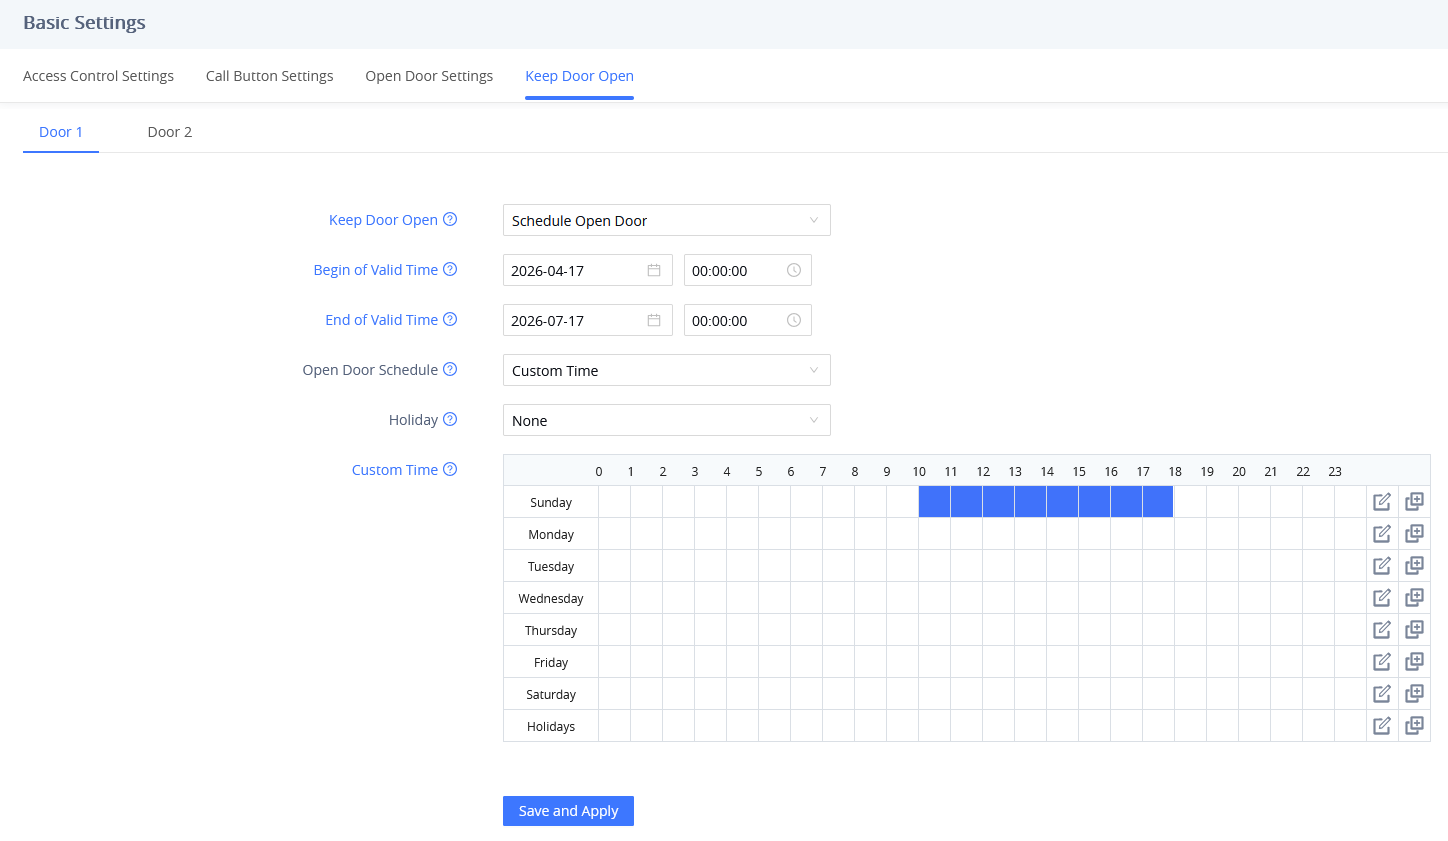
Keep Door Open
Access Control Settings Basic Settings Keep Door Open
Door 1 / Door 2
Keep Door Open
Configures the door to remain open. Options:
Disable (default): Disable keeping the door open.
Immediate Door Open: The door will open immediately without a schedule.
Schedule Open Door: The door will open based on a pre-configured schedule.
Duration to Keep Door Open (m)
Specifies the time duration (in minutes) to keep the door open.
Keep Door Open Time
Logs the time for which the door will remain open after being triggered.
Begin of Valid Time
The start time of the scheduled period during which the door can remain open.
End of Valid Time
The end time of the scheduled period during which the door can remain open.
Open Door Schedule
Defines the schedule type for opening the door, with options like specific schedule slots (e.g., schedule1, schedule2).
Include Holiday
When enabled, the configured open door schedule also applies on the selected holiday.
Custom Time
A table that allows setting custom time rules when Open Door Schedule is set to “Custom Time”, enabling the user to define specific intervals during which the door will remain open.
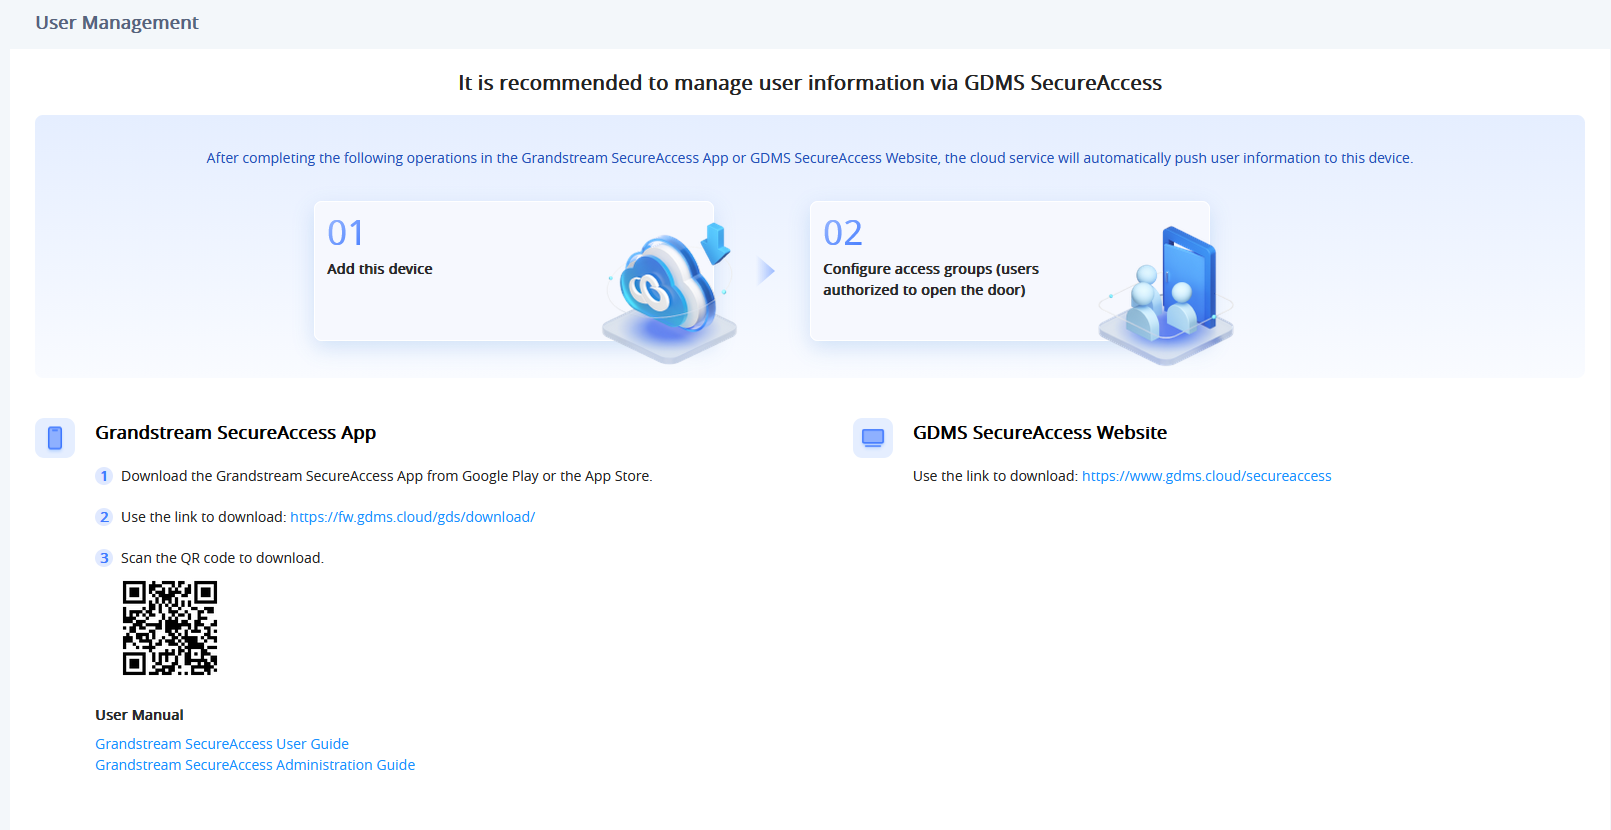
User Management
The User Management section is designed to simplify and centralize the management of users authorized to interact with the device through Grandstream’s cloud platform. Instead of configuring users locally, administrators are encouraged to use GDMS SecureAccess or the SecureAccess mobile app to add the device and define access groups, users, and permissions. Once configured in the cloud, all user data—including credentials and access rights—is automatically synchronized and pushed to the device, ensuring consistent, scalable, and remotely manageable access control across deployments.
User Management
Open Door Record
Export
Export open door record as .csv file.
Clear
Clear open door record.
No.
The record number or identifier for each door opening event in the system.
Open Door Type
Specifies the method used to open the door such as Keep Door Open, and SIP Open Door.
Door information
Door being accessed (door1/door2).
Open DoorTrigger
Indicates the source that initiated the door opening event
Keep Door Open Time
The date when the door remained open after being triggered.
End of Valid Time
The time when the scheduled door access or open period ends.
Operation
Provides actions that can be performed on the record, such as delete, or view details.
Alarm Settings Page Definitions
Alarm Event Settings
Alarm Event Settings→Alarm Event
Alarm Status
Click to restore all alarm statuses on this GSC356x device and clear active alarms.
Silent Alarm Event
Specifies which types of alarm events will trigger a silent alarm (multiple choices are supported):
None(No alarm will be silent)
All (All Alarms will be silent)
Digital Input
Tamper Alarm
Exceeded Access Time Limit Alarm
High Temperature Alarm
Insufficient Power Alarm
Intrusion/Loitering Alarm
Wrong password alarm of remote open door
Unauthorized Access Alarm
SD Card Alarm
The default setting is “None”.
Intrusion/Loitering Alarm
Intrusion/Loitering Alarm
Enables or disables the intrusion or loitering detection alarm.
Disabled by default.
Detection Zone
Allows configuration of up to 8 zones in the camera view where intrusion or loitering is monitored.
Duration of Loitering (s)
Sets the time (in seconds) a person must stay in a zone to trigger the alarm. The valid range is 3-300 or 0, and the default vaue is 10 seconds.
Note: If set to 0, an alarm is triggered as soon as as a humanoid is detected in the designated area.
Alarm Schedule
Defines when the alarm is active (e.g., daily, schedule1, schedule2, etc.).
Alarm Action Profile
Assigns a pre-configured action profile (up to 10 available) that determines how the system responds to the alarm.
Custom Alarm Tone
Enables customization of the local audio alarm tone. This setting is disabled by default.
Note: An audio alarm action profile must be assigned for this alarm event to hear this prompt.
Alarm Prompt Tone
Configures the alarm prompt tone that will play when this alarm is triggered. (Supported audio file formats: mp3, wav, ogg, wma, mid, m4a)
Play Rules
Specifies how the alarm will play when triggered by choosing one of the following methods:
Maximum Duration
Number of Loops
The default method is “Maximum Duration”.
Maximum Duration (s)
Defines the maximum duration (in seconds) for this alarm event. The valid range is 1 to 3600 and the default value is 60 seconds.
Number of Loops
Sets how many times the alarm will repeat. The valid range is 1 to 10 and the default value is 1.
Tamper Alarm
Tamper Alarm
Enables or disables the tamper alarm that detects physical tampering with the device.
Disabled by default.
Alarm Action Profile
Selects a response profile when a tamper alarm is triggered.
Custom Alarm Tone
Enables customization of the local audio alarm tone. This setting is disabled by default.
Note: An audio alarm action profile must be assigned for this alarm event to hear this prompt.
Alarm Prompt Tone
Configures the alarm prompt tone that will play when this alarm is triggered. (Supported audio file formats: mp3, wav, ogg, wma, mid, m4a)
Wrong password alarm of remote open door
Wrong password alarm of remote open door
Enables/Disables an alarm if the remote door opening password is entered incorrectly multiple times.
When enabled, the device will trigger an alarm if the password is entered incorrectly five times in a row for remote open door operations, including:
SIP unlock
HTTP API unlock
App unlock
This feature is disabled by default.
Lock Time (m)
Specifies the duration, in minutes, that remote door opening is disabled after multiple incorrect password attempts trigger an alarm.
When the lock time expires, the incorrect password count is reset and remote door opening is re-enabled.
Valid range is 1 to 1440, and the default value is 5 minutes.
Alarm Action Profile
Specifies the action profile that will be executed when the remote unlock wrong password alarm is triggered.
Custom Alarm Tone
Enables customization of the local audio alarm tone. This setting is disabled by default.
Note: An audio alarm action profile must be assigned for this alarm event to hear this prompt.
Alarm Prompt Tone
Configures the alarm prompt tone that will play when this alarm is triggered. (Supported audio file formats: mp3, wav, ogg, wma, mid, m4a)
Play Rules
Specifies how the alarm will play when triggered by choosing one of the following methods:
Maximum Duration
Number of Loops
The default method is “Maximum Duration”.
Maximum Duration (s)
Defines the maximum duration (in seconds) for this alarm event. The valid range is 1 to 3600 and the default value is 60 seconds.
Number of Loops
Sets how many times the alarm will repeat. The valid range is 1 to 10 and the default value is 1.
Exceeded Access Time Limit Alarm
Exceeded Access Time Limit Alarm
Triggers an alarm if someone attempts to open the door outside of the allowed time.
Disabled by default.
Alarm Action Profile
Specifies the action profile that will be executed when the exceeded access time limit alarm is triggered.
Custom Alarm Tone
Enables customization of the local audio alarm tone. This setting is disabled by default.
Note: An audio alarm action profile must be assigned for this alarm event to hear this prompt.
Alarm Prompt Tone
Configures the alarm prompt tone that will play when this alarm is triggered. (Supported audio file formats: mp3, wav, ogg, wma, mid, m4a)
Play Rules
Specifies how the alarm will play when triggered by choosing one of the following methods:
Maximum Duration
Number of Loops
The default method is “Maximum Duration”.
Maximum Duration (s)
Defines the maximum duration (in seconds) for this alarm event. The valid range is 1 to 3600 and the default value is 60 seconds.
Number of Loops
Sets how many times the alarm will repeat. The valid range is 1 to 10 and the default value is 1.
Unauthorized QR Code Access Alarm
Unauthorized QR Code Access Alarm
Enables or disables the unauthorized access alarm. When enabled, if the same unauthorized QR code fails three times within one minute, an alarm will be triggered.
Disabled by default.
Alarm Action Profile
Specifies the action profile that will be executed when the unauthorized access alarm is triggered.
Custom Alarm Tone
Enables customization of the local audio alarm tone. This setting is disabled by default.
Note: An audio alarm action profile must be assigned for this alarm event to hear this prompt.
Alarm Prompt Tone
Configures the alarm prompt tone that will play when this alarm is triggered. (Supported audio file formats: mp3, wav, ogg, wma, mid, m4a)
Play Rules
Specifies how the alarm will play when triggered by choosing one of the following methods:
Maximum Duration
Number of Loops
The default method is “Maximum Duration”.
Maximum Duration (s)
Defines the maximum duration (in seconds) for this alarm event. The valid range is 1 to 3600 and the default value is 60 seconds.
Number of Loops
Sets how many times the alarm will repeat. The valid range is 1 to 10 and the default value is 1.
High Temperature Alarm
High Temperature Alarm
Enables alarm triggering when the detected device temperature exceeds the supported threshold.
Disabled by default.
Alarm Action Profile
Defines the system’s response to high temperature detection.
Alarm Interval(seconds)
Sets the minimum time interval, in seconds, between consecutive high temperature alarm events.
The valid range is 60 to 3600 and the default setting is 3600 seconds.
Custom Alarm Tone
Enables customization of the local audio alarm tone. This setting is disabled by default.
Note: An audio alarm action profile must be assigned for this alarm event to hear this prompt.
Alarm Prompt Tone
Configures the alarm prompt tone that will play when this alarm is triggered. (Supported audio file formats: mp3, wav, ogg, wma, mid, m4a)
Play Rules
Specifies how the alarm will play when triggered by choosing one of the following methods:
Maximum Duration
Number of Loops
The default method is “Maximum Duration”.
Maximum Duration (s)
Defines the maximum duration (in seconds) for this alarm event. The valid range is 1 to 3600 and the default value is 60 seconds.
Number of Loops
Sets how many times the alarm will repeat. The valid range is 1 to 10 and the default value is 1.
Insufficient Power Alarm
Insufficient Power Alarm
When enabled, an alarm will be triggered if the device is not powered by DC (12-48V/2A, 24W) or PoE 802.3at (25W), resulting in suboptimal speaker volume and device instability.
Alarm Action Profile
Select the alarm action profile that triggers the alarm.
Custom Alarm Tone
If enabled, a custom alarm tone will sound when alarm triggered. If disabled, the standard alarm tone will be used.
Alarm Prompt Tone
Configure alarm prompt tone. Supports uploading audio files in mp3, wav, ogg, wma, mid and m4a formats.
Play Rules
Select the maximum duration the triggered alarm tone will play for or the number of loops the triggered alarm tone will play for.
Maximum Duration (s)
Configure the maximum duration of alarms tone.
Number of Loops
Configure the number of alarm tone loops.
SD Card Alarm
SD Card Alarm
An alarm will be triggered if the SD card read or write fails.
Alarm Action Profile
Select the alarm action profile that triggers the alarm.
Alarm Interval(s)
Used only in cases where an SD card becomes unavailable.
Custom Alarm Tone
If enabled, a custom alarm tone will sound when alarm triggered. If disabled, the standard alarm tone will be used.
Alarm Prompt Tone
Configure alarm prompt tone. Supports uploading audio files in mp3, wav, ogg, wma, mid and m4a formats.
Play Rules
Select the maximum duration the triggered alarm tone will play for or the number of loops the triggered alarm tone will play for.
Maximum Duration (s)
Configure the maximum duration of alarms tone.
Number of Loops
Configure the number of alarm tone loops.
Alarm Action
Alarm Action→Alarm Action Profile
No.
The index number of the alarm action profile, with up to 10 profiles available.
Name
Custom name for identifying the profile (e.g., “Office Alarm,” “Night Mode Alert”).
Alarm Notification
Specifies the actions to be executed when the profile is triggered. Multiple options can be selected:
All: Executes all available alarm notification methods.
Audio Alarm: Triggers an audible warning through the device speaker.
SIP Alarm: Sends an alarm notification via SIP to configured devices.
Linked Alarm Output: Allows the current profile to trigger a digital output, such as activating a connected siren.
Email Alarm: Sends an alarm message via email (Email settings must be configured).
Snapshot & Upload FTP: Sends a snapshot to a configured FTP server.
Snapshot & SD Card Save: Saves the snapshot to the device’s local storage.
Sync Alarm Info to Home assistant: Syncs alarm event details to the mobile app.
Cloud Call Alarm: Sends the alarm event to the cloud service GDMS SecureAccess and initiates a cloud-based notification call to authorized users or devices associated with the cloud account.
Operation
Available actions for each profile:
Edit: Modify the configuration and actions of the profile.
Simulation Alarm: Manually trigger the profile for testing or immediate response.
Alarm Action→Alarm Notification Settings
Call Mode
Specified the call mode for the SIP alarm:
Serial Hunting: Calls targets one by one until one answers.
Parallel Hunting: Calls all targets simultaneously.
Default setting is “Serial Hunting”.
Alarm Calling Timeout(s)
Sets the timeout period, in seconds, for alarm calls. If the remote party does not answer within this period, the call will automatically disconnect. The valid range is 10 to 90 and the default value is 60 seconds.
Note: This setting takes precedence over the call timeout configured in the account settings.
Alarm Prompt Tone
Specifies the audio prompt played when a SIP alarm call is triggered. If set to silent prompt, no prompt is played and normal calls can be made immediately after connection.
If a custom prompt is set, the recipient will first hear a 5-second prompt tone before normal communication begins. (Supported audio formats: MP3, WAV, OGG, WMA, MID, M4A)
SIP Alarm
Call Number
Defines the number called when the SIP alarm is triggered, users can configure up to 4 numbers:
Accounts: Select which SIP account to use for the outgoing alarm call.
Call Number: Enter the SIP number or IP address to call.
Cloud Call Alarm
Cloud Call Number
Enter the cloud-based number to be used for alarm calls, if applicable. When cloud service is enabled, Account 4 (Cloud Account) is fixed as the call-out account.
Audio Alarm
Alarm Prompt Tone
Select a built-in audio file or upload a custom one to be played when the alarm is triggered. Supported formats: mp3, wav, ogg, wma, mid, m4a.
Play Rules
Define how the audio file will be played during the alarm. The options are
Maximum Duration: Plays the sound based on a configured maximum duration.
Number of Loops: Plays the selected alarm sound repeatedly for the specified number of times
The default method is “Maximum Duration”.
Maximum Duration (s)
Sets the maximum time (in seconds) the audio prompt will play. The valid range is 1-3600 seconds and the default setting is 60.
Number of Loops
Specifies how many times the audio will repeat. The valid range is 1-10 and the default setting is 1.
Alarm Record
Export
Export alarm record as .csv file.
Clear
Delete all alarm records from the list.
Refresh
Update the list to display the most recent alarm events.
No.
Sequential number of each alarm record.
Alarm Event
Triggered alarm type (e.g., Intrusion, Tamper Alarm).
Alarm triggered
Indicates the source that activated the alarm
Alarm Notification
The action(s) taken in response to the alarm (e.g., SIP Call, Audio Alarm).
Alarm Time
Timestamp when the alarm event occurred.
Audio & Video Settings Page Definition
Audio Settings
Call Volume
Adjusts the speaker volume level during calls.
Doorbell Volume
Adjusts the speaker volume for the doorbell tone.
Open Door Tone Volume
Sets the volume for the confirmation tone played when the door is successfully opened.
Alarm Tone volume
Controls the loudness of general alarm notifications (e.g., intrusion, loitering).
Tamper Alarm Volume
Sets the volume level specifically for tamper alarm events.
System Volume
Adjusts the overall system sounds, including prompts and notifications.
Audio Settings
Doorbell Tone
Configures the doorbell sound (Supports uploading audio files in MP3, WAV, OGG, WMA, MID, and M4A formats).
Internal Open Door Tone
Configures the tone played when the internal open door action is triggered (Supports uploading audio files in MP3, WAV, OGG, WMA, MID, and M4A formats).
External Open Door Tone
Configures the tone played when the external open door action is triggered (Supports uploading audio files in MP3, WAV, OGG, WMA, MID, and M4A formats).
Door Opening Failure Prompt Tone
The sound or prompt played when a door opening attempt fails, such as access denied (Supports uploading audio files in MP3, WAV, OGG, WMA, MID, and M4A formats).
Audio Output Mode
The Audio Output Mode option defines how the device routes its audio signal between the built-in speaker and the Line-out port. This allows flexibility depending on whether you want to use only the internal horn speaker, connect to an external amplifier, or use both simultaneously.
SPK + Lineout: Uses both output modes.
Speaker Only: The audio output is directed exclusively to the built-in speaker of the device. Use this mode when the horn’s internal speaker alone is sufficient for broadcasting announcements or alarms.
Lineout Only: The audio output is sent only to the Line-out port. This mode is used when connecting the device to an external amplifier, PA system, or powered speaker, bypassing the internal horn.
Default setting is “SPK + Lineout”.
IP Announcement
Announcement Time after Startup (s)
Configure the time when IP announcement can be triggered after booting up. Beyond this time, IP announcement cannot be triggered.
Valid Range is 60-300 seconds. Default setting is 60.
Number of Loops
Configure the number of loop broadcasts for IP announcements.
Valid Range is 1-3 times. Default setting is 1.
OSD Settings
Display time
Enables or disables the display of date and time on the video stream.
Enabled by default.
OSD Date Format
Specifies the format in which the date is displayed:
YYYY-MM-DD
MM/DD/YYYY
DD MM YYYY
Default setting is “MM/DD/YYYY”.
OSD Time Format
Sets the format for displaying time:
24H: 24-hour format (e.g., 14:00)
12H: 12-hour format with AM/PM
Default setting is “24H”.
OSD Date/Time Position
Selects the on-screen location where the date and time appear:
Top Left
Bottom Left
Top Right
Bottom Right
Default setting is “Top Left”.
Display Text
Enables or disables the display of custom text on the video.
Enabled by default.
OSD Text
Allows input of a custom label to display on the video stream. Maximum allowed byte length: 25.
OSD Text Position
Selects where the custom OSD text appears on the screen:
Top Left
Bottom Left
Top Right
Bottom Right
Default setting is “Top Right”.
CMOS Settings
Wide Dynamic Range (WDR)
Enhances image visibility in scenes with both bright and dark areas by balancing exposure.
WDR (Wide Dynamic Range): Enables wide dynamic range for better image clarity in challenging lighting.
Normal: Disables WDR, using standard exposure settings.
WDR Schedule
Defines the schedule of the Wide Dynamic Range Camera view mode. It can be set to either Daily, meaning the Wide Dynamic Range will be enabled all the time. or to select one of the 50 schedules configured under System Settings => TimeTable. By default, it is set to “Daily”
Power Frequency
Sets the power line frequency to reduce flicker in the video caused by artificial lighting.
60Hz.
50Hz.
Default setting is “60HZ”.
Privacy Masks
Zone Edit 0/4
Configure up to 4 privacy mask zones to block specific areas in the video for privacy (e.g., windows, neighboring properties).
Zone ID: Identifier for each mask zone (e.g., Zone 1, Zone 2).
Enable: Check to activate the privacy mask for the selected zone.
Operation: Remove the selected privacy mask zone.
Monitoring Page Definitions
Onvif
Onvif
Enable or disable ONVIF protocol support for integration with third-party video management systems.
Disabled by default.
Onvif Username
Username used for ONVIF authentication when a third-party system connects to the device.
Onvif Password
Password used for ONVIF authentication.
Note: It is recommended that the ONVIF account credentials match the RTSP stream credentials to avoid preview or connection issues in third-party software.
RTSP
Note
This configuration is exclusive for the GSC3565 model.
RTSP→RTSP Server
RTSP
Enable or disable the RTSP (Real-Time Streaming Protocol) server for video stream access.
Disabled by default.
RTSP Port
Specifies the port used for RTSP streaming (default is 554).
RTSP Authentication
Select the method of user authentication for accessing the RTSP stream:
Basic: Sends credentials in plain text (less secure).
Digest: Sends hashed credentials (more secure and recommended).
Default setting is “Digest”.
RTSP Username
Username required to access the RTSP video stream.
RTSP Password
Password required to access the RTSP video stream.
Note: For best compatibility with third-party software, use the same credentials as the ONVIF account.
RTSP→Stream
Stream (1/2)
Preferred Video Codec
Specifies the compression format used for streaming:
H.264: Widely supported, good balance of quality and bandwidth.
MJPEG: Uses more bandwidth, but offers high image quality per frame.
Default setting is H.264.
Profile
Selects the H.264 profile for encoding:
Baseline: Basic compatibility, low complexity.
Main Profile: Better compression and quality, standard for most uses.
High Profile: Best video quality and efficiency, requires more processing power.
Resolution
Specifies the output video resolution:
1920×1080 (Full HD)
1280×720 (HD)
640×360 (Low resolution)
Default resolution for Stream 1: 1920*1080.
Default resolution for Stream 2: 1280*720.
Bit Rate(kbps)
Sets the target video bitrate in kilobits per second, affecting video quality and bandwidth usage. Options: 256, 512, 1024, 2048, 4096 kbps.
Default setting for Stream 1: 2048.
Default setting for Stream 2: 1024.
Frame Rate(fps)
Number of frames per second. A higher frame rate provides smoother video. Options: 5, 10, 15, 20, 25, 30 fps.
Default setting is 30.
Bit Rate Control
Enables dynamic bitrate adjustment based on scene complexity and motion, optimizing bandwidth usage.
I-frame Interval
Specifies how many frames are sent between two consecutive I-frames (key frames). A lower interval improves seek performance and stream stability but increases bandwidth.
Valid range is 5-150. Default setting is 30.
Accounts Page Definitions
Accounts
Account x→General Settings
Account Register
Account Active
Indicates whether the account is active.
The default setting is “Yes”.
Account Name
The name associated with each account.
SIP Server
The URL or IP address, and port of the SIP server. This is provided by your VoIP service provider (e.g., sip.mycompany.com, or IP address)
Secondary SIP Server
The URL or IP address, and port of the SIP server. This will be used when the primary SIP server fails
Outbound Proxy
Defines IP address or Domain name of the Primary Outbound Proxy, Media Gateway, or Session Border Controller.
Secondary Outbound Proxy
Defines secondary outbound proxy that will be used when the primary proxy cannot be connected.
SIP User ID
User account information, provided by your VoIP service provider.
SIP Authentication ID
SIP service subscriber’s Authenticate ID used for authentication. It can be identical to or different from the SIP User ID.
SIP Authentication Password
The account password required for the GSC356x to authenticate with the SIP server before the account can be registered.
After it is saved, this will appear as hidden for security purpose.
Display Name
The SIP server subscriber’s name (optional) that will be used for Caller ID display (e.g., John Doe).
TEL URI
If the GSC356x has an assigned PSTN telephone number, this field should be set to “user=phone”. A “user=phone” parameter will be attached to the Request-URI and “To” header in the SIP request to indicate the E.164 number. If set to “Enable”, “tel:” will be used instead of “sip:” in the SIP request.
Network Settings
DNS Mode
This parameter controls how the Search Appliance looks up IP addresses for hostnames. If “Use Configured IP” is selected, please fill in Primary IP, Backup IP 1 and Backup IP 2.
A Record
SRV
NAPTR/SRV
Use Configured IP
Max Number Of Sip Request Retries
Sets the maximum number of retries for the device to send requests to the server. In DNS SRV configuration, if the destination address does not respond, all request messages are resent to the same address according to the configured retry times. Valid range: 1-10.
DNS SRV Failover Mode
Configures the preferred IP mode for DNS SRV. If set to “default”, the first IP from the query result will be applied. If set to “Saved one until DNS TTL”, previous IP will be applied before DNS timeout is reached. If set to “Saved one until no response”, previous IP will be applied even after DNS timeout until it cannot respond.
Default
If the option is set with “default”, it will again try to send register messages to one IP at a time, and the process repeats.
Saved one until DNS TTL
If the option is set with “Saved one until DNS TTL”, it will send register messages to the previously registered IP first. If no response, it will try to send one at a time for each IP. This behavior lasts if DNS TTL (time-to-live) is up.
Saved one until no responses
If the option is set with “Saved one until no responses”, it will send registered messages to the previously registered IP first, but this behavior will persist until the registered server does not respond.
Failback follows failback expiration timer
If “Failback follows failback expiration timer” is selected, the device will send all SIP messages to the current failover SIP server or Outbound Proxy until the failback timer expires.
Failback Expiration (m)
Specifies the duration (in minutes) since failover to the current SIP server or Outbound Proxy before making failback attempts to the primary SIP server or Outbound Proxy.
Register Before DNS SRV Failover
Configures whether to send REGISTER requests to the failover SIP server or Outbound Proxy before sending INVITE requests in the event of a DNS SRV failover.
Primary IP
Configures the primary IP address where the GSC356x sends DNS query to when “Use Configured IP” is selected for DNS mode.
Backup IP 1
Configures the backup IP 1 address where the GSC356x sends DNS query to when “Use Configured IP” is selected for DNS mode.
Backup IP 2
Configures the backup IP 2 address where the GSC356x sends DNS query to when “Use Configured IP” is selected for DNS mode.
Proxy-Require
A SIP Extension to notify the SIP server that the GSC356x is behind a NAT/Firewall.
NAT Traversal
Configures whether NAT traversal mechanism is activated. Please refer to user manual for more details.
If set to “STUN” and STUN server is configured, the GSC356X will route according to the STUN server. If NAT type is Full Cone, Restricted Cone or Port-Restricted Cone, the GSC356x will try to use public IP addresses and port number in all the SIP&SDP messages.
The GSC356x will send empty SDP packet to the SIP server periodically to keep the NAT port open if it is configured to be “Keep-alive”. Configure this to be “No” if an outbound proxy is used. “STUN” cannot be used if the detected NAT is symmetric NAT. Set this to “VPN” if OpenVPN is used.
Media NAT Traversal
For configuring media NAT traversal strategies: If configured as “No,” media NAT traversal will not be used. If configured as “Auto,” it will follow the business logic of the “NAT traversal(STUN)” configuration. If configured as “STUN,” it will obtain the public IP and port information after NAT through a shared STUN server. If configured as “TURN,” it will forward the data stream through a TURN relay server. If configured as “ICE,” it will collect local IP addresses, STUN-reflected addresses, and TURN relay addresses to dynamically select the optimal connection path.
Account x→SIP Settings
Basic Settings
SIP Registration
Selects whether the GSC356x will send SIP Register messages to the proxy/server. The default setting is “Enabled”.
UNREGISTER on Reboot
If set to “No”, the GSC356x will not unregister the SIP user’s registration information before new registration.
If set to “All”, the SIP Contact header will use “*” to clear all SIP user’s registration information.
If set to “Instance”, the GSC356x only needs to clear the current SIP user’s info.
REGISTER Expiration
Specifies the frequency (in minutes) in which the GSC356x refreshes its registration with the specified registrar.
The maximum value is 64800 minutes (about 45 days). The default value is 60 minutes.
SUBSCRIBE Expiration
Specifies the frequency (in minutes) in which the GSC356x refreshes its subscription with the specified registrar.
The maximum value is 64800 minutes (about 45 days). The default value is 60 minutes.
Re-Register before Expiration
Specifies the time frequency (in seconds) that the GSC356x sends re-registration request before the Register Expiration. The default value is 0.
Registration Retry Wait Time
Specifies the interval to retry registration if the process is failed. The valid range is 1 to 3600. The default value is 20 seconds.
Add Auth Header on Initial REGISTER
If enabled, the GSC356x will add Authorization header in initial REGISTER request.
Default is “Disabled”.
Enable OPTIONS Keep-Alive
Configures whether to enable SIP OPTIONS to track account registration status. If enabled, the GSC356x will send periodic OPTIONS messages to server to track the connection status with the server.
Default is “Disabled”.
OPTIONS Keep-Alive Interval
Configures the time interval the GSC356x sends OPTIONS message to the server. If set to 30 seconds, it means the GSC356x will send an OPTIONS message to the server every 30 seconds.
OPTIONS Keep-Alive Max Tries
Configures the maximum number of times the GSC356x will try to send OPTIONS message consistently to server without receiving a response. If set to “3”, the GSC356x will send OPTIONS message 3 times. If no response from the server, the GSC356x will re-register.
SUBSCRIBE for Registration
When set to “Yes”, a SUBSCRIBE for Registration will be sent out periodically.
The default setting is “No”.
Use Privacy Header
Configures whether the “Privacy Header” is present in the SIP INVITE message.
Default: the GSC356X will add “Privacy Header” when special feature is not “Huawei IMS”.
Yes: the GSC356X will always add “Privacy Header”.
No: the GSC356X will not add “Privacy Header”.
The default setting is “default”.
Use P-Preferred- Identity Header
Configures whether the “P-Preferred-Identity Header” is present in the SIP INVITE message.
Default: the GSC356X will add “P-Preferred-Identity header” when special feature is not “Huawei IMS”.
Yes: the GSC356x will always add “P-Preferred-Identity header”.
No: the GSC356x will not add “P-Preferred-Identity header”.
Add MAC in User-Agent
If Yes except REGISTER, all outgoing SIP messages will include the GSC356X’s MAC address in the User-Agent header, except for REGISTER and UNREGISTER.
If Yes to All SIP, all outgoing SIP messages will include the GSC356X’s MAC address in the User-Agent header.
If No, the GSC356X’s MAC address will not be included in the User-Agent header in any outgoing SIP messages.
The default setting is “No”.
SIP Transport
Selects the network protocol used for the SIP transport.
The default setting is “UDP”.
Enable TCP Keep-alive
Configures whether to enable TCP Keep-alive for the TCP connection between the terminal and the SIP server.
Local SIP Port
Configures the local SIP port used to listen and transmit.
SIP URI Scheme when using TLS
Specifies if “sip” or “sips” will be used when TLS/TCP is selected for SIP Transport. The default setting is “sips”.
Use Actual Ephemeral Port in Contact with TCP/TLS
Configures whether the actual ephemeral port in contact with TCP/TLS will be used when TLS/TCP is selected for SIP Transport.
The default setting is “No”.
Support SIP Instance ID
Configures whether SIP Instance ID is supported or not.
The default setting is “Yes”.
SIP T1 Timeout
SIP T1 Timeout is an estimate of the round-trip time of transactions between a client and server. If no response is received the timeout is increased and request re-transmit retries would continue until a maximum amount of time define by T2. The default setting is 0.5 seconds.
SIP T2 Timeout
SIP T2 Timeout is the maximum retransmit time of any SIP request messages (excluding the INVITE message). The re-transmitting and doubling of T1 continues until it reaches the T2 value. Default is 4 seconds.
SIP Timer D Interval
Sets the wait time for response retransmissions when the INVITE receives a 3xx ~ 6xx response. Valid range is 32-64 seconds. Default is 32.
Outbound Proxy Mode
Configures whether to put the Outbound Proxy in the Route header, or if SIP messages should always be sent to Outbound Proxy.
In route
Not in route
Always send to
Default is “in route”.
Enable 100rel
When enabled, the 100rel tag is appended to the value of the Supported header of the initial signaling messages.
The default setting is “No”.
Session Timer
Enable Session Timer
Configures whether to enable session timer function. It enables SIP sessions to be periodically “refreshed” via a SIP request (UPDATE, or re-INVITE). If there is no refresh via an UPDATE or re-INVITE message, the session will be terminated once the session interval expires. If set to “Yes”, the GSC356X will use the related parameters when sending session timer according to “Session Expiration”. If set to “No”, session timer will be disabled.
The default setting is “No”.
Session Expiration
Session Expiration is the time (in seconds) where the session is considered timed out, provided no successful session refresh transaction occurs beforehand.
The default setting is 180. The valid range is from 90 to 64800.
Min-SE
The minimum session expiration (in seconds). The default value is 90 seconds. The valid range is from 90 to 64800.
Caller Request Timer
If set to “Yes” and the remote party supports session timers, the GSC356X will use a session timer when it makes outbound calls.
The default setting is “No”.
Callee Request Timer
If set to “Yes” and the remote party supports session timers, the GSC356X will use a session timer when it receives inbound calls.
The default setting is “No”.
Force Timer
If set to “Yes”, the GSC356X will use the Session Timer even if the remote party does not support this feature. Otherwise, Session Timer is enabled only when the remote party supports it.
The default setting is “No”.
UAC Specify Refresher
As a caller, select UAC to use the GSC356X as the refresher, or select UAS to use the callee or proxy server as the refresher. When set to “Omit”, the refresh object is not specified.
The default setting is “UAC”.
UAS Specify Refresher
As a callee, select UAC to use caller or proxy server as the refresher, or select UAS to use the GSC356X as the refresher.
The default setting is “UAC”.
Force INVITE
Select “Yes” to force using the INVITE method to refresh the session timer.
The default setting is “No”.
Account x→Codec Settings
Audio
Preferred Vocoder
(Choice 1 – 5)
Multiple vocoder types are supported on the GSC356X, the vocoders in the list is a higher preference. Users can configure vocoders in a preference list that is included with the same preference order in SDP message. The vocoders supported are:
PCMU
PCMA
G.722 (wide band)
G.729A/B
G.726-32
Codec Negotiation Priority
Configures the GSC356X to use which codec sequence to negotiate as the callee. When set to “Caller”, the GSC356X negotiates by SDP codec sequence from received SIP Invite. When set to “Callee”, the GSC356X negotiates by audio codec sequence on the GSC356X. The default setting is “Callee”.
Use First Matching Vocoder in 200OK SDP
When set to “Yes”, the device will use the first matching vocoder in the received 200OK SDP as the codec. The default setting is “No”.
G.726-32 Packing Mode
Selects “ITU” or “IETF” for G.726-32 packing mode.
The default setting is “ITU”.
G.726-32 Dynamic Payload Type
Specifies G.726-32 payload type. Valid range is 96 to 126. Default is 126.
Send DTMF
Specifies the mechanism to transmit DTMF digits. There are 3 supported modes:
In audio: DTMF is combined in the audio signal (not very reliable with low-bit-rate codecs).
RFC2833 sends DTMF with RTP packet. Users can check the RTP packet to see the DTMFs sent as well as the number pressed.
SIP INFO uses SIP INFO to carry DTMF.
Default setting is “RFC2833”.
DTMF Payload Type
Configures the payload type for DTMF using RFC2833. Cannot be the same as iLBC or OPUS payload type.
Enable Audio RED with FEC
If set to “Yes”, FEC will be enabled for audio call.
Audio FEC Payload Type
Configures audio FEC payload type. The valid range is from 96 to 126.
The default value is 121.
Audio RED Payload Type
Configures audio RED payload type. The valid range is from 96 to 126.
The default value is 124.
Silence Suppression
Configures G.729 silence suppression, also known as dynamic voice detection (VAD). When set to “Yes”, the device detects periods of no voice activity during a call and sends a minimal number of VAD packets instead of continuous voice packets.
Default setting is “No”.
Voice Frames Per TX
Configures the number of voice frames transmitted per packet. It is recommended that the IS limit value of Ethernet packet is 1500 bytes or 120 kbps. When configuring this, it should be noted that the “ptime” value for the SDP will change with different configurations here. This value is related to the codec used in the codec table or negotiate the payload type during the actual call. For example, if set to 2 and the first code is G.729, G.711 or G.726, the “ptime” value in the SDP datagram of the INVITE request is 20 ms. If the “Voice Frame/TX” setting exceeds the maximum allowed value, GSC356X will use and save the maximum allowed value for the selected first codec. It is recommended to use the default setting provided, and incorrect setting may affect voice quality.
The default setting is 2.
Preferred Video Codec
Preferred Video Codec
Specifies the prefered video codec used for GSC356X. The supported codec for this device is H.264.
Enable Video FEC
When enabled, the video sender will temporarily allocate part of the bandwidth to one data channel to send FEC data to system, thus, to improve the video quality the receiver gets. Enabling this function will take up part of bandwidth and reduce call rate. The default setting is “Yes”.
FEC Payload Type
Configures FEC payload type. The range is 96-126. Default setting is 120.
Packetization Mode
Configures video packetization mode. If set to “Single NAL Unit Mode”, the packetization mode will be negotiated as single NAL unit mode when dial video calls, if the other party does not support the negotiation, then single NAL unit mode will be used for video encoding by default. If set to “Non-Interleaved Mode”, the packetization mode will be negotiated as Non-interleaved mode when dial video calls, If the other party does not support negotiation, then the Non-interleaved mode will be used for video encoding by default. The default setting is “Non-Interleaved Mode”.
Image Size
Sets the image size. It can be selected from the dropdown list.
1080P
720P
4CIF
VGA
The default setting is 1080P.
Use H.264 Constrained Profiles
Configures that whether to set H.264 constrained profiles.
The default setting is “Yes”.
H.264 Profile Type
Selects the H.264 profile type from the dropdown list.
Baseline Profile
Main Profile
High Profile
BP/MP/HP (Default Setting)
Note: Lower levels are easier to decode, but higher levels offer better compression. Usually, for the best compression quality, choose “High Profile”; for playback on low-CPU machines or mobile devices, choose “Baseline Profile”. If “BP/MP/HP” is selected, all three profiles “Baseline Profile” “Main Profile” and “High Profile” will be used for negotiation during video decoding to achieve the best result. This is usually used in video conference when there is higher requirement on the video.
Video Bit Rate
Configures the bit rate for video call. It can be selected from the dropdown list. The default setting is 2048 kbps.
Note: The video bit rate can be adjusted based on the network environment. Increasing the video bit rate may improve video quality if the bandwidth is permitted. If the bandwidth is not permitted, the video quality will decrease due to packet loss. For some network environment, the default setting “1080P” might be too high that causes no video or video quality issue during video call. In this case, please change “H.264 Image Size” to “VGA” or “CIF” and change “Video Bit Rate” to “384kbps” or lower.
SDP Bandwidth Attribute
Specifies the SDP (Session Description Protocol) bandwidth attribute used for video streaming.
Standard: Uses AS format at the session level and TIAS format at the media level.
Media Stream Level: Uses AS format at the media level only.
Session Level: Uses AS format at the session level only.
None: No changes are made to the session format.
The default Setting is “Media Stream Level”.
Note: Please do not modify this setting without knowing the session format supported by the server. Otherwise, it might cause video decoding failure.
H.264 Payload Type
Enter H.264 codec payload type. The valid range is from 96 to 126. Default is 99.
Packet Retransmission
If set to “NACK”, the signaling will carry NACK info. After negotiation, the media will use NACK to retransmit lost packets.
If set to “NACK+RTX (SSRC-GROUP) “, the signaling will carry both NACK and RTX info. After negotiation, the media will use NACK+RTX (SSRC-GROUP), which is the default setting, to achieve packet loss retransmission.
If set to “Disabled”, packet loss retransmission cannot be used.
RTP Settings
SRTP Mode
Enable SRTP mode based on your selection from the drop-down menu.
No
Enabled but Not Forced
Enabled and Forced
Optional
The default setting is “No”.
SRTP Key Length
Allows users to specify the length of the SRTP calls. Available options are:
AES 128&256 bit
AES 128 bit
AES 256 bit
Default setting is AES 128&256 bit
Crypto Life Time
Enable or disable the crypto lifetime when using SRTP. If users set to disable this option, GSC356X does not add the crypto lifetime to SRTP header. The default setting is “No”.
RTCP Destination
Configures the server address. When there is a call, the RTCP package sent from the GSC356X will also be sent to this address. Note: The address should contain port number.
RTCP Keep-Alive Method
Configures the RTCP channel keep-alive packet type.
Receiver Report: The RTCP channel will sends “receiver report+source description+RTCP extension” as keep-alive data.
Sender Report: The RTCP channel will sends “Sender report+source description+ RTCP extension” as keep-alive data.
Default setting is “Receiver Port”.
RTP Keep-Alive Method
Configures the RTP channel keep-alive packet type.
No: No data will be sent
RTP Version 1: The wrong version infor “1” will be carried when sending RTP data packets.
Default setting is “RTP Version 1”.
Symmetric RTP
Configures whether Symmetric RTP is used or not. Symmetric RTP means that the UA uses the same socket/port for sending and receiving the RTP stream. The default setting is “No”.
RTP IP Filter
Configures whether to filter the received RTP. If set to “Disable”, the device will receive RTP from any address; If set to “IP Only”, the device will receive RTP from certain IP address in SDP with no port limited; If set to “IP and Port”, the device will only receive RTP from IP address & port in SDP. Disabled by Default
RTP Timeout (s)
Configures the RTP timeout of the GSC356X. If the GSC356X does not receive the RTP packet within the specified RTP time, the call will be automatically disconnected. The default range is 0 and 6-600. If set to 0, the GSC356X will not hang up the call automatically.
Account x→Call Settings
General
Video Send/Receive Capability
Configures the video sending and receiving capability for the account to ensure SIP proxy compatibility.
The default setting is “sendonly”.
send only: Send video only.
send and recieve: Send and receive video.
Auto Answer
Specifies whether the GSC356X automatically answers incoming calls. Options:
Yes: The device automatically answers incoming calls after a short reminder beep (Default setting).
No: The device does not automatically answer incoming calls.
Intercom/Paging Only: The device automatically answers only intercom or paging calls.
Custom Alert-Info for Auto Answer
Specifies the Alert-Info content used to trigger automatic answering for paging/intercom calls (Maximum allowed length is 20 characters).
Notes:
Only when the Alert-Info header of an incoming call matches the configured content will the device automatically answer the call.
If left blank, paging calls will ring according to the Incoming Call Rules instead of being auto-answered.
Play warning tone for Auto Answer Intercom
If enabled, GSC356X will play warning tone when auto answering Intercom.
Send Anonymous
If set to “Yes”, the “From” header in outgoing INVITE messages will be set to anonymous. Default is “No”.
Anonymous Call Rejection
If set to “Yes”, anonymous calls will be rejected.
The default setting is “No”.
Call Log
Configures Call Log setting on the GSC356X.
Log All Calls
Log incoming/outgoing only (missed calls will NOT be logged)
Disable Call Log
The default setting is “Log All Calls”.
Mute on Intercom Answer
If enabled, the GSC356X will mute the mirophone after answer an intercom call via Call-Info/Alert-Info.
Ring Timeout
Configures the timeout (in seconds) for the GSC356X to ring when an incoming call is not answered. Valid range is 30 to 3600. The default setting is 60.
Call Timeout
Set the SIP call timeout(in seconds). When the SIP call exceeds the set time, the call will be automatically hung up. When set to 0, the call will not be automatically hung up. Valid range is 0 to 65535. Default setting is 0.
Calling Timeout (s)
Specifies the maximum duration, in seconds, the system will wait for the call to be answered. If the call is not answered within this period, it will automatically disconnect. The valid range is 10 to 300 seconds, and the default is 90 seconds.
Ringtone
Account RingTone
Allows users to configure the ringtone for the account. Users can choose from different ringtones from the dropdown menu.
Note: User can also choose silent ring tone or doorbell.
Ignore Alert-Info header
Configures to play default ringtone by ignoring Alert-Info header.
The default setting is “No”.
Account x→Advanced Settings
Security Settings
Check Domain Certificates
Configures whether the domain certificates will be checked when TLS/TCP is used for SIP Transport. The default setting is “No”.
Validate Certificate Chain
Validate certification chain when TCP/TLS is configured.
The default setting is “No”.
Validate Incoming SIP Messages
Specifies if the GSC356X will check the incoming SIP messages Caller ID and CSeq headers. If the message does not include the headers, it will be rejected. The default setting is “No”.
Allow Unsolicited REFER
Configures whether to dial the number carried by Refer-to header after receiving out-of-dialog SIP REFER request actively.
If set to “Disabled“, the GSC356X will send error warning and stop dialing.
If set to “Enabled/Force Auth“, the GSC356X will dial the number after sending authentication. If the authentication fails, it will stop dialing.
If set to “Enabled“, the GSC356X will dial all numbers carried by SIP REFER.
Accept Incoming SIP from Proxy Only
When set to “Yes”, the SIP address of the Request URL in the incoming SIP message will be checked. If it does not match the SIP server address of the account, the call will be rejected. The default setting is “No”.
Check SIP User ID for Incoming INVITE
If set to “Yes”, SIP User ID will be checked in the Request URI of the incoming INVITE. If it does not match the GSC356X’s SIP User ID, the call will be rejected. The default setting is “No”.
Allow SIP Reset
Allow SIP Notification message to perform factory reset.
The default setting is “No”.
Authenticate Incoming INVITE
If set to “Yes”, the GSC356X will challenge the incoming INVITE for authentication with SIP 401 Unauthorized response.
The default setting is “No”.
SIP Realm Used For Challenge INVITE & NOTIFY
Configures this option to verify incoming INVITE, only take effect when enabled incoming INVITE first. It is used to verify provision NOTIFY information, including check-sync, resync and reboot, but only effective when enabled SIP authentication.
MOH
MOH Mode
Configures MOH mode:
If set to “Local MOH“, a local MOH audio file needs to be uploaded for this mode to work.
If set to “Disable” the MOH will be disabled.
Default setting is “Disable”.
Upload Local MOH Audio File
Click to upload audio file from PC. The MOH audio file should be “.ogg” format.
Advanced Features
Special Feature
Different soft switch vendors have special requirements. Therefore, users may need select special features to meet these requirements. Users can choose from the drop down list:
Standard Mode
Nortel MCS
Broadsoft
CBCOM
RNK
Sylantro
Huawei IMS
PhonePower
UCM Call center
Zoom
Reboot on check-sync event without “reboot=”
If enabled, the device will reboot when receiving a SIP NOTIFY check-sync event without the “reboot=” header. If disabled, the device will update its configuration without rebooting. Enabled by default.
Calls Page Definitions
Outgoing Calls
This page allows users to place outgoing calls from the GSC356X device using the Web UI.
Account Selection: Choose the SIP account to use when making a call from the available configured accounts.
Dial Number/IP: Enter the phone number or IP address of the destination you want to call.
Call Button: Initiates the call using the selected account and the entered number/IP.
Recent Calls List: Displays a history of recently dialed numbers for quick redial. You can click on an entry to automatically populate the dial field.
GSC356X Outgoing Calls Page
Call History
Call History→Call History
Delete
Removes selected call records from the list.
Delete All
Clears all call history records.
Add to Allowlist
Adds selected numbers to the allowlist to permit future calls.
Call Status
Indicates the direction of the call: Outgoing, Incoming.
Name
Displays the contact name if available.
Number
The phone number or IP address involved in the call.
Time
Timestamp of when the call occurred.
Operation
Available actions for each record:
Dial: Dial the number.
Details: View full call information.
Add to Allowlist: Permit future calls from this number/IP.
Add Users of the Access Control: Create an access control user entry with this number.
Delete: Remove the individual call record.
Call History→Intercept record
Delete
Removes selected intercepted call records from the list.
Add to Allowlist
Adds selected numbers to the allowlist, allowing future calls from them.
Name
Displays the caller’s name if available.
Number
The intercepted phone number or IP address.
Time
Timestamp of when the call was intercepted.
Operation
Available actions for each record:
Dial: Call the intercepted number.
Details: View more information about the intercepted call.
Call Settings
Video Call
Enables the video call feature on the GSC356X. The default setting is “Yes”.
Video Frame Rate
The video frame rate is adjustable based on network condition. Increasing the frame rate will significantly increase the amount of data transmitted, therefore consuming more bandwidth.
The video quality will deteriorate due to packet loss if extra bandwidth is not allocated.
Call Waiting
Enables the call waiting feature. If it is not checked, the GSC system will reject the second incoming call during an active session without user’s knowledge. But this missed call record will be saved to remind users.
The default setting is “Yes”.
Call Waiting Tone
Specifies whether the GSC356X plays a call waiting tone when another incoming call is received while a current call is in progress.
The default setting is “Yes”.
DND
Enable/disable the DND (Do not disturb) feature. If enabled, this device will block all incoming calls.
Disabled by default.
DND Prompt Sound
Enable/disabed the sound or tone played when a call is received while the device is in Do Not Disturb (DND) mode.
Enabled by default.
Multicast Tone
Enables/disables multicast tone.If enabled, there will be a prompt tone at the beginning and end of the multicast.
Disabled by default.
Automatic Answer Ringing Time (s)
Configures a ringing timer after which the GSC356X will answer an incoming call automatically.
Valid range is 0 to 10 seconds and the default setting is 0.
Filter Characters
Specifies characters to be automatically removed when dialing numbers. These characters are not part of the actual phone number and will be filtered out during dialing (Multiple characters can be set for filtering).
For example: if set to “[()-]”, when dialing (0571)-8800-8888, the character “()-” will be automatically filtered and dial 057188008888 directly.
Notes:
Filtering applies to calls initiated from call history or Click2Dial.
Dialing directly from the keypad will not filter any characters.
Noise Suppression Mode
The Noise Suppression Mode parameter determines how background noise is filtered during audio communication, helping to improve voice clarity and overall call quality. Users can choose between Classic Noise Suppression and AI Noise Suppression depending on the environment and application requirements.
Classic Noise Suppression: Uses traditional digital signal processing (DSP) algorithms to reduce common background noises such as fan noise, air conditioning, or low-level ambient sounds. This mode provides stable and efficient noise reduction with low processing overhead, making it suitable for most standard indoor environments.
AI Noise Suppression: Utilizes advanced artificial intelligence algorithms to distinguish human speech from surrounding noise in real time. It can more effectively suppress dynamic and complex noises such as conversations, traffic, machinery, or crowded environments while preserving voice quality. This mode is recommended for challenging acoustic conditions where maximum speech intelligibility is required.
Call Settings→Allowlist Management
Allowlist
Enable or disable allowlist functionality. If enabled, only the allowlist numbers are be able to call in, other numbers will be blocked. (Disabled by default)
Add
Manually add a new entry to the allowlist (name and number/IP).
Delete
Remove selected entries from the allowlist.
Delete All
Clear all entries from the allowlist.
Name
The label or identifier for the allowed contact.
Number
The phone number or IP address to allow.
Operation
Available actions for each entry:
Edit: Modify the name or number/IP.
Delete: Remove the specific allowlist entry.
Phone Settings Page Definitions
General Settings
Local RTP Port
This parameter defines the local RTP port used to listen and transmit. It is the base RTP port for channel 0.
When configured, channel 0 will use this port _value for RTP; channel 1 will use port_value+2 for RTP. Local RTP port ranges from 1024 to 65400 and must be even. Default value is 5004.
Local RTP Port Range
Gives users the ability to define the parameter of the local RTP port used to listen and transmit.
This parameter defines the local RTP port from 24 to 10000. This range will be adjusted if local RTP port + local RTP port range is greater than 65486. Default setting is 200.
Use Random Port
When set to “Yes”, this parameter will force random generation of both the local SIP and RTP ports. This is usually necessary when multiple phones are behind the same full cone NAT. The default setting is “No”
Note: This parameter must be set to “No” for Direct IP Calling to work.
Keep-alive Interval
Specifies how often the GSC356X sends a blank UDP packet to the SIP server to keep the “ping hole” on the NAT router to open. The default setting is 20 seconds. The valid range is from 10 to 160.
STUN Server
The IP address or Domain name of the STUN server. STUN resolution results are displayed in the STATUS page of the Web GUI.
Only non-symmetric NAT routers work with STUN.
STUN Server Username
The username to validate the STUN server.
STUN Server Password
The password to validate the STUN server.
Use NAT IP
The NAT IP address used in SIP/SDP messages. This field is blank at the default settings. It should ONLY be used if it is required by your ITSP.
Ringtone
Auto Config CPT by Region
Configures whether to choose Call Progress Tone automatically by region. If set to “Yes”, the phone will configure CPT (Call Progress Tone) according to different regions automatically. If set to “No”, you can manually configure CPT parameters.
The default setting is “No”.
Call Progress Tones:
Ring Back Tone
Busy Tone
Reorder Tone
Call-Waiting Tone
Configures tone frequencies according to user preference. By default, the tones are set to North American frequencies. Frequencies should be configured with known values to avoid uncomfortable high pitch sounds.
Syntax: f1=val,f2=val [,c=on1/off1[-on2/off2[-on3/off3]]]. (Frequencies are in Hz and cadence on and off are in 10ms)
ON is the period of ringing (“On time” in “ms”) while OFF is the period of silence. In order to set a continuous ring, OFF should be zero. Otherwise it will ring ON ms and a pause of OFF ms and then repeats the pattern.
Please refer to the document below to determine your local call progress tones: https://www.itu.int/ITU-T/inr/forms/files/tones-0203.pdf
Call-Waiting Tone Gain
Adjusts the call waiting tone volume. Users can select “Low”, “Medium” or “High”. The default setting is “Low”.
Default Ring Cadence
Defines the ring cadence for the phone. The default setting is: c=2000/4000.
Multicast Paging
Multicast Paging→Multicast Paging
Paging Barge
During an active call, if an incoming multicast paging has higher priority (Disable being the highest and 1 being the second), then the device will be hung up and multicast paging will be played.
The default setting is “Disabled”.
Paging Priority Active
If enabled, during a multicast page if another multicast is received with higher priority (1 being the highest) that one will be played instead.
Enabled by default.
Multicast Paging→Multicast Listening
Priority
Indicates the priority level for the multicast listening. A lower number (1) indicates higher priority, while a higher number (10) indicates lower priority.
Listening Address
Specifies the multicast IP address that the device listens to for paging or announcements. This address allows the device to receive audio from a multicast stream.
Label
A user-defined label or name to identify the multicast listening configuration. This can be helpful for organizing multiple multicast streams.
Network Settings Page Definitions
Ethernet Settings
Internet Protocol
Selects whether to prefer IPv4 or IPv6.
Default is IPv4 Only.
IPv4
IPv4 Address Type
Users could select “DHCP”, “Static IP” or “PPPoE”.
DHCP: Obtain IP address via a DHCP server in the LAN. All domain values for static IP/PPPoE are unavailable, even though the values have been saved in the flash.
PPPoE: Configures PPPoE account/password. Obtain the IP address from the PPPoE server via dialing.
Static IP: Manually configures IP Address, Subnet Mask, Default Router’s IP Address, DNS Server 1, and DNS Server 2.
By default, it is set to “DHCP“.
DHCP VLAN Override
Selects the DHCP Option VLAN mode. When set to “DHCP Option 132 and DHCP option 133”, the GSC356X will get DHCP option 132 and 133 as VLAN ID and VLAN priority. When set to “Encapsulated in DHCP Option 43”, the GSC356X will get values from Option 43 which encapsulate VLAN ID and VLAN priority.
Note: Please make sure the “Allow DHCP Option 43 and Option 66 to Override Server” setting under maintenance→upgrade is checked. The default setting is “Disable”.
Hostname (Option 12)
Sets the name of the client in the DHCP request. It is optional but may be required by some Internet Service Providers.
The field is empty by default.
Vendor Class ID
(Option 60)
Configures the vendor class ID header in the DHCP request.
The default setting is “Grandstream GSC3565”.
IP Address
Defines the GSC356X’s static IP address if the static IP is used.
Subnet Mask
Determines the network’s subnet mask if the static IP is used.
Default Gateway
Defines the network’s gateway address if the static IP is used.
DNS Server 1
Configures the primary DNS IP address if the static IP is used.
DNS Server 2
Configures the secondary DNS IP address if the static IP is used.
Preferred DNS Server
Enter the Preferred DNS server.
PPPoE Account ID
Configures the PPPoE account ID if the PPPoE is used.
PPPoE Password
Sets the PPPoE password if the PPPoE is used.
Layer 2 QoS 802.1Q/VLAN Tag
Assigns the VLAN Tag of the Layer 2 QoS packets for Ethernet.
The Default value is 0.
Layer 2 QoS 802.1p Priority Value
Assigns the priority value of the Layer 2 QoS packets for Ethernet.
The Default value is 0.
IPv6
IPv6 Address
Configures the appropriate network settings on the GSC356X. Users could select from “Auto-configured” or “Statically configured”.
Static IPv6 Address
Enter the static IPv6 address in “Statically configured” IPv6 address type.
IPv6 Prefix Length
Enter the IPv6 prefix length in “Statically configured” IPv6 address type.
This field is empty by default.
IPv6 Prefix (64 bits)
Enter the IPv6 Prefix (64 bits) when Prefix Static is used in “Statically configured” IPv6 address type.
This field is empty by default.
IPv6 Gateway
The gateway when static IPv6 is used.
DNS Server 1
Enter DNS Server 1 when static IP is used.
DNS Server 2
Enter DNS Server 2 when static IP is used.
Preferred DNS Server
Enter the Preferred DNS server.
802.1X
802.1x Mode
Enables and selects the 802.1x mode for the GSC356X system. The supported 802.1x modes are:
EAP-MD5
EAP-TLS
EAP-PEAPv0/MSCHAPv2
The default setting is “Disable”.
802.1x Identity
Enters the identity information for the selected 802.1x mode. (This setting will be displayed only if 802.1 X mode is enabled).
MD5 Password
Enters the MD5 password for this 802.1x mode
802.1X CA Certificate
Uploads the CA Certificate file to the GSC356X. This certificate is used only when the 802.1X authentication mode is set to TLS or PEAP. It is not required for MD5 mode.
802.1X Client Certificate
Loads the Client Certificate file to the GSC356X. (This setting will be displayed only if the 802.1 X TLS mode is enabled)
OpenVPN® Settings
OpenVPN® Enable
Enables/Disables OpenVPN® feature. Default is “No”.
Manual Import
Import OpenVPN® Configuration
Imports the configuration file from the current computer. After importing, the local configuration will be overwritten and OpenVPN® function is automatically enabled.
Local Configuration
OpenVPN® Server Address
Specify the IP address or FQDN for the OpenVPN® Server.
OpenVPN® Port
Specify the listening port of the OpenVPN® server. The valid range is 1 – 65535. The default value is “1194”.
OpenVPN® Transport
Specifies whether OpenVPN® connections use TCP or UDP as the transport protocol.
The default value is “UDP”.
OpenVPN® CA
Click on “Upload” to upload the Certification Authority of OpenVPN®. For a new upload, users could click on “Delete” to erase the last certificate, and then upload a new one.
OpenVPN® Certificate
Click on “Upload” to upload OpenVPN® certificate. For a new upload, users could click on “Delete” to erase the last certificate, and then upload a new one.
OpenVPN® Client Key
Click on “Upload” to upload OpenVPN® Key. For a new upload, users could click on “Delete” to erase the last certificate, and then upload a new one.
OpenVPN® Client Key Password
Allows user to set password for client.key file
OpenVPN® TLS Key
Uploads the OpenVPN® TLS .key file
OpenVPN® TLS Key Type
Selects the encryption type of the OpenVPN® TLS key. it can be set to : TLS-Auth, TLS-Crypt, TLS-Crypt V2
OpenVPN® Cipher Method
Specifies the Cipher method used by the OpenVPN® server. The available options are:
Blowfish
AES-128
AES-256
Triple-DES
The default setting is “Blowfish”.
OpenVPN® Username
Configures the optional username for authentication if the OpenVPN server supports it.
OpenVPN® Password
Configures the optional password for authentication if the OpenVPN server supports it.
OpenVPN® Comp-lzo
Configures enable/disable the LZO compression. When the LZO Compression is enabled on the OpenVPN server, you must turn on it at the same time. Otherwise, the network will be abnormal. Default value is YES.
Additional Options
Additional options to be appended to the OpenVPN® config file, separated by semicolons. For example, comp-lzo no;auth SHA256
Note: Please use this option with caution. Make sure that the options are recognizable by OpenVPN® and do not unnecessarily override the other configurations above.
Advanced Settings
Advanced Network Settings
DNS Refresh Timer (m)
Configures the refresh time (in minutes) for DNS query. If set to “0”, the GSC356X will use the DNS query TTL from DNS server response. the Default value is “0”
DNS Failure Cache Duration (m)
Configures the duration (in minutes) of the previous DNS cache when the DNS query fails. If set to “0”, the feature will be disabled. Note: Only valid for SIP registration. The Default value is “0”
Enable LLDP
Enables/Disables the LLDP (Link Layer Discovery Protocol) service.
Enabled by default.
LLDP TX Interval
Configures LLDP TX Interval (in seconds). Valid range is 1 to 3600. Default is 60.
Enable CDP
Enables/Disables the Cisco Discovery Protocol feature.
Enabled by default.
Layer 3 QoS for SIP
Configures the Layer 3 QoS parameter for SIP. This value is used for IP Precedence, Diff-Serv or MPLS.
Valid range is 0 to 63, and default value is 26.
Layer 3 QoS for Audio
Configures the Layer 3 QoS parameter for audio. This value is used for IP Precedence, Diff-Serv or MPLS.
Valid range is 0 to 63, and default value is 46.
Layer 3 QoS For Video
Configures the Layer 3 QoS parameter for video packets. This value is used for IP Precedence, Diff-Serv or MPLS.
Valid range is 0 to 63, and default value is 34.
HTTP/HTTPS User-Agent
Configures the user-agent for HTTP/HTTPS request.
SIP User-Agent
This sets the user-agent for SIP. If the value includes word “$version”, will replace it with the real system version.
Proxy
HTTP Proxy
Specifies the HTTP proxy URL for the GSC356X to send packets to. The proxy server will act as an intermediary to route the packets to the destination.
HTTPS Proxy
Specifies the HTTPS proxy URL for the GSC356X to send packets to. The proxy server will act as an intermediary to route the packets to the destination.
Bypass Proxy for
Configures the destination IP address where no proxy server is needed. The GSC356X will not use a proxy server when sending packets to the specified destination IP address.
Remote Control
Action URI Support
Configures whether to enable GSC356X to handle Action URI request.
Default is “Enabled”.
Action URI Allowed IP List
List of allowed IP addresses from which the GSC356X receives the Action URI.
Maximum allowed length is 512, and default setting is “any”.
System Settings Page Definitions
Time Settings
NTP Server
Configures the URL or IP address of the NTP server. The GSC356X may obtain the date and time from the server.
The default server is “pool.ntp.org”.
Enable Authenticated NTP
Configures whether to enable NTP authentication. If enabled, a cryptographic signature appended to each network packet. If the key is incorrectly configured, the GSC356X will refuse to use the time provided by the NTP server.
This setting is disabled by default.
Authenticated NTP Key ID
Configures the key ID for authenticated NTP.
The default value is “1”.
Authenticated NTP Key
Upload the key file for authenticated NTP.
Note: Only supports MD5 key type.
Allow DHCP Option 42 to Override NTP Server
Obtains NTP server address from a DHCP server using DHCP Option 42; it will override configured NTP Server. If set to “No”, the GSC356X will use configured NTP server to synchronize time and date even if an NTP server is provided by DHCP server.
The default setting is “Yes”.
DHCP Option 2 to Override Time Zone Setting
Obtains time zone setting (offset) from a DHCP server using DHCP Option 2; it will override the selected time zone.
If set to “No”, the GSC356X will use the selected time zone even if provided by the DHCP server. The default setting is Yes.
Time Zone
Configures the date/time display according to the specified time zone.
The default setting is “Auto”.
Self-defined Time Zone
When the Time Zone option is set to “Self-Defined”, this parameter allows users to specify their own custom time zone using the following syntax:
std offset dst [offset], start [/time], end [/time]
std: Abbreviation for standard time (e.g., MTZ).
offset: The difference (in hours) from UTC for standard time.
dst: Abbreviation for daylight saving time (e.g., MDT).
[offset]: The difference (in hours) from UTC for daylight saving time (usually 1 hour ahead of standard time).
start [/time]: The rule that defines when daylight saving time begins.
end [/time]: The rule that defines when daylight saving time ends.
The default self-defined time zone is “MTZ+6MDT+5,M4.1.0,M11.1.0”.
Note:
A positive (+) offset value means the local time zone is west of the Prime Meridian (Greenwich Meridian).
A negative (–) offset value means the local time zone is east of the Prime Meridian.
Date Display Format
Determines which format will be used to display the date.
It can be selected from the drop-down list.
YYYY-MM-DD: 2012-01-31
MM-DD-YYYY: 01-31-2012
DD-MM-YYYY: 31-01-2012
ddd, mmm DD: Tue, Jan 31
The default setting is “YYYY-MM-DD”.
Time Display Format
Specifies which format will be used to display the time. It can be selected from a 12-hour or 24-hour format.
The default setting is 24 Hour format.
Timetable
Timetable
Users can configure up to 50 timetables with different schedules and assign specific holidays to each one. Edit a schedule under Operation, then select Custom Time to define the days of the week and the time periods during which the schedule is active.
Holidays
Users can manually define up to 10 custom holidays by specifying date intervals. These holidays can later be assigned to specific schedules for customized access control.
Security Settings
Security Settings→Web/SSH Access
Enable SSH
Enables SSH access to the GSC356X. Default setting is “Yes”.
SSH Port
Customizes SSH port. Valid range: 1 – 65535.
Default port is 22.
HTTP Web Port
Configures the HTTP port under the HTTP web access mode. Valid range: 80-65500
Default port is 80.
HTTPS Web Port
Configures the HTTPS port under the HTTP web access mode.Valid range: 80-65500
Default port is 443.
Web Access Mode
Determines which protocol will be used to access the GSC356X’ s Web GUI. It can be selected from HTTP and HTTPS or Both.
The default setting is HTTPS.
User Login Timeout
Set login timeout (in minutes) for user. If there is no activity within the specified amount of time, the user will be logged out, and the system will jump to the login page automatically. Default is 15 minutes.
Enable User Web Access
Toggle to enable or disable user web UI access.
Default Settings is “Disabled”.
Validate Server Certificates
Verify the server certificate using the trusted certificates for TLS. If disabled, the device will bypass certificate verification.
Enabled by default.
Security Settings→User Info Management
Current Password
Enter the current password.
User
User Account
Displays the name of the user account.
New Password
Allows the administrator to set the password for user-level web GUI access. This field is case sensitive with a maximum length of 512 characters. The default password is “123”.
Confirm Password
Enter the new User password again to confirm.
Administrator
Admin Account
Displays the name of the admin account.
New Password
Allows the user to change the admin password. The password field is purposely blank after clicking the “Save” button for security purpose. This field is case sensitive with a maximum length of 512 characters.
Confirm Password
Enter the new Admin password again to confirm.
Security Settings→Client Certificate
Minimum TLS Version
Configures the minimum TLS version supported by the GSC356X.
The default setting is “TLS 1.2”.
Maximum TLS Version
Configures the maximum TLS version supported by the GSC356X.
The default setting is “Unlimited”.
Enable Weak TLS Cipher Suite
This setting controls how the GSC356X handles weak TLS cipher suites for encryption. The options are:
Enable Weak TLS Cipher Suites: Allows the device to use weak TLS cipher suites for encrypting data.
Disable Symmetric Encryption SEED: Disables the SEED symmetric cipher.
Disable All Weak Symmetric Encryption: Disables all weak symmetric ciphers.
Disable Symmetric Authentication MD5: Disables the weak MD5 authentication method.
Disable All Weak TLS Cipher Suites: Disables all weak TLS cipher suites (default setting).
SIP TLS Certificate
Defines the SSL certificate used for SIP over TLS.
SIP TLS Private Key
Defines the SSL Private key used for SIP over TLS.
SIP TLS Private Key Password
Defines the SSL Private key password used for SIP over TLS.
Custom Certificate
Allows to upload a Custom Certificate file to GSC356X.
Security Settings→Trusted CA Certificates
Index ID
A unique identifier for each CA (Certificate Authority) certificate entry in the list.
Issued By
Displays the name of the Certificate Authority that issued the trusted certificate.
Expiration
Shows the expiration date of the CA certificate, indicating until when it is valid for secure communications.
Light Settings
Call Button Light Brightness
Set the brightness level of the LED light surrounding the doorbell button on the device. This feature allows users to adjust visibility according to ambient lighting conditions. The available options are:
Dark: Lowest brightness, suitable for low-power environments.
Moderate: Balanced brightness for typical indoor or shaded outdoor conditions.
Bright: Enhanced visibility for most outdoor settings.
High Bright: Maximum brightness for very bright or low-visibility environments.
The default setting is “Moderate”.
LED Fill Light Mode
Controls the fill light near the camera:
Disabled: Turns off the fill light.
Auto: Automatically turns on the fill light based on lighting conditions.
Manual: The fill light will remain on continuously for a configured duration.
Default setting is “Auto”.
LED Fill Light Duration
Defines the time range during which the LED fill light remains continuously active when LED Fill Light Mode is set to “Manual”. Users can configure up to 3 non-conflicting time periods.
TR-069
Enable TR-069
Sets the GSC356X system to enable the “CPE WAN Management Protocol” (TR-069).
Enabled by default.
ACS URL
Specifies URL of TR-069 ACS (e.g., http://acs.mycompany.com), or IP address.
Default URL is “https://acs.gdms.cloud”.
TR-069 Username
Enters username to authenticate to ACS.
TR-069 Password
Enters password to authenticate to ACS.
Periodic Inform Enable
Sends periodic inform packets to ACS.
This setting is enabled by default.
Periodic Inform Interval
Configures how often the GSC356X sends “Inform” packets to the ACS. The interval determines the frequency of these periodic status updates.
The valid range is 1 to 4294967295, and the default value is 86400 seconds.
Connection Request Username
Enters username for the ACS to connect to the GSC356X.
Connection Request Password
Enters password for the ACS to connect to the GSC356X.
Connection Request Port
Enters the port for the ACS to connect to the GSC356X. Valid range: 1-65535
Default port is 7547.
CPE SSL Certificate
Uploads Cert File for the GSC356X to connect to the ACS via SSL.
CPE SSL Private Key
Uploads Cert Key for the GSC356X to connect to the ACS via SSL.
Start TR-069 at Random Time
If enabled, TR-069 will send out the first INFORM message to the server on randomized timing between 1 to 3600 seconds after the GSC356X boots up.
Disabled by default.
Backup/Restore
This page allows users to back up or restore the device configuration.
Backup: Click this button to download and save the current configuration settings of the GSC356X. The file will be saved in .uf format, which can later be used to restore the same settings.
Restore: Click this button to upload a previously saved .uf configuration file and apply it to the device. This will overwrite the current settings.
GSC356X BackupRestore Page
Email Settings
SMTP Server
The address of the outgoing mail server used to send email notifications (e.g., smtp.gmail.com).
SMTP Server Port
The port number used by the SMTP server (commonly 465 for SSL, 587 for TLS).
From Email Address
The email address shown as the sender in outgoing email notifications.
Sender Email Username
The username used to authenticate with the SMTP server.
Sender Email Password
The password or app-specific password used for SMTP authentication.
SSL
Enables/Disables SSL/TLS encryption for secure email transmission. (Enabled by default)
Test Email
A button to send a test email using the configured settings to verify that email notifications are working.
Email Notification Address
Recipient Address 1
The email addresses of the recipient 1 that will receive notifications (e.g., snapshots, alarms).
Recipient Address 2
The email addresses of the recipient 2 that will receive notifications (e.g., snapshots, alarms).
Email Notification Address
Email Subject
Allows configuration of the subject line used in alarm notification emails. This field supports dynamic variables that will be automatically replaced with actual values when the email is generated:
${MAC}: Device MAC address
${WARNING_MSG}: Event message details
${IP_ADDR}: Device IP address
${DATE}: Date and time of the event
${USERNAME}: Username associated with the event
${MODEL}: Device model information
${OSD}: On-Screen Display text
The default email subject is “${MODEL}_${MAC}_${WARNING_MSG}_${OSD}”
Email Content
Allows configuration of the body text used in alarm notification emails. This field supports dynamic variables that will be automatically replaced with actual values when the email is generated:
${MAC}: Device MAC address
${WARNING_MSG}: Event message details
${IP_ADDR}: Device IP address
${DATE}: Date and time of the event
${USERNAME}: Username associated with the event
${MODEL}: Device model information
${OSD}: On-Screen Display text
The default email content template is:
“Detected: ${WARNING_MSG}
Model: ${MODEL}
MAC Address: ${MAC}
Alarm Time: ${DATE}”
FTP Settings
FTP Server
The domain name or IP address of the FTP server used to store snapshots or recorded data.
FTP Server Port
The communication port used to connect to the FTP server (default is port 21).
FTP Server Username
The username required to authenticate and access the FTP server.
FTP Server Password
The password associated with the FTP server username for login authentication.
Storage Path
The directory or folder path on the FTP server where the files will be stored (e.g., /snapshots).
Test FTP Server
A button to verify the FTP connection and ensure that the credentials and path are correct.
Maintenance Page Definitions
Upgrade and Provisioning
Upgrade and Provisioning→Firmware
Current Version
Displays the current firmware version of the GSC356X.
Upgrade via Manual Upload
Upload Firmware File to Update
Allows users to load the local firmware to the GSC356X to update the firmware.
Upgrade via Network
Firmware Upgrade Mode
Allows users to choose one of the following the firmware upgrade methods: TFTP, HTTP, HTTPS, FTP, or FTPS.
The default setting is “HTTPS”.
Firmware Server Path
Set the IP address or domain name of the firmware server. The URL of the server that hosts the firmware release. This field is empty by default.
Administrators can also configure variables in the URL. The following variables are supported:
• $PN: is replaced with the GSC356X model.
• $MAC: is replaced with the MAC address of the GSC356X.
Firmware Server Username
Enters the username for the firmware server.
Firmware Server Password
Enters the password for the firmware server.
Firmware File Prefix
Checks if the firmware file is with matching prefix before downloading it. This field enables users to store different versions of firmware files in one directory on the firmware server.
Firmware File Postfix
Checks if the firmware file is with matching postfix before downloading it. This field enables users to store different versions of firmware files in one directory on the firmware server.
Upgrade Detection
Upgrade
Click the “Start” button to check whether the firmware in the firmware server has an updated version, if so, update immediately.
Upgrade and Provisioning→Config File
Configure Manually
Download Device Configuration
Click to download the device configuration file in .txt format.
Upload Device Configuration
Upload the configuration file to the GSC356X.
Configure via Network
Config Upgrade Via
Selects the provisioning method: TFTP, HTTP or HTTPS, FTP, FTPS. The default setting is “HTTPS”.
Config Server Path
Sets IP address or domain name of the configuration server. The server hosts a copy of the configuration file to be installed on the GD372x. This field is empty by default.
Administrators can also configure variables in the URL. The following variables are supported:
• $PN: is replaced with the GSC356X model.
• $MAC: is replaced with the MAC address of the GSC356X.
Config Server Username
Configures the username for the config server.
Config Server Password
Configures the password for the config server.
Config File Prefix
Checks if configuration files are with matching prefix before downloading them. This field enables users to store different configuration files in one directory on the provisioning server.
Config File Postfix
Checks if configuration files are with matching postfix before downloading them. This field enables user to store different configuration files in one directory on the provisioning server.
Authenticate Conf File
Sets the GD372x system to authenticate configuration file before applying it. When set to “Yes”, the configuration file must include value P1 with GD372x system’s administration password. If it is missed or does not match the password, the GD372x system will not apply it. The default setting is “No”.
XML Config File Password
Decrypts XML configuration file when encrypted. The password used for encrypting the XML configuration file is using OpenSSL.
Upgrade and Provisioning→Provision
Auto Upgrade
Automatic Upgrade
Specifies when the firmware upgrade process will be initiated; there are 4 options:
No: The GD372x will only do upgrade once at boot up.
Yes, check for upgrade periodically: User needs to set an automatic check interval in minutes.
Yes, check for upgrade every day: User needs to specify “Hour of the day (0-23)”.
Yes, check for upgrade every week: User needs to specify “Hour of the day (0-23)” and “Day of the week (0-6)”.
Notes:
Day of week setting starts from Sunday.
The default setting is “No”.
Start Upgrade at Random Time
Configures whether the GD372x will upgrade automatically at random time point within the configured period.
Automatic Upgrade Check Interval (m)
Configures how often the GSC356X checks for firmware upgrade (in minutes).
This setting is only valid if the user selects “Yes, check for upgrade periodically” in the “Automatic Upgrade”.
The valid range is 60-86400, and the default setting is 10080 (namely 7 days).
Hour of the Day (0-23)
Defines at which hour of the day the GD372x system will check the HTTP/HTTPS/TFTP/FTP/FTPS server for firmware upgrades or configuration files changes.
Day of the Week (0-6)
Defines which day of the week the GD372x system will check the HTTP/HTTPS/TFTP/FTP/FTPS server for firmware upgrades or configuration files changes.
Firmware Upgrade and Provisioning
Defines the GD372x system’s rules for automatic upgrade. It can be selected from:
Always check for new firmware.
Check new firmware only when F/W pre/suffix changes.
Always skip the firmware Check.
The default setting is “Always check for new firmware”.
DHCP Option
Allow DHCP Option 43 and Option 66 to Override Server
If DHCP option 43, and 66 is enabled on the LAN side, the device will reset the CPE, upgrade, network VLAN tag, and priority configuration according to option 43 sent by the server.
At the same time, the update mode and server path of the configuration upgrade mode will be reset according to the option 66 sent by the server. Default is “Yes”.
DHCP Option 120 Override SIP Server
Configures the GD372x system to allow the DHCP offer message to override the SIP Server Path via the Option 120 header.
The default setting is “No”.
Additional Override DHCP Option
Configures additional DHCP Options (150 or 160) to be used for firmware server instead of the configured firmware server or the server from DHCP Option 43 and 66.
This option will be effective only when “Allow DHCP Option 43 and Option 66 to Override Server” is enabled.
The default setting is “Option 150”.
Allow DHCP Option 242 (Avaya IP Phones)
Enables DHCP Option 242. Once enabled, the GD372x will use the configuration info issued by the local DHCP in Option 242 to configure the proxy, transport protocol, and server path.
The default setting is “No”.
Config Provision
Config Provision
Device will download the configuration files and provision by the configured order.
Download and Process All Available Config Files
By default, the device will provision the first available config in the order of cfgMAC.xml, cfgMODEL.xml, and cfg.xml (corresponding to device specific, model specific, and global configs).
If set to “Yes”, the device will download and apply (override) all available configs in the order of cfg.xml, cfgMODEL.xml, cfgMAC.xml.
The default setting is “No”.
3CX Auto Provision
If enabled, the GD372x will send SUBSCRIBE requests to the multicast address in LAN during bootup for automatic provisioning. This feature requires 3CX server support.
Upgrade and Provisioning→Advanced Settings
Send HTTP Basic Authentication By Default
Specifies whether the device should always include HTTP/HTTPS authentication credentials when using wget to download firmware or configuration files.
Yes: Always send the username and password, regardless of whether the server requests authentication.
No: Only send the username and password when the server requires authentication.
The default setting is “No”.
Enable SIP NOTIFY Authentication
Enables the GSC356X to challenge SIP NOTIFY with 401. The default setting is “Yes”.
Validate Certification Chain
Configures whether to validate the server certificate when download the firmware/config file. If it is set to “Yes”, the GD372x will download the firmware/config file only from the legitimate server. Default setting is “No”.
Allow AutoConfig Service Access
Configures whether to allow access to the AutoConfig service. If not checked, access to service.ipvideotalk.com will be disabled. Default value is “Enabled”.
Factory Reset
Resets the GSC356X system to the default factory setting mode.
System Diagnostics
System Diagnostics→Syslog
Syslog Protocol
Select the transport protocol over which log messages will be carried. The options are:
UDP: Syslog messages will be sent over UDP.
SSL/TLS: Syslog messages will be sent securely over TLS connection.
The default setting is “UDP”.
Syslog Server
Configures the URI which the GSC356X system will send the syslog messages to.
Syslog Level
Selects the level of logging for syslog. The default setting is “None”. There are 4 levels from the dropdown list: DEBUG, INFO, WARNING and ERROR. The following information will be included in the syslog packet:
DEBUG (Sent or received SIP messages).
INFO (Product model/version on boot up, NAT related info, SIP message summary, Inbound and outbound calls, Registration status change, negotiated codec, Ethernet link up).
WARNING (SLIC chip exception).
ERROR (SLIC chip exception, Memory exception).
Note: Changing syslog level does not require a reboot to take effect.
Syslog Keyword Filter
Only send the syslog with keyword, multiple keywords are separated by comma.
Example: set the filter keyword to “SIP” to filter SIP log.
Syslog Header Format
Configures the preferred header format for Syslog. The options are:
Legacy (Default setting)
RFC3164 Compliant
The RFC3164 compliant header begins with “PRI” which represent both the Facility (0 – 23) and severity level (0 – 7) of the event. The message includes the timestamp, hostname, process id and the log message.
For more information regarding the representation of the numerical values for the facility and severity, please refer to RFC3164.
Send SIP Log
Configures whether the SIP log will be included in the syslog messages. The default setting is “No”.
System Diagnostics→Packet Capture
With RTP Packets
Includes Real-time Transport Protocol (RTP) packets used for audio/video streams in the packet capture file.
With Secret Key Information
If enabled, includes encrypted key information in the capture (useful for debugging but should be used with caution due to security concerns).
Start
Begins the packet capture process.
Stop
Stops the ongoing packet capture.
Download
Downloads the captured packet file in a .tar archive. After extraction, the capture file will be available in .pcapng format for offline analysis.
Delete
Deletes the saved packet capture file from the device.
System Diagnostics→Ping
Input
Enter a domain name or IP address to test network connectivity (e.g., 8.8.8.8 or example.com).
Start
Initiates the ping test to check if the device can reach the specified address and measure the packet loss.
System Diagnostics→Traceroute
Input
Enter a domain name or IP address to trace the network path (e.g., 8.8.8.8 or example.com).
Start
Begins the traceroute process to identify the route and intermediate hops taken to reach the destination from the device.
System Diagnostics→Remote Diagnostics
Start
Enables remote diagnostics, allowing remote access the device and collection of diagnostic logs. Access will automatically expire after a set period for security purposes.
System Diagnostics→Audio Diagnosis
Audio Diagnostic Server
Specifies the server address used for audio diagnosis, typically provided by the system administrator or support team.
Audio Diagnosis
Enables or disables the audio diagnostic feature. When enabled, the device connects to the specified server for troubleshooting purposes.
Event Notification
Device Status
Bootup Completed
Configures the event URL when GSC356X boots up.
Registered
Configures the event URL when an account in the GSC356X is registered successfully.
Unregistered
Configures the event URL when an account in the GSC356X is unregistered.
Log On
Configures the event URL when users log on the GSC356X successfully.
Log Off
Configures the event URL when users log off the GSC356X.
Access control operation
Relay Trigger
Configures the Action URL to send when the relay is triggered.
Relay Off
Configures the Action URL to send when the relay is turned off.
Input Trigger
Configures the Action URL to send when digital input is triggered.
Input Off
Configures the Action URL to send when digital input is turned off.
Call Operation
Incoming Call
Configures the event URL when GSC356X has an incoming call.
Outgoing Call
Configures the event URL when GSC356X has an outgoing call.
Missed Call
Configures the event URL when the GSC356X has new a missed call.
Established Call
Configures the event URL when a call is established.
Terminated Call
Configures the event URL when a call is disconnected.
Application Page Definitions
Account Sharing
Account Sharing→Account Sharing
General Settings
Enable Account Sharing
Select whether to enable Account Sharing. This feature is disabled by default.
Role in Account Sharing
Specifies the role of the device in an account sharing setup.
Host Device: Registers an account on the IP PBX and allows guest devices to make calls through its account.
Guest Device: Does not register an account on the IP PBX and relies on the host device to place and receive calls within the network.
The default option is “Guest Device”.
SIP Server Port
Specifies the SIP service port used for account sharing. A value of 0 means a random port will be assigned. Valid range is 0–65535. Default port is 15060.
Group Name
Set the group name, in the host-guest mode, devices with the same group name can discover each other.
Note: This item is mandatory if using Account Sharing. The verification format is domain type
Group Password
In the host-guest mode, after setting the group password, the guest device with the same group password as the host device can successfully register an account on the host device.
Note:This item is mandatory if using Account Sharing.
Account Settings
Associated account
Specifies the account behavior in Account Sharing:
Host Device Role: Specifies which host account will be used as the outgoing and incoming account for calls outside of the Account Sharing network.
Guest Device Role: Specifies which host account the guest device will register to for making and receiving calls.
Host Device Number
Sets the number for the host device. This setting will be synchronized with the SIP Authentication ID and SIP User ID, and any modifications will be made simultaneously. he SIP authentication ID and SIP user ID are kept synchronized, and any modifications will be made simultaneously.
Guest Account Name
This setting specifies the account name corresponding to the account used by the guest device.
Ringing tone Settings
Sync Ringing In Group
Specifies whether the ringtones of all successfully registered guest devices in the group will play in synchronization when a call is received. The default setting is “No”.
Ringtone
Select an existing ringtone or upload a custom audio file. (Supported formats include MP3, WAV, OGG, WMA, MID, and M4A)
Account Sharing→Account Sharing List
Discover Device list
Refresh
Click to refresh the list of discovered devices.
Diagnostic Page Definitions
Microphone Test
Tests the microphone’s functionality by capturing and playing back audio input.
Speaker Test
Tests the speaker by playing a sample sound to confirm output functionality.
Reset Key Test
Checks if the hardware reset button is responsive and functioning correctly.
Light Test
Activates the LED lights to verify their operation (e.g., indicator or fill light).
Certificate Test
Verifies the integrity and validity of installed security certificates.
SD Card Test
Checks if an inserted SD card is recognized and functioning properly.
Relay Out Test
Tests the relay output by triggering it manually to ensure proper response (e.g., unlocking a door).
Alarm Input Test
Verifies the functionality of alarm input interfaces by detecting signal changes.
Key Test
Tests the physical keypad buttons to ensure each key press is detected.
Tamper Test
Simulates or detects a tamper event to confirm the tamper switch is operational.
Line Out Test
Connect an external active speaker to the Line Out port and click Test to verify audio output. If sound is heard, the function is working correctly; otherwise, check volume and connections.
GSC356X HTTP API
Grandstream Door Systems supports HTTP API (Application Programming Interface).
For more details, please refer to the following guide:
The document explains in detail the external HTTP-based application programming interface and parameters of functions via the supported method. The HTTP API is firmware-dependent. Please refer to the related firmware Release Note for the supported functions.
Administrator Privilege is required, and administrator authentication verification has to be executed before any operation on the related parameter configuration.
FACTORY RESET
Restore to Factory Default via Web GUI
To perform a factory reset to the GSC356X via the Web GUI, please refer to the following steps:
Access to GSC356X Web GUI using admin username and password.
Navigate to Maintenance 🡪Advanced Settings.
Press the Factory Reset button as displayed in the following screenshot.
GSC356X Web UI Factory Reset
Factory Reset via the Reset Button
To perform a hard factory reset on the GSC356X device:
Power on the device.
Press and hold the RESET button (located on the right rear side of the device) for about 10 seconds until the LED indicators flash.
Factory Reset via the Reset Button
Release the button. The device will reboot and restore to factory default settings.
Important Notes
Power must NOT be lost while performing a hard factory reset.
This process erases all settings and configurations. Ensure you back up any important data before proceeding.
CHANGE LOG
This section documents significant changes from previous versions of the user manual for GSC356X. Only major new features or major document updates are listed here. Minor updates for corrections or editing are not documented here.