OVERVIEW
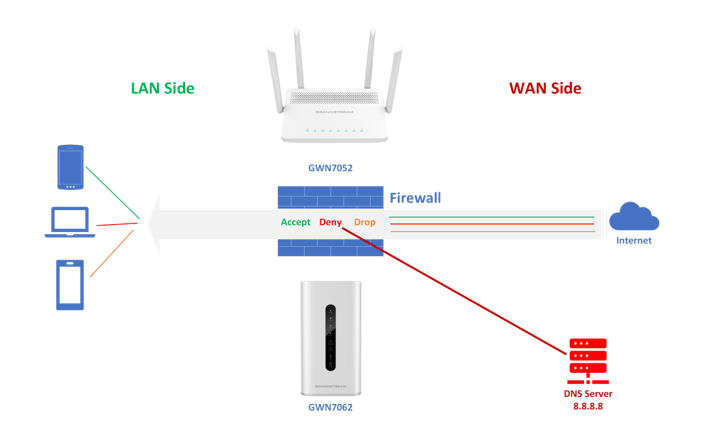
A firewall is a set of security measures designed to prevent unauthorized access to a networked computer system. It is similar to building walls in that their purpose is to separate one “network” or “compartment” from another.
To protect private networks and individual machines from the dangers of the Internet, a firewall can be employed to filter incoming or outgoing traffic based on a predefined set of rules called firewall policies.
Traffic Rules: Used to control incoming/outgoing, traffic in customized scheduled times, and take actions for specified rules such as accept; reject and drop.
This guide will help you to understand and configure Traffic Rules features on the GWN7052(F)/GWN7062.
TRAFFIC RULES
GWN7052(F)/GWN7062 offers the possibility to fully control incoming/outgoing traffic for different protocols in customized scheduled times, and take actions for specified rules such as Accept; Reject, and Drop.
Inbound Rules
Inbound traffic rules are used to control the traffic that is coming into the router from external networks or devices. These rules can be used to restrict access to certain services or ports, block traffic from specific IP addresses or ranges, or allow traffic from trusted sources. For example, an inbound traffic rule may allow incoming traffic on port 80 (HTTP) to a web server hosted behind the router, while blocking all other incoming traffic.
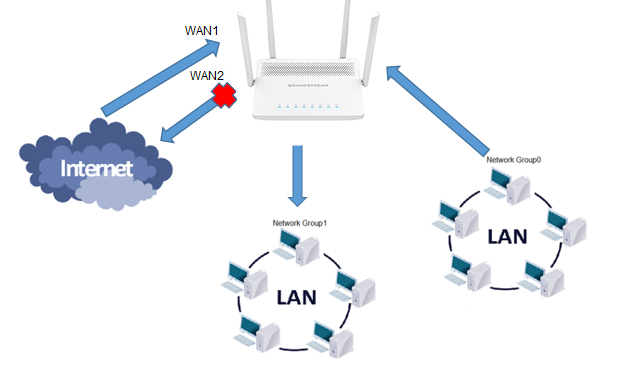
The GWN7052(F)/GWN7062 allows to filter of incoming traffic to network group or port WAN1 or WAN2 and applies rules such as:
- Accept: To allow the traffic to go through.
- Deny: A reply will be sent to the remote side stating that the packet is rejected.
- Drop: The packet will be dropped without any notice to the remote side.
The previous actions are available to configure inbound rules on the GWN7052(F)/GWN7062 under “Firewall →Traffic Rules → Input” for configured protocols.
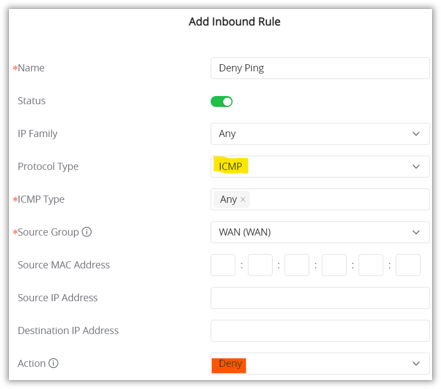
The below example shows the configuration steps done to create an Inbound Traffic rule :
- Navigate to “Web UI → Firewall→ Traffic Rules“.
- On the Inbound Rules Tab, Click on the “Add” button to create a new rule.*
- Enable the rule (Status ON), Source Group (WAN), and protocol type (in our case it’s ICMP and ICMP type = Any), and the Action is Deny.
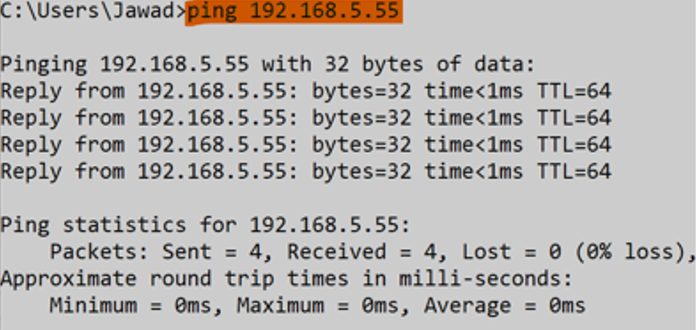
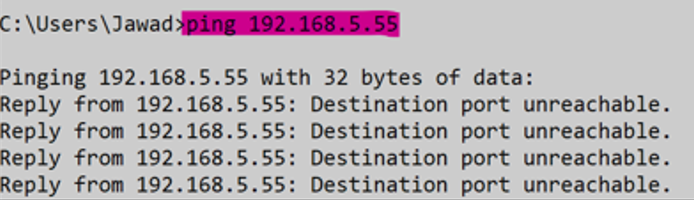
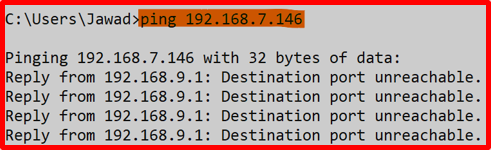
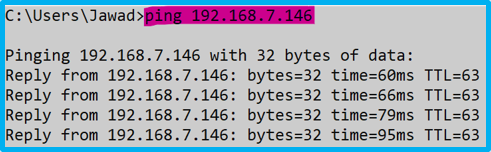
4. Open the command prompt or terminal then ping the router (WAN port IP Address) before adding the inbound rule and after adding the inbound rule.
Before adding the Inbound rule
After adding the Inbound rule
For more details about other fields please refer to [TRAFFIC RULES TABLE].
Outbound Rules
Outbound traffic rules are used to control the traffic that is leaving the router and going to external networks or devices. These rules can be used to restrict access to certain services or ports, block traffic to specific IP addresses or ranges, or allow traffic to trusted sources. For example, an outbound traffic rule may allow outgoing traffic on port 443 (HTTPS) to a secure website, while blocking all other outgoing traffic.
The GWN7052/GWN7062 allows to filter of outgoing traffic from the local network group to outside networks and applies rules such as:
- Accept: To allow the traffic to go through.
- Deny: A reply will be sent to the remote side stating that the packet is rejected.
- Drop: The packet will be dropped without any notice to the remote side.
In the following example, we show how to create an Outbound Traffic rule:
- Navigate to “Web UI → Firewall→ Traffic Rules“.
- On the Outbound Rules Tab, Click on the “Add” button to create a new rule.
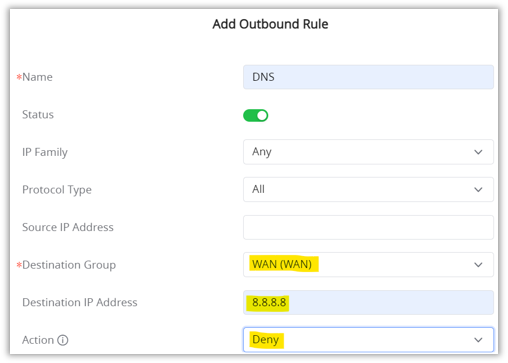
- Enable the rule (Status ON), Destination Group (WAN), and Destination IP (in our case it’s the DNS 8.8.8.8) and the Action is Deny.
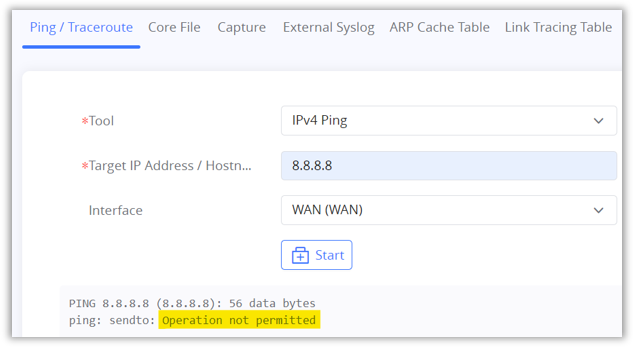
4. To verify the Outbound rule, the GWN routers have a built-in Ping/Traceroute tool for troubleshooting purposes. Navigate to “System Settings → System Diagnostics → Ping/Traceroute tab“.
5. Select the IP Address (ex: 8.8.8.8) then the interface (WAN) and click the button “Start”. The expected result is “Operation not permitted”.
For more details about other fields please refer to [TRAFFIC RULES TABLE].
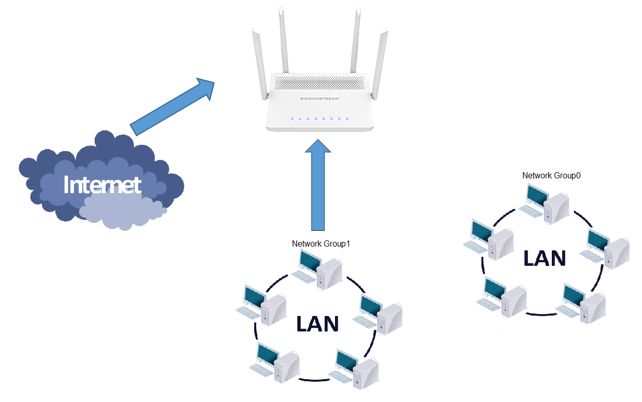
Forwarding Rules
The Forwarding rules are used to control the traffic that is being forwarded between different networks or devices within the network. The purpose of forwarding traffic rules is to direct traffic to the appropriate destination based on the network topology and the type of traffic. Forwarding traffic rules can be used to specify the next hop for the traffic, based on the destination IP address or network, the type of protocol used (TCP, UDP, ICMP), or the port number. For example, a forwarding traffic rule may direct incoming traffic from a specific subnet to a particular server on the network.
The GWN7052/GWN7062 allows to filter traffic passing through it, from a group or a WAN port to another one and applies rules such as:
- Accept: To allow the traffic to go trough
- Deny: A reply will be sent to the remote side stating that the packet is rejected.
- Drop: The packet will be dropped without any notice to the remote side.
The following actions are available to configure Forward rules on the GWN7052 under “Firewall → Traffic Rules → Forwarding Rules” for configured protocols.
A rule for Forwarding traffic can be created as follows:
- Navigate to “Web UI → Network Settings → LAN“ and create a VLAN.
- Navigate to “Web UI → Wi-Fi Settings → SSIDs“ and create an SSID and assign to it the previously created VLAN.
- Connect two devices (ex: PC & phone) to GWN router, first device to the default SSID (default VLAN) and the second device to the SSID created previously.

4. Navigate to “Web UI → Firewall → Traffic rules → Forwarding rules tab“ and create a new rule, select ICMP protocol, ICMP Type (any), Source Group (previously created VLAN), Destination Group (Default VLAN) and Action = Accept.

5. From the device connected to the default SSID (default VLAN) try pinging the other device on the other VLAN before applying the rule and after.
Before applying the Forwarding rule
After applying the Forwarding rule
For more details about other fields please refer to [TRAFFIC RULES TABLE].
TRAFFIC RULES TABLE
The following table provides an explanation of each field related to the traffic rules feature.
Field | Description |
Name | Specify a name for the traffic rule. |
Status | Check to enable this rule. |
IP Family | Select the IP version. |
Source Group | Select a WAN interface or a LAN group for Source Group, or select All. |
Protocol | Select one of the protocols from the dropdown list or All. |
Source IP Address | Set the source IP address. |
Source Port(s) | Set the source port. |
Source MAC address | Set the source MAC address. |
Destination Port(s) | Set the destination port. |
Action | Select which action to perform for the given traffic rule. |