


Overview
The Network Printer feature allows a USB printer connected to the router to be shared with multiple users on the same local network. It is designed for environments where the printer does not have its own Ethernet or Wi-Fi connection, but still needs to be accessible from more than one computer.
After network printing is enabled on the router, computers can connect to the shared printer using common printing protocols such as LPR or Raw TCP. Each computer must add the printer and install the appropriate driver once, because the router shares access to the printer but does not manage driver installation or client printer setup.
Router-Side Configuration
Note: This feature is in beta.
Printer Status
Sign in to the router web UI and navigate to Advanced → USB Application → Network Printer. The Printer Status tab is where you confirm the router can see the USB printer before you try to share it.
Make sure the printer is plugged into the router’s USB port, powered on, and in a ready state. Then click Detection to scan for the connected printer.
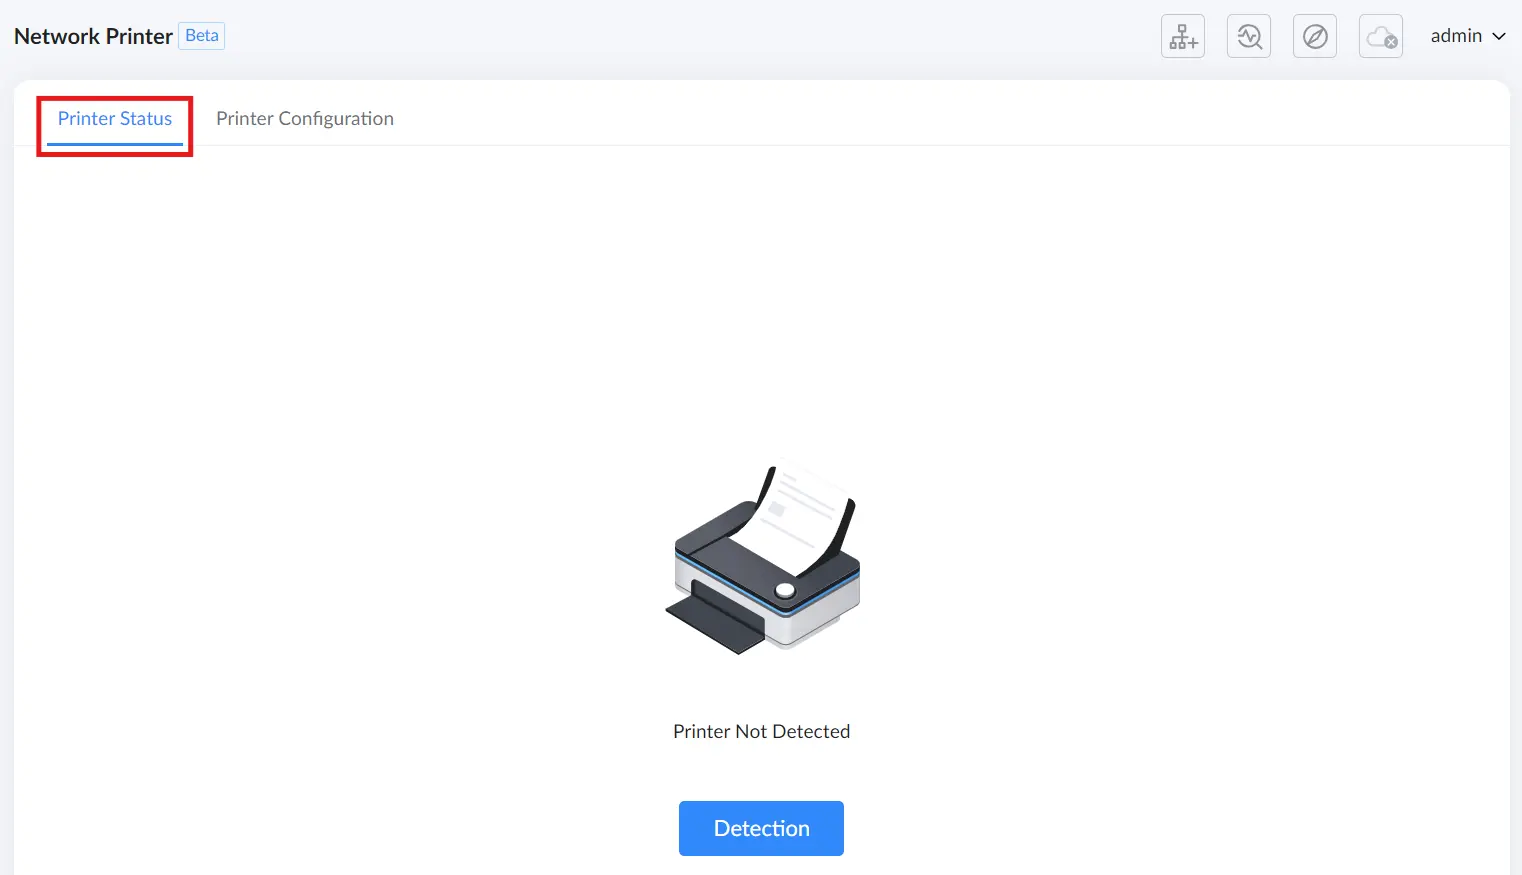
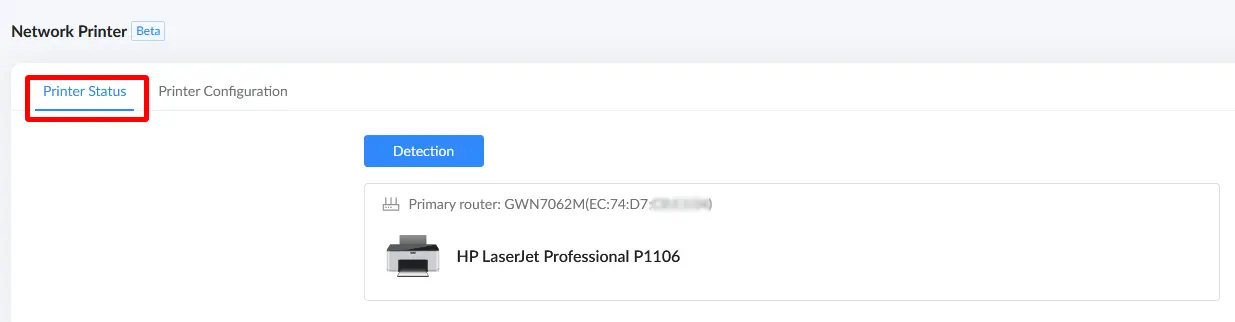
After detection completes, the printer should appear in the list with its model information. If it does not appear, re-check the USB connection and printer readiness, then run Detection again.
Printer Configuration
Open the Printer Configuration tab to enable sharing and define how computers will connect to the printer.
Turn on Network Printing, then select the correct Device Node (this must match the node where the printer is physically connected, especially in a mesh setup). Next, choose a Protocol for client connections and confirm the corresponding port settings. When finished, click Save.
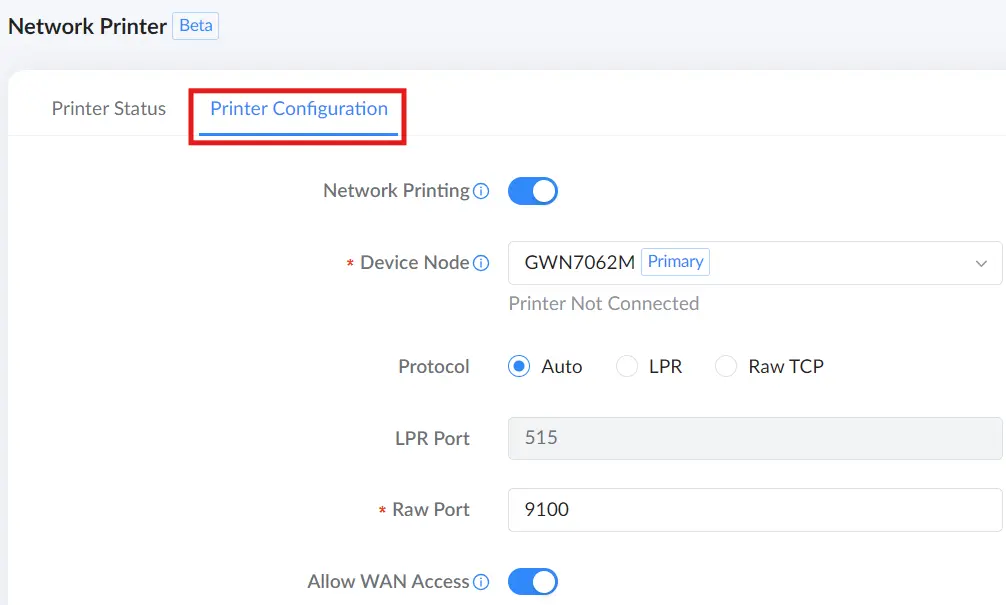
Use the table below as a reference for each option on this page:
Field | Description |
Network Printing | Enables or disables sharing the connected USB printer on the local network. |
Device Node | Selects the mesh unit (node) where the USB printer is physically connected (for example, the primary router or a mesh node). Printer sharing works only when the printer is connected to the selected node. |
Protocol | Selects the method computers must use to print through the router. Choose LPR (port 515) or Raw TCP (port 9100–9102) so the computer-side setup can match the same method. Note: Auto automatically selects a protocol based on printer detection, but manual selection (LPR or Raw TCP) is recommended for predictable behavior. Use Auto only if required. |
LPR Port | Used when LPR is selected. Default is 515. |
Raw Port | Used when Raw TCP is selected. Default is 9100 (range 9100–9102). |
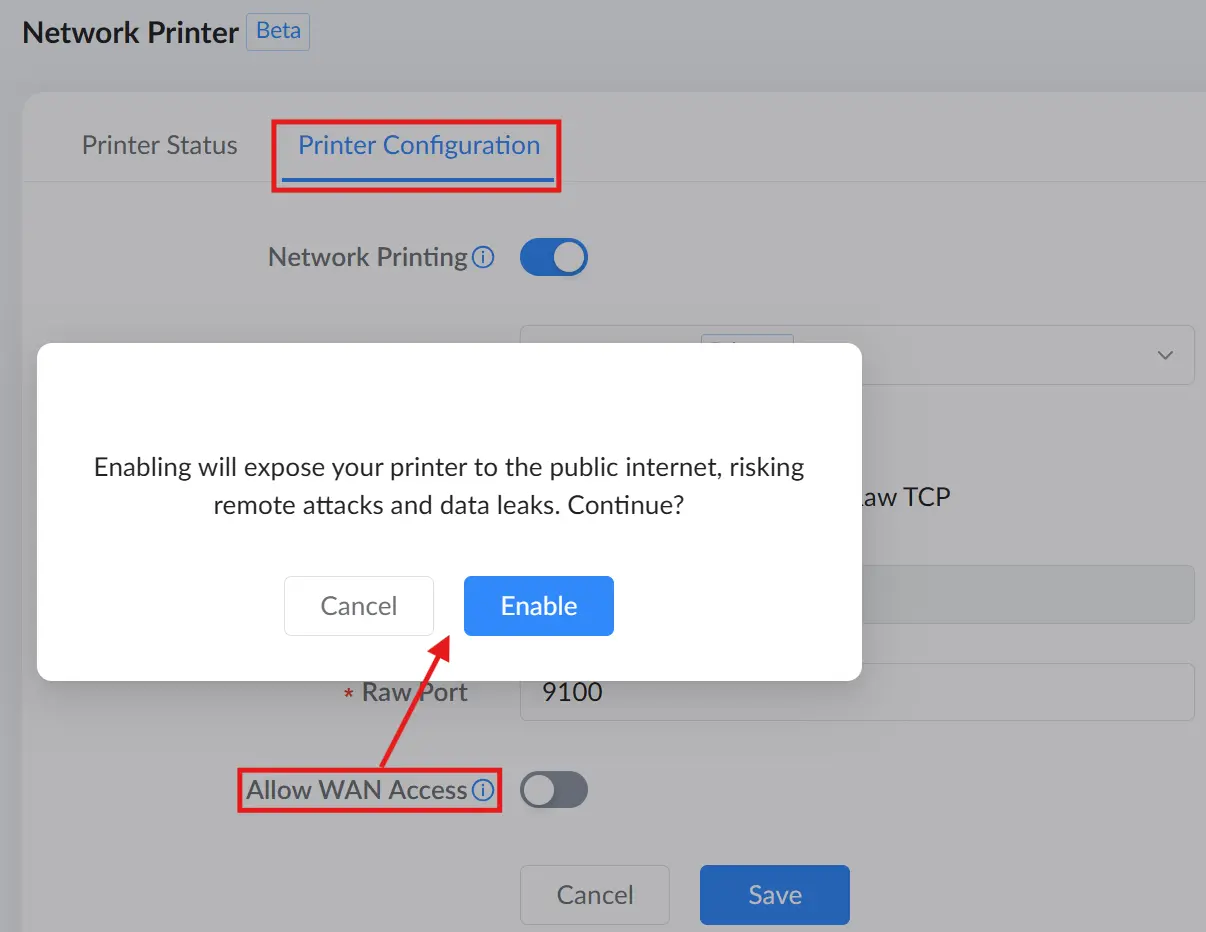
Allow WAN Access | Allows access from outside the local network using the WAN address. This increases exposure and should be enabled only when necessary and secured appropriately. |
Printer Configuration
Note: If you enable Allow WAN Access, the printer can become reachable from outside your local network. Only enable this when it is strictly required, and only after you’ve confirmed you understand the risk (exposure to unauthorized access and potential data leakage). In most deployments, keep this setting disabled.
Computer-Side Configuration (Windows Example)
Step 1: Enable LPR Port Monitor (LPR only)
If you plan to use LPR as the printing protocol, enable the Windows LPR feature first. Open Control Panel → Programs → Turn Windows features on or off, expand Print and Document Services, then enable LPR Port Monitor.
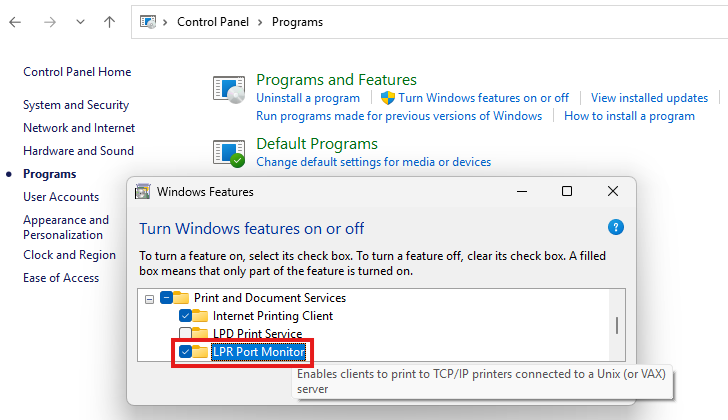
Note: If you are using Raw TCP, skip this step.
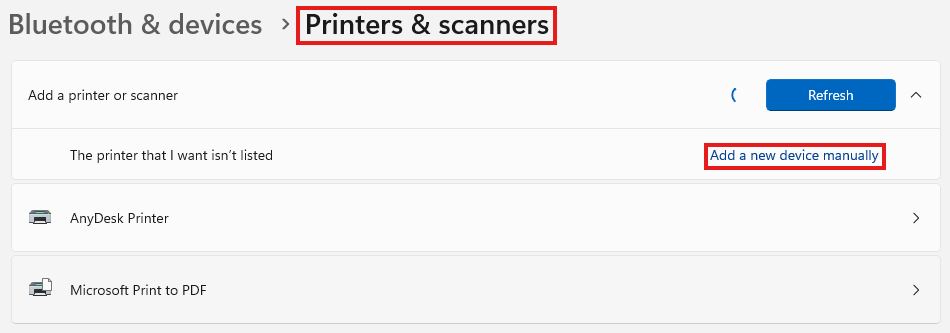
Step 2: Open Printers & scanners and start manual add
Open Settings → Bluetooth & devices → Printers & scanners. If the printer is not detected automatically, click Add a new device manually.
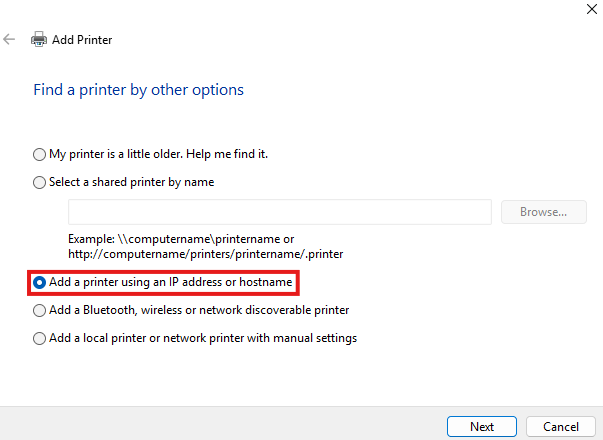
Step 3: Choose the TCP/IP option
In the Add Printer wizard, select Add a printer using an IP address or hostname, then click Next.
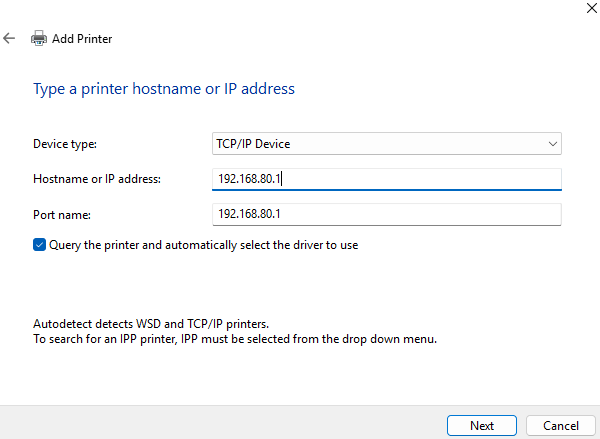
Step 4: Enter the router IP address
For Device type, keep TCP/IP Device. Enter the router’s LAN IP address in Hostname or IP address. Leave Query the printer and automatically select the driver to use enabled, then click Next.
Step 5: Open Custom port settings
If Windows shows Additional port information required, select Custom, then click Settings. This is where you match Windows to the protocol you selected on the router (LPR or Raw TCP).
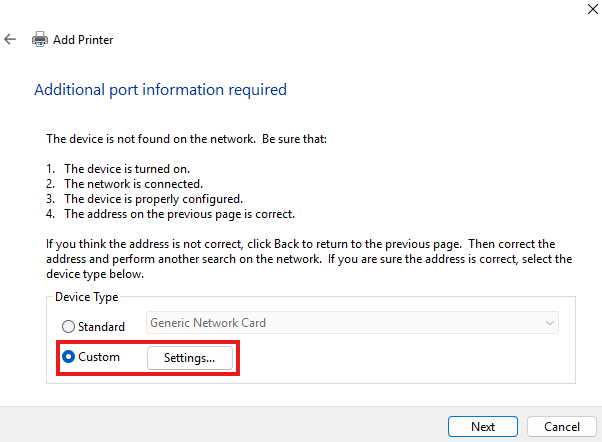
Step 6: Configure the port protocol (LPR or Raw TCP)
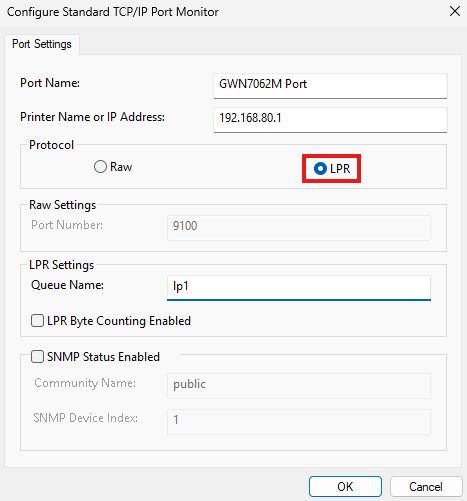
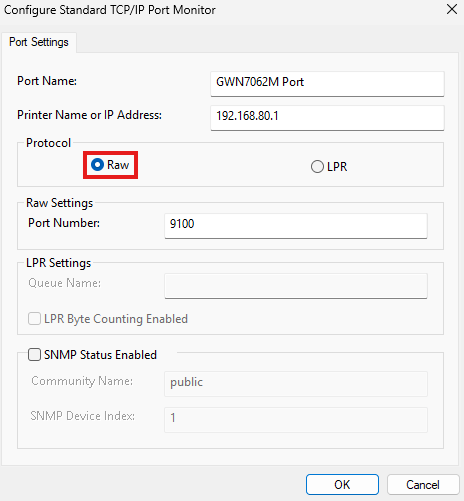
Choose the option that matches the Protocol selected on the router.
- Option A: LPR: Select LPR, set Queue Name to lp1, then click OK.
- Option B: Raw TCP: Select Raw, set Port Number to the router’s Raw Port (default 9100), then click OK.
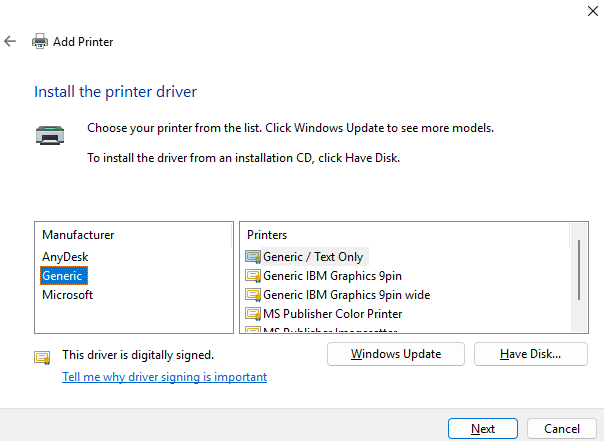
Step 7: Install the printer driver
When prompted, select the correct Manufacturer and Printer model. If the driver is not listed, click Windows Update or select Have Disk… and provide the vendor driver package.
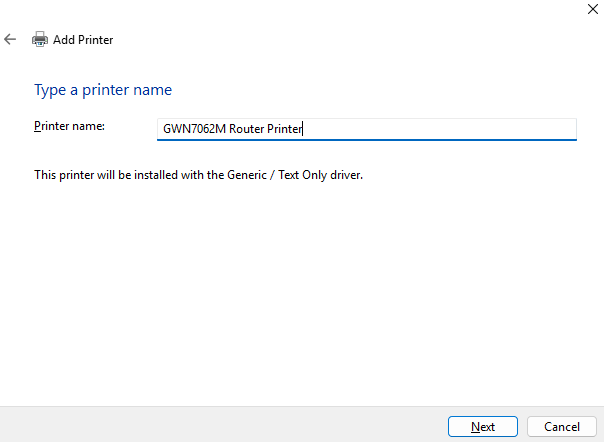
Step 8: Name the printer
Enter a friendly printer name (for example, “GWN7062M Router Printer”), then continue to finish the wizard.
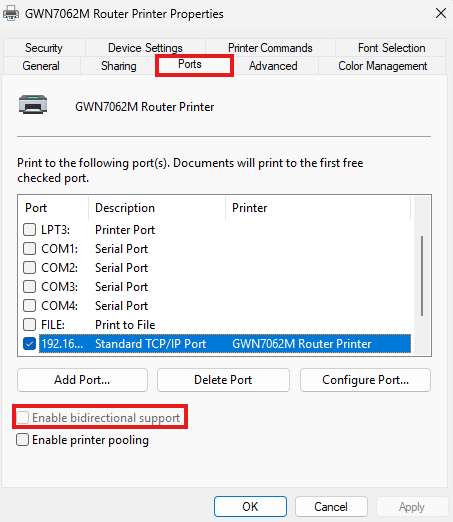
Step 9: Disable bidirectional support (recommended)
After installation, open the printer’s Printer properties, go to the Ports tab, and clear Enable bidirectional support. This can help prevent printing issues when using a shared TCP/IP printer port.
Supported Devices
This guide applies to the following router model: GWN7062M
A USB printer is required and must be physically connected to the router’s USB port. The printer must be powered on and in a ready state so the router can detect it and make it available to network clients.
The following USB printer models have been tested and verified with the GWN7062M Network Printer feature:
- Brother MFC-8535DN
- HP Laser Jet Pro MFP M227Ffdw
Note: Printer compatibility can vary by model and driver support. If the printer is not detected, try a different USB cable, confirm the printer is working locally, and ensure the printer is not connected through an unsupported USB hub.