The UCM630xA supports audio call conferencing which increases employee efficiency and productivity and also provides a more cost-effective way to hold business meetings. A variety of meeting call features are offered by UCM630xA including individual management of meeting call activity, multiple Meeting rooms, meeting bridge, and Meeting schedule.
The UCM630xA supports the Meeting bridge allowing multiple bridges used at the same time:
- UCM6300A supports up to 3 meeting rooms and up to 50 parties
- UCM6302A supports up to 5 meeting rooms and up to 75 parties.
- UCM6304A supports up to 7 meeting rooms and up to 120 parties
- UCM6308A supports up to 9 meeting rooms and up to 150 parties
This document introduces the Meeting options, and meeting bridge configurations including joining, inviting, and recording during meetings.
Meeting Configuration Settings
The meeting configuration settings are available under Web GUI🡪Call Features🡪Meeting.
Create and Edit Meeting Rooms
To create, edit, or delete the meeting rooms please refer to the following steps:
- Access the UCM630xA Web GUI using the administrator username and password. (By default the username is “admin” and the password is a random password that can be found on the sticker at the back of the UCM).
- Navigate to Call Features🡪Meetings 🡪 Room.
- Click on “Add” to add a new Meeting room or click on
 to edit the room.
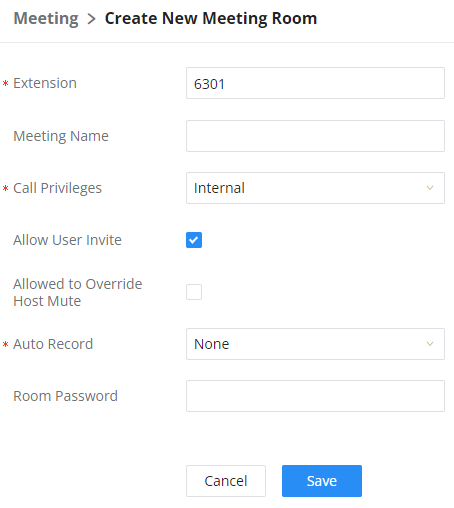
Extension | The number to dial to reach the meeting room. |
Meeting Name | The name of the meeting room. |
Privilege | Select the permission level for outgoing calls. |
Allow User Invite | If enabled, participants can invite other users to the meeting. |
Allowed to Override Host Mute | If enabled, participants will be able to unmute themselves if they have been muted by the host. |
Auto Record | If enabled, the meeting audio will be recorded and saved as a .WAV file with default filename meeting-${Meeting Number}-${UNIQUEID}. Recordings can be downloaded from the Meeting Recordings page. Note: When this option has been enabled the meeting host cannot stop the recording of the meeting. |
Room Password | If meeting room password is configured, meeting participants will need to enter a password to enter the room. Scheduling meetings will not be supported for this room. |
UCM630xA Meeting Room Configuration Parameters
Configure Meeting Settings
Please refer to the following steps in order to configure meeting settings:
- Access the UCM630xA Web GUI using the administrator username and password.
- Navigate to Call Features🡪Meeting.
- Click on “Meeting settings”.
The following table describes the meeting settings in detail:
Meeting Max Concurrent Audio | Maximum number of partipants that can be heard simultaenously in multimedia meetings. If the number of participants talking at any given point exceeds this value, the audio of the excess participants will not be heard. |
Meeting Voice Indicator Sensitivity | Configures the sensitivity of the talking indicator in multimedia meetings. Setting this higher will make the talking indicator appear more easily for lower volumes of audio. Note: This does not adjust audio input sensitivity itself. Lower volumes of sounds may still be heard even if the talking indicator does not show the source. |
Meeting Audio Quality | Audio quality of multimedia meetings |
Meeting Record Prompt | If enabled, system will prompt the user before the start of meeting recording that your meeting will be recorded. |
Allow New Participants To View Chat History | Configure whether new attendees joining in the middle of a Wave meeting can view the chat content already in the meeting. |
Meeting AGC (beta) | Enabling this option will toggle on Automatic Gain Control for meeting audio. AGC is a system that dynamically reduces the variability of sound levels by adjusting high and low volumes based on the average or peak sound level. High volume sounds will be lowered, and low volume sounds will be boosted. |
Silence Suppression | Silence suppression for temporary accounts (e.g., meeting participants that joined the meeting via link). If enabled, the UCM will send CN packets for silence suppression after a successful CN negotiation in the SIP SDP. If the client endpoint's OPUS codec supports the reception of DTX packets, the UCM will send DTX packets instead. |
Add Switchboard Number Information to Email | Configure whether to add the enterprise switchboard number to the meeting notification email. The participants can join the meeting through the enterprise switchboard number. For security reasons, this information will only added for email of random meeting that do not use existing public meeting rooms. |
The Switchboard Number in Email | The selected switchboard number will be displayed in the meeting notification email. |
Enable Talk Detection | If enabled, the AMI will send the corresponding event when a user starts or stops talking. |
DSP Talking Threshold (ms) | The amount of time(ms) that sound exceeds what the DSP has established as the baseline for silence before a user is considered to be talking. This value affects several operations and should not be changed unless the impact on call quality is fully understood. |
DSP Silence Threshold (ms) | The amount of time(ms) that sound falls within what the DSP has established as the baseline for silence before a user is considered be silent. This value affects several operations and should not be changed unless the impact on call quality is fully understood. |
Max Number of Video Feeds | Set the maximum number of video feeds supported per meeting room. |
Audio Codec Preference | Configures the preferred codecs for temporary accounts such as meeting participants who joined via link. |
Packet Loss Retransmission | Packet Loss Retransmission configuration for temporary accounts (meeting participants without registered extensions who entered the meeting via link). |
Jitter Buffer | Select the jitter buffer method for temporary accounts such as meeting participants who joined via link.
|
Meeting Settings
Schedule a Meeting
Meeting schedule Settings can be found under UCM630xA web GUI🡪Call Features🡪Meetings🡪 Meeting Schedule.
Users can create, edit, view, and delete a Meeting Schedule.
- Click on “Schedule Meeting” to add a new Meeting Schedule and configure schedule settings.
- Or, click on the scheduled meeting to edit or delete the event.

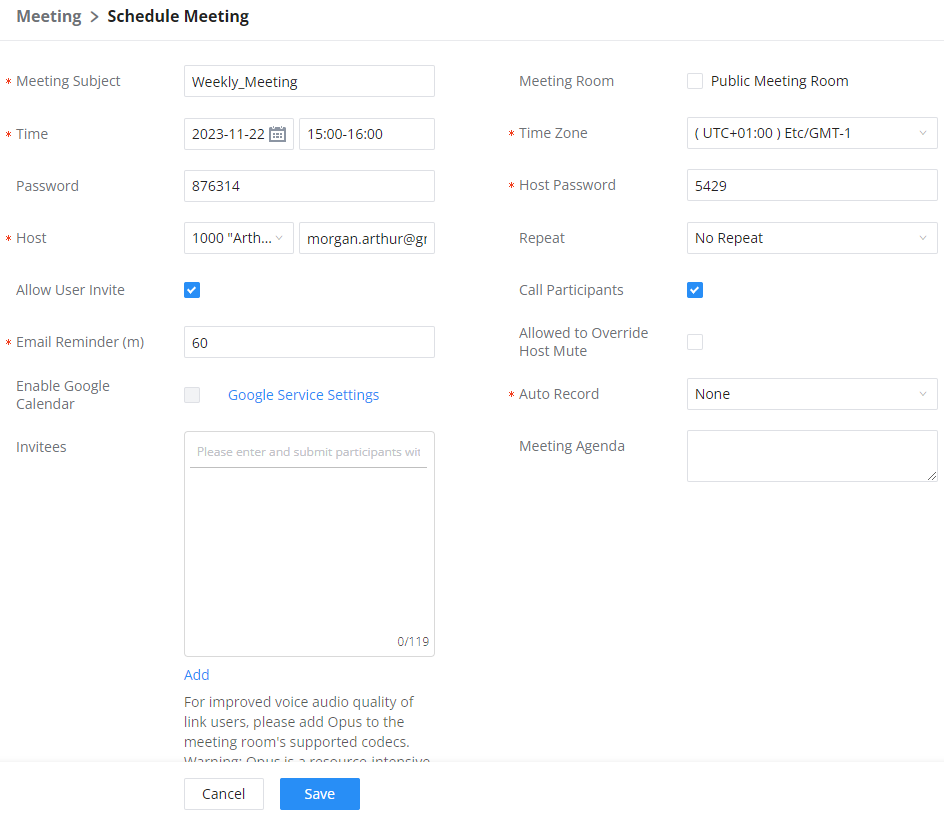
The following table describes the meeting schedule settings:
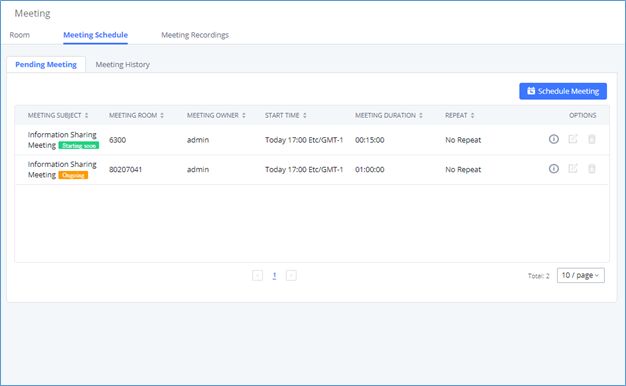
The list of meetings will be shown as below:
Schedule Options | |
Meeting Subject | Configure the name of the scheduled meeting. Letters, digits, Other special characters are also supported. such as #%&@*= |
Meeting Room | Choose which room to have this scheduled meeting. |
Time | Configure the meeting date and time. |
Time Zone | Select the meeting time zone. |
Password | Configure the meeting's login password. |
Host Password | Configure the Host Password. Note: It is randomly generated when first creating a new meeting Schedule. |
Host | Configure Host. |
Repeat | Choose when to repeat a scheduled meeting. |
Allow User Invite | If this option is enabled, the user can:
Note: Meeting host is always allowed to access this menu. |
Call Participant | If enabled, the invited participants will be called upon meeting start time. |
Allowed to Override Host Mute | If enabled, participants will be able to unmute themselves if they have been muted by the host. |
Email Reminder (m) | Email reminders will be sent out x minutes prior to the start of the meeting. Valid range is 5-1440. 60 is the default value. 0 indicates not to send out email reminders for the meeting. Note: After editing the time of a single recurrence of a scheduled meeting, a cancelation email will now be sent out followed by a meeting update email. |
Auto Record | If selected, the meeting will be recorded and saved as either a .WAV or .MKV file. The default filename is meeting-${Meeting Number}-${UNIQUEID}. Recordings can be downloaded from either the Meeting Recordings or the Meeting Video Recordings page. Video recordings require external storage to be available. When recording a screen share, only the screen share and meeting audio will be recorded. Note: Please note that UCM63XX Audio Series doesn't support Screen Sharing, Whiteboard, or PDF file sharing. |
Enable Google Calendar | Select this option to sync scheduled meeting with Google Calendar. Note: Google Service Setting OAuth2.0 must be configured on the UCM630X. Please refer to section [Google Service Settings Support]. |
Meeting Agenda | Enter information about the meeting, e.g., the purpose of the meeting or the subjects that will be discussed in the meeting. |
Invitees | Local extensions, remote extensions, and special extensions are supported. |
UCM630x/A Scheduled Meeting Parameters
The Meeting History section is showing the list of ended meetings:
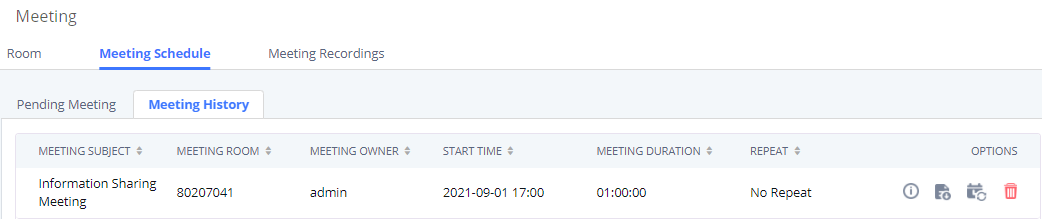
From this section, Users can download the meeting report by pressing on the Download icon next to the meeting entry:

The meeting reports are in PDF format and contain various meeting information and statistics such as the number of attendees and the Device type from which the attendees were accessing the meeting.
Users can also Reschedule the meeting by pressing on the Reschedule icon and then entering the new meeting details:

Users can also Delete the meeting from the Meeting history by pressing on ![]() , and view the meeting details by pressing on
, and view the meeting details by pressing on ![]() button, as shown in the below figure:
button, as shown in the below figure:

Join a Meeting
The UCM630xA allows users to dial the meeting number to join the meeting. If the password is required, users need to enter the password to join the meeting as a normal user or enter the Host password to join the meeting as an administrator.
Meeting Recordings
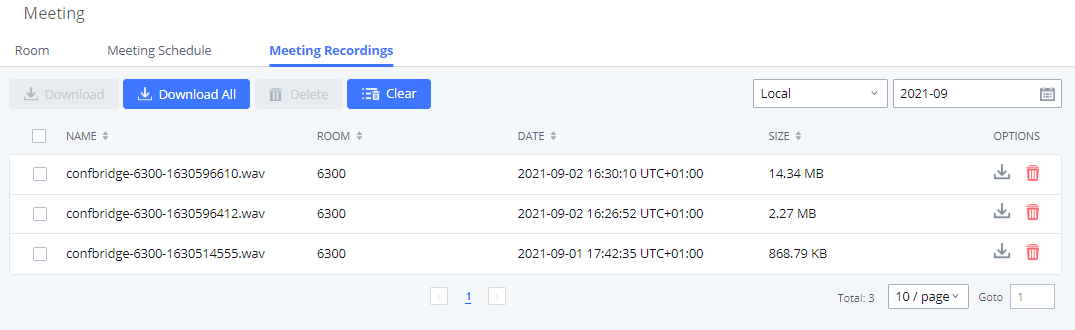
The UCM630xA allows users to record the meeting call and retrieve the recording from web GUI🡪Call Features🡪Meeting🡪Meeting Recordings.
To record the Meeting call, Users need to enable the Record Meeting option While creating a new meeting room or when scheduling the meeting.
When the Meeting starts, the call will be automatically recorded in .wav format. The recording files will be listed under Meeting Recording as below once available. Users could click on
![]() to download the recording or click on
to download the recording or click on
![]() to delete the recording. Users could also delete all recording files by clicking on “Delete All Recording Files”, or delete multiple recording files at once by clicking on “Delete Selected Recording Files” after selecting the recording files.
to delete the recording. Users could also delete all recording files by clicking on “Delete All Recording Files”, or delete multiple recording files at once by clicking on “Delete Selected Recording Files” after selecting the recording files.
Manage The Meeting Room
The following steps allow managing meeting rooms using the web GUI or IVR during a meeting call.
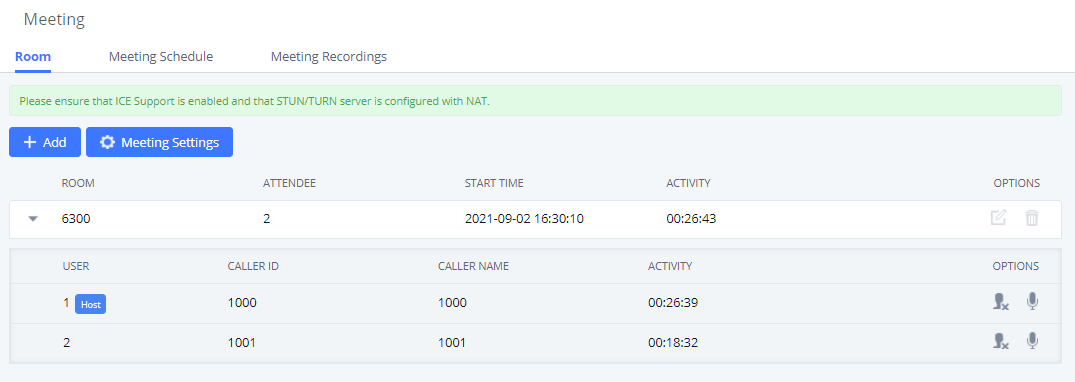
Manage The Meeting room from Web GUI
Access the UCM630xA web GUI during the meeting call 🡪 Call Features 🡪 Meeting and choose your Meeting room. The following operation can be done
-
Click on
 to kick a participant from the meeting.
-
Click on
 to mute the participant.
Manage Meeting Calls from IVR
During the meeting, meeting participants can input * to enter the IVR menu for the meeting. Please see the options listed in the table below.
Meeting Administrator IVR Menu | |
0 | Change your role. Press 1 to change your role to participant. |
1 | Mute/unmute yourself. |
2 | Lock/unlock the Meeting. |
3 | Kick the last joined user from the Meeting. |
4 | Decrease the volume of the Meeting. |
6 | Increase the volume of the Meeting |
7 | Decrease your volume. |
9 | Increase your volume. |
8 | More options.
|
Meeting Paricipant IVR Menu | |
0 | Change your role. Press 1 followed by the host password to become meeting host. |
1 | Mute/unmute yourself. |
4 | Decrease the volume of the Meeting. |
6 | Increase the volume of the meeting call. |
7 | Decrease your volume. |
9 | Increase your volume. |
8 | Exit the caller menu and return to the meeting. |
Meeting Caller IVR Menu
Invite Other Parties to Join The meeting
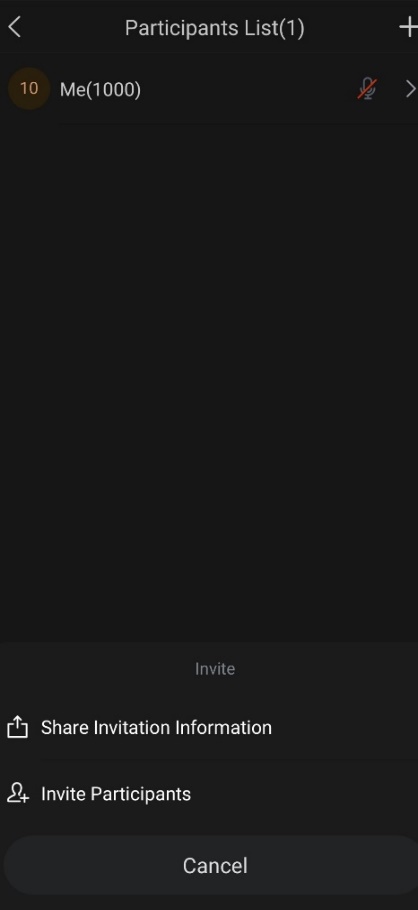
The meeting host and participants can invite other participants to the meeting from the meeting menu and choose to Invite other participants. After Inputting the participant number, the UCM will send a call to this number to join the meeting. Using the Wave app, for example, users can press on the Meeting symbol ![]() then on
then on ![]() and choose to Invite Participants Users can choose the participant from their contacts or dial a new number and the UCM will send the meeting invitation to the chosen destination.
and choose to Invite Participants Users can choose the participant from their contacts or dial a new number and the UCM will send the meeting invitation to the chosen destination.
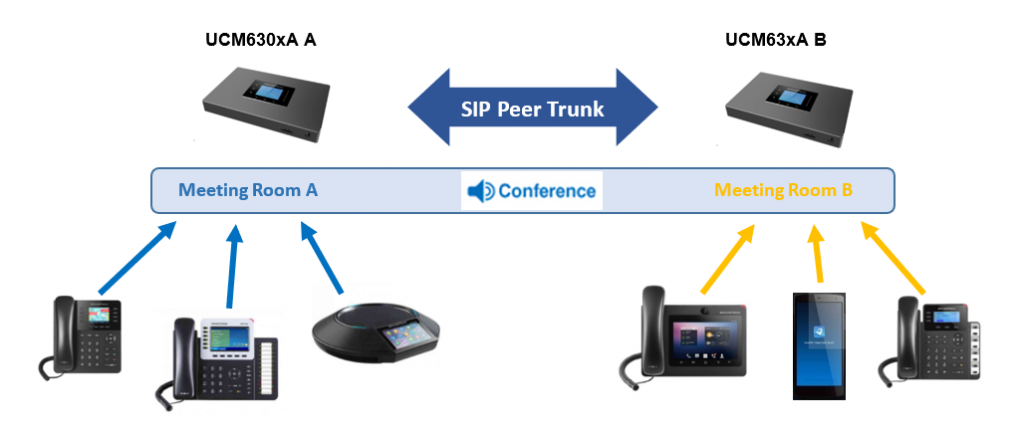
Multiple Meeting Bridges
The UCM630xA supports multiple Meeting bridges between different meeting (remote or local) rooms to essentially bridge two meeting rooms together reducing bandwidth usage as displayed on the following diagram illustrates a meeting bridge between two UCMs in a peered scenario.
In the following scenario, we are using the UCM6308A and the GXP21xx as an example.
During a meeting, please follow the steps below in order to bridge a meeting from your GXP21xx:
- Press on ConfRoom Softkey.
- Press on ConfMenu Softkey to access the meeting menu.
- Choose Bridge Meeting under option.
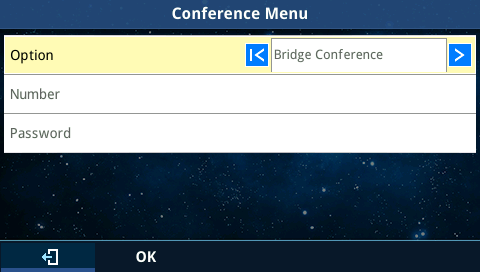
- Enter the remote meeting number that you would like to invite and its appropriate password.
- Click on “OK” to bridge meeting rooms.

Users can press on ConfMenu softkey afterward and choose Unbridge All to unbridge the meeting.
Meeting Schedule Example Application
This chapter illustrates an example of configuring the meeting schedule feature.
The sales director of the company “ABC” needs to organize a meeting and invite different sales managers to discuss different topics. We will assume the following:
- The sales director needs to have a meeting room available on extension number 6300 which will allow him to invite Sales Team members to discuss different topics.
- Every Monday at 9 AM, the sales director will organize with the sales team a meeting to discuss different topics and assign new tasks, the meeting room used to host this weekly meeting is 6301.
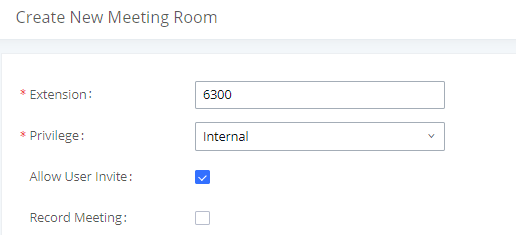
- Configuring Meeting Room 6300
Please refer to the following steps in order to configure the meeting room 6300:
- Access the Web GUI of the UCM630xA using the administrator username and password
- Navigate to Call Feature 🡪 Meeting 🡪 Room.
- Click on “Add“.
- Set the extension number to 6300.
- Press the Save button to save the new meeting room.
Once creating Meeting room 6300, the sales director can initiate the Meeting by dialing 6300 and inviting other participants. Please check the Invite Other Parties to Join The Meeting section in order to invite participants.
- Configuring Meeting Room 6301
The Meeting room 6301 is programmed to host the weekly meeting, on the following steps we will create a new meeting schedule:
- Access the Web GUI of the UCM630xA using the administrator username and password.
- Navigate to Call Feature 🡪 Meeting.
- Click on “Add “.
- Set the extension number to “6301”.
- Press the Save button to save the new Meeting room.
- Access to Call Feature 🡪 Meeting schedule.
- Click on “Schedule “.
- Set the “Meeting subject”, choose Use Existing Meeting Room under the “Meeting room option, and select Room 6301.
- Configure the “Time” of the meeting, the Host number, and the Invitees.
- Since this meeting is planned for each week, configure “Repeat” to weekly.
- Press the Apply Changes button to save and apply the new settings on the UCM630xA.