IVR (Interactive Voice Response) is a telephony technology in the telecom industry allowing customers to interact with the host system in real-time through a configurable voice menu using the caller’s DTMF tones.
When accessing the IVR system, customers are usually prompted with a welcome message and provided with different destinations where they can be redirected by pressing appropriate digit(s).
IVR systems are used in many industries where customers need to interact with the system to access appropriate service or departments without passing by a receptionist, such as in banks, call centers, customer services companies, hotels, insurance companies, hospitals, and more.
In other words, IVR can be considered as a digital receptionist with no need for a receptionist. IVR can be also used in conjunction with an office receptionist.
This document introduces the configuration of the IVR on the UCM6xxx series with examples illustrating the use of its features.
IVR Configuration
Using the UCM6xxx series, administrators can create up to 500 IVR systems. UCM6xxx series support IVR with up to 5 layers.
Please refer to the following paragraphs in order to configure the IVR on the UCM6xxx Series:
IVR Creation (Basic Settings)
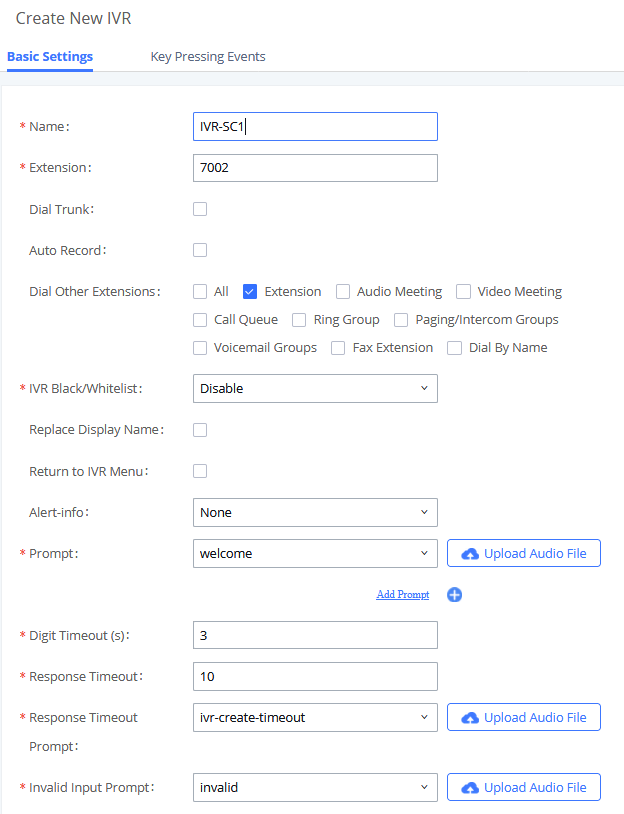
IVR features menu is accessible on the UCM6xxx series under Web GUI 🡪 Call Features 🡪 IVR.
First press “Create New IVR” to create a new IVR system.
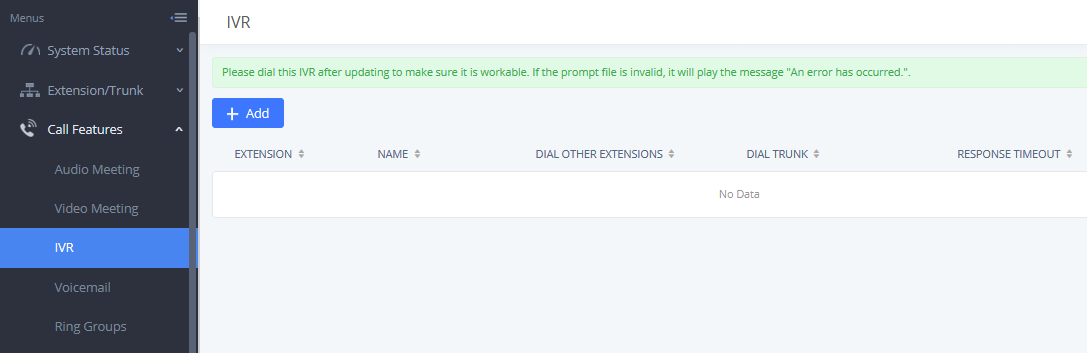
- Click on “Create New IVR” to add a new IVR.
-
Click on
 to edit the IVR configuration (if available).
-
Click on
 to delete the IVR (if available).
Once
![]() is pressed, you will be redirected to IVR configuration interface as displayed on the following screenshot.
is pressed, you will be redirected to IVR configuration interface as displayed on the following screenshot.
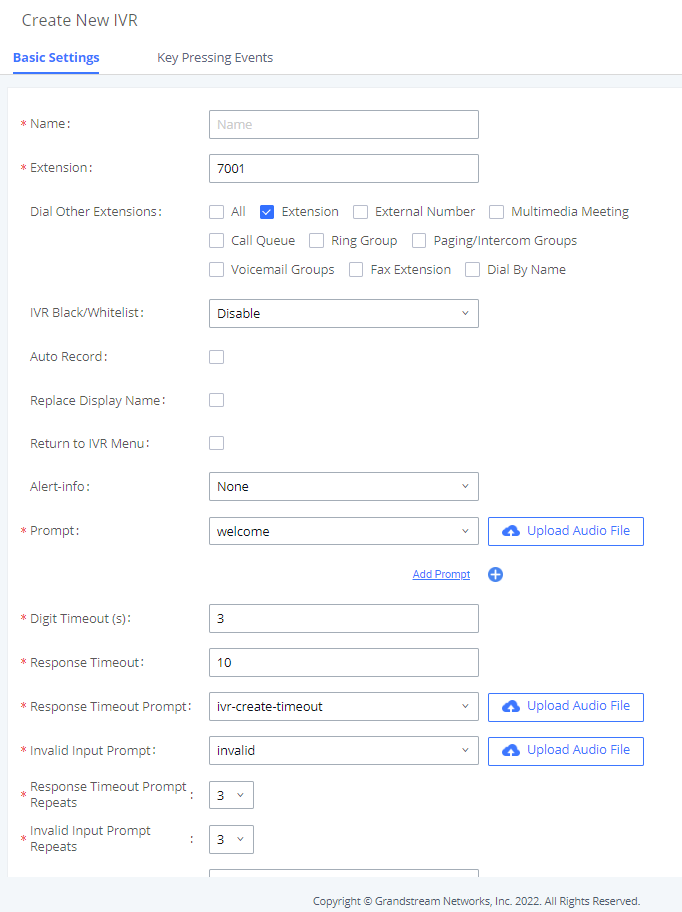
The following table describes the basic configuration options available for IVR features:
Name | Configures the name of the IVR. Letters, digits, _ and – are allowed. |
Extension | Specifies the extension number for users to access the IVR. |
Dial Other Extensions | Controls the destination that can be reached by the external caller via the inbound route. In other words, if enabled, callers can dial an extension number when accessing IVR and the call will be redirected to entered extension destination. The available destinations are:
|
IVR Black/Whitelist | Allows users to restrict the extensions that can be reached from IVR.
|
Auto Record (UCM630x/UCM630xA only) | If enabled, calls to this IVR will automatically be recorded. |
Replace Display Name | If enabled, the UCM will replace the caller display name with the IVR name the caller know whether the call is incoming from a direct extension or an |
Return to IVR Menu | If enabled and if a call to an extension fails, the caller will be redirected to the IVR menu. |
Alert-Info | When present in an INVITE request, the alert-Info header field specifies an alternative ring tone to the UAS. |
Prompt | Selects an audio file to play as the welcome prompt for the IVR, users can use up to 5 IVR welcome prompts. Click “Record New Custom Prompt” to add audio file(s) under web GUI🡪PBX Settings🡪 Voice Prompt🡪 Custom Prompt. (Please refer to Create Custom Prompt ) |
Digit Timeout | After the user enters a digit, the user needs to enter the next digit within the timeout. If no digit is detected within the timeout, the PBX will consider the entries complete. The default timeout is 3 seconds. |
Response Timeout | Timeout occurs when no DTMF entry is detected for the configured number of seconds after the IVR finishes playing the prompts. |
Response Timeout Prompt | Play the selected prompt if response timeout occurs. |
Response Timeout Prompt Repeats | Number of times to repeat the prompt. |
Invalid Input Prompt Repeats | Number of times to repeat the prompt. |
Language | Select voice prompt language for this extension. If set to "Default", the global setting for voice prompt language will be used. |
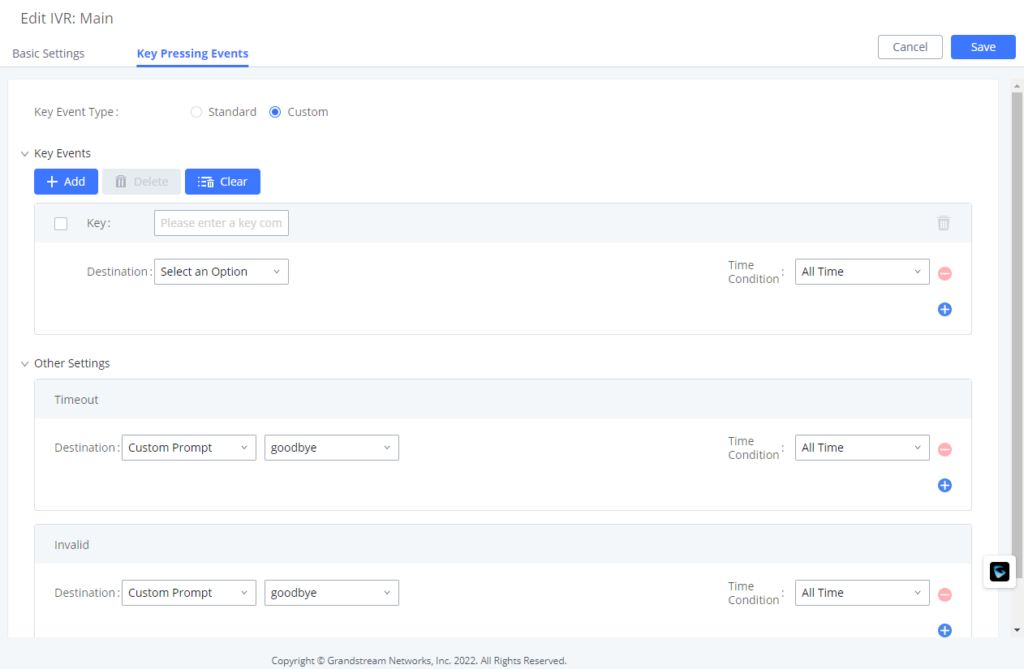
IVR Managing (Key Pressing Events)
Key Pressing Event: Standard
After creating the IVR system, the administrator needs to configure “Key Pressing Events” by assigning a keypress to a specific action or destination.
To manage IVR events, access the “Key Pressing Events” tab as shown in the below screenshot and assign digits to use with the appropriate destination or action.
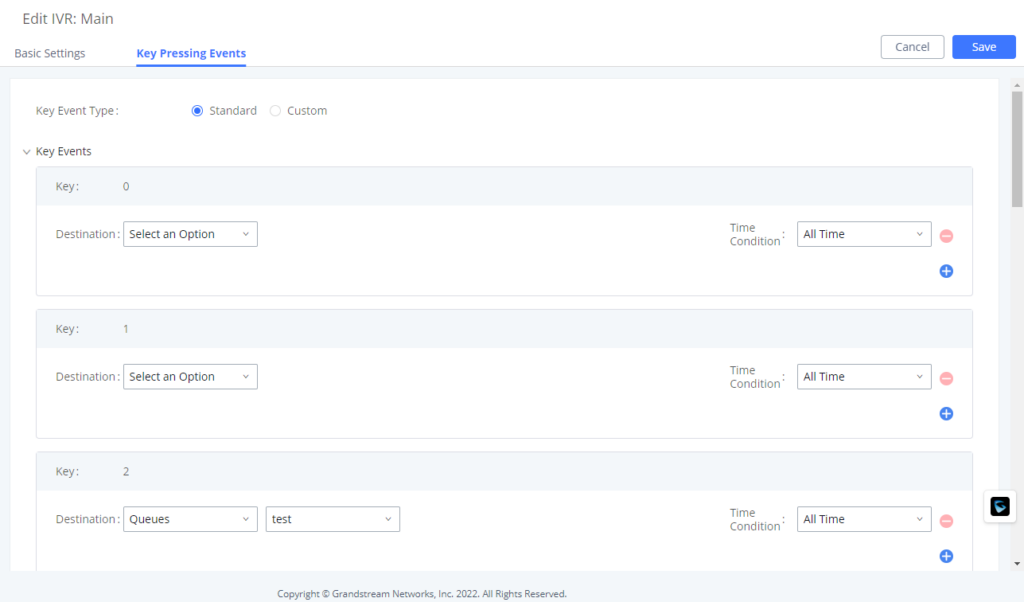
The following table describes available options that can be assigned on Key Pressing Events:
Key Pressing Events | |
Key Press Event: Press 0 Press 1 Press 2 Press 3 Press 4 Press 5 Press 6 Press 7 Press 8 Press 9 Press * | Select the event for each key pressing from 0-9, *, Timeout and Invalid. The event options are:
|
Timeout | Configures the destination when the Timeout Repeat Loop is done. |
Invalid | Configures the destination when the Invalid Repeat loop is done. |
Key Pressing Event Type: Custom
Custom Key Pressing Event type allows the administrator to configure a combination of digits that will be used to interact with the IVR in comparison with the standard Key Pressing Event type which has only one digit input.
Create Voice Prompt
Prompts on IVR can be customized/personalized at the customer’s convenience by either recording or uploading new prompts.
Click on the “Prompt” option as shown on the following figure to be redirected to the “Voice Prompt” page, or go to Web GUI🡪PBX Settings🡪 Voice Prompt🡪 Custom Prompt page directly.

Once the IVR prompt file (created/uploaded) is successfully added to the UCM6xxx, it will be shown in the prompt list options to select in different IVR scenarios.
Record New Custom Prompt
In the UCM6xxx Web GUI🡪PBX Settings🡪 Voice Prompt🡪 Custom Prompt, click on “Record New Custom Prompt” and follow the steps below to record a new IVR prompt.
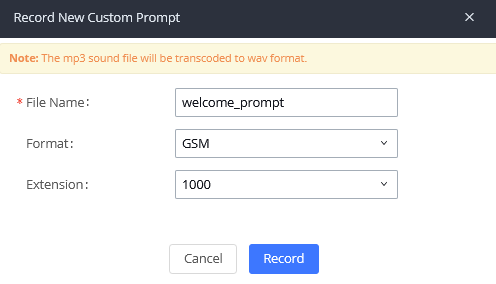
- Specify the custom prompt file name.
- Select the format (GSM or WAV) for the IVR prompt file to be recorded.
- Select the “Extension” to receive the call from the UCM6xxx to record the IVR prompt.
- Click the “Record” button. A call will be initiated to the selected extension.
- Pick up the call and start the recording following voice prompts.
- The recorded file will be listed in the IVR Prompt web page (see figure 6). Users could select to re-record, play, download or delete the recordings.
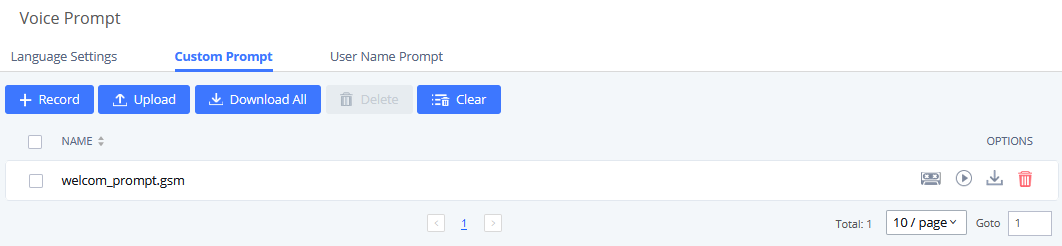
Upload Custom Prompt
If the user has a pre-recorded IVR prompt file, click on “Upload Custom Prompt” in Web GUI under PBX Settings 🡪 Voice Prompt 🡪 Custom Prompt page to upload the file to the UCM6xxx.
Following are IVR prompt requirements to be accepted by the UCM6xxx series:
- PCM encoded.
- 16 bits.
- 8000Hz mono.
- In .mp3 or .wav format; or raw/ulaw/alaw/gsm file with .ulaw or .alaw suffix.
- File size under 5M.
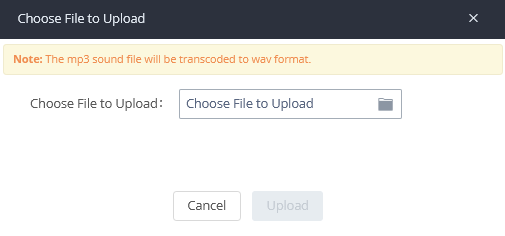
Click on “Choose File to Upload” to select an audio file from the local PC and start uploading it. Once uploaded, the file will appear on the “Custom Prompt” web page.
Accessing IVR Menu
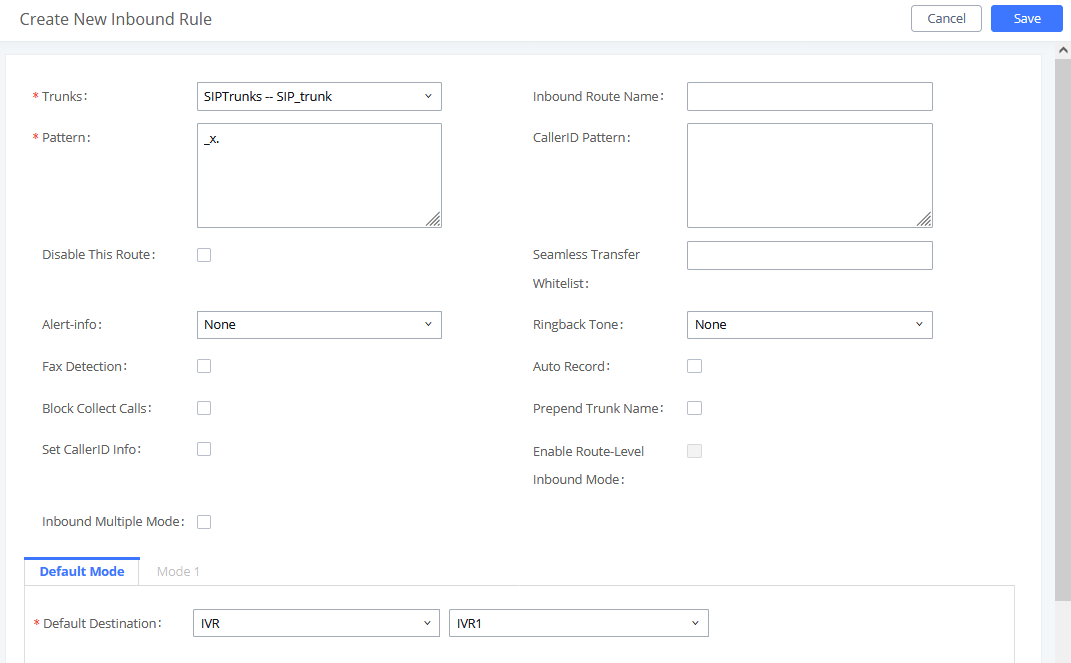
To access the IVR menu, users can either call directly the IVR’s extension or configure it as default destination for incoming calls via trunks using inbound routes.
To configure the default destination of the inbound routes, please refer to the following steps:
- Access the web GUI of the UCM6xxx.
- Navigate to Extension/Trunk 🡪 Inbound routes.
- Under default mode section, configure “Default destination” to the IVR configured as displayed on following figure.
IVR Application Examples
This chapter illustrates IVR application examples in different scenarios.
The following examples show how IVR can be used in different scenarios.
Example 1: Basic IVR System
The company ABC needs to have an IVR allowing callers to be redirected to different departments (sales, marketing, support…).
In this scenario we will assume the following:
- Inbound route is configured to redirect all the incoming calls to IVR-SC1.
- Calls redirected to sales will be handled by sales agents. (Sales_Ring_Group).
- Calls redirected to marketing will be handled by a marketing agent. (Marketing_Extension (2002)).
- Calls redirected to support will be handled by a support engineer. (Support_Call_Queue).
- Calls redirected to customer services will be handled by customer service agents. (Customers_Service_Ring_Group).
- Calls redirected to after sales service will be handled by a sales agent. (Sales_Call_Queue).
- Calls redirected to manager’s assistant will be handled by an assistant. (Manager_Extension (2001)).
We assume that all ring groups, call queues, extensions, inbound routes used in this example are previously configured.
In order to fulfill company ABC requirements, we need to create an IVR “IVR-SC1” and configure “Key Pressing Events”.
The following screenshots show needed configuration on “IVR-SC1” including “Key Pressing Events” settings:

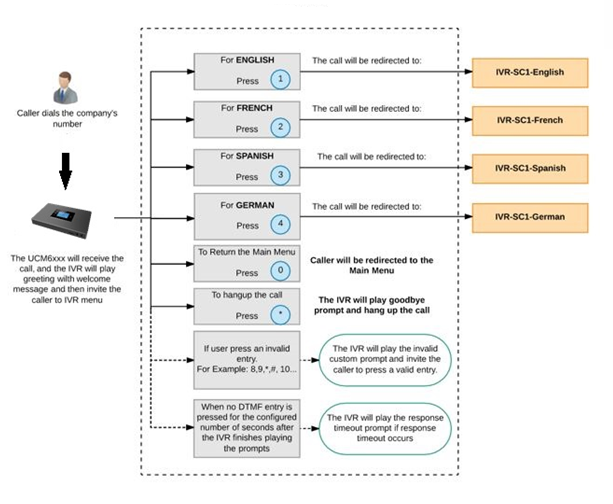
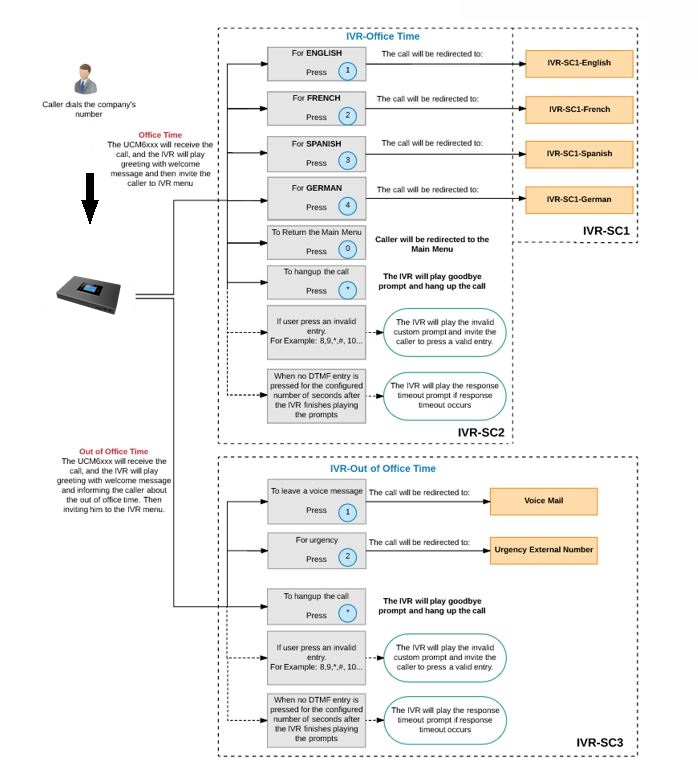
Example 2: Multi-layer IVR System
The same company ABC (in scenario 1) wants to upgrade its IVR system allowing the support of multilanguage, so customers can select a specific language to be used when playing prompts.
To achieve this, company ABC needs to create different IVRs and use IVR layers supported on the UCM6xxx series (5 layers supported).
We will assume the following:
- The inbound routes on UCM6xxx series are configured to redirect all the incoming calls to IVR-SC2.
- If user select English language, the call will be redirected to IVR-SC1-English.
- If user select French language, the call will be redirected to IVR-SC1-French.
- If user select Spanish language, the call will be redirected to IVR-SC1-Spanish.
- If user select German language, the call will be redirected to IVR-SC1-German.
First, we need to create different IVRs (in different languages) with the same configuration as shown in the previous example, with the “Language” option set and voice prompts uploaded/recorded in the appropriate language.
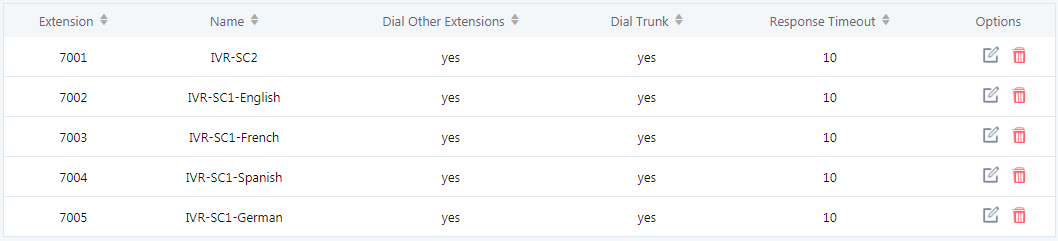
The IVRs created are IVR-SC1-English (7002), IVR-SC1-French (7003), IVR-SC1-Spanish (7004), and IVR-SC1-German (7005).
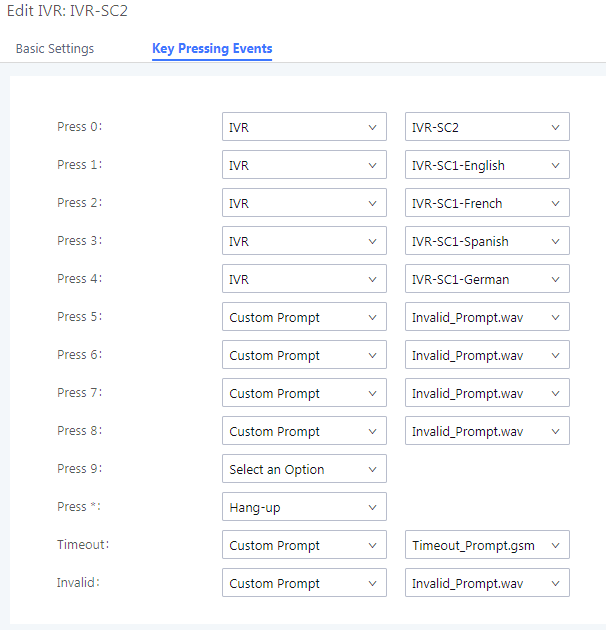
Then, we create “IVR-SC2” (7001) which will be the main IVR, and configure “Key Pressing Events” to connect to specific IVR depending on the language selected. IVR-SC2 will be using “Default” language.
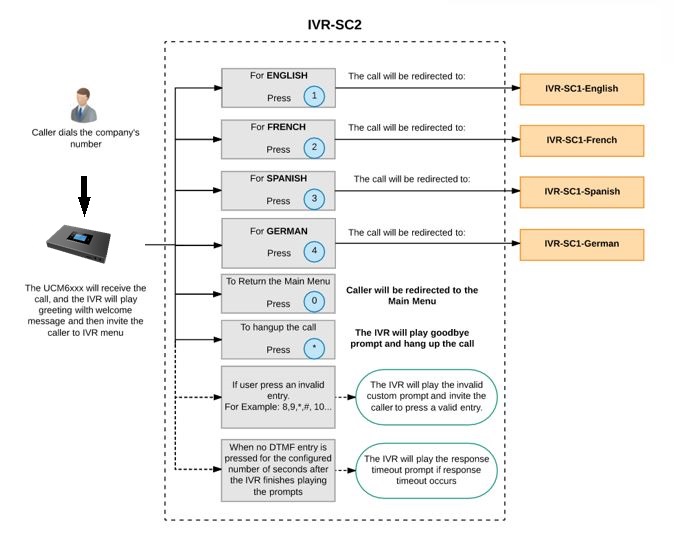
Once the caller dials the company’s number, the IVR plays a greeting message and invites him to select the desired language, and then, the IVR will play selectable menu items.
The following screenshot displays the different IVRs created.
Please refer to the following screenshot describing the basic configuration of IVR-SC2:

The following screenshot shows “Key Pressing Events” settings on IVR-SC2 allowing redirection to other IVRs depending on the customer’s choice.
Please refer to the following diagram explaining the IVR application in detail.
Example 3: IVR System based on Time
The same company ABC (in previous examples) wants to upgrade again its IVR system with one IVR accessible during office time, and another one accessible out of office time.
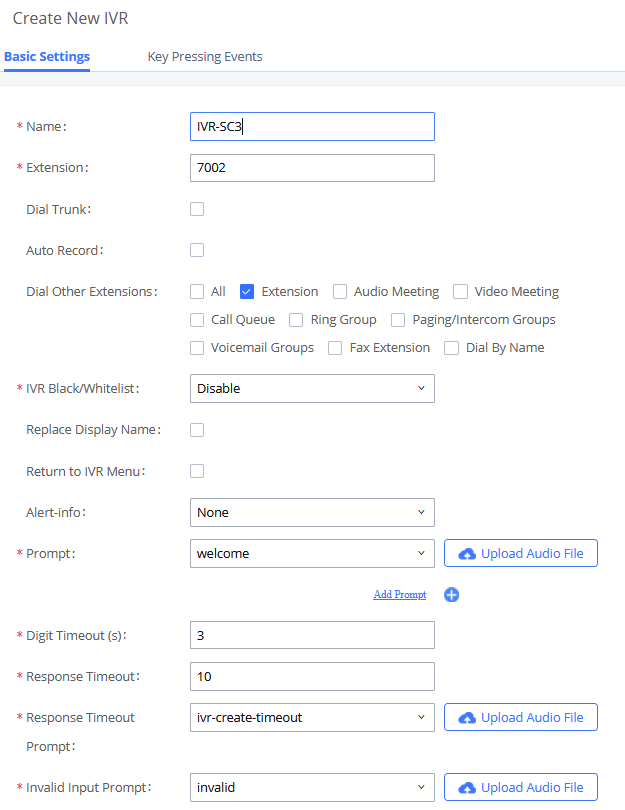
To achieve this, company ABC needs to create different IVR (IVR-SC3 for out office time).
We will assume the following:
- The “office time” has been previously set and inbound routes are configured to route incoming calls during office time to IVR-SC2, and to IVR-SC3 during out of office time.
Note:
- For more details about how to manage the inbound route, please refer to following guide:
https://documentation.grandstream.com/knowledge-base/how-to-manage-inbound-outbound-routes/
- For more details about how to configure the office time, please refer to following guide:
https://documentation.grandstream.com/knowledge-base/managing-office-time-holidays/
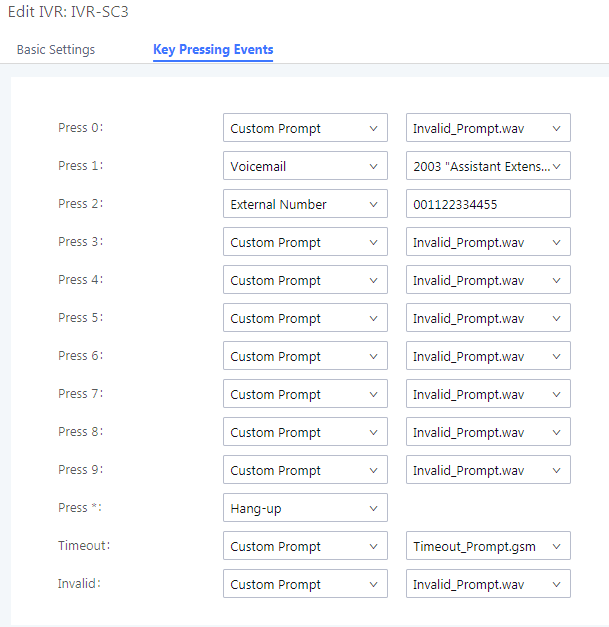
- IVR-SC3 will play a welcome and greeting message and then inform the caller about out of office time using a specific prompt message named in our example as “Out of office message” and then it will play a selectable menu items.
- If users select first choice, the call will be redirected to the Voice Mail.
- If users select second choice, the call will be redirected to an External Emergency Number (001122334455)
The following screenshots show needed configuration on “IVR-SC3” including “Key Pressing Events” settings:
Please refer to the following diagram explaining the IVR application in detail.