
Thank you for using Wave Lite. To meet the requirements of our customers, Wave Lite emerged on the basis of our existing multimedia VoIP Phones and enable users to move freely and continue to receive calls from any business or residential SIP account. The Wave Lite is a free softphone application that allows users to connect to their SIP accounts from anywhere in the world and it supports AndroidTM 4.0 and higher, and it is compatible with most of AndroidTM mobile phones and tablets.
By combining powerful phone functions and integration of Grandstream UCM applications, businesses throughout the world can use Wave Lite for all communication and productivity requirements with unprecedented high-quality experience.
PRODUCT OVERVIEW
Feature Highlights
The following tables contain the major features of the Wave Lite IOSTM:
Wave Lite AndroidTM 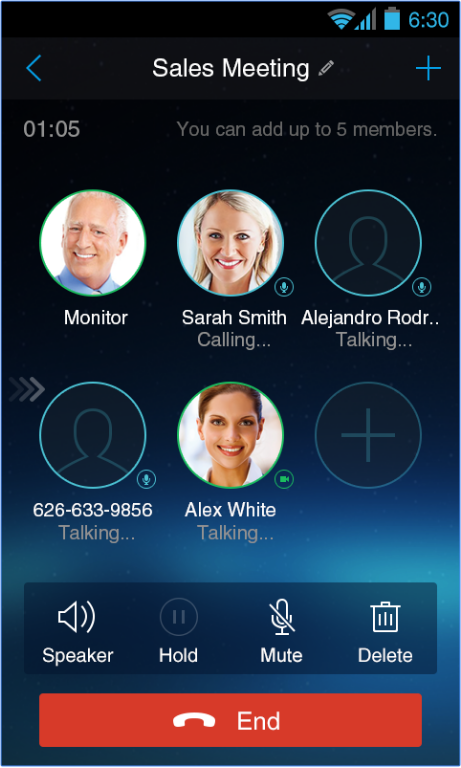
|
|
Wave Lite Technical Specifications
The following table resumes all the technical specifications including the protocols / standards supported, voice codecs, telephony features, languages, and upgrade/provisioning settings for the Wave Lite:
Lines | 6 lines with up to 6 independent SIP accounts |
Protocols and Standards | SIP RFC3261, TCP/IP/UDP, RTP/RTCP, HTTP/HTTPS, DNS (A record, SRV, NAPTR), STUN/ICE, SIMPLE, LDAP, TLS, SRTP, IPv6 |
Network | Support 2G/3G/4G and WiFi |
Graphic Display | 480×800 resolution or higher |
Camera | Support forward or rear facing cameras |
Bluetooth | Yes, supports mobile device’s bluetooth |
Support G.711µ/a, G.722 (wide-band), G.726-32, iLBC, G.729, GSM, DTMF(In audio, RFC2833, SIP INFO), Opus, HD Audio, H264, video resolution up to 720p HD, FIR and PLI | |
DTMF | In audio, RFC2833, SIP INFO |
Audio Quality | Full-duplex speaker, AEC, AGC, Noise Reduction, PLC, Adaptive JIB |
Telephony Features | Call hold, mute, transfer, forward (unconditional/no-answer/busy/time-based) , call park, paging/intercom, DND (Do Not Disturb), busy lamp field (BLF), LDAP contacts, call waiting, call history, flexible dial plan, custom ringtones, server redundancy & fail-over, BLF |
UCM Integration | Supports many functions like QR code scan |
Mobile Device Integration | Supports background mode, proximity sensor for in-call touch screen and keys lock, auto rotation, GPS location-based call forward (pending) |
Feature Functions | LDAP, MWI (Message Waiting Indicator), display instant online status, call history and messages |
QoS | Layer 3 (ToS, DiffServ, MPLS) QoS |
Security | Support AES configuration file, TLS encryption, SRTP encryption (128-bit and 256-bit), HTTPS |
Multi-language | English, Simplified Chinese, Polish, Germany, Russian, Italian, Arabic, Spanish, Portuguese, French, etc. |
Wave Lite AndroidTM Prerequisites
The Wave Lite is compatible with most of AndroidTM mobile phones and tablets running AndroidTM 4.0 or higher version and it supports 2G/3G/4G and WiFi. Users could download Wave Lite via scan QR code, or from Google Play store.
To fully manipulate the Wave Lite capacitive touch screen, use fingers to operate following the introductions below on the Wave Lite icons, buttons, menu items, onscreen keyboard, etc.

- Tap: Slightly touch the screen with fingertip once to initiate menu, options or applications.
- Long Press: Touch the screen with fingertip for about 2 seconds without lifting finger from the screen to bring up the context menu for more operations.
- Press and Drag: Press the item and move it by dragging the finger up, down, left or right, without lifting finger from the screen.
- Flick and Slide: Touch the screen with fingertip and slide over the screen. For example, users could slide up to scroll up the page, slide down to open dropdown menu, slide left to delete an item from the list. If the finger stays on the screen for too long, the item may be selected and sliding will not occur.
Using Wave Lite
This chapter provides basic operations on the Wave Lite, including making / receiving calls, call transfer, conference calls, managing contacts and etc…
Dial Screen
Tap on the keypad button
 at the bottom of screen to open dial screen, as shown in figure 2.
Dialing a Number Directly
- Access the dial screen;
-
Put one finger on left screen edge, and slide to right or tap
 on the upper left corner, select the account as shown on the following screenshot;
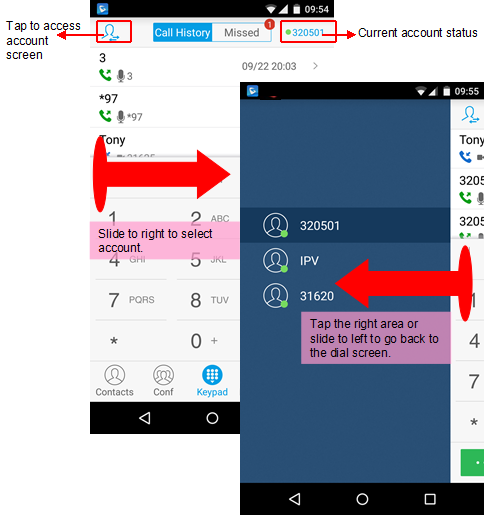
- Tap the right area to go back to the dial screen;
- Enter the phone number on the keypad;
-
Tap on
 to dial out with SIP account; Tap on
and select “Local Call”, “Video Call” or “Paging” to dial out via local phone number, or select “New Contact” to add the number as a contact quickly.
to dial out with SIP account; Tap on
and select “Local Call”, “Video Call” or “Paging” to dial out via local phone number, or select “New Contact” to add the number as a contact quickly.
Note:
- By default, Wave Lite allows users to press # key as SEND key. This behavior can be disabled via set option “Use # as Dial Key” to “No” under Settings➔Account Settings.
- If inserting an active SIM card into the phone, users could make calls with the SIM card number but cannot send messages with the local phone number.
Redial
Users can dial out the last dialed number if there is dialed call history.
- Access the dial screen;
- Press # key to dial out the last dialed number.
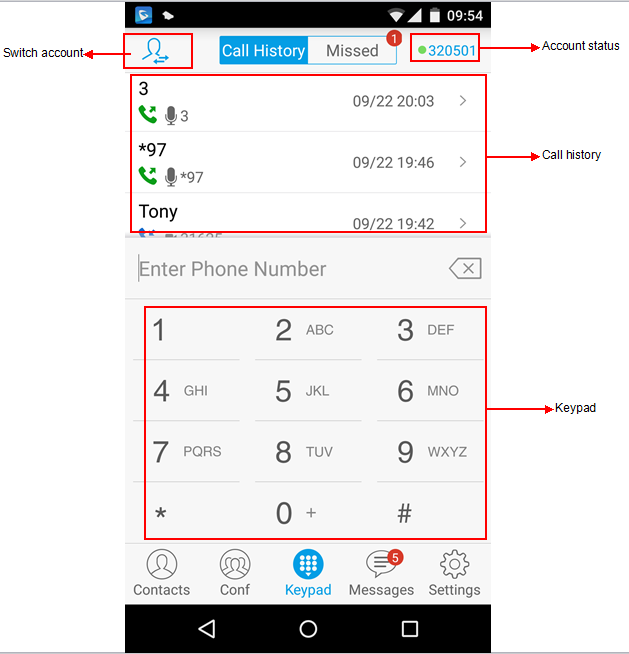
Dialing a Number via Call History
The Wave Lite call history is listed on the upper of the dial screen. It displays all call histories (local and SIP account) and missed calls. Navigate on the call history entries by tapping on button  on the bottom of the main screen to slide up/down as displayed on the following figure.
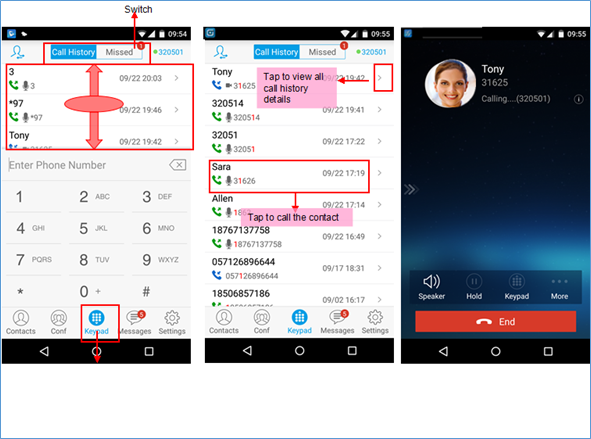
- Tap on one call history entry to dial out. The call screen is pictured as right.
- Tap on Keypad or roll horizontal in the direction of the arrow to view the call history.
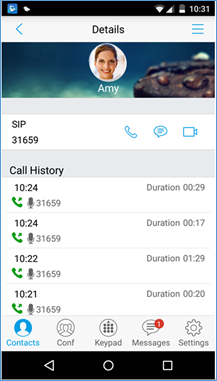
Dialing a Number via Contacts
Access Contacts by tapping on
 icon on the bottom of the main screen, the SIP contacts and LDAP Contacts (please go to Settings page to configure first) are shown up individually. Follow the steps in figure 6 to dial a number via Contacts.

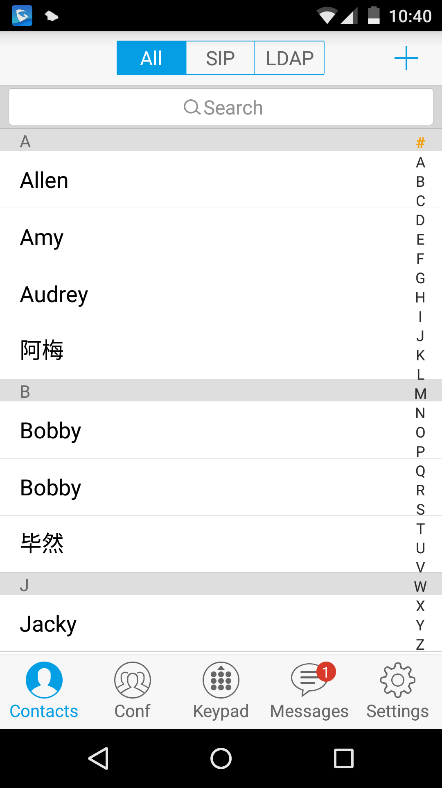
1. Tap Contacts to access the Contacts screen.
2. Search for the contacts by inputting initials.
3. Tap on the contact below to access the details screen.
4. Tap on
![]() or
or
 to dial out.
Switching Audio Channel during Call
Users could switch lines by sliding the call screen when there are multiple calls, as shown in figure below.
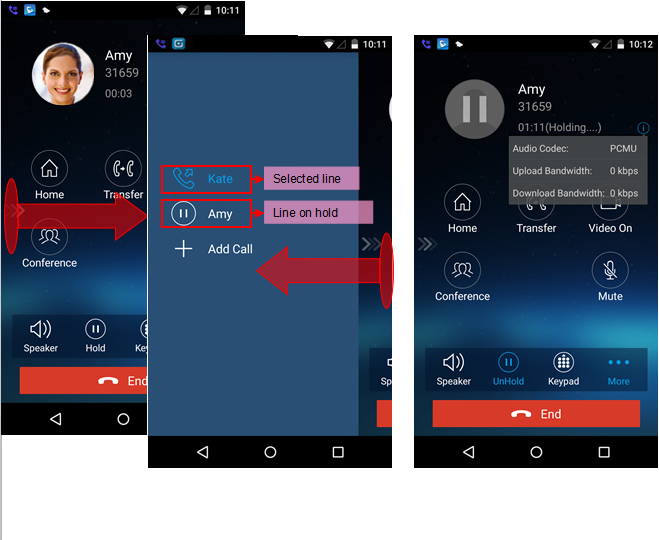
1. Slide right to access call line screen.
2. Tap on the line to select.
3. Tap on the right area, or slide to left and go back to the call screen.
4. Tap on “UnHold” to speak to this line, other lines will be put on hold automatically.
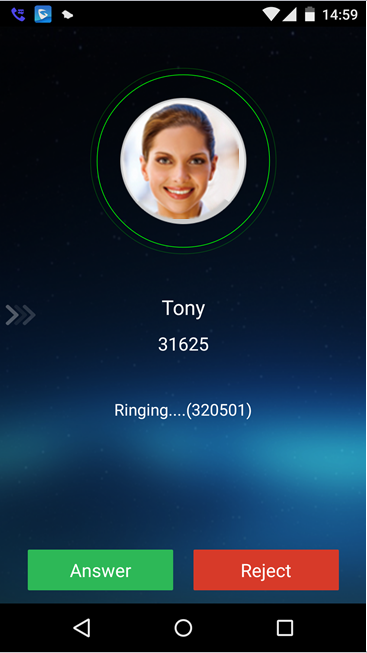
Answering Calls
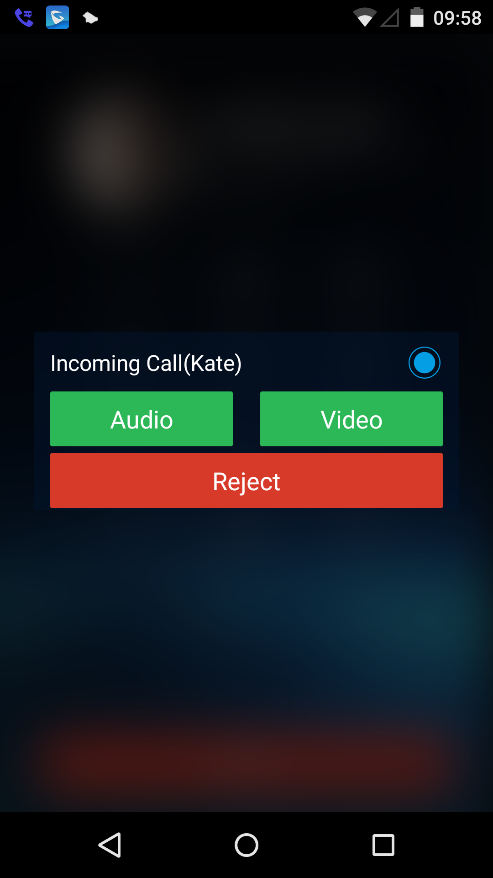
Single Incoming Call
When the phone is at idle state, and there is an incoming audio call, the status bar will display the icon
![]() and the phone screen is as shown on the figure below.
and the phone screen is as shown on the figure below.
Tap on button
![]() to answer the call via speaker, or tap on button
to answer the call via speaker, or tap on button
![]() to reject the call.
to reject the call.
When there is a video call, you can see the screen is as shown below.
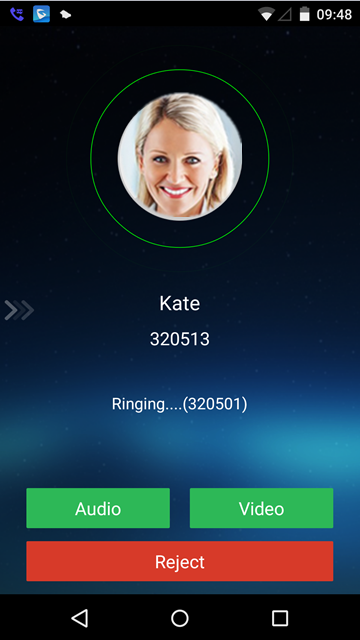
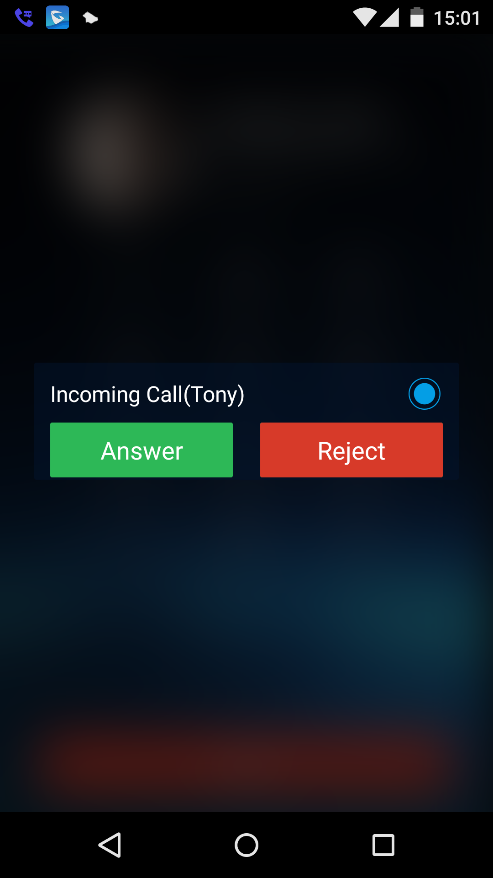
Multiple Incoming Calls
When there is another incoming audio call during an active call, the status bar will display the icon
![]() , and at the same time, users will hear call waiting tone, with the screen displaying the caller’s name or number for the incoming call. A prompt appears for users to confirm as shown on the following figure.
, and at the same time, users will hear call waiting tone, with the screen displaying the caller’s name or number for the incoming call. A prompt appears for users to confirm as shown on the following figure.
Tap on button
![]() to answer the call, once the new call is answered, the current active call will be placed on hold. If the new call is rejected by tapping on button
to answer the call, once the new call is answered, the current active call will be placed on hold. If the new call is rejected by tapping on button
![]() , the current active call will not be interrupted.
, the current active call will not be interrupted.
If the incoming call is video call, the screen is shown as below. Tap on
![]() or
or
![]() to answer. once the new call is answered, the current active call will be placed on hold. If the new call is rejected by tapping on button
to answer. once the new call is answered, the current active call will be placed on hold. If the new call is rejected by tapping on button
![]() , the current active call will not be interrupted.
, the current active call will not be interrupted.
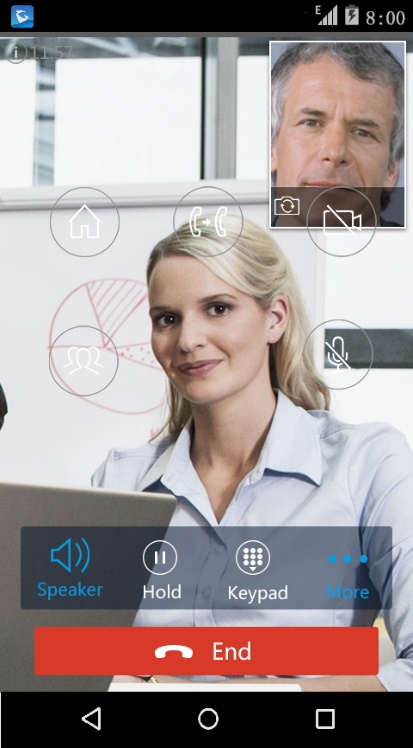
Active Call
During an active call, users could hold/resume call, mute/unmute, input DTMF, add new call, initiate conference, end a call or switch audio channel, turn on/off video, switch front/rear camera. Tap
 on left screen, and slide right to bring up the lines list. Users could switch to other lines or add a new call.
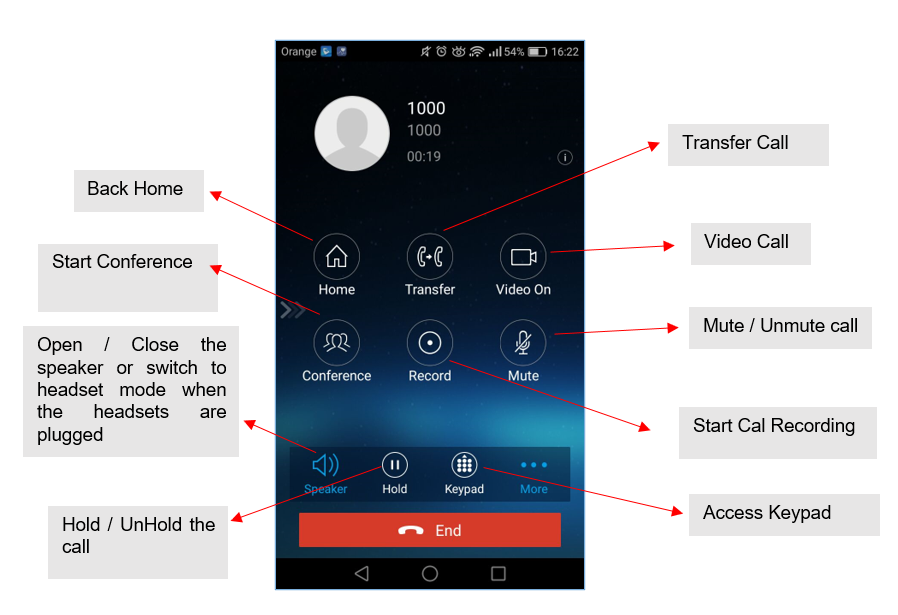
-
 : Slide to right to add new call or switch lines.
- Speaker: Switch voice channels to speaker or 3.5mm headset if it is plugged in.
- Hold/UnHold: During the call, users could press the HOLD button to hold or resume the call at any time.
- Keypad: Tap on the icon to bring up digital soft keypad for inputting DTMF.
- More: Access more operations including Home, Transfer, Conference and Mute/Unmute.
- Home: Back to the home screen (dial screen), the active call interface will be hidden; users could tap on button
 at the upper left corner of the screen to go back to the call interface.
- Transfer: Switch to the transfer screen. Wave Lite supports blind transfer and attended transfer. Please refer to chapter Call Transfer for more details.
- Video On: Enable video call. Tap to dial up video call to the callee.
- Conference: Bring up conference screen.
- Mute: Tap on the icon to mute/unmute the call.
- End: Tap on the icon to end the call.
 : Slide to right to add new call or switch lines.
 at the upper left corner of the screen to go back to the call interface.
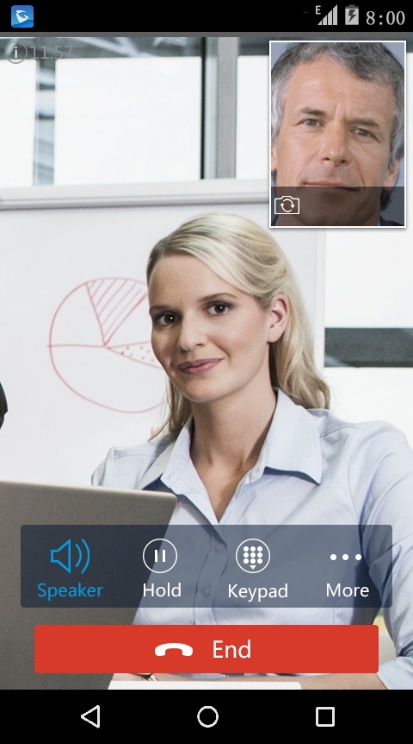
The video call screen is shown below; the basic operations are the same as audio call.
Call Hold/Resume
During the active call, press the HOLD button to put the call on hold. Users could dial up or answer a new call. The call hold screen is displayed on the following screenshot:
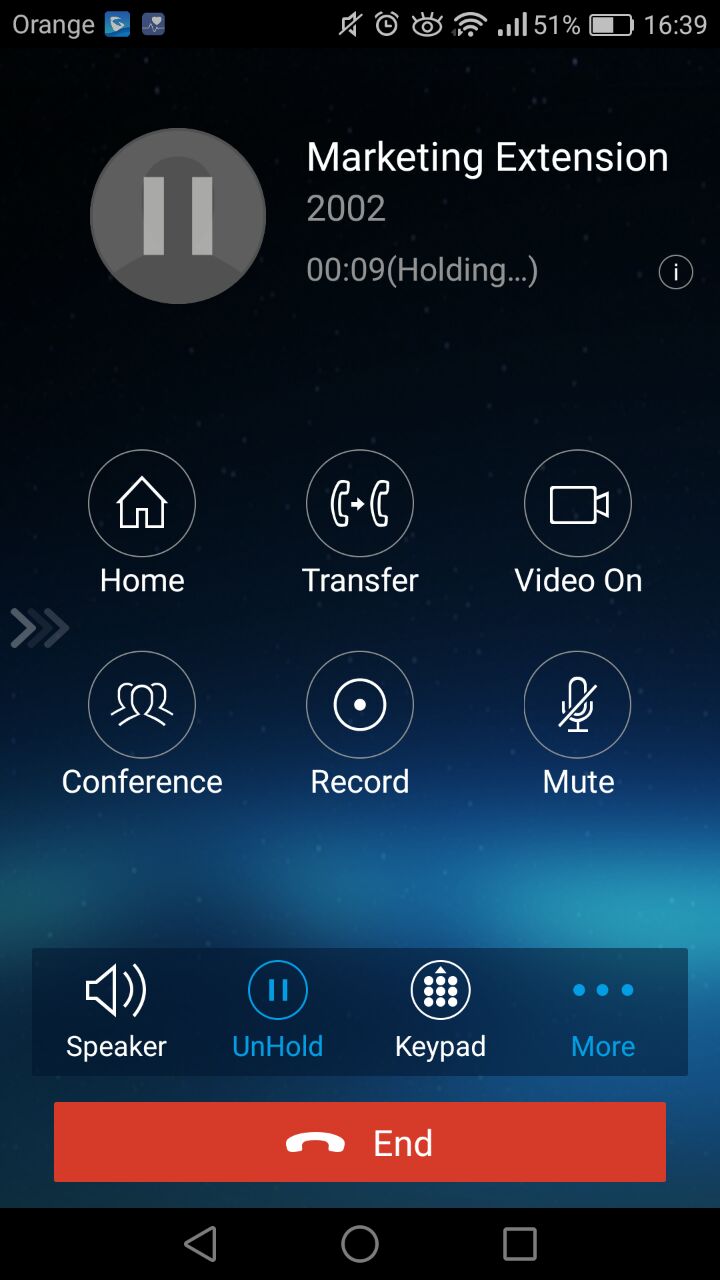
To resume the call, press the UNHOLD button again to resume the call if the current active call is put on hold.
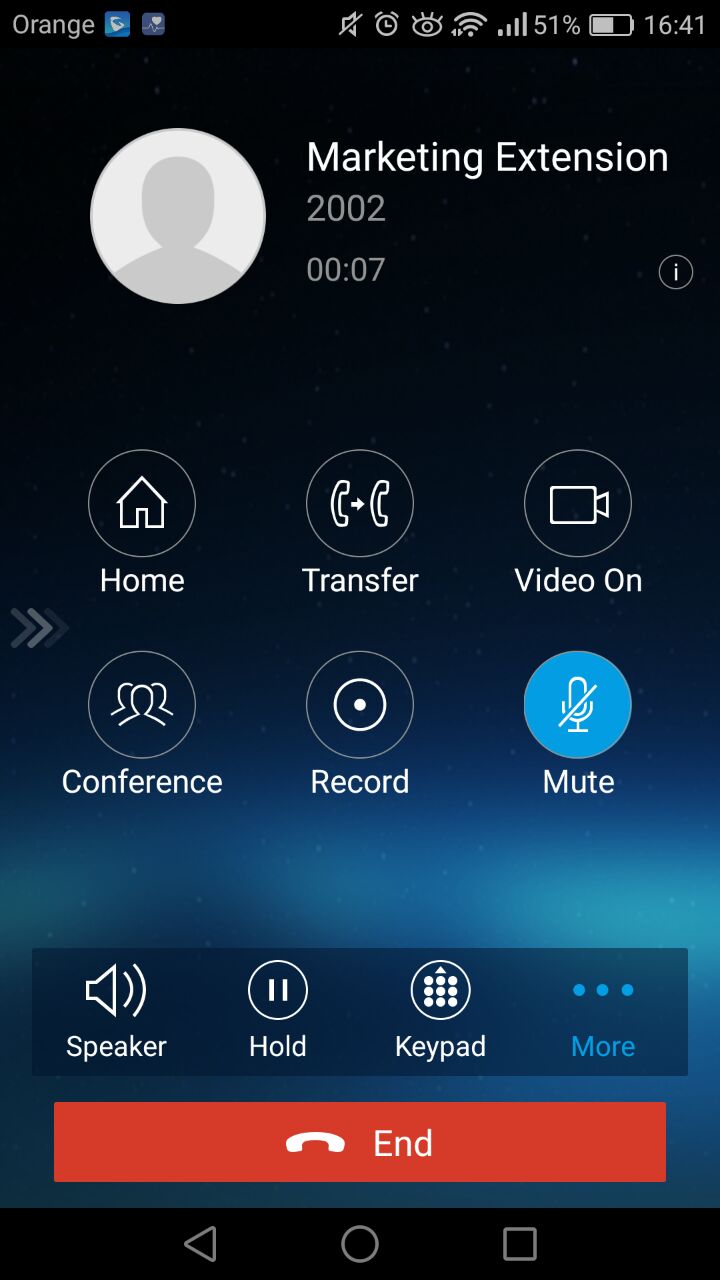
Mute
During an active call, press the mute button
![]() to mute the call. Press the button mute
to mute the call. Press the button mute
![]() again to unmute the call. The mute screen is displayed on the following figure:
again to unmute the call. The mute screen is displayed on the following figure:
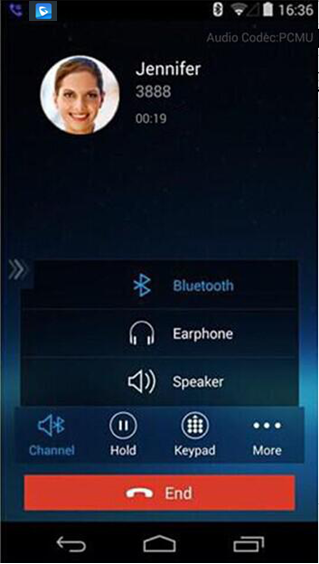
Switching Audio Channel During Call
Wave Lite allows users to switch audio channel among handset (if user plugs in headset, the handset status will be turned into headset status), speaker or Bluetooth headset when making calls. Following screenshots shows the call screen when using the Bluetooth, tap on button
![]() to switch channels.
to switch channels.
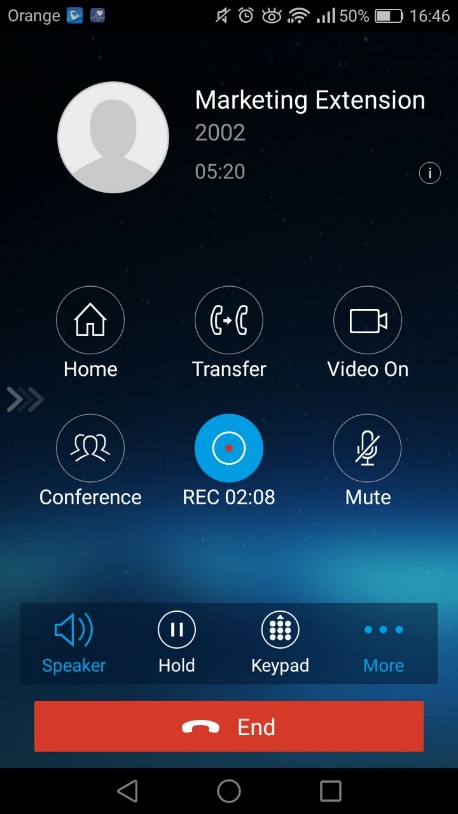
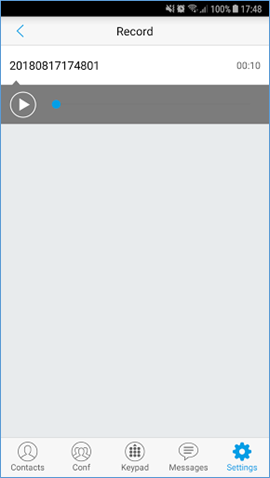
Call Recording
During an active call, users can start easily recording the outgoing audio conversation and retrieve the recording stored on the internal memory of the phone under the folder named “Record” as displayed on the following screenshots.

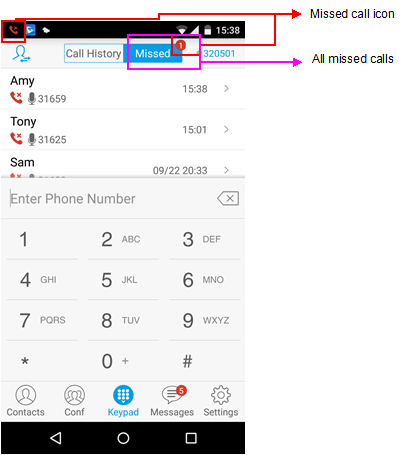
Missed Calls
When there is a missed call, the phone will display
 on the status bar and prompt on Wave Lite call history list, as shown in figure below.
Call Transfer
A call can be transferred to another party during the call. The Wave Lite supports blind transfer and attended transfer.
Blind Transfer
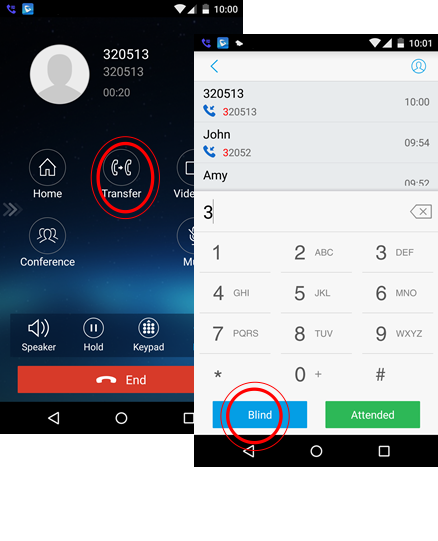
- During the active call, tap on “More” and select “Transfer” in the available options to access the transfer screen.
- Input the digits and then tap on “Blind” to transfer the call.
When the ringback tone is played, users will automatically go back to the main screen (dial screen) to complete the transfer after the callee answers the call.
Note: If entered incorrect digits, tap on button
 to delete the digits one by one, or long press it to clear all digits.
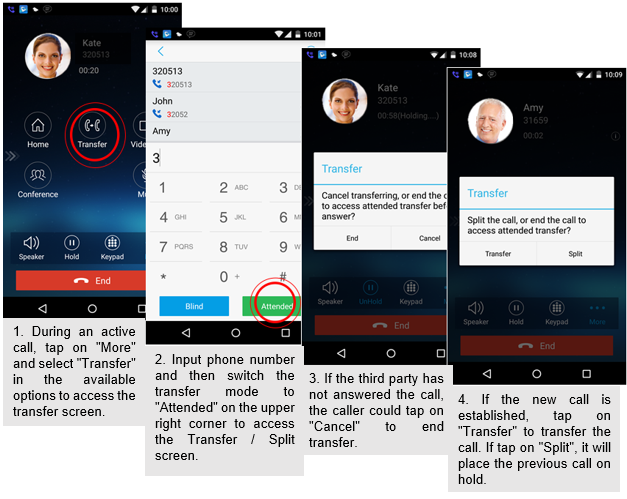
Attended Transfer After Calling
Wave Lite supports attended transfer before or after calling, which provides users a fast and easy way to complete attended transfer. Make an active call first and follow the steps below to transfer the call to the third party.
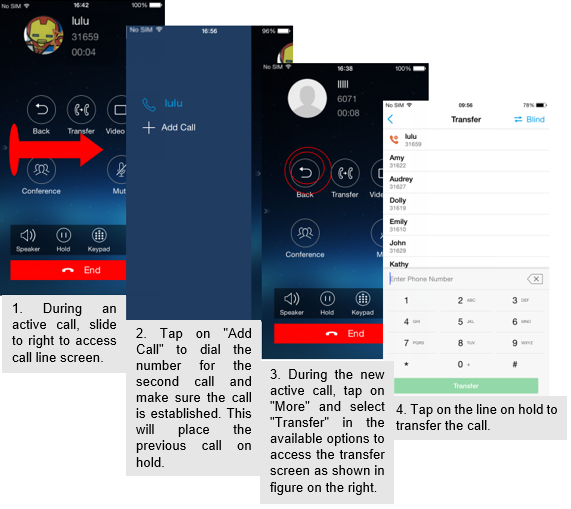
Attended Transfer Before Calling
Users can also consult the third party first before transferring the call. The following steps illustrate how to attend before calling:
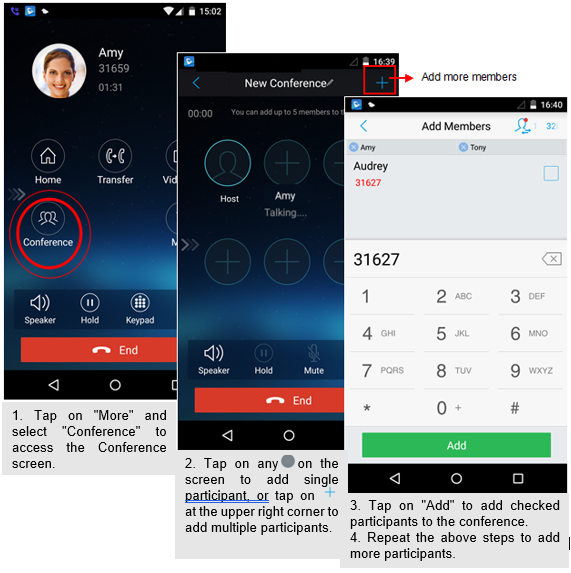
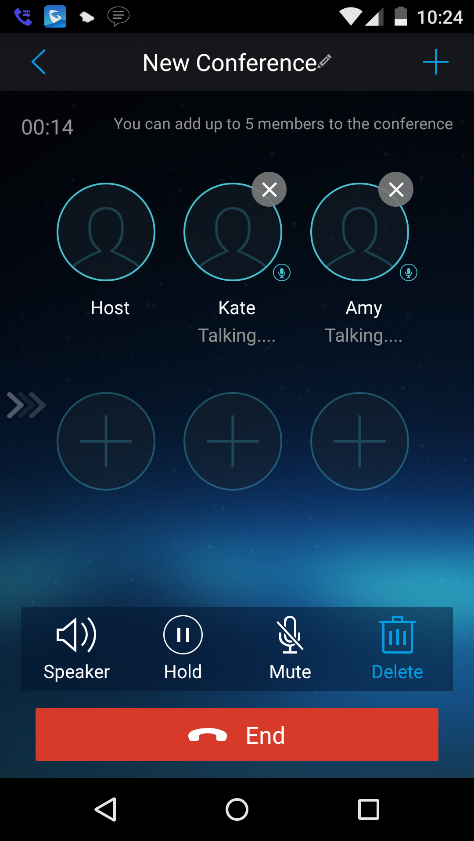
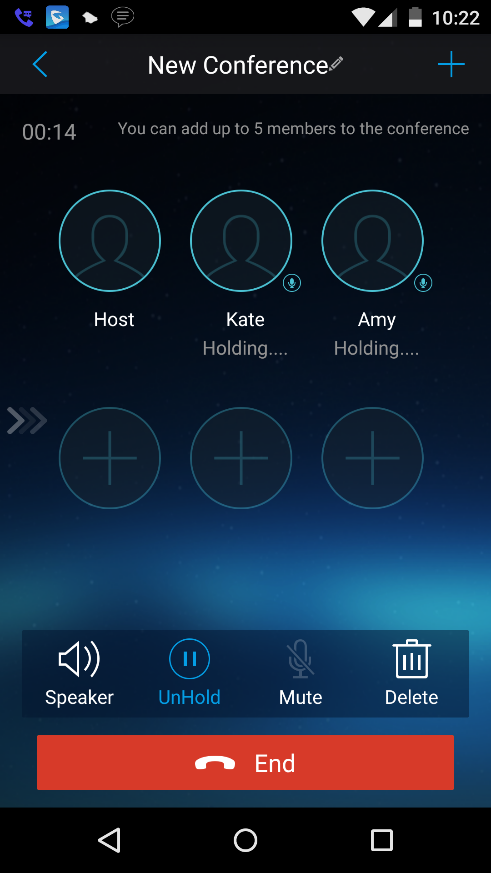
6-Way Conference
Wave Lite supports up to 6-way conferencing. The conference screen is displayed on the screenshot below:
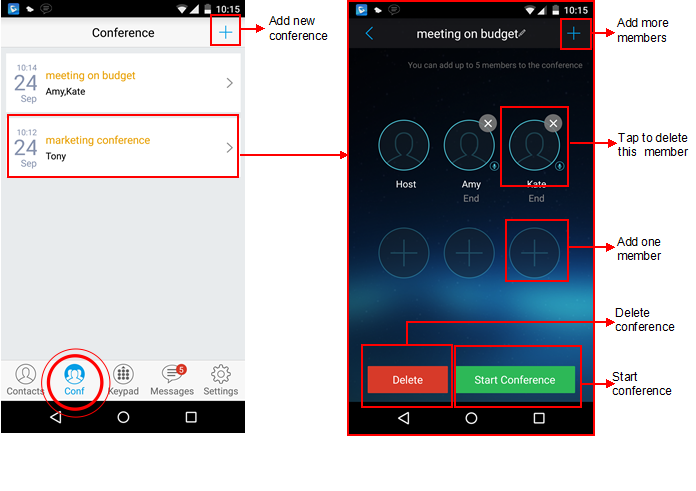
- Long press one conference entry to delete it.
- Users could start or delete the conference, or edit conference members after accessing the conference screen.
Add New Conference
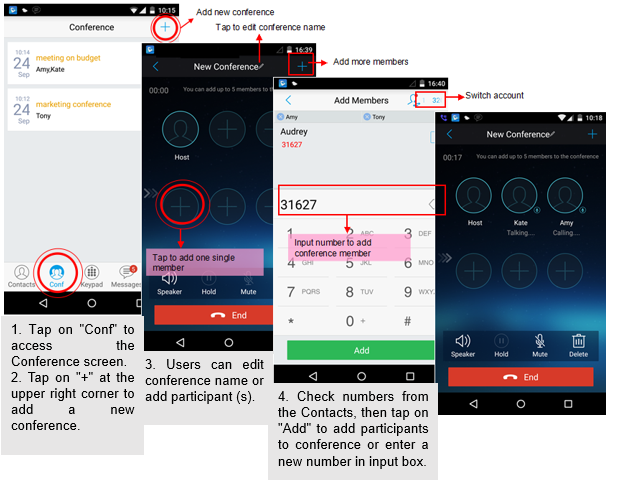
Adding a participant to conference via 2 ways:
- Enter phone number in the input box. If this is an existing contact in the Wave Lite, it will be shown up. Then, users could add it to the conference.
- If the conference has started and there already exists an existing line, check the line and tap on “Add” to add the line to conference directly.
Initiating Conference
During an active call, tap on “More” and select “Conference” to access conference room. Users could add new participants if there exits an active call.
While all participants have been in the conference, users could tap on the buttons below to make the corresponding operations.
- Speaker: Enable the speaker for the conference.
- Hold: Hold the conference.
- Mute: Mute the host and each conference participant individually.
- Delete: Delete each conference participant.
When the conference participant is disconnected, or the call with the participant is over, tap
 on the top right corner of the participant to redial.
Removing Participant from Conference
To remove a participant from the conference, users could press DELETE button on phone screen, then tap on
 icon at the upper right corner of the participant, and then it will be removed.
Mute/Unmute Conference
During an active conference, users could press MUTE button on phone screen, and then tap on
 at the upper right corner of the member to mute the member. The muted member will not be heard by other members, but can hear other members, while it still exists on the conference screen, the muted member in shown as
 .
.

Hold/Resume Conference
During the conference, users could press the HOLD button on phone screen to hold the conference with all participants at any time. If the remote participant presses the HOLD button, it will only hold his/her own call from the conference, as shown on the following figure:
To end the conference, users could tap
![]() on phone screen to disconnect all the participants from the conference. If the remote participant hangs up the call, it will be disconnected from the conference, but other participants in the conference will stay in the conference.
on phone screen to disconnect all the participants from the conference. If the remote participant hangs up the call, it will be disconnected from the conference, but other participants in the conference will stay in the conference.
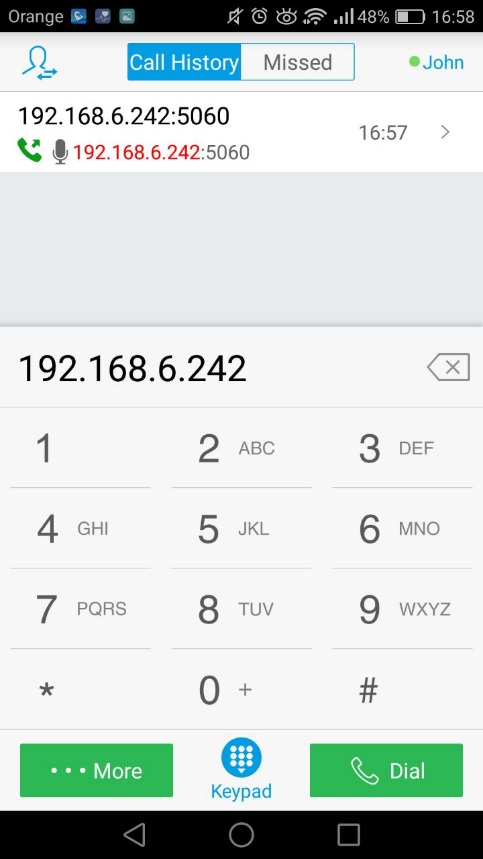
Direct IP Call
The Wave Lite supports Direct IP Call which allow users to make calls without a SIP proxy, VoIP calls can be made between the phone running the application and the destination phone if:
- The phone running the application and the destination phone have public IP addresses, Or
- Both are on the same LAN/VPN using private or public IP addresses, Or
- Both can be connected through a router using public or private IP addresses (with necessary port forwarding or DMZ).
To make a direct IP call, please follow the steps bellow:
- Access the dial screen;
- Input the target IP address. For example, if the target IP address is 192.168.1.60 and the port is 5062 (i.e., 192.168.1.60:5062), input the following: 192*168*1*60#5062
- Press “Dial” button to initiate an audio call, or press more to access the call menu and choose “Video call” for initiating video calls.
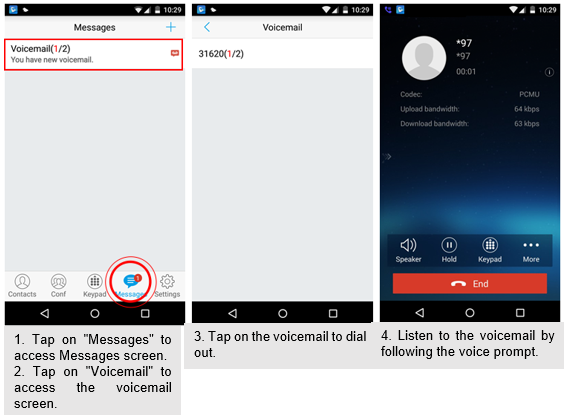
Voicemail
When there is a new voicemail, the voicemail icon
 will show up on the status bar, and at the same time users could see a new message prompt on the Wave Lite messages list.
To configure voicemail UserID, go to Settings➔Account Settings➔Edit Account to fill in the details, as shown on the screenshot below.
To retrieve the voicemail:
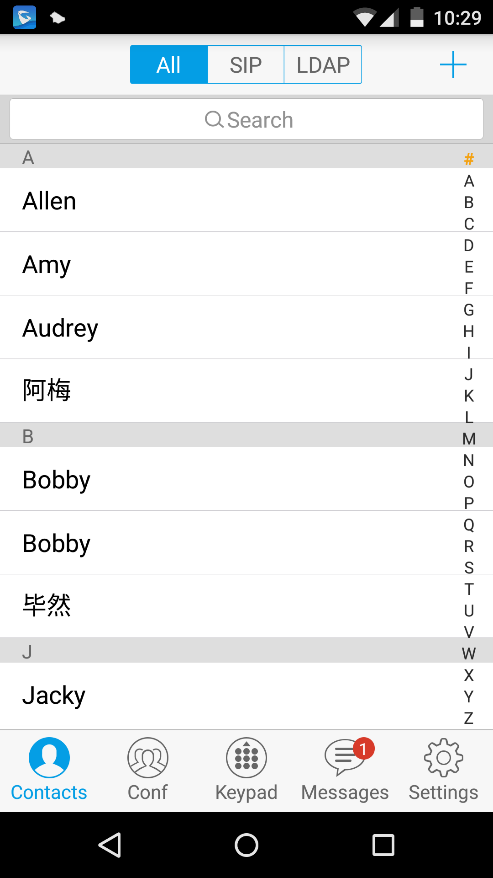
Contacts
Users can manage their phone contacts and SIP contacts in Wave Lite Contacts. To access Wave Lite Contacts, tap on button
 at the bottom of the main screen, as displayed on the following screenshot:
Add Contacts
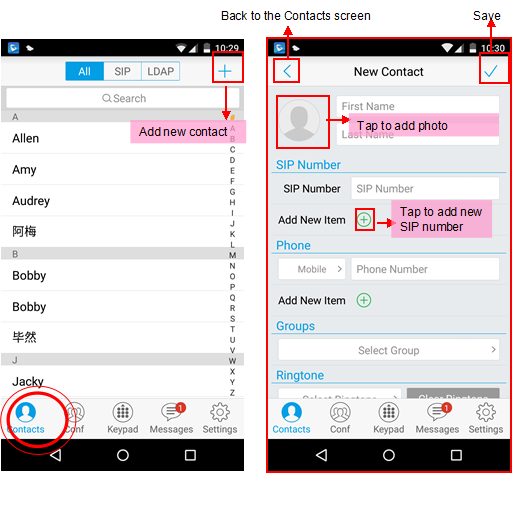
- Tap on “+” at the upper right corner to add a new contact.
- Input contact information and tap on the check mark on the upper right corner to save the contact.
Search Contacts
Tap on the search box on the Contacts screen to access the search screen, as shown on screenshot below:
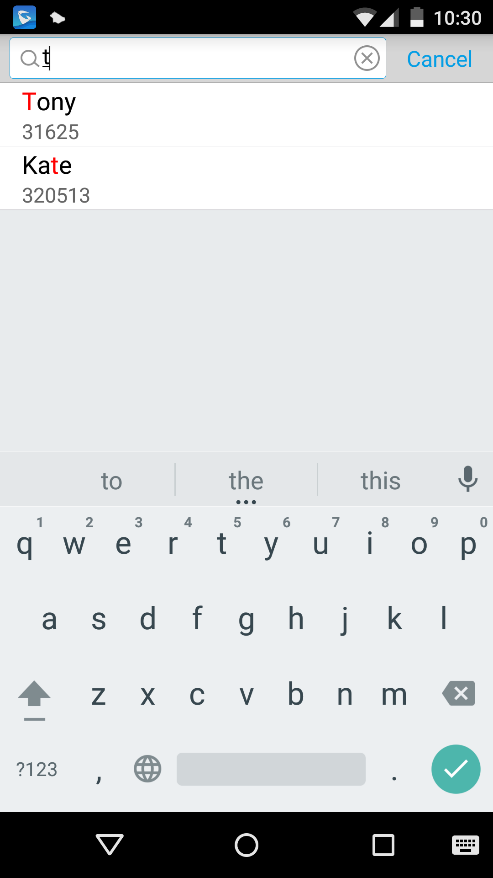
Enter the contact name or number to search, the contact will be updated and displayed automatically when entering the initial digits. Tap on the number to view details.
View Contact
Tap on one contact to view details or edit, as displayed on the following screenshot
 Dial up the audio call.
 - Access the Messages editing screen.
-
 Dial up the video call.
 Dial up the audio call.
  Access the Messages editing screen.
 Edit Contact
Long press the contact on the contact list to bring up the dialog box, tap on Edit to access the editing screen; Or long press the contact to access the details screen, tap on button
 at the upper right corner, then select Edit.
Delete Contact
Follow one of the following 3 ways to delete contact.
- Long press one contact on the contact list to bring up the dialog box, select Delete to access the editing screen.
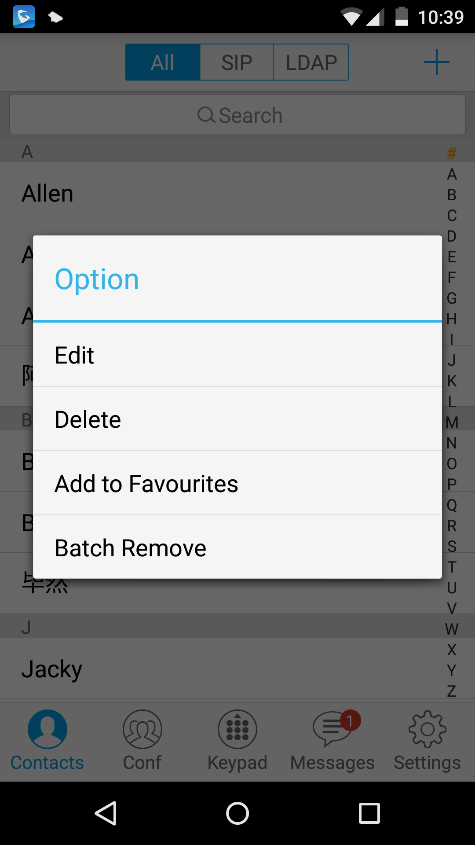
- Long press one contact on the contact list to bring up the dialog box, select Batch Remove to access batch remove screen, check contacts and tap on
 on the upper right corner to delete.
 on the upper right corner to delete.
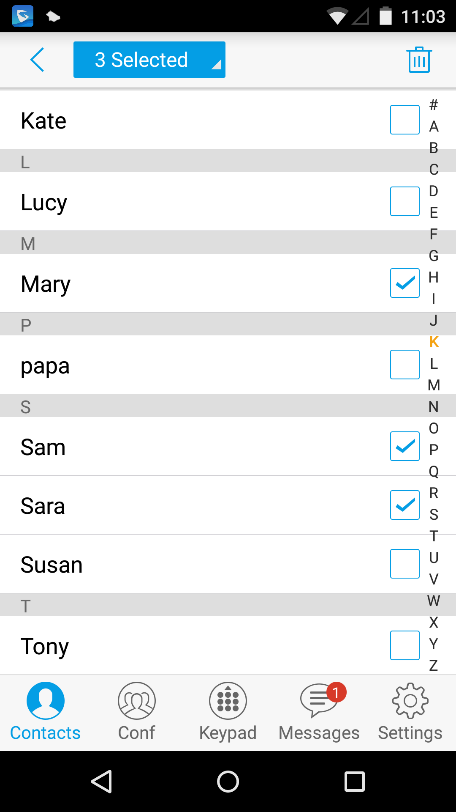
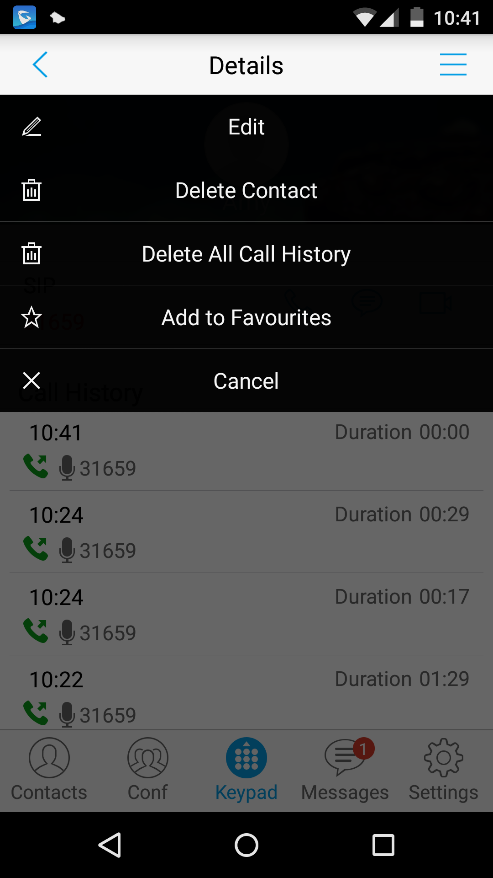
-
Tap on one contact to access the detail interface, tap on button
 at the upper right corner, then select Delete Contact, as shown on the following screenshot.
 at the upper right corner, then select Delete Contact, as shown on the following screenshot.
Add Contact to Favorites
To add a contact to favorites, as shown in figure below:
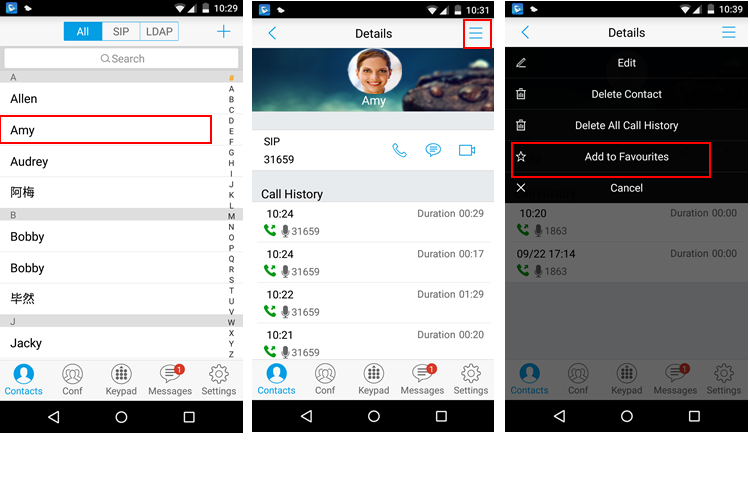
- Select one contact in the Contacts to access details screen,
- Tap on the menu button at the upper right corner.
- Tap “Add to Favorites” to add contact. Users could also tap “Delete Contact” to delete the contact from Favorites.
Besides the operation mentioned above, users could also select one contact in the Contacts and long press it to bring up the dialog box, select “Add to Favorites” to add contact to Favorites.
Via the similar way, users could delete contacts from Favorites by selecting “Remove from Favorites“.
LDAP Contacts
Users could access LDAP screen to search LDAP contacts, view LDAP contact details and add LDAP contact. Please go to Settings➔Advanced Settings➔LDAP Settings to fill in details.

Call History
To view recent call history or view classified call history on Wave Lite, tap
 on the dial screen or slide down the call history, as shown on screenshot below:
 Answered calls
 Dialed calls
 Missed calls
![]() Audio calls
Audio calls
![]() Video calls
Video calls
Tap on one call history entry to dial out with the last dial-out account. To access the details for this entry, tap
![]() on the right side of the entry, as shown on following screenshot:
on the right side of the entry, as shown on following screenshot:
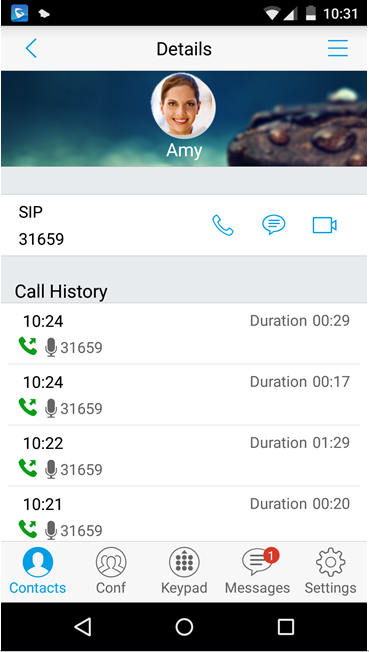
Users could view recent call history of this entry, make calls or send messages to it (not applicable to SIM card number or anonymous call). Tap on button
 at the upper right corner to make operations like Edit Contact, Add to Favorites, or Delete All Call History. If the call is not an existing contact, save it to Contacts before making the operations.
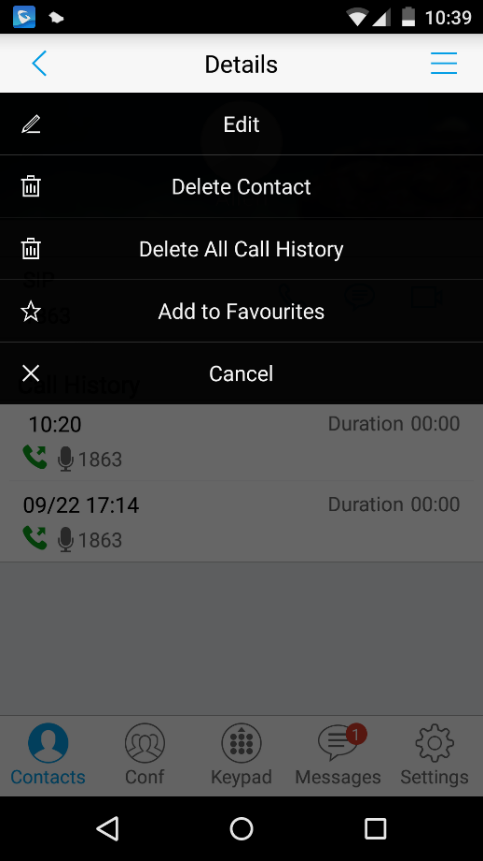
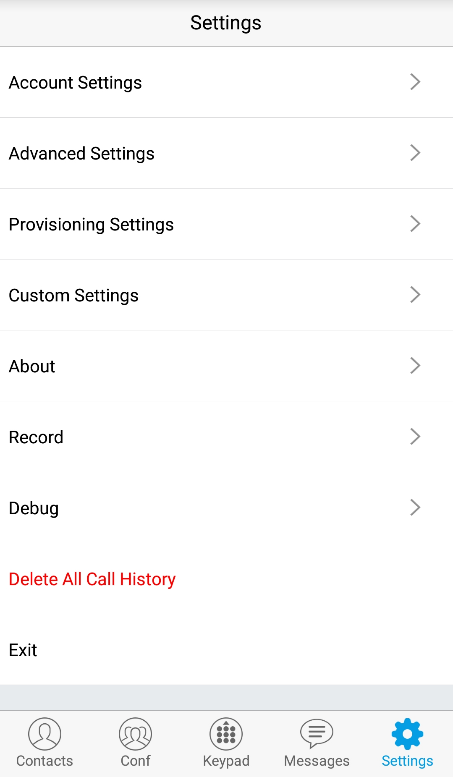
User can also delete the Call history from Settings menu by clicking on “Delete All Call History” as shown in the below image
Messages
Messages function allows users to send/receive messages. Tap on button
 to access the Messages screen, as shown on the following screenshot.
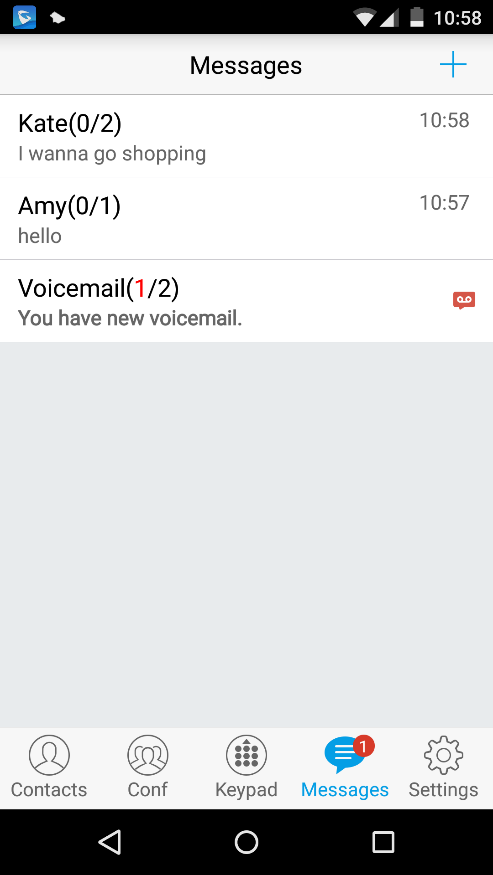
View Message
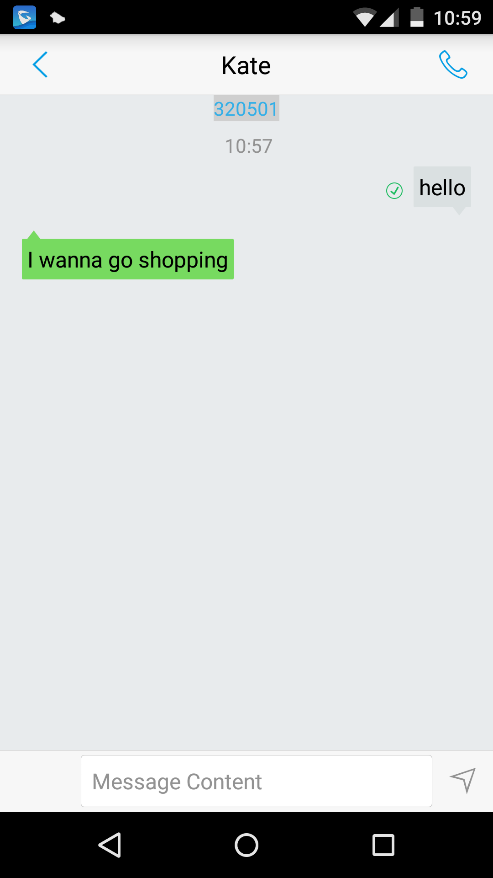
The Message screen displays sent & received (draft) messages, the messages are classified by contacts names or numbers while sorted by sent & received time. Tap on one message to check the details, as shown on the following screenshot:
Create New Message
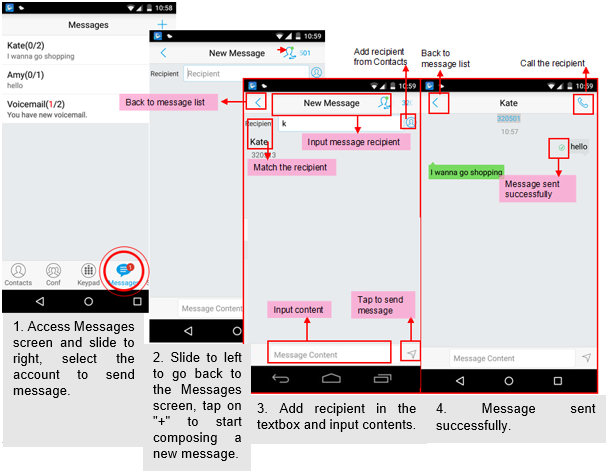
Tap
 on the right of the input box to add one contact or more from Wave Lite Contacts or input the contact phone number or name in the input box to find the corresponding contact.
If the sent or received message is phone number or Email address, you can tap on the number to dial out directly or tap on the Email address to send an email.
Edit Message
Long press one message on the Messages screen, select “Batch Remove” in the pop up dialog box, and tap
![]() on the upper right corner to delete all messages with this number. Long press one message content to access the editing screen, users could edit, copy or forward one single message as shown on the figure below.
on the upper right corner to delete all messages with this number. Long press one message content to access the editing screen, users could edit, copy or forward one single message as shown on the figure below.

-
 Copy the selected message.
-
 Forward the selected message.
-
 Delete the selected message.
SETTINGS
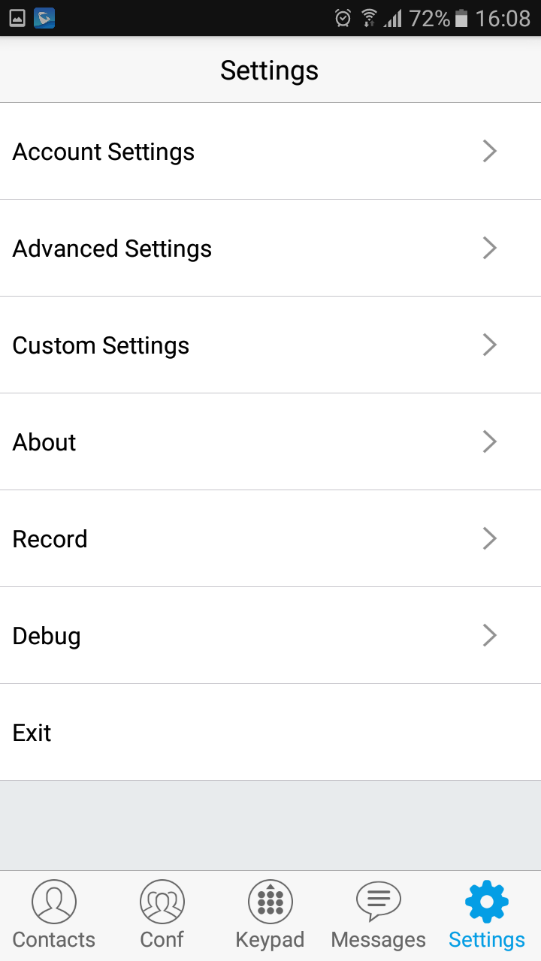
For the first time using Wave Lite, go to the Settings screen to complete the basic settings, including Account Settings, Advanced Settings, Custom Settings, About Version, Debug, etc.
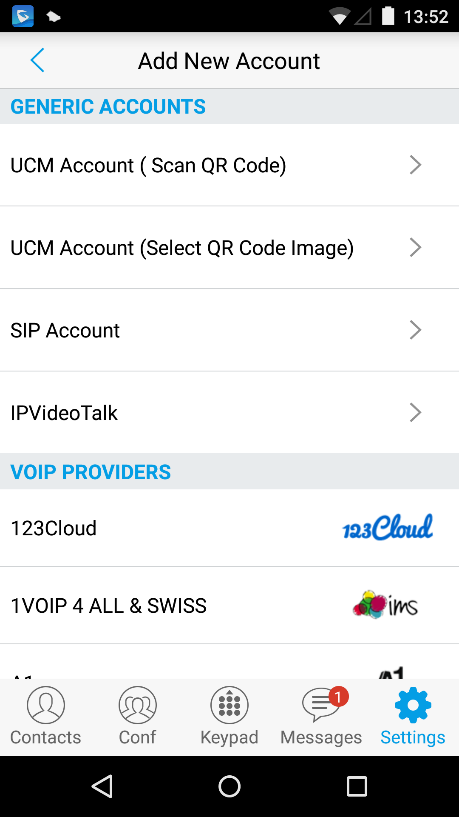
Account Settings
Wave Lite supports up to 6 independent SIP accounts and 6 lines. Users can make calls after registering the account to the SIP server. Tap on button
 at the upper right corner of the Account Settings screen to add accounts. Users could add account via Generic Accounts or VOIP Providers.
To add generic account, tapping on “UCM Account (Scan QR Code)” or “UCM Account (Select QR Code Image) “, or tap on “SIP Account” to add account, as shown on figure below.
The way to add VOIP Providers accounts is the same as add generic accounts, just select the providers in the list below and input required information.
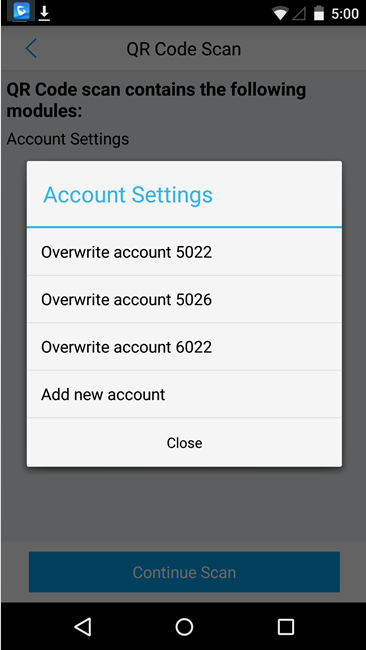
UCM Account (Scan QR Code)
To add account by QR code scan, please follow the steps below as shown in figure below.
- Tap on “UCM Account (Scan QR Code) ” to access the scan screen;
- Scan the QR code containing configuration info sent from the UCM server to the mailbox;
- Choose whether to overwrite account or add new account, and then the account will be added to the list.
UCM Account (Select QR Code Image)
- Tap on “UCM Account (Select QR Code Image)” to access the images screen;
- Select the QR code image containing configuration info;
- Choose whether to overwrite account or add account, and then the account will be added to the list.
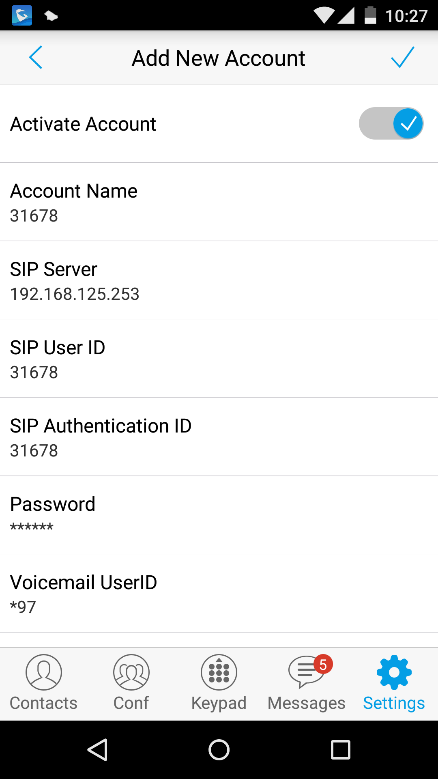
SIP Account
Follow the steps below to add account manually:
- Tap on “SIP Account” to access the Account Settings screen, tap on the button on the right of “Active Account” to active the account;
- Fill in account details and the SIP server address (provided by the service provider);
-
Tap
 on the upper right corner to save the configuration and go back to the account settings screen;
-
The following figure 48 shows the accounts are successfully registered, and the account icon is in green
 . If the account icon is in red
 , it means the registration failed.
 on the upper right corner to save the configuration and go back to the account settings screen;
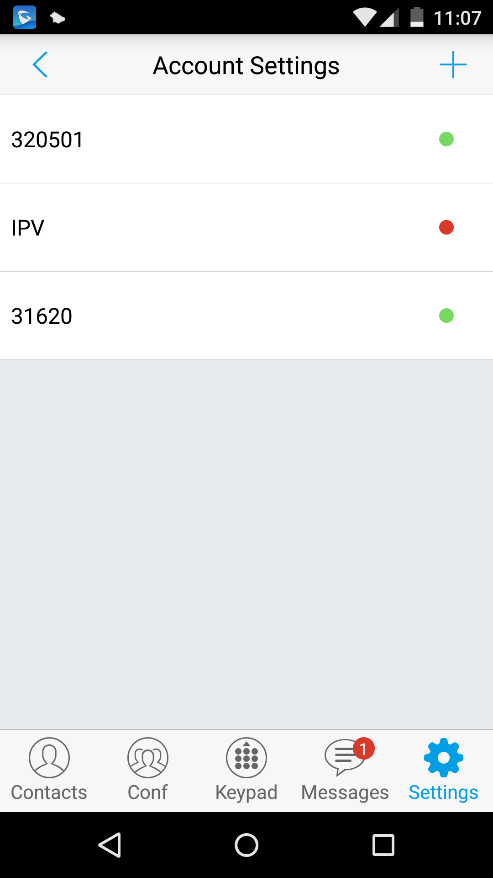
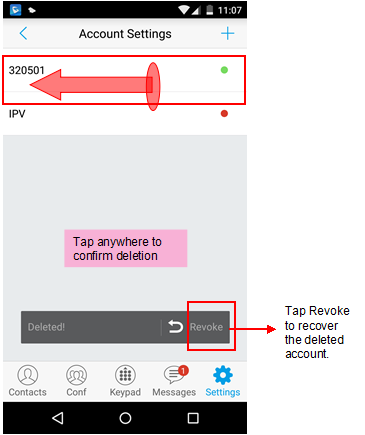
Users could also slide left to delete this account as shown in figure 49.
Activate Account | It is used to define whether to activate account. |
Account Name | Defines the name associated to the account to be displayed on the LCD. |
SIP Server | Defines the domain name or IP address of your SIP server, provided by your VoIP service provider (ITSP). |
SIP User ID | Configures the user account information, provided by your VoIP service provider (ITSP). It’s usually in the form of digits similar to phone number or the same as the phone number. |
SIP Authentication ID | Configures the SIP service subscriber’s Authenticate ID used for authentication. It can be identical to or different from the SIP User ID. |
Password | Defines the account password required for Wave Lite to authenticate with the ITSP (SIP) server before the account can be registered. |
VoiceMail UserID | Configure the voicemail user ID to retrieve voicemail by pressing LISTEN button on the message screen. This user ID is usually the VM portal access number. For example, the UCM server voicemail access number is *97. |
Display Name | Configures the name to display on LCD when calling, it needs SIP server to support it if this function is enabled. |
After configuring the account, users could tap on the existing account for more settings, such as General Settings, Call Settings, SIP Settings, Network Settings and Codec Settings.
Activate Account | Activate / deactivate the SIP account. |
Set as Default | It is used to set this account as default. |
Edit Account | Edits the accounts settings and parameters. |
Delete Account | Deletes the current account. |
Ringtone | Defines the ringtones played when receiving an incoming call. |
DialPlan | Configures to either enable or disable the dial plan. |
DialPlan Prefix | Configures the prefix to be added to each dialed number. All numbers use this account will automatically add the prefix. For example, if the prefix is 5, the phone number is 337, thus the dialing number is 5337. |
DialPlan Settings | Configures the allowed dial plan for the phone. Default setting is “{ x+ | \+x+ | *x+ | *xx*x+ }”. Dial Plan Rules: 1. Accepted Digits: 1,2,3,4,5,6,7,8,9,0 , *, #, A,a,B,b,C,c,D,d; 2. Grammar: x – any digit from 0-9 X – digits from 0-9, and letters from a-z, A-Z. a) xx+ – at least 2 digit numbers b) xx – only 2 digit numbers c) ^ – exclude d) [3-5] – any digit of 3, 4, or 5 e) [147] – any digit of 1, 4, or 7 f) – replace digit 2 with 011 when dialing g) | – the OR operand h) {X123} – match Z123, e123, 5123, … i) Back slash “\” Character can be used to escape specific letters. e.g. if { \p\a\r\k\+60 } dial plan is configured, park+60 should be able to pass dial plan check. This also can be used to escape Mark and User unreserved characters. Mark = “-” / “_” / “.” / “!” / “~” / “*” / “‘” / “(” / “)” User-unreserved = “&” / “=” / “+” / “$” / “,” / “;” / “?” / “/ |
Use # as Dial Key | Configures the “#” key as the “Send” key. If enable, press the “#” key to dial the numbers out immediately; If set to disable, the “#” key will be included in the dialing string. |
Call Forward | Tap to access Call Forward Settings screen. |
Call Forward Settings | It is used to specify the Call Forward Type from 4 modes: Unconditional, Time Based, Others (Forward When busy and No Answer Forward). |
Auto Answer | It is used to configure auto answer mode. If set to “Yes”, the phone will automatically turn on the speaker phone to answer incoming calls after a short reminding beep. If set to “Enable Intercom/Paging”, it will answer the call based on the SIP info header sent from the server/proxy. Default setting is No. |
Enable Session Expiration | Configures the relevant parameter in “Session Expiration Settings” option below. The default setting is “No”. |
Session Expiration Settings | Configures the relevant session expiration parameters. |
SIP Port | It is used to define the local SIP port used to listen and transmit. If enabled Random Port option on Advanced Settings screen, this option will be unavailable. |
Transmission Protocol | It is used to configure the transmission protocol to transmit SIP info. Users could choose TCP/UDP/ TLS. The default is “UDP”. |
Unregister Before New Registration | If set to “Register All”, the SIP contact header will use “*” to clear all SIP user’s registration information. If set to “Do Not Register”, the phone will not clear the current SIP user’s info. The default is “Unregister Single”, that means do not cancel the SIP user’s registration information. |
Register Expiration (m) | Specifies the frequency (in minutes) in which the phone refreshes its registration with the specified registrar. The minimum value is 1 minute while the maximum is 64800 minutes (about 45 days).The default value is 60 minutes (1 hour). |
Only Accept SIP Requests from Known Servers | Once enabled, only accept SIP request sent from known servers, the default setting is “Disable”. |
Checks SIP User ID in the Request URI of incoming INVITE; if it doesn’t match the base SIP User ID, the call will be rejected. Direct IP calling will also be disabled. Default is No. | |
Enables PRACK (Provisional Acknowledgment) method. PRACK improves the network reliability by adding an acknowledgement system to the provisional Responses (1xx). If it’s enabled, it will respond to the 1xx response from the remote party. The default setting is “Disabled” |
Session Expiration (s) | The SIP Session Timer extension that enables SIP sessions to be periodically “refreshed” via a SIP request (UPDATE, or re-INVITE). If there is no refresh of an UPDATE or re-INVITE message, the session will be terminated once the session interval expires. Session Expiration is the time (in seconds) where the session is considered timed out, provided no successful session refresh transaction occurs beforehand. |
Min-SE (s) | The minimum session expiration (in seconds). The default value is 90 seconds. |
UAC Specify Refresher | As a caller, select UAC to use the phone as the refresher; or select UAS to use the caller or proxy server as the refresher. If set to “Omit”, that means do not specify the refresh object. The default setting is “Omit”. |
UAS Specify Refresher | As a callee, select UAC to use caller or proxy server as the refresher; or select UAS to use the phone as the refresher. |
Force INVITE | The Session Timer can be refreshed using the INVITE method or the UPDATE method. Select “Yes” to use the INVITE method to refresh the session timer. |
Caller Request Timer | If set to “Yes” and the remote party supports session timers, the phone will use a session timer when it makes outbound calls. The default setting is “No”. |
Callee Request Timer | If set to “Yes” and the remote party supports session timers, the phone will use a session timer when it receives inbound calls. The default setting is “No”. |
Force Timer | If Force Timer is set to “Yes”, the phone will use the session timer even if the remote party does not support this feature. If Force Timer is set to “No”, the phone will enable the session timer only when the remote party supports this feature. To turn off the session timer, set Caller Request Timer, Callee Request Time and Force Timer all to “No”. |
Proxy-Require | A SIP Extension to notify the SIP server that the phone is behind a NAT/Firewall. Do not configure this parameter unless this feature is supported on the SIP server. |
Outbound Proxy | Configures the IP address or Domain name of the Primary Outbound Proxy, Media Gateway, or Session Border Controller. |
Secondary Outbound Proxy | Configures the IP address or Domain name of the Secondary Outbound Proxy, Media Gateway, or Session Border Controller. Secondary outbound proxy will be used when the primary outbound proxy fails. |
NAT Traversal | Enables or disables the NAT traversal mechanism. The default setting is “Keep-alive”.
|
DNS Mode | Controls how the search appliance looks up IP addresses for hostnames. There are three modes: A Record, SRV, NAPTR/SRV. The default setting is “A Record”. If the user wishes to locate the server by DNS SRV, the user may select “SRV” or “NATPTR/SRV”. |
DTMF | Users can choose different ringtones. Specifies the mechanism to transmit DTMF digits. There are 3 supported modes:
Default settings is via “RFC2833”. |
Selects which codecs will be used on Wi-Fi, 2G, 3G and 4G Multiple vocoder types are supported on the phone (PCMU, PCMA, OPUS, G722, G726_32, iLBC, G729 and GSM). The vocoders in the list is a higher preference. Users can configure vocoders in a preference list that is included with the same preference order in SDP message. | |
H.264 Image Size | Configures different image size (720P, VGA, CIF, QVGA and QCIF) in different network environment. For Wi-Fi network, the default setting is VGA; For 2G/3G/4G mobile network, the default setting is QVGA. |
Video Bit Rate | Configures different video bite rate in different network environment. It is recommended to increase the bit rate if the bandwidth is sufficient, and the video quality will be reduced if the bandwidth is not enough. For Wi-Fi network, the default setting is 512kbps; For 2G/3G/4G network, the default setting is 192kbps. |
SDP Bandwidth Attribute | Select the SDP bandwidth attribute from “Standard”,” Media Level”,” Session Level” or “None”. • Standard: Use AS at the session level and TIAS at the media level. • Media Level: Use AS at the media level. This is the default setting. • Session Level: Use AS at the session level. • None: Don not change the format. Please do not change the format or it may cause decode failure if unclear about what format the server supports. |
H.264 Payload Type | Configures the H.264 codec payload type. The valid range is from 96 to 127. The default value is 99. |
SRTP Mode | Configures the SRTP Mode, when set to “Enable and Force” it will enable and force to use SRTP and when set to: “Enable but Not Force”, it will enable but not force to use SRTP. The default setting is “Disable”. |
Enable SRTP Key Life Time | It is used to configure whether to enable SRTP key life time. If enabled, the RTP packets received and sent during the call cannot exceed 231. The default setting is “Yes”. |
Advanced Settings
Advanced Settings include General Settings, Call Settings, Network Settings and Additional Settings.
General Settings
Edit Before Dial | Configures whether to edit number before dial. If set to “No”, tap on the contact or one call history entry on call screen to dial out with the last dial-out account directly. If set to “Yes”, when tap on the contact or one call history entry on call screen, the phone will automatically fill in the corresponding number to the input box, users could edit the number before dial out. |
Default Account Registration Notification | Defines whether to enable registration notifications for default account. If enabled, users will see the notifications in the status bar once the default account status is changed. |
Vibrate When Ringing | Configures whether to vibrate when ringing. It is only applicable to the incoming calls for the Wave Lite. The phone settings priority is higher than this option. When set the phone to silent mode, the phone will not vibrate when ringing even set this option to “Yes”. |
Start on Boot | Configures whether auto start Wave Lite when starting up. |
Always use default account when dialing from native dialer | When this option is enabled, the phone will redirect the dialed number on the native dialer to the dialer of the Wave Lite Application and the calls can be made at this points using the default registered account on the application. |
Defines the local RTP-RTCP port pair used to listen and transmit. If it is configured with X, in channel 0 the port X will be used for audio RTP message, the port X+1 for audio RTCP message, the port X+2 for video RTP message and the port X+3 for video RTCP. In Channel 1, each port number will be incremented by 4 for each message. This increment rule will apply to other channels and other port numbers. By default, the Account 1 will use Channel 0, Account 2 Channel 1, Account 3 Channel 2, Account 4 Channel 3, and Account 5 Channel 4 and Account 6 Channel 5. If an account needs to establish multiple session simultaneously, the system will use the ports in the next available channels. The default value is 5004. The valid range is from 1024 to 65400. | |
Random Port | Forces Wave Lite to use random ports for both SIP and RTP messages. This is usually necessary when multiple phones are behind the same full cone NAT. The default setting is “No”. Note: This parameter must be set to “No” for Direct IP Calling to work. |
Call Settings
Sets the characters for filter when dial out numbers. Users could set up multiple characters. For example, if set to “[()- ]”, when dial (0571)-8800- 8888, the character “()-“will be automatically filtered and dial 057188008888 directly. Note: The space also can be used, and it will be automatically filtered. The default value is “[()- ]”. | |
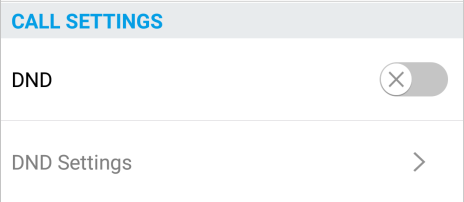
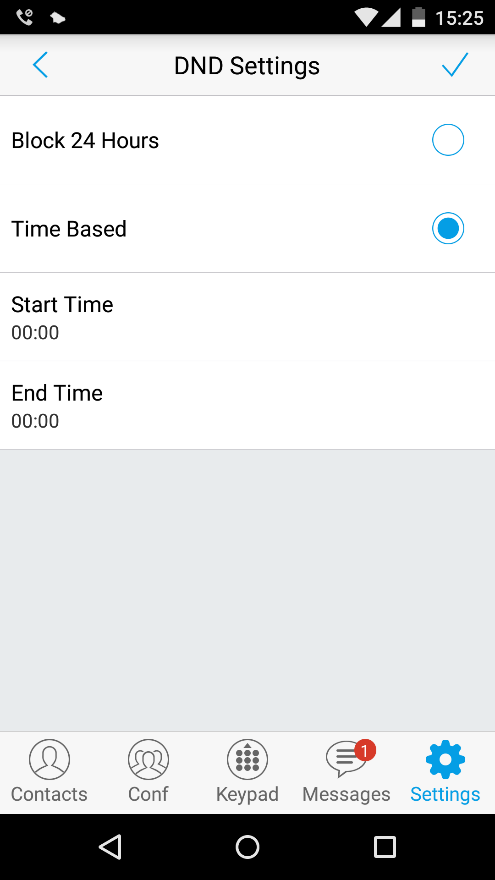
DND | Enable/Disable the DND feature |
DND Settings | Configures the time condition for the DND feature, this option will be grayed if the DND feature is disabled. |
Hard Encoder | Used to enable hardware encoding, this option is enabled by default |
Call Settings is mainly used for DND settings and Filter Characters. When DND is on, the phone will reject calls automatically and the status bar will display the icon
 . Tap on “DND Settings” to configure as shown on the figures below:
Audio Settings
Noise Reduction Level | Wave Lite provides users with multiple noise reduction levels. Choose the level according to the specific environment. |
Speaker Gain | Adjusts the speaker gain, available settings are (+6db, 0db and +6db). Default settings is: 0db. |
Microphone Gain | Adjusts the microphone gain, available settings are (+6db, 0db and +6db). Default settings is: 0db. |
Network Settings
Wave Lite supports data communication via 2G/3G/4G and WiFi, you can also configure QoS settings.
Network | Users could use Wave Lite in 2G/3G/4G/WiFi. |
Only Use This WiFi to Register Account | In the WiFi environment, only register account with this specified connected WiFi. |
STUN Server Settings | The IP address or URL of the STUN server. Only non-symmetric NAT routers work with STUN. |
QoS Settings | Configures layer 3 SIP QoS and layer 3 audio QoS. The valid range is 0-63. The default setting is 48. |
Additional Settings
Validate Server Certificate | Validates the servers certificate chain for the server’s certificate when enabled. Default settings is “Disabled”. | |
Config Server Path | Defines IP address or URL for the server. Wave Lite could obtain the configurations from the server path automatically. | |
Export Configuration | Exports the configuration files to the path on the phone: /sdcard/ Wave Lite/ config. | |
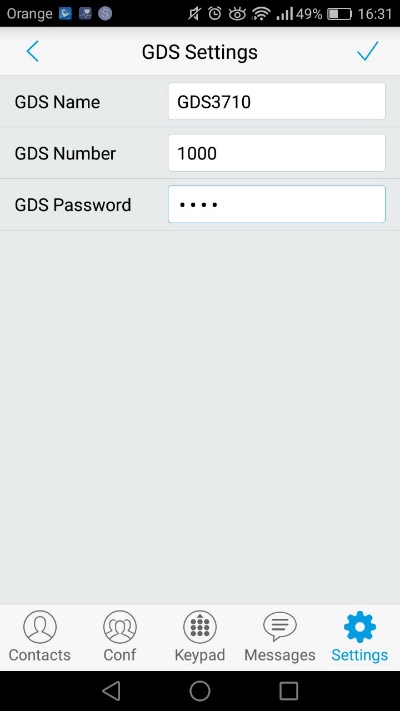
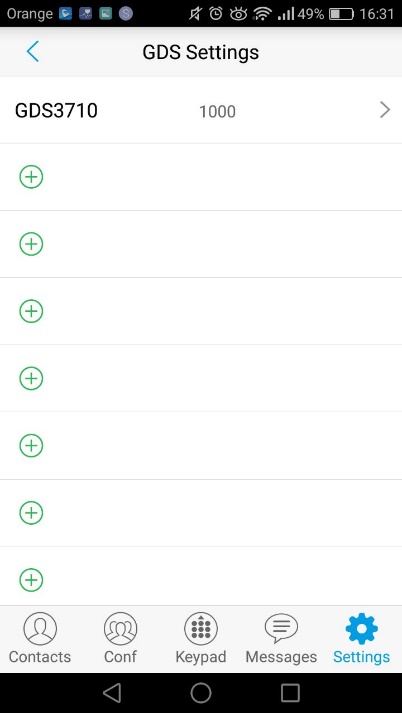
GDS Name | Specifies the name to identify the GDS3710. Note: The Wave Lite support up 10 GDS items | |
GDS Number | Specifies the GDS number which is the SIP user ID configured on GDS3710. | |
GDS Password | Determines the GDS password which should match the one configured on “Remote PIN to Open the Door” field on GDS3710 settings. | |
LDAP Settings | Tap to access the LDAP Settings screen to set up features. Users could set by QR Code Scan, Select QR Code Image or Manual Settings.
(Please refer to Table 13 for the description of the manual settings) | |
Configures whether to enable contacts status detection in BLF list. The status will be shown under SIP option of the Contacts. | ||
Add the contacts to monitor its BLF status online in BLF list. The status will be shown in SIP option of the Contacts. |
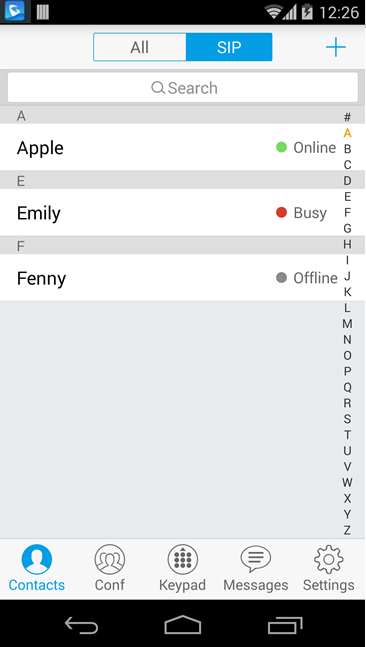
![]() Offline. Unable to detect the contact status, or the contact’s registration is failed.
Offline. Unable to detect the contact status, or the contact’s registration is failed.
![]() Busy. The active line of the contact is busy.
Busy. The active line of the contact is busy.
![]() Online. The call line is in idle.
Online. The call line is in idle.
Note: The BLF function requires that the server supports BLF feature.

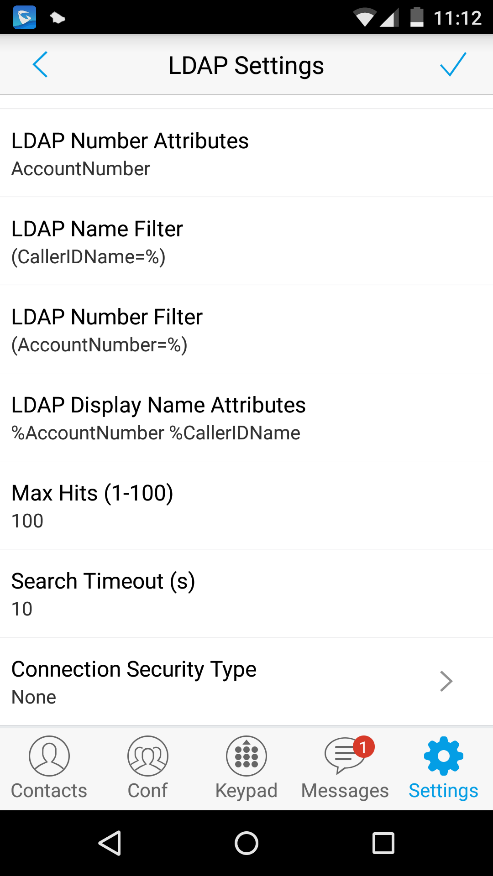
LDAP Lookup When Dialing | Defines whether to search LDAP when dialing. Default setting is “Yes”. |
LDAP Lookup When Incoming Call | Defines to search LDAP when there is an incoming call. The default setting is “Yes”. |
Server Address | Configures the LDAP server URL or IP address. |
Port | Configures the LDAP server port. The default value is 389. |
Base DN | Configures the base DN which is the root directory of the LDAP server, it means under which directory to search contact. |
Username (Binding DN) | Specifies the username to access the LDAP server. |
Password | Fill in the password to access the LDAP server. |
LADP Name Attributes | Specifies the “name” attributes of each record which are returned in the LDAP search result. Example: gn cn sn description |
LADP Number Attributes | Specifies the “number” attributes of each record which are returned in the LDAP search result. Example: telephoneNumber telephoneNumber Mobile |
LDAP Name Filter | Configures the filter used for name lookups. Examples: (|(cn=%)(sn=%)) returns all records which has the “cn” or “sn” field containing with the entered filter value; (!(sn=%)) returns all the records which do not have the “sn” field containing with the entered filter value; (&(cn=%) (telephoneNumber=*)) returns all the records with the “cn” field containing with the entered filter value and “telephoneNumber” field set. |
LDAP Number Filter | Configures the filter used for number lookups. Examples: (|(telephoneNumber=%)(Mobile=%) returns all records which has the “telephoneNumber” or “Mobile” field starting with the entered filter value; (&(telephoneNumber=%) (cn=*)) returns all the records with the “telephoneNumber” field starting with the entered filter value and “cn” field set. |
LDAP Display Name Attributes | Configures the entry information to be shown on phone’s LCD. Up to 3 fields can be displayed. Example: %cn %sn %telephoneNumber |
Max Hits (1-100) | The maximum contacts results return to the LDAP server. If set to “1”, The server will return all query results. The default setting is 100. |
Search Timeout (s) | Specifies the interval (in seconds) for the server to process the request and client waits for server to return. The default setting is 10 seconds. |
Connection Security Type | Configures LDAP connection security mode, users could choose None or SSL. |
Provisioning Settings
Config Upgrade Via | Selects provisioning method: TFTP, HTTP or HTTPS. Default setting is “HTTPS”. |
Config Server Path | Sets IP address or domain name of configuration server. The server hosts a copy of the configuration file to be installed on the Wave Lite. Default is fm.grandstream.com/gs. |
Config HTTP/HTTPS User Name | Configures the user name for the config HTTP/HTTPS server. |
Config HTTP/HTTPS Password | Configures the password for the config HTTP/HTTPS server. |
Start Provisioning | Click to confirm starting provisioning process to query the Config Server Path |
Custom Settings
Users could configure Color and Languages on Custom Settings screen.
Color | Configures the color of icon, tab bar, navigation bar, send & receive message backgrounds. |
Theme | Defines the theme to use for the application. Three themes are supported: white, black and blue. Default theme is: white |
Languages | Selects the language on the application to be displayed. |
About
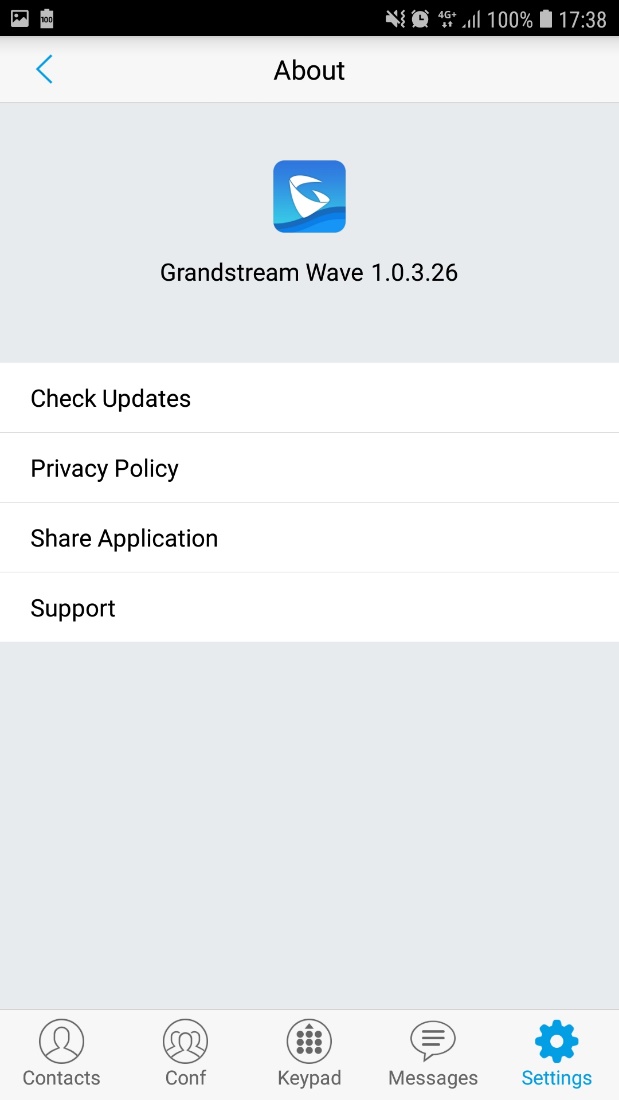
About page permits users to verify the version of the application running as shown on the following screenshot, access the Grandstream Privacy Statement web page when clicking on “Privacy agreement”, share this application via the Bluetooth, Gmail, Google, etc. and redirect users to Grandstream support Web page when pressing on Support in case the users need any help regarding the GSWave App.
Record
The Wave Lite supports recording audio VoIP calls, users can check and listen to the recorded files from Record menu as shown in below figures .
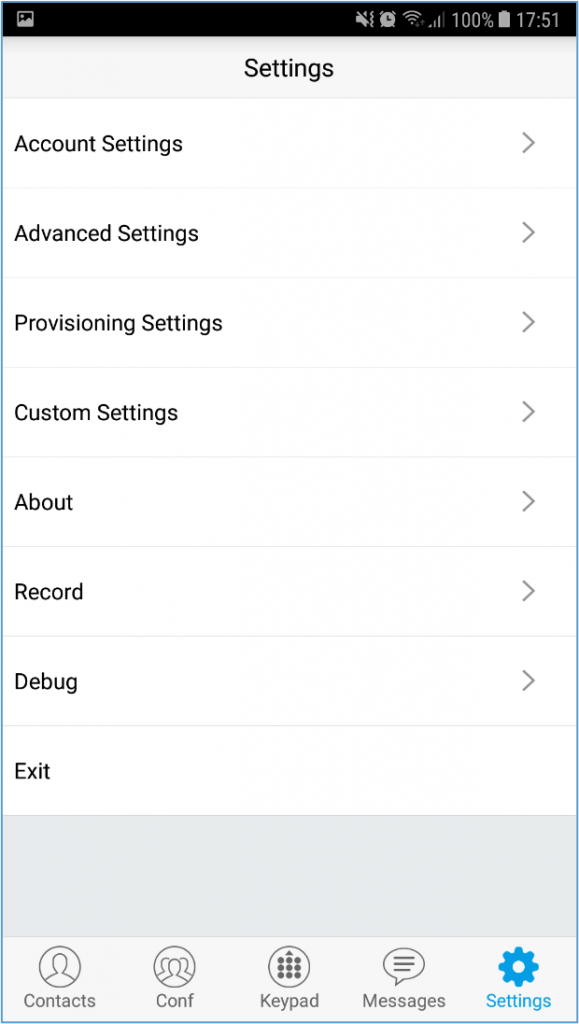
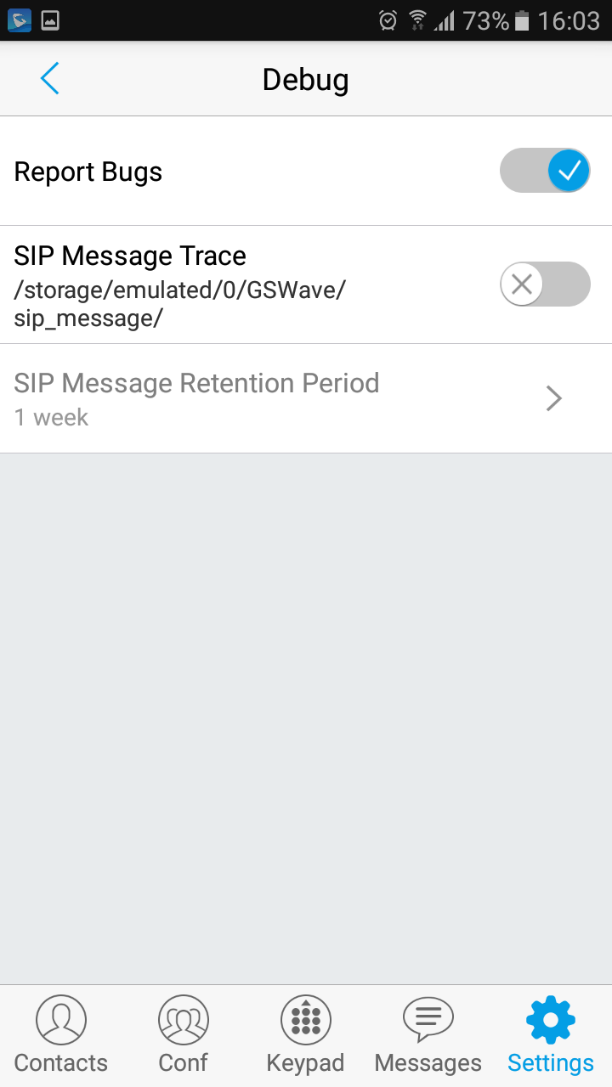
Debug
Users could trace SIP message with Debug function when coming across software problems.
Report Bugs | When unexpected crash or accidents occurs, upload the relevant logs to the server, the default setting is “Yes”. This function can help users to monitor service condition and locate exception logs. |
SIP Message Trace | Save the SIP message on the phone for users to check. |
SIP Message Retention Period | It is used to configure the retention period of the SIP message on the phone. |
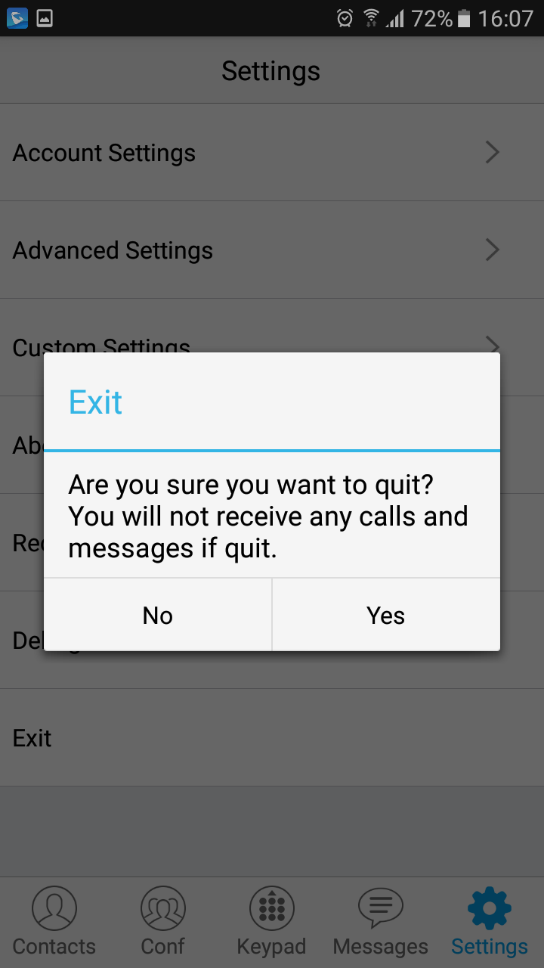
Exit
Users can easily quit the application by pressing the Exit button, and confirming their choice as displayed on the following screenshots. Once confirming, the application will be closed and then they will not receive any calls and messages.
CONNECTING WAVE LITE WITH GDS3710 DOOR SYSTEM
The Wave Lite can interact with the GDS3710 Door System to allows users to open door, initiate call to the GDS3710 and gets a real-time audio / video stream.
The following steps illustrate how to configure GDS3710 settings on the Wave Lite assuming that the Wave Lite and GDS SIP extension are correctly registered.
- Configure your SIP extension on the Wave Lite using the same SIP server on which the GDS extension is registered.
- Access Settings ➔ Advanced Settings ➔ Additional Settings ➔ GDS Settings.
- Click on “Add New Item” and configure your GDS settings:
- GDS Name: Specifies the name to identify the GDS3710.
- GDS Number: Specifies the SIP extension number of the GDS3710
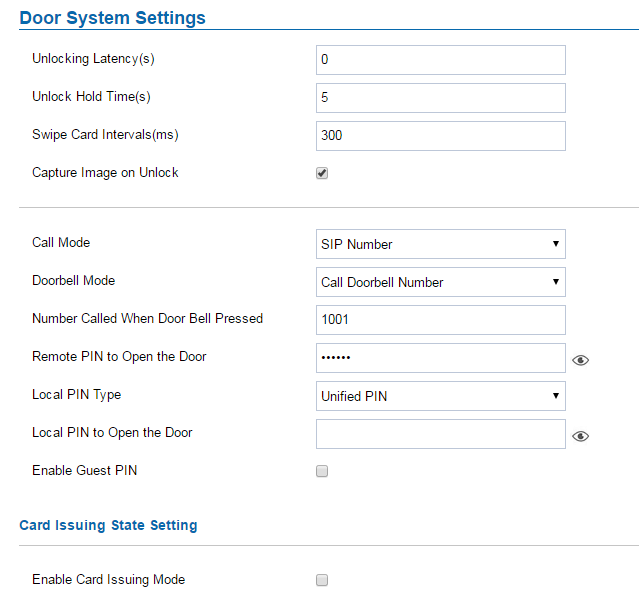
- GDS Password: Configure the remote PIN code used on the GDS available under GDS3710 web GUI ➔ Door System Settings ➔ Basic Settings ➔ Remote PIN to open the door.
- Press on
 to save the new GDS settings and add the new item as displayed below.
- Access to GDS Web GUI to configure the number called when the doorbell button is pressed under System Settings ➔ Basic settings ➔ “Number Called When Door Bell Pressed” as displayed on the following screenshot, and configure the remote PIN code if available.
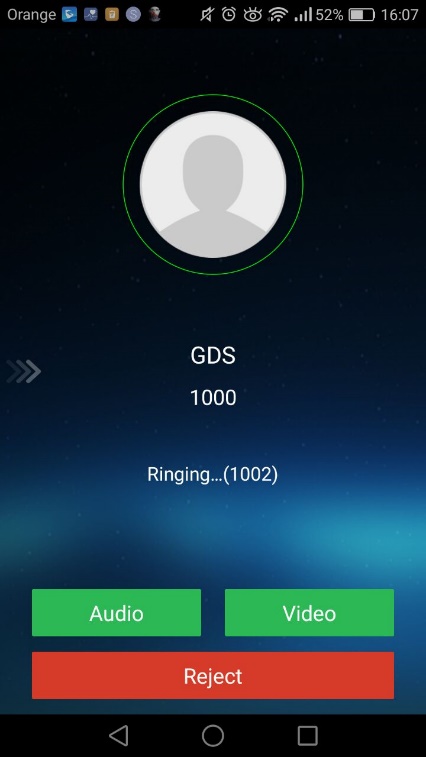
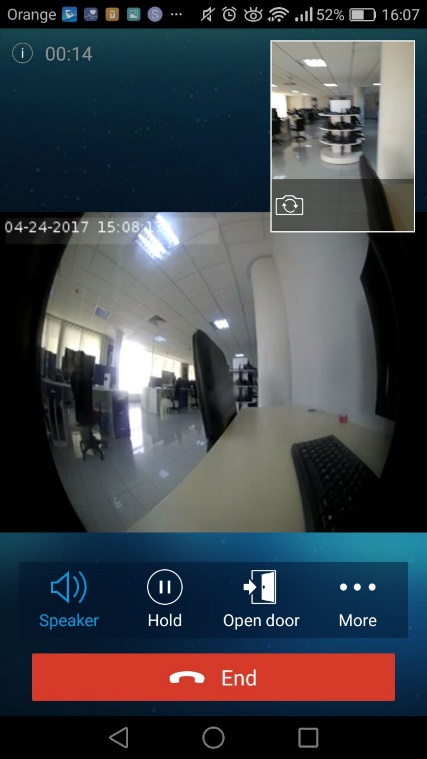
- Save and apply the new settings and then when someone presses the doorbell button on the GDS3710, it will initiate a video call to Wave Lite extension, once accepting the incoming call, the users can open the door by pressing “OpenDoor” button as displayed on the following screenshots.
CHANGE LOG
This section documents significant changes from previous firmware versions. Only major new features or major document updates are listed here. Minor updates for corrections or editing are not documented here.
- Added support for FIR and PLI. [Wave Lite Technical Specifications]
- Added support to delete call history [Delete All Call History]
- Added support for 100rel [Enable 100rel]
No major changes
- Added provisioning settings support [Provisioning Settings].
- Added Filter characters configuration support [Filter Characters].
- Added Local RTP port configuration support [Local RTP Port].
- Added video software encode feature.
- Add IP call feature [Direct IP Call].
- Added Speaker / MIC gain settings [Audio Settings].
- Added audio recording feature [Call Recording].
- Add “Check SIP User ID for Incoming INVITE” [Check SIP User ID for Incoming Invite].
- Add GDS Settings and open the door feature [GDS Settings] [CONNECTING WAVE LITE WITH GDS3710 DOOR SYSTEM].
- Support audio Codec G.729 [Voice / Video Codecs and Capabilities] [Preferred Vocoder].
- Remove IPVideoTalk account.
- This is the initial version for Wave Lite AndroidTM.