
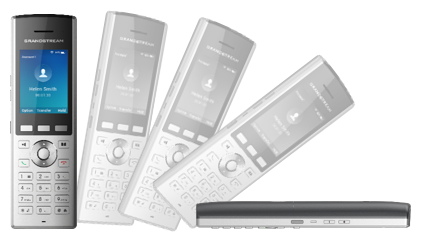
WELCOME
Thank you for purchasing Grandstream WP820. This powerful Enterprise Portable Wi-Fi Phone features dual-band 802.11a/b/g/n Wi-Fi, supports Wi-Fi roaming, and integrated Bluetooth. The combination of advanced telephony features and durability make it ideal for mobilizing your VoIP network in residences, warehouses, retail stores, hotels and many more environments. Due to a durable design, this sleek phone is drop safe from 1.2 meters, with 150 hours standby time and 7.5 hours talk time making it an ideal addition for homes and businesses alike.
PRODUCT OVERVIEW
Feature Highlights
The following table contains the major features of the WP820:
 |
|
Technical Specifications
The following table resumes all the technical specifications including the protocols/standards supported, voice codecs, telephony features, languages, and upgrade/provisioning settings for the Base station WP820.
Protocols/Standards | SIP RFC3261, TCP/IP/UDP, RTP/RTCP, HTTP/HTTPS, ARP, ICMP, DNS (A record, SRV,NAPTR), DHCP, SSH, TFTP, NTP, STUN, SIMPLE, LDAP, TR-069, 802.1x, TLS, SRTP, IPv6 |
Voice Codecs and Capabilities | Support for G.711μ/a, G.729A/B, G.722 (wide-band), iLBC, Opus, in-band, and out-of-band DTMF (In audio, RFC2833, SIP INFO), VAD, CNG, AEC, PLC, AJB, AGC, ANS |
Wi-Fi | Yes, integrated dual-band Wi-Fi 802.11 a/b/g/n (2.4GHz & 5GHz) |
Wi-Fi Encryption | WEP, WPA/WPA2, WPA Enterprise |
Graphic Display | 2.4-inch (240×320) TFT color LCD |
Peripherals | 3 soft keys, dial, hang up, speakerphone, phonebook, backlit keypad, proximity sensor, accelerator, vibration motor, volume button and navigation keys |
Push-to-Talk | Customizable button for push-to-talk, panic call and other related functions |
Bluetooth | Yes, Bluetooth integrated. |
Auxiliary Ports | 3.5 mm headset jack, Micro-USB port for charging, dual-MIC, dual-color LED. |
Telephony Features | Hold, transfer, forward, 3-way audio conference, downloadable phonebook (XML, up to 1000 items), call waiting, call log (up to 100 records), off-hook auto dial, auto answer, click-to-dial, flexible dial plan, hot desking, personalized music ringtones and music on hold, server redundancy and fail-over, push to talk |
Security | User and administrator level passwords, MD5 and MD5-sess based authentication, 256-bit AES based secure configuration file, SRTP, TLS, 802.1x media access control |
HD Audio | Yes, both on handset and speakerphone with support for wideband audio, HAC supported |
QoS | 802.11e (WMM) and Layer 3 (ToS, DiffServ, MPLS) QoS |
Multi-language | English, Arabic, Chinese, Czech, Dutch, German, French, Hebrew, Italian, Japanese, Polish, Portuguese, Russian, Spanish, Turkish, Hungarian, and Slovenian. |
Upgrade/ Provisioning | Firmware upgrade via TFTP/HTTP/HTTPS, manual upload, mass provisioning using TR-069 or encrypted XML configuration file, manual upload, USB upgrade |
Power & Green Energy Efficiency | Universal power adapter included Input: 100-240VAC; Output: +5VDC, 1A (5W) 1500mA Li-ion battery, 150h standby time and 7.5h talk time |
Physical | Handset dimensions: 168.5 x 52.5 x 21.8mm Charger cradle dimensions : 76 x 73 x 81mm
|
Temperature and Humidity | Operating Temperature: 0~45°C; Operating Humidity: 10~90%(non-condensing) Storage Temperature: -20~60°C; Storage Temperature:10~90%(non-condensing) |
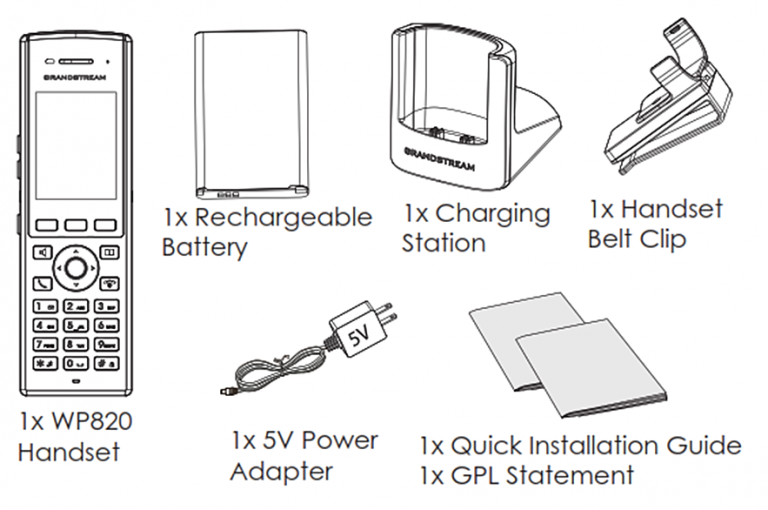
Package Contents | Handset unit, universal power supply, charger cradle, belt clip, 1 Li-ion battery. Quick Installation Guide. |
Durability | Drop-safe from 1.2 meters height |
Compliance | FCC, CE, RCM, IC |
WP820 Technical Specifications
GETTING STARTED
This chapter provides basic installation instructions including the list of the packaging contents and also information for obtaining best performance with the WP820.
Equipment Packaging
WP820 |
|
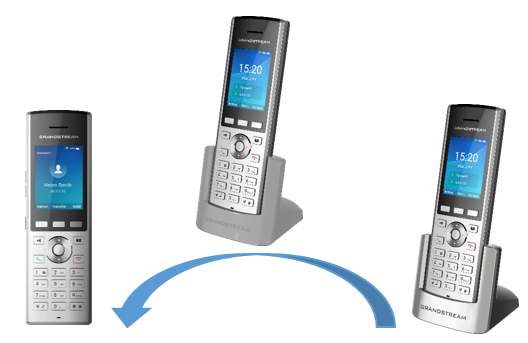
Setting up the WP820
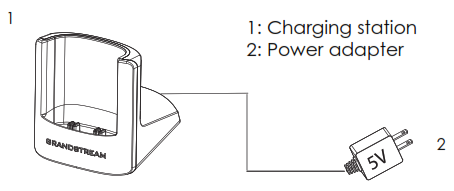
Charging Station
Plug the power adapter into a power source socket to start using the charging station.
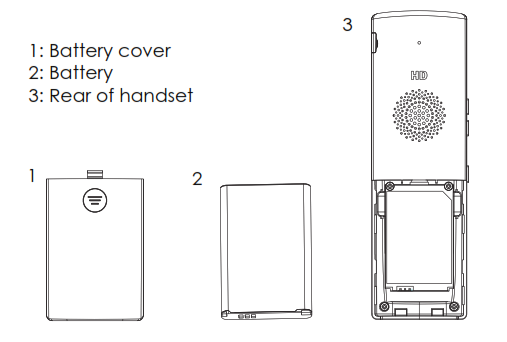
Handset
Please refer to the following steps in order to setup your WP820:
- Open the battery cover.
- Insert the battery with the electrodes in the bottom left corner.
- Close the battery cover.
Battery Information
- Technology: Rechargeable Li-ion Battery
- Voltage: 3.8V (Nominal Voltage 3.8V / Limited charge Voltage: 4.35 V)
- Capacity: 1500mAh
- Standby time: up to 150 hours
- Talk time: up to 7.5 hours’ active talk time
In order to get the best performance of your WP820, we recommend using original battery provided in the package. The specifications may differ depending on the age and capacity of the battery used.
WP820 Handset Keys Description
The WP820 enhances communication and combines usability and scalability in industries such as warehousing, catering, and retail as well as in factory settings. The following screenshot describe the WP820 LCD screen and the main hardware components.
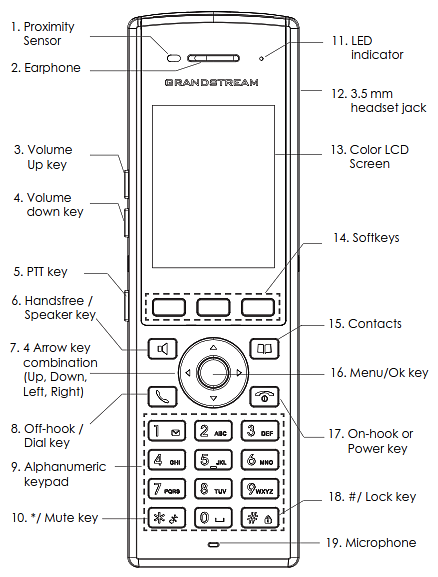
The following table describes the WP820 keypad keys.
Key | Description | |
1 | Proximity sensor | The proximity senor can detect the presence of a human ear. This sensing is done for two purposes: Reduce display power consumption by turning off the LCD backlight and to avoid inadvertent touches. |
2 | Earphone | Delivers audio output. |
3,4 | Volume up / Down Keys | Configure the handset and ringtone volume. |
5 | PTT Key | PTT (Push-to-Talk) button to initiate PTT call.
Note: PTT button can also be configured from Web GUI to have other functions such as: SAFE/Panic Call & Mute/Unmute during calls. |
6 | Hands-free / Speaker key | Switches between Handset and Hands-free / Speaker modes. |
7 | Arrow key combination (Up, Down, Left, Right) | Allows navigation of the cursor through the displayed menu options. |
8 | Off-hook / Dial key | Enters dialing mode, or dials number entered. |
9 | Alphanumeric Keypad | Provides the digits, letters, and special characters in context-sensitive applications. For + sign, press and hold key 0. |
10 | * / Mute key | Activates or deactivates the mute feature when keep pressing on * in idle screen. |
11 | LED indicator | 1dual-color LED indicator indicating: power, call, battery, message waiting … |
12 | 3.5 mm headset jack | Phone connector for the headphones/headsets. |
13 | Color LCD Screen | 2.4-inch (240×320) TFT color LCD |
14 | Softkeys | Correspond to functions displayed on the LCD. These functions change depending on the current context, and they can be customized on Home screen and Call screen from the Web GUI. |
15 | Contacts | Access to contacts list. |
16 | Menu/OK key | Selects the option chosen by the cursor or enters the main menu from the home screen. |
17 | On-hook or Power key | Terminates calls or turns the handset on / off. |
18 | # / Lock key | Locks keypad against unintentional entries when keep pressing #.
Press and hold # key for approximately 2 seconds to lock the keys. Press Unlock softkey and then # to unlock the keys.
|
19 | Microphone | Picks up audio earpiece and hands-free calls. |
WP820 Icons Description
Following table contains description of each icon that might be displayed on the screen of the WP820.
Battery status Charging | |
Wi-Fi not enabled/configured | |
Wi-Fi signal status | |
Outgoing Call notification | |
Missed Call notification | |
Incoming Call notification | |
Voicemail notification (Urgent) | |
Voicemail notification (Normal) | |
Mute enabled icon | |
DND enabled icon | |
Bluetooth enabled icon | |
Bluetooth connected icon | |
SRTP & TLS enabled icon | |
 | Contacts |
 | SMS |
 | Call History |
 | Voice Mail |
 | Diagnosis |
 | Settings |
 | Applications |
 | Status |
 | Broadsoft XSI |
WP820 LED Status
Red Fast Flashing | Upgrading |
Green Slow Flashing | Incoming call |
Green Blinking | Charging but not full |
Green Solid | Charging (full) |
Red Slow Flashing |
|
Red Solid | Network disconnected |
LED OFF | Normal |
WP820 LED Status
WP820 Handset Menu
The handset has an easy-to-use menu structure. Every menu opens a list of options. To open the main menu, unlock first the handset and press “Menu” (softkey in the middle). Press Arrow keys to navigate to the menu option you require. Then press “Select” (left softkey) or OK/Selection key to access further options or confirm the setting displayed.
To go to the previous menu item, press “Back” (right softkey). You can press Power key at any time to cancel and return to standby mode.
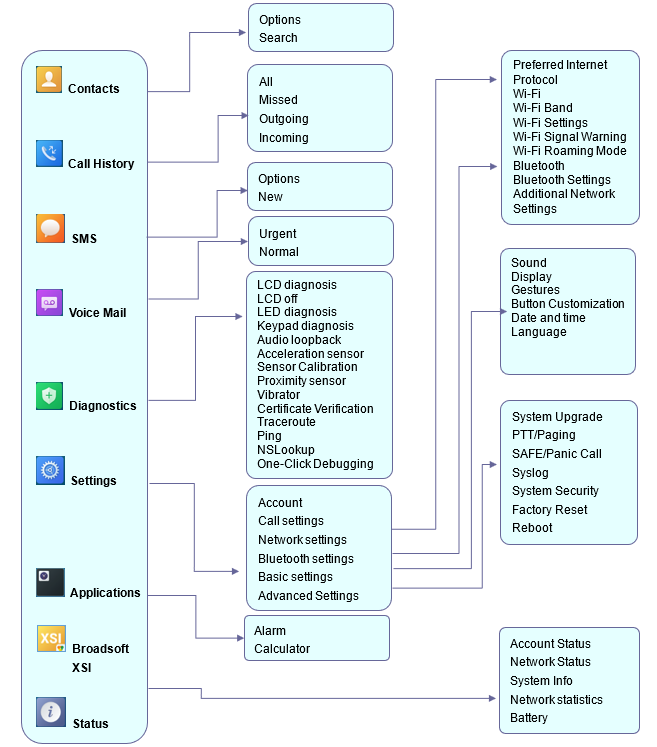
Contacts | Display the list of the registered contacts and also the groups contacts with the ability of searching, adding, or editing the entries and also deleting the selected contacts. The maximum number of contacts is 1000. |
Call History | Display the call history: Missed Calls, Accepted Calls, Outgoing Calls or All Calls. You can add contacts to Shared Contacts directly from call logs. |
SMS | SMS stands for Short Message Service and referred to as a “text message”. With a SMS, you can send a message by pressing “New” of up to 160 characters to another device or check the received ones. |
Voice Mail | Play Message: Play voice mail messages received. Set Voice Mail: Configure voice mail parameters.
|
Diagnostics | LCD diagnosis LCD off LED diagnosis Keypad diagnosis Audio loopback Acceleration sensor Sensor calibration Proximity sensor Vibrator Certificate Verification Traceroute Ping NSLookup One-click Debugging
|
Settings | Account Configure/View SIP accounts settings and account ringtone.
Call settings Configure the account auto answer, call forward, DND and speed dial settings.
Network Settings
Configure the networks settings including Wi-Fi settings and additional networks settings.
Bluetooth Settings
Configure the Bluetooth settings including discovery, pairing and connection actions. Basic Settings Configure the basic settings including voice settings, display settings, Gestures and button customization, language settings and date/time settings.
Advanced Settings
Configure the advanced settings including system upgrade, PTT/Paging settings, system security settings, syslog settings and factory reset / reboot. |
Applications | Alarm Clock: Configures the alarm clock settings Calculator: performs arithmetic operations on numbers.
|
Broadsoft XSI | Broadsoft account.
|
Status | Displays account status, system info, Network status and network statistics
Account status. Network status:
Press to enter the sub menu for MAC address, IP setting information (DHCP/Static IP), IPv4 address, IPv6 address, Subnet Mask, Gateway; DNS server and VPN. System Info: Press to enter the sub menu for Running memory, Storage status, MAC address, System version, Recovery version, U-boot version, Kernel version, Hardware version, PN number, Country code and Running time.
Network Statistics:
Press to enter the sub menu for Network SSID, BSSID, IP address, Signal strength, Connection speed, Channel, Frequency, Tx packets, Tx error packets, Tx error rate, Tx drop packets, Tx drop rate, Rx packets, Rx error packets, Rx error rate, Rx drop packets, Rx drop rate.
Battery:
Displays the battery status and the battery usage details. |
WP820 Keypad
The WP820 keypad can be used by tapping on an input field. WP820 keypad has 4 modes “ABCabc2”, “ABC”, “abc” and “123”. Default mode is “ABCabc2”. Note: If the input field is accepting only digits, only “123” mode will be available.
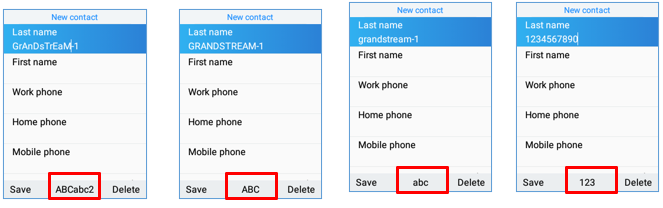
- “ABCabc2” Mode:
This mode allows to enter capital letters, small letters, digits, and symbolic characters.
Following table describes allowed characters for each key.
Key | Description | Key | Description | Key | Description |
1 | . , ’ ? ! ” – 1 | 2 | A B C a b c 2 | 3 | D E F d e f 3 |
4 | G H I g h i 4 | 5 | J K L j k l 5 | 6 | M N O m n o 6 |
7 | P Q R S p q r s 7 | 8 | T U V t u v 8 | 9 | W X Y Z w x y z 9 |
* | . , ‘ ? ! “ – ( ) @ / : _ ; + % * = < > $ [ ] { } ~ ^ # | ` & | 0 | Space | # | Switch mode |
- “ABC” Mode:
This mode allows to enter capital letters, digits, and symbolic characters.
Following table describes allowed characters for each key.
Key | Description | Key | Description | Key | Description |
1 | . , ’ ? ! ” – 1 | 2 | A B C 2 | 3 | D E F 3 |
4 | G H I 4 | 5 | J K L 5 | 6 | M N O 6 |
7 | P Q R S 7 | 8 | T U V 8 | 9 | W X Y Z 9 |
* | . , ‘ ? ! “ – ( ) @ / : _ ; + % * = < > $ [ ] { } ~ ^ # | ` & | 0 | Space | # | Switch mode |
- “abc” Mode:
This mode allows to enter small letters, digits, and symbolic characters.
Following table describes allowed characters for each key.
Key | Description | Key | Description | Key | Description |
1 | . , ’ ? ! ” – 1 | 2 | a b c 2 | 3 | d e f 3 |
4 | g h i 4 | 5 | j k l 5 | 6 | m n o 6 |
7 | p q r s 7 | 8 | t u v 8 | 9 | w x y z 9 |
* | . , ‘ ? ! “ – ( ) @ / : _ ; + % * = < > $ [ ] { } ~ ^ # | ` & | 0 | Space | # | Switch mode |
- “123” Mode: This mode allows to enter digits and . only.
Following table describes allowed characters for each key.
Key | Description | Key | Description | Key | Description |
1 | 1 | 2 | 2 | 3 | 3 |
4 | 4 | 5 | 5 | 6 | 6 |
7 | 7 | 8 | 8 | 9 | 9 |
* | . | 0 | 0 | # | Switch mode |
Tips using the keypad:
- To switch between the modes, users could press the middle softkey or # key.
- Press multiple times on same key to move forward between the allowed characters.
- Use Right/Left arrow keys to change the cursor’s position on the text entered.
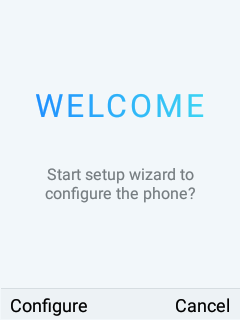
QUICK SETUP WIZARD
The WP820 offers a Setup Wizard tool to help users to quickly configure basic settings on the device such as language, time zone, Wi-Fi, and SIP account. The setup wizard appears automatically upon initial boot up of a factory default device.
WP820 WEB GUI ACCESS CONFIGURATION
The WP820 can be configured using:
- Web GUI embedded on the WP820 using PC’s web browser.
- LCD Configuration Menu using the WP820 keypad.
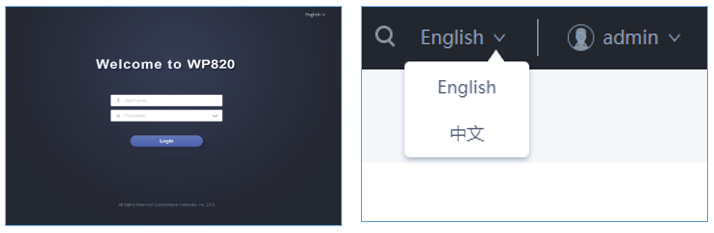
Configuration via Web Browser
The WP820 embedded Web server responds to HTTP/HTTPS GET/POST requests. Embedded HTML pages allow a user to configure the WP820 through a Web browser such as Google Chrome, Mozilla Firefox.
Accessing the Web UI
- Connect the computer to the same network as WP820.
- Make sure the WP820 is booted up and powered correctly.
- You may check WP820 IP address via a subscribed WP820 on its LCD menu Settings 🡪 Network Status. Please see [WP820 Network Status]
- Open Web browser on your computer and enter the WP820 IP address in the address bar of the browser.
- Enter the administrator’s username and password to access the Web Configuration Menu.
Web GUI Languages
Currently the WP820 web GUI supports English, Chinese languages.
Users can select the displayed language in web GUI login page, or at the upper right of the web GUI after logging in
Saving the Configuration Changes
When changing any settings, always submit them by pressing Save and Apply buttons. If using the Save button, after making all the changes, click on the Apply button on top of the page to submit.
Web UI Access Level Management
There are two default passwords for the login page:
User Level | Username | Password | Web Pages Allowed |
End User Level | user | 123 | Only Status, Phone Settings, System Settings, Maintenance and System Application with limited options. |
Administrator Level | admin | admin | All pages |
Changing User Level Password
- Access the Web GUI of your WP820 using the admin’s username and password. (Default username and password are: admin/admin).
- Press Login to access your settings.
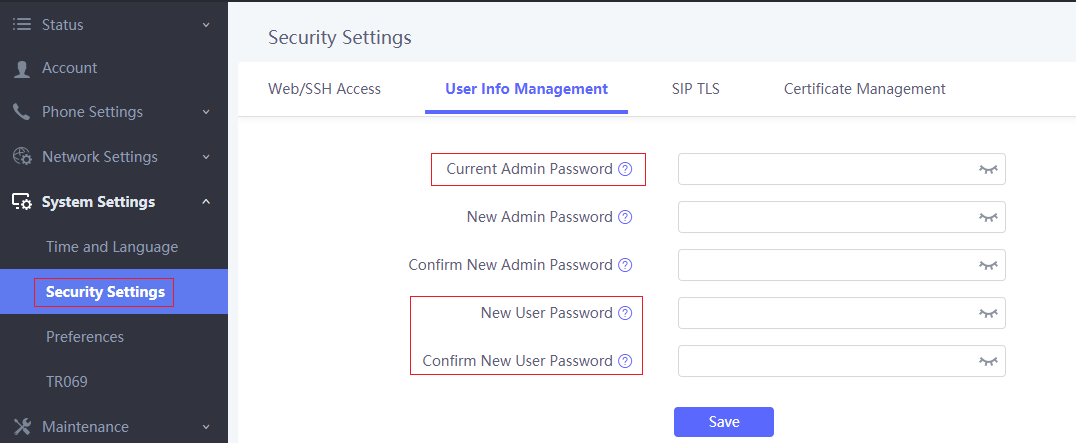
- Go to System Settings 🡪 Security Settings.
- In User Info Management, locate user password section:
- Type in the admin password in the Current Admin Password field.
- Type in your new user password in New User Password field.
- Type in again same entered password in Confirm New User Password field.
- Press Save and Apply buttons to save your new settings.
Changing Admin Level Password
- Access the Web GUI of your WP820 using the admin’s username and password. (Default username and password is: admin/admin).
- Press Login to access your settings.
- Go to System Settings 🡪 Security Settings.
- In User Info Management, locate admin password section:
- Type in the admin password in the Current Admin Password field
- Type in your new user password in New Admin Password field.
- Type in again same entered password in Confirm New Admin Password field.
- Press Save and Apply buttons to save your new settings.

Changing HTTP / HTTPS Web Access Port
- Access the Web GUI of your WP820 using the admin’s username and password. (Default username and password are: admin/admin).
- Press Login to access your settings.
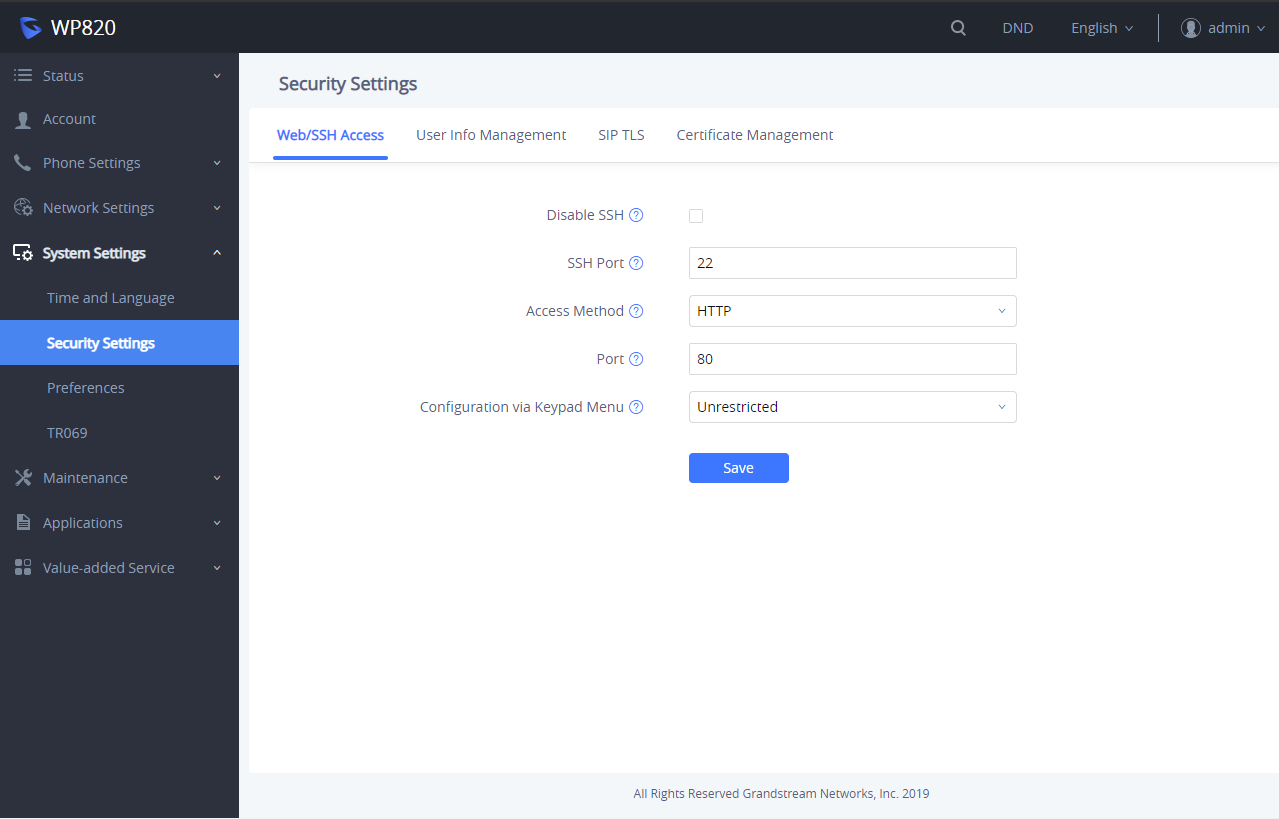
- Go to System Settings 🡪 Security Settings.
- In Web/SSH Access page, select the access method depending on desired protocol (HTTP or HTTPS)
- Locate HTTP / HTTPS Web Port field and change it to your desired/new HTTP / HTTPS port.
Note: By default, the HTTP port is 80 and HTTPS is 443. - Press Save and Apply buttons to save your new settings.
BASIC OPERATIONS
WP820 Home Screen
The WP820 Home screen comprises three pages that make it easy for the customer to access some settings, parameters, or notifications. Please refer to the following screenshots:
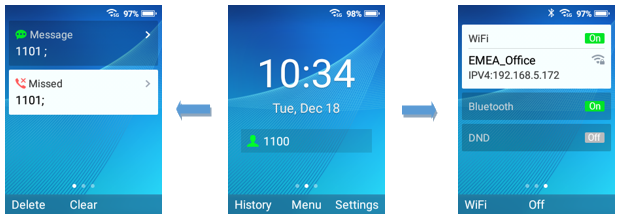
Left Home Screen Page:
- This page lists all the notifications that users need to check: Missed calls, unread SMS, unread Voice mails, etc …
- Users can access the notification by tapping on OK button, delete the notification by tapping on the left softkey or clear all the notifications by tapping on the middle softkey.
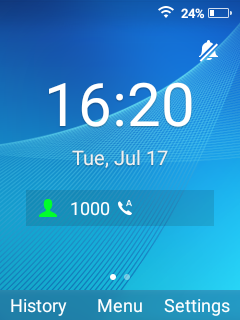
Middle Home Screen Page:
- The middle page of Home screen shows date/time and the registered SIP account(s) on the WP820.
- Users can access by default to History, Menu or Setting by using softkeys, and Administrator is able to change the functions of softkeys on Home screen from the Web GUI.
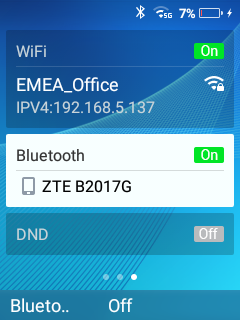
Right Home Screen Page:
- The right page is providing the users quick access to Wi-Fi, Bluetooth and DND option and configuration.
- Users can turn on/off the option using the middle softkey, while they also can access to the settings of each option by tapping on the left softkey.
Turning the Handset ON/OFF
To turn ON the handset: Long press on Power key ![]() until the LCD screen lights up.
until the LCD screen lights up.
To turn OFF the handset: Long press on Power key ![]() again when the handset is idle and press the softkey to choose to power off or reboot.
again when the handset is idle and press the softkey to choose to power off or reboot.
Connecting WP820 to Wi-Fi Network
Auto Connection
For easy deployment, WP820 out of the box is preconfigured to connect to a default SSID named wp_master with a password (WPA/WPA2 PSK) equal to wp!987@dmin, users can adapt these settings from the web UI as well to make it easier for deployment on customer site.
Go under the web interface of the “Network Settings 🡪 Wi-Fi Settings 🡪 Wi-Fi Security”.
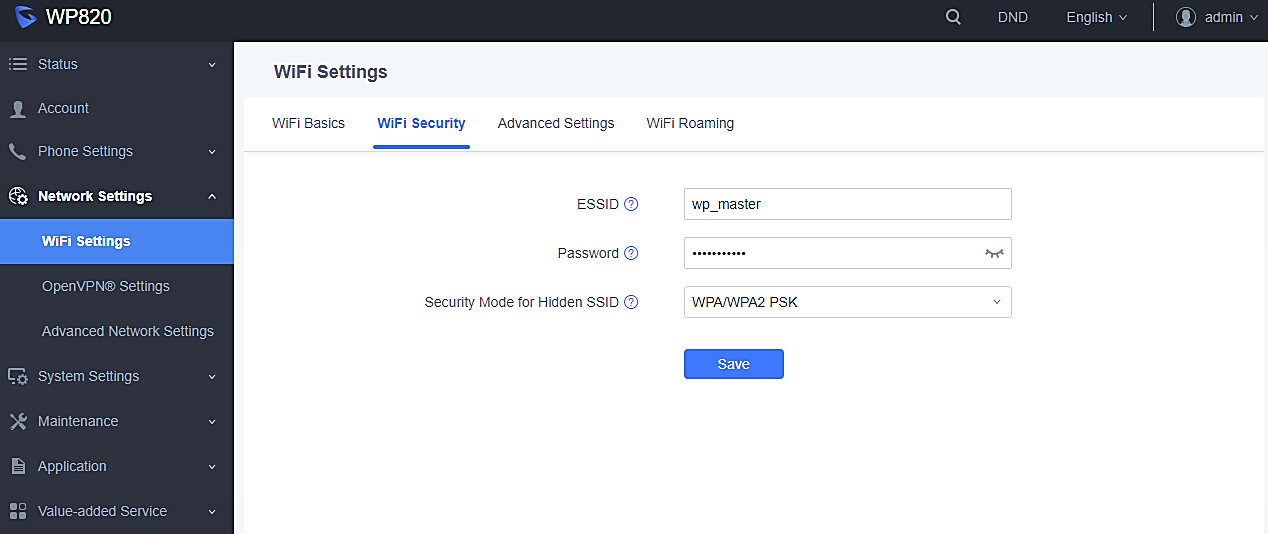
For example, the user can pre-configure the WP to automatically connect to the Wi-Fi network at the client site, making it easier for the client to use the phone without going through the setting up manually the Wi-Fi network. Also, the client could have the SSID hidden by default, and the WP820 handset would still be able to connect to the Wi-Fi network since they have SSID and password information configured.
Manual connection
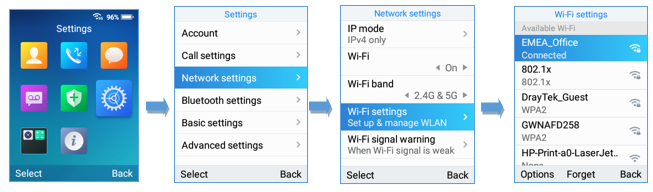
The WP820 supports dual-band 802.11a/b/g/n Wi-Fi, please refer to the following steps in order to connect your WP820 to the Wi-Fi networks:
- On LCD menu, press Menu key and navigate to Settings → Network Settings → Wi–Fi.
- Set Wi-Fi to “On “ and navigate to “Wi-Fi Settings “. A list of Wi-Fi networks will be displayed.
- Select the desired network to connect to. (Enter the correct password to connect if requested)
WP820 will display Wi-Fi icon on the main LCD menu if the connection to the Wi-Fi network is successful.
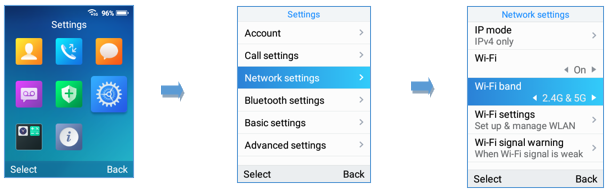
Wi-Fi Band Configuration
If 5GHz and 2.4Ghz are both available, the WP820 will use 5GHz, but it may switch to 2.4GHz if the signal of 5GHz is poor. Users may also specify the Wi-Fi Band in order to fix it or to keep it Dual Band under Settings🡪Network Settings🡪Wi-Fi Band.
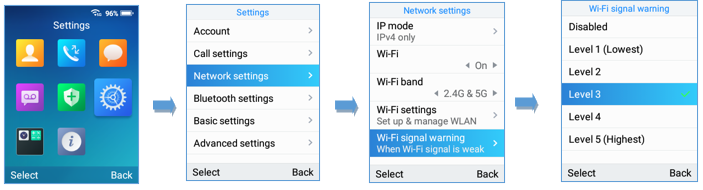
Wi-Fi Signal Warning Configuration
Users Can configure Wi-Fi signal warning sensitivity or disable it under Settings🡪Network Settings🡪Wi-Fi signal warning. Five sensitivity levels are available: Level 1 is the lowest and level 5 is the highest.
Wi-Fi Roaming Mode Configuration
Wi-Fi Roaming settings configuration can also be done by users under Settings🡪Network Settings🡪Wi-Fi Roaming Mode.
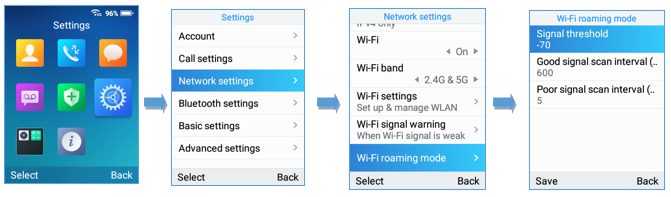
The options that can be configured under “Wi-Fi Roaming Mode” are the following:
- Signal Threshold: When the Wi-Fi signal strength of the device drops below this value, the device will scan for a hotspot above the threshold value and connect to it. The default setting is -70.
- Good Signal Scan Interval: The time interval for signal scanning when the Wi-Fi signal strength is higher than the signal threshold. The default setting is 600s.
- Poor Signal Scan Interval: The time interval for signal scanning when the Wi-Fi signal strength is lower than the signal threshold and there is no hotspot which is higher than the current signal strength. The default setting is 5s.
Connecting WP820 to Bluetooth Devices
Bluetooth is a proprietary, open wireless technology standard for exchanging data over short distances from fixed and mobile devices, creating personal area networks with high levels of security. The WP820 supports Bluetooth.
To connect to a Bluetooth device, turn on the WP820’s Bluetooth radio first. The first time when using a new Bluetooth device with the WP820, “pair” the device with WP820 so that both devices know how to connect securely to each other. After that, users could simply connect to a paired device. Turn off Bluetooth if it is not used.
Bluetooth settings are under WP820’s Settings🡪Network Settings🡪Bluetooth Settings.
Turn On/Off Bluetooth
- Go to WP820’s Settings🡪Network Settings🡪Bluetooth.
- Turn On or Off the Bluetooth option.
Change Bluetooth Device Name
The WP820 uses “WP820_XXXXXX” as Bluetooth device name by default where “XXXXXX” are the last 6 digits of the phone’s Bluetooth MAC address plus 1. The device name will be visible to other devices when connecting them. Follow the steps below to change the name:
- Go to WP820’s Settings🡪Network Settings🡪Bluetooth
- Turn on Bluetooth.
- Go to WP820’s Settings🡪Network Settings🡪Bluetooth Settings.
- Press “Device name”.
- Enter a name and tap on “Save”
Pair WP820 with a Bluetooth Device
Before connecting the WP820 with other Bluetooth device, users must pair them first. They will stay paired afterwards unless they are unpaired.
- Go to WP820’s Settings🡪Network Settings🡪Bluetooth.
- Turn on Bluetooth.
- Go to WP820’s Settings🡪Network Settings🡪Bluetooth Settings and set “Visible to nearby Bluetooth devices” to ON and set the Visibility timeout settings to make the WP820 phone visible to all nearby Bluetooth devices.
- Set the Bluetooth headset mode parameter to ON in order to allow the WP820 to pair with other Bluetooth mobile devices to make calls. After successful pairing, users can press the call key and then press “Accounts” to select the Bluetooth account.
5. Access the Bluetooth devices settings and press on Refresh softkey, the WP820 will scan and display the IDs of all available Bluetooth devices in range. If the device you would like to pair with does not show up in the list (available devices), ensure that the other device is turned on and set to be discoverable.
Once the Bluetooth device shows up in the result, press on it and specify if you want to allow it to access your contacts and call history then press on Pair. Confirm the passkey in the prompted message (if any).

Unpair a Bluetooth Device
- In the Bluetooth devices settings 🡪 Paired devices, select, and press on the already paired Bluetooth device name you want to unpair.
- Press on Unpair.
Connect to a Bluetooth Device
- In the Bluetooth devices settings 🡪 Paired devices, select the paired device you want to connect to.
- Press on Connect.
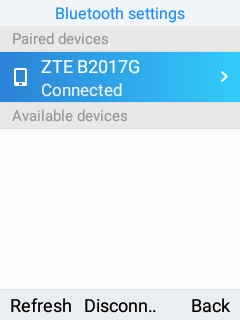
The Bluetooth connected device’s name will be showing in the Bluetooth devices menu.
Connect to a Bluetooth Device from Web Interface
Turn On/Off Bluetooth
- Go to WP820’s GUI 🡪Network Settings🡪Bluetooth.
- Turn On or Off the Bluetooth option.
Change Bluetooth Device Name
The WP820 uses “WP820_XXXXXX” as Bluetooth device name by default where “XXXXXX” are the last 6 digits of the phone’s Bluetooth MAC address plus 1. The device name will be visible to other devices when connecting them. Follow the steps below to change the name:
- Go to WP820’s GUI🡪Network Settings🡪Bluetooth
- Change the “Device name” then click on “Save”.
Pair WP820 with a Bluetooth Device
Before connecting the WP820 with other Bluetooth device, users must pair them first. They will stay paired afterwards unless they are unpaired.
- Go to WP820’s GUI 🡪Network Settings🡪Bluetooth.
- Turn on Bluetooth.
- Enable “Bluetooth Headset Mode” and press Scan.
- Select device from the discovered list and then click “save” then “Pair” and enter the key PIN on the paired device.
Checking WP820 Status
WP820 Account Status
To check the SIP accounts status, follow these steps:
- Press Menu key to bring up operation menu.
- Use arrow keys to Reach Status menu and navigate to Account status.
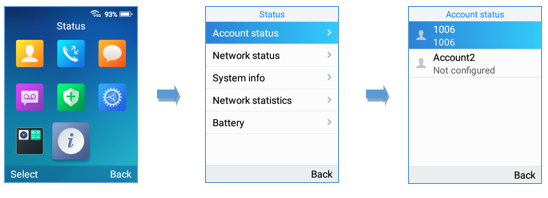
The following information will be displayed:
Item | Description |
Account 1 | Displays the information about the first account including name, number, and the status of its registration. |
Account 2 | Displays the information about the second account including name, number, and the status of its registration. |
WP820 Account Status Description
WP820 Network Status
To check the handset network information status, follow these steps:
- Press Menu key to bring up operation menu.
- Use arrow keys to reach Status menu and navigate to Network Status.
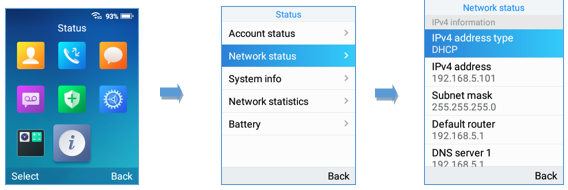
Item | Description |
IPv4 information | |
IPv4 Address Type | Displays the IPv4 address type. |
IPv4 Address | Displays the IPv4 address. |
Subnet mask | Displays the subnet mask address. |
Default router | Displays the IPv4 address of the router. |
DNS Server 1 | Displays the IPv4 address of the primary DNS Server. |
DNS Server 2 | Displays the IPv4 address of the secondary DNS Server. |
IPv6 information | |
IPv6 Address Type | Displays the IPv6 address type. |
IPv6 Address | Displays the IPv6 address. |
DNS Server 1 | Displays the IPv6 address of the primary DNS Server. |
DNS Server 1 | Displays the IPv6 address of the secondary DNS Server. |
Other Network Information | |
MAC address | Displays the handset’s MAC address. |
NAT Type | Displays the NAT type. |
VPN | |
VPN address | Displays the VPN IPv4 address. |
WP820 Network Status Description
WP820 System Info
To check the system info, follow these steps:
- Press Menu key to bring up operation menu
- Use arrow keys to reach Status menu and navigate to System Info section.
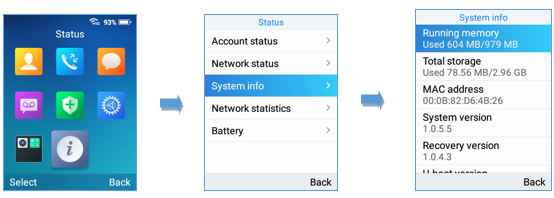
The following information will be displayed:
Item | Description |
Running Memory | Displays information about the memory. |
Total Storage | Displays information about the storage space on the phone. |
MAC Address | Displays the MAC Address of the phone. |
System Version | Displays the current firmware version installed. |
Recovery Version | Displays the recovery version installed. |
U-boot Version | Displays the u-boot version installed. |
Kernel Version | Displays the kernel version installed. |
Hardware Version | Displays the hardware version. |
LCD_SN | Displays the LCD serial number. |
DDR_SN | Displays the DDR serial number. |
FCT_SN | Displays the FCT serial number. |
SN | Displays the unit’s serial number. |
PN Number | Displays the Part Number. |
Country code | Displays the country code. |
Running Time | Displays the time during which the WP820 is powered on and working. |
WP820 System Info Description
WP820 Network Statistics
To check the handset network information status, follow these steps:
- Press Menu key to bring up operation menu.
- Use arrow keys to reach Status menu and navigate to Network Statistics.
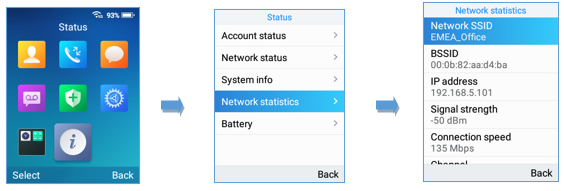
The following information will be displayed:
Item | Description |
Network SSID | Displays the SSID Name on which the handset is connected. |
BSSID | Displays the MAC address of the Access Point on which the handset is connected. |
IP Address | Displays the IP address of the handset. |
Signal strength | Displays the Wi-Fi signal strength. |
Connection Speed | Displays the connection speed value. |
Channel | Displays the channel on which handset is placed. |
Frequency | Displays the channel frequency. |
TX Packets | Displays the total packets volume sent by handset. |
TX error packets | Displays the number of packets that failed to be transmitted. |
TX error rate | Displays the global percentage of packets that failed to be transmitted. |
TX drop packets | Displays the amount of TX packets that were dropped by router. |
TX drop rate | Displays the global percentage of TX packets that were dropped by router. |
RX Packets | Displays the total packets volume received by handset. |
RX error packets | Displays the number of packets that failed to be received. |
Network statistics
WP820 Battery
To check the Battery information, follow these steps:
- Press Menu key to bring up operation menu.
- Use arrow keys to Reach Status menu and navigate to Battery.
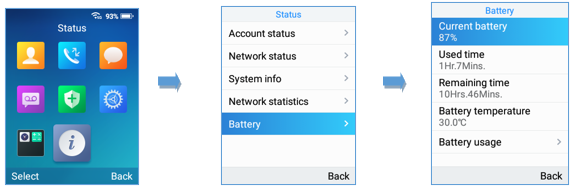
The following information will be displayed:
Item | Description |
Current Battery | Displays the current Battery percentage. |
Used Time | Displays the handset used time on Battery since the last full charge. |
Remaining time | Displays the remaining battery time. |
Battery Temperature | Displays the current Battery temperature. |
Battery usage | Displays the percentage of battery consumption of each app. |
WP820 Battery Description
Screen Lock
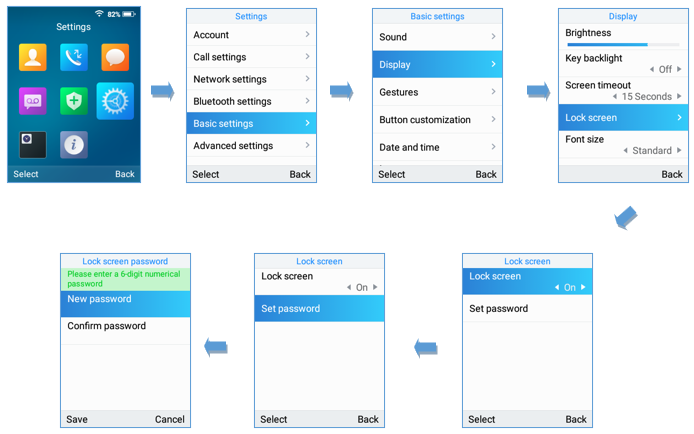
Setting the Key Lock from Handset
To configure Key lock from the handset, follow below steps:
- Access WP820’s menu 🡪 Settings 🡪 Basic Settings 🡪 Display 🡪 Lock Screen.
- Set “Lock screen” to “On”.
- (Optional). Configure “Set Password’ to define a PIN code (6-digit numerical password) to unlock the keypad and press “Save”.
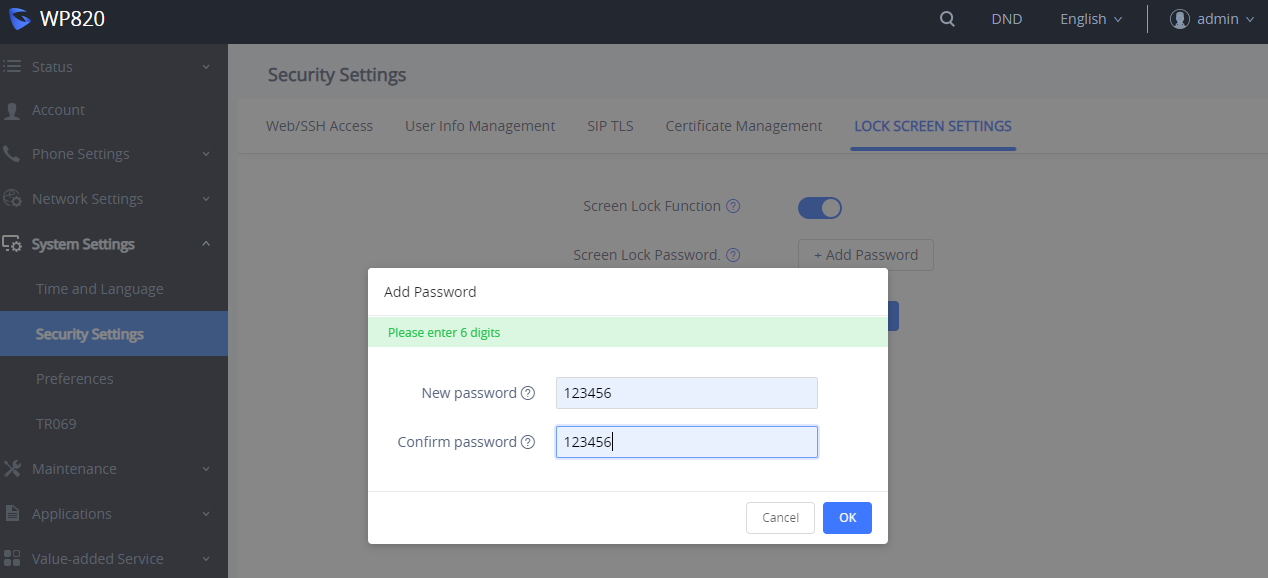
Lock Screen Settings from Web GUI
User can configure lock screen functions on the web UI. The screen lock password was also added to provide additional security. Default Disabled.
- Proceed from System Settings 🡪 Security Settings 🡪 Lock Screen Settings.
- Enable option “Screen Lock Function”.
- On Screen Lock Password, click on Add Password then once done, click OK then Save then Apply.
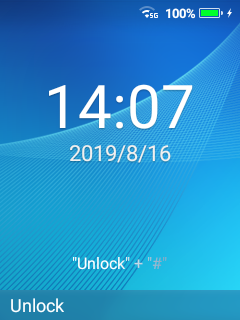
Locking/Unlocking the Screen
- To lock the Screen
- Press the Pound key “#” and hold for approximately 2 seconds, or
- Press On-hook / power key while the LCD is idle.
- To unlock the Screen
- Press Unlock button (Left softkey) and Pound key “#” to unlock the keys.
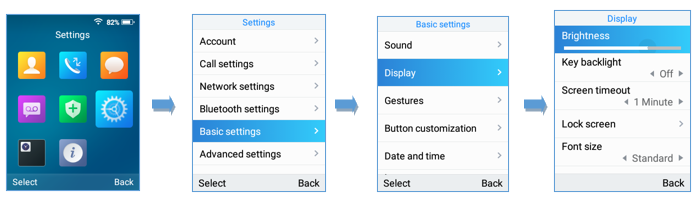
Configuring the LCD Brightness and Screen Timeout
- Press Menu to bring up operation menu.
- Use arrow keys to reach Settings.
- Navigate to Basic Settings, and then select Display.
- Configures the LCD brightness, key backlight, lock screen, screen time out and the font size.
- Press “Back” (right softkey) to save and apply the new settings.
Return to Idle Screen
Press the Power Key ![]() to quickly exit the menu and return back to the main idle screen.
to quickly exit the menu and return back to the main idle screen.
When you are navigating on the handset’s menu, and you receive an incoming call, the LCD screen will automatically exit the menu and you can either accept or reject the call, when the call is terminated, the LCD screen will return to the idle screen.
Register a SIP Account
The WP820 supports up to 2 SIP accounts and they can be configured either using the web GUI or via the keypad menu as described on the following section.
Register Account via Web User Interface
- Access your WP820 base station web UI by entering its IP address in your favorite browser.
- Enter your admin’s username and password (default username and password: admin/admin).
- Press Login to access your settings.
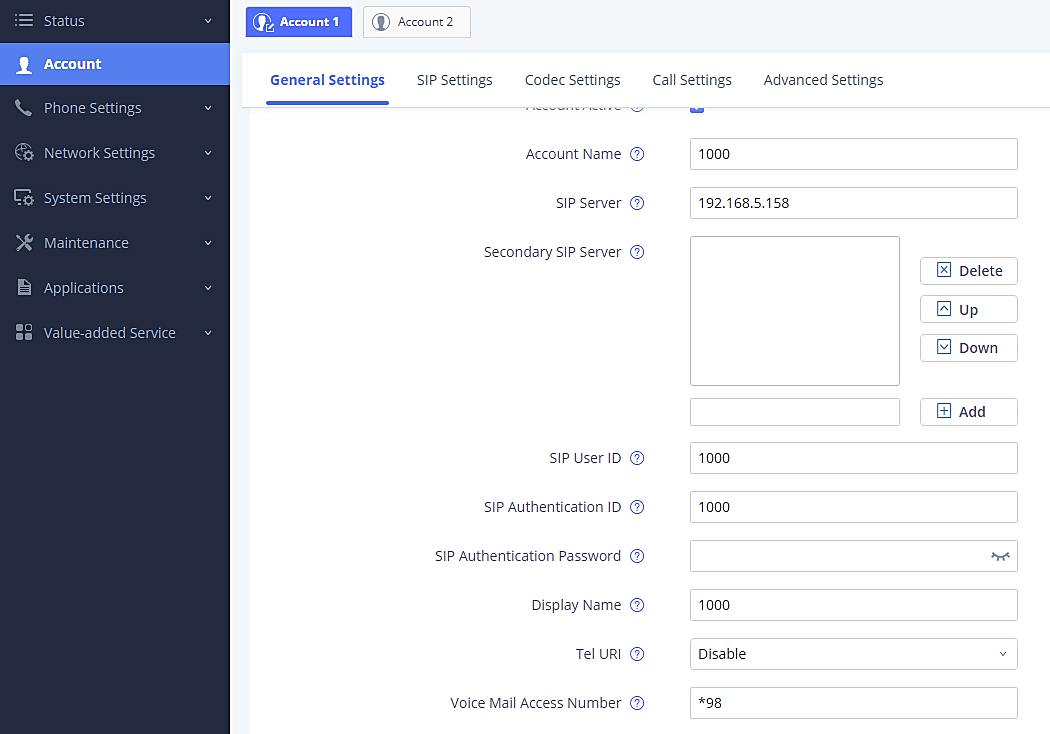
- Go to Account tab and select the account to configure.
- In General Settings, set the following:
- Account Active to Yes.
- Account Name: Any name to identify this specific user.
- SIP Server field with your SIP server IP address or FQDN.
- Secondary SIP Server with your secondary SIP server IP address or FQDN. Leave empty if not available.
- SIP User ID: User account information, provided by VoIP service provider (ITSP). Usually in the form of digit similar to phone number or actually a phone number.
- SIP Authenticate ID: SIP service subscriber authenticate ID used for authentication. Can be identical to or different from SIP User ID.
- SIP Authentication Password: SIP service subscriber’s account password to register to SIP server of ITSP. For security reasons, the password field will be shown as empty.
- Outbound Proxy: configure this field with your outbound proxy IP address or FQDN. Leave empty if not available.
- Press Save and Apply to save your configuration.
After applying your configuration, your phone will register to your SIP Server. You can verify if your WP820 has registered with your SIP server from its web interface under Status 🡪 Account Status (“Registered” with green color when the account is correctly registered, or “Unregistered” with grey when the account is not properly registered)

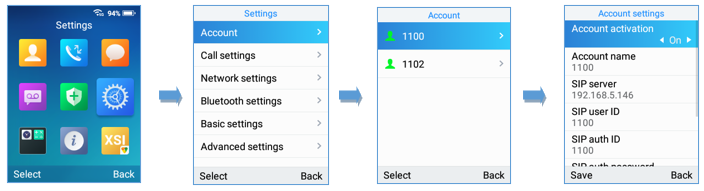
Register Account via LCD Menu
To register your SIP account via the LCD menu, please refer to following steps:
- Unlock your WP820 and press Menu to bring up operation menu.
- Use arrow keys to reach Settings and then select Account tab.
- Select which account you want to configure and then set the following:
- Account Activation to “On”.
- Account Name: Any name to identify this specific user.
- SIP Server field with your SIP server IP address or FQDN.
- SIP User ID: User account information, provided by VoIP service provider (ITSP). Usually in the form of digit similar to phone number or actually a phone number.
- SIP Authenticate ID: SIP service subscriber authenticate ID used for authentication. Can be identical to or different from SIP User ID.
- SIP Authentication Password: SIP service subscriber’s account password to register to SIP server of ITSP. For security reasons, the password field will be shown as empty.
- Outbound Proxy: configure this with outbound proxy IP address or FQDN. Leave empty if not available.
- Voicemail Access Number: The voicemail number of your account.
- Display Name: The name that will be used for caller ID name in SIP INVITE.
Guest Login
The Guest Login feature provides the ability to share the same wireless phone by multiple users at different periods of time.
Configuration
This feature can be enabled from the WEB GUI under Phone Settings 🡪 General Settings 🡪 Guest Features.

- Enable the Guest login by checking the Guest Login parameter.
- Enter the PIN to be used for authentication.
- Configure the SIP domain to be used as SIP server for registration:
- Server Alias: The server alias is used to customize the server name.
- The Server list will contain the IP addresses/Domain names to be used as SIP registration servers
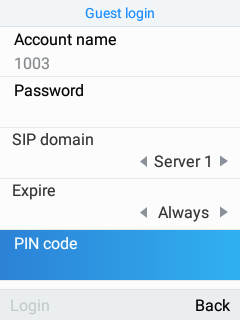
User Login
Once the phone boots up with the Guest Login feature enabled users can follow these steps to login:
- Press the dial button or press any numeric button.
- The Guest Login page will be opened, and the user is asked to enter the Extension credentials.
- Enter the Account ID, the SIP password and choose the Alias of the SIP server configured on the WEB GUI as mentioned on steps above.
- Set the “Expire parameter” to the number of hours this login will stay valid.
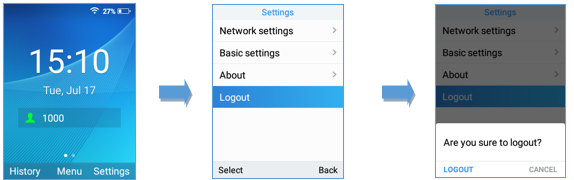
User Logout
To logout from the Guest Login mode users can follow these steps:
- On idle screen, press the Settings soft-key.
- Select Logout.
- Confirm the logout by pressing the Logout soft-key
PHONE SETTINGS
Selecting Phone Language
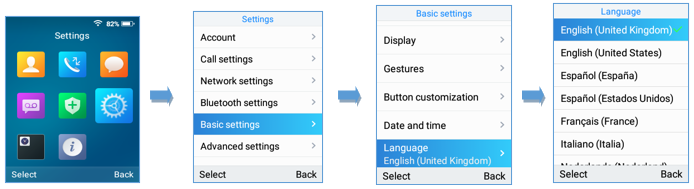
The WP820 supports different languages. The default language of the handset is English. To change the language of the handset, please proceed as follows:
- Press Menu to bring up operation menu.
- Use arrow keys to reach Settings.
- Navigate to Basic Settings, and then select Language.
- Choose the desired language from the available list and press “Select” and then the phone will apply the selected language.
Activate/Deactivate Hands-Free Mode
- Press the Hands-free key

while making a call or on the idle screen to activate hands free mode. - Press the Hands-free key
again to deactivate the hands-free function.


Muting the Microphone
- Press the button “Options” (Left softkey) during an established call and a list of the options will be displayed.
- Choose” Mute” and press “Select” button (left softkey / OK button) to switch on the microphone.
Notes:
- While muted, the icon

will be displayed on the screen. - To unmute the microphone during an established call, press the button “Options” (Left softkey), choose “Unmute” and press “Select” button (left softkey or OK button) to switch off the microphone.

Adjusting Speaker and Earpiece Volume
Press volume up and down keys on the left side of your phone while you are on an established call to set the volume of the earphone / speaker. You can choose between 8 different levels. The default level is 4.
Ringtones
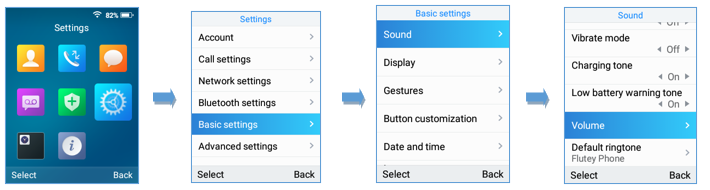
Setting the Ringer Volume on the WP820
To configure the desired ringer volume, proceed as follows:
- Press Menu to bring up operation menu and go to Settings.
- Navigate to Basic Settings, and then select Sound tab.
- User can configure the silent and vibrate modes and also the voice ringtones by pressing the left and right arrow keys to change repeatedly and set the desired volume.
- Press “Back” (right softkey) to confirm the new configuration settings.
Notes:
- 15 levels are supported. Level 15 is the highest level. Level 8 is default.

appears when silent mode is enabled. In this mode no ring will be played for incoming calls.
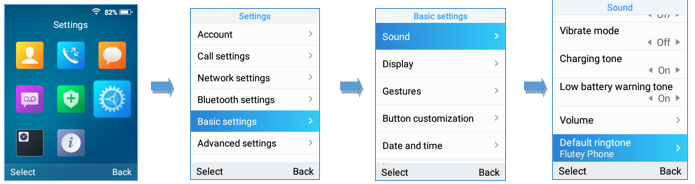
Setting the Ringtones on the WP820
You can change the ringer melody for an incoming call. The device has different ringer melodies and in order to configure the desired melody, proceed as follows:
- Press Menu to bring up operation menu.
- Use arrow keys to reach Settings 🡪 Basic Settings, and then select Sound tab.
- Go to “Default Ringtone”, and choose the desired ringtones, press “Save” to confirm the ringtones selected and the new ringtones will be set successfully.
Date and Time
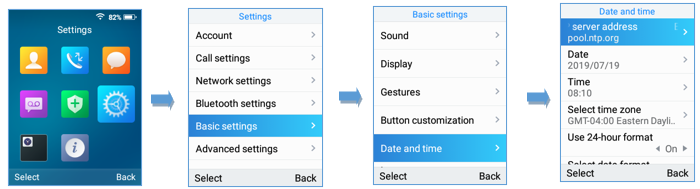
On the WP820 the Date and time are displayed on the idle screen and it obtains the date and time from the Simple Network Time Protocol (SNTP) server by default. If your phone cannot obtain the date and time from the SNTP server, you need to configure the date and time manually. You can configure the time format and date format, respectively. The handset supports two formats for time (12 Hour or 24 Hour) and three date formats (DD/MM/YYYY; MM/DD/YYYY; YYYY/MM/DD).
To configure date and time manually
- Press Menu to bring up operation menu.
- Use arrow keys to reach Settings 🡪 Basic Settings, and then select Date and Time tab.
- Press “Back” softkey to apply your changes
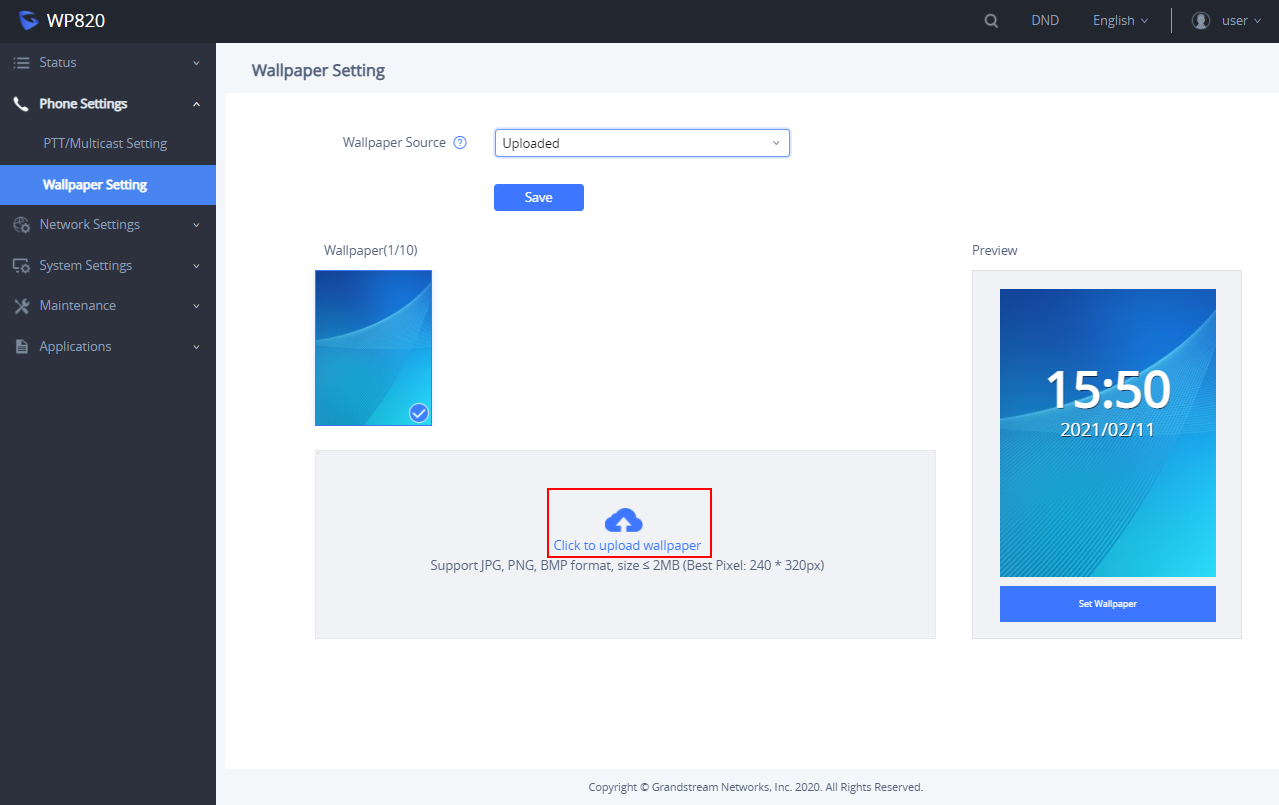
Wallpaper Customization
WP820 wallpaper is customizable through web GUI and the user can upload up to 10 wallpapers.
To upload new wallpaper, User can choose between the below two mentioned methods:
- Upload Wallpaper
- Access WP820 Web GUI 🡪 Phone Settings 🡪 Wallpaper Setting.
- Select Wallpaper Source 🡪 Uploaded
- Press Upload button and select the file to use.
4. Select “Display Mode”: “Default” or “Adaptive” to adjust displayed wallpaper (effective when uploaded file is not respecting recommended resolution).
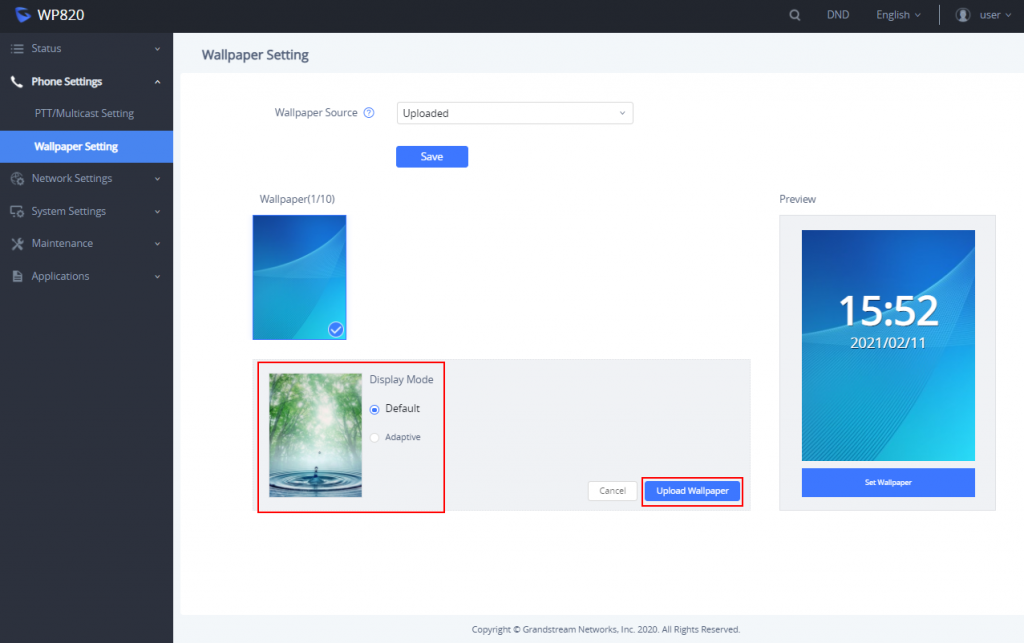
5. Press “Upload Wallpaper”.
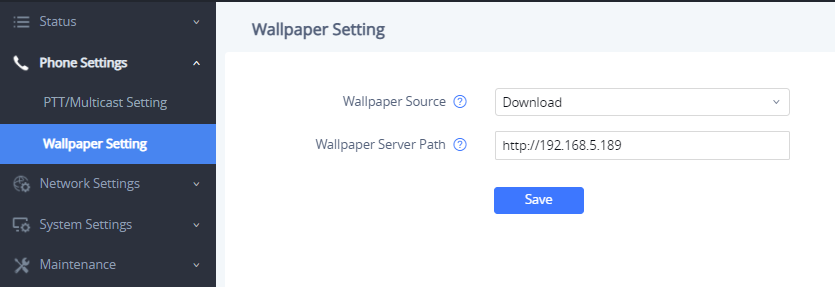
- Access WP820 Web GUI 🡪 Phone Settings 🡪 Wallpaper Setting.
- Select Wallpaper Source 🡪 Download
- Enter the Wallpaper Server Path
- Press on save.
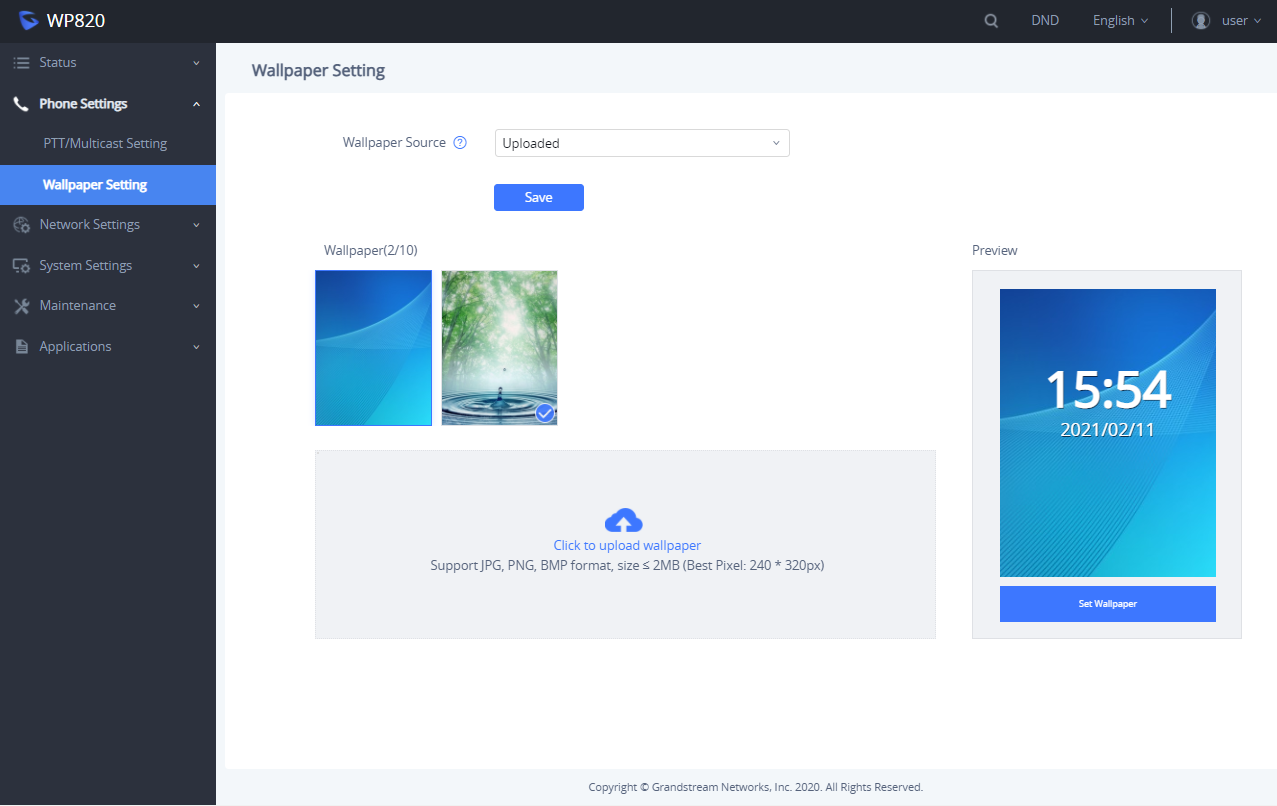
Applying Uploaded Wallpaper
To apply uploaded wallpaper, follow below steps:
- From Handset:
- Access WP820 menu 🡪 Settings 🡪 Basic Settings 🡪 Display 🡪 Wallpaper.
- Select uploaded wallpaper and press OK button or “Preview” (left softkey)
- Press “Set Wallpaper” (left softkey) to apply.
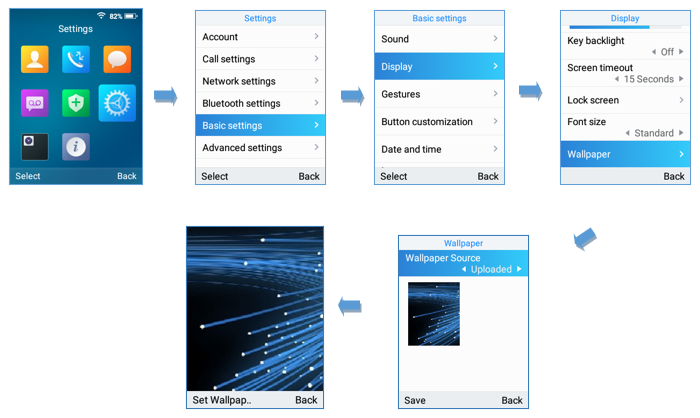
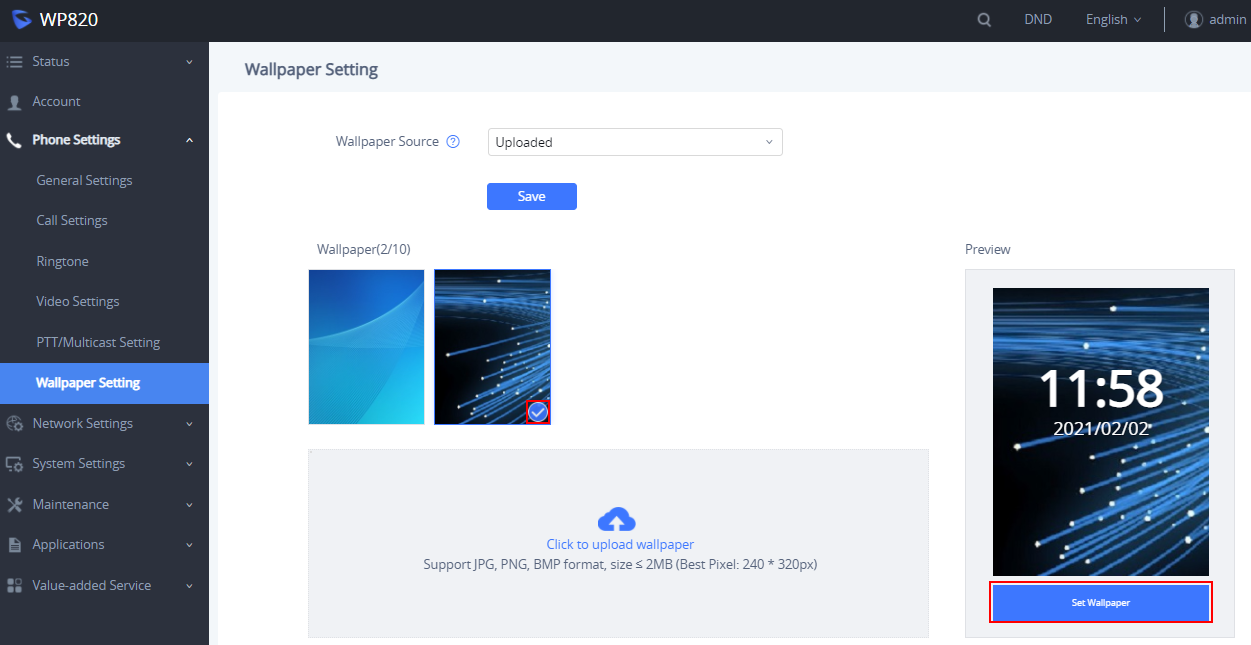
- From Web GUI:
- Access WP820 Web GUI 🡪 Phone Settings 🡪 Wallpaper Setting.
- Select Wallpaper Source 🡪 Uploaded.
- Select uploaded wallpaper and press “Set Wallpaper
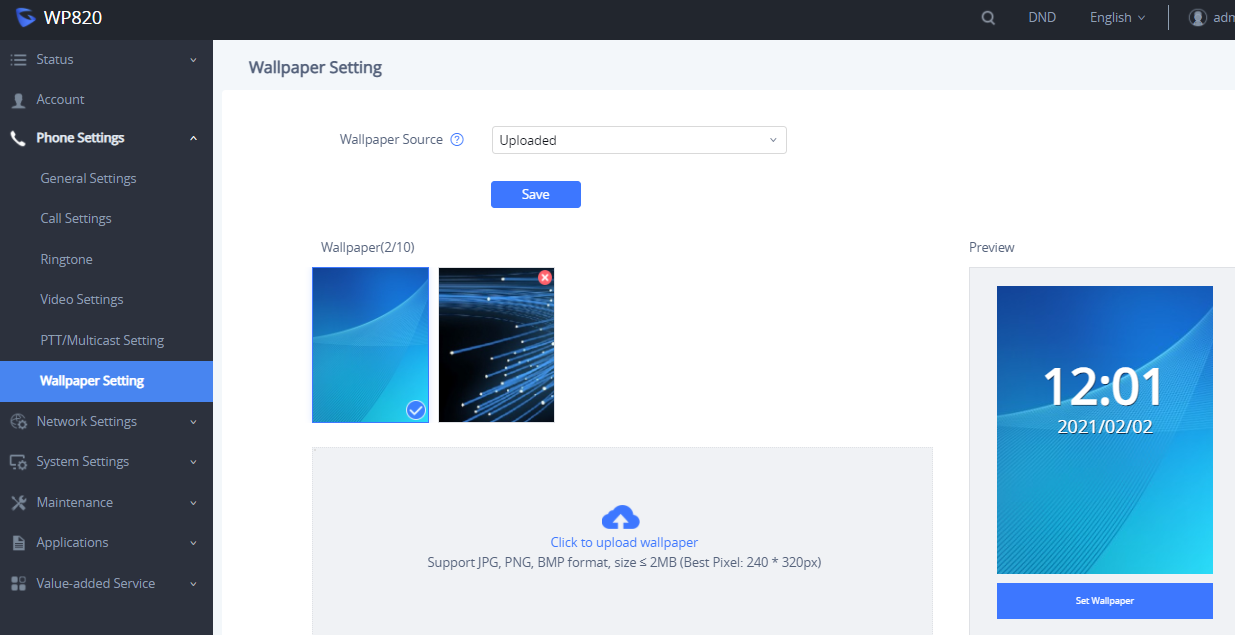
Deleting Wallpaper
To delete previously uploaded wallpaper, refer to following steps:
- Access WP820 Web GUI 🡪 Phone Settings 🡪 Wallpaper.
- Press
button to delete specific wallpaper.
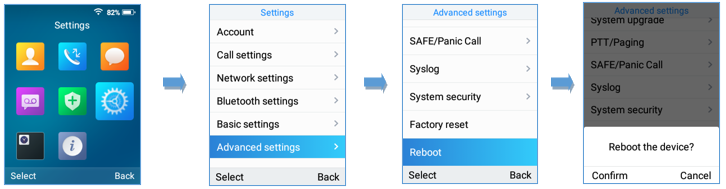
Reboot the WP820
To reboot the WP820, please refer to following steps:
- Access WP820 menu 🡪 Settings 🡪 Advanced Settings 🡪 Reboot.
- A confirmation LCD message will be displayed to confirm the reboot, press “Reboot” button to reboot the phone or “Cancel” to cancel the reboot.
CALL OPERATIONS
Placing calls
To place calls, you can use the following mode:
- Earpiece mode: pressing the off-hook / dial key to dial out.
- Speakerphone mode: pressing the speakerphone key to dial out.
- Headset mode: pressing the off-hook / dial key to dial out using connected headset.
During the call, you can switch the call mode by pressing the corresponding keys or connecting a headset.
Make a Call using a Line
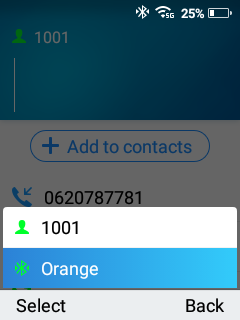
Making calls require the use of SIP lines. So, you should first register the SIP account to the handset beforehand, after registering the sip lines, you can choose between them while trying to make calls by pressing the “Accounts” button displayed on the call screen. Please refer to the following methods to make calls using a line:
Method 1:
- Enter the desired number using the keypad.
- Toggle between the available lines by pressing the “Accounts” button to choose the line for making calls. (The account name will change on the screen when press “Accounts” button).
- Press Dial key
 , left softkey “Call”, # (Use # as “Dial key” or “Redial key” must be configured in web configuration) to initiate the call or wait for 4 seconds and the call will be initiated automatically.

Note: Users can also initiate calls with handsfree mode using Speaker key . To terminate the call, press Hang-Up key
 .
.
Method 2:
- Press Dial key or Speaker key to enter the pre-dialing screen.
- Toggle between available lines by pressing the “Accounts” button to choose the line for making calls. (The account name will change on the screen when press “Accounts” button).
- Enter the number to dial using the keypad.
- Press Dial key, left softkey “Call”, # (Use # as “Dial key” or “Redial key” must be configured in web configuration) to initiate the call or wait for 4 seconds and the call will be initiated automatically.
- To terminate the call, press Hang-Up key
 .
.
During the call, you can switch the call mode by pressing the corresponding keys and cancel the dialing operation by pressing the on-hook key. During the call conversations, you can press the left and right navigation keys to adjust the volume. The call duration is displayed on the LCD screen while the call is in progress and call summary will be displayed once the call is terminated.
Notes:
- To dial “+” please keep pressing “0” key for about 2 seconds.
- To dial from contacts list, choose a contact using navigation keys and press Dial key.
- When having un-read voicemails on the WP820, once accessing the dialing interface a stutter tone will be heard to notify users about voicemails that need to be read.
- The maximum length of dialed digits is limited to 30 characters.
Dialing from Call history
Users may use their call history entries to initiate calls. Please refer to following steps:
- Press Menu to bring up operation menu.
- Use arrow keys to reach Call History.
- Select the desired entry and press Dial key to establish the call.

Dialing from Phonebook
Users may use their contacts list to initiate calls.
- Press Menu to bring up operation menu and use arrow keys to reach Contacts or press Contacts key

to access directly the contacts list. - Select the contact to call and press Dial Key to initiate the call.

Answering Calls
When receiving an incoming call, you can answer the call using following steps:
- Earpiece mode:
Press Dial Key to pick up the call, or “Accept” softkey (left softkey).
- Speakerphone mode:
Press Speaker Key to pick up the call.
- Headset mode:
Press Dial Key to pick up the call, or “Accept” softkey (left softkey) using a connected headset.
Note:
To answer an incoming call during an established call, press Dial Key, or the Speaker Key, or the “Answer” softkey. The incoming call is answered, and the original call is placed on hold.
Auto Answer
Users can enable Auto Answer feature to accept and automatically answer incoming calls.
If enabled, the WP820 will automatically answer incoming calls using speaker mode.
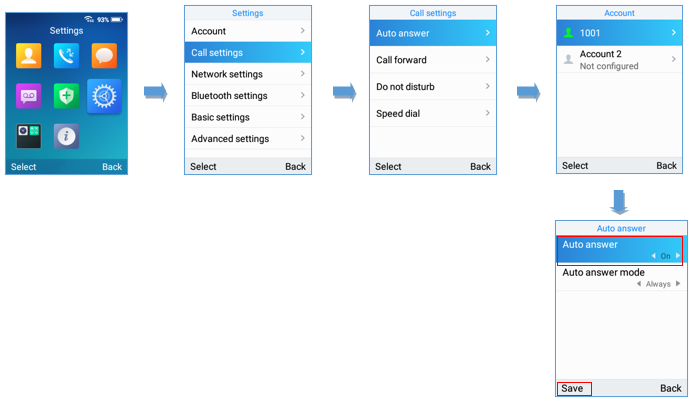
To activate / deactivate the auto answer feature:
- Using WP820 LCD Menu
- Press Menu to bring up operation menu.
- Use arrow keys to reach Settings 🡪 Call settings 🡪 Auto answer.
- Select which account will be enabling the Auto answer feature.
- Set “Auto–Answer” to “On” and configure the auto-answer mode and press “Save” button.
- Using WP820 Web Interface
- Access WP820 Web GUI Interface.
- Navigate to Account 🡪 Call Settings 🡪 Call features.
- Set “Auto Answer” to “Yes”. (By default, set to “No”).
Ending Calls
To terminate the calls, press Hang-Up key .
.
Rejecting Calls
To reject an incoming call, press Hang-Up key .
.
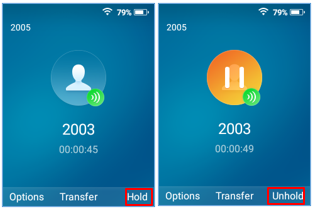
Call Hold/Resume
- During active call, press the right softkey “Hold” to put the established call on hold.
- To resume the call, press the right softkey “Unhold” while the established call is being on hold.
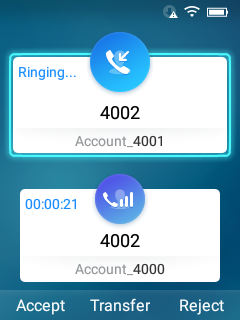
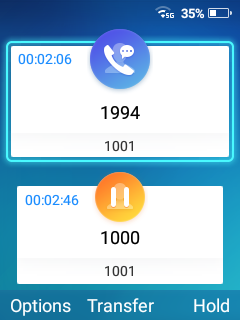
Call Waiting
This feature will notify you of a new incoming call during an established call and display the incoming call information visually on the LCD screen and a call waiting tone will be heard. If this feature is disabled, the new incoming call will be automatically rejected.
This feature is enabled from the WP820 Web GUI:
- Access WP820 Web Interface.
- Go to Phone settings 🡪 Call Settings.
- Set “Disable Call Waiting” and “Disable Call Waiting Tone” to “No”. (Default is No).
- Press Save and Apply buttons to confirm the new settings.
Users now will be able to hear the call waiting tone and it will be visible as well on the LCD screen as displayed on the following screenshot.
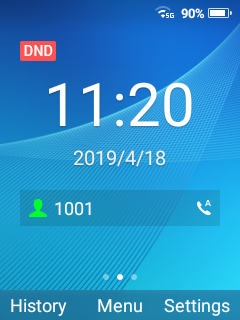
Do Not Disturb
You can activate or deactivate the DND mode for your accounts registered on the handset from its LCD menu. If DND mode is activated, all incoming calls will receive busy treatment depending on your configuration (forward to voice mail, busy tone…).
To enable or disable the DND mode, Access LCD Menu 🡪 Settings 🡪 Call Settings🡪 Do not disturb and set Do not disturb to On.
Call Forward
The call forward feature will allow you to forward all the incoming calls to the desired number. Three possible call forward types are available on the WP820.
- Unconditional: All the incoming calls are immediately forwarded to the desired number.
- Time Based: Incoming calls are immediately forwarded to the desired number based on the configured time.
- Others: Incoming calls are forwarded to the desired number when Busy, when DND is enabled or when there is no response.
To enable the call forward, please refer to the following steps:
- Press Menu to bring up operation menu.
- Use arrow keys to reach Settings 🡪 Call Settings🡪 Call forward.
- Select which account will be enabling the call forwarding feature and navigate to “Call forwarding”.
- Set “Call Forward” to “On” and select the call forwarding mode.
- Configure the parameters of the call forward mode and press “Save” button.

- Unconditional: All the incoming calls will be forwarded to the number set up in “All To” field.
- Time Based: All the incoming calls will be forwarded to the number as schedule in the time period. During the setup time, the call will be forwarded to the number in “In Time Forward To:” field. Other period the call will be forwarded to the number in “Out Time Forward To:” field.
- Others: The incoming call will be forwarded when the WP820 is busy or no answer after certain interval “Delayed Call Forward Wait Time (s)” or if the phone is set to DND mode.
Call Transfer
The WP820 supports the call transfer feature, you can transfer a call to another party using one of the following ways:
- Blind transfer: Transfer a call directly to another party without consulting
- Attended transfer: Transfer a call with prior consulting.
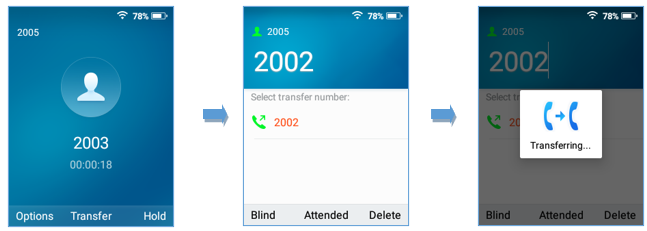
Blind Transfer
- Press “Transfer” softkey during a call, and then enter the number you want to transfer the call to.
- Select Blind transfer by pressing on Blind key.
- The call is connected to the number you specified, and the LCD screen prompts Call Transferred.
Attended Transfer
- Press “Transfer” softkey during a call, and then enter the number you want to transfer the call to.
- Select Attended transfer by pressing on Attended key.
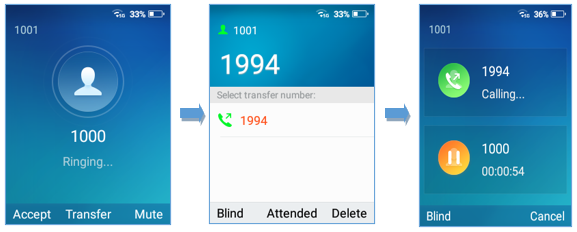
3. After transfer target answers the call, the following screen will be shown up. If the transferor taps on Confirm, the call will be transferred, and the WP-820 will hang up the call.
4. If the user taps on “Split” soft key to separate the calls, the user will talk to the second established call while the first call is on hold.
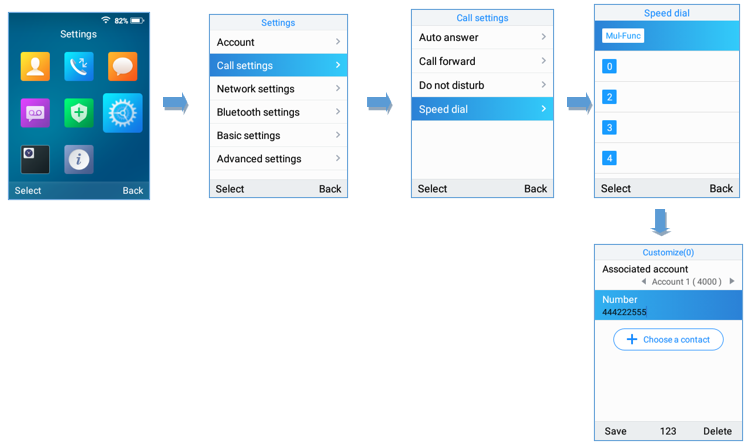
Speed Dial
Speed dial allows users to perform single-digit dialing to predefined numbers. This feature is particularly useful to speed up dialing frequently used or hard to remember numbers. A maximum of 10 speed dial numbers is allowed. For example, the digit key 2 is configured as a speed dial key and assigned the number 4000, the phone will dial out the number 4000 directly when you long press digit key 2.
To configure the speed dial (create, edit, or delete) numbers, proceed as the following steps:
- Press Menu to bring up operation menu and use arrow keys to reach Settings 🡪 Call Settings 🡪 Speed dial.
- Select the speed dial key to be configured and press “Select” softkey.
- Select the associated account and the number to be dialed.
Note: Users can also select the numbers from the contact list by selecting “Choose a contact”. - Press “Save” softkey to save the configured speed dial numbers.
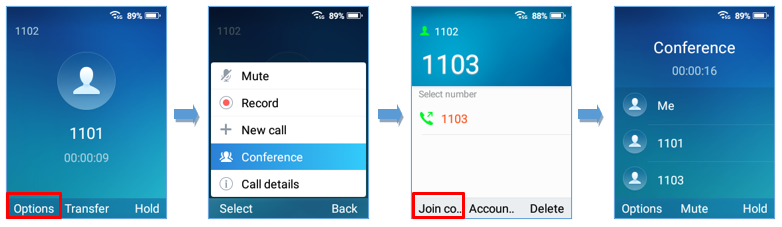
3-Way Conference
The WP820 supports creating a local conference with other parties (including handset starting the conference). To start a 3 Way conference, follow below steps:
- Place a call to the first party and press left softkey “Options”, then select “Conference”.
- Enter the number of the second party you want to add to the conference and press Join Conf.
- The conference will automatically be bridged before the third party answers the call.
Please refer to the following screenshots for more details.
UCM Conference
Participate in UCM Conference Room
Users could dial the UCM conference room extension to join the conference. If password is required, enter the password to join the conference as a normal user, or enter the admin password to join the conference as administrator.
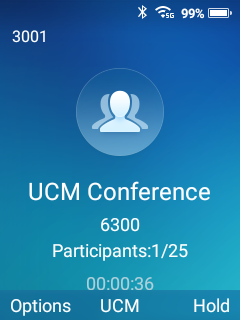
Conference Call Operations
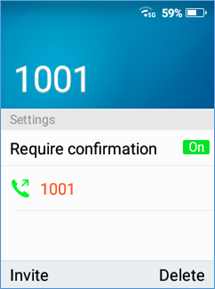
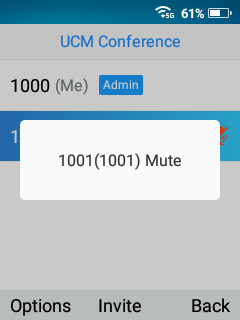
- View conference participants: Users could press on UCM key in order to view the conference participants.
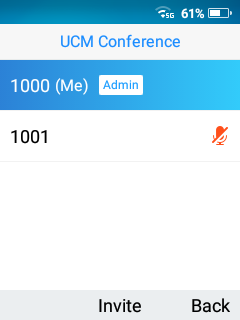
- Invite members: Administrators could press on UCM softkey during the conference and then press on Invite in order to send and meeting invitation to the composed number. Press on Invite after entering the number.
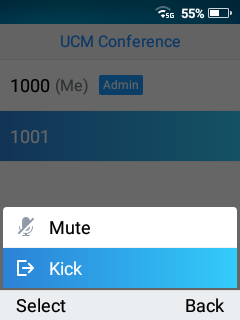
- Mute/Unmute a participant: Administrators could select a member and press on Options🡪 Mute/Unmute a participant.
- Kick a Participant: Administrators could select a member and press on Options 🡪 Kick a participant from the conference.
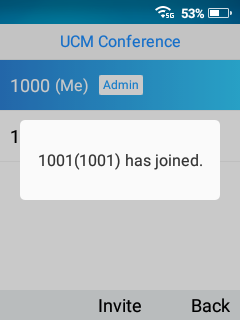
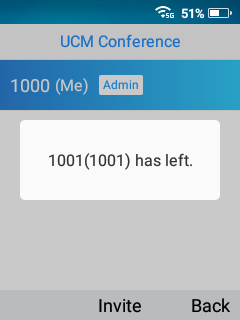
CEI (Conference Event Indicator)
If CEI is enabled, Events like members joining/Leaving the conference, Invitation sent, Mute/Unmute … will be displayed in the call screen as the examples shown below:
- Member has joined notification:
- Member Mute notification:
- Member Left Notification:
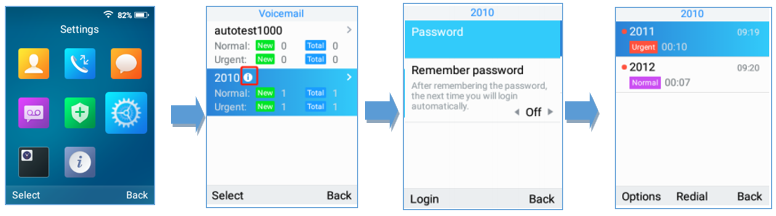
Voice Mail
The voice mail feature ensures that you will never miss any important messages. It permits either to leave voice mails to someone else or receive and listen to voice mails via the handset
Set Voice Mail ID
There are 2 ways to set Voice Mail Feature Code, either using WP820 Handset Menu or Web Interface.
- Using WP820 LCD Menu
- Press Menu to bring up operation menu.
- Use arrow keys to reach VoiceMail tab.
- Select the desired account and configure the Voicemail ID number, then press “Save” softkey.
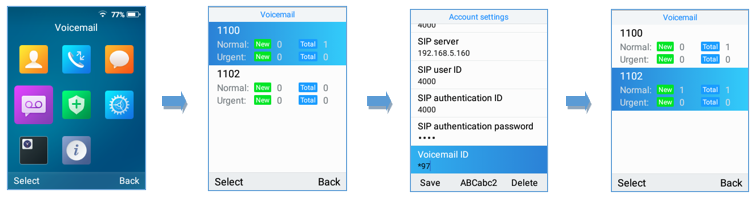
- Using WP820 Web Interface
- Access WP820 Web GUI Interface.
- Go to Account 🡪 General Settings 🡪 Account Registration.
- Configure Voice Mail Access Number.
Play Voice Mail Messages
- Press Menu to bring up operation menu.
- Use arrow keys to reach VoiceMail tab.
3. Choose the account, press “Select” button and enter Voicemail password then to can select visually and retrieve your voice messages saved on your voice mail and listen to each individual voicemail.
Note: this feature is compatible with UCM6xxx on v.1.0.20.6 or later.
CONTACTS
Users can manage local/LDAP and Broadsoft XSI contacts, groups, and blacklist by adding, deleting, and modifying every single contact. Users could access WP820 contacts under WP820 Menu. Please, refer to the following screenshots:
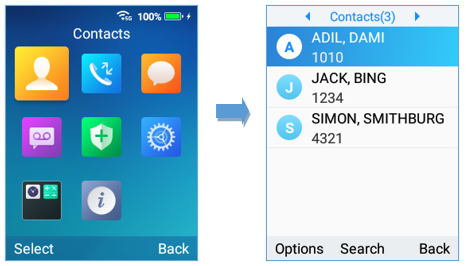
Local Contacts
Users can manage local contacts by adding, deleting, and modifying single contacts. The following operations can be done under local contacts screen:
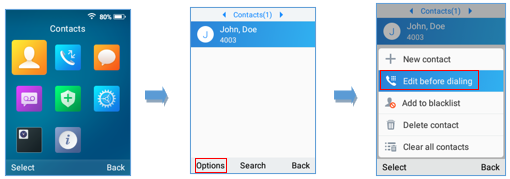
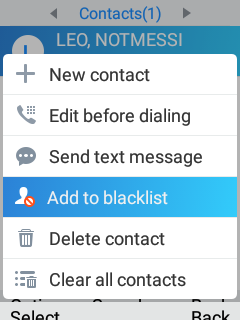
- Create new contact: Under “Option”, users can select “New Contact” in order to manually add the contacts information and details. Please, see the following screenshots and table:
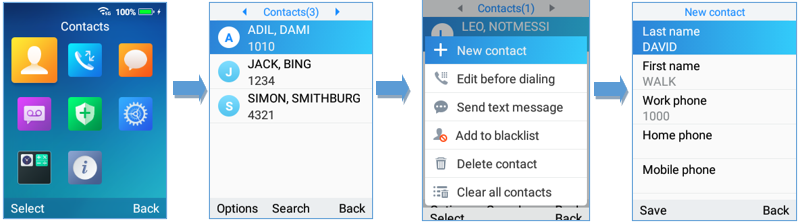
Last Name | Enter the contact’s last name. |
First Name | Enter the contact’s first name |
Work Phone | Enter the contact’s work phone number. |
Home phone | Enter the contact’s home phone number. |
Mobile phone | Enter the contact’s mobile phone number. |
Group | Choose the group you want to include your contact into. |
Ringtone | Choose a specific ringtone for the account’s received calls. |
Account | Choose the default account you want to dial with this contact. |
Address, company, Rank, Department and Title | Additional information. |
New Contact Parameters
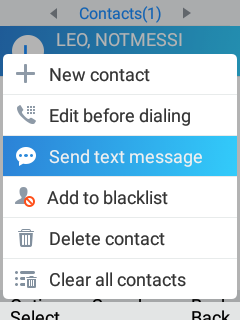
- Search for a contact: in case finding a specific contact among a batch of contacts is difficult, users can press the middle softkey “Search” and enter the name of the contact to find it easily or use the quick search feature and press on any keyboard key in order to enter the search mode.
- Dial out from Contacts: Select the needed contact and tap on the dial key
to call it directly. The phone will use the configured account on contact’s information to dial out with. - Edit before dialing: Users could copy the contact’s number to the dial screen in order to edit it before dialing.
- Add to blacklist: Users have the ability to block received calls from a specific contact from by adding it to Blacklist.
- Delete contact: Users can delete a specific contact by tapping on “Delete contact”.
- Clear all contacts: Users can delete the whole list of local contacts by tapping on “Clear all contacts”.

LDAP
In addition to local contacts, the WP820 also supports LDAP and LDAPS phonebook if LDAP or LDAPS server is available within the network. For more information about LDAP configuration on the WP820 Web GUI, please, refer to WP820 Administration guide.
In order to search for LDAP contacts on the WP820, users need to access “Contacts”, switch to “LDAP” using the right/left arrow buttons on the handset and show the search field by tapping on “Search”.
Groups
Open Contacts and switch to “Groups” using the right/left arrow buttons on the handset. To add a new group, tap on Options🡪New group.
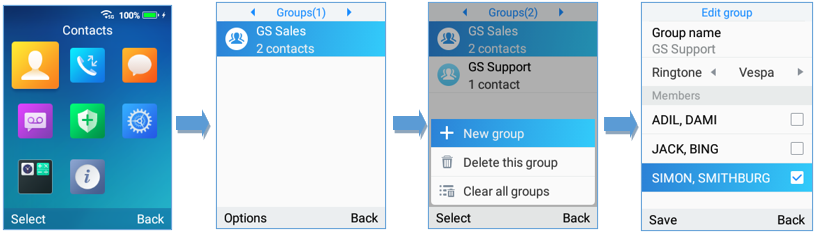
Users should enter the following information when creating a new group:
- Group Name: Enter the name of the group.
- Ringtone: Choose the ringtone that will be assigned to the group.
- Members: Choose the members of the group.
Blacklist
Blacklist WP820 has blacklist support for users to manage incoming calls. To access “Blacklist”, tap on “Contacts”, then switch to “Blacklist” using the right/left arrow button on the Handset.
Users can tap on “Remove” to remove a contact or on “Clear” to delete all contacts from blacklist.
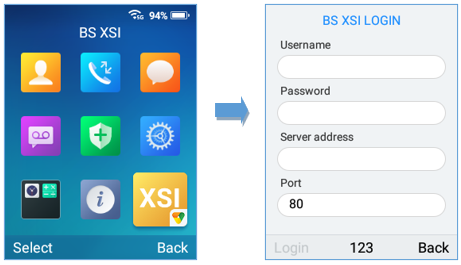
Broadsoft XSI
Users login to their BroadSoft XSI account from the LCD Menu:
CALL HISTORY
The WP820 Call history provides users access to phone’s call logs in different categories and help users to make some operations directly. Call history can be accessed under menu as shown on the following figure:
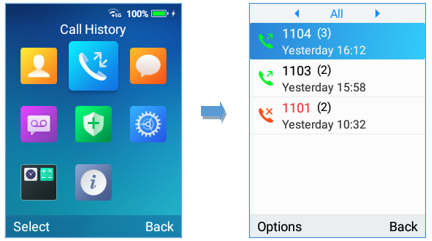
There are four different categories in the call history. Users could use the phone’s right and left arrows to view the following categories: All Calls, Missed Calls, Outgoing Calls, Incoming Calls.
Dial Out from Call History
Select one of the call history log and tap on the dial key
to call this number directly. The phone will use the same account as the call log to dial out.
Call History Options

- Add to contacts: Users can tap on this option to add the number listed on the selected call history entry to local contacts.
- Edit before dialing: Users could copy the number to the dial screen in order to edit it before dialing.
- Add to blacklist: Users have the ability to block a number’s calls/messages by adding it to Blacklist.
- Delete: Users could delete the selected call history log by tapping on “Delete”.
- Delete all: This option helps users to clear all the call history.
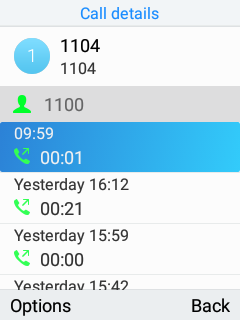
Call History Details
For each call history entry, users could tap on “OK” button to access the details to view the account on WP820 that was called and all the calls that have made/received to/from the selected number. Please, refer to the following screenshot:
The following operations could be done:
- Dial out this number directly.
- Bring up dial screen with the call history number. Users could edit the number before dialing out.
- Delete the entry.
- Add the number to black list by tapping on “Add to Blacklist”.
SMS
The WP820 has built-in SMS application to send/receive message if the SIP server supports SMS message. Users can create, edit draft, and delete one or all the messages. Tap
on phone’s menu to launch SMS application.
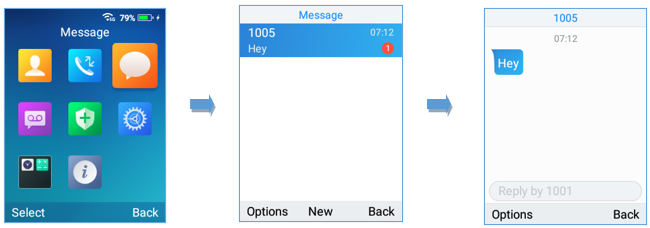
View SMS
On the SMS list screen, tap on one of the message using the OK button to view the SMS details.
Create SMS
Tap on “New” in SMS application to start composing a new message.
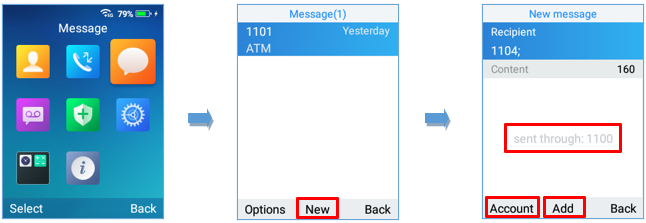
- Select the account to send the message from by tapping on “Account”. (Note: By tapping on “Account”, the user will switch from the first account to the second one in case both SIP accounts are registered. The account sending the message will be shown in the center of the screen to make sure of it as shown on the figure above).
- Add number to send the message to in Recipient section. (Note: Users could click on “Add” to add existing contacts/groups to Recipient list.
- Input content: Enter the message content on the next field of the screen. Tap on “Send” once finished, a “Sending” message will prompt and the message is confirmed as sent once the “Sending” message prompt disappears.
Delete SMS
- On the messages list, tap on “Options” to show more options.
- Tap on “Delete message” to delete the selected message, or on “Clear all messages” to delete all the messages/drafts.
CALL FEATURES
The WP820 supports traditional and advanced telephony features including call forward and etc.
*72 | Unconditional Call Forward. To set up unconditional call forward:
Off hook the phone; Dial *72 and then enter the number to forward the call; Press Call softkey or Dial key.
|
*73 | Cancel Unconditional Call Forward. To cancel the unconditional call forward:
Off hook the phone; Dial *73; Press Call softkey or Dial key.
|
*74 | Paging Call. To establish a paging call:
Off hook the phone; Dial *74; Press Call softkey or Dial key.
|
*90 | Busy Call Forward. To set up busy call forward:
Off hook the phone; Dial *90 and then enter the number to forward the call; Press Call softkey or Dial key.
|
*91 | Cancel Busy Call Forward. To cancel the busy call forward:
Off hook the phone; Dial *91; Press Call softkey or Dial key.
|
*92 | No Answer Call Forward. To set up delayed call forward:
Off hook the phone; Dial *92 and then enter the number to forward the call; Press Call softkey or Dial key.
|
*93 | Cancel No Answer Call Forward. To cancel the delayed call forward:
Off hook the phone; Dial *93; Press Call softkey or Dial key.
|
Call Features
MULTI-FUNCTION BUTTON
PTT (Push to talk) button can be configured under WP820 Web GUI 🡪 System Settings 🡪 Preferences 🡪 Button Customization 🡪 Multi-Function Button, to perform the following functions:
PTT/Paging
When users select Multi-function button to be a PTT/Paging button, a short press on the button will take users to PTT/Paging settings. Users can also press and hold the key to initiate PTT/Paging call.
Please, refer to the section PTT (PUSH-TO-TALK) FUNCTIONALITY
SAFE/Panic Call
Users could change the function of Multi-function button to SAFE/Panic Call, a short press on the key will open status page to make sure that Panic Call is enabled. Users can also press and hold the key to trigger Panic Call. Please, refer to the section SAFE/PANIC CALL
Mute/Un-mute
If “Mute” is chosen to be the function of Multi-function button, users will be able to mute incoming calls ringtone by pressing on the key. Also, the key will be performing mute/unmute function during calls.
Speed dial
The multi-function key can be used to speed dial a contact. Note: The speed dial function will need to be setup before activating the feature.
Disable
This function of Multi-function button allows the user to disable the multi-function button completely.

PTT (PUSH-TO-TALK) FUNCTIONALITY
The WP820 supports the Push to talk (PTT) features which is a technology based on the instantaneous communication commonly employed in wireless cellular phone services using a button to switch the device from voice transmission mode to voice reception mode. This feature is similar to “walkie talkie” use and the PTT mode switches a phone from full duplex mode, where both parties can hear each other simultaneously, to half duplex mode, where only one party can speak at one time. Multiple parties to the conversation may also be included.
Enabling PTT mode on the WP820
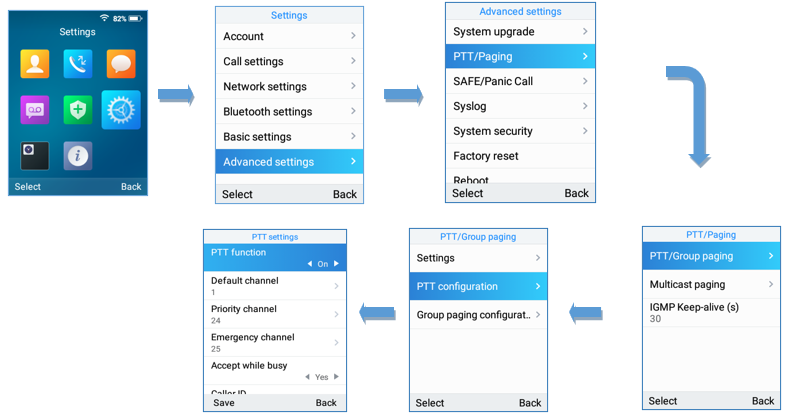
You can enable and configure the PTT settings using the WP820 LCD menu:
- Press Menu to bring up operation menu.
- Use arrow keys to reach Settings 🡪 Advanced settings 🡪 PTT and paging.
- Choose PTT settings and enable the PTT function.
- Press Save button to enable PTT mode.
Using the PTT Functionality on the WP820
To send a PTT broadcast from your WP820:
- Unlock your WP820.
- Make sure the multi-function button is configured to be a Push-To-Talk button.
- Press the Push to Talk soft key.
- Press and hold the Push to Talk key while speaking.
Notes:
- Users could press and hold the Push-to-talk key from any screen to quickly initiate PTT call using default channel.
- The channel status will change to Sending PTT to indicate that you are transmitting as displayed on the following screenshot.
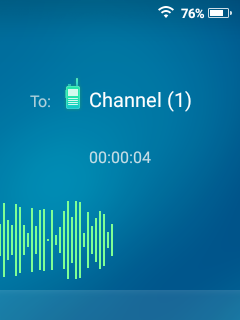
- The devices which are in the same channel will receive the PTT call.
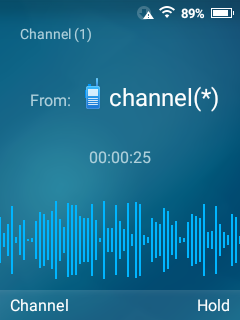
- Release the Push to Talk soft key when you have finished speaking. The channel will wait 10 seconds before release.
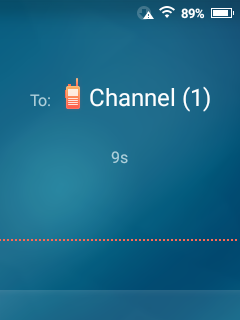
- You should press the Push to Talk soft key only when the channel status indicates Waiting. Otherwise, you may interrupt another person’s message.
PTT Configuration Settings
Please refer to the following Settings for more details about the configuration of the PTT functionality:
Settings
- Multicast address: The multicast IP address to send page audio to and receive page audio from. Default value is 224.0.1.116.
- Port: The port to send audio to and receive audio from. Default value is 5001
- Emergency volume: The Volume of the emergency cannel. Default value is 8
PTT Parameters
- PTT function: Enable or disable the PTT function.
- Default channel: The PTT channel used to transmit an outgoing page if the user does not explicitly specify a channel.
- Priority channel: The channel assigned for priority pages.
- Emergency channel: The channel assigned for emergency pages.
- Accept while busy: If no, incoming PTT sessions do not produce standard call waiting. If yes, incoming PTT sessions produce standard call waiting behavior on the active audio channel.
- CallerID(*): Caller ID number for identification.
- PTime: The audio payload size in milliseconds.
- Audio codec: The audio codec to use for outgoing PTT broadcasts. Incoming PTT audio will be decoded according to the codec specified in the incoming message.
- Channel: Set the channel whether to be usable, transported, acceptable, joined and the channel display name.
Group Paging
Enabling Group Paging Feature
You can enable and specify settings for the Group Paging feature through the phone’s user interface.
To specify the Group Paging feature settings:
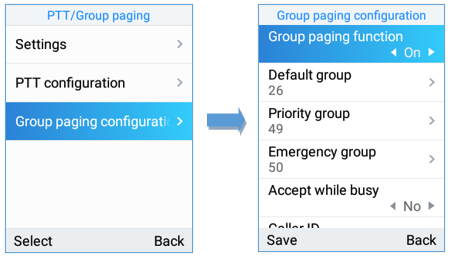
- Using your phone’s interface, navigate to the Group Paging Configuration menu by pressing Settings🡪 Advanced setting🡪 PTT and paging🡪PTT and group paging.
- Choose Group Paging Configuration.
- Set Group Paging function to Enabled.
Please, refer to the following screenshots:
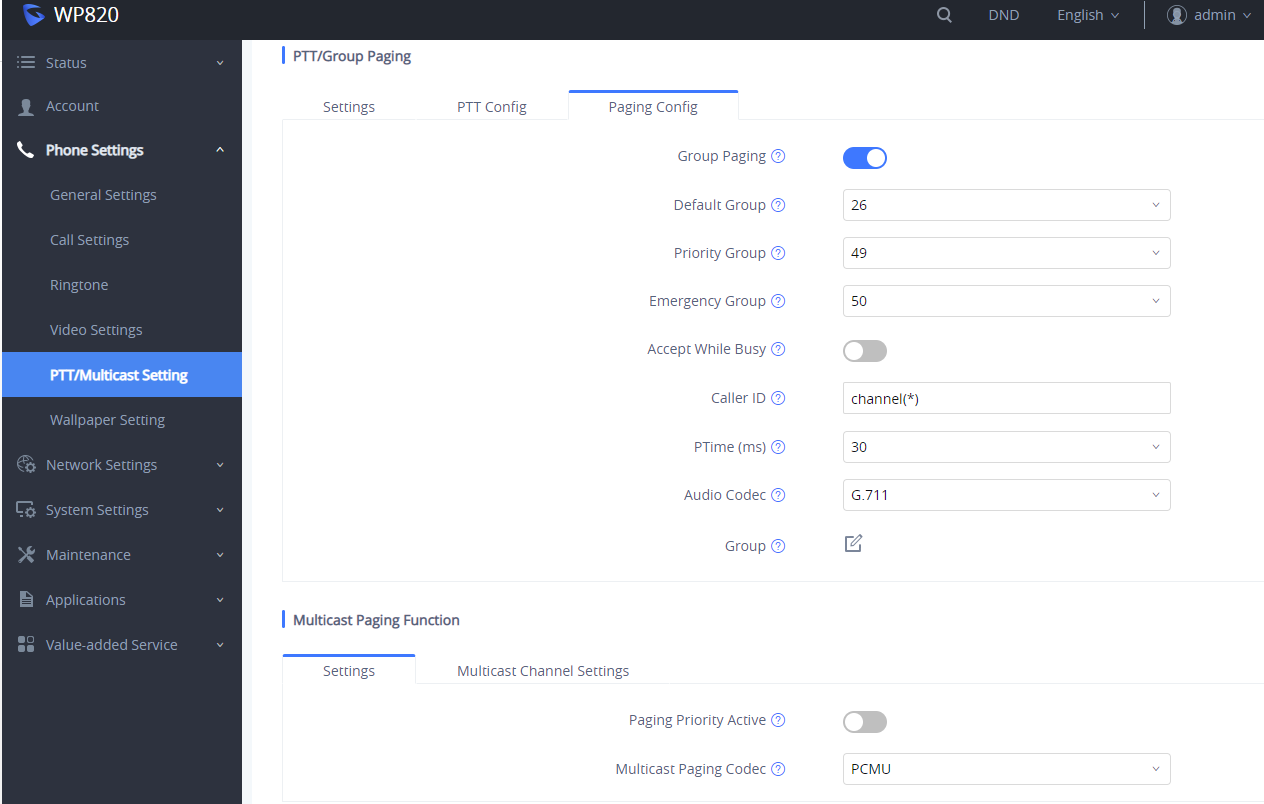
You can also enable and specify settings for the Group Paging feature through the Web GUI by selecting Phone Settings 🡪 PTT/Multicast Setting.
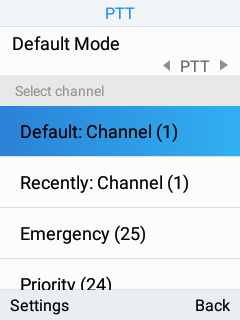
To send a Group Paging broadcast:
- Unlock your WP820.
- Press the Talk soft key.
- Set Default mode to Group paging.
- Scroll to the group you wish to send a broadcast to.
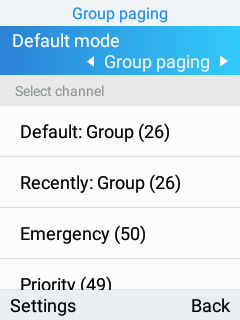
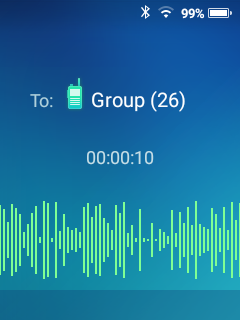
5. Press and hold the Talk soft key before speaking.
The group status will change to Sending group paging to indicate you are transmitting.
The devices which are in the group will receive the paging.
6. Release the Talk soft key, press the on-hook/power key when you have finished speaking.
Group Paging Parameters
- Paging function: Enable or disable the Group paging function.
- Default group: The group used to transmit an outgoing page if the user does not explicitly specify a group.
- Priority group: The group assigned for priority pages.
- Emergency group: The group assigned for emergency pages.
- Accept while busy: If no, incoming Group paging sessions do not produce standard call waiting. If yes, incoming PTT sessions produce standard call waiting behavior on the active audio group.
- CallerID(*):Caller ID number for identification.
- P-Time: The audio payload size in milliseconds.
- Audio codec: The audio codec to use for outgoing Group paging broadcasts. Incoming Group paging audio will be decoded according to the codec specified in the incoming message.
- group: Set the group whether to be available、transmit、subscribe、join group and the group name.
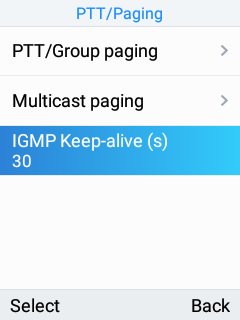
IGMP Settings
Users could specify how often the phone will report IGMP when PTT/ Paging function is turned on. IGMP reporter helps to keep PTT/ Paging receivable in dormant state. The interval may take some effect to standby time. The default setting is 30 s.
SAFE/PANIC CALL
Safe Monitoring Features
SAFE monitoring feature on WP820 will monitor the user’s safety situation and trigger an alarm once it detects any unsafe situation. Once the phone detects that the user may be in a dangerous situation such as unable to move, fall, or being chased using “Safe Monitoring Feature”, the WP820 can quickly alert or initiate an emergency call for timely assistance.
In particular, the phone will automatically prompt a warning alert and message once it detects any unsafe situation. If the user does not cancel the prompt warning message to confirm its safety within the set time, an alarm will be triggered and an emergency call will be initialed (if configured) for assistance.
There are three major types of safety detection methods that can be set on SAFE monitoring settings:
- No movement detection: It detects when the user may be unable to move because of an injury or a coma, etc. Users can configure the duration of the no movement. If it stays no movement longer than the duration, the device will be triggered for detection.
- Tilt detection: It detects when the user may be in a state of slipping or falling, etc. Users can configure the sensitivity and timeout for this detection. With higher sensitivity level on tilt status, a relative slight falling action will trigger tilt detection and alert.
- Running detection: It detects when user may be in a status of being chased or escaping from a dangerous environment. Users can configure the sensitivity and timeout for this detection. With higher sensitivity level on running status, a slower running speed will trigger the running detection.
Users could configure the following SAFE monitoring options under WP820 LCD 🡪 Menu 🡪 Settings 🡪 Advanced settings 🡪 SAFE/Panic Call 🡪 SAFE Monitoring Settings:
Option | Description |
Monitoring | Turn on/off the SAFE monitoring feature. |
No Movement Sensitivity | Set the sensitivity of “No movement” detection. There are 7 levels available for detection. Choose Disabled to stop No movement detection. |
No Movement Timeout (s) | Set the timeout value for “No movement” detection. The phone will start warning if the phone keeps no movement until timeout. |
Tilt Sensitivity | Set the sensitivity of “Tilt detection”. There are 7 levels available for detection. Choose Disabled to stop Tilt detection. |
Tilt Timeout (s) | Set the timeout value for “Tilt detection”. The phone will start warning if the phone keeps tilt until timeout. |
Running Sensitivity | Set the sensitivity of “Running detection”. There are 7 levels available for detection. Choose Disabled to stop Running detection. |
Running Timeout (s) | Set the timeout value for “Running detection”. The phone will start warning if the phone keeps waggle until timeout. |
Snooze Timeout (s) | Set the timeout value of snooze. You can choose snooze while in warning/alarm State. After the timeout, the phone will start detecting again. |
Warning Timeout (s) | Set the timeout value of warning. The phone will start alarm if the phone keeps warning and not be canceled. |
SAFE Monitoring Settings
Panic Call Feature
Users can configure to have Panic Call feature on WP820 by setting it under WP820 LCD 🡪 Menu 🡪 Settings 🡪 Advanced settings 🡪 SAFE/Panic Call. This feature provides users the ability to manually/automatically trigger Alarm then initiate an emergency call to call for help in case of a dangerous situation.
- Manual use: Users can press and hold the multiple function key on the side of the phone to initial an emergency call (Note: Users need to configure the multi-function button to have the function of “SAFE/Panic Call” under WP820 Web UI). Please, refer to WP820 Administration Guide.
- Automatic use: If SAFE monitoring feature has been enabled, Emergency call can be initiated automatically once the phone detects the un-safe situation.
The following list is the list of options that can be configured for “Panic Call” feature under:
WP820 LCD 🡪 Menu 🡪 Settings 🡪 Advanced settings 🡪 SAFE/Panic Call:
Option | Description |
SAFE Monitoring Settings | Configures “SAFE Monitoring Settings”. |
Panic Call Silent Alarm | To trigger alarm in a silent way during urgent or dangerous situation, configure the Panic Call silent alarm option to be on. The default setting is off. This setting will enable the phone to initiate an emergency call silently. It is mainly used when it is not convenient to play an alarm in a dangerous environment. |
Emergency Call | To initiate Emergency Call, users need to set the emergency call number after turning on this feature. The default setting is off. |
Warning Tone | Set the Warning tone. |
Alarm Tone | Set the Alarm tone. |
Panic/Emergency Call Settings
WP820 GESTURE AND INTELLIGENT CONTROL
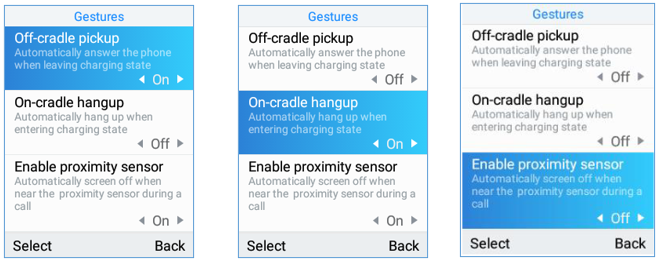
Intelligent Control
Intelligent Control options allow to automatically answer/hang up calls upon leaving charge/connecting to charger respectively, you can also enable/disable proximity sensor.
To configure Intelligent Control options, follow instructions below:
On WP820 LCD Menu Settings, select Basic Settings 🡪 Gestures🡪 Intelligent Control.
- Set “Off-Cradle Pickup” to On, so that phone will automatically answer the call when leaving charge.
- Set “On-Cradle hang up” to On, so that phone will automatically hang up the call when entering the charging state.
- Set “Enable proximity sensor” to OFF, so that the LCD screen will not turn off during a call when handset is held near the ear.
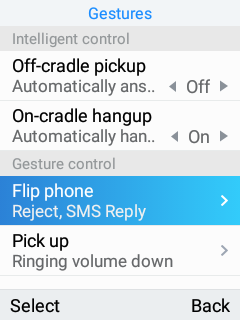
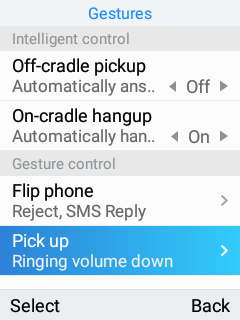
Gesture Control
Gesture Control options allow to perform actions (mute, decrease ringing volume, reject call…) based on the phone’s gesture such as “Flip Phone” or “Pick up”.
Flip Phone
- On WP820 LCD Menu Settings, select Basic Settings 🡪 Gestures 🡪 Gesture Control.
- Tap on Flip Phone option and set the option needed when flipping the phone.
- Ringing on Incoming Call:
- Off: The feature is disabled even if the phone is flipped while receiving an incoming call.
- Reject with SMS: Incoming call will be rejected, and pre-defined SMS will be sent to caller when flipping the phone while receiving an incoming call. Note: SMS feature must be supported by SIP server, and users can customize SMS content by entering the message under “Reply Content”.
- Reject: Incoming calls will be rejected when flipping the phone while receiving an incoming call.
Pick Up
- On WP820 LCD Menu Settings, select Basic Settings 🡪 Gestures 🡪 Gesture Control.
- Tap on Pick up option. Two options are available:
- Ringtone:
- Off: The feature is disabled even if the phone is picked up when receiving a call.
- Ringing Volume Down: When set to this option, picking up the WP820 from its cradle while charging will result in reducing the ringing volume.
- Mute: When set to this option, picking up the WP820 from its cradle while charging will result in muting the ringing.
- Alarm Ringtone:
- Off: The feature is disabled even if the phone is picked up when Alarm ringtone is heard.
- Ringing Volume Down: When set to this option, picking up the WP820 from its cradle while charging will result in reducing the ringing volume of Alarm ringtone.
- Mute: When set to this option, picking up the WP820 from its cradle while charging will result in muting the Alarm ringtone.
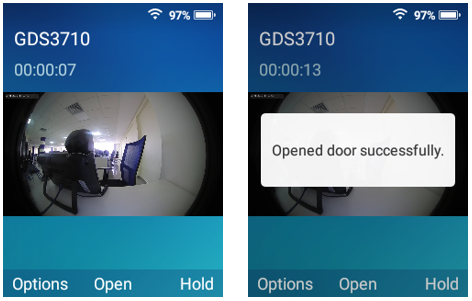
CONNECTING WP820 TO GDS3710 DOOR SYSTEM
The WP820 offers a powerful integration with GDS3710 Door System and allows users to open the door, initiates call to the GDS3710 and gets real time audio/video stream from the door system.
The WP820 can be connected with the GDS3710 in two different ways, either using peering mode (without a SIP server) or through a SIP server.
For more details, please, refer to:
https://documentation.grandstream.com/knowledge-base/connecting-gds37xx-with-wp820/
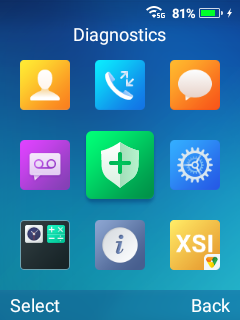
DIAGNOSTICS
The WP820’s LCD, Audio and many other features can be diagnosed from the diagnostics APP. The sections below describe how the diagnosis is run:
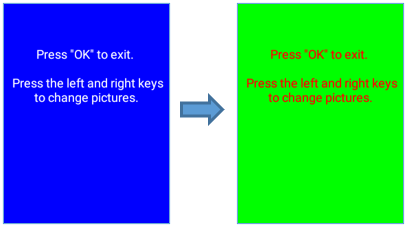
LCD Diagnostics
Proceed from Diagnostics APP🡪 Click on LCD Diagnostics, and you can use the left/right Keys to change the pictures and OK to exit:
LCD Off
Proceed from Diagnostics APP🡪 Click on Select to turn LCD Off, so that you can verify if the backlight does turn off.
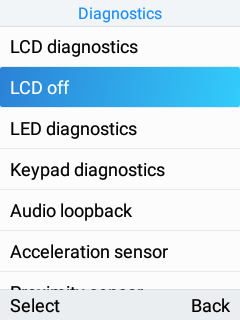
LED Diagnostics
Proceed from Diagnostics APP🡪 Click on Select to run LED Diagnostics, and you can verify if the LED color changes upon key press during the test:
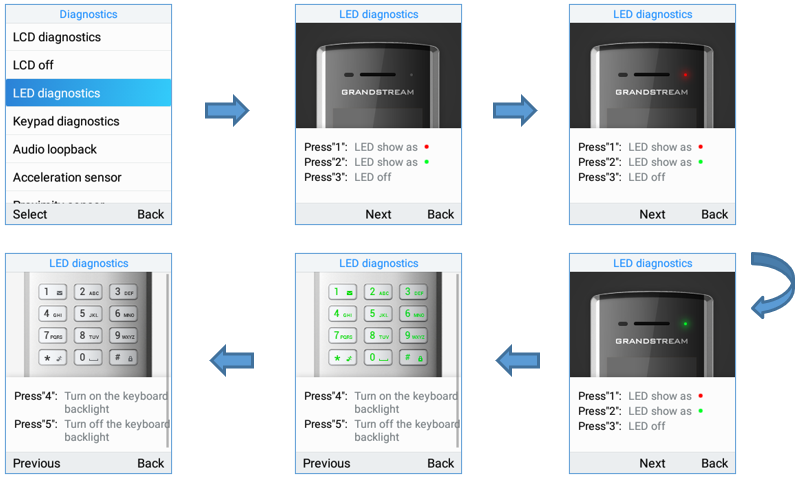
Keypad Diagnostics
Proceed from Diagnostics APP🡪 Click on Select to run Keypad Diagnostics, and you can verify if the keypad buttons are working fine:
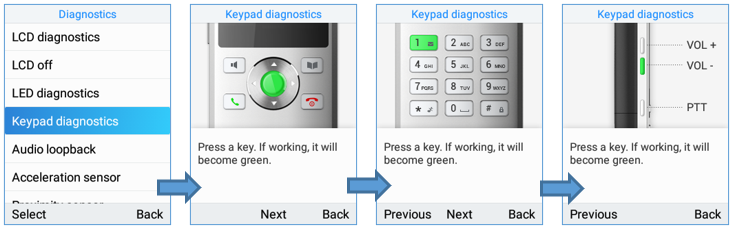
Audio Loopback
Proceed from Diagnostics APP🡪 Click on Select to run Audio Loopback, so that you can verify if the microphone, earphone, and back speaker are working fine.
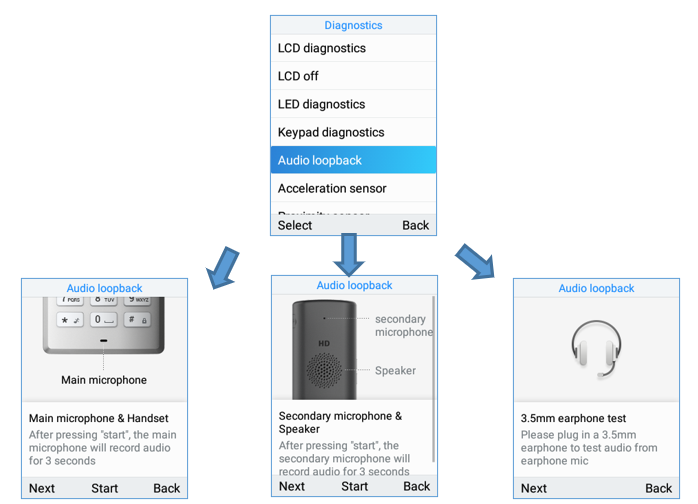
Acceleration Sensor
Proceed from Diagnostics APP🡪 Click on Select to run Acceleration sensor, so that you can verify if the acceleration sensor is operating fine by tilting the handset.
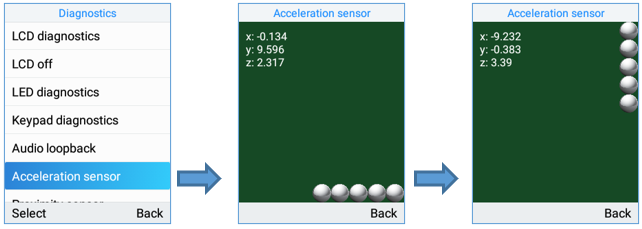
Sensor Calibration
Proceed from Diagnostics APP🡪 Click on Select to run Sensor calibration and then click on Start.
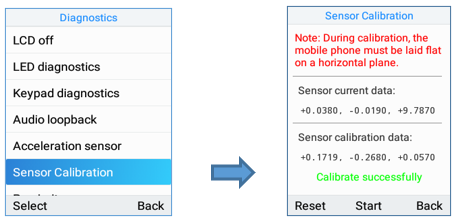
Proximity Sensor
Proceed from Diagnostics APP🡪 Click on Select to run Proximity sensor, run the test by covering the sensor with a finger and wait for LED to go green.
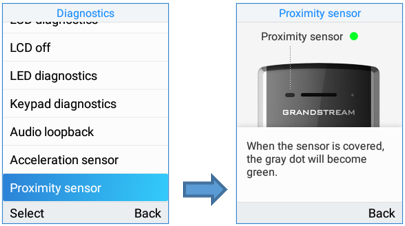
Vibration Diagnostics
Proceed from Diagnostics APP🡪 Click on Select to run Vibration diagnostics, run the test by selecting Vibrate.
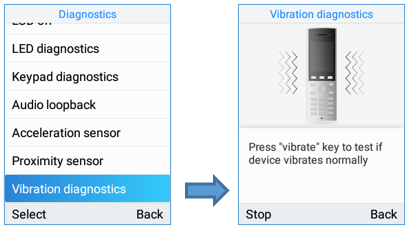
Certificate Verification
Proceed from Diagnostics APP🡪 Click on Select to run Certificate Verification to verify the device’s certificate.
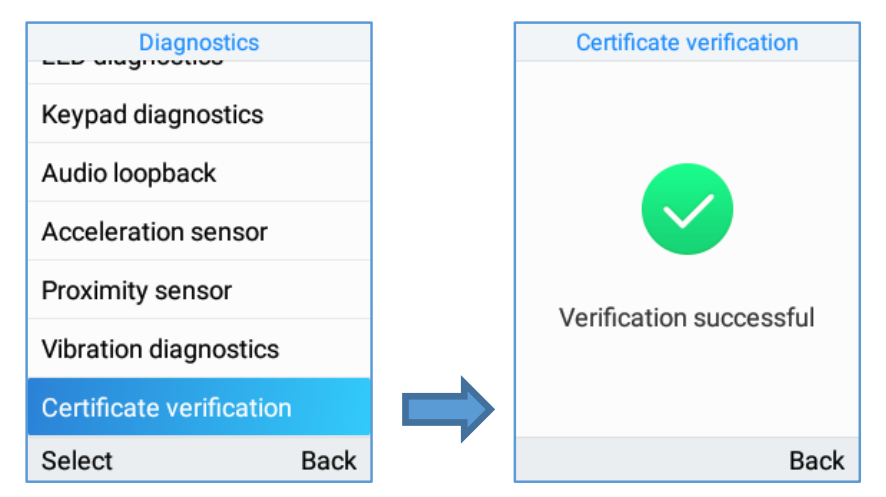
Traceroute
Proceed from Diagnostics APP🡪 Click on Select to run Traceroute to a FQDN.
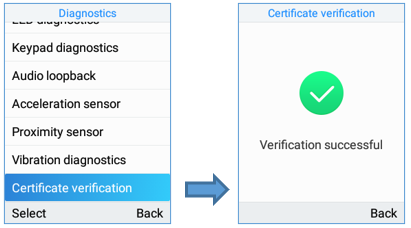
Ping
Proceed from Diagnostics APP🡪 Click on Select to run ping to FQDN.
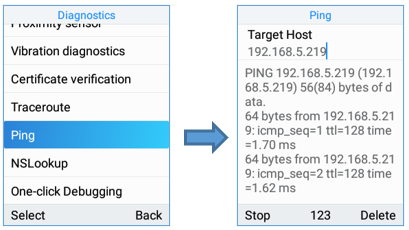
NsLookup
Proceed from Diagnostics APP🡪 Click on Select to run NSLookup on to a domain name.
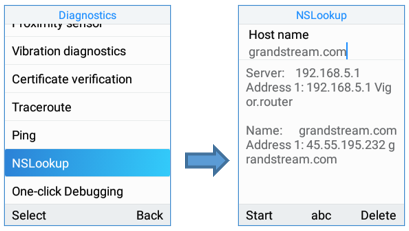
One-click Debugging
This feature allows user to launch the debug process from the LCD itself and to export the debug file via USB rather instead of accessing the web GUI to do so. Proceed from Diagnostics APP🡪 Click on Select to run one-click debugging from the LCD.
- Select the option One-click Debugging.
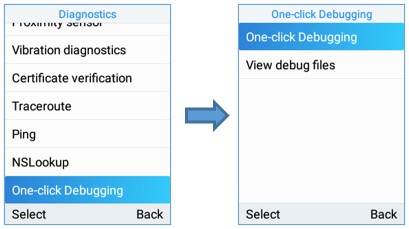
2. Select the debug file menu options to be included in the debug Info file then click start
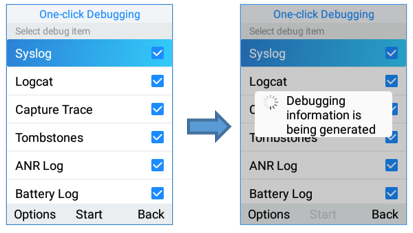
3. Click on stop then Back and select View debug file:
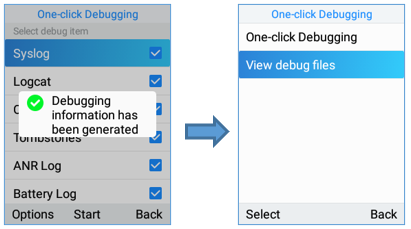
4. Export to USB drive or delete logs.
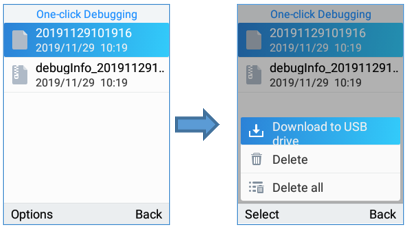
UPGRADING AND PROVISIONING
The WP820 can be upgraded via TFTP/HTTP/HTTPS by configuring the URL/IP Address for the TFTP/HTTP/HTTPS server and selecting a download method. Configure a valid URL for TFTP, HTTP or HTTPS; the server name can be FQDN or IP address.
Examples of valid URLs:
fw.mycompany.com
Upgrade and Provisioning Configuration
There are two ways to setup upgrade and provisioning on WP820. They are Keypad Menu and Web GUI.
Configure via keypad Menu
- In WP820 Settings, select Advanced Settings 🡪 System Upgrade.
- Navigate to Firmware/Config and configure the firmware upgrade and config settings.
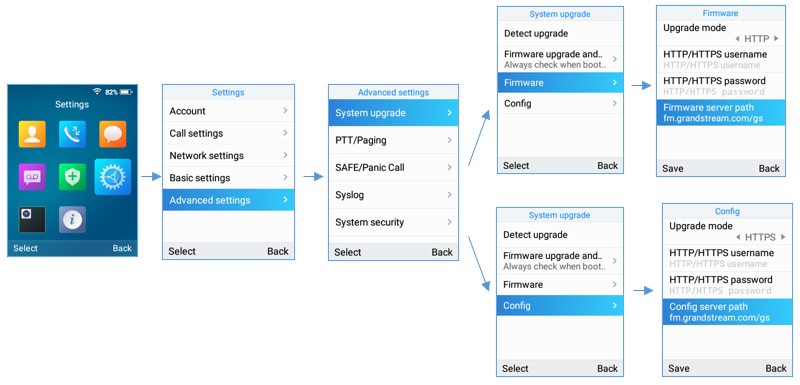
Configure via Web GUI
Open a web browser on PC and enter the IP address for the WP820. Then login with the administrator username and password. Go to Maintenance 🡪 Upgrade 🡪 Firmware. In the Upgrade web page, enter the IP address or the FQDN for the upgrade server and choose to upgrade via TFTP, HTTP or HTTPS (The default setting is HTTPS). Save and apply the changes, press Upgrade button, or reboot the phone to initiate firmware upgrade process.
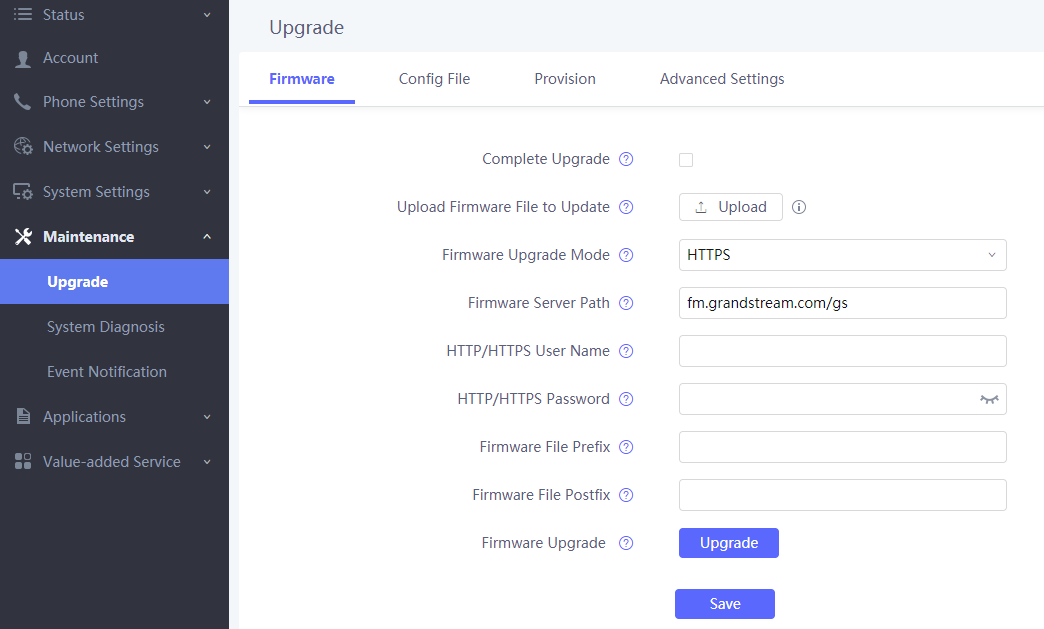
Upload Firmware Locally
If there is no HTTP/TFTP server, users could also upload the firmware to the WP820 directly via Web GUI. Please follow the steps below to upload firmware to WP820 locally.
- Download the latest WP820 firmware file from the following link and save it in your PC.
https://www.grandstream.com/support/firmware
- Log in the Web GUI as administrator in the PC.
- Go to Web GUI🡪Maintenance🡪Upgrade🡪Firmware.
- Click the “Upload” button, a window will be prompted to select firmware file to upload.
- Select the firmware file from your PC. Then uploading progress will show at the button where it was “Upload” in the above step.
- When uploading is done, users can see the upgrading process starts on the WP820 LCD.
- The phone will reboot again with the new firmware version upgraded.

No Local Firmware Servers
Service providers should maintain their own firmware upgrade servers. For users who do not have a TFTP/HTTP/HTTPS server, some free Windows version TFTP servers are available for download from:
http://www.solarwinds.com/free-tools/free-tftp-server and http://www.tftpd64.com/.
Please check our web site at https://www.grandstream.com/support/firmware for latest firmware.
Instructions for local firmware upgrade via TFTP:
- Unzip the firmware files and put all of them in the root directory of the TFTP server;
- Connect the PC running the TFTP server and the WP820 device to the same LAN segment;
- Launch the TFTP server and go to the File menu 🡪 Configure 🡪 Security to change the TFTP server’s default setting from “Receive Only” to “Transmit Only” for the firmware upgrade;
- Start the TFTP server and configure the TFTP server in the phone’s web configuration interface;
- Configure the Firmware Server Path on your WP820 to the IP address of the PC;
- Update the changes and reboot the WP820.
End users can also choose to download a free HTTP server from https://httpd.apache.org/ or use Microsoft IIS web server.
Firmware Upgrade via USB
For users that could not use remote upgrade or could not access the phone’s Web GUI to upload firmware, upgrading via external USB flash drive is an alternative. Follow the steps below to upgrade the WP820 via USB:
- Download the firmware file to PC and save it in the USB flash drive
- Insert the USB flash drive to the WP820.
- The following message will appear indicating that the USB drive is connected and the

icon will appear in the status bar.
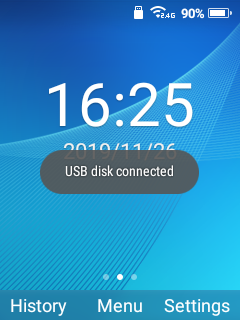
4. Power cycle the WP820 and wait for the device to detect the firmware.
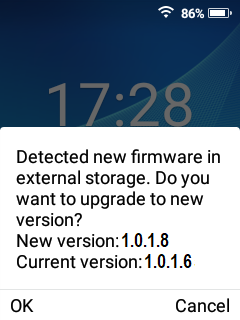
5. Press OK to start the upgrade.
Config Provision via USB
This feature allows the user to place an XML configuration file on a USB drive and upload to WP820.
- Download the Config file to PC and save it in the USB flash drive
- Insert the USB flash drive to the WP820.
- Power cycle the WP820 and wait for the device to detect the Config file.
Wi-Fi Provision via USB
This feature allows the user to place a Wi-Fi configuration package on USB and upload to WP820.
Provisioning and Configuration File Download
Grandstream SIP Devices can be configured via the Web Interface as well as via a Configuration File (binary or XML) through TFTP or HTTP/HTTPS. The “Config Server Path” is the TFTP, HTTP or HTTPS server path for the configuration file. It needs to be set to a valid URL, either in FQDN or IP address format. The “Config Server Path” can be the same or different from the “Firmware Server Path”.
A configuration parameter is associated with each particular field in the web configuration page. A parameter consists of a Capital letter P and 1 to 5 (could be extended to more in the future) digit numeric numbers. i.e., P2 is associated with the “Admin Password” in the Web GUI🡪System Settings🡪Security Settings🡪User Info Management page. For a detailed parameter list, please refer to the corresponding firmware release configuration template in the following link:
https://www.grandstream.com/support/tools
When the WP820 boots up, it will issue TFTP or HTTP(S) request to download a configuration XML file named “cfgxxxxxxxxxxxx” followed by “cfgxxxxxxxxxxxx.xml”, where “xxxxxxxxxxxx” is the MAC address of the phone, i.e., “cfg000b820102ab” and “cfg000b820102ab.xml”. If downloading “cfgxxxxxxxxxxxx.xml” file is not successful, the provision program will download a generic cfg.xml file. The configuration file name should be in lower case letters.
For more details on XML provisioning, please refer to the following document: https://documentation.grandstream.com/knowledge-base/sip-device-provisioning-guide/
FACTORY RESET
Restore to Factory Default via LCD Menu
There are two methods to restore the WP820 to the factory default settings.
- On WP820 idle screen, go to Settings 🡪 Advanced Settings 🡪 Factory reset.
- In the new window, confirm the reset using the left softkey.
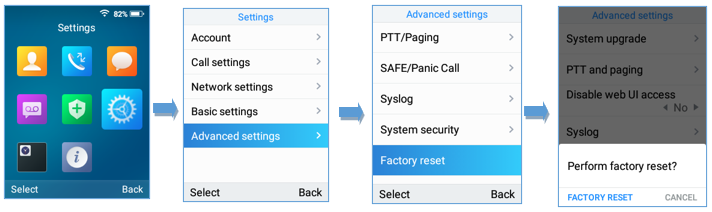
3. Once confirming the factory reset, WP820 will reboot with the default factory settings.
Restore to Factory Default via the Web GUI
- Login WP820 Web GUI and go to Maintenance 🡪 Upgrade 🡪 Advanced Settings;
- At the bottom of the page, click on the Reset button for Factory reset.

3. A dialog box will pop up to confirm factory reset.
4. Click OK to restore the phone to factory settings.
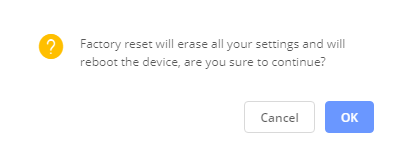
Restore to Factory Default using Hard Keys
In order to perform hard reset of the phone using keypad buttons please follow below steps:
- Power cycle the WP820.
- Press key 1 + key 9 immediately and hold it until the LCD shows the factory reset message.
- Release the buttons and the phone will boot up with the default settings.
CHANGE LOG
This section documents significant changes from previous firmware versions. Only major new features or major document updates are listed here. Minor updates for corrections or editing are not documented here.
Firmware Version 1.0.7.75
- Added support for the Slovenian language. [Multi-language]
Firmware Version 1.0.7.73
- No Major Updates.
Firmware Version 1.0.7.72
- No Major Updates.
Firmware Version 1.0.7.68
- No Major Updates.
Firmware Version 1.0.7.66
- No Major Updates.
Firmware Version 1.0.7.61
- Updated the display message on LCD when the call transfer fails. [Transfer]
- Adjusted the proximity sensor’s low threshold from 10 to 20. [Intelligent Control]
Firmware Version 1.0.7.58
- Added the option Incoming Call Indicator. [WP820 LED Status]
- Added the option Charging Indicator. [WP820 LED Status]
- he devices which are in the group will receive the paging.Added the option Charging Completed Indicator. [WP820 LED Status]
- Added support for the Hungarian language. [Hungarian Language]
Firmware Version 1.0.7.50
- Added New options for screen lock [Screen lock]
- Added Use # as Redial key [Make a Call using a Line]
Firmware Version 1.0.7.43
- No major changes.
Firmware Version 1.0.7.30
- Added ability to disable proximity sensor. [Intelligent Control]
- Added ability to disable multi-function button completely. [Disable]
- Added Sensor calibration feature code ***2223*. [Sensor Calibration]
- Added Ability to upload custom wallpaper by server path. [Download Wallpaper]
- Added allow transfer calls to LDAP contacts. [Call Transfer]
- Added support for Finnish and Hebrew language.
- Added detection for upgrade fail if speed lower than 1B/s for 120 secs for all modes.
- Added ability to configure outbound proxy from LCD menu. [Register Account via LCD Menu]
- Added USB icon display on status bar when USB drive is plugged. [Firmware Upgrade via USB]
- Added Broadsoft XSI support. [Broadsoft XSI]
- Added “One-click Debugging” feature on handset UI. [DIAGNOSTICS]
- Added SN info on LCD and web UI. [WP820 System Info]
- Added battery status. [WP820 Battery]
- Added Bluetooth interface on web UI. [Bluetooth]
- Added visual voicemail function. [Voice Mail]
- Added custom wallpaper support on web UI. [Wallpaper Customization]
- Added Wi-Fi provision via USB. [Wi-Fi Provision via USB]
- Added config file provision via USB. [Config Provision via USB]
- Added lock screen feature from web UI and screen lock password. [Screen Lock]
- Added UCM conference screen to show participants count info. [UCM Conference]
- Added send message in contacts UI. [SMS]
- Added speed dial option for multi-purpose key. [MULTI-FUNCTION BUTTON]
- Added phone support for clicking ok button to accept call.
- Added video call zoom function in door system integration feature with GDS. [CONNECTING WP820 TO GDS3710 DOOR SYSTEM]
- Added ability to enable/disable SSH access without requiring reboot. [Web/SSH Access]
- Added support for UCM conference control. [UCM Conference]
- Added support for quick search mode in contacts application. [CONTACTS]
- Added ability to disable web UI access. [Accessing the Web UI]
- Added ability to disable Low Wi-Fi signal warning. [Wi-Fi Signal Warning Configuration]
- Added quick setup wizard module. [QUICK SETUP WIZARD]
- Updated attended transfer confirmation msg. [Attended Transfer]
- Increased dial digit limit to 30 characters. [Placing calls]
- Removed “Personalized Account” menu and moved related options to Settings 🡪 Call settings. [WP820 Handset Menu]
- Added Wi-Fi restart when changed Wi-Fi frequency. [Wi-Fi Band Configuration]
- Added support for connected Bluetooth device display. [Connecting WP820 to Bluetooth Devices]
- Added Bluetooth headset mode support. [Connecting WP820 to Bluetooth Devices]
- Updated device LCD language supported list. [Selecting Phone Language]
- Updated SMS interface. [SMS]
- Add 2 second delay when detect flip to reject call. [Flip Phone]
- Updated factory reset using hard key interface when constraint mode enabled. [Restore to Factory Default using Hard Keys]
- Added support for factory reset to first unregister sip message without contact head. [FACTORY RESET]
- Updated SRTP icon to display only when signaling and media are both encrypted. [WP820 Icons Description]
- Changed voicemail notification from “Ordinary” to “Normal”. [WP820 Icons Description]
- Supported TLSv1.2. [Technical Specifications]
- Added Slovak language support on LCD display. [Technical Specifications]
- Added warning tone when device is low on battery. [Battery Information]
- Added auto bootup when placed on charger after an abnormal power off. [Battery Information]
- Added Calculator application. [WP820 Handset Menu]
- Added additional Home screen on the left and the right. [WP820 Home Screen]
- Added support for captive portal. [Manual connection]
- Added Wi-Fi Band selection. [Wi-Fi Band Configuration]
- Added warning and message prompt when Wi-Fi signal is weak. [Wi-Fi Signal Warning Configuration]
- Added beep tone during a call when Wi-Fi connection is lost. [Wi-Fi Signal Warning Configuration]
- Added support for captive portal. [Wi-Fi Roaming Mode Configuration]
- Improved time and date display for different format. [Date and Time]
- Added support for troubleshooting tools. [Diagnostics]
- Changed incoming call softkey options from “Accept, Transfer, Reject” to “Accept, Transfer, Mute” for user friendly purpose. [CALL OPERATIONS]
- Added stutter tone at dialing interface when account has un-read voicemails. [Voice Mail]
- Added support for quick conference during call. [3-Way Conference]
- Increased contacts max limit count to 1000. [CONTACTS]
- Improved SMS UI and UX. [SMS]
- Added prompt for message sending status after users click on “Send”. [SMS]
- Added setting IGMP Keep Alive for PTT/Paging feature. [IGMP Settings]
- Add support for SAFE/Panic Call mode. [SAFE/PANIC CALL]
- Added Gesture Control features. [Gesture Control]
- Improved Phone User interface for user friendly purpose.
- Adding show storage status in System Info. [WP820 System Info]
- This is the initial version for WP820.