This document describes basic configuration to interconnect GXW450x with UCM6xxx series. This is typically applied to the scenario where users would like to use T1/E1/J1 interface with UCM6xxx or add more T1/E1/J1 interfaces to UCM6510.
Environment Setup
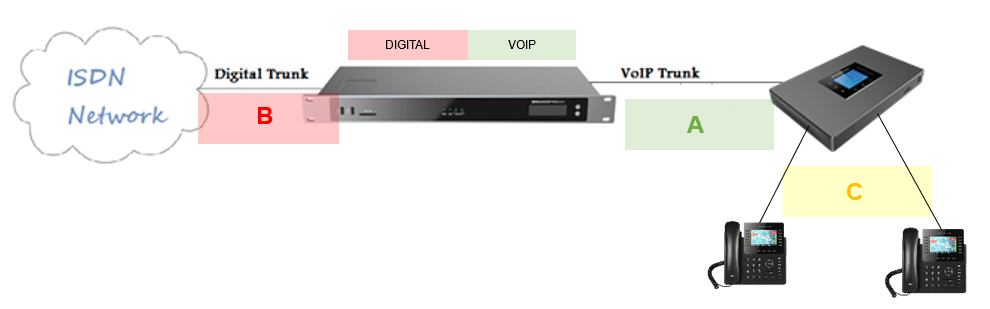
The following illustration show the typical setup that will be used in this guide:
To achieve this scenario, following main steps need to be performed:
- Create SIP Peer Trunk between GXW450X and UCM6xxx. This step must be done on both ends, refer to:
- Configuring call routing: This will allow to forward calls from Digital to VoIP and vice-versa.
In this guide, we will be using a GXW4501 as a digital interface for the UCM6xxx. The following methodology can be used for all UCM6XXX series.
The guide covers needed configuration between GXW450X and UCM6XXX only (marked as “A” in the figure above). The configuration between UCM6XXX and endpoints (marked as “C” in the figure above) is also not covered in this guide, for more details, refer to UCM6xxx User Manual[/ht_message]Connecting GXW450X and UCM6XXX using Peer SIP Trunk
Create Peer SIP trunk on GXW450X
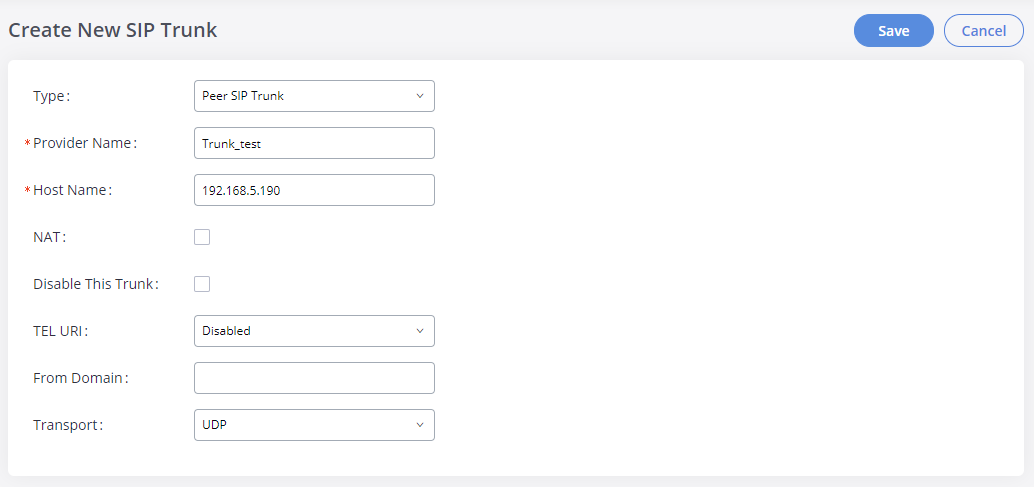
On the GXW450X web GUI, create a Peer SIP Trunk by navigating to Trunks → VoIP Trunks and click on “Add SIP Trunk”.
In the “Create New SIP Trunk” screen:
- Select “Peer SIP Trunk” for Type.
- Enter a reference name for Provider Name. This is mainly for reference. In this example Trunk_test is used.
- For Host Name enter the IP address/domain of the UCM6xxx. In this case 192.168.5.190 is the IP address of the UCM6xxx.
- Click Save when done.
- After clicking “Save” the new VoIP trunk will be displayed under Trunks → VoIP Trunks.
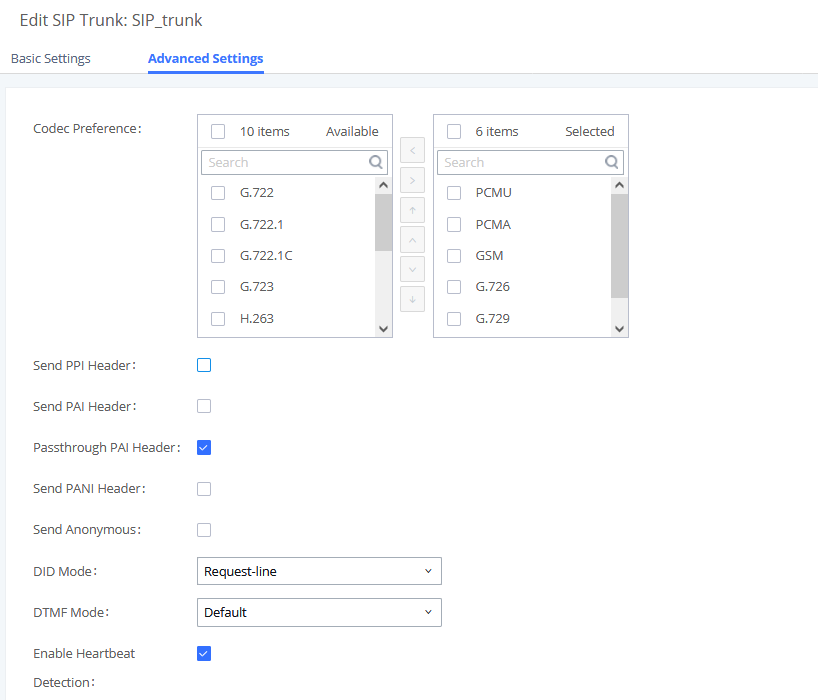
- Click edit button

. - Locate the option labeled Enable Heartbeat Detection and enable this option by clicking the check box. This is a SIP option that allows GXW4501 to monitor the status of UCM6xxx.

- Click Save when done.
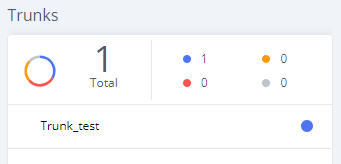
Once the trunk has been created and Enable Heartbeat Detection is set, users can view the status of the peered trunk by navigating to the Dashboard page.

Create Peer SIP trunk on UCM6xxx
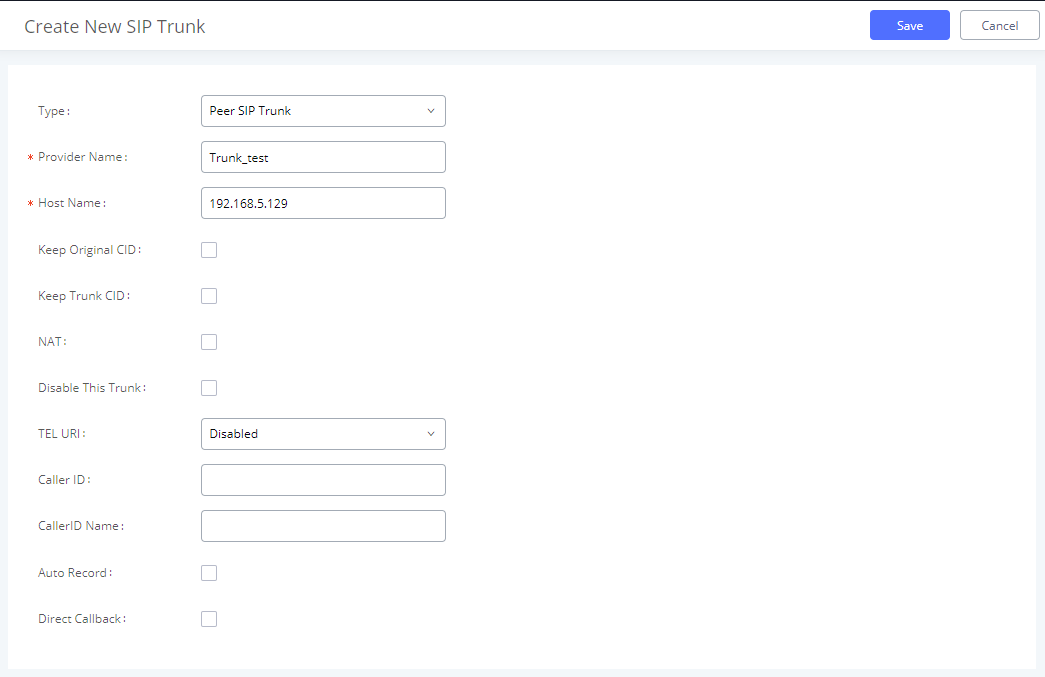
On the UCM6xxx web GUI, create a Peer SIP Trunk by navigating to Extension / Trunk → VoIP Trunks and click on “Add SIP Trunk”.
In the “Create New SIP Trunk” screen:
- Select “Peer SIP Trunk” for Type.
- Enter a reference name for Provider Name. This is mainly for reference. In this example “Trunk_test” is used.
- For Host Name enter the IP address/domain of the GXW450X. In this case 192.168.5.129 is the IP address of the GXW4501.
- Click Save when done.
- After clicking “Save” the new VoIP trunk will be displayed under Trunks → VoIP Trunks.
- Click edit button

. - Locate the option labeled Enable Heartbeat Detection and enable this option by clicking the check box. This is a SIP option that allows UCM6xxx to monitor the status of GXW4501.
- Click Save when done.
Once the trunk has been created and Enable Heartbeat Detection is set, users can view the status of the peered trunk by navigating to the Dashboard page.
Configure Call Routing
From GXW450X (Digital) to UCM6XXX (VoIP)
This section will guide you in order to forward the calls coming from Digital network to VOIP network.
Step 1: Configure Inbound Rule on GXW450X
In order to receive the inbound calls coming from the ISDN trunk, we need first to create an inbound route under Trunks → Inbound Routes for the PRI Trunk to define the incoming calls allowed.
Following needs to be configured:
- Pattern: the pattern used in this example is the DID for this trunk “_0612345678” to allow incoming calls coming from the PRI Trunk: Digital_1.
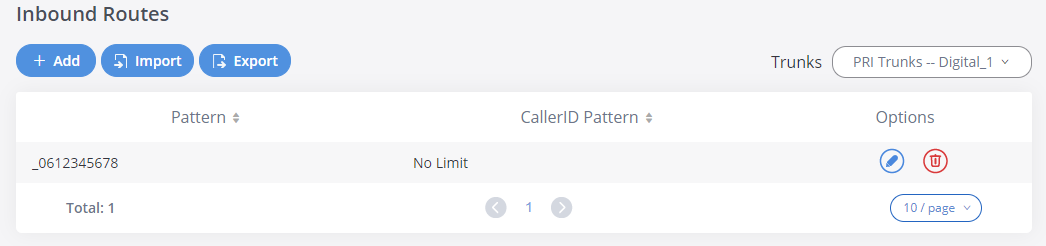
Click on Save then Apply Changes to apply the new settings.
Step 2: Configure Outbound Rule on GXW450X
In order to route the calls coming from ISDN to the UCM, on the GXW4501 web interface, go to Trunks → Outbound Routes to create a new outbound rule which will allow the digital network to reach the extension on UCM6xxx.
Following needs to be configured:
- Calling Rule Name: This is for reference purposes, so we chose to use “to190”.
- Pattern: the pattern used in this example is “_0612345678” since will be receiving the call from Digital_1 and allow this number to be dialed out to the UCM6xxx from the digital network.
- Trunk: Since we are configuring the GXW4501, we will select the SIP Peer Trunk “Trunk_test”, in order to send the call out to the UCM6xxx.

Click on Save then Apply Changes to apply the new settings.
Step 3: Configure Inbound Rule on UCM6XXX
These steps will also be used to create an inbound rule on the UCM6xxx so that when it receives an incoming call from the ISDN network it will redirect to the configured default destination.
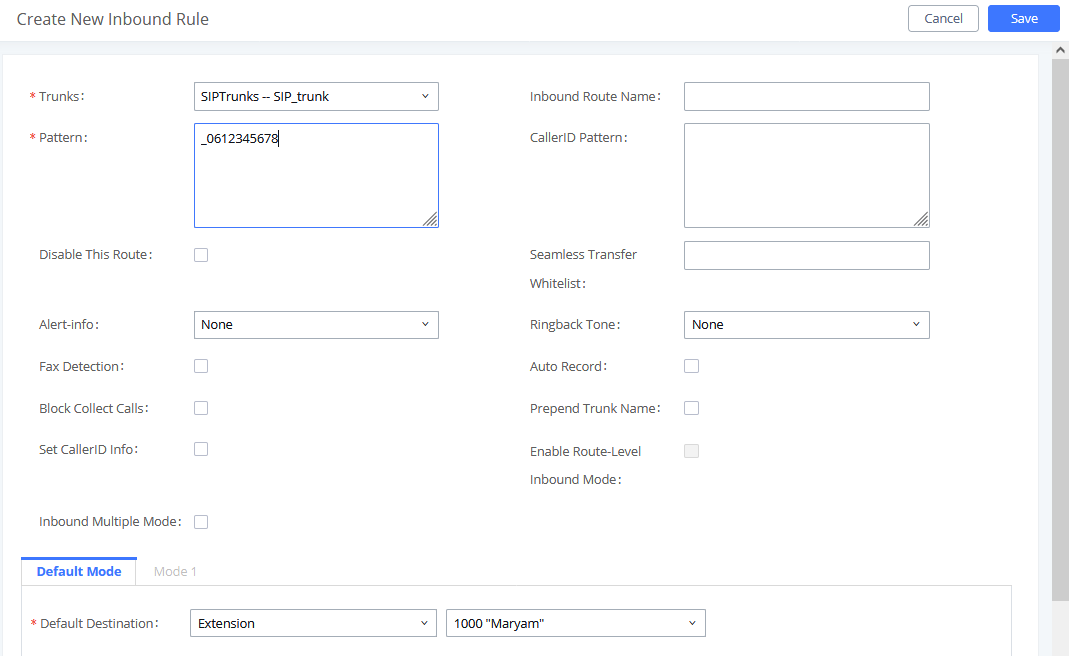
Following needs to be configured on the UCM6xxx Inbound Rule:
- Trunks: Select the Trunk_test.
- DID Pattern: Enter in the pattern “_0612345678”.
- Default Destination: Extension 1001.
From UCM6XXX (VoIP) to GXW450X (Digital)
This section will guide you in order to forward the calls coming from VoIP network to Digital network.
Step 1: Configure Outbound Rule on UCM6xxx
Same steps will also be applied when configuring the outbound route from the UCM6xxx to the GXW4501. The only difference in the configuration is the Pattern and the Main Trunk. Since will be using the pattern “_06X.” to reach Digital network on the GXW4501 and select the trunk between UCM6xxx and GXW4501.
Step 2: Configure Inbound Rule on GXW450x
To allow the inbound calls coming from the UCM6xxx on the GXW4501 we need to configure the Inbound Rule, to do so, navigate to the web GUI, go to Trunks → Inbound Routes to create a new inbound rule.
For this example, GXW4501 inbound rule needs to be configured so that when the UCM dials a digital network’s number it will be routed to the specified user.
On the GXW4501 configure the following:
- Trunks: Select the Trunk_test trunk.
- Pattern: Enter in the pattern “_06X.”.
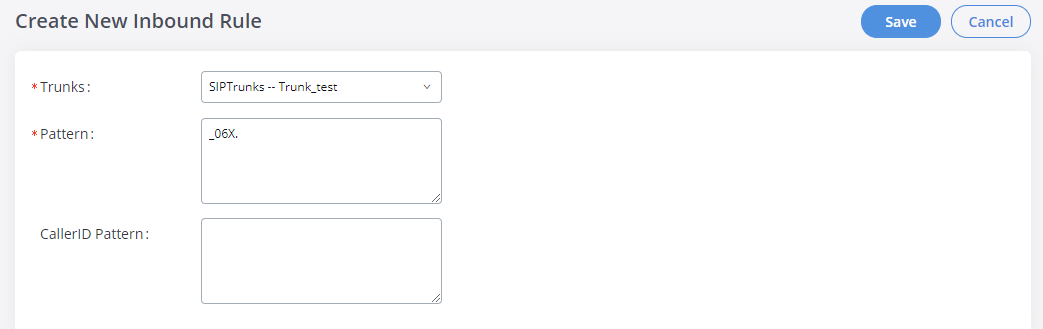
With this inbound rule configured, if an extension of the UCM6xxx dials an external number, it will send it over the gxw4501.
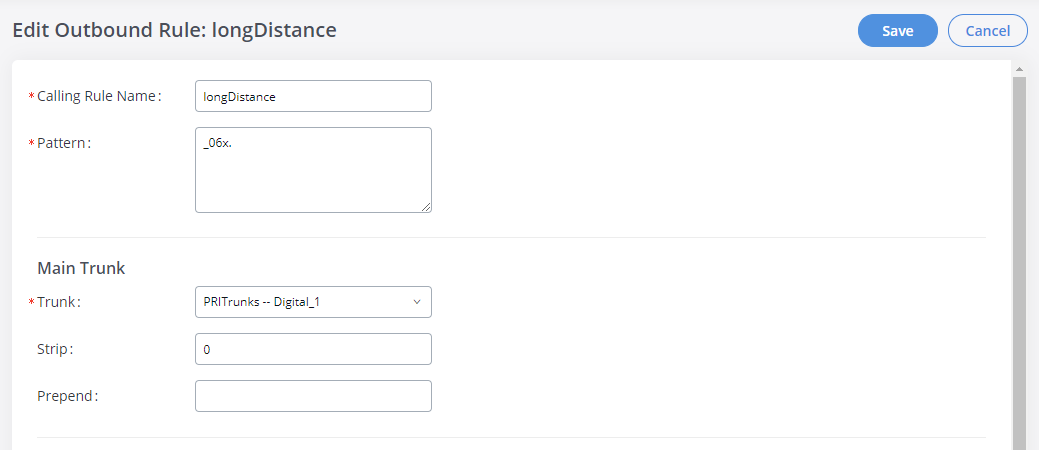
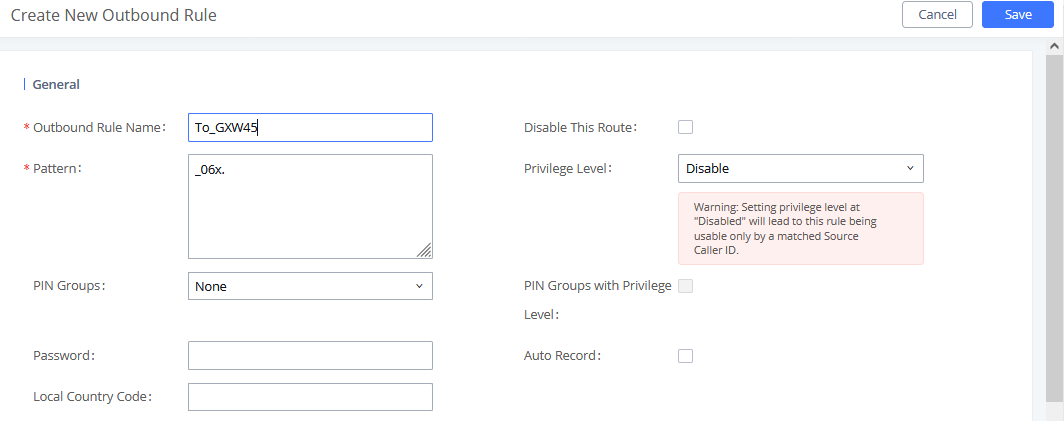
Step 3: Configure Outbound Rule on GXW450x
In order to define which Digital trunk the GXW4501 will choose to send the call from, we need to configure the Outbound Rule, under Trunks → Outbound Routes.
Following needs to be configured:
- Calling Rule Name: This is for reference purposes, so we chose to use “longDistance”.
- Pattern: the pattern used in this example is “_06x” since will be receiving the call from the UCM6xxx with number starting with “06”.
- Trunk: Since we want the call to be sent to the Digital Line, we need to select our ISDN trunk Digital_1.