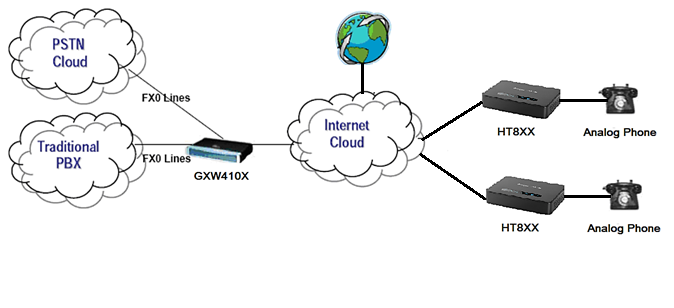
This document describes the basic configuration to peer the HT8XX series with GXW410X. This configuration applies to users seeking to add a GXW410X not only as a remote extension but also as an external PSTN trunk.
The document will demonstrate these two scenarios to set up HT8XX series with the GXW410X:

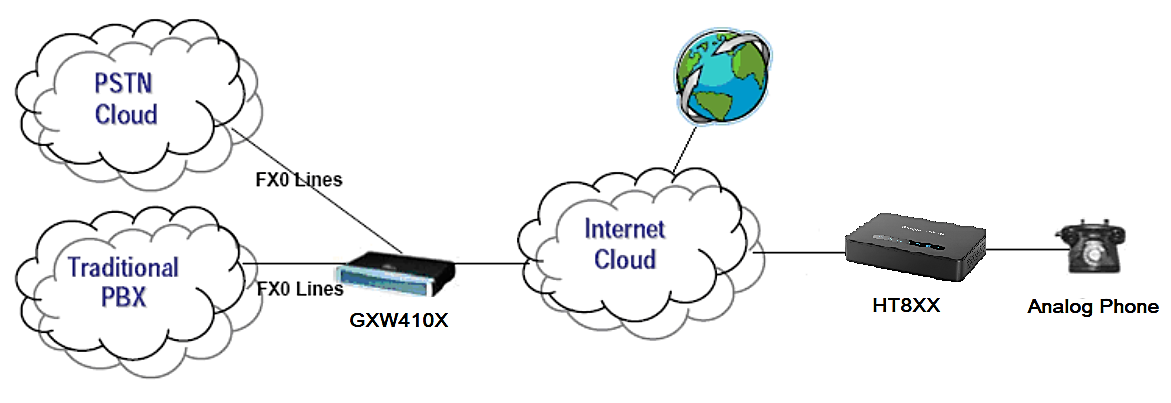
SCENARIO 1: PEERING ONE HT8XX WITH GXW410X
A common scenario which involves one HT8XX (ATA) and GXW410X (FXO gateway) but doesn’t involve any SIP server. This scenario allows an organization with remote locations to access FXO trunks through IP network.
In this scenario, we will proceed first from the web GUI of HT8XX, then on the GXW41XX in order to configure the Peer Trunk on both sides.
HT8XX Configuration
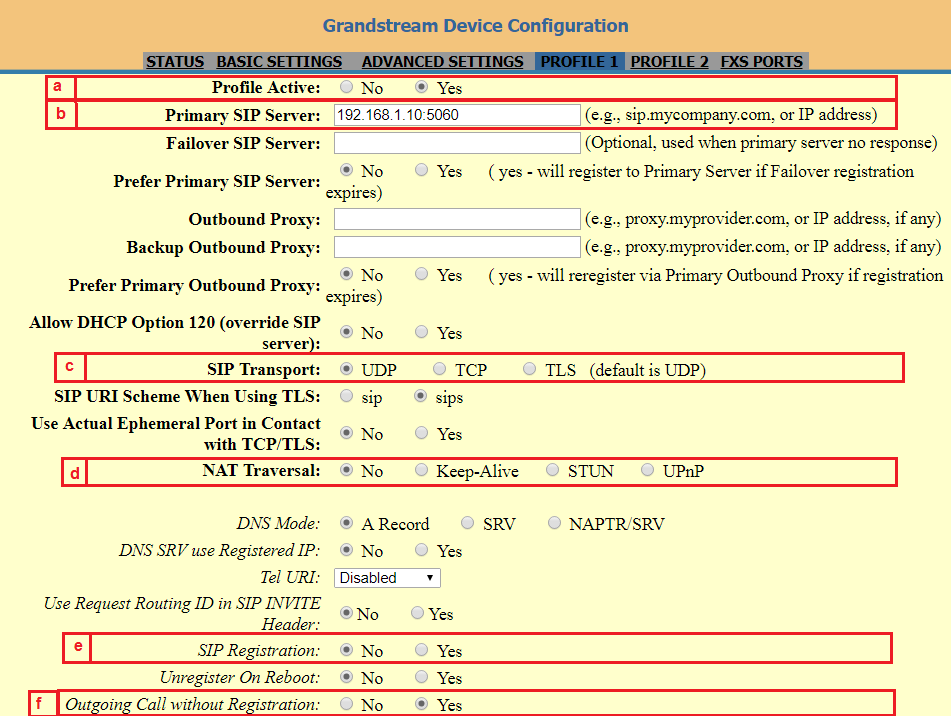
On the HT8XX web GUI, access to “Profile1”, then set the following:
- Profile Active 🡪 YES
Activates this account in order to make Profile1 operational. - Primary SIP Server 🡪 Enter the IP address of the GXW410X here.
- SIP Transport 🡪 UDP
In our example, we will use the protocol UDP as transport protocol. - NAT Traversal 🡪 NO
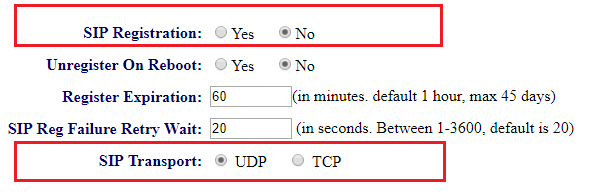
This setting will force the HT8XX to use its private IP address while making calls through peering link with GXW410X. - SIP Registration 🡪 NO
Registration not needed since this example is a peering between GXW410X and HT8XX. - Outgoing Call without Registration 🡪 YES
This enables the ability to place outgoing calls even if the account is not registered.
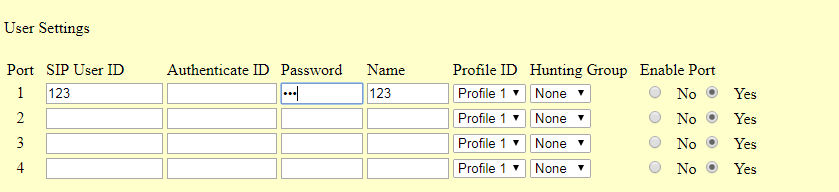
FXS Ports Settings:
- Port 1: SIP User ID: 123 | Password: 123 | Name: 123 | Profile ID: Profile 1 | Enable Port: Yes
GXW410X Configuration
- In order to activate the profile configured on GXW410X, please access to GXW410X web GUI under “Accounts” 🡪 “Account 1” 🡪 “General Settings” then set the following:
- Account Active 🡪YES
- Account Name 🡪 Specify a name to identify this profile.
- SIP Server 🡪 Enter the IP address of the HT8XX that you are peering with GXW410X.

- Now under “Accounts” 🡪 “Account 1” 🡪 “Network Settings”
- NAT traversal (STUN) 🡪 NO
This setting will force the GXW410X to use its private IP address while making calls through peering link with HT8XX.
- NAT traversal (STUN) 🡪 NO

- Under “Accounts” 🡪 “Account 1” 🡪 “SIP Settings”:
- SIP Registration 🡪 NO
Registration not needed since this example is a peering between GXW410X and HT8XX. - SIP Transport 🡪 UDP
In our example, we will use the protocol UDP as transport protocol.
- SIP Registration 🡪 NO
- Under “FXO lines” 🡪 “Setting” then set the following:
- Number of Rings Before Pick up 🡪4
This is the number of rings the gateway will wait to send the call to the VOIP side in case the Caller ID has yet to be detected. If there is CID, information the call will be sent right away. If your lines do not have the CID service set this to 1.
- Number of Rings Before Pick up 🡪4

- Under “FXO lines” 🡪 “Dialing” 🡪 “Dialing to PSTN” and set the following:
- Wait For Dial Tone 🡪 Yes or No
Set it to “YES” or “NO” depending on the setting that suits your FXO lines. - Stage Method 🡪 1
Setting this parameter to 1 will direct PSTN call from the VOIP endpoint. - Min Delay Before Dialing Out 🡪 500
It’s the time that GXW410X will wait before dialing out; available range 500ms to 65000ms).
- Wait For Dial Tone 🡪 Yes or No

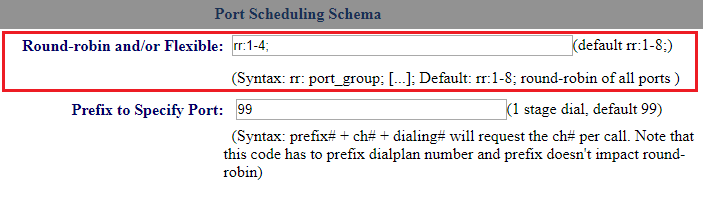
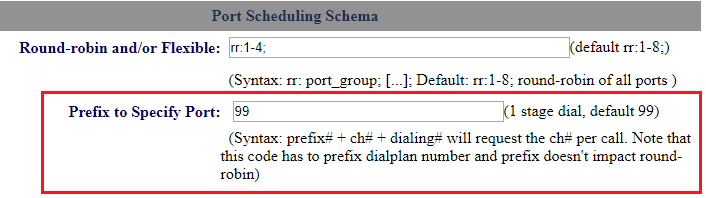
- Access the GXW410X web GUI under “FXO lines” 🡪 “Dialing” 🡪 “Port Scheduling Schema”, then set as follows:
- Round-robin and/or Flexible 🡪 rr:1-4;
With this setting, the GXW410X will behave as follows:- The VoIP endpoint wants to make an outgoing call through PSTN line.
- GXW410X receives the INVITE from the VOIP endpoint.
- GXW410X checks first the availability of FXO-4 since it has the highest Port-ID.
- If FXO-4 is available, the call will try to go through FXO-4.
- If FXO-4 is busy, the call will try to go through FXO-3.
- Then If FXO-3 is busy, the call will try to go through FXO-2.
- Then If FXO-2 is busy, the call will try to go through FXO-1.
- Round-robin and/or Flexible 🡪 rr:1-4;
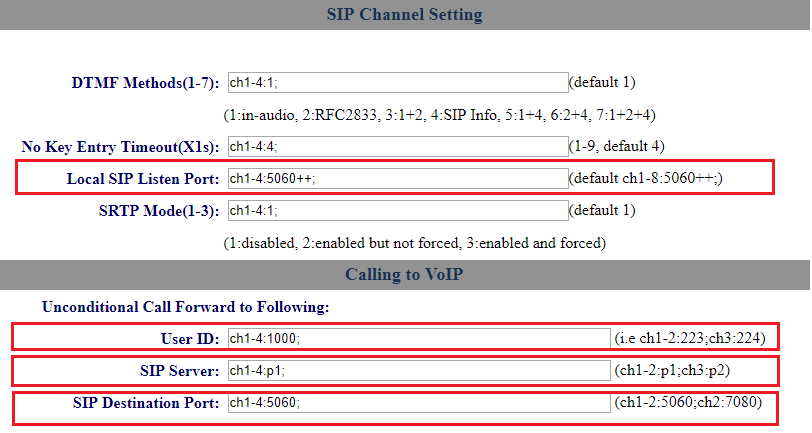
- Under “Settings” 🡪 “Channels Settings” then set the following:
- 🡪 SIP Channel Settings: Local SIP Listen Port 🡪 ch1-4:5060++;
The ++ indicates increments by two, so port 1 is set at 5060, port at 5062 and so on. This setting can be used with Round Robin and/or Flexible setting below to configure different ports to be placed under different Round Robin groups.
- 🡪 Calling to VOIP:
- User ID 🡪 ch1-4:123;
This parameter allows users to configure a User ID or extension number to be automatically dialed upon FXO line off-hook. (In our example, we will send it to User ID 123) - SIP Server 🡪 ch1-4: p1;
Specify the profile of the user id configured above (p1 stands for Profile 1, p2 stands for Profile 2 and so on). - SIP Destination Port 🡪 ch1-4: 5060;
Setting this port to 5060 will allow this GXW410X to always redirect the incoming PSTN calls to the HT8XX which is reachable via port 5060
- 🡪 SIP Channel Settings: Local SIP Listen Port 🡪 ch1-4:5060++;
One-To-One mapping
The One-to-One mapping feature will allow to the HT8XX FXS port to specify the port number ‘x’ that the user will use to access GXW410X FXO port ‘x’ for outbound calls.
To enable this One-To-One Mapping feature between HT8XX FXS ports and GXW410X FXO ports, you will need to access to GXW410X web GUI under “FXO lines” 🡪 “Dialing” 🡪” Port Scheduling Schema”, then set as follows:
Prefix to specify Port 🡪 99
This setting allows you the power to send outbound calls from the VOIP endpoint to a specific FXO line. With this setting, the GXW410X will behave as follow:
- User tries to make an outbound call to an external number 5669300 via GXW410X FXO port 1
- User should add the prefix 991 to the external called numbers.
- In this case the user will dial 99-1-5669300 wher :
- 99: represents the prefix
- 1: represents port number 1
- 5669300: represents external number
- Once received, the GXW4108 gateway will strip off 991 from the dialed number 9915669300
- GXW410X will route the call to port 1 and make call to 5669300 over the PSTN network connected to FXO1.

Port-To-Port mapping
Port-to-port mapping feature will force all calls placed on a specific FXS port “x” to be completed through the PSTN network that is connected to a specific FXO port “x”. This is similar to a one-to-one mapping configuration except it is hardcoded to be always routed through a specific FXO port. In this case, the End-user is not required to dial any extra numbers.
Port-to-port mapping is configured using the Dial Plan feature on the HT8XX. The HT8XX supports $P, $p as port numbers. Port to port mapping from the HT8XX to GXW410X is configured as follows:
- GXW410X: prefix to specific port: 99 —- default settings on FXO GXW
- HT8XX: dial plan: { <=99$P>x+ }
So, if the HT8XX configured with this dial plan, any number dialing from a specific port will be prefixed with 99 and a port number:
- User dials 5669300 from his analog phone which is connected to port 1
- HT8XX will append this number with the appropriate dial plan configured (HT8XX will be 9915669300)
- Once received, The GXW4108 gateway will strip off 991 from the dialed number 9915669300
- GXW410X will route the call to port 1 and make call to 5669300 over the PSTN network connected to FXO1.

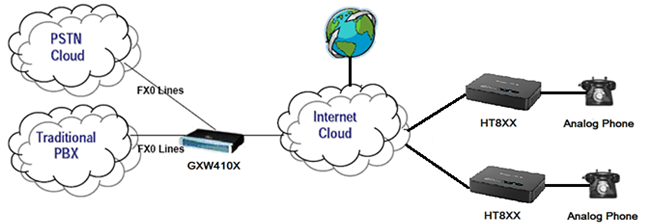
SCENARIO 2: PEERING MULTIPLE HT8XX WITH GXW410X
A common scenario which involves multiple HT8XX (ATA) and GXW410X (FXO gateway) but does not involve any SIP server. This scenario allows organization with remote location to access FXO trunks through IP network.
In this scenario, we will use two HT8XX, users can apply same configuration if more than two HT8XX are used.
To configure this scenario, you will need to follow the steps bellow:
- Step 1: Configure the first HT8XX to be peered with the GXW410X
- Step 2: Configure the second HT8XX to be peered with the GXW410X.
- Step 3: Configure GXW410X to be peered with both HT8XX.
Step 1: First HT8XX Configuration
Please refer to the page 5 where you will find the steps (from step 1 until step 8) to configure the first HT8XX, then you will need to set the FXS port settings as follow:
FXS Ports Settings:
- Port 1: SIP User ID: 111 | Password: 111 | Name: 111 | Profile ID: Profile 1 | Enable Port: Yes

Step 2: Second HT8XX Configuration
Please refer to the page 5 where you will find steps (from step 1 until step 8) to configure the first HT8XX, then you will need to set the FXS port settings as follow:
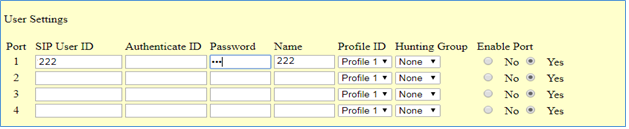
FXS Ports Settings:
- Port 1: SIP User ID: 222 | Password: 222 | Name: 222 | Profile ID: Profile 1 | Enable Port: Yes
Step 3: GXW410X Configuration
- In order to activate the first Account configured on GXW410X , please access to GXW410X web GUI under “Accounts” 🡪 “Account 1” 🡪 “General Settings” then set the Following:
- Account Active 🡪 YES
- Account Name 🡪 Specify a name to identify this profile
- SIP Server 🡪 Enter the IP address of the First HT8XX that you are peering the GXW410X with

- In order to activate the second account profile configured on GXW410X, please access to GXW410X web GUI under “Accounts” 🡪 “Account 2” 🡪 “General Settings” then set the Following:
- Account Active 🡪 YES
- Account Name 🡪 Specify a name to identify this profile
- SIP Server 🡪 Enter the IP address of the Second HT8XX that you are peering the GXW410X with
- Please refer to the page 7 and page 8 where you will find the steps (from step 2 until step 6) which show how to configure the remaining GXW410X settings.
- At this stage, you will need to configure the last step which is step 7 called “Channels Settings”, so under “Settings” 🡪 “Channels Settings” then set the following:
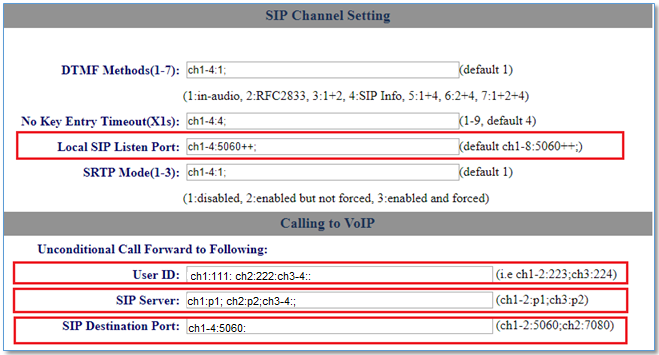
- 🡪 SIP Channel Settings: Local SIP Listen Port 🡪 ch1-4:5060++;
The ++ indicates increments by two, so port 1 is set at 5060, port at 5062 and so on. This setting can be used with Round Robin and/or Flexible setting below to configure different ports to be placed under different Round Robin groups. - 🡪 Calling to VoIP:
- User ID🡪 ch1:111; ch2:222;ch3-4:;
This parameter allows users to configure a User ID or extension number to be automatically dialed upon FXO line off-hook. (In our example, we will send it to User ID 123) - SIP Server🡪 ch1:p1; ch2:p2;ch3-4:;
Specify the Profile of the user id configured above (p1 stands for Profile 1, p2 stands for Profile 2 and so on). - SIP Destination Port 🡪 ch1-4:5060;
Setting this port to 5060 will allow this GXW410X to always redirect the incoming PSTN calls to the HT8XX reachable via port 5060
- 🡪 SIP Channel Settings: Local SIP Listen Port 🡪 ch1-4:5060++;