Grandstream Affinity is an easy-to-use CTI application allowing interaction between the Grandstream GXP17XX/GXP21XX/GRP26XX/GXV33XX/GXV34XX IP audio&video Phones series, providing a smooth call management and control interaction between the customer’s phone and desk computer running the application.
The purpose of this document is to describe in detail the user interface design and features of the Grandstream Affinity application.
Functions and Benefits of GS Affinity
The major benefits of using a Computer Telephony Integration (CTI) application are the following:
- Complete control over calls (answer, hang-up, call on hold, manage “do not disturb”, call forward, conference, call transfer etc…).
- Incoming calls notifications on desk computer allowing caller numbers to be screened against a database to collect or provide more information related to the caller.
- Initiate outbound calls directly from computer.
- Discovering phones with CTI feature enabled and communicating with the UCM6xxx directly to execute specific actions.
- The CTI application will be able to view, add, delete, modify and sync their contacts with the connected hosts.
- The CTI application will be able to view and delete the call history entries of the connected hosts.
GS AFFINITY APPLICATION INSTALLATION
The Grandstream Affinity application is available on our website.
Please refer to following steps to install GS Affinity:
- Once downloaded, users need to run the installation by a simple double click on the wizard from the path where the downloaded executable file was placed.
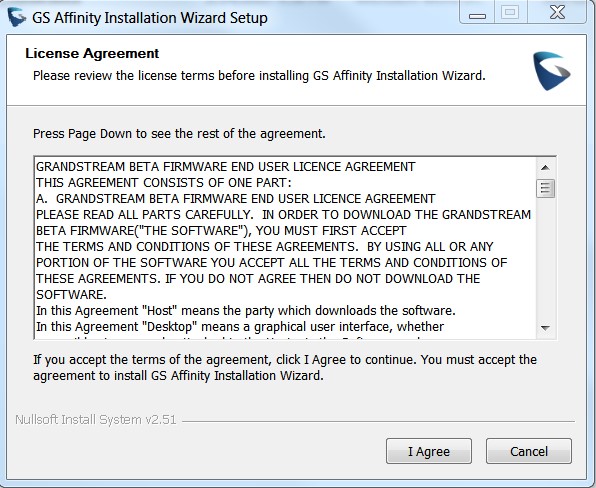
- Accept the license agreement by clicking the I Agree button.
- Check the components you want to install and click Next to continue.

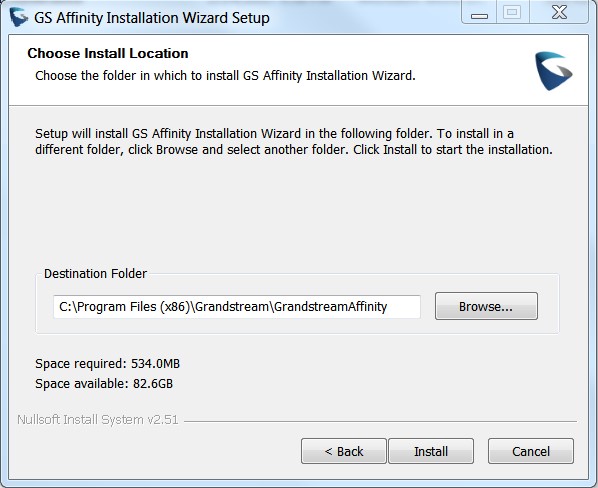
- Choose the install location and press Install to start the installation.
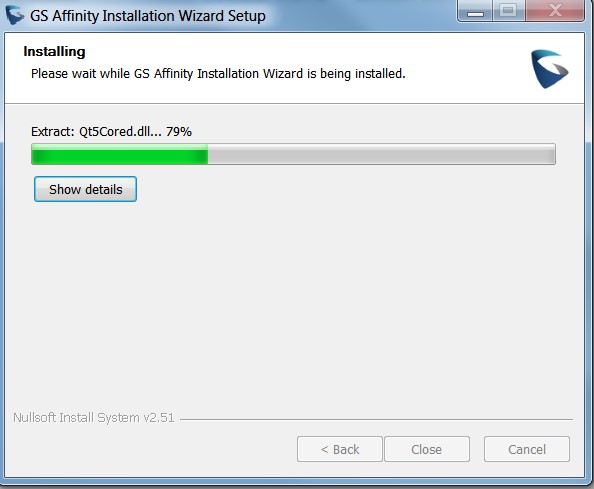
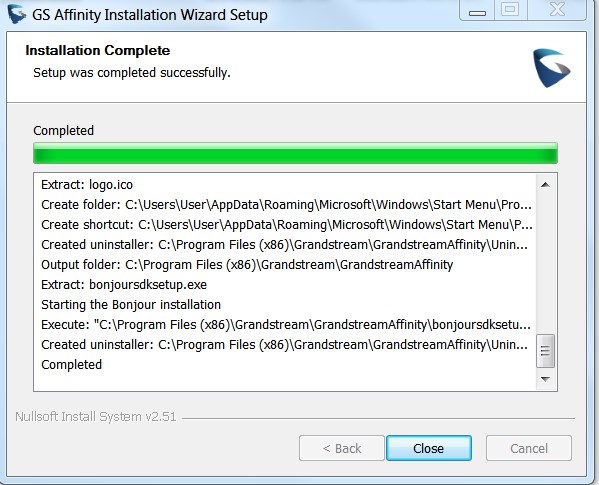
- The installation wizard will display the status of the installation as seen in the following screenshot.
- If you choose to also install the Bonjour SDK component, you will be invited to accept its agreement and click on the Next button to continue the installation.

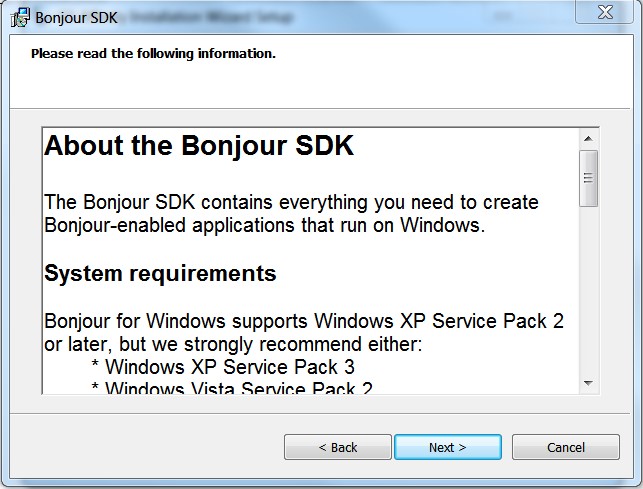
- The wizard will continue installing the Bonjour SDK, click the Finish button once Bonjour SDK installation is completed to continue installing GS Affinity application.
- Once the installation completes the wizard will display a confirmation message. Press Close to quit the installation.
ENABLING CTI FEATURE ON GXP PHONES
GXP17xx Series
To enable CTI application on GXP17xx series, please refer to the following steps:
- Access the web GUI of your GXP17xx using administrator username/password.
- Navigate to Settings → CTI Settings.
- Enable CTI Support by checking Enabled and choose CTI target SIP account under CTI Account field.
- Press Save and Apply to save the new settings.
- Reboot the GXP17xx phone to allow the interaction with the GS Affinity application.
GXP21xx Series
To enable CTI application on GXP21xx series, please refer to the following steps:
- Access the web GUI of your GXP21xx using administrator username/password.
- Navigate to Network → Affinity Settings.
- Enable Affinity Support by checking Enabled and choose affinity target SIP account under Preferred Account field.
- Press Save and Apply to save the new settings.
- Reboot the GXP21xx phone to allow interaction with the GS Affinity application.
GRP26xx Series
To enable CTI application on GRP26xx series, please refer to the following steps:
- Access the web GUI of your GRP26xx using administrator username/password.
- Navigate to Network → Affinity Settings.
- Enable Affinity Support by checking Enabled and choose affinity target SIP account under Preferred Account field.
- Press Save and Apply to save the new settings.
- Reboot the GRP26xx phone to allow interaction with the GS Affinity application.
GXV33xx Series
To enable CTI application on GXV33xx series, please refer to the following steps:
- Access the web GUI of your GXV33xx using administrator username/password.
- Navigate to Network Settings → Affinity Settings.
- Enable Affinity Support by checking Enabled and choose affinity target SIP account under Preferred Account field.
- Press Save and Apply to save the new settings.
- Reboot the GXV33xx phone to allow interaction with the GS Affinity application.
GXV34xx Series
To enable CTI application on GXV34xx series, please refer to the following steps:
- Access the web GUI of your GXV34xx using administrator username/password.
- Navigate to Network Settings → Affinity Settings.
- Enable Affinity Support by checking Enabled and choose affinity target SIP account under Preferred Account field.
- Press Save and Apply to save the new settings.
- Reboot the GXV34xx phone to allow interaction with the GS Affinity application.
CONNECTION ESTABLISHMENT
Simple Connection
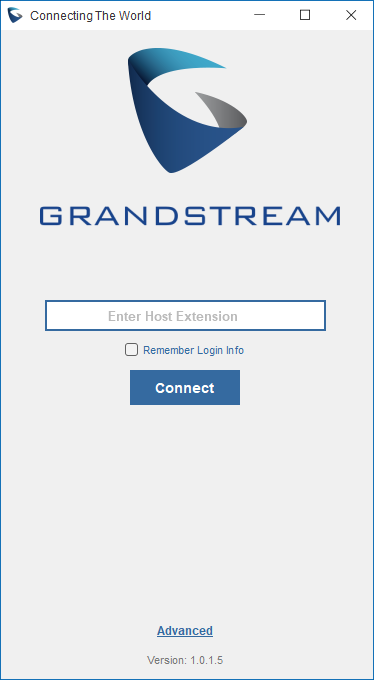
Once users launch the GS Affinity application, they will be redirected to following interface which is the simple connection interface, inviting users to introduce the phone’s extension number to interact with.
Before establishing the connection between the GS Affinity application and phones, make sure of the following:
- CTI settings are enabled on the host phones (Please refer to: Enabling CTI Feature on GXP Phones).
- If you are using the UCM6xxx with Router mode under network settings, please make sure to connect it to the LAN port.
Please follow the steps below to establish a simple connection using the GS Affinity application:
- Launch the GS Affinity application.
- Enter the host’s registered extension and press the Connect button.
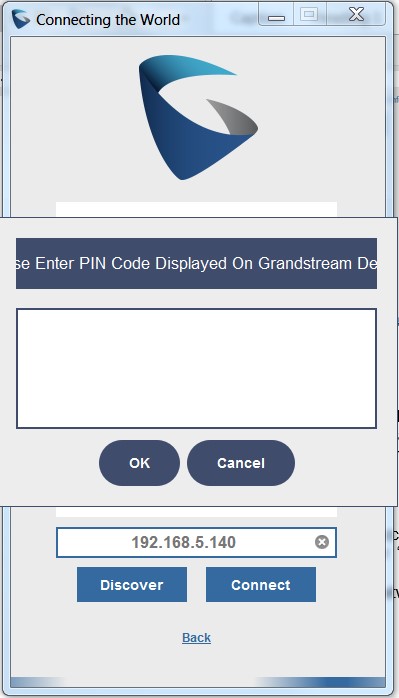
- The CTI application will then proceed to establish and interact with the desired phone and the host phone’s LCD will display a confirmation code (CTI Authentication Code) that users need to enter to achieve the connection as displayed in the following screenshot.
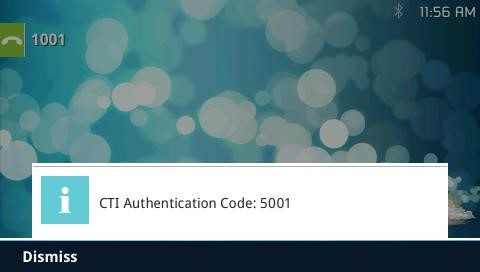
- Enter the CTI authentication code on the GS Affinity application and press OK to establish the connection between the application and the phone.
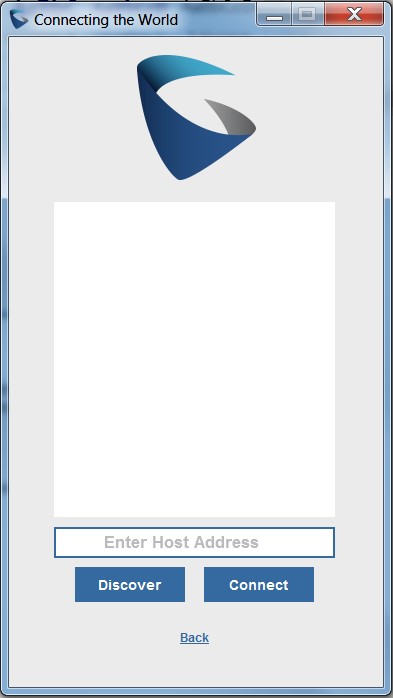
Advanced Connection
Grandstream Affinity also allows the user to discover available hosts on the same network and interact with the host phones via their IP addresses. To do so, users need to access Advanced Connection options by clicking on the Advanced button at the bottom of the page as shown in the following screenshot:
Direct Connect
Direct connect method allows users to establish a connection between the GS Affinity application and the desired phone using its IP address. Please refer to the following steps illustrating how to interact with your phone using the IP address.
- Launch the GS Affinity application.
- Click Advanced to access advanced access options.
- Enter the IP address of the host phone under the “Enter Host Address” field.
- Press Connect to establish a connection between the GS Affinity application and the host phone.
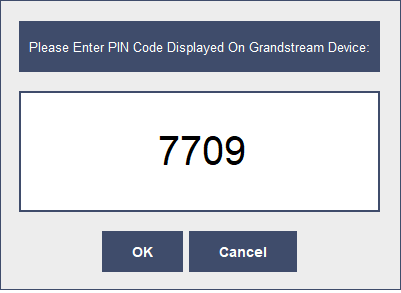
- The host phone’s LCD will display a confirmation code (CTI Authentication Code) that users need to enter in the appropriate field to achieve the connection as displayed in the following screenshots.
Discovery Mode
The discovery method on the Grandstream Affinity application allows users to discover available GXP phones with CTI functionality enabled and lists them.
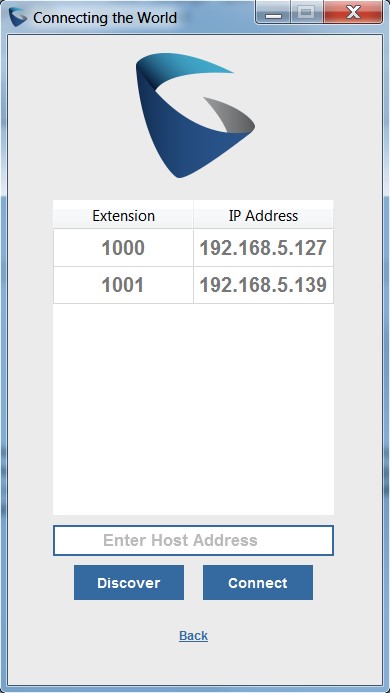
Establishing a Connection
New Connections
After an IP address has been selected, a TCP connection will be established between the Grandstream Affinity application and GXP series. If it is a new connection, the phone will prompt the CTI application to enter a 4-digit passcode displayed on its LCD screen. The user will then have 60 seconds to enter the passcode from the phone’s LCD to the CTI application. If the code is not entered within the time frame, the phone will close the CTI connection.
Existing Connections
When there is already an existing connection between the Grandstream Affinity application and the phone, the host will skip the CTI authentication process and will not prompt a CTI authentication code to configure on the Grandstream Affinity application, permitting the application to directly interact with the host.
GRANDSTREAM AFFINITY OVERVIEW
Home Interface
Once the user establishes a connection between the host phone and Grandstream Affinity application, the dialer page will show up as the main home interface, serving to control and route incoming/outgoing calls and navigate to other tabs on the navigation bar. Please refer to following screenshots and the description of the buttons for the CTI’s call controlling/routing features and the dialing pad.
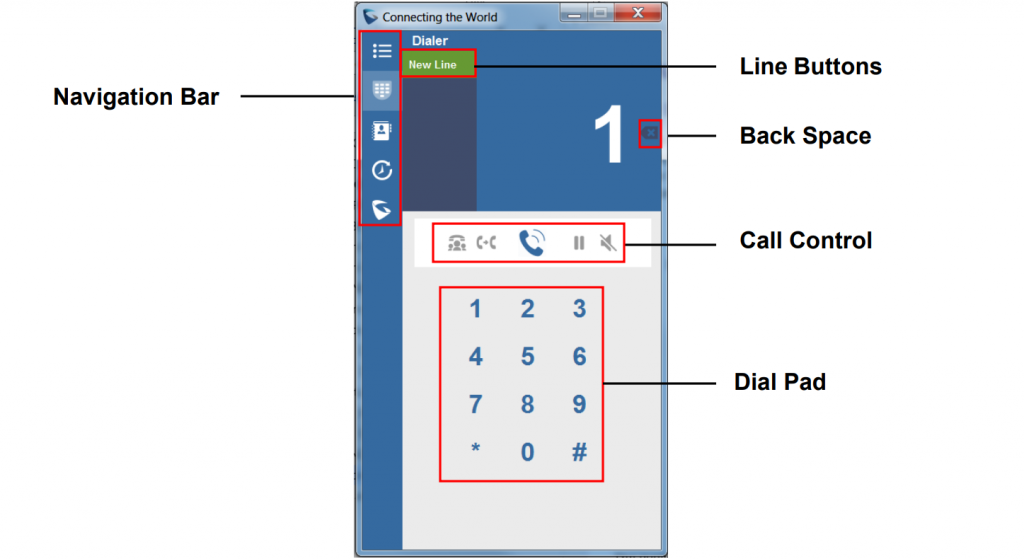
During the dialing state no call is established. When the desired number is configured and the call button is pressed, the CTI application will send a signal to the host phone to initiate the call. The available buttons in the upper portion of the page are line buttons on the top left, and call control/routing command buttons near the midsection of the page. Call control/routing command buttons will only work while on an active line and at appropriate states. If buttons are pressed during an invalid state, the button will not respond. There are also five different icons on the navigation bar representing different pages the user can access.
![]() : Menu page of the CTI application.
: Menu page of the CTI application.
![]() : Main dialing page of the CTI application.
: Main dialing page of the CTI application.
![]() : Contacts page of the CTI application.
: Contacts page of the CTI application.
![]() : Call history page of the CTI application.
: Call history page of the CTI application.
![]() : UCM settings page for the CTI application.
: UCM settings page for the CTI application.
Dialer Page
The dialer page permits initiation of an outgoing call using the call control buttons described below:
Icon | Description |
Call Button: When pressed with a number dialed, the CTI application will attempt to connect the call to the desired number. | |
End Call Button: When pressed during an active call, the CTI application will hang up the current active line call. | |
Mute Button: When pressed during an active connected call, the call/line will be muted. | |
Unmute Button: When pressed during an active call that has been muted, the call/line will be unmuted. | |
Hold Button: When pressed during an active connected call, the call/line will be placed on hold. Can be used to toggle hold on/off. [ht_message mstyle="info" title="Note:" show_icon="" id="" class="" style="" ]All other command buttons will be unresponsive until the line is unheld by pressing the hold button once more.[/ht_message] | |
Transfer Call Button: When pressed during an active connected call, the CTI application will enter the transfer state. | |
Conference Call Button: When pressed during an active connected call, the CTI application will enter the conference state. | |
Accept Button: When pressed during certain actions such call transfer and conference call, the CTI application will proceed and complete the action. | |
Cancel Button: When pressed during certain actions such call transfer and conference call, the CTI application will cancel that action. |
Table 1: Icon Descriptions
The following screenshots give some examples for handling incoming/outgoing calls using the Grandstream Affinity application:

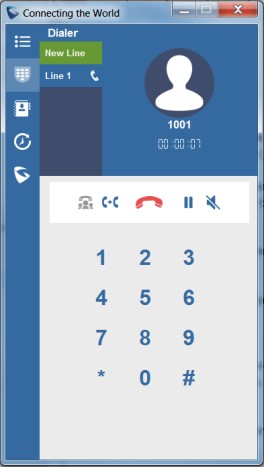
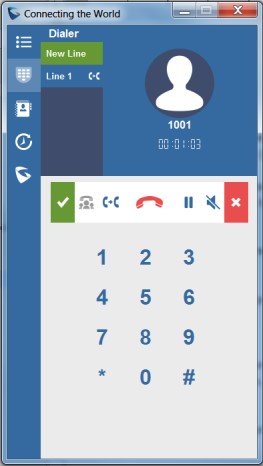
Call Status
Line buttons are shown on the top left of the dialer page, corresponding to the same lines on the host phone. Each button shows the state of the line in use. The following table describes call status:
Call State | Description |
 | Idle new line. |
 | Line button while making an outgoing call. |
 | Line button while receiving an incoming call. |
 | Line with outgoing call. |
 | Line with call put on hold. |
 | Line is muted. |
 | Line during transfer state. |
 | Line in conference call. Note: When the host phone initiates a conference call, it will also display the following indication at the bottom of the Grandstream Affinity application.  |
Table 2: Call State Descriptions
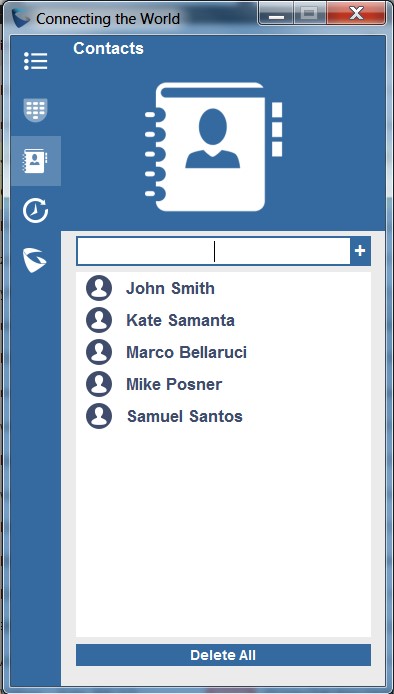
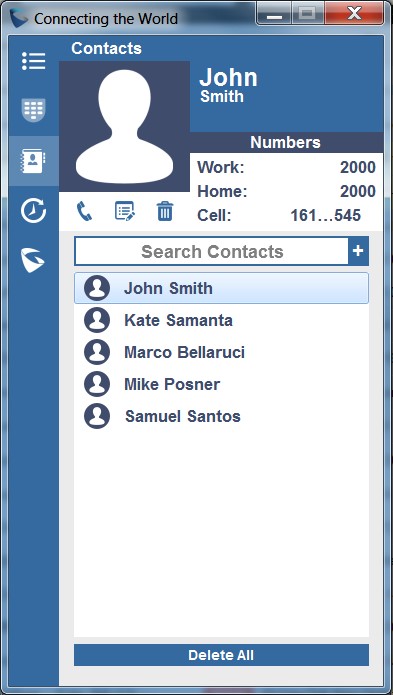
Contacts Management
The contacts page on the Grandstream Affinity application permits the user to view, add, delete, and modify existing contacts on the host phones. The page can list all existing contacts, and allow users to view each contact with his details including profile, name, work, cell, and home numbers if available, and buttons to call, edit, or delete the selected contact.
The user can search for contacts on the text box on top of the contacts list, as well as add a contact using the add contact button![]() to the right of the search text box.
to the right of the search text box.
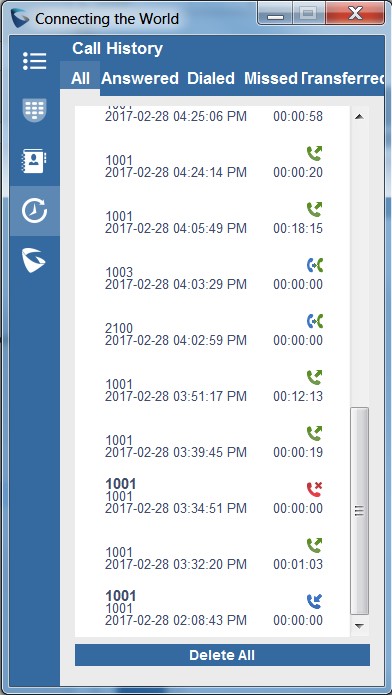
Call History
The Grandstream Affinity application syncs with the call history of the host phone and displays a list of outgoing, incoming, and missed calls. The list shows the name, number, as well as the data and time of the call on the left side of the list while showing the duration and an icon indicating the type of call on the right.
 Answered Calls
 - Dialed Calls
 Missed Calls
 Transferred Calls
Tabs at the top of the page filter the list by each type of call. When an entry of the list is clicked, two additional buttons show up on the right for the ability to add the call to the GXP/GRP/GXV host’s contacts or delete the entry from the list.
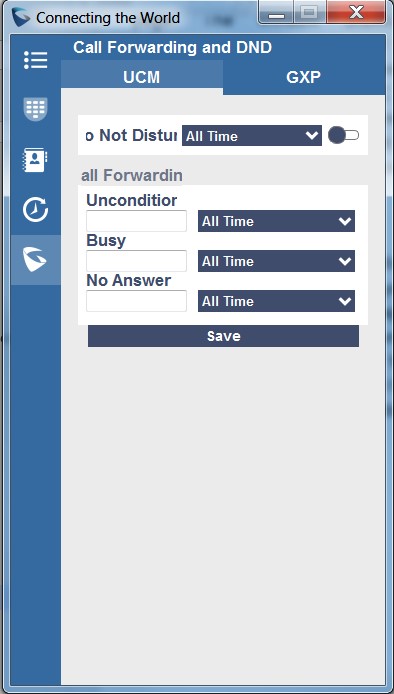
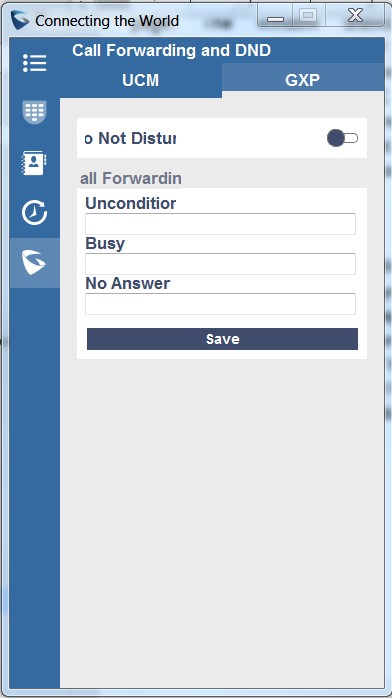
UCM and GXP Settings
Since Grandstream Affinity interacts directly with host phones and the UCM6xxx, the UCM Settings and GXP Settings pages allow the user to perform certain actions related to the UCM account on the host phone. The user can enable “Do Not Disturb” mode on the UCM account, or forward calls to a specific number depending on a certain time and status. All options can be enabled or disabled with the slider.
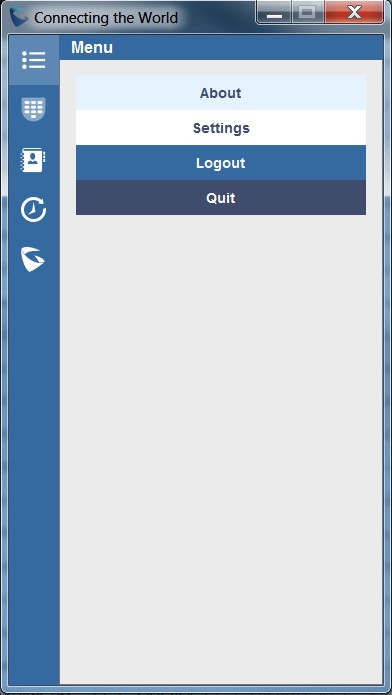
Menu Page
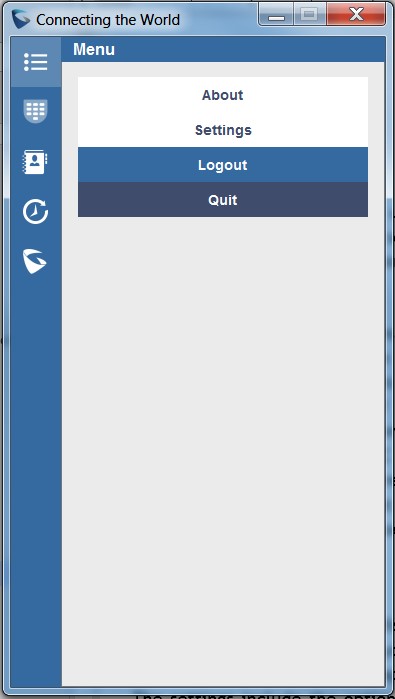
The menu page lets users view the about page, access the settings, and logout of the CTI application.
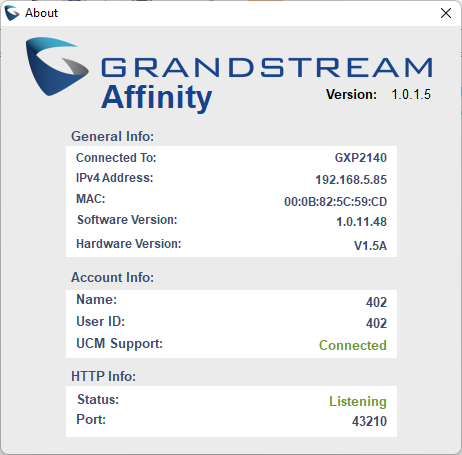
About Page
The about dialog window opens when the “About” option is selected on the menu page. The window shows general information about the host phones that the CTI application is connected to (name, IPv4 Address, MAC address, software version, and hardware version), as well as information about the UCM account of the host (name, user ID, and UCM connection status).
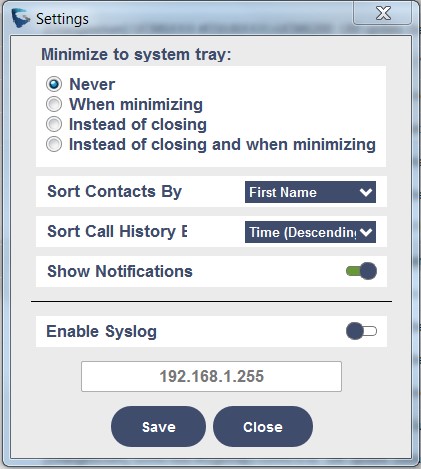
Settings Page
The settings dialog window displays the various modifications that user can enable/disable on the CTI application. The settings include the option for when to minimize the application of the system tray, for saving the host phones address, and for enabling/disabling syslog reporting.
Logout and Quit Grandstream Affinity Application
To log out of or quit the Grandstream Affinity application users need to access the Menu page and click the related button as displayed in the following screenshot.
SUPPORTED DEVICES
The following table shows CTI compatible Grandstream phones and their firmware version:
Model | Supported | Firmware |
GXP17XX Series | ||
GXP1760 | Yes | 1.0.0.45 or higher |
GXP1780 | Yes | 1.0.0.45 or higher |
GXP1782 | Yes | 1.0.0.45 or higher |
GXP21XX Series | ||
GXP2130 | Yes | 1.0.8.36 or higher |
GXP2135 | Yes | 1.0.8.36 or higher |
GXP2140 | Yes | 1.0.8.36 or higher |
GXP2160 | Yes | 1.0.8.36 or higher |
GXP2170 | Yes | 1.0.8.36 or higher |
GRP26xx Series | ||
GRP260x | ||
GRP2614 | Yes | 1.0.5.93 or higher |
GRP2615 | Yes | 1.0.5.93 or higher |
GRP2616 | Yes | 1.0.5.93 or higher |
GRP2624 | Yes | 1.0.5.93 or higher |
GRP2634 | Yes | 1.0.5.93 or higher |
GRP2670 | Yes | 1.0.5.93 or higher |
GXV33xx Series | ||
GXV3370 | Yes | 1.0.3.30 or higher |
GXV3350 | Yes | 1.0.3.30 or higher |
GXV34xx Series | ||
GXV3470 | Yes | 1.0.1.16 or higher |
GXV3450 | Yes | 1.0.1.16 or higher |
GXV3480 | Yes | 1.0.1.16 or higher |
Table 3: Supported Devices
The CTI Application (Grandstream Affinity) interacts with UCM6xxx running FW 1.0.3.14 or higher and Grandstream phones connected to the same network as the computer running the application and the UCM6xxx.