
Thank you for purchasing Grandstream GRP260X Essential IP Phones.
The GRP Series of Essential IP Phones provides simple, easy-to-use devices with zero touch provisioning for mass deployment and easy management. The four devices in the Essential series are designed to offer simple-to-use, affordable desktop IP Phones with a sleek design and next-generation features. Built for the needs of on-site and remote workers and designed for easy deployment by enterprises, service providers and other high-volume markets, these essential IP phones offer an easy-to-use and easy-to-deploy voice endpoint.
PRODUCT OVERVIEW
Feature Highlights
The following tables contain the major features of the GRP260x:
 GRP2601 GRP2601P GRP2601W |
|
 GRP2602 GRP2602P GRP2602W GRP2602G |
|
 GRP2603 GRP2603P |
|
 GRP2604 GRP2604P |
|
GRP260x Features at a glance
Technical Specifications
The following table resumes all the technical specifications including the protocols/standards supported, voice codecs, telephony features, languages, and upgrade/provisioning settings for the GRP260x series.
Protocols/Standards | SIP RFC3261, TCP/IP/UDP, RTP/RTCP, RTCP-XR, HTTP/HTTPS, ARP, ICMP, DNS(A record, SRV, NAPTR), DHCP, PPPoE, SSH, TFTP, NTP, STUN, SIMPLE, LLDP, LDAP, TR-069, SNMP, 802.1x, TLS, SRTP, IPV6 |
Network Interfaces | Dual switched auto-sensing 10/100 Mbps Ethernet ports, integrated PoE (GRP2601P only) |
Graphic Display | 132 x 48 (2.21’’) LCD display |
Wi-Fi | GRP2601W, Single frequency, 2.4 GHz, 802.11 b/g/n/ax (2.4G only) |
Feature Keys | 4 XML programmable context sensitive soft keys, 5 (navigation, menu) keys. 8 dedicated function keys for: MESSAGE (with LED indicator), TRANSFER, HEADSET, MUTE, SEND/REDIAL, SPEAKERPHONE, VOL+, VOL |
Voice Codec | RJ9 headset jack (allowing EHS with Plantronics & Jabra & Sennheiser headsets) |
Auxiliary Ports | RJ9 headset jack (allowing EHS with Plantronics & Jabra & Sennheiser headsets) |
Telephony Features | Hold, transfer, forward, 5-way conference, call park, call pickup, downloadable phonebook (XML, LDAP, up to 2000 items), call waiting, call log (up to 800 records), off-hook auto dial, auto answer, click-to-dial, flexible dial plan, hot-desking, personalized music ringtones and music on hold, server redundancy and fail-over |
Base Stand | Yes, 1 angle positions available |
Wall Mountable | Yes, (*wall mount sold separately) |
QoS | Layer 2 QoS (802.1Q, 802.1P) and Layer 3 (ToS, DiffServ, MPLS) QoS |
Security | User and administrator level passwords, MD5 and MD5-sess based authentication, 256-bit AES encrypted configuration file, SRTP, TLS, 802.1x media access control, secure boot. |
Multi-language | LCD Language: English 简体中文 (Simplified Chinese) العربية (Arabic) Català (Catalan) Čeština (Czech) Deutsch (German) Ελληνικά (Greek) Español (Spanish) Français (French) עברית (Hebrew) Hrvatski (Croatian) Magyar (Hungarian) Italiano (Italian) 日本語 (Japanese) 한국어 (Korean) Latviešu valoda (Latvian) Nederlands (Dutch) Polski (Polish) Português (Portuguese) Русский (Russian) Svenska (Swedish) Slovenščina (Slovenian) Slovenčina (Slovak) Türkçe (Turkish) Українська (Ukrainian) 正體中文 (Traditional Chinese) |
Upgrade/Provisioning | Firmware upgrade via FTP/TFTP / HTTP / HTTPS, mass provisioning using GDMS/TR-069 or AES encrypted XML configuration file |
Power & Green Energy Efficiency | Universal Power Supply Input 100-240VAC 50-60Hz; Output +5VDC, 600mA; PoE: IEEE802.3af Class 1, 3.84W; IEEE802.3az (EEE) (GRP2601P Only) |
Physical | Dimension: 208mm (L) x 180mm (W) x 63.4mm (H) (with handset) Unit weight:650g; Package weight:810g (860g for GRP2601) |
Temperature and Humidity | Operation: 0°C to 40°C Storage: -10°C to 60°C Humidity: 10% to 90% Non-condensing |
Package Content | GRP2601/2601P phone, handset with cord, base stand, universal power supply (GRP2601 only), network cable, Quick Installation Guide |
Compliance | FCC: Part 15 Class B; FCC Part 68 HAC; CE: EN RCM: AS/NZS CISPR32; AS/NZS 62368.1; AS/CA S004; IC: ICES-003; CS-03; |
GRP2601/GRP2601P/GRP2601W Technical Specifications
Protocols/Standards | SIP RFC3261, TCP/IP/UDP, RTP/RTCP, RTCP-XR, HTTP/HTTPS, ARP, ICMP, DNS(A record, SRV, NAPTR), DHCP, PPPoE, SSH, TFTP, NTP, STUN, SIMPLE, LLDP, LDAP, TR-069, SNMP, 802.1x, TLS, SRTP, IPV6 |
Network Interfaces | Dual switched auto-sensing 10/100 Mbps (1000 Mbps for GRP2602G) Ethernet ports, integrated PoE (GRP2602P/GRP2602G only) |
Graphic Display | 132 x 48 (2.21’’) backlit graphical LCD display |
Wi-Fi | Yes, Dual band support (GRP2602W only) |
Feature Keys | 2 SIP account keys with dual-color LED, 4 XML programmable context sensitive soft keys, 5 (navigation, menu) keys. 8 dedicated function keys for: MESSAGE (with LED indicator), TRANSFER, HEADSET, MUTE, SEND/REDIAL, SPEAKERPHONE, VOL+, VOL- |
Voice Codec | Support for G7.29A/B, G.711µ/a-law, G.726, G.722(wide-band), G723, iLBC, OPUS, in-band, and out-of-band DTMF(in audio, RFC2833, SIP INFO), VAD, AEC, CNG, PLC, AGC |
Auxiliary Ports | RJ9 headset jack (allowing EHS with Plantronics & Jabra &Sennheiser headsets) |
Telephony Features | Hold, transfer, forward, 5-way conference, call park, call pickup, shared-call-appearance (SCA)/bridged-line-appearance (BLA), downloadable phonebook (XML, LDAP, up to 2000 items), call waiting, call log (up to 800 records), off-hook auto dial, auto answer, click-to-dial, flexible dial plan, hot-desking, personalized music ringtones and music on hold, server redundancy and fail-over |
HD audio | Yes, HD handset and speakerphone with support for wideband audio |
Base Stand | Yes, 1 angle positions available |
Wall Mountable | Yes, (*wall mount sold separately) |
QoS | Layer 2 QoS (802.1Q, 802.1p) and Layer 3 (ToS, DiffServ, MPLS) QoS |
Security | User and administrator level passwords, MD5 and MD5-sess based authentication, 256-bit AES encrypted configuration file, SRTP, TLS, 802.1x media access control, secure boot |
Multi-language | LCD Language: English 简体中文 (Simplified Chinese) العربية (Arabic) Català (Catalan) Čeština (Czech) Deutsch (German) Ελληνικά (Greek) Español (Spanish) Français (French) עברית (Hebrew) Hrvatski (Croatian) Magyar (Hungarian) Italiano (Italian) 日本語 (Japanese) 한국어 (Korean) Latviešu valoda (Latvian) Nederlands (Dutch) Polski (Polish) Português (Portuguese) Русский (Russian) Svenska (Swedish) Slovenščina (Slovenian) Slovenčina (Slovak) Türkçe (Turkish) Українська (Ukrainian) 正體中文 (Traditional Chinese) |
Upgrade/Provisioning | Firmware upgrade via FTP/TFTP / HTTP / HTTPS, mass provisioning using GDMS/TR-069 or AES encrypted XML configuration file |
Power & Green Energy Efficiency | Universal Power Supply Input 100-240VAC 50-60Hz; Output +5VDC, 600mA; PoE: IEEE802.3af Class 1, 3.84W; IEEE802.3az (EEE) (GRP2602P Only) |
Physical | Dimension: 208mm (L) x 180mm (W) x 63.4mm (H) (with handset) Unit weight: 670g; Package weight:830g (880g for GRP2602) |
Temperature and Humidity | Operation: 0°C to 40°C Storage: -10°C to 60°C Humidity: 10% to 90% Non-condensing |
Package Content | GRP2602 phone, handset with cord, base stand, universal power supply (GRP2602/GRP2602W only), network cable, Quick Installation Guide |
Compliance | FCC: Part 15 Class B; FCC Part 68 HAC; CE: EN RCM: AS/NZS CISPR32; AS/NZS 62368.1; AS/CA S004; IC: ICES-003; CS-03; |
GRP2602/GRP2602P/GRP2602W Technical Specifications
Protocols/Standards | SIP RFC3261, TCP/IP/UDP, RTP/RTCP, RTCP-XR, HTTP/HTTPS, ARP, ICMP, DNS(A record, SRV, NAPTR), DHCP, PPPoE, SSH, TFTP, NTP, STUN, SIMPLE, LLDP, LDAP, TR-069, SNMP, 802.1x, TLS, SRTP, IPV6 |
Network Interfaces | Dual switched auto-sensing 10/100/1000 Mbps Ethernet ports, integrated PoE (GRP2603P only) |
Graphic Display | 132 x 64 backlit graphical LCD display |
Feature Keys | 3 SIP account keys with dual-color LED, 4 XML programmable context sensitive soft keys, 5 (navigation, menu) keys. 9 dedicated function keys for: MESSAGE(with LED indicator), TRANSFER, HOLD, HEADSET, MUTE, SEND/REDIAL, SPEAKERPHONE, VOL+, VOL- |
Voice Codec | Support for G7.29A/B, G.711µ/a-law, G.726, G.722(wide-band),G723,iLBC, OPUS, in-band, and out-of-band DTMF(in audio, RFC2833, SIP INFO), VAD, AEC, CNG, PLC, AGC |
Auxiliary Ports | RJ9 headset jack (allowing EHS with Plantronics & Jabra &Sennheiser headsets) |
Telephony Features | Hold, transfer, forward, 5-way conference, call park, call pickup, shared-call-appearance(SCA)/bridged-line-appearance(BLA), downloadable phonebook (XML, LDAP, up to 2000 items), call waiting, call log (up to 800 records), off-hook auto dial, auto answer, click-to-dial, flexible dial plan, hot-desking, personalized music ringtones and music on hold, server redundancy and fail-over |
HD audio | Yes, HD handset and speakerphone with support for wideband audio |
Base Stand | Yes, 2 angle positions available |
Wall Mountable | Yes, (*wall mount sold separately) |
QoS | Layer 2 QoS (802.1Q, 802.1p) and Layer 3 (ToS, DiffServ, MPLS) QoS |
Security | User and administrator level passwords, MD5 and MD5-sess based authentication, 256-bit AES encrypted configuration file, SRTP, TLS, 802.1x media access control, secure boot |
Multi-language | LCD Language: English 简体中文 (Simplified Chinese) العربية (Arabic) Català (Catalan) Čeština (Czech) Deutsch (German) Ελληνικά (Greek) Español (Spanish) Français (French) עברית (Hebrew) Hrvatski (Croatian) Magyar (Hungarian) Italiano (Italian) 日本語 (Japanese) 한국어 (Korean) Latviešu valoda (Latvian) Nederlands (Dutch) Polski (Polish) Português (Portuguese) Русский (Russian) Svenska (Swedish) Slovenščina (Slovenian) Slovenčina (Slovak) Türkçe (Turkish) Українська (Ukrainian) 正體中文 (Traditional Chinese) |
Upgrade/Provisioning | Firmware upgrade via FTP/TFTP / HTTP / HTTPS, mass provisioning using GDMS/TR-069 or AES encrypted XML configuration file |
Power & Green Energy Efficiency | Universal Power Supply Input 100-240VAC 50-60Hz; Output +5VDC, 600mA;PoE: IEEE802.3af Class 1, 3.84W; IEEE802.3az (EEE) (GRP2603P Only) |
Physical | Dimension: 214mm (L) x 206mm (W) x 68mm (H) (with handset) Unit weight: 780g; Package weight: 1090g for GRP2603P &1140g for GRP2603 |
Temperature and Humidity | Operation: 0°C to 40°C Storage: -10°C to 60°C Humidity: 10% to 90% Non-condensing |
Package Content | GRP2603 phone, handset with cord, base stand, universal power supply (GRP2603 only), network cable, Quick Installation Guide |
Compliance | FCC: Part 15 Class B; FCC Part 68 HAC; CE: EN RCM: AS/NZS CISPR32; AS/NZS 62368.1; AS/CA S004; IC: ICES-003; CS-03; |
GRP2603/GRP2603P Technical Specifications
Protocols/Standards | SIP RFC3261, TCP/IP/UDP, RTP/RTCP, RTCP-XR, HTTP/HTTPS, ARP, ICMP, DNS(A record, SRV, NAPTR), DHCP, PPPoE, SSH, TFTP, NTP, STUN, SIMPLE, LLDP, LDAP, TR-069, SNMP, 802.1x, TLS, SRTP, IPV6 |
Network Interfaces | Dual switched auto-sensing 10/100/1000 Mbps Ethernet ports, integrated PoE (GRP2603P only) |
Graphic Display | 132 x 64 backlit graphical LCD display |
Feature Keys | 3 SIP account keys with dual-color LED, 4 XML programmable context sensitive soft keys, 5 (navigation, menu) keys. 9 dedicated function keys for: MESSAGE(with LED indicator), TRANSFER, HOLD, HEADSET, MUTE, SEND/REDIAL, SPEAKERPHONE, VOL+, VOL- |
Voice Codec | Support for G7.29A/B, G.711µ/a-law, G.726, G.722(wide-band),G723,iLBC, OPUS, in-band, and out-of-band DTMF(in audio, RFC2833, SIP INFO), VAD, AEC, CNG, PLC, AGC |
Auxiliary Ports | RJ9 headset jack (allowing EHS with Plantronics & Jabra & Sennheiser headsets) |
Telephony Features | Hold, transfer, forward, 5-way conference, call park, call pickup, shared-call-appearance(SCA)/bridged-line-appearance(BLA), downloadable phonebook (XML, LDAP, up to 2000 items), call waiting, call log (up to 800 records), off-hook auto dial, auto answer, click-to-dial, flexible dial plan, hot-desking, personalized music ringtones and music on hold, server redundancy and fail-over |
HD audio | Yes, HD handset and speakerphone with support for wideband audio |
Base Stand | Yes, 2 angle positions available |
Wall Mountable | Yes, (*wall mount sold separately) |
QoS | Layer 2 QoS (802.1Q, 802.1p) and Layer 3 (ToS, DiffServ, MPLS) QoS |
Security | User and administrator level passwords, MD5 and MD5-sess based authentication, 256-bit AES encrypted configuration file, SRTP, TLS, 802.1x media access control, secure boot |
Multi-language | LCD Language: English 简体中文 (Simplified Chinese) العربية (Arabic) Català (Catalan) Čeština (Czech) Deutsch (German) Ελληνικά (Greek) Español (Spanish) Français (French) עברית (Hebrew) Hrvatski (Croatian) Magyar (Hungarian) Italiano (Italian) 日本語 (Japanese) 한국어 (Korean) Latviešu valoda (Latvian) Nederlands (Dutch) Polski (Polish) Português (Portuguese) Русский (Russian) Svenska (Swedish) Slovenščina (Slovenian) Slovenčina (Slovak) Türkçe (Turkish) Українська (Ukrainian) 正體中文 (Traditional Chinese) |
Upgrade/Provisioning | Firmware upgrade via FTP/TFTP / HTTP / HTTPS, mass provisioning using GDMS/TR-069 or AES encrypted XML configuration file |
Power & Green Energy Efficiency | Universal Power Supply Input 100-240VAC 50-60Hz; Output +5VDC, 600mA;PoE: IEEE802.3af Class 2, 3.84W-6.49W; IEEE802.3az (EEE) (GRP2604P Only) |
Physical | Dimension: 208mm (L) x 180mm (W) x 63.4mm (H) (with handset) Unit weight: 670g; Package weight:830g (880g for GRP2602) |
Temperature and Humidity | Operation: 0°C to 40°C Storage: -10°C to 60°C Humidity: 10% to 90% Non-condensing |
Package Content | GRP2604 phone, handset with cord, base stand, universal power supply (GRP2604 only), network cable, Quick Installation Guide |
Compliance | FCC: Part 15 Class B; FCC Part 68 HAC; CE: EN RCM: AS/NZS CISPR32; AS/NZS 62368.1; AS/CA S004; IC: ICES-003; CS-03; |
GRP2604/GRP2604P Technical Specifications
GETTING STARTED
This chapter provides basic installation instructions including the list of the packaging contents and information for obtaining the best performance with the GRP260x phone.
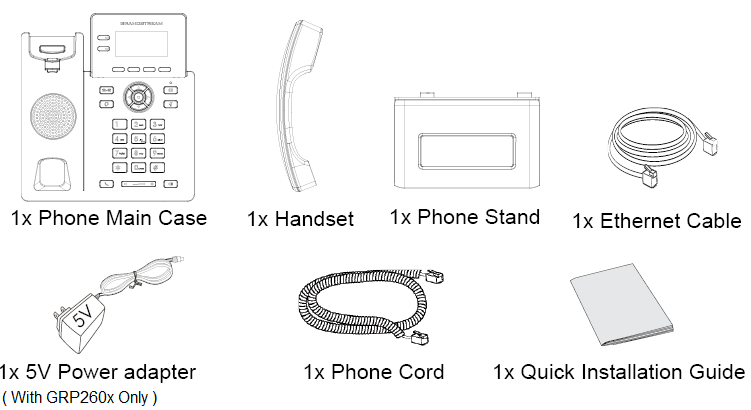
Equipment Packaging
GRP260X |
|
Connecting and Setting Up the GRP260x
The GRP260x phones can be installed on the desktop using the phone stand or attached on the wall using the slots for wall mounting.
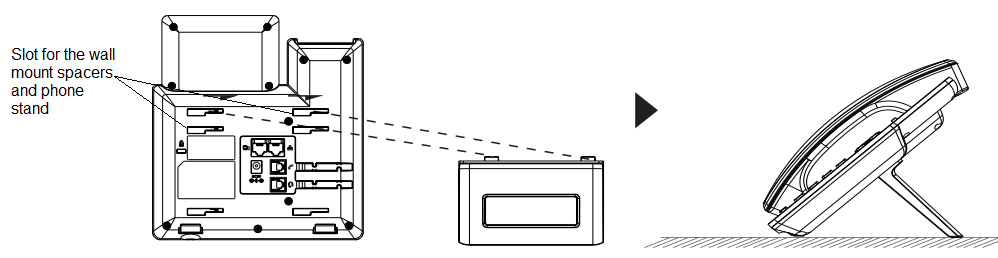
Using the Phone Stand
To install the phone on the table with the phone stand, attach the phone stand to the bottom of the phone through the phone stand slot. (Upper half, bottom part).
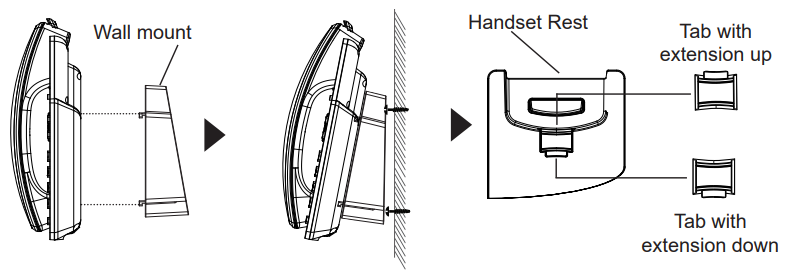
Using the Slots for Wall Mounting
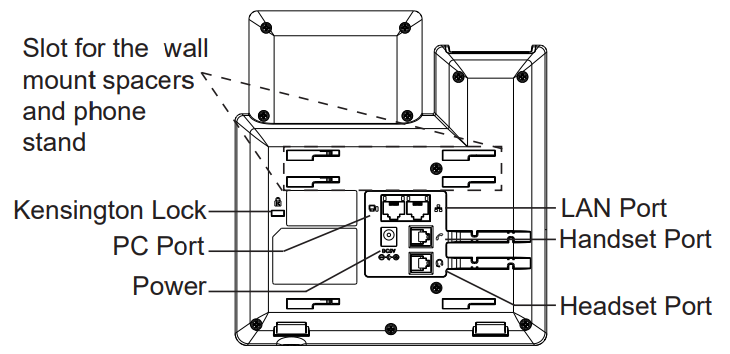
1. Attach the wall mount spacers to the slot for wall mount spacers on the back of the phone.
2. Attach the phone to the wall via the wall mount hole.
3. Pull out the tab from the handset cradle (See figure below).
4. Rotate the tab and plug it back into the slot with the extension up to hold the handset while the phone is mounted on the wall (see figure below).
Connecting the GRP260x
To set up the GRP2600, follow the steps below:
1. Connect the handset and main phone case with the phone cord.
2. Connect the LAN port of the phone to the RJ-45 socket of a hub/switch or a router (LAN side of the router) using the Ethernet cable.
3. Connect the PSU output plug to the power jack on the phone; plug the power adapter into an electrical outlet. If a PoE switch is used in step 2 (GRP2601P/GRP2602P/GRP2603P/GRP2604P only), this step could be skipped.
4. The LCD will display the Grandstream logo. Before continuing, please wait for the date/time display to show up.
5. Using the phone embedded web server or keypad configuration menu, you can further configure the phone using either a static IP or DHCP.
Connecting to Wi-Fi Network (GRP2602W only)
– On the LCD menu, navigate to “Settings 🡪 Wi-Fi settings” and enable Wi-Fi.
– Select “Wi-Fi Network” and GRP2602W will automatically start scanning within the range.
– A list of Wi-Fi networks will be displayed. Select the desired network, and if required, enter the correct password to connect.
– Users can add and connect to a hidden network by accessing “Wi-Fi” Network” and then press on Add softkey
![]() . Then enter the Network’s information.
. Then enter the Network’s information.
Notes:
- When the GPR2602W is not connected to any network (including Ethernet and Wi-Fi), a prompt interface will pop up to notify users about it. Users can quickly enter the “Wi-Fi Network” page by pressing on the Wi-Fi softkey.
- For easy deployment, The GRP2602W is preconfigured out of the box to connect to a default SSID named wp_master with a password (WPA/WPA2 PSK) equal to wp!987@dmin, users can adapt these settings from the web UI as well to make it easier for deployment on customer site.
- Admin authentication is required for LCD Menu Wi-Fi connections on GRP2602W.
GETTING TO KNOW GRP260X
Idle Screen
GRP260x screen displays differently depending on whether the phone is idle or in use (active). The following figures show the idle screen of GRP260x.
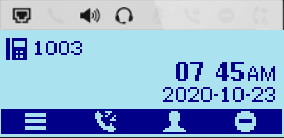
The following table describes the items displayed on the GRP260x idle screen:
Date and Time | Displays the current date and time. It can be synchronized with Internet time servers. |
Network icon | Shows the status of network. It will indicate whether the network is down or starting. |
Status icon | Shows the status of the phone for registration status, call features etc., using icons as shown in the next table. |
Line status indicator | Displays the name of the account that is in use. |
Softkeys in idle screen | The softkeys are context sensitive and will change depending on the status of the phone. Default functions assigned to softkeys are:
Note: The Idle Screen Softkey can be customized under web UI > Programmable Keys > Idle Screen Softkeys > Custom Softkey Layout |
Softkeys in call screen | The softkeys are context sensitive and will change depending on the call status of the phone. Here are the main softkeys in call screen.
|
LCD Display Definitions
Registered Account | Warning | ||
Registered SCA Account | Info | ||
Unregistered account / account is not available | Detail | ||
Calling / Dialing / Accept | The first page | ||
Incoming Call | The second page | ||
Dial | Line Switch Indicator | ||
Call failed / Missed Call | Line Switch Indicator | ||
Held | Right arrow | ||
Talking | Switch_Off | ||
Edit before dialing | Switch_On | ||
Dial DTMF | Mixed Input Method (Default) | ||
New Call | Capital Letter Input Method | ||
Redial | Lowercase Input Method | ||
Call Return | Digital Input Method | ||
Hang up | Settings / Configuration | ||
Call Waiting | Call Center Account available | ||
Speed Dial/Speed Dial via Active Account | Speed Dial/Speed Dial via Active Account | ||
Transfer | Multicast Listen | ||
Call Forward All | Close Call Forward All | ||
Call History | BS Contacts | ||
Blocked Calls | Blocked Calls | ||
Contact | Call Park | ||
New Contact / Invite | Call Pick | ||
Delete Contact / Remove | Delete Contact / Remove | ||
Group | Ringtone Off | ||
New Group | Logout | ||
Group Members | Recording Pause | ||
Blacklist | Conference Hold | ||
Remove from Blacklist | Conference Talking | ||
Clear all Blacklist | Hoteling | ||
Conference | Remote Search | ||
Incoming Cloud Conference | Sort | ||
Outgoing Cloud Conference | Noise Shield | ||
Missed Cloud Conference | Noise Shield Off | ||
GDS Door | More | ||
GDS Door Open | Lock Screen | ||
Hold | Unlock Screen | ||
UnHold | Voicemail Unread | ||
Recording On | Play | ||
Recording Off | Stop | ||
Power Off | Play Status | ||
DND | Stop Status | ||
Menu | Mark as Unread | ||
Back | Mark as Read | ||
Download | Mark All as Read | ||
Mark All as Read | Bridge | ||
Downloading | Share | ||
Upgrade System | Call Pull | ||
Edit | Password / Lock Status | ||
Delete | Add | ||
Delete All | Wi-Fi | ||
Refresh | Wi-Fi 5G Excellent | ||
More (page select) | Wi-Fi 5G Good | ||
LDAP Search | Wi-Fi 5G Fair | ||
Search | Wi-Fi 5G Poor | ||
OK / Save | Wi-Fi 2.4G Excellent | ||
Cancel | Wi-Fi 2.4G Good | ||
Backspace | Wi-Fi 2.4G Fair | ||
Switch / Convert | Wi-Fi 2.4G Poor | ||
Text Message | Wi-Fi Excellent | ||
New Text Message | Wi-Fi Good | ||
Speaker | Wi-Fi Fair | ||
Login | Wi-Fi Poor | ||
Ringtone | Wi-Fi Disconnect | ||
Ringtone Off | Connect | ||
Headset | Disconnect / Forget | ||
Voicemail | UnRegistered SCA Account | ||
Intercom | Mark All as Unread | ||
Single Box | Noise Filtering | ||
Checkbox not selected | Noise Filtering Off | ||
Checkbox selected | Noise Filtering Status | ||
Speaker Off |  | Energy Saving Mode enabled |
GRP260X LCD Icons
Using the Keypad
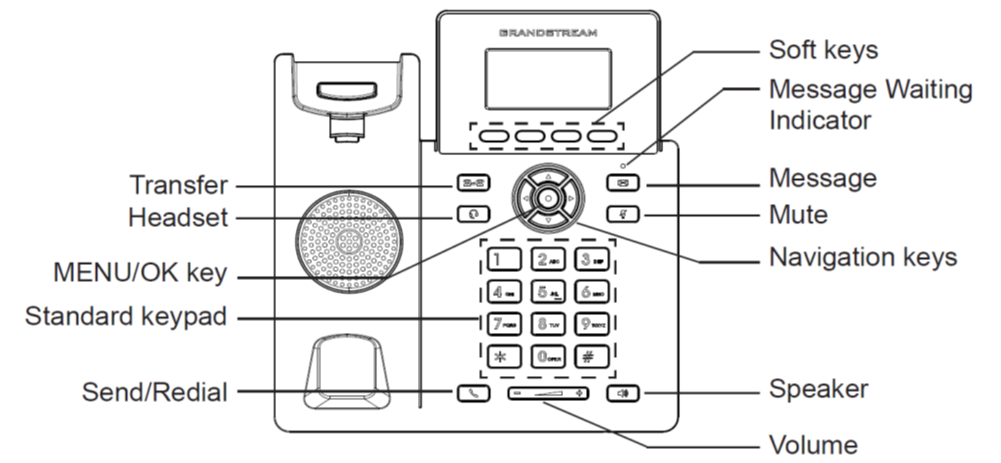
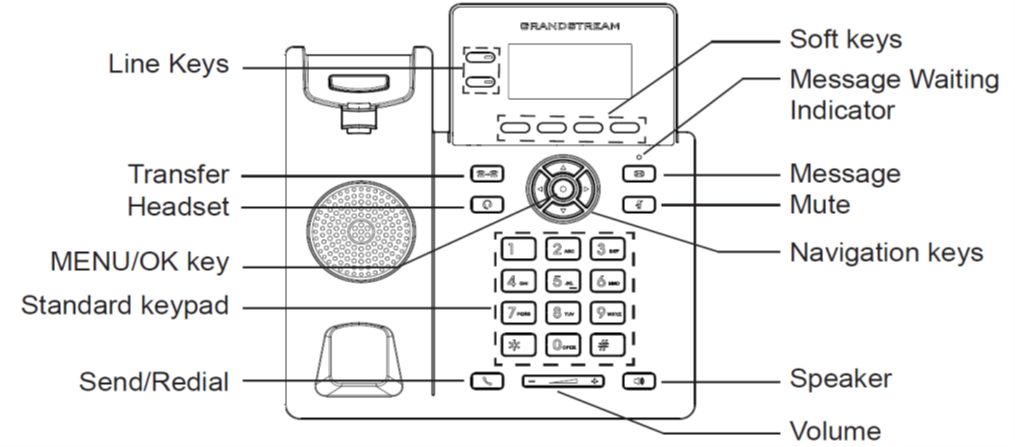
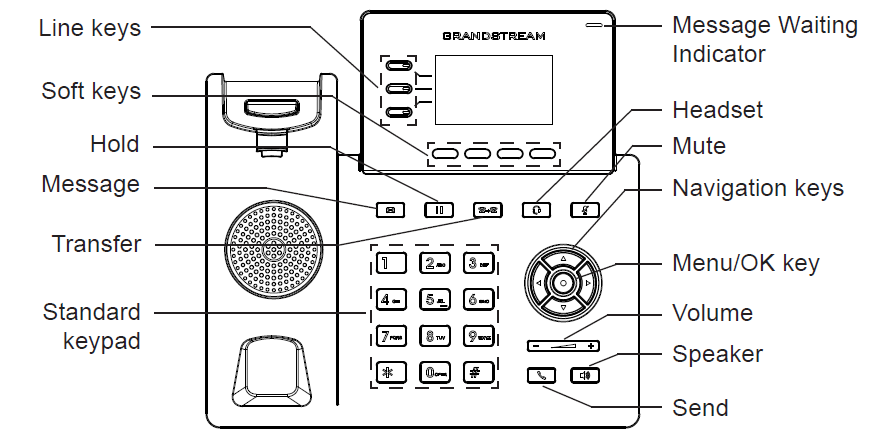
 | Hold: Press to put call on hold or resume the call. |
 | Mute:
|
 | Headset: Press to switch between headset and handset mode in an active call. |
 | Message: Press to view voicemail messages. |
 | Transfer: Press to transfer an active call to another number. |
 | Speaker: Press to switch between speaker and handset mode in an active call. |
 | Send/Redial |
 | Volume: Adjust volume. |
 | Navigation keys:
|
MENU button:
|
GRP260x Keypad Buttons
Configuration via Keypad
To configure the LCD menu using the phone’s keypad, follow the instructions below:
- Enter MENU options. When the phone is in idle, press the round MENU button or Menu Softkey
 to enter the configuration menu.
- Navigate in the menu options. Press the arrow keys UP/DOWN keys to navigate in the menu options.
- Enter/Confirm selection. Press the round MENU to enter the selected option.
- Exit. Press Return Softkey
to exit to the previous menu.
- Return to Home page.
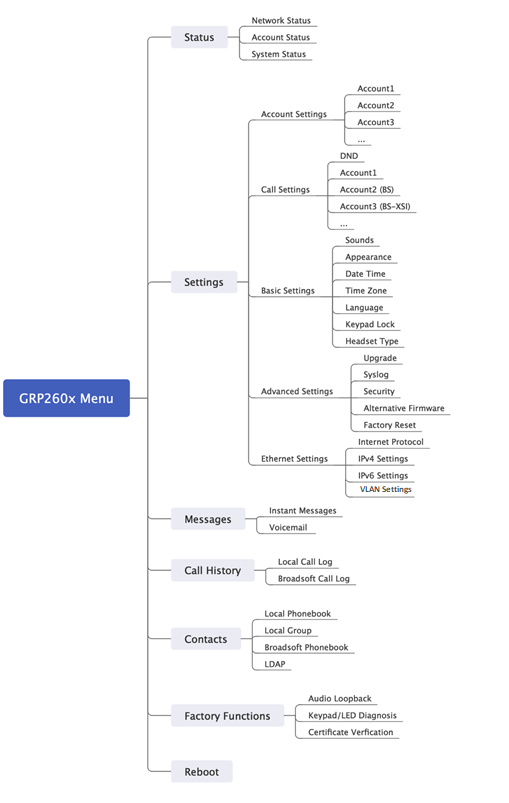
The MENU options are listed in the following table.
Status | Displays account status, network status, software version number and Hardware:
|
Settings | Settings sub menu contains the following options: - Account Settings: Enable/Disable SIP account, Configures Account Name, SIP server’s address, SIP User ID, SIP Auth ID, SIP Password, Outbound Proxy, and Voice Mail Access Number. - Call Settings: Enable/Disable DND, Enable Disable Auto Answer for SIP account, Enable/Disable Call Forward (Forward All/Busy/No Answer). - Basic Settings:
- Advanced Settings:
- Ethernet Settings:
- Wi-Fi Settings (GRP2602W only):
|
Messages |
|
Call History | Displays Local Call Logs: “All” Calls / “Missed” Calls/ “Dialed” Calls/ “Answered” Calls. |
Contacts | Contacts sub menu includes the following options:
User could configure phonebooks/groups options here, download phonebook XML to the phone and search and dial from the local phonebook and search and dial from LDAP phonebook. |
Factory Functions | Factory Functions sub menu includes the following options:
|
UCM Detect | Configures the IP address and port of the UCM on which the IP phone can be registered. |
Factory reset | Performs a Factory reset on the phone. |
Reboot | Reboots the phone. |
Configuration Menu
The following picture shows the keypad MENU configuration flow:
Characters Input
The GRP260x keypad can be used by tapping on an input field. GRP260x keypad has 4 modes “123”, “ABC”, “abc” and “Ab2”. The default mode is “Ab2”. Note: If the input field is accepting only digits, only “123” mode will be available.
- “123” Mode: This mode allows to enter digits and:.
The following table describes the allowed characters for each key.
Key | Description | Key | Description | Key | Description |
1 | 1 | 2 | 2 | 3 | 3 |
4 | 4 | 5 | 5 | 6 | 6 |
7 | 7 | 8 | 8 | 9 | 9 |
* | . | 0 | 0 | # | : |
Characters Input ABC Mode
- “ABC” Mode: This mode allows to enter capital letters, digits, and symbolic characters.
The following table describes the allowed characters for each key.
Key | Description | Key | Description | Key | Description |
1 | 1 . : @ + , ' " - ? ! ( ) / _ ; % = < > $ [ ] { } ~ ^ | ` & | 2 | A B C 2 | 3 | D E F 3 |
4 | G H I 4 | 5 | J K L 5 | 6 | M N O 6 |
7 | P Q R S 7 | 8 | T U V 8 | 9 | W X Y Z 9 |
* | * | 0 | 0 | # | # |
Characters Input: ABC Mode
- “abc” Mode: This mode allows to enter small letters, digits, and symbolic characters.
The following table describes the allowed characters for each key.
Key | Description | Key | Description | Key | Description |
1 | 1 . : @ + , ' " - ? ! ( ) / _ ; % = < > $ [ ] { } ~ ^ | ` & | 2 | a b c 2 | 3 | e d f 3 |
4 | g h i 4 | 5 | j k l 5 | 6 | m n o 6 |
7 | p q r s 7 | 8 | t u v 8 | 9 | w x y z 9 |
* | * | 0 | 0 | # | # |
Characters Input: abc Mode
- “Ab2” Mode: This mode allows to enter capital letters, small letters, digits, and symbolic characters.
The following table describes the allowed characters for each key.
Key | Description | Key | Description | Key | Description |
1 | 1 . : @ + , ' " - ? ! ( ) / _ ; % = < > $ [ ] { } ~ ^ | ` & | 2 | A B C a b c 2 | 3 | D E F e d f 3 |
4 | G H I g h i 4 | 5 | J K L j k l 5 | 6 | M N O m n o 6 |
7 | P Q R S p q r s 7 | 8 | T U V t u v 8 | 9 | W X Y Z w x y z 9 |
* | * | 0 | 0 | # | # |
Ab2 Mode
TELEPHONY FEATURES
Make Phone Calls
Handset, Speaker, and Headset Mode
The GRP260X allows users to switch between handset, speaker, or headset when making calls. Press the Hook Switch to switch to the handset; press the Headset button  to switch to headset mode, or press the Speaker button
  to switch to speaker.
Multiple SIP Accounts and Lines
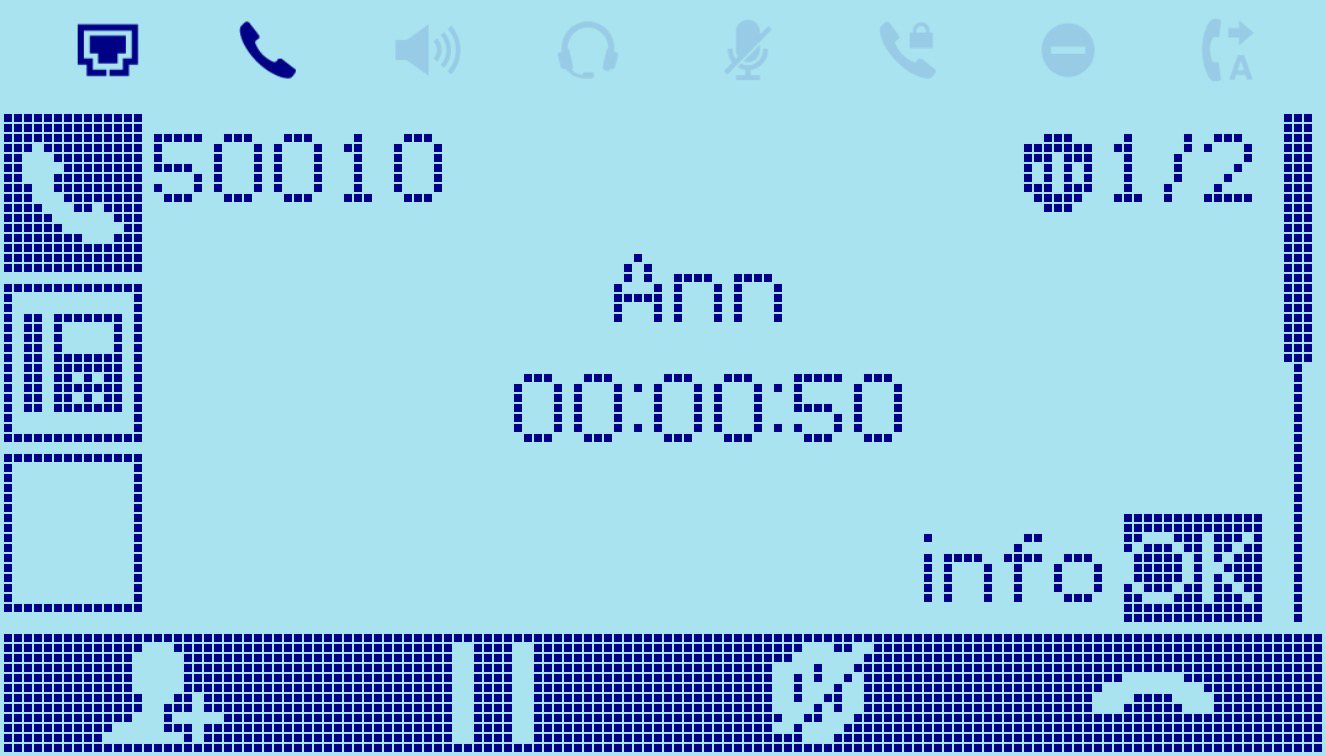
The GRP2601 supports 2 SIP accounts and 2 lines; GRP2602 supports up to 4 SIP accounts with 2 line keys; GRP2603/GRP2604 supports up to 6 SIP accounts with 3 line keys. Each account is capable of independent SIP server, user, and NAT settings. In off-hook state, select an idle line and the dial tone will be heard. To make a call, select the line you wish to use. The corresponding LINE LED will light up in green. The user can switch lines before dialing any number by pressing the LINE buttons.
Since the GRP260x can have more SIP accounts than the supported lines, the phone is supporting two line key modes; “Line mode” and “Account mode”. The main difference between the two is that during calls each line key displays the status of a call line in “Line Mode”; while in “Account mode”, available accounts will be displayed in each line key, which is handy in case multiple accounts are using the same line, there will be also the Header and name/number displayed. The figures below show the examples and differences in call screens between the two modes:
Line mode: Each line key is displaying the status of a call line
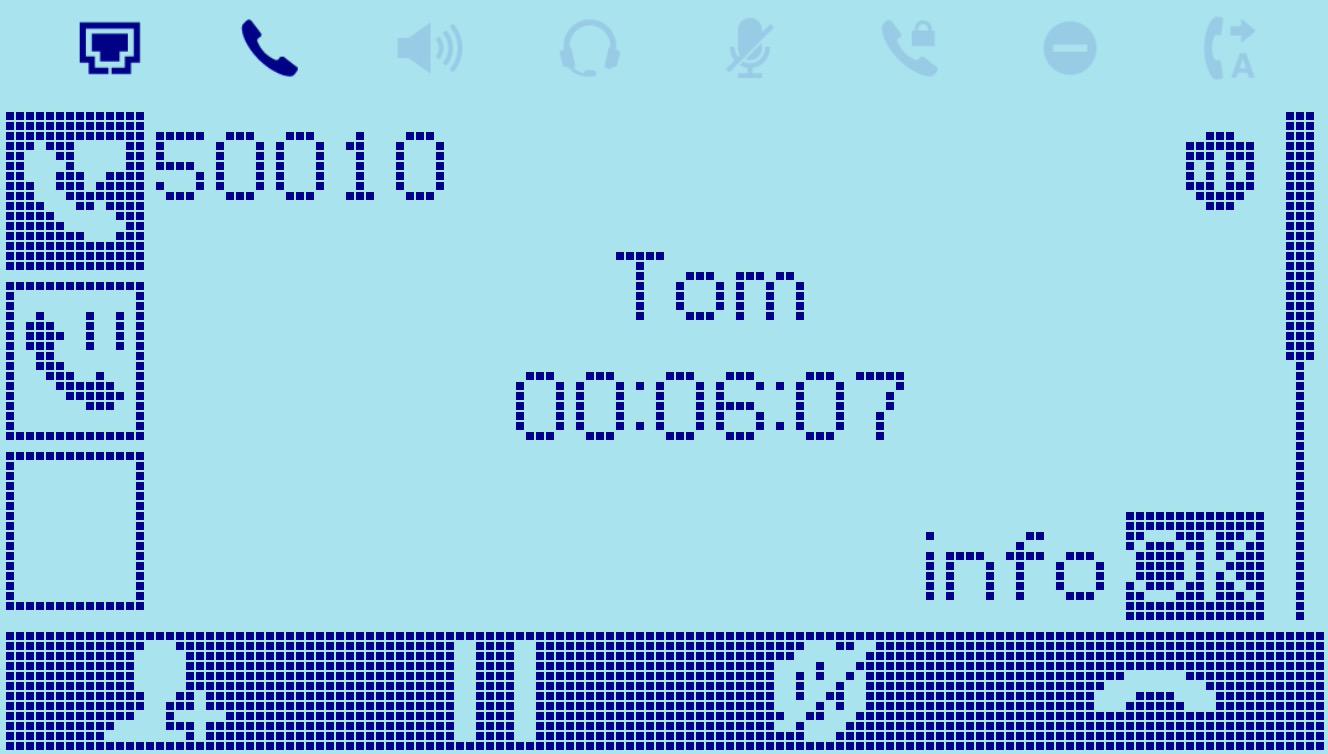
Account mode: An available account is displayed in each Line key. Users can view the current line and the number of all lines in the upper right corner of the call interface.
The key mode setting can be configured from the phone’s Web GUI 🡪 Phone Settings 🡪 Call Settings.
SIP URI Calls
SIP URIs typically look like this: sip:username@domain.com. When you enter a SIP URI into the GRP260x, it will use the SIP protocol to connect to the specified SIP server or destination, allowing you to establish voice or video calls over the internet.
Example: You have an IP phone in your office, and you want to call a colleague, John Doe, who is also using an IP phone, but he’s located in a different office within your organization. John’s SIP URI is sip:johndoe@companyvoip.com, on the GRP260x, instead of dialing a traditional phone number or an extension, you enter John’s SIP URI into the dialing interface, which looks like sip:johndoe@companyvoip.com.
Completing Calls
There are several ways to complete a call.
- On-hook dialing. Enter the number when the phone is on-hook and then send it out.
- When the phone is idle, enter the number to be dialed out;
- Take the handset off-hook, or Press the Speaker button, or Press the Headset button with the headset plugged in.
- The call will be dialed out.
- Off-hook and dial. Off-hook the phone, enter the number, and send it out.
- Take handset off-hook; or
- You shall hear dial tone after off-hook;
- Enter the number;
- Press SEND or # keys to dial out.
- Predictive dialing. When dialing numbers, based on the entered digit, the phone will predict and list the candidates of the target number.
If the target number is already saved in the phonebook or call history, when entering the first several digits, the phone will display a list of matching numbers. If the target number appears on the list, the user could select the number using the Up/Down key and dial out. GRP260x has a predefined call feature code (the first digit is *). When the user enters * as the first digit of the target number, the phone will list all the available feature codes.
- Redial. Redial the last dialed number.
- Take handset off-hook; or
- Press the Speaker button; or
- Press the Headset button with the headset plugged in; or
- Press an available LINE key to activate the speaker; or
- When the phone is in an idle state;
- Press SEND key, and the last number called will be redialed.
- Via Call History. Dial the number logged in the phone’s call history.
- Press the MENU button to bring up the main menu then enter Call History; or
- Press the “History” soft key when the phone is in an idle state;
- Select the entry you would like to call using the navigation arrow keys;
- Press SEND button to dial out.
- Via Phonebook. Dial the number from the phonebook.
- Press the MENU button to bring up the main menu then enter Contacts; or
- Press the “Contacts” soft key when the phone is in an idle state;
- Enter Local / BS Phonebook using the navigation arrow keys;
- Select the contact you would like to call
- Press SEND button to dial the selected contact.
Notes:
- After entering the number, the phone waits for the No Key Entry Timeout (Default timeout is 4 seconds, configurable via Web GUI) before dialing out. Press SEND or # key to override the No Key Entry Timeout;
- If digits have been entered after taking the handset off-hook, the SEND key will work as SEND instead of showing the history of Dialed extensions;
- (#) or (*) can be chosen as send keys from WEB GUI 🡪 Accounts 🡪 Account X 🡪 Call Settings 🡪 Key as Send.
- During an active call, users can see the call info on LCD:
– The call lasting time
– Contact information if the number is already saved in the phonebook. - An alert tone is generated when the device is initiating a multicast paging and when receiving a multicast paging
Making Calls using IP Addresses
Direct IP Call allows two phones to talk to each other in an ad-hoc fashion without a SIP proxy. VoIP calls can be made between two phones if:
- Both phones have public IP addresses; or
- Both phones are on the same LAN/VPN using private or public IP addresses; or
- Both phones can be connected through a router using public or private IP addresses (with necessary port forwarding or DMZ).
To make a direct IP call, please follow the steps below:
- Press Hook Switch/Speaker or Headset button to bring out the dialing screen.
- Input the 12-digit target IP address (Please see the example below).
- Press the “Dial” softkey to dial.
For example:
If the target IP address is 192.168.1.60 and the port is 5062 (i.e., 192.168.1.60:5062), input the following: 192*168*1*60#5062. The * key represents the dot (.), and the # key represents the colon (:).
When only dialing the IP address (example: 192*168*1*60) the call will automatically go through the default port 5060.
Answering Phone Calls
Receiving Calls
- Single incoming call.
The phone rings with the selected ring tone. The corresponding LINE key LED will flash in red for GRP2602(P/G/W)/GRP2603(P)/GRP2604(P) models,,the screen will indicate an incoming call as well. Answer call by taking handset off hook, or using Speaker/Headset, or pressing Answer softkey ![]() .
.
- Multiple incoming calls
When another call comes in while having an active call, the phone will produce a Call Waiting tone (stutter tone). The other LINE key will flash in red (GRP2602/GRP2603/2604). Answer the incoming call by pressing on the Answer softkey or the flashing LINE key in the case of GRP2602/GRP2603/GRP2604. The current active call will be put on hold automatically. Users can switch between the calls using the UP/DOWN keys.
Do Not Disturb
Do Not Disturb can be enabled/disabled from the phone’s LCD by following the steps below:
- Press the Menu button and navigate to “Settings 🡪 Call Settings 🡪 Do Not Disturb”.
- Use RIGHT/LEFT keys to disable/enable DND;
- Press the “Save” softkey to save the change
Users could also enable/disable DND quickly by pressing the Mute button  or DND softkey
 ![]() .
.
DND Icon will be displayed on the top right of the status bar indicating that DND is enabled. Incoming calls will not be accepted, or the call will directly go into voicemail.
Notes:
- The mute button function can be set also to idle Mute instead of DND or be disabled under the web GUI option Phone Settings 🡪 Call Settings 🡪 Mute Key Function While Idle.
- During an active call, press the MUTE button to mute/unmute the microphone. The LCD will show the Mute icon on the top of the screen when the call is muted.
Add Contact to Blacklist
If the contact number belongs to the Blacklist group, the call from that number will always be blocked.
Users can add a contact to the blacklist by accessing the local phonebook and selecting the contact in question and then pressing on the blacklist softkey ![]() , A confirmation message “Add this contact to Blacklist?” will be displayed on the screen, the contact will be added to the blacklist by pressing on the “Save” softkey.
, A confirmation message “Add this contact to Blacklist?” will be displayed on the screen, the contact will be added to the blacklist by pressing on the “Save” softkey.
To unblock a contact, users need to select the contact in question from the phonebook and then press on unblock softkey ![]() .
.
During a Phone Call
Call Waiting/Call Hold
Users can place a call on hold by pressing the HOLD softkey
![]() during an ongoing call. The active LINE key will blink in green (GRP2602/GRP2603/GRP2604). The call can be resumed by pressing on the Hold softkey again.
during an ongoing call. The active LINE key will blink in green (GRP2602/GRP2603/GRP2604). The call can be resumed by pressing on the Hold softkey again.
When there is a new call, the call screen will display the new incoming call information, and the Call waiting tone (stutter tone) will be audible during the active call, Use the UP/DOWN keys to switch between the two calls screens.
Users can choose whether to answer the new call using the Answer softkey ![]() , Reject the call using the Reject softkey
, Reject the call using the Reject softkey ![]() , forward the call using the Transfer/Forward softkey
, forward the call using the Transfer/Forward softkey ![]() or mute /silence the call using the silence softkey
or mute /silence the call using the silence softkey ![]() . When silence softkey is pressed, the call waiting tone will be muted.
. When silence softkey is pressed, the call waiting tone will be muted.
Notes:
- If “On Hold Reminder Tone” is Enabled under web GUI “Account X🡪 Advanced settings then a reminder tone will be played to notify the user that he has a call on hold.
- If the “Enable call Waiting” Option is set to NO on WEB GUI under Account X 🡪 Call Settings the second incoming call will be rejected.
Mute
During an active call, press the MUTE button  to mute/unmute the microphone. The LCD will show the Mute icon on the top of the screen when the call is muted.
Call Transfer
GRP2601/GRP2602/GRP2603/GRP2604 supports Blind Transfer and Attended Transfer:
- Blind Transfer.
- During an active call, press the TRANSFER button
 , or the icon
  to display more softkeys then press the transfer softkey
  .
. - Dial Transfer destination number.
- Press Transfer softkey to complete transfer of the active call.
 , or the icon
 - Attended Transfer.
- During an active call, press the TRANSFER button ,or the icon to display more softkeys then press the transfer softkey
- Dial Transfer destination number and press on dial softkey.

- The first call will be put on hold and a new call will be initiated with the transfer destination.
- When the second call is answered, Users could press on the Switch softkey
 to switch to the initial call (The second call will be put on hold) or press on transfer softkey to complete the transfer.
 ,or the icon
 Notes:
- To transfer calls across SIP domains, SIP service providers must support transfer across SIP domains.
- When the” Hold Call before Completing Transfer” Option is set to “No” on the WEB GUI, the phone will neither hold the current call in the transfer window nor hold the call with the transfer target before referring the call in the attended transfer.
- The Attended Transfer can be finished by on-hooking the phone.
Call Forwarding
When there is an incoming call, users could choose to not take the call and forward it to another number instead by pressing on the Forward /Transfer softkey and then dial the forward target number and press on again, the call will be then immediately forwarded to that number.
Establish Conferencing calls
The GRP260x can host up to 5 conference calls.
Initiate a conference call.
- Establish the first call.
-
While 1 call is active, press on conference Invite softkey
 and dial the second conference number.
- The conference will be established as soon as the dialed number answers the call.
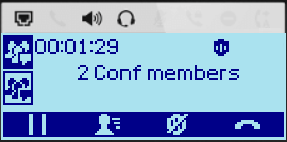
- View Conference members.
Users can view conference members by pressing on the conference info softkey ![]() , Information related to conference members will then be displayed.
, Information related to conference members will then be displayed.
- Kick Conference members.
During the conference, press on conference info softkey ![]() to view conference members. Then use UP/DOWN softkey to select a member and press on kick softkey
to view conference members. Then use UP/DOWN softkey to select a member and press on kick softkey ![]() to kick the selected number from the conference.
to kick the selected number from the conference.
- End Conference.
Users could press the End Call soft key
![]() or simply hang up the call to terminate the conference call.
or simply hang up the call to terminate the conference call.
Notes:
- Viewing and kicking conference members is possible only if the phone is the conference host.
- The party that starts the conference call must remain in the conference for its entire duration, you can put the party on mute, but it must remain in the conversation.
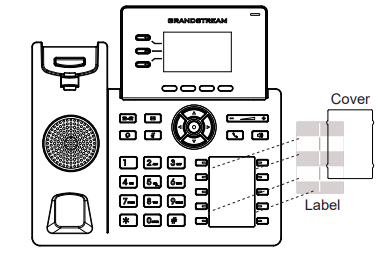
Multi-Purpose Keys (GRP2604 Only)
Users can configure Multi-Purpose keys (MPKs) from the phone’s WEB GUI -> Programmable Keys -> Multi-Purpose Keys. The GRP2604 supports up to 10 MPKs. (Check the figure below)
In this section, The MPKs are listed by order (From 1 to 10). Users can configure an MPK by choosing the Mode they need to set (Speed dial, Busy Lamp Field…) and then set the Value for the MPK and its Label (Description of the button). When done, scroll down and press on Save to save the configuration.
The Preview section will show the label of each configured MPK in order:
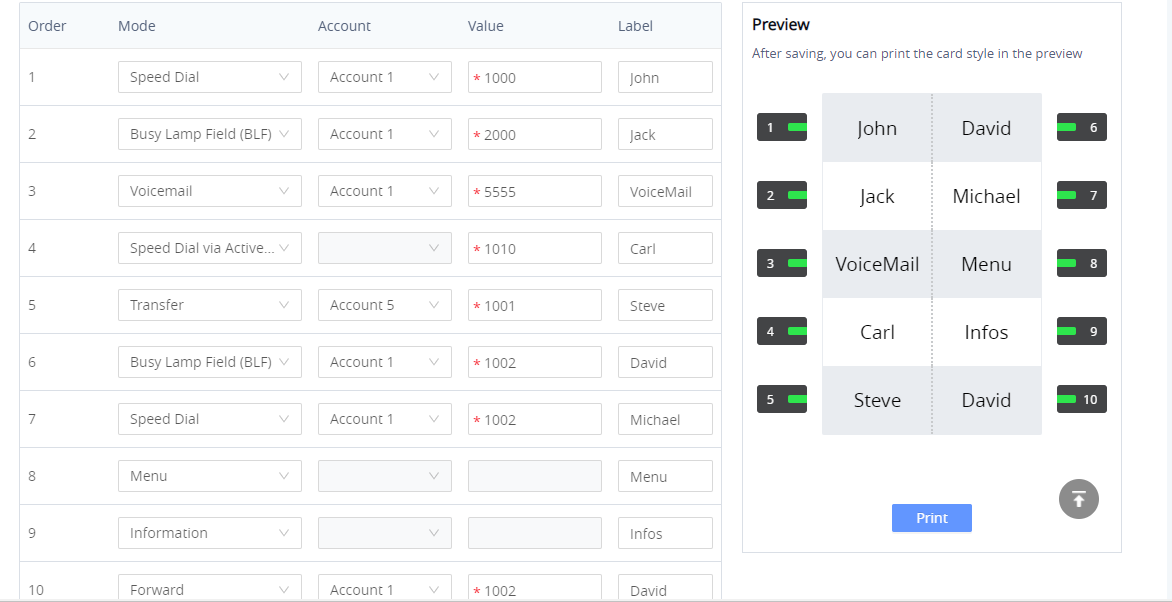
Users can print the card containing the configured MPK information by pressing on Print and then configure the printing options and preferences such as the Print Destination, print all pages or specific ones, Layout, Paper size, Margins, Scale, whether to display headers and footers and background colors …
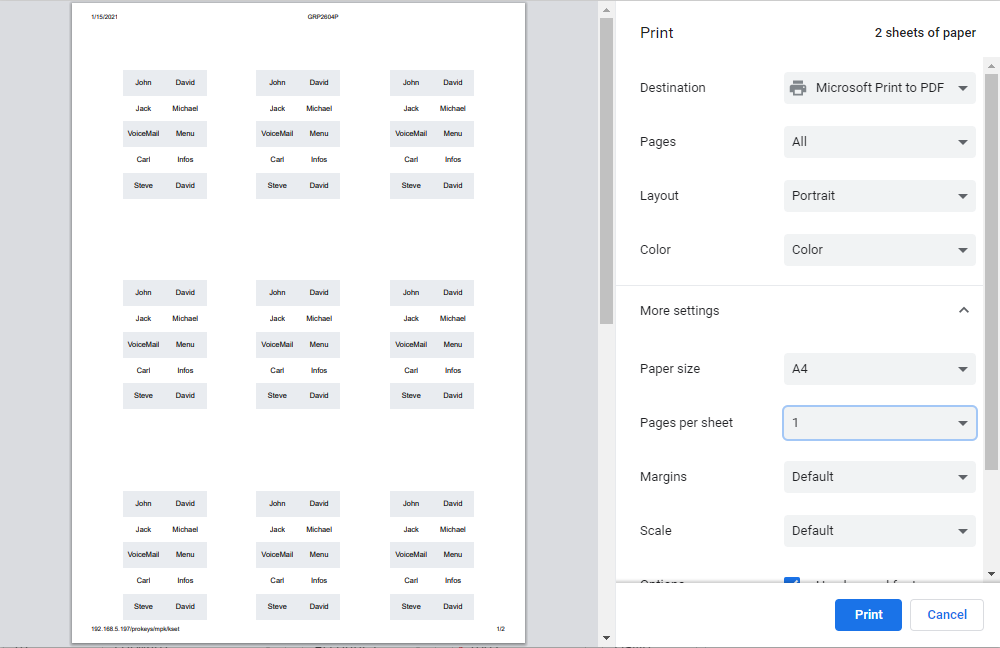
The MPK card can be printed over the dedicated space on the BLF label (Which can be found in the GRP2604 package content) and then follow the steps below to install it on the phone:
- Place the paper label in the groove of the phone.
- Bend the plastic film so that the protruding points on the left and right sides snap into the grooves to complete the installation.
- If you want to take it out, use a nail or thin card to move the slit on one side of the film to bend it and then take it out.
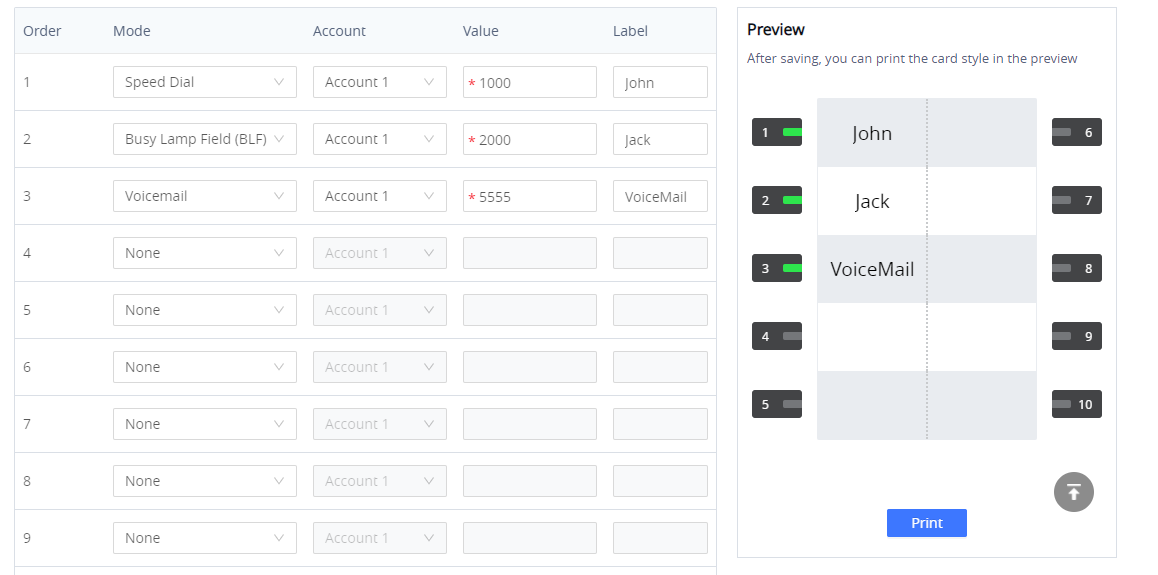
Virtual Multi-Purpose Keys
Users can configure Virtual Multi-Purpose keys (VPKs) from the phone’s WEB GUI -> Programmable Keys -> Virtual Multi-Purpose Keys. The GRP260X supports up to 12 VPKs. (Check the figure below)
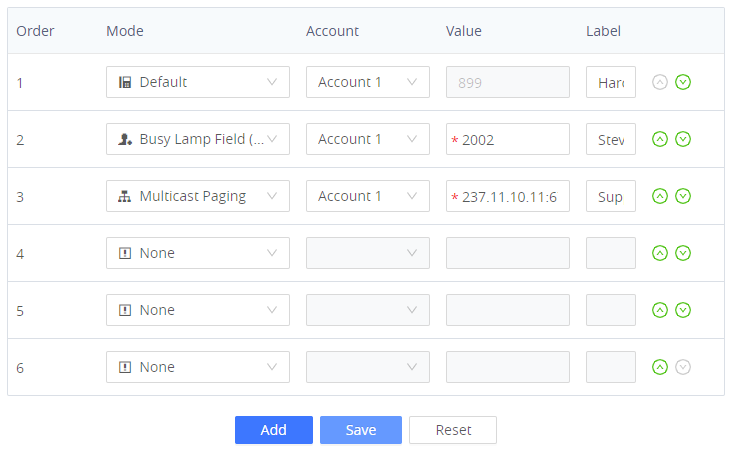
In this section, The VPKs are listed by order (From 1 to 12). Users can configure a VPK by choosing the Mode they need to set (Speed dial, Busy Lamp Field…) and then set the Value for the VPK and its Label (Description of the button). When done, scroll down and press on Save to save the configuration.
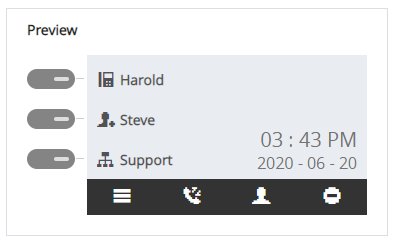
The Preview section will show the label of each configured VPK in order:
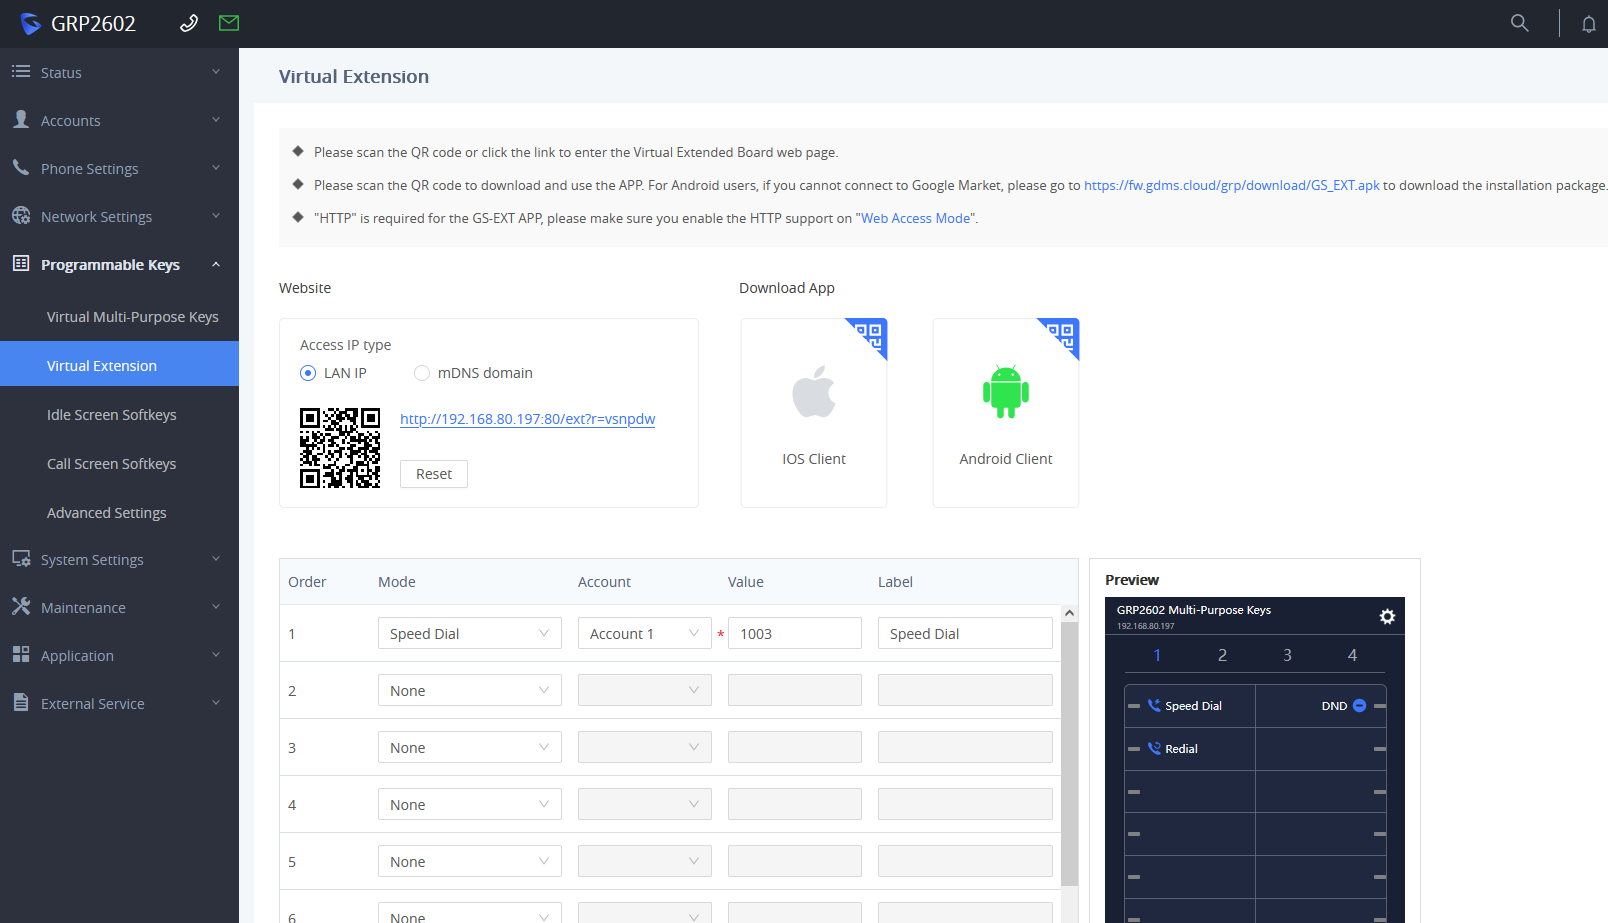
Virtual Extension Keys
Grandstream’s GRP260x series introduces an innovative “Virtual Extension” feature, enabling users to establish additional virtual extension associated with their physical IP phones. These extensions function similarly to separate accounts within a single device, enhancing communication by allowing the management of multiple accounts concurrently. Notably, these Virtual extension can be conveniently controlled via the dedicated “GS EXT” app on the phone or through a web interface, offering enhanced flexibility. This feature combines cost efficiency, easy central management, and smooth integration with different functions, all improving communication and meeting the changing needs of modern workplaces.
Voicemail
The Message waiting indicator situated above the Message button will light up in green indicating a message is waiting. Go to Web GUI🡪Account 🡪General Settings to configure Voicemail Access Number.
To retrieve the voicemail:
- Press the Message hard key to dial into the voicemail box.
- Select an account and check the number of Normal/Urgent voicemails displayed on the screen. make operations according to the voice prompt.
- Press on dial soft key and follow the voice prompt to dial the Voicemail access number and password which is configured on the SIP server.
- Follow the voice prompt to read the awaiting messages or further operations.
The steps above are for the situation where two or three accounts are configured (GRP2602/GRP2603/GRP2604), if configured only one account, there is no need for users to select an account but go to the dial-up interface directly.
For each account, the Voicemail User ID can be set up under Web GUI🡪Account X🡪General Settings: “Voice Mail Access number”. This is the number that will be dialed out to access voicemail messages when tapping on the account on the Voice Mail screen.
Call Features
The GRP260x supports traditional and advanced telephony features including caller ID, caller ID with caller Name, call forward, etc.
*30 | Block Caller ID (for all subsequent calls)
|
*31 | Send Caller ID (for all subsequent calls)
|
*50 | Disable Call Waiting
|
*51 | Enable Call Waiting
|
*67 | Call with Caller ID Blocked (per call)
|
*82 | Call with Caller ID Enabled (per call)
|
*70 | Call with Call Waiting Disable (per call)
|
*71 | Call with Call Waiting Enabled (per call)
|
*72 | Unconditional Call Forward.
|
*73 | Cancel Unconditional Call Forward. To cancel the unconditional call forward:
|
*90 | Busy Call Forward. To set up busy call forward:
|
*91 | Cancel Busy Call Forward. To cancel the busy call forward:
|
*92 | Delayed Call Forward. To set up delayed call forward:
|
*93 | Cancel Delayed Call Forward. To cancel the delayed call forward:
|
Call Features
CONTACTS
Local Contacts
The local contacts can save up to 2000 entries. Users can manage contacts by adding, deleting, and modifying single contacts, downloading contacts from HTTP/TFTP server, importing contacts from external storage, and exporting contacts to external storage.
For more details, please refer to the admin Guide:
https://documentation.grandstream.com/knowledge-base/grp260x-series-administration-guide/
Add a single Contact
On the Local Contacts menu, select Local Phonebook then press on Add contact softkey
![]() and input
and input
contact details such as First and last name, company/home/mobile numbers, and distinctive Ringtone …, and then press the “Save” soft key. The new contact will be added to your local phonebook.
Phonebook
XML Phonebook syntax
Users can add contacts using the below syntax in the phonebook.xml file:
<AddressBook>

<Contact>

<id>3</id>

<FirstName>SAUL</FirstName>

<LastName>GOODMAN</LastName>

<Frequent>0</Frequent>

<Phone type="Work">

<phonenumber>45426</phonenumber>

<accountindex>0</accountindex>

</Phone>

<Phone type="Home">

<phonenumber>54786</phonenumber>

<accountindex>0</accountindex>

</Phone>

<Phone type="Cell">

<phonenumber>08789654</phonenumber>

<accountindex>0</accountindex>

</Phone>

<Primary>0</Primary>

<Company>GRANDSTREAM</Company>

<Department>SUPPORT</Department>

</Contact></AddressBook>
Download/Upload XML Phonebook from Web UI
From the phone’s web interface under Application 🡪 Contact 🡪 Phonebook Management, Use the button “Download” to retrieve the XML phonebook currently configured on the phone. Press the button “Upload” to choose your XML phonebook to upload to the phone.

Users can also input the “Company”, “Title”, and “Department” fields on the phonebook.xml like the previous example or through the phone’s LCD by accessing contact and pressing the “Edit” soft key ![]() to edit the contact and add extra information before saving the contact.
to edit the contact and add extra information before saving the contact.
Note: When accessing the local phonebook, users could explore all available softkeys by pressing on “More” softkey ![]() , users could choose to look for a contact
, users could choose to look for a contact ![]() , Dial a contact number
, Dial a contact number ![]() , Add New Contact
, Add New Contact ![]() , Block a contact number
, Block a contact number ![]() , delete a contact
, delete a contact ![]() or clear all contact list with
or clear all contact list with ![]() softkey.
softkey.
XML Phonebook URLs
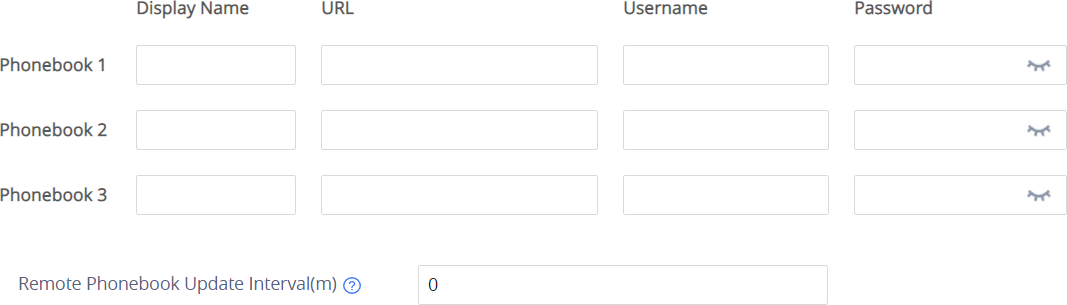
Users can configure Up to 3 XML Phonebooks URLs. This option can be found under device web GUI🡪 Application🡪 Remote phonebook.
CALL HISTORY
Local Call History
There are two categories in the local call history. Users could use LEFT/RIGHT navigation keys to switch between All calls Tab; Missed Calls Tab; Dialed Calls Tab; Answered Calls Tab and Blocked calls Tab. Below is the LCD icons indication for each type of call:
Dialed | |
Missed | |
Answered | |
Rejected |
Call History Icons
Call History Operations
- Dial number from call history: Press on dial softkey to or Send key to dial the number. The phone will use the same account as the call log when dialing out.
- Delete a number from call history: Select an entry then press “Delete” soft key
 to delete the call log.
 - /Clear call history: Press on Clear All softkey
 to clear the call history
DIAGNOSIS
Users could access the factory functions menu to diagnose the phone’s hardware/software. To do so please access to LCD menu under Factory Functions.
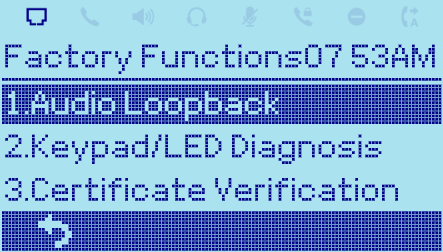
These tools can be used to check the hardware and software status of the phone like verifying the LED, keypad buttons, Microphone/speaker functionality, certificate verification …etc.
EHS HEADSET
The GRP260x supports a normal RJ9 headset jack (allowing EHS with Plantronics & Jabra & Sennheiser headsets).
Connect EHS Headset (Plantronics) to the GRP260x. To use headset mode, press the headset button on the phone. A headset icon ![]() will show on the status bar. The EHS headset will ring when there is an incoming call.
will show on the status bar. The EHS headset will ring when there is an incoming call.
RESTORE FACTORY DEFAULT SETTINGS
Restore factory settings using the LCD menu
Please follow the instructions below to reset the phone:
- Press the MENU button to bring up the keypad configuration menu.
- Navigate to Settings 🡪 Advanced Settings.
- Select “Factory Reset”.
- A warning window will pop out to make sure a reset is requested and confirmed.
Press the “Yes” Softkey to confirm and the phone will reboot, or “No” Softkey to cancel the Reset.
Restore to Factory Default via Web GUI
- Login GRP260X Web GUI.
- Navigate to Maintenance 🡪 Upgrade and provisioning 🡪 Advanced Settings 🡪 Factory reset.
- Press on Start Button situated against the Factory reset option
Click “OK” to confirm and the phone will reboot, or “Cancel” to cancel the Reset.
CHANGELOG
This section documents significant changes from previous versions of user manuals for GRP260x. Only major new features or major document updates are listed here. Minor updates for corrections or editing are not documented here.
Firmware Version 1.0.5.54
- No major changes.
Firmware Version 1.0.5.50
- No major changes.
Firmware Version 1.0.5.46
- No Major Changes
Firmware Version 1.0.5.38
- Improved device to clear warning icon automatically from the LCD after a certain period of time. [Warning Messages]
- Added support to have an LED signaling when receiving an incoming call. [Receiving calls]
Firmware Version 1.0.5.26
- No major changes.
Firmware Version 1.0.5.25
- Added Administrator authentication requirement when connecting to Wi-Fi from the LCD Menu on GRP2602W. [Connecting to Wi-Fi Network]
- Added Support to display call forward icon when the call forward is enabled by feature code from the device and also “Feature key sync” is enabled. [Call Forwarding]
- Added Support of SIP URI calls. [SIP URI calls]
Firmware Version 1.0.5.19
- No major changes.
Firmware Version 1.0.3.98
- Added Support to display Transfer softkey in call after enabling it in the Custom Call Screen Softkey Layout. [Call Transfer]
Firmware Version 1.0.3.87
- No major changes.
Firmware Version 1.0.3.86
- No major changes.
Firmware Version 1.0.3.83
Added Energy Saving mode Icon [GRP260X LCD Icons]
Firmware Version 1.0.3.72
- No major changes.
Firmware Version 1.0.3.70
- No major changes.
Firmware Version 1.0.3.63
- No major changes.
Firmware Version 1.0.3.59
- No major changes.
Firmware Version 1.0.3.57
- Added support to display the contacts when pressing the idle screen softkey “LDAP Search” before the search. [LDAP Search]
- Added support of remote phonebook as a call screen softkey. [Remote Phonebook]
- Improved Broadsoft call park indication by adding both display and sound notification. [Broadsoft call park]
Firmware Version 1.0.3.51
- Added support of an alert tone when the device is initiating a multicast paging. [Initiating multicast paging]
- Added support to have both header and name/number displayed on the LCD screen. [Multiple SIP Accounts and Lines]
Firmware Version 1.0.3.44
- Added Support of an alert tone when a multicast paging is received. [Multicast paging recieved]
Firmware Version 1.0.3.42
- No major changes
Firmware Version 1.0.3.31
- Added Ability to enable DND from web UI. [DND]
- No major changes
- No major changes
- Added ability to finish an attended transfer by on-hooking the phone. [Attended Transfer]
- Added ability to return to the idle screen after you press the activated Line key. [LINE key]
- Added VLAN tag settings on Device LCD menu. [Figure 10: Keypad Menu Configuration Flow]
- Added support to set up a Forward Always softkey on the idle screen. [Softkeys in idle screen]
- No major changes.
COPYRIGHT
©2023 Grandstream Networks, Inc. https://www.grandstream.com
All rights reserved. Information in this document is subject to change without notice. Reproduction or
transmittal of the entire or any part, in any form or by any means, electronic or print, for any purpose without the express written permission of Grandstream Networks, Inc. is not permitted.
Grandstream is a registered trademark and the Grandstream logo is the trademark of Grandstream Networks, Inc. in the United States, Europe, and other countries.
CAUTION
Changes or modifications to this product not expressly approved by Grandstream, or operation of this
product in any way other than as detailed by this guide could void your manufacturer warranty.
WARNING
Please do not use a different power adaptor with devices as it may cause damage to the products and void the manufacturer warranty.
CERTIFICATION
U.S. FCC Part 68 Regulatory Information
This equipment complies with Part 68 of the FCC rules. Located on the equipment is a label that contains, among other information, the ACTA registration number and ringer equivalence number (REN). If requested, this information must be provided to the telephone company.
The REN is used to determine the quantity of devices which may be connected to the telephone line. Excessive REN’s on the telephone line may result in the devices not ringing in response to an incoming call. In most, but not all areas, the sum of the REN’s should not exceed five (5.0). To be certain of the number of devices that may be connected to the line, as determined by the total REN’s contact the telephone company to determine the maximum REN for the calling area.
This equipment cannot be used on the telephone company-provided coin service. Connection to Party Line Service is subject to State Tariffs.
If this equipment causes harm to the telephone network, the telephone company will notify you in advance that temporary discontinuance of service may be required. If advance notice is not practical, the telephone company will notify the customer as soon as possible. Also, you will be advised of your right the file a complaint with the FCC if you believe it is necessary.
The telephone company may make changes in its facilities, equipment, operations, or procedures that could affect the operation of the equipment. If this happens, the telephone company will provide advance notice in order for you to make the necessary modifications in order to maintain uninterrupted service.
If any trouble experienced with this equipment, please contact (Agent in the US):
Company Name: Grandstream Networks, Inc.
Address: 126 Brookline Ave, 3rd Floor Boston, MA 02215, USA
Tel: 1-617-5669300
Fax: 1-617-2491987
If the trouble is causing harm to the telephone network, the telephone company may request you to remove the equipment from the network until the problem is resolved.
This equipment uses the following USOC jacks: RJ45C.
It is recommended that the customer install an AC surge arrester in the AC outlet to which this device is connected. This is to avoid damaging the equipment caused by local lightning strikes and other electrical surges.
Since this device has the HAC function, the earpiece is easy to absorb small, please take care to avoid scratching.
U.S. FCC Part 15 Regulatory Information
This device complies with part 15 of the FCC Rules. Operation is subject to the following two conditions:
(1) This device may not cause harmful interference, and (2) this device must accept any interference received, including interference that may cause undesired operation.
Any Changes or modifications not expressly approved by the party responsible for compliance could void the user’s authority to operate the equipment.
Note: This equipment has been tested and found to comply with the limits for a Class B digital device, pursuant to part 15 of the FCC Rules. These limits are designed to provide reasonable protection against harmful interference in a residential installation. This equipment generates, uses, and can radiate radio
Frequency energy and, if not installed and used in accordance with the instructions, may cause harmful interference to radio communications. However, there is no guarantee that interference will not occur in a particular installation. If this equipment does cause harmful interference to radio or television reception, which can be determined by turning the equipment off and on, the user is encouraged to try to correct the interference by one or more of the following measures:
- Reorient or relocate the receiving antenna.
- Increase the separation between the equipment and receiver.
- Connect the equipment into an outlet on a circuit different from that to which the receiver is connected.
- Consult the dealer or an experienced radio/TV technician for help.
This equipment complies with FCC radiation exposure limits set forth for an uncontrolled environment. This equipment should be installed and operated with minimum distance 20cm between the radiator& your body. This transmitter must not be co-located or operating in conjunction with any other antenna or transmitter.
Caution: Exposure to Radio Frequency Radiation
This equipment complies with EU radiation exposure limits set forth for an uncontrolled environment. This equipment should be installed and operated with minimum distance of 20 cm between the radiator and your body.
CE Authentication
Hereby, Grandstream Networks, Inc. declares that the radio equipment GRP2602W are in compliance with Directive 2014/53/EU.
The full text of the EU declaration of conformity is available at the following internet address:
https://www.grandstream.com/support/resources/
GNU GPL INFORMATION
GRP260x firmware contains third-party software licensed under the GNU General Public License (GPL). Grandstream uses software under the specific terms of the GPL. Please see the GNU General Public License (GPL) for the exact terms and conditions of the license.
Grandstream GNU GPL-related source code can be downloaded from the Grandstream website from:
https://www.grandstream.com/legal/open-source-software