
PRECAUTIONS
PACKAGE CONTENTS

OVERVIEW
The GVC3220 is a revolutionary video conferencing system that provides an interactive and immersive video conferencing environment to increase collaboration and productivity. This SIP-based GVC3220 allows the user to connect their video conferencing solutions with any 3rd-party SIP or H.323 video conferencing platform. Additionally, since the GVC3220 is based on an Android 9.0 operating system. Users will elevate their experience with its 4K Ultra-HD video, up to 5-way 1080P video conferences, screen-sharing capabilities, Integrated Wi-Fi, Bluetooth and more.
INSTALLATION
The GVC3220 can be installed in the following two ways:
Option 1: Place on desktop.
Option 2: Mount on wall. Wall mount bracket is required.
INSTALLING BRACKET TO MOUNT THE GVC3220 ON WALL
- Place the wall mount bracket against the wall and move it to the position where it’s needed.
- According to the position of the four screw holes on wall mount bracket, locate the corresponding spots on the wall and drill the holes. Note: Dimension of bracket screw hole is 82mm(L)×60mm(W).
- Fit the four anchors into each hole on the wall. Please make sure the glossy side is placed outwards.
- Mount the wall mount bracket to the wall. Then insert 4 PA4*30 screws into each anchor to secure the bracket.
- Tighten the screws so that bracket can be securely placed against the wall.
- Post alignment of the bracket; need to align with the positioning hole on the bottom of the bracket.
- Place GVC3220 on the top of wall mount bracket. Note that the positioning post on the bracket must be aligned with the hole at the bottom of GVC3220. The lens is facing outside the wall and GVC3220 needs to be placed stably.
- Use one hand screw to fix GVC3220 on the bracket from the bottom, and then use the remaining three PM3*8 screws to secure the GVC3220 to the bracket.
- See figure below which GVC3220 is fixed on the bracket after tightening the screws.

CONNECTING THE GVC3220
- Connect the LAN port of the GVC3220 to the RJ-45 socket of a hub/switch or a router (LAN side of the router) using the Ethernet cable.
- Connect the primary HDMI output port (marked with a blue highlight) of the GVC3220 to the HDMI port of the main display device (e.g., TV). Connect the secondary HDMI output port if you have additional display devices. Note: Please make sure to follow the port order when connecting HDMI output ports. When there is only 1 HDMI output, it has to use the primary HDMI port. GVC3220 will not work correctly if connecting the secondary HDMI output port without making sure primary HDMI output port is connected.
- Connect the 48V DC output plug to the power jack on the GVC3220; plug the power adapter into an electrical outlet.

- The display device (e.g., TV) will show the idle HOME screen with IP address on the top status bar.

- Insert your SD card into the SD card slot. The recording files will be saved in SD card.
- (Optional) Connect presentation device (e.g., a laptop) to the GVC3220 HDMI IN port for presentation purpose during conference call.
- (Optional) Connect USB accessory (e.g., mouse, keyboard, USB flash drive and etc) to the USB port.
Connecting example

USING THE GVC3220 REMOTE CONTROL
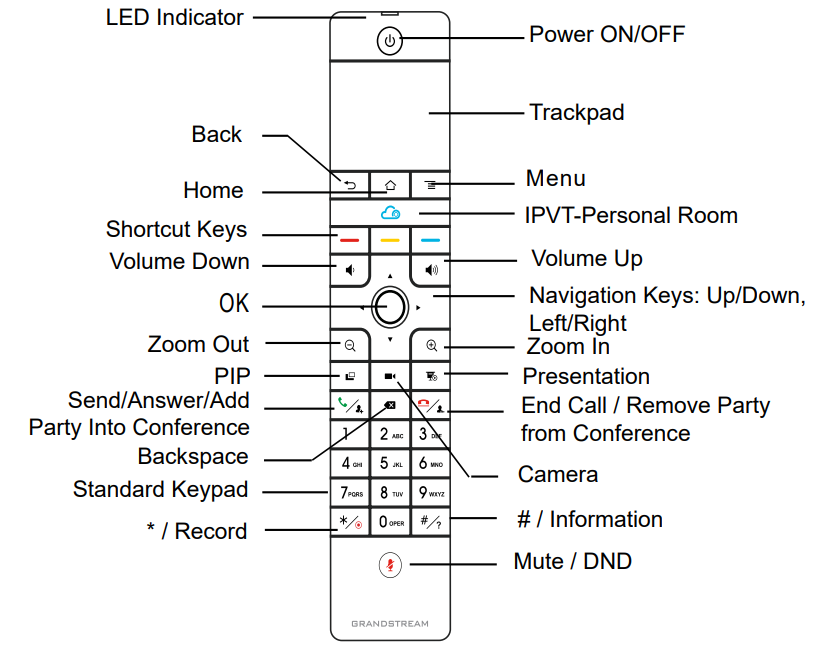
- Open the battery cover on the back of the remote control. Place four AAA batteries proprely and put the cover back on, the remote control can be used normally. At this time, the remote control is in infrared mode, and the LED light of the remote control shows green color when used.
- You can also choose to pair the remote control with GVC3220 main case according to the interface prompts: Please align the remote control to the device, long press OK and 5 on the remote control to connect to the GVC, when the LED on the top of the remote control flashes, the keys can be released. At this time, the remote control will be automatically paired and connected, and the LED light of the remote control shows blue color when used.
CONFIGURING GVC3220 VIA WEB UI
- Ensure your GVC3220 is properly powered up and connected to the Internet.
- The IP address of the GVC3220 will show on the top status bar of the connected display device (e.g., TV) via HDMI.
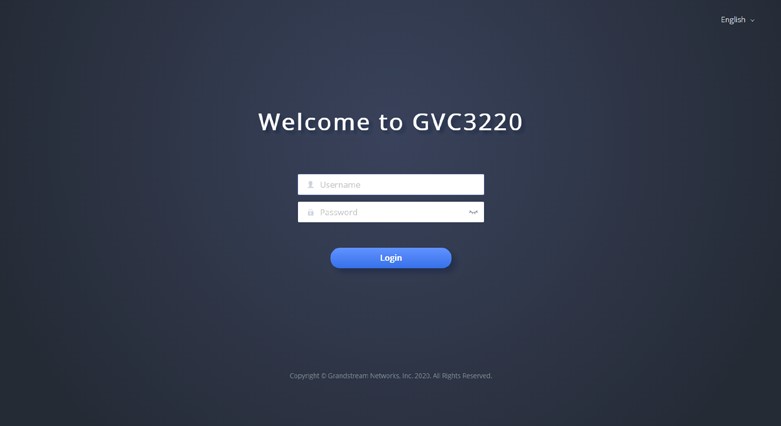
- Type the IP address in your PC’s browser (see figure below).
- Enter username and password to login. (The default administrator username is “admin” and the default random password can be found at the back sticker on the GVC3220).
For the detailed user manual, please download from: http://www.grandstream.com/support
*Android is a Registered Trademark of Google LLC.
*Skype and Skype for Business are Registered Trademarks of Microsoft Corporation
For Certification, Warranty, and RMA information, please visit
www.grandstream.com