
Overview
GWN7001/7002/7003 are Multi-WAN Gigabit VPN routers with built-in firewalls that allow businesses to build comprehensive wired, wireless and VPN networks for one or many locations. They offer high-performance routing and switching power along with built-in VPN support for secure in-office and inter-office connectivity. To provide enterprise-grade security protection and ensure stable network operation,the GWN 7001/7002/7003 features a built-in firewall with advanced content security, filtering, threat detection, attack prevention and more. To maximize network reliability, they support traffic load balancing, failover and bandwidth management capabilities. The GWN7001 includes 6 Gigabit ethernet ports.The GWN7002/7003 include 2 2.5 Gigabit SFP ports, 4/9 Gigabit ethernet ports, and 2 PoE output ports that allow them to pro-vide power to other endpoints. These routers can manage themselves and up to 150 Grandstream GWN Series Wi-Fi APs thanks to an embedded controller located in the products’ web user interface. These routers can also be managed with GWN.Cloud and GWN Manager, Grandstream’s free cloud and on-premise network management tools. By providing high-performance routing, VPN support, powerful security protec-tion and easy-to-use network management tools, the GWN Gigabit VPN routers are ideal for a wide variety of deployments including small-to-medium businesses, retail, education, hospitality, healthcare and more.
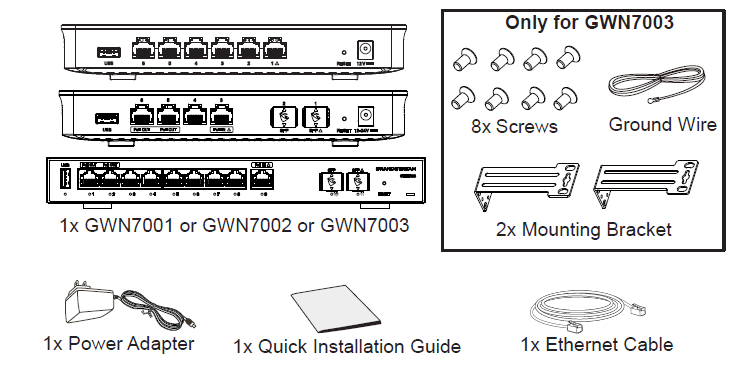
Package Contents
GWN700x Ports
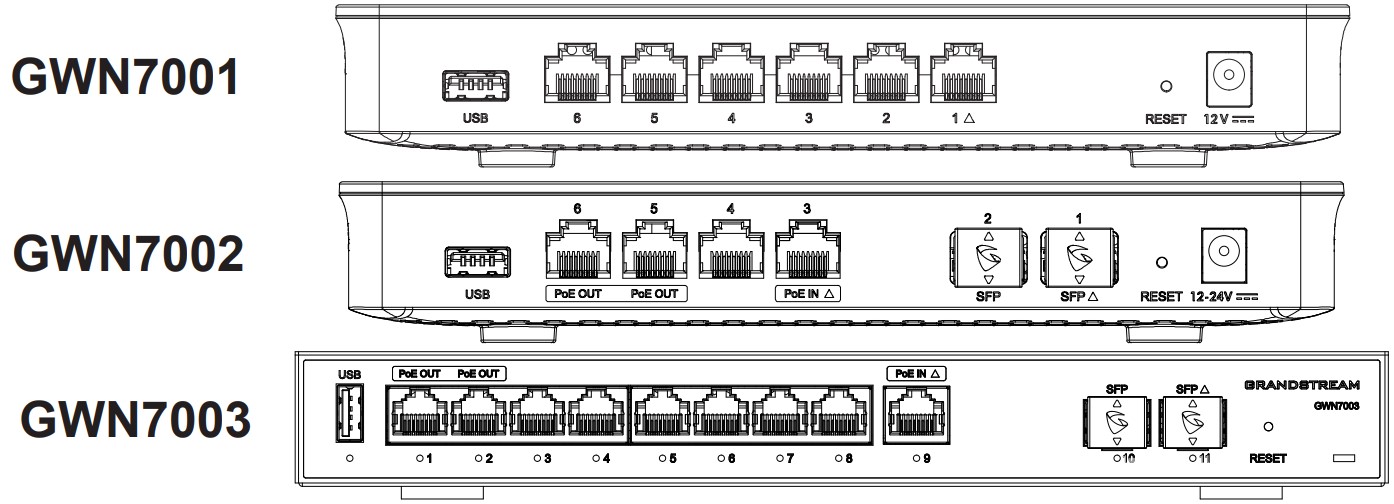
No. | Port | Description |
1 |  | GWN7001: 6x Gigabit Ethernet ports Note: All ports support WAN/LAN configurable. The Gigabit Ethernet ports include 2 x PoE OUT ports and 1 x PoE IN port (GWN7002/7003 only). |
2 |  | 2x 2.5 Gigabit SFP ports (GWN7002/7003 only) |
3 |  | USB 2.0 port |
4 |  | GWN7001: Power adapter connector (DC 12V, 1A) GWN7002: Power adapter connector (DC 24V, 1A) GWN7003: Power adapter connector (DC 24V, 1A) |
5 |  | Grounding terminal (GWN7003 only). |
6 |  | Factory Reset pinhole. Press for 5 seconds to reset factory default settings |
GWN700x Ports
Connecting The GWN700x
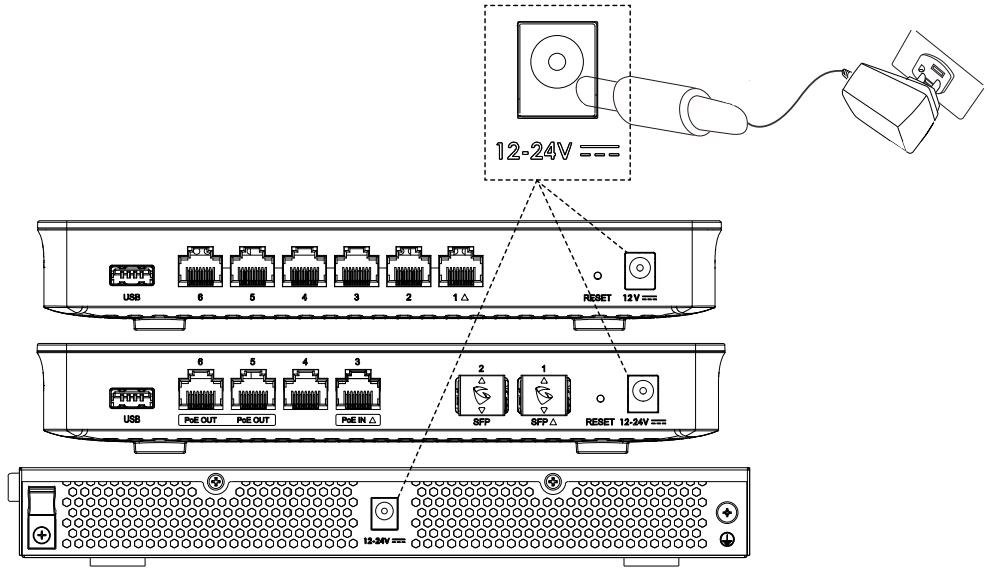
Power the GWN7001/7002/7003
GWN7001/7002/7003 can be powered on using the right PSU or PoE (IEEE 802.3af/at) only for GWN7002/7003.
Connect to the Internet
Connect the LAN/WAN or SFP/WAN (GWN7002/7003 only) port to an optical fiber broadband modem, ADSL broadband modem or community broadband interface.

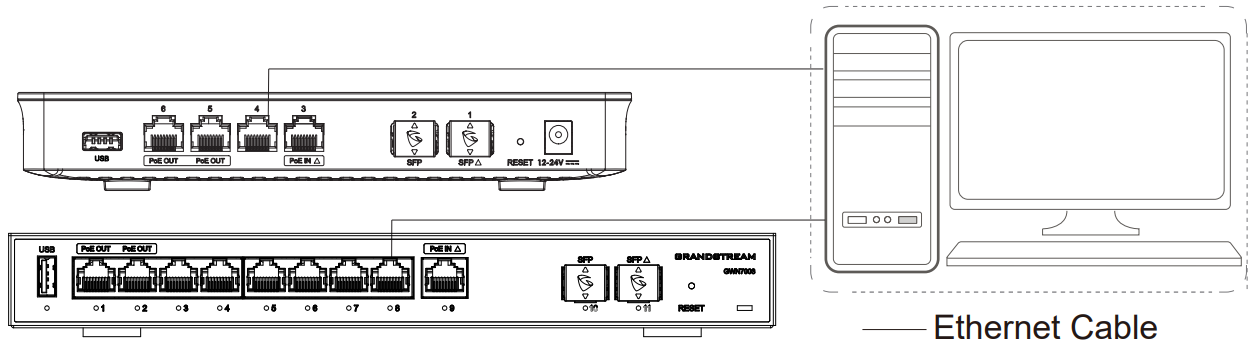
Connect to GWN7001/7002/7003 Network
Connect your computer to one of the LAN ports.
Installation
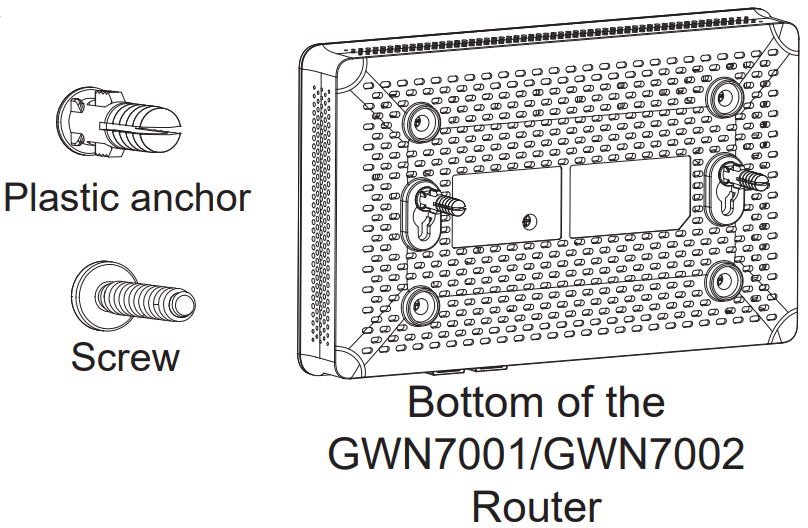
Mounting GWN7001/7002 to the wall
- Using a drill, make two holes in the wall with 135.0mm spacing, 6.0mm diameter. Put a plastic anchor and screw (not provided) on each hole.
- Mount the GWN7001/7002 router on the mounting screws.
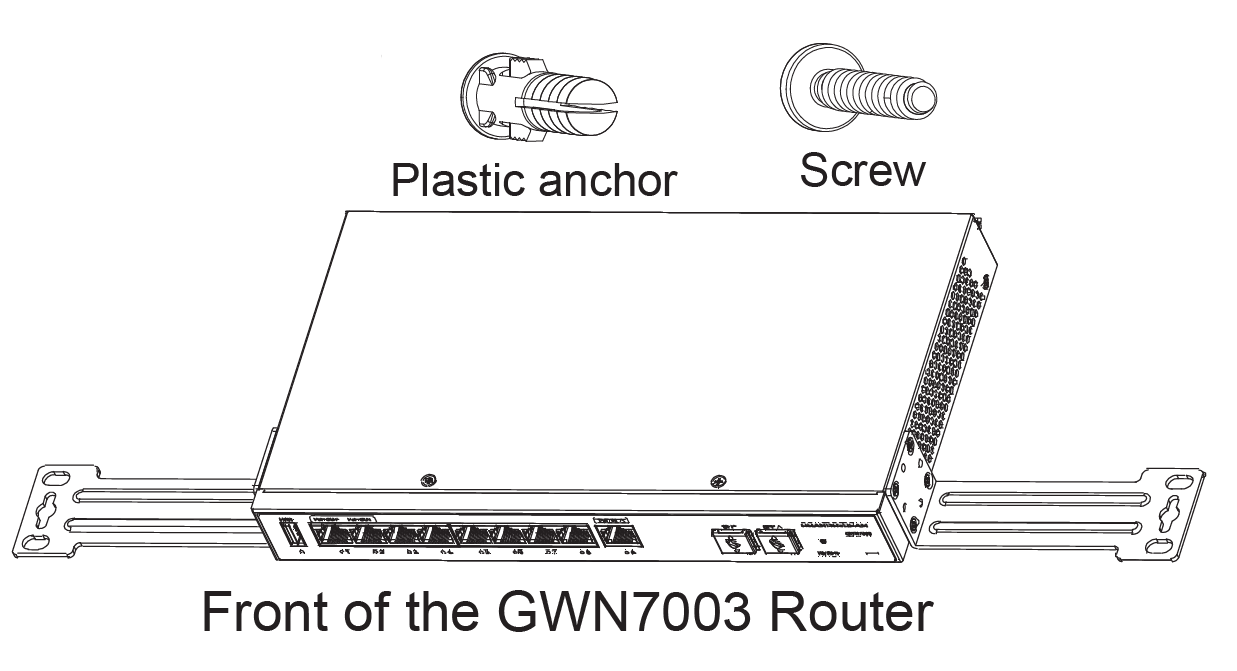
Mounting GWN7003 to the Wall
- Use the provided screws to fix the two L-shaped Mounting bracket (rotated 90°) on both sides of the GWN7003 router.
- Stick the router port up and horizontally on the selected wall, mark the position of the screw hole on the L-shaped mounting brackets with a marker. Then, drill a hole at the marked position with an impact drill, and drill the plastic anchors (prepared by yourself) into the drilled hole in the wall.
- Use a screwdriver to tighten the screws (prepared by yourself) that have passed through the L-shaped mounting brackets to ensure that the GWN7003 router is firmly installed on the wall.
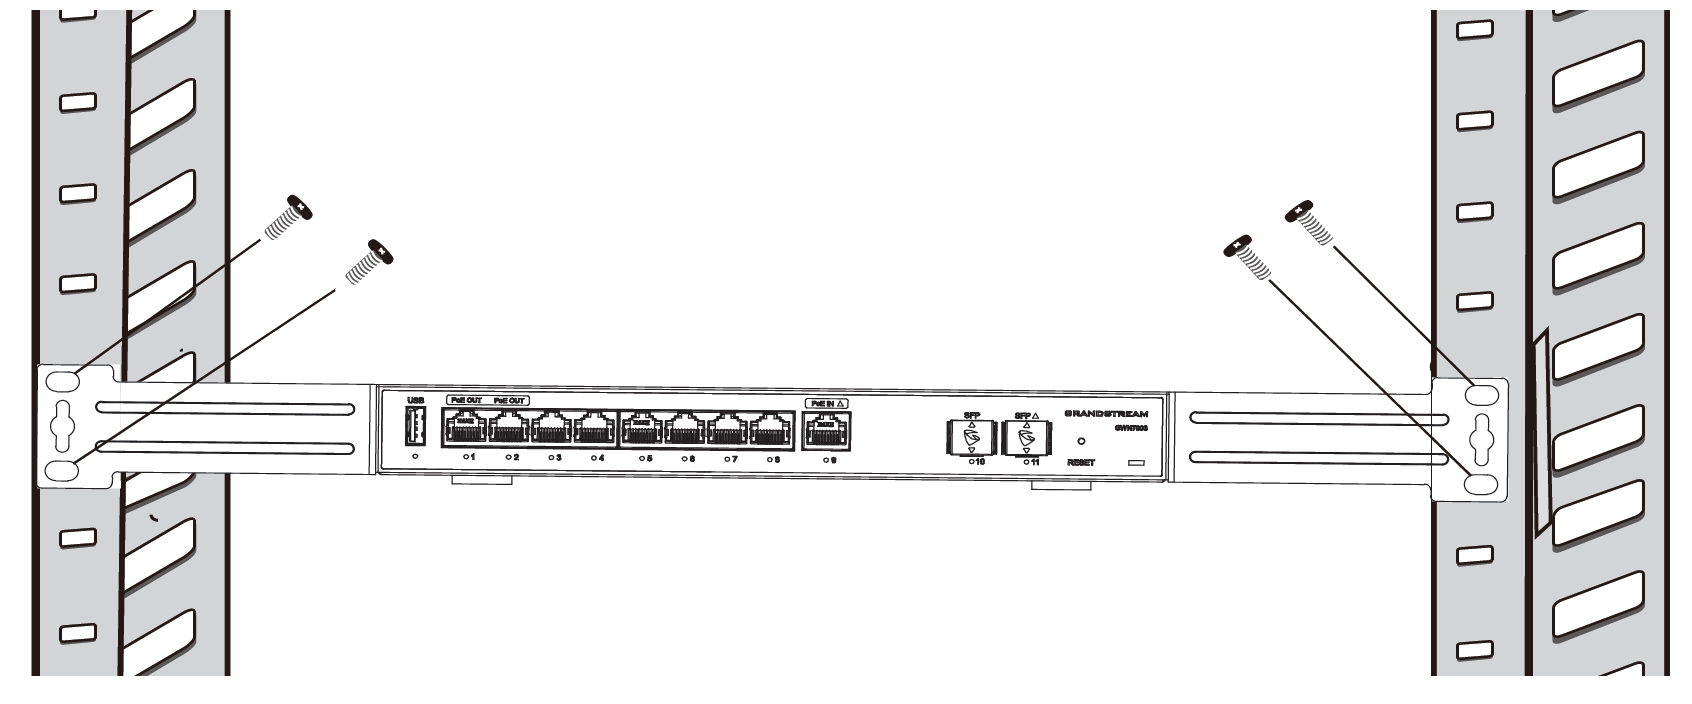
Install on a 19” Standard Rack (GWN7003 only)
- Check the grounding and stability of the rack.
- Install the two L-shaped rack-mounting in the accessories on both sides of the router, and fix them with the screws provided.
- Place the router in a proper position in the rack and support it by the bracket.
- Fix the L-shaped rack-mounting to the guide grooves at both ends of the rack with screws(prepared by yourself) to ensure that the router is stably and horizontally installed on the rack.
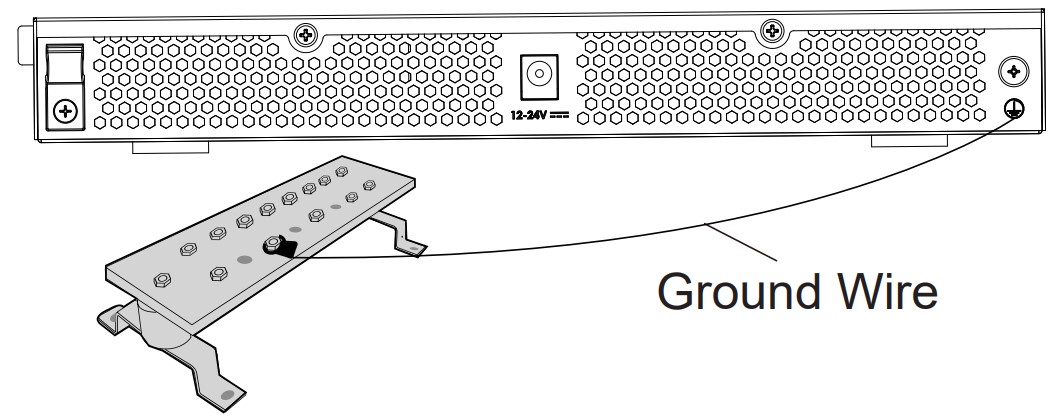
Grounding GWN7003
- Remove the ground screw from the back of the router, and connect one end of the ground cable to the wiring terminal of the router.
- Put the ground screw back into the screw hole, and tighten it with a screwdriver.
- Connect the other end of the ground cable to other device that has been grounded or directly to the terminal of the ground bar in the equipment room.
Accessing the configuration interface
Now that you are connected to the GWN7001/GWN7002/GWN7003’s LAN port with network cable, you can access into its configuration interface with: myrouter.grandstream.com or default IP address (192.168.80.1), then enter the password to login.
Refer to online documents and FAQ for more detailed information:
http://www.grandstream.com/our-products
For Certification, Warranty and RMA information,
please visit www.grandstream.com