
The GWN76xx Series are high-performance 802.11ac wireless access point for small to medium sized businesses, multiple floor offices, commercial locations and branch offices.
This wireless access point can be used with any third party routers. With support for advanced QoS, lowlatency real-time applications. The GWN76xx are ideal wireless access points for large and small wireless network deployments.
A GWN76xx Wireless Access Point model provides the ability to act either as Master Access Point or Slave Access Point.
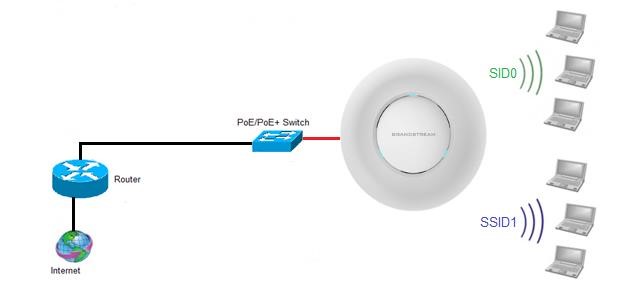
This guide describes GWN76xx in standalone mode where it can be used in network environments requiring Wi-Fi access with a single access point.
The figure below shows a sample setup of GWN76xx in standalone mode:
USING DEFAULT SSID
The GWN76xx can be used as standalone access point out of box, or after factory reset with Wi-Fi enabled by default. Users can simply power on the GWN76xx and connect it to the network to start using Wi-Fi access.
GWN76xx will broadcast a default SSID based on its MAC address GWN[MAC’s last 6 digits] and a random password.
Note that GWN76xx’s default SSID and password information are printed on the MAC tag of the unit as shown on the below figure.

To connect, Wi-Fi clients need to scan for Wireless networks, select SSID broadcasted from GWN76xx and enter password as printed in the label tag on the back of GWN76xx.
CREATE CUSTOM SSID
This section describes needed steps to manage and customize SSID and Wi-Fi settings, first by discovering the unit IP address, accessing its web interface and editing its configuration depending on environment needs.
Discover GWN76xx
Once the GWN76xx is powered up and connected to the network correctly, users can discover the GWN76xx using one of the following methods:
Method 1: Discover GWN76xx using its MAC address
- Locate the MAC address on the MAC tag of the unit, which is on the underside of the device, or on the package.
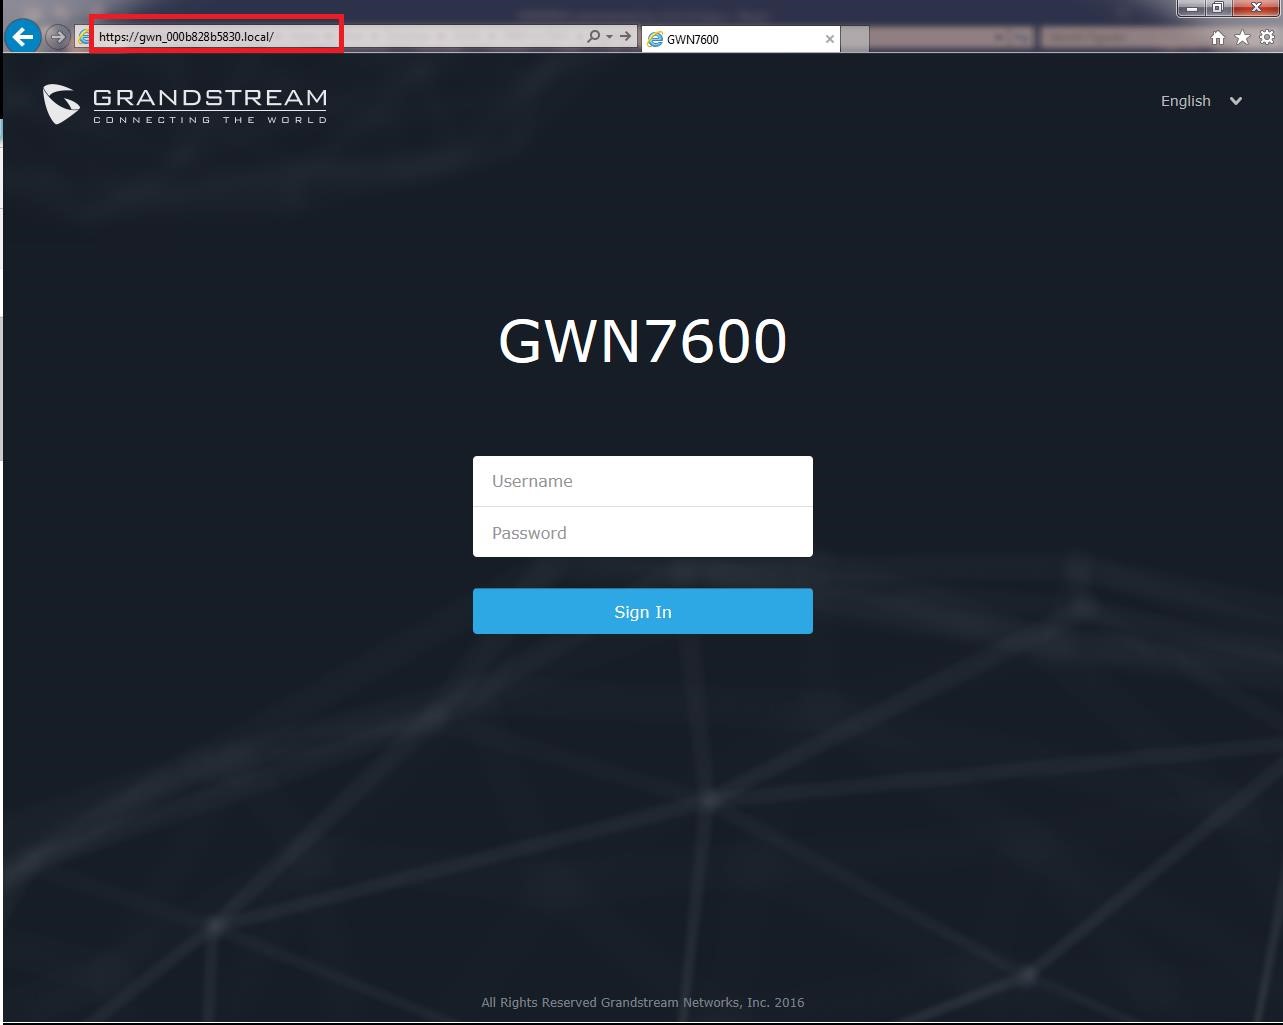
- From a computer connected to same network as the GWN76xx, type in the following address https://gwn_[MAC_address].local/ using the GWN76xx’s MAC address on your browser.
For example, if a GWN7600 has the MAC address 00:0B:82:8B:4D:D8, this unit can be accessed by typing https://gwn_000b828b4dd8.local/ on the browser.
Method 2: Discover GWN76xx using GWN Discovery Tool
- Download and install GWN Discovery Tool from the following link:
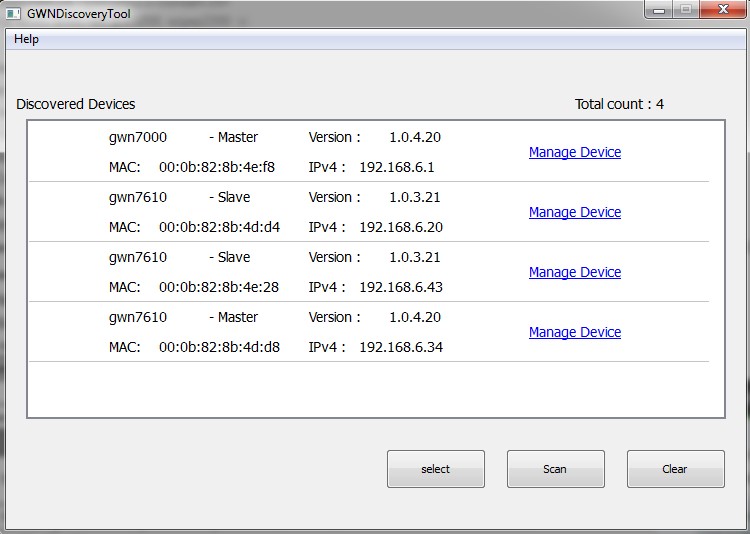
https://content.grandstream.com/hubfs/Grandstream_Feb_2021/Zip%20File/GWNDiscoveryTool.zip?hsLang=en - Open the “GWN Discovery Tool”, click on Select to define the network interface, then click on Scan.
- The tool will discover all GWN76xx Access Points connected on the network showing their MAC, IP addresses and firmware version.
- Click on Manage Device to be redirected directly to the GWN76xx’s configuration interface, or type in manually the displayed IP address on your browser.
Access the GWN76xx WebGUI
In order to access into the GWN76xx WebGUI, please follow those steps:
- Make sure to use a computer connected to the same local Network as the GWN76xx.
- Ensure the device is properly powered up.
- Open a Web browser on the computer and type in the URL using the MAC address as show previously or the IP address using the following format: https://IP_Address
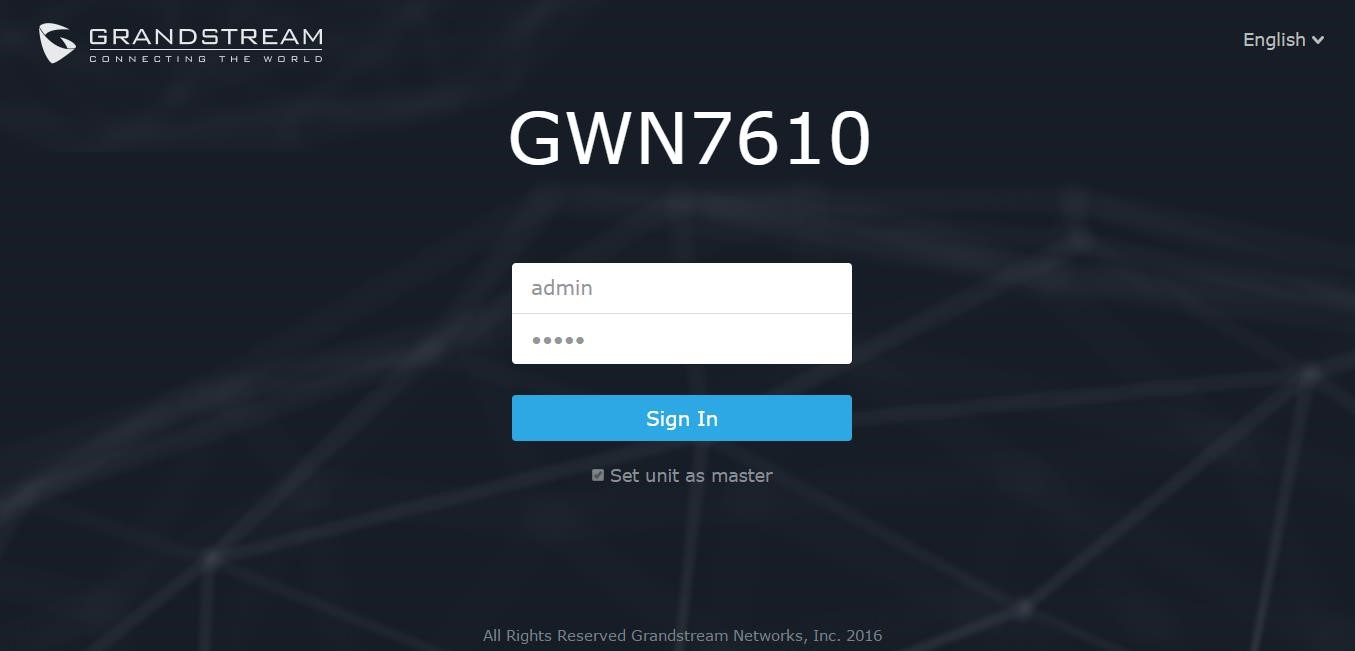
- Enter the administrator’s login and password to access the Web Configuration Menu. The default administrator’s username is admin and password is the default WiFi Password.
Notes:
- At first boot or after factory reset, users will be asked to change the default administrator and user passwords before accessing GWN76xx web interface. The new password fields are case sensitive with a maximum length of 32 characters. Using strong passwords including letters, digits and special characters are recommended for better security.
Wi-Fi Configuration
After accessing the GWN76xx web GUI navigate to “SSIDs”, the page will show default group (“group0”) and default SSID for the GWN76xx as shown below:

Click on ![]() to modify the SSID settings or
to modify the SSID settings or ![]() to add a new one.
to add a new one.
The following window will be shown:
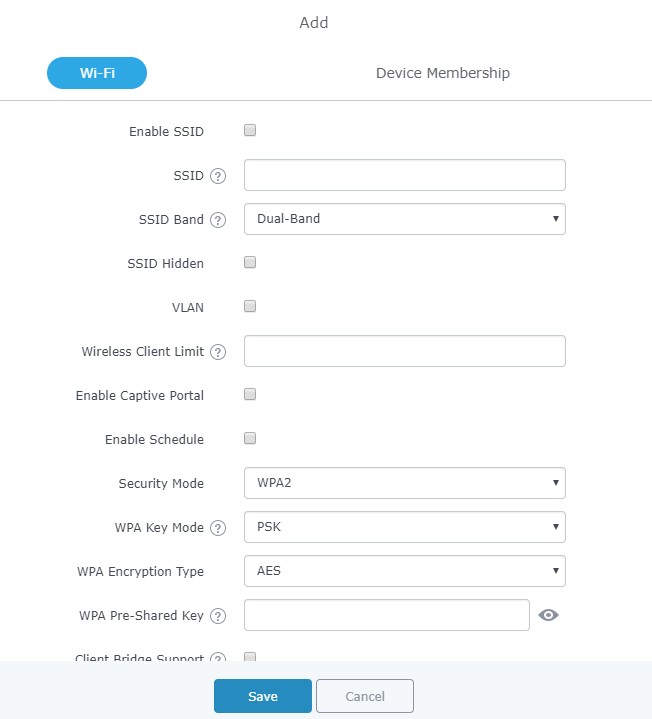
When editing or adding a new SSID, users will have two tabs to configure:
- Wi-Fi: Please refer to the below table for Wi-Fi tab options
Field | Description |
Enable SSID | Check to enable Wi-Fi for the SSID. |
SSID | Set or modify the SSID name. |
SSID Band | Select the Wi-Fi band the GWN will use, three options are available:
|
SSID Hidden | Select to hide SSID. SSID will not be visible when scanning for Wi-Fi, to connect a device to hidden SSID, users need to specify SSID name and authentication password manually. |
VLAN | Enter the VLAN ID corresponding to the SSID. |
Wireless Client Limit | Configure the limit for wireless client. If there’s an SSID per-radio on a SSID, each SSID will have the same limit. So, setting a limit of 50 will limit each SSID to 50 users independently. If set to 0 the limit is disabled. |
Enable Captive Portal | Click on the checkbox to enable the captive portal feature. |
Captive Portal Policy | Select the captive portal policy already created on the ”Policy List” web page to be used in the created SSID. |
| Enable Schedule | Check the box and choose a schedule to apply for the selected SSID. |
| Security Mode | Set the security mode for encryption, 5 options are available:
|
| WEP Key | Enter the password key for WEP protection mode. This field is available only when “Security Mode” is set to “WEP 64-bit” or “WEP 128-bit”. |
| WPA Key Mode | Two modes are available:
|
| WPA Encryption Type | Two modes are available:
This field is available only when “Security Mode” is set to “WPA/WPA2” or “WPA2”. |
| WPA Pre-Shared Key | Set the access key for the clients, and the input range should be: 8-63 ASCII characters or 8-64 hex characters. This field is available only when “Security Mode” is set to “WPA/WPA2” or “WPA2”. |
| RADIUS Sever Address | Configures RADIUS authentication server address. This field is available only when “WPA Key Mode” is set to “802.1x”. |
| RADIUS Server Port | Configures RADIUS Server Listening port. Default is: 1812. This field is available only when “WPA Key Mode” is set to “802.1x”. |
| RADIUS Server Secret | Enter the secret password for client authentication with RADIUS server. This field is available only when “WPA Key Mode” is set to “802.1x”. |
| RADIUS Accounting Server | Configures the address for the RADIUS accounting server. This field is available only when “WPA Key Mode” is set to “802.1x”. |
| RADIUS Accounting Server Port | Configures RADIUS accounting server listening port. Defaults to 1813. This field is available only when “WPA Key Mode” is set to “802.1x”. |
| RADIUS Accounting Server Secret | Enter the secret password for client authentication with RADIUS accounting server. This field is available only when “WPA Key Mode” is set to “802.1x”. |
| RADIUS NAS ID | Enter the RADIUS NAS ID. This field is available only when “WPA Key Mode” is set to “802.1x”. |
| Enable Dynamic VLAN | When enabled, clients will be assigned IP address from corresponding VLAN configured on the RADIUS user profile. This field is available only when “WPA Key Mode” is set to “802.1x”. |
| Client Bridge Support | Configures the client bridge support to allow the access point to be configured as a client for bridging wired only clients wirelessly to the network. When an access point is configured in this way, it will share the Wi-Fi connection to the LAN ports transparently. Once a SSID has a Client Bridge Support enabled, the AP adopted in this SSID can be turned in to Bridge Client mode by click the Bridge button. |
| Client Time Policy | Select a time policy to be applied to all clients connected to this SSID. |
| Use MAC Filtering | Choose Blacklist/Whitelist to specify MAC addresses to be excluded/included from connecting to the zone’s Wi-Fi. Default is Disabled. |
| Client Isolation | Client isolation feature blocks any TCP/IP connection between connected clients to GWN76XX’s Wi-Fi access point. Client isolation can be helpful to increase security for Guest networks/Public WiFi. Three modes are available:
|
| Gateway MAC Address | This field is required when using Client Isolation, so users will not lose access to the Network (usually Internet). Type in the default LAN Gateway’s MAC address (router’s MAC address for instance) in hexadecimal separated by “:”. Example: 00:0B:82:8B:4D:D8 |
| RSSI Enabled | Check to enable RSSI function, this will lead the AP to disconnect users below the configured threshold in Minimum RSSI (dBm). |
| Minimum RSSI (dBm) | Enter the minimum RSSI value in dBm. If the signal value is lower than the configured minimum value, the client will be disconnected. The input range is from “-94” or “-1”. |
| Beacon Interval | Configures interval between beacon transmissions/broadcasts. The Beacon signals help to keep the network synchronized and provide main information about the network such as SSID, Timestamp…
Notes:
Default value is 100ms. Valid range: 40 – 500 ms. |
| DTIM Period | Configures the frequency of DTIM (Delivery Traffic Indication Message) transmission per each beacon broadcast. Clients will check the AP for buffered data at every configured DTIM Period. You may set a high value for power saving consideration. Default value is 1, meaning that AP will have DTIM broadcast every beacon. If set to 10, AP will have DTIM broadcast every 10 beacons. Valid range: 1 – 10. |
| Multicast to Unicast | Once selected, AP will convert multicast streams into unicast streams over the wireless link. Which helps to enhance the quality and reliability of video/audio stream and preserve the bandwidth available to the non-video/audio clients. |
| Enable Voice Enterprise | Check to enable/disable Voice Enterprise. The roaming time will be reduced once enable voice enterprise.
Note: 11R is required for enterprise audio feature, 11V and 11K are optional. This field is available only when “Security Mode” is set to “WPA/WPA2” or “WPA2”. |
| Enable 11R | Check to enable 802.11r. This field is available only when “Security Mode” is set to “WPA/WPA2” or “WPA2”. |
| Enable 11K | Check to enable 802.11k |
| Enable 11V | Check to enable 802.11v |
| ARP Proxy | This option will enable GWN AP to answer the ARP requests from its LAN for its connected WiFi clients. This is mainly to reduce the airtime consumed by ARP Packets |
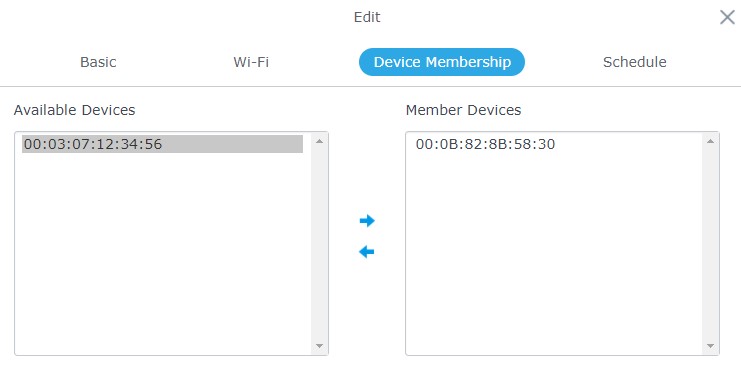
- Device Membership: Used to add or remove paired access points to the SSID.
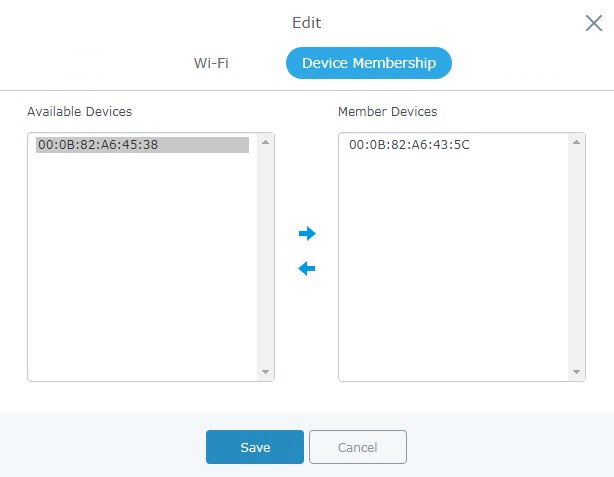
Click on ![]() to add the GWN76XX to the SSID or click on
to add the GWN76XX to the SSID or click on ![]() to remove it.
to remove it.
- Device Membership: This tab lists available devices on the network, it is used to add members to the group if more than one AP is available to manage the slaves AP from the Maser AP. In the standalone mode, only the master AP will present on the “Member Devices” as shown below.
Click on ![]() to add GWN76xx to the SSID, or click on
to add GWN76xx to the SSID, or click on ![]() to remove it.
to remove it.
Click on ![]() and
and ![]() to apply the new configuration. The SSIDs page will show as follow:
to apply the new configuration. The SSIDs page will show as follow:

At this stage, Wi-Fi clients can connect using created SSID upon successful authentication.
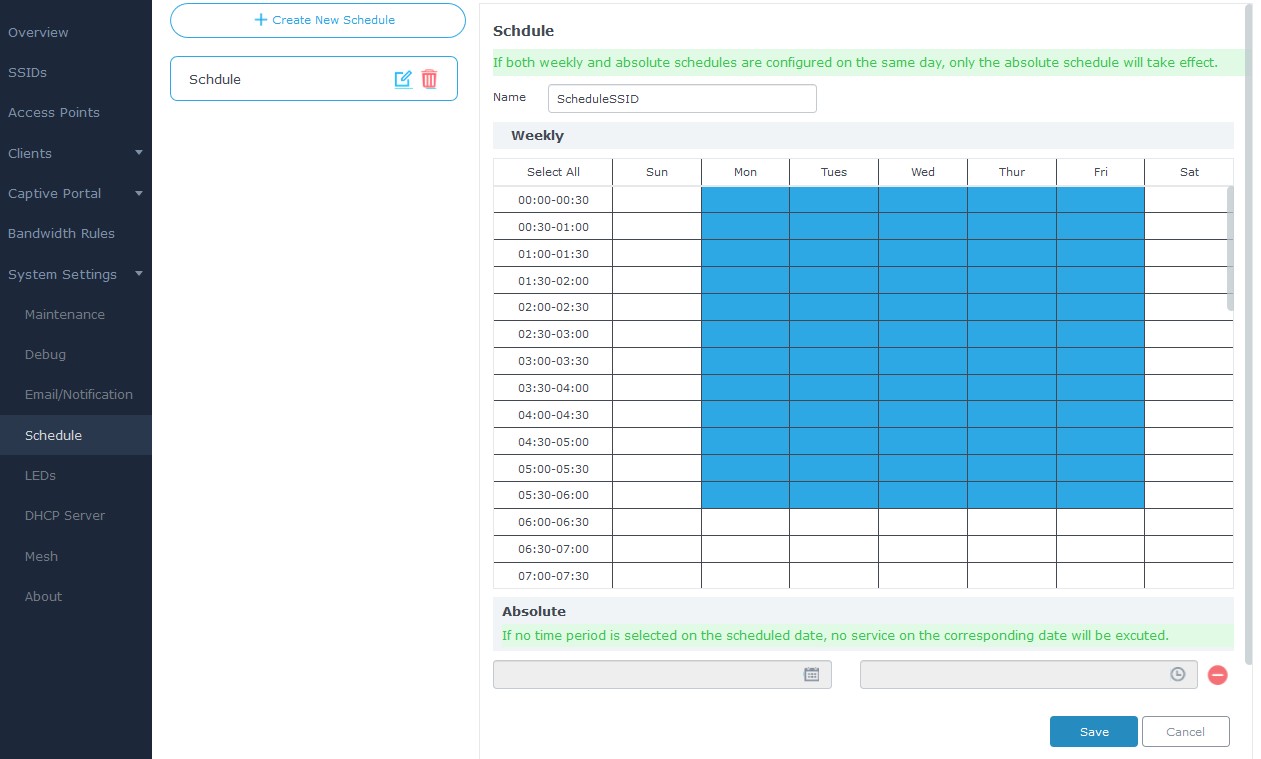
- WiFi schedule: If users want to schedule the AP operation time, Schedule should be set first under Maintenance -> Schedule then on the SSID “Enable Schedule” should be selected, and then, choose the schedule where the AP needs to work, at last, click on “Save” to save configuration.

Note: The GWN76xx supports up to 16 SSIDs per radio band (2.4G, 5G) Except for GWN7630 supporting 15.
At this stage, Wi-Fi clients will be able to find different SSIDs as previously defined and connected to selected one upon successful authentication.